

Dell TrueMobile 1300 User Manual

Dell™ TrueMobile™ 1300 Wireless USB2.0 Adapter
User's Guide
Information in this document is subject to change without notice.
© 2003 Dell Computer Corporation. All rights reserved.
The copying or reproducing of any material in this document in any manner whatsoever without the written
permission of Dell Computer Corporation is strictly forbidden.
The trademarks
Dell
, the
DELL
logo, and
TrueMobile
are trademarks of Dell Computer Corporation.
Microsoft
and
Windows
are registered trademarks of Microsoft Corporation.
Other trademarks and trade names may be used in this document to refer to either the entities claiming the
marks and names or their products. Dell disclaims any proprietary interest in trademarks and trade names
other than its own.
A
00 release: November 2003
Contents
Getting Started With Your Dell TrueMobile 1300 Wireless USB 2.0 Adapter
Using Your Dell Wireless Configuration Utility
Mounting a Dell TrueMobile 1300 Wireless Adapter to Your Computer
Technical Specification
Regulatory Information
Troubleshooting
Appendix
Glossary
Page 1 of 1Contents: Dell TrueMobile 1300 Wireless USB Adapter User's Guide
30-9-2003file://C:\Documents%20and%20Settings\dsarired\My%20Documents\projects%20200...

Back to Contents Page
Getting Started with your Dell TrueMobile 1300 Wireless
USB Adapter:
Dell™ TrueMobile™ 1300 Wireless USB Adapter User's
Guide
To complete the setup of your TrueMobile 1300 Wireless USB Adapter, perform the following 3
steps:
1. Installing the software (drivers and Dell Wireless Configuration Utility)
2. Connecting the device to the computer
3. Connecting to your wireless network
1. Installing the Software
a. Insert the
Dell TrueMobile 1300 Wireless USB 2.0 Adapter CD
into the CD or DVD
drive of your computer. If the
Main Menu
screen does not appear automatically, select
Start-->Run
and then type
x:\setup.exe
(where x:\ is your CD-ROM drive letter) and click
OK
.
b. Click on
Install Software
.
c. The wizard will install the Dell Wireless Configuration Utility and the driver for your device.
Back to Top
2. Connecting the Dell TrueMobile 1300 Wireless USB Adapter to Your Computer
a. Connect the small connector of the USB cable to the connector in the
Dell TrueMobile
1300 Wireless USB Adapter
as shown in Figure 1.
NOTE: If you did not purchase this device with a new Dell system, please start at step 1.
If you purchased this device with a new Dell system, please skip to step 2
.
NOTE: This installation is required before connecting the device to the system.
Page 1 of 4Getting Started with your Dell TrueMobile 1300 Wireless USB Adapter: Dell TrueMo...
30-9-2003file://C:\Documents%20and%20Settings\dsarired\My%20Documents\projects%20200...
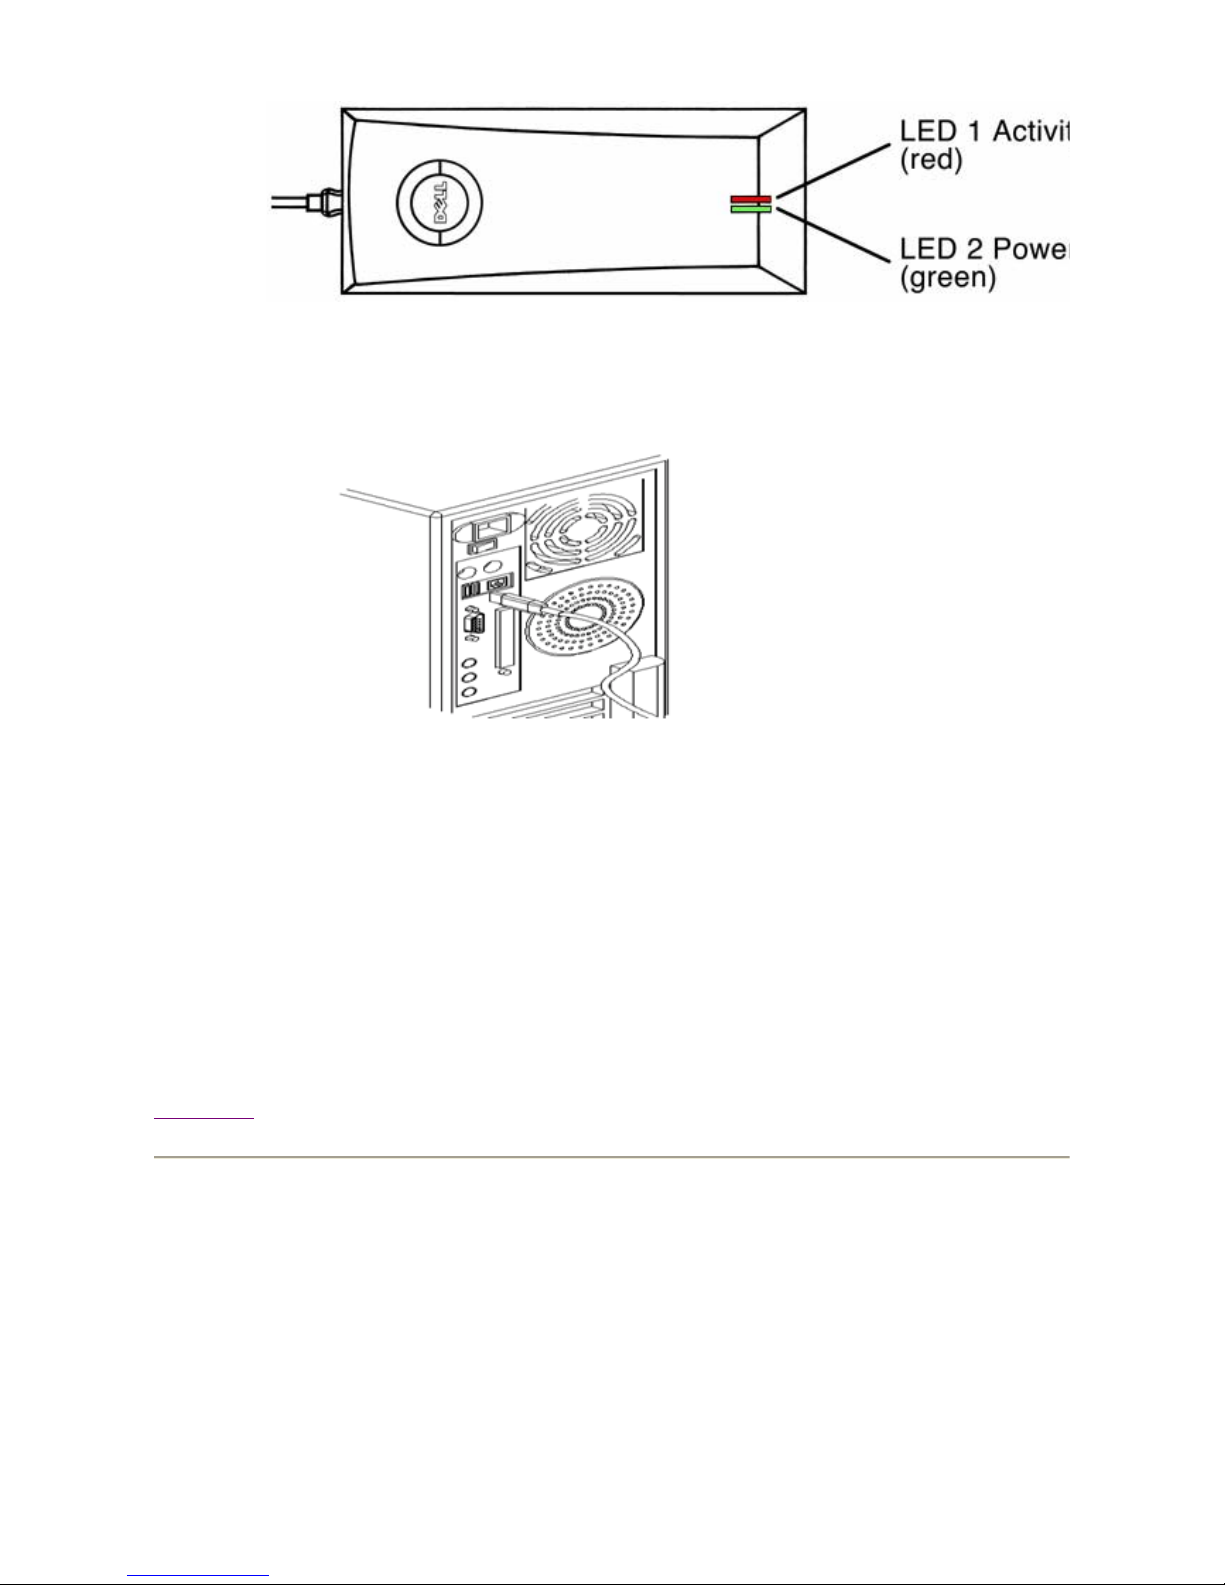
Figure 1
b. Connect the other end of the USB cable to any USB connector on the back of your
desktop computer as shown in Figure 2.
Figure 2
c. The
Found New Hardware
screen will appear.
d. The driver for your device will be automatically detected and installed.
e. Check for the
Green Light
on the device to make sure the USB cable is connected
between the device and the system correctly.
f. The
New network device installed
screen will appear on the bottom right corner. Click X
to close the message.
(XP only)
Back to Top
3. Connecting to Your Wireless Network
To connect to the wireless network, the wireless network name (SSID) of the
wireless USB
adapter
must match the wireless network name specified by your Wireless Broadband Router*.
To set the network name, follow the instructions below for Windows XP operating system. For
Windows 2000, follow instructions under
section 3.2
.
3.1 Connecting using Windows® XP Operating System
a. Click on the
Wireless Network Connection
pop up message on the
bottom right corner.
Page 2 of 4Getting Started with your Dell TrueMobile 1300 Wireless USB Adapter: Dell TrueMo...
30-9-2003file://C:\Documents%20and%20Settings\dsarired\My%20Documents\projects%20200...

b. In the
Available networks
list, you should see the wireless network name
that you specified in your wireless broadband router. Select that network
name and click
Connect
. You may see the names of other wireless
networks in this list. You only need to set the configuration for your wireless
network.
c. A pop up message on the bottom right corner will show that the device is
Connected to:
the network whose name was specified in step b) and also
indicates the
Signal Strength
.
d. Open the
Internet Explorer
and you should be able to browse the
Internet
.
3.2 Using the Dell Wireless Configuration Utility for Windows 2000
The Dell Wireless Configuration Utility is a software utility that you can use to:
! Check the quality of your wireless connection.
! View/change the settings of your network connection.
! Monitor your network connection.
Use the following procedure to start the Dell Wireless Configuration Utility:
a. Click
Start
_
> Programs _> Dell TrueMobile _> TrueMobile 1300 USB2.0
WLAN Card Utility
.
b. An icon like this will appear in the system tray (bottom right corner of your
screen).
Double click the icon.
c. Click on the
Wireless Connections
tab.
d. In the
Available networks
list, you should see the wireless network name
that you specified in your wireless broadband router. Select that network
name and click
Configure
. (You may see the names of other wireless
networks in this list. You only need to set the configuration for your wireless
network.)
e. In the
Wireless Network Properties
box, click OK and the window will
close. It may take up to one minute for the network connection to be made.
f. The network name and icon should now appear at the top of the
Preferred
networks
list when you next open the
Wireless Connections
tab in
Wireless Network Properties
. Your computer will be connected to the
selected network when you see a blue bubble on top of the icon for that
network.
Back to Top
NOTE:
If you are unable to access the
Internet
, refer to the
Trouble Shooting
section o
f
guide
.
Page 3 of 4Getting Started with your Dell TrueMobile 1300 Wireless USB Adapter: Dell TrueMo...
30-9-2003file://C:\Documents%20and%20Settings\dsarired\My%20Documents\projects%20200...

Securing your Network
Your network administrator may have implemented measures to help make your wireless
network secure. If so, you must get the required settings from your administrator to establish a
connection to the network. For detailed information on how to change these settings under any
of the supported Windows operating systems, please consult the Network Configuration
section
of your Dell Truemobile 1300 Wireless USB Adapter User’s Guide.
Back to Top
Back to Contents Page
Page 4 of 4Getting Started with your Dell TrueMobile 1300 Wireless USB Adapter: Dell TrueMo...
30-9-2003file://C:\Documents%20and%20Settings\dsarired\My%20Documents\projects%20200...

Back to Contents Page
Using your Dell Wireless Configuration Utility:
Dell™ TrueMobile™ 1300 Wireless USB Adapter User's
Guide
The Dell Wireless Configuration Utility allows you to configure your TrueMobile 1300 Wireless USB adapter
and your connection to the wireless network. The sections below provide complete information on the
operation of the Configuration Utility.
Contents
OPERATION
System Tray Icon
Icon Menu
Starting the Configuration Utility
CONNECTING TO THE WIRELESS NETWORK
Windows XP With Wireless Zero Configuration Enabled
Windows 2000 or Windows XP With Wireless Zero Configuration Disabled
CONFIGURING A WIRELESS NETWORK
Network Configuration
Association Tab
Creating Encryption Keys Manually
Creating Encryption Keys Using a Passphrase
Authentication Tab
PEAP Authentication
TLS/Smart Card Authentication
EAP
– Cisco Wireless (LEAP) Authentication
MD5 Challenge Authentication
TTLS Authentication
LINK STATUS
SITE MONITOR
DIAGNOSTICS
Back to Top
Back to Contents Page
Page 1 of 1Using your Dell Wireless Configuration Utility: Dell TrueMobile 1300 Wireless USB ...
30-9-2003file://C:\Documents%20and%20Settings\dsarired\My%20Documents\projects%20200...
Back to the Table of Contents
Operation of Your Dell Wireless Configuration Utility:
Dell™ TrueMobile™ 1300 Wireless USB Adapter User's
Guide
This section discusses operation of the utility once it has been installed. It describes the system tray icon, the
icon menu
, and starting the utility.
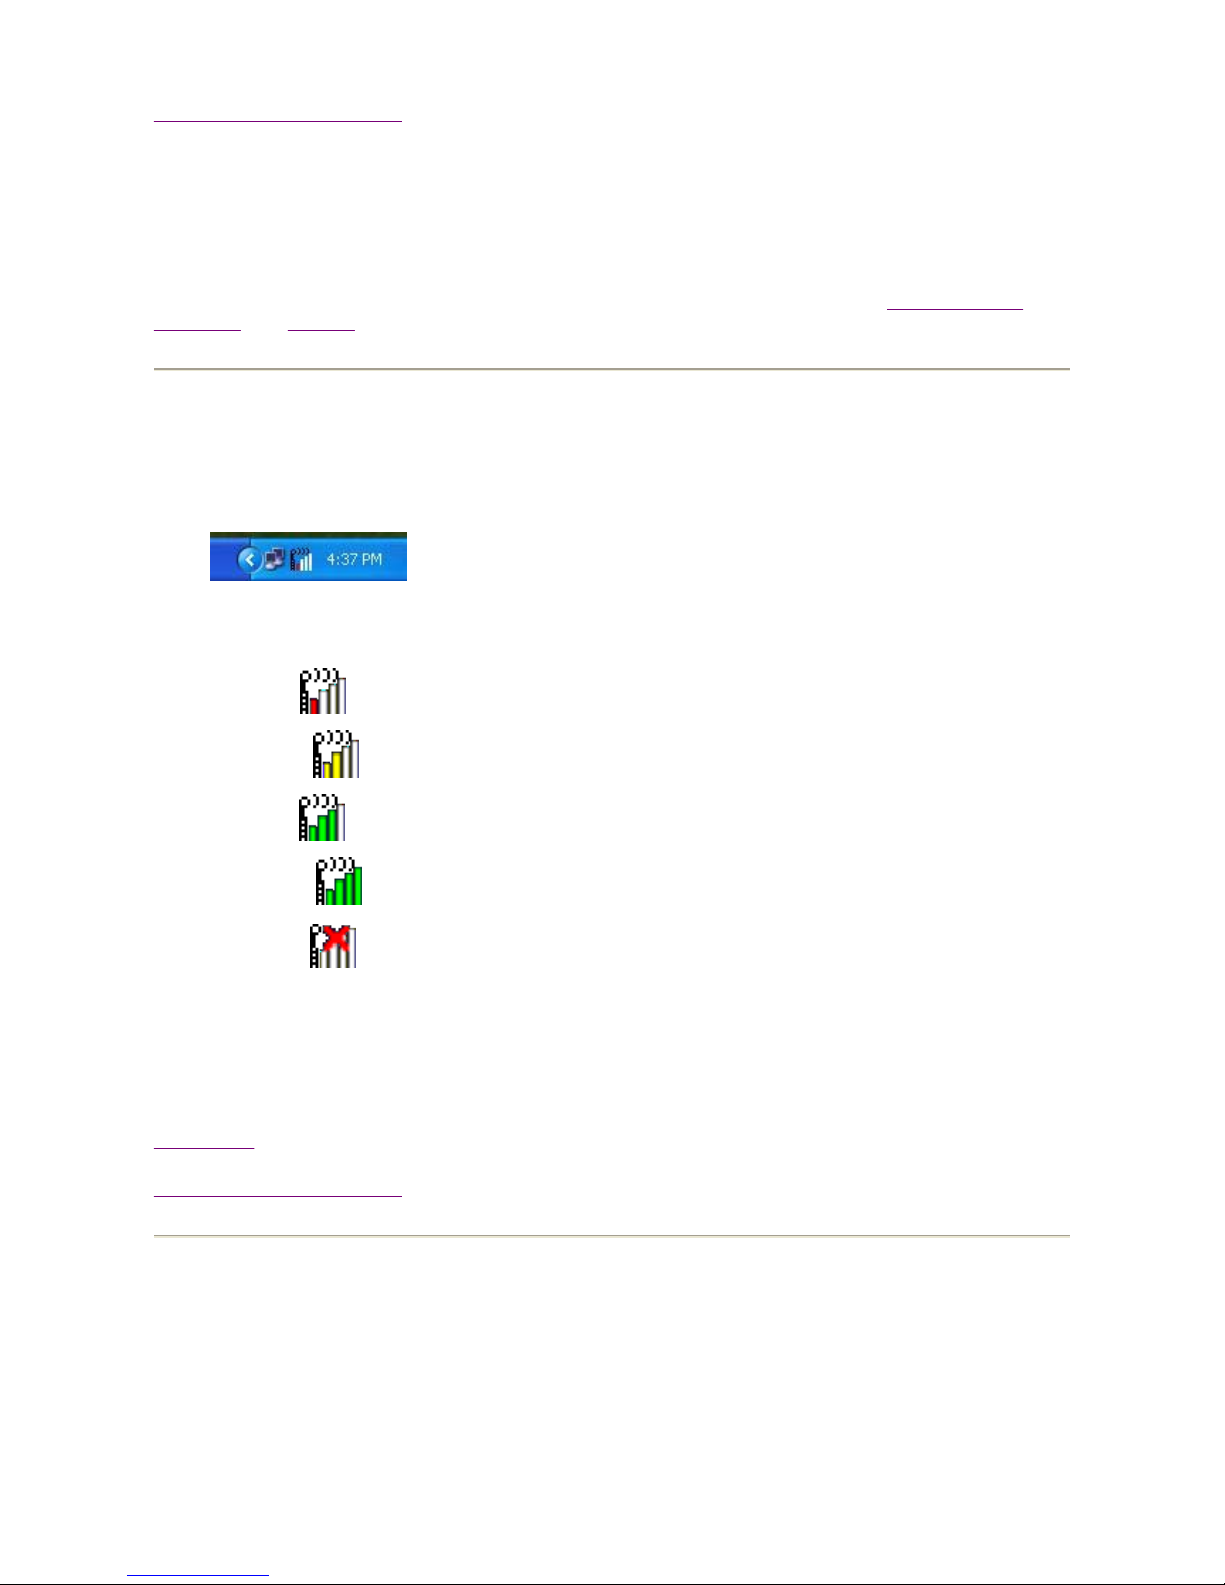
System Tray Icon
After the installation of the Dell Wireless Configuration Utility, its icon appears in the System
Tray in the bottom right corner of your desktop.
The color behind the logo indicates the link status, as follows:
You can also view more complete information on the connection status of the link by placing the
cursor over the Configuration Utility icon. When your computer has established a link, placing
the cursor over the icon displays the network name, network type (infra structure or ad-hoc) and
connection speed. If your computer has not established a link, placing the cursor over the icon
indicates the problem (no network adapter or no available network, for example).
Back to Top
Back to the Table of Contents
Icon Menu
Clicking the right mouse button on the System Tool Tray Icon displays a menu similar to the
following illustration:
Weak
Marginal
Good
Excellent
Disconnected
Page 1 of 3Operation of Your Dell Wireless Configuration Utility: Dell TrueMobile 1300 Wirele...
30-9-2003file://C:\Documents%20and%20Settings\dsarired\My%20Documents\projects%20200...
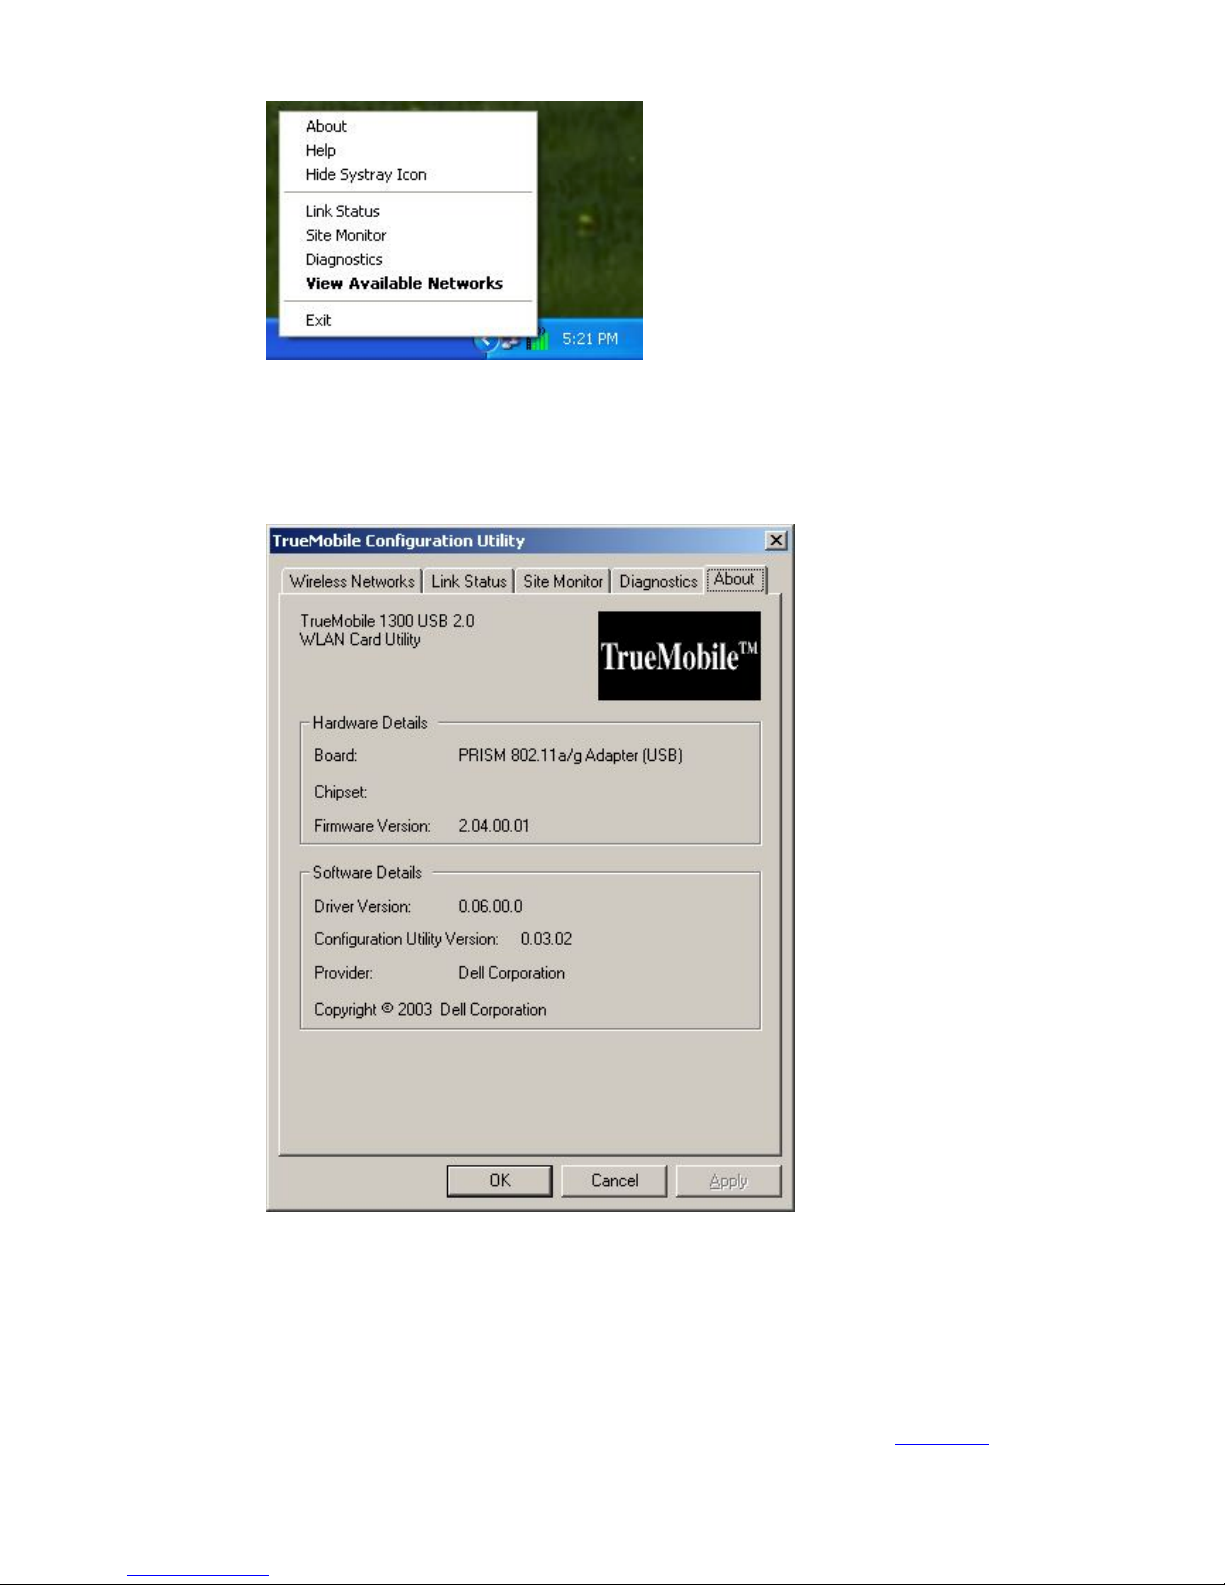
Clicking a command in the menu will cause the following action to occur:
About
opens the Utility with the
About
tab selected, giving information on your TrueMobile
Wireless adapter (its hardware and firmware components) and its associated software (driver
and configuration utility).
Help
opens the help file.
Hide Systray Icon
removes the icon for the utility from the System Tray at the bottom of your
screen. When you choose this command, the driver continues to operate the adapter in the last
commanded configuration, but to restart the Configuration Utility you must select
Programs
→
Dell TrueMobile
→
TrueMobile 1300 USB2.0 WLAN Card Utility
from the
Start
menu.
Link Status
opens the Utility with the
Link Status
tab selected. This tab provides information on
the details and current quality of your connection to the wireless LAN. The section Link Status
explains the information displayed by this tab.
Page 2 of 3Operation of Your Dell Wireless Configuration Utility: Dell TrueMobile 1300 Wirele...
30-9-2003file://C:\Documents%20and%20Settings\dsarired\My%20Documents\projects%20200...

Site Monitor
opens the Utility with the
Site Monitor
tab selected. The section titled Site Monitor
explains the operation of this tab.
Diagnostics
opens the Utility with the
Diagnostics
tab selected. The section titled Diagnostics
explains the operation of this tab.
View Available Networks
: The window displayed by this command depends on whether your
computer operates with the Wireless Zero Configuration service enabled under Windows XP:
! If you are already connected to a wireless network, choosing this command opens the
Wireless Network Connection
window if your computer operates with Wireless Zero
Configuration enabled. Otherwise, choosing this command opens the Configuration Utility
with the
Link Status
menu displayed.
! If you are not connected to a wireless network, choosing this command opens the
Connect to Wireless Network
window if your computer operates with Wireless Zero
Configuration enabled. Otherwise, choosing this command opens the Configuration Utility
with the
Wireless Networks
menu displayed.
Exit
closes the Utility.
Back to Top
Back to the Table of Contents
Starting the Configuration Utility
You can launch the Configuration Utility in one of three ways:
! by simply clicking the left mouse button on the Configuration Utility icon.
! by clicking the right mouse button on the Configuration Utility icon and selecting one of
the first five commands in the pop-up menu.
! If the Configuration Utility icon is not displayed in the System Tray, you can restart the
Configuration Utility from the Start Menu by selecting
Programs
→
Dell TrueMobile
→
TrueMobile 1300 USB2.0 WLAN Card Utility
.
Back to Top
Back to the Table of Contents
Note:
The window displayed by the utility depends on whether your computer runs the Window
s
system with the Wireless Zero Configuration service enabled. With this service enabled, many
o
configuration and security functions of your adapter are controlled by the operating system rath
e
Configuration Utility.
Page 3 of 3Operation of Your Dell Wireless Configuration Utility: Dell TrueMobile 1300 Wirele...
30-9-2003file://C:\Documents%20and%20Settings\dsarired\My%20Documents\projects%20200...
Back to the Table of Contents
Connecting to the Wireless Network:
Dell™ TrueMobile™ 1300 Wireless USB Adapter User's
Guide
With the Dell TrueMobile 1300 USB2.0 WLAN Card driver and Configuration Utility installed,
your computer automatically scans for wireless networks. You can connect to any of the
networks your card sees, and change the parameters of your communications with any of these
networks, by starting the Configuration Utility. The facilities provided by the Configuration Utility
to accomplish this differ slightly depending on whether or not your computer ru ns the Windows
XP operating system with the Wireless Zero Configuration service enabled.
Windows XP With Wireless Zero Configuration Enabled
Windows 2000 or Windows XP With Wireless Zero Configuration Disabled
Windows XP With Wireless Zero Configuration Enabled
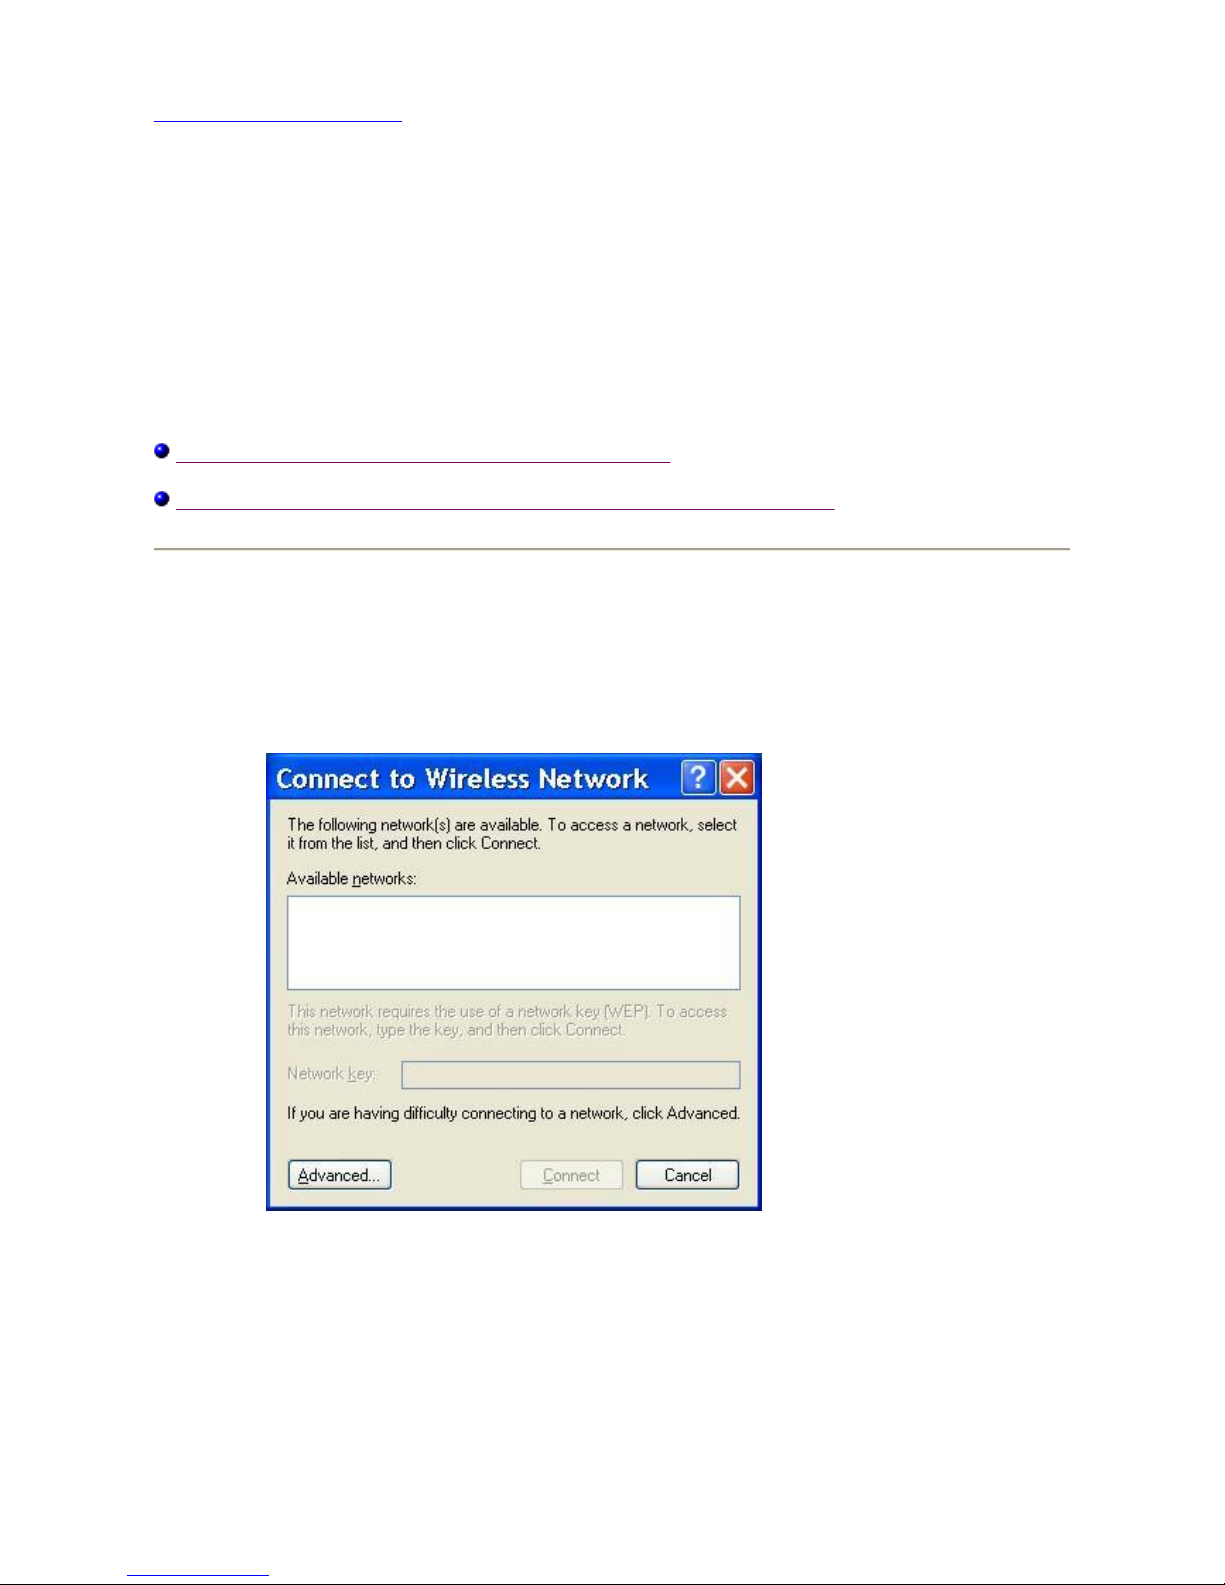
The Wireless Zero Configuration service allows the Windows XP operating system to handle the
configuration of your connection to a wireless network. With this service enabled, if you are not
connected to a wireless network when you start the Configuration utility, the following window
appears on your desktop:
This window lists the networks to which you can connect. To connect to any of these networks,
choose it from the list and click the
Connect
button. Once your connection is established, the
Wireless Network Connection
window (shown below) appears on your desktop.
With this service enabled, if you are already connected to a wireless network when you start the
Configuration utility, the following window appears on your desktop:
Page 1 of 3Connecting to the Wireless Network: Dell TrueMobile 1300 Wireless USB Adapter U...
30-9-2003file://C:\Documents%20and%20Settings\dsarired\My%20Documents\projects%20200...
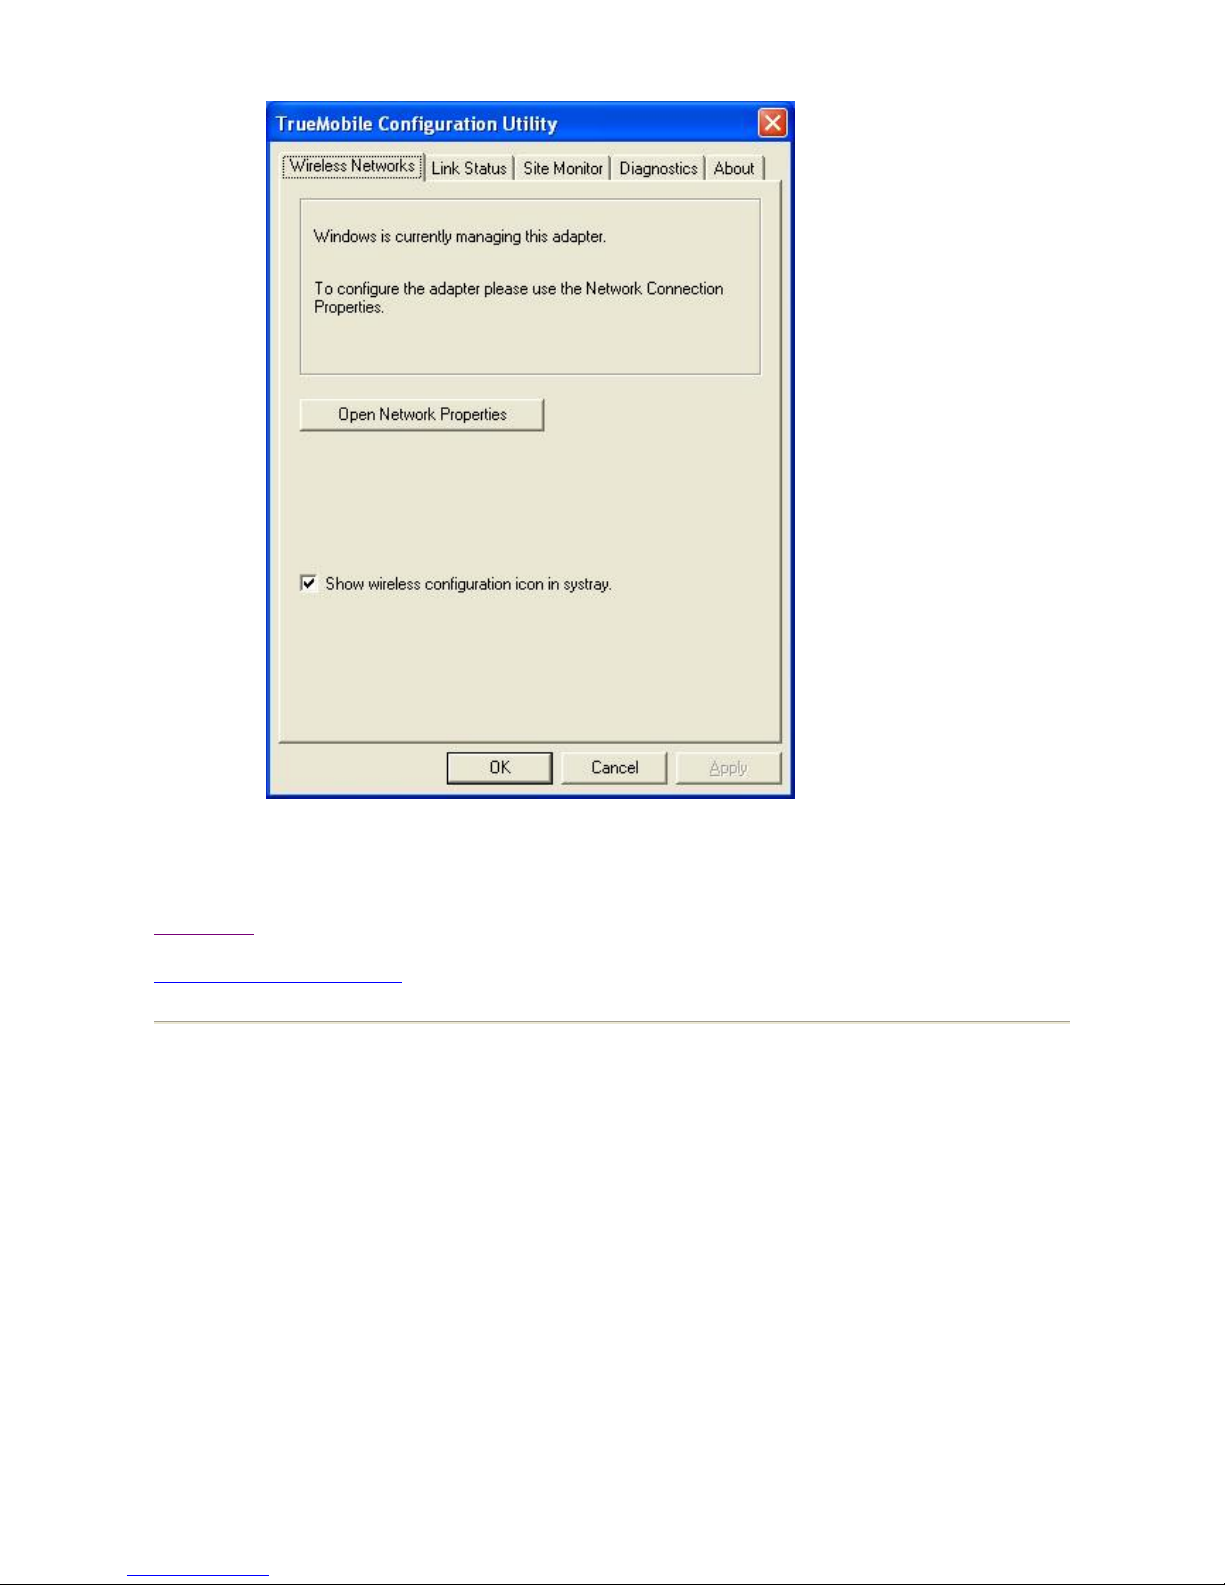
You can click the
Open Network Properties
button to access the tools provided by Windows
XP to manage network connections. Consult your operating system documentation for
information on using these tools.
Back to Top
Back to the Table of Contents
Windows 2000 or Windows XP With Wireless Zero Configuration Disabled
If your computer runs the Windows 2000 operating system or the Windows XP operating system
with Wireless Zero Configuration disabled, all configuration of your connection to the wireless
network is controlled by the Configuration Utility. Under these conditions, if you are not
connected to a wireless network when you start the Configuration utility, the Wireless Networks
window appears on your desktop:
Page 2 of 3Connecting to the Wireless Network: Dell TrueMobile 1300 Wireless USB Adapter U...
30-9-2003file://C:\Documents%20and%20Settings\dsarired\My%20Documents\projects%20200...
The networks to which you can connect are listed in the window in the
Available networks
section. To connect to any of these networks, choose it from the list and click the
Configure
button to the right of the list. Configuration of a network is explained in the Configuring a
Wireless Network section of this manual.
If you are already connected to a wireless network when you start the Configuration utility, the
Link Status menu appears on your desktop. Refer to the Link Status
section for a description of
the information displayed by this menu. To connect to a different network, follow the instructions
in the Configuring a Wireless Network
section of this manual.
Back to Top
Back to the Table of Contents
Page 3 of 3Connecting to the Wireless Network: Dell TrueMobile 1300 Wireless USB Adapter U...
30-9-2003file://C:\Documents%20and%20Settings\dsarired\My%20Documents\projects%20200...
Back to the Table of Contents
Configuring a Wireless Network:
Dell™ TrueMobile™ 1300 Wireless USB Adapter User's
Guide
The Dell WLAN Configuration Utility allows you to configure the parameters of your
communications with the wireless network through the
Wireless Networks
menu. The following
topics are covered in this section of the manual:
The
Wireless Networks
Menu
Network Configuration
The Association Tab
The Authentication Tab
The Wireless Networks Menu
Note:
If your computer runs the Windows XP operating system
with the Wireless Zero Configuration service enabled,
configuration of a wireless connection is controlled by that
service. You must disable that service in order to use the Dell
WLAN Configuration Utility to configure wireless
communications.
Page 1 of 11Configuring a Wireless Network: Dell TrueMobile 1300 Wireless USB Adapter User'...
30-9-2003file://C:\Documents%20and%20Settings\dsarired\My%20Documents\projects%20200...
Available Networks:
The first section of this menu displays a list of the available wireless
networks. If you are associated with a network, a blue bubble appears over the icon for the
network in both this list and in the
Preferred networks
list.
The
Configure
button to the right of this list allows you to configure your connection to the
highlighted network; refer to Network Configuration
for an explanation of this process. The
Refresh
button forces the Configuration Utility to update the list by scanning for available
networks.
Preferred Networks:
The second section of this menu displays a list of preferred networks. This
list shows the order, from top to bottom, of the networks to which your computer will attempt to
connect. If your computer is connected to any of these networks, a blue bubble appears over the
icon for that network. If your computer cannot find any of these networks when it per forms a
scan, a crossed-out red bubble appears over the icon for that network
When your computer starts searching for a wireless network, it begins by attempting to connect
to the first network in this list. If it cannot connect to this network, it then attempts to connect to
the second network in the list. This process continues until the computer establishes a
connection with one of these networks. After a connection is established, if a higher priority
network become available, then the current connection is dropped and the computer connects
with the higher priority network.
You can change the order of preferred networks by highlighting a network in this list and clicking
the
Move Up
or
Move Down
buttons.
The
Add
button allows you to add a network to the list of preferred networks. The
Properties
button allows you to configure the selected network. Refer to Network Configuration
for an
explanation of the operation of these buttons. The
Remove
button removes the selected
network from the list of preferred networks.
Two items appear beneath the
Preferred networks
section. The
Show wireless configuration
icon in systray
field determines whether the icon for the Dell WLAN configuration utility
appears in the system tray at the bottom right side of your desktop. If this field is not checked,
you can start the Configuration Utility from the Start Menu by selecting
Programs
→
Dell
TrueMobile
→
TrueMobile 1300 USB2.0 WLAN Card Utility
.
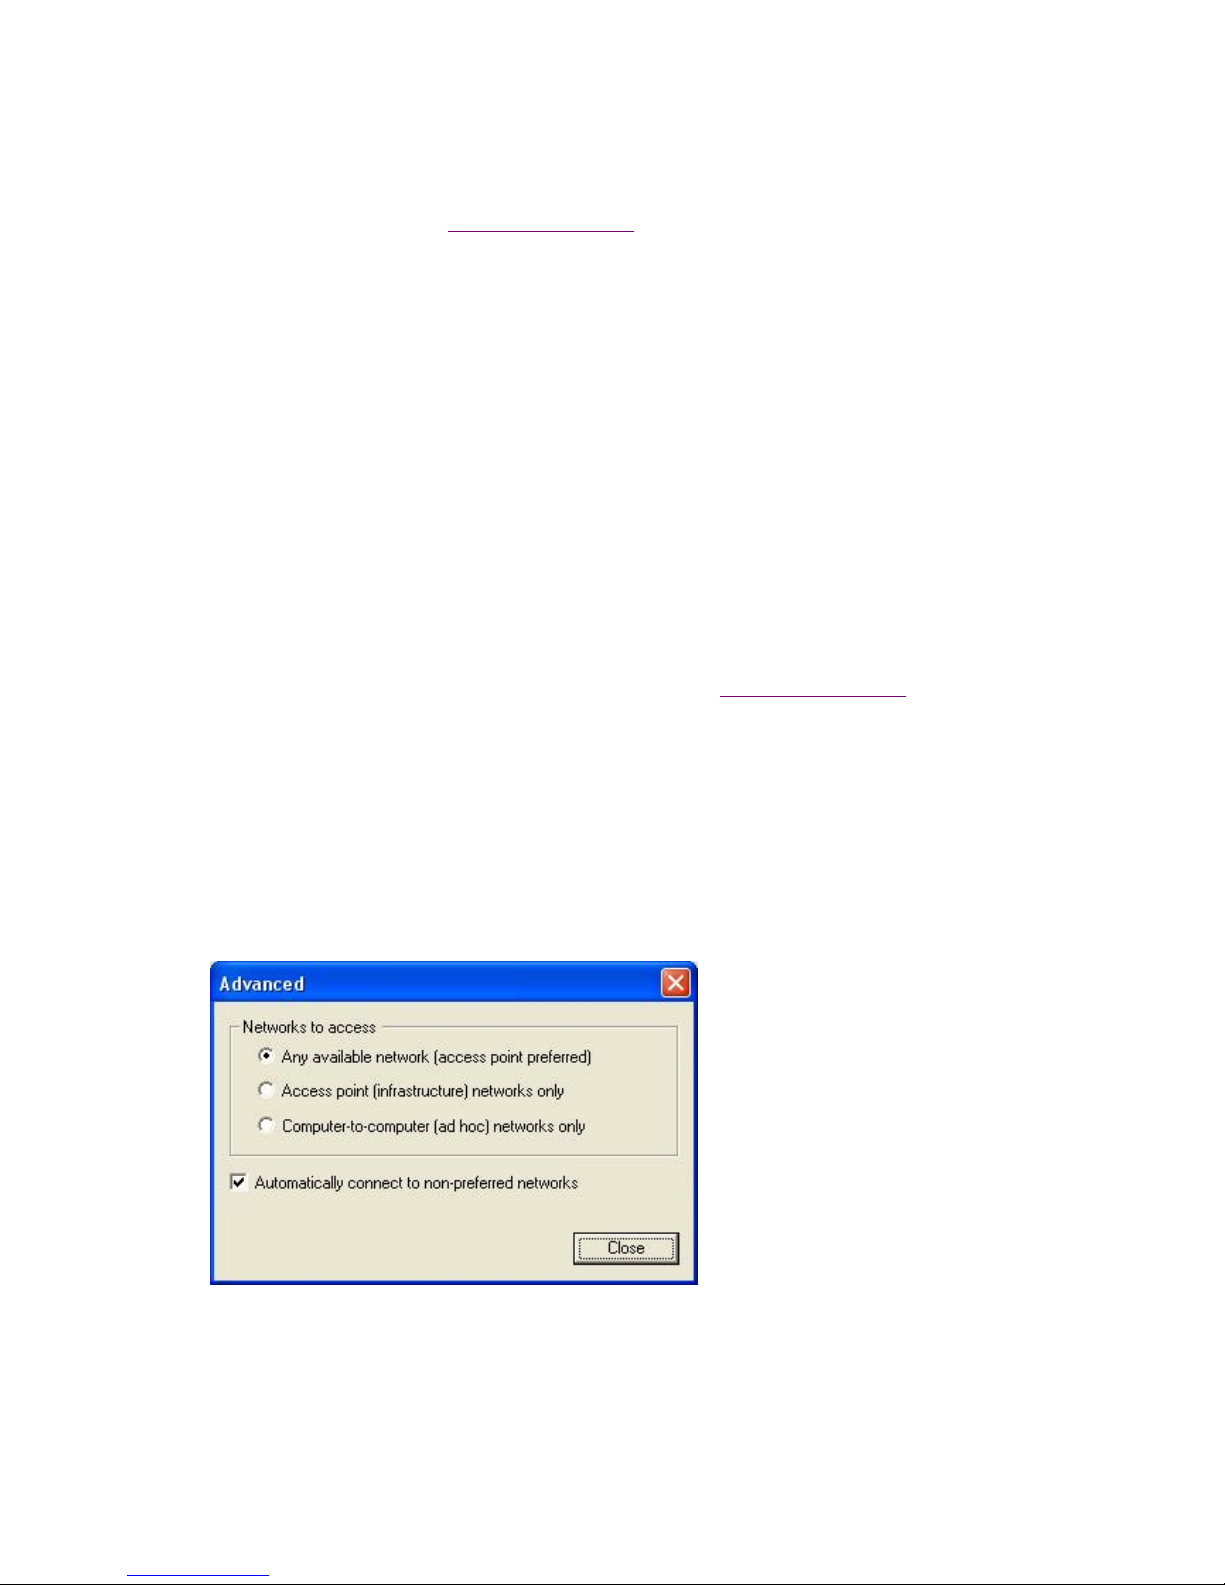
Clicking on the
Advanced...
button displays the following menu:
The first section of this menu allows you to specify the networks to access when your computer
is searching for a wireless network connection. Clicking the check box next to the
Automatically connect to non-preferred networks
field allows your computer to connect to
any available network if it cannot connect to a preferred network.
At the bottom of the
Wireless networks
menu are three buttons. Clicking the OK button applies
any changes you made in this or any of the other menus of the Configuration Utility and closes
Page 2 of 11Configuring a Wireless Network: Dell TrueMobile 1300 Wireless USB Adapter User'...
30-9-2003file://C:\Documents%20and%20Settings\dsarired\My%20Documents\projects%20200...
the utility. Clicking the
Cancel
button cancels any changes you made since you last clicked the
Apply
but does not close the utility. Clicking the
Apply
button saves any changes you made in
this or any of the other menus of the utility and leaves the utility open.
Back to Top
Back to the Table of Contents
Network Configuration
There are three ways to configure a network through the Dell WLAN Configuration Utility:
! by choosing a network in the list of available networks and clicking the
Configure
button
! by choosing a network in the list of preferred networks and clicking the
Properties
button
! by clicking the
Add
button beneath the list of preferred networks
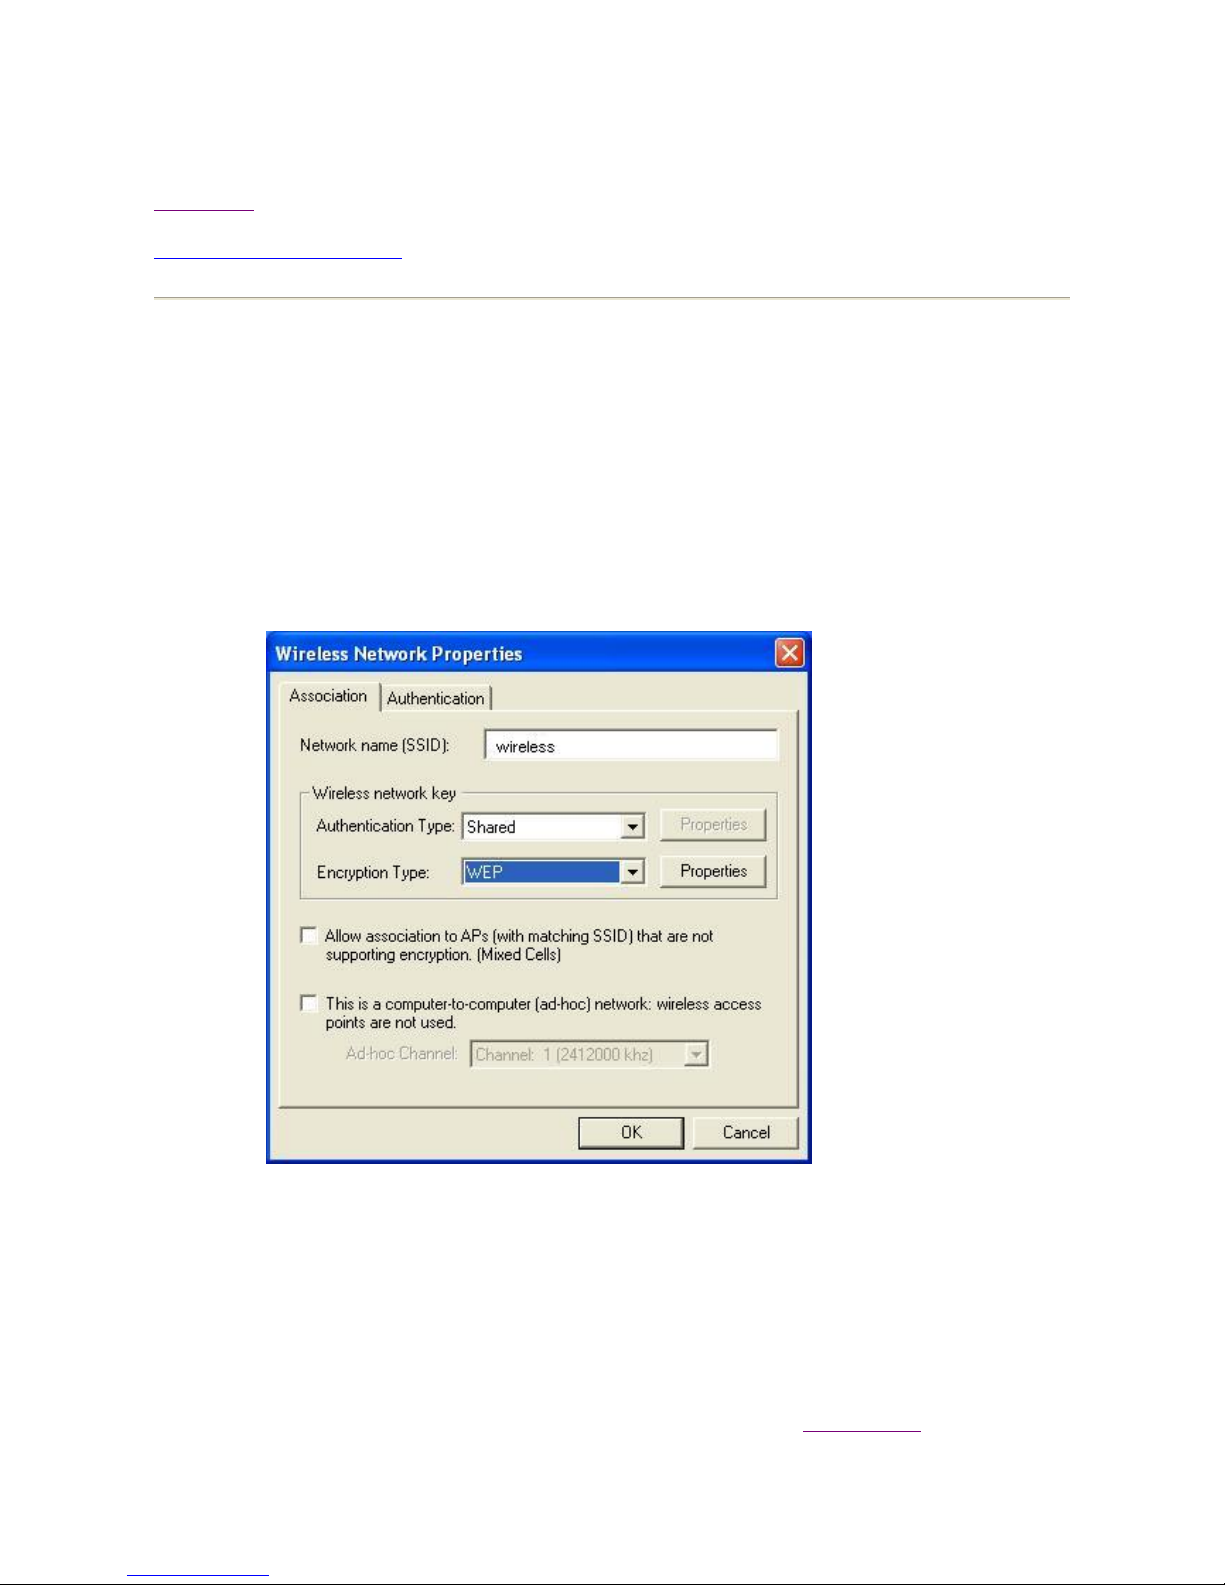
When you click any of these buttons a window similar to the following appears on your screen:
If you clicked the
Configure
or
Properties
button, the name of the network highlighted when
you clicked the button appears in the
Network name (SSID)
field. If you clicked the
Add
button
to display this menu, this field is blank. To add a network to the list of preferred networks, enter
its name in this field.
Two buttons appear at the bottom of this menu. Clicking the OK button applies any changes you
made in this or any of the other menus of the Configuration Utility. Clicking the
Cancel
button
cancels any changes you made since you last clicked the
Apply
button. Clicking either of these
buttons returns to the
Wireless networks
menu.
Network configuration consists of specifying values for association and authentication
, as
explained in the following sections.
Page 3 of 11Configuring a Wireless Network: Dell TrueMobile 1300 Wireless USB Adapter User'...
30-9-2003file://C:\Documents%20and%20Settings\dsarired\My%20Documents\projects%20200...
 Loading...