

Dell TrueMobile 1180 User Manual

Dell™ TrueMobile™ 1180 Internal 802.11b
PC Card User's Guide
Introduction
Completing the Setup
Using the Dell™ TrueMobile™ 1180 Wireless Utility
Specifications
Regulatory Information
Troubleshooting
Glossary
Information in this document is subject to change without notice.
© 2000–2003 Dell Computer Corporation. All rights reserved.
The copying or reproducing of any material in this document in any manner whatsoever without the written permission of
Dell Computer Corporation is strictly forbidden.
The trademarks Dell, Latitude, Inspiron, the DELL logo, and TrueMobile are trademarks of Dell Computer
Corporation. Microsoft and Windows are registered trademarks of Microsoft Corporation.
Other trademarks and trade names may be used in this document to refer to either the entities claiming the marks and
names or their products. Dell disclaims any proprietary interest in trademarks and trade names other than its own.
Initial Release: January 2003
DL1180-UG101-R

Back to Contents
Introduction: Dell™ TrueMobile™ 1180 PC Card
User's Guide
Before you begin
Things you should know
TrueMobile 1180 network
Before you begin
Obtain the following information from your network administrator (if you are a home user, obtain this information from the person that
installed your wireless access point):
● Network names (SSID) of the specific wireless networks that you want to connect to.
● WEP (Wired Equivalent Privacy) key information (if any) for the networks you want to connect to.
● For Microsoft® Windows® networking, your customer name and workgroup name.
● For your network account, your user name and password.
● Your IP address (if not using a DHCP server)
Things you should know
When you start your computer, your Dell™ TrueMobile™ 1180 internal 802.11b PC Card detects certain wireless networks that are within
range. Before you can connect to these and other wireless networks, you must configure a profile for each network using the information
you obtained from your network administrator. Instructions for configuring a network profile are provided in
WEP is a security protocol for wireless local area networks (defined in the IEEE 802.11b standard) that encrypts data sent over radio
waves. The use of the WEP key is optional and can be enabled or disabled. If the network you are connecting to has enabled WEP, you
must also enable WEP in the network profile and set the WEP key to match the WEP key used by the network. Otherwise, you cannot
connect to the network.
Completing the setup.
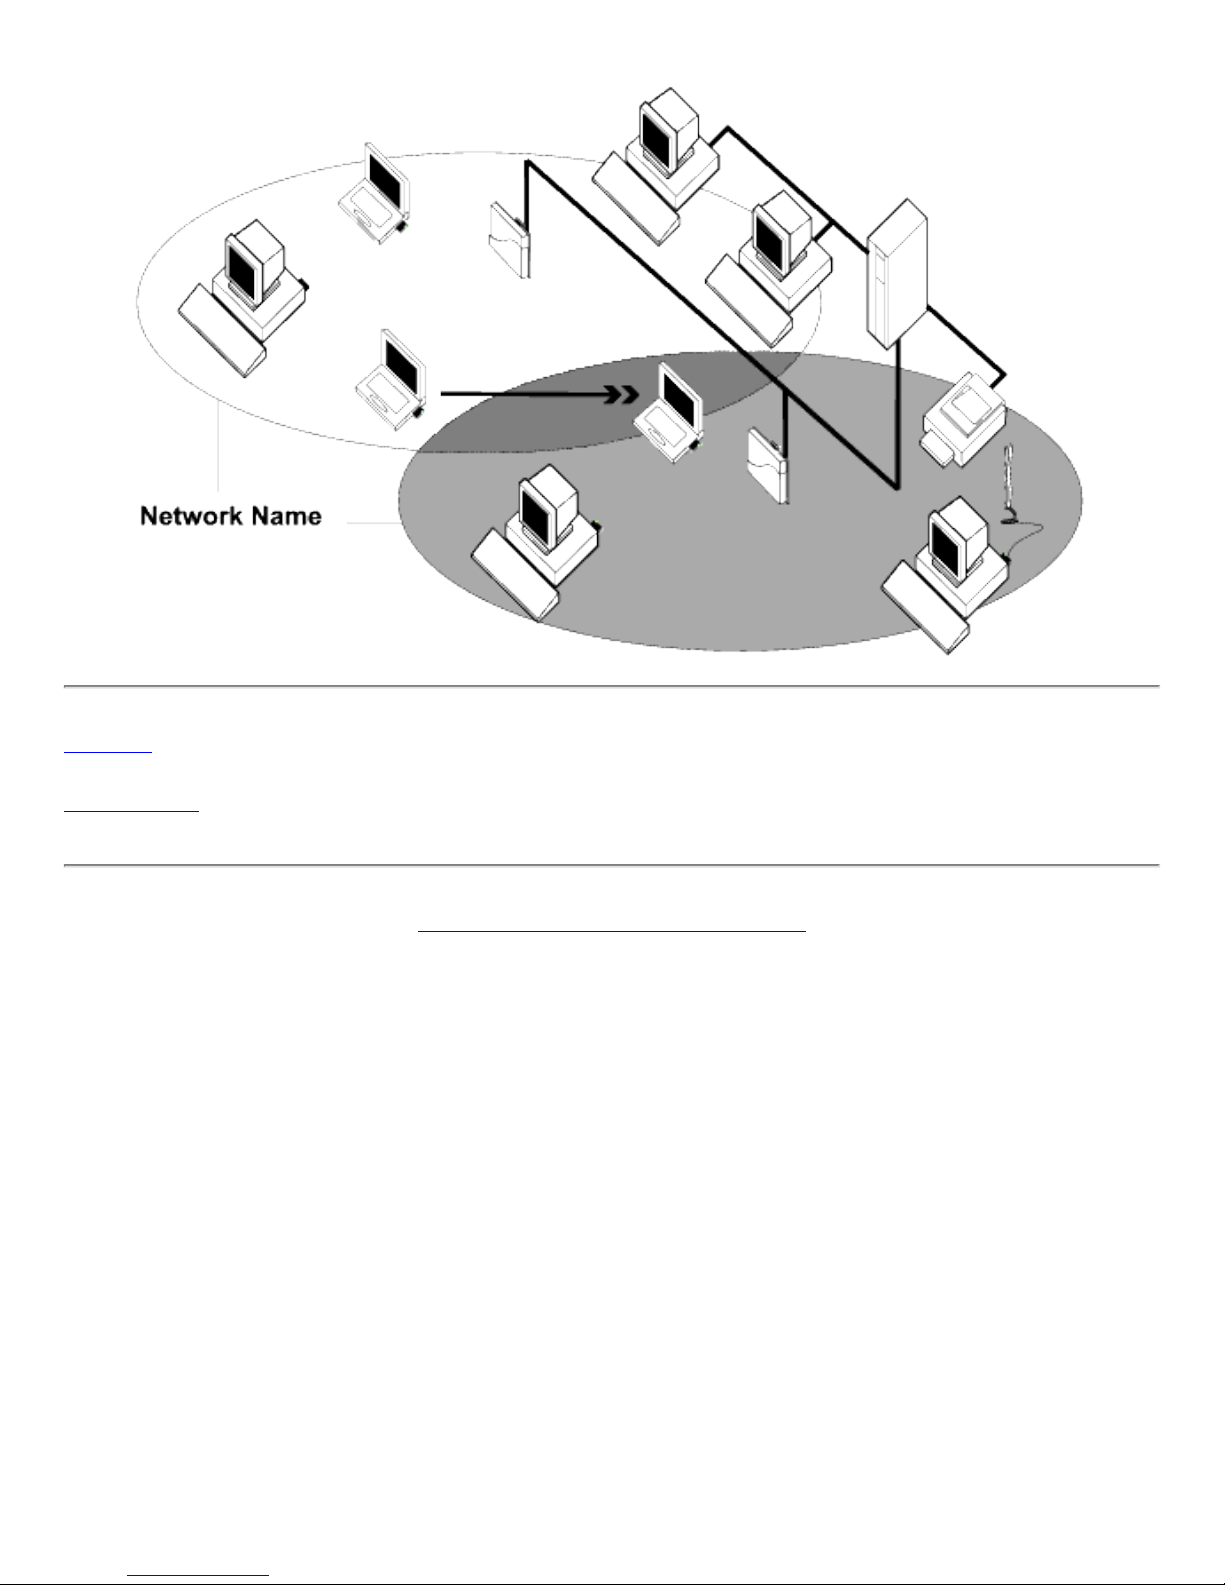
Dell TrueMobile 1180 network
The Dell TrueMobile 1180 solution allows you to make a wireless connection to a network, as illustrated below.
Back to top
Back to Contents
Please read copyright and trademark information.

Back to Contents
Completing the Setup: Dell™
TrueMobile™ 1180 PC Card User's Guide
NOTE—Before you begin, be sure you have the required network information from your network administrator (see Before
you begin in the Introduction section).
Configuring a network profile (Windows® 2000 environment)
Configuring a network profile (Windows® XP environment)
Configuring a network profile (Windows® 2000
environment)
Before you can connect to a wireless network, you must configure a network profile for that network on your computer
using the TrueMobile wireless utility. If you purchased your portable computer with the Dell TrueMobile 1180 internal
802.11b PC Card already installed and set up at the factory, follow the network profile configuration instructions provided
below. If this is not the case, first verify that the Dell TrueMobile 1180 card has been properly installed in your computer
according to the installation instructions. Then proceed with the following instructions for configuring your network profiles.
The instructions explain how to open the utility and how to use it to configure a network profile.
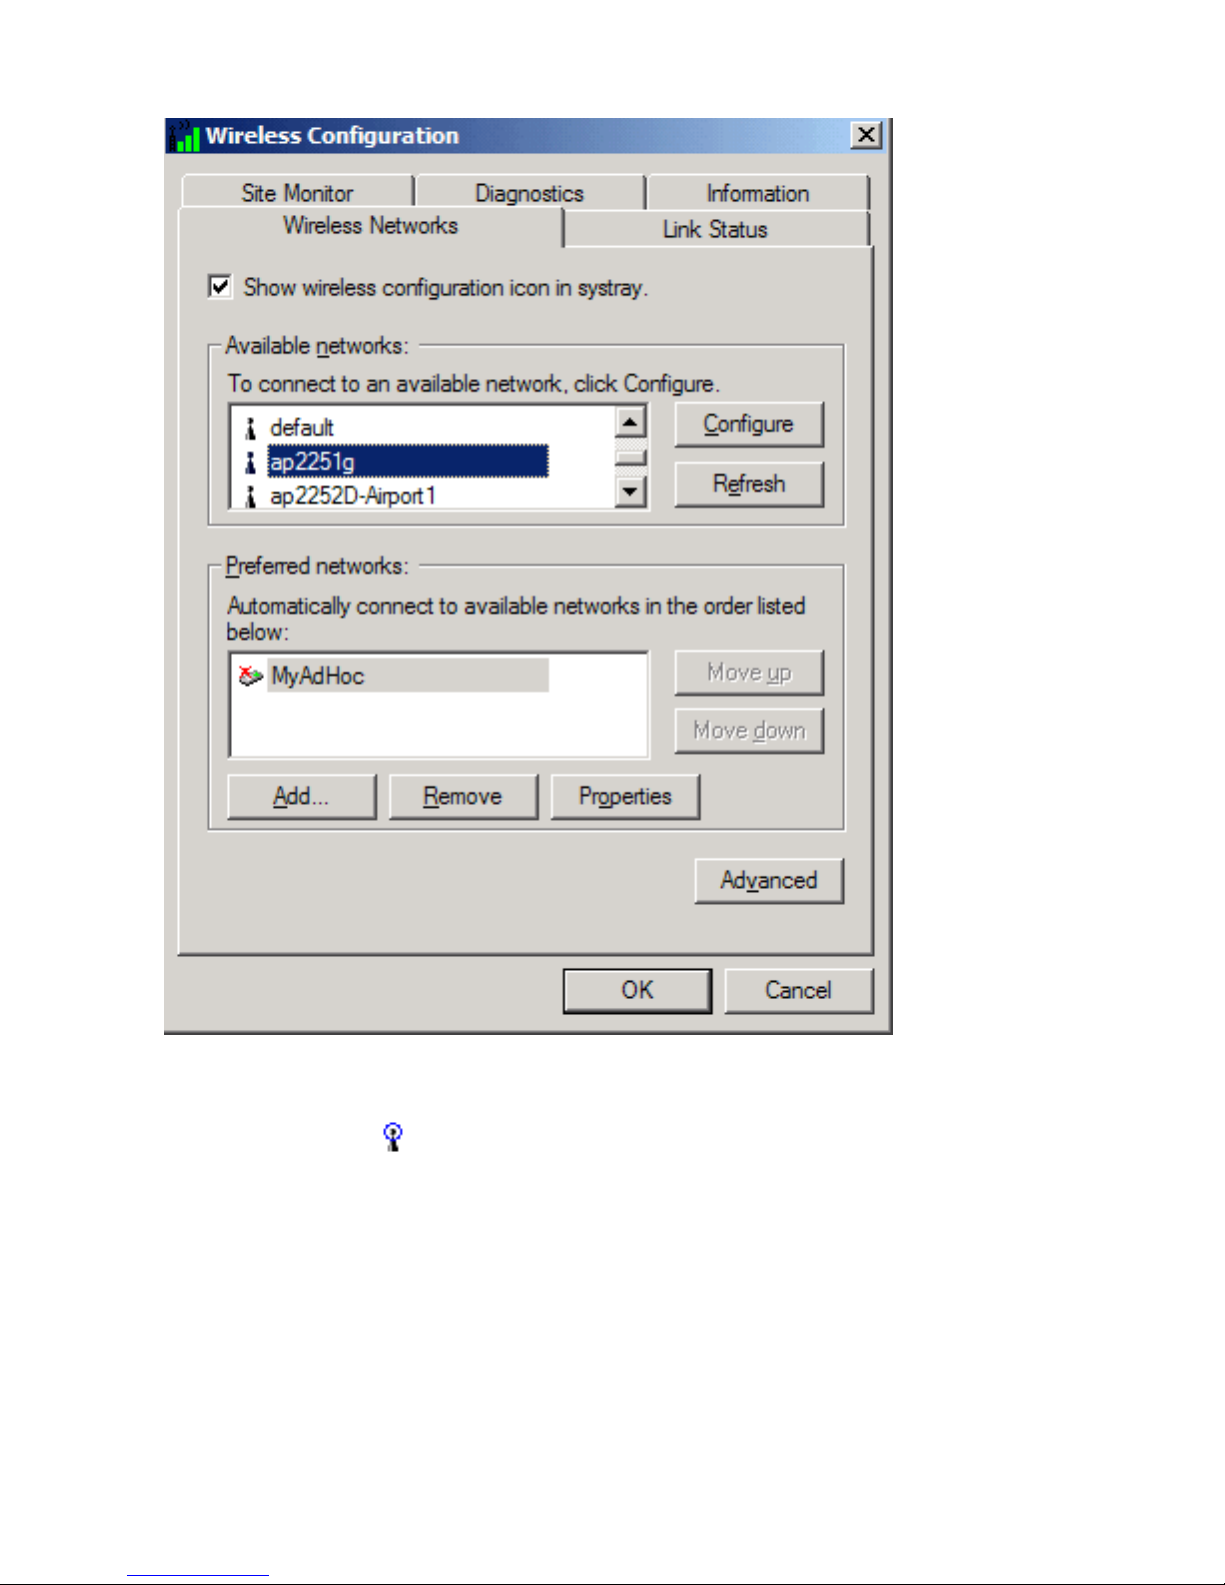
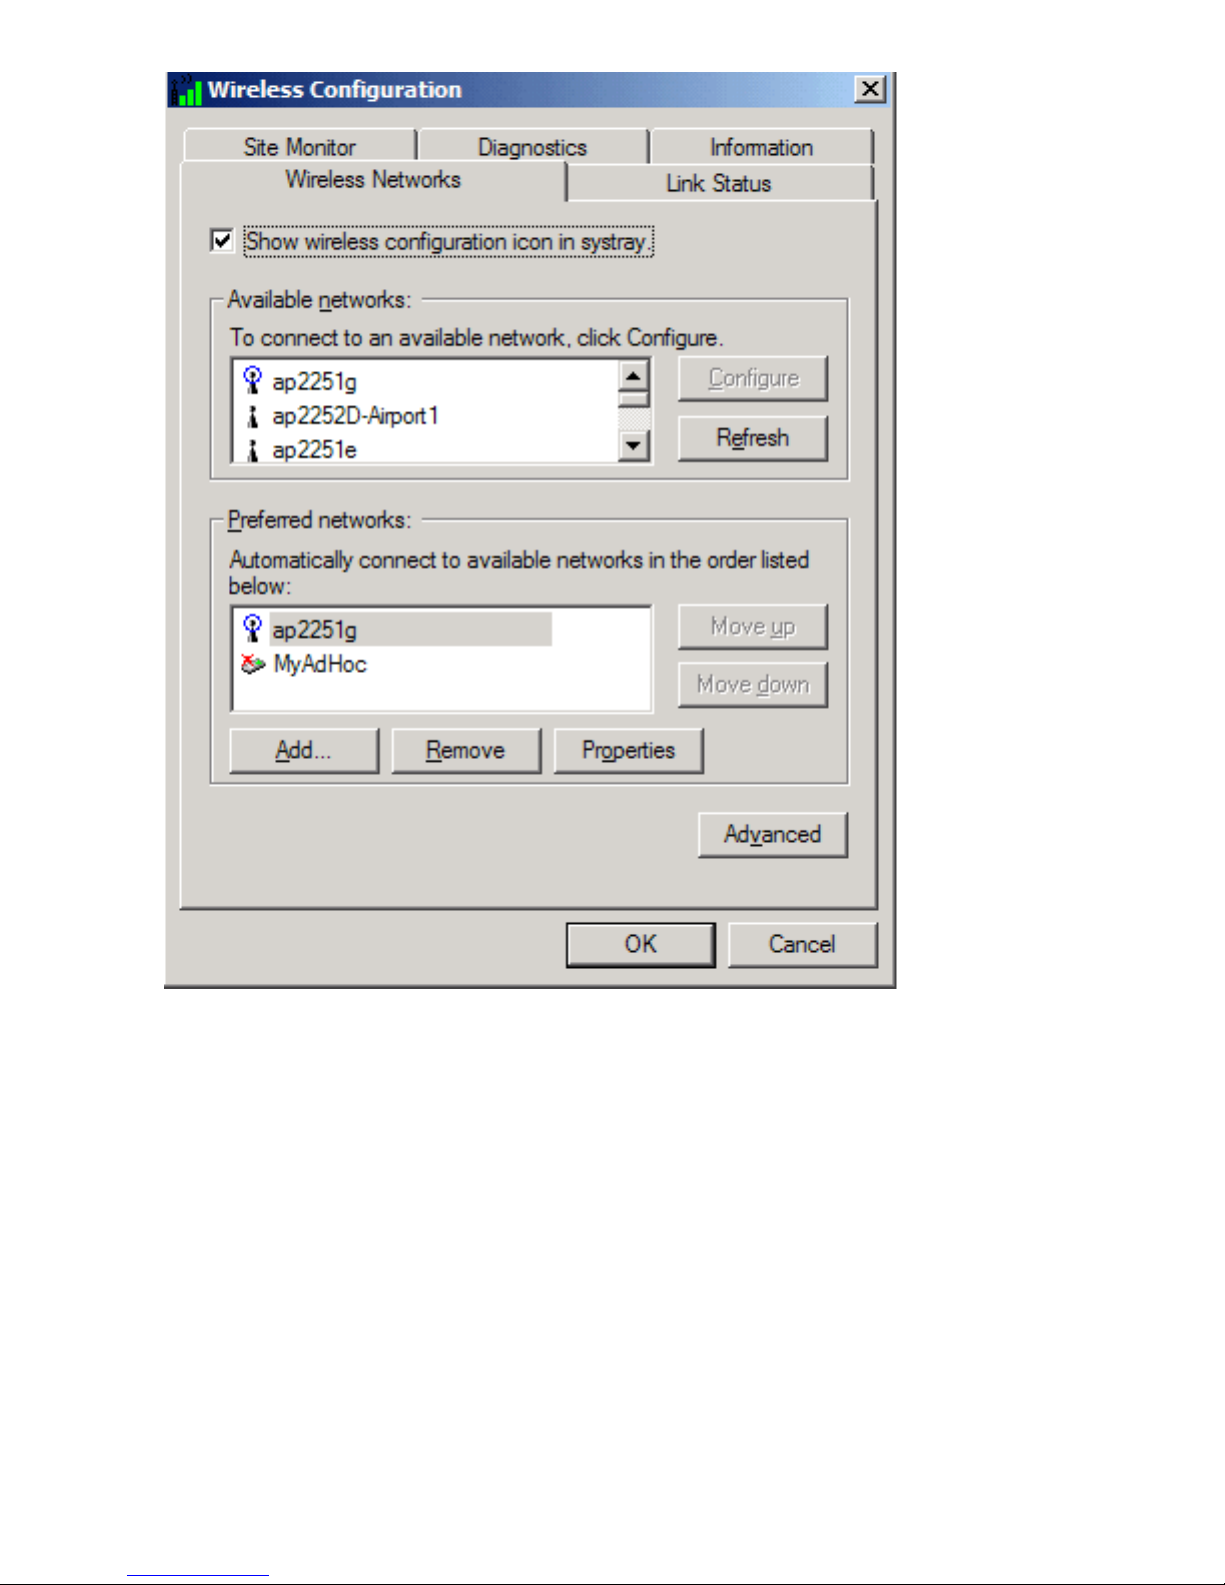
Opening the utility
1. From the desktop, click the Start button, point to Settings, and click Control Panel.
2. Double-click the TrueMobile Wireless Utility icon
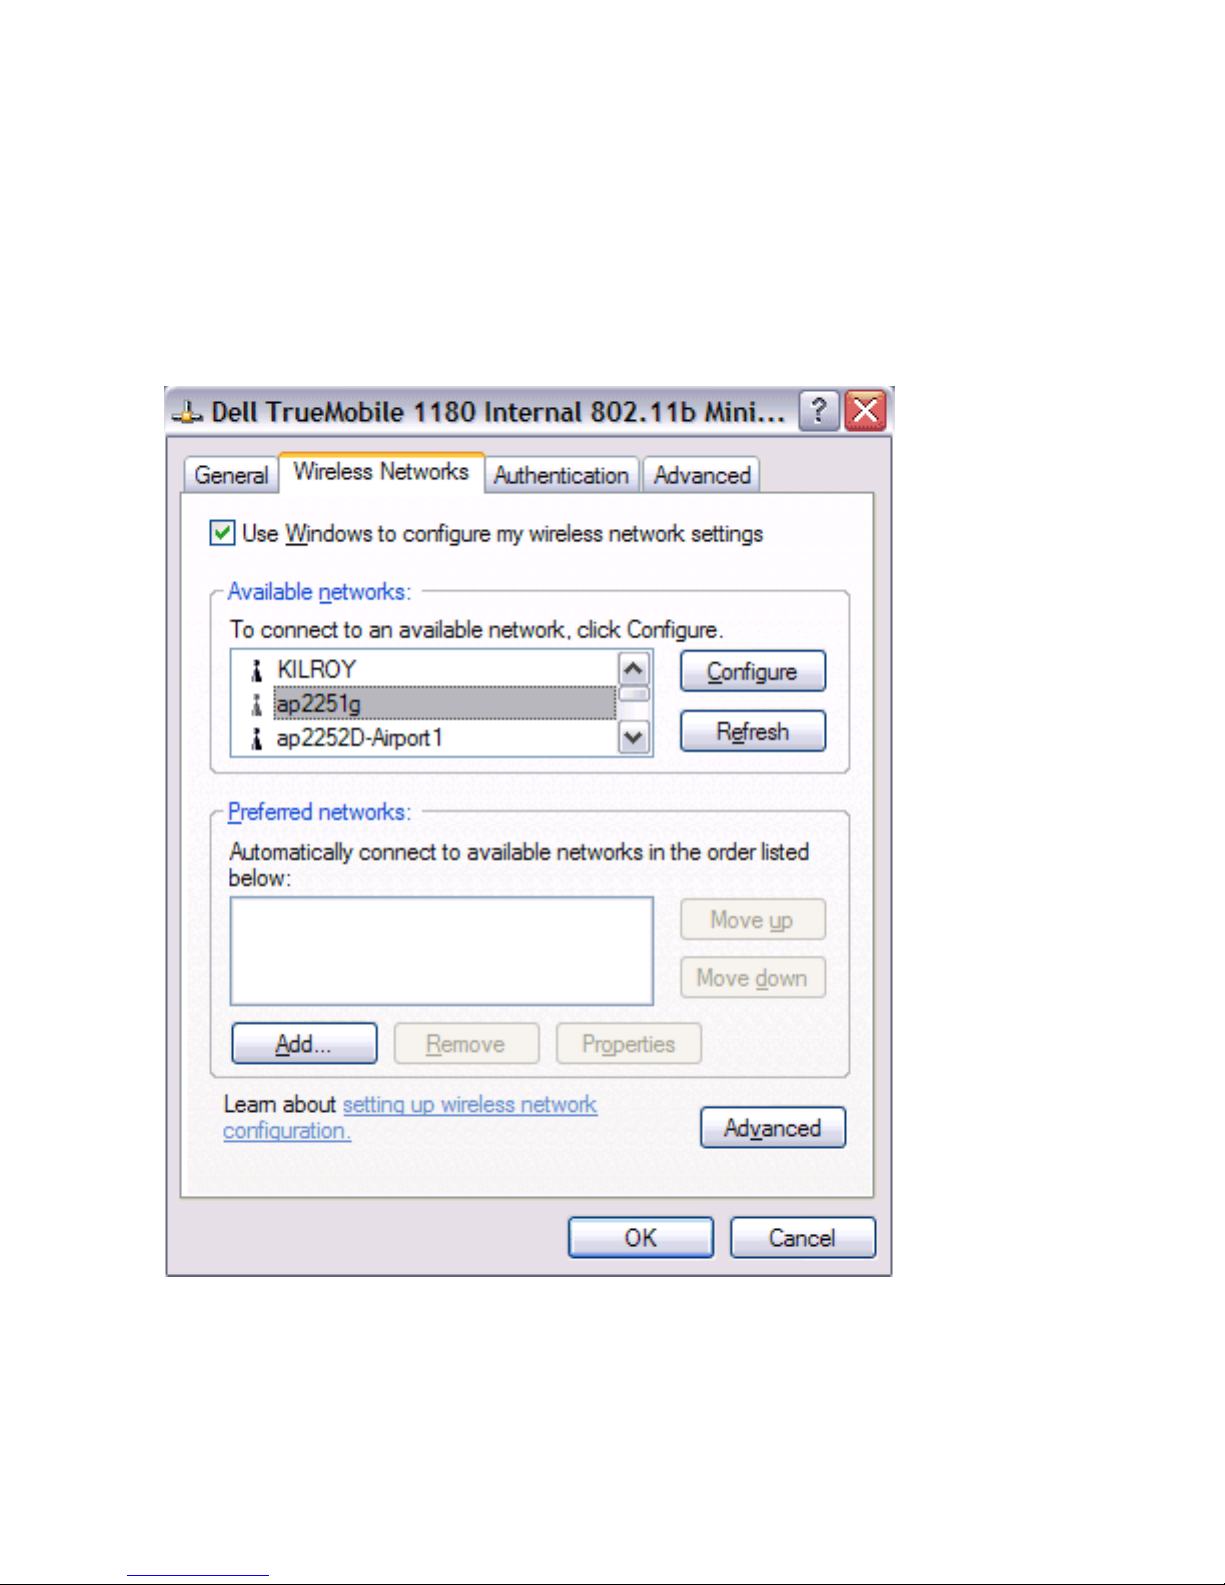
3. If the Wireless Networks tab in the Wireless Configuration box is not on top, click the Wireless Networks tab.
.
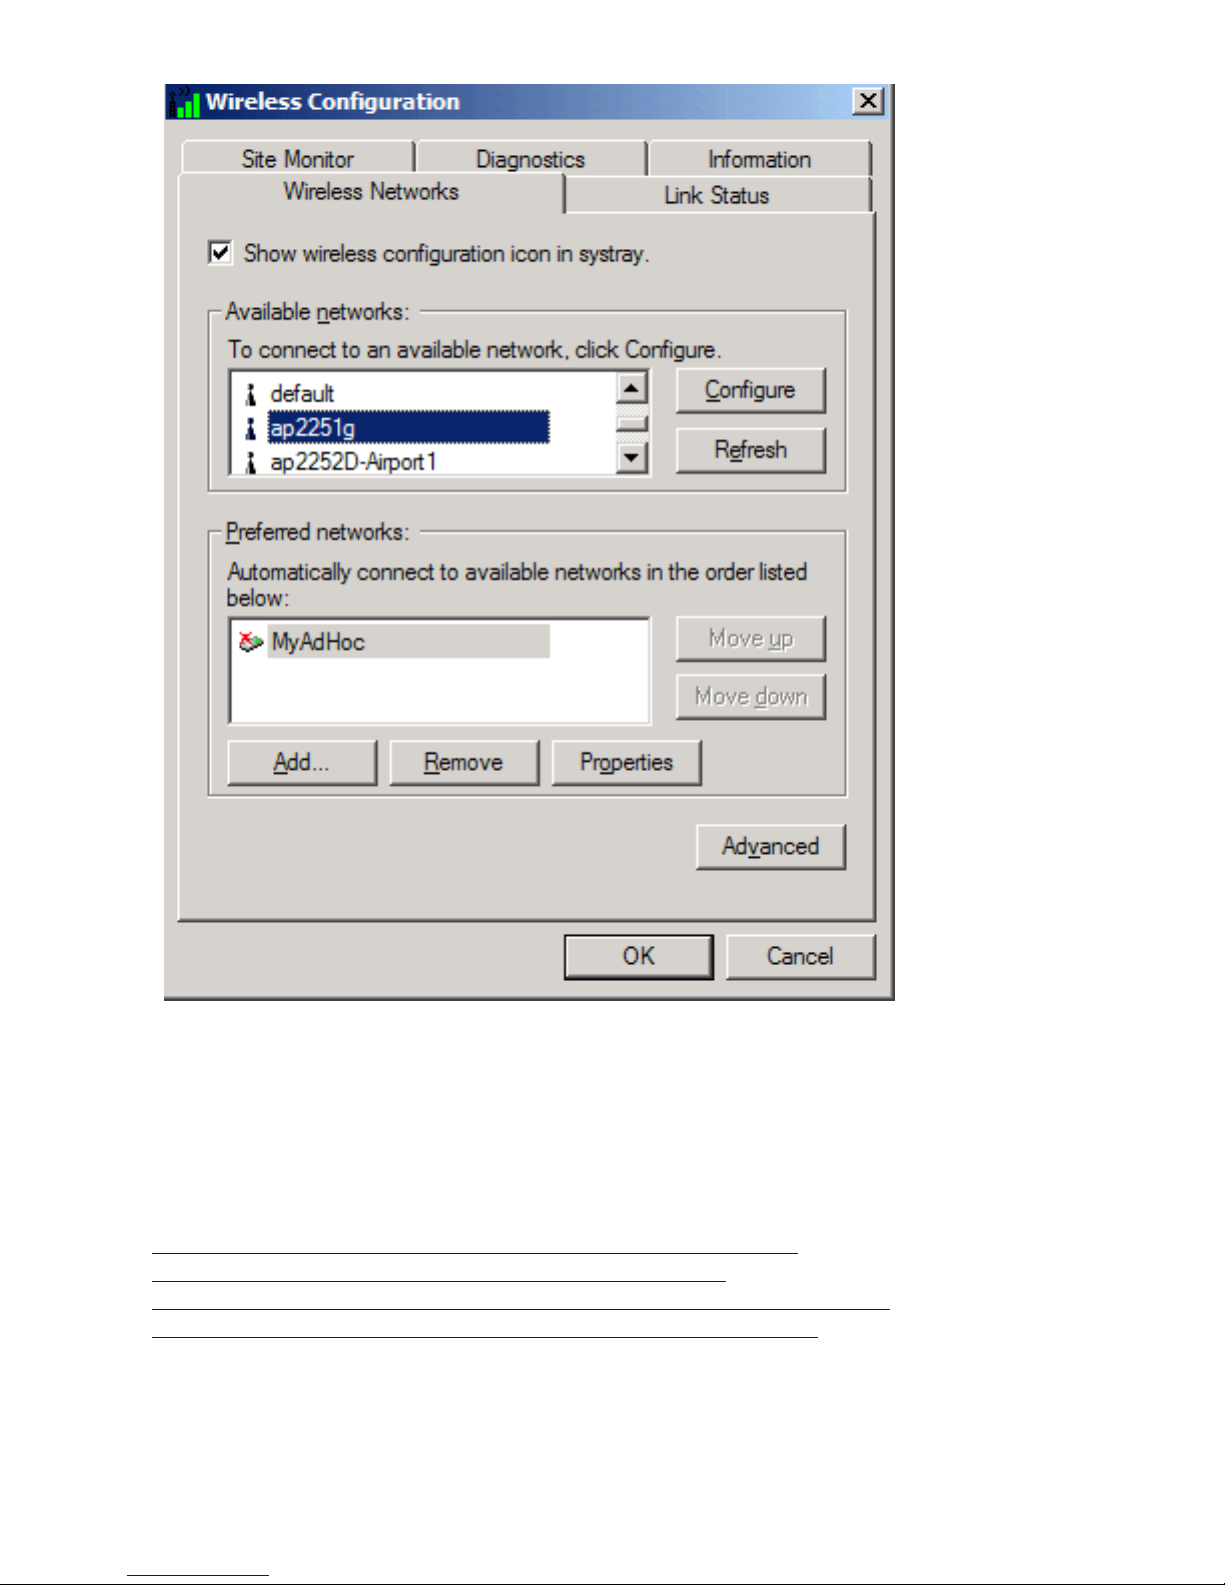
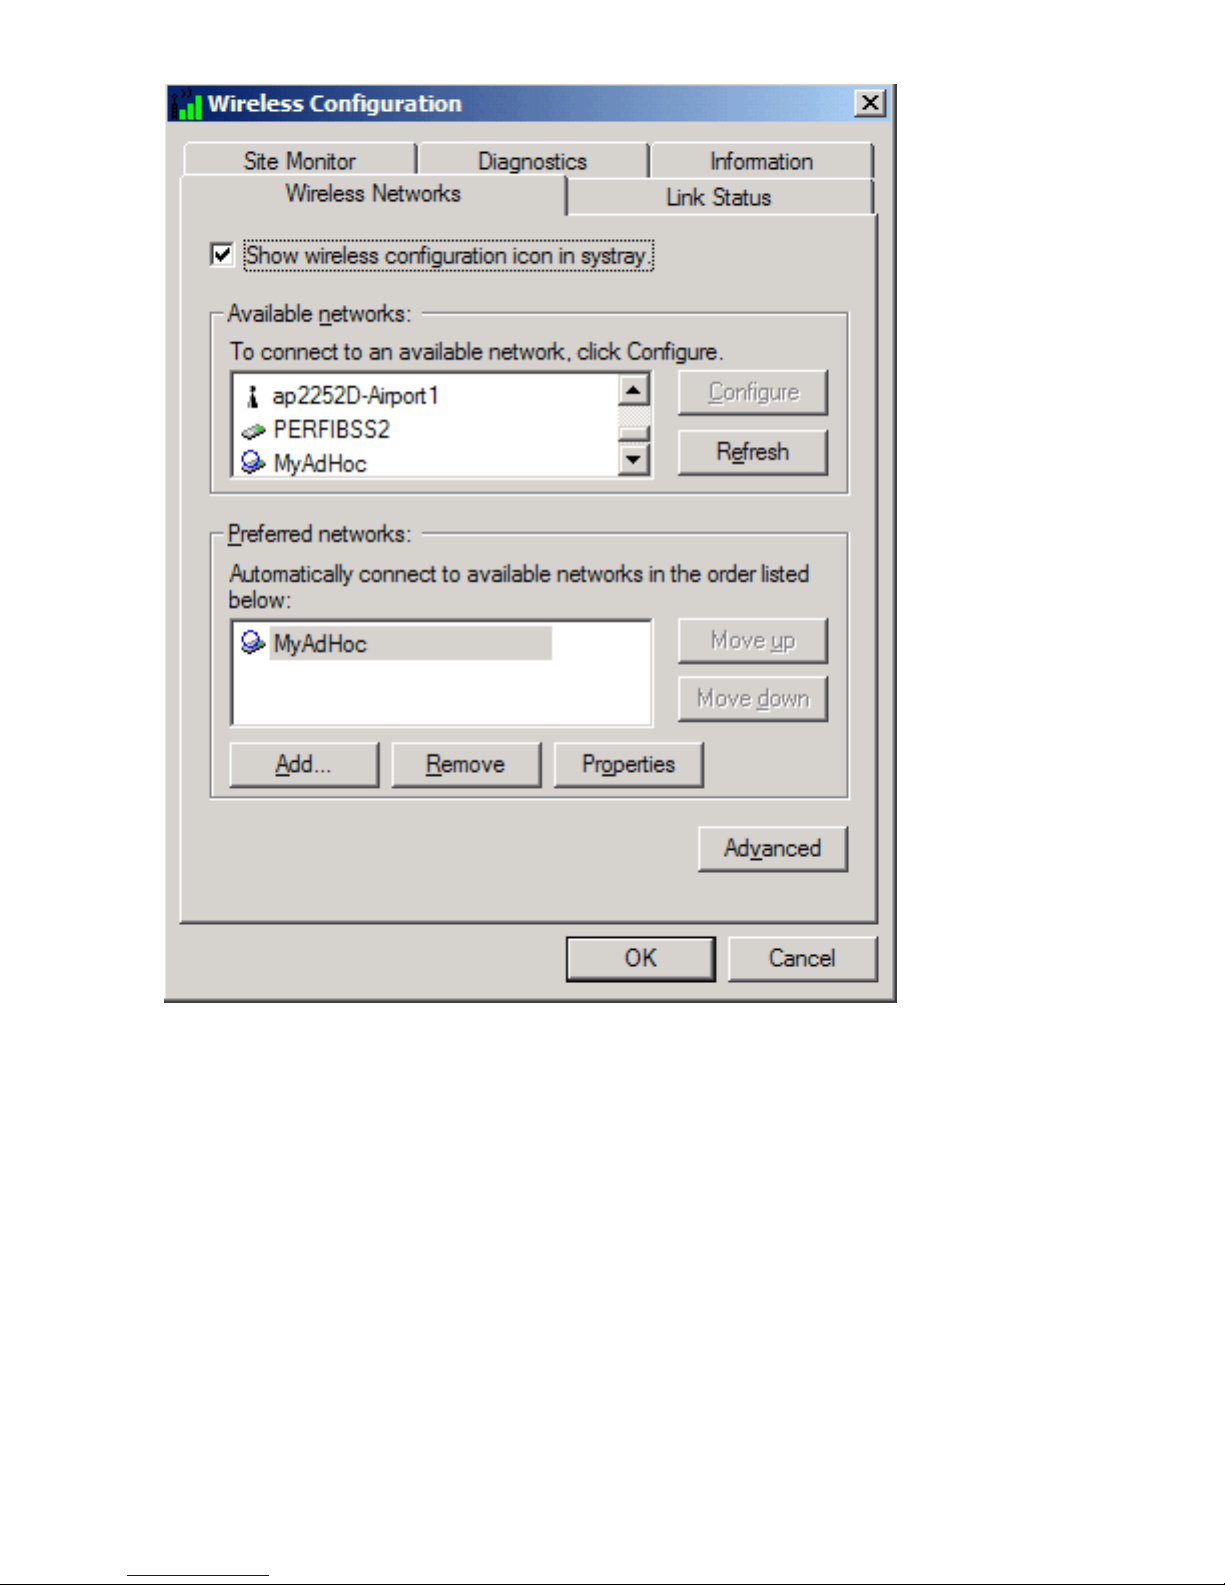
You can configure a network profile for networks that are listed in the Available networks list as well as networks that are
not listed. When you have completed configuring a network profile, the network name and icon appear at the top of the
Preferred networks list. Your computer automatically connects to the network at the top of the Preferred networks list.
Follow the applicable instruction set below, based on whether or not the network is listed and whether or not the network
requires a WEP key (check with your network administrator to see if a WEP key is required). NOTE—Both the network
name and the network key are case-sensitive.
● Configuring a profile for a listed network that does not require a WEP key
● Configuring a profile for a listed network that requires a WEP key
● Configuring a profile for a network that is not listed and does not require a WEP key
● Configuring a profile for a network that is not listed and requires a WEP key
Configuring a profile for a listed network that does
not require a WEP key (Windows 2000 environment)
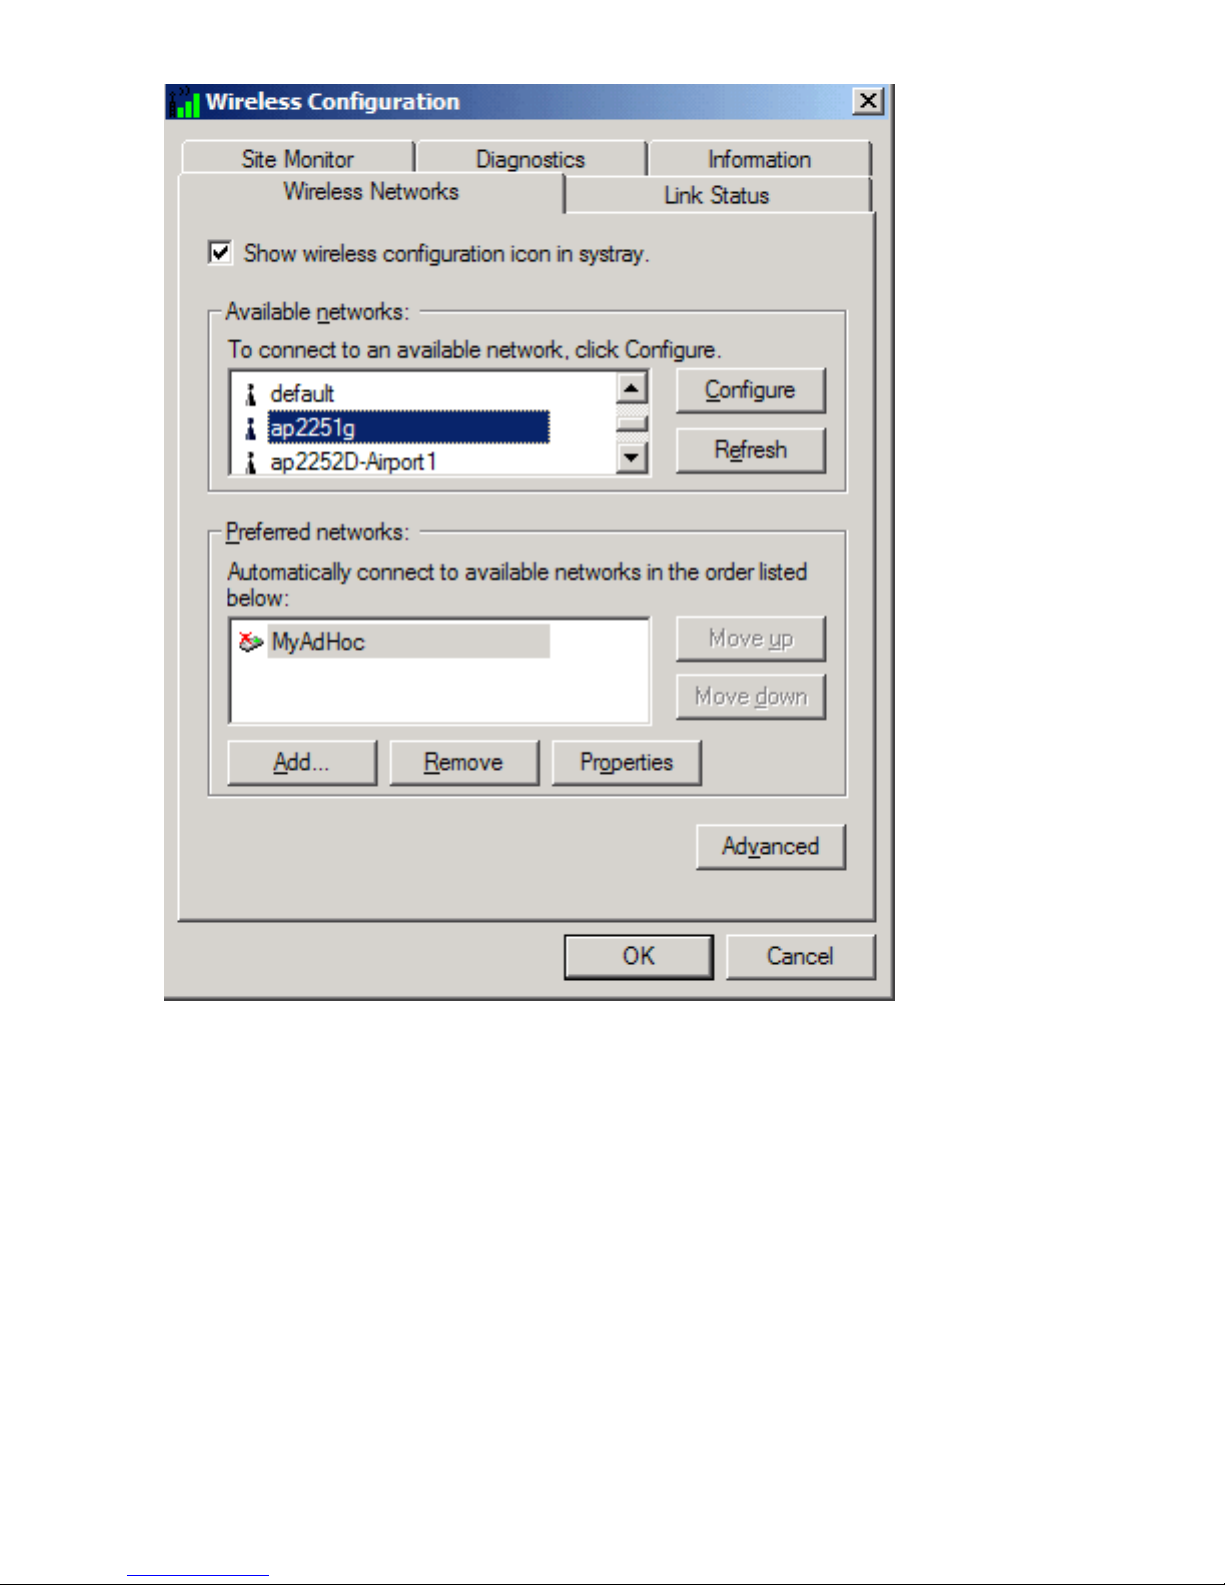
1. After opening the utility, select the network from the Available networks list and click Configure.
2. Click OK in the Wireless Network Properties box.
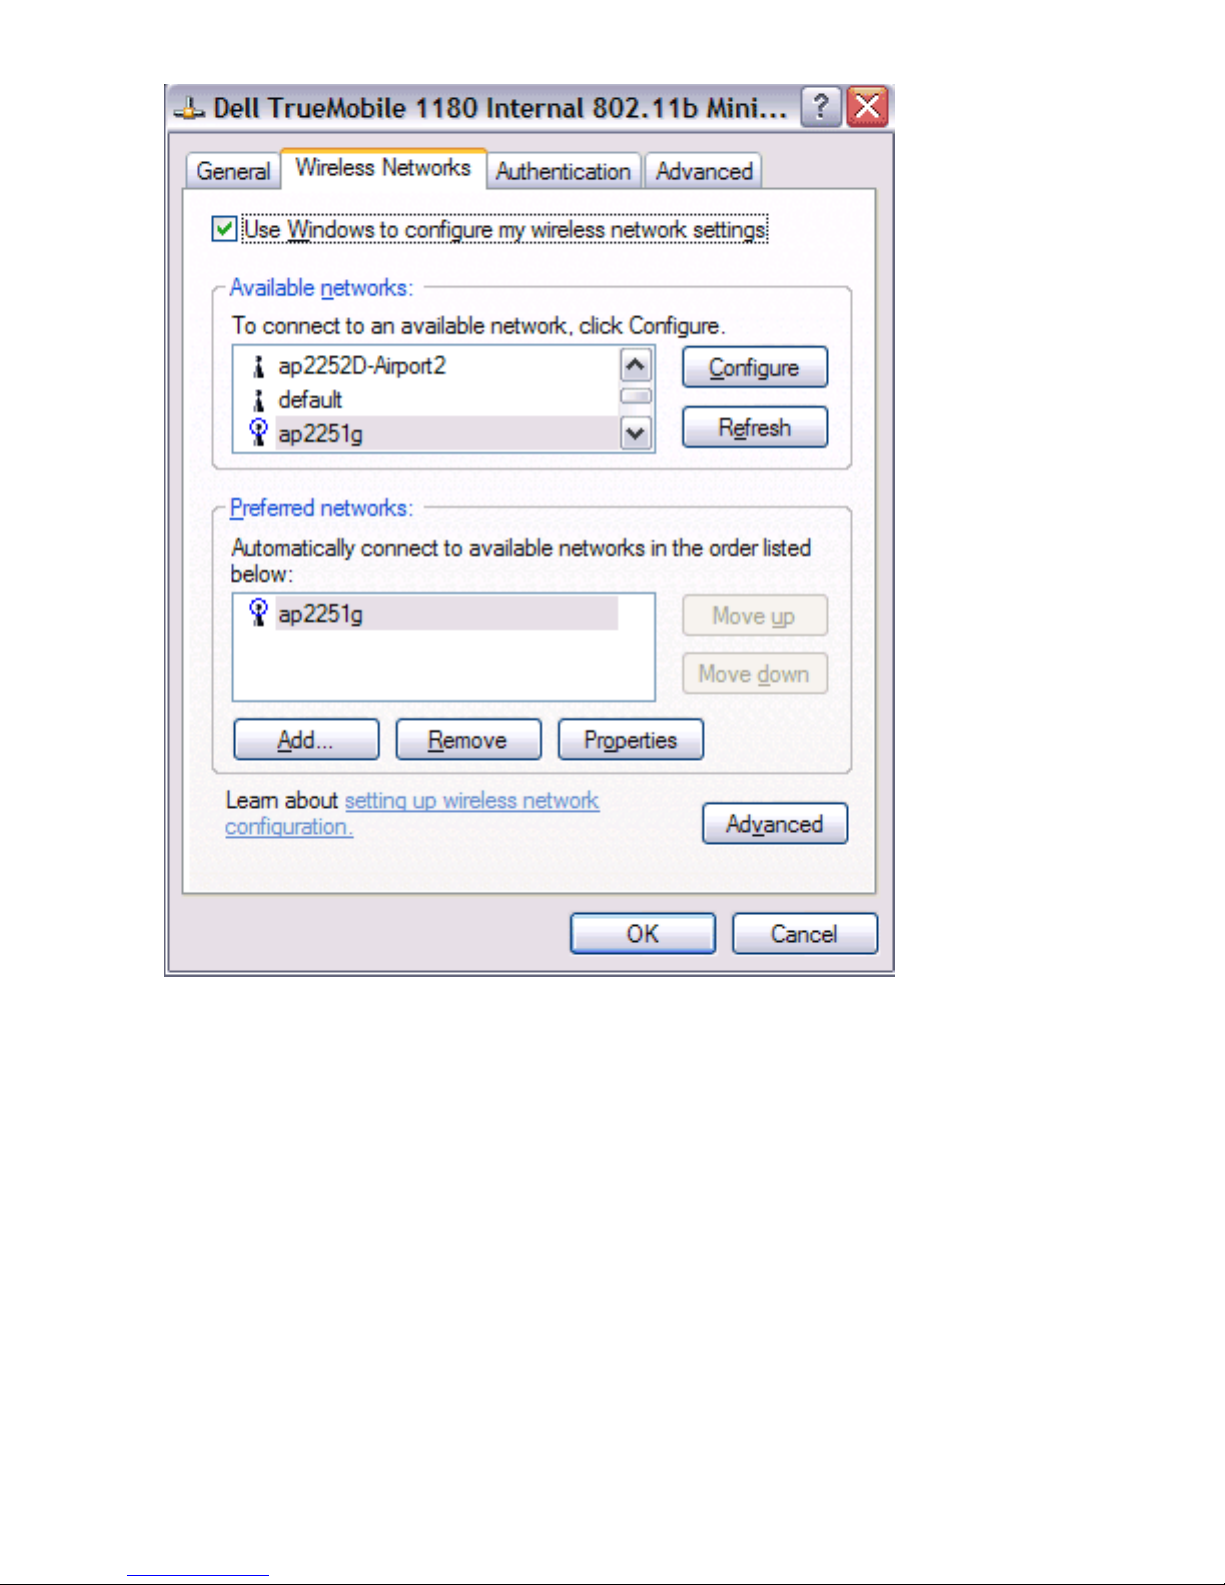
3. The network name and icon appear at the top of the Preferred networks list. Wait up to one minute for the
network connection to be made. Your computer is connected to the selected network when you see a blue
bubble on top of the icon
for that network. If the bubble does not appear, try to access a Web page to verify
that you are connected to the Internet.

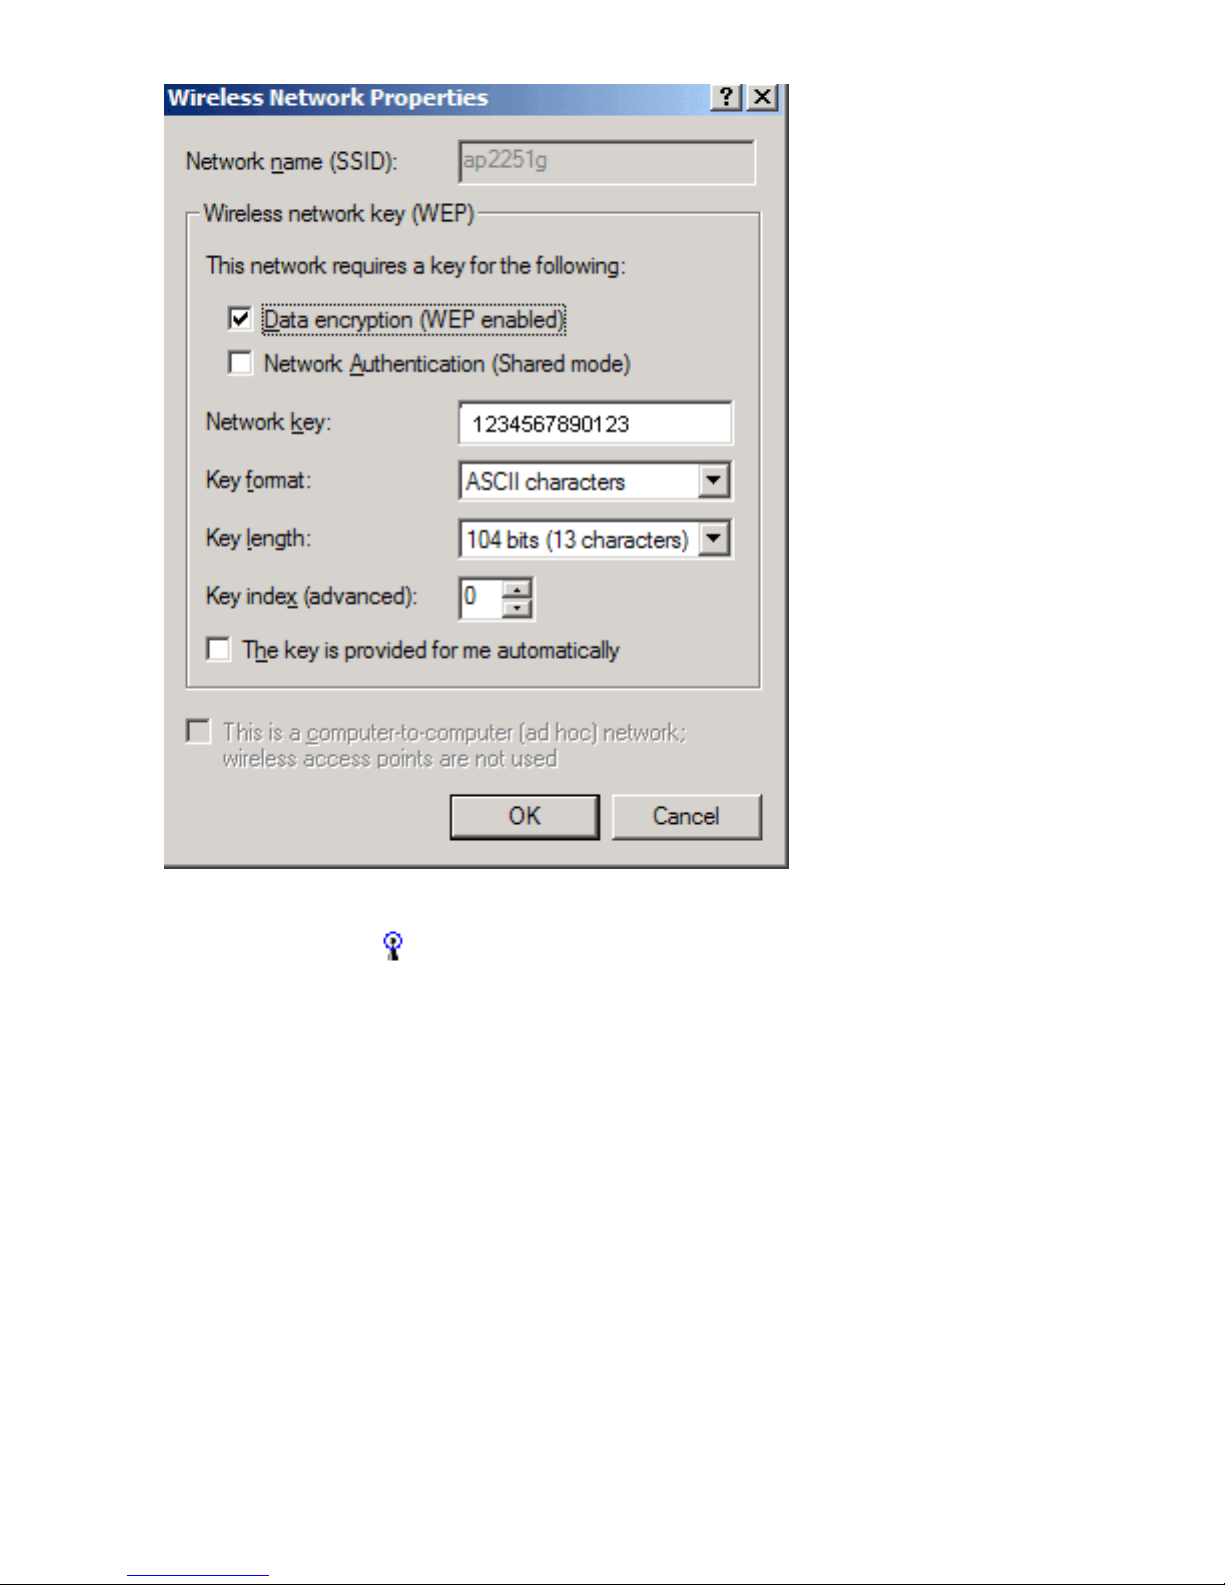
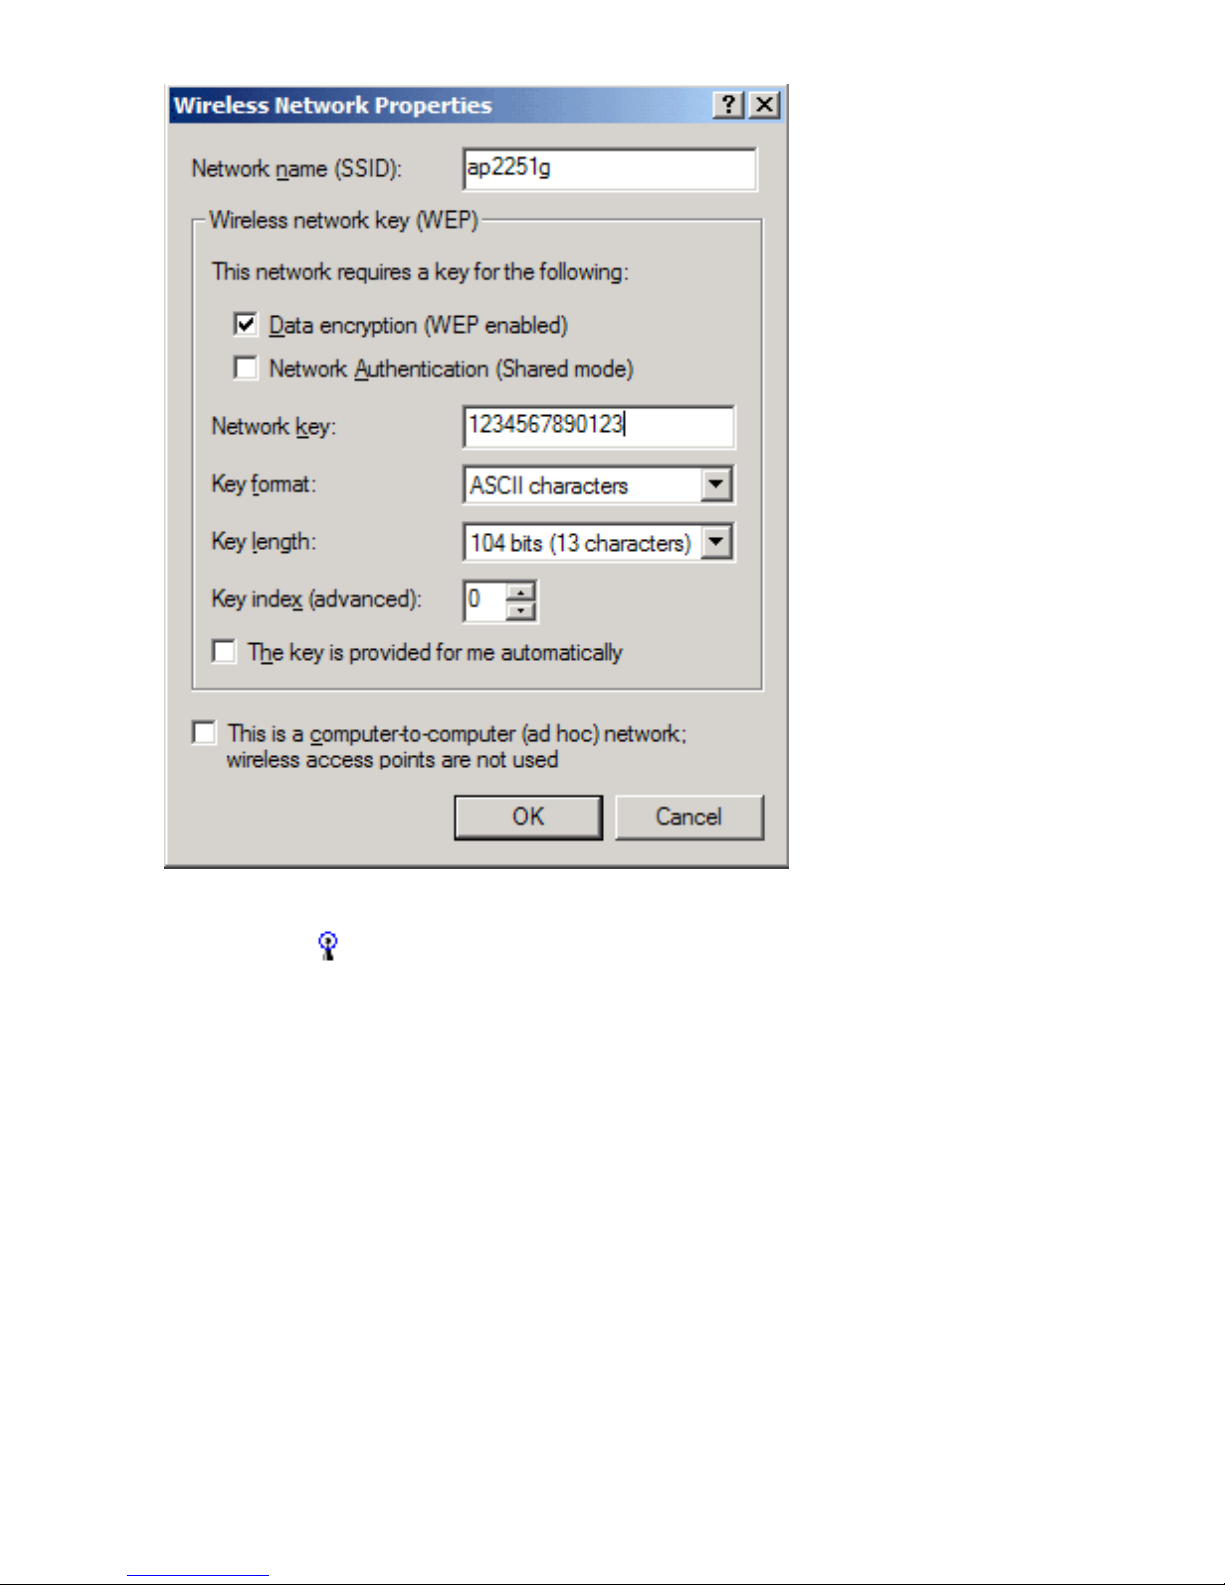
Configuring a profile for a listed network that requires
a WEP key (Windows 2000 environment)
1. After opening the utility, select the network from the Available networks list and click Configure.
2. Select the Data encryption (WEP enabled) box.
3. Clear the The key is provided for me automatically box.
4. Type the network key in the Network key box.
NOTE—You do not need to select the Key format or the Key length before typing the network key. These
settings automatically change to the appropriate setting as you type the network key.
5. Click OK.
6. The network name and icon appear at the top of the Preferred networks list. Wait up to one minute for the
network connection to be made. Your computer is connected to the selected network when you see a blue
bubble on top of the icon
for that network. If the bubble does not appear, try to access a Web page to verify
that you are connected to the Internet.

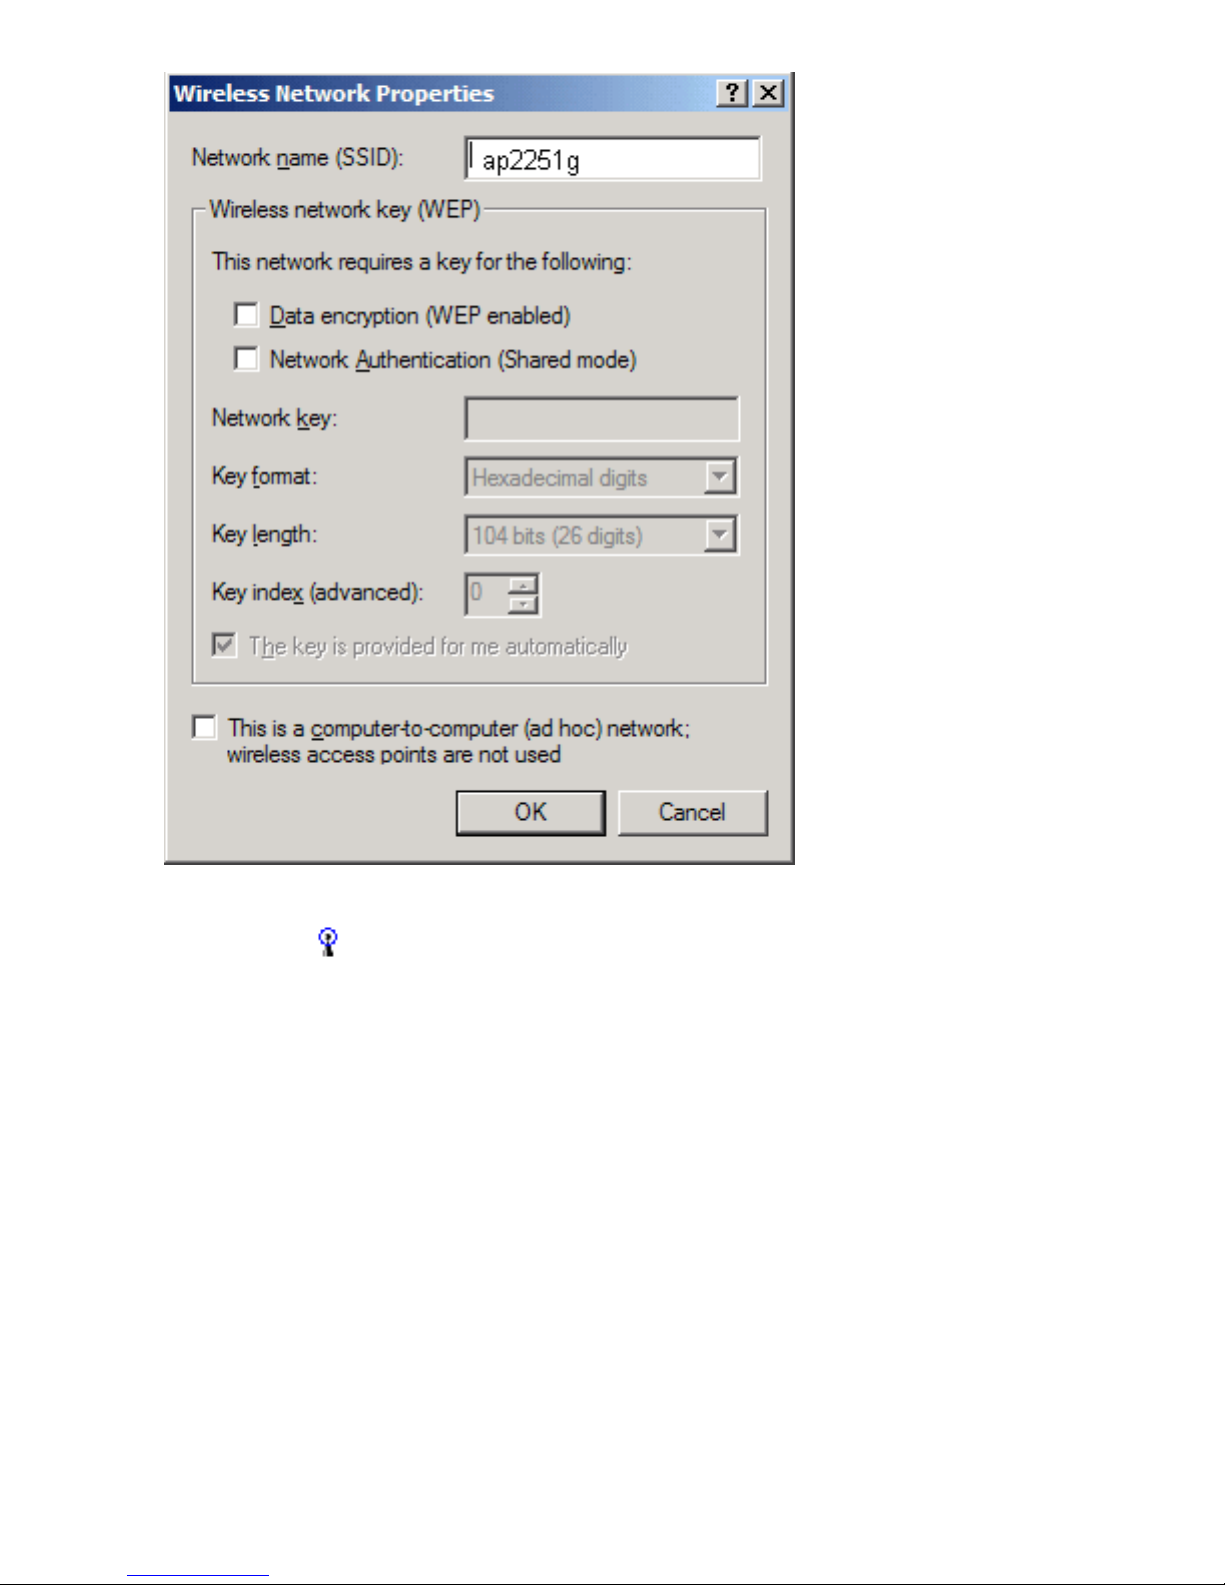
Configuring a profile for a network that is not listed
and does not require a WEP key (Windows 2000
environment)
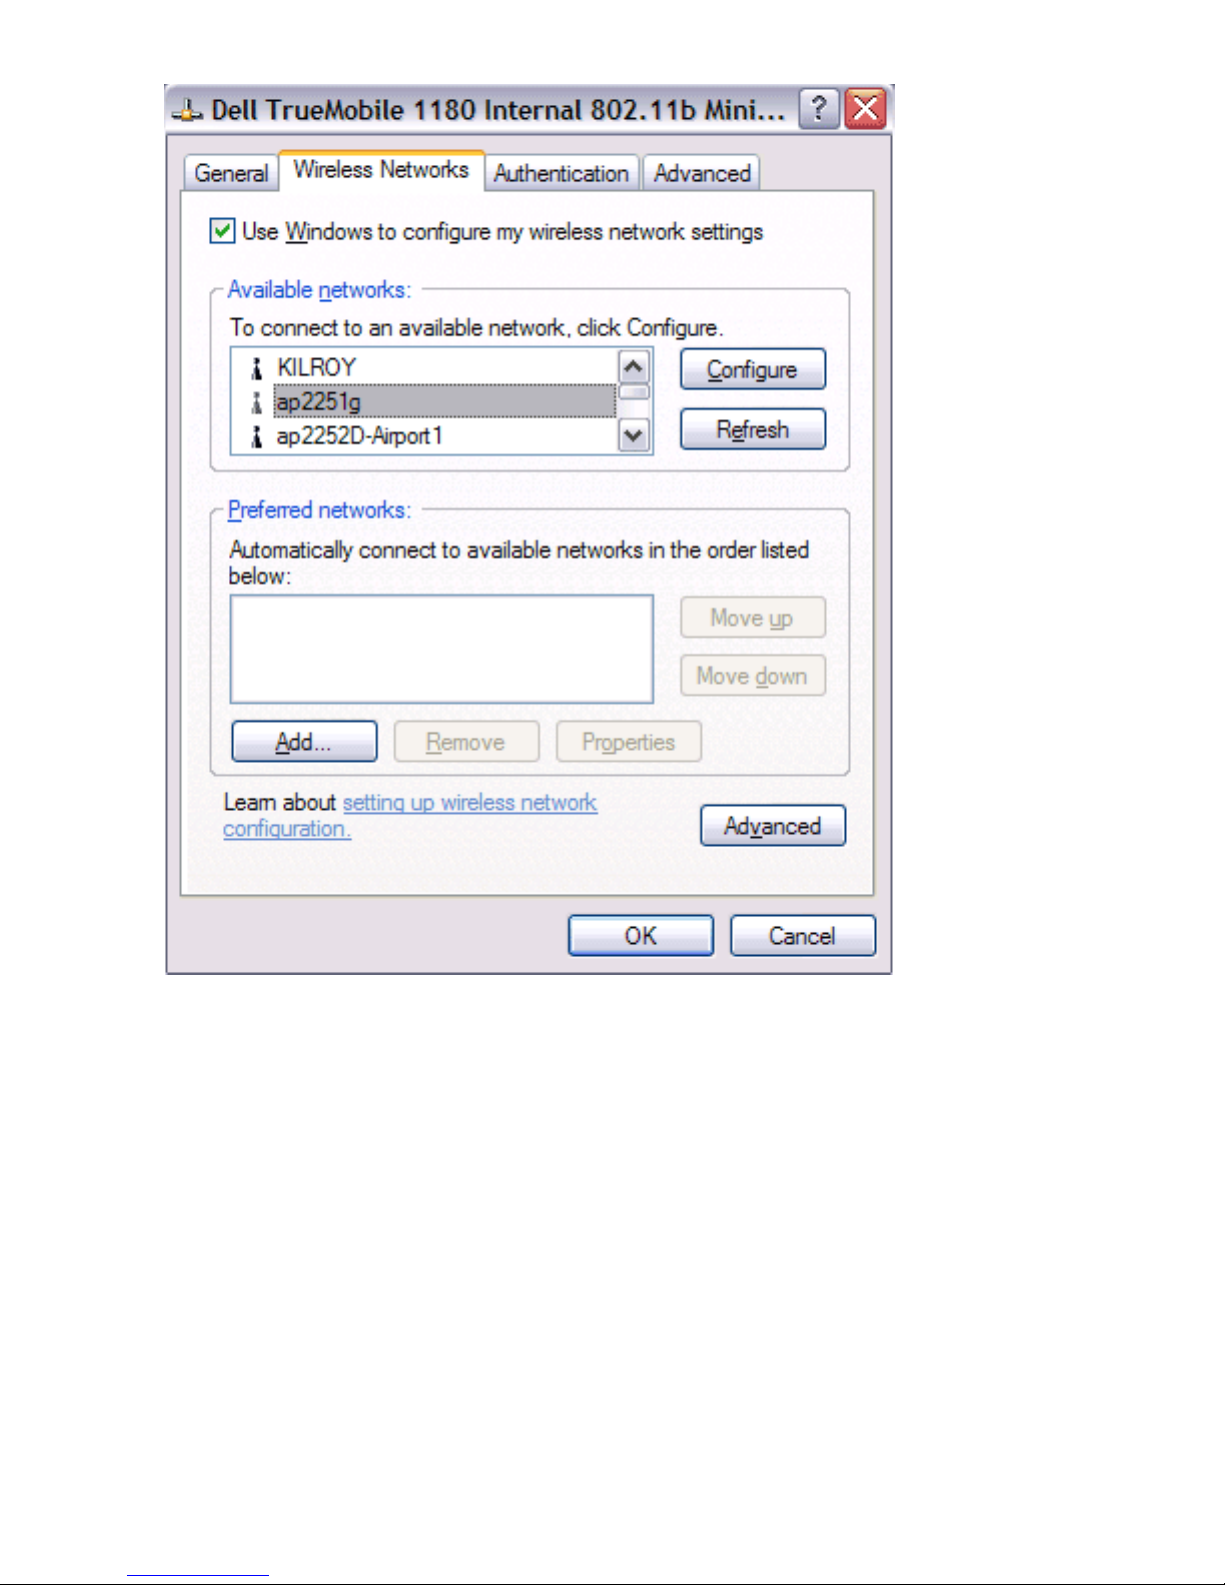
1. After opening the utility, click Add.

2. Type the network name in the Network name (SSID) box.
3. Click OK.
4. The network name and icon appear at the top of the Preferred networks list. Wait up to one minute for the
network connection to be made. Your computer is connected to the added network when you see a blue bubble
on top of the icon
for that network. If the bubble does not appear, try to access a Web page to verify that you
are connected to the Internet.
Configuring a profile for a network that is not listed
and requires a WEP key (Windows 2000 environment)
1. After opening the utility, click Add.
2. Type the network name in the Network name (SSID) box.
3. Select the Data encryption (WEP enabled) box.
4. Clear the The key is provided for me automatically box.
5. Type the network key in the Network key box.
NOTE—You do not need to select the Key format or the Key length before typing the network key. These
settings automatically change to the appropriate setting as you type the network key.
6. Click OK.
7. The network name and icon appear at the top of the Preferred networks list. Wait up to one minute for the
network connection to be made. Your computer is connected to the added network when you see a blue bubble
on top of the icon
for that network. If the bubble does not appear, try to access a Web page to verify that you
are connected to the Internet.

Configuring a network profile (Windows® XP
environment)
Before you can connect to a wireless network, you must configure a network profile for that network on your computer
using the TrueMobile wireless utility. If you purchased your portable computer with the Dell TrueMobile 1180 internal
802.11b PC Card already installed and set up at the factory, follow the network profile configuration instructions provided
below. If this is not the case, first verify that the Dell TrueMobile 1180 card has been properly installed in your computer
according to the installation instructions. Then proceed with the following instructions for configuring your network profiles.
The instructions explain how to open the utility and how to use it to configure a network profile.
NOTE—For more information on how to configure a network profile and 802.1x authentication, click Learn about setting
up wireless network configuration at the bottom of the Wireless Networks tab of the utility.
Opening the utility
1. From the desktop, click the Start button and click Control Panel.
2. If you are looking at the Category View of Control Panel, click Switch to Classic View. If you are looking at the
Classic View of Control Panel, go to the next step.
3. Double-click the Network Connections icon.
4. Right-click Dell TrueMobile 1180 Internal 802.11b PC Card in the LAN or High-Speed Internet area and click
Properties.
5. If the Wireless Networks tab is not on top, Click the Wireless Networks tab.
6. Verify that the Use Windows to configure my wireless network settings box is selected. If it is not, select it.
You can configure a network profile for networks that are listed in the Available networks list as well as those that are not
listed. When you have completed configuring a network profile, the network name and icon appear at the top of the
Preferred networks list. Your computer automatically connects to the network at the top of the Preferred networks list.
Follow the applicable instruction set below, based on whether or not the network is listed and whether or not the network
requires a WEP key (check with your network administrator to see if a WEP key is required). NOTE—Both the network
name and the network key are case-sensitive.

● Configuring a profile for a listed network that does not require a WEP key
● Configuring a profile for a listed network that requires a WEP key
● Configuring a profile for an network that is not listed and does not require a WEP key
● Configuring a profile for an network that is not listed and requires a WEP key
Configuring a profile for a listed network that does
not require a WEP key (Windows XP environment)
1. After opening the utility, select the network from the Available networks list and click Configure.
2. Click OK in the Wireless Network Properties box.
3. The network name and icon appear at the top of the Preferred networks list. Wait up to one minute for the
network connection to be made. Your computer is connected to the selected network when you see a blue
bubble on top of the icon
that you are connected to the Internet.
for that network. If the bubble does not appear, try to access a Web page to verify
Configuring a profile for a listed network that requires
a WEP key (Windows XP environment)
1. After opening the utility, select the network from the Available networks list and click Configure.
2. In the Wireless Network Properties box, select the Data encryption (WEP enabled) box.
3. Clear the The key is provided for me automatically box.
4. Type the network key in the Network key box.
NOTE—You do not need to select the Key format or the Key length before typing the network key. These
settings automatically change to the appropriate setting as you type the network key.
5. Click OK.
 Loading...