

Page 1

Dell Precision™
Mobile Workstation M20
Quick Reference Guide
www.dell.com | support.dell.com
Page 2

Notes, Notices, and Cautions
NOTE: A NOTE indicates important information that helps you make better use of your computer.
NOTICE: A NOTICE indicates either potential damage to hardware or loss of data and tells you how to avoid the
problem.
CAUTION: A CAUTION indicates a potential for property damage, personal injury, or death.
Abbreviations and Acronyms
For a complete list of abbreviations and acronyms, see your online
(depending upon your operating system) either double-click the
Start
button, click
Help and Support Center
, and click
User and system guides
If you purchased a Dell™ n Series computer, any references in this document to Microsoft
User’s Guide
User’s Guide
. To access your User’s Guide,
icon on your desktop or click the
.
®
Windows®
operating systems are not applicable.
NOTE: Some features may not be available for your computer or in certain countries.
____________________
Information in this document is subject to change without notice.
© 2004 Dell Inc. All rights reserved.
Reproduction in any manner whatsoever without the written permission of Dell Inc. is strictly forbidden.
Trademarks used in this text: Dell, the DELL logo, and Dell Precision are trademarks of Dell Inc.; Intel and Pentium are registered trademarks
of Intel Corporation; Microsoft and Windows are registered trademarks of Microsoft Corporation.
Other trademarks and trade names may be used in this document to refer to either the entities claiming the marks and names or their products.
Dell Inc. disclaims any proprietary interest in trademarks and trade names other than its own.
October 2004 P/N T7623 Rev. A00
Page 3

Contents
Finding Information . . . . . . . . . . . . . . . . . . . . . . . . . . . . 5
Setting Up Your Computer
Battery Performance
. . . . . . . . . . . . . . . . . . . . . . . . . 8
. . . . . . . . . . . . . . . . . . . . . . . . . . . . 9
Checking the Battery Charge
Dell™ QuickSet Battery Meter
Microsoft
Charge Gauge
Health Gauge
Low-Battery Warning
Charging the Battery
Removing a Battery
Installing a Battery
Storing a Battery
About Your Computer
Front View
Left View
Right View
Back View
Bottom View
Solving Problems
®
Windows® Power Meter. . . . . . . . . . . . . . . . . . 11
. . . . . . . . . . . . . . . . . . . . . . . . . . . . 11
. . . . . . . . . . . . . . . . . . . . . . . . . . . . . 12
. . . . . . . . . . . . . . . . . . . . . . . . . 12
. . . . . . . . . . . . . . . . . . . . . . . . . . . . 13
. . . . . . . . . . . . . . . . . . . . . . . . . . . . 13
. . . . . . . . . . . . . . . . . . . . . . . . . . . . 14
. . . . . . . . . . . . . . . . . . . . . . . . . . . . . . 14
. . . . . . . . . . . . . . . . . . . . . . . . . . . 15
. . . . . . . . . . . . . . . . . . . . . . . . . . . . . . 15
. . . . . . . . . . . . . . . . . . . . . . . . . . . . . . . 16
. . . . . . . . . . . . . . . . . . . . . . . . . . . . . . 17
. . . . . . . . . . . . . . . . . . . . . . . . . . . . . . 18
. . . . . . . . . . . . . . . . . . . . . . . . . . . . . 19
. . . . . . . . . . . . . . . . . . . . . . . . . . . . . 19
Notebook System Software
Lockups and Software Problems
Running the Dell Diagnostics
. . . . . . . . . . . . . . . . . . . . . . . . 10
. . . . . . . . . . . . . . . . . . . . . 10
. . . . . . . . . . . . . . . . . . . . . . 19
. . . . . . . . . . . . . . . . . . . . 20
. . . . . . . . . . . . . . . . . . . . . 22
Index . . . . . . . . . . . . . . . . . . . . . . . . . . . . . . . . . . . . 27
Contents 3
Page 4

4 Contents
Page 5

Finding Information
NOTE: Some features may not be available in certain countries
NOTE: Additional information may ship with your computer.
What Are You Looking For? Find It Here
• A diagnostic program for my computer
• Drivers for my computer
• My computer documentation
• My device documentation
• Notebook System Software (NSS)
• Warranty information
• Terms and Conditions (U.S. only)
• Safety instructions
• Regulatory information
• Ergonomics information
• End User License Agreement
Drivers and Utilities CD (also known as ResourceCD)
Documentation and drivers are already installed on your
computer. You can use the CD to reinstall drivers, run the
Dell Diagnostics, or access your documentation.
NOTE: Drivers and documentation updates can be found at
support.dell.com.
NOTE: The Drivers and Utilities CD is optional and may not
ship with your computer.
Dell™ Product Information Guide
Readme files may be
included on your CD to
provide last-minute
updates about technical
changes to your
computer or advanced
technical-reference
material for technicians
or experienced users.
• How to remove and replace parts
• Specifications
• How to configure system settings
• How to troubleshoot and solve problems
User’s Guide
®
Microsoft
1
Click the
2
Click
The User’s Guide is also available on the optional Drivers
and Utilities
Dell Precision Mobile Workstation M20 Quick Reference Guide 5
Windows® XP Help and Support Center
Start
button and click
User’s and system guides
CD
.
Help and Support
and click
User’s guides
.
.
Page 6
What Are You Looking For? Find It Here
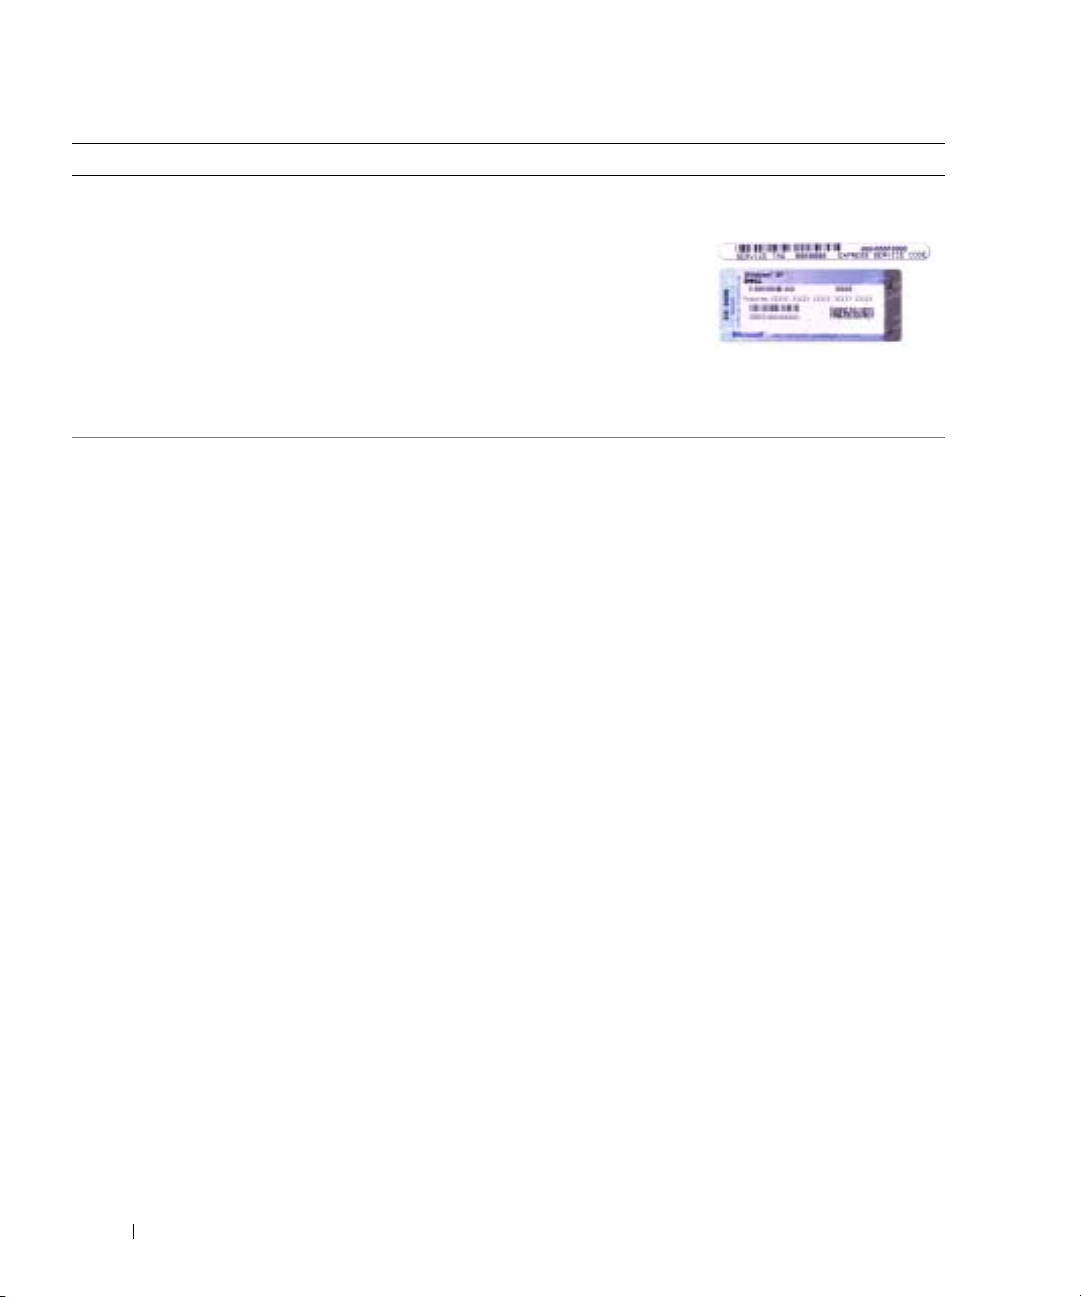
• Service Tag and Express Service Code
• Microsoft Windows License Label
www.dell.com | support.dell.com
• Solutions — Troubleshooting hints and tips, articles
from technicians, online courses, frequently asked
questions
• Community — Online discussion with other Dell
customers
• Upgrades — Upgrade information for components, such
as memory, the hard drive, and the operating system
• Customer Care — Contact information, service call and
order status, warranty, and repair information
• Service and support — Service call status and support
history, service contract, online discussions with
technical support
• Reference — Computer documentation, details on my
computer configuration, product specifications, and
white papers
• Downloads — Certified drivers, patches, and software
updates
• Notebook System Software (NSS)— If you reinstall the
operating system for your computer, you should also
reinstall the NSS utility. NSS provides critical updates
for your operating system and support for Dell™
3.5-inch USB floppy drives, Intel
processors, optical drives, and USB devices. NSS is
necessary for correct operation of your Dell computer.
The software automatically detects your computer and
operating system and installs the updates appropriate
for your configuration.
®
Pentium®M
Service Tag and Microsoft Windows License
These labels are located on the bottom of your computer.
• Use the Service Tag to
• Enter the Express Service Code to direct your call when
Dell Support Website — support.dell.com
NOTE: Select your region to view the appropriate
support site.
NOTE: Corporate, government, and education customers
can also use the customized Dell Premier Support website
at premier.support.dell.com. The website may not be
available in all regions.
identify your
computer when you
support.dell.com
use
or contact technical
support.
contacting technical support.
6 Dell Precision Mobile Workstation M20 Quick Reference Guide
Page 7

What Are You Looking For? Find It Here
• How to use Windows XP
• Documentation for my computer
• Documentation for devices (such as a modem)
Windows Help and Support Center
1
Click the
2
Type a word or phrase that describes your problem and
click the arrow icon.
3
Click the topic that describes your problem.
4
Follow the instructions on the screen.
• How to reinstall my operating system
Operating System CD
The operating system is already installed on your
computer. To reinstall your operating system, use the
Operating System CD. See your User’s Guide for
instructions.
NOTE: The color of your CD varies based on the operating
system you ordered.
NOTE: The Operating System CD is optional and may not
ship with all computers.
Start
button and click
Help and Support
.
After you reinstall your
operating system, use the
Drivers and Utilities CD
to reinstall drivers for the
devices that came with
your computer.
Your operating system
product key label is
located on your
computer.
Dell Precision Mobile Workstation M20 Quick Reference Guide 7
Page 8
Setting Up Your Computer
CAUTION: Before you begin any of the procedures in this section, follow the safety instructions in the
Product Information Guide.
1
Unpack the accessories box.
2
Set aside the contents of the accessories box, which you will need to complete the setup of
your computer.
The accessories box also contains user documentation and any software or additional
hardware (such as PC Cards, drives, or batteries) that you have ordered.
3
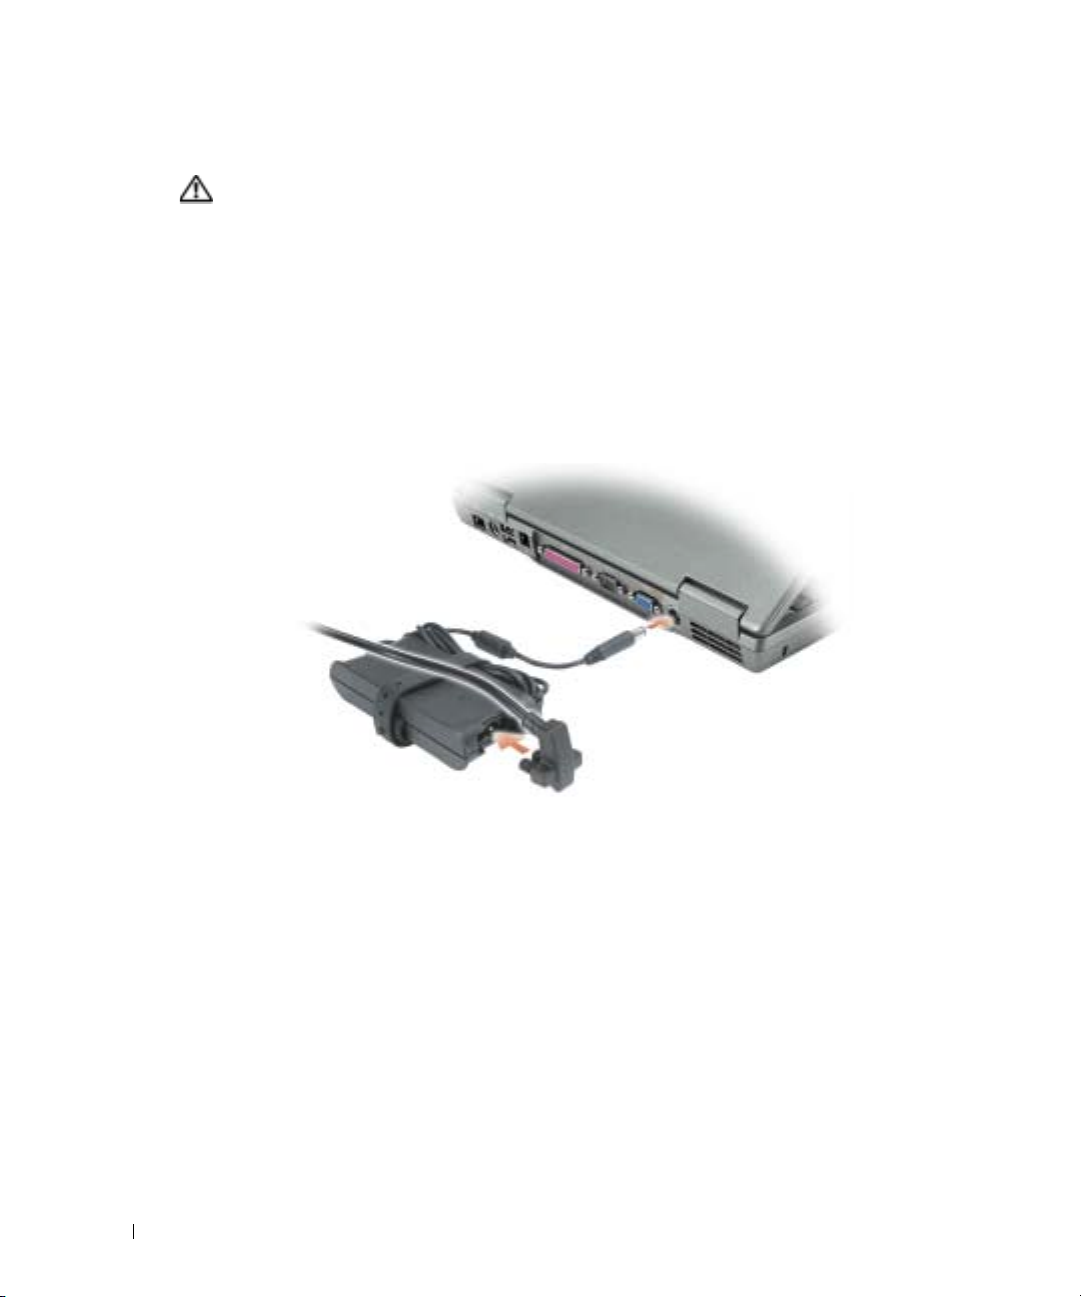
Connect the AC adapter to the AC adapter connector on the computer and to the electrical
www.dell.com | support.dell.com
outlet.
8 Dell Precision Mobile Workstation M20 Quick Reference Guide
Page 9

4
Open the computer display and press the power button to turn on the computer.
power button
NOTE: Do not connect the computer to the docking device until the computer has been turned on and
shut down at least once.
Battery Performance
CAUTION: Before you begin any of the procedures in this section, follow the safety instructions
located in the Product Information Guide.
NOTE: Batteries for portable computers are covered only during the initial 1-year period of the limited
warranty for your computer. For more information about the Dell warranty for your computer, see the
Product Information Guide or separate paper warranty document that shipped with your computer.
For optimal computer performance and to help preserve BIOS settings, operate your Dell™
portable computer with the main battery installed at all times. Use a battery to run the computer
when it is not connected to an electrical outlet. One battery is supplied as standard equipment in
the battery bay.
NOTE: Battery operating time (the time the battery can hold a charge) decreases over time. Depending
on how often the battery is used and the conditions under which it is used, you may need to purchase a
new battery during the life of your computer.
Dell Precision Mobile Workstation M20 Quick Reference Guide 9
Page 10

Battery operating time varies depending on operating conditions. You can install an optional
second battery in the module bay to significantly increase operating time. For more information
about the second battery, see your
Operating time is significantly reduced when you perform operations including, but not limited to,
the following:
• Using optical drives, such as DVD and CD drives
• Using wireless communications devices, PC Cards, or USB devices
• Using high-brightness display settings, 3D screen savers, or other power-intensive programs
such as 3D games
• Running the computer in maximum performance mode
www.dell.com | support.dell.com
NOTE: It is recommended that you connect your computer to an electrical outlet when writing to a CD or
DVD.
You can check the battery charge before you insert the battery into the computer. You can also set
power management options to alert you when the battery charge is low.
CAUTION: Using an incompatible battery may increase the risk of fire or explosion. Replace the
battery only with a compatible battery purchased from Dell. The lithium-ion battery is designed to work
with your Dell computer. Do not use a battery from other computers with your computer.
CAUTION: Do not dispose of batteries with household waste. When your battery no longer holds a
charge, call your local waste disposal or environmental agency for advice on disposing of a lithium-ion
battery. See "Battery Disposal" in the Product Information Guide.
CAUTION: Misuse of the battery may increase the risk of fire or chemical burn. Do not puncture,
incinerate, disassemble, or expose the battery to temperatures above 65°C (149°F). Keep the battery
away from children. Handle damaged or leaking batteries with extreme care. Damaged batteries may
leak and cause personal injury or equipment damage.
User’s Guide
.
Checking the Battery Charge
The Dell QuickSet Battery Meter, the Microsoft® Windows®
the battery charge gauge and health gauge, and the low-battery warning provide information on the
battery charge.
For more information about checking the charge on the second battery, see your
Dell™ QuickSet Battery Meter
If Dell QuickSet is installed, press <Fn><F8> to display the QuickSet Battery Meter.
The
Battery Meter
in your computer.
NOTE: You can use your docking device to charge a computer battery. However, a battery in a docking
device does not power the docking device or computer.
10 Dell Precision Mobile Workstation M20 Quick Reference Guide
window displays status, charge level, and charge completion time for the battery
Power Meter
window and icon,
User’s Guide
.
Page 11

In addition, when your computer is connected to a docking device (docked), the
window includes a
Dock Battery
tab, which displays the charge level and current status of the
Battery Meter
docking device battery.
The following icons appear in the
• The computer or docking device is running on battery power.
• The battery is discharging or idle.
• The computer or docking device is connected to an electrical outlet and
running on AC power.
• The battery is charging.
• The computer or docking device is connected to an electrical outlet and
running on AC power.
• The battery is discharging, idle, or charging.
For more information about QuickSet, right-click the icon in the taskbar, and click
Battery Meter
window:
Help
.
Microsoft® Windows® Power Meter
The Windows Power Meter indicates the remaining battery charge. To check the Power Meter,
double-click the icon on the taskbar. For more information about the
your
User’s Guide
.
If the computer is connected to an electrical outlet, a icon appears.
Power Meter
tab, see
Charge Gauge
Before you insert a battery, press the status button on the battery charge gauge to illuminate the
charge-level lights. Each light represents approximately 20 percent of the total battery charge. For
example, if the battery has 80 percent of its charge remaining, four of the lights are on. If no lights
appear, the battery has no charge.
Dell Precision Mobile Workstation M20 Quick Reference Guide 11
Page 12

www.dell.com | support.dell.com
Health Gauge
The battery operating time is largely determined by the number of times it is charged. After
hundreds of charge and discharge cycles, batteries lose some charge capacity, or battery health. To
check the battery health, press and hold the status button on the battery charge gauge for at least 3
seconds. If no lights appear, the battery is in good condition, and more than 80 percent of its
original charge capacity remains. Each light represents incremental degradation. If five lights
appear, less than 60 percent of the charge capacity remains, and you should consider replacing the
battery. See your
Low-Battery Warning
NOTICE: To avoid losing or corrupting data, save your work immediately after a low-battery warning.
Then connect the computer to an electrical outlet, or install a second battery in the module bay. If the
battery runs completely out of power, hibernate mode begins automatically.
A pop-up window warns you when the battery charge is approximately 90 percent depleted. For
more information about low-battery alarms, see your
A low-battery warning occurs when the battery charge is approximately 90 percent depleted. The
computer beeps once, indicating that minimal battery operating time remains. During that time,
the speaker beeps periodically. If two batteries are installed, the low-battery warning means that the
combined charge of both batteries is approximately 90 percent depleted. The computer enters
hibernate mode when the battery charge is at a critically low level. For more information about lowbattery alarms, see your
User’s Guide
User’s Guide
for more information about the battery operating time.
User’s Guide
.
.
12 Dell Precision Mobile Workstation M20 Quick Reference Guide
Page 13

Charging the Battery
NOTE: The AC adapter charges a completely discharged battery in approximately 1 hour with the
computer turned off. Charge time is longer with the computer turned on. You can leave the battery in the
computer as long as you like. The battery’s internal circuitry prevents the battery from overcharging.
When you connect the computer to an electrical outlet or install a battery while the computer is
connected to an electrical outlet, the computer checks the battery charge and temperature. If
necessary, the AC adapter then charges the battery and maintains the battery charge.
If the battery is hot from being used in your computer or being in a hot environment, the battery
may not charge when you connect the computer to an electrical outlet.
The battery is too hot to start charging if the light flashes alternately green and orange.
Disconnect the computer from the electrical outlet and allow the computer and the battery to cool
to room temperature. Then connect the computer to an electrical outlet to continue charging the
battery.
For more information about resolving problems with a battery, see your
User’s Guide
.
Removing a Battery
CAUTION: Before performing these procedures, disconnect the modem from the telephone wall jack.
For information about removing the second battery, see your
NOTICE: If you choose to replace the battery with the computer in standby mode, you have up to 1
minute to complete the battery replacement before the computer shuts down and loses any unsaved
data.
Ensure that the computer is turned off, suspended in a power management mode, or
1
connected to an electrical outlet.
2
If the computer is connected to a docking device (docked), undock it. See the documentation
that came with your docking device for instructions.
3
Slide and hold the battery-bay (or module-bay) latch release on the bottom of the computer,
and then remove the battery from the bay.
User’s Guide
.
Dell Precision Mobile Workstation M20 Quick Reference Guide 13
Page 14

www.dell.com | support.dell.com
Installing a Battery
Slide the battery into the bay until the latch release clicks.
For information about installing the second battery, see your
Storing a Battery
Remove the battery when you store your computer for an extended period of time. A battery
discharges during prolonged storage. After a long storage period, charge the battery fully before you
use it.
User’s Guide
.
14 Dell Precision Mobile Workstation M20 Quick Reference Guide
Page 15

About Your Computer
Front View
keyboard and
wireless status lights
mute button
display
power button
volume control
buttons
track stick
track stick/touch
pad button
device status
lights
keyboard
touch pad
display
latch
speakers
Dell Precision Mobile Workstation M20 Quick Reference Guide 15
Page 16

Left View
www.dell.com | support.dell.com
security cable slot
PC Card
slot
audio
connectors (2)
smart card
slot
infrared sensor
16 Dell Precision Mobile Workstation M20 Quick Reference Guide
Page 17

Right View
module bay
device latch
release
USB
connectors (2)
Dell Precision Mobile Workstation M20 Quick Reference Guide 17
Page 18
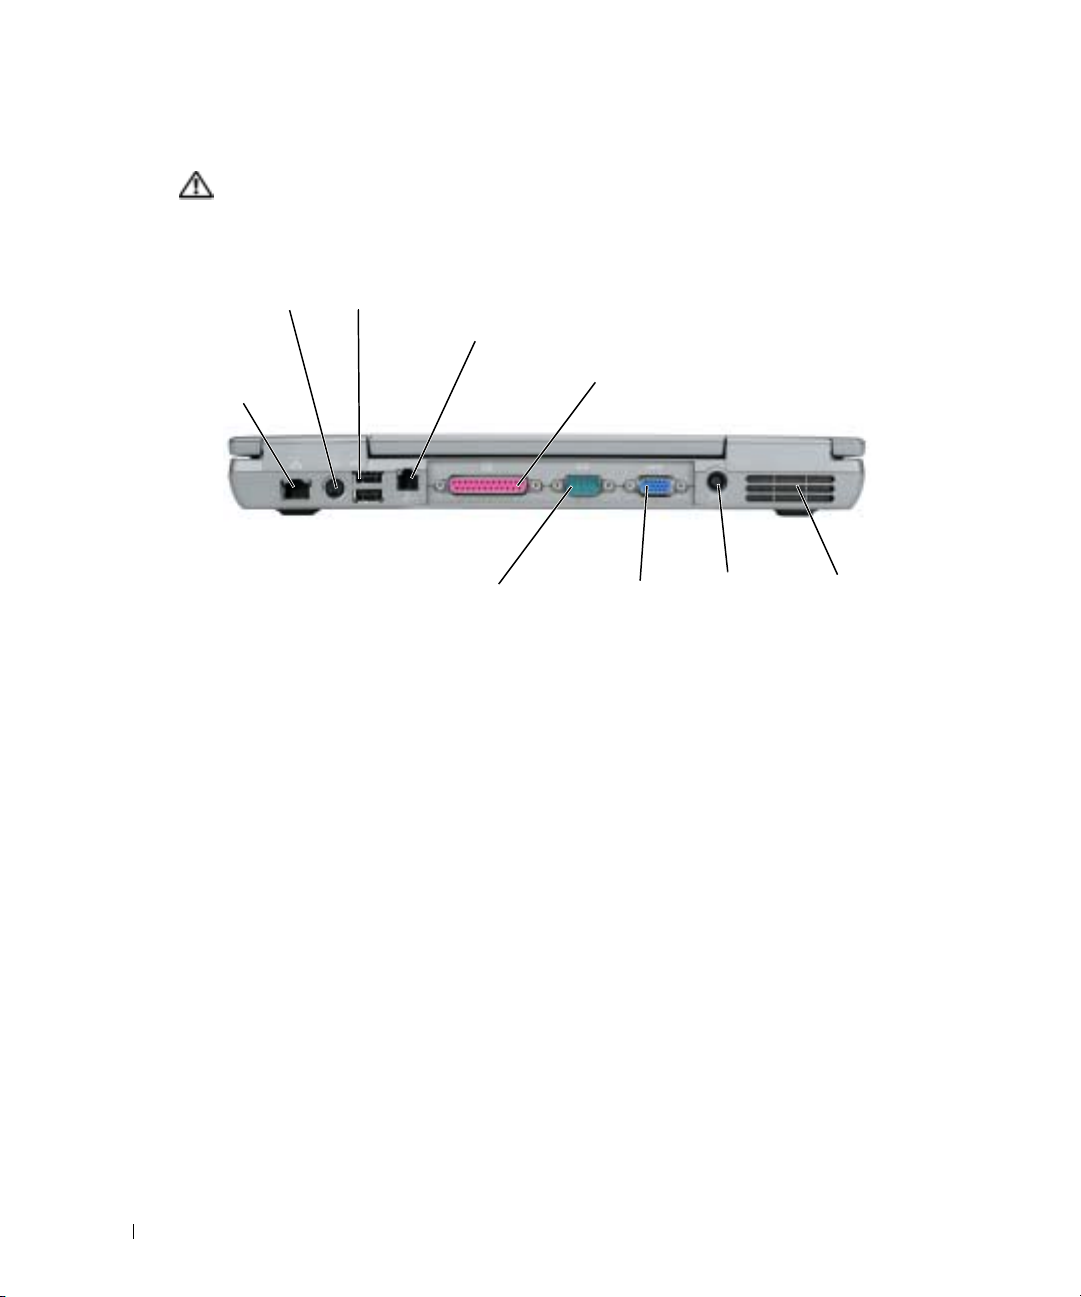
Back View
CAUTION: Do not block, push objects into, or allow dust to accumulate in the air vents. Do not store
your computer in a low-airflow environment, such as a closed briefcase, while it is running. Restricting
the airflow can damage the computer or cause a fire.
S-video TV-out
connector
network
connector
(RJ-45)
www.dell.com | support.dell.com
USB connectors (2)
modem connector (RJ-11)
serial connector
parallel connector
video connector
AC adapter
connector
air vents
18 Dell Precision Mobile Workstation M20 Quick Reference Guide
Page 19

Bottom View
hard drive
modem cover
fan
memory module cover
battery-bay latch
release
docking device slot
battery charge gauge
battery
Solving Problems
Notebook System Software
Notebook System Software (NSS) is a utility that provides critical updates for your operating
system. Install the NSS program to gain support for Dell 3.5-inch USB floppy drives, Intel
Pentium
®
M processors, optical drives, and USB devices. NSS is necessary for correct operation of
your Dell portable computer.
NOTICE: NSS is critical for the correct operation of USB devices, including the Dell D/Bay, D/Dock,
D/Port, and D/View devices.
Dell Precision Mobile Workstation M20 Quick Reference Guide 19
®
Page 20

Lockups and Software Problems
CAUTION: Before you begin any of the procedures in this section, follow the safety instructions in the
Product Information Guide.
The computer does not start up
ENSURE THAT THE AC ADAPTER IS FIRMLY CONNECTED TO THE COMPUTER AND TO THE
LECTRICAL OUTLET
E
The computer stops responding
www.dell.com | support.dell.com
NOTICE: You might lose data if you are unable to perform an operating system shutdown.
TURN THE COMPUTER OFF — If you are unable to get a response by pressing a key on your keyboard or
moving your mouse, press and hold the power button for at least 8 to 10 seconds until the computer
turns off. Then restart your computer.
A program stops responding
END THE PROGRAM —
1
Press <Ctrl><Shift><Esc> simultaneously.
2
Click
Applications
3
Click the program that is no longer responding.
4
Click
End Task
A program crashes repeatedly
NOTE: Software usually includes installation instructions in its documentation or on a floppy disk or CD.
CHECK THE SOFTWARE DOCUMENTATION — If necessary, uninstall and then reinstall the program.
.
.
20 Dell Precision Mobile Workstation M20 Quick Reference Guide
Page 21

A program is designed for an earlier Windows operating system
IF YOU ARE USING WINDOWS XP, RUN THE PROGRAM COMPATIBILITY WIZARD —
The Program Compatibility Wizard configures a program so it runs in an environment similar to nonWindows XP operating system environments.
1
Click the
Wizard
2
In the welcome screen, click
3
Follow the instructions on the screen.
Start
button, point to
.
All Programs→ Accessories
Next
.
, and then click
Program Compatibility
A solid blue screen appears
TURN THE COMPUTER OFF — If you are unable to get a response by pressing a key on your keyboard or
moving your mouse, press and hold the power button for at least 8 to 10 seconds until the computer
turns off. Then restart your computer.
Other software problems
CHECK THE SOFTWARE DOCUMENTATION OR CONTACT THE SOFTWARE MANUFACTURER FOR
TROUBLESHOOTING INFORMATION —
• Ensure that the program is compatible with the operating system installed on your computer.
• Ensure that your computer meets the minimum hardware requirements needed to run the software. See
the software documentation for information.
• Ensure that the program is installed and configured properly.
• Verify that the device drivers do not conflict with the program.
• If necessary, uninstall and then reinstall the program.
BACK UP YOUR FILES IMMEDIATELY
USE A VIRUS-SCANNING PROGRAM TO CHECK THE HARD DRIVE, FLOPPY DISKS, OR CDS
SAVE AND CLOSE ANY OPEN FILES OR PROGRAMS AND SHUT DOWN YOUR COMPUTER THROUGH THE
MENU
Start
Dell Precision Mobile Workstation M20 Quick Reference Guide 21
Page 22

SCAN THE COMPUTER FOR SPYWARE —If you are experiencing slow computer performance, you
frequently receive pop-up advertisements, or you are having problems connecting to the Internet, your
computer might be infected with spyware. Use an anti-virus program that includes anti-spyware
protection (your program may require an upgrade) to scan the computer and remove spyware. For more
information, go to support.dell.com and search for the keyword spyware.
RUN THE DELL DIAGNOSTICS FROM YOUR DRIVERS AND UTILITIES CD — If all tests run
successfully, the error condition is related to a software problem.
Running the Dell Diagnostics
www.dell.com | support.dell.com
CAUTION: Before you begin any of the procedures in this section, follow the safety instructions
located in the Product Information Guide.
When to Use the Dell Diagnostics
If you experience a problem with your computer, perform the checks in "Solving Problems" and run
the Dell Diagnostics before you contact Dell for technical assistance.
It is recommended that you print these procedures before you begin.
NOTICE: The Dell Diagnostics works only on Dell™ computers.
Enter system setup, review your computer’s configuration information, and ensure that the device
you want to test displays in system setup and is active.
Start the Dell Diagnostics from either your hard drive or from the
known as the
ResourceCD
Drivers and Utilities
CD (also
).
Starting the Dell Diagnostics From Your Hard Drive
The Dell Diagnostics is located on a hidden diagnostic utility partition on your hard drive.
NOTE: If your computer cannot display a screen image, see the "Contacting Dell" section in your online
User’s Guide.
Shut down the computer. Turn on (or restart) your computer.
1
2
If the computer is connected to a docking device (docked), undock it. See the documentation
that came with your docking device for instructions.
3
Connect the computer to an electrical outlet.
4
Turn on the computer. When the DELL™ logo appears, press <F12> immediately.
NOTE: If you do not press <F12> quickly enough and the Windows logo appears, wait for the computer to
finish restarting, and then shut down and restart the computer again.
NOTE: If you cannot see anything on your display, hold down the mute button and press the computer’s
power button to begin the Dell Diagnostics. The computer automatically runs the Pre-boot System
Assessment.
22 Dell Precision Mobile Workstation M20 Quick Reference Guide
Page 23

NOTE: If you see a message stating that no diagnostics utility partition has been found, run the Dell
Diagnostics from your Drivers and Utilities CD.
5
When the boot device list appears, highlight
Diagnostics
and press <Enter>.
The computer runs the Pre-boot System Assessment, a series of initial tests of your system
board, keyboard, hard drive, and display.
• During the assessment, answer any questions that appear.
• If a failure is detected, the computer stops and beeps. To stop the assessment and restart
the computer, press <n>; to continue to the next test, press <y>; to retest the
component that failed, press <r>.
• If failures are detected during the Pre-boot System Assessment, write down the error
code(s) and see "Contacting Dell" in your online
User’s Guide
before continuing on to
the Dell Diagnostics.
If the Pre-boot System Assessment completes successfully, you receive the following message:
Booting Dell Diagnostic Utility Partition. Press any key to continue
6
Press any key to start the Dell Diagnostics from the diagnostics utility partition on your hard
drive.
Starting the Dell Diagnostics From the Drivers and Utilities CD
NOTE: The Drivers and Utilities CD is optional and may not ship with all computers. To start the Dell
Diagnostics, see the previous procedure.
Insert the
1
2
Shut down and restart the computer.
Drivers and Utilities
CD.
.
NOTE: If you do not press <F12> quickly enough and the Windows logo appears, wait for the computer to
finish restarting and repeat step 2.
When the DELL logo appears, press <F12> immediately.
3
NOTE: The next steps change the boot sequence for one time only. On the next start-up, the computer
boots according to the devices specified in system setup.
4
When the boot device list appears, highlight
5
Select the
6
Select the
7
Ty p e 1 to start the
8
Ty p e 2 to start the Dell Diagnostics.
9
Select
CD/DVD/CD-RW Drive
Boot from CD-ROM
ResourceCD
option from the CD boot menu.
option from the menu that appears.
menu.
Run the 32 Bit Dell Diagnostics
CD/DVD/CD-RW Drive
and press <Enter>.
from the numbered list. If multiple versions are listed,
select the version appropriate for your computer.
10
When the Dell Diagnostics
Main Menu
Dell Precision Mobile Workstation M20 Quick Reference Guide 23
appears, select the test you want to run.
Page 24

Dell Diagnostics Main Menu
1
After the Dell Diagnostics loads and the
option you want.
Option Function
Express Test Performs a quick test of devices. This test typically takes
Extended Test Performs a thorough check of devices. This test typically
www.dell.com | support.dell.com
Custom Test Tests a specific device. You can customize the tests you
Symptom Tree Lists the most common symptoms encountered and
2
If a problem is encountered during a test, a message appears with an error code and a
description of the problem. Write down the error code and problem description and follow
the instructions on the screen.
If you cannot resolve the error condition, see the "Contacting Dell" section of your online
User’s Guide
Main Menu
10 to 20 minutes and requires no interaction on your
part. Run Express Test first to increase the possibility of
tracing the problem quickly.
takes 1 hour or more and requires you to answer
questions periodically.
want to run.
allows you to select a test based on the symptom of the
problem you are having.
screen appears, click the button for the
.
NOTE: The Service Tag for your computer is located at the top of each test screen. If you contact Dell,
technical support will ask for your Service Tag.
If you run a test from the
3
Custom Test
or
Symptom Tree
described in the following table for more information.
Tab Function
Results Displays the results of the test and any error conditions
encountered.
Errors Displays error conditions encountered, error codes, and
the problem description.
Help Describes the test and may indicate requirements for
running the test.
24 Dell Precision Mobile Workstation M20 Quick Reference Guide
option, click the applicable tab
Page 25

Ta b Function
Configuration Displays your hardware configuration for the selected
device.
The Dell Diagnostics obtains configuration information
for all devices from system setup, memory, and various
internal tests, and it displays the information in the
device list in the left pane of the screen. The device list
may not display the names of all the components
installed on your computer or all devices attached to your
computer.
Parameters Allows you to customize the test by changing the test
settings.
4
When the tests are completed, if you are running the Dell Diagnostics from the
Utilities
5
When the tests are complete, close Close the test screen to return to the
To exit the Dell Diagnostics and restart the computer, close the
CD, remove the CD.
Main Menu
Drivers and
Main Menu
screen.
screen.
Dell Precision Mobile Workstation M20 Quick Reference Guide 25
Page 26

www.dell.com | support.dell.com
26 Dell Precision Mobile Workstation M20 Quick Reference Guide
Page 27

Index
B
battery
charge gauge, 11
charging, 13
checking the charge, 10
health gauge, 12
installing, 14
low-battery warning, 12
performance, 9
power meter, 11
removing, 13
storing, 14
C
CD
operating system, 7
computer
crashes, 20-21
slow performance, 22
stops responding, 20
D
Dell
support site, 6
Dell Diagnostics, 22
Dell Premier Support
website, 5-6
diagnostics
Dell, 22
Drivers and Utilities CD, 5
documentation
device, 5
online, 6
ResourceCD, 5
System Information Guide, 5
User’s Guide, 5
drivers
ResourceCD, 5
Drivers and Utilities CD, 5
H
hardware
Dell Diagnostics, 22
Help and Support Center, 7
L
labels
Microsoft Windows, 6
Service Tag, 6
M
Microsoft Windows label, 6
O
Operating System
CD, 7
Installation Guide, 7
Operating System CD, 7
P
problems
blue screen, 21
computer crashes, 20-21
computer does not start up, 20
computer stops responding, 20
Dell Diagnostics, 22
lockups, 20
program crashes, 20
program stops responding, 20
programs and Windows
compatibility, 21
slow computer
performance, 22
software, 20-21
spyware, 22
R
reinstalling
Drivers and Utilties CD, 5
ResourceCD, 5
ResourceCD
Dell Diagnostics, 22
Index 27
Page 28

S
U
safety instructions, 5
Service Tag, 6
software
problems, 21
spyware, 22
system views
bottom, 19
right side, 17
T
troubleshooting
Dell Diagnostics, 22
Help and Support Center, 7
User’s Guide, 5
W
warranty, 5
Windows XP
Help and Support Center, 7
Program Compatibility
Wizard, 21
wizards
Program Compatibility
Wizard, 21
28 Index
Page 29

Dell Precision™
Mobil arbejdsstation M20
Hurtig Referenceguide
www.dell.com | support.dell.com
Page 30

Bemærkninger, meddelelser og advarsler
BEMÆRK: En BEMÆRKNING angiver vigtige oplysninger, som du kan bruge for at udnytte computeren optimalt.
MEDDELELSE: En MEDDELELSE angiver enten en mulig beskadigelse af hardware eller tab af data og oplyser dig om,
hvordan du kan undgå dette problem.
ADVARSEL: En ADVARSEL angiver mulig tingskade, legemsbeskadigelse eller død.
Forkortelser og akronymer
For en komplet liste over forkortelser og akronymer, henvises til din online
Brugerhåndbogen, (afhængigt af operativsystemet), enten dobbeltklik på ikonen
eller klik på
system guides
-knappen, klik på
(Brugerhåndbog og systemvejledninger).
Help and Support Center
(Supportcenter) og klik derefter på
Start
Hvis du købte en Dell™ Series computer, er eventuelle referencer i dette dokument til Microsoft
Brugerhåndbog
Brugerhåndbog
. For adgang til
på skrivebordet
User and
®
Windows®
operativsystemerne ikke gældende.
BEMÆRK: Visse funktioner er muligvis ikke tilgængelig på din computer eller i visse lande.
____________________
Oplysningerne i dette dokument kan ændres uden varsel.
© 2004 Dell Inc. Alle rettigheder forbeholdes.
Enhver form for gengivelse uden skriftlig tilladelse fra Dell Inc. er strengt forbudt.
Anvendte varemærker i denne tekst: Dell, DELL logoet ogDell Precision er varemærker, som tilhører Dell Inc.; Intel ogPe nt ium er registrerede
varemærker, som tilhører Intel Corporation; Microsoft og Windows er registrerede varemærker, som tilhører Microsoft Corporation.
Andre varemærker og firmanavne kan være brugt i dette dokument til at henvise til enten de fysiske eller juridiske personer, som gør krav på
mærkerne og navnene, eller til deres produkter. Dell Inc. fraskriver sig enhver tingslig rettighed, for så vidt angår varemærker og firmanavne,
som ikke er deres egne.
Oktober 2004 P/N T7623 Rev. A00
Page 31

Indholdsfortegnelse
Sådan finder du information . . . . . . . . . . . . . . . . . . . . . . . . 33
Opstilling af computeren
Batteriydelse
. . . . . . . . . . . . . . . . . . . . . . . . . . . . . . . 38
. . . . . . . . . . . . . . . . . . . . . . . . . . 37
Kontrol af batteriopladningen
Dell™ QuickSet batterimåler
Microsoft
Opladningsmeter
Helbredsmeter
®
Windows® strømmåler . . . . . . . . . . . . . . . . . . 40
. . . . . . . . . . . . . . . . . . . . . . . . . . . 40
. . . . . . . . . . . . . . . . . . . . . . . . . . . . 41
Advarsel om lavt batteri
Opladning af batteriet
Fjernelse af et batteri
Isætning af et batteri
Opbevaring af et batteri
Om computeren
. . . . . . . . . . . . . . . . . . . . . . . . . . . . . . . . 44
Forside
Venstre side
Visning fra højre
Visning af bagsiden
Underside
Problemløsning
. . . . . . . . . . . . . . . . . . . . . . . . . . . 42
. . . . . . . . . . . . . . . . . . . . . . . . . . . 42
. . . . . . . . . . . . . . . . . . . . . . . . . . . . 43
. . . . . . . . . . . . . . . . . . . . . . . . . . 43
. . . . . . . . . . . . . . . . . . . . . . . . . . . . . . 44
. . . . . . . . . . . . . . . . . . . . . . . . . . . . . 45
. . . . . . . . . . . . . . . . . . . . . . . . . . . 46
. . . . . . . . . . . . . . . . . . . . . . . . . . 47
. . . . . . . . . . . . . . . . . . . . . . . . . . . . . . 48
. . . . . . . . . . . . . . . . . . . . . . . . . . . . . . 48
Notebook System Software
Hængnings- og softwareproblemer
Kørsel af Dell Diagnostics
. . . . . . . . . . . . . . . . . . . . . . . 39
. . . . . . . . . . . . . . . . . . . . . . 39
. . . . . . . . . . . . . . . . . . . . . . . . 41
. . . . . . . . . . . . . . . . . . . . . . 48
. . . . . . . . . . . . . . . . . . 49
. . . . . . . . . . . . . . . . . . . . . . . 51
Index . . . . . . . . . . . . . . . . . . . . . . . . . . . . . . . . . . . . 55
Indholdsfortegnelse 31
Page 32

32 Indholdsfortegnelse
Page 33

Sådan finder du information
BEMÆRK: Visse egenskaber er muligvis ikke tilgængelig i visse lande
BEMÆRK: Yderligere information kan blive sendt med computeren.
Hvad søger du efter? Find det her
• Et diagnosticeringsprogram til computeren
• Drivere til computeren
• Dokumentation til computeren
• Dokumentationen til enheden
• Notebook System Software (NSS)
• Garantioplysninger
• Betingelser og vilkår (kun USA)
• Sikkerhedsinstruktioner
• Kontrolinformation
• Ergonomi-information
• Licensaftale for slutbrugere
Drivers and Utilities CD (også kaldet ResourceCD)
Dokumentationen og driverne er allerede installeret på
computeren. Du kan bruge cd'en til at geninstallere
drivere, køre Dell Diagnostics (Dell Diagnosticering) eller
få adgang til dokumentationen.
BEMÆRK: Drivere og dokumentationsopdateringer kan
findes på support.dell.com.
BEMÆRK: Cd'en Drivers and Utilities (Drivere og
hjælpeværktøjer) er ekstraudstyr og leveres muligvis ikke
med computeren.
Dell™ Produktinformation
På cd'en kan der være
readme-filer (Vigtigtfiler), som indeholder
sidste øjebliksopdateringer om tekniske
ændringer eller avanceret
teknisk
referencemateriale til
teknikere eller erfarne
brugere.
Dell Precision Mobil arbejdsstation M20 Hurtig Referenceguide 33
Page 34

Hvad søger du efter? Find det her
• Afmontering og udskiftning af dele
• Specifikationer
• Konfiguration af systemindstillinger
• Fejlfinding og løsning af problemer
User’s Guide (Brugerhåndbog)
Microsoft
(Hjælpe- og supportcenter)
1
2
User’s Guide (Brugerhåndbog) er kan også findes på
ekstra
www.dell.com | support.dell.com
• Servicemærke og ekspresservicekode
• Microsoft Windows licensetiket
Servicemærke og Microsoft Windows-licens
Disse etiketter er placeret i bunden af computeren.
•Anvend
• Indtast ekspressservicekoden for at anvise opkaldet, når
®
Windows® XP Help and Support Center
Klik på knappen
(Hjælp og support).
Support
Klik på
User and system guides
Start
(Start) og klik på
systeminformation) og klik på
(Brugerhåndbøger).
Drivers and Utilities
CD
.
servicemærket til at
identificere
computeren, når du
bruger
support.dell.com
eller
kontakter teknisk support.
du kontakter teknisk support.
Help and
(Brugerhåndbog og
User’s guides
34 Dell Precision Mobil arbejdsstation M20 Hurtig Referenceguide
Page 35

Hvad søger du efter? Find det her
• Løsninger — Fejlfinding ideer og tips, artikler fra
teknikere, kurser online, ofte spurgte spørgsmål
• Kundeforum — onlinediskussion med andre Dellkunder
• Opgraderinger — opgraderingoplysninger om
komponenter, f.eks. hukommelse, harddisken og
operativsystemet
Dell Support websted — support.dell.com
BEMÆRK: Vælg dit område for at se den relevante
supportside.
BEMÆRK: Kunder fra virksomheder, det offentlige og
uddannelsessystemet kan også bruge det tilpassede Dell
Premier Support websted på premier.support.dell.com.
Webstedet er muligvis ikke tilgængeligt i alle regioner.
• Kundeservice — Kontaktoplysninger, serviceopkald og
ordrestatus, garanti og reparationsoplysninger
• Service og support — Status på serviceopkald og
supporthistorie, servicekontrakt, diskussioner online
med teknisk support
• Reference — Computerdokumentation, detaljer om
denne computers konfiguration, produktspecifikationer
og hvidbøger
• Download — Godkendte drivere, programrettelser og
softwareopdateringer
• Notebook System Software (NSS)— Hvis du installerer
operativsystemet på computeren igen, bør du også
geninstallere NSS hjælpeprogram. NSS giver kritiske
opdateringer til operativsystemet og support til Dell™
3,5-tomme USB diskettedrev, Intel
®
Pentium®M
processorer, optiske drev og USB-enheder. NSS er
nødvendigt for korrekt drift af Dell computeren.
Softwaren detekterer automatisk computeren og
operativsystemet og installerer opdateringerne, som er
passende for konfigurationen.
• Brug af Windows XP
• Dokumentation til computeren
• Dokumentation for enheder (f.eks. et modem)
Windows Hjælp og Support Center
1
Klik på knappen
Support
2
Skriv et ord eller en sætning, der beskriver problemet, og
klik på pileikonet.
3
Klik på det emne, der beskriver problemet.
4
Følg vejledningen på skærmen.
Start
(Start) og klik på
(Hjælp og support).
Help and
Dell Precision Mobil arbejdsstation M20 Hurtig Referenceguide 35
Page 36

Hvad søger du efter? Find det her
• Geninstallation af operativsystemet
www.dell.com | support.dell.com
Cd'en Operating System (operativsystem)
Operativsystemet er allerede installeret på computeren.
Hvis operativsystemet skal installeres igen, anvendes
cd'en Operating System (Operativsystem). Se
Brugerhåndbogen for instruktioner.
BEMÆRK: Farven på din cd kan variere, afhængig af det
operativsystem, som du bestilte.
BEMÆRK: Cd'enOperating System (operativsystem) er
ekstra og vil måske ikke være afsendt sammen med alle
computere.
Efter du installerer
operativsystemet igen,
skal du bruge cd'en
Drivers and Utilities
(Drivere og
hjælpeværktøjer) for at
geninstallere driverne til
de enheder, der blev
leveret sammen med
computeren.
Operativsystemets
produktnøgleetikette.
36 Dell Precision Mobil arbejdsstation M20 Hurtig Referenceguide
Page 37

Opstilling af computeren
ADVARSEL: Før udførelse af nogle af procedurerne i dette afsnit, skal sikkerhedsinstruktionerne i
Produktinformationsguiden følges.
1
Åbn æsken med tilbehør, og tag delene ud.
2
Tag de dele fra, som du skal bruge, når du opstiller computeren.
Æsken med tilbehør indeholder også brugerdokumentation, programmer og ekstra hardware
(f.eks. PC Cards, drev eller batterier), som du har bestilt.
3
Tilslut vekselstrømsadapteren til vekselstrømsadapterstikket på computeren og til
stikkontakten.
Dell Precision Mobil arbejdsstation M20 Hurtig Referenceguide 37
Page 38

4
Tænd for computerskærmen, og tryk på tænd/sluk-knappen for at tænde computeren.
www.dell.com | support.dell.com
tænd/sluk-knap
BEMÆRK: Tilslut ikke computeren til dockingenheden, før computeren er blevet slukket og lukket ned
mindst en gang.
Batteriydelse
ADVARSEL: Før udførelse af nogle af procedurerne i dette afsnit, skal sikkerhedsinstruktionerne i
Produktinformationsguiden følges.
BEMÆRK: Batterier til bærbare computere er kun dækket under den indledende 1-årige periode af
computerens begrænsede garanti. For mere information om Dell garantien for computeren, se
Produktinformationsguiden eller garantidokumentet på et stykke separat papir, som blev sendt med
computeren.
For optimal computerpræstation og til at hjælpe med beholde BIOS-indstillinger, brug Dell™
bærbar computeren med det primære batteri installeret på alle tidspunkter. Brug et batteri til at
bruge computeren, når den ikke er sluttet til en stikkontakt. Et batteri følger med som standard
udstyr i batteribåsen.
BEMÆRK: Batteriets driftstid (den tid et batteri kan holde en opladning) formindskes med tiden.
Afhængigt af hvor ofte batteriet anvendes, og tilstandene, det bliver anvendt under, kan det være
nødvendigt at købe et nyt batteri i løbet af computerens levetid.
38 Dell Precision Mobil arbejdsstation M20 Hurtig Referenceguide
Page 39

Batteriets driftstid varierer afhængigt af driftstilstandene. Du kan installere et ekstra andet batteri i
modulbåsen, hvilket vil øge driftstiden betragteligt. For mere information om det andet batteri
henvises til
User’s Guide
(Brugerhåndbogen).
Driftstid reduceres betragteligt, når du udfører funktioner inkl., men ikke begrænset til, følgende:
• Brug af optiske drev, som f.eks. dvd- og cd-drev
• Brug af trådløse kommunikationsenheder, pc-kort eller USB-enheder
• Brug af displayindstillinger med høj lysstyrke, 3D-screensavers eller andre strømslugende
programmer, som f.eks. 3D-spil
• Når computeren køres i maksimum ydelsestilstand
BEMÆRK: Det anbefales, at computeren tilsluttes en stikkontakt, når der skrives til en cd eller dvd.
Du kan kontrollere batteriets opladning, før du sætter batteriet i computeren. Du kan også indstille
strømstyringsoptionerne for at gøre dig opmærksom, når batteriopladningen er lav.
ADVARSEL: Brug af et inkompatibelt batteri kan øge risikoen for brand eller eksplosion. Udskift kun
batteriet med et kompatibelt batteri, som er købt fra Dell. Lithium-ion-batteriet er beregnet til at fungere
med Dell computeren. Brug ikke et batteri fra andre computere med denne computer.
ADVARSEL: Batterier bør ikke bortskaffes sammen med køkkenaffald. Når batteriet ikke holder en
opladning mere, kontaktes det lokale renovationsfirma med henblik på råd vedr. bortskaffelse af et
lithium-ion batteri. Se "Bortskaffelse af batteri" i Produktinformationsvejledning.
ADVARSEL: Misbrug af batteriet kan øge risikoen for brand eller kemisk forbrænding. Batteriet må
ikke punkteres, forbrændes, adskilles eller udsættes for temperaturer over 65°C. Batteriet opbevares
utilgængeligt for børn. Håndter et beskadiget eller utæt batteri med stor forsigtighed. Beskadigede
batterier kan lække og medføre personskade eller skade på udstyret.
Kontrol af batteriopladningen
Dell QuickSet batterimåleren, vinduet Microsoft® Windows®
batteriopladningsmåleren og helbredsmåler, og advarslen om lavt batteri giver oplysninger om
batteriopladningen.
For mere information om kontrol af opladningen på det andet batteri, henvises til
(Brugerhåndbog).
Dell™ QuickSet batterimåler
Hvis Dell QuickSet er installeret, tryk på <Fn><F8> for at vise QuickSet batterimåleren.
Vinduet
batterimåler
BEMÆRK: Du kan bruge tildockingsenheden til at oplade et computerbatteri. Et batteri i en
tildockingsenhed driver imidlertid ikke tildockingsenheden eller computeren.
viser status, opladningsniveau samt opladningstid for batteriet i computeren.
Dell Precision Mobil arbejdsstation M20 Hurtig Referenceguide 39
strømmåler
og ikon,
User’s Guide
Page 40

Desuden, når computeren er tilsluttet en tildockingsenhed (tildocket), inkluderer vinduet
Batterimåler
et faneblad
for tildockingenhedens batteri.
Følgende ikoner vises i vinduet
• Computeren eller tildockingenheden kører på batteri.
• Batteriet aflader eller hviler.
• Computeren eller tildockingenheden er tilsluttet en stikkontakt og kører på
AC-netstrøm.
• Batteriet lader.
www.dell.com | support.dell.com
• Computeren eller tildockingenheden er tilsluttet en stikkontakt og kører på
AC-netstrøm.
• Batteriet aflader, hviler eller lader.
For mere information om QuickSet, højreklik på ikonen i proceslinjen
Microsoft® Windows® strømmåler
Windows strømmåler angiver den resterende batteriopladning. For at kontrollere strømmåleren,
dobbeltklik på ikonen på proceslinjen. For mere information om fanebladet
henvises til
Hvis computeren er tilsluttet en stikkontakt, vises en ikon.
User’s Guide
Tildockingsbatteri
Batterimåler
(Brugerhåndbogen).
, som viser opladningsniveauet og den aktuelle status
:
Help
(Hjælp).
Strømmåler
Opladningsmeter
Før du sætter et batteri i, tryk på statusknappen på batteriets opladningsmeter for at tænde for
lamperne til opladningsniveauet. Hver lampe repræsenterer ca. 20 procent af den totale
batteriopladning. Hvis batteriet f.eks. har 80 procent tilbage af sin opladning, er fire lamper tændt.
Hvis ingen lamper er tændt, har batteriet ingen opladning.
40 Dell Precision Mobil arbejdsstation M20 Hurtig Referenceguide
Page 41

Helbredsmeter
Batteriets driftstid afgøres hovedsagligt af det antal gange det oplades. Efter hundrevis af
opladnings- og afladningscykler, mister batterier en vis opladningskapacitet eller helbred. For at
kontrollere batteriets helbred, tryk og hold på statusknappen på batteriets opladningsmeter i
mindst 3 sekunder. Hvis ingen lamper kommer frem, er batteriet i god tilstand og der er mere end
80 procent af den originale opladningskapacitet tilbage. Hver lampe repræsenterer trinvis
degradering. Hvis fem lamper vises, er der mindre end 60 procent af opladningskapaciteten tilbage,
og du bør overveje at udskifte batteriet. Se
Brugerhåndbogen
for mere information om batteriets
driftstid.
Advarsel om lavt batteri
MEDDELELSE: For at undgå at tabe eller få korrupt data, skal arbejde gemmes øjeblikkeligt efter en
advarsel om lavt batteri. Tilslut derefter computeren til en stikkontakt eller sæt et andet batteri i
modulbåsen. Hvis batteriet løber totalt tørt, starter hviletilstand automatisk.
Et pop-up-vindue advarer dig, når batteriopladningen er ca. 90 procent opbrugt. For mere
information om alarmer om lavt batteri, henvises til
En advarsel om lavt batteri forekommer, når batteriopladningen er ca. 90 procent opbrugt.
Computeren bipper en gang, hvilket angiver, at der er minimal batteri-driftstid tilbage. I det
tidsrum bipper højttaleren med mellemrum. Hvis der er to sat to batterier i, betyder advarslen om
lavt batteri, at den samlede opladning af begge batterier er ca. 90 procent opbrugt. Computeren går
i hviletilstand, når batteriopladningen er på et kritisk lavt niveau. For mere information om alarmer
om lavt batteri, henvises til
Brugerhåndbogen
.
Brugerhåndbogen
.
Dell Precision Mobil arbejdsstation M20 Hurtig Referenceguide 41
Page 42

Opladning af batteriet
BEMÆRK: AC-adapteren oplader et helt afladt batteri på ca. 1 time, når computeren er slukket.
Opladningstiden er længere med computeren tændt. Du kan efterlade batteriet i computeren så længe,
du vil. Batteriets interne kredsløb forhindrer batteriet i at overoplade.
Når du slutter computeren til en stikkontakt, eller installerer et batteri, mens computeren er
tilsluttet en stikkontakt, kontrollerer computeren batteriopladningen og temperaturen. ACadapteren oplader om nødvendigt batteriet og vedligeholder batteriopladningen.
Hvis batteriet er varmt fra brug i computeren eller fra at være i varme omgivelser, vil det muligvis
ikke oplade, når du slutter computeren til en stikkontakt.
Batteriet er for varmt til at begynde opladning, hvis lampen blinker skiftevis grøn og orange.
www.dell.com | support.dell.com
Afbryd computeren fra stikkontakten og lad computeren og batteriet køle ned til stuetemperatur.
Tilslut derefter computeren til en stikkontakt for at fortsætte opladning.
For mere information om problemløsning med et batteri, henvises til
Fjernelse af et batteri
ADVARSEL: Inden du udfører disse procedurer, skal du tage modemkablet ud af telefonstikket i
væggen.
For information om fjernelse af det andet batteri, henvises til
MEDDELELSE: Hvis du vælger at udskifte batteriet, mens computeren er i standbytilstand, har du op til 1
minut til at udskifte batteriet i, før computeren slukkes, og du mister ikke-gemte data.
Kontroller, at computeren er slukket, afbrudt i strømstyringstilstand eller tilsluttet til en
1
stikkontakt.
2
Hvis computeren er tilsluttet til en dockingenhed, skal du tage den ud af enheden. Se den
dokumentation, der fulgte med dockingstationen, hvis du ønsker yderligere oplysninger.
3
Glid og hold frigørelseshåndtaget til batteribåsen (eller modulbåsen) på undersiden af
computeren og tag derefter batteriet ud af båsen.
Brugerhåndbogen
Brugerhåndbogen
.
.
42 Dell Precision Mobil arbejdsstation M20 Hurtig Referenceguide
Page 43

Isætning af et batteri
Skub batteriet ind i båsen, til låsehåndtaget klikker.
For information om installation af det andet batteri, henvises til
Brugerhåndbogen
.
Opbevaring af et batteri
Fjern batteriet, når du opbevarer computeren i længere tid. Et batteri aflader under længere
opbevaringstid. Efter en længere opbevaringsperiode skal batteriet oplades helt, før det bruges.
Dell Precision Mobil arbejdsstation M20 Hurtig Referenceguide 43
Page 44

Om computeren
Forside
statuslamper til
www.dell.com | support.dell.com
tastatur og trådløs
lydløs-knappen
skærm
tænd/slukknap
lydstyrkeknapper
trackstick
knap til
trackstick/touch pad
enhedstatuslamper
tastatur
pegeplad
skærmlås
højttalere
44 Dell Precision Mobil arbejdsstation M20 Hurtig Referenceguide
Page 45

Venstre side
stik til sikkerhedskabel
stik til PC Card
lydstik (2)
chipkortstik
infrarød sensor
Dell Precision Mobil arbejdsstation M20 Hurtig Referenceguide 45
Page 46

Visning fra højre
www.dell.com | support.dell.com
modulbås
frigørelseshåndtag
til enhed
USB-stik (2)
46 Dell Precision Mobil arbejdsstation M20 Hurtig Referenceguide
Page 47

Visning af bagsiden
ADVARSEL: Undgå at blokere, skubbe genstande ind i eller lade støv samle sig i ventilationshullerne.
Opbevar ikke computeren et sted med lav-luftgennemstrømning, f.eks. en lukket mappe eller taske, når
den er tændt. Dette kan beskadige computeren eller forårsage brand.
S-video TVout-stik
netværksstik
(RJ-45)
USB-stik (2)
seriel port
modemstik (RJ-11)
skærmstik
parallelport
vekselstrømsadapterstik
lufthuller
Dell Precision Mobil arbejdsstation M20 Hurtig Referenceguide 47
Page 48

Underside
dæksel til
hukommelsesmodul
harddisk
www.dell.com | support.dell.com
modemdæksel
blæser
frigørelseshåndtag
til batteribås
spændingsmåler til batteri
Batteri
åbning til docking-enhed
Problemløsning
Notebook System Software
Notebook System Software (NSS) er et hjælpeprogram, som yder kritiske opdateringer til
operativsystemet. Installér NSS-programmet for at få support til Dell 3,5-tomme USB diskettedrev,
®
Intel
Pentium® M processorer, optiske drev og USB-enheder. NSS er nødvendig for korrekt drift af
Dell bærbar computer.
MEDDELELSE: NSS er kritisk for korrekt drift af USB-enheder, deriblandt Dell D/Bay, D/Dock, D/Port og
D/View-enheder.
48 Dell Precision Mobil arbejdsstation M20 Hurtig Referenceguide
Page 49

Hængnings- og softwareproblemer
ADVARSEL: Før udførelse af nogle af procedurerne i dette afsnit, skal sikkerhedsinstruktionerne i
Produktinformationsguiden følges.
Computeren starter ikke op
SØRG FOR AT AC-ADAPTEREN ER FORSVARLIGT SAT I COMPUTEREN OG I STIKKONTAKTEN
Computeren reagerer ikke
MEDDELELSE: Du kan miste data, hvis du ikke kan udføre en nedlukning af operativsystemet.
SLUK FOR COMPUTEREN — Hvis du ikke får en reaktion ved at trykke på en tast på tastaturet eller
flytte musen, tryk og hold på strømknappen i mindst 8 til 10 sekunder, til computeren slukker. Genstart
derefter computeren.
Et program reagerer ikke
AFSLUT PROGRAMMET —
1
Tryk på<Ctrl><Shift><Esc> på samme tid.
2
Klik på
Programmer
3
Klik på programmet, som ikke længere reagerer.
4
Klik på
Afslut proces
.
.
Et program går ned gentagne gange
BEMÆRK: Software inkluderer som regel installationsinstruktioner i dokumentationen eller på en
diskette eller cd.
KONTROLLÉR SOFTWAREDOKUMENTATIONEN — Afinstallér og geninstallér om nødvendigt
programmet.
Dell Precision Mobil arbejdsstation M20 Hurtig Referenceguide 49
Page 50

Et program er beregnet til en tidligere version af Windows operativsystemet
HVIS DU BRUGER WINDOWS XP, KØR PROGRAMKOMPATIBILITETSGUIDEN —
Programkompatibilitetsguiden konfigurerer et program, så det kører i et miljø, der er lig med ikkeWindows XP operativsystemmiljøer.
1
Klik på knappen
Program Compatibility Wizard (Programkompatibilitetsguiden)
på
2
På velkomstskærmen, klik på
3
Følg vejledningen på skærmen.
Start
, peg på
All Programs (Alle programmer)→ Accessories (Tilbehør)
.
Next (Næste)
.
og klik derefter
www.dell.com | support.dell.com
En hel blå skærm kommer frem
SLUK FOR COMPUTEREN — Hvis du ikke får en reaktion ved at trykke på en tast på tastaturet eller
flytte musen, tryk og hold på strømknappen i mindst 8 til 10 sekunder, til computeren slukker. Genstart
derefter computeren.
Andre softwareproblemer
KONTROLLÉR SOFTWAREDOKUMENTATIONEN ELLER KONTAKT SOFTWAREPRODUCENTEN FOR
INFORMATION OM FEJLFINDING —
• Sørg for at programmet er kompatibelt med operativsystemet, som er installeret på computeren.
• Sørg for at computeren overholder minimum hardwarekravene, som er nødvendige til at køre softwaren.
Se softwaredokumentationen for information.
• Sørg for at programmet er installeret og konfigureret korrekt.
• Kontrollér at enhedsdrivere ikke er i konflikt med programmet.
• Afinstallér og geninstallér om nødvendigt programmet.
SIKKERHEDSKOPIÉR DINE FILER MED DET SAMME
BRUG ET VIRUSSCANNINGPROGRAM TIL AT KONTROLLERE HARDDISKEN, DISKETTER ELLER CD'ER
GEM OG LUK ALLE ÅBNE FILER ELLER PROGRAMMER OG LUK COMPUTEREN NED GENNEM Start-
MENUEN
50 Dell Precision Mobil arbejdsstation M20 Hurtig Referenceguide
Page 51

SCAN COMPUTEREN FOR SPYWARE —Hvis du er udsat for langsom computerydelse, og du
regelmæssigt modtager pop-up-reklamer eller hvis du har problemer med at få forbindelse til
internettet, er computeren muligvis inficeret med spyware. Brug et anti-virusprogram, som inkluderer
anti-spyware beskyttelse (programmet kræver muligvis en opgradering) til at scanne computeren og
fjerne spyware. For mere information, gå til support.dell.com og søg på nøgleordet spyware.
KØR DELL DIAGNOSTICS FRA CD' EN DRIVERS AND UTILITIES — Hvis alle tests lykkedes, er
fejltilstanden relateret til et softwareproblem.
Kørsel af Dell Diagnostics
ADVARSEL: Før udførelse af nogle af procedurerne i dette afsnit, skal sikkerhedsinstruktionerne i
Produktinformationsguiden følges.
Hvornår Dell Diagnostics (Dell diagnosticering) skal anvendes
Hvis du kommer ud for problemer med computeren, skal du udføre procedurerne i "Solving
Problems" (Problemløsning) og køre Dell Diagnostics (Dell Diagnosticering), før du kontakter Dell
for teknisk assistance.
Det anbefales at udskrive disse procedurer, før du begynder.
MEDDELELSE: Dell Diagnostics (Dell diagnosticering) fungerer kun på Dell™-computere.
Gå i systemets opsætning, gennemse informationen om computerens konfiguration og sørg for, at
enheden, som du vil teste, vises i systemets opsætning og er aktiv.
Start Dell Diagnostics fra enten harddisken eller fra cd'en
ResourceCD
).
Drivers and Utilities
(også kaldet
Start af Dell Diagnostics (Dell diagnosticering) fra harddisken
Dell Diagnostics (Dell Diagnosticering) findes på en skjult partition med diagnosticeringsværktøjer
på harddisken.
BEMÆRK: Hvis computeren ikke kan vise et skærmbillede, henvises til afsnittet "Sådan kontaktes Dell" i
din online Brugervejledning.
Luk computeren. Tænd (eller genstart) din computer.
1
2
Hvis computeren er tilsluttet til en dockingenhed, skal du tage den ud af enheden. Se den
dokumentation, der fulgte med dockingstationen, hvis du ønsker yderligere oplysninger.
3
Tilslut computeren til en stikkontakt.
4
Tænd computeren. Når DELL™-logoet vises, skal du trykke på <F12> med det samme.
BEMÆRK: Hvis du ikke trykker på <F12> hurtigt nok og Windows-logoet vises, vent da på at computeren
er færdig med at genstarte og luk den da ned og genstart computeren igen.
Dell Precision Mobil arbejdsstation M20 Hurtig Referenceguide 51
Page 52

BEMÆRK: Hvis du ikke kan se noget på skærmen, kan du holde lyddæmpningsknappen nede og trykke
på strømknappen for at starte Dell Diagnostics. Computeren kører automatisk en test af systemet før
start.
BEMÆRK: Hvis du ser en meddelelse om, at der ikke blev fundet en partition med
diagnosticeringsværktøjet, køres Dell Diagnostics fra cd'en Drivers and Utilities (Drivere og
hjælpeværktøjer).
Når startenhedslisten vises, skal du markere
5
Diagnostics
(Diagnosticering) og trykke på
<Enter>.
Computeren kører en vurdering af systemet før start, dvs. en række test af systemkortet,
tastaturet, harddisken og skærmen.
www.dell.com | support.dell.com
• Besvar eventuelle spørgsmål, der stilles under testen.
• Hvis der bliver fundet en fejl, stopper computeren og kommer med en biplyd. For at
stoppe vurderingen og genstarte computeren, tryk på <n>. For at fortsætte til den næste
test tryk på <y>. For at teste komponenten, som fejlede, igen, tryk på <r>.
• Hvis der registreres fejl under en vurdering af systemet før start, skal du notere
fejlkoden/koderne ned og se "Sådan kontaktesDell" i din online
fortsætter med Dell Diagnostics.
Hvis testen af systemet før start bliver fuldført uden fejl, modtager du følgende meddelelse:
Booting Dell Diagnostic Utility Partition. Press any key to continue.
(Start af partition med diagnosticeringsværktøjet Dell Diagnostic. Tryk
på en vilkårlig tast for at fortsætte)
6
Tryk på en vilkårlig tast for at starte Dell Diagnostics (Dell Diagnosticering) fra partitionen
med diagnosticeringsværktøjet på harddisken.
Start af Dell Diagnostics fra cd'en Drivers and Utilities (Drivere og hjælpeværktøjer)
BEMÆRK: Cd'enDrivere and Utilities (Drivere og hjælpeværktøjer) er ekstra og vil måske ikke være
afsendt sammen med alle computere. For at starte Dell Diagnostics, se den foregående procedure.
Indsæt cd'en
1
2
Luk computeren og genstart den.
BEMÆRK: Hvis du ikke trykker på <F12> hurtigt nok og Windows-logoet vises, vent da på at computeren
er færdig med at genstarte og gentag trin 2.
Når DELL-logoet vises, skal du trykke på <F12> med det samme.
3
Drivers and Utilities
.
(Drivere og hjælpeværktøjer).
Brugervejledning
før du
BEMÆRK: De næste trin ændrer kun boot-sekvensen denne ene gang. Ved den næste opstart, starter
computeren op i overensstemmelse med enhederne, som er specificeret i systemets opsætning.
4
Når listen med boot-enheder vises, fremhæv
5
Vælg optionen
6
Vælg optionen
CD/DVD/CD-RW Drive
Boot from CD-ROM
(Boot fra cd-rom) fra menuen, som vises.
CD/DVD/CD-RW-drev
(Cd-/dvd-/cd-rw-drev) fra cd'ens bootmenu.
52 Dell Precision Mobil arbejdsstation M20 Hurtig Referenceguide
og tryk på <Enter>.
Page 53

7
Skriv 1 for at starte menuen for
8
Skriv 2 for at starte Dell Diagnostics (Dell diagnosticering).
9
Væ lg
Run the 32 Bit Dell Diagnostics
ResourceCD
(Resurse-cd).
(Kør 32 bit Dell diagnosticering) fra den nummererede
liste. Hvis der er anført flere versioner, vælges versionen, som er passende for computeren.
10
Når Dell Diagnostics
Main Menu
(Hovedmenu for Dell diagnosticering) vises, vælg den test,
som du vil køre.
Dell Diagnostics Main Menu (Hovedmenu for Dell diagnosticering)
1
Når Dell Diagnostics (Dell Diagnosticering) er indlæst, og skærmbilledet
Main Menu
(Hovedmenu) vises, skal du klikke på knappen for den ønskede indstilling.
Valgmulighed Funktion
Eksprestest Udfører en hurtig test af enhederne. Testen tager typisk
10 til 20 minutter, og du behøver ikke at gøre noget. Run
Express Test (Kør eksprestest) først for at øge
muligheden for hurtigt at identificere problemet.
Udvidet test Udfører en grundig test af enhederne. Denne test varer
typisk 1 time eller længere og kræver at du med
mellemrum besvarer spørgsmål.
Brugerdefineret test Tester en bestemt enhed. Du kan tilpasse den test, der
skal køres.
Liste over symptomer Viser de mest almindelige symptomer, som oftest
forekommer og lader dig vælge en test baseret på
symptomet for det problem, du er udsat for.
>
2
Hvis der opdages et problem under en test, vises der en meddelelse med en fejlkode og en
beskrivelse af problemet. Skriv fejlkoden og beskrivelsen af problemet ned, og følg
vejledningen på skærmen.
Hvis du ikke kan løse fejltilstanden, henvises til afsnittet "Sådan kontaktesDell" i din online
Brugervejledning
BEMÆRK: Servicemærket til computeren findes øverst på hver testskærm. Hvis du kontakter Dell, vil
teknisk support bede om servicemærket.
Hvis du kører en test via indstillingen
3
(Liste over symptomer), skal du klikke på det relevante faneblad, som er beskrevet i
Tr ee
.
Custom Test
(Brugerdefineret test) eller via
Symptom
følgende tabel for at få yderligere oplysninger.
Fane Funktion
Resultater Her vises testresultaterne og de fejl, som opstod.
Dell Precision Mobil arbejdsstation M20 Hurtig Referenceguide 53
Page 54

Fane Funktion
Fejl Her vises, hvilke fejl der opstod, fejlkoder og beskrivelser
Hjælp Her får du en beskrivelse af testen og evt. hvilke krav, der
Konfiguration Her vises hardwarekonfigurationen for den valgte enhed.
www.dell.com | support.dell.com
Parametre Giver dig mulighed for at tilpasse testen ved at ændre
4
Når testerne er færdige, fjernes cd'en, hvis du kører Dell Diagnostics fra cd'en
Utilities
5
Når testerne er færdige, luk testskærmen for at vende tilbage til skærmen
(Hovedmenu). For at forlade Dell Diagnostics (Dell diagnosticering) og genstarte
computeren, luk skærmen
af problemet.
stilles til udførsel af testen.
Dell Diagnostics (Dell diagnosticering) henter
konfigurationsoplysningerne for alle enheder fra
systemets installation, hukommelse og forskellige interne
tests samt viser oplysningerne i enhedslisten i den
venstre rude på skærmen. Det er ikke sikkert, at alle
komponenter, som er installeret på computeren eller alle
enheder, som er tilsluttet til computeren, vises på listen
over enheder.
testindstillingerne.
Drivers and
.
Main Menu
Main Menu
(Hovedmenu).
54 Dell Precision Mobil arbejdsstation M20 Hurtig Referenceguide
Page 55

Index
B
batteri
advarsel om lavt batteri, 41
fjernelse, 42
helbredsmeter, 41
isætning, 43
kontrol af opladningen, 39
opbevaring, 43
opladning, 42
opladningsmeter, 40
strømmåler, 40
ydelse, 38
C
Cd
operativsystem, 36
Cd'en Operating System
(operativsystem), 36
computer
går ned, 49-50
langsom ydelse, 51
reagerer ikke, 49
D
Dell
supportside, 35
Dell Diagnostics, 51
Dell Premier Support
Website, 33
Dell Premier Support
websted, 35
diagnosticering
Dell, 51
diagnostisk
Drivers and Utilities CD, 33
-dokumentation
User’s Guide
(Brugerhåndbog), 34
dokumentation
device, 33
online, 35
ResourceCD, 33
Systeminformationsguide, 33
drivers
ResourceCD, 33
Drivers and Utilities CD, 33
E
etiketter
Microsoft Windows, 34
servicemærke, 34
F
Fejlfinding
Help og Support Center, 35
fejlfinding
Dell Diagnostics, 51
G
geninstallation
Cd'en Drivers and Utilties
(Drivere og
hjælpeværktøjer), 33
ResourceCD, 33
guider
Programkompatibilitetsguide,
50
H
hardware
Dell Diagnostics, 51
Hjælp og Support Center, 35
M
Microsoft Windows-etiket, 34
O
Operativsystem
cd, 36
operativsystem
Installation, 36
Index 55
Page 56

P
U
problemer
blå skærm, 50
computer går ned, 49-50
computeren reagerer ikke, 49
computeren starter ikke op, 49
Dell Diagnostics, 51
hængninger, 49
langsom computerydelse, 51
program går ned, 49
program reagerer ikke, 49
programmer og Windows
kompatibilitet, 50
software, 49-50
spyware, 51
R
ResourceCD
Dell Diagnostics, 51
S
User’s Guide
(Brugerhåndbog), 34
W
Windows XP
Hjælp og Support Center, 35
Programkompatibilitetsguide,
50
servicemærke, 34
sguidegaranti, 33
sikkerhedsinstruktioner, 33
software
problemer, 50
spyware, 51
systemvisninger
bunden, 48
højre side, 46
56 Index
Page 57

Station de travail mobile
Dell Precision™ M20
Guide de référence rapide
www.dell.com | support.dell.com
Page 58

Remarques, avis et précautions
REMARQUE : Une REMARQUE fournit des informations importantes qui vous aident à mieux utiliser votre ordinateur.
AVIS : Un AVIS vous avertit d’un risque de dommage matériel ou de perte de données et vous indique comment éviter le
problème.
PRÉCAUTION : Une PRÉCAUTION indique un risque potentiel de dommage matériel ou corporel, ou de mort.
Abréviations et sigles
Pour obtenir une liste complète des abréviations et des sigles, reportez-vous à votre
Pour accéder au Guide d'utilisation, double-cliquez sur l'icône
votre système d'exploitation, sur le bouton
guides
.
Si vous avez acheté un ordinateur Dell™ Série n, les références du présent document concernant les systèmes
d'application Microsoft
REMARQUE : Certaines fonctions ne sont pas nécessairement disponibles sur votre ordinateur ou dans tous les pays.
®
Windows® ne sont pas applicables.
Démarrer, Centre d'aide et de support
Guide d'utilisation
Guide d'utilisation
en ligne.
du bureau, ou encore, selon
, puis sur
User and system
____________________
Les informations contenues dans ce document sont sujettes à modification sans préavis.
© 2004 Dell Inc. Tous droits réservés.
La reproduction de ce document, de quelque manière que ce soit, sans l'autorisation écrite de Dell Inc. est strictement interdite.
Marques utilisées dans ce document : Dell, le logo DELL et Dell Precision sont des marques de Dell Inc. ; Intel et Pentium sont des marques
déposées d'Intel Corporation ; Microsoft et Windows sont des marques déposées de Microsoft Corporation.
D'autres marques et noms commerciaux peuvent être utilisés dans ce document pour faire référence aux entités se réclamant de ces marques
et de ces noms ou à leurs produits. Dell Inc. rejette tout intérêt propriétaire dans les marques et les noms commerciaux autres que les siens.
Octobre 2004 Réf. T7623 Rév. A00
Page 59

Table des matières
Recherche d'informations . . . . . . . . . . . . . . . . . . . . . . . . . 61
Configuration de votre ordinateur
Performances de la batterie
. . . . . . . . . . . . . . . . . . . . . . 64
. . . . . . . . . . . . . . . . . . . . . . . . 65
Vérification de la charge de la batterie
Jauge de batterie Dell QuickSet
. . . . . . . . . . . . . . . . . . . . 67
Jauge d'alimentation de Microsoft
Jauge de charge
Jauge d'état
Alerte de batterie faible
Chargement de la batterie
Retrait de la batterie
Installation d'une batterie
Stockage de la batterie
À propos de votre ordinateur
Vue frontale
Vue du côté gauche
Vue du côté droit
Vue arrière
Vue du dessous
Résolution des problèmes
Notebook System Software
. . . . . . . . . . . . . . . . . . . . . . . . . . . 68
. . . . . . . . . . . . . . . . . . . . . . . . . . . . . 68
. . . . . . . . . . . . . . . . . . . . . . . . 68
. . . . . . . . . . . . . . . . . . . . . . . . . 69
. . . . . . . . . . . . . . . . . . . . . . . . . . . . 69
. . . . . . . . . . . . . . . . . . . . . . . . . 70
. . . . . . . . . . . . . . . . . . . . . . . . . . 70
. . . . . . . . . . . . . . . . . . . . . . . . 71
. . . . . . . . . . . . . . . . . . . . . . . . . . . . . . 71
. . . . . . . . . . . . . . . . . . . . . . . . . . 72
. . . . . . . . . . . . . . . . . . . . . . . . . . . 73
. . . . . . . . . . . . . . . . . . . . . . . . . . . . . . 74
. . . . . . . . . . . . . . . . . . . . . . . . . . . . 75
. . . . . . . . . . . . . . . . . . . . . . . . . 75
. . . . . . . . . . . . . . . . . . . . . . 75
Problèmes de blocage et problèmes logiciels
Lancement de Dell Diagnostics
. . . . . . . . . . . . . . . . . . . . 78
. . . . . . . . . . . . . . . . . . . 67
®
Windows
®
. . . . . . . . . . . . 67
. . . . . . . . . . . . . . 76
Index . . . . . . . . . . . . . . . . . . . . . . . . . . . . . . . . . . . . 83
Table des matières 59
Page 60

60 Table des matières
Page 61

Recherche d'informations
REMARQUE : Certaines fonctions peuvent ne pas être disponibles dans certains pays
REMARQUE : Il est possible que des informations supplémentaires soient livrées avec votre ordinateur.
Que recherchez-vous ? Cherchez ici
• Un programme de diagnostic pour mon ordinateur
• Pilotes pour mon ordinateur
• La documentation de mon ordinateur
• Documentation concernant mon périphérique
• Notebook System Software (NSS)
• Informations sur les garanties
• Termes et Conditions (États-Unis uniquement)
• Consignes de sécurité
• Informations sur les réglementations
• Informations relatives à l'ergonomie
• Contrat de licence pour utilisateur final
CD Drivers and Utilities (Pilotes et utilitaires) (également appelé CD
ResourceCD)
La documentation et les pilotes sont déjà installés sur l'ordinateur.
Vous pouvez utiliser ce CD pour réinstaller les pilotes, exécuter
Dell Diagnostics, ou accéder à la documentation.
Des fichiers Lisez-moi peuvent
être inclus sur votre CD ; ces
fichiers fournissent des
informations sur les modifications
techniques de dernière minute
apportées à votre système ou des
informations de référence
destinées aux techniciens ou aux
utilisateurs expérimentés.
REMARQUE : Les dernières mises à jour des pilotes et de la
documentation se trouvent à l'adresse support.dell.com.
REMARQUE : Le CD Drivers and Utilities est en option et n'est pas
obligatoirement expédié avec tous les ordinateurs.
Guide d'information sur le produit Dell™
• Comment retirer et remplacer des pièces
• Caractéristiques
• Comment configurer les paramètres du système
• Comment déterminer et résoudre des problèmes
Guide de référence rapide de la station de travail mobile Dell Precision M20 61
Guide d'utilisation
®
Centre d'aide et de support Microsoft
1
Cliquez sur le bouton
2
Cliquez sur
système), puis sur
Le Guide d'utilisation est aussi disponible sur le CD optionnel
Drivers and Utilities
User and system guides
Démarrer
Guides d'utilisation
.
Windows® XP
, puis sur
Aide et support
(Guides d'utilisation du
.
.
Page 62

Que recherchez-vous ? Cherchez ici
• Numéro de service et code de service express
• Étiquette de licence Microsoft Windows
Numéro de service et licence Microsoft Windows
Ces étiquettes sont situées sur le dessous de votre ordinateur.
• Utilisez le numéro de service
pour identifier votre ordinateur
lorsque vous accédez au site
We b
lorsque vous appelez le service
de support technique.
• Entrez le code de service express pour orienter votre appel lorsque
www.dell.com | support.dell.com
• Solutions — Astuces de dépannage, articles de
techniciens, cours en ligne, questions
fréquemment posées
• Communauté — Discussion en ligne avec d'autres
clients Dell
• Mises à niveau — Informations sur les mises à
niveau des composants, comme la mémoire, le
disque dur et le système d'exploitation
vous communiquez avec le service d'assistance technique.
Site Web de support de Dell — support.dell.com
REMARQUE : Sélectionnez votre région pour afficher le site de
support approprié.
REMARQUE : Les représentants des grandes entreprises, du
gouvernement et du domaine de l'éducation peuvent également
utiliser le site Web Premier Support de Dell à l'adresse
premier.support.dell.com. Ce site Web n'est peut-être pas
disponible dans toutes les régions.
• Service clientèle — Personnes-ressources, appels
de service et état des commandes, garanties et
informations de réparation
• Service et support — Historique de l'état des
appels de service et du support, contrat de service,
discussions en ligne avec le support technique
• Référence — Documentation de l'ordinateur,
détails sur la configuration de l'ordinateur,
caractéristiques de produit et livres blancs
• Téléchargements — Pilotes, correctifs et mises à
jour logicielles agréés
• Notebook System Software (NSS)— Si vous
réinstallez le système d'exploitation de votre
ordinateur, vous devez également réinstaller
l'utilitaire NSS. NSS fournit des mises à jour
essentielles pour le système d'exploitation et la
prise en charge des lecteurs de disquette USB
Dell™ de 3,5 pouces, des processeurs Intel
Pentiu m
®
M, des lecteurs optiques et des
®
périphériques USB. NSS est requis pour le bon
fonctionnement de votre ordinateur Dell. Ce
logiciel détecte automatiquement votre ordinateur
et son système d'exploitation, et installe les mises à
jour appropriées à votre configuration.
support.dell.com
ou
62 Guide de référence rapide de la station de travail mobile Dell Precision M20
Page 63

Que recherchez-vous ? Cherchez ici
• Comment utiliser Windows XP
• Documentation sur mon ordinateur
• Documentation pour les périphériques (pour un
modem, par exemple)
• Comment réinstaller mon système d'exploitation
Centre d'aide et de support de Windows.
1
Cliquez sur le bouton
2
Tapez un mot ou une expression qui décrit votre problème, puis
cliquez sur l'icône en forme de flèche.
3
Cliquez sur la rubrique qui décrit votre problème.
4
Suivez les instructions qui s'affichent à l'écran.
CD Operating System
Le système d'exploitation est déjà installé sur votre ordinateur.
Pour réinstaller le système d'exploitation, utilisez le CD Operating
System. Pour des instructions supplémentaires, reportez-vous au
Guide d'utilisation.
REMARQUE : La couleur du CD varie selon le système d'exploitation
que vous avez commandé.
REMARQUE : Le CD Operating System est en option et n'est pas
obligatoirement expédié avec tous les ordinateurs.
Démarrer
, puis sur
Aide et support
Après avoir réinstallé votre système
d'exploitation, utilisez le CD
Drivers and Utilities pour
réinstaller les pilotes des
périphériques livrés avec votre
ordinateur.
L'étiquette de la clé de produit de
votre système d'exploitation se
trouve sur l'ordinateur.
.
Guide de référence rapide de la station de travail mobile Dell Precision M20 63
Page 64

Configuration de votre ordinateur
PRÉCAUTION : Avant de commencer toute procédure de cette section, suivez les consignes de
sécurité du Guide d'information sur le produit.
1
Déballez la boîte d'accessoires.
2
Mettez de côté le contenu de la boîte d'accessoires ; vous en aurez besoin ultérieurement pour
configurer votre ordinateur.
Cette boîte contient également la documentation utilisateur et tout autre logiciel ou matériel
supplémentaire (cartes PC, lecteurs, batteries, etc.) que vous avez commandés.
3
Reliez l'adaptateur secteur au connecteur de l'adaptateur secteur de l'ordinateur et à la prise
www.dell.com | support.dell.com
secteur.
64 Guide de référence rapide de la station de travail mobile Dell Precision M20
Page 65

4
Pour mettre l'ordinateur sous tension, ouvrez le moniteur et appuyez sur le bouton
d'alimentation.
bouton
d'alimentation
REMARQUE : Ne raccordez pas l'ordinateur à la station d'accueil tant qu'il n'a pas été mis sous tension
et arrêté au moins une fois.
Performances de la batterie
PRÉCAUTION : Avant de commencer toute procédure de cette section, consultez et respectez les
consignes de sécurité du Guide d'information sur le produit.
REMARQUE : La batterie d'un ordinateur portable n'est couverte que pendant la période initiale d'un an
de la garantie limitée de votre ordinateur. Pour plus d'informations sur la garantie Dell relative à
l'ordinateur, reportez-vous au Guide d'information sur le produit ou au document de garantie livré avec
votre ordinateur.
Pour un fonctionnement optimal et afin de préserver les paramètres du BIOS, laissez la batterie
principale installée en permanence dans votre ordinateur portable Dell™. Utilisez une batterie
pour alimenter l'ordinateur lorsqu'il n'est pas branché sur une prise électrique. Votre ordinateur est
livré avec une batterie, installée dans la baie.
Guide de référence rapide de la station de travail mobile Dell Precision M20 65
Page 66

REMARQUE : L'autonomie de la batterie (la période durant laquelle la batterie reste chargée) diminue
avec le temps. Selon la fréquence d'utilisation et les conditions de fonctionnement de la batterie, il est
possible que vous deviez en acheter une autre au cours de la durée de vie de votre ordinateur.
L'autonomie de la batterie varie en fonction de l'utilisation. Vous pouvez installer une deuxième
batterie en option dans la baie modulaire, et ce pour augmenter la durée de fonctionnement de
façon significative. Pour des informations supplémentaires concernant la deuxième batterie,
reportez-vous à votre
Cette durée est considérablement réduite par l'exécution de certaines opérations, notamment, sans
que cela soit limitatif :
• Utilisation de lecteurs optiques, tels que des lecteurs de DVD et CD
• Utilisation de périphériques de communication sans fil, cartes PC ou périphériques USB
www.dell.com | support.dell.com
• Utilisation de paramètres élevés d'affichage et de luminosité, d'économiseurs d'écran en 3D
ou d'autres programmes gourmands en ressources, tels que des jeux en 3D
• Utilisation de l'ordinateur en mode Performances maximales
REMARQUE : Il est recommandé de connecter l'ordinateur à une prise électrique lorsque vous gravez
un CD ou DVD.
Vous pouvez vérifier le niveau de charge de la batterie avant d'installer la batterie dans l'ordinateur.
Vous pouvez également définir des options de gestion de l'alimentation afin que l'ordinateur vous
alerte lorsque le niveau de charge de la batterie est bas.
PRÉCAUTION : L'utilisation d'une batterie non compatible peut accroître le risque d'incendie ou
d'explosion. Ne remplacez la batterie que par une batterie compatible achetée auprès de Dell. La
batterie au lithium-ion est conçue pour fonctionner avec votre ordinateur Dell. N'utilisez pas la batterie
d'un autre ordinateur.
Guide d'utilisation
.
PRÉCAUTION : Ne jetez pas les batteries avec les ordures ménagères. Lorsque votre batterie ne tient
plus sa charge, contactez votre service municipal de traitement des déchets pour savoir comment vous
en débarrasser. Consultez la section «Mise au rebut de la batterie» du Guide d'information sur le
produit.
PRÉCAUTION : Une utilisation inadéquate de la batterie peut augmenter le risque d'incendie ou de
brûlure chimique. Prenez soin de ne pas la percer, l'incinérer, la démonter ou l'exposer à une
température supérieure à 65° C (149° F). Rangez la batterie hors de portée des enfants. Manipulez les
batteries endommagées ou percées avec d'extrêmes précautions. Les batteries endommagées peuvent
fuir et causer des dommages personnels ou matériels.
66 Guide de référence rapide de la station de travail mobile Dell Precision M20
Page 67

Vérification de la charge de la batterie
La jauge de batterie Dell QuickSet, la fenêtre et l'icône de la
jauge d'alimentation/d'énergie
Microsoft® Windows®, l'indicateur de charge de la batterie, la jauge d'état et l'alerte en cas de
niveau de batterie faible fournissent des informations sur le niveau de charge de la batterie.
Pour plus d'informations sur la vérification de la charge de la seconde batterie, reportez-vous à votre
Guide d'utilisation
.
Jauge de batterie Dell QuickSet
Si Dell QuickSet est installé, appuyez sur <Fn><F8> pour afficher la jauge de batterie QuickSet.
La fenêtre
batterie de votre ordinateur.
De plus, lorsque votre ordinateur est connecté à une station d'accueil (amarré), la fenêtre
batterie
charge et l'état actuel de la batterie de la station d'accueil.
Les icônes suivantes s'affichent dans la fenêtre
Jauge de batterie
REMARQUE : Vous pouvez utiliser votre station d'accueil pour charger la batterie d'un ordinateur.
Cependant, une batterie située dans une station d'accueil n'alimente pas la station d'accueil ou
l'ordinateur.
affiche l'état, le niveau de charge et le temps de chargement de la
Jauge de
affiche l'onglet
• L'ordinateur ou la station d'accueil fonctionne sur batterie.
• La batterie se décharge ou est inactive.
• L'ordinateur ou la station d'accueil est connecté à une prise électrique et
alimenté en CA.
• La batterie est en cours de charge.
• L'ordinateur ou la station d'accueil est connecté à une prise électrique et
alimenté en CA.
• La batterie se décharge, est inactive ou en cours de chargement.
Dock Battery
(Batterie de station d'accueil), qui indique le niveau de
Jauge de batterie
:
Pour plus d'informations sur QuickSet, cliquez avec le bouton droit de la souris sur l'icône dans
Aide
la barre des tâches, puis cliquez sur
Jauge d'alimentation de Microsoft® Windows
.
®
La jauge d'alimentation Windows indique la charge de batterie restante. Pour consulter la jauge,
double-cliquez sur l'icône de la barre des tâches. Pour des informations supplémentaires
concernant l'onglet
Jauge d'alimentation
, reportez-vous à votre
Guide d'utilisation
.
Si l'ordinateur est branché sur le secteur, une icône apparaît.
Guide de référence rapide de la station de travail mobile Dell Precision M20 67
Page 68

Jauge de charge
Avant d'installer une batterie, appuyez sur le bouton d'état situé sur la jauge de charge de la batterie
afin d'allumer les voyants de niveau de charge. Chaque voyant représente environ 20 pour cent de
la charge totale de la batterie. S'il reste, par exemple, 80 pour cent de la charge de la batterie, quatre
des voyants sont allumés. Si aucun voyant n'est allumé, la batterie est complètement déchargée.
www.dell.com | support.dell.com
Jauge d'état
La durée de service de la batterie est déterminée en grande partie par le nombre de charges qu'elle
reçoit. Après des centaines de cycles de charge et de décharge, la capacité de charge des batteries
diminue et l'état des batteries se dégrade. Pour vérifier l'état de la batterie, appuyez sur le bouton
d'état, situé sur l'indicateur de charge de la batterie, et maintenez-le enfoncé pendant au moins 3
secondes. Si aucun voyant ne s'allume, la batterie est en bon état et elle dispose encore de plus de
80 pour cent de sa capacité de charge d'origine. Chaque voyant représente une dégradation
incrémentielle. Si cinq voyants s'allument, la batterie dispose de moins de 60 pour cent de sa
capacité de charge et vous devez envisager son remplacement. Reportez-vous à votre
d'utilisation
pour plus d'informations sur l'autonomie de la batterie.
Alerte de batterie faible
AVIS : Pour éviter la perte ou la corruption de vos données, enregistrez votre travail immédiatement
après avoir reçu une alerte de niveau de batterie faible. Branchez ensuite l'ordinateur sur une prise
électrique ou installez une seconde batterie dans la baie modulaire. Si la batterie est complètement
déchargée, l'ordinateur passe automatiquement en mode Mise en veille prolongée.
68 Guide de référence rapide de la station de travail mobile Dell Precision M20
Guide
Page 69

Une fenêtre contextuelle vous avertit lorsque la batterie est déchargée à environ 90 pour cent. Pour
des informations supplémentaires concernant les alertes niveau de batterie faible, reportez-vous à
votre
Guide d'utilisation
Un avertissement de batterie faible survient lorsque la batterie est déchargée à environ 90 pour
cent. L'ordinateur émet un signal sonore pour indiquer que la limite de durée minimale de
fonctionnement est atteinte. Pendant ce délai, le haut-parleur émet régulièrement des bips. Si
deux batteries sont installées, l'alerte de batterie faible indique que les deux batteries sont
déchargées à environ 90 pour cent. L'ordinateur passe en mode Mise en veille prolongée lorsque la
charge de la batterie est extrêmement faible. Pour des informations supplémentaires concernant les
alertes niveau de batterie faible, reportez-vous à votre
.
Guide d'utilisation
.
Chargement de la batterie
REMARQUE : L'adaptateur secteur charge complètement la batterie déchargée en 1 heure environ
lorsque l'ordinateur est éteint. La durée de chargement est plus longue lorsque l'ordinateur est sous
tension. Vous pouvez laisser la batterie dans l'ordinateur aussi longtemps que vous le souhaitez. Les
circuits internes de la batterie préviennent toute surcharge.
Lorsque vous branchez l'ordinateur sur une prise électrique ou installez une batterie pendant que
l'ordinateur est branché sur une prise électrique, l'ordinateur vérifie le niveau de charge et la
température de la batterie. Au besoin, l'adaptateur secteur charge alors la batterie et maintient le
niveau de charge.
Si la batterie est chaude parce qu'elle se trouvait dans l'ordinateur ou en raison de la température
extérieure, il est probable qu'elle ne se charge pas lorsque vous branchez l'ordinateur sur une prise
électrique.
Si le voyant clignote alternativement vert et orange, la batterie est trop chaude pour être
chargée. Débranchez l'ordinateur de la prise électrique et laissez refroidir l'ordinateur et la batterie
jusqu'à ce qu'ils atteignent la température ambiante. Branchez alors l'ordinateur sur une prise
électrique et continuez à charger la batterie.
Pour des informations supplémentaires sur la résolution des problèmes de batterie, reportez-vous à
votre
Guide d'utilisation
.
Retrait de la batterie
PRÉCAUTION : Avant d'effectuer cette procédure, déconnectez le modem de la prise téléphonique
murale.
Pour des informations supplémentaires sur le retrait de la seconde batterie, reportez-vous à votre
Guide d'utilisation
AVIS : Si vous décidez de remplacer la batterie pendant que l'ordinateur est en veille, vous disposez
d'une minute pour effectuer cette opération. Passé ce délai, l'ordinateur s'éteint et toutes les données
non enregistrées sont définitivement perdues.
.
Guide de référence rapide de la station de travail mobile Dell Precision M20 69
Page 70

1
Assurez-vous que l'ordinateur est éteint, en mode gestion de l'alimentation ou branché à une
prise électrique.
2
Si l'ordinateur est connecté à une station d'accueil (amarré), déconnectez-le. Pour obtenir des
instructions, reportez-vous à la documentation qui accompagne la station d'accueil.
3
Faites glisser et maintenez le loquet de verrouillage de la baie de batterie (ou de la baie
modulaire), situé en dessous de l'ordinateur, puis retirez la batterie de la baie.
www.dell.com | support.dell.com
Installation d'une batterie
Faites glisser la batterie dans la baie jusqu'à ce que le loquet s'enclenche.
Pour des informations supplémentaires sur l'installation de la seconde batterie, reportez-vous à
votre
Guide d'utilisation
.
Stockage de la batterie
Retirez la batterie de l'ordinateur lorsque vous rangez ce dernier pendant une période prolongée.
Sinon, la batterie finira par se décharger. Après une longue période d'entreposage, rechargez
complètement la batterie avant de l'utiliser.
70 Guide de référence rapide de la station de travail mobile Dell Precision M20
Page 71

À propos de votre ordinateur
Vue frontale
état du clavier
et du sans fil
écran
bouton de
mise en sourdine
boutons de
contrôle du volume
manette
bouton de
manette/tablette tactile
bouton
d'alimentation
voyants d'état
de l'appareil
clavier
tablette tactile
loquet de fermeture
de l'écran
haut-parleurs
Guide de référence rapide de la station de travail mobile Dell Precision M20 71
Page 72

Vue du côté gauche
www.dell.com | support.dell.com
logement de carte PC
logement de carte à puce
emplacement pour
câble de sécurité
connecteurs
audio (2)
capteur infrarouge
72 Guide de référence rapide de la station de travail mobile Dell Precision M20
Page 73

Vue du côté droit
baie modulaire
connecteurs USB (2)
dispositif de verrouillage du
périphérique
Guide de référence rapide de la station de travail mobile Dell Precision M20 73
Page 74

Vue arrière
PRÉCAUTION : Ne bloquez pas les entrées d'air de l'ordinateur et n'insérez pas d'objets dedans ;
évitez également toute accumulation de poussière. Ne placez pas l'ordinateur dans un environnement
peu-aéré, tel qu'une mallette fermée, lorsque celui-ci fonctionne. Le manque de ventilation risquerait
de causer un incendie ou d'endommager l'ordinateur.
connecteur de
sortie TV S-vidéo
connecteur
réseau (RJ-45)
www.dell.com | support.dell.com
connecteurs USB (2)
connecteur modem (RJ-11)
connecteur série
connecteur vidéo
connecteur parallèle
entrées d'air
connecteur
d'adaptateur secteur
74 Guide de référence rapide de la station de travail mobile Dell Precision M20
Page 75

Vue du dessous
loquet de verrouillage de la baie de batterie
cache du module de mémoire
unité de
disque dur
cache du modem
ventilateur
indicateur de charge de la batterie
batterie
connecteur de station d'accueil
Résolution des problèmes
Notebook System Software
Notebook System Software (NSS) est un utilitaire qui fournit des mises à jour critiques pour votre
système d'exploitation. Installez le programme NSS pour prendre en charge les lecteurs de
disquette Dell USB de 3,5 pouces, les processeurs Intel
périphériques USB. NSS est requis pour le bon fonctionnement de votre ordinateur portable Dell.
AVIS : NSS est indispensable pour le bon fonctionnement des périphériques USB, qui comprennent les
périphériques D/Bay, D/Dock, D/Port et D/View de Dell.
Guide de référence rapide de la station de travail mobile Dell Precision M20 75
®
Pentium® M, les lecteurs optiques et les
Page 76

Problèmes de blocage et problèmes logiciels
PRÉCAUTION : Avant de commencer toute procédure de cette section, suivez les consignes de
sécurité du Guide d'information sur le produit.
L'ordinateur ne démarre pas
ASSUREZ-VOUS QUE L'ADAPTATEUR SECTEUR EST SOLIDEMENT BRANCHÉ SUR L ' ORDINATEUR ET
SUR LA PRISE SECTEUR
L'ordinateur ne répond plus
www.dell.com | support.dell.com
AVIS : Vous pouvez perdre des données si vous n'arrivez pas à arrêter correctement le système
d'exploitation.
ÉTEIGNEZ L ' ORDINATEUR — Si vous n'obtenez aucune réponse lorsque vous appuyez sur une touche
du clavier ou lorsque vous déplacez la souris, appuyez sur le bouton d'alimentation et maintenez-le
enfoncé pendant au moins 8 à 10 secondes jusqu'à ce que l'ordinateur s'éteigne. Redémarrez
l'ordinateur.
Un programme ne répond plus
QUITTEZ LE PROGRAMME —
1
Appuyez simultanément sur <Ctrl><Maj><Échap>.
2
Cliquez sur
3
Cliquez sur le programme qui ne répond plus.
4
Cliquez sur
Un programme se bloque fréquemment
REMARQUE : La documentation de tout logiciel, la disquette ou le CD qui l'accompagne incluent
généralement des instructions d'installation.
VÉRIFIEZ LA DOCUMENTATION DU LOGICIEL — Si nécessaire, supprimez, puis réinstallez le
programme.
Applications
Fin de tâche
.
.
76 Guide de référence rapide de la station de travail mobile Dell Precision M20
Page 77

Un programme est conçu pour une version antérieure du système d'exploitation Windows
SI VOUS UTILISEZ WINDOWS XP, EXÉCUTEZ L 'ASSISTANT COMPATIBILITÉ DES PROGRAMMES —
L'Assistant Compatibilité des programmes configure un programme pour qu'il fonctionne dans un
environnement proche des environnements des systèmes d'exploitation non Windows XP.
1
Cliquez sur le bouton
Assistant Compatibilité des programmes
2
Dans l'écran d'accueil, cliquez sur
3
Suivez les instructions qui s'affichent à l'écran.
Démarrer
, pointez sur
.
Suivant
.
Tous les programmes→ Accessoires
, puis cliquez sur
Un écran bleu uni apparaît
ÉTEIGNEZ L ' ORDINATEUR — Si vous n'obtenez aucune réponse lorsque vous appuyez sur une touche
du clavier ou lorsque vous déplacez la souris, appuyez sur le bouton d'alimentation et maintenez-le
enfoncé pendant au moins 8 à 10 secondes jusqu'à ce que l'ordinateur s'éteigne. Redémarrez
l'ordinateur.
Autres problèmes logiciels
VÉRIFIEZ LA DOCUMENTATION DU LOGICIEL OU CONTACTEZ LE FABRICANT POUR OBTENIR DES
INFORMATIONS DE DÉPANNAGE —
• Assurez-vous que le programme est compatible avec le système d'exploitation installé sur votre
ordinateur.
• Assurez-vous que l'ordinateur est conforme aux exigences matérielles requises pour que le logiciel
fonctionne. Reportez-vous à la documentation du logiciel pour de plus amples informations.
• Assurez-vous que le programme est correctement installé et configuré.
• Assurez-vous que les pilotes de périphérique n'entrent pas en conflit avec le programme.
• Le cas échéant, supprimez, puis réinstallez le programme.
SAUVEGARDEZ IMMÉDIATEMENT VOS FICHIERS
UTILISEZ UN PROGRAMME DE RECHERCHE DES VIRUS POUR VÉRIFIER LE DISQUE DUR, LES
DISQUETTES OU LES CD.
ENREGISTREZ LES FICHIERS OUVERTS ET QUITTEZ TOUS LES PROGRAMMES, PUIS ÉTEIGNEZ
L 'ORDINATEUR VIA LE MENU Démarrer
Guide de référence rapide de la station de travail mobile Dell Precision M20 77
Page 78

ANALYSEZ VOTRE ORDINATEUR POUR VOIR S'IL CONTIENT DES LOGICIELS ESPIONS — Si vous
observez un ralentissement des performances de votre ordinateur, si des fenêtres publicitaires s'affichent
fréquemment sur votre écran ou si vous avez des problèmes pour vous connecter sur Internet, votre
ordinateur est peut-être infecté par un logiciel espion. Utilisez un programme anti-virus qui inclut une
protection contre les logiciels espions (une mise à niveau de votre programme sera peut-être nécessaire)
afin d'analyser votre ordinateur et de supprimer les logiciels espions. Pour plus d'informations, allez sur
le site support.dell.com et lancez une recherche avec le mot-clé espion.
LANCEZ DELL DIAGNOSTICS À PARTIR DU CD DRIVERS AND UTILITIES — Si tous les tests
s'exécutent correctement, la condition d'erreur est liée à un problème logiciel.
www.dell.com | support.dell.com
Lancement de Dell Diagnostics
PRÉCAUTION : Avant de commencer toute procédure de cette section, consultez et respectez les
consignes de sécurité du Guide d'information sur le produit.
Quand utiliser Dell Diagnostics
Si vous rencontrez des difficultés avec votre ordinateur, procédez aux vérifications décrites dans la
section «Résolution des problèmes» et exécutez Dell Diagnostics avant de contacter Dell pour
obtenir une assistance technique.
Il est recommandé d'imprimer ces procédures avant de commencer.
AVIS : Dell Diagnostics ne fonctionne qu'avec les ordinateurs Dell™.
Ouvrez le programme de configuration du système, étudiez les informations de configuration de
votre ordinateur et assurez-vous que le périphérique que vous souhaitez tester s'affiche dans le
programme de configuration du système et qu'il est actif.
Démarrez Dell Diagnostics à partir de votre disque dur ou du CD
appelé CD
ResourceCD
Démarrage de Dell Diagnostics à partir de votre disque dur
Dell Diagnostics se trouve dans une partition cachée (utilitaire de diagnostics) de votre disque dur.
REMARQUE : Si aucune image n'apparaît sur l'écran de votre ordinateur, reportez-vous à la section
«Contacter Dell» de votre Guide d'utilisation en ligne.
Éteignez l'ordinateur. Mettez votre ordinateur sous tension (ou redémarrez-le).
1
2
Si l'ordinateur est connecté à une station d'accueil (amarré), déconnectez-le. Pour obtenir des
instructions, reportez-vous à la documentation qui accompagne la station d'accueil.
3
Connectez l'ordinateur à une prise électrique.
4
Allumez l'ordinateur. Lorsque le logo DELL™ apparaît, appuyez immédiatement sur <F12>.
Drivers and Utilities
(également
).
REMARQUE : Si vous n'appuyez pas assez vite sur la touche <F12> et que le logo Windows apparaît,
attendez que l'ordinateur ait fini de redémarrer, puis éteignez-le et redémarrez-le de nouveau.
78 Guide de référence rapide de la station de travail mobile Dell Precision M20
Page 79

REMARQUE : Si rien ne s'affiche, maintenez le bouton de mise en sourdine enfoncé et appuyez sur le
bouton d'alimentation de l'ordinateur pour démarrer Dell Diagnostics. L'ordinateur lance
automatiquement l'évaluation du système de préamorçage.
REMARQUE : Si un message indique qu'aucune partition de Dell Diagnostics n'a été trouvée, exécutez
Dell Diagnostics à partir du CD Drivers and Utilities.
Lorsque la liste des périphériques d'initialisation s'affiche, sélectionnez
5
Diagnostics
et
appuyez sur <Entrée>.
L'ordinateur lance l'évaluation de préamorçage du système avec une série de diagnostics
intégrés qui effectue un test préalable de la carte système, du clavier, du disque dur et de
l'écran.
• Répondez à toutes les questions qui s'affichent pendant l'évaluation.
• Si une défaillance de composant est détectée, l'ordinateur s'arrête et émet un signal
sonore. Pour arrêter l'évaluation et redémarrer l'ordinateur, appuyez sur <n> ; pour
passer au test suivant, appuyez sur <y> ; pour retester le composant défectueux,
appuyez sur <r>.
• Si des défaillances sont détectées lors de l'évaluation du système de préamorçage, notez le
ou les codes d'erreur et reportez-vous à la section «Contacter Dell» dans votre
d'utilisation
avant de continuer Dell Diagnostics.
Guide
Si l'évaluation du système de préamorçage se déroule sans problème, vous recevez le message
suivant :
Booting Dell Diagnostic Utility Partition (Initialisation de la
partition de l'utilitaire Dell Diagnostics). Press any key to continue
(Appuyez sur une touche pour continuer)
.
.
6
Appuyez sur une touche pour démarrer Dell Diagnostics à partir de la partition de diagnostics
du disque dur.
Démarrage de Dell Diagnostics à partir du CD Drivers and Utilities
REMARQUE : Le CD Drivers and Utilities est en option et n'est pas obligatoirement expédié avec tous les
ordinateurs. Pour démarrer Dell Diagnostics, reportez-vous à la procédure décrite précédemment.
1
Insérez le CD
2
Arrêtez l'ordinateur et redémarrez-le.
REMARQUE : Si vous n'appuyez pas assez vite sur la touche <F12> et que le logo Windows apparaît,
attendez que l'ordinateur ait fini de redémarrer et répétez l'étape 2.
Lorsque le logo DELL apparaît, appuyez immédiatement sur <F12>.
3
REMARQUE : Les étapes suivantes ne modifient la séquence d'amorçage qu'une seule fois. Au
démarrage suivant, l'ordinateur démarre en fonction des périphériques définis dans le programme de
configuration du système.
Drivers and Utilities
Guide de référence rapide de la station de travail mobile Dell Precision M20 79
.
Page 80

4
Lorsque la liste de périphérique d'amorçage apparaît, sélectionnez
(Lecteur de CD/DVD/CD-RW) et appuyez sur <Entrée>.
5
Sélectionnez l'option
6
Sélectionnez l'option
7
Ta p e z 1 pour démarrer le menu du CD
8
Saisissez 2 pour démarrer Dell Diagnostics.
9
Sélectionnez
Exécuter Dell Diagnostics 32 bits
Lecteur de CD/DVD/CD-RW
Amorcer à partir du CD-ROM
ResourceCD
dans la liste numérotée. Si plusieurs versions
à partir du menu d'amorçage du CD.
dans le menu qui s'affiche.
.
sont répertoriées, sélectionnez la version appropriée à votre ordinateur.
10
Lorsque le
menu principal
de Dell Diagnostics s'affiche, sélectionnez le test à effectuer.
CD/DVD/CD-RW Drive
www.dell.com | support.dell.com
Menu principal de Dell Diagnostics
1
Une fois Dell Diagnostics chargé et l'écran du
correspondant à l'option souhaitée.
Option Fonction
Express Test (Test
rapide)
Extended Test (Test
approfondi)
Custom Test (Test
personnalisé)
Symptom Tree
(Arborescence des
symptômes)
2
Si un problème survient pendant un test, un message indiquant le code d'erreur et une
description du problème s'affichent. Notez le code d'erreur et la description du problème et
suivez les instructions.
Si vous ne parvenez pas à résoudre l'erreur, reportez-vous à la section «Contacter Dell» de
votre
Guide d'utilisation
menu principal
Exécute un test rapide des périphériques. Ce test dure
généralement de 10 à 20 minutes et n'exige pas d'action
de votre part. Effectuez tout d'abord un Test rapide pour
trouver le problème plus rapidement.
Exécute un test approfondi des périphériques. En règle
générale, ce test prend une heure ou plus et nécessite que
vous répondiez régulièrement à des questions.
Teste un périphérique spécifique. Vous pouvez
personnaliser les tests à exécuter.
Répertorie les symptômes couramment rencontrés et
permet de sélectionner un test en fonction du symptôme
du problème.
affiché, cliquez sur le bouton
en ligne.
REMARQUE : Le numéro de service de votre ordinateur s'affiche dans la partie supérieure de chaque
écran de test. Lorsque vous communiquerez avec le support technique de Dell, ce numéro de service
vous sera demandé.
Si vous exécutez un test à partir de l'option
3
symptômes
, cliquez sur l'onglet approprié décrit dans le tableau suivant pour en savoir plus.
Test personnalisé
80 Guide de référence rapide de la station de travail mobile Dell Precision M20
ou
Arborescence des
Page 81

Onglet Fonction
Résultats Affiche les résultats du test et les conditions d'erreur
rencontrées.
Erreurs Affiche les conditions d'erreur rencontrées, les codes
d'erreur et la description du problème.
Aide Décrit le test et peut indiquer les conditions requises
pour exécuter le test.
Configuration Affiche la configuration matérielle du périphérique
sélectionné.
Dell Diagnostics obtient vos informations de
configuration de tous les périphériques à partir du
programme de configuration du système, de la mémoire
et de divers tests internes, et les affiche dans la liste des
périphériques située dans le volet gauche de l'écran. La
liste des périphériques risque de ne pas afficher les noms
de tous les composants installés sur votre ordinateur ou
de tous les périphériques reliés à celui-ci.
Paramètres Vous permet de personnaliser le test en modifiant ses
paramètres.
4
Lorsque les tests sont terminés, si vous exécutez Dell Diagnostics à partir du CD
Utilities,
5
Lorsque les tests sont terminés, fermez l'écran de test pour revenir au
quitter Dell Diagnostics et redémarrer l'ordinateur, fermez l'écran du
retirez le CD.
menu principal
menu principal
Drivers and
. Pour
.
Guide de référence rapide de la station de travail mobile Dell Precision M20 81
Page 82

www.dell.com | support.dell.com
82 Guide de référence rapide de la station de travail mobile Dell Precision M20
Page 83

Index
A
assistants
Assistant Compatibilité des
programmes, 77
B
batterie
alerte de batterie faible, 68
chargement, 69
installation, 70
jauge d'alimentation, 67
jauge d'état, 68
jauge de charge, 68
performances, 65
retrait, 69
stockage, 70
vérification de la charge, 67
C
CD
système d'exploitation, 63
CD Drivers and Utilities, 61
CD Operating System, 63
CD ResourceCD
Dell Diagnostics, 78
Centre d'aide et de
support, 63
consignes de sécurité, 61
D
Dell
site de support, 62
Dell Diagnostics, 78
dépannage
Centre d'aide et de support, 63
Dell Diagnostics, 78
diagnostics
CD Drivers and Utilities, 61
Dell, 78
documentation
CD ResourceCD, 61
en ligne, 62
Guide d'information sur le
système, 61
Guide d'utilisation, 61
Périphérique, 61
E
étiquette Microsoft
Windows, 62
étiquettes
Microsoft Windows, 62
numéro de service, 62
G
garantie, 61
Guide d'utilisation, 61
L
logiciel
problèmes, 77
logiciel espion, 78
M
matériel
Dell Diagnostics, 78
N
numéro de service, 62
O
ordinateur
blocages, 76-77
ne répond plus, 76
performances lentes, 78
P
Pilotes
CD ResourceCD, 61
problèmes
blocage d'ordinateur, 76-77
blocages, 76
blocages programme, 76
compatibilité programmes et
Windows, 77
Index 83
Page 84

Dell Diagnostics, 78
écran bleu, 77
l'ordinateur ne démarre pas, 76
l'ordinateur ne répond plus, 76
le programme ne répond
plus, 76
logiciel, 76
logiciel espion, 78
logiciels, 76-77
performances lentes de
l'ordinateur, 78
R
réinstaller
CD Drivers and Utilities, 61
CD ResourceCD, 61
S
site Web «Dell Premier
Support» (Support
Premier de Dell), 61
W
Windows XP
Assistant Compatibilité des
programmes, 77
Centre d'aide et de support, 63
Site Web Premier Support de
Dell, 62
système d'exploitation
CD, 63
Guide d'installation, 63
V
vues du système
côté droit, 73
de dessous, 75
84 Index
Page 85

Dell Precision™
Mobile Workstation M20
Kurzanleitung
www.dell.com | support.dell.com
Page 86

Anmerkungen, Hinweise und Vorsichtshinweise
ANMERKUNG: Eine ANMERKUNG macht auf wichtige Informationen aufmerksam, die Ihnen die Arbeit mit dem Com-
puter erleichtern.
HINWEIS: Ein HINWEIS warnt vor möglichen Beschädigungen der Hardware oder vor Datenverlust und erläutert, wie
das vermieden werden kann.
VORSICHT: Durch VORSICHT werden Sie auf Gefahrenquellen hingewiesen, die materielle Schäden, Verletzungen
oder sogar den Tod von Personen zur Folge haben können.
Abkürzungen und Akronyme
Eine vollständige Liste mit Abkürzungen und Akronymen finden Sie in Ihrem Online-
Benutzerhandbuch
. Zum
Öffnen Ihres Benutzerhandbuchs doppelklicken Sie (je nach Betriebssystem) entweder auf Ihrem Desktop auf
das Symbol
portcenter
Wenn Sie einen Dell™ Computer der Serie n erworben haben, gelten die Bezüge auf Microsoft
Benutzerhandbuch
und dann auf
Benutzer- und Systemhandbücher
oder klicken Sie auf die Schaltfläche
.
Start
, anschließend auf
Hilfe- und Sup-
®
Windows®-
Betriebssysteme in diesem Dokument nicht.
ANMERKUNG: Einige Leistungsmerkmale sind möglicherweise nicht für Ihren Computer oder in bestimmten Ländern
nicht verfügbar.
____________________
Die in diesem Dokument enthaltenen Informationen können sich ohne vorherige Ankündigung ändern.
© 2004 Dell Inc. Alle Rechte vorbehalten.
Die Vervielfältigung oder Wiedergabe in jeglicher Weise ist ohne schriftliche Genehmigung von Dell Inc. strengstens untersagt.
Markenzeichen in diesem Text: Dell, das DELL Logo und Dell Precision sind Markenzeichen von Dell Inc.; Intel und Pen ti um sind eingetragene
Markenzeichen von Intel Corporation; Microsoft und Windows sind eingetragene Markenzeichen von Microsoft Corporation.
Alle anderen in dieser Dokumentation genannten Marken und Handelsbezeichnungen sind Eigentum der entsprechenden Hersteller und Firmen.
Dell Inc. verzichtet auf alle Besitzrechte an Markenzeichen und Handelsbezeichnungen, die nicht Eigentum von Dell sind.
Oktober 2004 P/N T7623 Rev. A00
Page 87

Inhalt
Informationsquellen . . . . . . . . . . . . . . . . . . . . . . . . . . . . 89
Einrichten des Computers
Akkuleistung
. . . . . . . . . . . . . . . . . . . . . . . . . . . . . . . 93
Prüfen des Akkuladezustands
. . . . . . . . . . . . . . . . . . . . . . . . . 92
. . . . . . . . . . . . . . . . . . . . . . . 94
Akkuanzeige von Dell QuickSet
Microsoft
Ladestandanzeige
®
Windows®-Energieanzeige . . . . . . . . . . . . . . . . 95
. . . . . . . . . . . . . . . . . . . . . . . . . . . 95
Health Gauge (Zustandsanzeige)
Warnung „Akku niedrig”
Aufladen des Akkus
. . . . . . . . . . . . . . . . . . . . . . . . . . . . 97
Entfernen des Akkus
Einsetzen eines Akkus
Lagern des Akkus
. . . . . . . . . . . . . . . . . . . . . . . . . . . . . 98
. . . . . . . . . . . . . . . . . . . . . . . . 96
. . . . . . . . . . . . . . . . . . . . . . . . . . . . 97
. . . . . . . . . . . . . . . . . . . . . . . . . . . 98
Wissenswertes über Ihren Computer
Vorderansicht
Linke Seitenansicht
Rechte Seitenansicht
Rückansicht
Unterseite
Beheben von Störungen
Notebook-Systemsoftware
. . . . . . . . . . . . . . . . . . . . . . . . . . . . . 99
. . . . . . . . . . . . . . . . . . . . . . . . . 100
. . . . . . . . . . . . . . . . . . . . . . . . 101
. . . . . . . . . . . . . . . . . . . . . . . . . . . . 102
. . . . . . . . . . . . . . . . . . . . . . . . . . . . . 103
. . . . . . . . . . . . . . . . . . . . . . . . . 103
. . . . . . . . . . . . . . . . . . . . . 103
Probleme mit Absturz und Software
Durchführen der Dell Diagnose
. . . . . . . . . . . . . . . . . . . . 95
. . . . . . . . . . . . . . . . . . . . 96
. . . . . . . . . . . . . . . . . . . . 99
. . . . . . . . . . . . . . . . . 104
. . . . . . . . . . . . . . . . . . . 106
Index . . . . . . . . . . . . . . . . . . . . . . . . . . . . . . . . . . . 111
Inhalt 87
Page 88

88 Inhalt
Page 89

Informationsquellen
ANMERKUNG: Einige Leistungsmerkmale sind möglicherweise in bestimmten Ländern nicht verfügbar.
ANMERKUNG: Zusätzliche Informationen werden eventuell mit dem Computer geliefert.
Welche Informationen benötigen Sie? Hier finden Sie die gewünschten Informationen
• Ein Diagnoseprogramm für Ihren Computer
• Treiber für Ihren Computer
• Dokumentation zu Ihrem Computer
• Dokumentation zu Ihrem Gerät
• Notebook-Systemsoftware (NSS)
• Garantieinformationen
• Verkaufs- und Lieferbedingungen für USA
• Sicherheitshinweise
• Zulassungsinformationen
• Informationen zur Ergonomie
• Enduser-Lizenzvereinbarung
Drivers and Utilities CD (auch bekannt als ResourceCD)
Dokumentation und Treiber, sind bereits auf dem Computer installiert. Mithilfe der CD können Sie Treiber neu installieren, das Programm Dell Diagnostics ausführen oder auf die Dokumentation zugreifen.
Möglicherweise finden Sie auf der
CD Infodateien. Diese Dateien
enthalten Angaben zu den neuesten technischen Änderungen bzw.
Detailinformationen zu technischen Fragen für erfahrene Benutzer oder Techniker.
ANMERKUNG: Treiber und Doku-
mentationsaktualisierungen finden
Sie unter support.dell.com.
ANMERKUNG: Die Drivers and Utilities CD ist optional und ist mögli-
cherweise nicht im Lieferumfang Ihres Computers enthalten.
Dell™ Produktinformationshandbuch
• Anweisungen zum Entfernen und Austauschen
von Teilen
• Technische Daten
• Anweisungen zum Konfigurieren von Systemeinstellungen
• Anweisungen zur Behebung von Störungen und
Problemlösung
Benutzerhandbuch
®
Start
und auf
Windows® XP
Hilfe und Support
(Benutzer- und System-
User’s guides
(Benutzer-
Drivers and
Hilfe- und Supportcenter von Microsoft
1
Klicken Sie auf die Schaltfläche
2
Klicken Sie auf
handbücher) und klicken Sie dann auf
handbücher).
Das Benutzerhandbuch ist ebenfalls auf der optionalen
Utilities
CD
Kurzanleitung Dell Precision Mobile Workstation M20 89
User’s and system guides
verfügbar.
.
Page 90

Welche Informationen benötigen Sie? Hier finden Sie die gewünschten Informationen
• Service-Tag-Nummer und Express-Servicecode
• Microsoft Windows-Lizenzetikett
www.dell.com | support.dell.com
• Lösungen – Tipps zur Behebung von Störungen,
Berichte von Technikern, Online-Schulungen,
häufig gestellte Fragen
• Kundenforum – Online-Diskussion mit anderen
Dell-Kunden
• Aufrüstung – Aufrüstunginformationen für Komponenten wie Speicher, die Festplatte und das Betriebssystem
• Kundenbetreuung – Kontaktinformationen, Status von Serviceanfrage und Bestellung, Informationen zu Garantie und Reparatur
• Service und Support – Status der Serviceanfrage
und Support-Verfolgung, Service-Vertrag, OnlineDiskussion mit dem Technischen Support
• Referenzmaterial – Computer-Dokumentation,
Angaben zur Arbeitsplatz-Konfiguration, Produktangaben und Whitepapers
• Downloads – Zertifizierte Treiber, Patches und
Softwareaktuaufrüstungen
• Notebook-Systemsoftware (NSS) – Wenn Sie das
Betriebssystem auf Ihrem Computer neu installieren, sollten Sie auch das NSS- Dienstprogramm neu installieren. NSS stellt wichtige
Aktualisierungen für Ihr Betriebssystem und den
Support für Dell™ 3,5-Zoll-USB-Diskettenlaufwerke, Intel
sche Laufwerke und USB-Geräte bereit. NSS ist
für den ordnungsmäßigen Betrieb des Dell Computers notwendig. Die Software erkennt automatisch Ihren Computertyp und das Betriebssystem und installiert die für Ihre Konfiguration
geeigneten Aktualisierungen.
®
Pentium®-M-Prozessoren, opti-
Service-Tag-Nummer und Microsoft Windows Lizenz
Diese Etikette befinden sich an der Unterseite Ihres Computers.
• Geben Sie die Service-TagNummer auf der Website
support.dell.com
Anruf beim Technischen Support an, um den Computer zu
identifizieren.
• Geben Sie beim Anruf beim Technischen Support den ExpressServicecode an, um zum geeigneten Ansprechpartner weitergeleitet zu werden.
Dell Support-Website – support.dell.com
oder beim
ANMERKUNG: Wählen Sie Ihre Region, um die passende Support-
Website anzuzeigen.
ANMERKUNG: Kunden aus den Bereichen Unternehmen, Regierung
und Bildungswesen können auch die individuelle Dell Premier
Support-Website www.premier.support.dell.com verwenden. Diese
Website ist möglicherweise nicht in allen Ländern verfügbar.
90 Kurzanleitung Dell Precision Mobile Workstation M20
Page 91

Welche Informationen benötigen Sie? Hier finden Sie die gewünschten Informationen
• Anweisungen zum Arbeiten unter Windows XP
• Dokumentation zum Arbeitsplatz
• Dokumentation für Komponenten (z. B.
Modem)
Hilfe- und Supportcenter von Windows
1
Klicken Sie auf die Schaltfläche
2
Geben Sie ein Wort oder einen Ausdruck ein, das bzw. der Ihr
Start
und auf
Problem beschreibt, und klicken Sie anschließend auf das Pfeilsymbol.
3
Klicken Sie auf das Thema, das Ihr Problem beschreibt.
4
Befolgen Sie die Anweisungen auf dem Bildschirm.
• Anweisungen zur Neuinstallation Ihres Betriebssystems
Betriebssystem-CD
Das Betriebssystem ist bereits auf dem Computer installiert. Um
das Betriebssystem neu zu installieren, verwenden Sie die Betriebs-
system-CD. Anweisungen finden Sie in Ihrem Benutzerhandbuch.
Verwenden Sie die Drivers and
Utilities CD, um Treiber für die mit
Ihrem Computer ausgelieferten
Geräte erneut zu installieren, nachdem Sie das Betriebssystem Ihres
Computers neu installieren.
Das Etikett mit dem Product Key
des Betriebssystems finden Sie am
Computer.
ANMERKUNG: Die Farbe der CD hängt von dem von Ihnen bestelltem
Betriebssystem ab.
ANMERKUNG: Die Betriebssystem-CD ist optional und möglicher-
weise nicht bei allen Computern im Lieferumfang enthalten.
Hilfe und Support
.
Kurzanleitung Dell Precision Mobile Workstation M20 91
Page 92

Einrichten des Computers
VORSICHT: Bevor Sie Arbeiten an den in diesem Abschnitt beschriebenen Komponenten ausführen,
lesen Sie erst die Sicherheitshinweise im Produktinformationshandbuch.
1
Nehmen Sie das Zubehör aus der Verpackung.
2
Legen Sie die für das Einrichten des Computers erforderlichen Zubehörteile bereit.
Der Lieferumfang des Zubehörs umfasst ferner die Benutzerdokumentation sowie die Soft-
ware oder zusätzliche Hardware (wie z. B. PC Cards, Laufwerke oder Batterien), die Sie bestellt haben.
3
Schließen Sie den Netzadapter an den Netzadapteranschluss am Computer und an die Steck-
www.dell.com | support.dell.com
dose an.
92 Kurzanleitung Dell Precision Mobile Workstation M20
Page 93

4
Öffnen Sie zum Einschalten des Computers den integrierten Bildschirm und betätigen Sie
den Netzschalter.
Netzschalter
ANMERKUNG: Schließen Sie den Computer erst an das Docking-Gerät an, wenn der Computer mindes-
tens einmal hoch- und wieder heruntergefahren wurde.
Akkuleistung
VORSICHT: Bevor Sie irgendwelche in diesem Abschnitt beschriebenen Verfahren ausführen, lesen
Sie erst die Sicherheitshinweise im Produktinformationshandbuch.
ANMERKUNG: Für Akkus in portablen Computern gilt die eingeschränkte Garantie nur für das erste
Jahr des Garantiezeitraums Ihres Computers. Weitere Informationen zur Dell-Garantie für den Computer
finden Sie im Produktinformationshandbuch bzw. im Garantieschein, der im Lieferumfang des Computers
enthalten ist.
Für eine optimale Leistung des Computers und zur Beibehaltung der BIOS-Einstellungen müssen
Sie für Ihren portablen Computer von Dell™ immer den Hauptakku verwenden. Verwenden Sie
den Akku, um den Computer mit Strom zu versorgen, wenn kein Netzstrom zur Verfügung steht.
Bei Auslieferung ist standardmäßig bereits ein Akku im Akkufach installiert.
Kurzanleitung Dell Precision Mobile Workstation M20 93
Page 94

ANMERKUNG: Die Betriebsdauer eines Akkus (Zeit, wie lange eine Akkuladung vorhält) nimmt mit der
Zeit ab. Je nachdem, wie oft und unter welchen Bedingungen der Akku verwendet wird, müssen Sie
möglicherweise noch vor Ende der Laufzeit Ihres Computers den Akku ersetzen.
Die Betriebsdauer des Akkus hängt von den Betriebsbedingungen ab. Sie können einen optionalen
zweiten Akku im Modulschacht installieren und die Betriebsdauer so erheblich verlängern. Weitere
Informationen über den zweiten Akku finden Sie in Ihrem
Die Betriebsdauer wird stark beeinträchtigt, wenn Sie bestimmte Vorgänge durchführen. Dazu gehören u. a.:
• Verwenden von optischen Laufwerken wie DVD- und CD-Laufwerken
• Einsatz von wireless Kommunikationsgeräten, PC Cards oder USB-Geräten
www.dell.com | support.dell.com
• Verwenden von sehr hellen Anzeigeeinstellungen, von 3D-Bildschirmschonern oder anderen
Programmen, die viel Energie benötigen, z. B. 3D-Spielen
• Betrieb des Computers mit maximaler Leistung
ANMERKUNG: Es wird empfohlen, den Computer beim Beschreiben von CDs oder DVDs an das Strom-
netz anzuschließen.
Sie können den Akkuladezustand überprüfen, bevor Sie den Akku in den Computer einsetzen.
Außerdem können Sie Energieverwaltungsoptionen so einstellen, dass Sie über einen niedrigen
Ladezustand des Akkus informiert werden.
VORSICHT: Bei Verwendung inkompatibler Akkus besteht Brand- oder Explosionsgefahr. Ersetzen Sie
die Akkus nur mit einem kompatiblen Akku von Dell. Der Lithium-Ionen-Akku ist für den Einsatz in
Ihrem Dell-Computer vorgesehen. Verwenden Sie keinesfalls den Akku eines anderen Computers mit
Ihrem Computer.
Benutzerhandbuch
.
VORSICHT: Entsorgen Sie Akkus nicht im Hausmüll. Falls ein Akku nicht mehr aufgeladen werden
kann, wenden Sie sich bitte an einen Recyclinghof vor Ort oder an eine Umweltorganisation, um Informationen zur Entsorgung von Lithium-Ionen-Akkus zu erhalten. Informationen zur Batterieentsorgung
finden Sie im entsprechenden Abschnitt im Produktinformationshandbuch.
VORSICHT: Unsachgemäße Verwendung von Akkus kann zu Feuer oder chemischen Bränden führen.
Sie dürfen den Akku nicht aufstechen, verbrennen, auseinander nehmen oder Temperaturen über 65 °C
aussetzen. Bewahren Sie den Akku außerhalb der Reichweite von Kindern auf. Handhaben Sie beschädigte oder auslaufende Akkus mit äußerster Vorsicht. Beschädigte Akkus können auslaufen und Personen- oder Sachschäden verursachen.
Prüfen des Akkuladezustands
Die Akkuanzeige von Dell QuickSet, die Energieanzeige von Microsoft® Windows® als Fenster
und als Symbol, die Akku-Ladestandanzeige und Zustandsanzeigeund die Warnung „Akku
niedrig” liefern Informationen über den Akkuladezustand.
Weitere Informationen zum Überprüfen des Ladezustands des zweiten Akkus finden Sie in Ihrem
Benutzerhandbuch
94 Kurzanleitung Dell Precision Mobile Workstation M20
.
Page 95

Akkuanzeige von Dell QuickSet
Ist Dell QuickSet installiert, drücken Sie <Fn><F8>, um die Akkuanzeige von QuickSet anzuzeigen.
Im Fenster
Computer angezeigt.
Wenn der Computer an ein Docking-Gerät angeschlossen ist, wird auf dem Bildschirm
Meter
den Ladezustand und den aktuellen Status des Akkus im Docking-Gerät wieder.
Folgende Symbole sind im Fenster
Um weitere Informationen über die QuickSet-Anzeige zu erhalten, klicken Sie in der Taskleiste mit
der rechten Maustaste auf das Symbol und anschließend auf
Battery Meter
ANMERKUNG: Sie können Computerakkus mit Hilfe des Docking-Geräts laden. Ein Akku in einem
Docking-Gerät versorgt das Docking-Gerät oder den Computer jedoch nicht mit Strom.
(Akkuanzeige) werden Status, Ladezustand und Ladedauer des Akkus im
Battery
(Akkuanzeige) auch die Registerkarte
Akkuanzeige
• Der Computer oder das Docking-Gerät wird mit Akkustrom betrieben.
• Der Akku wird entladen oder ist inaktiv.
• Der Computer oder das Docking-Gerät ist an eine Steckdose angeschlossen und wird mit Netzstrom betrieben.
• Der Akku wird aufgeladen.
• Der Computer oder das Docking-Gerät ist an eine Steckdose angeschlossen und wird mit Netzstrom betrieben.
• Der Akku wird entladen, ist inaktiv oder wird geladen.
Dock Battery
zu sehen:
(Docking-Akku) angezeigt. Diese gibt
Hilfe
.
Microsoft® Windows®-Energieanzeige
Die Energieanzeige von Windows zeigt die verbleibende Akkuladung an. Um die Energieanzeige
zu überprüfen, doppelklicken Sie auf das entsprechende Symbol in der Taskleiste. Weitere
Informationen über das Register
Energieanzeige
finden Sie in Ihrem
Benutzerhandbuch
.
Wenn der Computer an eine Steckdose angeschlossen ist, wird das Symbol angezeigt.
Ladestandanzeige
Bevor Sie eine Batterie einfügen, drücken Sie die Taste für die Akku-Ladestandanzeige, damit die
Ladestandanzeigen aufleuchten. Jede Anzeige repräsentiert etwa 20 Prozent der Gesamtladekapazität des Akkus. Wenn der Akku also beispielsweise noch zu 80 Prozent geladen ist, leuchten vier
der fünf Anzeigen auf. Wenn keine der Anzeigen aufleuchtet, ist der Akku vollständig entladen.
Kurzanleitung Dell Precision Mobile Workstation M20 95
Page 96

www.dell.com | support.dell.com
Health Gauge (Zustandsanzeige)
Die Betriebsdauer des Akkus hängt weitgehend von der Anzahl der Aufladungen ab. Durch hunderte Auf- und Entladungen verlieren Akkus an Ladekapazität, d. h. der Akkuzustand verschlechtert sich. Um den Akkuzustand zu überprüfen, halten Sie die Statustaste der Akku-Ladestandanzeige mindestens drei Sekunden lang gedrückt. Wenn keine der Anzeigen aufleuchtet, ist der Akku
in gutem Zustand, und mehr als 80 Prozent der ursprünglichen Ladekapazität verbleiben. Jede Anzeige stellt eine prozentuelle Verschlechterung dar. Wenn fünf Anzeigen leuchten, verbleiben weniger als 60 Prozent der Ladekapazität. In diesem Fall sollten Sie den Akku austauschen. Weitere Informationen über die Betriebsdauer des Akkus finden Sie in Ihrem
Warnung „Akku niedrig”
HINWEIS: Um den Verlust oder die Beschädigung von Daten zu vermeiden, sollten Sie Ihre Arbeit bei
einer Warnung „Akku niedrig” unverzüglich speichern. Schließen Sie danach den Computer an eine
Netzsteckdose an, oder setzen Sie einen zweiten Akku in den Modulschacht ein. Ist der Akku vollständig
entladen, wird automatisch der Ruhezustand aktiviert.
Ein Popup-Fenster mit einer Warnung wird angezeigt, wenn der Ladezustand bei etwa 10% liegt.
Weitere Informationen zu Warnhinweisen bei niedrigem Batterieladezustand finden Sie in Ihrem
Benutzerhandbuch
Die Warnung „Akku niedrig” wird angezeigt, wenn der Akku zu ungefähr 90 Prozent entladen ist.
Es wird ein Signalton ausgegeben, der darauf hinweist, dass nur noch die Mindestbetriebsdauer
verbleibt. Während dieser Zeit gibt der Lautsprecher in regelmäßigen Abständen Signaltöne aus.
Falls zwei Akkus installiert sind, bedeutet die Warnung „Akku niedrig”, dass die Gesamtkapazität
Benutzerhandbuch
.
.
96 Kurzanleitung Dell Precision Mobile Workstation M20
Page 97

der beiden Akkus zu etwa 90 Prozent erschöpft ist. Der Computer geht in den Ruhezustand über,
wenn die Akkuladung ein kritisch niedriges Niveau erreicht hat. Weitere Informationen zu Warnhinweisen bei niedrigem Batterieladezustand finden Sie in Ihrem
Benutzerhandbuch
.
Aufladen des Akkus
ANMERKUNG: Das Aufladen eines vollständig entladenen Akkus mit dem Netzadapter dauert bei aus-
geschaltetem Computer etwa 1 Stunde. Bei eingeschaltetem Computer verlängert sich die Ladezeit entsprechend. Der Akku kann beliebig lange im Computer verbleiben. Der interne Schaltkreis des Akkus verhindert ein Überladen.
Wenn der Computer an das Stromnetz angeschlossen oder ein Akku in einen daran angeschlossenen Computer eingesetzt wird, prüft der Computer den Ladezustand und die Temperatur des Akkus. Der Netzadapter lädt gegebenenfalls den Akku auf und erhält die Akkuladung.
Falls der Akku durch Betrieb in Ihrem Computer oder aufgrund hoher Umgebungstemperaturen
heiß ist, wird der Akku bei Anschluss des Computers an eine Steckdose unter Umständen nicht
geladen.
Der Akku ist zu heiß, um aufgeladen zu werden, wenn die Statusanzeige grün und orange
blinkt. Ziehen Sie den Netzstecker aus der Steckdose, und lassen Sie Computer und Akku auf
Zimmertemperatur abkühlen. Schließen Sie den Computer anschließend wieder an eine Steckdose
an, und setzen Sie den Ladevorgang fort.
Weitere Informationen zum Beheben von Problemen mit dem Akku finden Sie in Ihrem
handbuch
.
Benutzer-
Entfernen des Akkus
VORSICHT: Trennen Sie die Verbindung von Modem und Telefonleitung, bevor Sie die folgenden
Schritte ausführen.
Weitere Informationen zum Entfernen des zweiten Akkus finden Sie in Ihrem
HINWEIS: Wenn Sie den Akkuaustausch im Standby-Modus durchführen, haben Sie bis zu einer Minu-
te Zeit, um den Austauschvorgang abzuschließen, bevor das System herunterfährt und nicht gesicherte
Daten verloren gehen.
Stellen Sie sicher, dass der Computer entweder ausgeschaltet ist, sich in einem Stromverwal-
1
tungsmodus befindet oder an eine Steckdose angeschlossen ist.
2
Falls der Computer mit einem Docking-Gerät verbunden ist, trennen Sie die Verbindung.
Weitere Anweisungen hierzu finden Sie in der Dokumentation zum Docking-Gerät.
3
Den Freigabehebel des Akkufachs (oder des Modulschachts) an der Unterseite des Computers zur Seite schieben und in dieser Position festhalten, dann den Akku aus dem Akkufach
herausnehmen.
Kurzanleitung Dell Precision Mobile Workstation M20 97
Benutzerhandbuch
.
Page 98

www.dell.com | support.dell.com
Einsetzen eines Akkus
Schieben Sie den Akku in das Fach, bis er einrastet.
Weitere Informationen zum Einsetzen des zweiten Akkus finden Sie in Ihrem
Lagern des Akkus
Entfernen Sie den Akku, wenn Sie den Computer für längere Zeit lagern möchten. Akkus entladen
sich während einer längeren Lagerzeit. Nach einer langen Lagerung sollten Sie den Akku vollständig aufladen, bevor Sie ihn verwenden.
Benutzerhandbuch
.
98 Kurzanleitung Dell Precision Mobile Workstation M20
Page 99

Wissenswertes über Ihren Computer
Vorderansicht
Tastatur- und WirelessStatusanzeigen
Stummtaste
Bildschirm
Netzschalter
Tasten zur
Lautstärkeregelung
Trackstick
Tr ac ks t ic k/Touchpadtasten
Gerätestatusanzeige
Tastatur
Touchpad
Bildschirmhebel
Lautsprecher
Kurzanleitung Dell Precision Mobile Workstation M20 99
Page 100

Linke Seitenansicht
www.dell.com | support.dell.com
Sicherheitskabeleinschub
PC CardSteckplatz
Infrarotsensor
Audioanschlüsse (2)
Steckplatz für
Smart Card
100 Kurzanleitung Dell Precision Mobile Workstation M20
 Loading...