

Page 1

Dell™ | Interactive Projector
S520
Laser Touch Setup Guide
レーザータ ッチセットアッ プガイド
激光触控设置指南
雷射觸控設定指南
레이저 터치 설치 설명서
Panduan Konfigurasi Sentuhan Laser
คูมือการติดตั้ง Laser Touch
Page 2

Page 3

Dell™ | Interactive Projector
S520
Laser Touch Setup Guide
Page 4

About Notes
NOTE: A NOTE indicates important information that helps you make better use of your
projector.
__________________
Information in this document is subject to change without notice.
© 2014 Dell Inc. All rights reserved.
Reproduction of these materials in any manner whatsoever without the written permission of
Dell Inc. is strictly forbidden.
Trademarks used in this text: Dell and the DELL logo are trademarks of Dell Inc.; Microsoft,
Windows 7, and Windows Vista are trademarks or registered trademarks of Microsoft Corporation
in the United States and/or other countries.
Other trademarks and trade names may be used in this document to refer to either the entities
claiming the marks and names or their products. Dell Inc. disclaims any proprietary interest in
trademarks and trade names other than its own.
June 2014 P/N 05PF0 Rev. A02
Page 5
Set Up Laser Touch on Your Projector
Set Up Laser Touch on Your Projector
NOTE: You computer must have the
following minimum system requirements:
Operating System:
• Windows XP Professional service pack 3
32-bit, Windows 7 32-bit/64-bit, and
Windows 8 32-bit/64-bit
• Windows .NET Framework 4.0
installation is required (You can
download it from the Microsoft site)
• MacOS 10.6 and above
Minimum Hardware:
• Windows processor type: Intel Core i3
or above
• MAC processor type: Intel Core i2 duo
or above
• Windows/MAC RAM: 2 GB of RAM
required or more are recommended
• Windows/MAC Min. HDD space: 110 MB
of available hard-disk space
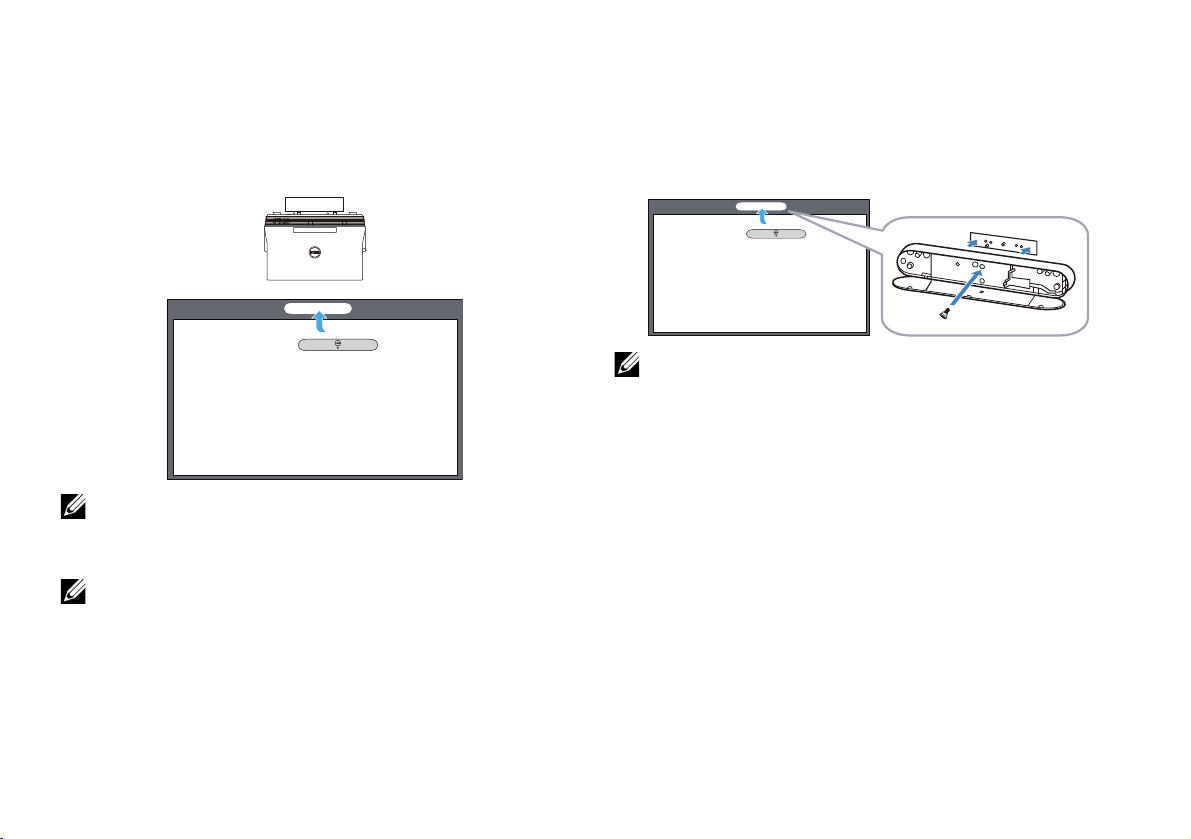
Part A: Install the Whiteboard
1 Install the whiteboard.
NOTE: Refer to "whiteboard installation
instructions".
3
Page 6
Set Up Laser Touch on Your Projector
(b) Screw
(a)
Part B: Mount the Projector
2 Install the wall mount and the projector.
NOTE: The wall mount is shipped with your
projector. Please refer "wall mount
installation instructions".
NOTE: Project at 87" for a maximum image
size projection or ~84" if you would like to
leave a border around the projector image
for optimal touch experience.
Part C: Attach Laser Curtain Kit
3 Attach the laser curtain kit onto the
whiteboard.
NOTES:
a Attachment is aided with locating pin
and magnets.
b You can also lock the kit in place with a
security screw.
c There is a cover for the laser curtain kit.
4
Page 7
Set Up Laser Touch on Your Projector
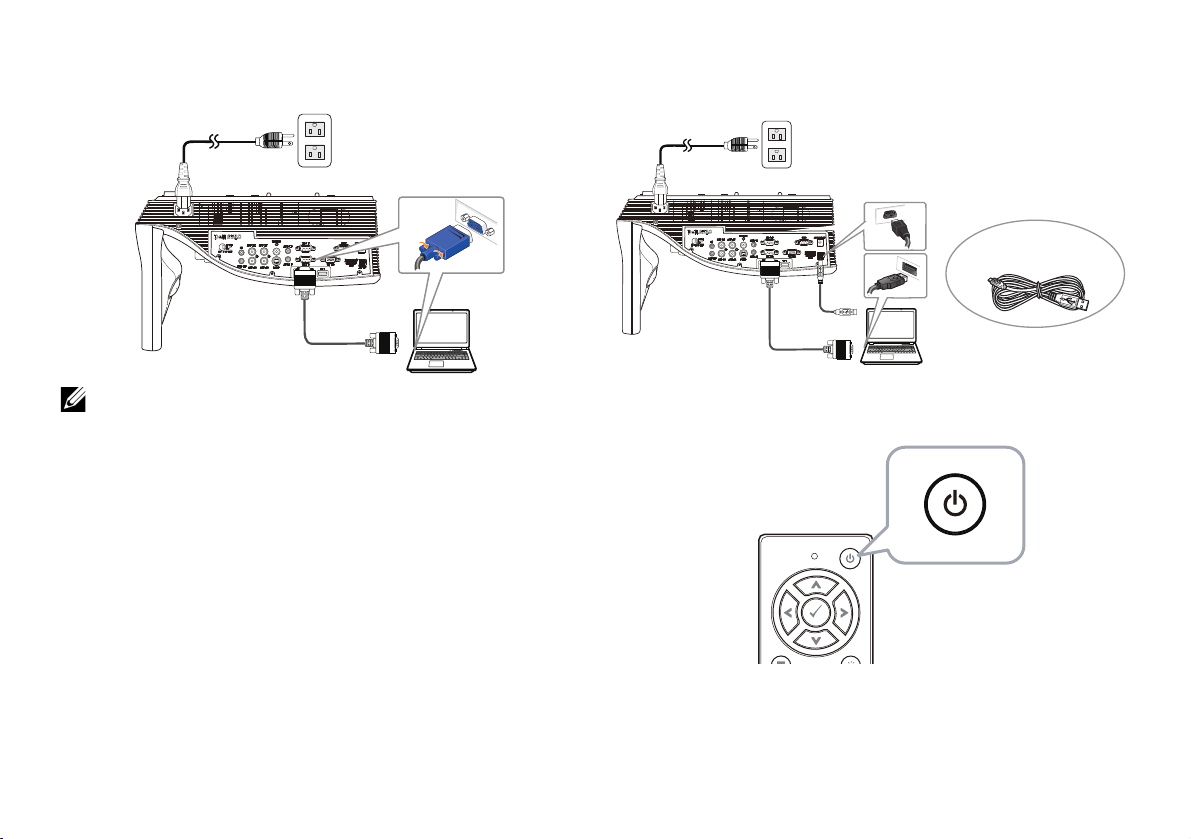
2m DC-to-DC cable
Part D: Connect Necessary
Cables
4 Connect power, video, Mini USB, and DC-
to-DC cables to the projector.
5 Connect the power cable to the power
outlet.
6 Connect the DC-to-DC cable to the laser
curtain kit.
5
Page 8
Set Up Laser Touch on Your Projector
MOLEX
5 m Mini USB cable
7 Connect the VGA cable to your computer.
NOTE: You can also project the image
through VGA-B and HDMI. Press the left
button on your control panel for auto
searching and selecting the correct input
source.
8 Connect the Mini USB cable to your
computer.
9 Power on the projector by pressing the
power button on the remote control.
6
Page 9
Set Up Laser Touch on Your Projector
Part E: Install the Touch Driver
on Your Computer
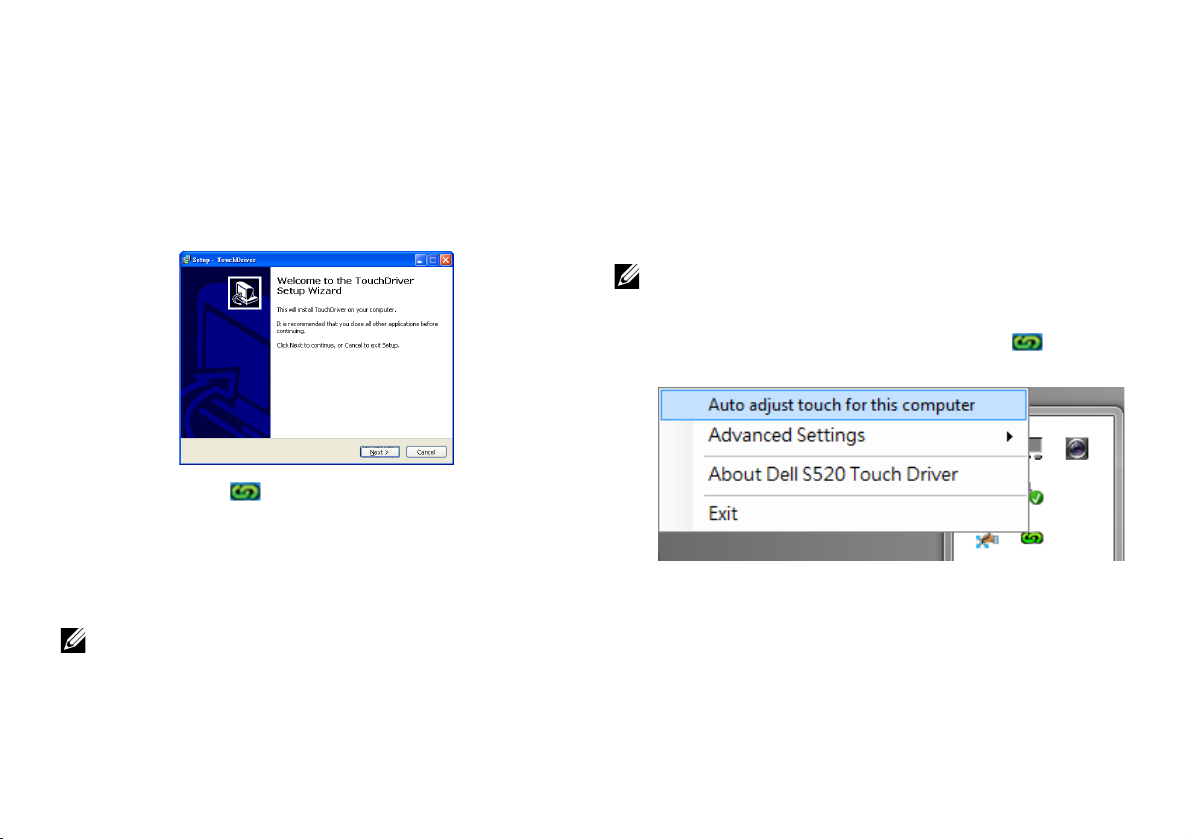
10 The TouchDriver install message will pop-
up automatically after you plug in the USB
cable to your computer. Follow the onscreen instruction to complete setup.
The driver icon will appear in your
computer's notification area if the driver has
installed successfully.
If the Touch driver is not automatically installed,
go to My Computer and run "TouchDriver.exe".
NOTE: You may require administrator-level
access to install the driver. Contact your
network administrator for support.
Part F: Initialize the Touch
Control Function: Auto Adjust
Touch
This is recommended for first-time use, and
necessary when touch screen responds
inaccurately or erratically.
NOTE: You have to project in duplicate or
projector only modes.
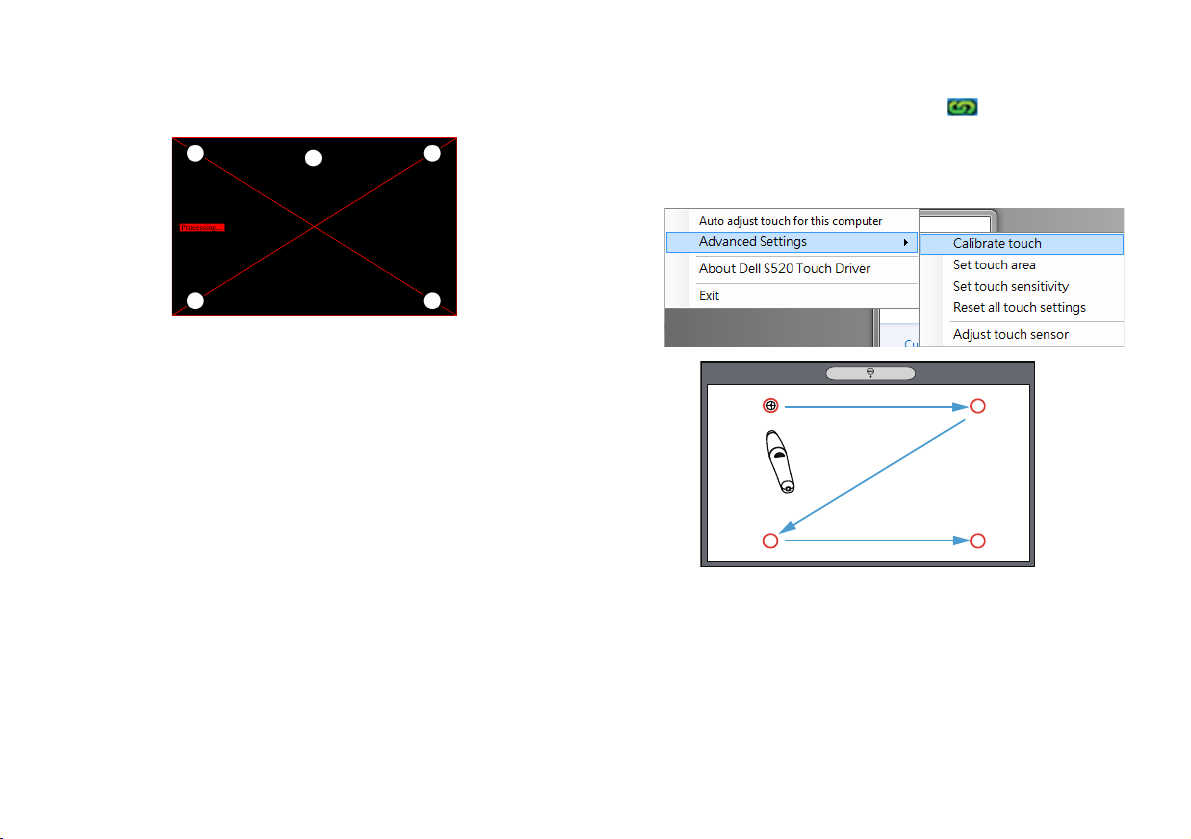
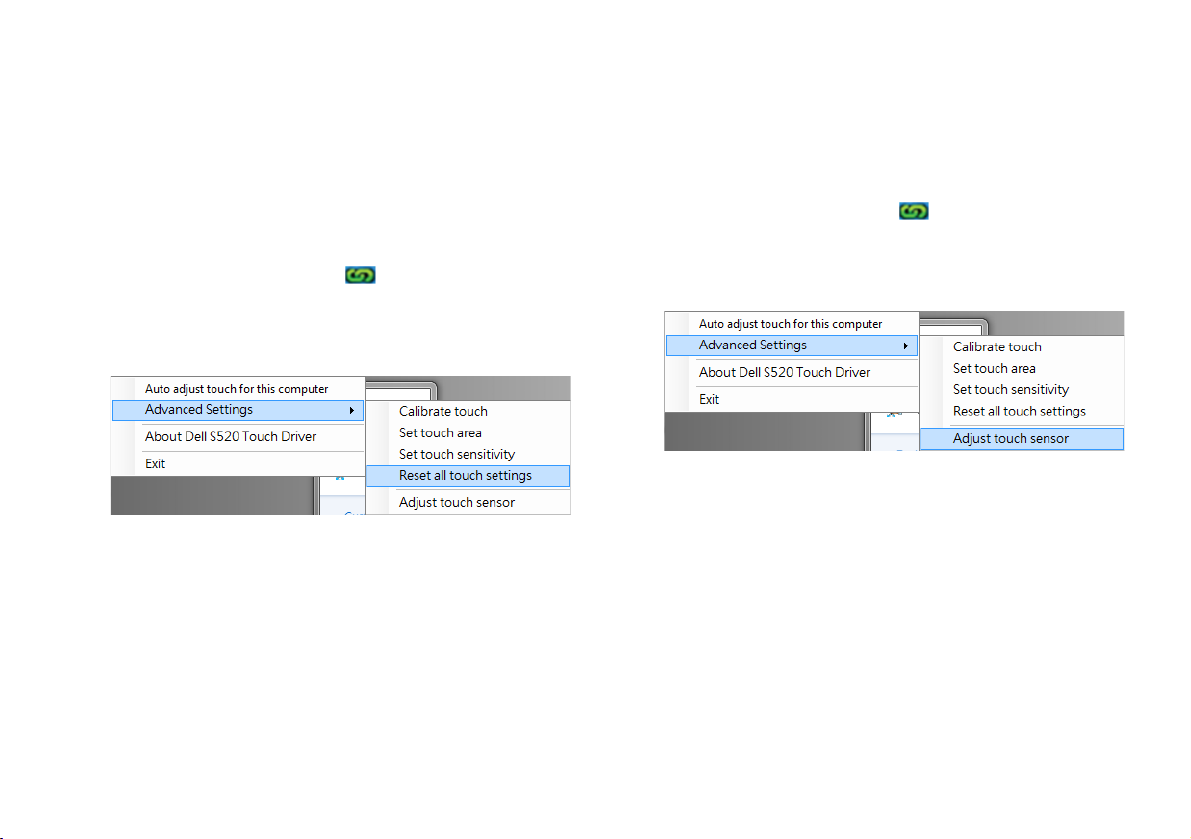
11 When executing driver, click the icon.
The following menu appears on-screen.
7
Page 10
Set Up Laser Touch on Your Projector
Select "Auto adjust touch for this computer"
option to execute the auto "calibration and
touch area" procedure.
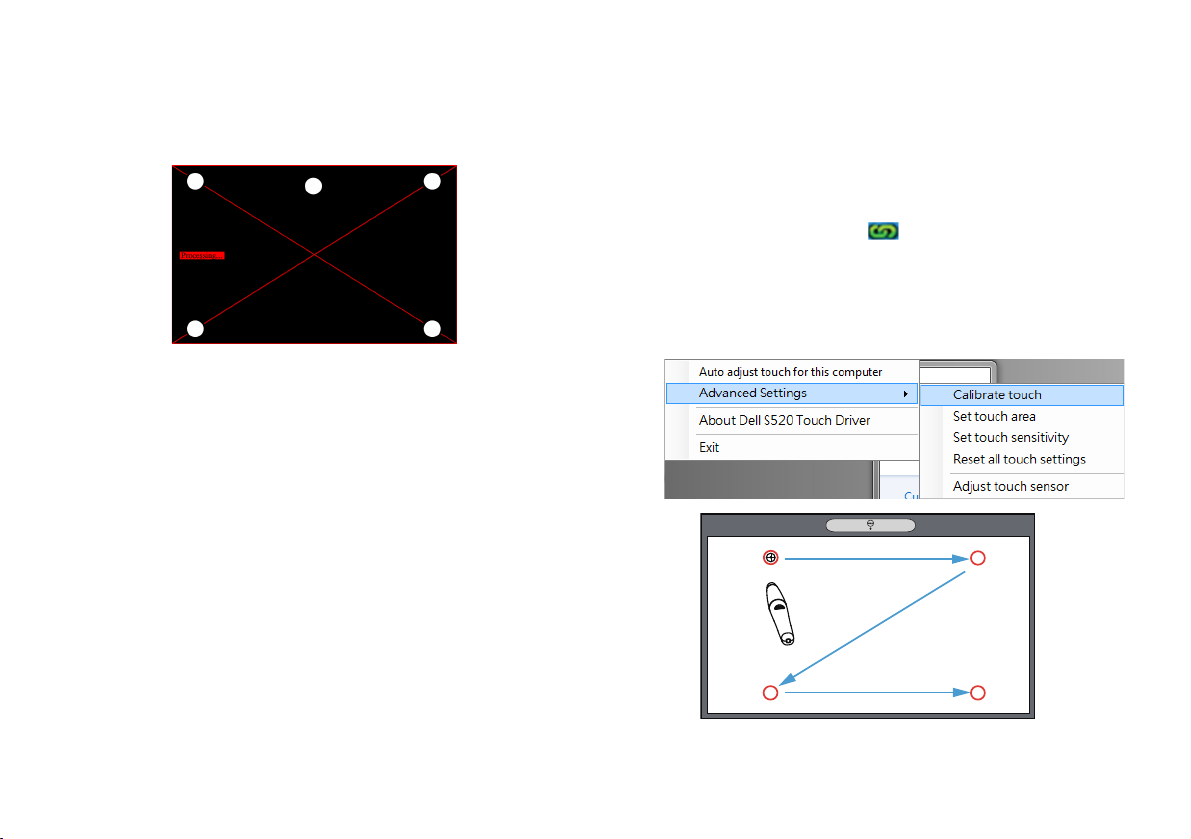
If the "auto adjust touch failed" message
prompts, please take the steps below for
troubleshooting, then do auto adjust touch
again.
a Turn lights off or reduce stray light to
whiteboard
b Do not walk in front of or move the
projector
c Adjust focus to sharpen the projected
image
If the "auto adjust touch still failed" message
appears on screen, please change to manual
calibrate touch and manual touch area.
Calibrate Touch by Manual:
Executing driver, click the icon, and go
to Advanced Settings menu, click the
Calibrate touch option to execute the
manual calibrate touch mode.
1
3
2
4
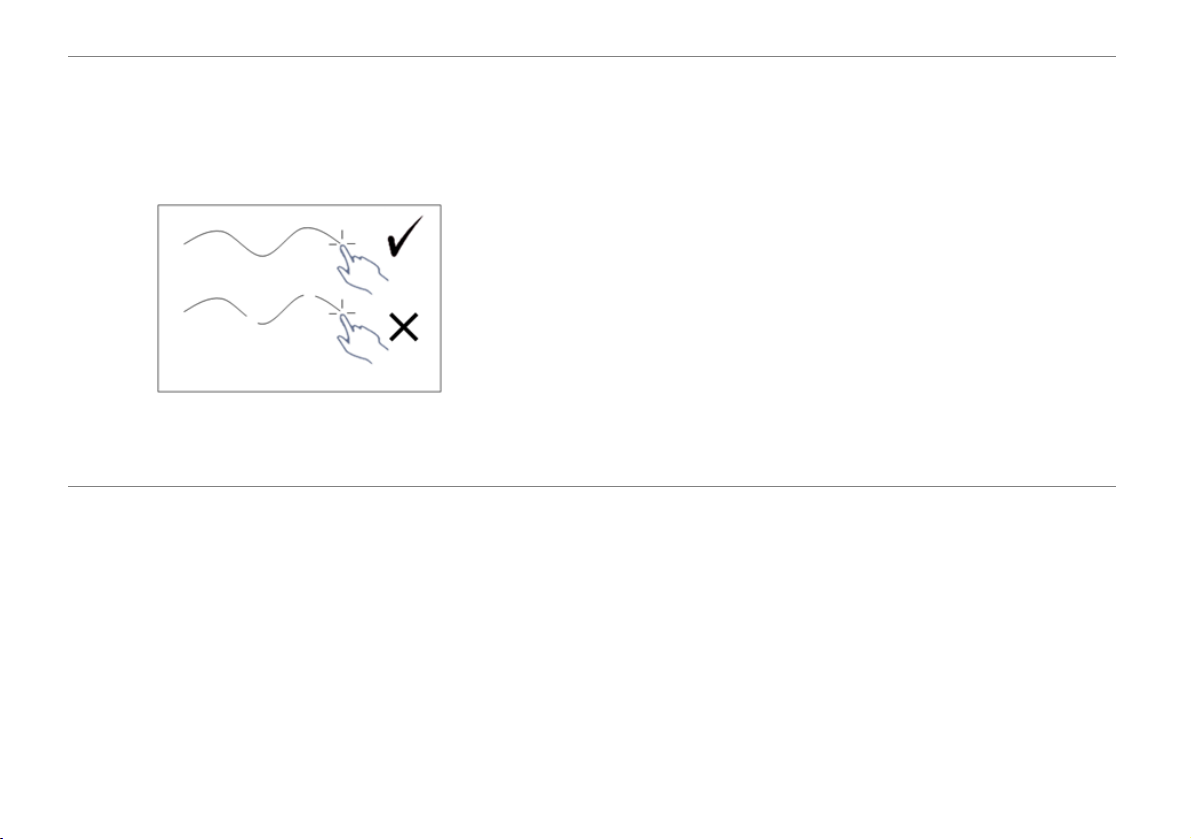
Touch the target marks on the screen.
(Press the "ESC" key to exit the calibration
process). After the 4th point of calibration
is finished, please wait for 2 seconds while
the calibration data is saved.
8
Page 11
Set Up Laser Touch on Your Projector
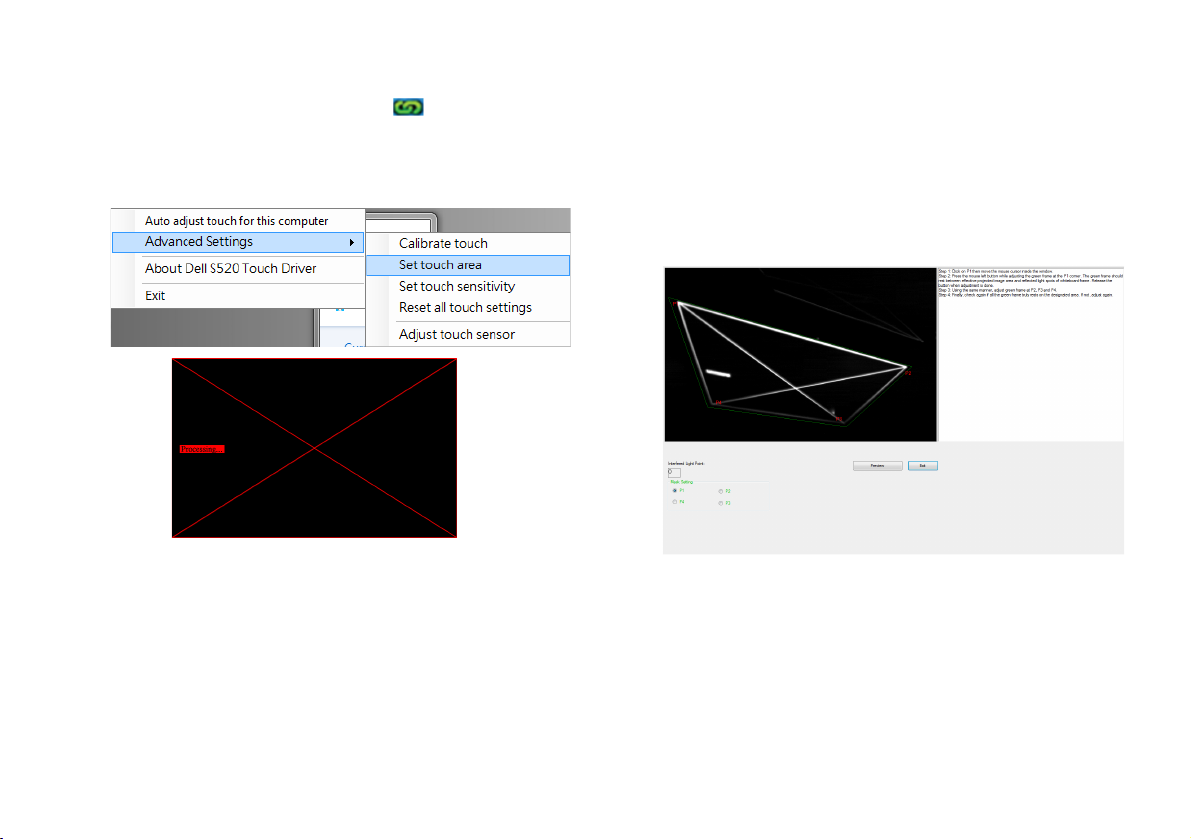
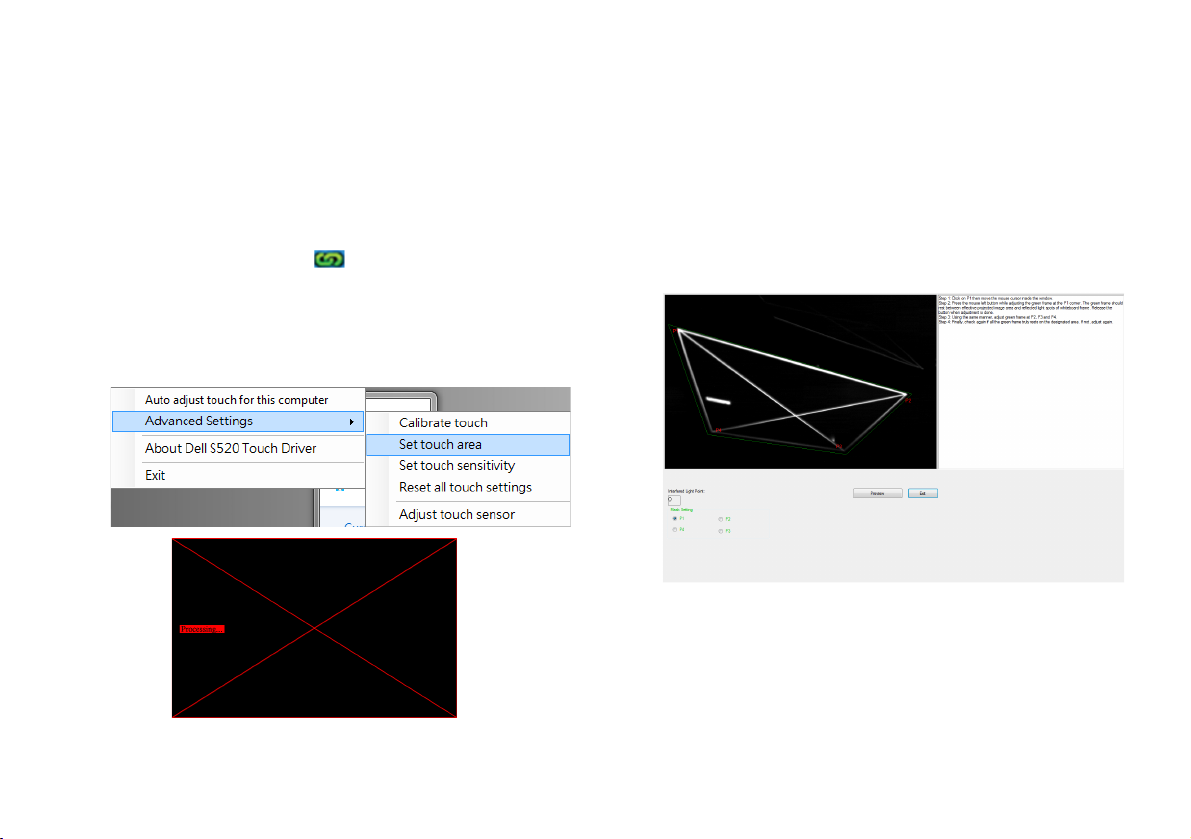
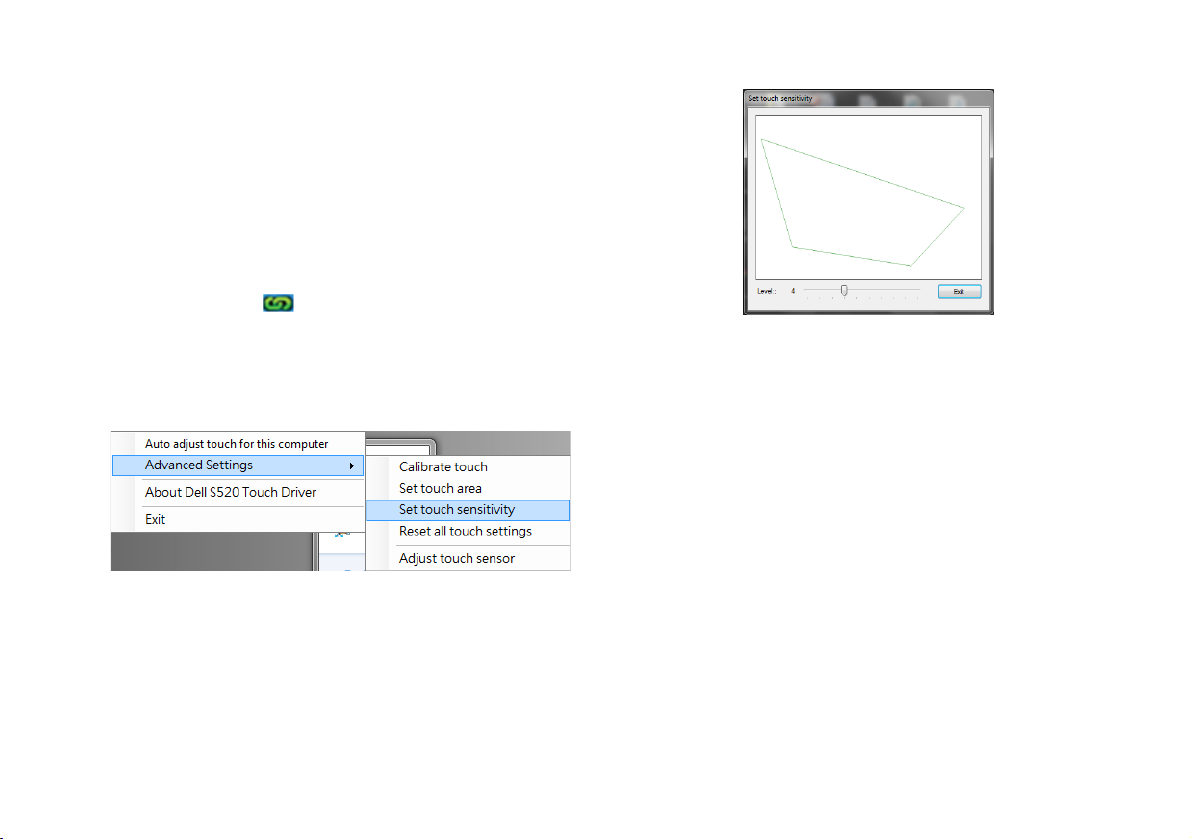
Touch Area by Manual:
Executing driver, click the icon, and go
to Advanced Settings menu, click the Set
touch area option to execute the manual
calibrate touch mode.
Touch area window will pop up.
Drag the 4 points, in the order of P1 to P4.
The green frame should lie slightly outside
the projected image area and there should
not be any reflected light spot within this
frame. Once you have completed this task,
click "Exit".
9
Page 12
Set Up Laser Touch on Your Projector
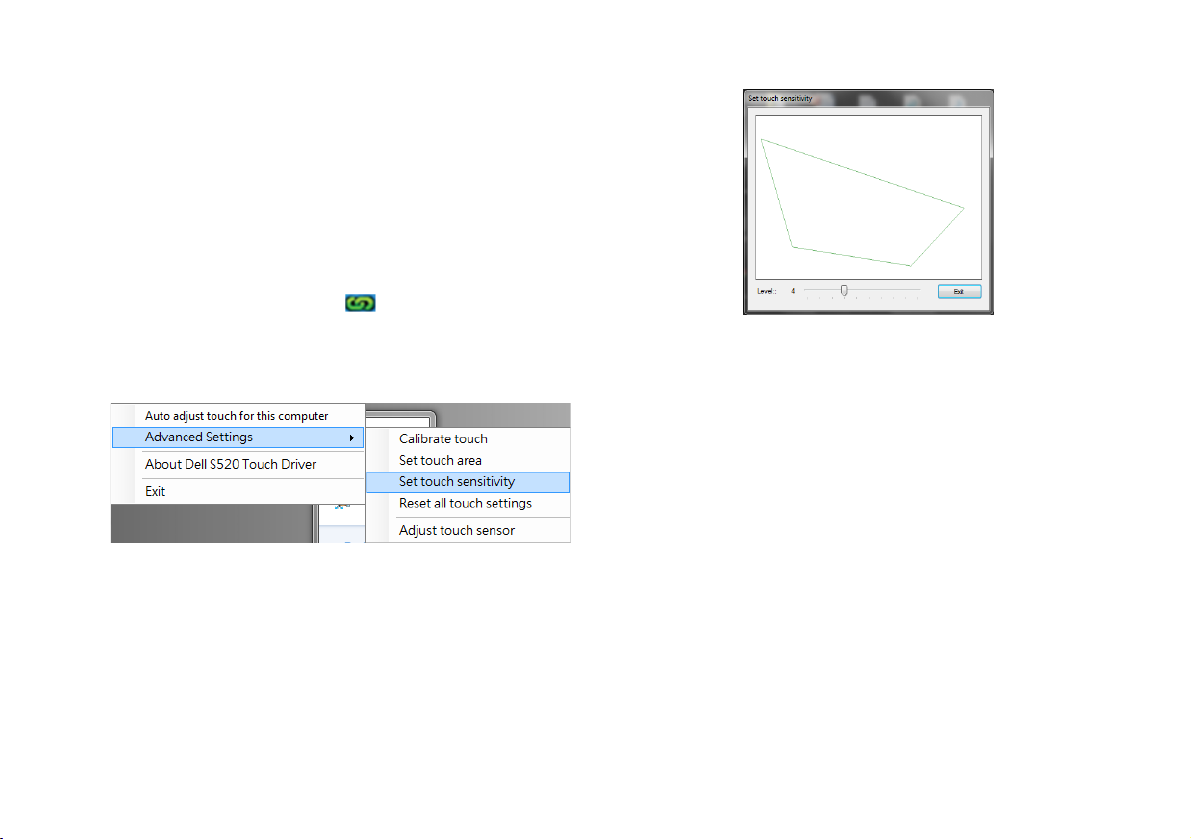
Part G: Touch Sensitivity
Adjust
When laser curtain has been operative for a
long period of time, the sensitivity might be
slightly reduced. Touch sensitivity functions to
re-sensitize the laser curtain by restoring the
initial setting.
Executing driver, click the icon, and go to
Advanced Settings menu, click the Set touch
Sensitivity option to re-sensitize laser curtain
by restoring the initial setting.
Default value for Touch Sensitivity is 4.
Increasing the value increases the Touch
Sensitivity and Decreasing the Touch Sensitivity
values reduces it.
10
Page 13
Set Up Laser Touch on Your Projector
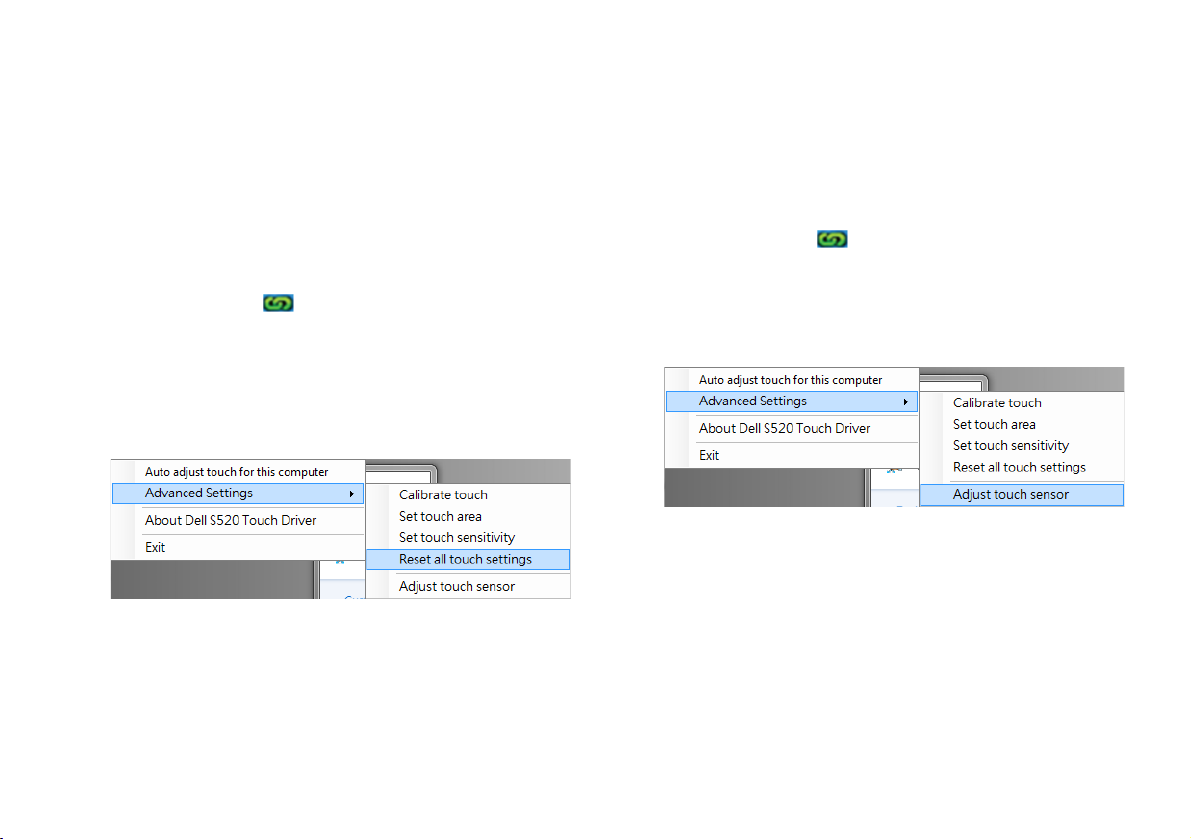
Part H: Reset All Touch
Settings
When auto or manual "calibrate touch and
touch area" settings still are incorrect, you can
to execute the Reset all touch settings option
to reset all settings to its factory default.
Executing driver, click the icon, and go to
Advanced Settings menu, click the Reset all
touch settings option to re-sensitize laser
curtain by restoring the initial setting.
Part I: Touch Sensor Adjust
When your touch sensor setting is incorrect,
you can to execute the Adjust touch sensor
option to manual adjust touch sensor area.
Executing driver, click the icon, and go to
Advanced Settings menu, click the Adjust
touch sensor option to manual adjust touch
sensor area.
11
Page 14

Set Up Laser Touch on Your Projector
Touch sensor adjustment instruction screen
shown below appears, and follow the onscreen instruction to complete settings.
Part J: Install the Workspace
Application Software on Your
Computer
The WorkSpace Application software is
bundled along with the CD that shipped with
your projector. Install the WorkSpace
Application Software and follow the on-screen
instructions to complete the setup. For more
instructions, refer to "WorkSpace Getting
Started Guide".
12
Page 15

Troubleshooting
Troubleshooting
If you experience problems with Touch, see the following troubleshooting tips. If the problem
persists, contact Dell (see Projector User's Guide Contacting Dell on page 122).
Problem Possible Solution
The touch functionality on the edge or
corner of image is not working.
Please refer to Part F to execute the auto adjust
touch or touch area by manual or project at ~84" if
whiteboard bezel is affecting touch functionality on
the edge of the image.
If there is a big gap between the cursor
and touch point.
Please refer to Part F to execute the auto adjust
touch.
13
Page 16
Troubleshooting
Problem (continued) Possible Solution (continued)
If the line drawn is not continuos, broken,
or if you encounter problems with the
Touch function in other areas of the
projected image.
1 Check for presence of foreign objects on the
whiteboard.
2 Please refer to Part I to execute the Adjust
touch sensor area.
3 If there is halogen lamp near the projector and
whiteboard, light from the halogen lamp may
affect touch performance. If so,
a Turn off the halogen lamp.
b Shielding the halogen lamp light to
whiteboard or camera.
c Reduce Touch Sensitivity in driver. Doing so
may however affect touch performance at
whiteboard corners.
14
Page 17

Dell™ | インタラクティブプロジェクタ
S520
レーザータ ッ チセッ トア ッ プガイド
Page 18

注について
メモ: 「メ モ」 は、 プ ロ ジ ェ ク タ の使用に際し て役立つ重要な情報です。
__________________
本書の内容は 予告な く 変更 さ れ る こ と が あ り ま す 。
© 2014 Dell Inc. All rights reserved.
Dell Inc. 社の書面に よ る 許諾 を 受け る こ と な く 、 ど の よ う な形態で あ っ て も 、 本書 を 複製す る こ
とは固く禁じられています。
本書で使用さ れ て い る 商標 :Dell および DELL ロゴは、Dell Inc の商標です。 Microsoft、
Windows 7、および Windows Vista は 、 米国 お よ び / ま たはそ の他の国に おける Microsoft
Corporation の商標ま た は登録商標です。
本書で使用 さ れ て い る そ の 他 の商標お よ び製品名は そ れ ぞ れ の 所有者 に 帰属 し て い ま す。 Dell
Inc. は他社の所有す る商標や製品名の 所有権 を す べ て 放棄 し ま す。
2014 年 6 月 P/N 05PF0 Rev. A02
Page 19
プロジェクタへのレーザータ ッチのセッ トアッ プ
プロジェクタへのレーザータッチのセットアップ
メモ: コンピュータには以下の最低システ
ム要件を満た し てい る必要があ り ま す。
オペレーテ ィ ングシステム :
• Windows XP Professional service pack 3
32 ビット、Windows 7 32 ビット/
64 ビット、Windows 8 32 ビット/
64 ビット
• Windows .NET Framework 4.0 をインス
トールする必要があります(Microsoft
サイトからダウンロードできます)
•MacOS 10.6以上
最低ハ ー ド ウ ェ ア :
•Windowsプロセッサータイプ:Intel
Core i3 以上
•MACプロセッサータイプ :Intel Core i2
duo 以上
• Windows/MAC RAM:RAM 2GB (必須)
以上推奨
• Windows/MAC の最小HDD 容量 :
110 MB の空き ハー ド デ ィ ス ク容量
パート A: ホワイトボードの
取り付け
1 ホワイトボードを取り付けます。
メモ: 「ホ ワ イ ト ボー ド取り付け手順」 を
参照 し て く だ さ い。
3
Page 20
プロジェクタへのレーザータ ッチのセッ トアッ プ
(b) ネジ
(a)
パート B :プロジェクタの
取り付け
2 ウォールマウントおよびプロジェクタを取
り付けます。
メモ: ウォールマウントはプロジェクタに
付属しています。 「ウ ォールマウント取り付
け手順」 を 参照 し て く だ さ い。
メモ: 最大画像投影を 行 う 場合は 87 インチ
で投影し ます。 最適な タ ッ チ体験のため、
投影画像の周囲に境界を 残す場合は、 84
インチ以下で投影します。
パート C :レーザーカーテン
キットの取り付け
3 ホワイトボード上にレーザーカーテン
キットを取り付けます。
注:
a ア タ ッ チ メ ン ト は、 位置決め ピ ン お よ び
磁石で補助 さ れ ま す。
b また、 セキュ リティネジでキ ッ トを
ロックすることができます。
c レーザーカーテンキッ ト用のカバーが
あります。
4
Page 21

プロジェクタへのレーザータ ッチのセッ トアッ プ
2 m DC - DC ケーブル
パート D :必要なケーブルの
接続
4 電源、 ビ デ オ 、 ミ ニ USB、およびDC - DC
ケーブルをプロジェ ク タに接続します。
5 電源ケ ー ブ ル を 電源 コ ン セ ン ト に 接続 し ま
す。
6 DC - DC ケーブルをレーザーカーテンキッ
トに接続します。
5
Page 22
プロジェクタへのレーザータ ッチのセッ トアッ プ
MOLEX
5 m ミニ USB
ケーブル
7 VGA ケーブルをお使いのコンピュータに接
続し ます。
メモ: また、VGA-B および HDMI を通し て、
画像 を 投影 す る こ と が で き ま す。 制御 パ ネ
ル上の左ボ タ ン を 押 し て 、 自動検索 を 行 い 、
正しい入力ソー スを選択します。
8 ミニUSB ケーブルをお使いのコンピュータ
に接続します。
9 リモコンの電源ボタンを押して、 プロジェ
クタに電源を投入します。
6
Page 23
プロジェクタへのレーザータ ッチのセッ トアッ プ
パート E :コンピュータへの
タッチドライバのインストール
10 USB ケーブルをコンピ ュータに接続
TouchDriver インストールメ ッ セージが自
動的に ポ ッ プ ア ッ プ 表示 さ れ ま す。 画面 の
指示に従 っ て 、 セ ッ ト ア ッ プ を 完了 し ま す。
ドライバが正常にインストールされると、 コン
ピ ュ ー タ の 通知領域 に ド ラ イ バ ア イ コ ン が表
示されます。
タ ッチドライバが自動的にインストールされな
い場合は、 マイ コンピューターに移動し、
「TouchDriver.exe」 を 実行 し て く だ さ い。
メモ: ドライバをインストールするには、
管理者 レ ベ ル の ア ク セ ス が 必要で す。 ネ ッ
トワーク管理者に連絡し、 サポートを求め
てください。
パート F : タ ッ チ 制御機能の
初期化 : 自動調整 タ ッ チ
こ れ は初回使用時に推奨 さ れ、 タ ッ チ ス ク リ ー
ン の 反応が不正確ま た は不規則な 場合 に 必要 と
なります。
メモ: 重複モ ー ド ま た は プ ロ ジ ェ ク タ の み
モ ー ド で投影す る 必要が あ り ま す。
11 ドライバを実行する時は、 アイコンをク
リ ッ ク し ま す 。 画面上 に次の メ ニ ュ ー が表
示されます。
7
Page 24
プロジェクタへのレーザータ ッチのセッ トアッ プ
1
3
4
2
「Auto adjust touch for this computer (こ の コ
ン ピ ュ ー タ の自動調整 タ ッ チ)」オプションを選
択 し て 、 自動 「校正 と タ ッ チ領域」 手順 を 実行
します。
「auto adjust touch failed (自動調整 タ ッ チ に 失
敗し ま し た)」 と い う メ ッ セ ー ジ が表示 さ れ た
ら 、 以下 の手順に従 っ て ト ラ ブ ル シ ュ ー テ ィ ン
グ を 行い、 自動調整 タ ッ チ を 再 び実行 し て く だ
さい。
a ライトを消す、 または、 ホワイトボード
へ の迷光 を 減 ら し ま す。
b プロジェクタの前を歩いたり、 プロジェ
クタを動かしたりしないようにします。
c フ ォ ー カ ス を 調整 し 、 投影画像を シ ャ ー
プします。
「auto adjust touch still failed (自動調整 タ ッ チ
に再度失敗 し ま し た )」というメッセージがスク
リ ー ン に 表示 さ れ た ら 、 手動校正 タ ッ チ と 手動
タ ッ チ領域に切り替え て く だ さ い。
手動に よ る 校正 タ ッ チ :
ドライバを実行し、 アイコンをクリ ック
して、Advanced Settings (詳細設定) メ
ニューに進み、Calibrate touch (校正 タ ッ
チ) オ プ シ ョ ン を ク リ ッ ク し て手動校正
タッチモードを実行します。
8
Page 25
プロジェクタへのレーザータ ッチのセッ トアッ プ
画面上の対象マ ー ク に タ ッ チ し て く だ さ
い。 (「ESC」キーを押して、校正プロセス
を 終了 し ま す)。 第 4 校正 ポ イ ン ト が完了
し た後、 校正 デ ー タ が保存 さ れ る ま で 、 2
秒間待機 し て く だ さ い。
手動に よ る タ ッ チ領域 :
ドライバを実行し、 アイコンをクリック
して、Advanced Settings (詳細設定) メ
ニューに進み、Set touch area (タ ッ チ領
域の設定) オプショ ンをクリ ッ クして手動
校正 タ ッ チ モ ー ド を 実行 し ま す 。
タッチ領域ウィンドウがポップアップ表示
されます。
P1 から P4 の順に 4 つのポイントをドラ ッ
グします。緑色のフレームが投影された画
像領域の少し 外側 に 表示 さ れ ま す。 そ し
て、 こ の フ レ ー ム内に反射光ス ポ ッ ト が な
い よ う に し ま す。 こ の タ ス ク を 完了後、
「Exit (終了)」 を ク リ ッ ク し ま す。
9
Page 26
プロジェクタへのレーザータ ッチのセッ トアッ プ
パート G : Touch Sensitivity
( タ ッ チ 感度) の調整
レ ー ザ ー カ ー テ ン が長時間に わ た っ て 動作 し て
い る 場合、 感度が若干低下す る お そ れ が あ り ま
す。 Touch sensitivity (感度機能 を タ ッ チ し )、
初期設定 を 復元 す る こ と に よ っ て 、 レ ー ザ ー
カ ー テ ン を 再感作 し ま す。
ドライバを実行し、 アイコンをクリ ックして、
Advanced Settings (詳細設定) メニューに進
み、 Set touch Sensitivity ( タ ッ チ感度の設定)
オ プ シ ョ ン を ク リ ッ ク し て 初期設定 を復元す る
こ と に よ っ て レ ー ザ ー カ ー テ ン を再感作 し ま す。
Touch Sensitivity ( タ ッ チ 感度) の デ フ ォ ル ト
値は 4 です。 値を大き く する と Touch
Sensitivity ( タ ッ チ 感度) が 向上 し 、 Touch
Sensitivity ( タ ッ チ 感度) の値 を 小 さ く す る と 、
感度 を 減 ら す こ と が で き ま す。
10
Page 27
プロジェクタへのレーザータ ッチのセッ トアッ プ
パート H :すべてのタッチ設定
のリセット
自動 ま た は手動 「校正 タ ッ チ お よ び タ ッ チ 領域」
設定が ま だ正 し く な い場合、 Reset all touch
settings (全て の タ ッ チ設定の リ セ ッ ト ) オプ
シ ョ ン を 実行 し て す べ て の設定を 出荷時デ フ ォ
ルトにリセッ トすることができます。
ドライバを実行し、 アイコンをクリ ックして、
Advanced Settings (詳細設定) メニューに進
み、 Reset all touch settings (すべて の タ ッ チ
設定のリセット) オプションをクリ ッ クして初
期設定 を 復元 す る こ と で 、 レ ー ザ ー カ ー テ ン を
再感作 し ま す。
パート I :タッチセンサー調整
タ ッ チ セ ン サ ー設定が間違 っ て い る と き 、
Adjust touch sensor (タ ッ チセンサーの調整)
オ プ シ ョ ン を 実行 し て タ ッ チ セ ン サ ー 領域 を 手
動調整す る こ と が で き ま す。
ドライバを実行し、 アイコンをクリ ックして、
Advanced Settings (詳細設定) メニューに進
み、 Adjust touch sensor (自動センサーの調
整) オプシ ョ ンをク リ ッ クしてタ ッチセンサー
領域 を 手動調整 し ま す 。
11
Page 28

プロジェクタへのレーザータ ッチのセッ トアッ プ
以下に タ ッ チ セ ン サ ー調整指示が表示 さ れ た ら 、
画面の指示に従 っ て 設定 を 完了 し ま す。
パート J :コンピュータへの
ワークスペースアプ リ ケーシ ョ
ンソフトウェアのインストール
ワークスペースアプ リケーシ ョ ンソフトウ ェア
は、 プ ロ ジ ェ ク タ に付属の CD と共にバンドル
されています。 ワークスペースアプ リケーショ
ン ソ フ ト ウ ェ ア を イ ン ス ト ー ル し 、 画面上 の指
示に従い セ ッ ト ア ッ プ を 完了 し ま す 。 詳細手順
は、 「ワ ー ク ス ペ ー ス ス タ ー ト ア ッ プ ガ イ ド ガ イ
ド」 を参照して く だ さ い。
12
Page 29
トラブルシューティング
トラブルシューティング
タ ッ チ で問題が発生 し た 場合、 次 の ト ラ ブ ル シ ュ ー テ ィ ン グ の ヒ ン ト を 参照 し て く だ さ い 。 問題が
解決 し な い場合は、 Dell に連絡して く ださい (プロジェ クタのユーザーガイドの 122 ページ Dell へ
のお問い合わせを参照)。
問題 解決方法
画像の エ ッ ジ ま た は コ ー ナ ー で は、 タ ッ
チ機能が動作し ま せ ん 。
手動で自動調整 タ ッ チ ま た は タ ッ チ領域 を 実行 す る
場合、 あ る い は、 ホ ワ イ ト ボ ー ド の ベ ゼ ル が 、 画像
の エ ッ ジ上で の タ ッ チ 機能 に 影響 を及ぼ し て い る と
きに 84 イ ン チ以下で投影す る 場合は、 パ ー ト F を
参照 し て く だ さ い。
カーソルとタ ッチポイントの間に大きな
ギ ャ ッ プ が あ る 場合。
自動調整 タ ッ チ を 実行す る に は、 パ ー ト F を参照
してください。
13
Page 30
トラブルシューティング
問題
(続 き )
描か れ た 線が、 連続的で は な く 、 途切れ
て い る 場合、 ま た は 、 投影画像の他の領
域で タ ッ チ 機能の問題が発生し た場合。
解決方法
(続き )
1 ホ ワ イ ト ボ ー ド 上の異物の有無 を 確認 し て く だ
さい。
2 タッチセンサー領域の調整を実行するには、
パート I を参照し て く だ さ い。
3 プロジェクタおよびホワイトボード近くにハロ
ゲンランプがある場合、 ハロゲンランプからの
光が、 タ ッ チ性能に影響を与え る場合があ り ま
す。 そ の場合は、
a ハロゲンランプをオフにします。
b ホワイトボードまたはカメラに対するハロゲ
ンランプの光を遮蔽します。
c ドライバでTouch Sensitivity ( タ ッ チ 感度)
を減ら し ます。 し か し、 そ う する こ と で、 ホ
ワイトボードの四隅でのタ ッチ性能に影響を
与え る可能性が あ り ま す。
14
Page 31

Dell™ | 交互式投影仪
S520
激光触控设置指南
Page 32

关于 “ 注 ”
注: “ 注 ” 表示重要信息,可以帮助您更好地使用投影机。
__________________
本文档所含信息如有更改,恕不通知。
© 2014 Dell Inc. 版权所有。
未经 Dell Inc. 的书面许可,严禁任何人以任何方式复制这些资料。
本文所用商标:Dell 和 DELL 标志是 Dell Inc. 的商标; Microsoft、 Windows 7 和 Windows Vista
是 Microsoft Corporation 在美国和 / 或其他国家 (地区)的商标或注册商标。
本文档中可能用到的其它商标和品牌名称是指拥有该商标或名称的实体或其产品。除其自身的商
标和品牌名称之外, Dell Inc. 对其它商标和品牌名称不拥有任何权益。
2014 年 6 月 P/N 05PF0 Rev. A02
Page 33

在投影仪上设置激光触控
在投影仪上设置激光触控
注: 您的计算机必须满足下列最低系统要求:
操作系统:
• Windows XP Professional service pack 3
32-bit、 Windows 7 32-bit/64-bit 及
Windows 8 32-bit/64-bit
• 需要安装 Windows .NET Framework 4.0
(您可以从微软网站下载)
•MacOS 10.6及更高版本
最低硬件:
•Windows处理器类型:Intel Core i3
或以上
•MAC处理器类型:Intel Core i2 duo
或以上
• Windows/MAC RAM:2 GB RAM,建议
使用更大容量
• Windows/MAC 最小硬盘空间:110 MB
可用硬盘空间
A 部分:安装白板
1 安装白板。
注: 参见 “ 白板安装说明 ”。
3
Page 34

在投影仪上设置激光触控
(b) 螺丝
(a)
B 部分:安装投影仪
2 安装壁挂架和投影仪。
注: 此投影仪附送壁挂架。请参见 “ 壁挂架
安装说明 ”。
注: 在 87" 屏幕上投影时可以达到最大投影
图像尺寸;如果希望在投影图像四周留出边
框以达到最佳触控体验,可以在 ~84" 屏幕上
投影。
C 部分:安装激光幕套件
3 将激光幕套件安装到白板上。
注:
a 安装时需使用定位销和磁铁。
b 此外,也可以使用安全螺丝将套件锁定到
位。
c 激光幕套件有一个护盖。
4
Page 35

在投影仪上设置激光触控
2m DC 到 DC 线
D 部分:连接必要的线缆
4 将电源线、视频线、 Mini USB 线和 DC 到
DC 线连接到投影仪。
5 将电源线连接到电源插座。
6 将 DC 到 DC 线连接到激光幕套件。
5
Page 36

在投影仪上设置激光触控
5m Mini USB 线
7 将 VGA 线连接到计算机。
注: 您还可以通过 VGA-B 和 HDMI 投影图
像。按控制面板上的向左按钮自动搜索和选
择正确的输入源。
8 将 Mini USB 线连接到计算机。
MOLEX
9 按遥控器上的电源按钮开启投影仪。
6
Page 37

在投影仪上设置激光触控
E 部分:在计算机中安装触控驱
动程序
10 将 USB 线插入计算机后,自动弹出
TouchDriver 安装消息。按照屏幕上的说明
完成安装。
如果驱动程序安装成功,驱动程序图标 会出现
在计算机的通知区域中。
如果触控驱动程序不自动安装,可以转到我的电
脑,然后运行 “TouchDriver.exe”。
注: 为了安装驱动程序,您需要拥有管理员
权限。请联系网络管理员为您提供支持。
F 部分:初始化触控功能:自动
调节触屏
建议在首次使用时启用,并在触摸屏响应不准确
或不正常时启用。
注: 您必须在双屏幕模式或仅投影机模式下
才能进行投影。
11 在执行驱动程序时,单击 图标。屏幕上显
示下面的菜单。
7
Page 38

在投影仪上设置激光触控
选择 “Auto adjust touch for this computer
(对本计算机自动调节触屏) ” 选项,以执行自动
“ 校准和触控区域 ” 程序。
如果显示 “auto adjust touch failed (自动调节
触屏失败) ” 消息,请采取下面的步骤排除故障,
然后再进行一次自动调节触屏。
a 关闭灯光或者减少照到白板上的杂散光。
b 请勿在投影仪前面走动或移动投影仪。
c 调整焦距以使投影图像更清晰。
如果屏幕上显示 “auto adjust touch still failed
(自动调节触屏仍然失败) ” 消息,请改为手动校
准触屏和手动触控区域。
手动校准触屏:
执行驱动程序,单击 图标,进入
Advanced Settings (高级设置)菜单,单
击 Calibrate touch (校准触屏)选项,执
行手动校准触屏模式。
1
3
2
4
请触摸屏幕上的目标遮盖。(按 “ESC” 键退
出校准过程)。第四个点校准完毕后,请等
待 2 秒钟以保存校准数据。
8
Page 39

在投影仪上设置激光触控
手动触控区域:
执行驱动程序,单击 图标,进入
Advanced Settings (高级设置)菜单,单
击 Set touch area (设置触控区域)选项,
执行手动校准触屏模式。
弹出触控区域窗口。
按照P1到P4的顺序拖动4个点。绿框应略
微超出投影图像区域,此框内不应有任何反射
亮点。完成此任务后,单击
“Exit
(退出)”。
9
Page 40

在投影仪上设置激光触控
G 部分:Touch Sensitivity
(触摸灵敏度)调整
激光幕在长时间运行后,灵敏度可能会略有下
降。通过 Touch sensitivity (触摸灵敏度)功能
恢复初始设置,以恢复激光幕灵敏度。
执行驱动程序,单击 图标,进入 Advanced
Settings (高级设置)菜单,单击 Set touch
Sensitivity (设置触摸灵敏度)选项,恢复初始
设置,以恢复激光幕灵敏度。
触摸灵敏度的默认值是 4。增大值时提高触摸灵
敏度,减小值时降低触摸灵敏度。
10
Page 41

在投影仪上设置激光触控
H 部分:重置所有触摸设置
如果自动或手动 “ 校准触屏和触控区域 ” 设置仍
然不正确,可以执行 Reset all touch settings
(重置所有触摸设置)选项,以将所有设置重置
为出厂默认设置。
执行驱动程序,单击 图标,进入 Advanced
Settings (高级设置)菜单,单击 Reset all
touch settings (重置所有触摸设置)选项,
恢复初始设置,以恢复激光幕灵敏度。
I 部分:触摸传感器调整
如果触摸传感器设置不正确,可以执行 Adjust
touch sensor (调节触摸传感器)选项,以手动
调节触摸传感器区域。
执行驱动程序,单击 图标,进入 Advanced
Settings (高级设置)菜单,单击 Adjust touch
sensor (调节触摸传感器)选项,以手动调节触
摸传感器区域。
11
Page 42

在投影仪上设置激光触控
触摸传感器调节指示屏幕如下图所示,请按照屏
幕上的说明完成设置。
J 部分:在计算机中安装
Workspace 应用程序软件
在投影仪随附的光盘中,附带 WorkSpace 应用
程序软件。安装 WorkSpace 应用程序软件,并
按照屏幕上的说明完成设置。有关的详细信息,
请参见 “WorkSpace 入门指南 ”。
12
Page 43

故障排除
故障排除
如果触控功能出现问题,请参见下面的故障排除提示。如果问题仍然存在,请联系 Dell (参见投影仪
用户指南第 122 页的与 Dell 联系)。
问题 解决办法
图像边缘或角落的触控功能不起作用。 请参见 F 部分执行自动调节触屏或手动触控区域;
或者,如果白板斜面影响图像边缘的触控功能,请在
~ 84” 屏幕上投影。
如果光标和触摸点间距较大。 请参见 F 部分执行自动调节触屏。
13
Page 44

故障排除
问题
(续)
如果画线不连续或断开,或者如果触摸功
能在投影图像的其他区域遇到问题。
解决办法
(续)
1 检查白板上是否有异物。
2 请参见 I 部分执行自动触摸传感器区域。
3 如果投影仪和白板附近有卤素灯,卤素灯光线可
能影响触摸性能。在此情况下,
a 关闭卤素灯。
b 屏蔽照射到白板或镜头上的卤素灯光线。
c 在驱动程序中降低 Touch Sensitivity (触摸灵
敏度)。不过,这可能会影响白板角落的触摸
性能。
14
Page 45

Dell™ | 互動式投影機
S520
雷射觸控設定指南
Page 46

關於備註
備註: 備註代表能協助您更妥善應用投影機的重要資訊。
__________________
本文件中的資訊如有變更恕不另行通知。
© 2014 Dell Inc. 版權所有。
如果沒有事先獲得 Dell Inc. 的書面許可,嚴禁以任何方式重製本文件。
文中所使用的商標:Dell 及 DELL 標誌皆為 Dell Inc. 的商標;Microsoft、Windows 7 及 Windows
Vista 皆為 Microsoft Corporation 在美國及 / 或其他國家的商標或註冊商標。
本文件所使用的其他商標以及商業名稱分別為所屬個體所有,Dell 公司放棄其商標與商業名稱之
外的任何專屬權益。
2014 年 6 月 P/N 05PF0 Rev. A02
Page 47

在您的投影機上設定雷射觸控
在您的投影機上設定雷射觸控
備註: 您的電腦必需具有下列最低系統要求:
作業系統:
• Windows XP Professional service pack 3
32 位元、Windows 7 32 位元 /64 位元以
及 Windows 8 32 位元 /64 位元
• 需要安裝 Windows .NET Framework 4.0
(您可從 Microsoft 網站下載)
• MacOS 10.6 以上
最低硬體要求:
•Windows 處理器類型:Intel Core i3 以上
•MAC 處理器類型:Intel Core i2 duo 以上
• Windows/MAC RAM: 需要 2 GB RAM,
建議使用 2 GB 以上
• Windows/MAC 最小硬碟空間:110 MB
可用硬碟空間
第 A 部份:安裝白板
1 安裝白板。
備註: 請參閱 「白板安裝說明」。
3
Page 48

在您的投影機上設定雷射觸控
(b) 螺絲
(a)
第 B 部分:安裝投影機
2 安裝掛牆架及投影機。
備註: 您的投影機隨附掛牆架。請參閱 「掛
牆架安裝說明」。
備註: 以 87" 投影可獲得最大投影尺寸,或
者若您想要在投影機影像周圍留邊以獲得最
佳觸控體驗,可以 ~84" 投影。
第 C 部分:安裝雷射幕套件
3 將雷射幕套件安裝在白板上。
備註:
a 附加裝置可協助確定插銷及磁鐵的位置。
b 您也可利用安全螺絲鎖定套件。
c 雷射幕套件有一個護蓋。
4
Page 49

在您的投影機上設定雷射觸控
2m DC 轉 DC 纜線
第 D 部分:連接必要纜線
4 連接電源線、視訊線、Mini USB 纜線及 DC
轉 DC 纜線至投影機。
5 連接電源線至電源插座。
6 連接 DC 轉 DC 纜線至雷射幕套件。
5
Page 50

在您的投影機上設定雷射觸控
5 m Mini USB 纜線
7 將 VGA 纜線連接您的電腦。
備註: 您也可透過 VGA-B 及 HDMI 來投影。
按下控制面板上的左側按鈕,以便自動搜尋
和選擇正確的輸入來源。
8 將迷你 USB 纜線連接您的電腦。
MOLEX
9 按下遙控器上的電源按鈕以開啟投影機電
源。
6
Page 51

在您的投影機上設定雷射觸控
第 E 部分:在您的電腦上安裝觸
控驅動程式
10 將 USB 纜線連接電腦後,TouchDriver 安裝
訊息將自動跳出。請遵循螢幕上指示完成安
裝。
若驅動程式已成功安裝,驅動程式圖示 將出
現在您電腦的通知區域。
若觸控驅動程式未自動安裝,請前往我的電腦並
執行 「TouchDriver.exe」。
備註: 您可能需要管理員層級的存取權限才
能安裝驅動程式。請聯絡網路管理員取得支
援。
第 F 部分:啟動觸控功能:自動
調整觸控
初次使用時,建議進行此操作;觸控畫面反應不
準確或不穩定時,亦須進行觸控校正。
備註: 您必須在重複或投影機模式下進行投
影。
11 執行驅動程式時,請按一下 圖示。下列
選單會出現在畫面上。
7
Page 52

在您的投影機上設定雷射觸控
選擇 「Auto adjust touch for this computer
(對此電腦執行自動調整觸控)」選項,以執行自
動 「校正及觸控區域」程序
若出現 「auto adjust touch failed (自動調整觸
控失敗)」訊息,請依照下列步驟進行疑難排解,
然後重新執行自動調整觸控。
a 關閉燈光或減少白板上的雜散光
b 請勿在投影機前方走動或移動投影機
c 調整對焦以銳化投影影像
若畫面上出現 「auto adjust touch still failed
(自動調整觸控仍然失敗)」訊息,請變更為手動
校正觸控及手動觸控區域。
手動校正觸控:
執行驅動程式,點選 圖示並前往
Advanced Settings (進階設定)選單,點
選 Calibrate touch (校正觸控)選項,執
行手動校正觸控模式。
1
3
2
4
請觸碰畫面上的目標標記。(按下 「ESC」
鍵以離開校正程序)。在結束第四點校正
後,請等候 2 秒待校正資料儲存。
8
Page 53

在您的投影機上設定雷射觸控
手動觸控區域:
執行驅動程式,點選 圖示並前往
Advanced Settings (進階設定)選單,點
選 Set touch area (設定觸控區域)選項,
執行手動校正觸控模式。
觸控區域視窗將會出現。
依 P1 至 P4 順序拖曳 4 個點。綠色畫面應稍
微置於投影區域外側,且此畫面內不應有任
何反射的光點。一完成此工作後,請按一下
「Exit (結束)」。
9
Page 54

在您的投影機上設定雷射觸控
第 G 部分:Touch Sensitivity
(觸控靈敏度)調整
雷射屏幕長時間運作後,靈敏度可能會稍微減
弱。透過還原回初始設定,即可重新恢復雷射屏
幕的 Touch sensitivity (觸控靈敏度)功能。
執行驅動程式,點選 圖示並前往 Advanced
Settings (進階設定)選單,點選 Set touch
Sensitivity (設定觸控靈敏度)選項,透過還原
初始設定,重新調整雷射屏幕靈敏度。
Touch Sensitivity (觸控靈敏度)的預設值為 4。
增加此值可增加 Touch Sensitivity (觸控靈敏
度),而減少此值則可降低 Touch Sensitivity
(觸控靈敏度)。
10
Page 55

在您的投影機上設定雷射觸控
第 H 部分:重設所有觸控設定
若自動或手動 「校正觸控及觸控區域」設定還是
不正確,您可執行 Reset all touch settings
(重設所有觸控設定)選項,將所有設定重設為
出廠預設值。
執行驅動程式,點選 圖示並前往 Advanced
Settings (進階設定)選單,點選 Reset all
touch settings (重設所有觸控設定)選項,透
過還原初始設定,重新調整雷射屏幕靈敏度。
第 I 部分:觸控感應器調整
當觸控感應器設定不正確時,您可執行 Adjust
touch sensor (調整觸控感應器)選項,手動調
整觸控感應器區域。
執行驅動程式,點選 圖示並前往 Advanced
Settings (進階設定)選單,點選 Adjust touch
sensor (調整觸控感應器)選項,手動調整觸控
感應器區域。
11
Page 56

在您的投影機上設定雷射觸控
如下所示的觸控感應器調整指示畫面會隨即出
現,請依照螢幕上的指示完成設定。
第 J 部分:在您的電腦上安裝
Workspace 應用程式軟體
WorkSpace 應用程式軟體為與您投影機隨附的
CD 一起搭售。安裝 WorkSpace 應用程式軟體並
依畫面說明完成設定。如需詳細說明,請參閱
「WorkSpace 開始使用指南」。
12
Page 57

疑難排解
疑難排解
若您遭遇觸控問題,請參閱下列疑難排解提示。若問題仍然存在,請聯絡 Dell (請參閱 「投影機使用
指南」第 122 頁的聯絡 Dell)。
問題 可能的解決方式
影像邊緣或角落的觸控功能沒有作用。 若白板邊框會影響影像邊緣的觸控功能,請參閱 F 部
分執行自動調整觸控、手動觸控區域或以 ~84" 投射。
若游標及觸控點之間的差距過大。 請參閱 F 部分,執行自動調整觸控。
13
Page 58

疑難排解
問題
(續)
若繪製線條非連續、中斷,或若您在其他
投影影像區域遭遇觸控功能的問題。
可能的解決方式
(續)
1 檢查白板上是否有異物。
2 請參閱 I 部分,執行調整觸控感應器區域。
3 若在投影機及白板附近有鹵素燈,鹵素燈的燈光
可能會影響觸控效能。若遭影響,
a 請關閉鹵素燈。
b 遮蔽照射白板或攝影機的鹵素燈光線。
c 降低驅動器的觸控靈敏度。否則會影響白板角
落的觸控效能。
14
Page 59

Dell ™ | 인터랙티브 프로젝터
S520
레이저 터치 설치 설명서
Page 60

참고에 관하여
참고 : 참고는 프로젝터 사용에 도움이 되는 중요한 정보를 제공합니다 .
__________________
이 문서의 정보는 통보 없이 변경될 수 있습니다 .
© 2014 Dell Inc. All rights reserved.
Dell Inc. 의 서면 허가가 없으면 어떠한 방법으로도 무단 복제할 수 없습니다 .
이 문서에 나오는 상표 : Dell 및 DELL 로고는 Dell Inc. 의 상표이고 , Microsoft, Windows 7 및
Windows Vista 는 미국 및 / 또는 기타 국가에서 사용되는 Microsoft Corporation 의 상표 또는 등
록 상표입니다 .
본 설명서에서 특정 회사의 마크와 이름 또는 제품을 지칭하기 위해 기타 상표와 상호가 사용될 수
있습니다 . Dell Inc. 은 자사가 소유하고 있는 상표 이외의 다른 모든 등록 상표 및 상표명에 대해 어
떠한 소유권도 없음을 알려 드립니다 .
2014 년 6 월 P/N 05PF0 개정 A02
Page 61

프로젝터에 레이저 터치 설치하기
프로젝터에 레이저 터치 설치하기
참고: 다음과 같은 최소한의 컴퓨터 시스템이
필요합니다 .
운영 체계 :
• Windows XP Professional
32-
비트
, Windows 7 32-
Windows 8 32-
• Windows .NET Framework 4.0 을 설치해
야 합니다 (Microsoft 사이트에서 다운로
드할 수 있음 )
• MacOS 10.6 이상
최소 하드웨어 :
•Windows 프로세서 종류 : Intel Core i3
이상
•MAC 프로세서 종류 : Intel Core i2 duo
이상
• Windows/MAC RAM: 2 GB 의 RAM 필요
또는 그 이상 권장
• Windows/MAC 최소 HDD 공간 : 110 MB
의 하드 디스크 공간 여유
비트
/64-
서비스 팩
비트
/64-
비트
3
비트
단계 A: 화이트보드 설치하기
1 화이트보드를 설치합니다 .
,
참고 : " 화이트보드 설치 방법 " 을 참조하십
시오 .
3
Page 62

프로젝터에 레이저 터치 설치하기
(b) 나사
(a)
단계 B: 프로젝터 설치하기
2 벽걸이 홀더와 프로젝터를 설치합니다 .
참고 : 벽걸이 홀더는 프로젝터와 함께 제공됩
니다 . " 벽걸이 홀더 설치 방법 " 을 참조하십
시오 .
참고 : 최대 이미 크기로 투사하려면 87" 로 투
사하고 , 최적의 터치 경험을 위해 프로젝터
이미지 주위로 여백을 남기려면 ~84" 로 투사
하십시오 .
단계 C: 레이저 커튼 키트 부착하
기
3 레이저 커튼 키트를 화이트보드에 부착합니
다 .
참고 :
a 위치 결정 핀과 자석을 사용하여 부착을
보조합니다 .
b 또한 고정 나사를 사용하여 키트를 제자리
에 고정할 수 있습니다 .
c 레이저 커튼 키트용 커버가 있습니다 .
4
Page 63

프로젝터에 레이저 터치 설치하기
2m DC 와 DC 연결
케이블
단계 D: 필요한 케이블 연결하기
4 전원 , 비디오 , 미니 USB 및 DC 와 DC 연결
케이블을 프로젝터에 연결합니다 .
5 전원 케이블을 전원 콘센트에 연결합니다 .
6 DC와 DC 연결 케이블을 레이저 커튼 키트에
연결합니다 .
5
Page 64

프로젝터에 레이저 터치 설치하기
5 m 미니 USB
케이블
7 VGA 케이블을 컴퓨터에 연결합니다 .
참고 : 또한 VGA-B 및 HDMI 를 통해서 이미
지를 투사할 수 있습니다 . 제어판에서 왼쪽
버튼을 눌러 자동 검색하여 올바른 입력 소스
를 선택하십시오 .
8 미니 USB 케이블을 컴퓨터에 연결합니다 .
MOLEX
9 리모컨의 전원 버튼을 눌러 프로젝터를 켭니
다 .
6
Page 65

프로젝터에 레이저 터치 설치하기
단계 E: 컴퓨터에 터치 드라이버
설치하기
10 USB 케이블을 컴퓨터에 연결하면
TouchDriver 설치 팝업 메시지가 자동으로
나타납니다 . 화면 안내에 따라 설치를 완료하
십시오 .
드라이버가 성공적으로 설치되면 컴퓨터의 알림
영역에 드라이버 아이콘 이 표시됩니다 .
터치 드라이버가 자동으로 설치되지 않으면 내 컴
퓨터로 이동하여 "TouchDriver.exe" 를 실행하십
시오 .
참고 : 드라이버 설치 시 관리자 권한이 필요
할 수 있습니다 . 네트워크 관리자에게 연락하
여 도움을 받으십시오 .
단계 F: 터치 제어 기능 초기화하
기 : 터치 자동 조정
이 기능은 최초 사용 시 권장되며 , 터치 스크린이
부정확하거나 불안하게 반응할 때 필요합니다 .
참고 : 복제 또는 프로젝터 전용 모드에서 투
사해야 합니다 .
11 드라이버를 실행할 때 아이콘을 클릭하
십시오 . 다음 메뉴가 화면에 표시됩니다 .
7
Page 66

프로젝터에 레이저 터치 설치하기
" 보정 및 터치 영역 " 절차를 실행하려면 "Auto
adjust touch for this computer( 이 컴퓨터의 터
치 자동 조정 )" 옵션을 선택하십시오 .
"auto adjust touch failed( 터치 자동 조정 실패 )"
메시지가 표시되면 아래의 단계에 따라 문제를 해
결하고 터치 자동 조정을 다시 실행하십시오 .
a 라이트를 끄거나 화이트보드의 미광을 줄
입니다 .
b 프로젝터 앞에서 걷거나 프로젝터를 움직
이지 마십시오 .
c 초점을 조정하여 투사된 이미지를 선명하
게 만드십시오 .
"auto adjust touch still failed( 터치 자동 조정 계
속 실패 )" 메시지가 화면에 표시되면 터치 수동
보정 및 수동 터치 영역으로 변경하십시오 .
수동으로 터치 보정 :
드라이버를 실행하고 아이콘을 클릭하
여 Advanced Settings( 고급 설정 ) 메뉴로
이동한 후 Calibrate touch( 터치 보정 ) 옵션
을 클릭하여 터치 수동 보정 모드를 실행합
니다 .
1
3
2
4
8
Page 67

프로젝터에 레이저 터치 설치하기
화면에서 대상 마스크를 터치하십시오
정
과정을 종료하려면
4번
보정 지점까지 완료하고 나면, 보정 데
이터가
시오
저장되는 동안 2초 정도 기다려 주십
.
"ESC"
키를 누릅니다
. (
보
수동 터치 영역 :
드라이버를 실행하고 아이콘을 클릭하
여 Advanced Settings( 고급 설정 ) 메뉴로
이동한 후 Set touch area( 터치 영역 설정 )
옵션을 클릭하여 터치 수동 보정 모드를 실
행합니다 .
).
터치 영역 창이 표시됩니다 .
P1
에서
P4
순서로 4개의 지점을 끕니다. 녹
색 프레임이 투사된 이미지 영역을 약간 벗어
나고 이 프레임 내에는 반사된 광점이 없어야
합니다. 이 작업을 완료하면
클릭하십시오
.
"Exit(
종료)"를
9
Page 68

프로젝터에 레이저 터치 설치하기
단계 G: Touch Sensitivity ( 터치
민감도 ) 조정
레이저 커튼이 장시간 작동되었을 경우 , 민감도
가 다소 떨어질 수 있습니다 . Touch sensitivity (
터치 민감도 ) 는 초기 설정 복구로 레이저 커튼을
다시 민감하게 만드는 기능을 합니다 .
드라이버를 실행하고 아이콘을 클릭하여
Advanced Settings( 고급 설정 ) 메뉴로 이동한
후 Set touch Sensitivity(터치 감도 설정) 옵션을
클릭하여 초기 설정을 복원함으로써 레이저 커튼
의 감도를 수정합니다 .
Touch Sensitivity ( 터치 민감도 ) 의 기본값은 4
입니다 . 기본값을 높이면 Touch Sensitivity ( 터
치 민감도 ) 가 증가하고 Touch Sensitivity ( 터치
민감도 ) 값을 낮추면 민감도가 감소합니다 .
10
Page 69

프로젝터에 레이저 터치 설치하기
단계 H: 모든 터치 설정 초기화
자동 또는 수동 " 터치 보정 및 터치 영역 " 설정에
서 계속 오류가 발생하면 Reset all touch
settings( 모든 터치 설정 초기화 ) 옵션을 실행하
여 모든 설정을 공장 기본값으로 초기화할 수 있
습니다 .
드라이버를 실행하고 아이콘을 클릭하여
Advanced Settings( 고급 설정 ) 메뉴로 이동한
후 Reset all touch settings( 모든 터치 설정 초기
화 ) 옵션을 클릭하여 초기 설정을 복원함으로써
레이저 커튼의 감도를 수정합니다 .
단계 I: 터치 센서 조정
터치 센서 설정이 잘못된 경우 Adjust touch
sensor( 터치 센서 조정 ) 옵션을 실행하여 터치
센서 영역을 수동으로 조정할 수 있습니다 .
드라이버를 실행하고 아이콘을 클릭하여
Advanced Settings( 고급 설정 ) 메뉴로 이동한
후 Adjust touch sensor( 터치 센서 조정 ) 옵션을
클릭하여 터치 센서 영역을 수동으로 조정합니다
.
11
Page 70

프로젝터에 레이저 터치 설치하기
터치 센서 조정 지시 화면이 아래와 같이 표시되
면 화면 지시사항에 따라 설정을 완료하십시오 .
단계 J: 컴퓨터에 작업 영역 응용
프로그램 소프트웨어 설치하기
WorkSpace 앱 소프트웨어는 프로젝터와 함께 제
공된 CD 에 포함되어 있습니다 . 작업 영역 응용
프로그램 소프트웨어를 설치한 후 화면 지시에 따
라 설치를 완료하십시오 . 자세한 내용은 " 작업 영
역 시작하기 설명서 " 를 참조하십시오 .
12
Page 71

문제 해결
문제 해결
터치에 문제가 있으면 다음 문제 해결 정보를 참조하십시오 . 문제가 지속되면 Dell 에 문의하십시오
(122 페이지의 프로젝터 사용 설명서 Dell 에 문의하기 참조 ).
문제점 해결 방법
이미지의 가장자리 또는 모서리에서 터치
기능이 작동하지 않습니다 .
단계 F 를 참조하여 터치 자동 조정 또는 터치 영역을
실행하거나 화이트보드 베젤이 이미지 가장자리에서
터치 기능에 영향을 미칠 경우 84” 이하로 투사하십시
오 .
커서와 터치 포인트 간의 간격이 클 경우 .
터치 자동 조정을 실행하려면 단계 F를 참조하십시오
.
13
Page 72

문제 해결
문제점 (
계속
) 해결 방법 (
그린 선이 계속 이어지지 않거나 , 끊어지거
나 또는 투사한 이미지의 다른 영역에 터치
기능 관련 문제가 생길 경우 .
계속
)
1 화이트보드 위에 이물질이 있는지 확인하십시오 .
2 터치 센서 영역 조정을 실행하려면 단계 I 를 참조
하십시오 .
3 프로젝터와 화이트보드 근처에 할로겐 램프가 있
을 경우 할로겐 불빛이 터치 성능에 영향을 미칠
수 있습니다 . 그 경우 ,
a 할로겐 램프를 끕니다 .
b 화이트보드 또는 카메라에 미치지 않도록 할로
겐 불빛을 가립니다 .
c 드라이버 내 Touch Sensitivity (터치 민감도)를
줄입니다 . 그러나 , 이렇게 할 경우 화이트보드
모서리에서의 터치 성능에 영향을 줄 수 있습
니다 .
14
Page 73

Dell™ | Proyektor Interaktif
S520
Panduan Konfigurasi Sentuhan Laser
Page 74

Tentang Catatan
CATATAN: CATATAN menunjukkan informasi penting yang membantu Anda menggunakan
proyektor dengan lebih baik.
__________________
Informasi dalam dokumen ini dapat berubah tanpa pemberitahuan sebelumnya.
© 2014 Dell Inc. Semua hak dilindungi undang-undang.
Dilarang keras memperbanyak materi ini dengan cara apapun tanpa izin tertulis dari Dell Inc.
Merek dagang yang digunakan dalam teks ini: Dell dan logo DELL adalah merek dagang dari Dell
Inc.; Microsoft, Windows 7, dan Windows Vista adalah merek dagang atau merek dagang terdaftar
dari Microsoft Corporation di Amerika Serikat dan/atau negara lainnya.
Merek dagang dan nama dagang lainnya yang mungkin digunakan dalam dokumen ini mengacu
pada entitas yang mengklaim merek dan nama maupun produk mereka. Dell Inc. melepaskan
tanggung jawab hukum atas kepentingan eksklusif pada merek dagang dan nama dagang selain
yang dimiliki sendiri.
Juni 2014 P/N 05PF0 Rev. A02
Page 75

Mengkonfigurasi Sentuhan Laser di Proyektor
Mengkonfigurasi Sentuhan Laser di Proyektor
CATATAN: Komputer harus memiliki
persyaratan sistem minimum berikut:
Sistem operasi:
• Windows XP Professional Service Pack 3
32-bit, Windows 7 32-bit/64-bit, dan
Windows 8 32-bit/64-bit
• Memerlukan instalan Windows .NET
Framework 4.0 (dapat di-download dari
situs Microsoft)
• MacOS 10.6 dan versi lebih baru
Perangkat Keras Minimum:
• Tipe prosesor Windows: Intel Core i3
atau versi lebih baru
• Tipe prosesor MAC: Intel Core i2 duo
atau versi lebih baru
• Windows/MAC RAM: Memerlukan RAM
2GB, disarankan lebih besar
• Minimal ruang HDD Windows/MAC:
Kapasitas hard disk sebesar 110 MB
Bagian A: Memasang Papan
Tulis
1 Pasang papan tulis.
CATATAN: Lihat "petunjuk pemasangan
papan tulis".
3
Page 76

Mengkonfigurasi Sentuhan Laser di Proyektor
(b) Sekrup
(a)
Bagian B: Memasang
Proyektor
2 Pasang kit dinding dan proyektor.
CATATAN: Kit dinding diberikan bersama
proyektor. Lihat "petunjuk pemasangan kit
dinding".
CATATAN: Proyeksikan pada 87" untuk
proyeksi ukuran gambar maksimum atau
~84" jika Anda ingin memberikan garis tepi
di sekitar gambar proyektor untuk
pengalaman sentuh yang optimal.
Bagian C: Memasang Kit Laser
Tirai
3 Pasang kit laser tirai ke papan tulis.
CATATAN:
a Perangkat tambahan diberikan bersama
pin penahan dan magnet.
b Anda juga dapat mengunci kit pada
tempatnya menggunakan sekrup
pengaman.
c Kit laser tirai dilengkapi penutup.
4
Page 77

Mengkonfigurasi Sentuhan Laser di Proyektor
Kabel DC-ke-DC 2m
Bagian D: Menyambungkan
Kabel yang Diperlukan
4 Sambungkan kabel daya, video, mini-USB,
dan DC-ke-DC ke proyektor.
5 Sambungkan kabel daya ke stopkontak.
6 Sambungkan kabel DC-ke-DC ke kit laser
tirai.
5
Page 78

Mengkonfigurasi Sentuhan Laser di Proyektor
Kabel mini-USB 5m
7 Sambungkan kabel VGA ke komputer.
CATATAN: Anda juga dapat
memproyeksikan gambar melalui VGA-B
dan HDMI. Tekan tombol kiri pada panel
kontrol untuk pencarian otomatis dan
memilih sumber input yang benar.
8 Sambungkan kabel USB ke komputer.
MOLEX
9 Hidupkan proyektor dengan menekan
tombol daya pada remote control.
6
Page 79

Mengkonfigurasi Sentuhan Laser di Proyektor
Bagian E: Memasang Driver
sentuh di Komputer
10 Pesan penginstalan TouchDriver akan
muncul secara otomatis setelah Anda
menyambungkan kabel USB ke komputer.
Untuk menyelesaikan konfigurasi, ikuti
petunjuk pada layar.
Ikon driver akan muncul pada area
pemberitahuan di komputer jika driver berhasil
terinstal.
Jika Driver sentuh tidak terinstal otomatis, buka
Komputer Saya, lalu jalankan
"TouchDriver.exe".
CATATAN: Anda mungkin memerlukan
akses tingkat administrator untuk
menginstal driver. Hubungi administrator
jaringan untuk mendapatkan dukungan.
Bagian F: Menginisialisasi
Fungsi Kontrol Sentuh:
Penyesuaian Sentuh Otomatis
Direkomendasikan untuk penggunaan pertama
kali dan diperlukan saat respons layar sentuh
tidak akurat atau tidak teratur.
CATATAN: Anda harus memproyeksikan
duplikasi atau hanya dalam mode
proyektor.
11 Saat menjalankan driver, klik ikon . Menu
berikut akan muncul di layar.
7
Page 80

Mengkonfigurasi Sentuhan Laser di Proyektor
1
3
4
2
Gunakan pilihan "Auto adjust touch for this
computer (Penyesuaian sentuh otomatis
untuk komputer ini)" untuk menjalankan
prosedur "kalibrasi dan area sentuh" secara
otomatis.
Jika pesan "auto adjust touch failed
(penyesuaian sentuh otomatis gagal)" muncul,
lakukan langkah berikut untuk mengatasi
masalah, lalu jalankan kembali penyesuaian
sentuh otomatis.
a Matikan lampu atau kurangi cahaya pada
papan tulis
b Jangan berjalan di depan atau
pindahkan proyektor
c Sesuaikan fokus untuk mempertajam
gambar proyeksi
Jika pesan "auto adjust touch still failed
(penyesuaian sentuh otomatis masih gagal)"
muncul di layar, ubah ke kalibrasi sentuh
manual dan area sentuh manual.
Kalibrasi Sentuh Manual:
Jalankan driver, klik ikon , lalu buka
menu Advanced Settings (Pengaturan
Lanjutan), klik pilihan Calibrate touch
(Kalibrasikan sentuh) untuk menjalankan
mode kalibrasi sentuh manual.
8
Page 81

Mengkonfigurasi Sentuhan Laser di Proyektor
Sentuh tanda target pada layar. (Tekan
tombol "ESC" untuk mengakhiri proses
kalibrasi). Setelah titik keempat kalibrasi
selesai, tunggu selama dua detik
sementara data kalibrasi disimpan.
Area Sentuh Manual:
Jalankan driver, klik ikon , lalu buka
menu Advanced Settings (Pengaturan
Lanjutan), klik pilihan Set touch area
(Tetapkan area sentuh) untuk
menjalankan mode kalibrasi sentuh
manual.
Jendela area sentuh akan ditampilkan.
Tarik 4 titik, dengan urutan P1 hingga P4.
Bingkai hijau akan sedikit berada di bagian
luar area gambar proyeksi dan tidak ada
titik pantulan terang dalam bingkai ini.
Setelah tugas ini selesai, klik "Exit (Tutup)".
9
Page 82

Mengkonfigurasi Sentuhan Laser di Proyektor
Bagian G: Pengaturan Touch
Sensitivity (Sensitivitas
Sentuh)
Bila tirai laser telah dioperasikan dalam waktu
lama, sensitivitas kemungkinan sedikit
menurun. Fungsi Touch sensitivity (sensitivitas
sentuh) digunakan untuk membuat ulang
kepekaan tirai laser dengan mengembalikan
pengaturan awal.
Jalankan driver, klik ikon , lalu buka menu
Advanced Settings (Pengaturan Lanjutan), klik
pilihan Set touch Sensitivity (Atur Sensitivitas
sentuh) untuk mengatur ulang kepekaan tirai
laser dengan mengembalikan pengaturan awal.
Nilai default untuk Touch Sensitivity (Sensitivitas
Sentuh) adalah 4. Penambahan nilai yang akan
meningkatkan Touch Sensitivity (Sensitivitas
Sentuh) dan Pengurangan nilai untuk
mengurangi nilai Touch Sensitivity (Sensitivitas
Sentuh).
10
Page 83

Mengkonfigurasi Sentuhan Laser di Proyektor
Bagian H: Atur Ulang Semua
Pengaturan Sentuh
Bila pengaturan "kalibrasi sentuh dan area
sentuh" otomatis maupun manual masih salah,
jalakan pilihan Reset all touch settings (Atur
ulang semua pengaturan sentuh) untuk
mengatur ulang semua pengaturan ke nilai
default pabrik.
Jalankan driver, klik ikon , lalu buka menu
Advanced Settings (Pengaturan Lanjutan), klik
pilihan Reset all touch settings (Atur ulang
semua pengaturan sentuh) untuk mengatur
ulang kepekaan laser tirai dengan
mengembalikan pengaturan awal.
Bagian I: Penyesuaian Sensor
Sentuh
Bila pengaturan sensor sentuh salah, Anda
dapat menjalankan pilihan Adjust touch sensor
(Sesuaikan sensor sentuh) untuk
menyesuaikan area sensor sentuh secara
manual.
Jalankan driver, klik ikon , lalu buka menu
Advanced Settings (Pengaturan Lanjutan), klik
pilihan Adjust touch sensor (Sesuaikan sensor
sentuh) untuk menyesuaikan area sensor
sentuh secara manual.
11
Page 84

Mengkonfigurasi Sentuhan Laser di Proyektor
Petunjuk panyesuaian sensor sentuh yang
ditunjukkan di bawah ini akan ditampilkan di
layar, ikuti petunjuk di layar tersebut untuk
menyelesaikan pengaturan.
Bagian J: Memasang
Perangkat Lunak Aplikasi
Workspace di Komputer
Perangkat lunak aplikasi WorkSpace disertakan
dalam CD yang diberikan bersama proyektor.
Instal Perangkat Lunak Aplikasi WorkSpace, lalu
ikuti petunjuk di layar untuk menyelesaikan
konfigurasi. Untuk petunjuk lebih lanjut, lihat
"Panduan Persiapan WorkSpace".
12
Page 85

Mengatasi masalah
Mengatasi masalah
Jika Anda mengalami masalah dengan sentuhan, lihat tips mengatasi masalah berikut. Jika
masalah berlanjut, hubungi Dell (lihat Menghubungi Dell pada halaman 122 dalam Panduan
Pengguna Proyektor).
Masalah Kemungkinan Solusi
Fungsi sentuh di bagian tepi atau sudut
gambar tidak berfungsi.
Lihat Bagian F untuk menjalankan penyesuaian
sentuh otomatis maupun area sentuh secara
manual atau memproyeksikan di layar ~84" jika
bezel papan tulis putih berdampak pada fungsi
sentuh di sudut gambar.
Jika terdapat celah besar antara kursor
dan titik sentuh.
Lihat Bagian F untuk menjalankan penyesuaian
sentuh otomatis.
13
Page 86

Mengatasi masalah
Masalah (lanjutan) Kemungkinan Solusi (lanjutan)
Jika baris yang digambar tidak lurus,
rusak, atau jika masalah terjadi pada
fungsi Sentuh di area lain gambar yang
diproyeksikan.
1 Periksa keberadaan objek asing di papan tulis.
2 Lihat Bagian I untuk menjalankan Sesuaikan
area sensor sentuh.
3 Jika terdapat lampu halogen di dekat proyektor
dan papan tulis, maka cahaya dari lampu
halogen tersebut dapat mempengaruhi
performa sentuh. Jika demikian,
a Matikan lampu halogen.
b Halangi cahaya lampu halogen ke papan
tulis atau kamera.
c Kurangi Touch Sensitivity (Sensitivitas
Sentuh) pada driver. Jika dilakukan, dapat
mempengaruhi performa sentuh di pojok
papan tulis.
14
Page 87

Dell™ | โปรเจ็กเตอรแบบโตตอบ
S520
คูมือการติดตั้ง Laser Touch
Page 88

เกี่ยวกับหมายเหตุ
หมายเหตุ: หมายเหตุ ระบุถึงขอมูลที่สําคัญที่จะชวยใหคุณใชงานโปรเจ็กเตอรของคุณไดดีขึ้น
__________________
ขอมูลในเอกสารนี้อาจเปลี่ยนแปลงไดโดยไมตองแจงใหทราบลวงหนา
© 2014 Dell Inc. สงวนลิขสิทธิ์
หามทําซ้ําสวนหนึ่งสวนใดหรือทั้งหมดของเอกสารนี้โดยไมไดรับอนุญาตเปนลายลักษณอักษรจาก Dell
Inc. โดยเด็ดขาด
เครื่องหมายการคาที่ใชในเอกสารนี้: Dell และโลโก DELL logo คือเครื่องหมายการคาของ Dell Inc.;
Microsoft, Windows 7 และ Windows Vista คือเครื่องหมายการคาและเครื่องหมายการคาจดทะเบียนของ
Microsoft Corporation ในสหรัฐฯ และ/หรือประเทศอื่นๆ
อาจมีการใชเครื่องหมายการคา และชื่อทางการคาอื่นในเอกสารฉบับนี้เพื่ออางถึงรายการและผล ิตภัณฑที่
เปนของบริษัทเหลานั้น Dell Inc. ขอประกาศวาเราไมมีความสนใจในเครื่องหมายการคาหรือชื่อทางการคา
อื่นนอกเหนือจากของบริษัทเอง
มิถุนายน 2014 หมายเลขผลิตภัณฑ 05PF0 Rev. A02
Page 89

ติดตั้ง Laser Touch บนโปรเจ็กเตอร
หมายเหตุ: คอมพิวเตอรของคุณตอง
มีคุณสมบัติตรงตามความตองการของระบบ
ขั้นต่ํา:
ระบบปฏิบัติการ:
• Windows XP Professional service pack 3 32-bit,
Windows 7 32-bit/64-bit และ Windows 8 32-bit/
64-bit
• ตองติดตั้ง Windows .NET Framework 4.0
(สามารถดาวนโหลดไดจากเว็บไซตของ Microsoft)
• MacOS 10.6 ขึ้นไป
ฮารดแวรขั้นต่ํา:
• ชนิดหนวยประมวลผล Windows: Intel Core i3
ขึ้นไป
• ชนิดหนวยประมวลผล MAC: Intel Core i2 duo
ขึ้นไป
• Windows/MAC RAM: ตองใช RAM 2 GB ขึ้นไป
• พื้นที่ HDD ต่ําสุดสําหรับ Windows/MAC:
พื้นที่วางบนฮารดดิสก 110 MB
สวน A: ติดตั้งกระดานไวทบอรด
1 ติดตั้งกระดานไวทบอรด
หมายเหตุ: โปรดดู "คําแนะนําเกี่ยวกับ
การติดตั้งกระดานไวทบอรด"
ติดตั้ง Laser Touch บนโปรเจ็กเตอร
3
Page 90

ติดตั้ง Laser Touch บนโปรเจ็กเตอร
(b) สกรู
(a)
สวน B: ยึดโปรเจ็กเตอร
2 ติดตั้งที่ยึดผนังและโปรเจ็กเตอร
หมายเหตุ: ที่ยึดผนังจะถูกจัดสงมาพรอมกับโป
รเจ็กเตอรของคุณ โปรดดู "คําแนะนําเกี่ยวกับ
การติดตั้งที่ยึดผนัง"
หมายเหตุ: โปรเจ็กเตอรสามารถฉายภาพ
ขนาดสูงสุด 87" หรือประมาณ 84" หากคุณ
สวน C:
ติดชุดผามานปองกันแสงเลเซอร
3 ติดชุดผามานปองกันแสงเลเซอรบนกระดานไวท
บอรด
หมายเหตุ:
a สลักและแมเหล็กตําแหนงชวยใหการติด
สะดวกขึ้น
b คุณยังสามารถล็อกชุดผามานปองกัน
แสงเลเซอรใหเขาที่ดวยสกรูนิรภัย
c มีฝาครอบสําหรับชุดผามานปองกันแสงเลเซอร
ตองการเวนบริเวณขอบรอบๆ ภาพโปรเจ็กเตอร
สําหรับใชสัมผัส
4
Page 91

ติดตั้ง Laser Touch บนโปรเจ็กเตอร
สายแปลงไฟ DC เปน DC
ยาว 2 ม.
สวน D: เชื่อมตอสายเคเบิลที่จําเปน
4 เชื่อมตอสายไฟ, สายวิดีโอ, สายมินิ USB, สาย
แปลงไฟ DC เปน DC กับโปรเจ็กเตอร
5 เชื่อมตอสายไฟกับเตารับไฟ
6 เชื่อมตอสายแปลงไฟ DC เปน DC กับชุด
ผามานปองกันแสงเลเซอร
5
Page 92

ติดตั้ง Laser Touch บนโปรเจ็กเตอร
MOLEX
สายมินิ USB ยาว 5 ม.
7 เชื่อมตอสาย VGA กับคอมพิวเตอรของคุณ
หมายเหตุ: คุณยังสามารถฉายภาพผาน
VGA-B และ HDMI ไดอีกดวย กดปุมซายบน
แผงควบคุมสําหรับการคนหาอัตโนมัติและเลือก
แหลงสัญญาณเขาที่ถูกตอง
8 เชื่อมตอสาย มินิ USB กับคอมพิวเตอร
9 เปดเครื่องโปรเจ็กเตอรโดยกดปุมเพาเวอรบน
รีโมทคอนโทรล
6
Page 93

สวน E: ติดตั้งไดรฟเวอร Touch
บนคอมพิวเตอรของคุณ
ติดตั้ง Laser Touch บนโปรเจ็กเตอร
หมายเหตุ: คุณอาจจําเปนตองมีสิทธิ์การเขา
ใชงานระดับผูดูแลระบบเพื่อติดตั้งไดรฟเวอร
ติดตอผูดูแลระบบเครือขายของคุณเพื่อขอรับ
10 ระบบจะแสดงขอความการติดตั้ง TouchDriver
โดยอัตโนมัติหลังจากที่คุณเสียบสาย USB กับ
คอมพิวเตอรของคุณ ปฏิบัติตามขั้นตอนบนหนาจอ
เพื่อทําการติดตั้งใหสมบูรณ
ไอคอนไดรฟเวอร จะปรากฏขึ้นในพื้นที่แจงเตือน
ของคอมพิวเตอรของคุณหากไดรฟเดอรไดรับการต ิดตั้ง
สําเร็จ
หากไดรฟเวอร Touch ไมไดรับการติดตั้งโดยอัตโนม ัติ
ใหไปที่ My Computer (คอมพิวเตอรของฉัน) และ
ดําเนินการ "TouchDriver.exe"
การสนับสนุน
สวน F: เริ่มเปดใชงานฟงกชั่น
ควบคุมการสัมผัส: ปรับการสัมผัส
อัตโนมัติ
แนะนําใหใชสําหรับการใชงานครั้งแรก และจําเปนตอง
ทําเมื่อหนาจอสัมผัสตอบสนองไมถูกตองหรือผิดพลาด
หมายเหตุ: คุณตองฉายในโหมดทําซ้ํา
หรือโหมดโปรเจ็กเตอรเทานั้น
11 เมื่อดําเนินการไดรฟเวอร ใหคลิกไอคอน
เมนูตอไปนี้จะปรากฏขึ้นมาบนหนาจอ
7
Page 94

ติดตั้ง Laser Touch บนโปรเจ็กเตอร
เลือกตัวเลือก "Auto adjust touch for this computer
(ปรับการสัมผัสอัตโนมัติสําหรับคอมพิวเตอร
เครื่องนี้)" เพื่อดําเนินการ "การตรวจเทียบและพื้นที่
สัมผัส" โดยอัตโนมัติ
หากระบบแสดงขอความ "auto adjust touch failed
(การปรับการสัมผัสอัตโนมัติลมเหลว)" โปรด
ดําเนินการขั้นตอนดานลางเพื่อแกไขปญหา แลวทําการ
ปรับการสัมผัสอัตโนมัติอีกครั้ง
a ปดไฟหรือลดแสงไฟที รบกวนกระดานไวทบอรด
b หามเดินดานหนาหรือหามขยับโปรเจ็กเตอร
c ปรับโฟกัสเพื่อใหภาพที่ฉายคมชัด
หากระบบแสดงขอความ "
(การปรับการสัมผัสอัตโนมัติยังคงลมเหลว)
auto adjust touch still failed
" โปรด
เปลี่ยนเปนการปรับเทียบการสัมผัสและพื้นที่ส ัมผัสเอง
การปรับเทียบการสัมผัสเอง:
ดําเนินการไดรฟเวอร คลิกที่ไอคอน แลวไป
ที่เมนู
Advanced Settings (การตั้งคาขั้นสูง)
ที่ตัวเลือก
Calibrate touch (ตรวจเทียบการสัมผัส)
เพื่อเริ่มโหมดการเปรียบเทียบการสัมผัสดวยตัวเอง
1
3
2
4
โปรดสัมผัสเครื่องหมายเปาบนหนาจอ (กดปุม "ESC"
เพื่อออกจากกระบวนการปรับเทียบ) หลังจากการปรับ
เทียบจุดที่สี่เสร็จสิ้น โปรดรอประมาณ 2 วินาทีใน
ระหวางที่ระบบบันทึกขอมูลการปรับเทียบ
คลิก
8
Page 95

ติดตั้ง Laser Touch บนโปรเจ็กเตอร
การปรับพื้นที่สัมผัสเอง:
ดําเนินการไดรฟเวอร คลิกที่ไอคอน แลวไป
ที่เมนู Advanced Settings (การตั้งคาขั้นสูง)
คลิกที่ตัวเลือก Set touch area (ตั้งคาพื้นที่
การสัมผัส) เพื่อเริ่มโหมดการเปรียบเทียบ
การสัมผัสดวยตัวเอง
ระบบจะแสดงหนาตางพื้นที่การสัมผัส
ลาก 4 จุดตามลําดับจาก P1 ถึง P4 เฟรมสีเขียว
ควรอยูนอกพื้นที่ภาพที่ฉายเล็กนอยและไมควรใ
หมีจุดแสงสะทอนใดๆ ภายในเฟรมนี้ เมื่อคุณ
ดําเนินการนี้เสร็จสมบูรณ ใหคลิก "Exit (ออก)"
9
Page 96

ติดตั้ง Laser Touch บนโปรเจ็กเตอร
สวน G: ปรับ Touch Sensitivity
(ความไวการสัมผัส)
เมื่อมานเลเซอรทํางานเปนเวลานานๆ ความไว
อาจจะลดลงเล็กนอย ฟงกชั่น Touch Sensitivity
(ความไวการสัมผัส) เพื่อปรับความไวของมาน
เลเซอรโดยการเรียกคืนการตั้งคาเริ่มตน
ดําเนินการไดรฟเวอร คลิกที่ไอคอน แลวไปที่เมนู
Advanced Settings (การตั้งคาขั้นสูง)
เลือก
Set touch Sensitivity (ตั้งคาความไว
การสัมผัส)
การเรียกคืนการตั้งคาเริ่มตน
10
เพื่อปรับคามานเลเซอรรับการสัมผัสโดย
คลิกที่ตัว
คาเริ่มตนของ Touch Sensitivity (ความไวการสัมผัส)
คือ 4 การเพิ่มคาจะเปนการเพิ่ม Touch Sensitivity
(ความไวการสัมผัส) การลดคาจะเปนการลด Touch
Sensitivity (ความไวการสัมผัส)
Page 97

ติดตั้ง Laser Touch บนโปรเจ็กเตอร
สวน H: รีเซ็ตการตั้งคาการสัมผัส
ทั้งหมด
เมื่อการตั้งคา "การตรวจเทียบการสัมผัสและพื้นที่
สัมผัส" โดยอัตโนมัติและตั้งคาเองยังไมสามารถชวย
ใหทํางานไดอยางถูกตอง คุณสามารถ
touch settings (รีเซ็ตการตั้งคาการสัมผัสทั้งหมด)
เพื่อรีเซ็ตการตั้งคาทั้งหมดเปนคาเริ่มตนจากโรงงาน
ดําเนินการไดรฟเวอร คลิกที่ไอคอน แลวไปที่เมนู
Advanced Settings (การตั้งคาขั้นสูง)
เลือก
Reset all touch settings (รีเซ็ตการตั้งคา
การสัมผัสทั้งหมด)
การสัมผัสโดยการเรียกคืนการตั้งคาเริ่มตน
เพื่อปรับคามานเลเซอรรับ
Reset all
คลิกที่ตัว
สวน I: ปรับเซ็นเซอรการสัมผัส
เมื่อการตั้งคาเซ็นเซอรการสัมผัสของคุณไมถ ูกตอง
คุณจะสามารถใชตัวเลือก Adjust touch sensor
(ปรับเซ็นเซอรการสัมผัส) เพื่อปรับพื้นที่เซ็นเซอร
การสัมผัสเองได
ดําเนินการไดรฟเวอร คลิกที่ไอคอน แลวไปที่เมนู
Advanced Settings (การตั้งคาขั้นสูง)
เลือก
Adjust touch sensor (ปรับเซ็นเซอร
การสัมผัส)
เพื่อปรับเซ็นเซอรการสัมผัสดวยตัวเอง
คลิกที่ตัว
11
Page 98

ติดตั้ง Laser Touch บนโปรเจ็กเตอร
ระบบจะแสดงหนาจอคําแนะนําการปรับเซ็นเซอร
การสัมผัสตามรูปดานลาง ใหปฏิบัติตามคําแนะนํา
บนหนาจอเพื่อดําเนินการตั้งคาใหเสร็จสิ้น
สวน J: ติดตั้งซอฟตแวรเวิรคสเปซแอ
พพลิเคชั่นบนคอมพิวเตอรของคุณ
ใน CD ที่ใหมาพรอมกับเครื่องโปรเจ็กเตอรจะ
มีซอฟตแวร WorkSpace Application ใหมาดวย
ติดตั้งซอฟตแวรเวิรคสเปซแอพพลเคชั่น และ
ปฏิบัติตามคําแนะนําบนหนาจอเพื่อทําการติดตั้งให
เสร็จสิ้น สําหรับคําแนะนําเพิ่มเติม โปรดดู "คูมือ
การเริ่มตนใชงานเวิรคสเปซ"
12
Page 99

การแกไขปญหา
การแกไขปญหา
หากคุณประสบปญหากับ Touch ใหดูเคล็ดลับการแกไขป ัญหาตอไปนี้ หากปญหายังคงอยู ใหติดตอ Dell (ดูคูมือการใช
งานโปรเจ็กเตอร
ปญหา ทางแกปญหาที่อาจชวยได
การสัมผัสที่ขอบหรือมุมภาพใชงานไมได โปรดดูที่สวน F เพื่อดําเนินการปรับการสัมผัสหร ือพื้นที่
การติดตอ Dell
ในหนา 122)
การสัมผัสโดยอัตโนมัติหรือปรับเอง หรือเพื่อฉายภาพ
ขนาดประมาณ 84" หากหนามเตยกระดานไวทบอรด
มีผลตอการสัมผัสที่ขอบภาพ
หากมีความแตกตางระหวางเคอรเซอรและจุด
ที่สัมผัสมาก
โปรดดูที่สวน F เพื่อดําเนินการปรับการสัมผัสโดยอัตโนมัติ
13
Page 100

การแกไขปญหา
ปญหา (ตอ) ทางแกปญหาที่อาจชวยได (ตอ)
หากเสนที่ลากไมตอเนื่อง ขาด หรือหากคุณ
มีปญหากับฟงกชั่นการสัมผัสในพื้นที่อื่นๆ ของ
ภาพที่ฉาย
1 ตรวจหาสิ่งแปลกปลอมในไวทบอรด
2 โปรดดูที่สวน I เพื่อดําเนินการปรับพื้นที่เซ็น
เซอรการสัมผัสโดยอัตโนมัติ
3 หากมีหลอดไฟฮาโลเจนใกลๆ เครื่องฉายหรือไวท
บอรด ไฟจากหลอดฮาโลเจนอาจจะมีผลกระทบตอ
ประสิทธิภาพสัมผัส ในกรณีดังกลาว
a ปดหลอดไฟฮาโลเจน
b บังระหวางหลอดไฟและไวทบอรดหรือกลอง
c ลด Touch Sensitivity (ความไวการสัมผัส) ใน
ไดรฟเวอร อยางไรก็ตาม การดําเนินการดังกลาว
จะมีผลกระทบตอประสิทธิภาพการสัมผัสที่มุม
ของไวทบอรด
14
 Loading...