

Page 1
Replacing the Dell™ S520 Projector Lamp
Ersetzen der Dell™ S520 Projektorlampe
Remplacer la Lampe du Projecteur Dell™ S520
Cambio de la lámpara del proyector Dell™ S520
Sostituzione della lampada del proiettore Dell™ S520
Substituir a lãmpada do projetor S520 Dell™
Dell™ S520 プロジェクターランプの交換
Dell™ S520 投影仪的灯泡更换
Замена проекционной лампы Dell™ S520
Dell™ S520 Projektör Lambasını Değiştirme
www.dell.com/support
Page 2
About Cautions and
Warnings
CAUTION: A CAUTION indicates potential damage to hardware or
loss of data if instructions are not followed.
WARNING: A WARNING indicates a potential for property damage,
personal injury, or death.
____________________
Information in this document is subject to change without notice.
© 2013 Dell Inc. All rights reserved. Printed in China. Printed on recycled paper.
Reproduction of these materials in any manner whatsoever without the written
permission of Dell Inc. is strictly forbidden.
Trademarks used in this text: Dell and the DELL logo are trademarks of Dell Inc.; DLP
and DLP
Other trademarks and trade names may be used in this document to refer to either
the entities claiming the marks and names or their products. Dell Inc. disclaims any
proprietary interest in trademarks and trade names other than its own.
Model S520
September 2013 Rev. A00
®
logo are trademarks of TEXAS INSTRUMENTS INCORPORATED.
Page 3
Replacing the Dell™ S520 Projector Lamp
The following message appears on the screen when your projector lamp
is approaching its end of life and needs to be changed:
Lamp is approaching the end of its useful life in the operation.
Replacement suggested! www.dell.com/lamps
CAUTION: Before you begin any of the procedures in this section,
follow the Safety Instructions in the user’s manual.
To replace the lamp:
1 Turn off the projector and disconnect the power cable.
WARNING: The lamp becomes very hot when in use. Do not
attempt to replace the lamp until the projector has been allowed
to cool down for at least 30 minutes.
2
Let the projector cool for at least 30 minutes.
Page 4
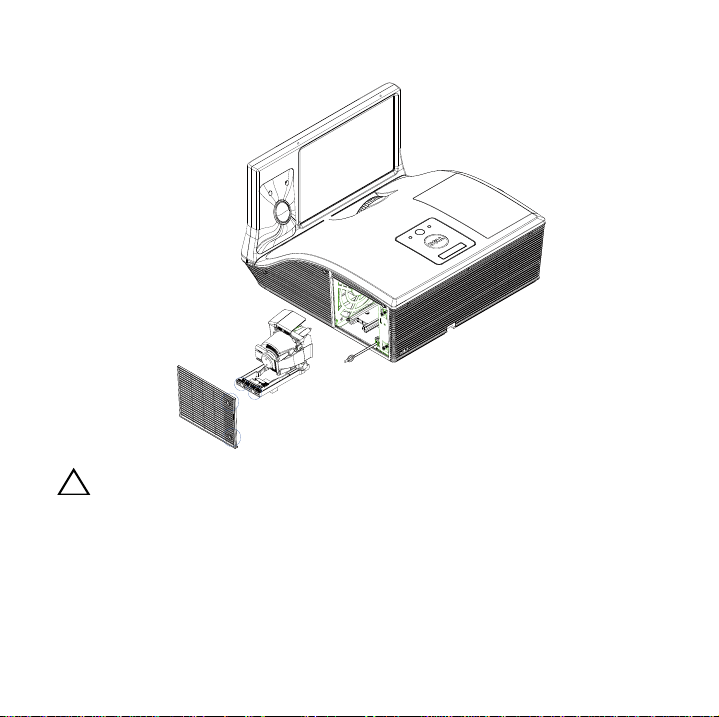
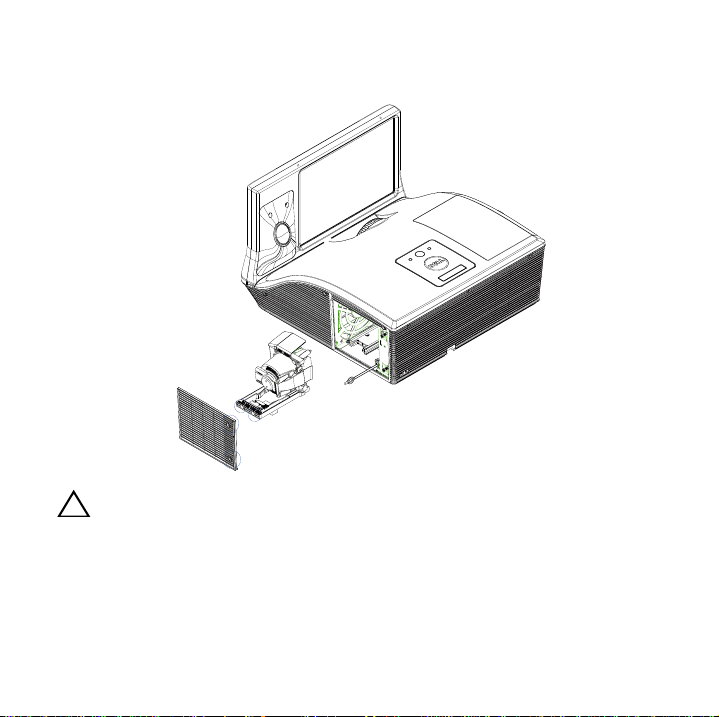
3
Loosen the screws that secure the lamp cover, and remove the cover.
CAUTION: Do not touch the projector lamp or the lamp glass at any
time. Projector lamps are very fragile and may shatter if touched.
Page 5

CAUTION: If the lamp shatters, remove all the broken pieces from
the projector and dispose or recycle according to state, local, or
federal law. For more information see www.dell.com/hg.
4
Loosen the two screws that secure the lamp.
5
Pull the lamp up by its metal handle.
6
Replace with the new lamp.
NOTE: Dell™ may require lamps replaced under warranty to be
returned. Otherwise, dispose or recycle the lamp.
7
Tighten the two screws that secure the lamp.
8
Replace the lamp cover and tighten the screws.
9
Reset the lamp usage time. (See Changing the Lamp in the User's Guide.)
CAUTION: Lamp Disposal (for the US only)
- LAMP(S) INSIDE THIS PRODUCT CONTAIN MERCURY AND
MUST BE RECYCLED OR DISPOSED OF ACCORDING TO LOCAL,
STATE OR FEDERAL LAWS. FOR MORE INFORMATION, GO TO
WWW.DELL.COM/HG OR CONTACT THE ELECTRONIC INDUSTRIES
ALLIANCE AT WWW.EIAE.ORG. FOR LAMP-SPECIFIC DISPOSAL
INFORMATION, CHECK WWW.LAMPRECYCLE.ORG.
Page 6
Vorsicht und Warnung
VORSICHT: Eine VORSICHT-Mitteilung zeigt potentielle Hardware-
Schäden oder möglichen Datenverlust an, falls die Anweisungen
nicht korrekt befolgt werden.
WARNUNG: Eine WARNUNG weist auf Gefahrenquellen hin, die
Sachschäden, Verletzungen oder sogar den Tod von Personen zur
Folge haben können.
____________________
Die Information in diesem Dokument kann ohne Vorankündigung geändert
werden.
© 2013 Dell Inc. Alle Rechte vorbehalten. Gedruckt in China. Auf Recyclingpapier
gedruckt.
Reproduktionen dieser Materialien sind ohne vorherige schriftliche Genehmigung
von Dell Inc. strengstens untersagt.
Marken in diesem Text: Dell, das DELL -Logo sind Marken von Dell Inc.; DLP und das
®
DLP
logo sind Marken von TEXAS INSTRUMENTS INCORPORATED.
Alle anderen in dieser Dokumentation genannten Marken und
Handelsbezeichnungen sind Eigentum der entsprechenden Hersteller und Firmen.
Dell Inc. verzichtet auf alle Besitzrechte an Marken und Handelsbezeichnungen, die
nicht ihr Eigentum sind.
Modell S520
September 2013 Rev. A00
Page 7
Ersetzen der Dell™ S520
Projektorlampe
Die folgende Meldung erscheint auf dem Bildschirm, wenn die
Lebensdauer Ihrer Projektorlampe zu Ende geht, und ein Lampenwechsel
nötig wird:
Das Gebrauchsende der Lampe ist im Betrieb bald erreicht. Ein
Lampenwechsel wird empfohlen! www.dell.com/lamps
VORSICHT: Bevor Sie mit den in diesem Kapitel gezeigten
Vorgängen beginnen, beachten Sie die auf Sicherheitshinweise.
Wenn Sie die Lampe wechseln:
1
Schalten Sie den Projektor ab und ziehen Sie den Netzstecker.
WARNUNG: Die Lampe wird während des Gebrauchs sehr heiß.
Wechseln Sie die Lampe erst, nachdem sich der Projektor
mindestens 30 Minuten lang abgekühlt hat.
2
Lassen Sie den Projektor mindestens 30 Minuten lang abkühlen.
Page 8

3
Lösen Sie die Schrauben, mit denen die Lampenabdeckung befestigt ist,
und entfernen Sie die Abdeckung.
VORSICHT: Berühren Sie nie die Lampe oder das Lampenglas.
Projektorlampen sind leicht zerbrechlich und können bereits bei
Berührung beschädigt werden.
Page 9

VORSICHT: Falls die Lampe platzt, entfernen Sie alle Scherbenreste
aus dem Projektor und entsorgen Sie sie entsprechend den
geltenden Entsorgungsvorschriften. Weitere Informationen hierzu
finden Sie unter www.dell.com/hg.
4
Lösen Sie die beiden Schrauben, mit denen die Lampe befestigt ist.
5
Ziehen Sie die Lampe am Metallgriff nach oben.
6
Setzen Sie die neue Lampe ein.
ANMERKUNG: Dell™ fordert Sie möglicherweise auf, im Rahmen
der Garantie gewechselte Lampen an Dell zurückzuschicken.
Andernfalss sollten Sie die Lampe entsorgen.
7
Ziehen Sie die beiden Schrauben, mit denen die Lampe befestigt ist.
8
Schließen Sie das Lampenfach wieder und schrauben Sie den Deckel mit
den zwei Schrauben fest.
9
Setzen Sie die Lampenbetriebsdauer zurück. (Siehe Auswechseln der
Lampe im Bedienungsanleitung.)
Page 10

Avertissements et Attention
AVERTISSEMENT: Un AVERTISSEMENT indique un risque de
dommage à l’appareil ou de perte de données si les instructions ne
sont pas suivies.
ATTENTION: Un signe ATTENTION indique un risque de dommage
matériel, de blessure corporelle ou de mort.
____________________
Les informations contenues dans ce document sont sujettes à modification sans
préavis.
© 2013 Dell Inc. Tous droits réservés. Imprimé en Chine. Imprimé sur du papier
recyclé.
La copie de ces documents, sous quelque forme que ce soit, sans l’autorisation écrite
de Dell Inc. est strictement interdite.
Marques utilisées dans ce texte : Dell, le logo DELL et PowerVault sont des marques
commerciales de Dell Inc. ; DLP et le logo DLP
T
EXAS INSTRUMENTS INCORPORATED.
D’autres marques et noms commerciaux peuvent être utilisés dans ce document
pour faire référence aux entités se réclamant de ces marques et de ces noms ou à
leurs produits. Dell Inc. dénie tout intérêt propriétaire dans les marques et les noms
commerciaux autres que les siens.
Modèle S520
Septembre 2013 Rev. A00
®
sont des marques commerciales de
Page 11
Remplacer la Lampe du Projecteur
Dell™ S520
Le message suivant apparaît sur l’écran lorsque la lampe de votre
projecteur est près de la fin de sa durée de vie et qu'elle doit être changée:
La lampe atteint sa fin de vie en fonctionnement. Songez à la remplacer!
www.dell.com/lamps
AVERTISSEMENT: Avant de débuter quelque procédure que ce soit
de cette section, lisez et suivez les Instructions de sécurité.
Pour remplacer la lampe :
1
Eteignez le projecteur et débranchez le cordon d'alimentation.
ATTENTION: La lampe devient très chaude en cours d'utilisation.
Pour remplacer la lampe attendez que le projecteur ait refroidi
pendant au moins 30 minutes.
2
Laissez le projecteur se refroidir pendant au moins 30 minutes.
Page 12
3
Desserrez les vis de fixation du couvercle de la lampe, et retirez le
couvercle.
AVERTISSEMENT: Ne touchez pas la lampe ou le verre de la lampe à
aucun moment. Ils sont très fragiles et peuvent se briser si vous les
touchez.
Page 13

AVERTISSEMENT: Si la lampe est brisée, enlevez toutes les débris du
projecteur et jetez-les ou recyclez-les conformément aux lois
locales, régionales et fédérales. our plus d¡?informations, visitez
www.dell.com/hg.
4
Dévissez les deux vis de fixation de la lampe.
5
Soulevez la lampe en la tenant par sa partie métallique.
6
Remplacez par une lampe neuve.
REMARQUE : Dell™ peut demander que les lampes remplacées
durant la période de garantie lui soient renvoyées. Sinon, jetez ou
recyclez la lampe.
7
Vissez les deux vis de fixation de la lampe.
8
Replacez le couvercle de lampe et serrez les vis.
9
Réinitialisez le temps d'utilisation de la lampe. (Voir le Remplacer la lampe
dans le Guide d'utilisation.)
Page 14

Precauciones y advertencias
PRECAUCIÓN: Una PRECAUCIÓN indica un daño potencial en el
hardware o una pérdida de datos si no se siguen las instrucciones.
ADVERTENCIA: Una ADVERTENCIA indica que se pueden producir
daños materiales o personales o, incluso, la muerte.
____________________
La información de este documento está sujeta a cambios sin previo aviso.
© 2013 Dell Inc. Todos los derechos reservados. Impreso en China. Impreso en
papel reciclado.
Queda expresamente prohibida la reproducción de estos materiales de cualquier
forma, fuere lo que fuere, sin permiso por escrito de Dell Inc.
Marcas comerciales que aparecen en este documento: Dell, el logotipo DELL son
marcas comerciales de Dell Inc.; DLP y el logotipo DLP
T
EXAS INSTRUMENTS INCORPORATED.
Otras marcas y nombres comerciales pueden usarse en este documento para
referirse a entidades ya sea a las entidades que reclaman las marcas o a sus productos.
Dell Inc. niega cualquier interés de propiedad de las marcas y nombres de marcas
distintas a las suyas.
Modelo S520
Septiembre de 2013 Rev. A00
®
son marcas comerciales de
Page 15

Cambio de la lámpara del proyector
Dell™ S520
EL mensaje siguiente aparece en la pantalla cuando la lámpara del
proyector está llegando al final de su vida útil, y es necesario cambiarla:
La lámpara está alcanzando el fin de su vida útil a funcionamiento. Debe
cambiarla. www.dell.com/lamps
PRECAUCIÓN: Antes de comenzar cualquiera de los
procedimientos de esta sección, siga las instrucciones de seguridad.
Para cambiar la lámpara:
1
Apague el proyector y desconecte el cable de alimentación.
ADVERTENCIA: La lámpara se calienta mucho durante el uso. No
intente cambiarla hasta que el proyector se haya dejado enfriar
durante al menos 30 minutos.
2
Deje que el proyector se enfríe durante al menos 30 minutos.
Page 16

3
Afloje los tornillos que sujetan la tapa de la lámpara y quite la tapa.
PRECAUCIÓN: No toque el foco ni el vidrio de la lámpara en ningún
momento. Las lámparas de los proyectores sin muy frágiles y
pueden romperse si se tocan.
Page 17

PRECAUCIÓN: Quite todas las piezas rotas del proyector y tírelas o
recíclelas según la ley estatal, local o federal. Para más información,
consulte www.dell.com/hg.
4
Afloje los 2 tornillos que sujetan la lámpara.
5
Tome la lámpara por su asa de metal.
6
Coloque la nueva lámpara.
NOTA: Es posible que Dell™ solicite que las lámparas reemplazadas
bajo garantía sean devueltas a Dell. De lo contrario, elimine o recicle
la lámpara.
7
Afloje los 2 tornillos que sujetan la lámpara.
8
Vuelva a colocar la tapa de la lámpara y apriete los tornillos.
9
Restaure el tiempo de uso de la lámpara. (Consulte el Cambio de la
lámpara en el Guía del usuario.)
Page 18

Richiami all'Attenzione e Avvisi
ATTENZIONE: Un richiamo all'ATTENZIONE indica potenziali danni
all'hardware o la perdita dei dati se non sono seguite le istruzioni.
AVVISO: Un avviso all'ATTENZIONE segnala il potenziale di danni
alle proprietà, di lesioni personali o di morte.
____________________
Le informazioni contenute in questo documento sono soggette a variazione senza
preavviso.
© 2013 Dell Inc. Reservados todos os direitos. Stampato in China. Stampato su
carta riciclata.
È severamente proibita la riproduzione in qualsivoglia forma di questi materiali senza
la previa autorizzazione scritta di Dell Inc..
Marchi utilizzati in questo testo: Dell, il logo DELL sono marchi di Dell Inc.; DLP e il
logo DLP
Altri marchi di fabbrica e nomi commerciali possono essere utilizzati in questo
documento sia in riferimento alle aziende che rivendicano il marchio e i nomi sia in
riferimento ai prodotti stessi. Dell Inc. nega qualsiasi partecipazione di proprietà
relativa a marchi di fabbrica e nomi commerciali diversi da quelli di sua proprietà.
Modello S520
Settembre 2013 Rev. A00
®
sono marchi di TEXAS INSTRUMENTS INCORPORATED.
Page 19

Sostituzione della lampada del
proiettore Dell™ S520
Il seguente messaggio appare sullo schermo quando la lampada del
proiettore sta per esaurirsi e necessita di essere cambiata:
La lampada sta raggiungendo il termine della sua durata utile. È
suggerita la sostituzione! www.dell.com/lamps
ATTENZIONE: Prima di iniziare le procedure descritte in questa
sezione, seguire le Istruzioni di sicurezza.
Per sostituire la lampada:
1
Spegnere il proiettore e scollegare il cavo di alimentazione.
AVVISO: Durante l'uso, la lampadina diventa molto calda. Non
cercare di sostituire la lampadina prima di aver lasciato raffreddare
il proiettore per almeno 30 minuti.
2
Lasciare che il proiettore si raffreddi per almeno 30 minuti.
Page 20

3
Allentare le viti che fissano il coperchio della lampadina e rimuovere il
coperchio.
ATTENZIONE: Non toccare mai la lampada o la sua parte in vetro. É
molto fragile e potrebbe rompersi se toccata.
Page 21

ATTENZIONE: Se la lampada si rompe, rimuovere tutti i pezzi rotti
dal proiettore e smaltire o riciclare secondo la legislazione locale o
statale vigente. Per ulteriori informazioni vedere www.dell.com/hg.
4
Allentare le 2 viti che fissano la lampadina.
5
Sollevare la lampada mediante la sua maniglia di metallo.
6
Sostituire con una nuova lampadina.
N.B.: Dell™ potrebbe richiedere la restituzione delle lampade
sostituite in garanzia. Altrimenti, smaltirle o riciclarle.
7
Stringere le 2 viti che fissano la lampadina.
8
Sostituire la copertura della lampadina e serrare le viti.
9
Azzerare il tempo di funzionamento della lampada. (Vedere il Sostituzione
della lampada nel Guida dell'utente).
Page 22

Chamadas de atenção e Avisos
CUIDADO: Uma chamada de ATENÇÃO indica danos potenciais ao
hardware ou perda de dados se as instruções não forem respeitadas.
ATENÇÃO: Um AVISO assinala a possibilidade de ocorrência de
danos materiais, de ferimentos físicos ou o risco de morte.
____________________
A informação neste documento é passível de alteração sem aviso prévio.
© 2013 Dell Inc. Todos os direitos reservados. Impresso na China. Imprimido
sobre papel reciclado.
É estritamente proibida a reprodução destes materiais em qualquer forma sem a
autorização escrita da Dell Inc.
Marcas comerciais usadas neste texto: Dell, o logotipo da DELL são marcas
comerciais da Dell Inc.; DLP e o logotipo DLP
I
NSTRUMENTS INCORPORATED.
Outras marcas e nomes comerciais podem ser usados neste documento para se
referir tanto a entidades que reivindiquem as marcas e os nomes ou seus produtos.
A Dell Inc. nega qualquer interesse de propriedade em marcas ou nomes comerciais
que não sejam os seus próprios.
Modelo S520
Setembro de 2013 Rev. A00
®
são marcas comerciais da TEXAS
Page 23

Substituir a lâmpada do projector S520
Dell™
A mensagem a seguir aparece na tela quando a lâmpada do projetor está
chegando ao final da vida útil e precisa ser trocada.
A lâmpada está a aproximar-se do fim da sua vida útil no modo de
funcionamento normal. Troca sugerida. www.dell.com/lamps
CUIDADO: Antes de iniciar qualquer procedimento desta seção, siga
as Instruções de segurança.
Para trocar a lâmpada:
1
Desligue o projetor e desconecte o cabo de alimentação.
ATENÇÃO: A lâmpada esquenta muito durante o uso. ão tente
trocar a lâmpada até o projetor esfriar por pelo menos 30 minutos.
2
Deixe o projetor esfriar por pelo menos 30 minutos.
Page 24

3
Solte os parafusos que prendem o protetor da lâmpada e remova-o.
CUIDADO: Nunca toque na lâmpada ou no vidro da lâmpada. As
lâmpadas de projetor são muito frágeis e podem quebrar se tocadas.
Page 25

CUIDADO: Se a lâmpada quebrar, remova todos os cacos do
projetor e elimine ou recicle de acordo com a lei estadual, local ou
federal. Para mais informações, consulte www.dell.com/hg.
4
Solte os dois parafusos que prendem a lâmpada.
5
Puxe a lâmpada pelo punho de metal.
6
Substitua pela nova lâmpada.
NOTA: A Dell™ pode exigir que as lâmpadas trocadas sob garantia
devolvidas. Do contrário, elimine ou recicle a lâmpada.
7
Aperte os dois parafusos que fixam a lâmpada.
8
Recoloque a tampa da lâmpada e aperte os parafusos.
9
Redefina o tempo de uso da lâmpada. (Consulte o Troca da lâmpada no
Guia do usuário.)
Page 26

注意、警告
注意 : 「注意」は、指示に従わない場合ハードウェアの損傷やデータ
損失の可能性を示しています。
警告 : 「警告」は、物的損害、負傷、もしくは死の可能性を意味しま
す。
____________________
この文書に含まれる情報は、予告なく変更されることがあります。
©2013DellInc.す 2013 べての権利は保護されています。中国で印刷。リサイクル
紙で印刷。
Dell 社の書面による許可なく、いかなる方法にせよこれらの資料の複製は、厳禁し
ます。
本書で使用されている商標 : Dell、DELL ロゴは Dell Inc. の商標です。 DLP および
®
DLP
ロゴは TEXAS INSTRUMENTS INCORPORATED の商標です。
本書で使用されているその他の商標および製品名はそれぞれの所有者に帰属してい
ます。Dell Inc. は他社の所有する商標や製品名の所有権をすべて放棄します。
モデル S520
2013 年 9 月改訂 A00
Page 27

Dell™ S520 プロジェクターランプの交換
プロジェクタランプの寿命が短くなり、交換が必要になると、次のメッ
セージが画面に表示されます :
ランプは操作で耐用年数の終わりに達しています。交換をお勧めします。
www.dell.com/lamps
注意 : この章で説明する交換処理の前に、「安全上のご注意」をお読
みください。
ランプを交換する :
1
プロジェクタの電源を切り、電源コードを取り外します。
警告 : ランプは使用中、非常に高温になります。プロジェクタが冷却
するまで、少なくとも 30 分はランプの交換をしないでください。
2
プロジェクタを少なくとも
30
分間放置して冷却します。
Page 28

3
ランプカバーを固定している ネジを緩め、カバーを外します。
注意 : ランプやランプのガラスには絶対に触れないでください。プロ
ジェクタのランプは壊れやすいため、触れると破損することがありま
す。
Page 29

注意 : ランプが壊れた場合は、破片をすべてプロジェクタから取り除
き、州や地域、国の法律に従って廃棄またはリサイクルしてくださ
い。詳しくは www.dell.com/hg をご覧ください。
4
ランプを固定している2 つのネジを緩めます。
5
金属部分を持ってランプを取り出します。
6
新しいランプと交換します。
メモ:デルは、保証によって交換したランプの返却をお願いする場合
がございます。その他の場合は、ランプを廃棄またはリサイクリング
します。
7
ランプを固定している2 つのネジを締めてください。
8
ランプカバーを交換し、ネジを締めます。
9
ランプ使用時間をリセットします。
ニューを参照。
)
(
ユーザーガイド
の[ランプの交換] メ
Page 30

小心和警告
小心: “ 小心 ” 表示如果不遵循使用说明,可能会导致硬件损坏或数据
丢失。
警告: “ 警告 ” 表示潜在的财产损失、人身伤害甚至死亡。
____________________
本文档内含信息若有更改,恕不通知。
© 2013 Dell Inc. 版权所有。中国印制。再造纸印制。
未经 Dell Inc. 的书面许可,严禁任何人以任何方式复制这些资料。
本文所用商标:
I
NSTRUMENTS INCORPORATED 的商标。
本文档中可能用到的其它商标和品牌名称是指拥有该商标或名称的实体或其产品。
型号 S520
2013 年 9 月 Rev. A00
Dell、DELL 徽标是 Dell Inc. 的商标; DLP 和 DLP® 徽标是 TEXAS
Page 31

Dell™ S520 投影仪的灯泡更换
当投影仪灯泡接近使用寿命因而需要更换时,屏幕上显示下面的信息:
灯泡在作业情况下使用寿命已近终止。建议更换灯泡! www.dell.com/
lamps
小心: 在执行此部分中的任何过程之前,请阅读 “ 安全注意事项 ”。
要更换灯泡:
1
关闭投影仪并拔下电源线。
警告: 灯泡在使用过程中会变得极为炽热。灯泡使用后至少需要冷却
30 分钟,此前请不要试图更换投影仪灯泡。
2
让投影仪冷却至少
30
分钟。
Page 32

3
松开用于固定灯泡盖板的螺丝,然后取下此盖板。
小心: 任何时候都不要触摸灯泡或灯泡玻璃。投影仪灯泡非常易碎,触
碰就可能导致破碎。
Page 33

小心: 若灯泡碎裂,请从投影仪中将碎片全部取走,并根据州、当地或
联邦法律的规定处理或回收这些碎片。有关的详细信息,请访问
www.dell.com/hg。
4
松开用于固定灯泡的两颗螺丝。
5
握住金属把手,将灯泡拉出。
6
更换新的灯泡。
注:
Dell™ 可能会要求将保修期内更换下来的灯泡返还。否则,废弃或
回收灯泡。
7
拧紧用于固定灯泡的两颗螺丝。
8
更换灯泡盖板,拧紧螺丝。
9
重置灯泡使用时间。(请参阅 《
用户手册
》上的更换灯泡。)
Page 34

Предостережения и
предупреждения
ВНИМАНИЕ! ПРЕДОСТЕРЕЖЕНИЕ указывает на потенциальную
возможность повреждения оборудования или потерю данных при
несоблюдении приведенных указаний.
ОСТОРОЖНО! Знак ОСТОРОЖНО указывает на
потенциальную возможность повреждения имуще ства,
причинения тяжких телесных повреждений или смертельный
исход.
____________________
Информация, со держащаяся в настоящем доку менте, мо жет из меняться без предупреждения.
© 2013 Dell Inc. Все права защищены. Отпечатано в Китае. Отпечатано на бумаге из
бумажных отходов.
Воспроизведение этих материалов в любой форме без письменного разрешения компании
Dell Inc. строго запрещено.
Тов арн ые знаки, используемые в тексте: Dell, логотип DELL являются товарными знаками
компан ии Dell Inc.; DLP и логотип DLP
INSTRUMENTS INCORPORATED.
Другие товарные знаки и торговые названия могут быть использованы в настоящем
документе для ссылки на организации, заявляющие о марках и названиях, или на их
продукцию. Компания Dell Inc. отрицает любую заинтересованность в отношении
товарных знаков и торговых названий кроме своих собственных.
Модель S520
Сентябрь 2013 г. Версия A00
®
являются товарными знаками комп ан ии TEXAS
Page 35

Замена проекционной лампы Dell ™
S520
При истечении срока пригодности проекционной лампы и необходимости ее
замены на экране отображается следующее сообщение:
Истекает срок пригодности лампы. Предлагается ее заменить!
www.dell.com/lamps
ВНИМАНИЕ! При проведении любых операций, описанных в
данном разделе, соблюдайте все указания по технике
безопасности, описанные в руководстве пользователя.
Замена лампы:
Выключите проектор и отсоедините кабель питания.
1
ОСТОРОЖНО! При работе лампа сильно нагревается. Перед
заменой лампы дождитесь остывания проектора в течение не
менее 30 минут.
2
Дождитесь остывания проектора в течение не менее 30 минут.
Page 36

3
Ослабьте винты, удерж ива ющи е крышку лампы, и снимите крышку.
ВНИМАНИЕ! Ни при каких обстоятельствах не касайтесь лампы и
стекла колбы. Проекционные лампы очень хрупкие и могут
разбиться при прикосновении.
Page 37

ВНИМАНИЕ! Если лампа разбилась, удалите все осколки из
проектора и утилизируйте их в соответствии с местным или
федеральным законодательством. Для получения
дополнительной информации см. веб-сайт www.dell.com/hg.
Ослабьте два винта, удерж ива ющи е лампу.
4
5
Приподнимите лампу за металлическую ручку .
6
Ус т а н о в ит е новую лампу.
ПРИМЕЧАНИЕ. Компания Dell ™ может потребовать возврата
замененных по гарантии ламп. В противном случае,
самостоятельно утилизируйте лампу.
Затяните два винта, уде ржива ющие лампу.
7
8
Ус т а н о в ит е крышку лампы и затяните винты.
9
Сбросьте счетчик времени использования лампы. (См. раздел "Замена лампы"
в
Руководстве пользователя
.)
Page 38

Dikkat İbareleri ve Uyarılar
Hakkında
DİKKAT: DİKKAT, talimatlar izlenmezse donanımla ilgili olası zararı
veya veri kaybını gösterir.
UYARI: UYARI olasılıkla mala gelebilecek zararı, kişisel yaralanmayı
veya ölüm durumunu gösterir.
____________________
Bu belgede yer alan bilgiler haber verilmeksizin değişime tabidir.
© 2013 Dell Inc. Tüm hakları saklıdır. Çin'de basılmıştır. Geri dönüştürülmüş kağıda
basılmıştır.
Bu materyallerin Dell Inc.'in önceden yazılı izni olmaksızın herhangi bir yolla
çoğaltılması kesinlikle yasaktır.
Bu metinde kullanılan ticari markalar: Dell, DELL logosu Dell Inc.'in ticari markalarıdır;
DLP ve DLP
Bu belgede kullanılan diğer ticari markalar ve ticari adlar markaların ve adların hak
sahiplerine veya bunların ürünlerine işaret eder. Dell Inc. kendisine ait olanlar dışındaki
ticari markalar ve ticari adlar üzerinde hiçbir mülkiyet iddiasında bulunmaz.
Model S520
Eylül 2013 Rev. A00
®
logosu TEXAS INSTRUMENTS INCORPORATED'ın ticari markalarıdır.
Page 39

Dell™ S520 Projektör Lambasını
Değiştirme
Projektör lambanız ömrünün sonuna yaklaştığında ve değiştirilmesi
gerektiğinde ekranda aşağıdaki mesaj görünür:
Lamba kullanım ömrü sonuna yaklaşıyor. Değiştirme önerilir!
www.dell.com/lamps
DİKKAT: Bu bölümdeki prosedürlerden herhangi birine başlamadan
önce, kullanım kılavuzunda anlatılan Güvenlik Talimatları'nı izleyin.
Lambayı değiştirmek için:
1
Projektörü kapatın ve güç kablosunun bağlantısını kesin.
UYARI: Lamba kullanımdayken çok ısınır. Projektör en az 30 dakika
soğumadan lambayı değiştirmeye çalışmayın.
2
Projektörün en az 30 dakika soğumasını sağlayın.
Page 40

3
Lamba kapağını tutan vidaları gevşetin ve kapağı çıkarın.
DİKKAT: Projektör lambasına veya lamba camına hiçbir zaman
dokunmayın. Projektör lambaları çok kırılgandır ve dokunulursa
kırılabilir.
Page 41

DİKKAT: Lamba kırılırsa, kırılan tüm parçaları projektörden çıkarın ve
eyalet, yerel veya federal yasalarına göre elden çıkarın veya geri
dönüştürün. Daha fazla bilgi için bkz. www.dell.com/hg.
4
Lambayı tutan iki vidayı gevşetin.
5
Lambayı metal tutacağından yukarı çekin.
6
Yeni lambayla değiştirin.
NOT: Dell™ garanti kapsamõnda değiştirilen lambalarõn iade edilmesini
isteyebilir. Aksi halde, lambayõ elden çõkarõn veya geri dönüştürün.
7
Lambayı tutan iki vidayı sıkıştırın.
8
Lamba kapağını yerleştirin ve vidaları sıkın.
9
Lamba kullanım süresini sıfırlayın. (Kullanım Kılavuzu'ndaki Lambayı
Değiştirme konusuna bakın.)
DİKKAT: Lambayı Elden Çıkarma (yalnızca ABD için)
- BU ÜRÜN İÇİNDEKİ LAMBALAR CIVA İÇERİR VE YEREL, EYALET
VEYA FEDERAL YASALARA UYGUN ŞEKİLDE GERİ
DÖNÜŞTÜRÜLMELERİ VEYA ELDEN ÇIKARILMALARI GEREKİR. DAHA
FAZLA BİLGİ İÇİN, WWW.DELL.COM/HG ADRESİNE GİDİN VEYA
WWW.EIAE.ORG ADRESİNDEKİ ELECTRONIC INDUSTRIES
ALLIANCE'A GİDİN. LAMBAYA ÖZGÜ ELDEN ÇIKARMA BİLGİLERİ
İÇİN, WWW.LAMPRECYCLE.ORG ADRESİNİ ZİYARET EDİN.
Page 42

0V10N4A00
 Loading...