

Page 1

Dell Interactive Projector
S510/S510n
User’s Guide
Page 2

Notes, Cautions, and Warnings
NOTE: A NOTE indicates important information that helps you make
better use of your projector
CAUTION: A CAUTION indicates potential damage to hardware or
loss of data if instructions are not followed.
WARNING: A WARNING indicates a potential for property damage,
personal injury, or death.
____________________
Information in this document is subject to change without notice.
© 2015 Dell Inc. All rights reserved.
Reproduction of these materials in any manner whatsoever without the written
permission of Dell Inc. is strictly forbidden.
Trademarks used in this text: Dell and the DELL logo are trademarks of Dell Inc.; DLP
and DLP logo are trademarks of T
Windows are either trademarks or registered trademarks of Microsoft Corporation in
the United States and/or other countries.
Other trademarks and trade names may be used in this document to refer to either
the entities claiming the marks and names or their products. Dell Inc. disclaims any
proprietary interest in trademarks and trade names other than its own.
Model: Dell Interactive Projector S510/S510n
February 2015 Rev. A01
EXAS INSTRUMENTS INCORPORATED; Microsoft and
Page 3

Contents
1 About Your Dell Projector . . . . . . . . . . . . . . . . . 5
Projector Box Contents . . . . . . . . . . . . . . . . . . . . 5
Projector Top and Bottom View
2 Setting Up Your Projector . . . . . . . . . . . . . . . . . 9
Cleaning Projector's Mirror . . . . . . . . . . . . . . . . . . 9
Adjusting Projector Focus
Adjusting Image Size
Adjusting Image Shape
Using Remote Control
Projector Connections
. . . . . . . . . . . . . . . . . . . . . 10
. . . . . . . . . . . . . . . . . . . . 11
. . . . . . . . . . . . . . . . . . . . 12
. . . . . . . . . . . . . . . . . . . . 17
3 Using Your Projector . . . . . . . . . . . . . . . . . . . . 31
Turning Projector On . . . . . . . . . . . . . . . . . . . . . 31
Turning Projector Off
Menu Settings
Using Interactive Pen (Only for S510)
Using Intel
®
WiDi . . . . . . . . . . . . . . . . . . . . . . . . 59
Using Miracast
Using Wireless/LAN Display (DoWiFi/DoLAN)
Using USB Display (DoUSB)
Using PC-Free Presentation
Using Audio Projection
Managing Projector with Web Browser
. . . . . . . . . . . . . . . . . . . . . 31
. . . . . . . . . . . . . . . . . . . . . . . . . . 32
. . . . . . . . . . . . . . . . . . . . . . . . . . 68
. . . . . . . . . . . . . . . . . . . 102
. . . . . . . . . . . . . . . 7
. . . . . . . . . . . . . . . . . . . 9
. . . . . . . . . . 51
. . . . . . . . . . . . . . . . . 91
. . . . . . . . . . . . . . . . . 94
. . . . . . . . . 111
. . . . . 74
4 Troubleshooting Your Projector . . . . . . . . . . 130
Guiding Signals . . . . . . . . . . . . . . . . . . . . . . . . 135
Changing the Lamp
FAQS:
. . . . . . . . . . . . . . . . . . . . . . . . . . . . . . 138
Firewall Configuration and FAQ
. . . . . . . . . . . . . . . . . . . . . 136
. . . . . . . . . . . . . 140
5 Specifications . . . . . . . . . . . . . . . . . . . . . . . . . 142
RS232 Pin Assignment . . . . . . . . . . . . . . . . . . . 146
Contents | 3
Page 4

6 Contacting Dell . . . . . . . . . . . . . . . . . . . . . . . 148
Contacting Crestron . . . . . . . . . . . . . . . . . . . . 149
7 Appendix: Glossary . . . . . . . . . . . . . . . . . . . . 150
4 | Contents
Page 5
About Your Dell Projector
Freeze
Source
Auto
Adjust
Blank
Screen
Blank
Screen
Video
Mode
VGA Video
Page Down
HDMI
Page Up
Aspect
Ratio
AAA
AAA
Dell
TM
Projectors
oduct Information Guide
Informacion Importante
Dell™ Interactive Projector
S510/S510n
C
o
n
te
n
t
s
:
•
Use
r
's
G
uide
Documentation
P/
N 8K5P4
Rev. A01
P/
N 36.73901G001
January 2015
Made
in
C
h
ina
©
2
0
1
5
D
e
l
l
I
n
c
.
A
l
l
r
i
g
h
t
s
r
e
s
e
r
v
e
d
.
De
ll
™
Projector S510/S510n
08K5P4A01
1
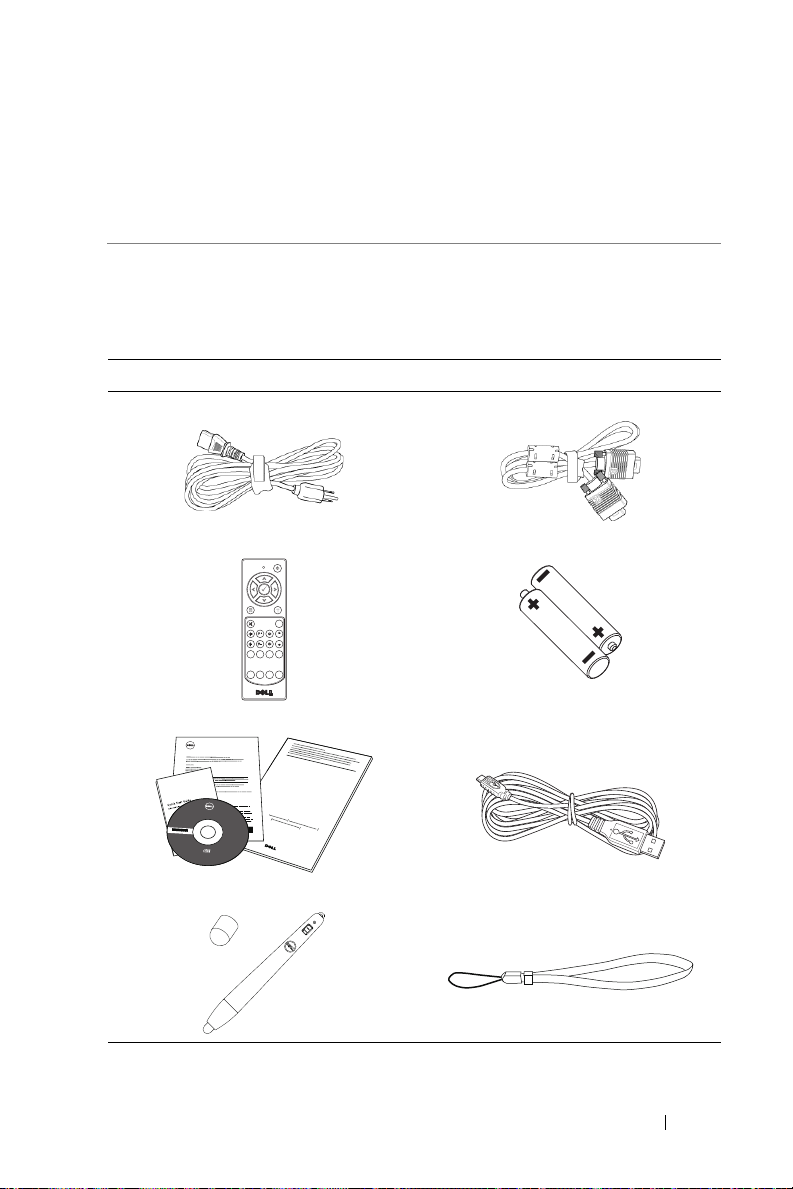
Your projector comes with all the items shown below. Ensure that you have
all the items, and contact Dell if anything is missing.
Projector Box Contents
S510 Package Contents
Power cable VGA cable (VGA to VGA)
Remote control AAA Batteries (6)
CD User’s Guide and Documentation Mini USB cable (USB-A to Mini
USB-B)
IR Pen (2 pcs)/Pen tip cap (4 pcs) Wrist strap (2 pcs)
About Your Dell Projector 5
Page 6
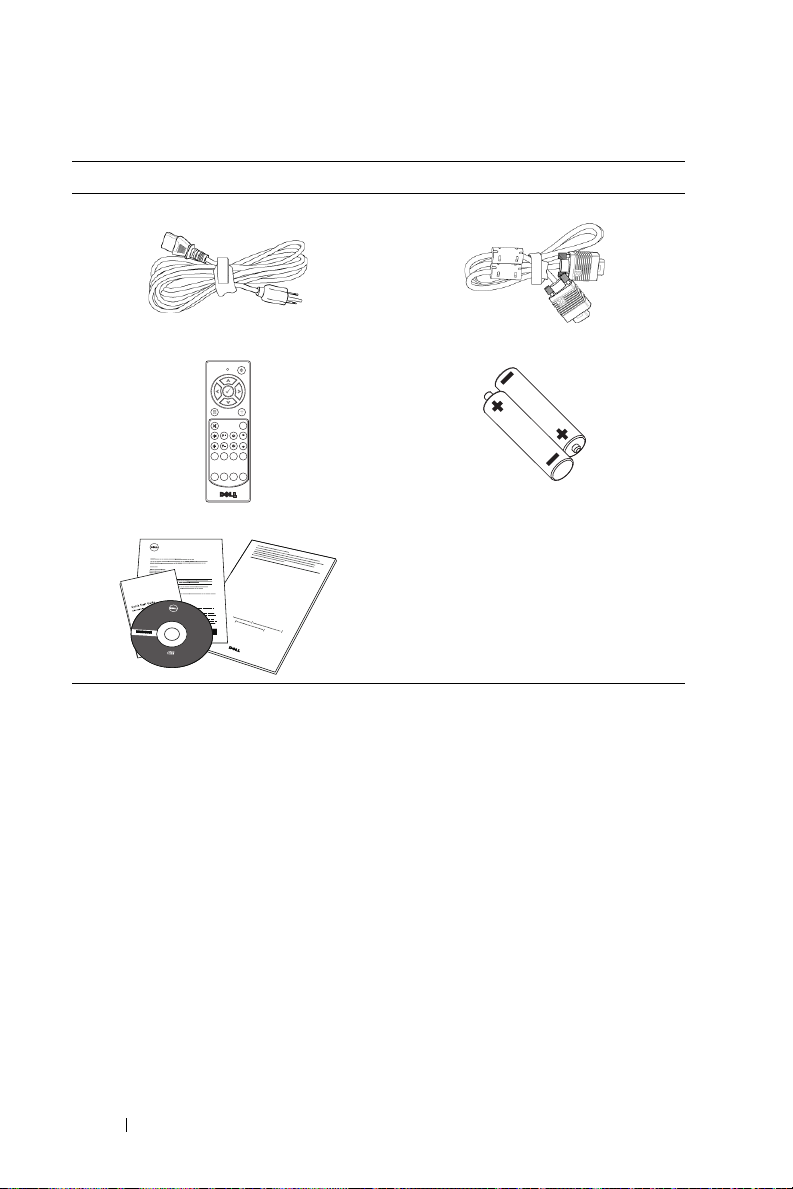
S510n Package Contents
Freeze
Source
Auto
Adjust
Blank
Screen
Blank
Screen
Video
Mode
VGA Video
Page Down
HDMI
Page Up
Aspect
Ratio
AAA
AAA
Dell
TM
Projectors
oduct Information Guide
Informacion Importante
Dell™ Interactive Projector
S510/S510n
C
o
n
te
n
t
s
:
•
Us
e
r
's
G
uide
Documentation
P/
N 8K5P4
Rev
. A01
P/N 36.73901G001
January 2015
Made
in
C
h
ina
©
2
0
1
5
D
e
l
l
I
n
c
.
A
l
l
r
i
g
h
t
s
r
e
s
e
r
v
e
d
.
De
ll
™
Projector S510/S510n
08K5P4A01
Power cable VGA cable (VGA to VGA)
Remote control AAA Batteries (6)
CD User’s Guide and Documentation
6 About Your Dell Projector
Page 7
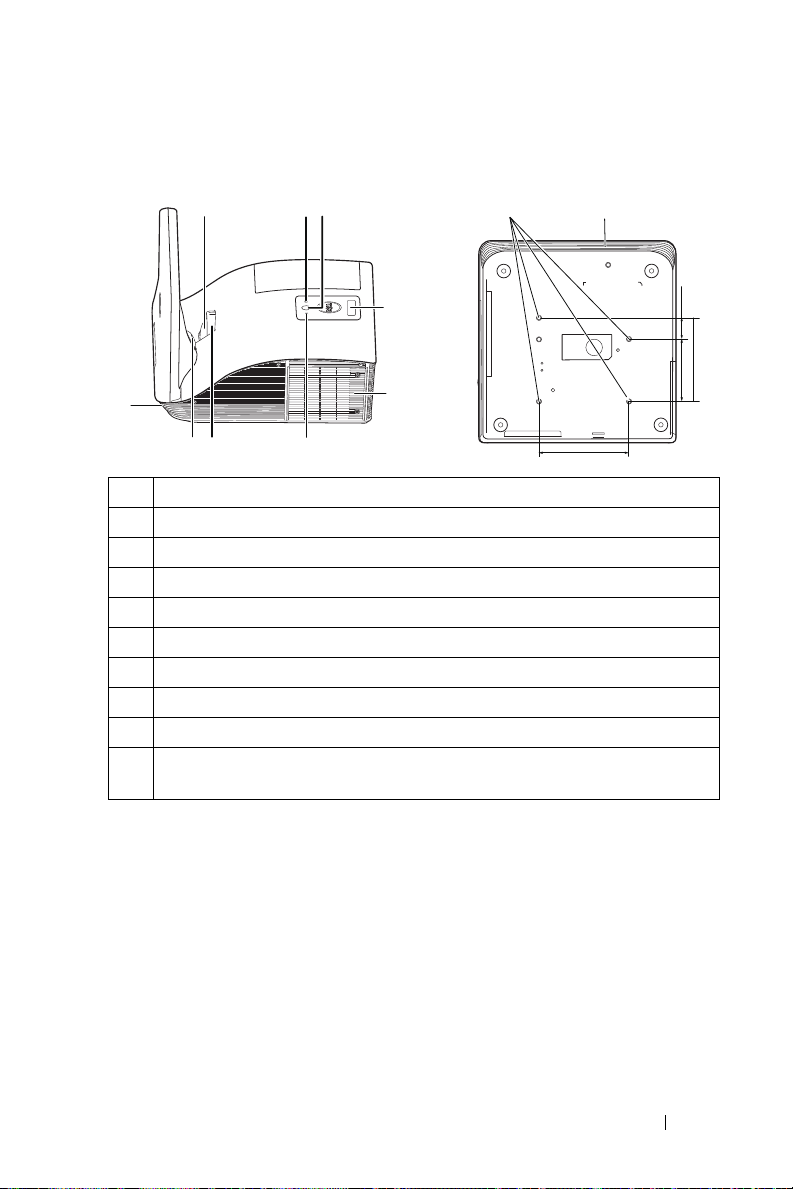
Projector Top and Bottom View
163.00
112.5038.80
151.30
10 7
4
5
936
7
821
Top Vi e w
Bottom View
1 Power button
2Temp LED
3 Lamp LED
4IR receivers
5 Lamp cover
6 Camera (only for S510)
710 W speaker
8 Lens
9Focus ring
10 Mounting holes for wall mount: Screw hole M4 x 8 mm depth.
Recommended torque <10 kgf-cm
About Your Dell Projector 7
Page 8

CAUTION: Safety Instructions
1
Do not use the projector near appliances that generate a lot of heat.
2
Do not use the projector in areas where there is an excessive amount of
dust. The dust may cause the system to fail and the projector will
automatically shutdown.
3
Ensure that the projector is mounted in a well-ventilated area.
4
Do not block the ventilation slots and openings on the projector.
5
Ensure the projector operates between ambient temperatures (5 °C to
35 °C).
6
Do not try to touch the ventilation outlet as it can become very hot after
the projector has been turned on or immediately after it is turned off.
7
Do not look into the lens while the projector is on as it may cause injury to
your eyes.
8
Do not place any objects near or in front of the projector or cover its lens
while the projector is on as the heat may cause the object to melt or burn.
9
Do not use the wireless projector near cardiac pacemakers.
10
Do not use the wireless projector near medical equipment.
11
Do not use the wireless projector near microwave ovens.
NOTE:
•
Do not attempt to wall mount the projector by yourself. It should be
installed by a qualified technician.
•
Recommended Projector Wall Mount Kit (P/N: 7XY53). For more
information, see the Dell Support website at
•
For more information, see the Safety Information that shipped with
dell.com/support
your projector.
•
The S510/S510n projector can only be used indoors.
.
8 About Your Dell Projector
Page 9
Setting Up Your Projector
1
2
Cleaning Projector's Mirror
1
Turn off the projector power and disconnect the power cord.
2
Let the projector cool for at least 30 minutes.
3
Use air blower bulb to blow off dust on the mirror or gently wipe the mirror
by using a microfiber cleaning cloth. Do not scrub the surface of the
mirror. It may scratch the mirror.
CAUTION: Do not spray cleaners or solvents directly on the
projector.
WARNING: Cleaning a wall-mounted projector can result in a fall
or injury. You can remove the projector from the wall-mounting
bracket to clean the projector's mirror.
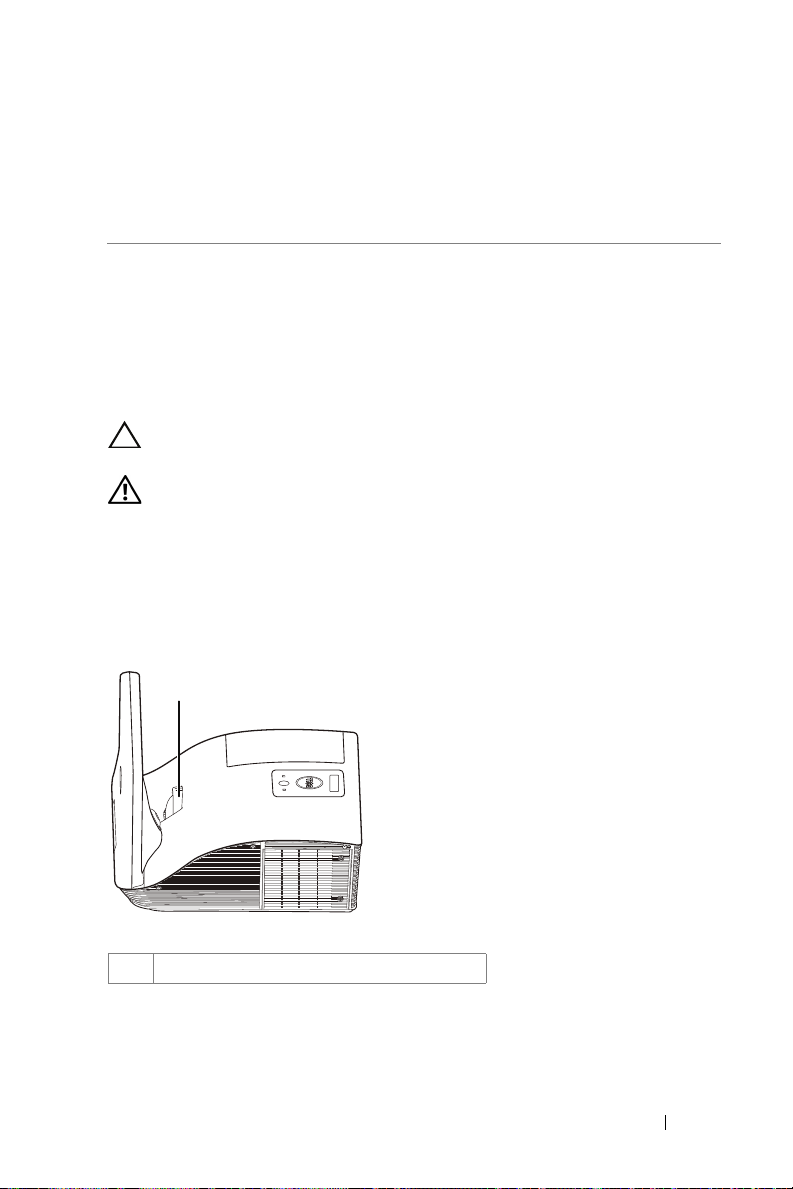
Adjusting Projector Focus
1
Rotate the focus ring until the image is clear. The projector focuses at
distances ranging between 1.7 ft to 2.49 ft (0.517 m to 0.759 m ± 0.01 m).
1Focus ring
Setting Up Your Projector 9
Page 10
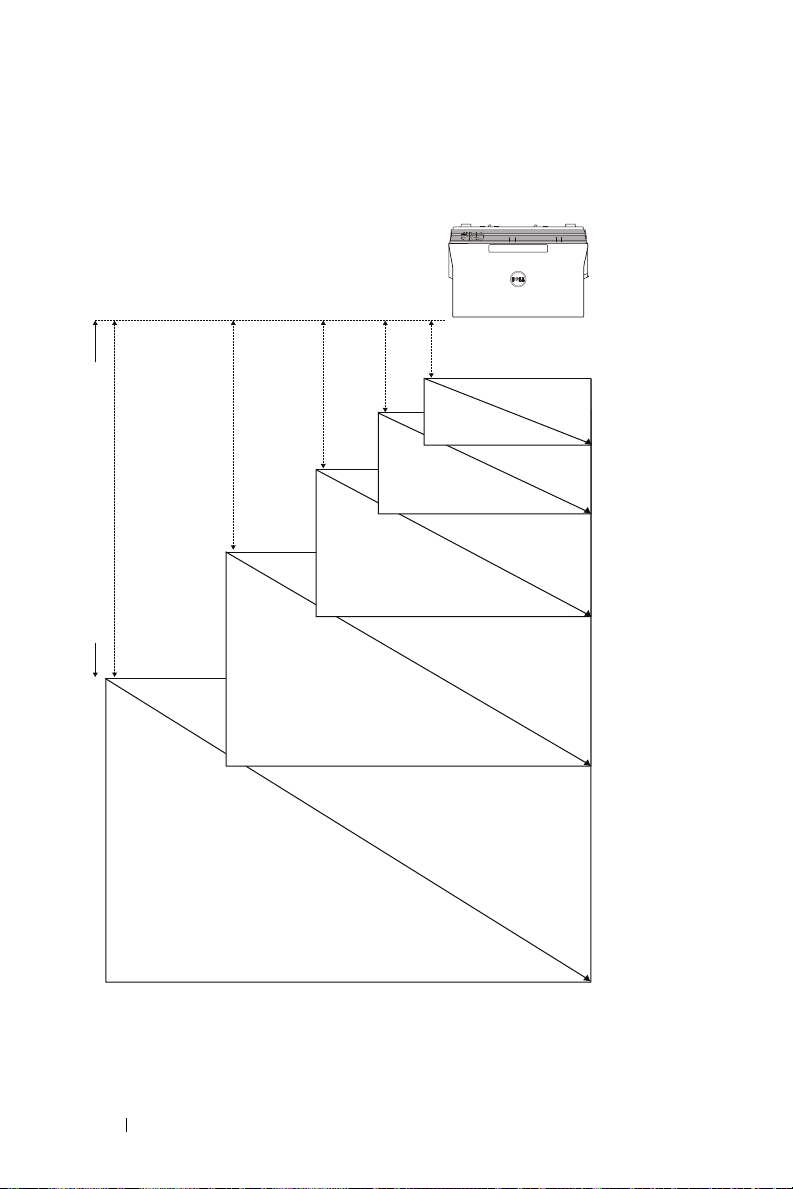
Adjusting Image Size
70" (177.8 cm)
0.597’ (18.2 cm)
0.872’ (26.6 cm)
1.05’ (32 cm)
1.122’ (34.2 cm)
1.391’ (42.4 cm)
80" (203.2 cm)
87.2" (221.49 cm)
90" (228.6 cm)
100" (254 cm)
Projector to screen distance (d)
10 Setting Up Your Projector
Page 11
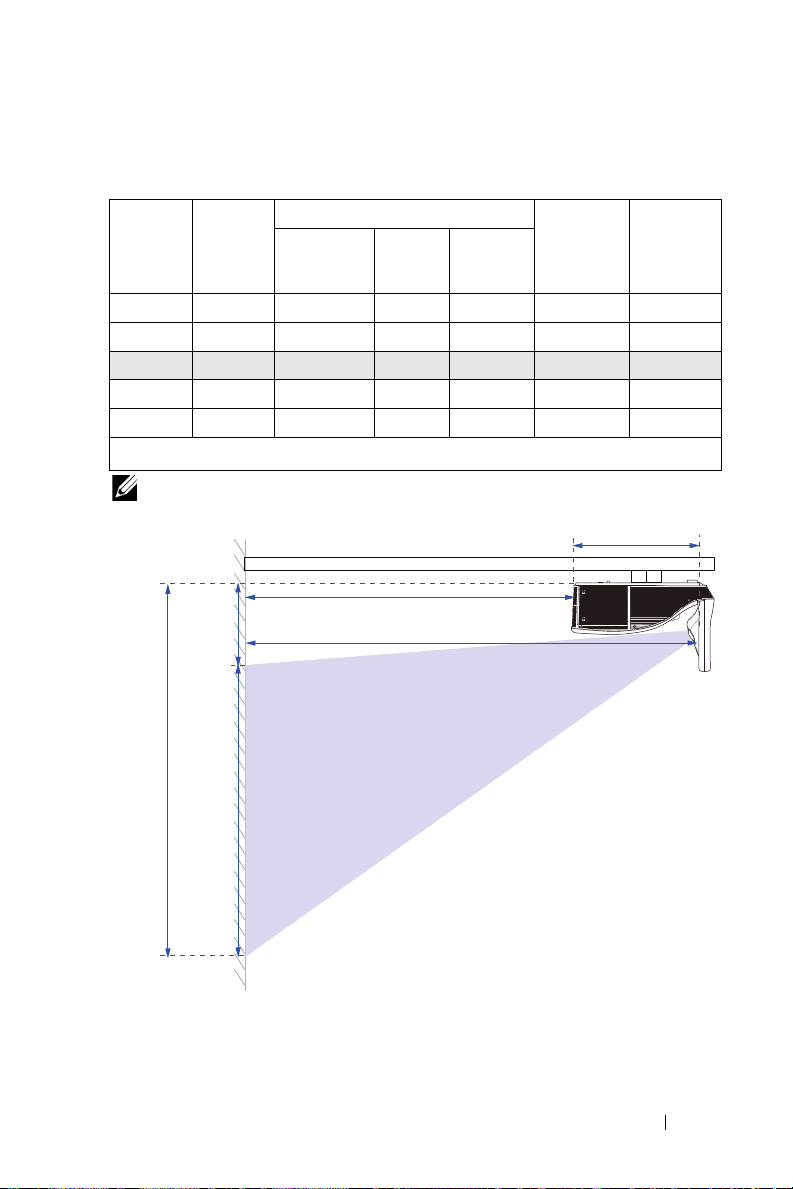
Adjusting Image Shape
[E]
Image
Diagonal
[C]
Projection Distance [A]
Projection Distance [B]
Height
[D]
Image
Height
[H]
33.5 cm
[C]
Image size
Width (cm)
Height (cm)
[H]
Projector
base to top of
image (cm)
[D]
Projection
Distance
(cm)
51.7 18.2 70"/ 177.8 cm 148 92 120 28
60.1 26.6 80"/203.2 cm 172 107 139 32
65.5 32 87.2"/221.4 cm 187 117 151 34
67.7 34.2 90"/228.6 cm 193 121 156 35
75.9 42.4 100"/254 cm 217 136 175 39
* This graph is for user reference only.
* Offset Ratio: 125±5%
[A]
Projection
Distance
(cm)
[B]
Diagonal
(inch/cm)
NOTE: The distance from mirror to the rear of projector: 33.5 cm
Projector
base to
bottom of
image (cm)
[E]
Setting Up Your Projector 11
Page 12
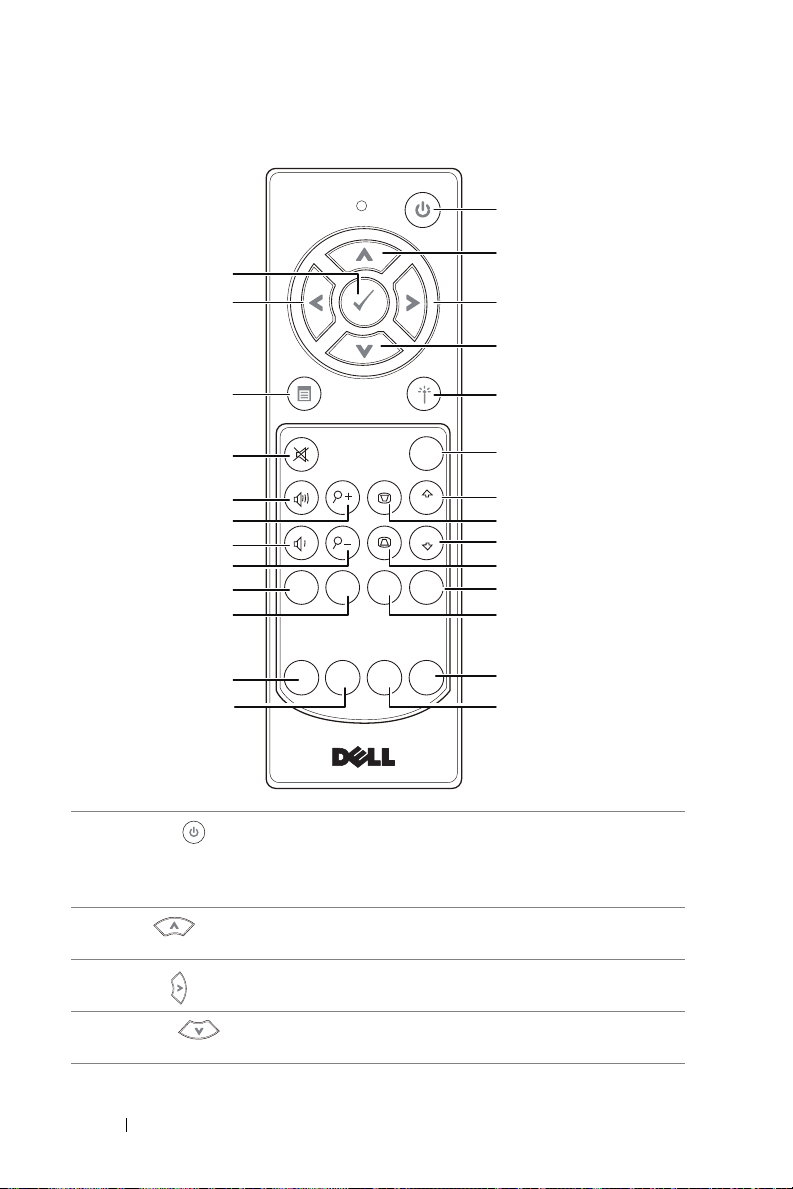
Using Remote Control
Freeze
Source
Auto
Adjust
Blank
Screen
Blank
Screen
Video
Mode
VGA Video
Page Down
HDMI
Page Up
Aspect
Ratio
1
2
316
20
22
24
26
15
17
18
19
21
23
25
4
5
6
7
9
8
11
10
12
13
14
1
Power
Turns the projector on or off. For more
information, see "Turning Projector On" on
page 31 and "Turning Projector Off" on
page 31.
Press to navigate through the On-Screen
Display (OSD) Menu items.
Press to navigate through the On-Screen
Display (OSD) Menu items.
Press to navigate through the On-Screen
Display (OSD) Menu items.
2
3
4
Up
Right
Down
12 Setting Up Your Projector
Page 13
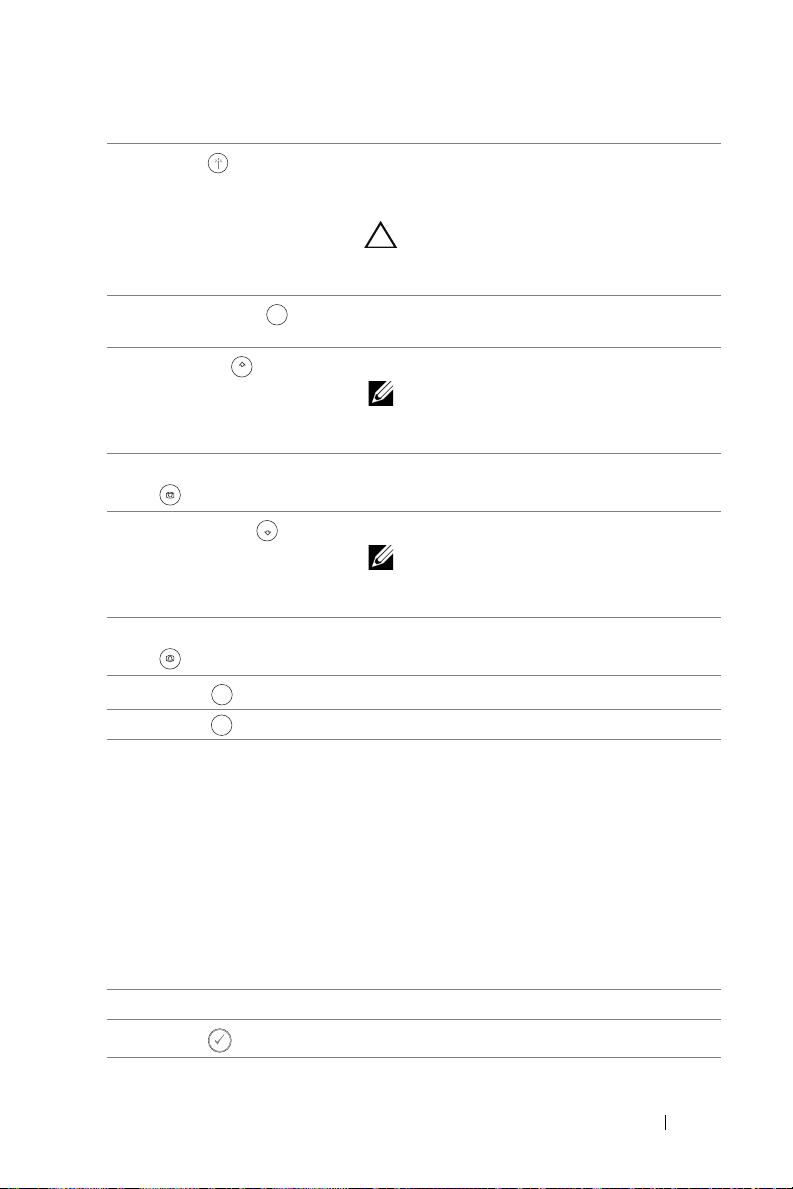
5
Aspect
Ratio
HDMI
Video
Laser
Point the remote control at the screen,
press and hold the laser button to activate
the laser light.
CAUTION: Do not look at the laser
point when it is active. Avoid
directing the laser light on your eyes.
6
Aspect Ratio
Press to change the aspect ratio of a
displayed image.
7
Page up
Page Up
Press to move to the previous page.
NOTE: The Mini USB cable must be
connected if you want to use the
Page Up feature.
8 Keystone adjustment + Press to adjust image distortion caused by
tilting the projector (-15/+15 degrees).
9
Page down
Page Down
Press to move to the next page.
NOTE: The Mini USB cable must be
connected if you want to use the
Page Down feature.
10 Keystone adjustment - Press to adjust image distortion caused by
tilting the projector (-15/+15 degrees).
11
HDMI
Press to choose HDMI source.
12 Video Press to choose Composite Video source.
13 Video mode The projector has preset configurations
that are optimized for displaying data
(presentation slides) or video (movies,
games, etc.).
Press the Video Mode button to toggle
between Presentation mode, Bright mode,
Movie mode, sRGB, or Custom mode.
Pressing the Video Mode button once will
show the current display mode. Pressing
the Video Mode button again will switch
between modes.
14 Blank screen Press to hide/unhide the image.
15
Enter
Press to confirm the selection.
Setting Up Your Projector 13
Page 14

16
Freeze
VGA
17
18
19
Left
Menu
Mute
Volume up
Press to navigate through the On-Screen
Display (OSD) Menu items.
Press to activate the OSD.
Press to mute or un-mute the projector
speaker.
Press to increase the volume.
20 Zoom + Press to increase the image.
21
Volume down
Press to decrease the volume.
22 Zoom - Press to decrease the image.
23
Freeze
Press to pause the screen image, then
press "Freeze" again to unfreeze the image.
24 VGA Press to choose VGA source.
25 Source Press to switch between VGA-A, VGA-B,
Composite, HDMI-A, HDMI-B, Wireless
®
Display, USB Display, USB Viewer, Intel
WiDi, and Internal Memory source.
26 Auto Adjust Press to synchronize the projector with the
input source. Auto adjust does not operate
if the OSD is displayed.
14 Setting Up Your Projector
Page 15
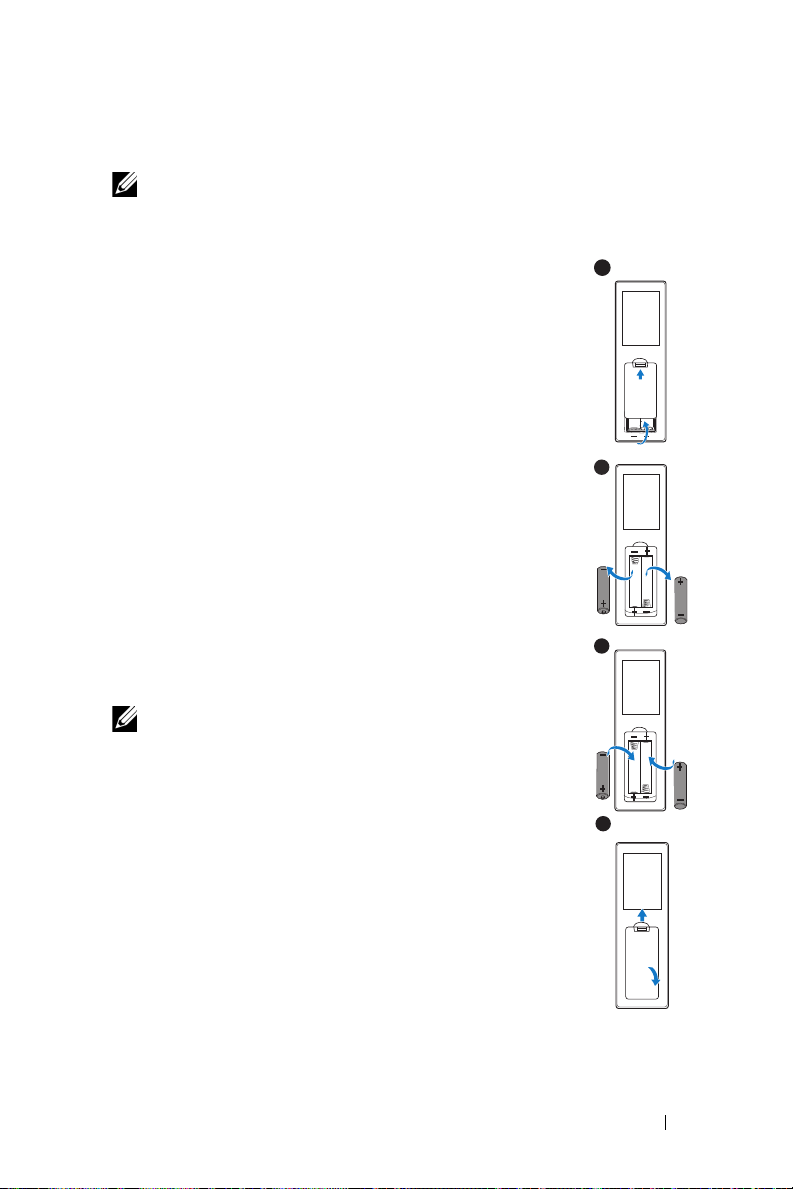
Installing Remote Control Batteries
1
AAA
AAA
2
NOTE: Remove the batteries from the remote control when not in
use.
1
Press the tab to lift the battery compartment cover.
2
Check the polarity (+/-) marking on the batteries.
3
Insert the batteries and align their polarity correctly
according to the marking in the battery compartment.
3
NOTE: Avoid mixing different types of batteries
or using new and old batteries together.
AAA
AAA
4
Slip the battery cover back.
4
Setting Up Your Projector 15
Page 16
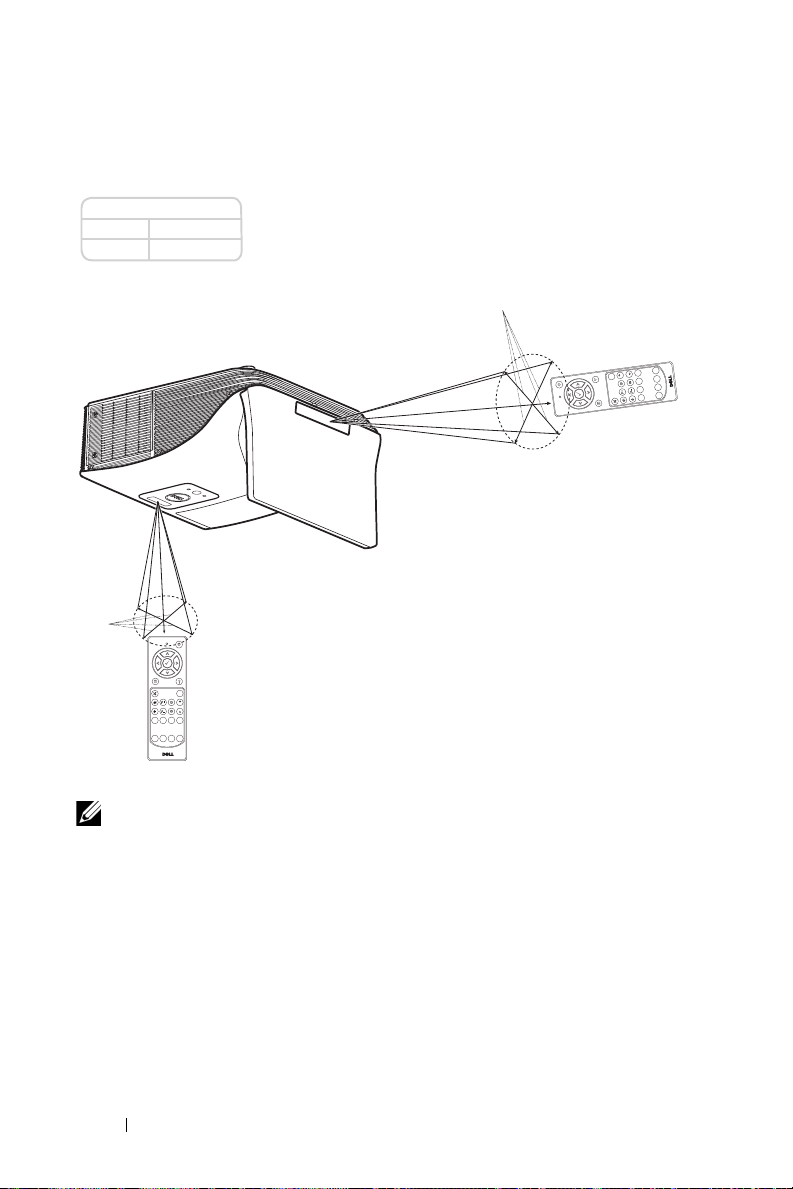
Remote Control Operating Range
Angle
Distance
Angle
Distance
Operating range
Angle
±40°
Distance
7 m/22.97 feet
Freeze
Source
Auto
Adjust
Blank
Screen
Blank
Screen
Video
Mode
VGA Video
Page Down
HDMI
Page Up
Aspect
Ratio
Freeze
Source
Auto
Adjust
Blank
Screen
Blank
Screen
Video
Mode
VGA
Video
Page Down
HDMI
Page Up
Aspect
Ratio
NOTE: Actual operating range may slightly differ from the diagram.
Weak batteries will also prevent the remote control from properly
operating the projector.
16 Setting Up Your Projector
Page 17
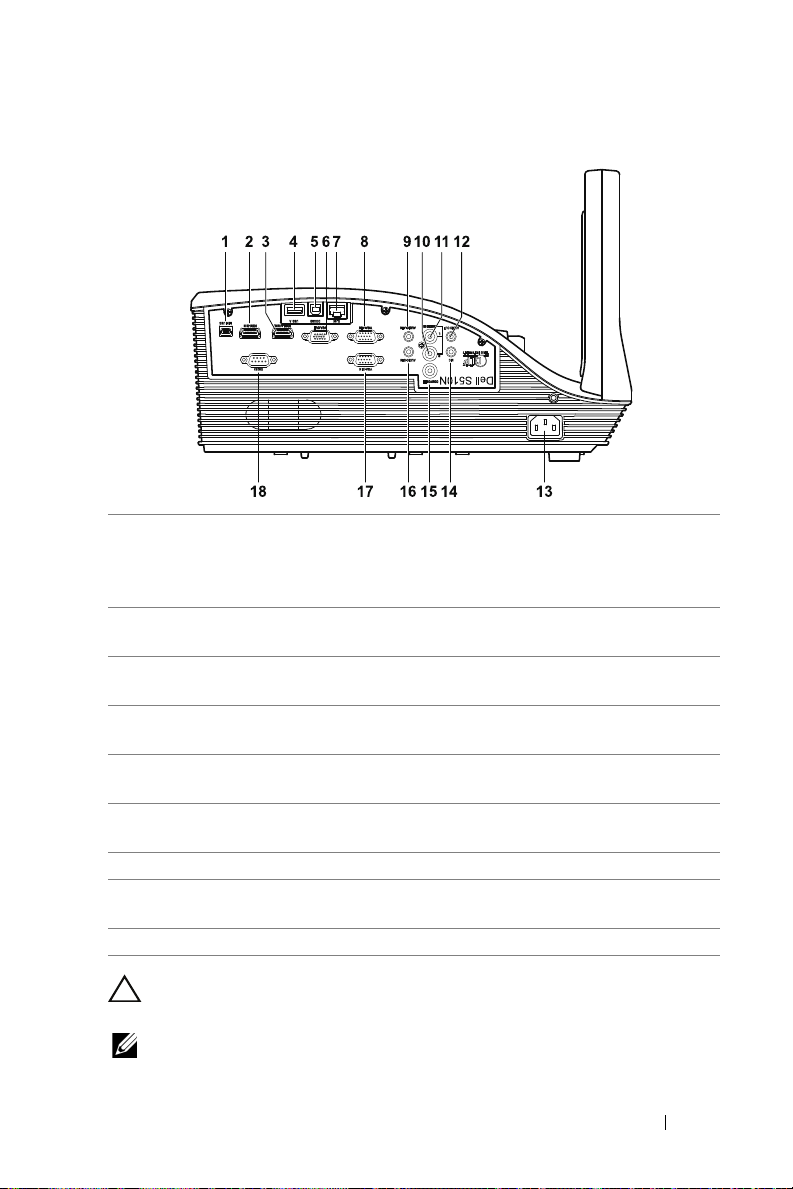
Projector Connections
1 Mini USB (Mini Type B)
connector for remote control,
interactive pen (only for S510),
and firmware upgrade
2 HDMI-B connector 11 Audio left-channel input
3 HDMI-A/MHL connector for
support MHL feature
4 USB Type A connector for USB
Viewer
5 USB Type B connector
(DoUSB) for USB Display
6 VGA output (monitor loop
through) connector
7 RJ-45 connector 16 Audio-B input connector
8 VGA-A input (D-sub)
connector
9 Audio-A input connector 18 RS232 connector
CAUTION: Before you begin any of the procedures in this section,
follow the Safety Instructions as described on page 8.
NOTE: Camera feature only support the S510 projector.
10 Audio right-channel input
connector
connector
12 Audio output connector
13 Power cord connector
14 Microphone connector
15 Composite Video connector
17 VGA-B input (D-sub)
connector
Setting Up Your Projector 17
Page 18
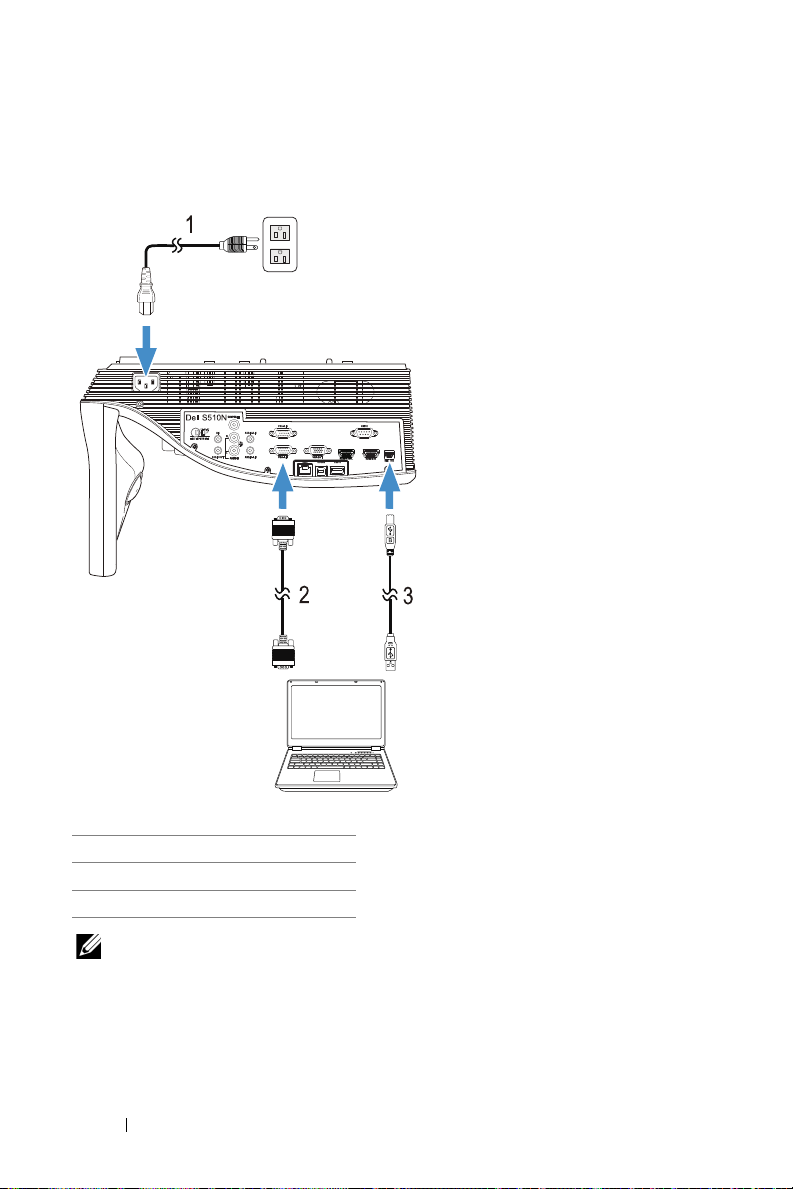
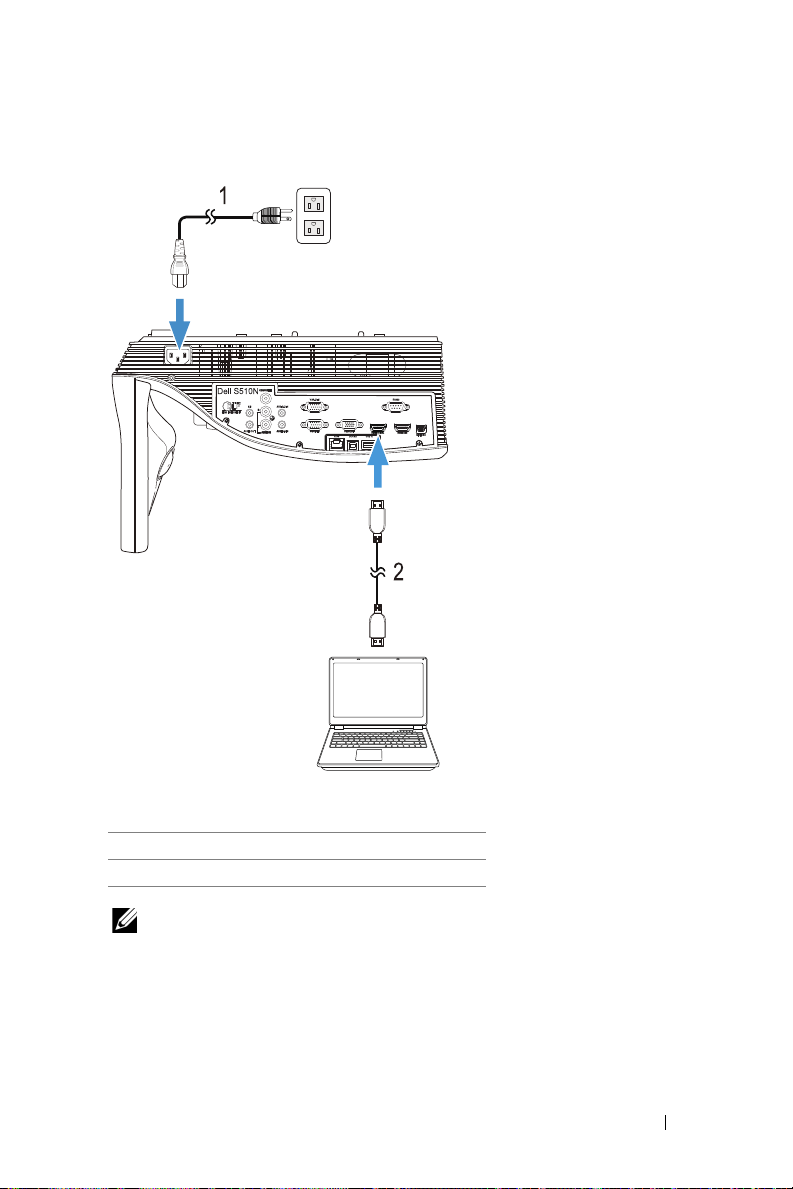
Connecting to a Computer
Connecting to Computer for VGA Video
1 Power cord
2 VGA to VGA cable
3 USB-A to Mini USB-B cable
NOTE: The Mini USB cable must be connected if you want to use the
Page Up and Page Down features on the remote control.
18 Setting Up Your Projector
Page 19
Connecting to Computer for HDMI Video and Audio
1 Power cord
2 HDMI cable
NOTE: The HDMI cable is not shipped with your projector. You can
purchase the HDMI cable on the Dell website at
Setting Up Your Projector 19
www.dell.com
.
Page 20
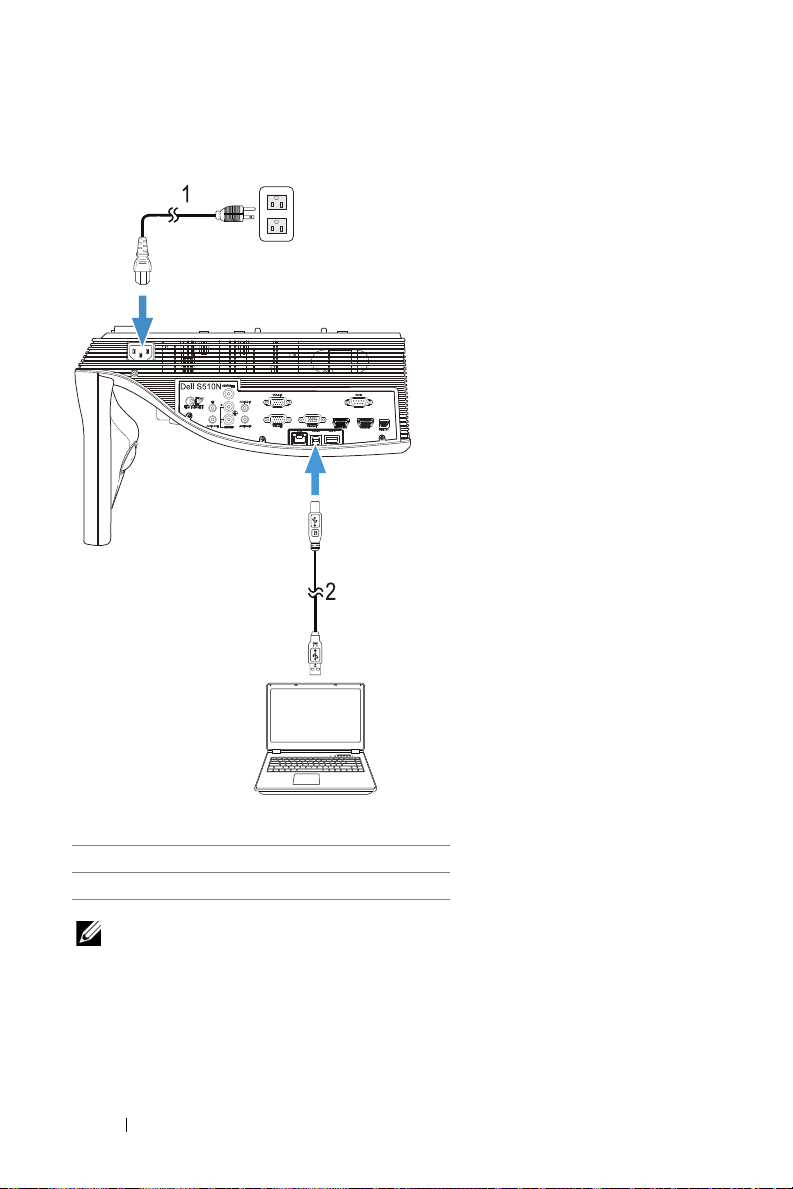
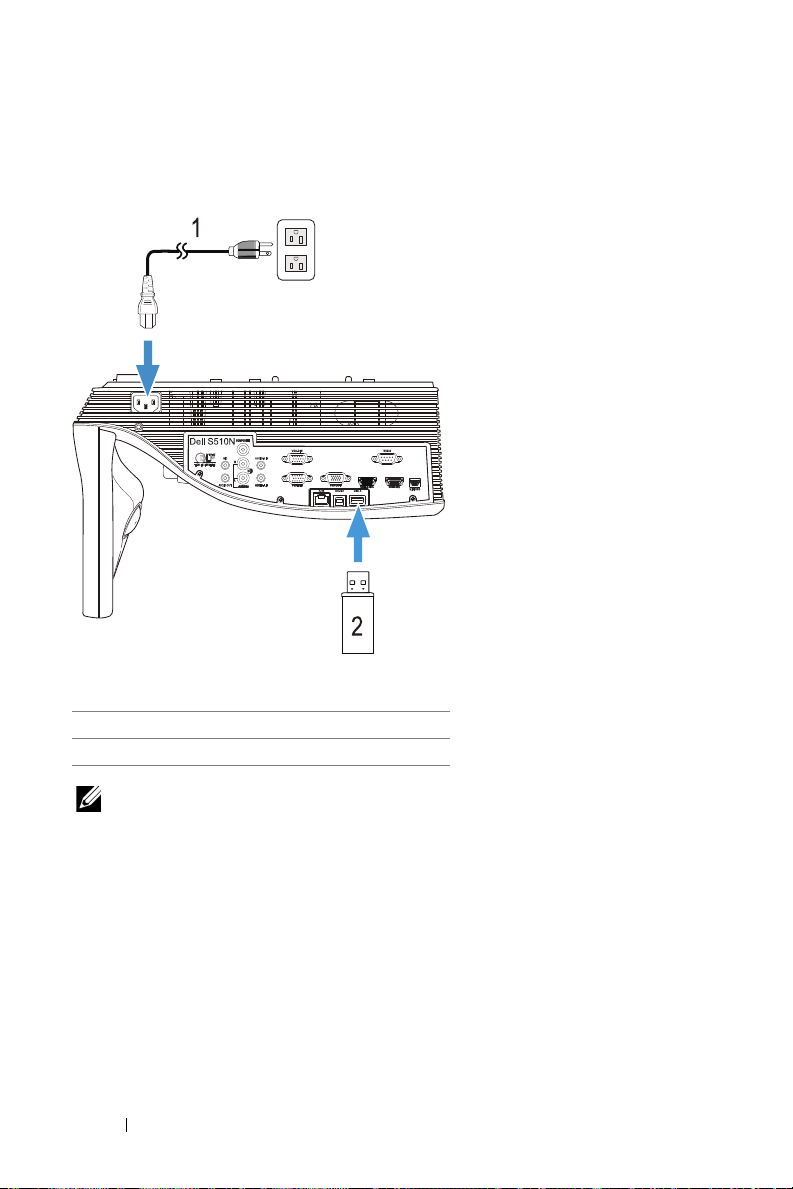
Connecting to Computer for USB Video and Audio
1 Power cord
2 USB-A to USB-B cable
NOTE: Plug and Play. Only one USB cable is shipped with your
projector. An additional USB cable can be purchased on the Dell
website at
20 Setting Up Your Projector
www.dell.com
.
Page 21
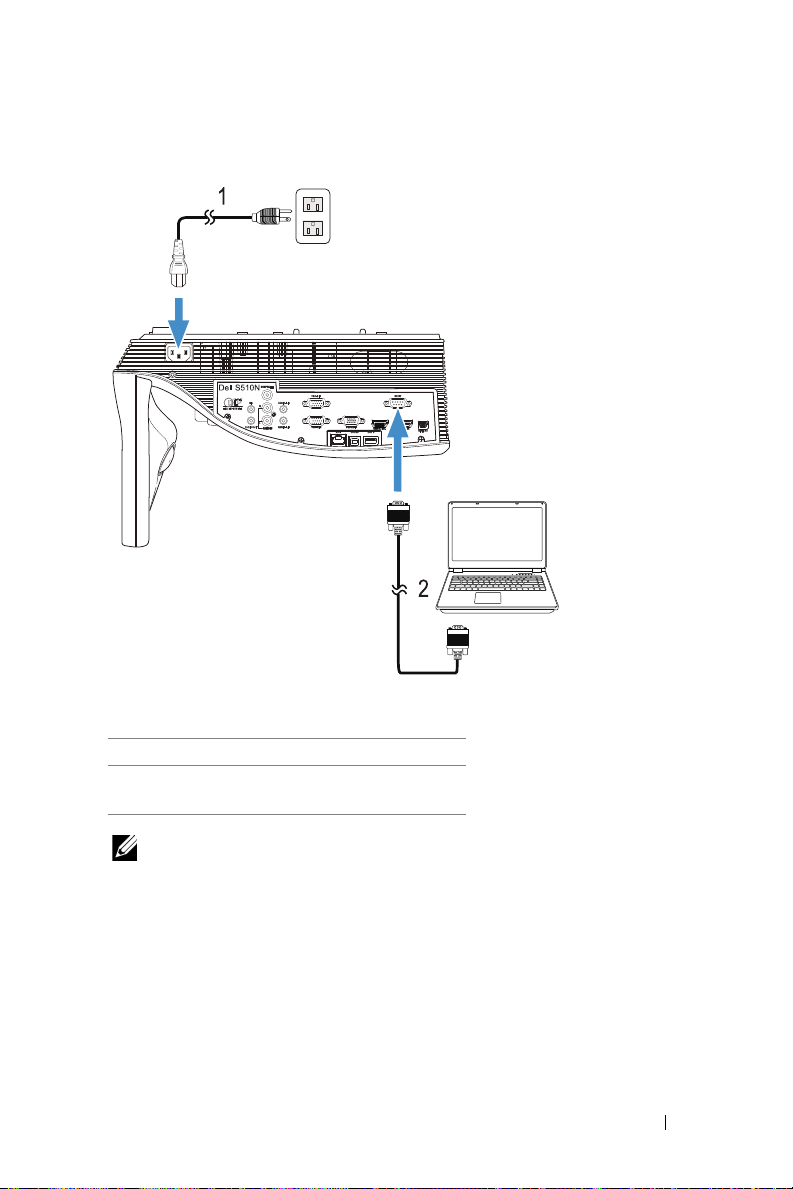
Connecting to Computer for RS232 Video
1 Power cord
2 RS232 (9-pin D-sub female to female
pin2-3 swap) cable
NOTE: The RS232 (9-pin D-sub female to female pin2-3 swap) cable
is not shipped with your projector. Consult a professional installer for
the cable and RS232 remote control software.
Setting Up Your Projector 21
Page 22

Connecting to Computer for Intel® WiDi or Wireless Display (DoWiFi)
NOTE: Your computer should be equipped with a wireless adapter
and properly configured to detect another wireless connection. Refer
to your computer’s documentation on how to configure a wireless
connection.
NOTE: To connect a computer via Intel
be Intel
®
WiDi compatible.
®
WiDi, your computer must
For more information, see "Using Intel® WiDi" on page 59 and "Using
Wireless/LAN Display (DoWiFi/DoLAN)" on page 74.
22 Setting Up Your Projector
Page 23
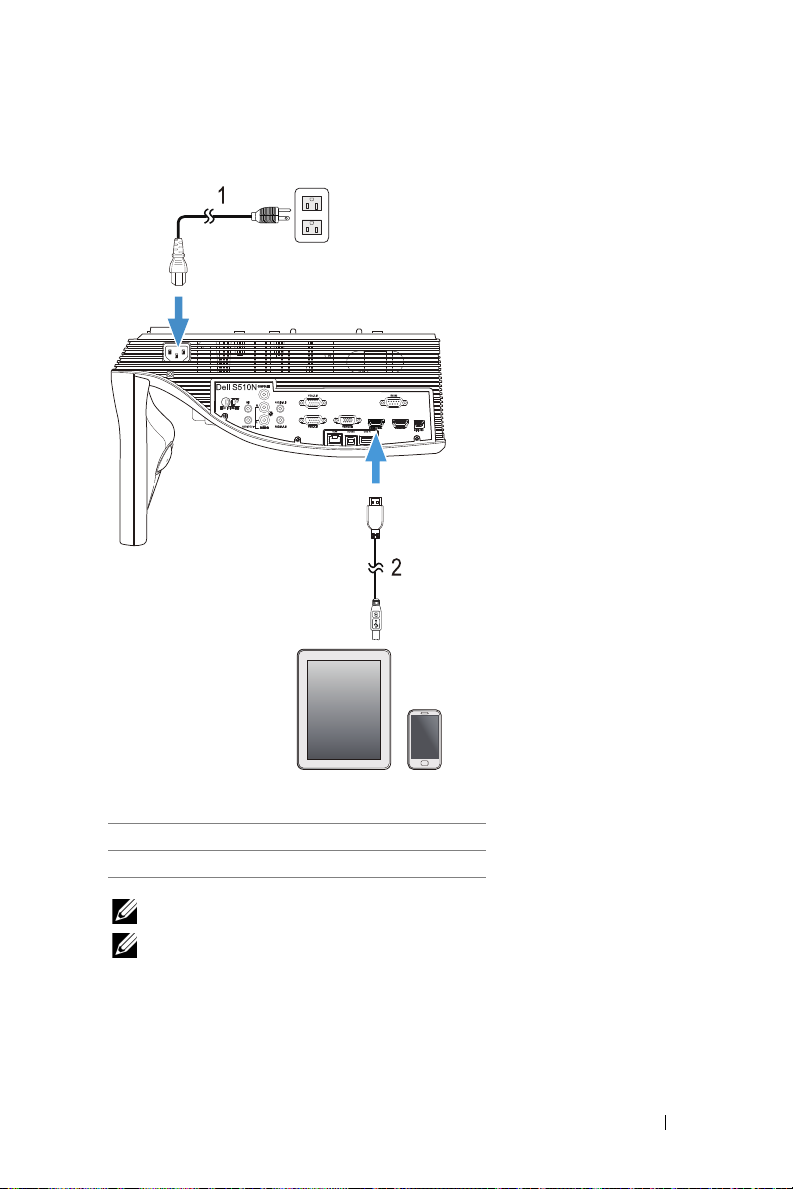
Connecting to Tablets and Smartphones for MHL Video and Audio
1 Power cord
2 MHL cable
NOTE: The MHL cable is not shipped with your projector.
NOTE:
a Your smartphone or tablet must support MHL function.
b Some smartphone or tablet need to connect the additional MHL
adapter or adapter cable, please contact your dealer of devices.
Setting Up Your Projector 23
Page 24
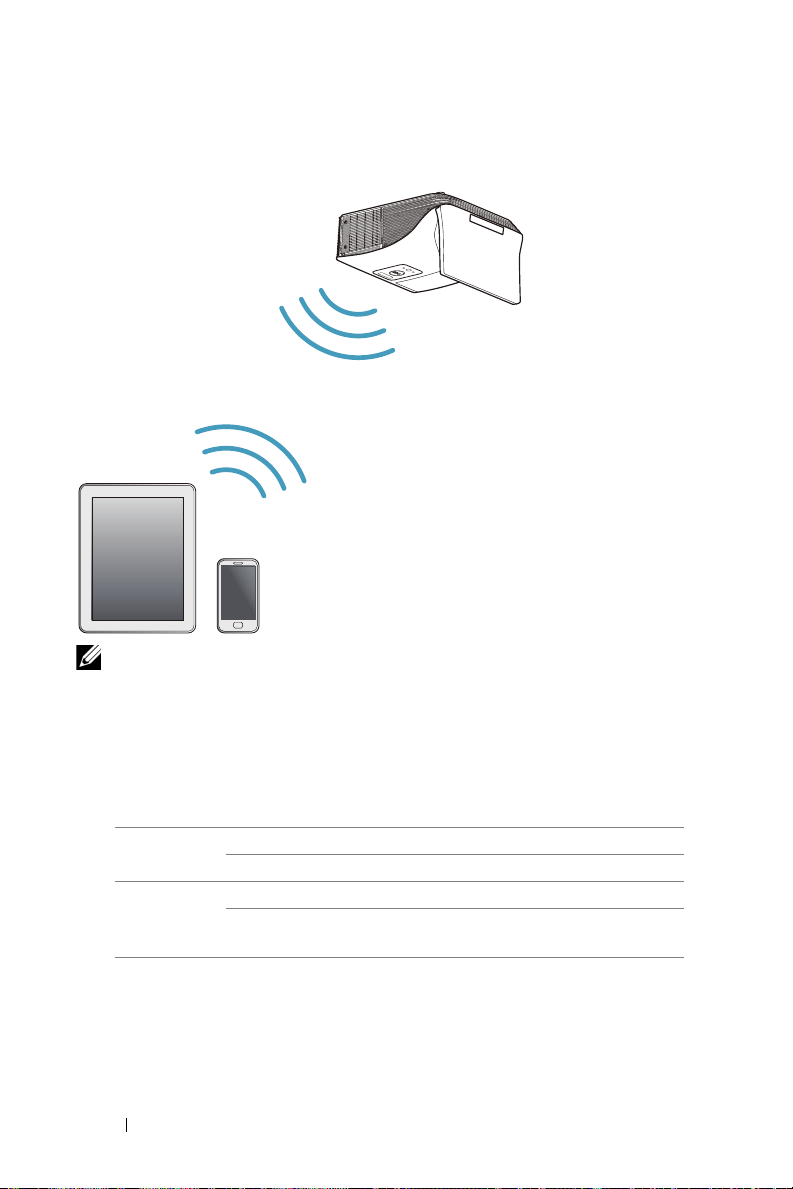
Connecting to Tablets or Smartphones for Wireless Presentation Using WiFi-Doc and MobiShow
NOTE: Dell S510/S510n supports wireless presentation from Android
and iOS devices. Download MobiShow and WiFi-Doc (Bundle Version)
mobile applications from Google Play or App Store. These
applications enable you to transmit supported content from your
Android or iOS devices wirelessly. After installing and launching the
application on your mobile device, enable Wi-Fi on your mobile
device and connect to the projector network, Dell S510 or S510n.
Files supported are:
Mobi Show Photos jpeg / jpg
MS Powerpoint
WiFi-Doc Photos jpeg / jpg
MS Powerpoint / Word /
Excel / Text / PDF
For information on use of MobiShow and WiFi-Doc, go to Dell Support site,
dell.com/support and browse manuals for Dell S510/S510n.
* Please install the PtG2 Converter into your PC for file conversion of ppt into
PtG2 format. PtG2 Converter can be downloaded from dell.com/support.
24 Setting Up Your Projector
PtG2 (converted from ppt)*
ppt / pptx / doc / docx /
xls / xlsx / txt / pdf
Page 25
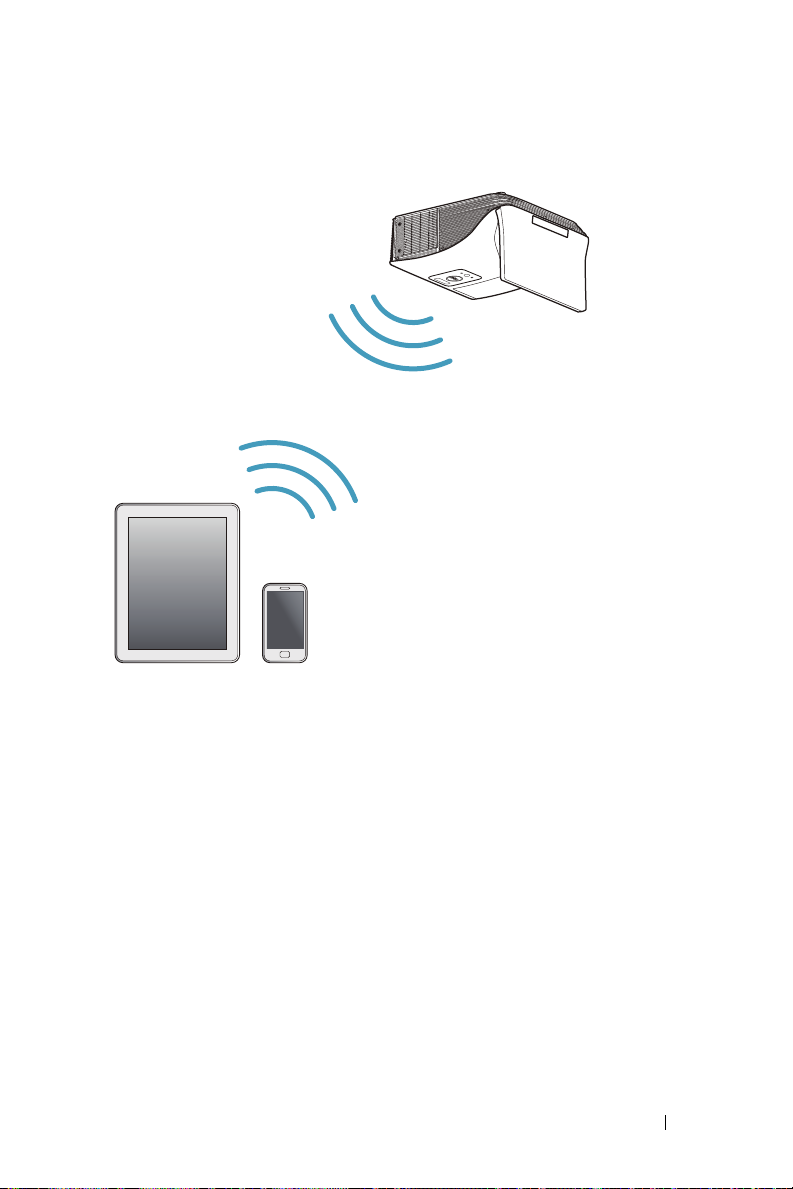
Connecting to Tablets or Smartphones for Wireless Streaming of Video and Audio Using Miracast
For more information, see "Using Miracast" on page 68.
Setting Up Your Projector 25
Page 26
Connecting to Video Sources
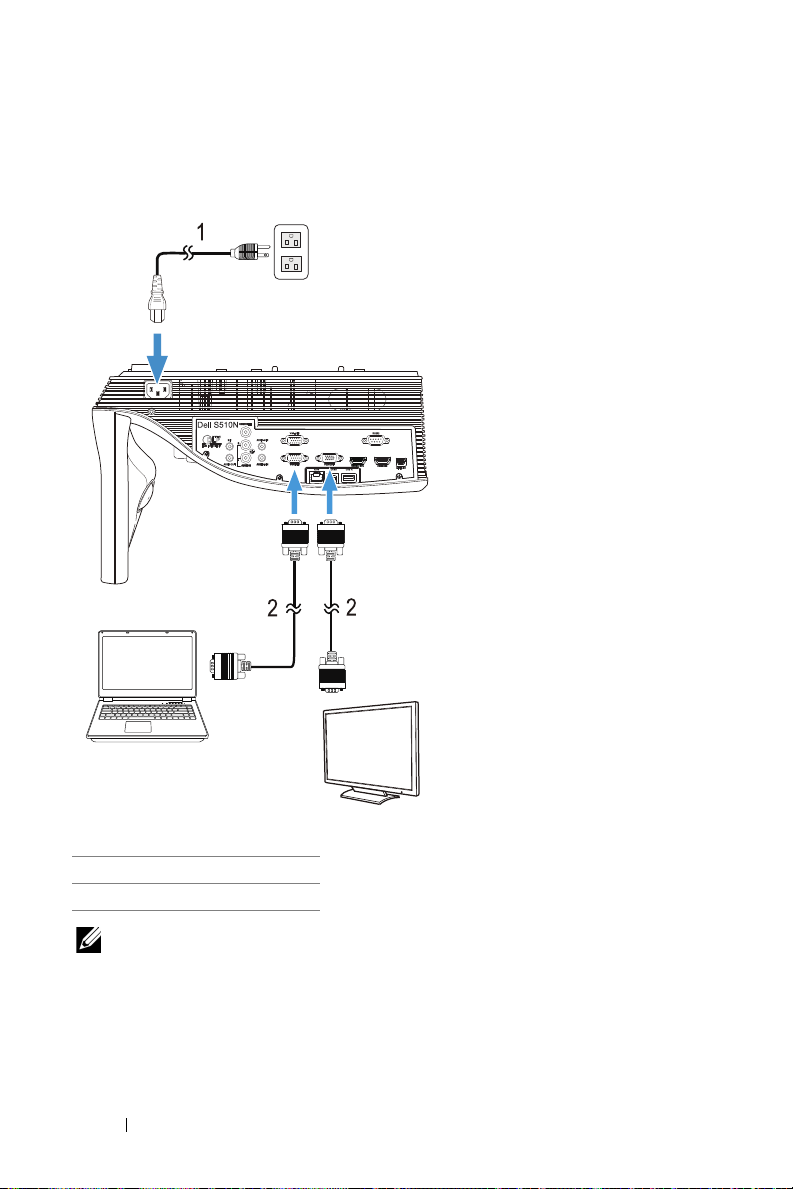
Connecting to External Monitor for Loop-Through VGA Video
1 Power cord
2 VGA to VGA cable
NOTE: Only one VGA cable is shipped with your projector. An
additional VGA cable can be purchased on the Dell website at
www.dell.com
26 Setting Up Your Projector
.
Page 27
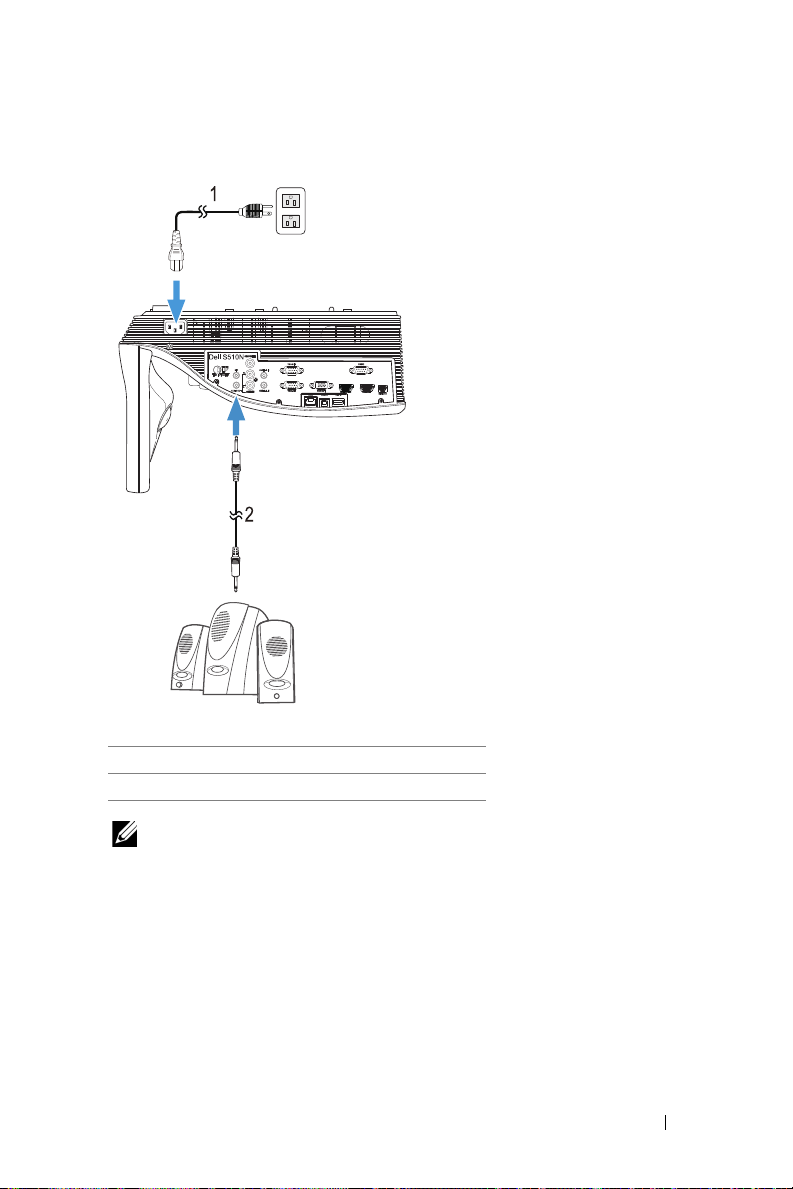
Connecting to External Speakers
1 Power cord
2 Audio cable
NOTE: The audio cable is not shipped with your projector.
Setting Up Your Projector 27
Page 28
Connecting to External USB Devices
USB Memory Storage
1 Power cord
2 USB flash disk
NOTE: The USB flash disk is not shipped with your projector.
For more information, see "Using PC-Free Presentation" on page 94
28 Setting Up Your Projector
Page 29
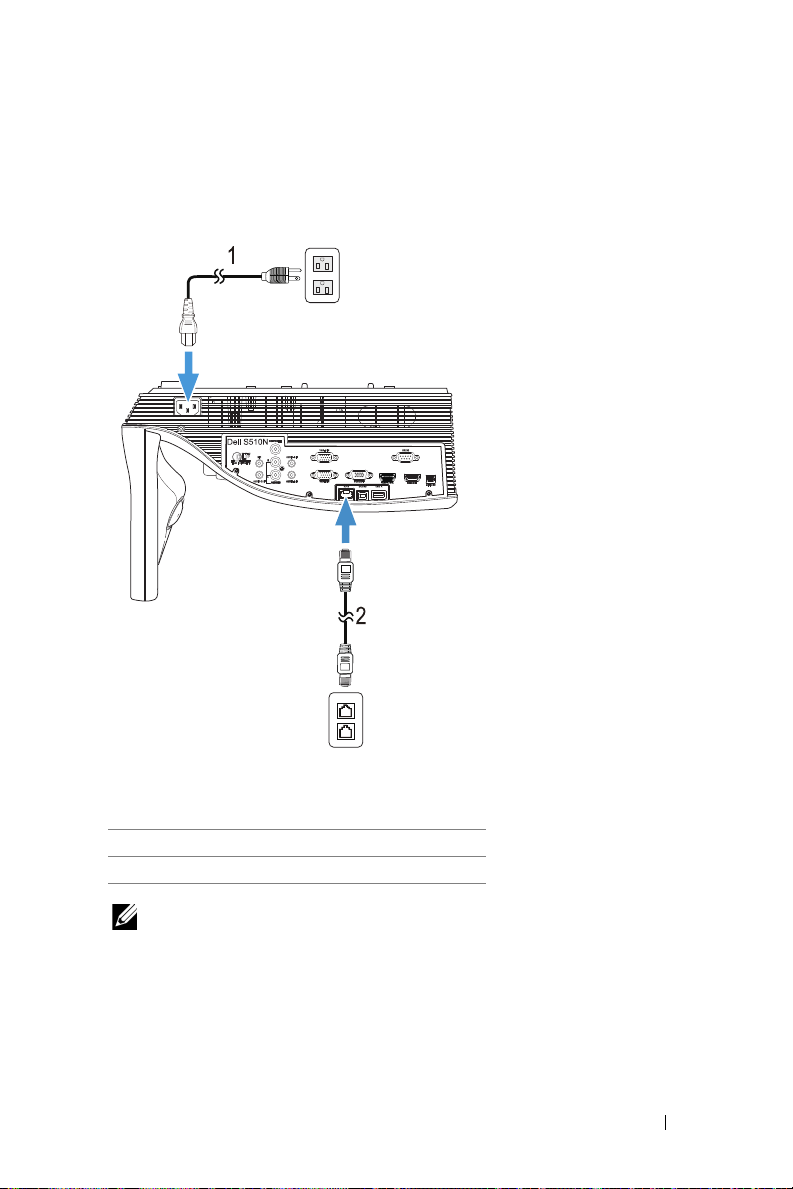
Connecting to Local Area Network (LAN)
Local Area Network (LAN)
To project an image and control the projector that is connected to a
network through a RJ45 cable.
For configuring the network setting, refer to "Network Setup" on page 116.
1 Power cord
2 RJ45 cable
NOTE: The RJ45 cable is not shipped with your projector. You can
purchase the RJ45 cable on the Dell website at
Setting Up Your Projector 29
www.dell.com
.
Page 30
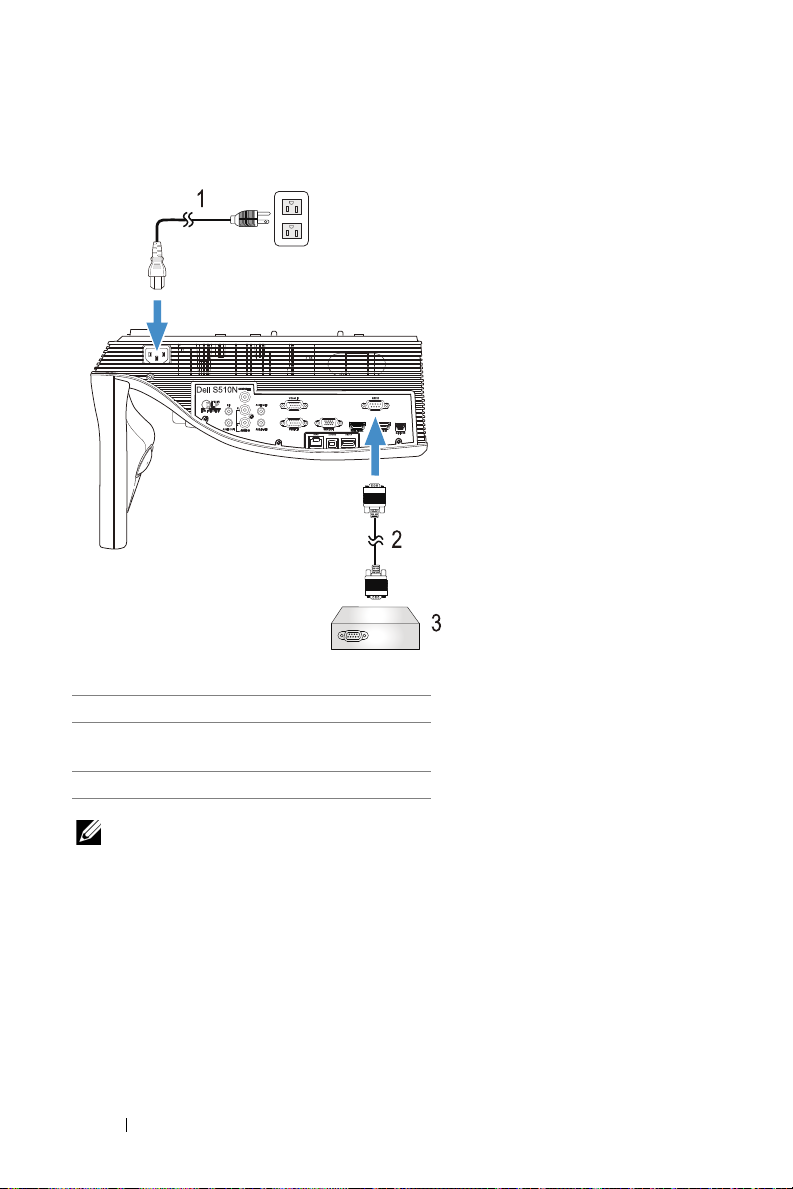
Connecting to Commercial RS232 Control Box
1 Power cord
2 RS232 (9-pin D-sub female to female
pin2-3 swap) cable
3 Commercial RS232 control box
NOTE: The RS232 (9-pin D-sub female to female pin2-3 swap) cable
is not shipped with your projector. Consult a professional technician
to obtain the cable.
30 Setting Up Your Projector
Page 31

Using Your Projector
3
Turning Projector On
NOTE: Turn on the projector before you turn on the source
(computer, DVD player, etc.). The Power button light blinks white
until pressed.
1
Connect the power cord and appropriate signal cables to the projector.
For information about connecting the projector, see "Setting Up Your
Projector" on page 9.
2
Press the
the
3
Turn on your source (computer, DVD player, etc.)
4
Connect your source to the projector using the appropriate cable. See
"Setting Up Your Projector" on page 9 for instructions to connect your
source to the projector.
5
By default, the input source of the projector is set to VGA-A. Change the
input source of the projector if necessary.
6
If you have multiple sources connected to the projector, press the
button on the remote control to select the desired source. See "Using
Remote Control" on page 12 to locate the
Turning Projector Off
Power
Power
button (see "Using Remote Control" on page 12 to locate
button).
Source
button.
Source
CAUTION: Unplug the projector after properly shutting down as
explained in the following procedure.
1
Press the
properly turn off the projector.
NOTE: The "Press Power Button to Turn off Projector" message
2
Press the
120 seconds.
3
To power off the projector quickly, press the Power button and hold for 1
second while the projector’s cooling fans are still running.
Power
button. Follow the instruction displayed on screen to
will appear on the screen. The message disappears after 5 seconds
or you can press the Menu button to clear it.
Power
button again. The cooling fans continue to operate for
Using Your Projector 31
Page 32

NOTE: Before you turn on the projector again, wait for 60 seconds
to allow the internal temperature to stabilize.
4
Disconnect the power cord from the electrical outlet and the projector.
Menu Settings
•
The projector has a multi-language On-Screen Display (OSD) Menu that
can be displayed with or without an input source.
•
Press the Menu button on the remote control to enter the Main Menu.
•
To navigate through the tabs in the Main Menu, press the or
buttons on the remote control.
•
To select a submenu, press the or button on the remote control.
•
To select an option, press the or buttons on the remote control.
When an item is selected, the color changes to dark blue.
•
Use the or buttons on the remote control to adjust the settings.
•
To go back to the Main Menu, press the button on the remote control.
•
To exit the OSD, press the Menu button directly on the remote control.
INPUT SOURCE
The Input Source menu allows you to select your projector's input source.
VGA-A—Press to detect a VGA-A signal.
VGA-B—Press to detect a VGA-B signal.
HDMI-A/MHL—Press to detect a HDMI-A/MHL signal.
HDMI-B—Press to detect a HDMI-B signal.
WIRELESS/LAN—Press to activate the Input Source WIRELESS/LAN
menu.
NOTE: The WIRELESS/LAN can be used after the "Wireless and LAN"
option is turned on.
USB—Press to activate the Input Source USB menu.
32 Using Your Projector
Page 33

NOTE: The USB can be used after the "Wireless and LAN" option is
turned on.
COMPOSITE—Press to detect a Composite Video signal.
INTERNAL MEMORY—Allows you to playback the photo, video, music, and
MS word, excel, powerpoint, and PDF files from internal memory of the
projector.
NOTE: The internal memory can be used after the "Wireless and
LAN" option is turned on.
NOTE:
STORAGE MODE—
Memory source to execute copy, delete, move and more
instructions from your computer to projector internal memory.
When you connect the projector and computer via USB cable,
a USB Connected message will pop up and allow you to select
DoUSB
or
You may also connect USB cable in Internal
Storage Mode
.
INPUT SOURCE WIRELESS/LAN
The Input Source Wireless/LAN menu allows you to activate the Intel®
WIDI/Miracast and Wireless/LAN Display.
INTEL® WIDI/MIRACAST—Press to access the projector's Intel
Miracast Guide screen.
®
WIDI or
WIRELESS/LAN DISPLAY—Press to access the projector's Wireless or
Using Your Projector 33
Page 34

LAN Guide screen. See "Wireless/LAN Guide screen" on page 75.
INPUT SOURCE USB
The Input Source USB menu allows you to activate the USB Display and USB
Viewer.
USB DISPLAY—Allows you to display the computer/laptop screen to your
projector via the USB cable.
NOTE: If the DoUSB can't display, please see "Troubleshooting Your
Projector" on page 130.
USB VIEWER—
excel, powerpoint, and PDF files from your USB flash disk.
Allows you to playback the photo, video, music, and MS word,
AUTO ADJUST
Auto Adjust automatically adjusts the projector's Horizontal, Vertical,
Frequency, and Tracking in PC mode.
34 Using Your Projector
Page 35

BRIGHTNESS/CONTRAST
The Brightness/Contrast menu allows you adjust the brightness/contrast
settings of your projector.
BRIGHTNESS—Use and to adjust the brightness of the image.
CONTRAST—Use and to adjust the display contrast.
NOTE: If you adjust the settings for Brightness and Contrast the
projector automatically switches to Custom mode.
VIDEO MODE
The Video Mode menu allows you to optimize the display image:
Presentation, Bright, Movie, sRGB
representation), and
Custom
(provides more accurate color
(set your preferred settings).
Using Your Projector 35
Page 36

AUDIO VOLUME
The Audio Volume menu allows you adjust the
volume settings of your projector.
Audio, Microphone, Master
AUDIO VOLUME—Press to increase the audio volume and to
decrease the audio volume.
MIC VOLUME—Press to increase the microphone volume and to
decrease the microphone volume.
Master Volume—Press to increase the audio and microphone
volume and decrease the audio and microphone volume.
AUDIO EQ
The Audio EQ menu allows you adjust the audio to boost or reduce
(attenuating) the levels of different frequencies in a signal.
36 Using Your Projector
Page 37

ADVANCED SETTINGS
The Advanced Settings menu allows you to change settings for
Display, Projector, LAN, Wireless, Menu, Power
, and
Information
Image
.
,
IMAGE SETTINGS (IN PC MODE)—Select and press to activate image
settings. The image settings menu provides the following options:
OLOR TEMPERATURE—
C
Allows you to adjust the color temperature. The
screen appears cooler at higher color temperatures and warmer at
lower color temperatures. When you adjust the values in the
Adjust
menu, the Custom mode is activated. The values are saved in
Color
the Custom mode.
RGB COLOR ADJUST—
Allows you to manually adjust the colors red,
green, and blue.
WHITE INTENSITY—
Press and use and to display white
intensity.
COLOR SPACE—
Allows you to select the color space. The options are:
RGB, YCbCr, and YPbPr.
VGA OUTPUT—
Select On or Off the VGA output function at projector
standby status. Default is Off.
NOTE: If you adjust the settings for Color Temperature, RGB Color
Adjust, and White Intensity the projector automatically switches to
Custom mode.
Using Your Projector 37
Page 38

IMAGE SETTINGS (IN VIDEO MODE)—Select and press to activate image
settings. The image settings menu provides the following options:
OLOR TEMPERATURE—
C
Allows you to adjust the color temperature. The
screen appears cooler at higher color temperatures and warmer at
lower color temperatures. When you adjust the values in the
Adjust
menu, the Custom mode is activated. The values are saved in
the Custom mode.
RGB COLOR ADJUST—
Allows you to manually adjust the colors red,
green, and blue.
SATURATION—
Allows you to adjust the video source from black and
white to fully saturated color. Press to increase the amount of
color in the image and to decrease the amount of color in the
image.
SHARPNESS—
Press to increase the sharpness and to decrease
the sharpness.
TINT—
Press to increase the amount of green in the image and
to decrease the amount of green in the image.
WHITE INTENSITY—
Press and use and to display white
intensity.
COLOR SPACE—
Allows you to select the color space. The options are:
RGB, YCbCr, and YPbPr.
VGA OUTPUT—
Select On or Off the VGA output function at projector
standby status. Default is Off.
NOTE:
1
If you adjust the settings for
Saturation, Sharpness, Tin t
Color Temperature, RGB Color Adjust
, and
White Intensity
the projector
automatically switches to Custom mode.
Color
,
38 Using Your Projector
Page 39

2 Saturation, Sharpness, and Ti nt only available when the input source
is from Composite.
IMAGE SETTINGS (NO INPUT SOURCE)—Select and press to activate
image settings. The image settings menu provides the following options:
VGA O
UTPUT—
Select On or Off the VGA output function at projector
standby status. Default is Off.
DISPLAY SETTINGS (IN PC MODE)—Select and press to activate display
settings. The display settings menu provides the following options:
ORIZONTAL POSITION—
H
move the image left.
VERTICAL POSITION—
the image down.
FREQUENCY—
Allows you to change the display data clock frequency to
match the frequency of your computer’s graphics card. If you see a
vertical flickering wave, use the Frequency control to minimize the
bars. This is a coarse adjustment.
TRACKING—
Synchronize the phase of the display signal with the
graphic card. If you experience an unstable or flickering image, use
Tra c kin g to c or r ec t it . This is a fine adjustment.
Press to move the image right and to
Press to move the image up and to move
Using Your Projector 39
Page 40

ASPECT RATIO—
Allows you to select the aspect ratio to adjust how the
image appears. Options are: Origin, 16:10, and 4:3.
•Origin — Select Origin to maintain the aspect ratio of the image
projector according to the input source.
•16:10 — The input source scales to fit the width of the screen to
project a 16:10 screen image.
•4:3 — The input source scales to fit the screen and projects a 4:3
image.
ZOOM—
Press and to zoom and view the image.
Adjust the image scale by pressing or
and press to view on your remote
control only.
ZOOM NAVIGATION—
Zoom Navigation
Press to activate the
menu.
Use to navigate the projection
screen.
3D FORMAT—
Allows you to select the 3D format. Options are: Side By
Side, Side By Side Full, Top/Bottom, and Top/Bottom Full.
3D SYNC INVERT—
If you see a discrete or overlapping image while
wearing DLP 3D goggles, you may need to execute 'Invert' to get
best match of left/right image sequence to get the correct image.
(For DLP 3D goggles)
NOTE:
1
When you want to create a 3D experience, you will need a
few other components including:
a
"Active" 3D glasses with DLP Link™.
b
3D content. See "Note 2".
c
3D Player.
2
HDMI 1.4a 3D support and refresh rate are as below:
a
1280x720p@50 Hz Frame Packing
b
1280x720p@59.94/60 Hz Frame Packing
c
1920x1080p@23.98/24 Hz Frame Packing
d
1920x1080i@50 Hz Side by Side Half
e
1920x1080i@59.94/60 Hz Side by Side Half
f
1280x720p@50 Hz Top and Bottom
40 Using Your Projector
Page 41

g
1280x720p@59.94/60 Hz Top and Bottom
h
1920x1080p@23.98/24 Hz Top and Bottom
DISPLAY SETTINGS (IN VIDEO MODE)—Select and press to activate
display settings. The display settings menu provides the following options:
A
SPECT RATIO—
image appears. Options are: Origin, 16:10, and 4:3.
•Origin — Select Origin to maintain the aspect ratio of image projector
according to the input source.
•16:10 — The input source scales to fit the width of the screen to
project a 16:10 screen image.
•4:3 — The input source scales to fit the screen and projects a 4:3
image.
ZOOM—
Allows you to select the aspect ratio to adjust how the
Press and to zoom and view the image.
Adjust the image scale by pressing or
and press to view on your remote
control only.
ZOOM NAVIGATION—
Press to activate the
Zoom Navigation menu.
Use to navigate the projection
screen.
3D FORMAT—
Allows you to select the 3D format. Options are: Side By
Side, Side By Side Full, Top/Bottom, and Top/Bottom Full.
3D SYNC INVERT—
If you see a discrete or overlapping image while
wearing DLP 3D goggles, you may need to execute 'Invert' to get
best match of left/right image sequence to get the correct image.
(For DLP 3D goggles)
Using Your Projector 41
Page 42

NOTE:
1
When you want to create a 3D experience, you will need a
few other components including:
a
"Active" 3D glasses with DLP Link™.
b
3D content. See "Note 2".
c
3D Player.
2
HDMI 1.4a 3D support and refresh rate are as below:
a
1280x720p@50 Hz Frame Packing
b
1280x720p@59.94/60 Hz Frame Packing
c
1920x1080p@23.98/24 Hz Frame Packing
d
1920x1080i@50 Hz Side by Side Half
e
1920x1080i@59.94/60 Hz Side by Side Half
f
1280x720p@50 Hz Top and Bottom
g
1280x720p@59.94/60 Hz Top and Bottom
h
1920x1080p@23.98/24 Hz Top and Bottom
PROJECTOR SETTINGS—Select and press to activate projector settings.
The projector settings menu provides the following options:
A
UTO SOURCE—
Select Off (the default) to lock the current input signal.
If you press the Source button when the Auto Source mode is set to
Off, you can manually select the input signal. Select On to auto detect
the available input signals. If you press the Source button when the
projector is on, it automatically finds the next available input signal.
PROJECTOR MODE—
Allows you to select the projector mode,
depending upon how the projector is mounted.
•Rear Projection-Wall Mount — The projector reverses and turns the
image upside down. You can project from behind a translucent screen
with a wall-mounted projection (for regular projection).
•Front Projection-Wall Mount — The projector turns the image upside
down for wall-mounted projection.
42 Using Your Projector
Page 43

CLOSED CAPTION—
Test Pattern 1:
Test Pattern 2:
Select On to enable close caption and activate the
closed caption menu. Select appropriate closed caption options: CC1,
CC2, CC3, and CC4.
NOTE:
1
Closed caption option is available for NTSC only.
2
Closed captioning can only be enabled via Composite Video
input.
STARTUP SCREEN—
Default is Dell logo as wallpaper. You can also select
Capture Screen option to capture the screen display. The following
message appears on the screen.
NOTE: To capture a full image, ensure that the input signal
connected to the projector is at 1280 x 800 resolution.
EST PATTERN—Test Pattern is used to test focus and resolution.
T
You can enable or disable the Test Pattern by selecting Off, 1, or 2.
INI USB FUNCTION—Allows you to select the Interactive Pen or
M
Remote Pg Ctrl.
NOTE: Mini USB function only support the S510 projector.
Using Your Projector 43
Page 44

FACTORY RESET—Select Confirm and press to reset all settings to
its factory default. The below warning message appears:
Reset items include both computer sources and Video source
settings.
LAN SETTINGS—
settings menu provides the following options:
Select and press to activate LAN settings. The LAN
WIRELESS AND LAN—
function. Select
function.
DHCP—
is connected, the IP address will automatically be acquired when you
select DHCP On. If DHCP is Off, manually set the IP Address, Subnet
Mask, and Gateway. Use and to select the number of IP
address, Subnet Mask, and Gateway. Key in enter to confirm each
number and then use and to set the next item.
IP ADDRESS—
projector connected to the network.
SUBNET MASK—
GATEWAY—
administrator if you configure it manually.
DNS—
administrator if you configure it manually.
STORE—
settings.
44 Using Your Projector
If a DHCP server exists in the network to which the projector
Automatically or manually assigns the IP address to the
Check the Gateway address with your network/system
Check the DNS Server IP address with your network/system
Press to save the changes made in network configuration
Select
Enabled
Disabled
Configure the Subnet Mask of the network connection.
to deactivation the Wireless and LAN
to activate the Wireless and LAN
Page 45

NOTE:
1
Use and button to select IP Address, Subnet Mask,
Gateway, DNS, and Store.
2
Press the button to enter IP Address, Subnet Mask,
Gateway or DNS to set the value. (The selected option is
highlighted in blue)
a
Use and button to select the option.
b
Use and button to set the value.
c
After the setup is complete, press the button to exit.
3
After the
up, select
4
If you select
IP Address, Subnet Mask, Gateway
Store
and press button to store the settings.
Store
without pressing the
system will keep the original settings.
RESET—
WIRELESS SETTINGS—
Press to reset network configuration.
Select and press to activate wireless settings. The
wireless settings menu provides the following options:
Enter
, and
DNS
button, the
is set
DHCP SERVER—
START IP ADDRESS—
Allows you to enable DHCP server of the wireless.
Automatically or manually assigns the Start IP
address of the DHCP server to the projector connected to the wireless.
END IP ADDRESS—
Automatically or manually assigns the End IP address
of the DHCP server to the projector connected to the wireless.
SUBNET MASK—
GATEWAY—
Configure the Subnet Mask of the wireless connection.
Check the Gateway address with your network/system
administrator if you configure it manually.
DNS—
Check the DNS Server IP address with your network/system
administrator if you configure it manually.
STORE—
Press to save the changes made in wireless configuration
settings.
Using Your Projector 45
Page 46

NOTE:
1
Use and button to select IP Address, Subnet Mask,
Gateway, DNS, and Store.
2
Press the button to enter IP Address, Subnet Mask,
Gateway, or DNS to set the value. (The selected option is
highlighted in blue)
a
Use and button to select the option.
b
Use and button to set the value.
c
After the setup is complete, press the button to exit.
3
After the
up, select
4
If you select
IP Address, Subnet Mask, Gateway
Store
and press button to store the settings.
Store
without pressing the
system will keep the original settings.
RESET—
MENU SETTINGS—
Press to reset wireless configuration.
Select and press to activate the menu settings. The
menu settings consists of the following options:
Enter
, and
DNS
is set
button, the
MENU POSITION—
Allows you to change the position of the OSD menu
on the screen.
MENU TIMEOUT—
Allows you to adjust the time for an OSD timeout. By
default, the OSD disappears after 20 seconds of non-activity.
MENU TRANSPARENCY—
Select to change the transparency level of the
OSD background.
PASSWORD—
When Password Protect is enabled, a Password Protect
screen requesting you to enter a password will be displayed when the
power plug is inserted into the electrical output and the power for the
projector is first turned on. By default, this function is disabled. You
can enable this feature by selecting
Enabled
. If the password has been
set before, key in the password first and select the function. This
46 Using Your Projector
Page 47

password security feature will be activated the next time you turn on
the projector. If you enable this feature, you will be asked to enter the
projector’s password after you turn on the projector:
1
First time password input request:
a
Go to
Menu Settings
enable the password settings.
b
Enabling the Password function will pop up a change screen. Key in
a 4-digit number from the screen and press .
, press and then select
Password
to
c
To confirm, enter the password again.
d
If the password verification is successful, you may resume with
accessing the projector's functions and its utilities.
2
If you have entered an incorrect password, you will be given two more
chances. After three invalid attempts, the projector will automatically
turn off.
NOTE: If you forget your password, contact DELL or a
qualified service person.
3 To disable the password function, select the Disabled option to close
the function.
4 To delete the password, select the Delete option.
Using Your Projector 47
Page 48

CHANGE PASSWORD—
password and confirm the new password again.
Key in the original password. Then, enter the new
POWER SETTINGS—
power settings menu provides the following options:
48 Using Your Projector
Select and press to activate power settings. The
Page 49

QUICK SHUTDOWN—
Select On to turn off the projector with a single
press of the Power button. This function allows the projector to
quickly power off with an accelerated fan speed. Slightly higher
acoustic noise is expected during quick power off.
NOTE: Before you turn on the projector again, wait for 60
seconds to allow the internal temperature to stabilize. The
projector will take a longer time to turn on if you try to power
on immediately. Its cooling fan will run at full speed for about
30 seconds to stabilize the internal temperature.
P
OWER SAVING—
By default, the projector is set to enter power saving
mode after 20 minutes of no activity. A warning message appears on
screen showing a 60 seconds countdown before switching to power
saving mode. Press any button during the countdown period to stop
the power-saving mode.
You can also set a different delay period to enter power saving mode.
The delay period is the time you want the projector to wait without an
input signal.
If an input signal is not detected during the delay period, the projector
turns off. To turn on the projector press the Power button.
DURING STANDBY—
Select Wireless On or Off set the Wireless/LAN
model on/off while the projector is standby status (default is Wireless
Off).
LAMP MODE—
Allows you to select the Normal, ECO, Dynamic, or
Extreme Dimming mode.
Normal mode operates at full power level. ECO mode operates at a
lower power level which may provide longer lamp life, quieter
operation, and dimmer luminance output on the screen.
DYNAMIC—
EXTREME DIMMING—
Select and press to activate dynamic feature.
Select and press to activate extreme dimming
feature.
LAMP HOUR RESET—
Press and select the Confirm option to reset
the lamp hour.
Using Your Projector 49
Page 50

INFORMATION—
projector settings.
The information menu displays the current S510 or S510n
LANGUAGE
Allows you to set the language for the OSD. Press to activate the
Language menu.
HELP
If you encounter problems with your projector, you can access the help
menu for troubleshooting.
50 Using Your Projector
Page 51

Using Interactive Pen (Only for S510)
System Requirements
NOTE: You computer must have the following minimum system
requirements:
Operating System:
•
Windows
Windows XP Professional service pack 3 32-bit, Windows 7 32bit/64-bit, Windows 8 32-bit/64-bit, and Windows 8.1 32-bit/64-bit
Windows .NET Framework 4.0 installation is required (You can
download it from the Microsoft site)
•
Mac
MacOS 10.6 and above
Minimum Hardware:
a
Windows processor type: Intel Core i3 or above
b
MAC processor type: Intel Core i2 duo or above
c
Windows/MAC RAM: 2 GB of RAM required or more are
recommended
d
Windows/MAC Min. HDD space: 110 MB of available hard-disk
space
Using Your Projector 51
Page 52

About Your Interactive Pen (Only for S510)
You can navigate, select, and interact with your computer programs from the
projected screen using the interactive pens just as you would a mouse.
3
2
1
5
4
1 Power switch
2 Power indicator
As you turn on the pen, the power indicator flashes a few seconds
and goes off.
Green: Normal operation
Red: Battery is low
No light: Battery is empty
3 Wrist strap holder
4 Battery compartment access. Turn to open and replace batteries.
5 Pen tip
52 Using Your Projector
Page 53

Replacing the Interactive Pen Tips (Only for S510)
NOTE: If the pen tip becomes damaged or no longer works well,
you should replace them.
Using Your Projector 53
Page 54

Replacing the Interactive Pen Batteries (Only for S510)
NOTE: If the battery is low, the LED indicator starts flashing red as
you turn on the pen. You should replace with two new AAA batteries.
1
You can access the battery compartment by turning open the pen head.
2
Check the polarity (+/-) marking on the batteries.
3
Insert the batteries and align their polarity correctly according to the
marking on the pen head.
NOTE: Avoid mixing different types of batteries or using new and
old batteries together.
4
Place the pen head back, turn until the battery compartment access fully
closed.
54 Using Your Projector
Page 55

Using Interactive Pen with Windows
Dell S510
MOLEX
1
Connect power, VGA, mini USB cables to projector.
2
Power on the projector by pressing the power button on the
remote control.
3
Connect VGA and mini USB cables to your computer.
Using Your Projector 55
Page 56

4
The PenDriver install message will pop-up automatically after
you plug in the USB cable to your computer. Follow the onscreen instruction to complete setup.
The driver icon will appear in your computer's notification
area if the driver has installed successfully.
If the Pen driver is not automatically installed, go to
Computer
NOTE: You may require administrator-level access to install the
driver. Contact your network administrator for support.
Using Interactive Pen with Mac
5
Repeat
and run "PenDriver.exe".
steps 1 - 3
to turn on the projector power and connect
VGA and USB cables.
6
Search CD-ROM of the PenDriver in your computer.
7
Double-click PenDriver.zip file from the MAC folder.
8
Execute the PenDriver.app in the Download folder.
9
Refer to
steps 5 - 7
to execute the initialize the control function
and start using your IR Pen.
My
56 Using Your Projector
Page 57
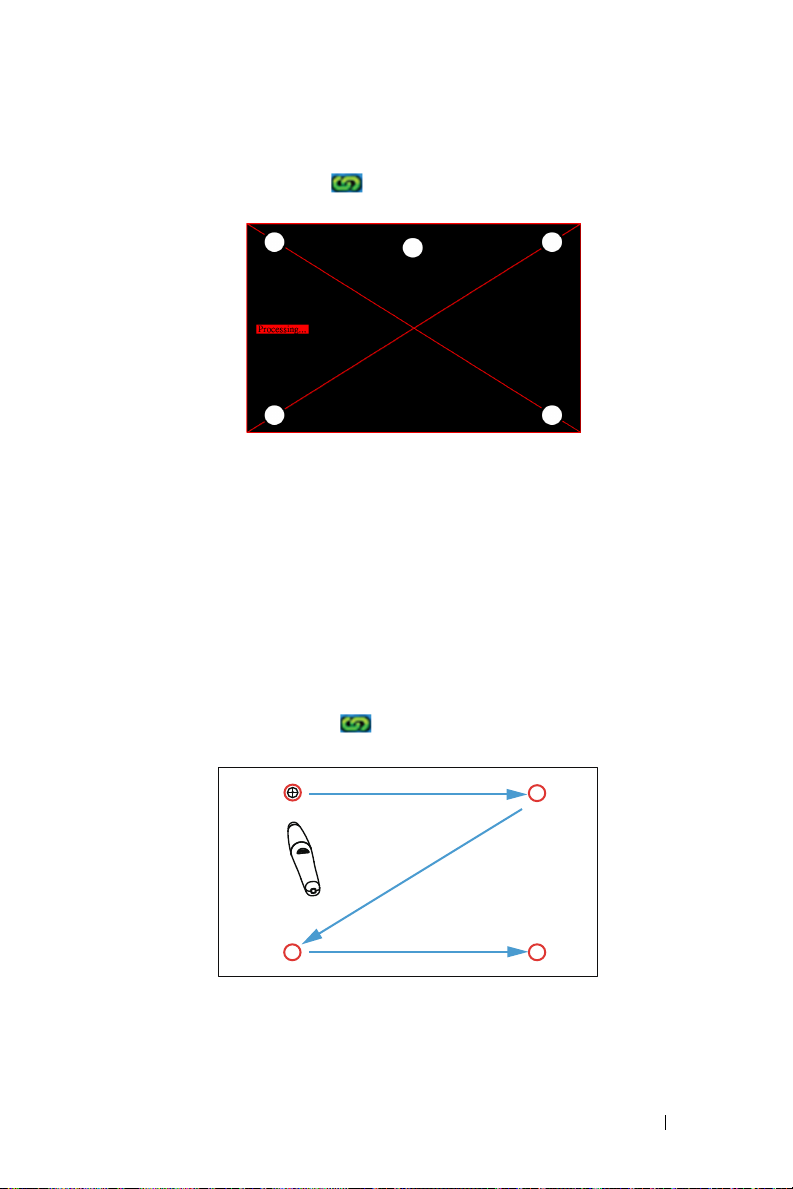
Pen Calibration
1
3
4
2
10
Click the Pen driver icon, select
select
Auto
on the sub-menu.
If the "
auto calibrate failed
" message prompts, please take the
Calibrate pen
steps below for troubleshooting, then do auto calibrate again.
a
Turn lights off or reduce stray light to whiteboard
b
Do not walk in front of or move the projector
c
Adjust focus to sharpen the projected image
If the "auto calibrate still failed" message appears on screen,
please change to manual calibrate.
Manual Calibrate:
Click the Pen driver icon, select Calibrate pen and then
select auto calibrate still failed on the sub-menu.
and then
Using Your Projector 57
Page 58

Touch the target marks on the screen. (Press the "ESC" key to
exit the calibration process). After the 4
th
point of calibration is
finished, please wait for 2 seconds while the calibration data is
saved.
11
Turn on the power switch of the IR Pen.
12
Point the IR Pen to the screen, and start using your IR Pen.
58 Using Your Projector
Page 59

Using Intel® WiDi
System Requirements
NOTE: Your computer must have the following Intel® Wireless
Display system requirements:
System
Component
Processor One of the following processors is required:
Requirement
2nd generation Intel
Processor
3rd Generation Intel
®
Desktop Processor
4th Generation Intel
®
Desktop Processor
®
Pentium® N3510 Processor
Intel
®
Celeron® N2805 Processor
Intel
®
Celeron® N2810 Processor
Intel
®
Celeron® N2910 Processor
Intel
®
Atom® Z3740 Processor
Intel
®
Atom® Z3740D Processor
Intel
®
Atom® Z3770 Processor
Intel
®
Atom® Z3770D Processor
Intel
®
Core™ i3/i5/i7 Mobile
Core™ i3/i5/i7 Mobile and
Core™ i3/i5/i7 Mobile and
Using Your Projector 59
Page 60

Graphics One of the following graphics solutions is
required:
®
Iris™ Pro Graphics 5200
Intel
®
Iris™ Graphics 5100
Intel
®
HD Graphics 5000
Intel
®
HD Graphics 4600
Intel
®
HD Graphics 4400
Intel
®
HD Graphics 4200
Intel
®
HD Graphics 4000
Intel
®
HD Graphics 3000 (mobile)
Intel
®
HD Graphics 2500
Intel
®
HD Graphics 2000 (mobile)
Intel
Wireless One of the following wireless adapters is
required:
Intel® Centrino® Wireless-N 1000, 1030, 2200, or
2230
®
Centrino® Wireless-N 2200 for Desktop
Intel
®
Centrino® Advanced-N 6200, 6205, 6230,
Intel
or 6235
®
Centrino® Advanced-N 6205 for Desktop
Intel
®
Centrino® Wireless-N + WiMAX 6150
Intel
®
Centrino® Advanced-N + WiMAX 6250
Intel
®
Centrino® Ultimate-N 6300
Intel
®
Dual Band Wireless-N 7260
Intel
®
Dual Band Wireless-AC 7260
Intel
®
Dual Band Wireless-AC 7260 for Desktop
Intel
®
Dual Band Wireless-AC 3160
Intel
®
Wireless-N 7260
Intel
Broadcom BCM43228
Broadcom BCM43241
Broadcom BCM4352
60 Using Your Projector
Page 61

Software Intel
Page Down
Page Up
Aspect
Ratio
®
My Wi-Fi Technology (Intel® MWT) and
Intel® Wireless Display must be pre-installed and
enabled.
Operating System One of the following operating systems is
required:
Microsoft Windows 7
Microsoft Windows 8
Microsoft Windows 8.1
Enable Intel® WiDi on Projector
1
Connect the power cable and press the power button.
2 Press the Menu button on the remote cont
rol.
NOTE: Use , , , and buttons to navigate and to select.
Using Your Projector 61
Page 62

3 Access the Input Source menu, select Wireless/LAN and then select
Intel® WIDI/Miracast on the sub-menu.
The
Intel® WiDi Guide Screen
4 Take note of the ADAPTER NAME and PIN CODE. You will need this
information to log-in later.
shown below appears:
Using Intel® WiDi with Microsoft Windows 7 and Windows 8
NOTE: Get the latest Get the latest Intel® WiDi Software to ensure
the best experience, go to
http://www.intel.com/go/wirelessdisplayupdate.
1
Type WiDi in your Windows search bar. If your computer has built-in
Intel® WiDi, you will see the "Intel® WiDi" application in your search
results.
62 Using Your Projector
Page 63

2 Connect your computer to Dell Projector.
3 Key in Security Code as provided in Step 4 of Enable Intel
®
WiDi on
Projector, for pairing confirmation.
Using Intel® WiDi with Microsoft Windows 8.1
NOTE: The Intel® WiDi features are accessed differently in Windows
8.1, and the Intel® WiDi software is not needed.
1
Bring up the
Devices
Charm.
Using Your Projector 63
Page 64

2 Select "Project".
3 Select "Add a wireless display".
4 Choose detected Dell Projector.
64 Using Your Projector
Page 65

5 Key in PIN as provided in Step 4 of Enable Intel® WiDi on Projector for
pairing confirmation.
6 Screen is projected.
7 To adjust projection modes or disconnect, bring up the Devices
Charm, select "Project". Alternatively, use the shortcut "Win + P" for
direct toggle.
Using Your Projector 65
Page 66

Renaming Intel® WiDi Adapter
1
Select "
2
Select "
Settings
Current Display Settings
".
".
3
You may type a new descriptive name for the adapter.
66 Using Your Projector
Page 67

Intel® WiDi Support
For most up-to-date information, visit Intel® WiDi website at
www.intel.com/go/widi
Using Your Projector 67
Page 68

Using Miracast
Page Down
Page Up
Aspect
Ratio
Enable Miracast on Projector
1
Connect the power cable and press the power button.
2 Press the Menu button on the remote control
.
NOTE: Use , , , and buttons to navigate and to select.
3 Access the Input Source menu, select Wireless/LAN and then select
Intel® WIDI/Miracast on the sub-menu
.
68 Using Your Projector
Page 69

The
Screen Guide
4 Take note of the ADAPTER NAME and PIN CODE. You will need this
information to log-in later.
shown below appears:
Using Miracast with Windows 8.1
5 Bring up the Devices Charm
.
6 Select "Project"
.
Using Your Projector 69
Page 70

7 Select "Add a wireless display"
.
8 Choose detected Dell Projector
9 Key in PIN as provided in Step 4 of Enable Miracast on Projector for
pairing confirmation.
.
70 Using Your Projector
Page 71

10 Screen is projected
11 To adjust projection modes or disconnect, bring up the Devices
Charm, select "Project". Alternatively, use the shortcut "Win + P" for
direct toggle
.
.
Using Miracast with Android 4.4 or higher
12 Go to "Settings " menu.
13 Go to "Display" menu.
Using Your Projector 71
Page 72

14 Tu r n o n "Cast Screen".
15 Choose detected wireless display device i.e. Dell Projector-Dell.
16 Screen is projected.
17 Direct access to "Cast Screen" from Quick Settings shade if "Cast
Screen" is switched ON.
72 Using Your Projector
Page 73

18 Swipe down to "Disconnect" from notification shade.
19 Tap on "Settings" in Cast Screen UI to rename or forget device.
Miracast Support
To use Miracast, you need a device running Android 4.4 or higher. If your
device is running 4.4 or lower, the Menu icon looks lik
is running 4.3 or lower, the Settings icon looks like this .
For more information about Miracast, visit website at
https://support.google.com/nexus/answer/2865484?hl=en
e this . If your device
Using Your Projector 73
Page 74

Using Wireless/LAN Display (DoWiFi/DoLAN)
System Requirements
NOTE: Your computer must have the following minimum system
requirements:
Operating System:
•
Windows
Microsoft Windows XP Home or Professional Service pack 2 (32-bit
recommended), Windows Vista 32-bit, and Windows 7 Home or
Professional 32-bit or 64-bit, Windows 8 32-bit or 64-bit
•
MAC
MacBook and above, MacOS 10.5 and above
Minimum Hardware:
a
Intel Dual Core 1.4 MHz or higher
b
256 MB of RAM required, 512 MB or more recommended
c
10 MB of available hard-disk space
d
nViDIA or ATI graphic card with 64 MB VRAM or above
e
Ethernet adapter (10/100 bps) for an Ethernet connection
f
A supported WLAN adapter for a WLAN connection (any NDIS-compliant
802.11b or 802.11g or 802.11n Wi-Fi device)
Web browser
Microsoft Internet Explorer 6.0 or 7.0 (recommended) or 8.0, Firefox 2.0,
Safari 3.0, and above
Enable Wireless or LAN on Projector
1
Connect the power cable and press the power button.
74 Using Your Projector
Page 75

2 Press the Menu button on the remote contro
Page Down
Page Up
Aspect
Ratio
l.
NOTE: Use , , , and buttons to navigate and to
select.
3 Access the Input Source menu, select Wireless/LAN and then select
Wireless/LAN Display on the sub-menu
The
Wireless Guide Screen
shown below appear
.
s:
4 Take note of the Wireless Network (SSID), IP Address, and Access
Code. You will need this information to log-in in later.
Using Your Projector 75
Page 76
Using Wireless Display or LAN Display with Windows
Install the Dell Projector Connection Manager on Your Computer by
Wireless
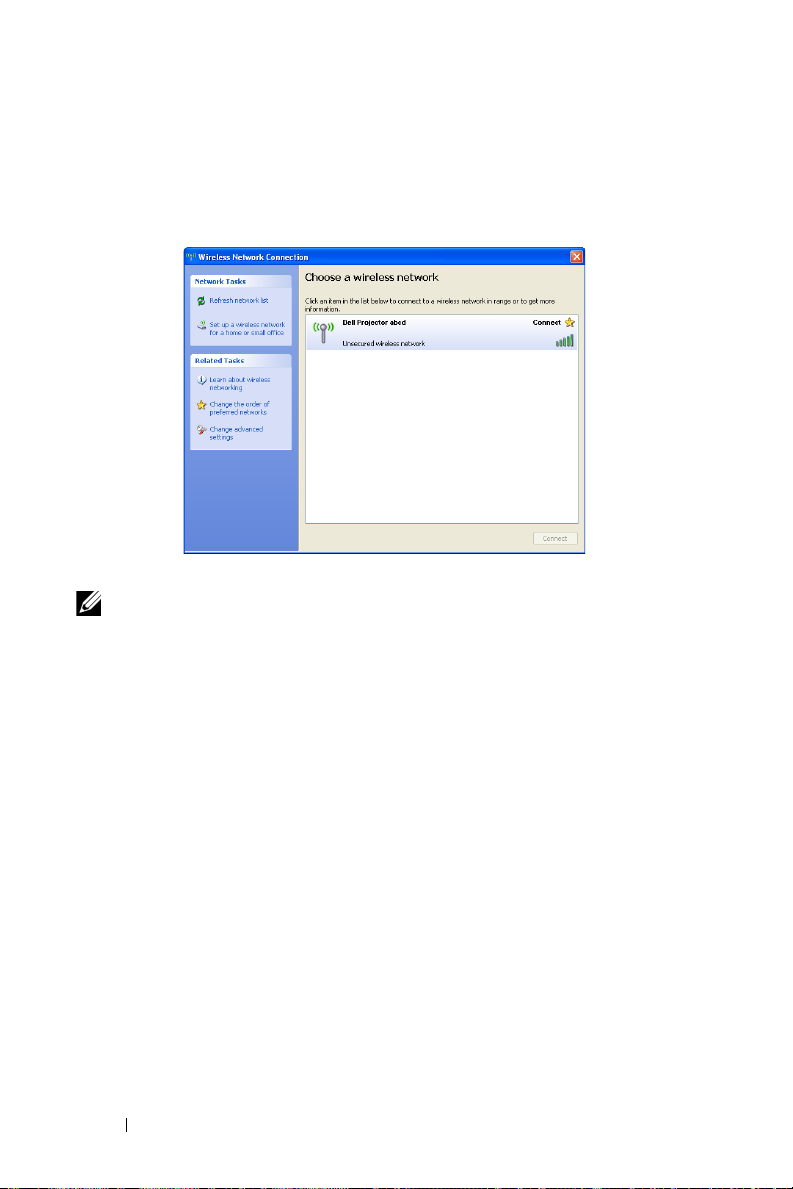
5 Connect your computer to the Dell Projector abcd wireless network.
NOTE:
• Your computer must have wireless network function to detect the
connection.
• When you connect to the Dell Projector abcd wireless network,
you will lose wireless connectivity with other wireless networks.
76 Using Your Projector
Page 77

NOTE: Remember to turn off all proxies. (In Microsoft® Windows
Vista: Click Control Panel Internet Options Connections
LAN Settings)
6 Open your internet browser. You will be automatically directed to the
S510 or S510n Web Management web page.
NOTE: If the web page does not load automatically, enter the IP
address (default IP address is 192.168.100.10) noted from the
projector’s screen in the browser’s address bar.
Using Your Projector 77
Page 78

7
The S510 or S510n Web Management page opens. For first-time use,
click
Download
8 Select the appropriate operating system, then click Download.
.
78 Using Your Projector
Page 79

9 Click Run to proceed with
the one-time installation
of the software.
NOTE: You may choose
to save the file and install
it at a later time. To do
this, click Save.
NOTE: Audio projection
function needs install extra driver only in Windows XP. If your
computer does not have the driver installed, a pop-up message will
appear on-screen prompting you to install the required driver. You
can download the “Audio Projection Driver” from the Dell Support
site at dell.com/support.
NOTE: If you are unable to install the application because of
inadequate rights on the computer, please contact your network
administrator.
10 The installation software will launch. Follow the on-screen instruction
to complete setup.
Using Your Projector 79
Page 80

Launch the Dell Projector Connection Manager
Once the installation is complete, the program will launch and search
automatically. If the program does not launch automatically, you can
double-click the icon on the desktop to start the application.
Login
Login with the Access Code provided in Step 4 of Using Wireless/LAN
Display (DoWiFi/DoLAN), then click OK.
80 Using Your Projector
Page 81

Install the Dell Projector Connection Manager on Your Computer by LAN
(Fig.1) (Fig.2) (Fig.3)
11 The installation software will launch. Follow the on-screen instruction
to complete setup.
12 Repeat steps 6 - 10 to install Dell Projector Connection Manager.
Launch and Login the Dell Projector Connection Manager
Once the installation is complete, the program will launch and search
automatically. If the program does not launch automatically, you can
double-click the icon on the desktop to start the application.
a
b
c
Click the "
Enter
Enter
Manual Network Connection
IP Address
Access Code
(Fig.2, default IP address: 192.168.100.10).
(Fig.3).
" (Fig.1).
Using Your Projector 81
Page 82

Understanding the Buttons
2
1
After a successful log in, the following screen appears:
Item Description
1 Status Bar
Settings Click to activate the application settings.
Minimize button Click to minimize the application.
Close button Click to exit the application.
2 Controls Toolbar
Information Click to display SSID, IP, and Access Code
information.
Share mode Click to activate the share mode.
Display mode Click to change the display mode.
Start Click to start projection.
Pause Click to pause projection.
Stop Click to stop projection.
Audio Click to toggle audio projection On/Off.
82 Using Your Projector
Page 83

Using the Settings
Click to display the settings menu.
RESOLUTION—Allows you to setup the resolution.
DISPLAY MODE—Allows you to setup the default projection mode.
Using Your Projector 83
Page 84

AUDIO—Allows you to change the audio settings.
USB DONGLE—Allows you to create USB dongle. See "Make USB Token for
Plug & Show Projection" on page 86.
84 Using Your Projector
Page 85

ABOUT—Display the application version.
Using Your Projector 85
Page 86

Make USB Token for Plug & Show Projection
The Application Token lets you perform Plug and Show using a USB token.
1 From the application software, click > USB Dongle
2 The following screen appears. Click Next.
3 Plug a flash drive into any of the USB ports on your computer. Select
the drive from the list, then click Next.
4 Click Finish to close the wizard.
86 Using Your Projector
Page 87

Using Wireless Display or LAN Display with Mac
Launch the Dell Wireless Application Software on Your Computer by
Wireless
5 Connect your computer to the Dell Projector abcd wireless network.
6 Open your Safari browser. You will be automatically directed to the
S510 Web Management web page.
NOTE: If the web page does not load automatically, enter the IP
address (default IP address is 192.168.100.10) noted from the
projector’s screen in the browser’s address bar.
7 The S510 Web Management page opens. For first-time use, click
Download.
8 Select the appropriate operating system, then click Download.
9 Execute the Dell_S510.dmg file from downloaded folder.
10 Execute the Dell S510 Wireless Application from Dell S510 folder.
Using Your Projector 87
Page 88

Login
Login with the Access Code provided in Step 4 of Using Wireless/LAN
Display (DoWiFi/DoLAN), then click Connect.
Launch the Dell Wireless Application Software on Your Computer by LAN
11 Connect the LAN cable to the projector and the computer.
12 Repeat steps 6 - 10 to launch the Dell Wireless Application.
Login
Login with the Access Code provided in Step 4 of Using Wireless/LAN
Display (DoWiFi/DoLAN), then click Connect.
88 Using Your Projector
Page 89

Understanding the Buttons
1
2
3
After a successful log in, the following screen appears:
Item Description
1 Status Bar Displays IP and LOGIN CODE
information.
Menu Click to activate the application menu.
Minimize button Click to minimize the application.
Close button Click to exit the application.
2 Controls Toolbar
Full screen Click to project the image in full screen.
Split 1 Click to project the image in the upper
left corner of the screen.
Split 2 Click to project the image in the upper
right corner of the screen.
Split 3 Click to project the image in the lower
left corner of the screen.
Split 4 Click to project the image in the lower
right corner of the screen.
Stop Click to stop projection.
Pause Click to pause projection.
Audio Projection Click to enable audio projection.
3 Connection Status
Connection Icon Blinks when projection is in progress.
Using Your Projector 89
Page 90

Projecting the Presentation
•
To project the presentation, click any of the projection buttons .
•
To pause the presentation, click . The icon turns green.
•
To continue the presentation, click again.
•
To audio projection the presentation, click .
•
To stop the presentation, click .
NOTE: WLAN environment using 802.11g connection, and no
screen stretching.
Using the Menu
Click to display the menu.
WEB MANAGEMENT—Click to open the Web Management page. See "Using
Interactive Pen (Only for S510)" on page 51.
SEARCH SERVER—Click to search and connect to wireless projector.
PROJECTION QUALITY—Allows you to set the projector quality is Blur but
Faster or Clear but Slower.
INFO—Click to display system information.
ABOUT—Click to display the application version.
EXIT—Click to close the application.
90 Using Your Projector
Page 91

Using USB Display (DoUSB)
Display over USB with Windows
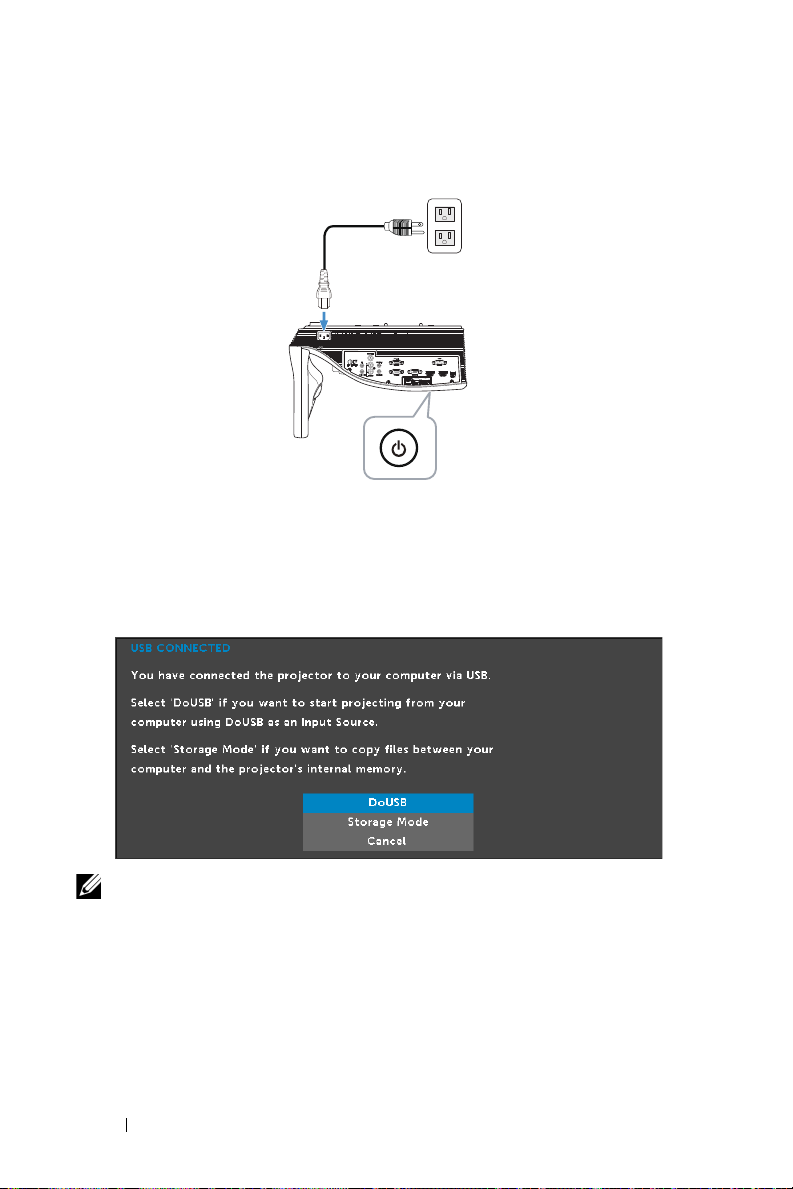
1
Connect the power cable and press the power button.
2 Connect the USB (type A to B) cable to the projector and the
computer.
3 When you connect the projector and computer via USB cable, a USB
Connected message will pop up and allow you to select DoUSB or
Storage Mode. Select "DoUSB" option to switch to the USB Display
source.
NOTE: If the DoUSB can't display, please see "Troubleshooting Your
Projector" on page 130.
Using Your Projector 91
Page 92
Display over USB with Mac
1
Connect the power cable and press the power button.
2 Connect the USB (type A to B) cable to the projector and the
computer.
3 When you connect the projector and computer via USB cable, a USB
Connected message will pop up and allow you to select DoUSB or
Storage Mode. Select "DoUSB" option to switch to the USB Display
source.
NOTE: DoUSB function needs install driver in Mac operating system.
If your Mac computer does not have the driver installed, a pop-up
message will appear on-screen prompting you to install the required
driver. See "Install the DoUSB Driver" on page 93.
92 Using Your Projector
Page 93

Install the DoUSB Driver
1
Double-click the "
2
Execute the "
USB_DISPLAY
MAC_USB_Display.pkg
" icon on the desktop.
" file from USB_DISPLAY
folder.
3
The installation software will launch. Follow the on-screen
instruction to complete setup.
4
When installation is completed, restart your computer.
Using Your Projector 93
Page 94

Using PC-Free Presentation
Multimedia File Type Support
Photos
Image Type (Ext Name) Sub Type
GIF 8000 x 8000
PNG 8000 x 8000
BMP 8000 x 8000
JPEG/JPG Baseline YUV420 8000 x 8000
Progressive YUV420 8000 x 8000
Video
File Format Max. Resolution
Motion
JPEG
AVI 1920 x 1080, 30fps 20 Mbps 1080p, 60 Hz
MPEG-4 1920 x 1080, 30fps 20 Mbps 1080p, 60 Hz
MOV 1920 x 1080, 30fps 20 Mbps 1080p, 60 Hz
ASF 1920 x 1080, 30fps 20 Mbps 1080p, 60 Hz
MKV 1920 x 1080, 30fps 20 Mbps 1080p, 60 Hz
WMV 1920 x 1080, 30fps 20 Mbps 1080p, 60 Hz WMA
1920 x 1080, 30fps 20 Mbps 1080p, 60 Hz LPCM
Encode Type Max Pixels
YUV422
YUV440
YUV444
YUV422
YUV440
YUV444
Max. Bit
Rate (bps)
Max. Display Audio
Format
MPEG-1
Layer 3
94 Using Your Projector
Page 95

Music
Music Type (ext Name) Max. Sample Rate (KHz)
LPCM 48 KHz 320 Kbps
MPEG-1 Layer 3 48 KHz 320 Kbps
WMA 48 KHz 320 Kbps
WAV 48 KHz 320 Kbps
OGG 48 KHz 320 Kbps
Max. Bit Rate (Kbps)
Using Your Projector 95
Page 96

Office Viewer File Type Support
The Office Viewer feature allows you to use MS Excel, MS Word, MS
PowerPoint, and PDF files.
Buttons Introduction
Use the up, down, left, and right buttons for navigation and button on the
remote control to select.
Button Up Down Left Right Enter Menu
No
function
No
function
Previous
page
Next
page
No
function
Back to
previous
menu
96 Using Your Projector
Page 97

Setting up to present using External USB Storage
Page Down
Page Up
Aspect
Ratio
NOTE: A USB flash disk must be plugged into the projector if you
want to use the multimedia USB function.
Follow these steps to playback the Photo, Video, or Music files on your
projector:
1
Connect the power cable and turn on the projector by pressing the
power button.
2 Plug in a USB flash disk to your projector.
3 Press the Menu button on the remote control.
Using Your Projector 97
Page 98

4 Access the Input Source menu, select USB and then select USB
Viewer on the sub-menu.
The
USB Screen
5 Select the multimedia files: Photo, Video, Music, or Office Viewer,
and then press the to start playing. Or select the Setup option to
change multimedia settings. See "Multimedia Setup" on page 101.
shown below appears:
98 Using Your Projector
Page 99

Setting up to present using Internal Memory Storage
Page Down
Page Up
Aspect
Ratio
Follow these steps to playback the Photo, Video, or Music files on your
projector:
1
Connect the power cable and turn on the projector by pressing the
power button.
2 Press the Menu button on the remote control.
3 Access the Input Source menu, select Internal Memory source.
Using Your Projector 99
Page 100

The
Internal Memory Screen
4 Select the multimedia files: Photo, Video, Music, or Office Viewer,
and then press the to start playing. Or select the Setup option to
change multimedia settings. See "Multimedia Setup" on page 101.
shown below appears:
100 Using Your Projector
 Loading...