

Page 1
Dell™ S3845cdn
CAC
Star
™ Smart Card Reader
Installation and Configuration Guide
Document protection for CAC/PIV enabled
Multifunction Devices
S3845cdn CACStar User Guide Rev A01
Copyright 2017 Digital Imaging Technology Page 1
Page 2

Table of Contents
Introduction ......................................................................................... 4
Initial Setup .......................................................................................... 5
Configuring the CACStar Option via Touchscreen ............................... 6
Activating the CACStar Configuration Menu System .................. 6
Access Code ................................................................................. 6
The Top-Level Menu .................................................................... 8
LAN TCP/IP settings ..................................................................... 9
Ethernet Connection Settings ................................................... 11
Additional Functions in Menu Mode ......................................... 12
Configuring the CACStar Option via Administration Website ........... 13
Accessing the MFD/Printer Web Site ................................................ 14
Connectivity ....................................................................................... 14
LAN Side Configuration ................................................................14
Local Side Configuration ..............................................................17
Security .............................................................................................. 18
MFD Function Enabling ...............................................................18
Email Setup ..................................................................................20
Authentication Method ...............................................................22
User Logging ................................................................................29
Upload Certificate ........................................................................29
Device Certificate Management ..................................................30
Administrator .................................................................................... 32
Change Password ........................................................................32
Administrator Access ...................................................................32
Firmware Update .........................................................................34
Technical Support ........................................................................36
S3845cdn CACStar User Guide Rev A01
Copyright 2017 Digital Imaging Technology Page 2
Page 3

Setup Test ....................................................................................37
Date Time ....................................................................................38
Hold Print Files .............................................................................39
Hold File Name Matching Format ............................................. 40
Status ................................................................................................. 41
Card Reader .................................................................................41
Network .......................................................................................42
Other............................................................................................43
Appendix A – Setup Information Checklist ........................................ 44
Appendix B – CACStar Option Installation Procedure ....................... 46
Step 1: Determine IP Address of the printer. ..............................46
Step 2: Disable Sleep Mode .........................................................47
Install the Installation Cloning File ..............................................48
Hardware Installation of CACStar ................................................50
S3845cdn CACStar User Guide Rev A01
Copyright 2017 Digital Imaging Technology Page 3
Page 4

Introduction
CACStar™ provides a solution to HSPD-12 requirements for
CAC/PIV based protection of network data to and from printers or
Multifunction Devices (MFDs). You can configure it to require an
authenticated CAC/ PIV card to control Copy, Print, Fax, Scan to
Folder, Scan to Email, SNMP, or FTP.
Configurable authentication methods include Basic X.509 certificate
on the card, PIN validation, expiration, OCSP, root certificate, LDAP,
and Kerberos. CACStar will adopt the IP address of the MFD on
which it is installed, so there is no host network configuration change
necessary.
Configuration is easily done using secure web based access to
CACStar by the network administrator. In its simplest form, the
admin only needs to configure the IP address of the MFD and the IP
address of the local time server. Information about many additional
configuration options is described later in this guide.
Prior to starting the CACStar configuration, you must know your
network infrastructure. Appendix A has a convenient list of questions
and the necessary data that you will need to collect.
If you need help obtaining correct firmware or documentation,
contact the Dell ProSupport Help Desk by calling 1-866-516-3115, or
by sending email to Imaging_Solutions_Support_CAC@dell.com.
This manual will guide you through installing the hardware, installing
the software to convert the Dell S3845cdn to be CACStar enabled,
and configuration of the customer desired authentication control
options. Prior to starting the installation, you may wish to use the
checklist in Appendix A to help you collect the information you will
need.
S3845cdn CACStar User Guide Rev A01
Copyright 2017 Digital Imaging Technology Page 4
Page 5

Initial Setup
If your 3845 came to you with the CACStar option not pre-installed,
you should refer to Appendix B to find instructions regarding initial
installation. Otherwise, proceed to CACStar Configuration below.
S3845cdn CACStar User Guide Rev A01
Copyright 2017 Digital Imaging Technology Page 5
Page 6
Configuring the CACStar Option via Touchscreen
A limited number of configuration settings can be accessed directly
from the printer’s touchscreen:
• TCP/IP address
• Ethernet connection (speed / duplex)
Access to all settings for the CACStar option are available via the
CACStar administration web site.
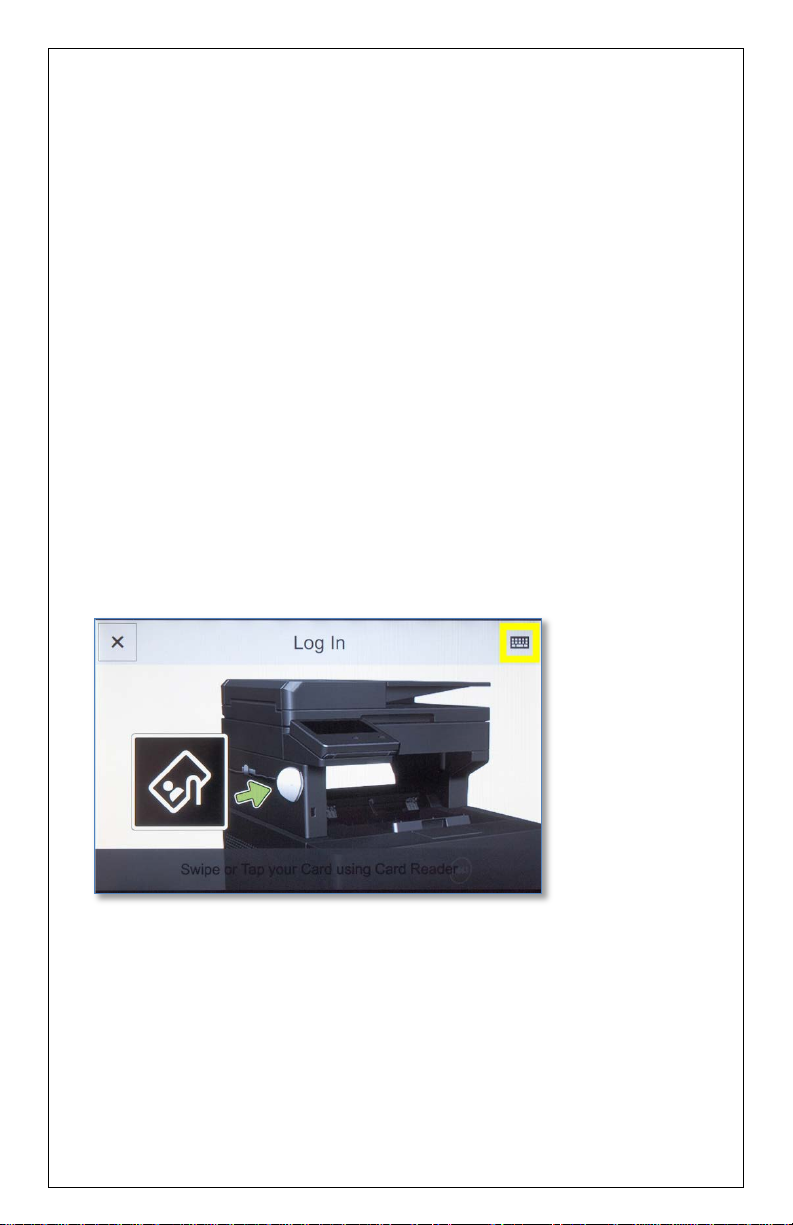
Activating the CACStar Configuration Menu System
To activate the CACStar Configuration Menu System, tap the
“Manual Login” icon on the touchscreen. It looks like a small
keyboard icon. In the picture below it is highlighted by a yellow box.
If the touchscreen does not look like the picture below, then tap the
[Log In] button at the top left corner of the touchscreen.
Access Code
If the CACStar “disable front panel configuration” setting has been
enabled, then you will be asked to enter an access code before
access to the menu system will be granted. This access code is fixed
to a value of “3149”.
S3845cdn CACStar User Guide Rev A01
Copyright 2017 Digital Imaging Technology Page 6
Page 7

If an incorrect access code is entered, then access to the menu
system will be denied.
S3845cdn CACStar User Guide Rev A01
Copyright 2017 Digital Imaging Technology Page 7
Page 8
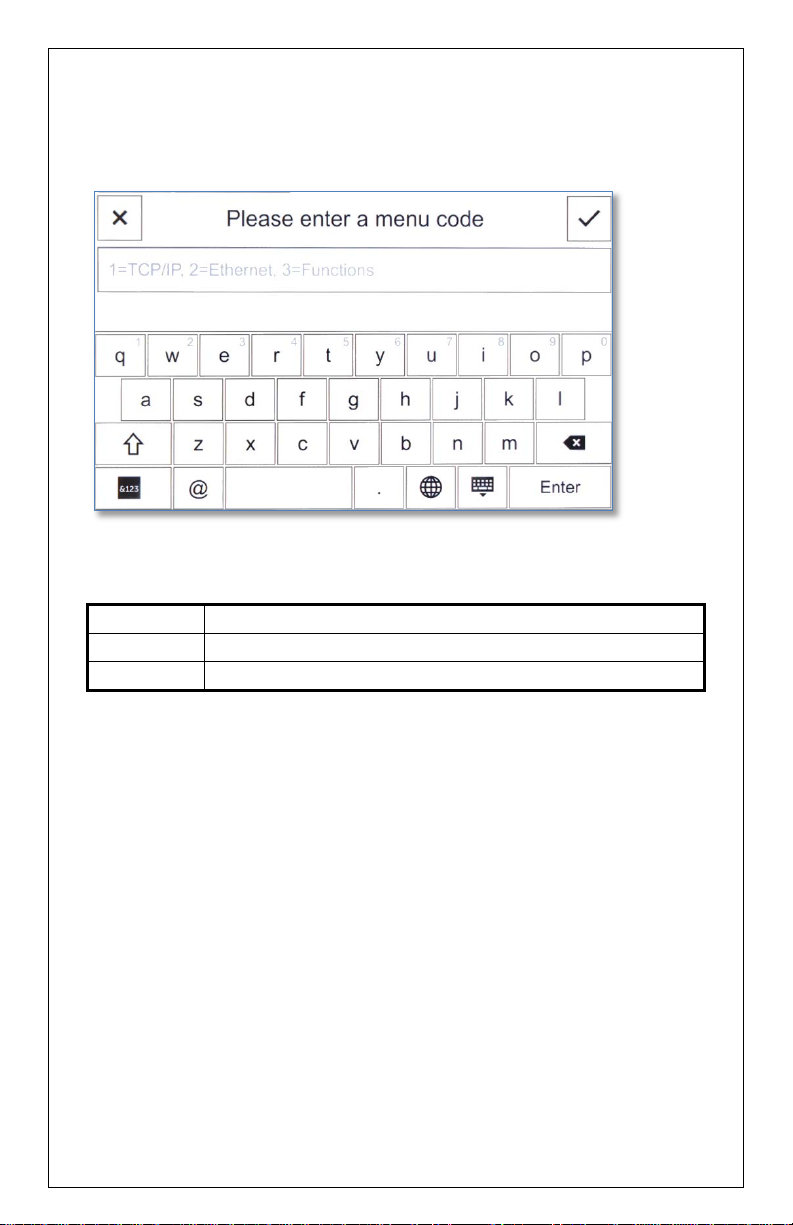
The Top-Level Menu
1
CACStar LAN TCP/IP Settings
2
CACStar LAN Ethernet connection settings
3
Additional functions (described below)
Upon entry into the CACStar menu system, you are asked which
configuration area you wish to use.
Menu codes that can be entered:
S3845cdn CACStar User Guide Rev A01
Copyright 2017 Digital Imaging Technology Page 8
Page 9
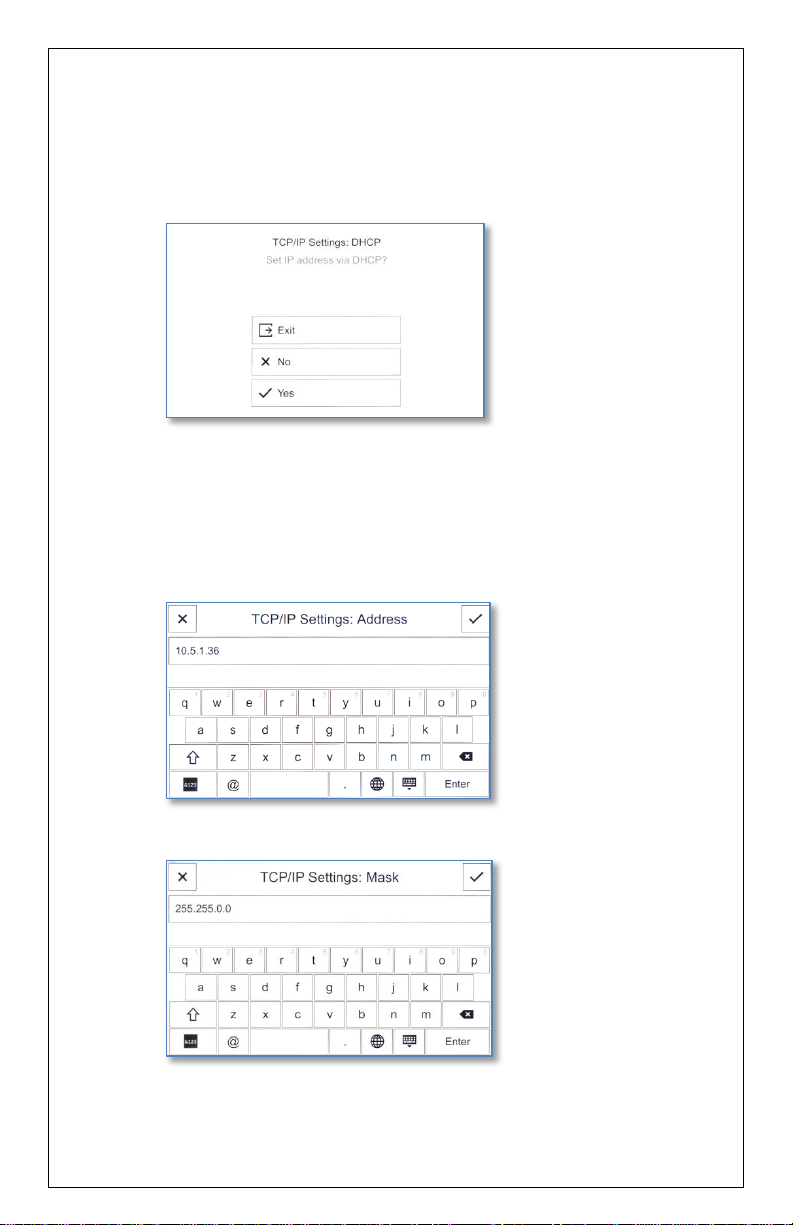
LAN TCP/IP settings
When setting TCP/IP settings, you will be walked through the
following settings:
• DHCP
If you answer “No” to using DHCP, then the following
settings are presented.
• IP Address
• Subnet Mask
S3845cdn CACStar User Guide Rev A01
Copyright 2017 Digital Imaging Technology Page 9
Page 10
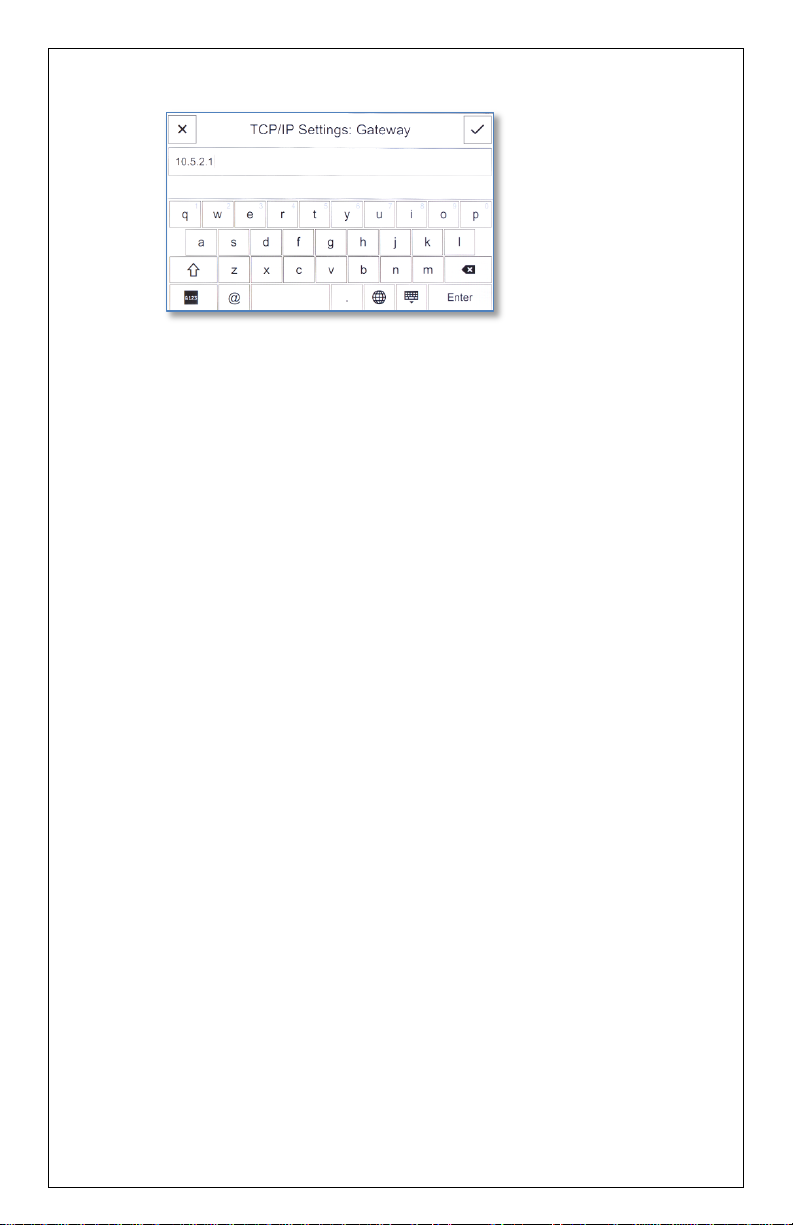
• Gateway
No changes will be saved until all applicable settings have been set
(i.e. If you choose “Yes” for DHCP, then the configuration is saved,
and no other settings are presented. If “No” is selected for DHCP,
then all settings must be entered before any are saved. Exiting the
menu system by pressing the “X” or “Exit” button at any time will
exit the menu system without saving any changes.
S3845cdn CACStar User Guide Rev A01
Copyright 2017 Digital Imaging Technology Page 10
Page 11

Ethernet Connection Settings
When changing Ethernet connection settings, you will be walked
through the following settings:
• Auto Negotiation
If “No” is chosen for Auto Negotiation, then the following
settings will be presented:
• Connection Speed
• Duplex
As with the TCP/IP settings, no changes are made until all applicable
settings have been entered. Aborting the menu system by tapping
the “X” or “Exit” button at any time will abort the menu system
without saving any changes.
S3845cdn CACStar User Guide Rev A01
Copyright 2017 Digital Imaging Technology Page 11
Page 12

Additional Functions in Menu Mode
The Functions area of the menu system allows you to:
• Print a CACStar Configuration Summary page
• Reset the Administrator password for the CACStar web site
• Reset CACStar to a Factory Default configuration. When
requesting a reset to factory defaults, you will be asked if
you are sure you want to do the reset before it is done.
S3845cdn CACStar User Guide Rev A01
Copyright 2017 Digital Imaging Technology Page 12
Page 13

Configuring the CACStar Option via Administration Website
CACStar Admin Login
Login to CACStar as the Administrator by pointing your browser to
the CACStar using a secure connection on port 8443 at the IP address
you assigned in the steps above.
For example: https://192.168.1.23:8443 or https://10.5.9.11:8443
You are likely to get an Invalid Certificate Warning from the browser.
If so, override the warning and continue to the CACStar web site.
The browser will require an ID and password. The default ID is
“admin”. The default password is “admin”.
After initial login, you can change the password to one of your choice
by going to the Administrator tab.
S3845cdn CACStar User Guide Rev A01
Copyright 2017 Digital Imaging Technology Page 13
Page 14
Accessing the MFD/Printer Web Site
If you wish to access the MFD/printer web site, go to the same URL
but do not use port 8443. For example: http://192.168.1.23
https://192.168.1.23. On the 3845, the default login credentials are
the same as CACStar (username “admin”, password “admin”.)
The following sections describe the different areas of the CACStar
administration website.
or
Connectivity
CACStar has a “Local Side” and a “LAN Side”. The Local Side pertains
to a local Ethernet connection from the MFD to the CACStar option.
It is not accessible from the user’s network. The LAN Side pertains
to the Ethernet connection to the host network.
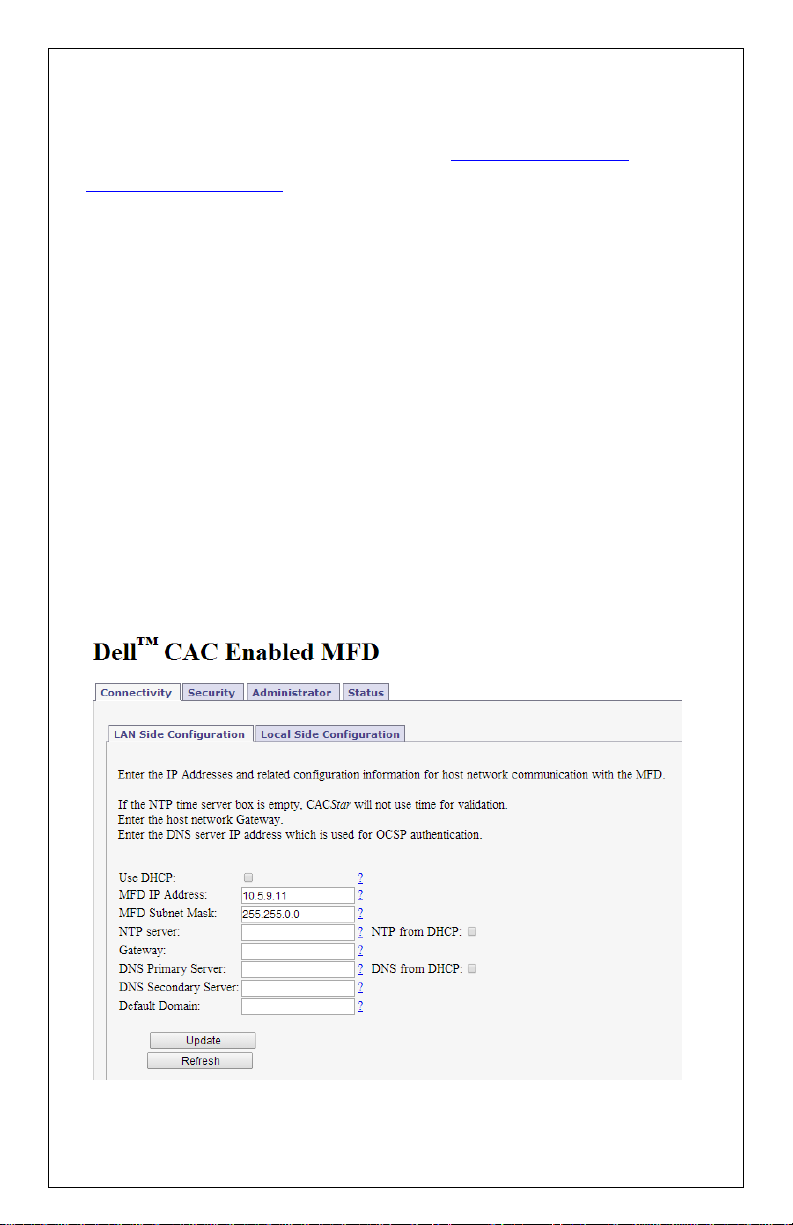
LAN Side Configuration
S3845cdn CACStar User Guide Rev A01
Copyright 2017 Digital Imaging Technology Page 14
Page 15

Update
Step 1 – MFD IP Address
This is the IP address that is used for access to these administrator
web pages. It is also used for host computer connection to the
MFD/printer. This IP address was already set in the initial setup
process using the card reader keypad.
If you wish to change this address, it can be done using this screen or
from the card reader keypad.
Note: When you press the
button, the CACStar will switch to
the new IP address which will cause your browser to be
disconnected from the CACStar. To reconnect, redirect your browser
to the new IP address you just entered.
Step 2 – NTP Server:
Set this to the Network Time Protocol Server IP address or Server
Name. This will allow the CACStar to validate certificates by date.
If DHCP is in use, you may check the "NTP From DHCP" box to force
retrieval of the NTP Server address from the DHCP server in which
case the address field is not used and may be left blank.
Step 3 – Configure Gateway and DNS Server
Note: A DNS Server is required for OCSP support. It is not necessary
to configure a DNS server if you are not using OCSP.
Set this to the DNS IP address to be used by the CACStar for Domain
Name resolution.
Example: 10.5.1.2
If DHCP is in use, you may check the "DNS From DHCP" box to force
retrieval of DNS addresses from the DHCP server - in which case the
DNS address fields are not used and may be left blank.
S3845cdn CACStar User Guide Rev A01
Copyright 2017 Digital Imaging Technology Page 15
Page 16

Step 4 – Configure Default Domain
This field is used for DNS Server Name resolution. Set this to the
Default Domain name for the LAN.
Step 5 – Press Update
S3845cdn CACStar User Guide Rev A01
Copyright 2017 Digital Imaging Technology Page 16
Page 17

Local Side Configuration
These settings define the IP addresses used for Local communication
between the CACStar and the MFD/printer. The defaults are likely to
be acceptable. Usually there is no need to enter any IP addresses on
this configuration page.
Make sure these values were entered into the MFD using the
MFD/printer operator panel.
S3845cdn CACStar User Guide Rev A01
Copyright 2017 Digital Imaging Technology Page 17
Page 18

Security
Scan-to-Folder
CAC Enable Scan-To-
Folder
MFD Function Enabling
Check the boxes for Functions that require a validated CAC Card for
use.
If a box is un-checked the Function will always be allowed.
For example:
If you want the MFD
when a validated CAC Card is installed, check the
box.
S3845cdn CACStar User Guide Rev A01
Copyright 2017 Digital Imaging Technology Page 18
Function to only be available
Page 19

If you want the MFD
Scan-to-Folder
CAC Enable
Scan-To-Folder
Update
Function to be available all the
time whether a CAC card is inserted or not, uncheck the
box.
Click the
button after all entries are made.
Hold Print
If enabled, Print jobs will be held in the CACStar until the user is
authenticated at the printer by inserting their CAC card. After
authentication, the user’s jobs will be printed.
CAC Print Server
Set this to the IP address of the Secure Print server.
Server Print Only
If enabled, print jobs will only be allowed from the configured CAC
Print Server. If not, jobs will be allowed from any IP address. For this
to operate, “CAC Enable Printing” must be selected in the
“Security/MFD Function Enabling” menu.
S3845cdn CACStar User Guide Rev A01
Copyright 2017 Digital Imaging Technology Page 19
Page 20

Email Setup
If you have elected to control MFD generated email with your CAC
cards, you will need to configure the item shown in the screen
below.
SMTP Address or Server Name
Set the IP address or Server Name of the SMTP server.
SMTP Port Number
Set the TCP port number for SMTP communications.
User Email Address From
Select the source location for the “From” email address. Emailed
scans can be from either the user’s own email address on his CAC
card, or from the user’s email address on the LDAP server.
S3845cdn CACStar User Guide Rev A01
Copyright 2017 Digital Imaging Technology Page 20
Page 21

Force Email to Self
Choose whether you want to force all emailed scans to the user’s
own email address. If not checked, he can send to any email
address.
If this option is not selected, the user can select the recipient from
the printer’s internal address book or he can use the printer to enter
the email address he wants to use.
Encrypt Email
When sending emails of scanned documents, choose to never
encrypt, always encrypt, or Prompt on each message for whether or
not to encrypt.
When the MFD is operational and has been configured here to
prompt for whether or not to encrypt, the printer’s touchscreen will
be used for prompting, The user can press the [Yes] or [No] buttons
on the touchscreen to answer the prompt. Note: pressing the [Exit]
button during prompting will cause the operation to be aborted,
and the user will be logged out.
Email Encryption Type
Choose the encryption type from either 3DES or AES-256.
Sign Email
When sending emails of scanned documents, choose to never sign,
always sign, or Prompt on each message for whether or not to sign.
LDAP Primary Certificate Attribute
Specify the primary LDAP attribute name which should be used to
retrieve a certificate for email encryption.
LDAP Secondary Certificate Attribute
Specify the secondary LDAP attribute name which should be used if
the primary attribute fails.
Kerberos Email Authentication
S3845cdn CACStar User Guide Rev A01
Copyright 2017 Digital Imaging Technology Page 21
Page 22

Check this box if you want to use Kerberos for Email Login
Authentication.
If this box is checked, the "Kerberos" section of "Authentication
Method" web page must be completed properly.
Authentication Method
CAC Validated Timeout
This setting is the number of minutes of inactivity before a CAC
Validated session will be terminated.
If this setting is 0, the timeout is disabled.
Basic
S3845cdn CACStar User Guide Rev A01
Copyright 2017 Digital Imaging Technology Page 22
Page 23

This includes PIN validation, card expiration check, and X.509 card
LAN
Side Configuration
Root Certificate
certificate validation. If an NTP server is not configured on the
page, the expiration check is bypassed. The Basic
level of authentication is always included and cannot be removed
from the configuration. In some installations, this is sufficient
authentication and is the only one activated.
OCSP
Check this box to enable OCSP (Online Certificate Status Protocol)
verification of CAC Cards. If enabled the OCSP server will be used to
validate the current status of the CAC card PKI certificate.
NOTE: If OCSP is enabled, you must have a DNS server configured.
Root Certificate
Check this box to enable Root Certificate verification of CAC Cards. If
enabled, the certificate chain, including the Root CA Certificate will
be used to validate the CAC card PKI certificate. The card is also
checked to be certain the CAC certificate has a valid private key.
NOTE: If
is enabled, all Issuer Certificates and Root
CA Certificate chains for cards in use at this installation must be
loaded into the CACStar. If not, Verify Failures will occur.
LDAP
Check this to enable use of the Active Directory server for additional
authentication
LDAP Server IP: IP address of the LDAP server.
LDAP Server Port: Port number of the LDAP server.
The default is 389.
LDAP Query User Name: User Name for the LDAP service
account login.
S3845cdn CACStar User Guide Rev A01
Copyright 2017 Digital Imaging Technology Page 23
Page 24

LDAP Query Password: Password for the LDAP service
account login.
LDAP Search Base: Defines the location in the directory
where a search will start.
Example: OU=Users, DC=Itek, DC=com
LDAP Search String: The Search String is used by
the LDAP server to find users. In conjunction with User ID
options below, this field helps create the query to the LDAP
server to find users by name. Any data can go in this field,
but there are certain keys that will be expanded to create
the query.
The keywords are:
%L – expands to become the user’s last name
%F – expands to become the user’s first name
%M – expands to become the user’s middle name
%E – expands to the user’s email address
%e – expands to the user’s EDI-PI
%I – expands to the user’s PIC-Identification
%s - expands to the user's SAN Principal name
LDAP User ID options:
Choices are cn, upn, mail, or name to be used for finding
and identifying users.
Disable LDAP Referrals:
If this box is checked, the Referrals sent by LDAP Servers will
NOT be followed.
Kerberos
If LDAP is enabled, you may choose to use Kerberos authentication
for the LDAP server. If enabled, Kerberos will be used for: validating
the cardholder, authentication to the LDAP server if needed,
authentication to the SMTP server if so configured, and
S3845cdn CACStar User Guide Rev A01
Copyright 2017 Digital Imaging Technology Page 24
Page 25

authentication to the SMB server if so configured. Multiple entries
are allowed.
KDC Server IP: IP address of the Kerberos server
KDC Server Port: Port number of the Kerberos server.
The default is 88.
KDC Realm: Kerberos Realm
KDC Principal: User Name. This can be either the
CN or the EDI-PI, or San Principal.
PKINIT Win2K
The setting affects the "Public Key Cryptography for Initial
Authentication" in Kerberos. Check this box if you are using a
Windows 2000 KDC Server and/or need to use the older
Kerberos PKINIT command/reply set.
Disable Reverse DNS Lookups:
Check this box to disable Reverse DNS Lookups by Kerberos
(and LDAP). This is only necessary if there is a problem using
Reverse DNS Lookups. If this box is checked, host names
must be used for "KDC Server" and "LDAP Server" input
fields.
MFD LDAP Kerberos Proxy
If enabled and Kerberos is enabled, LDAP searches from the
MFD will be modified to use Kerberos Authentication. The
LDAP Server and Port settings must be correct.
MFD SMB Kerberos Proxy
If enabled and Kerberos is enabled, network scan (SMB)
operations from the MFD will be modified to use Kerberos
authentication.
Default SMB Server Address
The IP address or server name for the default SMB server.
This address will be used if the SMB server address cannot
be obtained from the printer.
S3845cdn CACStar User Guide Rev A01
Copyright 2017 Digital Imaging Technology Page 25
Page 26

Default SMB Service Name
The Service Name for the default SMB server, e.g.
myshare$. This name will be used as the principal for
Kerberos authentication if the Service Name cannot be
obtained from the printer.
Default SMB Username
The Username for the default SMB server.
This is only needed if "MFD SMB Kerberos Proxy" is NOT
checked - AND the "SMB Folder Name" IS configured.
Default SMB Password
The Password for the default SMB server.
This is only needed if "MFD SMB Kerberos Proxy" is NOT
checked - AND the "SMB Folder Name" is configured.
SMB Folder Name
If a Folder Name is configured, any folder name that is used
by the printer will be replaced with this Folder Name.
Keywords can be used in this definition so the folder name is
"customized" based on the validated user.
These keywords are:
%L - expands to the user's last name
%F - expands to the user's first name
%M - expands to the user's middle name
%E - expands to the user's Email
%e - expands to the user's EDI-PI
%I - expands to the user's PIC-Identification
%u - expands to LDAP Attribute value
SMB Folder LDAP Attribute
If a Folder Name is configured using %u, the LDAP Attribute
defined here will be used
to retrieve the path value for the %u field. Care should be
taken when using
"\" characters before or after the %u - based on whether the
LDAP Attribute
value includes "\" character(s) at the beginning or end.
S3845cdn CACStar User Guide Rev A01
Copyright 2017 Digital Imaging Technology Page 26
Page 27

Additional Realms
This button provides a separate page to define additional realms.
SSL CA Certificate Checking
If enabled, the host SSL certificate will be verified against the CA
certificate. Therefore, the applicable CA certificate must be loaded
into the CACStar.
S3845cdn CACStar User Guide Rev A01
Copyright 2017 Digital Imaging Technology Page 27
Page 28

SMB Address Book
SMB Address Book entries allow definition of multiple variable-based
Server/Path destinations.
Each destination name has the format "SMB-Book1" to "SMBBook99" - this name should be used for the printer's "Server
Address" configuration.
The following sequences may be used to specify user-related data in
the destination path:
%F : First name, %M : Middle Name, %L : Last name,
%E : Email Address, %e : EDI-PI, %I : PIC-Identification,
%u<ldap-attribute>% : LDAP attribute value
Examples:
\\myserver\myshare\%e < or > %uhomeDirectory%
NOTE: all entries MUST resolve to a fully-qualified Server and path
(Ex: \\myserver\myshare\myfolder).
S3845cdn CACStar User Guide Rev A01
Copyright 2017 Digital Imaging Technology Page 28
Page 29

User Logging
User Logging provides a means to create, view or delete a user log
file to track user activity. If this is enabled, it will log the date, user
name, and other information. The log can be downloaded in a csv
file format for viewing.
Upload Certificate
S3845cdn CACStar User Guide Rev A01
Copyright 2017 Digital Imaging Technology Page 29
Page 30

Use this page to load Issuer and Root Certificate Authority
Browse
Upload Certificate
Create Certificates Summary
View Certificates Summary
Certificates into CACStar.
PKCS7, X509, PEM and DER formats are supported.
Use the
click the
button to select the Certificate file on your PC; then
button.
If your certificates are in a .txt file format, please send them to us,
and we will convert them to a supported format. If desired, we can
preload them into new units.
The
will create a text file listing all
certificates stored in the CACStar. This is a text file that can be
viewed or downloaded by selecting the
button.
Device Certificate Management
Using this function you can generate and upload a Certificate Signing
Request. Once the request is processed by a Trusted Certificate
Authority, upload the Signed Certificate.
S3845cdn CACStar User Guide Rev A01
Copyright 2017 Digital Imaging Technology Page 30
Page 31

S3845cdn CACStar User Guide Rev A01
Copyright 2017 Digital Imaging Technology Page 31
Page 32

Administrator
Allow
Change Password
Use this feature to change the password for the administrator. When
the Change Password button is clicked, the next internal web page
access will require this new password.
Administrator Access
These settings allow the admin to provide additional security by
limiting CACStar admin access to specified IP addresses. If the
S3845cdn CACStar User Guide Rev A01
Copyright 2017 Digital Imaging Technology Page 32
Page 33

all IPs
box is checked, an admin can access the CACStar configuration
items from a PC at any IP address if he knows the ID and password.
If it is not checked, the admin must access the CACStar configuration
pages from the IP addresses specified for Administrator #1 or #2.
These addresses must be on the same subnet as the CACStar.
Allow Telnet
If this is enabled CACStar will allow a Telnet session to occur. The
Telnet session will happen over Port 23. Telnet use with CACStar is
intended for diagnostics by the developers.
Allow Non-Secure Port 8080
If this is enabled, CACStar will use Port 8080 and HTTP for HTML.
Otherwise, Port 8443 and HTTPS will be used for HTML. Changing
this setting requires a reboot of CACStar.
Power-on Print Summary
When enabled, CACStar will automatically print a summary page
after power-on initialization is complete. This is the default setting.
Disable Front Panel Configuration
If this is checked, CACStar will disable the Front Panel keyboard from
changing the IP address, subnet mask, and gateway. Viewing of
these settings on the front panel LCD will still be allowed.
Disable Front Panel Configuration
If this is checked, CACStar will suppress NBSS traffic from the printer.
This setting is only required when SMB/Kerberos Proxy is enabled
and the local network does not allow NBSS traffic.
S3845cdn CACStar User Guide Rev A01
Copyright 2017 Digital Imaging Technology Page 33
Page 34

Firmware Update
Firmware is stored in flash memory and can be updated as necessary
for addition of new features. The CACStar.cfg file may also be
uploaded. It is a text file that contains the CACStar configuration
items.
For more details about how to update the firmware, please see the
separate document “Firmware Update Procedure”.
S3845cdn CACStar User Guide Rev A01
Copyright 2017 Digital Imaging Technology Page 34
Page 35

Create and Export Current Configuration
Create Config File will create a configuration file containing all
current settings except LAN IP Address, LAN Mask, and LAN
Gateway. Thus, the Config file can be used to configure other
CACStars. The passwords are encrypted so they may not be edited.
The first line of the file must not be edited. The MAC address and
Serial Number are displayed for information purposes only and will
not be used as a configuration item.
Export Config File will allow this file to be saved outside CACStar.
This file should be saved as a text file. It may be edited with a text
editor. It may also be uploaded to CACStar at a later date.
Create and Export Current Certificates
Create Certificates File will create a file called CACStarCerts.tar.gz
which will contain all currently loaded certificates. Export
Certificates File will allow this file to be saved outside CACStar. This
file may be loaded to any CACStar.
S3845cdn CACStar User Guide Rev A01
Copyright 2017 Digital Imaging Technology Page 35
Page 36

Technical Support
For help obtaining the correct firmware or documentation, contact
Dell’s ProSupport Help Desk by calling 1-866-516-3115, or by sending
email to Imaging_Solutions_Support_CAC@dell.com
This page is used to obtain Log Files and Capture Files to help
diagnose network and configuration concerns. Use of these features
is normally in conjunction with technical support from your vendor.
Create SysLog File
A log file can be created for use by CACStar
resolve problems that may occur.
Ethernet Capture
An Ethernet Capture file can be created containing information from
either the Local port or the LAN port for use by CACStar
in customer support activities.
Ping MFD
CACStar pings the MFD over its internal local link to verify
communication between CACStar and the MFD.
S3845cdn CACStar User Guide Rev A01
Copyright 2017 Digital Imaging Technology Page 36
Engineering to help
Engineering
Page 37

Setup Test
S3845cdn CACStar User Guide Rev A01
Copyright 2017 Digital Imaging Technology Page 37
Page 38

Date Time
This is used to set the system date and time in CACStar if necessary.
The time zone should be set to your local time zone.
S3845cdn CACStar User Guide Rev A01
Copyright 2017 Digital Imaging Technology Page 38
Page 39

Hold Print Files
Hold Print Files
Hold Print files will be stored encrypted in CACStar and can be
printed with CAC authentication at the printer.
Hold Print files expire after the set number of days. When the
expiration date is reached, the file will be deleted without being
printed.
Remaining storage and total storage are displayed so the user will
know if held print files are reaching the maximum storage capacity.
When storage is nearly full, a warning message will be displayed on
the CAC reader LCD - MEMORY NEAR FULL.
Hold Print Expiration
This sets the default expiration in number of days for all received
Hold Print files. When the expiration date is reached for a Hold Print
file, it will be deleted without printing.
S3845cdn CACStar User Guide Rev A01
Copyright 2017 Digital Imaging Technology Page 39
Page 40

Hold File Name Matching Format
This field defines the format that will be used to associate the
username in the Hold Print files with Card-Validated users. Any data
can go into this field and keywords will be expanded.
These keywords are:
%F - the user's first name
%f - the first character of the user's first name
%M - the user's middle name
%m - the first character of the user's middle name
%L - the user's last name
%l - the first character of the user's last name
%e - the user's EDI-PI
%I - the user's PIC-Identification
%S - the user's SAM Account Name (from LDAP)
A number may be used between the '%' and the keyword to specify a
maximum number of characters.
For example: '%5L' would indicate a maximum of 5 characters of the
user's last name.
Add Hold Print Usernames
If jobs must have user names from the host system that cannot be
identified using the Name Matching information from the CAC card,
a host Username can be entered into CACStar using the “Add a new
Hold Print Username” command. The Username can be associated
with identifying data from the CAC card as follows:
S3845cdn CACStar User Guide Rev A01
Copyright 2017 Digital Imaging Technology Page 40
Page 41

Export Hold Print Usernames
If you want to copy the usernames from one CACStar to another, you
can Export the usernames. You will get a ***.db file which you can
then send to another CACStar to load them into the other CACStar.
Status
The Status pages offer three views of information about the current
operations of CACStar. Number of successful card validations,
number of unsuccessful card validations, network operations,
date/time, and firmware version are all displayed.
Card Reader
S3845cdn CACStar User Guide Rev A01
Copyright 2017 Digital Imaging Technology Page 41
Page 42

Network
S3845cdn CACStar User Guide Rev A01
Copyright 2017 Digital Imaging Technology Page 42
Page 43

Other
S3845cdn CACStar User Guide Rev A01
Copyright 2017 Digital Imaging Technology Page 43
Page 44

Appendix A – Setup Information Checklist
This checklist can be used prior to installation to collect the
information necessary for installation of the CAC option.
• Should the MFD use DHCP to acquite an IP address?
If No, specify the following for the MFD:
IP address
Subnet mask
Gateway
• What is the IP address for an available NTP (Network Time
Protocol) server?
• What are the IP addresses for the primary and secondary
DNS servers?
Functions
• Do you wish to use CAC/PIV control for the Scan-to-Email
function?
o Is Kerberos authentication required for accessing the
Email server and sending Email?
• Do you wish to use CAC/PIV control for printing?
o If Yes, multiple secure printing modes are available.
• Do you wish to use CAC/PIV control for other network
protocols such as SMB, SNMP, or LDAP?
Email
If you are using CAC/PIV controlled Scan-to-Email or
Kerberos authentication, please complete this section.
Otherwise go to the next section for LDAP.
• What is the serrver name or IP address for the SMTP server?
• Do you wish to retrieve the “From” address for all emails
from the CAC/PIV card, or from and LDAP lookup of the
CAC/PIV user?
S3845cdn CACStar User Guide Rev A01
Copyright 2017 Digital Imaging Technology Page 44
Page 45

• Do you wish to force all emails to go to the CAC/PIV card’s
email address?
o If No, selection can be made from the front panel by
typing in the address, or using the Network Address
Book (LDAP) feature.
• Should emails be encrypted? (Yes, No, or Prompt)
o If Yes, what encryption should be used? (3DES or
AES256)
LDAP
• Do you wish to use the Network Address Book (LDAP)
feature to look up email addresses?
o If Yes, please complete this section. Otherwise go to
the Kerberos section.
• What is the server name or IP address for the LDAP server?
• Is Kerberos required for accessing the LDAP server?
o This is usually Yes.
• What is the proper search base?
o ex: “dc=somename, dc=gov”
Kerberos
• What is the server name or IP address for the Kerberos
server? There could be more than one.
• What is the Realm name? ex: “somename.gov”
• Is SSL required for Kerberos sessions?
S3845cdn CACStar User Guide Rev A01
Copyright 2017 Digital Imaging Technology Page 45
Page 46

Appendix B – CACStar Option Installation Procedure
If the CACStar option is not already installed on your printer, the
following procedure will ensure proper installation of your CACStar
option.
Step 1: Determine IP Address of the printer.
First, ask your Network Administrator if your network uses a DHCP
server to assign the IP address for your device.
• If DHCP is used, then physically mount the CACStar option
and connect it to the printer, as described in the Hardware
Installation instructions below. Then connect the device to
the network, place paper in the paper tray, and turn on the
printer. After initialization is complete, a network summary
page will be printed, showing you the assigned IP address.
• If a static IP address is used, then do not mount the CACStar
option yet; in this case the initial setup procedure is done
with the printer directly connected to the network without
the CACStar option. Set the printer’s IP address to the static
IP address that your Network Administrator has assigned to
your device (refer to the S3845cdn User’s Guide.)
Make a note of the IP address used by your device, you will use this
information in a later step.
S3845cdn CACStar User Guide Rev A01
Copyright 2017 Digital Imaging Technology Page 46
Page 47

Step 2: Disable Sleep Mode
It is necessary to disable printer sleep mode for operation with CAC
control. To do this, follow the following procedure (refer to the
diagram of the operator panel below):
1. Turn the printer on. If the printer is already turned on but is
in Power Save mode (the touchscreen will be dark), wake up
the printer by pressing the power button in the lowerright corner of the operator panel.
2. Hold down the Home button for 5 seconds, then release
it. You will be prompted for a passcode.
3. Enter “2456” and then tap the OK button. You will then see
the Home screen with the word “Service” shown in the top
left corner of the touchscreen.
4. Tap the “Diagnostics” tile.
5. Tap “DC131 NVM Read/Write”.
6. Enter “700131” on the touchscreen (the “Chain-Link” section
of the touchscreen will show “700-131”). Then tap the
“Change” button.
S3845cdn CACStar User Guide Rev A01
Copyright 2017 Digital Imaging Technology Page 47
Page 48

7. Enter a value of zero (0), and tap the “OK” button in the top
right corner of the touchscreen.
8. Tap the “X” button in the top left corner of the touchscreen.
9. Tap the “Exit” button in the top left corner of the
touchscreen.
10. Tap the “Keep Error Log History” button on the touchscreen.
11. Tap the “Restart Now” button on the touchscreen.
Install the Installation Cloning File
To install the cloning file, use the management web site for the
printer:
1. Open a web browser to the URL for the printer’s web site
(http://<ip-address>/)
2. Log in as the “admin” user (default password is “admin”)
3. Select the “Cloning” icon at the bottom of the page
4. Click the [Select] button and select the cloning file for
CACStar installation (CACStar_S3845cdn_Install.zip)
S3845cdn CACStar User Guide Rev A01
Copyright 2017 Digital Imaging Technology Page 48
Page 49

5. Click the [Install] button.
Note: If the “FIPS 140-2” setting is turned on, this step will
fail with an error message indicating that the clone file
installation cannot be done with FIPS 140-2 enabled. In this
case, turn off the FIPS 140-2 setting (in the [System]>[Security] section of the printer management web site)
before installing the clone file.
6. After the cloning file is installed, the printer will restart
automatically.
7. After the printer reboots, bring up the printer web site again,
and make sure that DHCP is enabled, and the “Release IP on
reboot” setting is also enabled.
8. If the CACStar hardware has not been installed yet, then turn
the printer off, and install the CACStar hardware as
described below.
S3845cdn CACStar User Guide Rev A01
Copyright 2017 Digital Imaging Technology Page 49
Page 50

Hardware Installation of CACStar
The kit arrives assembled as shown in the photo below. The
contents of the box includes the CACStar option, User’s Guide, and a
bag containing 2 M4 x 10mm screws required for securing the
CACStar option to the back of the printer as shown below. You will
need a Phillips #1 screwdriver.
S3845cdn CACStar User Guide Rev A01
Copyright 2017 Digital Imaging Technology Page 50
Page 51

Turn off power to the MFD.
At the rear of the S3845, remove and discard the two mounting
screws indicated by arrows in the following picture:
Connect the CACStar Ethernet cable to the C3845 Ethernet port as
shown below:
S3845cdn CACStar User Guide Rev A01
Copyright 2017 Digital Imaging Technology Page 51
Page 52

Use the M4 x 10mm screws to attach the back assembly to the back
White backing
M4 x 10mm
M4 x 10mm
of the MFD. These two screws use the two holes from which screws
were removed earlier. Leave these screws loose until after the next
step.
Remove the white backing from the Dual Lock tape on the back of
the CACStar enclosure. Then press the CACStar enclosure against
the stainless steel back of the printer.
S3845cdn CACStar User Guide Rev A01
Copyright 2017 Digital Imaging Technology Page 52
Page 53

Tighten the two M4 x 10mm screws.
USB Power
Card reader
Cable clamp
Plug the CACStar USB power cord into the MFD USB port just above
CACStar. This USB cable is for power only. It has no data connection.
Install the white cable clamp as shown. Peel the adhesive protection
tape from the back of the card reader. Install the card reader on the
side of the MFD as shown.
Turn on the S3845.
S3845cdn CACStar User Guide Rev A01
Copyright 2017 Digital Imaging Technology Page 53
 Loading...