

Dell S2522HG User Manual

Dell Gaming Monitor - S2522HG
User’s Guide
Model: S2522HG
Regulatory model : S2522HGb

NOTE: A NOTE indicates important information that helps you make
better use of your computer.
CAUTION: A CAUTION indicates potential damage to hardware or loss
of data if instructions are not followed.
WARNING: A WARNING indicates a potential for property damage,
personal injury, or death.
Copyright © 2021 Dell Inc. or its subsidiaries. All rights reserved. Del l, EMC, and other trademarks
are trademarks of Del l Inc. or its subsidiaries. Other trademarks may be trademarks of their respective
owners.
2021 - 05
Rev. A00

Contents
Safety instructions . . . . . . . . . . . . . . . . . . . . . . . . . . 6
About your monitor. . . . . . . . . . . . . . . . . . . . . . . . . . 7
Package contents . . . . . . . . . . . . . . . . . . . . . . . . . . . . . . . . 7
Product features . . . . . . . . . . . . . . . . . . . . . . . . . . . . . . . . 8
Identifying parts and controls . . . . . . . . . . . . . . . . . . . . . 10
Front view . . . . . . . . . . . . . . . . . . . . . . . . . . . . . . . . . . . . . . . . . . . . 10
Side view. . . . . . . . . . . . . . . . . . . . . . . . . . . . . . . . . . . . . . . . . . . . . 10
Back view . . . . . . . . . . . . . . . . . . . . . . . . . . . . . . . . . . . . . . . . . . . . 11
Bottom view . . . . . . . . . . . . . . . . . . . . . . . . . . . . . . . . . . . . . . . . . . 12
Monitor specifications . . . . . . . . . . . . . . . . . . . . . . . . . . . 14
Resolution specifications. . . . . . . . . . . . . . . . . . . . . . . . . 15
Supported video modes . . . . . . . . . . . . . . . . . . . . . . . . . . . . . . . . . 16
Preset display modes . . . . . . . . . . . . . . . . . . . . . . . . . . . . . . . . . . . 16
Electrical specifications . . . . . . . . . . . . . . . . . . . . . . . . . . . . . . . . . 17
Physical characteristics . . . . . . . . . . . . . . . . . . . . . . . . . . . . . . . . . 18
Environmental characteristics . . . . . . . . . . . . . . . . . . . . . . . . . . . . 19
Pin assignments . . . . . . . . . . . . . . . . . . . . . . . . . . . . . . . . . . . . . . 20
Plug and Play capability . . . . . . . . . . . . . . . . . . . . . . . . . . 22
Universal Serial Bus (USB) interface . . . . . . . . . . . . . . . . 22
USB 3.2 Gen1 (5 Gbps) upstream connector . . . . . . . . . . . . . . . . 22
USB 3.2 Gen1 (5 Gbps) downstream connector . . . . . . . . . . . . . . 23
USB ports . . . . . . . . . . . . . . . . . . . . . . . . . . . . . . . . . . . . . . . . . . . 23
LCD monitor quality and pixel policy . . . . . . . . . . . . . . . . 24
Ergonomics. . . . . . . . . . . . . . . . . . . . . . . . . . . . . . . . . . . . 24
Handling and moving your display . . . . . . . . . . . . . . . . . . 26
Maintenance guidelines . . . . . . . . . . . . . . . . . . . . . . . . . . 27
│ 3

Cleaning your monitor . . . . . . . . . . . . . . . . . . . . . . . . . . . . . . . . . . 27
Setting up the monitor. . . . . . . . . . . . . . . . . . . . . . 28
Setting up the stand. . . . . . . . . . . . . . . . . . . . . . . . . . . . . 28
Connecting your monitor . . . . . . . . . . . . . . . . . . . . . . . . . 31
Connecting the DisplayPort (DP to DP) cable and the power
cable. . . . . . . . . . . . . . . . . . . . . . . . . . . . . . . . . . . . . . . . . . . . . . . . 31
Connecting the HDMI cable and the power cable . . . . . . . . . . . . . 31
Connecting the SuperSpeed USB 5 Gbps (USB 3.2 Gen1) cable
and the power cable. . . . . . . . . . . . . . . . . . . . . . . . . . . . . . . . . . . . 32
Organizing your cables. . . . . . . . . . . . . . . . . . . . . . . . . . . 33
Securing your monitor using Kensington lock (optional) . 33
Removing the monitor stand . . . . . . . . . . . . . . . . . . . . . . 34
VESA wall mounting (optional) . . . . . . . . . . . . . . . . . . . . 35
Operating the monitor . . . . . . . . . . . . . . . . . . . . . . 36
Turning on the monitor. . . . . . . . . . . . . . . . . . . . . . . . . . . 36
Using the joystick control . . . . . . . . . . . . . . . . . . . . . . . . 36
Using the rear-panel controls . . . . . . . . . . . . . . . . . . . . . 37
Using the On-Screen Display (OSD) menu . . . . . . . . . . . 38
Accessing the menu system . . . . . . . . . . . . . . . . . . . . . . . . . . . . . 38
OSD warning message . . . . . . . . . . . . . . . . . . . . . . . . . . . . . . . . . . 49
Locking the rear-panel control buttons . . . . . . . . . . . . . . 52
Setting the maximum resolution . . . . . . . . . . . . . . . . . . . 53
Setting the maximum frame rate . . . . . . . . . . . . . . . . . . . 53
Using the tilt and vertical extension . . . . . . . . . . . . . . . . 54
Tilt and swivel extensions . . . . . . . . . . . . . . . . . . . . . . . . . . . . . . . 54
Vertical extension . . . . . . . . . . . . . . . . . . . . . . . . . . . . . . . . . . . . . 55
Rotating the display. . . . . . . . . . . . . . . . . . . . . . . . . . . . . . . . . . . . 55
Rotate clockwise . . . . . . . . . . . . . . . . . . . . . . . . . . . . . . . . . . . . . . 56
Rotate counterclockwise . . . . . . . . . . . . . . . . . . . . . . . . . . . . . . . . 56
Adjusting the rotation display settings of your system . . 57
4 │

Troubleshooting . . . . . . . . . . . . . . . . . . . . . . . . . . . 58
Sel f-test. . . . . . . . . . . . . . . . . . . . . . . . . . . . . . . . . . . . . . 58
Built-in diagnostics . . . . . . . . . . . . . . . . . . . . . . . . . . . . . 59
Common problems . . . . . . . . . . . . . . . . . . . . . . . . . . . . . . 60
Product specific problems . . . . . . . . . . . . . . . . . . . . . . . . 64
Universal Serial Bus (USB) specific problems . . . . . . . . . 65
Appendix . . . . . . . . . . . . . . . . . . . . . . . . . . . . . . . . . 66
FCC notices (U.S. only) and other regulatory
information. . . . . . . . . . . . . . . . . . . . . . . . . . . . . . . . . . . . 66
Contact Dell . . . . . . . . . . . . . . . . . . . . . . . . . . . . . . . . . . . 66
EU product database for energy label and product
information sheet. . . . . . . . . . . . . . . . . . . . . . . . . . . . . . . 66
│ 5

Safety instructions
CAUTION: Use of controls, adjustments, or procedures other than
those specified in this documentation may result in exposure to shock,
electrical hazards, and/or mechanical hazards.
• Place the monitor on a solid surface and handle it carefully. The screen is
fragile and can be damaged if dropped or hit sharply.
• Always be sure that your monitor is electrically rated to operate with the AC
power available in your location.
• Keep the monitor in room temperature. Excessive cold or hot conditions can
have an adverse effect on the liquid crystal of the display.
• Do not subject the monitor to severe vibration or high impact conditions. For
example, do not place the monitor inside a car trunk.
• Unplug the monitor when it is going to be left unused for an extended period
of time.
• To avoid electric shock, do not attempt to remove any cover or touch the
inside of the monitor.
6 │ Safety instructions
About your monitor
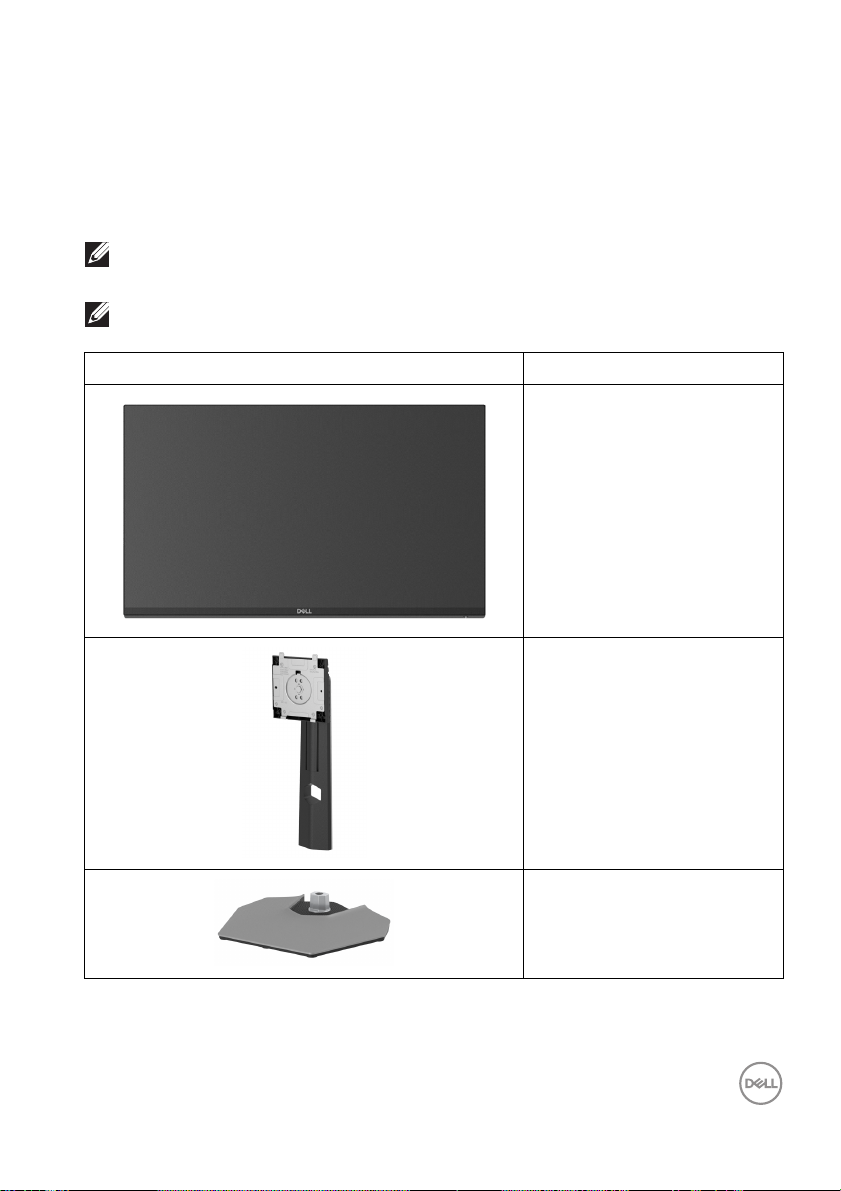
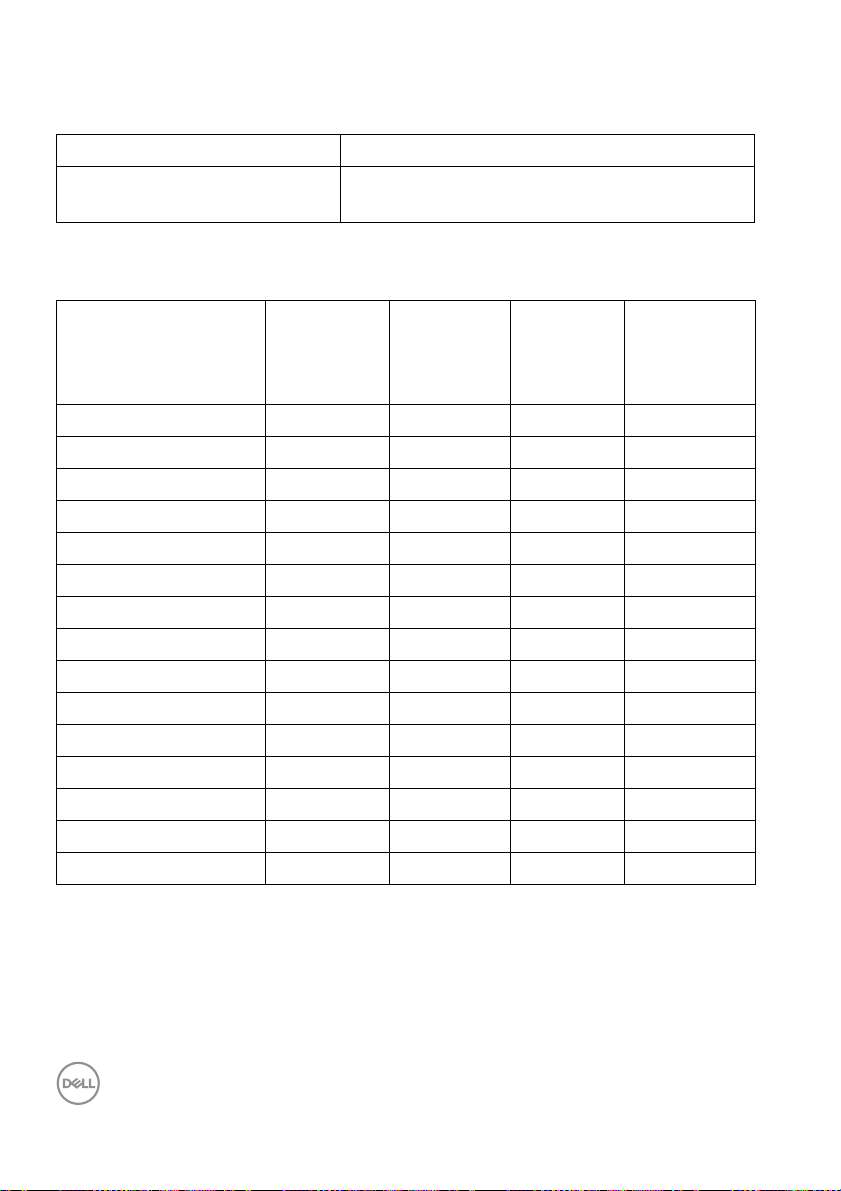
Package contents
Your monitor ships with the components shown in the table below. If any
component is missing, contact Dell. For more information, see Contact Del l.
NOTE: Some items may be optional and may not ship with your monitor.
Some features may not be available in certain countries.
NOTE: If you are connecting a stand that you purchased from any other
source, follow the setup instructions that are included with the stand.
Component image Component description
Display
Stand riser
Stand base
About your monitor │ 7
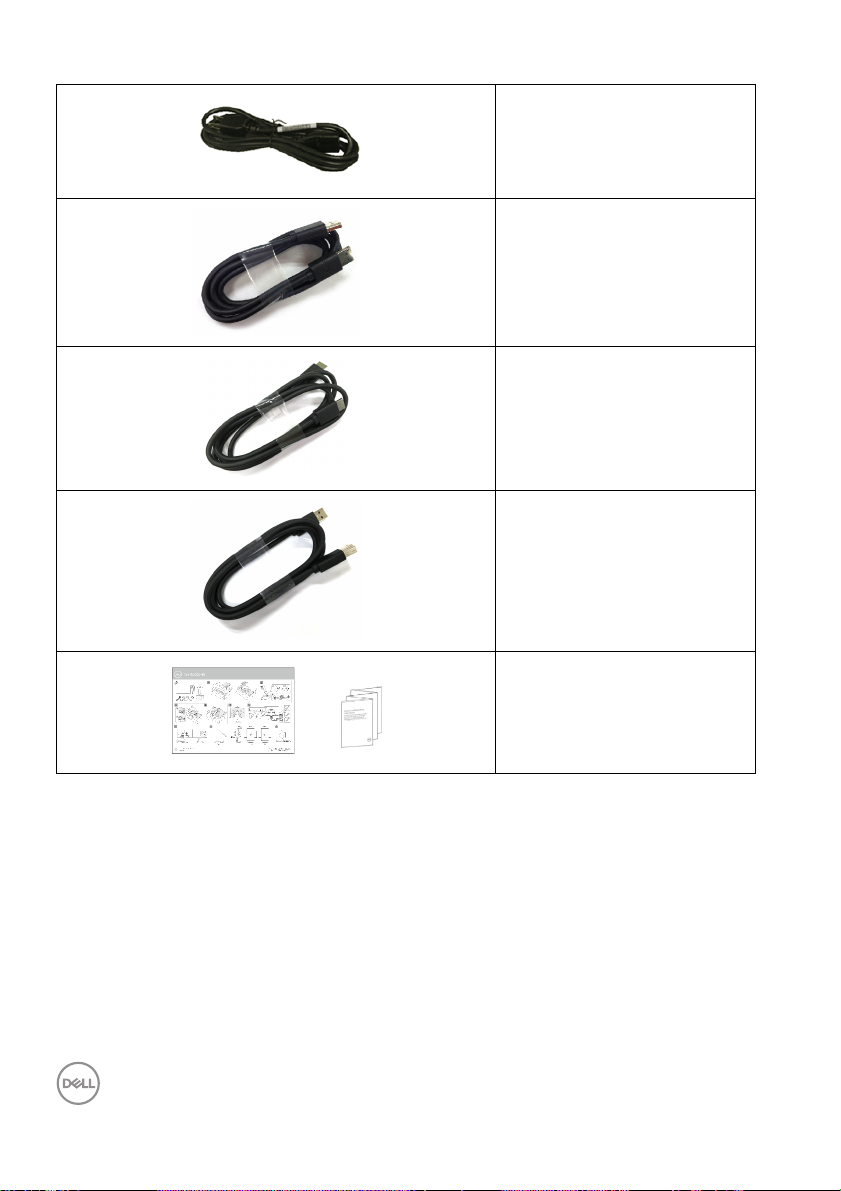
Power cable (varies by
try)
coun
DisplayPort to DisplayPort
1.2 cable
HDMI 2.0 cable
SuperSpeed USB 5 Gbps
(USB 3.2 Gen1) upstream
cable (enables the USB
ports on the monitor)
•Quick Setup Guide
• Safety, Environmental,
and R
egulatory
Information
Product features
The Dell S2522HG monitor has an active matrix, Thin-Film Transistor (TFT), Liquid
Crystal Display (LCD), and LED backlight. The monitor features include:
• 62.20 cm (24.50 in.) viewable area (measured diagonal l y).
1920 x 1080 (16:9) resolution, plus ful l-screen support for lower resolutions.
®
•NVIDIA
Technology minimizes graphic distortions like screen tearing and stuttering for
smoother, fluid gameplay.
8 │ About your monitor
G-SYNC® Compatible Certification and AMD FreeSync™ Premium

• Supports a high refresh rate of 240 Hz and a rapid response time of 1 ms gray
to gray in Extreme mode*
• Color gamut of 99% sRGB
• Tilt, swivel, pivot, and height adjustment capabilities
• Digital connectivity with DisplayPort and HDMI
• Equipped with one SuperSpeed USB 5 Gbps (USB 3.2 Gen1) Type B upstream
port, one SuperSpeed USB 5
charging port, and three SuperSpeed USB 5
downstream ports.
• Enabled with gaming console VRR supportability.
• Removable stand and Video Electronics Standards Association (VESA™)
100
mm mounting holes for flexible mounting solutions.
• Plug-and-play capability if supported by your system.
• On-Screen Display (OSD) adjustments for ease of setup and screen
optimization.
• Game enhanced features such as Time r, Frame Rate, and Dark Stabilizer in
addition to enhanced game modes such as FPS, MOBA/RTS, SPORTS, or
RPG, and 3 additional game modes to personalize your preferences.
•Power and OSD buttons lock
• Security lock slot
•Stand lock
• < 0.3 W in Standby Mode
• Optimize eye comfort with a flicker-free screen and ComfortView feature
which minimizes blue light emission.
Gbps (USB 3.2 Gen1) Type-A downstream
Gbps (USB 3.2 Gen1) Type-A
WARNING: The possible long-term effects of blue light emission from
the monitor may cause damage to the eyes, including eye fatigue,
digital eye strain, and so on. ComfortView feature is designed to reduce
the amount of blue light emitted from the monitor to optimize eye
comfort.
*1 ms is achievable in Extreme mode to reduce visible motion blur and increased
image responsiveness. However this may introduce some slight and noticeable
visual artifacts into the image. As every system setup and every gamer's needs are
different, we recommend that users experiment with the different modes to find the
setting that is right for them.
About your monitor │ 9
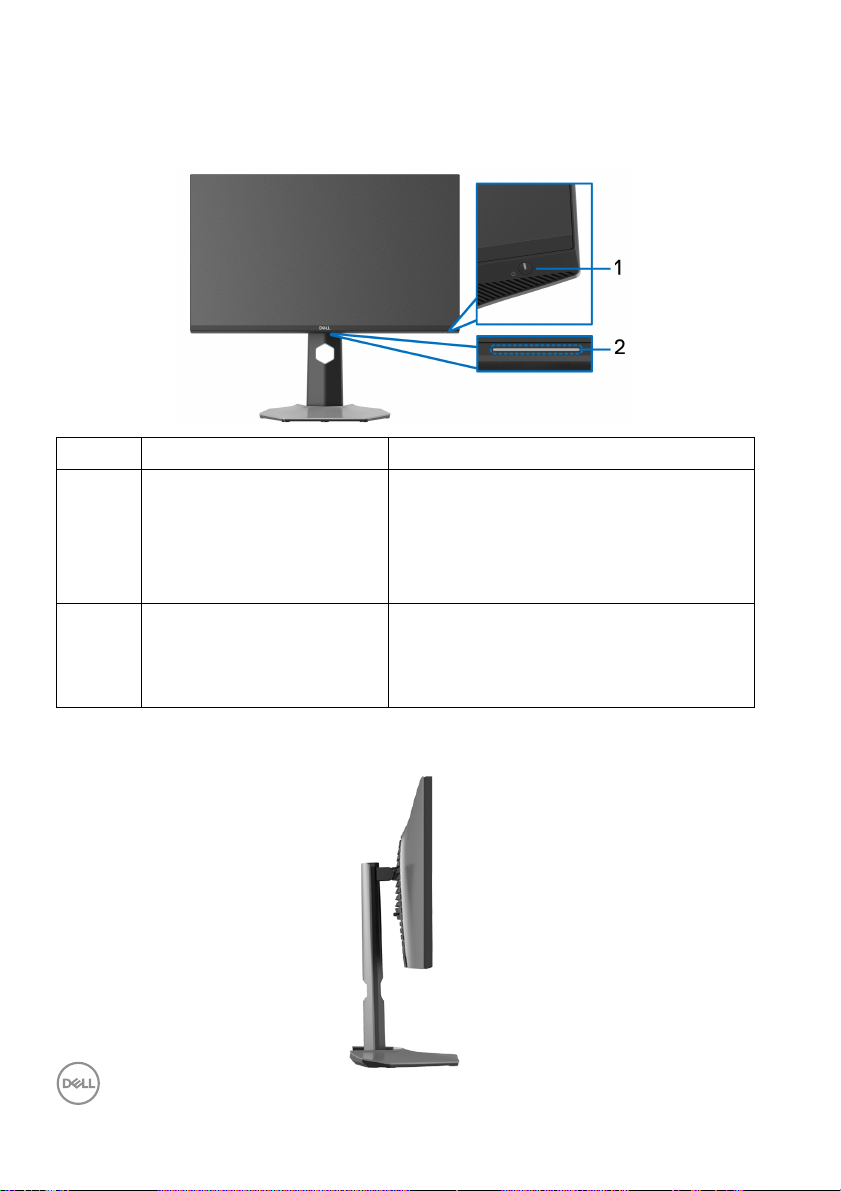
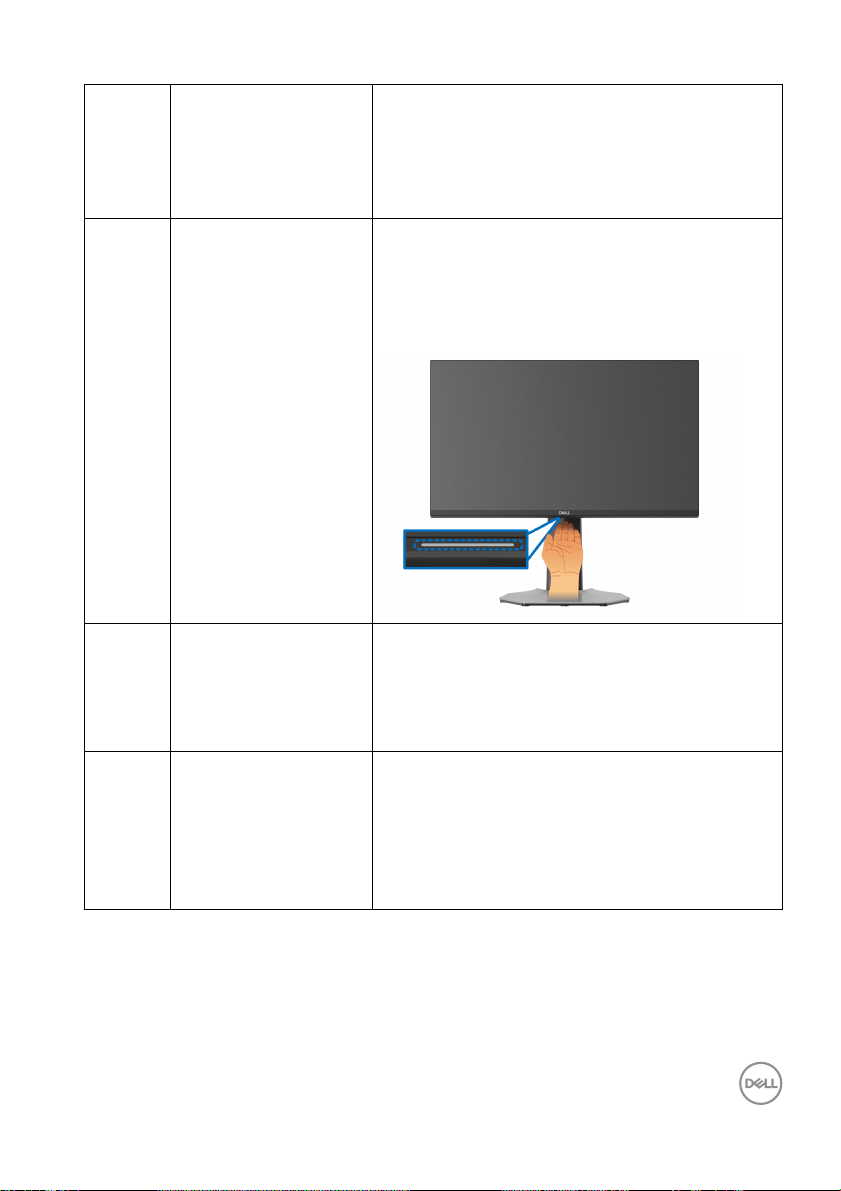
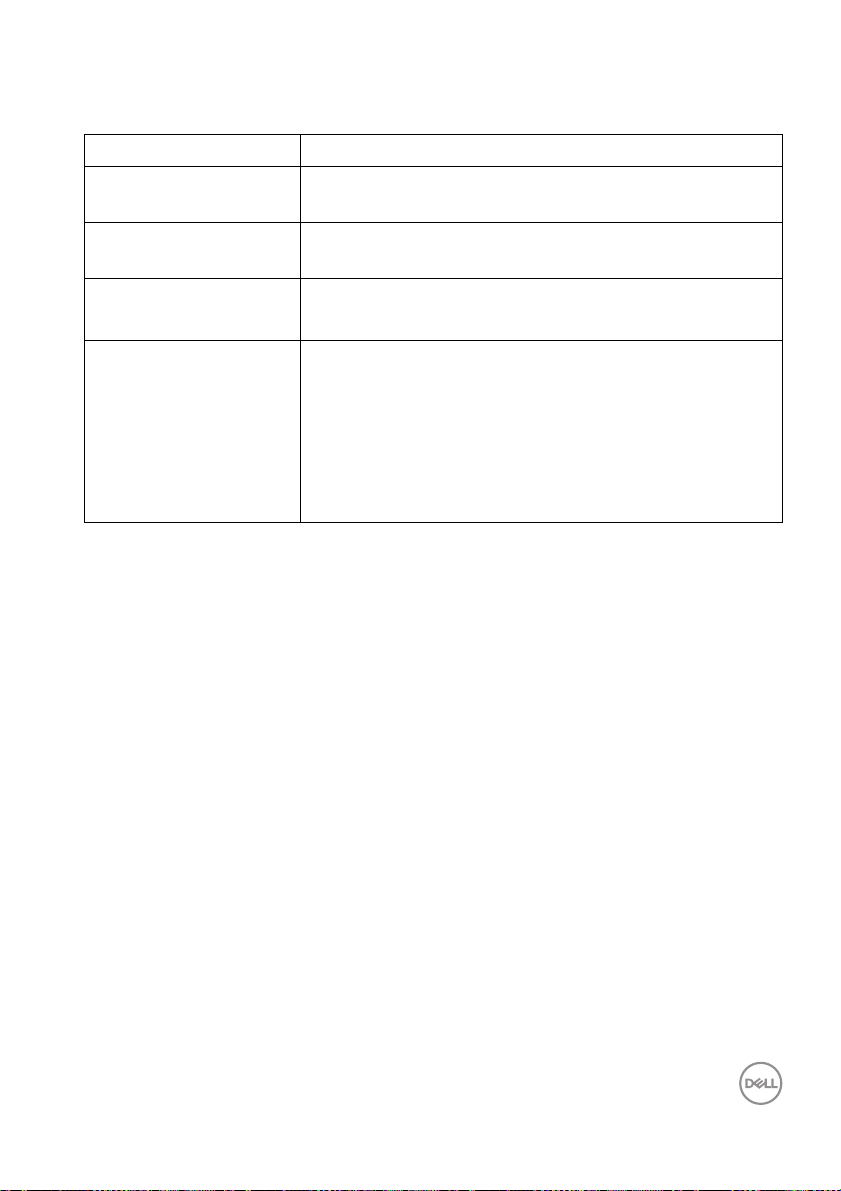
Identifying parts and controls
Front view
Label Description Use
1 Power On/Off button (with
LE
D indicator)
2 Downlights When the monitor setup is complete, tap
To turn the monitor on or off.
Solid white light indicates that the
mon
itor is turned on and functioning
normally. Blinking white light indicates
that the monitor is in Standby Mode.
ouch sensor at the bottom of the
the t
display to turn the downlights on or off
(see Downlights and Downlight).
Side view
10 │ About your monitor
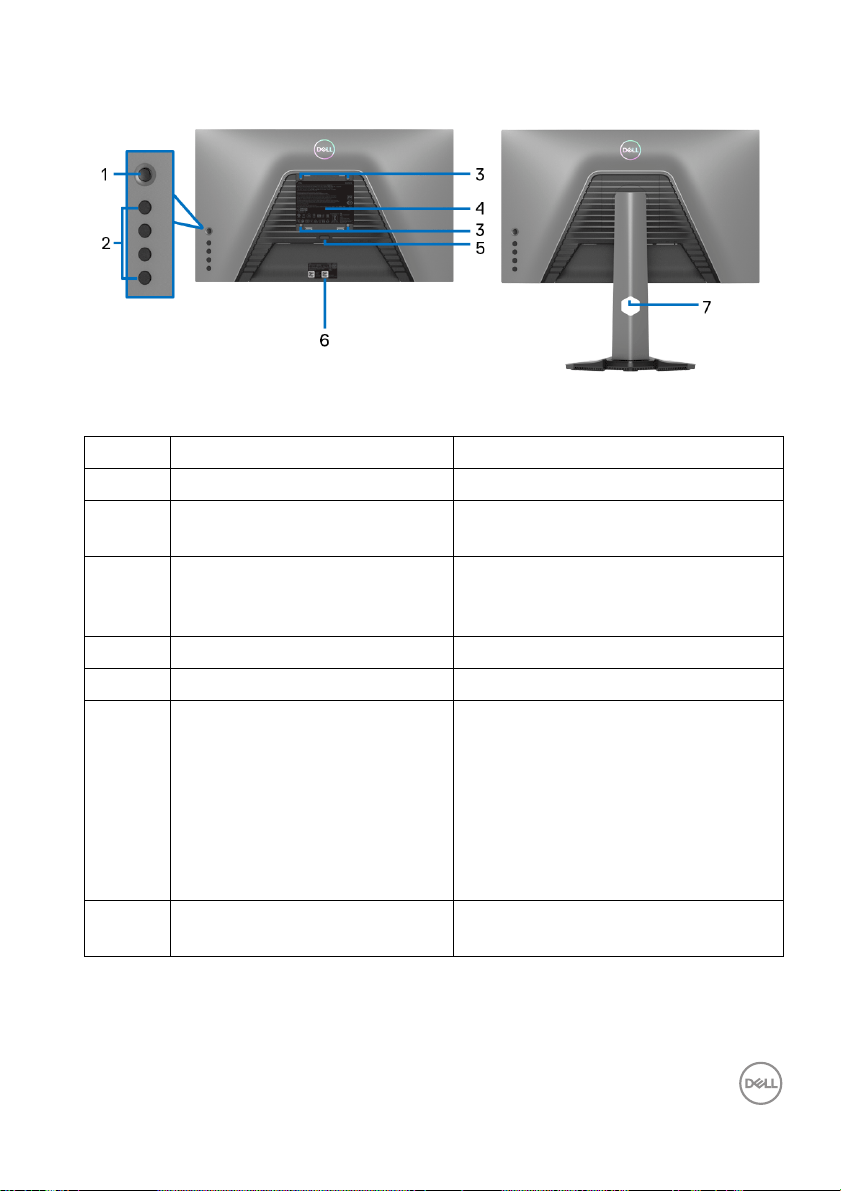
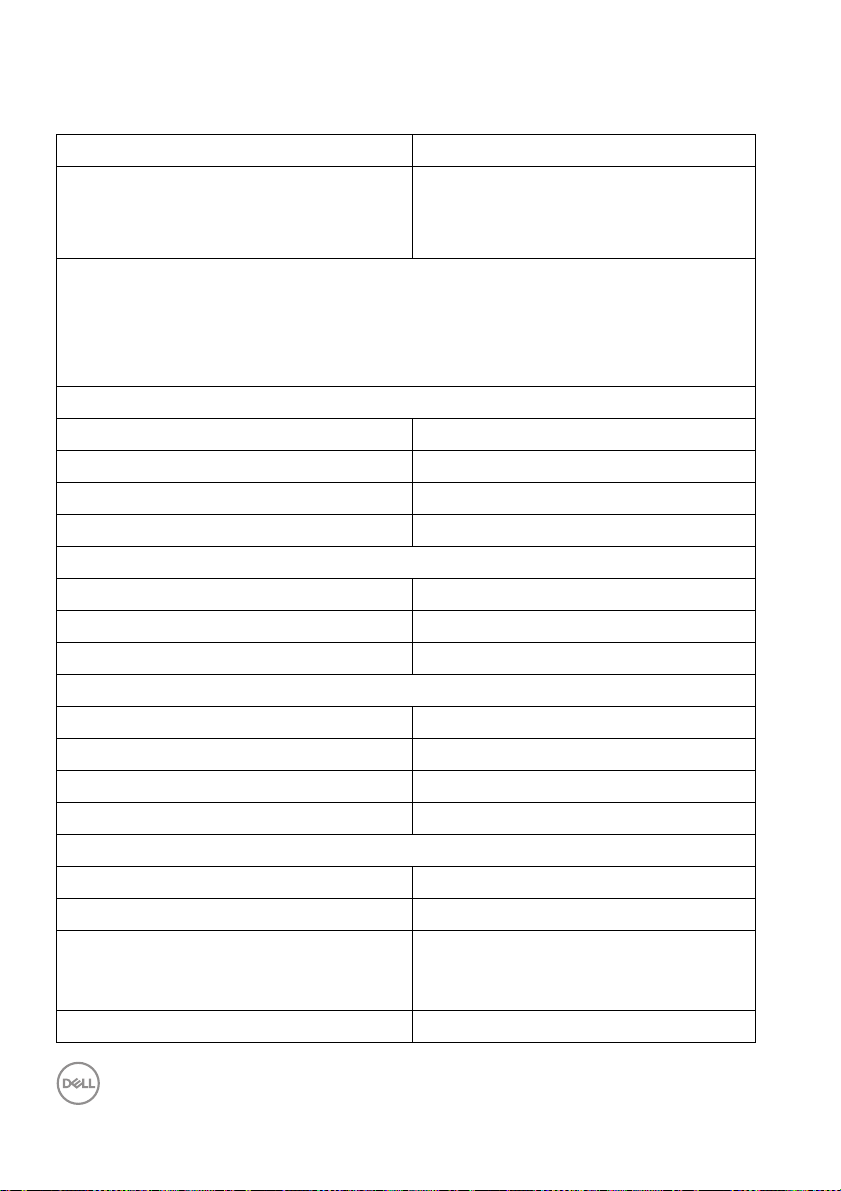
Back view
Back view without monitor stand Back view with monitor stand
Label Description Use
1 Joystick Use it to navigate the OSD menu.
2 Function buttons For more information, see Operating
the monitor.
3 VESA mounting holes (100 mm
x 1
00 mm - behind attached
VESA Cover)
4 Regulatory label Lists the regulatory approvals.
5 Stand release button Releases stand from the monitor.
6 Barcode, serial number, and
Service
7 Cable-management slot Organizes the cables when the
Tag label
Wall-mount the monitor using VESAcompatible wall mount kit (100 mm x
100 mm).
Refer to this label if you need to
contact Dell for technical support.
The Service Tag is a unique
alphanumeric identifier that enables
Del l service technicians to identify
the hardware components in your
monitor and access warranty
information.
les are routed through the slot.
cab
About your monitor │ 11
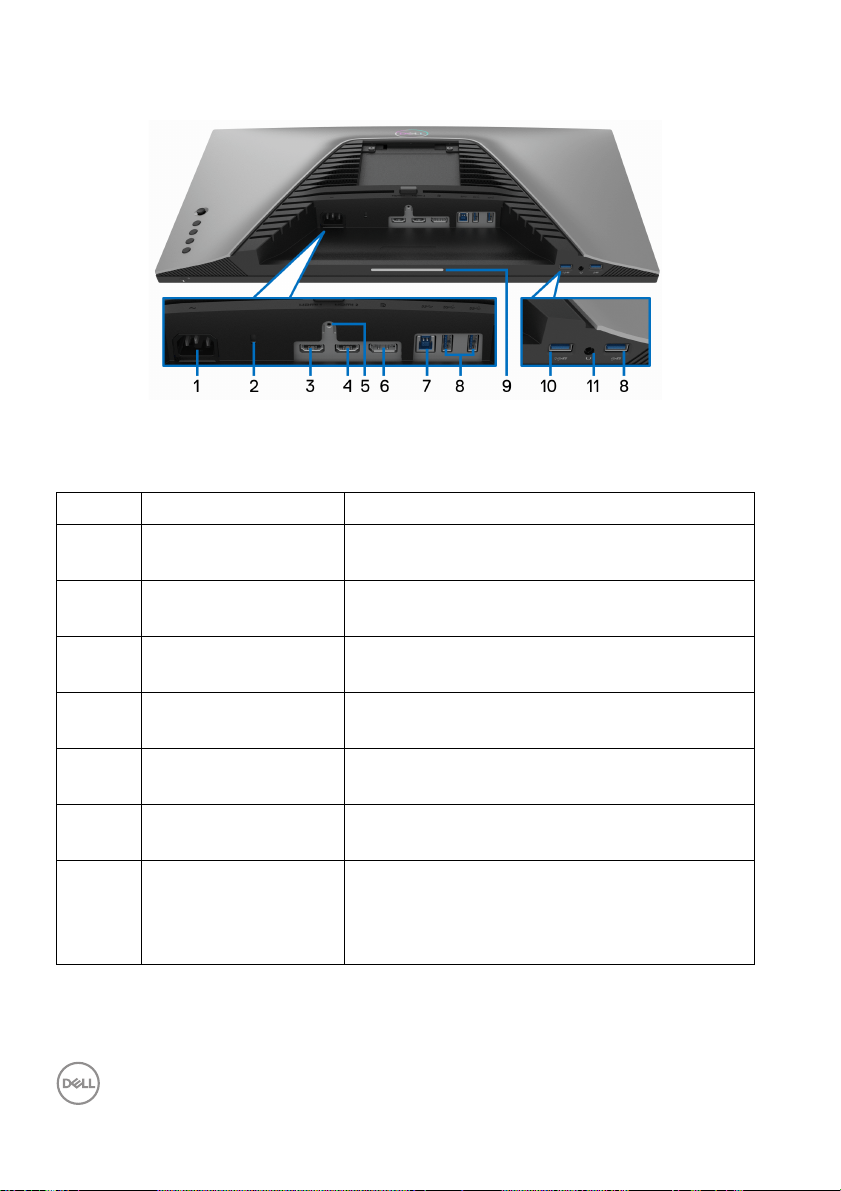
Bottom view
Bottom view without monitor stand
Label Description Use
1 Power connector Connect the power cable (shipped with your
monit
or).
2 Security lock slot Secure the monitor with a security lock
(
security lock not included).
3 HDMI port (HDMI 1) Connect to your computer with the HDMI
cab
le (shipped with your monitor).
4 HDMI port (HDMI 2) Connect to your computer with the HDMI
cab
le (shipped with your monitor).
5 Stand lock feature Lock the stand to the monitor using a M3 x
6 mm screw (screw not included).
6 DisplayPort Connect to your computer with the
Disp
layPort cable (shipped with your monitor).
7 SuperSpeed USB
5 Gbps (USB 3.2
Gen
1) Type-B
upstream port
Connect the USB cable (shipped with your
or) from this port to your computer to
monit
enable the USB ports on your monitor.
12 │ About your monitor
8 SuperSpeed USB
5 Gbps (USB 3.2
n1) Type-A
Ge
downstream port (3)
9 Downlights When the monitor setup is complete, tap the
Connect your USB 3.2 Gen1 (5 Gbps) device.*
NOTE: T
the USB cable (shipped with your monitor) to
the USB-upstream port on the monitor and to
your computer.
ouch sensor at the bottom of the display to
t
turn the downlights on or off. The factory
setting is on, so the downlights are active if the
power cable is connected (see Downlight).
o use these ports, you must connect
10 SuperSpeed USB
5 Gbps (USB 3.2
n1) Type-A
Ge
downstream port with
Power Charging
11 Headphone out port Connect the headphones to the computer.
*To avoid signal interference, when a wireless USB device has been connected to a
USB downstream port, it is not recommended to connect any other USB devices to
the adjacent port.
Connect to your computer to charge your USB
vice.
de
CAUTION: In
50% on the volume control or equalizer may
increase the output voltage on the
headphones thereby increasing the sound
pressure levels.
creasing the audio output beyond
About your monitor │ 13
Monitor specifications
Model S2522HG
Screen type Active matrix - TFT LCD
Panel technology Fast IPS
Aspect ratio 16:9
Viewable image
Diagonal
Width (active area)
Height (active area)
Tot a l a re a
Pixel pitch 0.2832 x 0.2802 mm
Pixel per inch (PPI) 90
Viewing angle
Vertical
Horizontal
Luminance output 400 cd/m² (typical)
Contrast ratio 1000 to 1 (typical)
Faceplate coating Anti-glare treatment of the polarizer (Haze 25%, 3H)
Backlight White LED edgelight system
Response time 1 ms gray to gray in Extreme Mode*
622 mm (24.50 in.)
543.74 mm (21.40 in.)
302.62 mm (11.91 in.)
164545.63 mm2 (255.04 in.2)
178° (typical)
178° (typical)
2 ms gray to gray in Super Fast Mode
4 ms gray to gray in Fast Mode
*1 ms is achievable in Extreme mode to reduce visible
motion blur and increased image responsiveness.
However this may introduce some slight and noticeable
visual artifacts into the image. As every system setup
and every gamer's needs are different, we recommend
that users experiment with the different modes to find
the setting that is right for them.
14 │ About your monitor
Color depth 16.78 million colors (8 bit)
Color gamut sRGB 99% (typical)
Connectivity • 1 x DisplayPort version 1.2
• 2 x HDMI ports version 2.0
• 1 x Headphone out port
• 1 x USB 3.2 Gen1 (5 Gbps) upstream port
• 4 x USB 3.2 Gen1 (5 Gbps) downstream ports with
B
C1.2 charging at 2 A (maximum)
Border width (edge of monitor to active area)
To p
Left/Right
Bottom
Adjustability
Height adjustable stand
Ti l t
Swivel
Pivot
Del l Display Manager
compa
tibility
Security Security lock slot (cable lock sold separately)
5.84 mm
5.83 mm/5.83 mm
18.79 mm
0 to 130 mm
-5° to 21°
-45° to 45°
-90° to 90°
Easy Arrange and other key features
Resolution specifications
Model
Horizontal scan range 30 kHz to 255 kHz (automatic)
Vertica l scan range 48 Hz to 240 Hz (automatic)
Maximum preset resolution 1920 x 1080 at 240 Hz
S2522HG
About your monitor │ 15
Supported video modes
Model S2522HG
Video display capabilities (HDMI
& DisplayPort)
Preset display modes
480i, 480p, 576i, 576p, 720p, 1080i, 1080p, FHD
Display mode Horizontal
equency
fr
720 x 400
VESA, 640 x 480
VESA, 640 x 480
VESA, 800 x 600
VESA, 800 x 600
VESA, 1024 x 768
VESA, 1024 x 768
VESA, 1152 x 864
VESA, 1280 x 1024
VESA, 1280 x 1024
VESA, 1600 x 900
VESA, 1920 x 1080
1920 x 1080
1920 x 1080
1920 x 1080
Vertical
frequency
(kHz)
31.50 70.10 28.30 -/+
31.50 59.90 25.20 -/-
37.50 75.00 31.50 -/-
37.90 60.30 40.00 +/+
46.90 75.00 49.50 +/+
48.40 60.00 65.00 -/-
60.00 75.00 78.80 +/+
67.50 75.00 108.00 +/+
64.00 60.00 108.00 +/+
80.00 75.00 135.00 +/+
60.00 60.00 108.00 +/+
67.50 60.00 148.50 +/+
137.30 120.00 285.50 +/-
166.60 144.00 346.50 +/-
278.40 240.00 567.40 +/-
(Hz)
Pixel
clock
(MHz)
Sync
polarity
(Horizontal
/Vertical)
16 │ About your monitor
Electrical specifications
Model S2522HG
Video input signals HDMI 2.0/DisplayPort 1.2, 600 mV for each differential
l
ine, 100 Ω input impedance per differential pair
AC input vo l tage/
fr
equency/current
100 VAC to 240 VAC / 50 Hz or 60 Hz ± 3 Hz / 1.50 A
(typical)
Inrush current • 120 V: 30 A (Max.) at 0°C (cold start)
• 240 V: 60 A (Max.) at 0°C (cold start)
Power consumption •0.3 W (Off mode)
•0.3 W (Standby Mode)
•16.8 W (On mode)
•72 W (Max.)
•17.26 W (Pon)
•55.77 kWh (TEC)
1
As defined in EU 2019/2021 and EU 2019/2013.
2
Max. brightness and contrast setting with maximum power loading on all USB
1
1
1
2
3
3
ports.
3
Pon: Power consumption of On Mode measured with reference to Energy Star
test method.
TEC: Total energy consumption in kWh measured with reference to Energy Star
test method.
This document is informational only and reflects laboratory performance. Your
product may perform differently, depending on the software, components and
peripherals you ordered and shall have no obligation to update such information.
Accordingly, the customer should not rely upon this information in making
decisions about electrical tolerances or otherwise. No warranty as to accuracy or
completeness is expressed or implied.
About your monitor │ 17
Physical characteristics
Model S2522HG
Signa
l cable type
NOTE: De
are shipped with your monitor. As Dell does not have control over the different
cable suppliers in the market, the type of material, connector and process used to
manufacture these cables, Dell does not guarantee video performance on cables
that are not shipped with your Dell monitor.
Dimensions (with stand)
Height (extended) 505.75 mm (19.91 in.)
Height (compressed) 375.75 mm (14.79 in.)
Width 555.40 mm (21.87 in.)
Depth 200.30 mm (7.89 in.)
Dimensions (without stand)
Height 327.24 mm (12.88 in.)
Width 555.40 mm (21.87 in.)
Depth 68.38 mm (2.69 in.)
Stand dimensions
Height (extended) 416.90 mm (16.41 in.)
Height (compressed) 369.19 mm (14.54 in.)
Width 275.90 mm (10.86 in.)
Depth 200.30 mm (7.89 in.)
Weight
Weight with packaging 8.54 kg (18.82 l b)
Weight with stand assembly and cables 6.13 kg (13.51 l b)
Weight without stand assembly (For
w
all mount or VESA mount
considerations - no cables)
Weight of stand assembl y 5.72 kg (12.61 lb)
ll monitors are designed to work optimally with the video cables that
• Digital: DisplayPort, 20 pins
• Digital: HDMI, 19 pins
• Universal Serial Bus: USB, 9 pins
3.72 kg (8.20 lb)
18 │ About your monitor
Environmental characteristics
Model S2522HG
Comp
liant standards
• RoHS-compliant
• BFR/PVC Free monitor (excluding external cables)
• Arsenic-free glass and Mercury-free for the panel only
Te m p e ra t u re
Operating 0°C to 40°C (32°F to 104°F)
Non-operating • Storage: -20°C to 60°C (-4°F to 140°F)
• Shipping: -20°C to 60°C (-4°F to 140°F)
Humidity
Operating 10% to 80% (non-condensing)
Non-operating • Storage: 5% to 90% (non-condensing)
• Shipping: 5% to 90% (non-condensing)
Altitude
Operating 5,000 m (16,404 ft) (maximum)
Non-operating 12,192 m (40,000 ft) (maximum)
Thermal dissipation
• 245.66 BTU/hour (maximum)
•57.32 BTU/hour (typical)
About your monitor │ 19
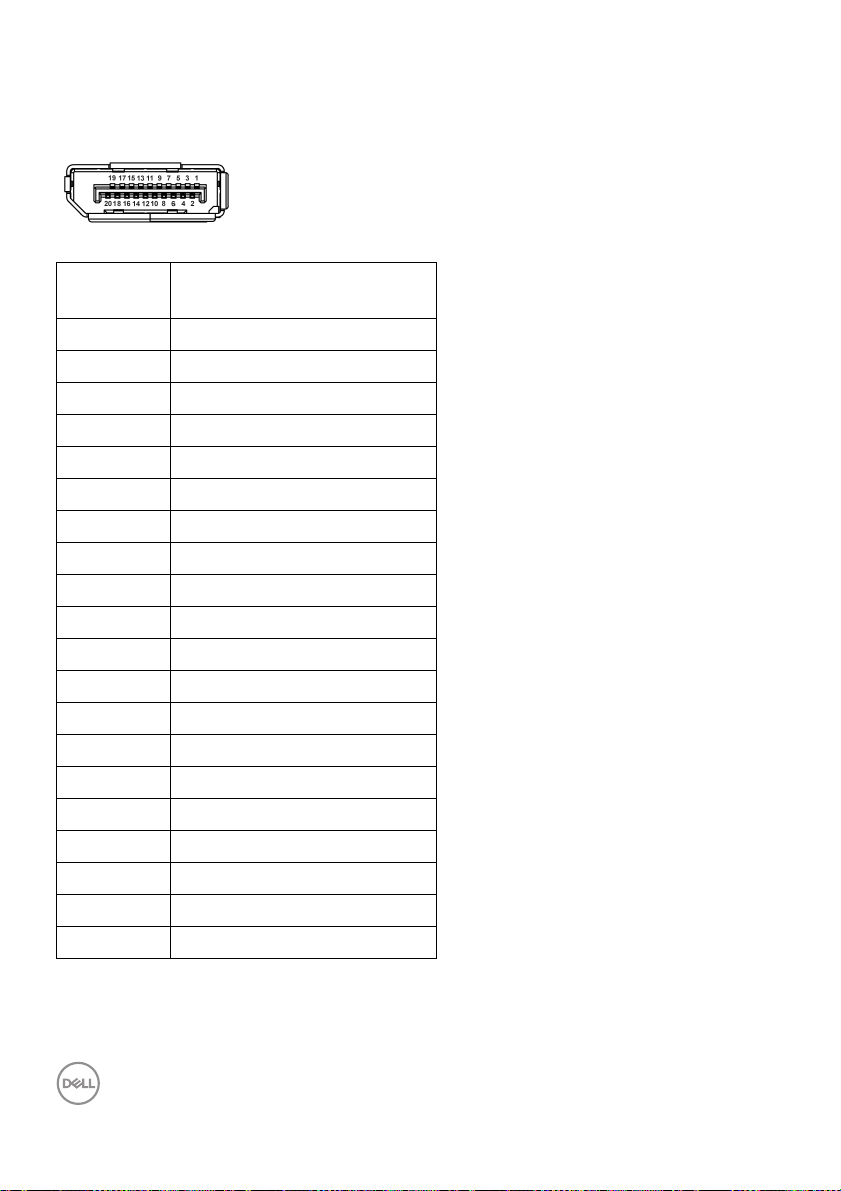
Pin assignments
DisplayPort connector
Pin
number
1 ML3 (n)
2 GND
3 ML3 (p)
4 ML2 (n)
5 GND
6 ML2 (p)
7 ML1 (n)
8 GND
9 ML1 (p)
10 ML0 (n)
11 GND
12 ML0 (p)
13 GND
14 GND
15 AUX (p)
16 GND
17 AUX (n)
18 Hot Plug Detect
19 Re-PWR
20 +3.3 V DP_PWR
20-pin side of the
connected signal cable
20 │ About your monitor
 Loading...