

Page 1
Dell Technologies Boot Optimized Storage
Solution-S2
User's Guide
Par t N umb er: BM SA- 150 0
Sep tem ber 20 20
Rev . A 00
Page 2

Notes, cautions, and warnings
NOTE: A NOTE indicates important information that helps you make better use of your product.
CAUTION: A CAUTION indicates either potential damage to hardware or loss of data and tells you how to avoid
the problem.
WARNING: A WARNING indicates a potential for property damage, personal injury, or death.
© 2020 Dell Inc. or its subsidiaries. All rights reserved. Dell, EM C, and other trademarks are trademarks of Dell Inc. or its subsidiaries. Oth er
trademarks may be trademarks of their respective owners.
Page 3

Contents
Chapter 1: Dell Technologies Boot Optimized Storage Solution-S2................................................ 5
Features of BOSS-S2 card................................................................................................................................................5
Technical specifications of BOSS-S2 card....................................................................................................................6
Supported M.2 drives of BOSS-S2 card........................................................................................................................7
PowerEdge systems supported by BOSS-S2 ..............................................................................................................8
Operating systems supported by BOSS-S2.................................................................................................................. 8
Chapter 2: Applications supported by BOSS-S2............................................................................ 9
Unified Extensible Firmware Interface RAID Configuration Utility.......................................................................... 9
Dell OpenManage Storage Management....................................................................................................................... 9
BOSS-S2 Command Line Interface Utility.....................................................................................................................9
The Integrated Dell Remote Access Controller and Lifecycle Controller............................................................. 10
Chapter 3: Update the BOSS-S2 firmware version........................................................................11
Update BOSS-S2 using Windows update packages.................................................................................................. 11
Update BOSS-S2 using Linux.......................................................................................................................................... 11
Update BOSS-S2 using iDRAC....................................................................................................................................... 12
Update BOSS-S2 using Lifecycle Controller............................................................................................................... 12
Chapter 4: Features of BOSS-S2..................................................................................................14
Hot–plugging M.2 drives in PowerEdge systems...................................................................................................... 14
Identify M.2 drives by using LEDs..................................................................................................................................14
Controlled firmware update.............................................................................................................................................14
Foreign import of VDs.......................................................................................................................................................15
Detect a drive failure using SMART feature............................................................................................................... 15
Auto–rebuild a degraded drive....................................................................................................................................... 15
Support of non–RAID drives........................................................................................................................................... 15
TRIM feature on SSDs...................................................................................................................................................... 16
Erase physical disk data....................................................................................................................................................16
Chapter 5: Install and remove a BOSS-S2 card.............................................................................17
Safety instructions.............................................................................................................................................................17
Before working inside your system................................................................................................................................ 17
After working inside your system...................................................................................................................................18
Remove the BOSS-S2 module........................................................................................................................................18
Install the BOSS-S2 module............................................................................................................................................23
Chapter 6: Driver support for BOSS-S2.......................................................................................28
Chapter 7: BOSS-S2 UEFI configuration utility............................................................................ 29
Enter the BOSS-S2 UEFI configuration utility........................................................................................................... 29
Exit the BOSS-S2 UEFI configuration utility.............................................................................................................. 29
Navigate to BOSS-S2 configuration utility................................................................................................................. 30
Physical or virtual disk information............................................................................................................................... 30
Contents 3
Page 4

View physical disk information................................................................................................................................. 30
View virtual disk information.................................................................................................................................... 30
Import and set a foreign virtual disk as BOSS-S2 native................................................................................... 31
Create a virtual disk...........................................................................................................................................................31
Delete a virtual disk........................................................................................................................................................... 31
Recover or rebuild a degraded virtual drive................................................................................................................32
Erase physical disk data................................................................................................................................................... 32
View RAID controller information.................................................................................................................................. 32
Clear RAID controller configuration data...............................................................................................................32
Chapter 8: Manage BOSS-S2 using CLI commands...................................................................... 33
BOSS-S2 CLI commands supported on PowerEdge servers................................................................................. 33
Run BOSS-S2 CLI commands on PowerEdge servers running the Windows operating system................... 34
Run BOSS-S2 CLI commands on PowerEdge servers running the Linux operating system.......................... 34
Run BOSS-S2 CLI commands on PowerEdge servers running the ESXi operating system........................... 34
Chapter 9: Troubleshooting......................................................................................................... 35
Importing the BOSS ESXi CLI offline bundle may fail in VSphere Lifecycle Manager..................................... 35
BOSS ESXi CLI package fails when upgrading from Dell EMC customized versions of 6.7.x to
version 7.0...................................................................................................................................................................... 35
M.2 drive firmware update from iDRAC fails on unconfigured drives with an existing adapter key on
the BOSS-S2 controller...............................................................................................................................................36
Unconfigured drives in the BOSS-S2 controller is unavailable for operating system installation with
an existing adapter key................................................................................................................................................ 36
The ROM version for BOSS is reported as firmware version in IDRAC interface............................................. 36
Unable to update the M.2 drive firmware by using iDRAC or Lifecycle Controller........................................... 36
BOSS-S2 CLI displays No Adapter Found error in Linux......................................................................................... 36
LC log displays fan unavailability error......................................................................................................................... 37
Physical disk size is not updated on iDRAC when CSIOR is disabled................................................................... 37
Physical disk or virtual disk is indicated as missing on iDRAC when CSIOR is disabled...................................37
The Back Ground Activity (BGA) task process in HII does not report real-time status.................................. 37
Virtual disk related events are repeatedly generated in BOSS-S2 and OMSS...................................................37
Characters are limited when entering a virtual drive name.................................................................................... 38
VMFS datastore is disabled from YX5X of PowerEdge systems that are shipped with VMware ESXi
installed on BOSS-S2................................................................................................................................................... 38
One or more physical disks are not detected by the operating system...............................................................38
Virtual disk is not detected by the operating system...............................................................................................38
An installed drive is not listed in the BOSS-S2 Configuration Utility....................................................................39
The BOSS-S2 card is not presented to the PowerEdge server............................................................................ 39
Unable to boot to M.2 drive installed in slot 1............................................................................................................ 39
Unsupported commands, options, and features are displayed by BOSS-S2 CLI with VMware CLI
utility.................................................................................................................................................................................39
Unable to deploy ESXi on RAID 1 of BOSS-S2........................................................................................................... 39
Chapter 10: Getting help..............................................................................................................41
Recycling or End-of-Life service information............................................................................................................. 41
Contacting Dell................................................................................................................................................................... 41
Receiving automated support with SupportAssist ................................................................................................... 41
Chapter 11: Documentation resources.......................................................................................... 43
4
Contents
Page 5
1
Dell Technologies Boot Optimized Storage
Solution-S2
Dell Technologies Boot Optimized Storage Solution-S2 (BOSS-S2) is a RAID solution card that is designed for booting a server's
operating system that supports:
● 80 mm M.2 SATA Solid-State Devices (SSDs)
● PCIe card with PCIe Gen 2 x 4 Host Interface
● Dual SATA Gen 3 Device Interfaces
NOTE: For the safety, regulatory, and ergonomic information associated with these devices, and for more information
about the Integrated Dell Remote Access Controller (iDRAC) or Lifecycle Controller (LC) remote management, see your
platform documentation.
Topics:
• Features of BOSS-S2 card
• Technical specifications of BOSS-S2 card
• Supported M.2 drives of BOSS-S2 card
• PowerEdge systems supported by BOSS-S2
• Operating systems supported by BOSS-S2
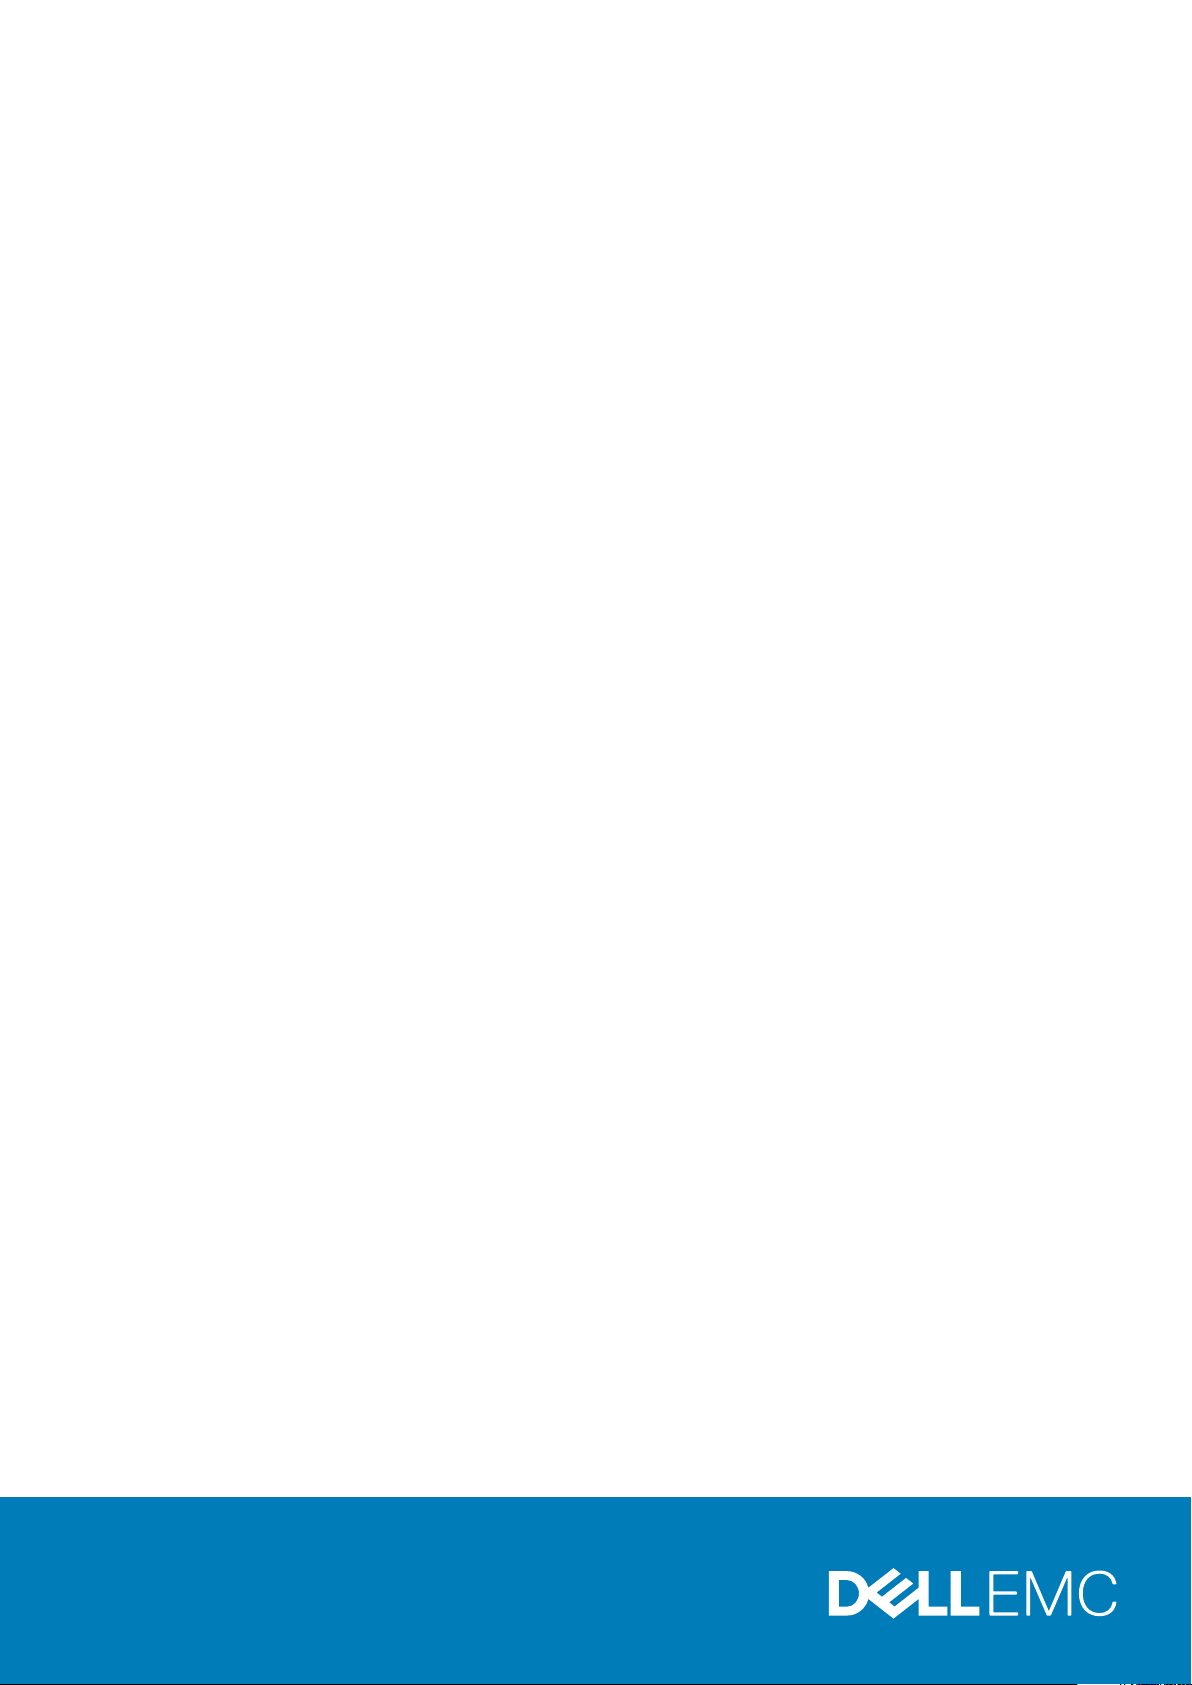
Features of BOSS-S2 card
Figure 1. Features of BOSS-S2 card
Dell Technologies Boot Optimized Storage Solution-S2 5
Page 6
1. M.2 blank 2. M.2 carrier
3. BOSS-S2 module bracket 4. BOSS-S2 module
5. M.2 card 6. BOSS-S2 card
7. Signal cable 8. Power cable
9. Power cable connector 10. Signal cable connector
Technical specifications of BOSS-S2 card
The following table lists the BOSS-S2 card technical specifications:
Table 1. Technical specifications of BOSS-S2 card
Function or feature BOSS-S2 card
Hot–plug of M.2 drives Yes
LED activity of M.2 drives Yes
Controlled firmware update Yes
RAID levels RAID 1 and Non–RAID
Stripe size Supports default 64 K stripe size only
Battery backup unit No
Non–volatile cache No
Virtual disk cache function Write through
Maximum number of virtual disks 1
Maximum number of drives supported 2
Support for non–RAID disks Yes (supports up to two disks)
Drive types 6 Gbps M.2 SATA SSDs x 2
PCIe support Gen 2
Disk cache policy Drive default
TRIM Non–RAID mode
Stripe size supported 64 K
Configuration (HII) Yes
Full initialization No
Fast initialization Yes
NOTE: By default, fast initialization is performed when
you create a virtual disk.
Background initialization No
RAID 0 No
RAID 1 Yes
Single non–RAID Yes
Dual non–RAID Yes
Degraded RAID 1 and non–RAID No
Foreign import Yes
Consistency check No
Patrol read No
6 Dell Technologies Boot Optimized Storage Solution-S2
Page 7
Table 1. Technical specifications of BOSS-S2 card (continued)
Function or feature BOSS-S2 card
Load balance N/A
Rebuild Yes (Only Auto–rebuild)
Hot spare No
Change rebuild priority/rate No
Virtual disk write back/read ahead cache No
NOTE: BOSS-S2 controller does not support controller
cache.
Battery support N/A
NOTE: BOSS-S2 controller does not support a battery.
Non–RAID disk cache policy Yes
NOTE: OS controlled or device defaults.
SMART Info Yes
NOTE: Use the BOSS-S2 CLI to retrieve the SMART
information from the drives.
Physical disk hot–plug Yes
Virtual disk expansion No
Virtual disk slicing No
Virtual disk migration Yes
Split mirror No
Non–RAID migration Yes
BIOS configuration utility (Ctrl-M) Yes
Add on driver for data path (OS device driver) No
4 K native drive support No
TRIM and UNMAP virtual disk No
TRIM and UNMAP non–RAID physical disk Yes
Self-encrypting drives (SED) support No
Cryptographic erase (sanitize) Yes
NOTE: On new controller, virtual disk must be imported
from HII before presented to OS.
NOTE: System required to shutdown and migrate one
physical disk to another system and continue rebuild.
NOTE: Console Windows driver or Linux library is required
for management purposes only.
NOTE: If drive supports SANITIZE Crypto Erase. No other
encryption support from controller or drive.
Supported M.2 drives of BOSS-S2 card
The BOSS-S2 card supports the following M.2 drives:
CAUTION:
controller.
The BOSS-S2 card is tested and supported only with the M.2 drives that are shipped with the
Dell Technologies Boot Optimized Storage Solution-S2 7
Page 8

Table 2. Supported M.2 drives of BOSS-S2 card
Drive Model Capacity
Intel M.2 S4510 240 GB, 480 GB
Micron M.2 5300 240 GB, 480 GB
NOTE: Dell Technologies recommends that you use the BOSS-S2 card only as an operating system boot device.
NOTE: Ensure that M.2 drives have the latest firmware. You can download the latest firmware from www.dell.com/
support/home.
PowerEdge systems supported by BOSS-S2
The following PowerEdge systems support the BOSS-S2 card:
● PowerEdge R6525
● PowerEdge R7525
Operating systems supported by BOSS-S2
See Dell Technologies Enterprise operating systems support for a list of supported operating systems by a specific server for
the BOSS-S2 card.
NOTE:
For the latest list of supported operating systems and driver installation instructions, see the operating system
documentation at www.dell.com/operatingsystemmanuals. For specific operating system service pack requirements, see
the Drivers and Downloads section at www.dell.com/manuals.
8 Dell Technologies Boot Optimized Storage Solution-S2
Page 9
2
Applications supported by BOSS-S2
BOSS-S2 card management applications include the UEFI RAID Configuration Utility, Dell OpenManage Storage Management,
BOSS-S2 Command Line Interface (CLI) Utility, The Integrated Dell Remote Access Controller (iDRAC), and Lifecycle Controller
(LC). They enable you to manage and configure the RAID system, create and manage a disk group, and provide online
maintenance.
Topics:
• Unified Extensible Firmware Interface RAID Configuration Utility
• Dell OpenManage Storage Management
• BOSS-S2 Command Line Interface Utility
• The Integrated Dell Remote Access Controller and Lifecycle Controller
Unified Extensible Firmware Interface RAID Configuration Utility
Unified Extensible Firmware Interface (UEFI) RAID Configuration Utility is integrated into the system BIOS (F2). See UEFI/HII
RAID configuration utility.
Dell OpenManage Storage Management
Dell OpenManage Storage Management enables you to perform controller and enclosure functions for all supported RAID
controllers and enclosures from a single graphical or command line interface. For more information, see the Dell OpenManage
Storage Management User's Guide at www.dell.com/openmanagemanuals.
BOSS-S2 Command Line Interface Utility
The BOSS-S2 Command Line Interface (CLI) Utility enables you to check controller, physical disk, and virtual disk status while
booted to an operating system. The application is also used to check physical disks and display controller SMART information.
For more information about CLI commands, see Manage BOSS-S2 using CLI commands on page 33.
Table 3. BOSS-S2 CLI utility for supported operating systems
Operating system Utility name
Windows mvsetup
Linux mvcli
ESXi mvcli
NOTE: To use the mvsetup Windows utility, the BOSS-S2 management driver must be installed first. You can download the
latest Windows unified console driver from www.dell.com/support/home. Linux or ESXi mvcli does not require a driver.
NOTE: To remove mvcli from the operating systems, uninstall BOSS-S2 drivers from the operating systems or remove the
libraries and the executable files.
Table 4. Instructions to remove mvcli from the operating systems
Operating system Instructions to remove mvcli from the operating systems
Windows Locate and remove the library and executable files
Applications supported by BOSS-S2 9
Page 10

Table 4. Instructions to remove mvcli from the operating systems (continued)
Operating system Instructions to remove mvcli from the operating systems
Linux Locate and remove the library and executable files
ESXi Remove using vib remove command
The Integrated Dell Remote Access Controller and Lifecycle Controller
The Integrated Dell Remote Access Controller (iDRAC) and Lifecycle Controller (LC) application enables you to effectively
monitor the RAID and network controllers installed on the system using iDRAC and LC without an operating system installed on
the system. For more information, see the Integrated Dell Remote Access Controller 9 User's Guide at www.dell.com/
idracmanuals.
10 Applications supported by BOSS-S2
Page 11
Update the BOSS-S2 firmware version
BOSS-S2 card firmware updates can be done using the following methods:
● Operating system Dell Update Packages
○ Windows
○ Linux
● The Integrated Dell Remote Access Controller (iDRAC)
● Lifecycle Controller (LC)
Topics:
• Update BOSS-S2 using Windows update packages
• Update BOSS-S2 using Linux
• Update BOSS-S2 using iDRAC
• Update BOSS-S2 using Lifecycle Controller
Update BOSS-S2 using Windows update packages
3
Prerequisites
Download the latest operating system Dell Update Package (DUP) from SAS-RAID_Firmware_xxxxx_xxxx_xxx.exe for
Windows from www.dell.com/support/home and install it for monolithic servers.
About this task
Perform the following steps to update using Windows:
NOTE: Ensure that you have Administrator privileges for Windows.
Steps
1. Download the latest Dell Update Package (DUP) for Windows from the www.dell.com/support/home.
2. Double-click the EXE file and click Install.
After the inventory collection and firmware validation processes are complete, the installed version and package version are
displayed.
NOTE:
Installed version refers to the current firmware version of the controller, and package version refers to the DUP
version.
3. Click Yes to continue.
4. Click Yes to reboot the system.
System reboot is required for a successful update as the firmware updates are staged.
5. Verify the installed firmware version in HII, iDRAC, or MVCLI utility.
Update BOSS-S2 using Linux
Prerequisites
Download the latest operating system Dell Update Package (DUP) from SAS-RAID_Firmware_xxxxx _xxxx_xxx.bin for Linux
from www.dell.com/support/home and install it for monolithic servers.
About this task
Perform the following steps to update using Linux:
Update the BOSS-S2 firmware version 11
Page 12

NOTE: Ensure that you have Root or Sudo privileges for Linux or ESXi.
Steps
1. Download the latest Dell Update Package (DUP) for Linux from the www.dell.com/support/home.
2. Go to the downloaded file path and provide the permissions to execute the DUP file.
3. Execute the BIN file ./SAS-RAID_Firmware_xxxxx_xxxx_xxx.bin.
4. When prompted, press Q to proceed.
After the inventory collection and firmware validation processes are complete, the installed version and package version are
displayed.
5. To continue press Y+Enter or N+Enter to cancel.
6. When prompted to reboot the server, press Y+Enter.
System reboot is required for a successful update as the firmware updates are staged.
7. Verify the installed firmware version in HII, iDRAC, or BOSS-S2 CLI.
Update BOSS-S2 using iDRAC
Prerequisites
You can update controller firmware using iDRAC. The controller firmware can be updated using the Dell Update Package (DUP)
when booted to an operating system. Ensure that you have installed the latest firmware version available at www.dell.com/
support/home.
About this task
To update the firmware using the iDRAC web interface:
Steps
1. Download the latest DUP SAS- RAID_Firmware_xxxxx_xxxx_xxx.exe from the www.dell.com/support/home.
2. Click Maintenance > System Update > Manual Update.
3. Click Choose file. Select the DUP firmware image.
4. Click Upload.
The update section displays the firmware DUP details.
5. Select the EXE Dell Update Package (DUP).
6. Upload the file, and then click Install > Reboot.
System boots into Lifecycle Controller automatically to perform update operation. Launch Job Queue and Lifecycle Log
page to view and monitor the staged firmware updates.
7. Log in and verify the installed firmware version in HII, iDRAC, or BOSS-S2 CLI.
Update BOSS-S2 using Lifecycle Controller
Prerequisites
You can update controller firmware using Lifecycle Controller (LC). The controller firmware can be updated using the Dell
Update Package (DUP) when booted to an operating system. Ensure that you have installed the latest firmware version
available at www.dell.com/support/home.
About this task
To update the firmware using the Lifecycle Controller:
Steps
1. Download the DUP file from the www.dell.com/support/home and copy the .exe DUP file to a local drive.
Example of the file name: SAS- RAID_Firmware_xxxxx_xxxx_xxx.exe.
2. Open Virtual Console and boot into Lifecycle Controller by pressing F10 at boot time.
12
Update the BOSS-S2 firmware version
Page 13

3. Click Firmware Update on the dashboard window and click Launch Firmware Update.
4. Select any one of these repositories FTP Server, Local Drive (CD/DVD/USB), or Netowrk Share (CIFS, NFS, HTTP,
or HTTPS). Click Next.
5. Select the EXE file and click Next.
6. Select the EXE Dell Update Package (DUP) and click Apply.
7. After successful installation, reboot and verify the installed firmware version in the HII, iDRAC, or BOSS-S2 CLI.
NOTE: For Information on how to update using the CLI, see Manage BOSS-S2 using CLI commands on page 33.
Update the BOSS-S2 firmware version 13
Page 14
Features of BOSS-S2
Topics:
• Hot–plugging M.2 drives in PowerEdge systems
• Identify M.2 drives by using LEDs
• Controlled firmware update
• Foreign import of VDs
• Detect a drive failure using SMART feature
• Auto–rebuild a degraded drive
• Support of non–RAID drives
• TRIM feature on SSDs
• Erase physical disk data
Hot–plugging M.2 drives in PowerEdge systems
The unique controller design of the BOSS-S2 card carrier card allows you to hot plug M.2 drives. This feature reduces the
possibility of downtime during M.2 replacement. Automatic rebuild replaces the M.2 configured drives that are identified as
degraded and then starts an automatic rebuild.
NOTE:
The Integrated Dell Remote Access Controller (iDRAC) and Lifecycle Controller (LC) logs for the hot–plug events of
M.2 drives are not updated on a real time basis.
4
Drive removal and absence status information are available in the hard drive queried by the iDRAC. The event logs return
information about the removal, failure, and rebuild status of an M.2 module. The iDRAC and OMSA provides the status of the
virtual drive and also the hard drive status such as SMART and Remaining Rated Write Endurance (RRWE).
Identify M.2 drives by using LEDs
BOSS-S2 card supports Activity and Status LEDs.
● Activity LED—The activity LED is triggered when an activity is initiated in M.2 drives.
● Status LED—The status LED is driven based on the drive status as mentioned below:
Table 5. Status LED state
Status LED state Description
Green Drive is online or rebuild
BLINK - Amber Drive is failed
BLINK - Green Locate or identify
NOTE: The locate or identify functionality is triggered using iDRAC and OpenManage
Server Administrator (OMSA).
OFF Drive is not present
Controlled firmware update
Use the Dell update Package with out-of-band support and iDRAC to update the BOSS-S2 firmware. The firmware payload is
verified using a cryptographic digital signature, offering a secure update. By default, the BOSS-S2 controller state is secure and
locked, and is unlocked only during the firmware update process. Following the update, the controller automatically returns to
the default, locked state to prevent any unauthorized updates to the firmware.
14 Features of BOSS-S2
Page 15

NOTE: Firmware update using DUP within an operating system (in-band) enters through the iDRAC as a staged operation.
Foreign import of VDs
A virtual disk is considered foreign if it is not native to the adapter.
● A virtual disk is considered native to the adapter if:
○ The virtual disk was created or imported on the adapter.
● A physical disk is considered native to the adapter if:
○ There is no previous virtual disk metadata on the adapter and the physical disk are unconfigured.
○ When the virtual disk corresponding to the physical disks is deleted
The system must be rebooted after performing foreign import.
To check for previous virtual disk metadata, see Controller Information. Only a virtual disk or physical disk native to the adapter
will be presented to the operating system.
Upon migrating two foreign drives to a controller, you must do either of the following:
● Clear the controller configuration if using unconfigured drives—Clear Controller Configuration.
● Import the virtual disk if using configured drives—Virtual Disk Import.
Detect a drive failure using SMART feature
SMART monitors certain physical aspects of the disk electronics to help detect predictable disk failures. Data on SMARTcompliant physical disks can be monitored to identify changes in values and determine whether the values are within the
threshold limits. Any electrical failures in the disk can cause degradation in the performance before failure.
A SMART failure is also referred to as a predicted failure. There are numerous factors that predict physical disk failures, such as
a read error rate, throughput performance, and changes in spin-up time. In addition, there are factors related to read/write
surface failure, such as seek error rate and excessive bad blocks.
NOTE: The BOSS-S2 CLI displays error messages with the status OK and NOT OK along with smart attributes.
Auto–rebuild a degraded drive
Auto–rebuild is enabled by default, and the rebuild can start automatically if the native virtual disk is degraded and a valid rebuild
target is present. A valid rebuild target is any functional drive attached to the BOSS-S2 device which is not part of the native
virtual disk and is of equal or greater storage capacity. An auto–rebuild occurs without prompting the user, and any data on the
rebuild target is overwritten.
NOTE: Auto–rebuild is applicable during drive replacement (hot–plug event).
Support of non–RAID drives
By default, all the drives are in an unconfigured state.
NOTE:
● For the BOSS-S2 card, unconfigured drives are automatically non–RAID drives. To convert RAID drives to non–RAID
drives, delete the virtual disk.
● The BOSS-S2 only supports one configured (RAID) and two unconfigured states. The BOSS-S2 card does not break
unconfigured drives into RAID and non–RAID states.
Features of BOSS-S2 15
Page 16

TRIM feature on SSDs
TRIM (Non–RAID physical disk) allows an operating system to delete a block of data that is no longer considered in use by
SSDs. For supported operating systems, the TRIM command resolves the write amplification issue. When an operating system
deletes a file, the file is marked for deletion in the file system, but the contents on the disk are not actually erased. As a result,
the SSDs do not know the Logical Block Addressing (LBA) previously occupied can be erased. With the introduction of TRIM,
when a file is deleted, the operating system sends a TRIM command along with the LBAs that do not contain valid data to the
physical disk.
Erase physical disk data
The erase physical disk feature deletes metadata from the physical disk. This feature can be enabled only when the physical disk
is not part of any virtual disk.
CAUTION: Performing erase physical disk removes all the data from the physical disk.
16 Features of BOSS-S2
Page 17

Install and remove a BOSS-S2 card
Topics:
• Safety instructions
• Before working inside your system
• After working inside your system
• Remove the BOSS-S2 module
• Install the BOSS-S2 module
Safety instructions
NOTE: To avoid injury, do not lift the system on your own. Get others to assist you.
WARNING: Opening or removing the system cover while the system is turned on may expose you to a risk of
electric shock.
CAUTION: Do not operate the system without the cover in place for a duration exceeding five minutes.
Operating the system without the system cover in place can result in component damage.
5
CAUTION: Many repairs may only be done by a certified service technician. You should only perform
troubleshooting and simple repairs as authorized in your product documentation, or as directed by the online or
telephone service and support team. Damage due to servicing that is not authorized by Dell is not covered by
your warranty. Read and follow the safety instructions that are shipped with your product.
CAUTION: To ensure proper operation and cooling, all system bays and fans must be always populated with a
component or a blank.
NOTE: It is recommended that you always use an antistatic mat and antistatic strap while working on components inside
the system.
NOTE: While replacing the hot swappable PSU, after next server boot; the new PSU automatically updates to the same
firmware and configuration of the replaced one. For more information about the Part replacement configuration, see the
Lifecycle Controller User's Guide at https://www.dell.com/idracmanuals
NOTE: While replacing faulty storage controller/FC/NIC card with the same type of card, after you power on the system;
the new card automatically updates to the same firmware and configuration of the faulty one. For more information about
the Part replacement configuration, see the Lifecycle Controller User's Guide at https://www.dell.com/idracmanuals
Before working inside your system
Steps
1. Power off the system and all attached peripherals.
2. Disconnect the system from the electrical outlet, and disconnect the peripherals.
3. If applicable, remove the system from the rack.
For more information, see the Rail Installation Guide relevant to your rail solutions at www.dell.com/poweredgemanuals.
4. Remove the system cover.
Install and remove a BOSS-S2 card 17
Page 18

After working inside your system
Steps
1. Replace the system cover.
2. If applicable, install the system into the rack.
For more information, see the Rail Installation Guide relevant to your rail solutions at www.dell.com/poweredgemanuals.
3. Reconnect the peripherals and connect the system to the electrical outlet, and then power on the system.
Remove the BOSS-S2 module
Prerequisites
CAUTION: Many repairs may only be done by a certified service technician. You should only perform
troubleshooting and simple repairs as authorized in your product documentation, or as directed by the online or
telephone service and support team. Damage due to servicing that is not authorized by Dell is not covered by
your warranty. Read and follow the safety instructions that came with the system.
1. Follow the safety guidelines listed in the Safety instructions on page 17.
2. Follow the procedure listed in the Before working inside your system on page 17.
NOTE: The below procedure is applicable to 1U systems. For more information on 2U systems, see the system-specific
Installation and Service Manual available at www.dell.com/poweredgemanuals.
Steps
1. Disconnect the BOSS-S2 module power cable and signal cable from the system board.
18
Install and remove a BOSS-S2 card
Page 19

2. Slide the M.2 carrier from the BOSS-S2 module bay.
Figure 2. Slide the M.2 carrier from the BOSS-S2 module bay
Install and remove a BOSS-S2 card
19
Page 20

3. If installed, pull the M.2 blank out from the BOSS-S2 module bay.
NOTE: An M.2 module blank is installed only if the controller has one M.2 carrier.
Figure 3. Pull the M.2 blank out from the BOSS-S2 module bay
20
Install and remove a BOSS-S2 card
Page 21

4. Using a Phillips #1 screwdriver, remove the two screws that secure the BOSS-S2 module bay. Slide the BOSS-S2 module out
of the BOSS-S2 module bay.
Figure 4. Remove the screws that secure the BOSS-S2 module bay
Install and remove a BOSS-S2 card
21
Page 22

5. Using a Phillips #1 screwdriver, remove the screw that secures the bracket on the BOSS-S2 module. Slide the bracket from
the BOSS-S2 module to remove the bracket.
Figure 5. Remove the screw of the bracket on the BOSS-S2 module
22
Install and remove a BOSS-S2 card
Page 23

6. Using a Phillips #1 screwdriver, remove the screw that secures the M.2 card to the M.2 card carrier.
Figure 6. Remove the screw that secures the M.2 card to the M.2 card carrier
7. Slide the M.2 card from the M.2 card carrier.
Install the BOSS-S2 module
Prerequisites
CAUTION:
troubleshooting and simple repairs as authorized in your product documentation, or as directed by the online or
telephone service and support team. Damage due to servicing that is not authorized by Dell is not covered by
your warranty. Read and follow the safety instructions that came with the system.
Many repairs may only be done by a certified service technician. You should only perform
1. Follow the safety guidelines listed in the Safety instructions on page 17.
2. Follow the procedure listed in the Before working inside your system on page 17.
NOTE: The below procedure is applicable to 1U systems. For more information on 2U systems, see the system-specific
Installation and Service Manual available at www.dell.com/poweredgemanuals.
Steps
1. Align the M.2 card at an angle with the M.2 card carrier.
2. Insert the M.2 card until it is firmly seated in the M.2 card carrier.
Install and remove a BOSS-S2 card
23
Page 24

3. Using a Phillips #1 screwdriver, secure the M.2 card to the M.2 card carrier with the screw.
CAUTION: Ensure that the screws are tightened by using a torque of 1.7 in-lb (0.19 N-m).
Figure 7. Install the screw that secures the M.2 card to the M.2 card carrier
4. Slide the bracket on the BOSS-S2 module. Using a Phillips #1 screwdriver, secure the bracket on the BOSS-S2 module with
the screw.
Figure 8. Install the screw of the bracket on the BOSS-S2 module
5. Slide the BOSS-S2 module into the BOSS-S2 module bay until it is firmly seated.
24
Install and remove a BOSS-S2 card
Page 25

6. Using a Phillips #1 screwdriver, secure the BOSS-S2 module with the two screws.
CAUTION: Ensure that the screws are tightened by using a torque of 4 in-lb (0.45 N-m).
Figure 9. Install the screws that secure the BOSS-S2 module
7. Connect the BOSS-S2 module power cable and signal cable to the system board.
Install and remove a BOSS-S2 card
25
Page 26

8. Slide the M.2 card carrier into the BOSS-S2 module bay.
Figure 10. Slide the M.2 carrier into the BOSS-S2 module bay
26
Install and remove a BOSS-S2 card
Page 27

9. Slide the M.2 blank into the BOSS-S2 module bay to lock the carrier in place.
NOTE: An M.2 blank is installed only if the controller has one M.2 carrier.
Figure 11. Slide the M.2 blank into the BOSS-S2 module bay
Next steps
1. Follow the procedure listed in After working inside your system on page 18.
Install and remove a BOSS-S2 card
27
Page 28

Driver support for BOSS-S2
The BOSS-S2 card leverages the inbox AHCI driver with all the supported operating systems.
Windows driver installation—By default, native AHCI driver is the inbox for installation.
NOTE: The Management console driver is required to support the command line interface for BOSS-S2 card in Windows
driver installation.
Linux driver installation—By default, native AHCI driver is the inbox for installation.
ESXi driver installation—By default, native AHCI driver is the inbox for installation.
6
28 Driver support for BOSS-S2
Page 29

7
BOSS-S2 UEFI configuration utility
The Unified Extensible Firmware Interface (UEFI) RAID configuration utility is a storage management application integrated into
the system BIOS <F2>. It is used to configure and manage RAID disk groups, virtual disks, and physical disks. This utility is
independent of the operating system.
The following topics provide information about using the UEFI RAID configuration utility. For more information, see the online
help option in the UEFI RAID configuration utility.
NOTE: Use the UEFI RAID configuration utility for initial setup and disaster recovery. Certain advanced features are also
offered in the utility.
Topics:
• Enter the BOSS-S2 UEFI configuration utility
• Exit the BOSS-S2 UEFI configuration utility
• Navigate to BOSS-S2 configuration utility
• Physical or virtual disk information
• Create a virtual disk
• Delete a virtual disk
• Recover or rebuild a degraded virtual drive
• Erase physical disk data
• View RAID controller information
Enter the BOSS-S2 UEFI configuration utility
About this task
Perform the following steps to boot to the UEFI configuration utility:
Steps
1. Turn on the system.
2. While the system is booting, press <F2> to enter System Setup.
3. Click Device Settings.
Device Settings lists all the RAID controllers in the system.
To access the management menu for the controller, use the arrow keys or the mouse.
NOTE:
For more information in all the options, click Help, available on the top right-hand corner of the browser screen.
Help information for individual option menus can also be viewed by scrolling down on each option.
NOTE: Some of the options within the UEFI RAID configuration utility are not present if the controller does not support
the corresponding feature. Options may also be disabled if the feature is not supported in the existing configuration.
Exit the BOSS-S2 UEFI configuration utility
About this task
To exit the UEFI configuration utility, perform the following steps:
Steps
1. Click Finish at the bottom-right corner on the System Setup Main Menu screen.
A warning message confirming your choice appears.
BOSS-S2 UEFI configuration utility 29
Page 30

2. Click Yes to exit the configuration utility.
NOTE: Depending on the device configuration changes, exiting the UEFI configuration utility may prompt for a system
reboot.
Navigate to BOSS-S2 configuration utility
About this task
To navigate to UEFI configuration utility, perform the following steps:
Steps
1. Enter the UEFI configuration utility. See Enter the UEFI RAID configuration utility
The Device Settings screen displays a list of NIC ports and the BOSS-S2 configuration utility.
2. To enter BOSS-S2 configuration utility, click BOSS-S2 Configuration Utility.
The list of Configuration Options appears:
● Physical/Virtual Disk Information — view the properties of physical disks and virtual disks
● Create RAID Configuration — configure a virtual disk
● Delete RAID Configuration — delete a virtual disk
● RAID Rebuild — rebuild a degraded RAID volume, if a suitable peer drive is available
● Erase Physical Disk — clear data on a physical disk
● Controller Information — view BOSS-S2 adapter information
Physical or virtual disk information
The Physical/virtual disk information menu allows you to view physical disk properties and virtual disk properties.
View physical disk information
About this task
To view the physical disk information, perform the following steps:
Steps
1. Enter the BOSS-S2 Configuration utility. See Enter the BOSS-S2 Configuration Utility.
2. Click Physical/Virtual disk information.
All available physical disks are displayed.
3. Select a physical disk to view its information.
View virtual disk information
About this task
To view the virtual disk information, perform the following steps:
Steps
1. Enter the BOSS-S2 Configuration utility. See Enter the BOSS-S2 Configuration Utility.
2. Click Physical/Virtual disk information.
3. Select Virtual disk info.
All available virtual disks are displayed.
4. Select a virtual disk to view its information.
5. Observe quick initialization information in the virtual disk information.
30
BOSS-S2 UEFI configuration utility
Page 31

Import and set a foreign virtual disk as BOSS-S2 native
About this task
The Import operation sets a foreign virtual disk as native to the configuration.
Steps
1. Enter the BOSS-S2 Configuration utility. See Enter the BOSS-S2 Configuration Utility.
2. Click Physical/Virtual disk information.
3. Click Virtual disk information.
4. Select the virtual disk.
5. Select Yes for the option Would you like to import this virtual disk?.
NOTE: This option is only available when the controller detects a foreign disk.
6. Click OK, and then click Import.
7. Click Back untill you return to the screen.
8. Click Finish, and then click Yes to save the settings.
Create a virtual disk
About this task
To create a virtual disk, perform the following steps:
Steps
1. Enter the BOSS-S2 Configuration Utility. See Enter the BOSS-S2 Configuration Utility.
2. Click Create RAID Configuration.
3. Select the physical disks.
4. Click Next.
5. Type a name for the virtual disk in the Name field.
NOTE: Adding special characters in the virtual disk name is not supported.
6. Select Yes for the option Would you like to create this virtual disk? and click OK.
7. Click Next, and then click OK.
A virtual disk is created with quick initialization by default.
Delete a virtual disk
About this task
To delete a virtual disk, perform the following steps:
Steps
1. Enter the BOSS-S2 configuration utility. See Enter the BOSS-S2 Configuration Utility.
2. Click Delete RAID configuration.
3. Select the virtual disk.
4. Select Yes for the option Are you sure you want to delete the selected Virtual Disk?.
5. Click OK, and then click Next to delete the selected virtual disk.
BOSS-S2 UEFI configuration utility
31
Page 32

Recover or rebuild a degraded virtual drive
You can manually rebuild a degraded virtual disk. RAID rebuild is available only when a degraded RAID volume is present and
there is an available target device. If a foreign virtual disk is in rebuild state, rebuild starts automatically after you import the
virtual disk and reboot the server. Clear configuration operation does not affect any background activity, like rebuild.
Erase physical disk data
About this task
NOTE: Erase physical disk is not supported when the physical disk is a part of virtual disk.
Steps
1. Enter the BOSS-S2 Configuration Utility. See Enter the BOSS-S2 Configuration Utility.
2. Click Erase Physical Disk.
3. Select the devices by selecting the check box next to the available physical disk configuration.
4. Select Yes for the option Would you like to erase this Physical Disk?.
5. Click Next.
After the physical disk is successfully erased, the Physical Disk information tab shows the physical disk status as
unconfigured.
View RAID controller information
About this task
The Controller information menu allows you to view the properties of the RAID Controller.
Steps
1. Enter the BOSS-S2 configuration utility. See Enter the BOSS-S2 Configuration Utility.
2. Click Controller information.
The RAID adapter information is displayed.
Clear RAID controller configuration data
About this task
The clear configuration operation is used to clear RAID metadata from the adapter.
NOTE: The clear configuration operation does not delete any data on the virtual disk.
Steps
1. Click Controller information.
2. Select Clear Config.
3. Click OK.
32
BOSS-S2 UEFI configuration utility
Page 33

Manage BOSS-S2 using CLI commands
This section provides information about the methods to use the BOSS-S2 Command Line Interface (CLI) for performing a
variety of controller and enclosure specific operations.
The BOSS-S2 CLI utility is supported on the following operating systems:
● Windows
● Linux
● ESXi
Topics:
• BOSS-S2 CLI commands supported on PowerEdge servers
• Run BOSS-S2 CLI commands on PowerEdge servers running the Windows operating system
• Run BOSS-S2 CLI commands on PowerEdge servers running the Linux operating system
• Run BOSS-S2 CLI commands on PowerEdge servers running the ESXi operating system
BOSS-S2 CLI commands supported on PowerEdge servers
8
The following table lists the supported BOSS-S2 command line interface (CLI) commands. For more information about the
commands, type > help.
NOTE: The BOSS-S2 CLI utility only supports the following commands:
Table 6. Supported CLI commands
CLI commands Description Windows usage Linux/VMware usage
info -o hba Display BOSS-S2 controller
information.
info -o vd Display virtual drive
information.
info -o pd Display physical drive
information.
smart -p <PD_ID> Display SMART information
of physical drive.
event Display controller events. mvsetup event ./mvcli event
help Details help for all
commands or for only one
command.
NOTE: SMART reports the health status of the M.2 disks. See the SMART status return after the command is executed.
NOTE: There might be inconsistency in the events that are listed in BOSS CLI and other management interfaces that
include Dell EMC Open Manage Storage Services.
mvsetup info -o hba ./mvcli info -o hba
mvsetup info -o vd ./mvcli info -o vd
mvsetup info -o pd ./mvcli info -o pd
mvsetup smart -p 0 ./mvcli smart -p 0
mvsetup help info ./mvcli help
Manage BOSS-S2 using CLI commands 33
Page 34

Run BOSS-S2 CLI commands on PowerEdge servers running the Windows operating system
About this task
Follow these procedures to run CLI commands using the Windows operating system:
Steps
1. Download the latest MVSETUP BOSS-S2 utility for Windows from www.dell.com/support/home.
2. Extract the content of the mvsetup_xxxx_Axx.zip file on the system.
3. Browse the directory where you have extracted the content of the mvsetup_xxxx_Axx.zip file and run the mvsetup.exe
file.
The CLI window, within which you can run BOSS-S2 CLI commands, is displayed. Run BOSS-S2 CLI commands from this
window.
Run BOSS-S2 CLI commands on PowerEdge servers running the Linux operating system
About this task
Follow these procedures to run CLI commands using the Linux operating system:
Steps
1. Download the latest MVCLI BOSS-S2 utility for Linux from www.dell.com/support/home.
2. Extract the content of the mvcli.xxxx_Axx.zip file on the system.
3. Browse the directory to which you have extracted the content of the mvcli.xxxx_Axx.zip file and run the ./install and ./
mvcli files.
The CLI window, within which you can run BOSS-S2 CLI commands appears.
Run BOSS-S2 CLI commands on PowerEdge servers running the ESXi operating system
About this task
Follow these procedures to run CLI commands using the ESXi operating system:
Steps
1. Install ESXi on a host machine.
2. Use WinSCP or SCP and copy the attached files into the /tmp/ directory.
3. Log in to an ESXi shell using putty.
4. Change the directory to cd /tmp.
5. Run the command, - esxcli software vib install -d /tmp/SAS-RAID_BOSS-S2_CLI_Axx.zip to install
the offline bundle.
Successful commands are reported at the command line.
6. Enter the directory cd /opt/dell/boss/ and run the mvcli (BOSS CLI) utility.
NOTE: ESXi 7.0 or ESXi 6.7 U3 is the minimum requirement to install the BOSS-S2 CLI utility.
34 Manage BOSS-S2 using CLI commands
Page 35

9
Troubleshooting
To get help with your Dell BOSS-S2 card, you can contact your Dell Technical Service representative or see https://
www.dell.com/support.
Topics:
• Importing the BOSS ESXi CLI offline bundle may fail in VSphere Lifecycle Manager
• BOSS ESXi CLI package fails when upgrading from Dell EMC customized versions of 6.7.x to version 7.0
• M.2 drive firmware update from iDRAC fails on unconfigured drives with an existing adapter key on the BOSS-S2 controller
• Unconfigured drives in the BOSS-S2 controller is unavailable for operating system installation with an existing adapter key
• The ROM version for BOSS is reported as firmware version in IDRAC interface
• Unable to update the M.2 drive firmware by using iDRAC or Lifecycle Controller
• BOSS-S2 CLI displays No Adapter Found error in Linux
• LC log displays fan unavailability error
• Physical disk size is not updated on iDRAC when CSIOR is disabled
• Physical disk or virtual disk is indicated as missing on iDRAC when CSIOR is disabled
• The Back Ground Activity (BGA) task process in HII does not report real-time status
• Virtual disk related events are repeatedly generated in BOSS-S2 and OMSS
• Characters are limited when entering a virtual drive name
• VMFS datastore is disabled from YX5X of PowerEdge systems that are shipped with VMware ESXi installed on BOSS-S2
• One or more physical disks are not detected by the operating system
• Virtual disk is not detected by the operating system
• An installed drive is not listed in the BOSS-S2 Configuration Utility
• The BOSS-S2 card is not presented to the PowerEdge server
• Unable to boot to M.2 drive installed in slot 1
• Unsupported commands, options, and features are displayed by BOSS-S2 CLI with VMware CLI utility
• Unable to deploy ESXi on RAID 1 of BOSS-S2
Importing the BOSS ESXi CLI offline bundle may fail in VSphere Lifecycle Manager
Issue:
Corrective
Action:
Importing the BOSS ESXi CLI offline bundle into vSphere Lifecycle Manager fails through the vSphere
Web Client. For more information, see https://kb.vmware.com/s/article/78688.
This issue is resolved. For more information, see https://kb.vmware.com/s/article/2147284 published by
VMware for this behavior.
BOSS ESXi CLI package fails when upgrading from Dell EMC customized versions of 6.7.x to version 7.0
Issue:
Corrective
Action:
When upgrading vSphere versions from 6.7.x to version 7.0, the package update fails if the previous
version of BOSS CLI exists.
Remove the driver packages before attempting an upgrade using the command esxcli software
vib remove -n <vib name>.
NOTE: The ESXi must be gracefully rebooted to complete the driver packages removal before
upgrading. For more information, see https://kb.vmware.com/s/article/78389.
Troubleshooting 35
Page 36

M.2 drive firmware update from iDRAC fails on unconfigured drives with an existing adapter key on the BOSS-S2 controller
Issue: M.2 drive firmware update from iDRAC fails on unconfigured drives in systems containing a controller
with an existing adapter key.
Corrective
Action:
Clear the controller configuration in HII under Controller Information > Clear Configuration and
update the drive firmware.
Unconfigured drives in the BOSS-S2 controller is unavailable for operating system installation with an existing adapter key
Issue: Unconfigured drives in systems containing a controller with an existing adapter key is not exposed for
installing an operating system.
Corrective
Action:
Clear the controller configuration in HII under Controller Information > Clear Configuration and
initiate the operating system installation.
The ROM version for BOSS is reported as firmware version in IDRAC interface
Issue:
Corrective
Action:
Starting with BOSS-S2 A00 release, BOSS-S2 versions are tracked using the ROM version. Therefore,
iDRAC may report the ROM version as firmware version. For example, 2. 5.13. 4008 for A00.
This is an expected behavior and no action is required.
Unable to update the M.2 drive firmware by using iDRAC or Lifecycle Controller
Issue:
Corrective
Action:
Firmware update of M.2 drives using the iDRAC web interface fails when the drive is in foreign state.
Import the foreign configuration before updating the firmware of the drives.
BOSS-S2 CLI displays No Adapter Found error in Linux
Issue:
Probable Cause: Using the BOSS-S2 CLI, when you run the CLI commands using non-administrative user privileges, the
Corrective
Action:
36 Troubleshooting
BOSS-S2 CLI displays No Adapter Found error message in the Linux operating system.
error No Adapter found is displayed.
Use root/sudo administrator privilege while you run the CLI commands.
Page 37

LC log displays fan unavailability error
Issue: LC log displays The BOSS-S2 device does not have a fan installed in it error
message.
Probable Cause: Currently there is no fan requirement for BOSS-S2, which might be required in future based on M.2
thermal requirement.
Corrective
Action:
No action required. This error message can be ignored.
Physical disk size is not updated on iDRAC when CSIOR is disabled
Probable Cause: When Collect System Inventory on Reboot (CSIOR) is disabled, iDRAC displays partial information about
BOSS-S2 components.
Corrective
Action:
Ensure that CSIOR is enabled in iDRAC for the server to collect the system inventory on reboot.
NOTE: Ensure that the BOSS-S2 controller firmware and iDRAC firmware are updated to the latest
version.
Physical disk or virtual disk is indicated as missing on iDRAC when CSIOR is disabled
Probable Cause:
Corrective
Action:
When Collect System Inventory on Reboot (CSIOR) is disabled, iDRAC displays partial information about
BOSS-S2 components.
Ensure that CSIOR is enabled in iDRAC for the server to collect the system inventory on reboot.
NOTE: Ensure that the BOSS-S2 controller firmware and iDRAC firmware are updated to the latest
version.
The Back Ground Activity (BGA) task process in HII does not report real-time status
Issue:
Probable Cause: This is an expected firmware behavior, and there is no functionality loss.
Corrective
Action:
NOTE: BOSS-S2 Command Line Interface (CLI) and Dell EMC Open Manage Storage Services only report events for the
tasks that are completed.
Back Ground Activity (BGA) task progress in HII does not report the real-time status of running tasks.
It is recommended that you check the BOSS-S2 CLI for status.
Virtual disk related events are repeatedly generated in BOSS-S2 and OMSS
Issue:
Events related to virtual disk state will be generated twice in BOSS-S2 CLI and Open Manage Storage
Services (OMSS).
Troubleshooting 37
Page 38

Probable Cause: This occurs when Dell EMC PowerEdge Servers perform a cold reboot.
Corrective
Action:
These events can be safely ignored as there is no functionality loss.
Characters are limited when entering a virtual drive name
Issue: Limitation in the number of characters while creating a virtual disk name
Corrective
Action:
It is recommended that you use maximum of 10 characters while naming the virtual disk.
VMFS datastore is disabled from YX5X of PowerEdge systems that are shipped with VMware ESXi installed on BOSS-S2
Issue: Installation of ESXi on a BOSS-S2 device does not have VMFS datastore enabled by default, and disables
VMFS if you use a custom image for installation. This issue occurs when using ESXi version 6.5.x or later
on the BOSS-S2 card.
Corrective
Action:
When you have VMware ESXi installed on BOSS-S2, it is recommended that you use the BOSS-S2 device
only as a boot device and disable VMFS if you are installing a custom image. For more information, see
https://kb.vmware.com/s/article/2004582 and https://kb.vmware.com/s/article/2145210.
NOTE: The scratch partition is created and configured during VMware ESXi installation in addition to
boot support on BOSS-S2.
One or more physical disks are not detected by the operating system
Issue:
Probable Cause: A physical disk will not be presented to the operating system in the following scenarios:
Corrective
Action:
One or more physical disks are not detected by the operating system.
● There is RAID metadata on the physical disk and no RAID metadata on the controller.
● The BOSS-S2 controller has RAID metadata on it and the physical disk does not have the RAID
metadata on it.
If the RAID metadata is on the controller, follow the steps listed in Clear Controller Configuration.
If the RAID metadata is on the physical disk, follow the steps specified in Erase physical disk.
Alternatively, if you want to keep the RAID drive, refer to Virtual Disk Not visible to Operating System
Virtual disk is not detected by the operating system
Issue:
Probable Cause: Virtual disks will not be presented to the system if they are not native to the controller.
Corrective
Action:
In RAID mode a virtual disk is not appearing for use by an operating system.
Import the virtual disk via HII as specified in section Virtual Disk Import.
38 Troubleshooting
Page 39

An installed drive is not listed in the BOSS-S2 Configuration Utility
Issue: An installed drive is not listed in the BOSS-S2 configuration utility.
OpenManage reports Physical disk offline state.
Probable Cause: Drive is either in failure state or has corrupted firmware.
Corrective
Action:
Reseat drive to ensure drive is inserted correctly. If error persists, attempt to update drive firmware using
DUP. If error is still present, replace erroneous drive.
The BOSS-S2 card is not presented to the PowerEdge server
Issue: The BOSS-S2 card is not presented to the PowerEdge server.
Probable Cause: Hardware fault on the card.
Corrective
Action:
Replace the BOSS-S2 adapter.
Unable to boot to M.2 drive installed in slot 1
Issue:
Probable Cause: Working as designed, BIOS only allows booting from the first listed boot device, in this case, slot 0 per
Corrective
Action:
When two unconfigured bootable M.2 drives are inserted into the BOSS-S2 device, only the slot 0 drive
may be used as a boot drive.
peripheral controller. This only occurs in legacy BIOS boot mode.
Remove the drive from slot 1 and install it in slot 0.
Unsupported commands, options, and features are displayed by BOSS-S2 CLI with VMware CLI utility
Issue:
Probable Cause: CLI shows the same information on all Marvell products, but only implements the functions which are
Corrective
Action:
Several commands, options, or other features listed by the VMware CLI utility state that they are
unsupported when run.
pertinent to that platform or system.
Use the supported features. See Manage BOSS-S2 using CLI commands on page 33.
Unable to deploy ESXi on RAID 1 of BOSS-S2
Issue:
Probable Cause: If an unconfigured physical disk containing an ESXi partition is used in a virtual disk, any attempts to
Attempting to install ESXi on a RAID 1 results in an invalid partition table error.
install a partition of ESXi on this virtual disk will raise an error due to failure to clear out the previous
partition.
Troubleshooting 39
Page 40

Corrective
Action:
Delete the existing RAID 1, run erase physical disk on both drives, re-create the RAID 1 with quick
initialization ON, then attempt to reinstall ESXi on the virtual disk.
40 Troubleshooting
Page 41

10
Getting help
Topics:
• Recycling or End-of-Life service information
• Contacting Dell
• Receiving automated support with SupportAssist
Recycling or End-of-Life service information
Take back and recycling services are offered for this product in certain countries. If you want to dispose of system components,
visit www.dell.com/recyclingworldwide and select the relevant country.
Contacting Dell
Dell provides online and telephone based support and service options. If you do not have an active internet connection, you can
find Dell contact information on your purchase invoice, packing slip, bill or Dell product catalog. The availability of services varies
depending on the country and product, and some services may not be available in your area. To contact Dell for sales, technical
assistance, or customer service issues:
Steps
1. Go to www.dell.com/support/home.
2. Select your country from the drop-down menu on the lower right corner of the page.
3. For customized support:
a. Enter the system Service Tag in the Enter a Service Tag, Serial Number, Service Request, Model, or Keyword
field.
b. Click Submit.
The support page that lists the various support categories is displayed.
4. For general support:
a. Select your product category.
b. Select your product segment.
c. Select your product.
The support page that lists the various support categories is displayed.
5. For contact details of Dell Global Technical Support:
a. Click Global Technical Support.
b. The Contact Technical Support page is displayed with details to call, chat, or e-mail the Dell Global Technical Support
team.
Receiving automated support with SupportAssist
Dell EMC SupportAssist is an optional Dell EMC Services offering that automates technical support for your Dell EMC server,
storage, and networking devices. By installing and setting up a SupportAssist application in your IT environment, you can receive
the following benefits:
● Automated issue detection — SupportAssist monitors your Dell EMC devices and automatically detects hardware issues,
both proactively and predictively.
● Automated case creation — When an issue is detected, SupportAssist automatically opens a support case with Dell EMC
Technical Support.
Getting help 41
Page 42

● Automated diagnostic collection — SupportAssist automatically collects system state information from your devices and
uploads it securely to Dell EMC. This information is used by Dell EMC Technical Support to troubleshoot the issue.
● Proactive contact — A Dell EMC Technical Support agent contacts you about the support case and helps you resolve the
issue.
The available benefits vary depending on the Dell EMC Service entitlement purchased for your device. For more information
about SupportAssist, go to www.dell.com/supportassist.
42 Getting help
Page 43

Documentation resources
This section provides information about the documentation resources for your system.
To view the document that is listed in the documentation resources table:
● From the Dell EMC support site:
1. Click the documentation link that is provided in the Location column in the table.
2. Click the required product or product version.
NOTE: To locate the product name and model, see the front of your system.
3. On the Product Support page, click Manuals & documents.
● Using search engines:
○ Type the name and version of the document in the search box.
Table 7. Additional documentation resources for your system
Task Document Location
11
Setting up your system For more information about installing and
securing the system into a rack, see the Rail
Installation Guide included with your rail
solution.
For information about setting up your system,
see the Getting Started Guide document that
is shipped with your system.
Configuring your system For information about the iDRAC features,
configuring and logging in to iDRAC, and
managing your system remotely, see the
Integrated Dell Remote Access Controller
User's Guide.
For information about understanding Remote
Access Controller Admin (RACADM)
subcommands and supported RACADM
interfaces, see the RACADM CLI Guide for
iDRAC.
For information about Redfish and its protocol,
supported schema, and Redfish Eventing
implemented in iDRAC, see the Redfish API
Guide.
For information about iDRAC property
database group and object descriptions, see
the Attribute Registry Guide.
For information about Intel QuickAssist
Technology, see the Integrated Dell Remote
Access Controller User's Guide.
www.dell.com/poweredgemanuals
www.dell.com/poweredgemanuals
For information about earlier versions of the
iDRAC documents.
To identify the version of iDRAC available on
your system, on the iDRAC web interface,
click ? > About.
www.dell.com/idracmanuals
Documentation resources 43
Page 44

Table 7. Additional documentation resources for your system (continued)
Task Document Location
For information about installing the operating
system, see the operating system
documentation.
For information about updating drivers and
firmware, see the Methods to download
firmware and drivers section in this document.
Managing your system For information about systems management
software offered by Dell, see the Dell
OpenManage Systems Management Overview
Guide.
For information about setting up, using, and
troubleshooting OpenManage, see the Dell
OpenManage Server Administrator User’s
Guide.
For information about installing, using, and
troubleshooting Dell OpenManage Enterprise,
see the Dell OpenManage Enterprise User’s
Guide.
For information about installing and using Dell
SupportAssist, see the Dell EMC SupportAssist
Enterprise User’s Guide.
For information about partner programs
enterprise systems management, see the
OpenManage Connections Enterprise Systems
Management documents.
www.dell.com/operatingsystemmanuals
www.dell.com/support/drivers
www.dell.com/poweredgemanuals
www.dell.com/openmanagemanuals >
OpenManage Server Administrator
https://www.dell.com/openmanagemanuals
https://www.dell.com/serviceabilitytools
www.dell.com/openmanagemanuals
Working with the Dell
PowerEdge RAID controllers
Understanding event and
error messages
Troubleshooting your
system
For information about understanding the
features of the Dell PowerEdge RAID
controllers (PERC), Software RAID controllers,
or BOSS card and deploying the cards, see the
Storage controller documentation.
For information about the event and error
messages generated by the system firmware
and agents that monitor system components,
go to qrl.dell.com > Look Up > Error Code,
type the error code, and then click Look it up.
For information about identifying and
troubleshooting the PowerEdge server issues,
see the Server Troubleshooting Guide.
www.dell.com/storagecontrollermanuals
www.dell.com/qrl
www.dell.com/poweredgemanuals
44 Documentation resources
 Loading...