

Page 1
Setting Up Your Monitor
Setup litres Monitors | Installation de votre moniteur | Instalación de su monitor |
Ustawianie monitora | Instalagao do monitor | Impostazione del monitor
CAUTION:
Before setting up your Dell™ monitor,
see the safety instructions that ship
with your monitor.
Bevor Sie Ihren DelF^Computer einrichten
und in Betrieb nehmen, beachten Sie bitte
die Sicherheitsanweisungen, die mit Ihrem
Computer mitgeliefert werden.
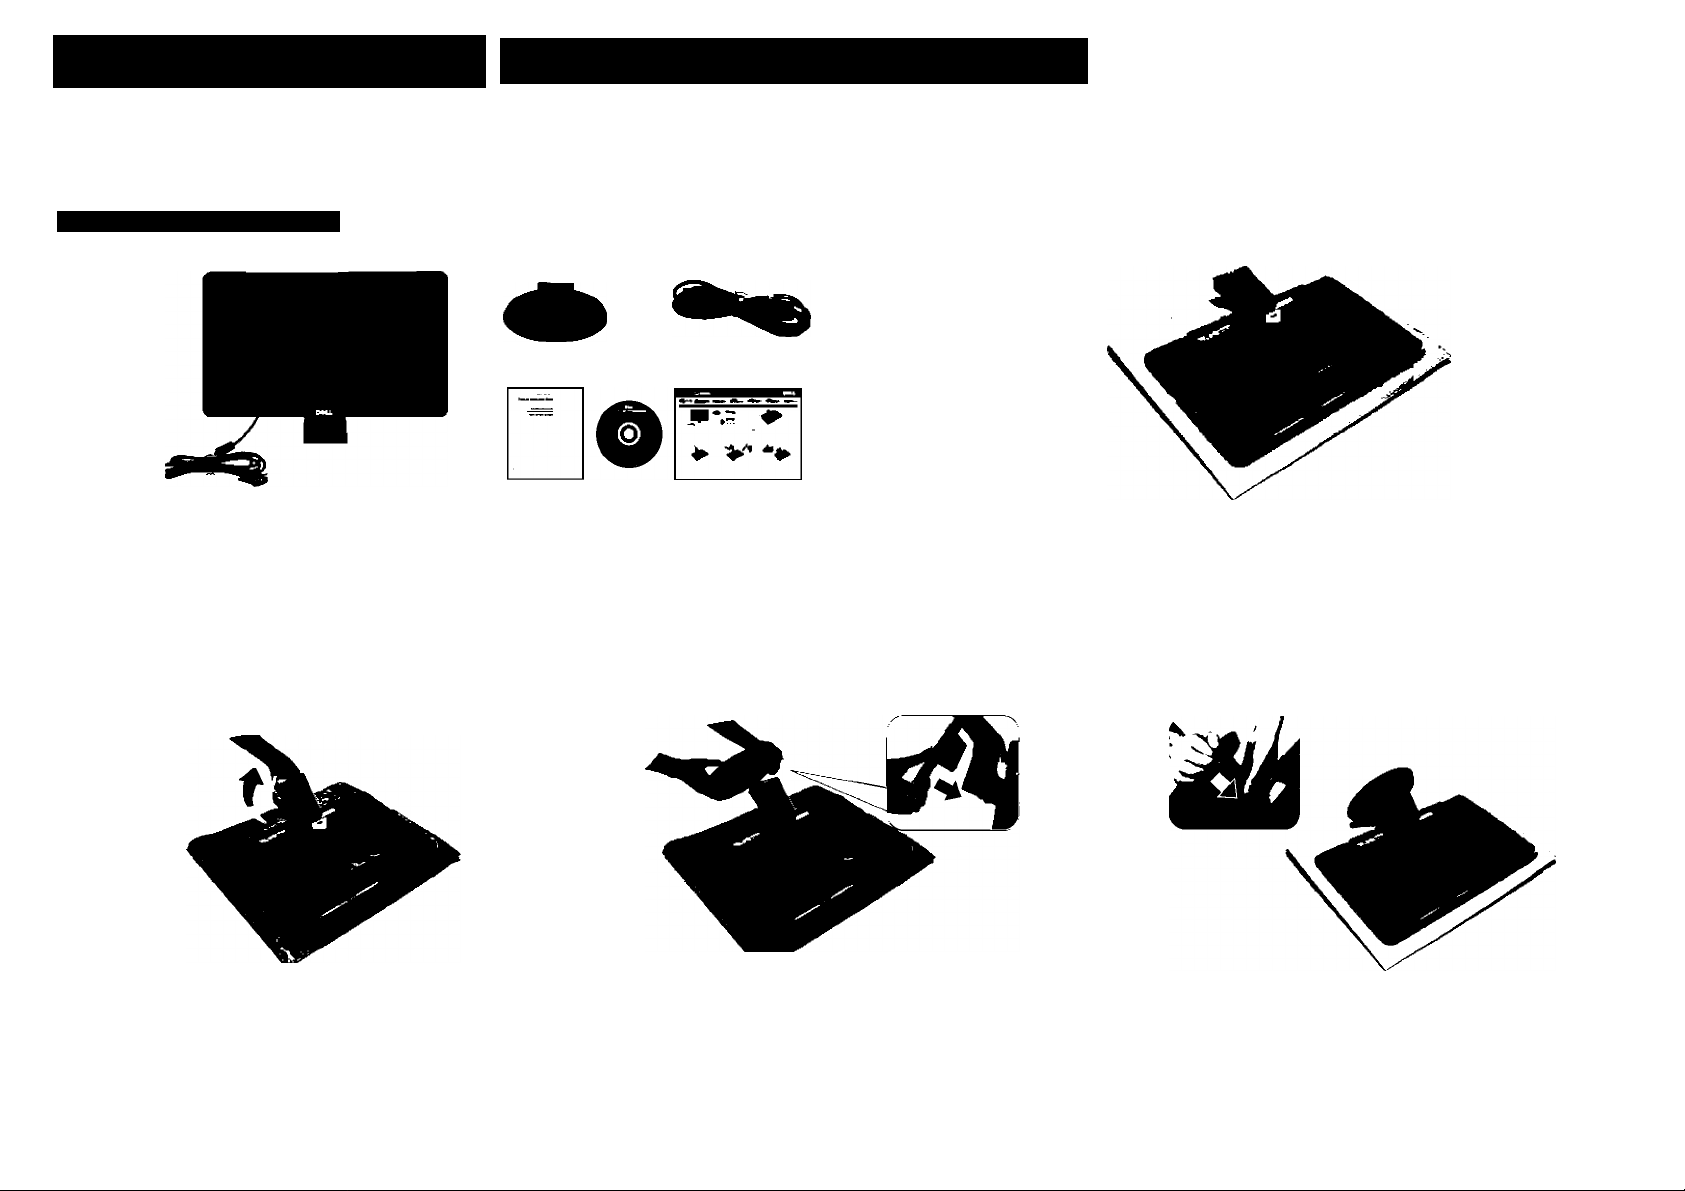
Dell™ S1909WN Fiat Panel Monitor
t Verify the contents of the box
Überprüfen Sie den Lieferumfang
Vérifiez le contenu de la boîte
Verifique los contenidos de la caja
Sprawdz zawartesc opakowanla
Verifique o conteùdo da caixa
Verificare il contenuto della scatola
VORSICHT:
Jè ATTENTION:
Avant de configurer et d'utiliser votre
ordinateur Dell™, consuitez les précautions
de sécurité livrées avec votre moniteur.
Jà PRECAUCIÓN:
Antes de configurar y utilizar su equipo
Dell™, consulte las instrucciones de
seguridad que se entregan con el mismo.
Jà OSTRZEZENIE:
Przed ustawíeniem i uruchomíeniem komputera
Dell™, sprawdz instrukcje bezpieczenstwa
dostarczone razem z monitorem.
Já CUIDADO:
Antes de vocé ajustar e operar seu computador
Dell™, veja as ínstrugSes de seguranza
que sio enviadas com seu monitor.
2 Remove the cover and place the monitor on it
Nehmen Sie die Abdeckung ab, und stellen Sie den Monitor darauf
Enievez le cache et placez le moniteur dessus
Extraiga la cubierta y coloque el monitor sobre ella
Zdejmlj poktywg I ustaw na niej monitor
Retire a cobertura e coloque o monitor sobre a mesma
Rimuovere la copertura e collocarvi spora il monitor
Jà ATTENZIONE:
Prima di installare ed usare il computer
Dell™, leggere le istruzioni dì sicurezza
fornite in dotazione al monitor.
3 Lift the monitor stand
Heben Sie den Monitorständer an
Soulevez l'embase du moniteur
Levante el soporte del monitor
Unies wspornik monitora
Levante o suporte do monitor
Sollevare la base del monitor
4 Attach the base to the stand
Befestigen Sie die Unterseite am Ständer
Fixez I'embase sur le support
Coloque la base en el soporte
POdi^cz podstawg do wspornika
Prenda a base no suporte
Attaccare la base al supporto
5 Push the hook to lock the stand base
Zum Fixleren der FuBbasIs Verriegelung niederdrücken
Enfoncez le crochet pour verrouiller l'embase du support
Presione el gancho para bloquear la base del soporte
Wcisnij haczykw celu zablokowania podtoza podstawy
Pressione oganchopara bloquear a base do suporte
Premere II gancio per bloccare la base del supporto
Page 2
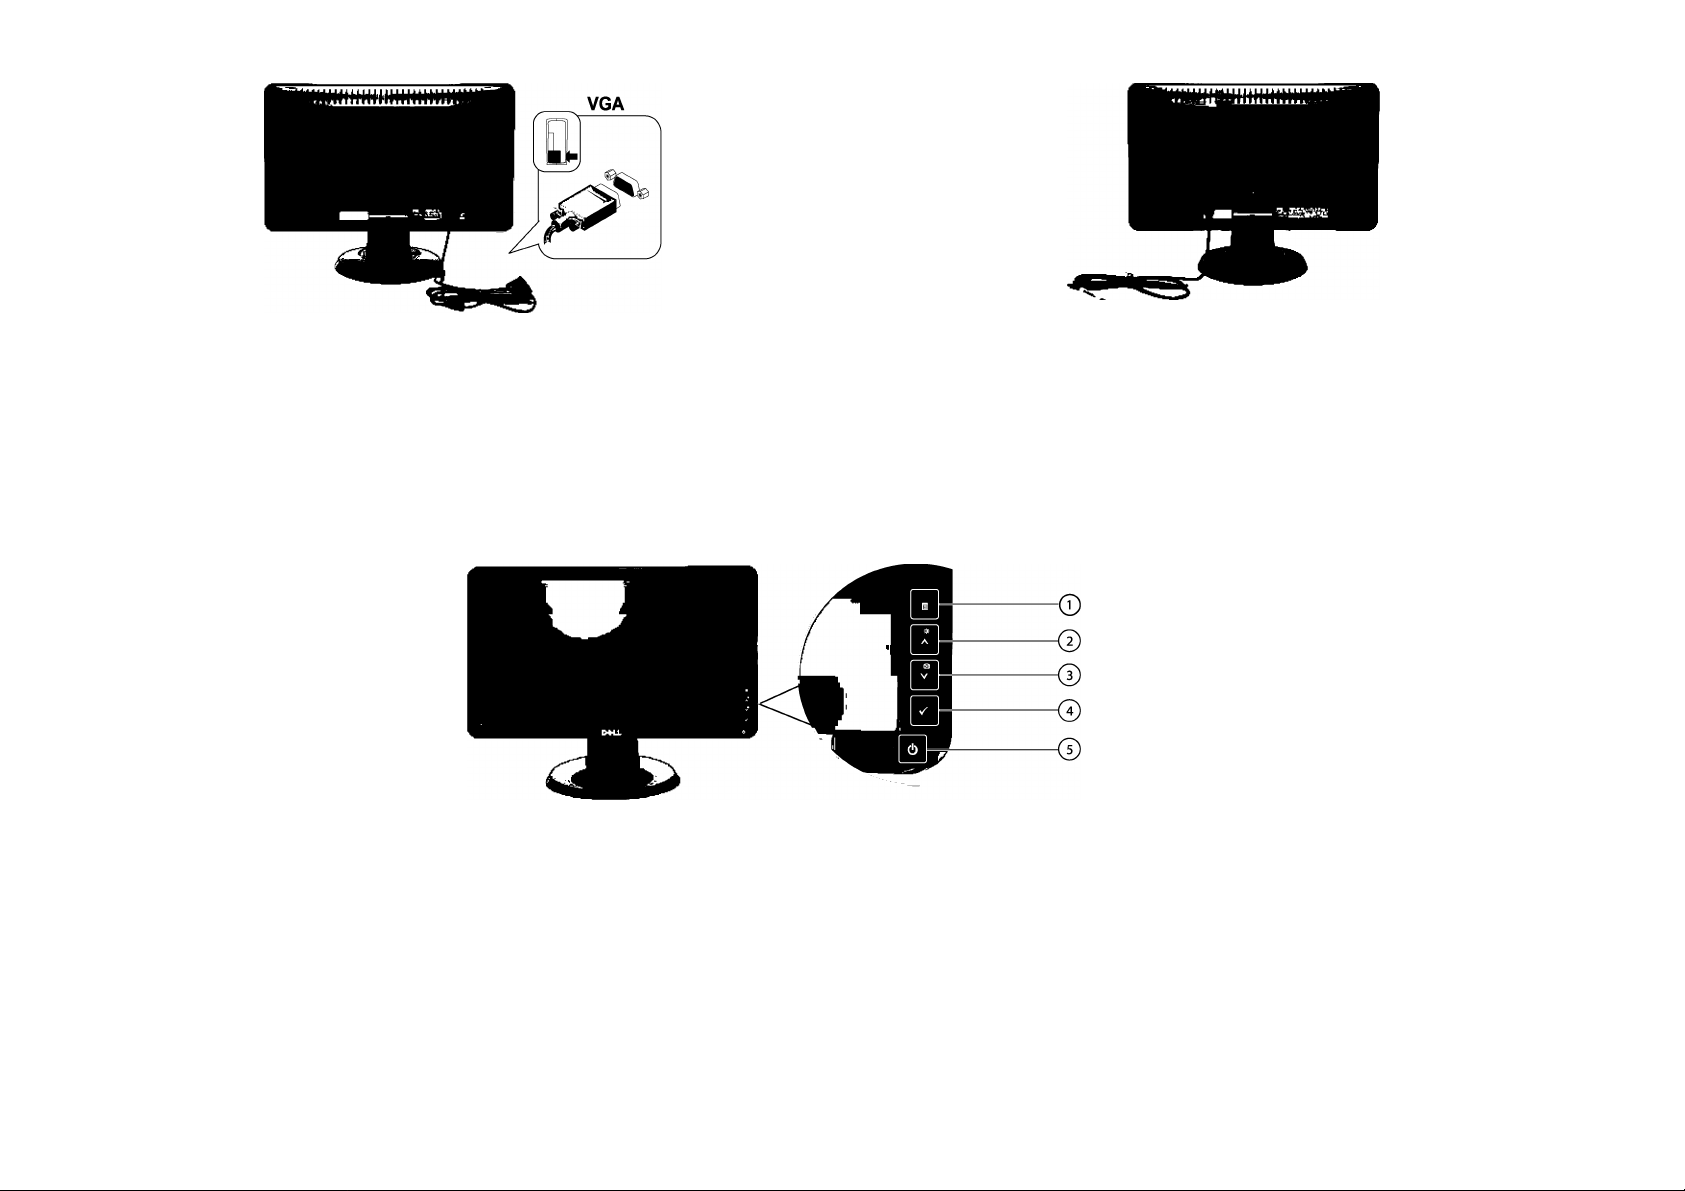
ß Connect the monitor using the Blue VGA cable
Connect the power cable and press the power button
Verbinden Sie das blaue VGA-Kabel mit Ihrem Computer
Reliez le câble VGA bleu à l'ordinateur
Conecte el cable VGA azul al equipo
Podta.czyc niebieski kabel VGA do komputera
Conecte o cabo VGA azul ao computador
Collegare il cavo blu VGAal computer
1. Menu/Exit
2. Brightness and contrast/ Up
3. Auto adjust/Down
4. Select
5. Power Button
(with power light indicator)
1. Menü/Ausspringen
2. Helligkeit und Kontrast/Erhöhen
3. Automatische Einstellung/
Verringern
4. Wählen
5. Netzschalter (mit Netzanzeige)
1. Menu / Quitter
2. Luminosité et contraste / Haut
3. Réglage Auto/Bas
4. Choix
5. Bouton d'alimentation
(Avec témoin lumineux d'alimentation)
1. Menú/Salir
2. Aumentar brillo / contraste
3. Ajuste automático/ Reducir
4. Seleccionar
5. Botón de encendido
(con indicador luminoso)
Schließen Sie das Netzkabel an, und drücken Sie den Netzschalter.
Branchez le câble d'alimentation et appuyez sur le bouton d'alimentation
Conecte el cable de alimentación y presione el botón de encendido
Podtqcz kabel zasilajqcy i nacisnij przyciskzasilania
Conecte o cabo de energia e pressione o botâo de energia
Collegare il cavo d'alimentazione e premere il tasto d'accensione
1. Menu/Wyjscie
2. Jasnosc i kontrast/W gore
3. Automatyczna regulacja / W dói
4. Wybór
5. Przyciskzasilania
(ze wskaznikiem zasilania)
1. Menu/Sair
2. Brilho e contraste / Para cima
3. Ajuste automático / Para baixo
4. Selecionar
5. Botâo de Energia
(com indicador de luz para energia)
1. Menu/Uscita
2. Luminosità e contrasto/Su
3. Regolazione automatica / Giù
4. Selezione
5. Tasto d'accensione
(con indicatore luminoso)
NOTE: For more information see the User’s
Guide in the Drivers and Documentation
media that ships with your monitor.
HINWEIS: Weitere Informationen finden Sie
im Benutzerhandbuch im Medium "Treiber
und Dokumentation", das mit Ihrem Monitor
mitgeliefert wird.
REMARQUE : Pour plus d'informations consultez
le Guide Utilisateur sur le support Pilotes et
documentation livré avec votre moniteur.
NOTA: para más información, consulte el
Manual del usuario en el medio de Documentación
y controladores que incluye su monitor.
UWAGA: W celu uzyskania dalszych informacji,
patrz Podrecznik uzytkownika na nosniku
Drivers and Documentation (Sterowñiki i
Dokumentacja) dostarczonym z monitorem.
0BSERVAÇÀ0.: Para mais informaçôes veja
Guia do Usuàrio na mídia Drivers e
Documenlaçâo que é enviada junto ao seu monitor.
NOTA: Per altre informazioni, fare riferimento
alla Guida all’uso, del supporto Drivers and
User Documentation (Driver e Documentazione)
fornito in dotazione al monitor
Printed in China.
Printed on recycied paper.
O
506280008701 R(A)XX
(DELL P/N:N413G Rev.AOO)
D«LL'
in this document is subject to
change without notice.
© 2008 Dell Inc. All rights reserved.
Reproduction of these materials in any manner
whatsoever without the written permission of
Dell Inc. Is strictly forbidden.
Dell and the DELL logo are trademarks of Dell Inc..
Dell disclaims proprietary interest In the marks and
names of others.
Les iniormations contenues dans ce document
sont sujettes à m
©2008 Dell Inc. tous di
La reproduction de ces contenus de quelque
façon sans la permission écrite de
Dell Inc. est strictement Interdite.
Dell Inc.. Dell renonce à tout Intérêt de propriété dans
les marques et noms des autres.
La información de este documento se encuentra
sujeta a cambios sin aviso previo.
©2008 Dell Inc. Todos los derechos reservados.
La reproducción de dichos materiales sin permiso
por escrito de Dell Inc. queda terminantemente
prohibida.
As iniormagóes neste documento estào sujeitas a alteragóo
sem aviso.
©2008 Dell Ine. Todo os dir
A reproduçâo destes materials em qualquer maneira sem
a permissào escrita da Dell Ine. é estritamente prolbida.
A Dell nega qualquer Interesse de proprìedade em marcas
e nomes di
la Dell Ine..
Änderung der Informationen in diesem Dokument
jederzeit Vorbehalten.
© 2008 Dell Inc. Alle Rechte Vorbehalten.
Die Reproduzierung dieser Materialien unter Irgendeiner
Form Ohre die schriftliche Erlaubnis von Dell Inc.
ist strengstens verboten.
Dell und das DELL Logo sind Warenzeichen von Dell Inc..
Dell hat keine Eigentumsre
Namen anderer Inhaber.
www.dell.com | support.dell.com
Le informazioni di questo documento sono soggette
a cambiamenti senza preavviso.
©2008 Dell Ine. Tutti i diritti sono riservati..
della Dell Ine.. Dell nega ogni interesse di proprietà in
marchi e nomi diversi dal proprio.
Informacje zawarte w niniejszym dokumencie
podlegajq zmianom bez uprzedzenia.
©2008 Dell Ine. Wszystkie prawa zatrzezone.
Powielanie tych materiatów w jakikóiwiek sposób
bez pisemnej zgody Dell Ine. jest surowo zabronlone.
Dell i lego DELL sa zastrzeionymi znakami towarowymi
Dell Ine.. Firma Dell zaprzecza zainteresowaniu prawami
wlasnoéci do marek I nazw naiezqcych do innych.
PaYdziernik2008
 Loading...