

Page 1

Precision 3640 Tower
Setup and Specifications
0.0.0.0
Regulatory Model: D24M
Regulatory Type: D24M004
May 2020
Rev. A00
Page 2

Notes, cautions, and warnings
NOTE: A NOTE indicates important information that helps you make better use of your product.
CAUTION: A CAUTION indicates either potential damage to hardware or loss of data and tells you how to avoid the
problem.
WARNING: A WARNING indicates a potential for property damage, personal injury, or death.
© 2020 Dell Inc. or its subsidiaries. All rights reserved. Dell, EMC, and other trademarks are trademarks of Dell Inc. or its subsidiaries. Other
trademarks may be trademarks of their respective owners.
Page 3

Contents
1 Set up your computer................................................................................................................... 5
2 Chassis...................................................................................................................................... 10
Front view............................................................................................................................................................................. 10
Back view.............................................................................................................................................................................. 12
3 Specifications of Precision 3640 Tower........................................................................................ 13
Dimensions and weight........................................................................................................................................................13
Processors.............................................................................................................................................................................13
Chipset...................................................................................................................................................................................14
Operating system................................................................................................................................................................. 14
Memory................................................................................................................................................................................. 14
Ports and connectors.......................................................................................................................................................... 15
Communications...................................................................................................................................................................16
Audio...................................................................................................................................................................................... 17
Storage.................................................................................................................................................................................. 17
Optical Disk Drive (ODD)...............................................................................................................................................18
Media-card reader..........................................................................................................................................................19
Power supply unit.................................................................................................................................................................19
Video..................................................................................................................................................................................... 20
Add-in cards..........................................................................................................................................................................21
Security..................................................................................................................................................................................21
Regulatory............................................................................................................................................................................. 21
Data security........................................................................................................................................................................ 22
Environmental...................................................................................................................................................................... 22
Computer environment.......................................................................................................................................................22
4 System setup.............................................................................................................................24
BIOS overview..................................................................................................................................................................... 24
Entering BIOS setup program............................................................................................................................................24
Boot menu............................................................................................................................................................................ 24
Navigation keys....................................................................................................................................................................24
Boot Sequence.................................................................................................................................................................... 25
System setup options......................................................................................................................................................... 25
Assigning a system setup password................................................................................................................................. 29
Deleting or changing an existing system setup password............................................................................................. 30
Clearing CMOS settings/RTC reset................................................................................................................................. 30
Clearing BIOS (System Setup) and System passwords................................................................................................. 31
5 Software................................................................................................................................... 32
Downloading Windows drivers...........................................................................................................................................32
System device drivers...................................................................................................................................................32
Serial IO driver................................................................................................................................................................32
Security drivers.............................................................................................................................................................. 32
Contents 3
Page 4

USB drivers.....................................................................................................................................................................32
Network adapter drivers...............................................................................................................................................33
Realtek Audio................................................................................................................................................................. 33
Storage controller..........................................................................................................................................................33
6 Getting help and contacting Dell..................................................................................................34
4 Contents
Page 5
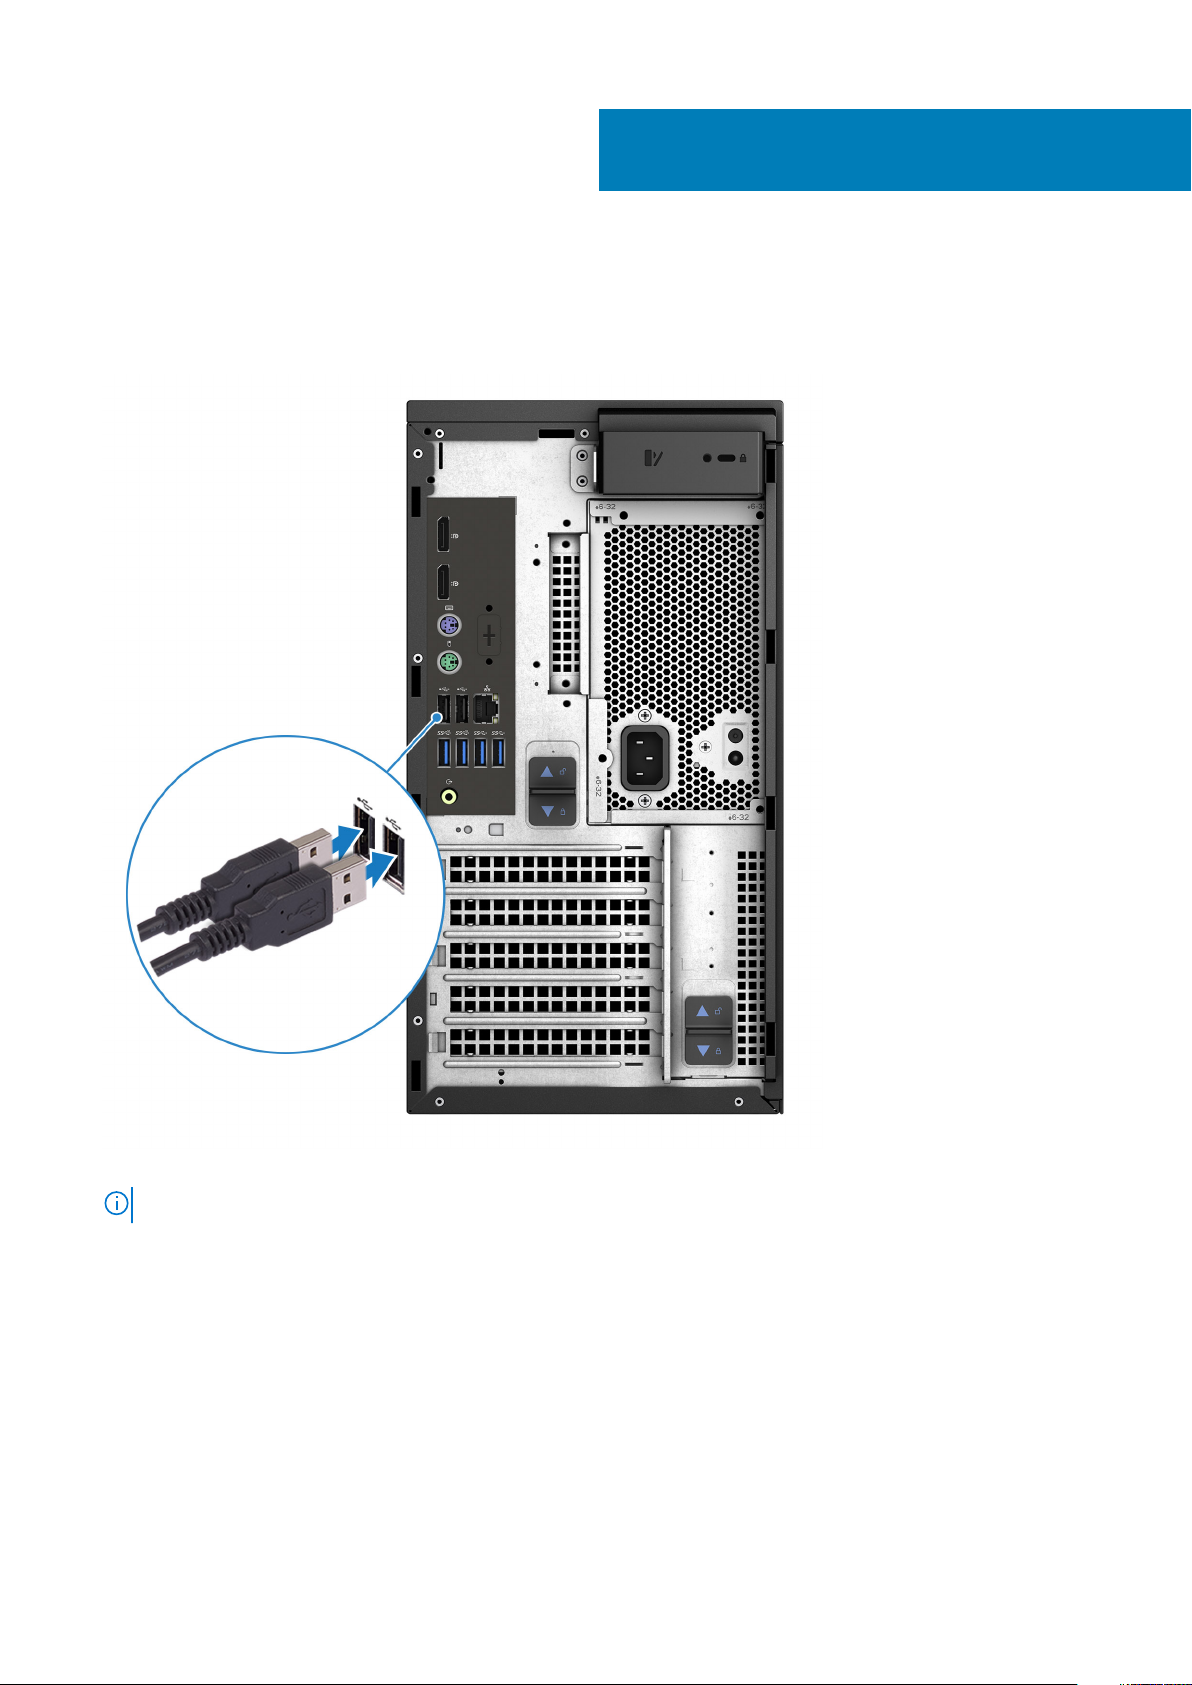
Steps
1. Connect the keyboard and mouse.
1
Set up your computer
2. Connect to your network using a cable, or connect to a wireless network.
NOTE: The wireless network card is optional and needs to be purchased separately.
Set up your computer 5
Page 6
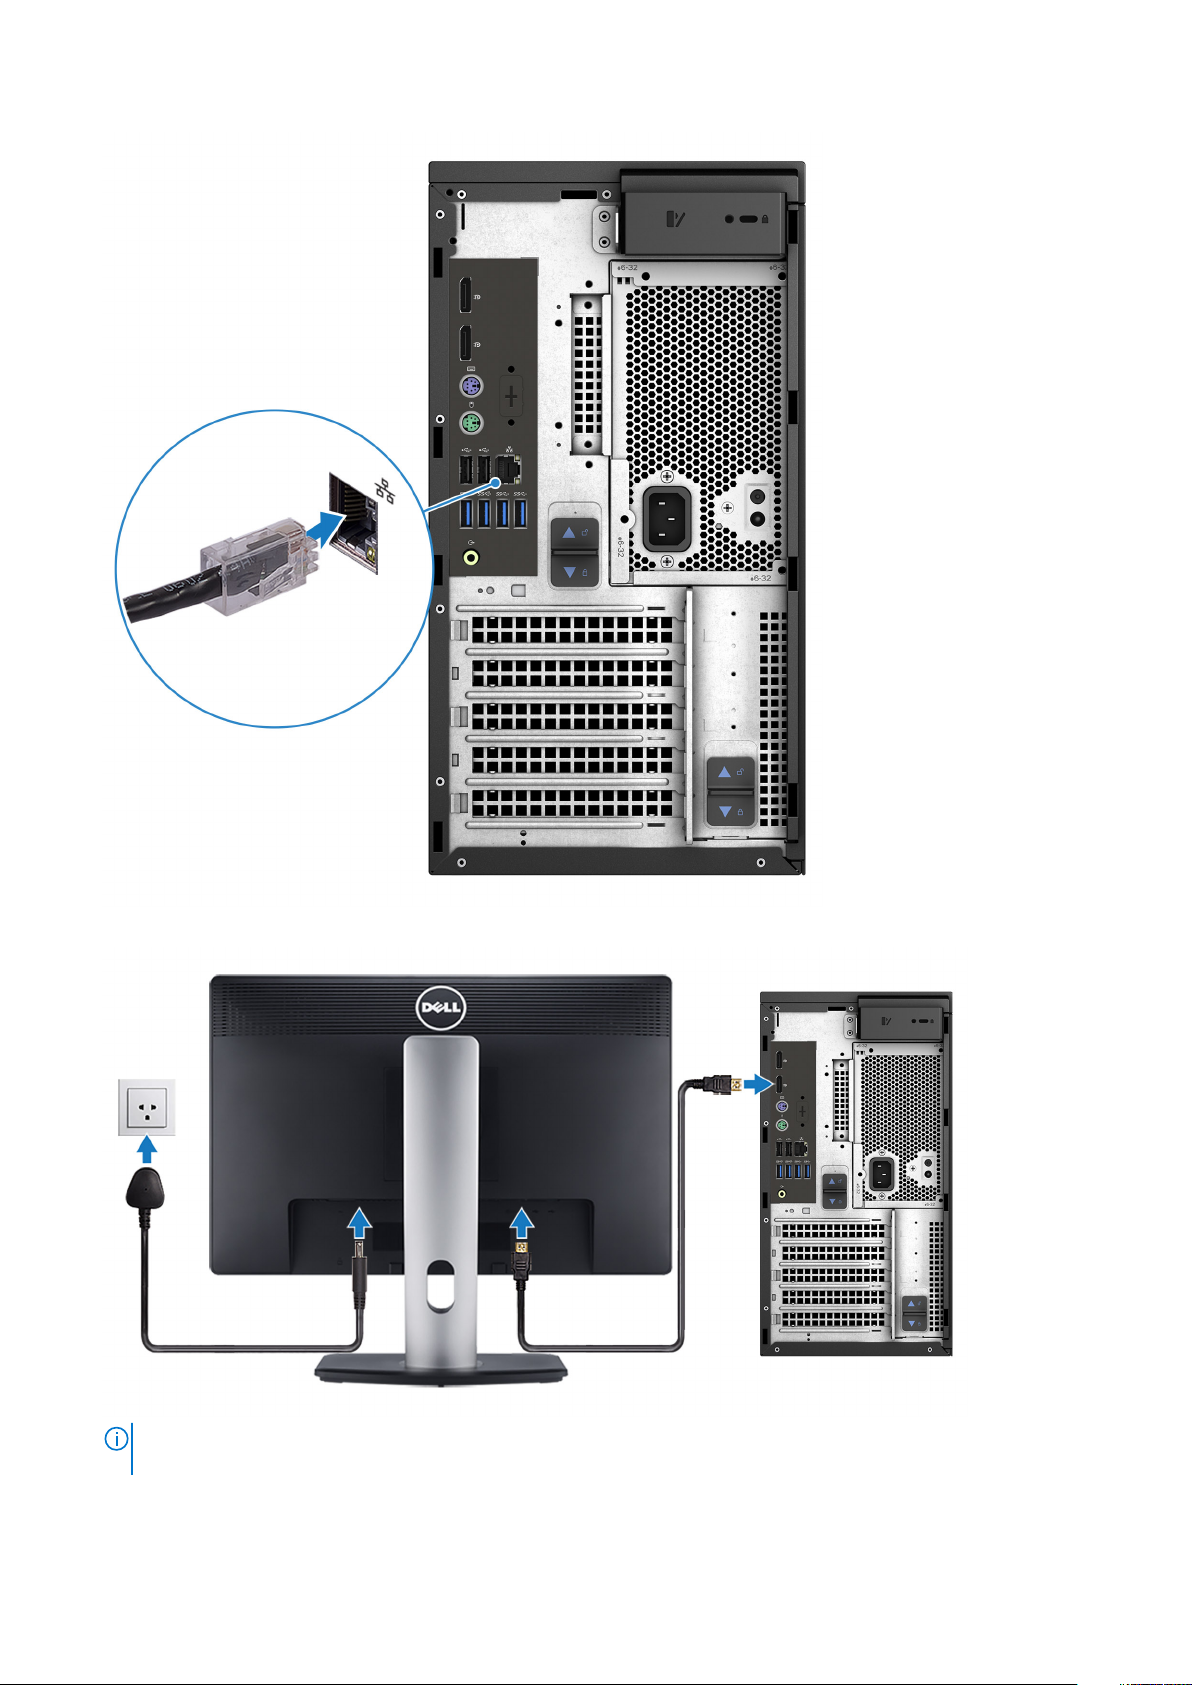
3. Connect the display.
NOTE:
If you ordered your computer with a discrete graphics card, the HDMI and the display ports on the back panel
of your computer are covered. Connect the display to the discrete graphics card.
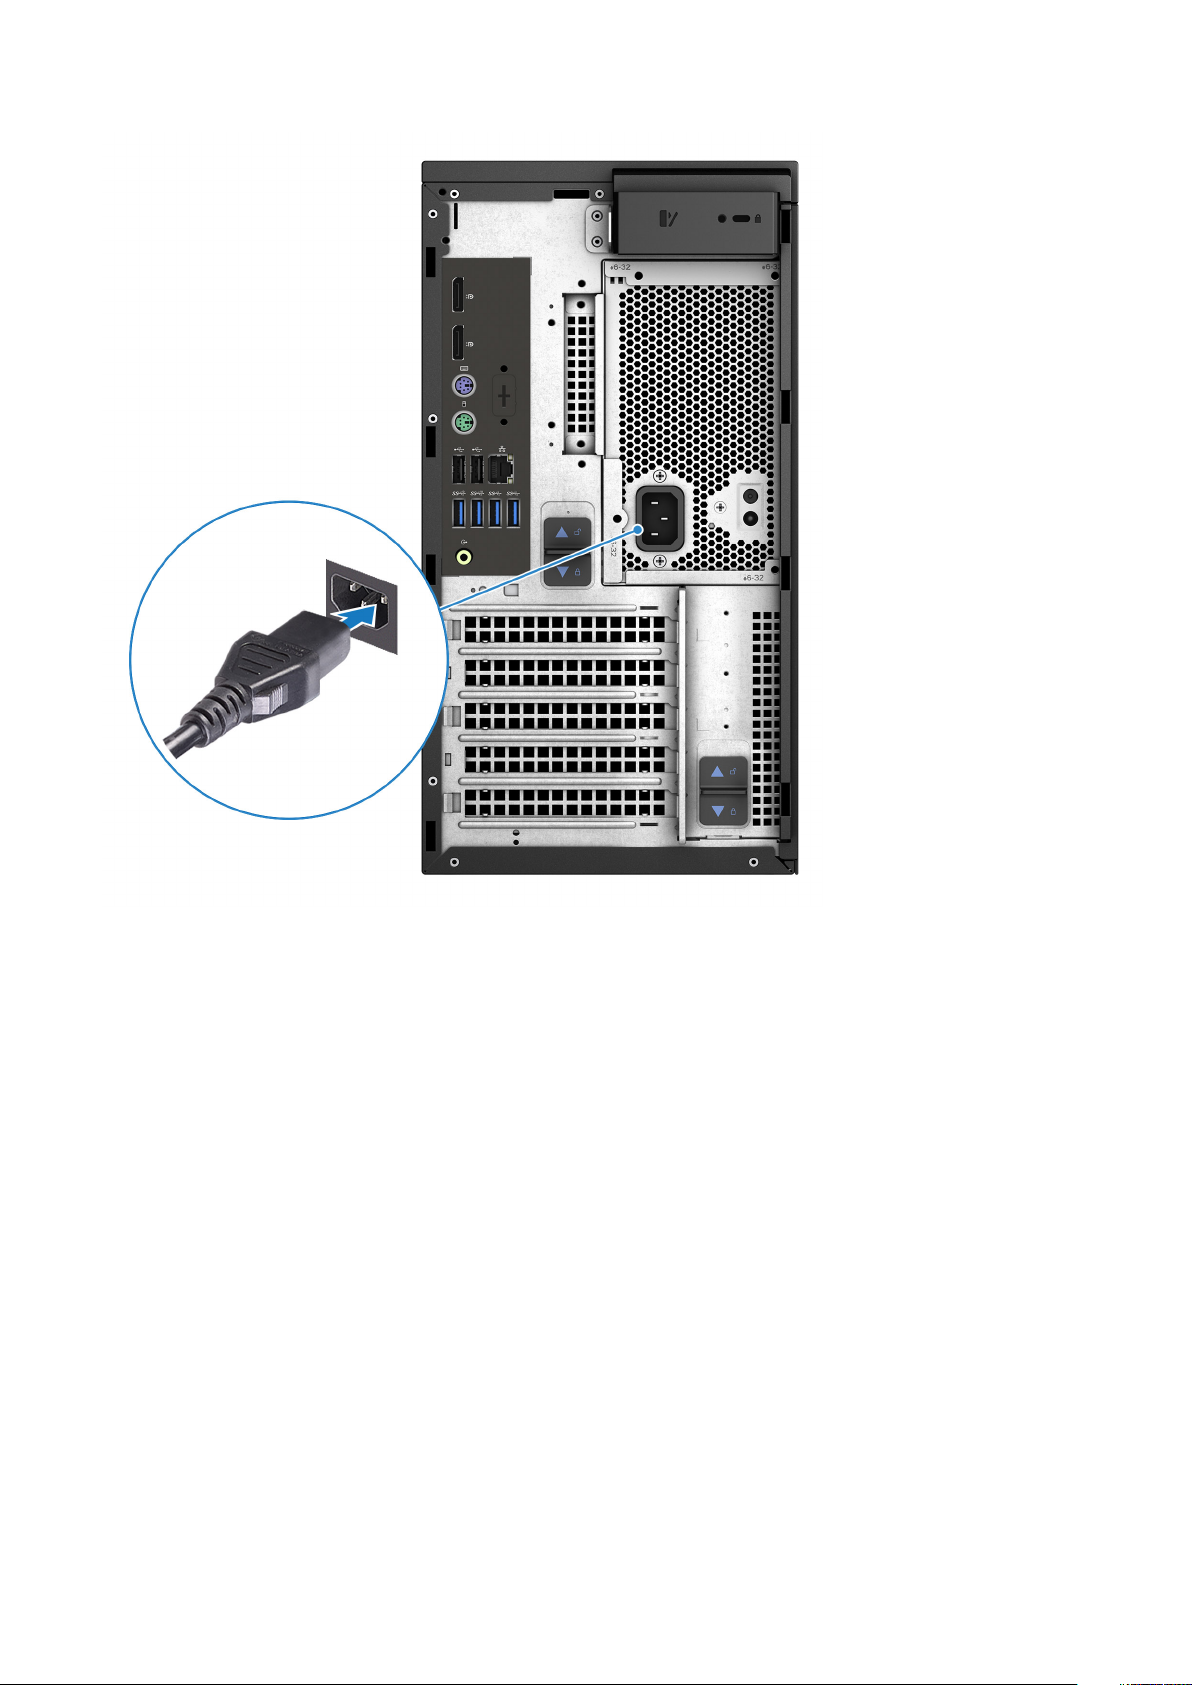
4. Connect the power cable.
6
Set up your computer
Page 7
5. Press the power button.
Set up your computer
7
Page 8
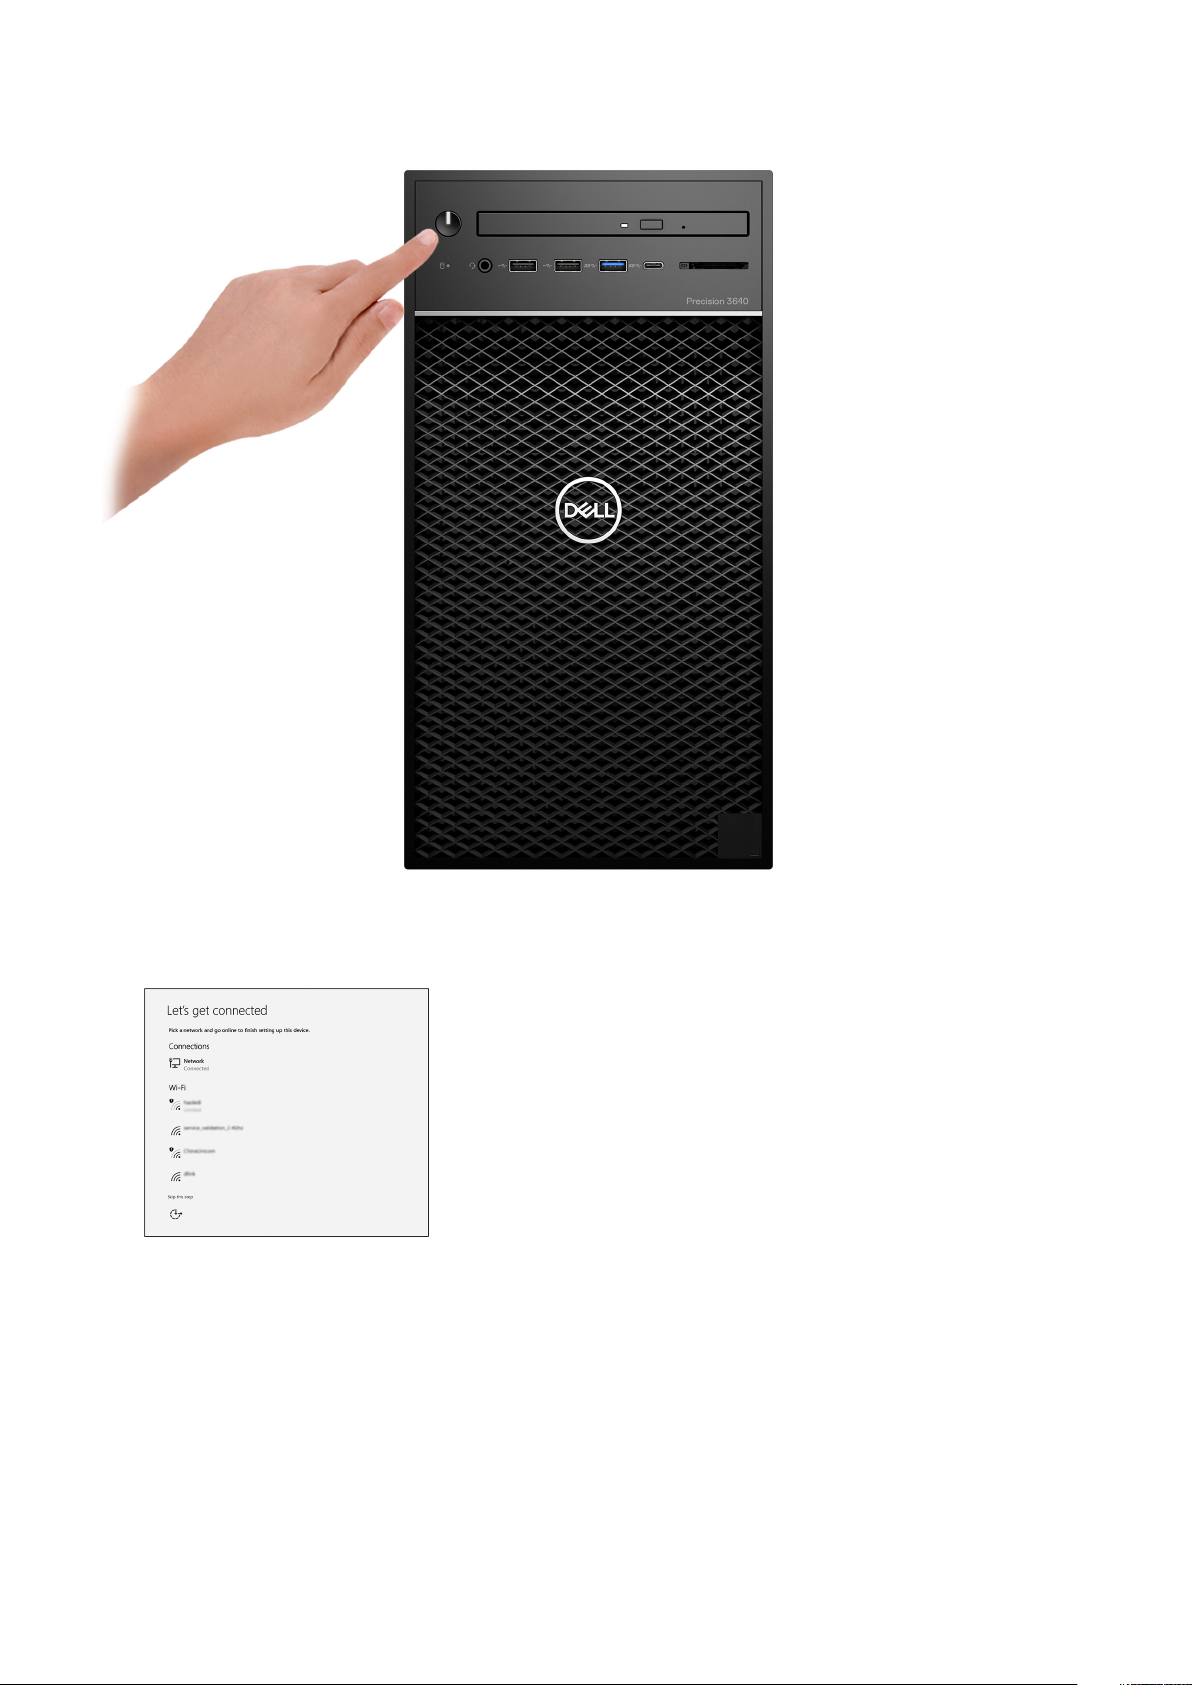
6. Follow the instructions on the screen to finish Windows setup:
a. Connect to a network.
b. Sign-in to your Microsoft account or create a new account.
8
Set up your computer
Page 9
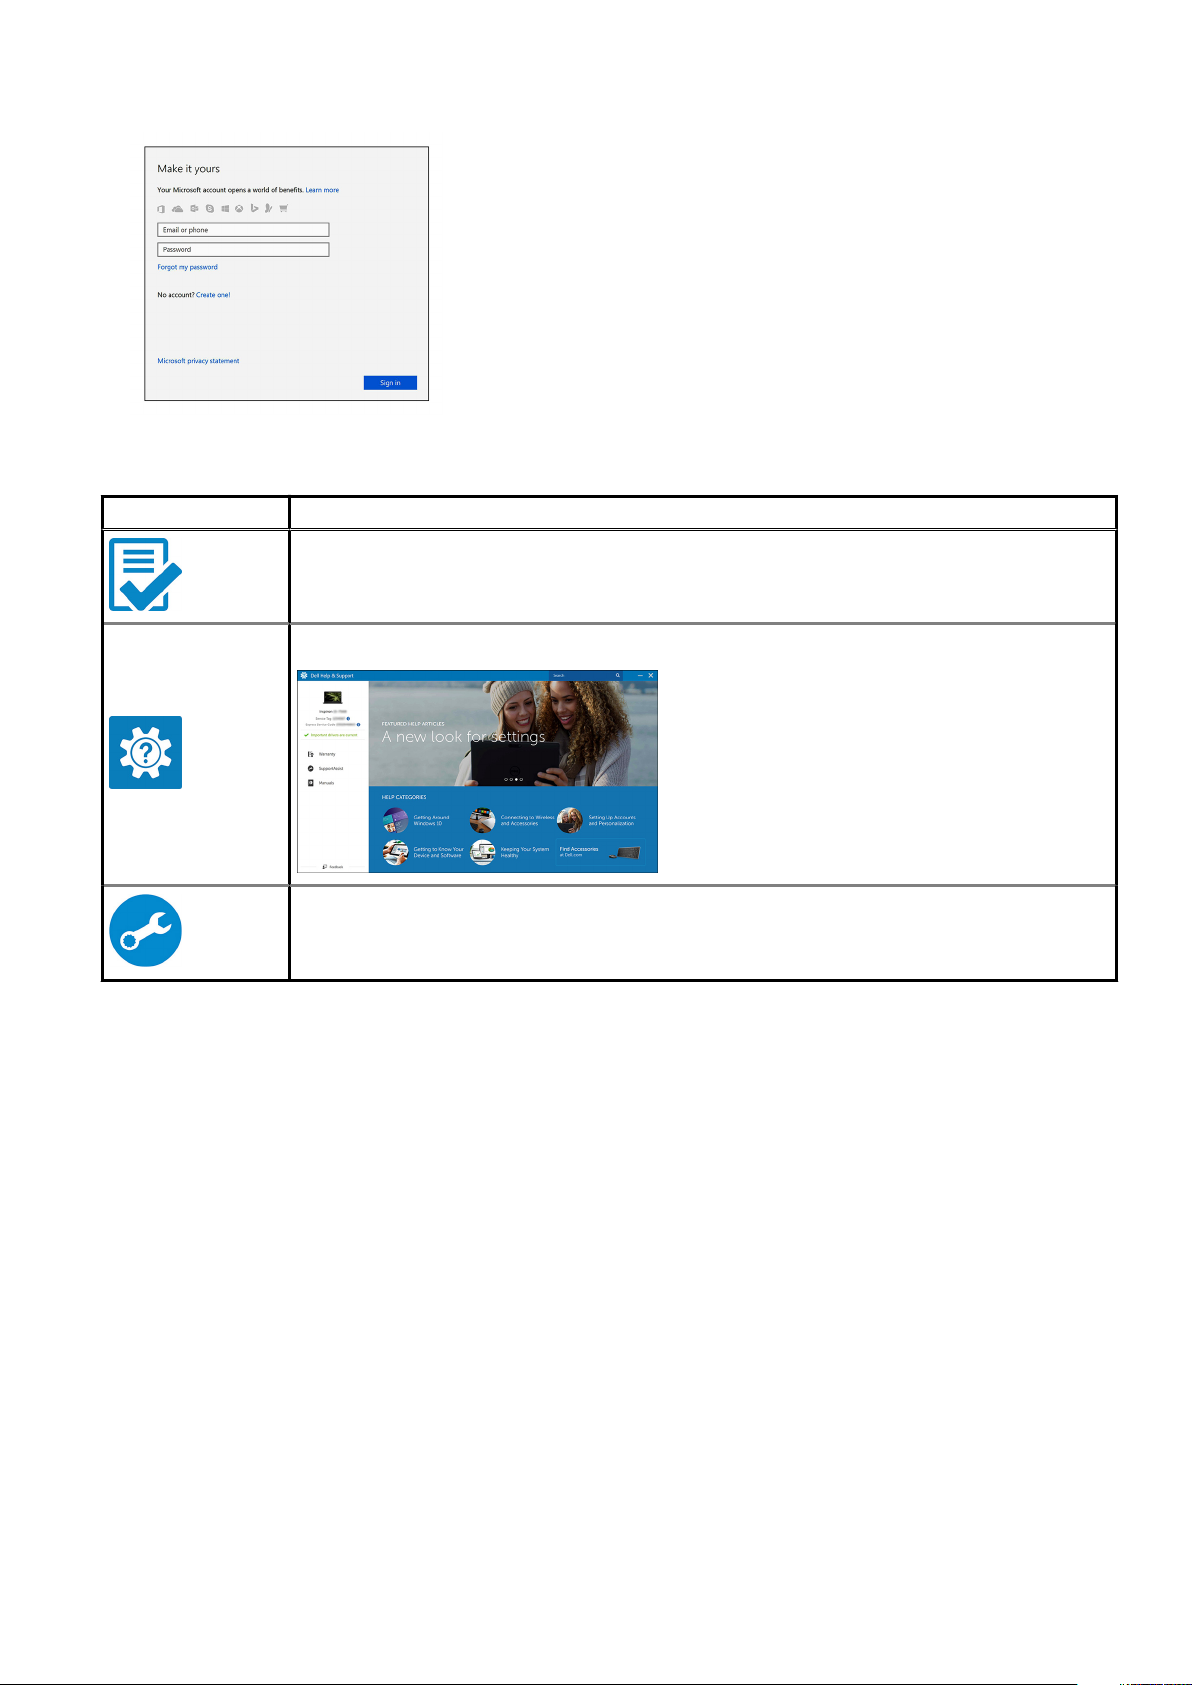
7. Locate Dell apps.
Table 1. Locate Dell apps
Icons Functions
Register your computer
Dell Help & Support
SupportAssist — Check and update your computer
Set up your computer 9
Page 10
Chassis
This chapter illustrates the multiple chassis views along with the ports and connectors and also explains the FN hot key combinations.
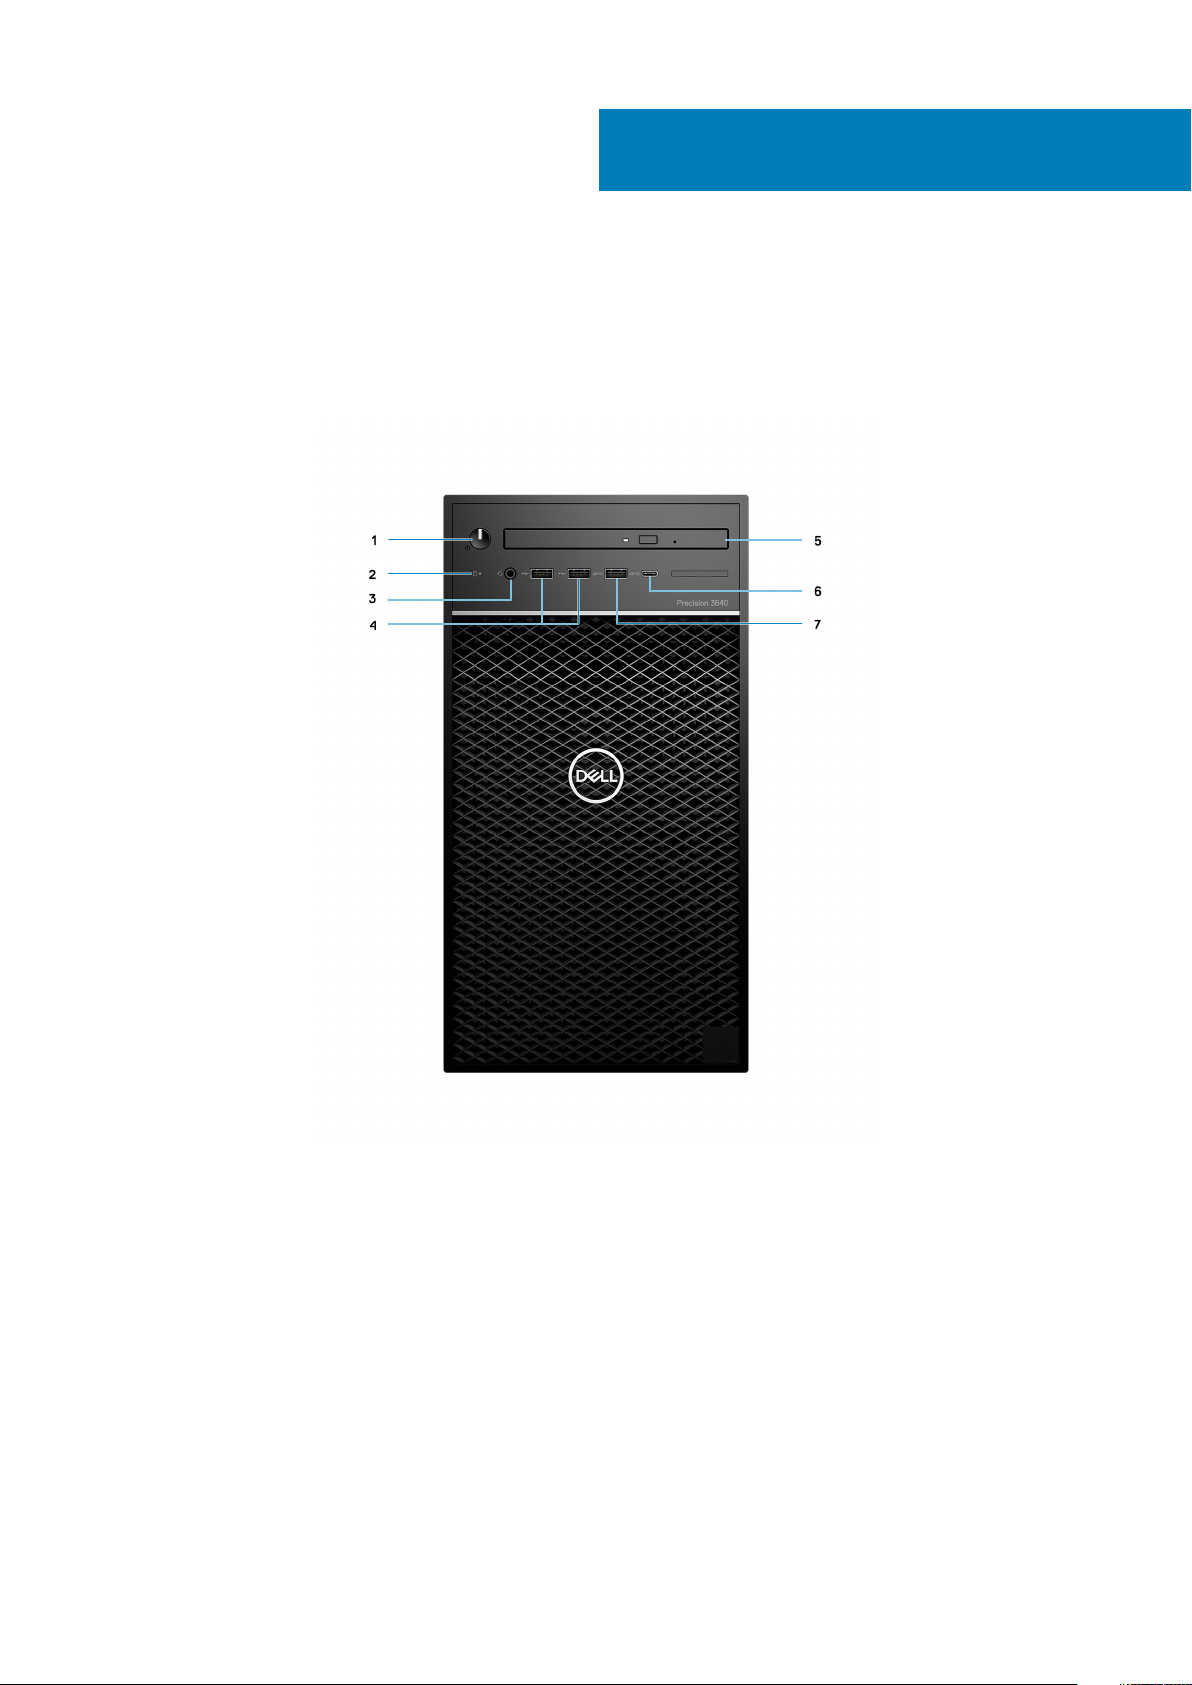
Front view
2
Figure 1. Front view with standard I/O configuration
1. Power button/Diagnostics indicator
2. Hard drive activity LED
3. 3.5 mm stereo headset/mic combo
4. 2x USB 2.0 Type-A ports
5. Optical drive/CAC Reader (Optional)
6. USB 3.2 Type C Gen2 (10 Gbps), with PowerShare
7. USB 3.2 Type A Gen1 (5 Gbps), with PowerShare
10 Chassis
Page 11
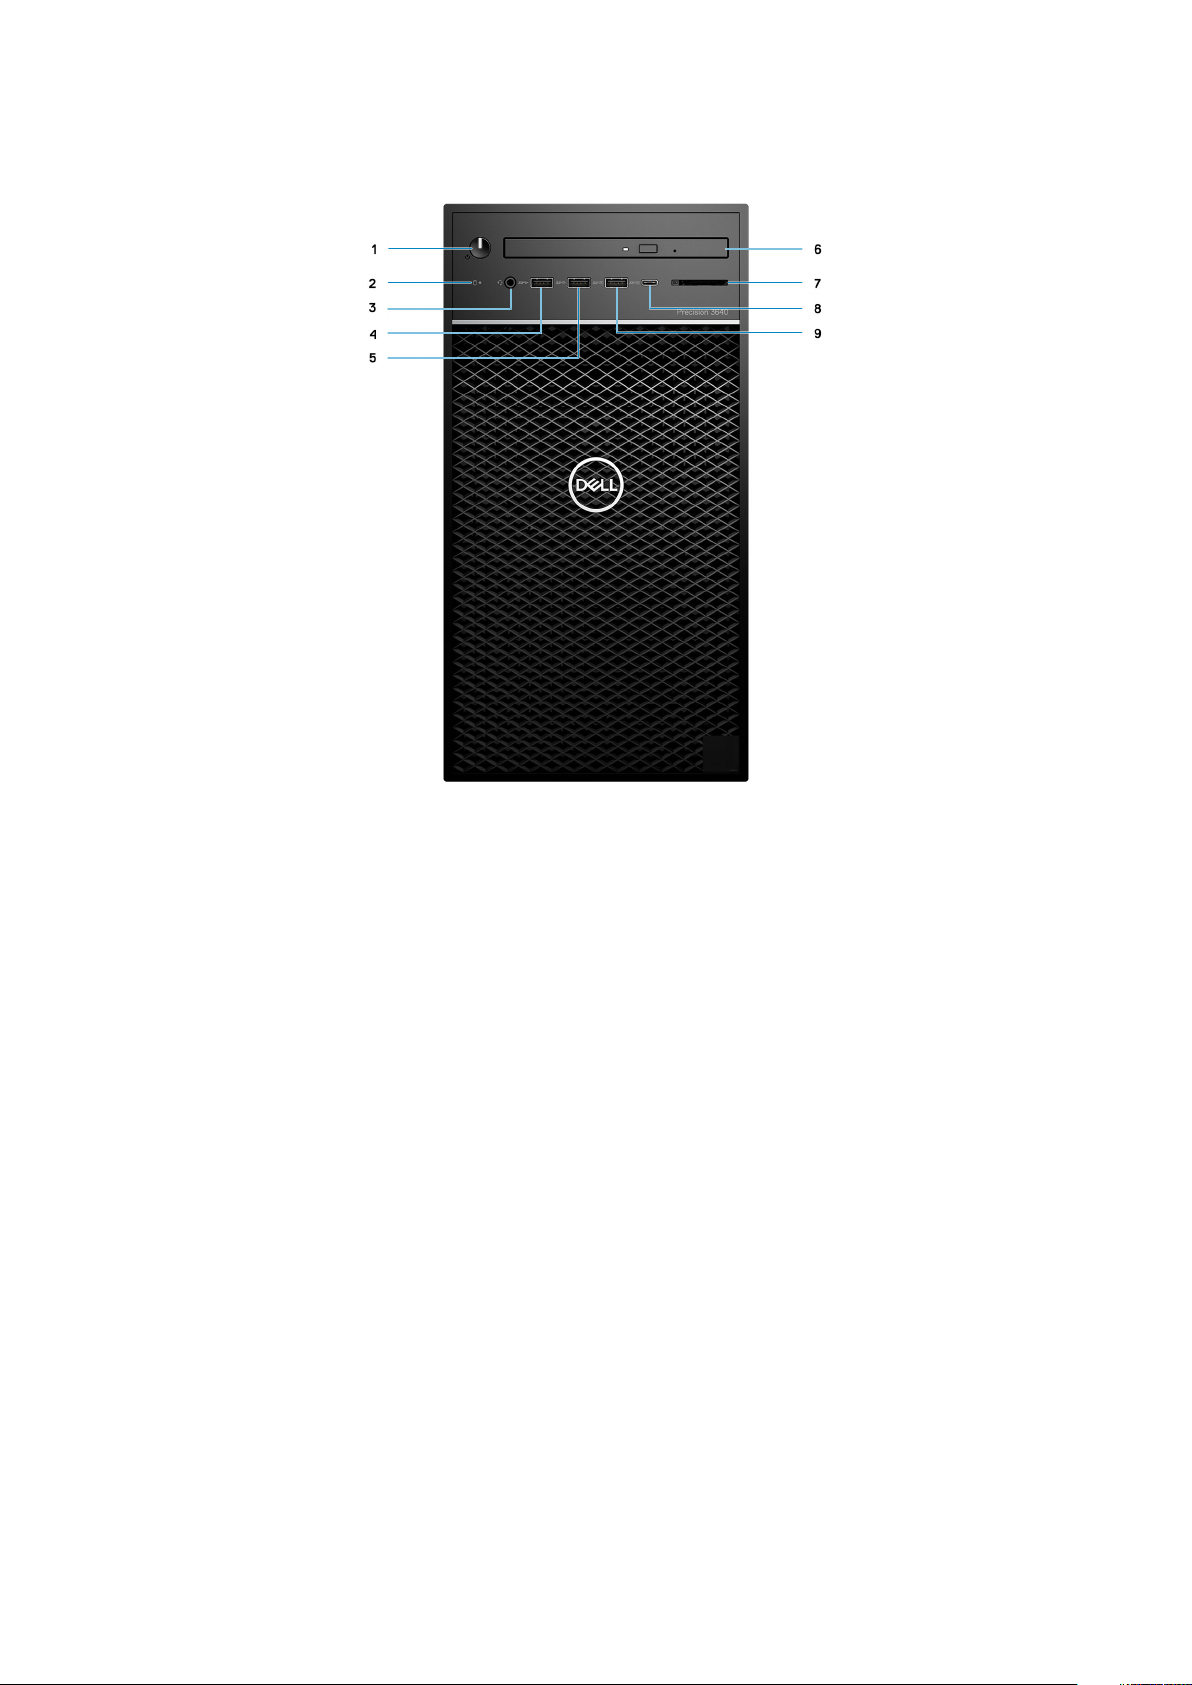
Figure 2. Front view with advanced I/O configuration
1. Power button/Diagnostics indicator
2. Hard drive activity LED
3. 3.5 mm stereo headset/mic combo
4. USB 3.2 Type A Gen1 (5 Gbps)
5. USB 3.2 Type A Gen2 (10 Gbps)
6. Optical drive/CAC Reader (Optional)
7. Media card reader
8. USB 3.2 Type C Gen2 (10 Gbps), with PowerShare
9. USB 3.2 Type A Gen2 (10 Gbps), with PowerShare
Chassis
11
Page 12

Back view
1. Cable cover slot 2. Padlock loop
3. 2x DisplayPort 1.4 4. PS/2 port (Keyboard)
5. PS/2 port (Mouse) 6. 2x USB 2.0 Type-A ports with Smart Power On
7. 2x USB 3.2 Type A Gen2 (10 Gbps) 8. 2x USB 3.2 Type A Gen1 (5 Gbps)
9. Line-out re-tasking Line-in audio port 10. Cable hook slot
11. PCIe Expansion slots (Placeholder) 12. PSU hinge release latch
13. PSU release latch 14. Power port
15. PSU Built in Self Test (BIST) LED 16. Ethernet port
17. Placeholder for optional VGA, DP, HDMI, Type-C daughterboards 18. Security screw
19. Kensington Cable lock 20. Cover release latch
12 Chassis
Page 13

Specifications of Precision 3640 Tower
Dimensions and weight
Table 2. Dimensions and weight
Description Values
3
Height
Width
Depth
Weight (approximate)
NOTE: The weight of your system unit varies depending on the configuration ordered and the manufacturing
variability.
13.19 in. (335.0 mm)
6.95 in. (176.6 mm)
13.58 in. (345.0 mm)
23.37 lb (10.6 kg)
Processors
NOTE:
Global Standard Products (GSP) are a subset of Dell’s relationship products that are managed for availability and
synchronized transitions on a worldwide basis. They ensure the same platform is available for purchase globally. This
allows customers to reduce the number of configurations managed on a worldwide basis, thereby reducing their costs.
They also enable companies to implement global IT standards by locking in specific product configurations worldwide.
Device Guard (DG) and Credential Guard (CG) are the new security features that are only available on Windows 10 Enterprise today.
Device Guard is a combination of enterprise-related hardware and software security features. When you configure together, it locks a
device down so that it can only run trusted applications. Credential Guard uses virtualization-based security to isolate secrets (credentials)
so that only privileged system software can access them. Unauthorized access to these secrets can lead to credential theft attacks.
Credential Guard prevents these attacks by protecting NT LAN Manager (NTLM) password hashes and Kerberos Ticket Granting Tickets.
NOTE:
Processor numbers are not a measure of performance. Processor availability is subject to change and may vary
by region/country.
Table 3. Processors
Processors Wattage Core
10th Generation Intel Core i3-10100,
DDR4 2666
10th Generation Intel Core i5-10500,
DDR4 2666
10th Generation Intel Core i5-10600,
DDR4 2666
10th Generation Intel Core i5-10600K,
DDR4 2666
10th Generation Intel Core i7-10700,
DDR4 2933
10th Generation Intel Core i7-10700K,
DDR4 2933
65 W 4 8 3.6 GHz to 4.3 GHz 6 MB Intel UHD Graphics 630
65 W 6 12 3.1 GHz to 4.5 GHz 12 MB Intel UHD Graphics 630
65 W 6 12 3.3 GHz to 4.8 GHz 12 MB Intel UHD Graphics 630
125 W 6 12 4.1 GHz to 4.8 GHz 12 MB Intel UHD Graphics 630
65 W 8 16 2.9 GHz to 4.7 GHz 16 MB Intel UHD Graphics 630
125 W 8 16 3.8 GHz to 5.0
count
Thread
count
Speed
GHz
Specifications of Precision 3640 Tower 13
Cache Integrated graphics
16 MB Intel UHD Graphics 630
Page 14

Table 3. Processors(continued)
Processors Wattage Core
10th Generation Intel Core i9-10900,
DDR4 2933
10th Generation Intel Core i9-10900K,
DDR4 2933
10th Generation Intel Xeon W-1250,
DDR4 2666
10th Generation Intel Xeon W-1250P,
DDR4 2666
10th Generation Intel Xeon W-1270,
DDR4 2666
10th Generation Intel Xeon W-1270P,
DDR4 2666
10th Generation Intel Xeon W-1290,
DDR4 2666
10th Generation Intel Xeon W-1290P,
DDR4 2666
65 W 10 20 2.8 GHz to 5.2 GHz 20 MB Intel UHD Graphics 630
125 W 10 20 3.7 GHz to 5.3 GHz 20 MB Intel UHD Graphics 630
80 W 6 12 3.3 GHz to 4.7 GHz 12 MB Intel UHD Graphics
125 W 6 12 4.1 GHz to 4.8 GHz 12 MB Intel UHD Graphics
80 W 8 16 3.4 GHz to 4.9 GHz 16 MB Intel UHD Graphics
125 W 8 16 3.8 GHz to 5.1 GHz 16 MB Intel UHD Graphics
80 W 10 20 3.2 GHz to 5.2 GHz 20 MB Intel UHD Graphics
125 W 10 20 3.7 GHz to 5.3 GHz 20 MB Intel UHD Graphics
count
Chipset
Thread
count
Speed
Cache Integrated graphics
P630
P630
P630
P630
P630
P630
Table 4. Chipset
Description Values
Chipset
Processor
DRAM bus width
PCIe bus
Comet Lake PCH-H W480
10th Intel Comet Lake Core i3/i5/i7/i9 and Xeon CPU
64-bit
Up to Gen 3.0
Operating system
• Windows 10 Home (64-bit)
• Windows 10 Professional (64-bit)
• Windows 10 Professional (64-bit) National Academic
• Windows CMIT Government Edition (CMGE V2020-L)
• Windows 10 Professional Workstation (64-bit) (for 6 or more cores)
• Windows 10 IoT Enterprise LTSC
• Red Hat Linux 8.2
• Ubuntu Linux 18.04 LTS
• NeoKylin Linux 7.0 (China only)
Memory
Table 5. Memory specifications
Description Values
Slots
14 Specifications of Precision 3640 Tower
Four DIMM slots
Page 15

Table 5. Memory specifications(continued)
Description Values
Type
Speed
Maximum memory
Minimum memory
Memory per slot
Configurations supported:
DDR4 DRAM ECC or non-ECC memory
2666 MHz or 2933 MHz
NOTE: 2933 MHz requires Intel Core i7, i9 or, Xeon
processors
128 GB
8 GB
• 4 GB, 8 GB, 16 GB, 32 GB
• 128 GB: 4 x 32 GB, 2666 MHz, UDIMM, ECC
• 64 GB: 2 x 32 GB or 4 x 16 GB, 2666 MHz, UDIMM, ECC
• 32 GB: 2 x 16 GB or 4 x 8 GB or 1 x 32 GB, 2666, MHz,
UDIMM, ECC
• 16 GB: 2 x 8 GB, 1 x 16 GB, 2666 MHz, UDIMM, ECC
• 8 GB: 1 x 8 GB, 2 x 4 GB, 2666 MHz, UDIMM, ECC
• 128 GB: 4 x 32 GB, 2666 MHz, for Intel Core i3 or i5
processors and 2933 MHz for Intel Core i7 or i9 or Xeon
processors, UDIMM, non-ECC
• 64 GB: 2 x 32 GB or 4 x 16 GB, 2666 MHz, for Intel Core i3
or i5 processors and 2933 MHz for Intel Core i7 or i9 or Xeon
processors, UDIMM, non-ECC
• 32 GB: 4 x 8 GB, 1 x 32 GB, 2 x 16 GB, 2666 MHz, for Intel
Core i3 or i5 processors and 2933 MHz for Intel Core i7 or i9
or Xeon processors, UDIMM, non-ECC
• 16 GB: 4 x 4 GB, 1 x 16 GB, 2 x 8 GB, 2666 MHz, for Intel
Core i3 or i5 processors and 2933 MHz for Intel Core i7 or i9
or Xeon processors, UDIMM, non-ECC
• 8 GB: 1 x 8 GB, 2 x 4 GB, 2666 MHz, for Intel Core i3 or i5
processors and 2933 MHz for Intel Core i7 or i9 or Xeon
processors, UDIMM, non-ECC
NOTE: A multiple DIMM memory option is
recommended to prevent any performance reduction.
If the system configuration includes integrated
graphics, consider selecting 2 or more DIMMs
Ports and connectors
Table 6. Ports and connectors
Description Values
Network One RJ-45 Network connector
Front USB
NOTE: Front I/O offerings are tied with chassis (PSU)
selection and are different based on region. Precision
3640 Tower has two Front I/O offerings: Standard and
Advanced Front I/O
Standard Front I/O USB ports:
• Two USB 2.0 Type A
• One USB 3.2 Type A Gen1, with PowerShare
Specifications of Precision 3640 Tower 15
Page 16

Table 6. Ports and connectors(continued)
Description Values
• One USB 3.2 Type C Gen2, with PowerShare
Advanced Front I/O USB ports:
• One USB 3.2 Type A Gen1
• One USB 3.2 Type A Gen2
• One USB 3.2 Type A Gen2, with PowerShare
• One USB 3.2 Type C Gen2, with PowerShare
Back USB
Audio
Memory card reader
Video
Serial Two PS2 (Legacy for keyboard and mouse)
Internal
Expansion
M.2
• Two USB 2.0 Type A (with SmartPower)
• Two USB 3.2 Type A Gen2
• Two USB 3.2 Type A Gen1
• One 3.5 mm headphone jack (Front)
• One Line-out re-tasking Line-in audio port (Back)
NOTE: SD Media card reader is only included with
Advanced Front I/O configuration.
Push-Pull type with USB 3.0 interface and WORM (Write Once
Read Many) support.
• Two DisplayPort 1.4
• One Optional Port (VGA or HDMI 2.0 or DP1.4 or USB Type C
with DP-Alt mode)
• One Full-height Gen 3 PCIe x16 slot
• One Full-height Gen 3 PCI slot
• One Full-height Gen 3 PCIe x4 slot
• One M.2 2230 PCIe x1 slot, keyed E for WiFi and Bluetooth
card
• One M.2 2280 PCIe x4, keyed M for solid-state drive
• One M.2 2280 PCIe x4 and SATA slot, keyed M for solid-state
drive
NOTE: To learn more about the features of different
types of M.2 cards, see the knowledge base article at
https://www.dell.com/support/article/sln301626/.
Communications
WLAN module
Table 7. Wireless module specifications
Description Values
Model number Qualcomm QCA61x4A (DW1820) Intel Wi-Fi 6, AX201, 2x2, 802.11ax with Bluetooth
5.1
Transfer rate 867 Mbps 2400 Mbps
Frequency bands supported 2.4 GHz/5 GHz 2.4 GHz/5 GHz
16 Specifications of Precision 3640 Tower
Page 17

Table 7. Wireless module specifications(continued)
Description Values
Wireless standards
Encryption
Bluetooth Bluetooth 4.2 Bluetooth 5.1
• WiFi 802.11a/b/g
• Wi-Fi 4 (WiFi 802.11n)
• Wi-Fi 5 (WiFi 802.11ac)
• 64-bit/128-bit WEP
• AES-CCMP
• TKIP
• WiFi 802.11a/b/g
• Wi-Fi 4 (WiFi 802.11n)
• Wi-Fi 5 (WiFi 802.11ac)
• Wi-Fi 6 (WiFi 802.11ax)
• 64-bit/128-bit WEP
• AES-CCMP
• TKIP
Ethernet
Table 8. Ethernet specifications
Description Values
Model number
Transfer rate
Intel WGI219LM
10/100/1000 Mbps
Audio
Table 9. Audio specifications
Description Values
Type
Controller
Internal interface
External interface
Universal type
Realtek ALC3246
High Definition audio
• Universal 3.5 mm headphone jack (Front)
• Line-out re-tasking Line-in audio port
Storage
Primary storage
Precision 3640 supports up to 4x 2.5" HDD or up to 3x 3.5" HDD. Also, Precision 3640 supports up to 3x M.2 NVMe SSDs. (2x via M.2
2280 slots on motherboard and 1x via Dell Ultra Speed Drive)
Your computer supports one or any combination of the following storage configurations:
• 4x 2.5 inch SATA hard-disk drive or
• 3x 3.5 inch SATA hard-disk drive and
• 2x M.2 2280 NVMe solid-state drive (class 40 or 50)
NOTE: 1x 2280 NVMe SSD on optional PCIe SSD M.2 Interposer Card (Dell Ultra Speed Drive).
The primary drive of your computer varies with the storage configuration. For computers:
• with a M.2 drive, the M.2 drive is the primary drive
• without a M.2 drive, the 2.5-inch/3.5-inch hard drive is the primary hard drive
Specifications of Precision 3640 Tower
17
Page 18

Table 10. Primary Storage specifications
Storage type Interface type Capacity
2.5 in. hard disk drive, 5400 RPM
2.5 in. hard disk drive, 7200 RPM
3.5 in. hard disk drive, 5400 RPM
3.5 in. hard disk drive, 7200 RPM
3.5 in. hard disk drive, 7200 RPM Enterprise
2.5 in. hard-disk drive, 7200 RPM, FIPS Self Encrypting
M.2 2280, PCIe x4 Gen 3 NVMe, Class 40 solid-state drive
M.2 2280, PCIe x4 Gen 3 NVMe, Class 50 solid-state drive
M.2 2280, PCIe x4 Gen 3 NVMe, Class 50 solid-state drive Self Encrypting
Opal 2.0
Optical Disk Drive (ODD)
Table 11. 8x Optical Disk 9.5mm Drive DVD +/- R/W
Description Values
SATA AHCI, upto 6 Gbps
SATA AHCI, upto 6 Gbps
SATA AHCI, upto 6 Gbps
SATA AHCI, upto 6 Gbps
SATA AHCI, upto 6 Gbps
SATA AHCI, upto 6 Gbps 500 GB
NVMe 3.0 PCIe x4
NVMe 3.0 PCIe x4
NVMe 3.0 PCIe x4
up to 2 TB
Up to 1 TB
4 TB
Up to 2 TB
Up to 8 TB
Up to 2 TB
Up to 1 TB
Up to 1 TB
Type 8x Optical Disk 9.5 mm Drive
DVD +/- R/W
External dimensions without
bezel (W x H X D)
Weight (max) 140 g (0.39 lb) 140 g (0.39 lb) 140 g (0.39 lb)
Interface type and speed SATA 1.5 Gb/s SATA 1.5 Gb/s SATA 1.5 Gb/s
Disc capacity Standard Standard Standard
Internal buffer size 0.5 MB 0.5 MB 4 MB
Access time (typical) Supplier dependent Supplier dependent Supplier dependent
Maximum data transfer
rates
Writes 8x DVD/24x CD Not applicable 8x DVD/24x CD/ 6x BD
Reads 8x DVD/24x CD 8x DVD/24x CD 8x DVD/24x CD/ 6x BD
Power source
DC power requirement 5 V 5 V 5 V
DC current 1300 mA 1300 mA 1300 mA
Environmental Operating
Conditions (NonCondensing):
128.0 mm (5.04 in.)/ 9.5 mm
(0.37 in.)/ 126.1 mm (4.97 in.)
8x Optical Disk 9.5 mm Drive DVD
ROM
128.0 mm (5.04 in.)/ 9.5 mm
(0.37 in.)/ 126.1 mm (4.97 in.)
6x BluRay 9.5 mm Drive
DVD/CD/BD +/- R/W
128.0 mm (5.04 in.)/ 9.5 mm
(0.37 in.)/ 126.1 mm (4.97 in.)
Operating Temperature
Range
Relative Humidity Range 10% to 90% RH 10% to 90% RH 10% to 90% RH
18 Specifications of Precision 3640 Tower
5°C to 50°C 5°C to 50°C 5°C to 50°C
Page 19

Table 11. 8x Optical Disk 9.5mm Drive DVD +/- R/W(continued)
Description Values
Maximum Wet Bulb
Temperature
Altitude Range 0 m to 3048 m 0 m to 3048 m 0 m to 3048 m
Environmental NonOperating Conditions
(Non-Condensing):
Operating Temperature
Range
Relative Humidity Range 5% to 95% RH 5% to 95% RH 5% to 95% RH
Maximum Wet Bulb
Temperature
Altitude Range 0 m to 10600 m 0 m to 10600 m 0 m to 10600 m
29°C 29°C 29°C
-40°C to 65°C -40°C to 65°C -40°C to 65°C
38°C 38°C 38°C
Media-card reader
Table 12. Media-card reader specifications
Description Values
Type
SD 4.0 Media card reader, Push-Pull Type with WORM support
(Optional)
Cards supported
• SDHC
• SDXC
Power supply unit
Table 13. Power supply unit specifications
Description Values
Type ATX 300 W Bronze ATX 300 W Gold ATX 460 W Gold ATX 550 W Gold
Input voltage 90 VAC to 264 VAC 90 VAC to 264 VAC 90 VAC to 264 VAC 90 VAC to 264 VAC
Input frequency 47 Hz to 63 Hz 47 Hz to 63 Hz 47 Hz to 63 Hz 47 Hz to 63 Hz
Input current
(maximum)
Output current
(continuous)
6 A 6 A 6 A 6 A
• 5.1 V /13 A
• 12 VA1/16.5 A
• 12 VA2/16.5 A
• 12 VB/16 A
• 3.3 V/10 A
• 5.1 Vaux/4 A
• 5.1 V /13 A
• 12 VA1/16.5 A
• 12 VA2/16.5 A
• 12 VB/16 A
• 3.3 V/10 A
• 5.1 Vaux/4 A
• 5.1 V /20 A
• 12 VA1/18 A
• 12 VA2/18 A
• 12 VB/16 A
• 12 VC/18 A
• 3.3 V/15 A
• 5.1 Vaux/4 A
• 5.1 V /20 A
• 12 VA1/18 A
• 12 VA2/18 A
• 12 VB/16 A
• 12 VC1/18 A
• 12 VC2/18 A
• 3.3 V/15 A
• 5.1 Vaux/4 A
Rated output
voltage
• 5.1 V
• 12 VA1
• 12 VA2
• 12 VB
• 5.1 V
• 12 VA1
• 12 VA2
• 12 VB
• 5.1 V
• 12 VA1
• 12 VA2
• 12 VB
• 5.1 V
• 12 VA1
• 12 VA2
• 12 VB
Specifications of Precision 3640 Tower 19
Page 20

Table 13. Power supply unit specifications(continued)
Description Values
• 3.3 V
• 5.1 Vaux
Temperature range:
Operating 5°C to 45°C (41°F to
113°F)
Storage -40°C to 70°C (-40°F
to 158°F)
• 3.3 V
• 5.1 Vaux
5°C to 45°C (41°F to 113°F) 5°C to 45°C (41°F to
-40°C to 70°C (-40°F to
158°F)
• 12 VC
• 3.3 V
• 5.1 Vaux
113°F)
-40°C to 70°C (-40°F to
158°F)
• 12 VC1
• 12 VC2
• 3.3 V
• 5.1 Vaux
5°C to 45°C (41°F to
113°F)
-40°C to 70°C (-40°F to
158°F)
Video
Table 14. Integrated graphics specifications
Integrated graphics
Controller External display support Memory size Processor
Intel UHD Graphics 630 • Two DisplayPort
• VGA/ USB Type-C Alt mode/HDMI
Intel UHD Graphics P630 • Two DisplayPort
• VGA/ USB Type-C Alt mode/HDMI
Shared system memory 10th Generation Intel
Core i5/ i7/i9
processors
Shared system memory 10th Generation Intel
Xeon W-series
processors
Table 15. Discrete graphics specifications
Discrete graphics
Controller External display support Memory size Memory Type
NVIDIA Quadro RTX 5000 • Four DisplayPort
• One USB Type-C port
NVIDIA Quadro RTX 4000 • Three DisplayPort
• One USB Type-C port
NVIDIA Quadro P2200 • Four DisplayPort
NVIDIA Quadro P1000 • Four mini-DisplayPort
NVIDIA Quadro P620 • Four mini-DisplayPort
NVIDIA Quadro P400 • Three mini-DisplayPort
• One USB Type-C port
AMD Radeon Pro W5700 • Four mini-DisplayPort
• One USB Type-C port
AMD Radeon PRO W5500 • Four DisplayPort
AMD Radeon Pro WX3200 • Four mini-DisplayPort
16 GB DDR6
8 GB DDR6
5 GB DDR5X
4 GB DDR5
2 GB DDR5
2 GB DDR5
8 GB DDR6
8 GB DDR6
4 GB DDR5X
20 Specifications of Precision 3640 Tower
Page 21

Add-in cards
Table 16. Add-in cards
Add-in cards
Serial and parallel port PCIe add-in card
USB 3.2 Gen 1 PCIe card
USB 3.2 Type-C PCIe card
Intel Ethernet server adapter I210-T1
Dell Ultra Speed Drive
2.5/5.0GbE NIC (Aquantia) add-in card
Security
Table 17. Security
Security options Dell Precision Tower 3640
Cable lock Supported
Padlock Supported
Lockable port cover Optional
Chassis Intrusion Switch Standard
Dell Smartcard Keyboard Optional
Regulatory
Table 18. Regulatory compliance
Features Specifications
ENERGY STAR 8.0 qualified Compliant
EPEAT Gold Registered available in select configurations and regions only
China CECP Compliant
China RoHS Compliant
TCO 8.0 available in select configurations only
CEL Compliant
WEEE Compliant
Japan Energy Law Compliant
South Korea E-standby Compliant
South Korea Eco-label Compliant
EU RoHS Compliant
Specifications of Precision 3640 Tower 21
Page 22

Data security
Table 19. Data security
Data security options Values
Dell Data Protection—Endpoint Security Suite and Endpoint
Security Suite Enterprise
Dell Data Protection—Software Encryption Supported
Dell Data Protection—External Media Encryption Not supported
Windows 10 Device Guard and Credential Guard (Enterprise SKU) Supported
Microsoft Windows BitLocker Supported
Local hard drive data wipe through BIOS (secure erase) Supported
FIPS Self-Encrypting Opal 2.0 hard drive Supported
Dell Data Guardian Supported
Supported
Environmental
Table 20. Environmental specifications
Feature Dell Precision 3640 Tower
Recyclable packaging Yes
BFR/PVC—free chassis No
Vertical orientation packaging support Yes
Energy-Efficient Power Supply Standard
ENV0424 compliant Yes
NOTE: Wood‐based fiber packaging contains a minimum of 35% recycled content by total weight of wood‐based fiber.
Packaging that contains without wood‐based fiber can be claimed as Not Applicable. Anticipated Required Criteria for
EPEAT Revision Effective 1H 2018.
Computer environment
Airborne contaminant level: G1 as defined by ISA-S71.04-1985
Table 21. Computer environment
Description Operating Storage
Temperature range
Relative humidity (maximum)
Vibration (maximum)
*
Normal ambient condition 25°C and
40~50%RH 0°C to Normal ambient
condition 25°C and 40~50%RH 35°C
(32°F to 95°F)
Normal ambient condition 25°C and
40~50%RH 10% to Normal ambient
condition 25°C and 40~50%RH 80% (noncondensing)
0.26 GRMS 1.37 GRMS
-40°C to 65°C (-40°F to 149°F)
0%RH 10% to 95%RH 95% (noncondensing)
Shock (maximum)
22 Specifications of Precision 3640 Tower
40 G† 105 G†
Page 23

Table 21. Computer environment(continued)
Description Operating Storage
Altitude (maximum)
* Measured using a random vibration spectrum that simulates user environment.
† Measured using a 2 ms half-sine pulse when the hard drive is in use.
‡ Measured using a 2 ms half-sine pulse when the hard-drive head is in parked position.
-15.2 m to 3048 m (-50 ft to 10,000 ft) -15.2 m to 10,668 m (-50 ft to 35,000 ft)
Specifications of Precision 3640 Tower 23
Page 24

4
System setup
System setup enables you to manage your hardware and specify BIOS level options. From the System setup, you can:
• Change the NVRAM settings after you add or remove hardware
• View the system hardware configuration
• Enable or disable integrated devices
• Set performance and power management thresholds
• Manage your computer security
BIOS overview
The BIOS manages data flow between the computer's operating system and attached devices such as hard disk, video adapter, keyboard,
mouse, and printer.
Entering BIOS setup program
About this task
Turn on (or restart) your computer and press F2 immediately.
Boot menu
Press <F12> when the Dell logo appears to initiate a one-time boot menu with a list of the valid boot devices for the system. Diagnostics
and BIOS Setup options are also included in this menu. The devices listed on the boot menu depend on the bootable devices in the system.
This menu is useful when you are attempting to boot to a particular device or to bring up the diagnostics for the system. Using the boot
menu does not make any changes to the boot order stored in the BIOS.
The options are:
• UEFI Boot:
○ Windows Boot Manager
• Other Options:
○ BIOS Setup
○ BIOS Flash Update
○ Diagnostics
○ Change Boot Mode Settings
Navigation keys
For most of the System Setup options, changes that you make are recorded but do not take effect until you
NOTE:
restart the system.
Keys Navigation
Up arrow Moves to the previous field.
Down arrow Moves to the next field.
Enter Selects a value in the selected field (if applicable) or follow the link in the field.
Spacebar Expands or collapses a drop-down list, if applicable.
Tab Moves to the next focus area.
24 System setup
Page 25

Keys Navigation
Esc Moves to the previous page until you view the main screen. Pressing Esc in the main screen displays a message
that prompts you to save any unsaved changes and restarts the system.
Boot Sequence
Boot Sequence allows you to bypass the System Setup–defined boot device order and boot directly to a specific device (for example:
optical drive or hard drive). During the Power-on Self Test (POST), when the Dell logo appears, you can:
• Access System Setup by pressing F2 key
• Bring up the one-time boot menu by pressing F12 key
The one-time boot menu displays the devices that you can boot from including the diagnostic option. The boot menu options are:
• Removable Drive (if available)
• STXXXX Drive (if available)
NOTE: XXX denotes the SATA drive number.
• Optical Drive (if available)
• SATA Hard Drive (if available)
• Diagnostics
NOTE: Choosing Diagnostics, will display the diagnostics screen.
The boot sequence screen also displays the option to access the System Setup screen.
System setup options
NOTE: Depending on this computer and its installed devices, the items listed in this section may or may not appear.
Table 22. System setup options—System information menu
General-System Information
System Information
BIOS Version Displays the BIOS version number.
Service Tag Displays the Service Tag of the computer.
Asset Tag Displays the Asset Tag of the computer.
Ownership Tag Displays the ownership tag of the computer.
Manufacture Date Displays the manufacture date of the computer.
Ownership Date Displays the ownership date of the computer.
Express Service Code Displays the express service code of the computer.
Memory Information
Memory Installed Displays the total computer memory installed.
Memory Available Displays the total computer memory available.
Memory Speed Displays the memory speed.
Memory Channel Mode Displays single or dual channel mode.
Memory Technology Displays the technology used for the memory.
DIMM 1 Size Displays the DIMM 1 memory size.
DIMM 2 Size Displays the DIMM 2 memory size.
PCI Information
SLOT2 Displays the PCI information of the computer.
SLOT3 Displays the PCI information of the computer.
System setup 25
Page 26

Table 22. System setup options—System information menu(continued)
General-System Information
SLOT5_M.2 Displays the PCI information of the computer.
Processor Information
Processor Type Displays the processor type.
Core Count Displays the number of cores on the processor.
Processor ID Displays the processor identification code.
Current Clock Speed Displays the current processor clock speed.
Minimum Clock Speed Displays the minimum processor clock speed.
Maximum Clock Speed Displays the maximum processor clock speed.
Processor L2 Cache Displays the Processor L2 Cache size.
Processor L3 Cache Displays the Processor L2 Cache size.
HT Capable Displays whether the processor is HyperThreading (HT) capable.
64-Bit Technology Displays whether 64-bit technology is used.
Device Information
SATA-0 Displays the SATA device information of the computer.
SATA-1 Displays the SATA device information of the computer.
M.2 PCIe SSD-2 Displays the M.2 PCIe SSD information of the computer.
LOM MAC Address Displays the LOM MAC address of the computer.
Video Controller Displays the video controller type of the computer.
Audio Controller Displays the audio controller information of the computer.
Wi-Fi Device Displays the wireless device information of the computer.
Bluetooth Device Displays the bluetooth device information of the computer.
Boot Sequence
Boot Sequence Displays the boot sequence.
Boot List Option Displays the available boot options.
UEFI Boot Path Security
Always,Except Internal HDD Enable or disable the system to prompt the user to enter the Admin password when
booting a UEFI boot path from the F12 boot menu. Default: Enabled
Always
Never
Date/Time
Enable or disable the system to prompt the user to enter the Admin password when
booting a UEFI boot path from the F12 boot menu. Default: Disabled
Enable or disable the system to prompt the user to enter the Admin password when
booting a UEFI boot path from the F12 boot menu. Default: Disabled
Displays the current date in MM/DD/YY format and current time in HH:MM:SS
AM/PM format.
Table 23. System setup options—System Configuration menu
System Configuration
Integrated NIC Controls the on-board LAN controller.
Enable UEFI Network Stack Enable or disable UEFI Network Stack.
SATA Operation Configure operating mode of the integrated SATA hard drive controller.
Drives Enable or disable various drives on board.
SATA-0 Displays the SATA device information of the computer.
26 System setup
Page 27

Table 23. System setup options—System Configuration menu(continued)
System Configuration
SATA-1 Displays the SATA device information of the computer.
M.2 PCIe SSD-2 Displays the M.2 PCIe SSD information of the computer.
SMART Reporting Enable or disable SMART Reporting during system startup.
USB Configuration
Enable USB Boot Support Enable or disable booting from USB mass storage devices such as external hard
drive, optical drive, and USB drive.
Enable front USB Port Enable or disable the front USB ports.
Enable rear USB Port Enable or disable the rear USB ports.
Front USB Configuration Enable or disable the front USB ports.
Rear USB Configuration Enable or disable the rear USB ports.
Audio Enable or disable the integrated audio controller.
Miscellaneous Devices Enable or disable various onboard devices.
Table 24. System setup options—Video menu
Video
Multi-Display Enable or disable multiple displays.
Primary Display Set or change the primary display.
Table 25. System setup options—Security menu
Security
Admin Password Set, change, or delete the administrator password.
System Password Set, change, or delete the system password.
Internal HDD-0 Password Set, change, or delete the internal hard-disk drive password.
Password Configuration Control the minimum and maximum number of characters allowed for Admin and
System passwords.
Password Change Enable or disable changes to the System and Hard Disk passwords when an
administrator password is set.
UEFI Capsule Firmware Updates Enable or disable BIOS updates through UEFI capsule update packages.
PTT Security
PTT On Enable or disable Platform Trust Technology (PTT) visibility to the operating system.
Clear Default: Disabled
PPI ByPass for Clear Command Enable or disable the TPM Physical Presence Interface (PPI). When enabled, this
setting will allow the OS to skip BIOS PPI user prompts when issuing the Clear
command. Changes to this setting take effect immediately.Default: Disabled
Absolute(R) Enable or disable the BIOS module interface of the optional Computrace(R) Service
from Absolute Software.
Admin Setup Lockout Enable to prevent users from entering Setup when an Admin Password is set.
Master Password Lockout Disables the master password support. Hard Disk passwords need to be cleared
before changing the setting.
SMM Security Mitigation Enable or disable SMM Security Mitigation
System setup 27
Page 28

Table 26. System setup options—Secure Boot menu
Secure Boot
Secure Boot Enable Enable or disable the secure boot feature.
Secure Boot Mode
Deployed Mode
Audit Mode
Expert Key Management
Expert Key Management
Custom Mode Key Management
Modifies the behavior of Secure Boot to allow evaluation or enforcement of UEFI
driver signatures.
• Deployed Mode-Default: Enabled
• Audit Mode-Default: Disabled
Enable or disable the deployed mode.
Enable or disable the audit mode.
Enable or disable Expert Key Management.
Select the custom values for expert key management.
Table 27. System setup options—Intel Software Guard Extensions menu
Intel Software Guard Extensions
Intel SGX Enable Enable or disable Intel Software Guard Extensions.
Enclave Memory Size Set the Intel Software Guard Extensions Enclave Reserve Memory Size.
Performance
Multi Core Support Enable multiple cores.
Default: Enabled.
Intel SpeedStep Enable or disable Intel Speedstep Technology.
Default: Enabled.
NOTE: If enabled, the processor clock speed and core voltage are
adjusted dynamically based on the processor load.
C-States Control Enable or disable additional processor sleep states.
Default: Enabled.
Intel TurboBoost Enable or disable Intel TurboBoost mode of the processor.
Default: Enabled.
HyperThread control Enable or disable HyperThreading in the processor.
Default: Enabled.
Power Management
AC Recovery Sets what action the computer takes when power is restored.
Enable Intel Speed Shift Technology Enable or disable Intel Speed Shift Technology.
Auto On Time Enable to set the computer to turn on automatically every day or on a preselected
date and time. This option can be configured only if the Auto On Time is set to
Everyday, Weekdays or Selected Days.
Default: Disabled.
USB Wake Support Enable the USB devices to wake the computer from Standby.
Deep Sleep Control Enables you to control the Deep Sleep mode support.
Wake on LAN/WLAN Enables the computer to be powered on by special LAN signals.
Block sleep Enables you to block entering to sleep mode in OS environment.
POST Behavior
28 System setup
Page 29

Table 27. System setup options—Intel Software Guard Extensions menu(continued)
Intel Software Guard Extensions
Numlock LED Enables the NumLock function when computer boots.
Keyboard Errors Enables the keyboard error detection.
Fastboot Enable to set the speed of the boot process.
Default: Thorough.
Extend BIOS POST Time Configure additional pre-boot delay.
Full Screen Logo Enable or disable to display full screen logo.
Warnings and Errors Sets the boot process to pause when Warnings or Errors are detected.
Table 28. System setup options—Virtualization Support menu
Virtualization Support
Virtualization Specify whether a Virtual Machine Monitor (VMM) can utilize the additional
hardware capabilities provided by Intel Virtualization Technology.
VT for Direct I/O Specify whether a Virtual Machine Monitor (VMM) can utilize the additional
hardware capabilities provided by Intel Virtualization Technology for Direct I/O.
Table 29. System setup options—Wireless menu
Wireless
Wireless Device Enable Enable or disable internal wireless devices.
Table 30. System setup options—Maintenance menu
Maintenance
Service Tag Display the system’s Service Tag.
Asset Tag Create a system Asset Tag.
SERR Messages Enable or disable SERR messages.
BIOS Downgrade Control flashing of the system firmware to previous revisions.
Data Wipe Enable to securely erase data from all internal storage devices.
BIOS Recovery Enable the user to recover from certain corrupted BIOS conditions from a recovery
file on the user primary hard drive or an external USB key.
Table 31. System setup options—System Logs menu
System Logs
BIOS Events Display BIOS events.
Table 32. System setup options—SupportAssist System Resolution menu
SupportAssist System Resolution
Auto OS Recovery Threshold Control the automatic boot flow for SupportAssist System Resolution Console and
for Dell OS Recovery tool.
Assigning a system setup password
Prerequisites
You can assign a new System or Admin Password only when the status is in Not Set.
System setup
29
Page 30

About this task
To enter the system setup, press F2 immediately after a power-on or reboot.
Steps
1. In the System BIOS or System Setup screen, select Security and press Enter.
The Security screen is displayed.
2. Select System/Admin Password and create a password in the Enter the new password field.
Use the following guidelines to assign the system password:
• A password can have up to 32 characters.
• The password can contain the numbers 0 through 9.
• Only lower case letters are valid, upper case letters are not allowed.
• Only the following special characters are allowed: space, (”), (+), (,), (-), (.), (/), (;), ([), (\), (]), (`).
3. Type the system password that you entered earlier in the Confirm new password field and click OK.
4. Press Esc and a message prompts you to save the changes.
5. Press Y to save the changes.
The computer reboots.
Deleting or changing an existing system setup password
Prerequisites
Ensure that the Password Status is Unlocked (in the System Setup) before attempting to delete or change the existing System and
Setup password. You cannot delete or change an existing System or Setup password, if the Password Status is Locked.
About this task
To enter the System Setup, press F2 immediately after a power-on or reboot.
Steps
1. In the System BIOS or System Setup screen, select System Security and press Enter.
The System Security screen is displayed.
2. In the System Security screen, verify that Password Status is Unlocked.
3. Select System Password, alter or delete the existing system password and press Enter or Tab.
4. Select Setup Password, alter or delete the existing setup password and press Enter or Tab.
NOTE:
If you change the System and/or Setup password, re enter the new password when prompted. If you delete
the System and Setup password, confirm the deletion when prompted.
5. Press Esc and a message prompts you to save the changes.
6. Press Y to save the changes and exit from System Setup.
The computer restarts.
Clearing CMOS settings/RTC reset
About this task
CAUTION:
on your BIOS.
Steps
1. Press and hold the power button for 30 seconds.
2. Release the power button and allow the system to boot.
30
Clearing CMOS settings will reset the BIOS settings on your computer as well as reset the Real-Time Clock
System setup
Page 31

Clearing BIOS (System Setup) and System passwords
About this task
NOTE: To conduct a BIOS and System password reset, you must call the Dell Tech Support number in your region.
Steps
1. Key in your computer's service tag number into the locked BIOS/system setup screen.
2. Convey the code generated to the Dell Tech Support agent.
3. The Dell Tech Support agent will provide a 32 character Master System Password that can be used to access the locked BIO/system
setup.
System setup 31
Page 32

This chapter details the supported operating systems along with instructions on how to install the drivers.
Downloading Windows drivers
Steps
1. Turn on the .
2. Go to Dell.com/support.
3. Click Product Support, enter the Service Tag of your , and then click Submit.
NOTE: If you do not have the Service Tag, use the auto detect feature or manually browse for your model.
4. Click Drivers and Downloads.
5. Select the operating system installed on your .
6. Scroll down the page and select the driver to install.
7. Click Download File to download the driver for your .
8. After the download is complete, navigate to the folder where you saved the driver file.
9. Double-click the driver file icon and follow the instructions on the screen.
5
Software
System device drivers
Verify if the system device drivers are already installed in the system.
Serial IO driver
Verify if the drivers for Touchpad, IR camera, and keyboard and are installed.
Figure 3. Serial IO driver
Security drivers
Verify if the security drivers are already installed in the system.
USB drivers
Verify if the USB drivers are already installed in the computer.
32 Software
Page 33

Network adapter drivers
Verify if the Network adapter drivers are already installed in the system.
Realtek Audio
Verify if audio drivers are already installed in the computer.
Storage controller
Verify if the storage control drivers are already installed in the system.
Software
33
Page 34

Getting help and contacting Dell
Self-help resources
You can get information and help on Dell products and services using these self-help resources:
Table 33. Self-help resources
Self-help resources Resource location
Information about Dell products and services https://www.dell.com/
Dell Support
Tips
Contact Support In Windows search, type Contact Support, and press Enter.
6
Online help for operating system
Troubleshooting information, user manuals, set up instructions,
product specifications, technical help blogs, drivers, software
updates, and so on.
Dell knowledge base articles for various of system concerns:
Learn and get more information about your product:
• Product specifications
• Operating system
• Setting up and using your product
• Data backup
• Troubleshooting and diagnostics
• Factory and system restore
• BIOS information
• Windows: https://www.dell.com/support/windows
• Linux: https://www.dell.com/support/linux
https://www.dell.com/support/home/
1. Go to https://www.dell.com/support/home/?
app=knowledgebase.
2. Type the subject or keyword in the Search box.
3. Click Search to retrieve the related articles.
Dell provides several online and telephone-based support and
service options. If you do not have an active Internet connection,
you can find contact information about your purchase invoice,
packing slip, bill, or Dell product catalog.
• Select Detect Product.
• Locate your product through the drop-down menu under View
Products.
• Enter the Service Tag number or Product ID in the search
bar.
• Once on product support page, scroll down to Manuals and
Documents section to preview all the Manuals, documents, and
other information for your product.
34 Getting help and contacting Dell
Page 35

Contacting Dell
Dell provides several online and telephone-based support and service options. If you do not have an active Internet connection, you can
find contact information about your purchase invoice, packing slip, bill, or Dell product catalog. Availability varies by country/region and
product, and some services may not be available in your area. To contact Dell for sales, technical support, or customer service issues:
1. Go to https://www.dell.com/support/.
2. Select your country/region from the drop-down menu on the lower right corner of the page.
3. For customized support:
a. Enter your system Service Tag in the Enter your Service Tag field.
b. Click submit.
• The support page that lists the various support categories is displayed.
4. For general support:
a. Select your product category.
b. Select your product segment.
c. Select your product.
• The support page that lists the various support categories is displayed.
5. For contact details of Dell Global Technical Support, see https://www.dell.com/contactdell.
NOTE: The Contact Technical Support page is displayed with details to call, chat, or email the Dell Global Technical
Support team.
NOTE: Availability varies by country/region and product, and some services may not be available in your area.
Getting help and contacting Dell 35
 Loading...