

Page 1

Dell Precision™ Workstation 360
Setup and Quick Reference Guide
Models: DHM and WHM
www.dell.com | support.dell.com
Page 2

Notes, Notices, and Cautions
NOTE: A NOTE indicates important information that helps you make better use of your
computer.
NOTICE: A NOTICE indicates either potential damage to hardware or loss of data and tells you
how to avoid the problem.
CAUTION: A CAUTION indicates a potential for property damage,
personal injury, or death.
Abbreviations and Acronyms
For a complete list of abbreviations and acronyms, see the “Glossary” in the User’s Guide.
____________________
Information in this document is subject to change without notice.
© 2003 Dell Computer Corporation. All rights reserved.
Reproduction in any manner whatsoever without the written permission of Dell Computer Corporation is strictly
forbidden.
Trademarks used in this text: Dell, the DELL logo, and Dell Precision are trademarks of Dell Computer Corporation;
Microsoft, Windows, and Windows NT are registered trademarks of Microsoft Corporation.
Other trademarks and trade names may be used in this document to refer to either the entities claiming the marks and
names or their products. Dell Computer Corporation disclaims any proprietary interest in trademarks and trade names
other than its own.
Models: DHM and WHM
February 2003 P/N D0732 Rev. A00
Page 3

Contents
Finding Information for Your Computer . . . . . . . . . . . . . . 5
Setting Up Your Computer
Monitor Connections
Completed Setup
. . . . . . . . . . . . . . . . . . . . . . . . . 16
Opening the Computer Cover
Inside Your Computer
Solving Problems
. . . . . . . . . . . . . . . . . . . . . . . . . 21
Resolving Software and Hardware Incompatibilities
Using System Restore in Windows XP
Using the Last Known Good Configuration in Windows 2000
When to Use the Dell Diagnostics
Starting the Dell Diagnostics
Beep Codes
. . . . . . . . . . . . . . . . . . . . . . . . . . 27
Error Messages
System Lights
. . . . . . . . . . . . . . . . . . . . . . . . . 28
Diagnostic Lights
. . . . . . . . . . . . . . . . . . . . . 8
. . . . . . . . . . . . . . . . . . . . . . . 14
. . . . . . . . . . . . . . . . . . . 17
. . . . . . . . . . . . . . . . . . . . . . . 19
. . . . . . 21
. . . . . . . . . . . . . 23
. . 24
. . . . . . . . . . . . . . . 24
. . . . . . . . . . . . . . . . . . 25
. . . . . . . . . . . . . . . . . . . . . . . . 28
. . . . . . . . . . . . . . . . . . . . . . . 30
Frequently Asked Questions . . . . . . . . . . . . . . . . . . . . 33
Contents 3
Page 4

4 Contents
Page 5
Finding Information for Your Computer
Dell provides the following resource and support tools. Additional resources may be shipped
with your computer.
What are you looking for? Find It Here
• A diagnostic program for my computer
• Drivers for my computer
•My User’s Guide
• My device documentation
• System board connectors
• Location of system board components
Drivers and Utilities CD
(also known as the ResourceCD)
Documentation and drivers are already
installed on your computer when shipped
from Dell. You can use the CD to reinstall
drivers, run the Dell Diagnostics, or access
your documentation.
Readme files may be included on your CD
to provide last-minute updates about
technical changes to your computer or
advanced technical-reference material for
experienced users or technicians.
System Information Label
or
Located on the inside of your computer cover.
Setup and Quick Reference Guide 5
Page 6

What are you looking for? Find It Here
• Warranty Information
Dell System Information Guide
• Safety Information
• How to remove and replace parts
www.dell.com | support.dell.com
• Technical specifications
• How to configure system settings
• How to troubleshoot and solve problems
• Express Service Code and Service Tag
• Windows
License Label
• Latest drivers for my computer
• Answers to technical service and support
questions
• Online discussions with other users and
technical support
• Documentation for my computer
including the Service Manual
®
User’s Guide Icon (Microsoft
Windows® 2000)
Double-click the User’s Guides icon on your desktop.
Windows XP Help and Support Center
1
Click the Start button and click Help and Support.
2 Click User’s and system guides and click User’s guides.
Express Service Code and Product Key Label
These labels are located on your computer.
Dell Support Website — support.dell.com
The Dell Support website provides several online tools, including:
• Solutions — Troubleshooting hints and tips, articles from
technicians, and online courses
• Community Forum — Online discussion with other Dell customers
• Upgrades — Upgrade information for components, such as memory,
the hard drive, and the operating system
• Customer Care — Contact information, order status, warranty,
and repair information
• Downloads — Drivers, patches, and software updates
• Reference — Computer documentation, product specifications,
and white papers
6 Setup and Quick Reference Guide
Page 7

What are you looking for? Find It Here
• Service call status and support history
• Top technical issues for my computer
• Frequently asked questions
• File downloads
• Details on my computer configuration
Dell Premier Support Website —
premiersupport.dell.com
The Dell Premier Support website is customized for corporate,
government, and education customers. This website may not be
available in all regions.
• Service contract for my computer
• How to use Windows XP
• Documentation for my computer
• Documentation for devices
(such as a modem)
Windows XP Help and Support Center
1 Click the Start button and click Help and Support.
2 Type a word or phrase that describes your problem
and click the arrow icon.
3 Click the topic that describes your problem.
4 Follow the instructions on the screen.
• How to reinstall my operating system Operating System CD
After you reinstall the operating system
using the Operating System
Reinstallation CD, use the Drivers and
Utilities CD to reinstall drivers for the
devices that came with your computer.
The product key for your operating
system is located on your computer.
or
Setup and Quick Reference Guide 7
Page 8

Setting Up Your Computer
CAUTION: Before performing any of the procedures in this section,
follow the safety instructions in the System Information Guide.
NOTICE: If your computer has an expansion card installed (such as a network card), connect
the appropriate cable to the card, not to the connector on the computer back panel.
You must complete all steps to properly set up your computer. See the appropriate figures
that follow the instructions.
1 Connect the keyboard and mouse.
NOTICE: Do not attempt to operate a PS/2 mouse and a USB mouse simultaneously.
www.dell.com | support.dell.com
2 Connect the modem or network cable.
Insert the network cable, not the phone line, into the network connector. If you have
an optional modem, connect the phone line to the modem.
NOTICE: Do not connect a modem cable to the network adapter. Voltage from telephone
communications can cause damage to the network adapter.
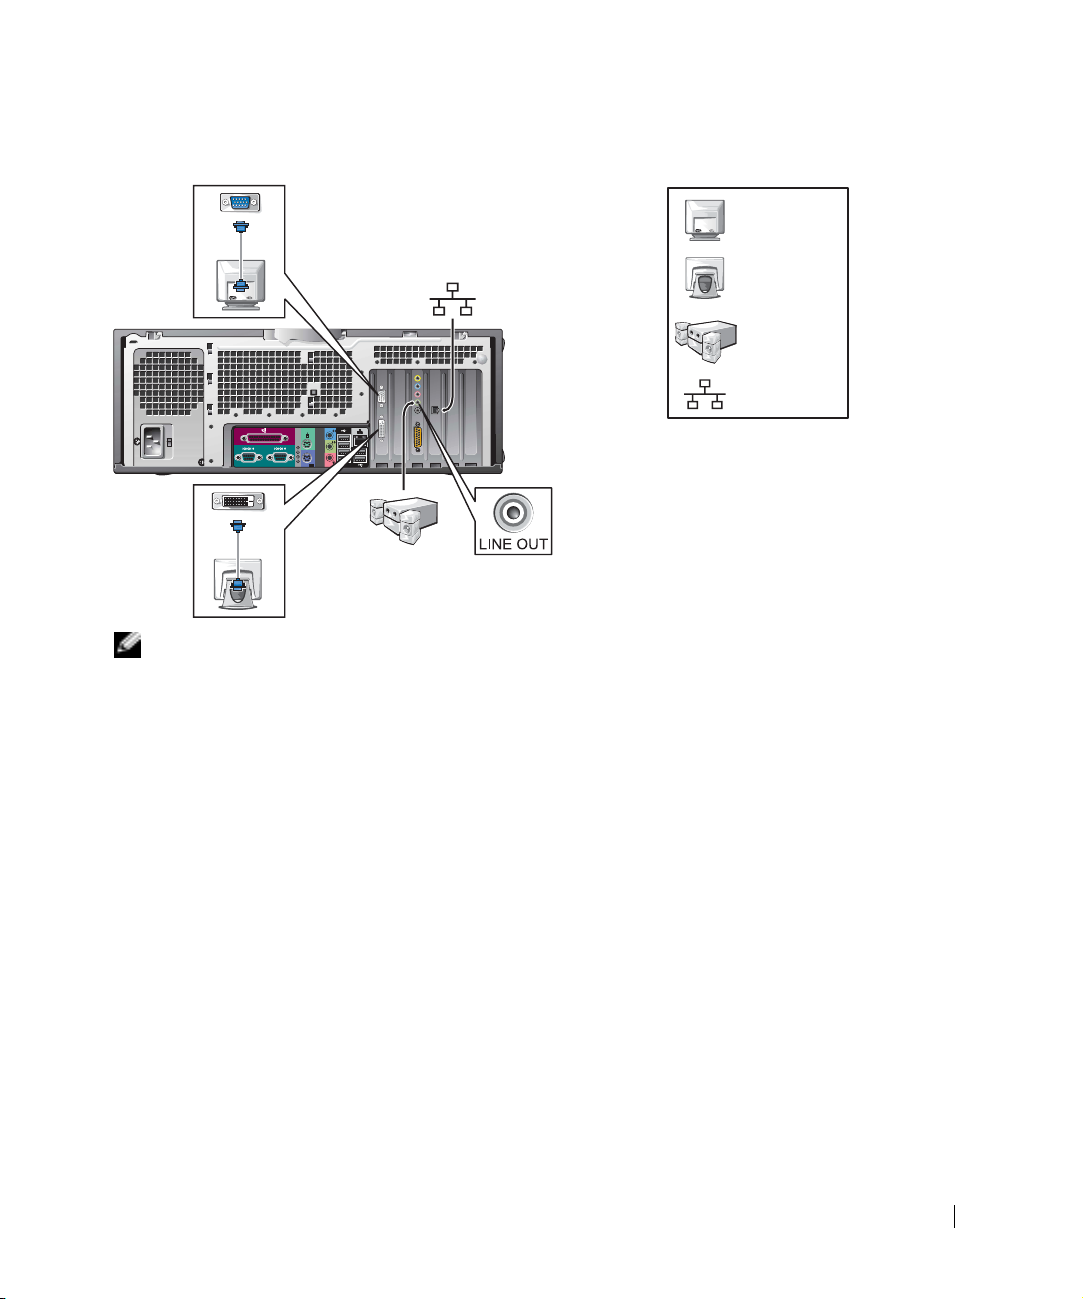
Connect the monitor.
3
Align and gently insert the monitor cable to avoid bending connector pins. Tighten
the thumbscrews on the cable connectors.
NOTE: Some flat-panel displays and graphic cards support Digital Visual Interface (DVI). If
your monitor and card have DVI connectors, Dell recommends that you use DVI instead of VGA.
A second monitor is optional and requires a multimonitor graphics adapter card. To
enable dual-monitor support, both monitors must be attached when the computer
starts. See “Monitor Connections” on page 14 for more information on attaching two
monitors.
4 Connect the speakers.
5 Connect power cables to the computer, monitor, and devices and insert the other ends
of the power cables to electrical outlets.
8 Setup and Quick Reference Guide
Page 9

6 Verify that the voltage selection switch is set correctly for your location.
Your computer is equipped with one of the following:
• A fixed-voltage power supply — Computers with a fixed-voltage power supply
do not have a voltage selection switch on the back panel and operate at only
one voltage (see the regulatory label on the outside of the computer for its
operating voltage).
• An auto-sensing voltage circuit — Computers with an auto-sensing voltage circuit
do not have a voltage selection switch on the back panel and automatically detect
the correct operating voltage.
• A manual voltage selection switch — Computers with a voltage selection switch
on the back panel must be manually set to operate at the correct operating
voltage.
NOTICE: To help avoid damaging a computer with a manual voltage selection switch, set the
switch for the voltage that most closely matches the AC power available in your location. For
Japan, the voltage selection switch must be set to the 115-V position even though the AC power
available in Japan is 100 V. Also, ensure that your monitor and attached devices are electrically
rated to operate with the AC power available in your location.
Press the power buttons to turn on the computer and monitors.
7
See “Completed Setup” on page 16.
NOTE: Before you install any devices or software that did not ship with your computer, read the
documentation that came with the software or device, or contact the vendor to verify that the
software or device is compatible with your computer and operating system.
Setup and Quick Reference Guide 9
Page 10
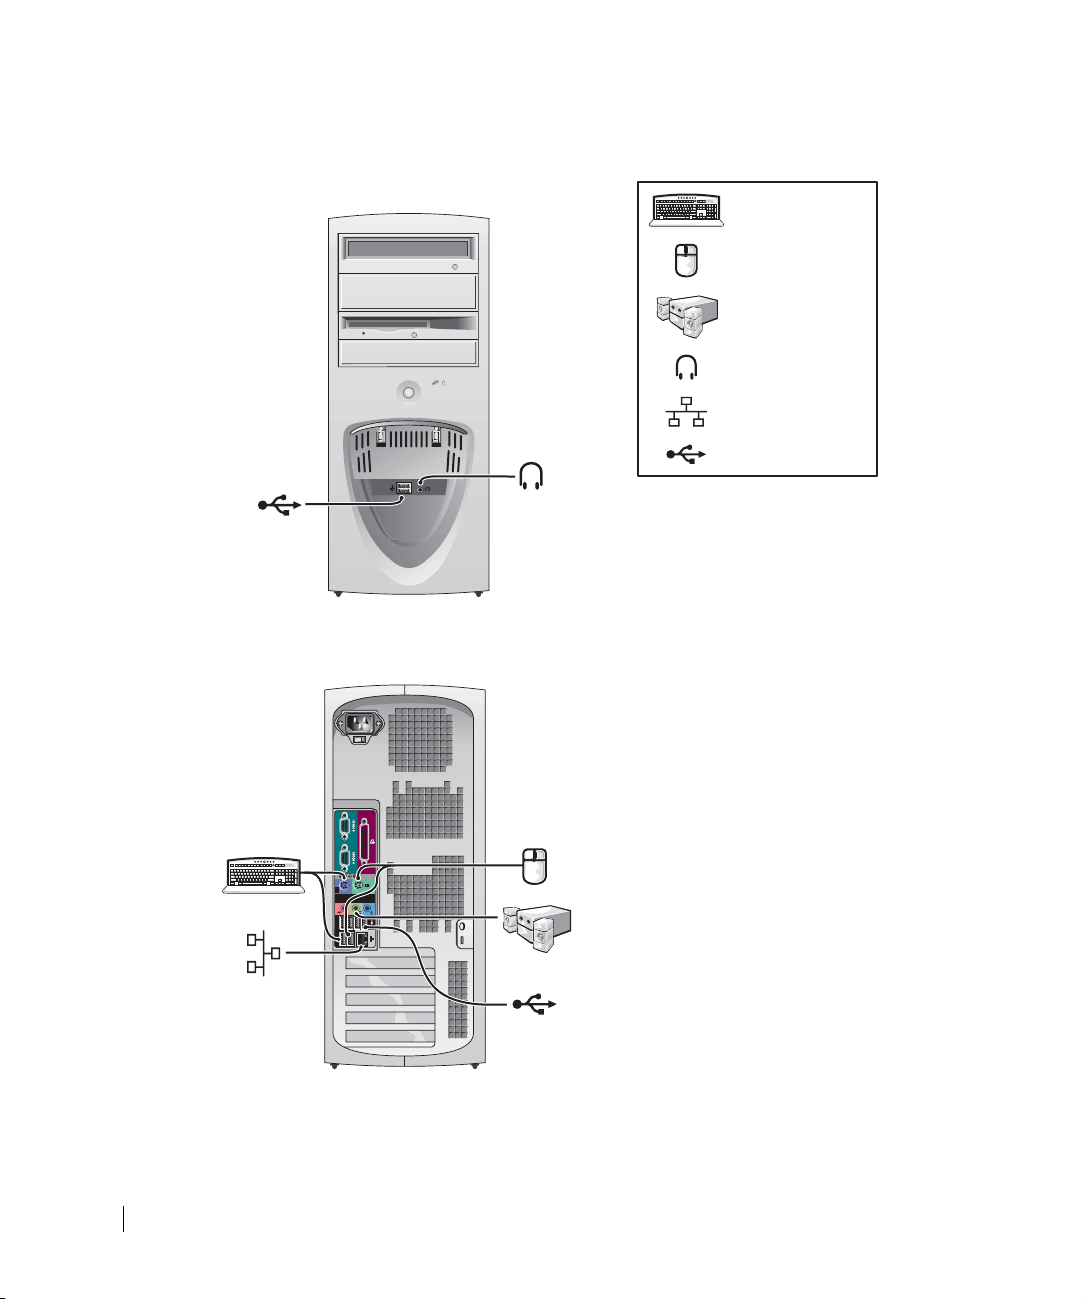
Mini-Tower Setup — Without Expansion Cards
www.dell.com | support.dell.com
keyboard
mouse
speakers
headphones
network
USB
10 Setup and Quick Reference Guide
Page 11
Mini-Tower Setup — With Expansion Card
NOTE: For more information on setting up monitors with your specific graphics card,
see “Monitor Connections” on page 14.
monitor
flat-panel
monitor
speakers
network
Setup and Quick Reference Guide 11
Page 12
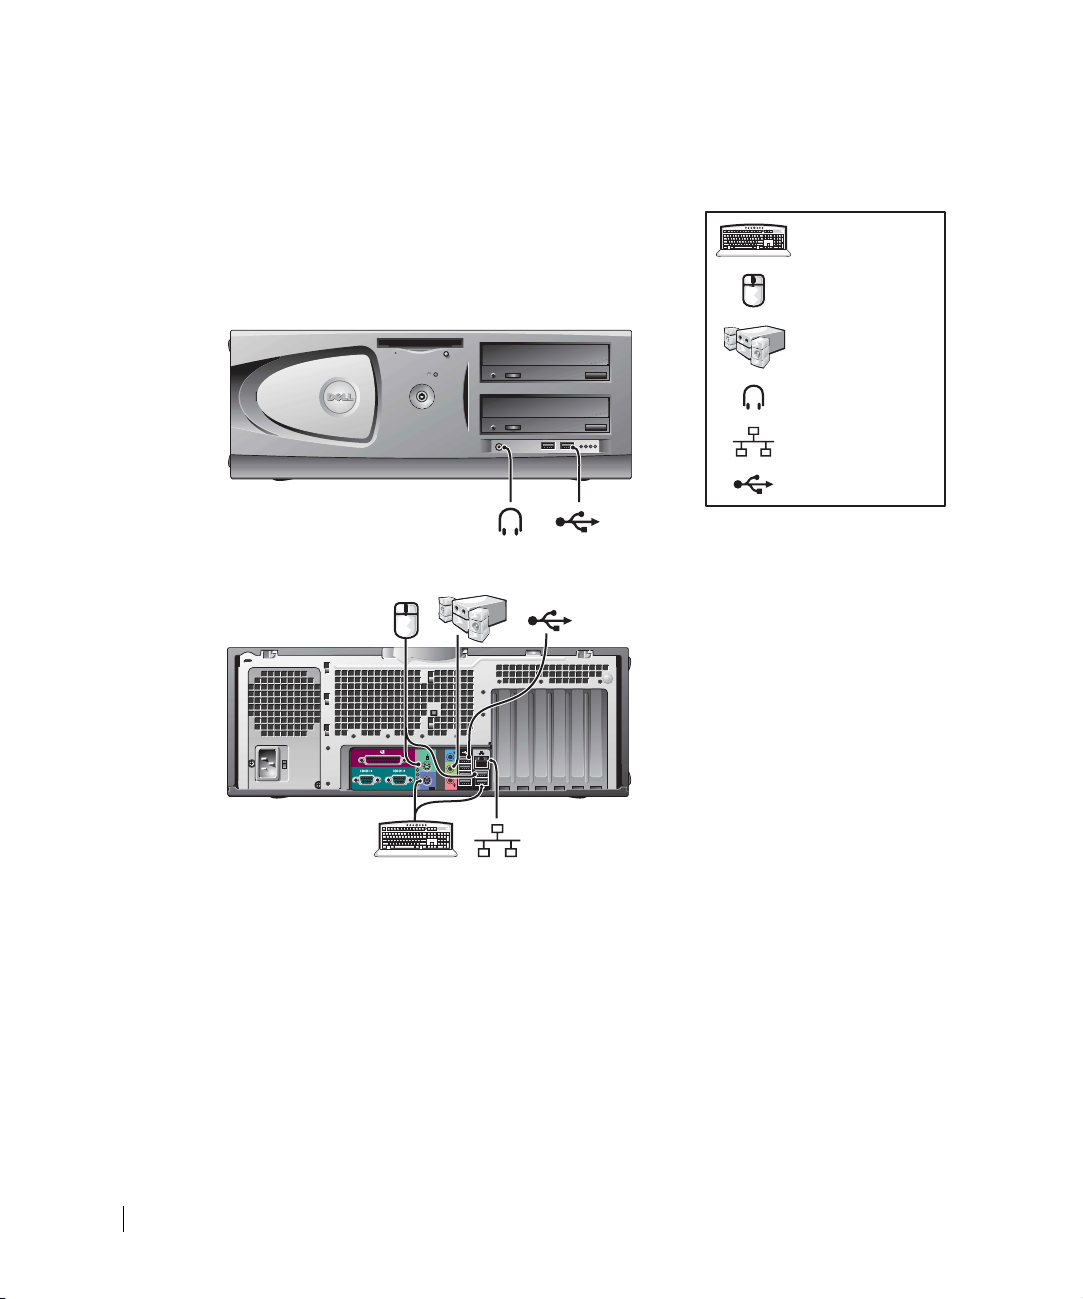
Desktop Setup — Without Expansion Cards
keyboard
mouse
speakers
headphones
www.dell.com | support.dell.com
network
USB
12 Setup and Quick Reference Guide
Page 13
Desktop Setup — With Expansion Cards
NOTE: For more information on setting up two monitors, see “Monitor Connections”
on page 14.
monitor
flat-panel
monitor
speakers
network
Setup and Quick Reference Guide 13
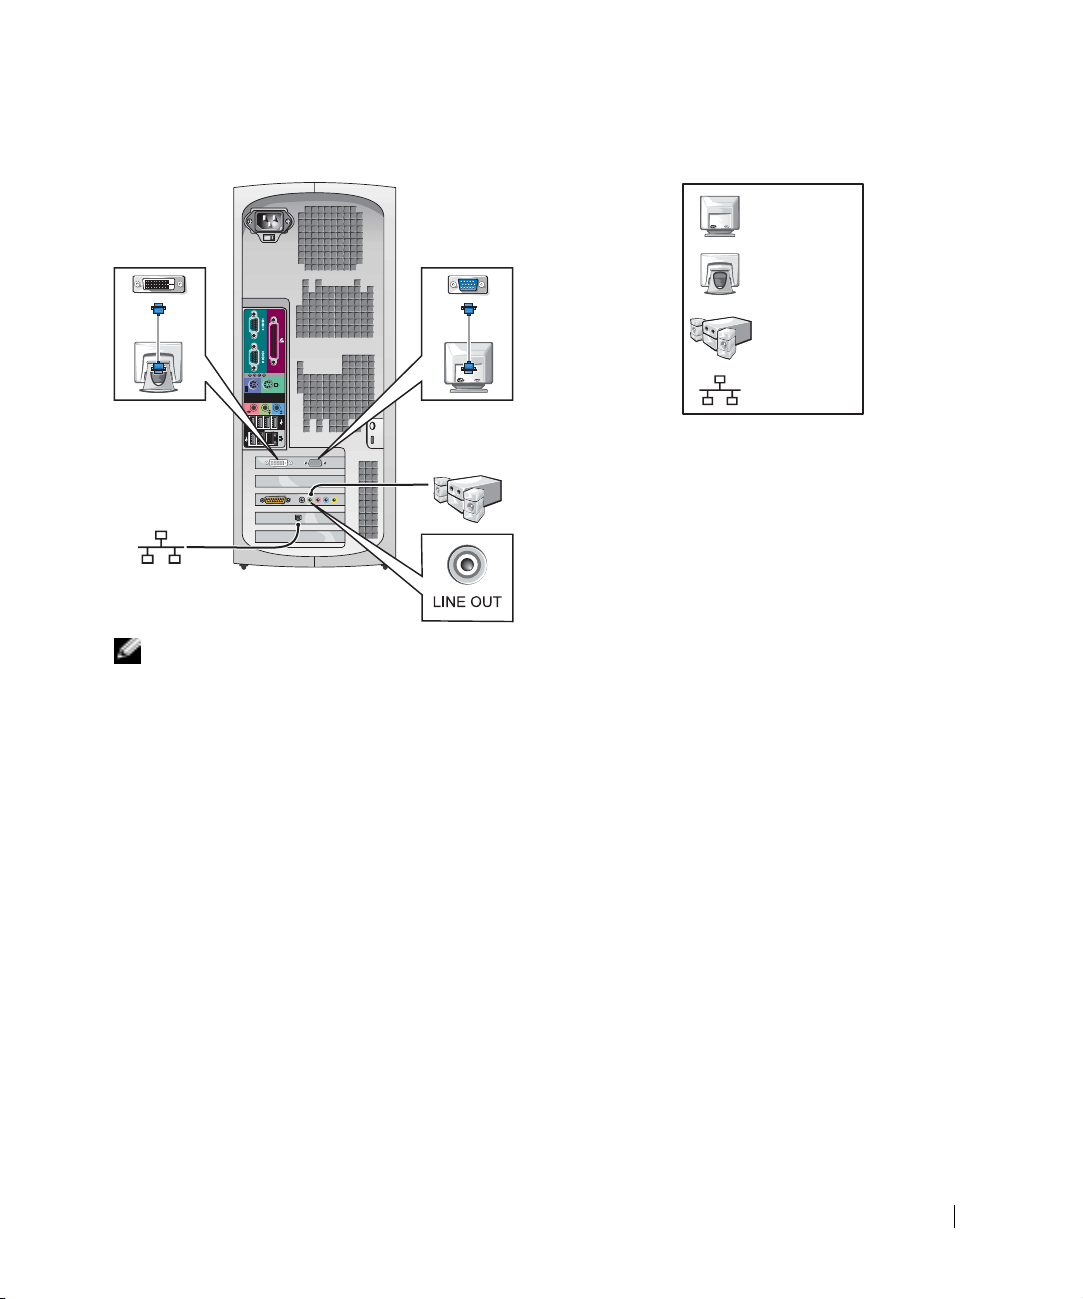
Page 14
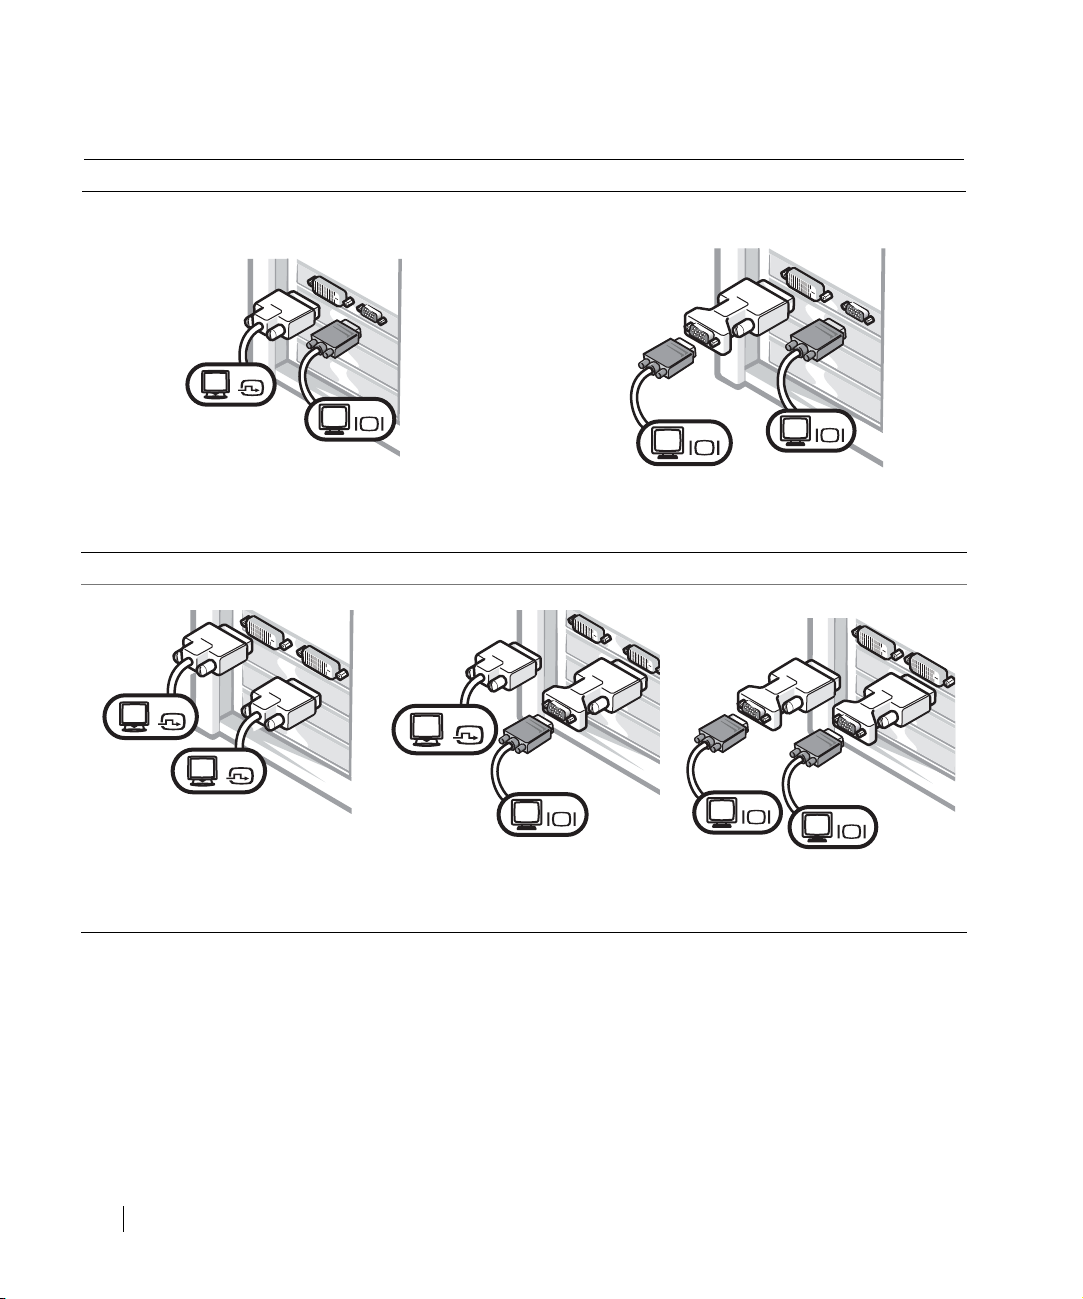
Monitor Connections
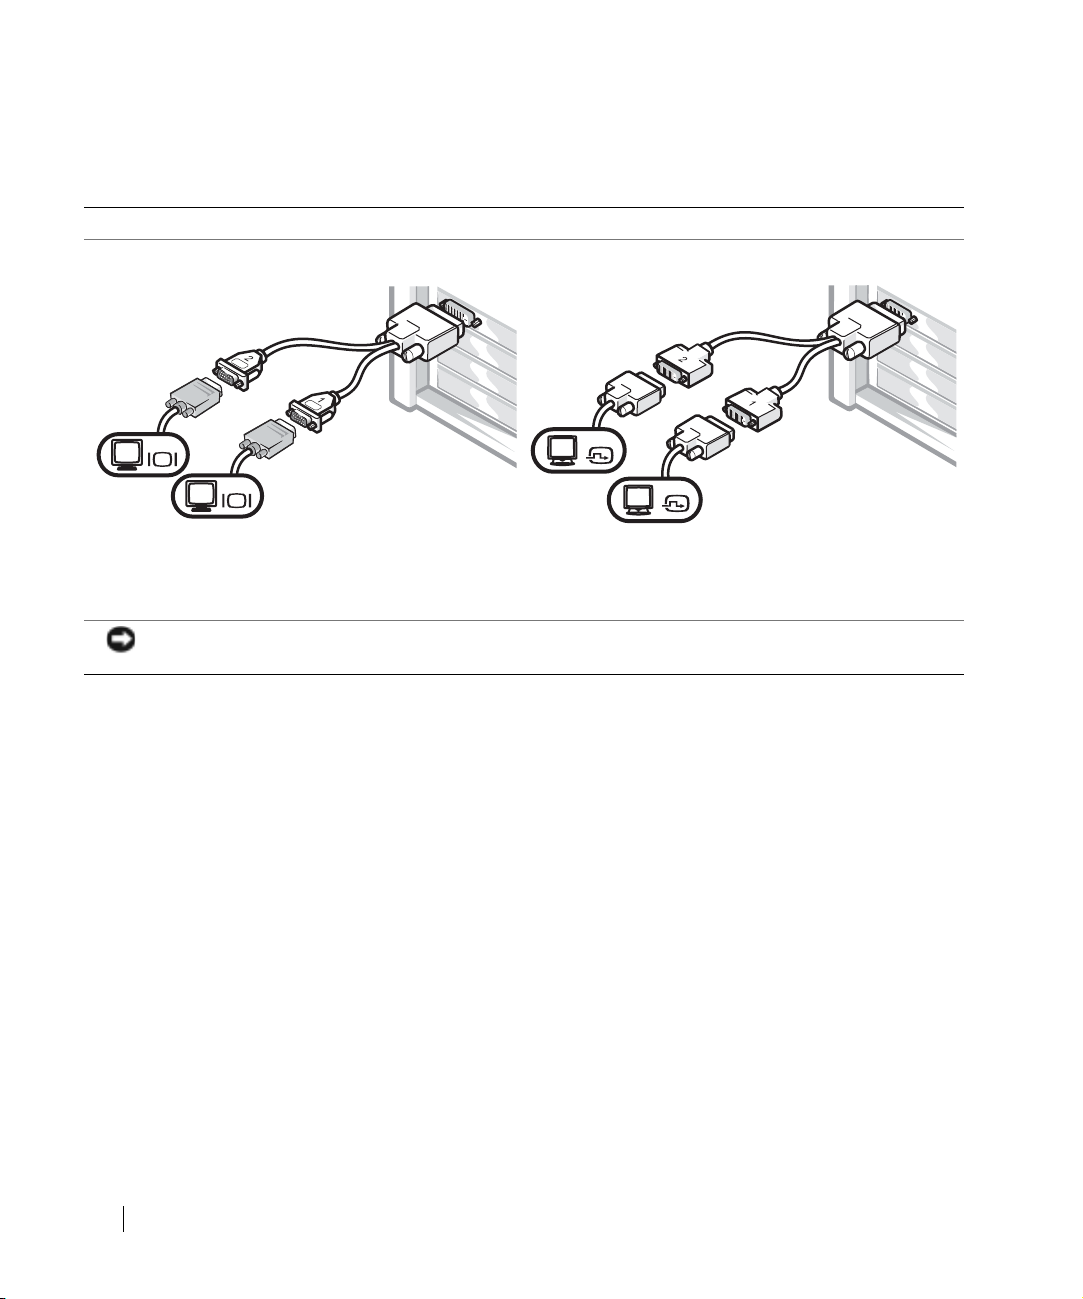
For dual monitor capable cards with a single connector
Dual VGA Y Cable Adapter
Dual DVI Y Cable Adapter
www.dell.com | support.dell.com
VGA
VGA
• This adapter cable can support one or two VGA
monitors. The cable is color coded: blue for the
primary monitor and black for an optional secondary
monitor.
NOTICE: The Y Cable Adapter provided with your computer is unique to the graphics card in your computer.
Adapter cables from other graphics cards should not be used.
DVI
DVI
• This adapter cable can support one or two DVI
monitors. The cable is color coded: blue for the
primary monitor and black for an optional secondary
monitor.
14 Setup and Quick Reference Guide
Page 15
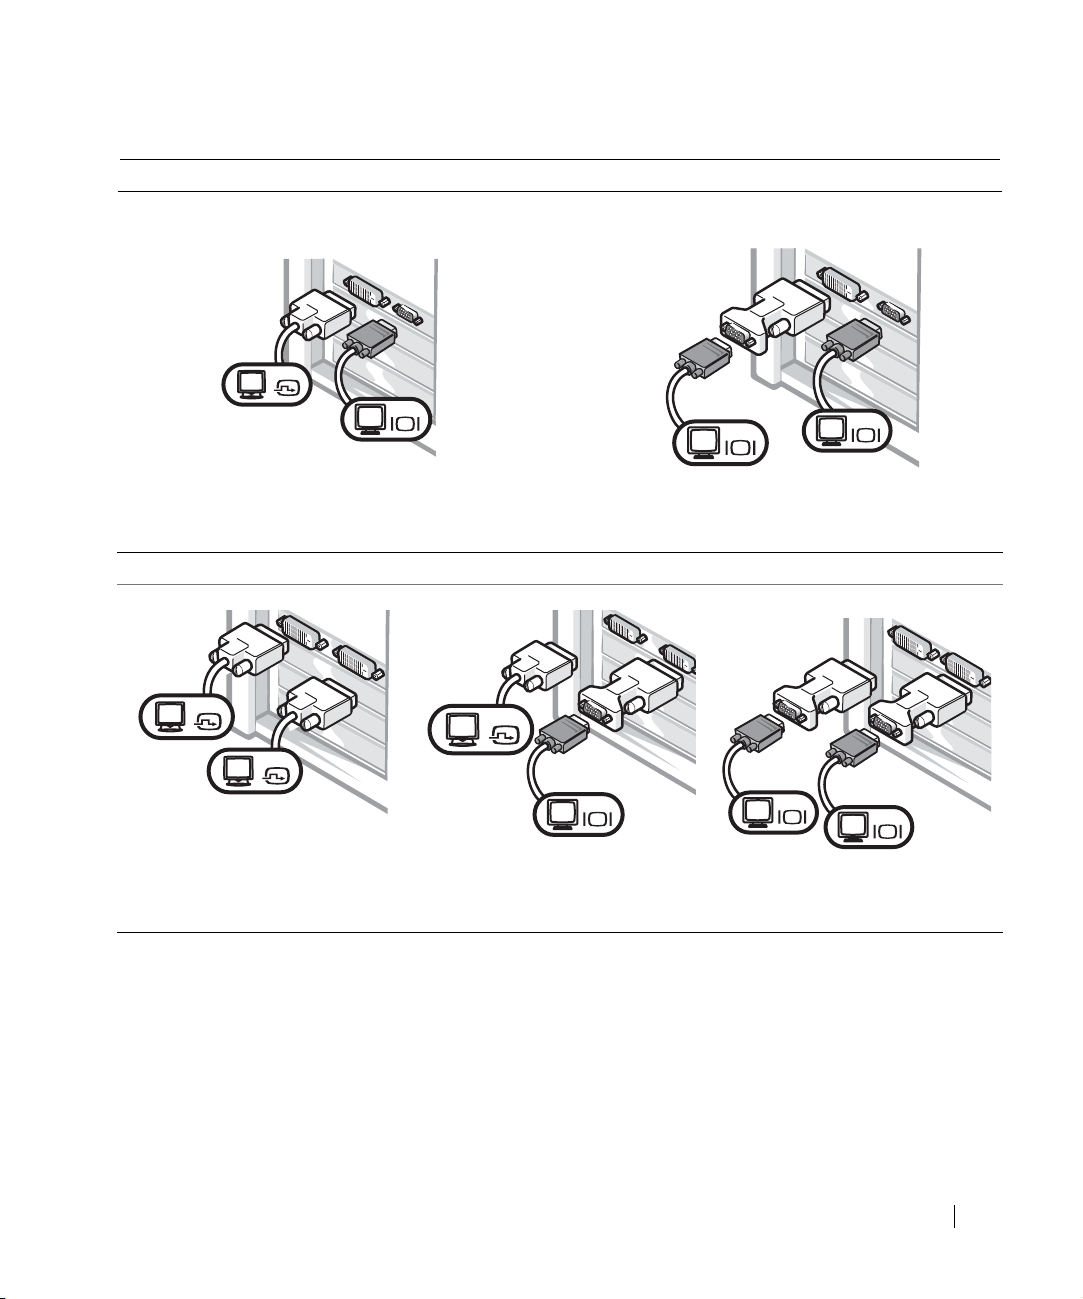
For dual-monitor capable cards with 1 DVI and 1 VGA connector
Single DVI/Single VGA
DVI
Dual VGA With VGA Adapter
VGA
• Use the appropriate connector when you connect
• Use the VGA adapter when you want to connect
to one or two monitors.
For dual-monitor capable cards with 2 DVI connectors
Dual DVI
DVI
DVI
• Use the DVI connectors to
connect to one or two DVI
monitors.
Dual DVI With One VGA Adapter
DVI
VGA
• Use the VGA adapter to connect
a VGA monitor to one DVI
connector.
VGA
to two VGA monitors.
Dual DVI With Two VGA Adapters
• Use two VGA adapters to
connect two VGA monitors
to the DVI connectors.
VGA
VGA
VGA
Setup and Quick Reference Guide 15
Page 16

Completed Setup
www.dell.com | support.dell.com
power
Microsoft Windows Product Key
16 Setup and Quick Reference Guide
Microsoft Windows Product Key
Page 17

Opening the Computer Cover
CAUTION: Before performing any of the procedures in this section, follow the
safety instructions in the System Information Guide.
1
Shut down the computer through the Start menu.
2 Ensure that your computer and attached devices are turned off. If your computer and
attached devices did not automatically turn off when you shut down your computer,
turn them off now.
NOTICE: To disconnect a network cable, first unplug the cable from your computer and then
unplug it from the network wall jack.
Disconnect any telephone or telecommunication lines from the computer.
3
4 Disconnect your computer and all attached devices from electrical outlets, and then
press the power button to ground the system board.
5 If you have installed a padlock through the padlock ring on the back panel, remove the
padlock.
CAUTION: To guard against electrical shock, always unplug your computer from
the electrical outlet before opening the cover.
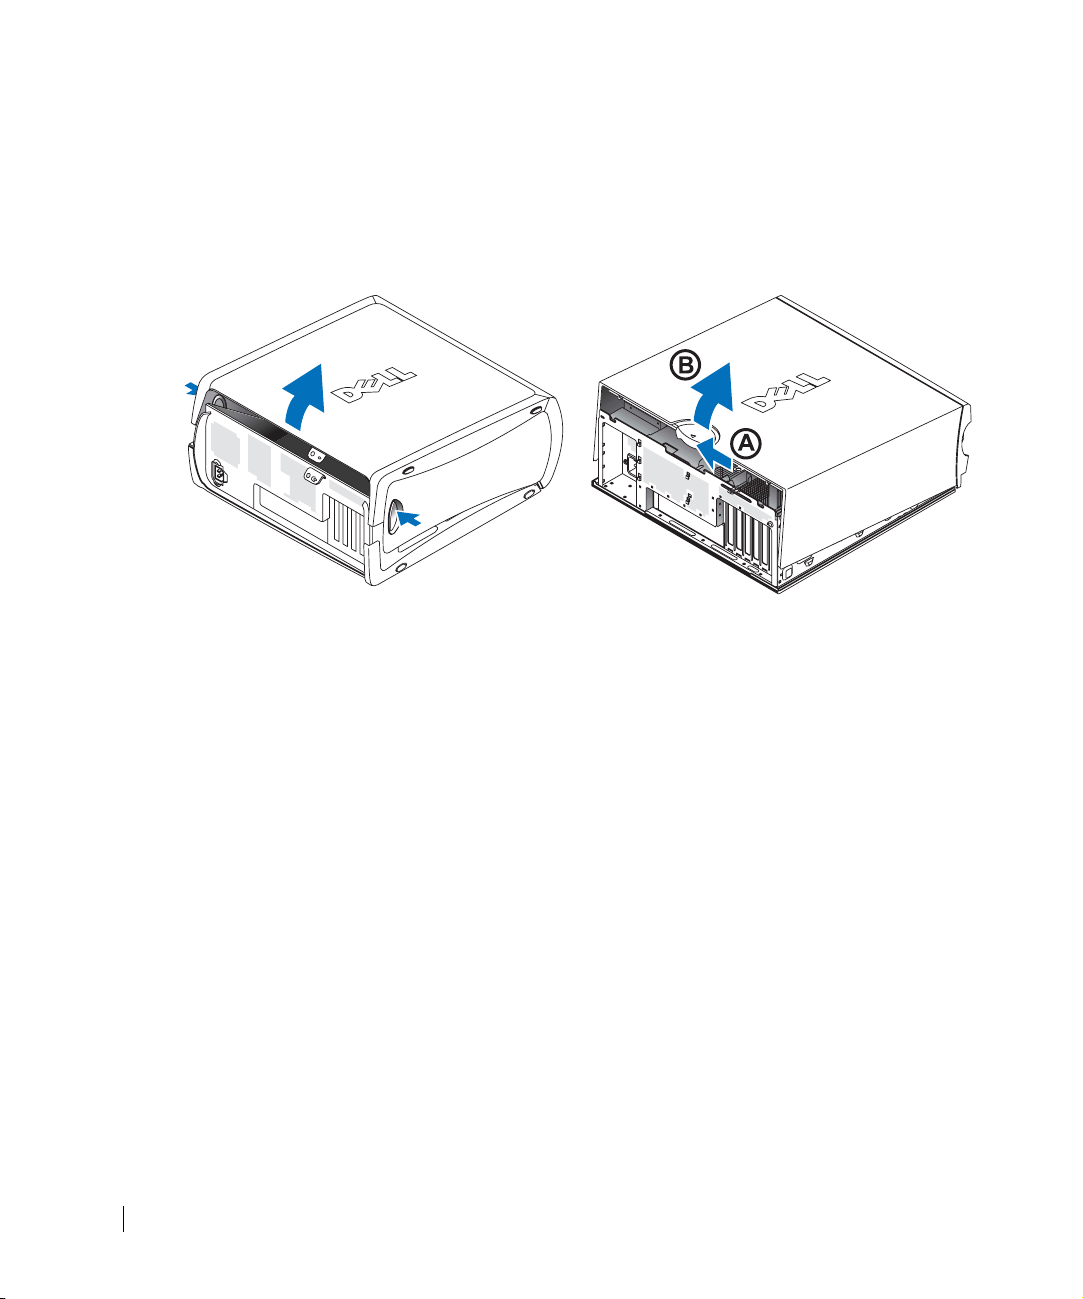
Lay the computer on its side as shown in the illustration.
6
NOTICE: Ensure that sufficient space exists to accommodate the open cover—at least 30 cm
(1 ft) of desktop space.
Open the computer cover.
7
– For the mini-tower, push the buttons on both ends and lift the cover open.
– For the desktop, slide the cover release latch toward the power supply of the
computer. Raise the cover, and pivot it toward the front of the computer.
Setup and Quick Reference Guide 17
Page 18
8 Ground yourself by touching an unpainted metal surface on the computer, such as the
metal at the back of the computer, before touching anything inside your computer.
While you work, periodically touch any unpainted metal surface on the computer to
dissipate any static electricity that could harm internal components.
www.dell.com | support.dell.com
18 Setup and Quick Reference Guide
Page 19
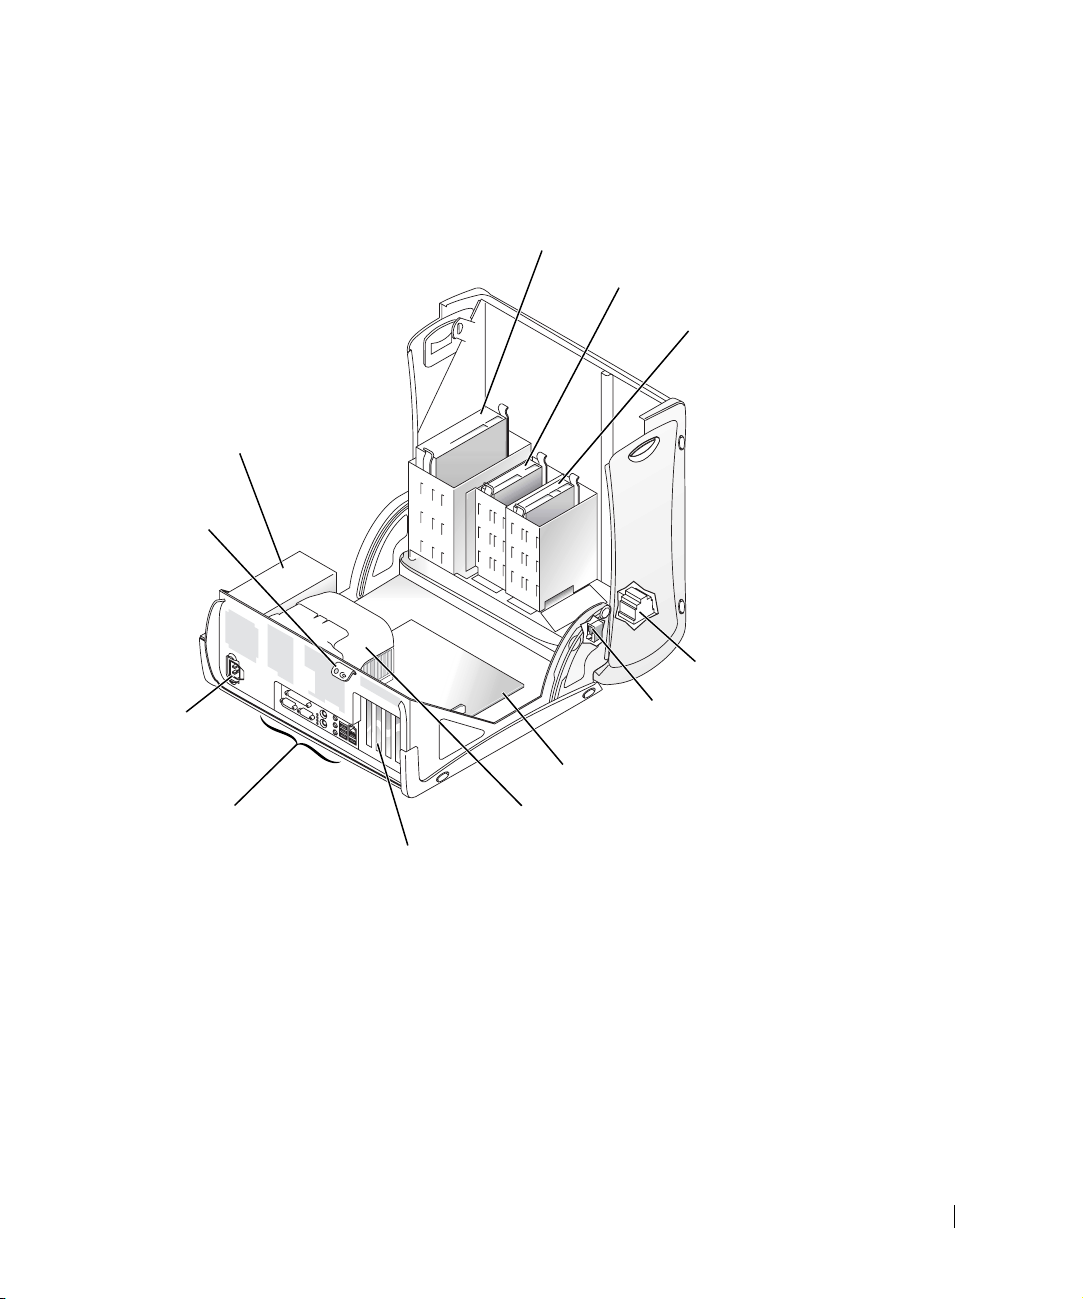
Inside Your Computer
Mini-Tower Computer
power supply
padlock ring
power
connector
removable media drive
floppy drive
hard drive
optional speaker
chassis intrusion
switch
back-panel
connectors
system board
microprocessor airflow shroud
AGP and PCI expansion-card slots
Setup and Quick Reference Guide 19
Page 20
Desktop Computer
chassis
intrusion switch
power supply
removable media drive
floppy drive
hard drive
www.dell.com | support.dell.com
padlock ring
power
connector
back-panel
connectors
system board
microprocessor airflow shroud
AGP and PCI expansion-card slots
20 Setup and Quick Reference Guide
Page 21

Solving Problems
Resolving Software and Hardware Incompatibilities
Microsoft® Windows® XP
Windows XP IRQ conflicts occur if a device either is not detected during the operating
system setup or is detected but incorrectly configured.
To check for conflicts on a computer running Windows XP:
1 Click the Start button and click Control Panel.
2 Click Performance and Maintenance and click System.
3 Click the Hardware tab and click Device Manager.
4 In the Device Manager list, check for conflicts with the other devices.
Conflicts are indicated by a yellow exclamation point (
or a red
5 Double-click any conflict to display the Properties window.
X if the device has been disabled.
!) beside the conflicting device
If an IRQ conflict exists, the Device status area in the Properties window reports the
cards or devices that share the device's IRQ.
6 Resolve conflicts by reconfiguring the devices or removing the devices from the Device
Manager.
To use the Windows XP Hardware Troubleshooter:
1 Click the Start button and click Help and Support.
2 Ty p e hardware troubleshooter in the Search field, and click the arrow to start the
search.
3 Click Hardware Troubleshooter in the Search Results list.
4 In the Hardware Troubleshooter list, click I need to resolve a hardware conflict on my
computer, and then click Next.
Setup and Quick Reference Guide 21
Page 22

Windows 2000
To check for conflicts on a computer running Windows 2000:
1 Click the Start button, point to Settings, and then click Control Panel.
2 In the Control Panel window, double-click System.
3 Click the Hardware tab.
4 Click Device Manager.
5 Click View and click Resources by connection.
6 Double-click Interrupt request (IRQ) to view the IRQ assignments.
Conflicts are indicated by a yellow exclamation point (
www.dell.com | support.dell.com
or a red
7 Double-click any conflict to display the Properties window.
If an IRQ conflict exists, the Device status area in the Properties window reports the
cards or devices that share the device's IRQ.
8 Resolve conflicts by reconfiguring the devices or removing the devices from the Device
Manager.
To use the Windows 2000 Hardware Troubleshooter:
1 Click the Start button and click Help.
2 Click Troubleshooting and Maintenance on the Contents tab, click Windows 2000
troubleshooters, and then click Hardware.
3 In the Hardware Troubleshooter list, click I need to resolve a hardware conflict on my
computer, and then click Next.
!) beside the conflicting device
X if the device has been disabled.
22 Setup and Quick Reference Guide
Page 23

Using System Restore in Windows XP
The Windows XP operating system provides System Restore to allow you to return your
computer to an earlier operating state (without affecting data files) if changes to the
hardware, software, or other system settings have left the computer in an undesirable
operating state.
NOTICE: Back up your data files regularly. System Restore does not monitor your data files or
recover them.
Creating a Restore Point
1 Click the Start button and click Help and Support.
2 Click System Restore.
3 Follow the instructions on the screen.
Restoring the Computer to an Earlier Operating State
NOTICE: Before you restore the computer to an earlier operating state, save and close all open
files and close all open programs. Do not alter, open, or delete any files or programs until the
system restoration is complete.
1
Click the Start button, point to All Programs→Accessories→System Tools,
and then click System Restore.
2 Ensure that Restore my computer to an earlier time is selected, and then click Next.
3 Click a calendar date to which you want to restore your computer.
The Select a Restore Point screen provides a calendar that allows you to see and select
restore points. All calendar dates with available restore points appear in bold.
4 Select a restore point and click Next.
If a calendar date has only one restore point, then that restore point is automatically
selected. If two or more restore points are available, click the restore point that you
prefer.
5 Click Next.
The Restoration Complete screen appears after System Restore finishes collecting
data, and then the computer automatically restarts.
6 After the computer restarts, click OK.
To change the restore point, you can either repeat the steps using a different restore
point, or you can undo the restoration.
Setup and Quick Reference Guide 23
Page 24

Using the Last Known Good Configuration in Windows 2000
1 Restart your computer and press <F8> when the message Please select the
operating system to start
2 Highlight Last Known Good Setting, press <Enter>, press <l>, and then select your
operating system when prompted.
Other Options to Help Resolve Additional Device or Software Conflicts
NOTICE: The following processes erase all of the information on your hard drive.
• If the previous procedures did not work, run a low-level format of your hard drive.
appears.
www.dell.com | support.dell.com
• Reinstall your operating system using the operating system installation guide and
operating system CD.
When to Use the Dell Diagnostics
If you experience a problem with your computer, perform the checks in “Solving Problems”
in your User’s Guide and run the Dell Diagnostics before you contact Dell for technical
assistance. Running the Dell Diagnostics may help you resolve the problem without
contacting Dell. If you do contact Dell, the test results can provide important information
for Dell's service and support personnel.
The Dell Diagnostics allows you to:
• Perform tests on one or all devices.
• Select tests based on a symptom of the problem you are having.
• Choose how many times a test is run.
• Suspend testing if an error is detected.
• Access help information that describes the tests and devices.
• Receive status messages that tell you whether tests completed successfully.
• Receive error messages if problems are detected.
See your operating system installation guide for more information.
24 Setup and Quick Reference Guide
Page 25

Starting the Dell Diagnostics
It is recommended that you print these procedures before you begin.
NOTICE: Use the Dell Diagnostics to test your Dell™ computer only. Using this program with
other computers can result in error messages.
Enter system setup, review your computer’s configuration information, and ensure that the
device you want to test displays in system setup and is active.
Start the Dell Diagnostics from either your hard drive or from the Drivers and Utilities CD
(also known as the ResourceCD).
Starting the Dell Diagnostics From Your Hard Drive
1 Shut down and restart the computer.
2 When the DELL™ logo appears, press <F12> immediately.
NOTE: If you see a message stating that no diagnostics utility partition has been found, follow
the instruction to run the Dell Diagnostics from your Drivers and Utilities CD.
If you wait too long and the Microsoft® Windows® logo appears, continue to wait
until you see the Windows desktop. Then shut down your computer through the
Start menu and try again.
3 When the boot device list appears, highlight Boot to Utility Partition and press
<Enter>.
4 When the Dell Diagnostics Main Menu appears, select the test you want to run.
Starting the Dell Diagnostics From the Drivers and Utilities CD
1 Insert the Drivers and Utilities CD.
2 Shut down and restart the computer.
When the DELL logo appears, press <F12> immediately.
If you wait too long and the Windows logo appears, continue to wait until you see the
Windows desktop. Then shut down your computer through the Start menu and try
again.
NOTE: This feature changes the boot sequence for one time only. On the next start-up,
the computer boots according to the devices specified in system setup.
When the boot device list appears, highlight IDE CD-ROM Device
3
and press <Enter>.
4 Select the IDE CD-ROM Device option from the CD boot menu.
Setup and Quick Reference Guide 25
Page 26

5 Select the Boot from CD-ROM option from the menu that appears.
6 Ty p e 1 to start the ResourceCD menu.
7 Ty p e 2 to start the Dell Diagnostics.
8 Select Run the 32 Bit Dell Diagnostics from the numbered list. If multiple versions
are listed, select the version appropriate for your computer.
9 When the Dell Diagnostics Main Menu appears, select the test you want to run.
Dell Diagnostics Main Menu
1 After the Dell Diagnostics loads and the Main Menu screen appears, click the button
for the option you want.
www.dell.com | support.dell.com
Option Function
Express Test Performs a quick test of devices. This test typically
Extended Test Performs a thorough check of devices. This test
Custom Test Tests a specific device. You can customize the tests you
Symptom Tree Lists the most common symptoms encountered and
takes 10 to 20 minutes and requires no interaction on
your part. Run Express Test first to increase the
possibility of tracing the problem quickly.
typically takes an hour or more and requires you to
answer questions periodically.
want to run.
allows you to select a test based on the symptom of the
problem you are having.
2 If a problem is encountered during a test, a message appears with an error code and a
description of the problem. Write down the error code and problem description and
follow the instructions on the screen.
If you cannot resolve the error condition, contact Dell.
NOTE: The Service Tag for your computer is located at the top of each test screen. If you
contact Dell, technical support personnel will ask for your Service Tag number.
26 Setup and Quick Reference Guide
Page 27

3 If you run a test from the Custom Test or Symptom Tree option, click the applicable
tab described in the following table for more information.
Tab Function
Results Displays the results of the test and any error conditions
encountered.
Errors Displays error conditions encountered, error codes,
and the problem description.
Help Describes the test and may indicate requirements for
running the test.
Configuration Displays your hardware configuration for the selected
device.
The Dell Diagnostics obtains configuration
information for all devices from system setup, memory,
and various internal tests, and it displays the
information in the device list in the left pane of the
screen. The device list may not display the names of all
the components installed on your computer or all
devices attached to your computer.
Parameters Allows you to customize the test by changing the test
settings.
4 When the tests are completed, if you are running the Dell Diagnostics from the
Drivers and Utilities CD, remove the CD.
5 Close the test screen to return to the Main Menu screen. To exit the Dell Diagnostics
and restart the computer, close the Main Menu screen.
Beep Codes
Your computer might emit a series of beeps that identify a problem. One possible series
(code 1-3-1) consists of one beep, a burst of three beeps, and then one beep. This series tell
you that the computer encountered a memory problem.
If a beep code is emitted, write it down and look it up under “Beep Codes” in the User’s
Guide.
Setup and Quick Reference Guide 27
Page 28

Error Messages
NOTE: If the message is not listed, see the documentation for either the operating system or the
program that was running when the message appeared.
If an error occurs during start-up, a message may be displayed on the monitor identifying
the problem. See “Error Messages” in the User’s Guide for suggestions on resolving any
problems.
System Lights
Your computer has a number of lights that can help you analyze and solve problems.
www.dell.com | support.dell.com
Power Light Hard-Drive
Light
Solid green N/A Power is on, and the computer is
Blinking green Blank The computer is in the suspended
Blinks green
several times and
then turns off
Solid yellow N/A The Dell Diagnostics is running a
Blinking yellow Blank A power supply or system board
N/A A configuration error exists. Check the diagnostic lights to see if
Problem Description Suggested Resolution
operating normally.
state (Microsoft
and Windows XP).
test, or a device on the system board
may be faulty or incorrectly
installed.
failure has occurred.
®
Windows® 2000
No corrective action is required.
Press the power button, move the
mouse, or press a key on the
keyboard to wake the computer. See
“Power Button” in your User’s
Guide.
the specific problem is identified.
If the Dell Diagnostics is running,
allow the testing to complete.
Check the diagnostic lights to see if
the specific problem is identified.
See “System Board Problems” in
your User’s Guide.
If the computer does not boot,
contact Dell for technical
assistance.
Check the diagnostic lights to see if
the specific problem is identified.
See “Power Problems” and “System
Board Problems” in your User’s
Guide.
28 Setup and Quick Reference Guide
Page 29

Power Light Hard-Drive
Light
Blinking yellow Solid green A system board or VRM failure has
Solid green and a
beep code during
POST
Solid green power
light and no beep
code and no video
during POST
Solid green power
light and no beep
code, but the
computer locks
up during POST
N/A A problem was detected while the
N/A The monitor or the graphics card
N/A An integrated system board device
Problem Description Suggested Resolution
occurred.
BIOS was executing.
may be faulty or incorrectly
installed.
may be faulty.
Check the diagnostic lights to see
if the specific problem is identified.
See “System Board Problems” in
your User’s Guide.
See “Beep Codes” in your User’s
Guide. Also, check the diagnostic
lights to see if the specific problem
is identified.
Check the diagnostic lights to see
if the specific problem is identified.
See “Video and Monitor Problems”
in your User’s Guide.
Check the diagnostic lights to see
if the specific problem is identified.
If the problem is not identified,
contact Dell for technical
assistance.
Setup and Quick Reference Guide 29
Page 30
Diagnostic Lights
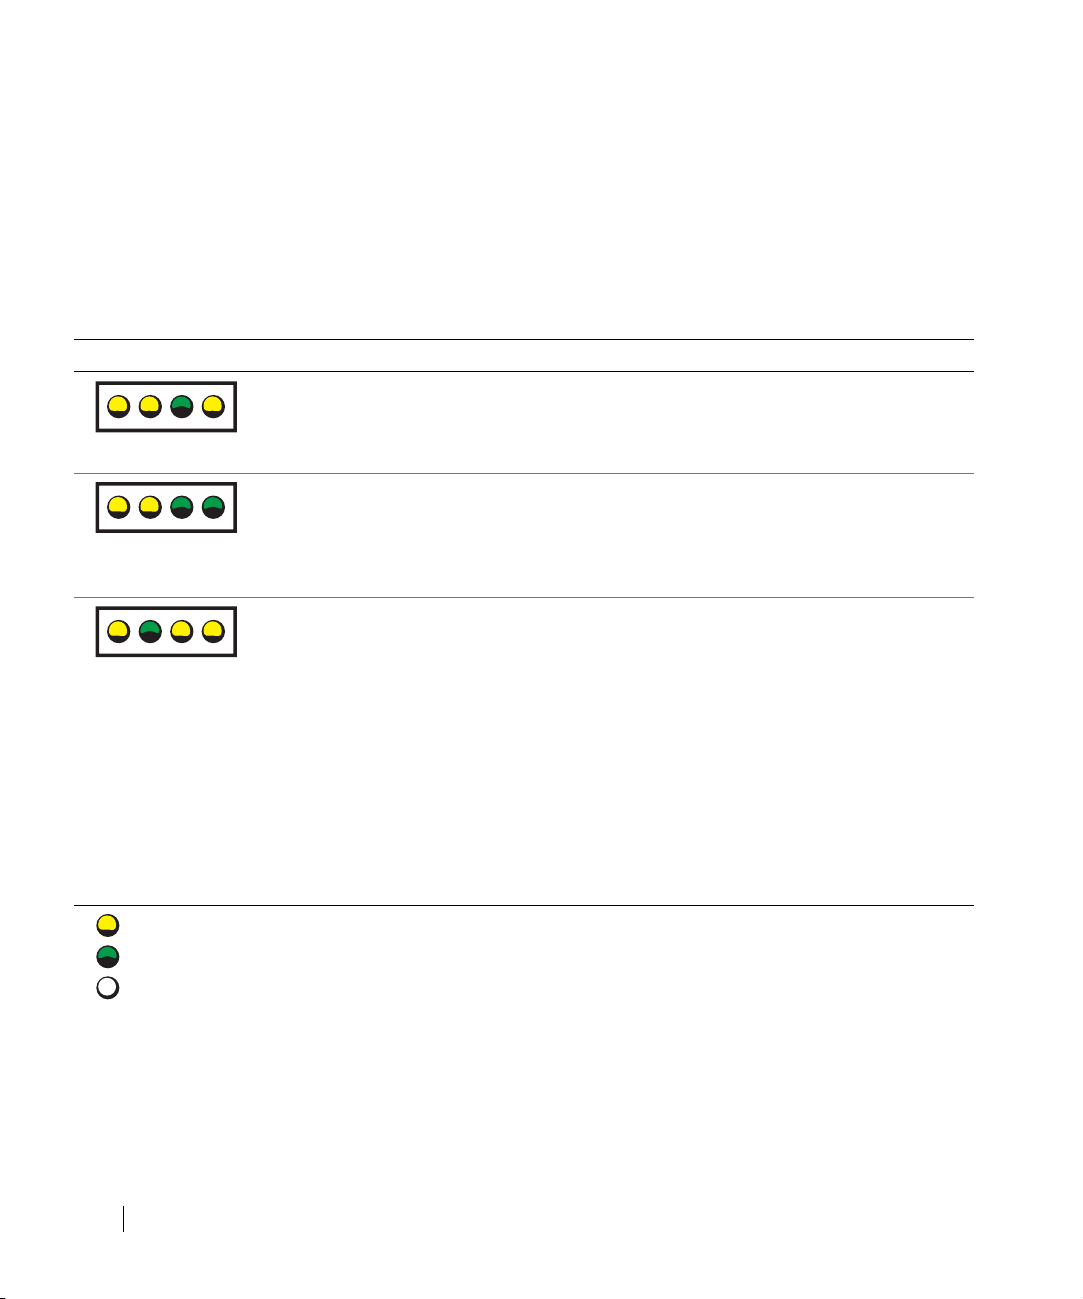
To help you troubleshoot a problem, your computer is equipped with four lights labeled “A,”
“B,” “C,” and “D.” Diagnostic lights are located on the back of the mini-tower computer
and on the front of the desktop computer. When the computer starts normally, the lights
flash. After the computer starts, all four lights will display solid green. If the computer
malfunctions, the color and sequence of the lights identify the problem.
Light Pattern Problem Description Suggested Resolution
A possible microprocessor failure has
occurred.
www.dell.com | support.dell.com
A B C D
Reinstall the microprocessor and restart the
computer. See your User’s Guide for
information on how to reinstall the
microprocessor for your computer.
A B C D
A B C D
= yellow
= green
= off
Memory modules are detected, but a memory
failure has occurred.
A possible expansion card failure has
occurred.
1 Remove and reinstall all memory modules.
Ensure that all the connector tabs are
locked. For optimal performance, install
the DIMMs in pairs (1 and 2 and 3 and 4).
2 Restart the computer.
1 Determine if a conflict exists by removing
a card (not the video card) and then
restarting the computer.
2 If the problem persists, reinstall the card
that you removed, remove a different card,
and then restart the computer.
3 Repeat this process for each card. If the
computer starts normally, troubleshoot the
last card removed from the computer for
resource conflicts (see “Resolving Software
and Hardware Incompatibilities” in your
User’s Guide).
4 If the problem persists, contact Dell.
30 Setup and Quick Reference Guide
Page 31

Light Pattern Problem Description Suggested Resolution
A possible graphics card failure has occurred. Reinstall the graphics card and restart the
computer.
A B C D
A possible floppy or hard drive failure has
occurred.
If the problem still exists, install a graphics
card that you know works and restart the
computer.
If the problem persists, contact Dell.
Check all power and data cable connections,
and then restart the computer.
A B C D
A possible USB failure has occurred. Reinstall all USB devices, check cable
connections, and then restart the computer.
A B C D
A B C D
A B C D
A B C D
= yellow
= green
= off
No memory modules are detected.
System board failure has occurred. Perform the procedures in “System Board
Memory modules are detected, but a memory
configuration or compatibility error exists.
1 Remove and reinstall all memory modules.
Ensure that all the connector tabs are
locked. For optimal performance, install
the DIMMs in pairs (1 and 2 and 3 and 4).
2 Restart the computer.
Problems” in your User’s Guide.
If the problem persists, contact Dell.
Ensure that there are no special memory
module/memory connector placement
requirements. See “Memory” in your User’s
Guide.
Reinstall the memory modules, and then
restart the computer.
If the problem persists, contact Dell.
Setup and Quick Reference Guide 31
Page 32

Light Pattern Problem Description Suggested Resolution
A possible system board resource and/or
hardware failure has occurred.
A B C D
A possible expansion card failure has
occurred.
A B C D
www.dell.com | support.dell.com
Other failure has occurred. Ensure that the cables are properly connected
A B C D
The computer is in a normal operating
condition after POST.
Perform the procedure in “System Board
Problems” and see “Resolving Software and
Hardware Incompatibilities” in your User’s
Guide.
If the problem persists, contact Dell.
1 Determine if a conflict exists by removing
a card and then restarting the computer.
2 If the problem persists, reinstall the card
that you removed, remove a different card,
and then restart the computer.
3 Repeat this process for each card. If the
computer starts normally, troubleshoot the
last card removed from the computer for
resource conflicts (see “Resolving Software
and Hardware Incompatibilities” in your
User’s Guide).
4 If the problem persists, contact Dell.
from the hard drive, CD drive, and DVD drive
to the system board.
If the problem persists, contact Dell.
None.
A B C D
= yellow
= green
= off
32 Setup and Quick Reference Guide
Page 33

Frequently Asked Questions
How Do I... Solution Where to Find Additional
Information
Set up my computer to use
two monitors?
Connect my monitor when the
monitor cable connector doesn’t
seem to fit the connector on the
back of my computer?
Connect my speakers? If you have a sound card installed,
Find the right connectors for
my USB devices?
Locate information about the
hardware and other technical
specifications for my computer?
Find documentation for
my computer?
See “Monitor Connections”
on page 14 for instructions on
connecting two display monitors to
the provided graphics card.
If your graphics card has a DVI
connector but your monitor has a
VGA connector, you need to use an
adapter. An adapter should be
included in the box.
connect the speakers to the
connectors on the card.
Your Dell Precision 360 computer
has eight USB connectors (two on
the front and six on the back).
Yo u r User’s Guide has a
specifications table that provides
more detailed information about
your computer and the hardware.
To locate your User’s Guide, see
“Finding Information for Your
Computer” on page 5.
The following documentation is
available for your computer:
• User’s Guide
• Setup and Quick Reference
Guide
• System Information Guide
• System Information Label
• Service Manual
To locate these documents,
see “Finding Information for Your
Computer” on page 5.
Contact Dell Technical Support for more
information.
See the documentation that came with
your speakers for more information.
See the front and back view graphics of
your computer in your User’s Guide. To
locate your User’s Guide, see “Finding
Information for Your Computer”
on page 5.
Go to the Dell Support website and use
one of the following support tools: read
white papers on the latest technology or
communicate with other Dell users at the
Dell forum chat room.
If you lose your documentation, it is
available on the Dell Support website
at support.dell.com.
Setup and Quick Reference Guide 33
Page 34

www.dell.com | support.dell.com
34 Setup and Quick Reference Guide
Page 35

Dell Precision™ Workstation 360
Guide de configuration et de référence rapide
Modèles : DHM et WHM
www.dell.com | support.dell.com
Page 36

Remarques, avis et précautions
REMARQUE : une REMARQUE fournit des informations importantes qui vous aident à mieux
utiliser votre ordinateur.
AVIS : un AVIS vous avertit d'un risque de dommage matériel ou de perte de données et vous
indique comment éviter le problème.
PRÉCAUTION : une PRÉCAUTION indique un risque potentiel d'endommagement
du matériel, de blessure corporelle ou de mort.
Abréviations et acronymes
Pour obtenir une liste complète des abréviations et des acronymes, reportez-vous
au “glossaire” du Guide d'utilisation.
____________________
Les informations contenues dans ce document sont sujettes à modification sans préavis.
© 2003 Dell Computer Corporation. Tous droits réservés.
Toute reproduction sous quelque forme que ce soit sans l'autorisation écrite de Dell Computer Corporation est strictement
interdite.
Marques utilisées dans ce texte : Dell, le logo DELL et Dell Precision sont des marques de Dell Computer Corporation ;
Microsoft, Windows et Windows NT sont des marques déposées de Microsoft Corporation.
D'autres marques et noms commerciaux peuvent être utilisés dans ce document pour faire référence aux entités se
réclamant de ces marques et de ces noms ou à leurs produits. Dell Computer Corporation dénie tout intérêt propriétaire
aux marques et aux noms commerciaux autres que les siens.
Modèles : DHM et WHM
Février 2003 P/N D0732 Rev. A00
Page 37

Table des matières
Trouver des informations relatives à votre ordinateur . . . . . . 39
Configuration de votre ordinateur
Connexions des moniteurs
Configuration terminée
. . . . . . . . . . . . . . . . . . . . . 49
. . . . . . . . . . . . . . . . . . . . . . 51
Ouverture du capot de l'ordinateur
À l'intérieur de votre ordinateur
Résolution des problèmes
. . . . . . . . . . . . . . . . . . . . . 56
. . . . . . . . . . . . . . . . 43
. . . . . . . . . . . . . . . . 52
. . . . . . . . . . . . . . . . . . 54
Résolution des problèmes d'incompatibilité logicielle
et matérielle
. . . . . . . . . . . . . . . . . . . . . . . . . . 56
Utilisation de la fonction Restauration du système
de Windows XP
. . . . . . . . . . . . . . . . . . . . . . . . 58
Utilisation de la dernière configuration fonctionnelle
sous Windows 2000
Quand utiliser les Diagnostics Dell
Démarrage des Diagnostics Dell
Codes sonores
Messages d'erreur
Voyants du système
Voyants de diagnostic
. . . . . . . . . . . . . . . . . . . . . . 59
. . . . . . . . . . . . . . . 60
. . . . . . . . . . . . . . . . 60
. . . . . . . . . . . . . . . . . . . . . . . . . 63
. . . . . . . . . . . . . . . . . . . . . . . 64
. . . . . . . . . . . . . . . . . . . . . . 64
. . . . . . . . . . . . . . . . . . . . . 65
Questions fréquemment posées
. . . . . . . . . . . . . . . . . . 69
Table des matières 37
Page 38

38 Table des matières
Page 39

Trouver des informations relatives à votre ordinateur
Dell fournit les ressources et outils d'aide suivants. À noter que d'autres informations ont pu
vous être fournies avec votre ordinateur.
Que recherchez-vous ? Consultez les sections suivantes
• Programme de diagnostics
pour mon ordinateur
• Pilotes pour mon ordinateur
•Mon Guide d'utilisation
• Documentation concernant
mon périphérique
• Connecteurs de carte système
• Emplacement des composants
de la carte système
CD Drivers and Utilities (Pilotes et utilitaires,
également appelé ResourceCD)
La documentation et les pilotes sont déjà
installés sur votre ordinateur lorsqu'il est
livré par Dell. Vous pouvez utiliser le CD
pour réinstaller des pilotes, lancer les
Diagnostics Dell ou accéder à votre
documentation.
Des fichiers readme peuvent être inclus
sur votre CD concernant des mises à jour
de dernière minute sur des modifications
techniques apportées à votre système, ou
des informations de référence destinées
aux utilisateurs expérimentés ou aux
techniciens.
Étiquette d'informations du système
ou
Sur la partie intérieure du capot de l'ordinateur.
Guide de configuration et de référence rapide 39
Page 40

Que recherchez-vous ? Consultez les sections suivantes
• Informations sur la garantie
Guide d'informations du système Dell
• Informations de sécurité
• Comment retirer et remplacer des pièces
www.dell.com | support.dell.com
• Caractéristiques techniques
• Comment configurer les paramètres
système
• Comment dépanner et résoudre
les problèmes
• Code de service express
et numéro de service
• Étiquette de licence Windows
Icône du Guide d'utilisation
(Microsoft
®
Windows® 2000)
Double-cliquez sur l'icône des Guides d'utilisation
qui se trouve sur votre bureau.
Centre d'aide et de support Windows XP
Cliquez sur le bouton Démarrer puis sur Aide et support.
1
2 Cliquez sur Guides d'utilisation et du système
puis sur Guides d'utilisation.
Étiquette du code de service express et de la clé
de produit
Ces étiquettes sont situées sur votre ordinateur.
40 Guide de configuration et de référence rapide
Page 41

Que recherchez-vous ? Consultez les sections suivantes
• Pilotes les plus récents pour mon ordinateur
• Réponses aux questions posées au service
et support technique
• Discussions en ligne avec le support
technique et d'autres utilisateurs
• Documentation sur mon ordinateur
y compris le Guide technique
Site Web du support Dell — support.dell.com
Le site Web du support Dell comporte plusieurs outils en ligne,
notamment :
• Solutions — Conseils et astuces de dépannage, articles écrits
par des techniciens et cours en ligne
• Forum communauté — Discussion en ligne avec d'autres utilisateurs
Dell
• Mises à niveau — Informations de mise à niveau pour les
composants tels que la mémoire, le disque dur et le système
d'exploitation
• Service clientèle — Coordonnées, statut des commandes,
garantie et informations sur les réparations
• Téléchargements — Pilotes, correctifs et mises à jour logicielles
• Référence — Documentation sur l'ordinateur, caractéristiques
produit et livres blancs
• État des appels au service clients
et historique du support
• Principaux problèmes techniques
concernant mon ordinateur
• Questions fréquemment posées
Site Web Dell Premier Support —
premiersupport.dell.com
Le site Web Dell Premier Support est personnalisé pour les entreprises,
les institutions gouvernementales ou d'enseignement. Ce site n'est pas
disponible dans toutes les régions.
• Téléchargements de fichiers
• Détails sur la configuration
de mon ordinateur
• Contrat de service pour mon ordinateur
• Comment utiliser Windows XP
• Documentation sur mon ordinateur
• Documentation sur les périphériques
(ex : un modem)
Centre d'aide et de support Windows XP
1 Cliquez sur le bouton Démarrer, puis sur Aide et support.
2 Tapez un mot ou une phrase pour décrire votre problème,
puis cliquez sur l'icône représentant une flèche.
3 Cliquez sur la rubrique qui décrit votre problème.
4 Suivez les instructions qui s'affichent à l'écran.
Guide de configuration et de référence rapide 41
Page 42

Que recherchez-vous ? Consultez les sections suivantes
• Comment réinstaller mon système
CD du système d'exploitation
d'exploitation
www.dell.com | support.dell.com
ou
Une fois que vous avez réinstallé votre
système d'exploitation (à l'aide du CD
du Système d'exploitation), utilisez le CD
Drivers and Utilities (Pilotes et
utilitaires) pour réinstaller les pilotes
des périphériques fournis à l'origine
avec votre ordinateur.
La clé de produit de votre système
d'exploitation se trouve sur votre
ordinateur.
42 Guide de configuration et de référence rapide
Page 43

Configuration de votre ordinateur
PRÉCAUTION : avant d'exécuter l'une des procédures de cette section, suivez les
instructions de sécurité fournies dans le Guide d’informations du système.
AVIS : si votre ordinateur est équipé d'une carte d'extension (telle qu'une carte réseau),
reliez le câble approprié à la carte, pas au connecteur du panneau arrière de l'ordinateur.
Votre ordinateur ne sera correctement configuré qu'une fois toutes ces étapes réalisées.
Consultez les figures correspondant à ces instructions.
1 Branchez le clavier et la souris.
AVIS : n'essayez pas d'utiliser simultanément une souris PS/2 et une souris USB.
2 Branchez le modem ou le câble réseau.
Insérez le câble réseau dans le connecteur réseau (faites attention de ne pas le
confondre avec un câble téléphonique). Si vous disposez d'un modem en option,
connectez la ligne téléphonique au modem.
AVIS : ne branchez pas de câble modem sur la carte réseau. En effet, la tension
des communications téléphoniques risquerait de l'endommager.
Connectez l'écran.
3
Alignez et insérez le câble du moniteur avec précaution, afin d'éviter de tordre
les broches du connecteur. Vissez les connecteurs de câbles.
REMARQUE : certains écrans plats et cartes graphiques sont compatibles DVI (Digital Visual
Interface). Si votre moniteur et votre carte sont équipés de connecteurs DVI, Dell recommande
d'utiliser la technologie DVI au lieu de VGA.
Vous pouvez utiliser un deuxième moniteur en option à condition de disposer
d'une carte graphique multimoniteur. Pour activer le fonctionnement de deux écrans,
branchez les deux moniteurs avant de démarrer l'ordinateur. Reportez-vous à la
rubrique “Connexions des moniteurs” page 49 pour plus d'informations sur
l'utilisation de deux moniteurs.
4 Branchez les haut-parleurs.
5 Reliez les câbles d'alimentation à l'ordinateur, au moniteur et aux périphériques,
et reliez les autres extrémités des câbles à des prises électriques.
Guide de configuration et de référence rapide 43
Page 44

6 Vérifiez que le sélecteur de tension correspond à l'alimentation secteur de votre pays.
Votre ordinateur est équipé de l'un des éléments suivants :
• Un module d'alimentation à tension fixe : dans ce cas, il n'est pas équipés d'un
sélecteur de tension et ne fonctionnent qu'à une tension donnée (voir l'étiquette
placée sur l'ordinateur relative aux réglementations).
• Un circuit à détection automatique de la tension : ces ordinateurs ne disposent
pas d'un sélecteur de tension, car ils détectent automatiquement la tension de
fonctionnement appropriée.
• Un sélecteur de tension manuel : les ordinateurs équipés d'un interrupteur de
sélection de tension sur le panneau arrière nécessitent une intervention manuelle
pour régler la tension appropriée.
www.dell.com | support.dell.com
AVIS : pour éviter d'endommager un ordinateur équipé d'un interrupteur de sélection de
tension, placez l'interrupteur sur la tension la plus proche de la tension secteur fournie dans
votre pays. Au Japon, l'interrupteur doit être placé sur la position 115 V, bien que la tension
secteur fournie soit de 100 V. Vérifiez également que votre moniteur et vos périphériques
peuvent fonctionner à la tension secteur fournie dans votre pays.
Appuyez sur le bouton d'alimentation pour démarrer l'ordinateur et les moniteurs.
7
Reportez-vous à la section “Configuration terminée” page 51.
REMARQUE : avant d'installer tout périphérique ou logiciel qui n'a pas été livré avec votre
ordinateur, lisez attentivement la documentation fournie avec le logiciel ou le périphérique ou
contactez votre fournisseur, afin de vous assurer que le logiciel ou l'appareil est compatible avec
votre ordinateur et votre système d'exploitation.
44 Guide de configuration et de référence rapide
Page 45

Configuration Mini-Tour, sans carte d'extension
Clavier
Souris
Haut-parleurs
Casque
Réseau
USB
Guide de configuration et de référence rapide 45
Page 46

Configuration Mini-Tour, avec carte d'extension
www.dell.com | support.dell.com
REMARQUE : pour plus d'informations sur la configuration des moniteurs avec votre carte
graphique, consultez la section “Connexions des moniteurs” page 49.
Moniteur
Écran plat
moniteur
Haut-parleurs
Réseau
46 Guide de configuration et de référence rapide
Page 47

Configuration de bureau, sans carte d'extension
Clavier
Souris
Haut-parleurs
Casque
Réseau
USB
Guide de configuration et de référence rapide 47
Page 48

Configuration de bureau, avec carte d'extension
www.dell.com | support.dell.com
REMARQUE : pour plus d'informations sur la configuration de deux moniteurs,
consultez la section “Connexions des moniteurs” page 49.
Moniteur
Écran plat
moniteur
Haut-parleurs
Réseau
48 Guide de configuration et de référence rapide
Page 49

Connexions des moniteurs
Pour les cartes compatibles double-écran avec un seul connecteur
Adaptateur VGA en Y pour deux écrans
Adaptateur DVI en Y pour deux écrans
VGA
VGA
• Cet adaptateur convient pour un ou deux moniteurs
VGA. Ce câble présente un code de couleurs :
bleu pour l'écran principal, noir pour l'écran
secondaire en option.
DVI
DVI
• Cet adaptateur convient pour un ou deux moniteurs
DVI. Ce câble présente un code de couleurs :
bleu pour l'écran principal, noir pour l'écran
secondaire en option.
AVIS : l'adaptateur en Y fourni avec votre ordinateur est spécifique à la carte graphique de votre ordinateur.
N'utilisez pas un adaptateur fourni avec une autre carte graphique.
Guide de configuration et de référence rapide 49
Page 50
Pour les cartes graphiques compatibles double-écran, avec 1 connecteur DVI et 1 connecteur VGA
Un écran DVI ou un écran VGA
DVI
Deux écrans VGA avec adaptateur VGA
VGA
www.dell.com | support.dell.com
• Utilisez le connecteur approprié lorsque
vous branchez un ou deux écrans.
• Utilisez l'adaptateur VGA lorsque vous branchez
deux écrans VGA.
Pour les cartes graphiques compatibles double-écran avec 2 connecteurs DVI
Deux écrans DVI
DVI
DVI
• Utilisez les connecteurs DVI
lorsque vous branchez un ou
deux écrans DVI.
Un écran DVI et un écran VGA
DVI
VGA
• Utilisez l'adaptateur VGA pour
brancher un écran VGA sur un
connecteur DVI.
VGA
VGA
Deux écrans VGA
VGA
VGA
• Utilisez deux adaptateurs VGA
pour brancher deux écrans VGA
aux connecteurs DVI.
50 Guide de configuration et de référence rapide
Page 51

Configuration terminée
Clé de produit Microsoft Windows
Alimentation électrique
Clé de produit Microsoft Windows
Guide de configuration et de référence rapide 51
Page 52

Ouverture du capot de l'ordinateur
PRÉCAUTION : avant d'effectuer l'une des procédures de cette section, suivez
les instructions de sécurité fournies dans le Guide d’informations du système.
1
Éteignez l'ordinateur par le menu Démarrer.
2 Vérifiez que votre ordinateur et que les périphériques connectés sont bien éteints.
Si votre ordinateur et les périphériques qui y sont connectés ne se sont pas éteints
automatiquement lorsque vous avez éteint votre ordinateur, éteignez-les maintenant.
AVIS : pour débrancher un câble réseau, débranchez tout d'abord le câble de votre ordinateur,
puis de la prise réseau murale.
Débranchez les lignes téléphoniques ou de télécommunications de l'ordinateur.
www.dell.com | support.dell.com
3
4 Débranchez votre ordinateur et tous les périphériques connectés des prises
électriques, puis appuyez sur le bouton d'alimentation pour mettre la carte système
àla masse.
5 Si vous avez installé un cadenas dans l'anneau de sécurité situé sur le panneau arrière,
ôtez-le.
PRÉCAUTION : pour prévenir tout risque de choc électrique, débranchez
toujours votre ordinateur de la prise électrique avant d'ouvrir le capot.
6
Posez l'ordinateur sur le côté, comme indiqué sur l'illustration.
AVIS : vérifiez que vous avez suffisamment d'espace (30 cm minimum) pour ouvrir le capot.
7 Ouvrez le capot de l'ordinateur.
– Pour le modèle le mini-tour, appuyez sur les boutons des deux extrémités puis
soulevez le capot pour l'ouvrir.
– Pour le modèle de bureau, faites glisser le loquet de verrouillage du capot vers
le bloc d'alimentation de l'ordinateur. Soulevez le capot et faites-le pivoter vers
l'avant de l'ordinateur.
52 Guide de configuration et de référence rapide
Page 53

8 Avant de toucher quoi que ce soit à l'intérieur de l'ordinateur, raccordez-vous à
la masse en touchant une surface métallique non peinte, par exemple la partie
métallique à l'arrière de l'ordinateur.
Pendant votre intervention dans l'ordinateur, touchez régulièrement une surface
métallique non peinte de l'ordinateur afin de dissiper l'électricité statique qui pourrait
endommager les composants.
Guide de configuration et de référence rapide 53
Page 54

À l'intérieur de votre ordinateur
Modèle mini-tour
Lecteur de support amovible
Alimentation électrique
Lecteur de disquette
Unité de disque dur
www.dell.com | support.dell.com
Anneau pour cadenas
Connecteur
d'alimentation
Connecteurs du
panneau arrière
Haut-parleur
optionnel
Commutateur
d'intrusion du châssis
Carte système
Carénage du ventilateur du microprocesseur
Emplacements pour cartes d'extension PCI et AGP
54 Guide de configuration et de référence rapide
Page 55

Modèle de bureau
Commutateur
d'intrusion du châssis
Lecteur de support amovible
Lecteur de disquette
Alimentation
électrique
Anneau pour
cadenas
Connecteur
d'alimentation
Connecteurs du
panneau arrière
Unité de
disque dur
Carte système
Carénage du ventilateur du microprocesseur
Emplacements pour cartes d'extension PCI et AGP
Guide de configuration et de référence rapide 55
Page 56

Résolution des problèmes
Résolution des problèmes d'incompatibilité logicielle et matérielle
Microsoft® Windows® XP
Des conflits d'interruption (IRQ) Windows XP se produisent lorsqu'un périphérique n'est
pas détecté lors de l'installation du système d'exploitation ou lorsqu'il est détecté mais qu'il
n'est pas correctement configuré.
Pour rechercher des conflits sur un ordinateur sous Windows XP:
1 Cliquez sur le bouton Démarrer puis sur Panneau de configuration.
www.dell.com | support.dell.com
2 Cliquez sur Performances et maintenance puis sur Système.
3 Cliquez sur l'onglet Matériel, puis sur Gestionnaire de périphériques.
4 Dans la liste Gestionnaire de périphériques, vérifiez l'absence de conflits avec
les autres périphériques.
Les conflits sont indiqués par un point d'exclamation jaune (
du périphérique qui est à l'origine du conflit, ou par un x rouge (
!) situé en regard
X) lorsque le
périphérique a été désactivé.
5 Double-cliquez sur un conflit pour afficher la fenêtre Propriétés.
En cas de conflit d'IRQ, la zone État du périphérique de la fenêtre Propriétés
indique les autres cartes ou périphériques qui partagent cette IRQ.
6 Résolvez les conflits en reconfigurant les périphériques ou retirant les périphériques
du gestionnaire de périphériques.
Pour utiliser l'utilitaire de résolution de problèmes matériels de Windows XP:
1 Cliquez sur le bouton Démarrer, puis sur Aide et support.
2 Ta p e z utilitaire de résolution de problèmes matériels dans le champ
Rechercher, puis cliquez sur la flèche pour lancer la recherche.
3 Cliquez sur Utilitaire de résolution de problèmes matériels dans la liste
Résultats de la recherche.
4 Dans la liste Utilitaire de résolution de problèmes matériels, cliquez sur
Je dois résoudre un problème matériel sur mon ordinateur, puis sur Suivant.
56 Guide de configuration et de référence rapide
Page 57

Windows 2000
Pour rechercher des conflits sur un ordinateur sous Windows 2000 :
1 Cliquez sur le bouton Démarrer, pointez sur Paramètres,
puis cliquez sur Panneau de configuration.
2 Dans la fenêtre Panneau de configuration, double-cliquez sur Système.
3 Cliquez sur l'onglet Matériel.
4 Cliquez sur Gestionnaire de périphériques.
5 Cliquez sur Afficher puis sur Ressources par connexion.
6 Double-cliquez sur Requête d'interruption (IRQ) pour afficher les affectations d'IRQ.
Les conflits sont indiqués par un point d'exclamation jaune (
périphérique qui est à l'origine du conflit, ou par un x rouge (
!) situé en regard du
X) lorsque le
périphérique a été désactivé.
7 Double-cliquez sur un conflit pour afficher la fenêtre Propriétés.
En cas de conflit d'IRQ, la zone État du périphérique de la fenêtre Propriétés indique
les autres cartes ou périphériques qui partagent cette IRQ.
8 Résolvez les conflits en reconfigurant les périphériques ou retirant les périphériques
du gestionnaire de périphériques.
Pour utiliser l'utilitaire de résolution de problèmes matériels de Windows 2000 :
1 Cliquez sur le bouton Démarrer, puis sur Aide.
2 Cliquez sur Dépannage et maintenance sous l'onglet Sommaire, cliquez sur
Utilitaires de résolution de problèmes de Windows 2000, puis sur Matériel.
3 Dans la liste Utilitaire de résolution de problèmes matériels, cliquez sur
Je dois résoudre un problème matériel sur mon ordinateur, puis sur Suivant.
Guide de configuration et de référence rapide 57
Page 58

Utilisation de la fonction Restauration du système de Windows XP
Le système d'exploitation Windows XP comporte la fonction Restauration du système,
qui vous permet de restaurer l'ordinateur à un état antérieur (sans affecter les fichiers de
données) si les modifications apportées au matériel, aux logiciels ou aux paramètres du
système empêchent l'ordinateur de fonctionner correctement.
AVIS : sauvegarder vos fichiers de données régulièrement. La fonction Restauration du système
ne gère pas et ne récupère pas vos fichiers de données.
Création d'un point de restauration
1 Cliquez sur le bouton Démarrer, puis sur Aide et support.
www.dell.com | support.dell.com
2 Cliquez sur Restauration du système.
3 Suivez les instructions qui s'affichent à l'écran.
Restauration de l'ordinateur à un état antérieur
AVIS : avant de restaurer l'ordinateur à un état antérieur, enregistrez et fermez tous les fichiers
et les programmes ouverts. Ne modifiez, n'ouvrez ou ne supprimez en aucun cas des fichiers ou
des programmes tant que la restauration du système n'est pas terminée.
1
Cliquez sur le bouton Démarrer, pointez sur Tous les programmes→Accessoires→
Outils système, puis cliquez sur Restauration du système.
2 Vérifiez que l'option Restaurer mon ordinateur à une date antérieure est sélectionnée
et cliquez sur Suivant.
3 Cliquez sur la date à laquelle vous souhaitez restaurer l'ordinateur.
L'écran Sélection d'un point de restauration présente un calendrier pour visualiser et
sélectionner les points de restauration. Toutes les dates du calendrier comportant des
points de restauration apparaissent en gras.
4 Sélectionnez un point de restauration et cliquez sur Suivant.
Si une date du calendrier contient un seul point de restauration, ce dernier est
sélectionné automatiquement. Si plusieurs points de restauration sont disponibles,
cliquez sur celui que vous souhaitez utiliser.
58 Guide de configuration et de référence rapide
Page 59

5 Cliquez sur Suivant.
Une fois que la fonction Restauration du système termine la collecte des données,
l'écran Restauration terminée apparaît et l'ordinateur redémarre automatiquement.
6 Une fois l'ordinateur redémarré, cliquez sur OK.
Pour changer de point de restauration, répétez les étapes précédentes un utilisant
un autre point de restauration ou annulez la restauration.
Utilisation de la dernière configuration fonctionnelle sous Windows 2000
1 Redémarrez votre ordinateur et appuyez sur <F8> lorsqu'apparaît le message Please
select the operating system to start
pour commencer).
2 Sélectionnez Last Known Good Setting (Dernière configuration fonctionnelle),
appuyez sur <Entrée>, appuyez sur la touche <l> et sélectionnez votre système
d'exploitation lorsque vous y êtes invité.
Autres options permettant de résoudre des conflits logiciels ou matériels
AVIS : les procédures suivantes effacent toutes les informations sur votre disque dur.
• Si les procédures précédentes n'ont pas fonctionné, procédez à un formatage bas
niveau de votre disque dur.
Pour plus d'informations, reportez-vous au manuel d'installation de votre système
d'exploitation.
(Sélectionnez le système d'exploitation
• Réinstallez le système à l'aide du CD du guide d'installation et du système
d'exploitation.
Guide de configuration et de référence rapide 59
Page 60

Quand utiliser les Diagnostics Dell
Si vous rencontrez des difficultés avec votre ordinateur, procédez aux vérifications décrites
dans la rubrique “Résolution des problèmes” de votre Guide d'utilisation, et exécutez les
Diagnostics Dell avant de contacter Dell pour obtenir une assistance technique. Les
Diagnostics Dell peuvent vous aider à résoudre le problème sans contacter le service
technique. Si vous contactez le service technique de Dell, les résultats des tests fournissent
des informations importantes au personnel du support technique.
Les Diagnostics Dell vous permettent de :
• Effectuer des tests sur l'un ou l'ensemble des périphériques.
www.dell.com | support.dell.com
• Sélectionner les tests selon un symptôme du problème que vous rencontrez.
• Sélectionner le nombre d'exécutions du test.
• Suspendre le test si une erreur est détectée.
• Accéder à des informations de l'aide en ligne décrivant les tests et périphériques.
• Recevoir des messages d'état vous indiquant si les tests se sont déroulés sans problème.
• Recevoir des messages d'erreur si des problèmes sont détectés.
Démarrage des Diagnostics Dell
Il est recommandé d'imprimer ces procédures avant de commencer.
AVIS : utilisez les Diagnostics Dell pour tester uniquement votre ordinateur Dell™.
L'emploi de ce programme avec d'autres ordinateurs peut générer des messages d'erreur.
Ouvrez le programme de configuration du système, étudiez les informations de
configuration de votre ordinateur et assurez-vous que le périphérique que vous souhaitez
tester s'affiche dans le programme de configuration du système et qu'il est actif.
Démarrez les Diagnostics Dell à partir de votre disque dur ou du CD Drivers and Utilities
(Pilotes et utilitaires) (également appelé ResourceCD).
60 Guide de configuration et de référence rapide
Page 61

Démarrage des Diagnostics Dell à partir de votre disque dur
1 Arrêtez puis redémarrez l'ordinateur.
2 Lorsque le logo DELL™ apparaît, appuyez immédiatement sur <F12>.
REMARQUE : si un message indique qu'aucune partition des Diagnostics Dell n'a été trouvée,
suivez les instructions pour les exécuter à partir du CD Pilotes et utilitaires.
Si vous attendez trop longtemps et que le logo Microsoft® Windows® apparaît,
attendez encore jusqu'à ce que le bureau Windows s'affiche. Éteignez alors votre
ordinateur par le biais du menu Démarrer et faites une nouvelle tentative.
3 Lorsque la liste des périphériques d'amorçage s'affiche, sélectionnez Boot to Utility
Partition (Initialiser à partir de l'utilitaire de diagnostics) et appuyez sur <Entrée>.
4 Lorsque le menu principal des Diagnostics Dell s'affiche, sélectionnez le test à
effectuer.
Démarrage des Diagnostics Dell à partir du CD Drivers and Utilities (Pilotes et utilitaires)
1 Insérez le CD Pilotes et utilitaires.
2 Arrêtez puis redémarrez l'ordinateur.
Lorsque le logo DELL apparaît, appuyez immédiatement sur <F12>.
Si vous attendez trop longtemps et que le logo Windows s'affiche, attendez encore
jusqu'à ce que le Bureau Windows s'affiche. Éteignez alors votre ordinateur par le biais
du menu Démarrer et faites une nouvelle tentative.
REMARQUE : cette fonctionnalité modifie temporairement la séquence d'initialisation. Au
démarrage suivant, l'ordinateur s'initialise en fonction de l'ordre habituel, indiqué dans le
programme de configuration du système.
Lorsque la liste des périphériques d'amorçage s'affiche, sélectionnez IDE CD-ROM
3
Device (périphérique CD-ROM IDE) et appuyez sur <Entrée>.
4 Sélectionnez l'option IDE CD-ROM Device (périphérique CD-ROM IDE)
à partir du menu d'initialisation du CD.
5 Sélectionnez l'option Boot from CD-ROM (Initialiser à partir du CD-ROM)
à partir du menu.
6 Ta p e z 1 pour ouvrir le menu ResourceCD.
7 Ta p e z 2 pour lancer les Diagnostics Dell.
8 Sélectionnez Run Dell 32-bit Diagnostics (Exécuter les diagnostics Dell 32 bits)
dans la liste numérotée. Si plusieurs versions sont répertoriées, sélectionnez la version
appropriée pour votre ordinateur.
9 Lorsque le Menu principal des Diagnostics Dell s'affiche, sélectionnez le test
àeffectuer.
Guide de configuration et de référence rapide 61
Page 62

Menu principal des Diagnostics Dell
1 Une fois les diagnostics Dell chargés et lorsque l'écran Menu principal s'affiche,
cliquez sur le bouton de l'option que vous souhaitez.
Option Fonction
Express Test
(Test rapide)
Extended Test
www.dell.com | support.dell.com
2 Si un problème est rencontré lors d'un test, un message indiquant le code d'erreur
(Test complet)
Custom Test
(Test personnalisé)
Symptom Tree
(Arborescence
des symptômes)
et une description du problème s'affiche. Notez le code d'erreur et la description du
problème et suivez les instructions à l'écran.
Si vous ne pouvez pas résoudre le problème, contactez Dell.
Exécute un test rapide des périphériques. Ce test
prend 10 à 20 minutes et n'exige aucune intervention
de votre part. Exécutez le test rapide en premier pour
augmenter la possibilité de déterminer le problème
rapidement.
Exécute un test approfondi des périphériques. Ce test
peut prendre une heure ou plus et nécessite que vous
répondiez régulièrement à des questions.
Teste un périphérique spécifique. Vous pouvez
personnaliser les tests que vous souhaitez exécuter.
Répertorie les symptômes rencontrés le plus souvent et
vous permet de sélectionner un test selon le symptôme
du problème auquel vous êtes confronté.
REMARQUE : le numéro de service de votre ordinateur est situé en haut de chaque écran
de test. Lorsque vous appelez le service d'assistance technique de Dell, le technicien vous
demandera ce numéro.
62 Guide de configuration et de référence rapide
Page 63

3 Si vous effectuez un test à partir de l'option Custom Test (test personnalisé) ou
Symptom Tree (arborescence des symptômes), cliquez sur l'onglet approprié décrit
dans le tableau suivant pour obtenir plus d'informations.
Onglet Fon ction
Results (Résultats) Affiche les résultats du test et les conditions d'erreur
rencontrées.
Errors (Erreurs) Affiche les conditions d'erreur rencontrées, les codes
d'erreur et la description du problème.
Help (Aide) Décrit le test et peut indiquer les conditions requises
pour l'effectuer.
Configuration Affiche la configuration matérielle du périphérique
sélectionné.
Les diagnostics Dell obtiennent les informations de
configuration de tous vos matériels à partir du
programme de configuration du système, de la
mémoire et de divers tests internes, puis les affichent
dans la liste des périphériques, dans le volet gauche de
l'écran. La liste des périphériques peut ne pas afficher
les noms de tous les composants installés sur votre
ordinateur ni de tous les périphériques reliés.
Parameters
(Paramètres)
Vous permet de personnaliser le test en modifiant ses
paramètres.
4 Lorsque les tests sont terminés, si vous exécutez les Diagnostics Dell à partir du CD
Drivers and Utilities (Pilotes et utilitaires), retirez le CD.
5 Fermez l'écran de test pour revenir à l'écran Menu principal. Pour quitter les
Diagnostics Dell et redémarrer l'ordinateur, fermez l'écran Menu principal.
Codes sonores
Votre ordinateur peut émettre une série de signaux sonores pour identifier un problème.
Par exemple, le code 1-3-1 se compose d'un signal, d'une série de trois signaux, puis
d'un dernier signal. Cette série vous indique que l'ordinateur a rencontré un problème
de mémoire.
Si un code sonore est émis, notez-le et recherchez-le dans la section “Codes sonores”
du Guide d'utilisation.
Guide de configuration et de référence rapide 63
Page 64

Messages d'erreur
REMARQUE : si le message n'est pas répertorié, consultez la documentation du système
d'exploitation ou du programme en cours d'utilisation au moment où le message est apparu.
Si une erreur survient lors du démarrage, un message identifiant le problème peut s'afficher
à l'écran. Pour des suggestions de résolution des problèmes, consultez la section
“Messages d'erreur” du Guide d'utilisation.
Voyants du système
Votre ordinateur est équipé de voyants qui peuvent vous aider à analyser et résoudre
les problèmes.
www.dell.com | support.dell.com
Voyant
d'alimentation
Vert fixe N/A L'ordinateur est sous tension
Vert clignotant Éteint L'ordinateur est en mode
Le voyant vert
clignote plusieurs
fois, puis s'éteint.
Jaune fixe N/A Les Diagnostics Dell effectuent un
Voyant de
disque dur
N/A Présence d'une erreur de
Description du problème Solution proposée
et fonctionne normalement.
suspension (Microsoft
Windows
configuration.
test ou bien un composant de la
carte système est défectueux ou
installé de manière incorrecte.
®
2000 et Windows XP).
®
Aucune action corrective n'est
requise.
Pour réactiver l'ordinateur, appuyez
sur le bouton de l'alimentation,
déplacez la souris ou appuyez sur
une touche du clavier. Consultez la
section “Bouton d'alimentation”
de votre Guide d'utilisation.
Contrôlez les voyants de diagnostic
pour savoir si ce problème est
identifié.
Si les Diagnostics Dell
fonctionnent, laissez le test
s'exécuter.
Contrôlez les voyants de diagnostic
pour savoir si ce problème est
identifié. Consultez la section
“Problèmes liés à la carte système”
dans le Guide d'utilisation.
Si l'ordinateur ne démarre pas,
contactez Dell pour obtenir
une assistance technique.
64 Guide de configuration et de référence rapide
Page 65

Voyant
d'alimentation
Voyant jaune
clignotant
Voyant jaune
clignotant
Vert fixe et code
sonore durant le
POST
Voyant
d'alimentation
vert fixe, aucun
code sonore et
aucune vidéo
durant le POST
Voyant
d'alimentation
vert fixe et aucun
code sonore, mais
l'ordinateur se
verrouille durant
le POST
Voyant de
disque dur
Éteint Une défaillance de la carte système
Vert fixe Une défaillance du VRM ou de
N/A Un problème a été détecté lors
N/A Le moniteur ou la carte graphique
N/A Un composant de la carte système
Description du problème Solution proposée
ou de l'alimentation s'est produite.
la carte système s'est produite.
de l'exécution du BIOS.
peut être défectueux(se) ou
installé(e) de manière incorrecte.
peut être défaillant.
Contrôlez les voyants de diagnostic
pour savoir si ce problème est
identifié. Consultez les sections
“Problèmes d'alimentation” et
“Problèmes liés à la carte système”
dans le Guide d'utilisation.
Contrôlez les voyants de diagnostic
pour savoir si ce problème est
identifié. Consultez la section
“Problèmes liés à la carte système”
dans le Guide d'utilisation.
Consultez la section “Codes
sonores” de votre Guide
d'utilisation. Contrôlez également
les voyants de diagnostic pour
savoir si ce problème est identifié.
Contrôlez les voyants de diagnostic
pour savoir si ce problème est
identifié. Consultez la section
“Problèmes de vidéo et d'affichage”
dans le Guide d'utilisation.
Contrôlez les voyants de diagnostic
pour savoir si ce problème est
identifié. Si le problème n'est pas
identifié, contactez Dell pour
obtenir une assistance technique.
Voyants de diagnostic
Afin de vous aider à résoudre vos problèmes, votre ordinateur est muni de quatre voyants :
“A”, “B”, “C” et “D”. Ces voyants sont situés à l'arrière des ordinateurs mini-tour et à l'avant
des ordinateurs de bureau. Lorsque l'ordinateur démarre normalement, les voyants
clignotent. Après le démarrage de l'ordinateur, les voyants restent verts. Si l'ordinateur ne
fonctionne pas correctement, la couleur et le clignotement des voyants identifient le
problème.
Guide de configuration et de référence rapide 65
Page 66

Comportement
des voyants
A B C D
Description du problème Solution proposée
Défaillance possible du microprocesseur. Réinstallez le microprocesseur et redémarrez
l'ordinateur. Pour plus d'informations sur la
remise en place du microprocesseur,
consultez votre Guide d'utilisation.
Des modules de mémoire sont détectés
mais une panne de mémoire s'est produite.
A B C D
www.dell.com | support.dell.com
Défaillance possible d'une carte d'extension.
A B C D
Défaillance possible de la carte graphique. Réinstallez la carte graphique et redémarrez
A B C D
1 Retirez puis réinstallez tous les modules
de mémoire. Vérifiez que les pattes de
fixation de tous les connecteurs sont bien
verrouillées. Pour des performances
optimales, installez les DIMM par paires
(1 et 2, puis 3 et 4).
2 Redémarrez l'ordinateur.
1 Déterminez s'il existe un conflit en retirant
une carte (autre que la carte vidéo) puis en
redémarrant l'ordinateur.
2 Si le problème persiste, réinstallez la carte
retirée, retirez une autre carte puis
redémarrez l'ordinateur.
3 Renouvelez cette opération avec toutes
les cartes. Si l'ordinateur démarre
correctement, recherchez les conflits de
ressources avec la dernière carte retirée
de l'ordinateur (consultez la section
“Résolution des problèmes
d'incompatibilité logicielle ou matérielle”
de votre Guide d'utilisation).
4 Si le problème persiste, contactez Dell.
l'ordinateur.
Si le problème persiste, installez une carte
graphique qui fonctionne et redémarrez
l'ordinateur.
Si le problème persiste, contactez Dell.
= jaune
= vert
= éteint
66 Guide de configuration et de référence rapide
Page 67

Comportement
des voyants
A B C D
A B C D
Description du problème Solution proposée
Défaillance possible de l'unité de disque dur
ou du lecteur de disquette.
Défaillance possible de l'USB. Réinstallez tous les périphériques USB,
Vérifiez les connexions de tous les câbles
de données et d'alimentation et redémarrez
l'ordinateur.
vérifiez les connexions des câbles et
redémarrez l'ordinateur.
A B C D
A B C D
A B C D
A B C D
Aucun module de mémoire n'est détecté.
Défaillance de la carte système. Effectuez les procédures décrites dans la
Des modules de mémoire sont détectés mais
il existe une erreur de compatibilité ou de
configuration de mémoire.
Défaillance possible de la carte système
et/ou du matériel.
1 Retirez puis réinstallez tous les modules
de mémoire. Vérifiez que les pattes de
fixation de tous les connecteurs sont bien
verrouillées. Pour des performances
optimales, installez les DIMM par paires
(1 et 2, puis 3 et 4).
2 Redémarrez l'ordinateur.
section “Problèmes liés à la carte système”
de votre Guide d'utilisation.
Si le problème persiste, contactez Dell.
Vérifiez qu'il n'existe aucune exigence
concernant le placement des modules ou
leur qualité. Consultez la section “Mémoire”
de votre Guide d'utilisation.
Réinstallez les modules de mémoire et
redémarrez l'ordinateur.
Si le problème persiste, contactez Dell.
Suivez la procédure de la section “Problèmes
liés à la carte système” et consultez la section
“Résolution des problèmes d'incompatibilité
logicielle ou matérielle” de votre Guide
d'utilisation.
Si le problème persiste, contactez Dell.
= jaune
= vert
= éteint
Guide de configuration et de référence rapide 67
Page 68

Comportement
des voyants
Description du problème Solution proposée
Défaillance possible d'une carte d'extension. 1 Déterminez s'il existe un conflit en retirant
A B C D
www.dell.com | support.dell.com
Une autre panne s'est produite. Vérifiez que les câbles sont correctement
A B C D
L'ordinateur fonctionne normalement
après le POST.
A B C D
une carte puis en redémarrant l'ordinateur.
2 Si le problème persiste, réinstallez la carte
retirée, retirez une autre carte puis
redémarrez l'ordinateur.
3 Renouvelez cette opération avec toutes
les cartes. Si l'ordinateur démarre
correctement, recherchez les conflits de
ressources avec la dernière carte retirée
de l'ordinateur (consultez la section
“Résolution des problèmes
d'incompatibilité logicielle ou matérielle”
de votre Guide d'utilisation).
4 Si le problème persiste, contactez Dell.
connectés entre le disque dur, le lecteur
de CD-ROM, le lecteur de DVD-ROM
et la carte mère.
Si le problème persiste, contactez Dell.
Aucune
= jaune
= vert
= éteint
68 Guide de configuration et de référence rapide
Page 69

Questions fréquemment posées
Comment faire pour... Solution Où trouver des informations
supplémentaires ?
Configurer mon ordinateur
pour utiliser deux écrans ?
Connecter mon écran lorsque
son connecteur ne semble pas
correspondre à celui situé à
l'arrière de mon ordinateur ?
Brancher mes haut-parleurs ? Si votre ordinateur est équipé
Trouver les bons connecteurs
pour mes périphériques USB ?
Trouver des informations
surlematériel et autres
caractéristiques techniques
de mon ordinateur ?
Reportez-vous à la rubrique
“Connexions des moniteurs”
page 49 pour plus d'informations
sur la connexion de deux
moniteurs à la carte graphique.
Si votre carte graphique possède
un connecteur DVI mais que votre
écran est de type VGA, vous devez
utiliser un adaptateur, que vous
devriez retrouver dans l’emballage.
d'une carte audio, branchez les
haut-parleurs aux connecteurs de
la carte.
Votre ordinateur Dell Precision 360
possède huit connecteurs USB
(deux à l'avant et six à l'arrière).
Vo tre Guide d'utilisation présente
un tableau des caractéristiques,
dont le but est de fournir des
informations plus détaillées sur
votre ordinateur et sur le matériel.
Pour retrouver votre Guide
d'utilisation, reportez-vous à la
section “Trouver des informations
relatives à votre ordinateur”
page 39.
Contactez le Support Dell pour
de plus amples informations.
Consultez la documentation
fournie avec les haut-parleurs
pour plus d'informations.
Reportez-vous aux graphiques
des vues avant et arrière de votre
ordinateur dans le Guide
d'utilisation. Pour retrouver votre
Guide d'utilisation, reportez-vous
à la section “Trouver des
informations relatives
à votre ordinateur” page 39.
Consultez le site Web Dell
Support et utilisez l'un des outils
d'aide suivants : lisez les livres
blancs relatifs aux dernières
technologies en date ou
communiquez avec d'autres
utilisateurs Dell sur le salon
de discussion.
Guide de configuration et de référence rapide 69
Page 70

Comment faire pour... Solution Où trouver des informations
Trouver de la documentation
pour mon ordinateur ?
www.dell.com | support.dell.com
La documentation suivante est
disponible pour votre ordinateur :
• Guide d'utilisation
• Guide de configuration
et de référence rapide
• Guide d'informations du système
• Étiquette d'informations du
système
• Guide technique
Pour retrouver ces documents,
reportez-vous à la section
“Trouver des informations
relatives à votre ordinateur”
page 39.
supplémentaires ?
En cas de perte de votre
documentation, vous pourrez
la retrouver sur le site Web du
support technique de Dell à
l'adresse support.dell.com.
70 Guide de configuration et de référence rapide
Page 71

Dell Precision™ Workstation 360
Guia de configuração e de referência rápida
Modelos: DHM e WHM
www.dell.com | support.dell.com
Page 72

Observações, avisos e cuidados
OBSERVAÇÃO: As OBSERVAÇÕES fornecem informações importantes que o ajudam
a utilizar melhor o computador.
AVISO: As mensagens de AVISO informam sobre danos potenciais no hardware ou perda
de dados e indica como evitar o problema.
CUIDADO: As mensagens de CUIDADO indicam possíveis danos à propriedade,
danos pessoais ou morte.
Abreviações e acrônimos
Para obter a lista completa de abreviações e acrônimos, consulte o “Glossário”
do Guia do usuário.
____________________
As informações contidas nesse documento estão sujeitas a alterações sem aviso prévio.
© 2003 Dell Computer Corporation. Todos os direitos reservados.
É proibida a reprodução de qualquer produto da Dell sem permissão por escrito da Dell Computer Corporation .
Marcas comerciais utilizadas neste texto: Dell, o logotipo da DELL, e Dell Precision são marcas comerciais da Dell
Computer Corporation; Microsoft, Windows, e Windows NT são marcas registradas da Microsoft Corporation.
Neste documento poderão aparecer referências a nomes de produtos e marcas registradas de outras entidades. A Dell
Computer Corporation renuncia à reclamação de direitos sobre marcas registradas e nomes de produtos que não sejam
de sua propriedade.
Modelos: DHM e WHM
Fevereiro de 2003 P/N D0732 Rev. A00
Page 73

Conteúdo
Como obter informações sobre seu computador . . . . . . . . . 75
Configuração do computador
Conexões do monitor
Configuração concluída
Abertura da tampa do computador
Parte interna do computador
Resolução de problemas
. . . . . . . . . . . . . . . . . . . 79
. . . . . . . . . . . . . . . . . . . . . . . 85
. . . . . . . . . . . . . . . . . . . . . . 87
. . . . . . . . . . . . . . . . 88
. . . . . . . . . . . . . . . . . . . 90
. . . . . . . . . . . . . . . . . . . . . . 92
Resolução de problemas de incompatibilidade de software
e hardware
. . . . . . . . . . . . . . . . . . . . . . . . . . . 92
Uso do recurso Restauração do sistema do Windows XP
Utilização da última configuração válida no Windows 2000
Quando utilizar o Dell Diagnostics (Diagnósticos da Dell)
Inicialização do programa de Diagnósticos da Dell
Códigos de bipe
Mensagens de erro
LEDs do sistema
LEDs de diagnóstico
Perguntas mais freqüentes
. . . . . . . . . . . . . . . . . . . . . . . . 99
. . . . . . . . . . . . . . . . . . . . . . . 100
. . . . . . . . . . . . . . . . . . . . . . . . 100
. . . . . . . . . . . . . . . . . . . . . . 102
. . . . . . . . . . . . . . . . . . . . 106
. . . . 94
. . 95
. . . . 96
. . . . . . . 96
Conteúdo 73
Page 74

74 Conteúdo
Page 75

Como obter informações sobre seu computador
A Dell fornece as seguintes ferramentas de recursos e suporte. Recursos adicionais podem
ser fornecidos junto com seu computador.
O que está procurando? Encontre aqui
• Um programa de diagnóstico
para o meu computador
• Drivers para o meu computador
•Meu Guia do usuário
• Documentação de meus dispositivos
• Conectores da placa de sistema
• Localização dos componentes
da placa de sistema
CD Drivers and Utilities (Drivers e utilitários),
também chamado ResourceCD)
A documentação e os drivers já vêm
instalados de fábrica. Pode-se utilizar esse
CD para reinstalar drivers, executar
ferramentas de diagnóstico ou acessar
sua documentação.
Os arquivos de leitura (Readme) estão
inclusos em seu CD para fornecer as
atualizações mais recentes sobre as
alterações técnicas de seu computador
ou material de referência técnica avançada
para técnicos e usuários.
Etiqueta de informações do sistema
ou
Localizado no lado interno da tampa de seu computador.
Guia de configuração e de referência rápida 75
Page 76

O que está procurando? Encontre aqui
• Informações sobre garantia
Guia de informações do sistema da Dell
• Informações de segurança
• Como remover e substituir peças
www.dell.com | support.dell.com
• Especificações técnicas
• Como configurar os parâmetros
do sistema
• Como solucionar problemas
• Código de serviço expresso
e Etiqueta de Serviço
• Windows
Etiqueta de licença
Ícone do Guia do usuário
(Microsoft
®
Windows® 2000)
Clique duas vezes no ícone Guia do usuário localizado
na área de trabalho.
Centro de ajuda e suporte do Windows XP
Clique no botão Iniciar e, em seguida,
1
clique em Ajuda e suporte.
2 Clique em Guias do usuário e do sistema e,
em seguida, clique em Guia do usuário.
Código de serviço expresso e Etiqueta da chave
do produto
Essas etiquetas estão localizadas no computador.
76 Guia de configuração e de referência rápida
Page 77

O que está procurando? Encontre aqui
• Drivers mais recentes para o meu
computador
• Respostas para dúvidas de assistência
técnica e suporte
• Troca de informações on-line com outros
usuários e com o suporte técnico
• Documentação do meu computador
incluindo o Manual de serviço
Site de suporte da Dell — support.dell.com (em inglês)
O site de suporte da Dell oferece várias ferramentas on-line,
como por exemplo:
• Soluções - Dicas e sugestões de resolução de problemas,
comentários de técnicos e cursos on-line
• Fórum do cliente – Troca de informações on-line
com outros clientes da Dell
• Atualizações - Informações sobre atualização de componentes,
tais como memória, unidade de disco rígido e sistema operacional
• Proteção ao cliente - Informações sobre contato, status de pedidos,
garantia e reparação
• Downloads - Drivers, patches e atualizações de software
• Referência - Documentação do computador, especificações
do produto e artigos
• Status do serviço de chamadas
e histórico de suporte
• Principais questões técnicas
sobre o meu computador
• Perguntas mais freqüentes
Site do Dell Premier Support — premiersupport.dell.com
(em inglês)
O site do Dell Premier Support é personalizado para clientes
corporativos, governamentais e educacionais. Esse site pode não
estar disponível em todas as regiões.
• Downloads de arquivos
• Detalhes sobre a configuração do meu
computador
• Contrato de serviço do meu computador
• Como utilizar o Windows XP
• Documentação do meu computador
• Documentação dos dispositivos
(modem, por exemplo)
Centro de ajuda e suporte do Windows XP
1 Clique no botão Iniciar e, em seguida, clique em Ajuda e suporte.
2 Digite uma palavra ou frase que descreva o seu problema
e clique no ícone de seta.
3 Clique no tópico que descreve o seu problema.
4 Siga as instruções exibidas na tela.
Guia de configuração e de referência rápida 77
Page 78

O que está procurando? Encontre aqui
• Como reinstalar o sistema operacional CD Operating System (sistema operacional)
Após reinstalar o sistema operacional
utilizando o CD Operating System
Reinstallation (Reinstalação do sistema
operacional), utilize o CD Drivers and
Utilities (Drivers e utilitários) para
reinstalar os drivers dos dispositivos
fornecidos com seu computador.
A chave do produto de seu sistema
operacional está localizada em seu
www.dell.com | support.dell.com
ou
computador.
78 Guia de configuração e de referência rápida
Page 79

Configuração do computador
CUIDADO: Antes de executar os procedimentos desta seção, siga as instruções
de segurança localizadas no Guia de informações do sistema.
AVISO: Se em seu computador houver uma placa de expansão instalada (placa de rede,
por exemplo), conecte o cabo apropriado à mesma, e não ao conector do painel traseiro
do equipamento.
É necessário completar todos os procedimentos para configurar seu computador
corretamente. Observe as figuras apropriadas para seguir as instruções.
1 Conecte o teclado e o mouse.
AVISO: Não utilize um mouse PS/2 e um USB ao mesmo tempo.
2
Conecte o cabo do modem ou de rede.
Insira o cabo de rede (não o da linha telefônica) no conector de rede. Caso possua
um modem opcional, conecte o cabo da linha telefônica ao modem.
AVISO: Não conecte o cabo do modem ao adaptador de rede. A voltagem das comunicações
telefônicas pode causar danos ao adaptador de rede.
Conecte o monitor.
3
Alinhe e insira o cabo do monitor cuidadosamente para que os pinos do conector não
entortem. Aperte os parafusos de aperto manual nos conectores do cabo.
OBSERVAÇÃO: Alguns monitores de tela plana e placas gráficas são compatíveis com a
interface visual digital (DVI – Interface Visual Digital). Se seu monitor ou placa possuir
conectores DVI, a Dell recomenda que utilize o DVI em vez do VGA.
O segundo monitor é opcional e exige uma placa gráfica adaptadora para vários
monitores. Para ativar o suporte de dois monitores, estes deverão estar conectados
quando o computador for inicializado. Consulte a seção “Conexões do monitor”
a página 85 para obter mais informações sobre conexão de dois monitores.
4 Conecte os alto-falantes.
5 Conecte os cabos de alimentação ao computador, monitor e dispositivos e insira
a outra extremidade desses cabos nas tomadas elétricas.
Guia de configuração e de referência rápida 79
Page 80

6 Verifique se o interruptor de seleção de voltagem está na posição correta de acordo
com o local onde o computador será instalado.
Seu computador está equipado com um dos seguintes itens:
• Fonte de alimentação de voltagem fixa - Os computadores com fonte de
alimentação de voltagem fixa não possuem interruptor de seleção de voltagem
no painel traseiro e funcionam apenas em uma voltagem (para saber a voltagem
correta, consulte a etiqueta de regulamentação na parte externa do computador).
• Circuito de troca de voltagem automática - Os computadores com o circuito de
troca de voltagem automática não possuem interruptor de seleção de voltagem
no painel traseiro e detecta a voltagem correta do equipamento automaticamente.
• Interruptor de seleção de voltagem manual - Os computadores com interruptor
www.dell.com | support.dell.com
de seleção de voltagem no painel traseiro devem ser conectados na voltagem de
funcionamento correta manualmente.
AVISO: Para evitar danos ao computador que podem ser causados pelo interruptor de seleção
de voltagem manual, coloque o interruptor na voltagem que mais se aproxime aos valores de
energia de CA em seu local. No Japão, o interruptor de seleção de voltagem deve ser colocado
em 115-V, mesmo que a energia de CA disponível no Japão seja 100-V. Certifique-se, também,
de que o monitor e os dispositivos conectados sejam apropriados para o funcionamento com a
energia de CA disponível em seu local.
Pressione o botão Liga/Desliga para ligar o computador e os monitores.
7
Consulte a seção “Configuração concluída” a página 87.
OBSERVAÇÃO: Antes de instalar quaisquer dispositivos ou programas que não foram
fornecidos com o computador, leia a documentação que acompanha o programa ou dispositivo
ou entre em contato com seu fornecedor para verificar se o programa ou dispositivo é compatível
com seu computador e o sistema operacional.
80 Guia de configuração e de referência rápida
Page 81

Configuração da minitorre - sem placas de expansão
Teclado
Mouse
Alto-falantes
Fones de ouvido
Rede
USB
Guia de configuração e de referência rápida 81
Page 82

Configuração da minitorre - com placas de expansão
Monitor
Tela plana
monitor
Alto-falantes
www.dell.com | support.dell.com
OBSERVAÇÃO: Para obter mais informações sobre configuração de monitores com placas
gráficas específicas, consulte a seção “Conexões do monitor” a página 85.
Rede
82 Guia de configuração e de referência rápida
Page 83

Configuração do computador de mesa - sem placas de expansão
Teclado
Mouse
Alto-falantes
Fones de ouvido
Rede
USB
Guia de configuração e de referência rápida 83
Page 84

Configuração do computador de mesa - com placas de expansão
Monitor
Tela plana
monitor
Alto-falantes
www.dell.com | support.dell.com
OBSERVAÇÃO: Para obter mais informações sobre configuração de dois monitores,
consulte a seção “Conexões do monitor” a página 85.
Rede
84 Guia de configuração e de referência rápida
Page 85

Conexões do monitor
Para placas com capacidade para dois monitores com apenas um conector
Adaptador duplo de cabos VGA Y
Adaptador duplo de cabos DVI Y
VGA
VGA
• O cabo desse adaptador pode suportar um ou dois
monitores VGA. Esse cabo é codificado por cores:
azul para o primeiro monitor e preto para o segundo
(opcional).
DVI
DVI
• O cabo desse adaptador pode suportar um ou dois
monitores DVI. Esse cabo é codificado por cores:
azul para o primeiro monitor e preto para o segundo
(opcional).
AVISO: O adaptador de cabos Y fornecido com o computador é funciona somente para a placa gráfica
do equipamento. Os cabos do adaptador de outras placas gráficas não devem ser utilizados.
Guia de configuração e de referência rápida 85
Page 86
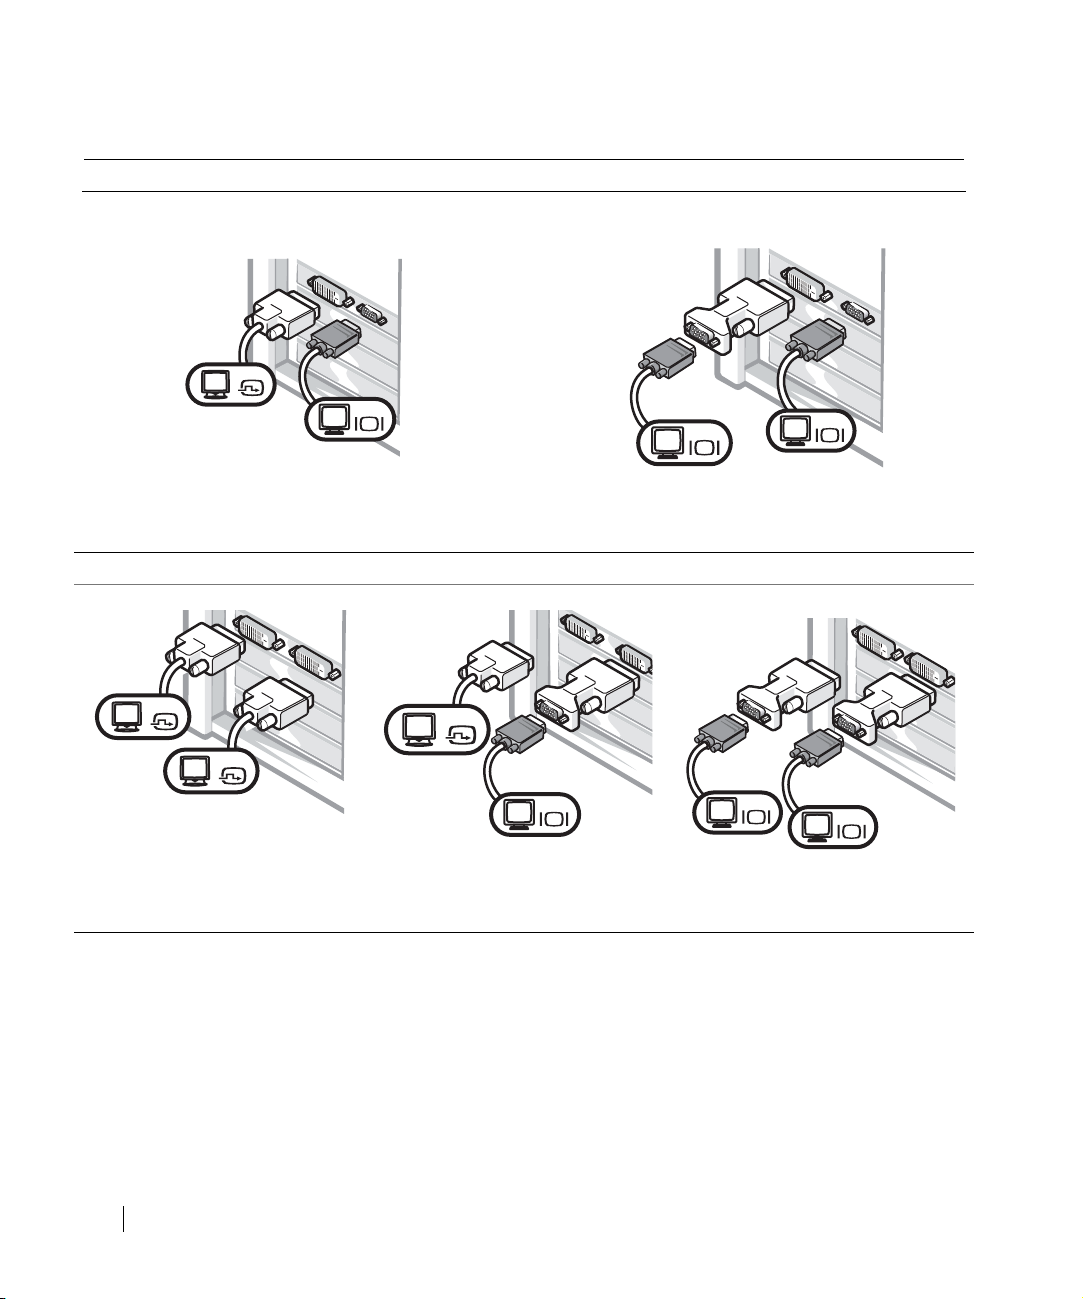
Para placas com capacidade para dois monitores com um conector DVI e um VGA.
DVI individual/VGA individual
DVI
VGA duplo com adaptador VGA
VGA
www.dell.com | support.dell.com
• Utilize o conector apropriado para efetuar
a conexão de um ou dois monitores.
• Utilize o adaptador VGA quando desejar conectar
dois monitores VGA.
Para placas com capacidade para dois monitores com dois conectores DVI.
DVI duplo
DVI
DVI
• Utilize os conectores DVI para
conectar um ou dois monitores
DVI.
DVI duplo com um adaptador VGA
DVI
VGA
• Utilize o adaptador VGA para
conectar um monitor VGA ao
conector DVI.
VGA
VGA
DVI duplo com dois adaptadores VGA
VGA
VGA
• Utilize dois adaptadores VGA para
conectar dois monitores VGA a
conectores DVI.
86 Guia de configuração e de referência rápida
Page 87

Configuração concluída
Chave do produto do Microsoft Windows
Energia
Chave do produto do Microsoft Windows
Guia de configuração e de referência rápida 87
Page 88

Abertura da tampa do computador
CUIDADO: Antes de executar os procedimentos dessa seção, siga as instruções
de segurança localizadas no Guia de informações do sistema.
1
Desligue o computador através do menu Iniciar.
2 Certifique-se de que o computador e os dispositivos conectados estejam desligados.
Se o computador e os dispositivos acoplados não tiverem sido desligados
automaticamente quando desligou o computador, faça-o agora.
AVISO: Para desconectar o cabo de rede, primeiramente desconecte o cabo do computador
e depois o desconecte da tomada da rede.
Desconecte qualquer linha telefônica ou de telecomunicação do computador.
www.dell.com | support.dell.com
3
4 Desconecte o computador e todos os dispositivos acoplados das tomadas elétricas e,
em seguida, pressione o botão Liga/Desliga para aterrar a placa de sistema.
5 Caso tenha instalado um cadeado utilizando o anel de cadeado no painel traseiro,
remova-o.
CUIDADO: Para evitar choque elétrico, desconecte sempre o computador
da tomada elétrica antes de abrir a tampa.
Deite o computador de lado conforme mostrado na ilustração.
6
AVISO: Certifique-se de que há espaço suficiente para que a tampa fique aberta - pelo menos
30 cm de espaço da área de trabalho.
Abra a tampa do computador.
7
– Na minitorre, empurre os botões das duas extremidades e levante a abertura
da tampa.
– Em computadores de mesa, deslize a trava de liberação da tampa até a fonte
de alimentação de seu computador. Levante a tampa e gire-a em direção à parte
frontal do computador.
88 Guia de configuração e de referência rápida
Page 89

8 Antes de tocar em qualquer componente interno do computador, elimine a
eletricidade estática do seu corpo tocando em uma superfície metálica sem pintura,
como o metal na parte traseira do computador.
No decorrer do trabalho, toque periodicamente em uma superfície metálica sem
pintura do computador para dissipar a eletricidade estática, que poderia danificar
os componentes internos.
Guia de configuração e de referência rápida 89
Page 90

Parte interna do computador
Computador de minitorre
Unidade de mídia removível
Unidade de disquete
Fonte de alimentação
www.dell.com | support.dell.com
Anel do cadeado
Conector
de energia
Conectores do
painel traseiro
Unidade de disco
rígido
Alto-falante
opcional
Sensor de
violação do chassi
Placa de sistema
Cobertura da passagem de ar
do microprocessador
Slots de placas de expansão AGP e PCI
90 Guia de configuração e de referência rápida
Page 91

Computador de mesa
Sensor de violação
do chassi
Fonte de alimentação
Anel do cadeado
Conector
de energia
Unidade de mídia removível
Unidade de disquete
Unidade de disco
rígido
Placa de sistema
Conectores do
painel traseiro
Cobertura da passagem de ar
do microprocessador
Slots de placas de expansão AGP e PCI
Guia de configuração e de referência rápida 91
Page 92

Resolução de problemas
Resolução de problemas de incompatibilidade de software e hardware
Microsoft® Windows® XP
Ocorrerão conflitos de IRQ no Windows XP quando algum dispositivo não for detectado
durante a configuração do sistema operacional ou for detectado, mas configurado
incorretamente.
Para verificar conflitos em computadores que estejam executando o Windows XP:
1 Clique no botão Iniciar e, em seguida, em Painel de controle.
www.dell.com | support.dell.com
2 Clique em Desempenho e manutenção e em Sistema.
3 Clique na guia Hardware e em Gerenciador de dispositivos.
4 Na lista do Gerenciador de dispositivos, verifique se há conflitos com outros
dispositivos.
Os conflitos são indicados por um ponto de exclamação amarelo (
dispositivo em conflito ou por um
5 Clique duas vezes no conflito para exibir a janela Propriedades.
X vermelho, se o dispositivo tiver sido desativado.
!) ao lado do
Quando houver algum conflito de IRQ, a área de status do Dispositivo na janela
Propriedades informará quais são os outros dispositivos que compartilham o mesmo
IRQ.
6 Resolva os conflitos configurando novamente os dispositivos ou removendo-os
do Gerenciador de dispositivos.
Para utilizar o Hardware Troubleshooter (Solucionador de problemas de hardware)
do Windows XP:
1 Clique no botão Iniciar e, em seguida, clique em Ajuda e suporte.
2 Digite hardware troubleshooter no campo Pesquisar e clique na seta para iniciar
a pesquisa.
3 Clique em Hardware Troubleshooter (Solucionador de problemas) na lista de
Resultados da pesquisa.
4 Na lista do Hardware Troubleshooter (Solucionador de problemas), clique em I need
to resolve a hardware conflict on my computer (Preciso resolver um conflito de
hardware) e, em seguida, clique em Next (Avançar).
92 Guia de configuração e de referência rápida
Page 93

Windows 2000
Para verificar conflitos em computadores que estejam executando o Windows 2000:
1 Clique no botão Iniciar, aponte para Configurações e, em seguida,
clique em Painel de controle.
2 Na janela Painel de controle, clique duas vezes em Sistema.
3 Clique na guia Hardware.
4 Clique em Gerenciador de dispositivos.
5 Clique em Visualizar e em Recursos por conexão.
6 Clique duas vezes em Pedido de interrupção (IRQ) para visualizar as designações
de IRQ.
Os conflitos são indicados por um ponto de exclamação amarelo (
dispositivo em conflito ou por um
7 Clique duas vezes no conflito para exibir a janela Propriedades.
X vermelho, se o dispositivo tiver sido desativado.
!) ao lado do
Quando houver algum conflito de IRQ, a área de status do Dispositivo na janela
Propriedades informará quais são os outros dispositivos que compartilham o mesmo
IRQ.
8 Resolva os conflitos configurando novamente os dispositivos ou removendo-os
do Gerenciador de dispositivos.
Para utilizar o Hardware Troubleshooter (Solucionador de problemas de hardware)
do Windows 2000:
1 Clique no botão Iniciar e, em seguida, clique em Ajuda.
2 Clique em Troubleshooting and Maintenance (Resolução de problemas e
manutenção) na guia Contents (Conteúdo) e, em seguida, clique em Windows 2000
troubleshooters (Solucionador de problemas do Windows 2000) e em Hardware.
3 Na lista do Hardware Troubleshooter (Solucionador de problemas) clique em I need
to resolve a hardware conflict on my computer (Preciso resolver um conflito de
hardware) e, em seguida, clique em Next (Avançar).
Guia de configuração e de referência rápida 93
Page 94

Uso do recurso Restauração do sistema do Windows XP
O recurso “Restauração do sistema” do sistema operacional do Windows XP permite que
o computador retorne ao estado operacional anterior (sem afetar arquivos de dados) se as
alterações efetuadas nas configurações do sistema ou no hardware/software tiverem deixado
o computador em estado operacional não desejado.
AVISO: Faça a cópia de segurança (back up) de seus arquivos de dados regularmente.
O recurso Restauração do sistema não monitora os arquivos de dados nem os recupera.
Como criar o ponto de restauração
1 Clique no botão Iniciar e, em seguida, clique em Ajuda e suporte.
www.dell.com | support.dell.com
2 Clique em Restauração do sistema.
3 Siga as instruções exibidas na tela.
Como restaurar o computador ao estado operacional anterior
AVISO: Antes de restaurar o computador ao estado operacional anterior, salve e feche todos os
arquivos e programas que estejam abertos. Não altere, abra ou exclua qualquer arquivo ou
programa enquanto a restauração do sistema não estiver concluída.
1
Clique no botão Iniciar, aponte para Todos os programas→Acessórios→Ferramentas
do sistema e clique em Restauração do sistema.
2 Verifique se a opção Restaurar meu computador ao estado anterior está selecionada e,
em seguida, clique em Avançar.
3 Clique na data do calendário em que deseja restaurar seu computador.
A tela Selecionar um ponto de restauração fornece um calendário que permite
a visualização e seleção dos pontos de restauração. Todas as datas no calendário
com pontos de restauração disponíveis aparecem em negrito.
4 Selecione o ponto de restauração e clique em Avançar.
Se a data do calendário possuir somente um ponto de restauração, este será
selecionado automaticamente. Se houver dois ou mais pontos de restauração
disponíveis, clique no ponto que deseja restaurar.
94 Guia de configuração e de referência rápida
Page 95

5 Clique em Avançar.
Após o recurso Restaurar sistema concluir a coleta de dados, a tela Restauração
concluída será exibida e o computador será reiniciado automaticamente.
6 Após reiniciar o computador, clique em OK.
Para alterar o ponto de restauração, repita as etapas usando um ponto de restauração
diferente ou desfaça a restauração.
Utilização da última configuração válida no Windows 2000
1 Reinicie o computador e pressione a tecla <F8> quando a mensagem Please
select the operating system (Selecione o sistema operacional)
aparecer
2 Selecione o item Last Known Good Setting (Última configuração válida), pressione
<Enter> e, em seguida, a tecla <l> e selecione o sistema operacional quando lhe for
solicitado.
Outras opções para auxiliar na resolução de conflitos de software e hardware adicionais
AVISO: Os procedimentos a seguir eliminam todas as informações da unidade de disco rígido.
• Quando os procedimentos anteriores não funcionarem, execute um formato de nível
baixo da unidade de disco rígido.
Consulte o guia de instalação do sistema operacional para obter mais informações.
.
• Reinstale o sistema operacional utilizando o guia de instalação e o CD do sistema
operacional.
Guia de configuração e de referência rápida 95
Page 96

Quando utilizar o Dell Diagnostics (Diagnósticos da Dell)
Quando houver algum problema com seu computador, consulte a seção “Resolução de
problemas” em seu Guia do usuário . Execute o Dell Diagnostics antes de entrar em contato
com a Dell para obter assistência técnica. A execução do Dell Diagnostics pode ajudá-lo a
solucionar o problema sem precisar entrar em contato com a Dell. Caso entre em contato
com a empresa, os resultados dos testes fornecerão informações importantes para a equipe
de atendimento e suporte da Dell.
O Dell Diagnostics permite:
• Executar testes em um ou mais dispositivos.
www.dell.com | support.dell.com
• Selecionar testes com base no sintoma do problema.
• Escolher quantas vezes o teste será executado.
• Suspender os testes quando o erro for detectado.
• Acessar as informações da ajuda on-line que descrevem os testes e os dispositivos.
• Receber mensagens de status que indicam se os testes foram concluídos com êxito.
• Receber mensagens de erro quando algum problema for detectado.
Inicialização do programa de Diagnósticos da Dell
É recomendável que imprima estes procedimentos antes de começar.
AVISO: Utilize o Dell Diagnostics somente para testar seu computador Dell™. O uso desse
programa em outros computadores poderá gerar mensagens de erro.
Entre na configuração do sistema, revise as informações de configuração de seu computador
e verifique se o dispositivo que deseja testar faz parte da configuração do sistema e se está
ativado.
Inicie o Dell Diagnostics de sua unidade de disco rígido ou do CD Drivers and Utilities
(Drivers e utilitários), também chamado ResourceCD.
96 Guia de configuração e de referência rápida
Page 97

Inicialização do Dell Diagnostics da unidade de disco rígido
1 Desligue e reinicieo computador.
2 Quando o logotipo da DELL™ aparecer, pressione a tecla <F12> imediatamente.
OBSERVAÇÃO: Caso receba uma mensagem informando que nenhuma partição do utilitário
de diagnósticos foi encontrada, siga as instruções para executar o Dell Diagnostics do CD
Drivers and Utilities (Drivers e utilitários).
Quando esperar durante muito tempo e o logotipo do Microsoft® Windows® aparecer,
continue esperando até visualizar a área de trabalho do Windows. Em seguida,
desligue o computador através do menu Iniciar e tente novamente.
3 Quando a lista de dispositivos de inicialização aparecer, destaque Boot to Utility
Partition (Inicializar na partição do utilitário) e pressione <Enter>.
4 Quando o menu principal do Dell Diagnostics aparecer, selecione o tipo de teste que
deseja executar.
Inicie o Dell Diagnostics do CD Drivers and Utilities (Drivers e utilitários)
1 Insira o CD Drivers and Utilities (Drivers e utilitários).
2 Desligue e reinicie o computador.
Quando o logotipo da DELL aparecer, pressione a tecla <F12>imediatamente.
Se esperar muito tempo e o logotipo do Windows aparecer na tela, aguarde até
visualizar a área de trabalho do Windows. Em seguida, desligue o computador através
do menu Iniciar e tente novamente.
OBSERVAÇÃO: Este recurso altera a seqüência de inicialização apenas uma vez. A próxima
inicialização acontecerá de acordo com os dispositivos especificados na configuração do
sistema.
3
Quando a lista de dispositivos aparecer na tela, destaque IDE CD-ROM Device
(Dispositivo de CD-ROM IDE) e pressione <Enter>.
4 Selecione a opção IDE CD-ROM Device (Dispositivo de CD-ROM IDE)
do menu do CD de inicialização.
5 Selecione a opção Boot from CD-ROM (Inicializar a partir do CD-ROM)
do menu que aparecer na tela.
6 Digite 1 para abrir o menu do Resource CD.
7 Digite 2 para iniciar o Dell Diagnostics.
Guia de configuração e de referência rápida 97
Page 98

8 Selecione Run the 32 Bit Dell Diagnostics (Executar o Dell Diagnostics de 32 bits)
na lista numerada. Se houver várias versões listadas, selecione a versão correta para
seu computador.
9 Quando o menu principal do Dell Diagnostics aparecer na tela, selecione o tipo
de teste que deseja executar.
Menu principal do Dell Diagnostics
1 Quando o Dell Diagnostics for carregado e a tela Main Menu (Menu principal),
clique no botão referente à opção desejada.
www.dell.com | support.dell.com
2 Caso seja encontrado um problema durante o teste, uma mensagem aparecerá na tela
Opção Função
Express Test
(Teste rápido)
Extended Test
(Teste longo)
Custom Test
(Teste personalizado)
Symptom Tree
(Árvore de sintomas)
com o código de erro e uma descrição do problema. Anote o código do erro e a
descrição do problema e siga as instruções na tela.
Quando não conseguir solucionar o erro, entre em contato com a Dell.
OBSERVAÇÃO: A etiqueta de serviço do computador está localizada na parte superior
de cada tela de teste. Quando entrar em contato com a Dell, o atendente do suporte técnico
perguntará o número da Etiqueta de Serviço de seu computador.
Executa um teste rápido nos dispositivos. Esse teste
dura normalmente de 10 a 20 minutos e não precisa
de nenhuma interação de sua parte. Execute primeiro
o Express Test (Teste rápido) para aumentar as
possibilidades de detectar o problema.
Executa uma verificação completa nos dispositivos.
Esse teste dura normalmente uma hora ou mais e
requer que responda a perguntas periodicamente.
Testa um determinado dispositivo. É possível
personalizar os testes que deseja executar.
Lista os sintomas mais comuns encontrados e permite
selecionar um teste com base no sintoma do problema
que está ocorrendo no momento.
98 Guia de configuração e de referência rápida
Page 99

3 Se executar testes das opções Custom Test (Teste personalizado) ou Symptom Tree
(Árvore de sintomas), clique na guia aplicável descrita na tabela a seguir para obter
mais informações.
Guia Função
Resultados Exibe os resultados do teste e qualquer condição
de erro encontrada.
Erros Exibe as condições de erros encontradas, os códigos
de erro e a descrição do problema.
Ajuda Descreve o teste e pode indicar os requisitos para sua
execução.
Configuração Exibe a configuração do hardware referente ao
dispositivo selecionado.
O Dell Diagnostics recupera as informações de
configuração de todos os dispositivos da configuração
do sistema, memória e testes internos, e as exibe na
lista de dispositivos localizada no painel esquerdo da
tela. Pode acontecer que a lista de dispositivos não
exiba os nomes de todos os componentes instalados
no computador ou de todos os dispositivos acoplados
aele.
Parâmetros Permite que personalize o teste alterando
as configurações de teste.
4 Quando os testes forem concluídos, remova o CD se estiver executando o Dell
Diagnostics do CD Drivers and Utilities (Drivers e utilitários).
5 Feche a tela do teste para retornar à tela do Main Menu (Menu principal). Para sair
a tela do Dell Diagnostics e reiniciar o computador, feche a janela do Main Menu
(Menu principal).
Códigos de bipe
O computador poderá emitir uma série de bipes que identificam um determinado
problema. Uma série possível (código 1-3-1) consiste em um bipe, uma seqüência rápida
de três bipes e, em seguida, um bipe. Essa série informa que o computador encontrou
um problema na memória.
Se o código de bipe for emitido, anote-o e procure-o na seção “Códigos de bipe”
no Guia do usuário.
Guia de configuração e de referência rápida 99
Page 100

Mensagens de erro
OBSERVAÇÃO: Se a mensagem não estiver listada, consulte a documentação do sistema
operacional ou do programa que estava em execução no momento em que a mensagem apareceu
na tela.
Quando ocorrer algum erro durante a inicialização, poderá aparecer uma mensagem na tela
identificando o problema. Consulte a seção “Mensagens de erro” no Guia do usuário para
obter informações sobre resolução de problemas.
LEDs do sistema
O computador possui vários LEDs que auxiliam na análise e resolução de problemas.
www.dell.com | support.dell.com
LED de
alimentação
Verde N/D A energia está ligada e o
Verde piscando Sem cor O computador está no modo
O LED verde
pisca diversas
vezes e se apaga
Amarelo N/D O Dell Diagnostics está executando
LED da
unidade de
disco rígido
N/D Existe um erro de configuração. Verifique os LEDs de diagnóstico
Descrição do problema Solução sugerida
computador está funcionando
normalmente.
suspenso (Microsoft
Windows
um teste ou um dispositivo na placa
de sistema pode estar com defeito
ou ter sido instalado
incorretamente.
®
2000 e Windows XP).
®
Nenhuma ação corretiva é
necessária.
Pressione o botão Liga/Desliga,
mova o mouse ou pressione uma
tecla para acionar o computador.
Consulte a seção “Botão
Liga/Desliga” no Guia do usuário.
para ver se o problema foi
identificado.
Se o Dell Diagnostics estiver em
execução, espere até que o teste seja
concluído.
Verifique os LEDs de diagnóstico
para ver se o problema foi
identificado. Consulte a seção
“Problemas com a placa de sistema”
no Guia do usuário.
Se não for possível inicializar o
computador, entre em contato com
a Dell para obter assistência
técnica.
100 Guia de configuração e de referência rápida
 Loading...