

Page 1

PowerProtect Data Manager
Version 19.2
Administration and User Guide
REV 03
October 2019
Page 2

Copyright © 2016-2019 Dell Inc. or its subsidiaries. All rights reserved.
Dell believes the information in this publication is accurate as of its publication date. The information is subject to change without notice.
THE INFORMATION IN THIS PUBLICATION IS PROVIDED “AS-IS.” DELL MAKES NO REPRESENTATIONS OR WARRANTIES OF ANY KIND
WITH RESPECT TO THE INFORMATION IN THIS PUBLICATION, AND SPECIFICALLY DISCLAIMS IMPLIED WARRANTIES OF
MERCHANTABILITY OR FITNESS FOR A PARTICULAR PURPOSE. USE, COPYING, AND DISTRIBUTION OF ANY DELL SOFTWARE DESCRIBED
IN THIS PUBLICATION REQUIRES AN APPLICABLE SOFTWARE LICENSE.
Dell Technologies, Dell, EMC, Dell EMC and other trademarks are trademarks of Dell Inc. or its subsidiaries. Other trademarks may be the property
of their respective owners. Published in the USA.
Dell EMC
Hopkinton, Massachusetts 01748-9103
1-508-435-1000 In North America 1-866-464-7381
www.DellEMC.com
2 PowerProtect Data Manager Administration and User Guide
Page 3

CONTENTS
Preface
Chapter 1
Chapter 2
9
Getting Started 13
Introducing PowerProtect Data Manager software........................................... 14
Accessing the PowerProtect Data Manager UI..................................................14
Replacing the default PowerProtect Data Manager certificate ............15
Getting Started.................................................................................... 16
UI tools and options ............................................................................. 16
Managing Users 19
Managing user roles and privileges ...................................................................20
Managing users....................................................................................20
Default admin user............................................................................... 22
Roles.................................................................................................... 22
Privileges............................................................................................. 25
Resetting system-generated VM Direct credentials..........................................30
Managing LDAP or AD groups...........................................................................30
Managing keychains.......................................................................................... 31
Add credentials.....................................................................................31
LDAP or AD authentication................................................................................31
Configuring LDAP or AD authorities and assigning roles....................... 31
Example: Configuring an AD authority .................................................35
Example: Configuring an LDAP authority............................................. 36
Troubleshooting LDAP configuration issues......................................... 37
Chapter 3
Chapter 4
Managing Storage 39
Add protection storage .................................................................................... 40
Overview of PowerProtect Data Manager cloud tier......................................... 41
Add Data Domain cloud protection storage...........................................41
Overview of PowerProtect Data Manager Cloud Disaster Recovery..................41
Enabling the Microsoft Application Agent for SQL 43
About the Microsoft application agent for SQL.................................................44
Microsoft SQL Server data protection and replication requirements................ 44
Protecting a stand-alone SQL Server................................................................44
Protecting SQL Server clustered environments................................................45
Install and configure the Microsoft application agent for SQL Server............... 46
Prerequisites ....................................................................................... 46
Install the Microsoft application agent................................................. 46
Upgrade the Microsoft application agent............................................. 48
Uninstall the Microsoft application agent with the setup file................48
Required privileges for backup and recovery of a stand-alone server...49
Required privileges for backup and recovery of an Always On availability
group................................................................................................... 49
Required privileges for backup and recovery of a Failover Cluster
Instance or Always On Failover Cluster Instance..................................50
PowerProtect Data Manager Administration and User Guide 3
Page 4

Contents
Stagger SQL discovery jobs in host scale-out environments................50
Manage the Microsoft application agent for SQL............................................. 50
Support for existing SQL agent backups with PowerProtect Data Manager......51
Supporting existing SQL agent backups with PowerProtect................ 52
Use the backup discovery tool for PowerProtect Data Manager
management of existing backups......................................................... 53
Chapter 5
Chapter 6
Enabling the Oracle RMAN Agent 55
About the Oracle RMAN agent......................................................................... 56
Review Oracle data protection and replication requirements............................ 56
Prerequisites........................................................................................56
Protecting a stand-alone Oracle server.............................................................57
Protecting Oracle RAC environments............................................................... 57
Install and configure the Oracle RMAN agent................................................... 58
Install the Oracle RMAN agent.............................................................58
Upgrade the Oracle RMAN agent.........................................................60
Uninstall the Oracle RMAN agent........................................................ 62
Integration with PowerProtect Data Manager software.......................64
Install the PowerProtect Data Manager agent..................................... 65
Uninstall the PowerProtect Data Manager agent................................. 67
How the Oracle RMAN agent communicates with PowerProtect Data
Manager...............................................................................................67
Verify the connectivity from ddbmcon..................................................71
Discover the storage units....................................................................74
Add or manage the Oracle application agent..................................................... 74
Supporting existing Oracle RMAN agent backups with PowerProtect Data
Manager............................................................................................................75
Support existing Oracle RMAN agent backups with PowerProtect Data
Manager...............................................................................................76
Enabling the File System Agent 79
About the File System agent.............................................................................80
File System agent prerequisites........................................................................ 80
Roadmap for protection with the File System agent..........................................81
Installing and configuring File System agent..................................................... 82
Install the File System agent on Linux.................................................. 82
Install the File System agent on Windows ........................................... 82
Silent installation of File System agent.................................................83
Uninstalling the File System agent ...................................................... 83
Upgrade the File System agent............................................................ 84
Manage the File System agent..........................................................................84
Chapter 7
4 PowerProtect Data Manager Administration and User Guide
Enabling the Storage Direct Agent 87
About the Storage Direct agent........................................................................ 88
Storage Direct agent prerequisites................................................................... 88
Additional setup and configuration file requirements for existing Storage Direct
users................................................................................................................. 89
Roadmap for protection with the Storage Direct agent (new users)................. 91
Roadmap for protection with the Storage Direct agent (existing Storage Direct
users)............................................................................................................... 93
Installing or Upgrading Storage Direct.............................................................. 94
Install the Storage Direct agent on Linux............................................. 94
Upgrade the Storage Direct agent on Linux......................................... 95
Install or Upgrade the Storage Direct agent on Windows .................... 97
Page 5

Contents
Silent installation of the Storage Direct agent......................................98
Uninstall the Storage Direct agent on Linux......................................... 98
Uninstall the Storage Direct agent on Windows................................... 98
Manage the Storage Direct agent..................................................................... 98
Chapter 8
Chapter 9
Managing Assets 101
About asset sources, assets, and storage........................................................ 102
Prerequisites for discovering asset sources.....................................................102
Adding a vCenter Server asset source.............................................................102
Add a VMware vCenter Server........................................................... 102
Virtual asset discovery........................................................................104
Creating a dedicated vCenter user account and assigning the role in vCenter.105
Specify the required privileges for a dedicated vCenter user account ....
105
VM Direct protection engine overview............................................................ 108
Add a VM Direct appliance..................................................................108
Additional VM Direct actions.............................................................. 109
Discovering an application or File System host ................................................110
Discover an Oracle or SQL application host......................................... 111
Discover a File System Host.................................................................111
Discover a Storage Direct agent host.................................................. 112
Add and discover the SMIS server for the Storage Direct agent...................... 113
Managing Protection Policies 115
Protection policies........................................................................................... 116
Policy retention time considerations................................................... 116
Data Domain protection considerations...............................................116
Before you a create protection policy.............................................................. 118
Add a protection policy for virtual machine protection..................................... 118
On-demand backups of virtual machines............................................. 121
Additional options for managing virtual machine backups................... 122
Add a protection policy for SQL database protection...................................... 122
Add a protection policy for Oracle database protection...................................125
Add a protection policy for File System protection.......................................... 129
Add a protection policy for Storage Direct protection..................................... 132
Add a Cloud Tier protection policy...................................................................136
Edit a protection policy....................................................................................137
Add or remove assets in a protection policy.....................................................137
Removing expired backup copies.....................................................................138
Export protection ........................................................................................... 139
Delete a protection policy................................................................................139
Add a Service Level Agreement....................................................................... 140
Export Asset Compliance.................................................................................142
Dynamic filters ................................................................................................143
Creating virtual machine tags in the vSphere Client............................143
Add a dynamic filter............................................................................ 144
Manually run a dynamic filter.............................................................. 145
Edit or delete a dynamic filter ............................................................ 146
Change the priority of the existing dynamic filter .............................. 146
Chapter 10
Restoring Data and Assets 147
View copies..................................................................................................... 148
Restore a virtual machine or VMDK................................................................. 148
Prerequisites to restore a virtual machine...........................................149
PowerProtect Data Manager Administration and User Guide 5
Page 6

Contents
Restore to original virtual machine......................................................149
Restore individual virtual disks............................................................ 151
Restore to new....................................................................................151
Restore an instant access virtual machine.......................................... 153
File level restore................................................................................. 156
Direct Restore to ESXi....................................................................... 158
Restore an application-aware virtual machine backup..................................... 159
Performing centralized restore of a File System host...................................... 159
Centralized restore of File Systems in PowerProtect Data Manager.. 159
Restore of Storage Direct backups in PowerProtect Data Manager.................161
Restore the PowerProtect Data Manager server ............................................162
Restore operations for cloud tier..................................................................... 163
Restore from cloud tier.......................................................................163
Chapter 11
Chapter 12
Chapter 13
Performing Self-service Backup and Restore of Application and File
System Agents 165
Performing self-service backups of Microsoft SQL databases........................ 166
Performing self-service backups of Oracle databases..................................... 166
Performing self-service backups of File Systems.............................................167
Performing self-service backups of Microsoft SQL databases........................ 168
Restore a SQL application host....................................................................... 168
Restore an Oracle application host.................................................................. 168
Performing self-service restore of a File System host..................................... 169
Using the ddfsadmin utility for File Systems....................................... 169
Self-service image-level restore of File Systems................................ 170
Self-service file-level restore of File Systems......................................171
Preparing for and Recovering from a Disaster 173
Managing system backups...............................................................................174
Manage PowerProtect Data Manager backups for disaster recovery.............. 174
Prepare the Data Domain recovery target....................................................... 175
Configure backups for disaster recovery......................................................... 175
Configure PowerProtect Data Manager server disaster recovery backups...... 176
Record settings for disaster recovery..............................................................176
Restore PowerProtect Data Manager from an external Data Domain system.. 177
Managing Alerts, Jobs, and Tasks 179
Configure Alert Notifications........................................................................... 180
View and manage System Alerts......................................................................180
View and manage System Alerts...................................................................... 181
Monitoring and viewing jobs.............................................................................181
Monitor and view tasks....................................................................................182
Restart a job or task........................................................................................ 182
Cancel a job or task......................................................................................... 183
Export logs for a job or task.............................................................................184
Chapter 14
6 PowerProtect Data Manager Administration and User Guide
Upgrading the PowerProtect Data Manager Software 185
Upgrade the software from PowerProtect Data Manager version 19.1............ 186
Upgrade PowerProtect Data Manager from version 19.2 and later.................. 187
Managing certificates after upgrading from versions earlier than PowerProtect
Data Manager version 19.1............................................................................... 188
Page 7

Contents
Chapter 15
Best Practices and Troubleshooting 191
Compatibility information................................................................................ 192
Power off the PowerProtect Data Manager OVA............................................ 192
Creating a dedicated vCenter user account and assigning the role in vCenter.192
Specify the required privileges for a dedicated vCenter user account ....
192
Best practices with the VM Direct appliance................................................... 195
Software and hardware requirements.................................................196
PowerProtect Data Manager resource requirements on VMware
environment........................................................................................197
Configuration checklist for common issues.........................................197
VM Direct appliance performance and scalability................................198
Increasing the number of instant access sessions...............................199
Enabling or disabling Changed Block Tracking.................................... 199
Configure a backup to support vSAN datastores............................... 200
Disable SSL certification on the vCenter Server................................ 200
Troubleshooting backup configuration issues..................................................200
Troubleshooting virtual machine backup issues............................................... 201
VM Direct limitations and unsupported features................................. 201
Managing command execution for VM Direct Agent operations on Linux
.......................................................................................................... 203
SQL Server application-consistent backups fail with error "Unable to
find VSS metadata files in directory"................................................. 203
Failed to lock Virtual Machine for backup: Another EMC VM Direct
operation 'Backup' is active on VM ................................................... 203
vMotion operations are not allowed during active backup operations.203
Backups fail if certain characters are used in the virtual machine name,
datastore, folder, or datacenter names.............................................. 203
Lock placed on virtual machine during backup and recovery operations
continues for 24 hours if VM Direct appliance fails............................ 204
Trailing spaces not supported in SQL database names.......................204
SQL databases skipped during virtual machine transaction log backup....
204
Accessing Knowledge Base Articles................................................... 205
Recover a failed PowerProtect Data Manager backup....................................205
Troubleshooting virtual machine restore issues...............................................205
Troubleshooting instant access restore failures................................. 207
FLR Agent for virtual machine file-level restore................................. 208
Supported platform versions for file-level restore..............................209
File-level restore and SQL restore limitations..................................... 210
Troubleshoot recovery of PowerProtect Data Manager.................................. 212
Application agent and File System agent co-existence.................................... 212
Microsoft application agent for SQL Server application-aware protection...... 214
Troubleshooting Microsoft Application Agent discoveries on Windows 2008 and
Application Direct............................................................................................ 216
Supporting more than 50 database clients...................................................... 216
File System agent limitations........................................................................... 216
Storage Direct agent limitations...................................................................... 218
Time synchronization required between PowerProtect Data Manager and the
systems it interfaces with................................................................................221
PowerProtect Data Manager allows completion of protection policy when
storage unit on the Data Domain cannot be created........................................ 221
Viewing the DD Boost storage unit password.................................................. 221
Chapter 16
Modifying the System Settings 223
PowerProtect Data Manager Administration and User Guide 7
Page 8

Contents
System settings.............................................................................................. 224
Modify the network settings.............................................................. 224
Modify the appliance time zone..........................................................224
Change the system root user password............................................. 224
Enable replication encryption............................................................. 225
License types..................................................................................... 225
PowerProtect Data Manager licenses................................................ 226
System Support.............................................................................................. 227
Register the Secure Remote Services gateway..................................227
Callhome ........................................................................................... 228
Set up the email server...................................................................... 230
Add Auto Support............................................................................... 231
Enable automatic upgrade package downloads................................... 231
Add a log bundle................................................................................. 231
Monitor system state and system health............................................232
Configure PowerProtect Central reporting........................................ 234
Modifying the PowerProtect Data Manager virtual machine disk settings...... 235
Modify the virtual machine memory configuration............................. 235
Modify the data disk size................................................................... 235
Modify the system disk size............................................................... 237
Configure the Data Domain system................................................................. 237
Chapter 17
Chapter 18
PowerProtect plug-in within the vSphere Client 239
Overview of the PowerProtect plug-in within the vSphere Client...................240
Prerequisites to using the PowerProtect plug-in within the vSphere Client.....241
Monitor virtual machine protection copies...................................................... 242
Restore a virtual machine protection copy in the vSphere Client.................... 242
VMware Cloud on Amazon Web Services (AWS) Support 245
PowerProtect Data Manager image backup and recovery for VMware Cloud on
AWS................................................................................................................246
Configure the VMware Cloud on AWS web portal console.............................. 246
Amazon AWS web portal requirements........................................................... 247
Interoperability with VMware Cloud on AWS product features....................... 247
vCenter server inventory requirements...........................................................248
VMware Cloud on AWS configuration best practices...................................... 248
Add a VM Direct appliance.............................................................................. 248
Protection and recovery operations................................................................ 249
Interoperability with VMware Cloud on AWS product features....................... 250
Unsupported operations in VMware Cloud on AWS ....................................... 250
Troubleshooting VMware Cloud on AWS ....................................................... 250
8 PowerProtect Data Manager Administration and User Guide
Page 9

Preface
As part of an effort to improve product lines, periodic revisions of software and hardware are
released. Therefore, all versions of the software or hardware currently in use might not support
some functions that are described in this document. The product release notes provide the most
up-to-date information on product features.
If a product does not function correctly or does not function as described in this document,
contact a technical support professional.
Note: This document was accurate at publication time. To ensure that you are using the latest
version of this document, go to the Support website https://www.dell.com/support.
Note: References to Data Domain systems in this documentation, in the UI, and elsewhere in
the product include Data Domain systems and the new PowerProtect DD systems.
Purpose
This document describes how to install, configure, and administer PowerProtect Data Manager
software.
Audience
This document is intended for the host system administrator who is involved in managing,
protecting, and reusing data across the enterprise by deploying PowerProtect Data Manager.
Revision history
The following table presents the revision history of this document.
Table 1
Revision history
Revision Date Description
03 October 29, 2019 This revision includes the following updates:
l
File System agent limitations updates,
including exclusions when performing
block-based backups.
l
Add a protection policy for File System
protection updates.
02 September 27, 2019 Post GA updates.
01 September 24, 2019 Initial release of this document for
PowerProtect Data Manager 19.2.
Related documentation
The following publications provide additional information:
l
PowerProtect Data Manager Administration and User Guide
Describes how to configure the software.
l
PowerProtect Data Manager Release Notes
Contains information on new features, known limitations, environment, and system
requirements for the software.
l
PowerProtect Data Manager Security Configuration Guide
Contains security information.
PowerProtect Data Manager Administration and User Guide
9
Page 10

Preface
l
PowerProtect Data Manager Cloud Disaster Recovery Administration and User Guide
Describes how to deploy Cloud DR, protect VMs in the AWS cloud, and run recovery
operations.
l
PowerProtect Data Manager for Cyber Recovery User Guide
Describes how to install, upgrade, patch, and uninstall the Dell EMC PowerProtect Cyber
Recovery software.
l
PowerProtect Data Manager API documentation: https://developer.dellemc.com
Contains the PowerProtect Data Manager APIs and includes tutorials to guide to you in their
use.
You can use the following resources to find more information about this product, obtain support,
and provide feedback.
Special notice conventions that are used in this document
The following conventions are used for special notices:
NOTICE Identifies content that warns of potential business or data loss.
Note: Contains information that is incidental, but not essential, to the topic.
Typographical conventions
The following type style conventions are used in this document:
Table 2 Style conventions
Bold Used for interface elements that a user specifically selects or clicks,
for example, names of buttons, fields, tab names, and menu paths.
Also used for the name of a dialog box, page, pane, screen area with
title, table label, and window.
Italic
Monospace
Monospace italic
Monospace bold
[ ] Square brackets enclose optional values.
| Vertical line indicates alternate selections. The vertical line means or
Used for full titles of publications that are referenced in text.
Used for:
l
System code
l
System output, such as an error message or script
l
Pathnames, file names, file name extensions, prompts, and
syntax
l
Commands and options
Used for variables.
Used for user input.
for the alternate selections.
{ } Braces enclose content that the user must specify, such as x, y, or z.
... Ellipses indicate non-essential information that is omitted from the
example.
You can use the following resources to find more information about this product, obtain support,
and provide feedback.
10 PowerProtect Data Manager Administration and User Guide
Page 11

Where to find product documentation
l
https://www.dell.com/support
l
https://community.emc.com
Where to get support
The Support website https://www.dell.com/support provides access to product licensing,
documentation, advisories, downloads, and how-to and troubleshooting information. The
information can enable you to resolve a product issue before you contact Support.
To access a product-specific page:
1. Go to https://www.dell.com/support.
2. In the search box, type a product name, and then from the list that appears, select the
product.
Knowledgebase
The Knowledgebase contains applicable solutions that you can search for either by solution
number (for example, KB000xxxxxx) or by keyword.
To search the Knowledgebase:
1. Go to https://www.dell.com/support.
2. On the Support tab, click Knowledge Base.
3. In the search box, type either the solution number or keywords. Optionally, you can limit the
search to specific products by typing a product name in the search box, and then selecting the
product from the list that appears.
Preface
Live chat
To participate in a live interactive chat with a support agent:
1. Go to https://www.dell.com/support.
2. On the Support tab, click Contact Support.
3. On the Contact Information page, click the relevant support, and then proceed.
Service requests
To obtain in-depth help from Licensing, submit a service request. To submit a service request:
1. Go to https://www.dell.com/support.
2. On the Support tab, click Service Requests.
Note:
To create a service request, you must have a valid support agreement. For details about
either an account or obtaining a valid support agreement, contact a sales representative. To
find the details of a service request, in the Service Request Number field, type the
service request number, and then click the right arrow.
To review an open service request:
1. Go to https://www.dell.com/support.
2. On the Support tab, click Service Requests.
3. On the Service Requests page, under Manage Your Service Requests, click View All Dell
Service Requests.
Online communities
For peer contacts, conversations, and content on product support and solutions, go to the
Community Network https://community.emc.com. Interactively engage with customers, partners,
and certified professionals online.
PowerProtect Data Manager Administration and User Guide 11
Page 12

Preface
How to provide feedback
Feedback helps to improve the accuracy, organization, and overall quality of publications. You can
send feedback to DPAD.Doc.Feedback@emc.com.
12 PowerProtect Data Manager Administration and User Guide
Page 13

CHAPTER 1
Getting Started
This section includes the following topics:
l
Introducing PowerProtect Data Manager software................................................................14
l
Accessing the PowerProtect Data Manager UI...................................................................... 14
PowerProtect Data Manager Administration and User Guide 13
Page 14

Getting Started
Introducing PowerProtect Data Manager software
PowerProtect Data Manager software is an enterprise solution that provides software-defined
data protection, deduplication, operational agility, self-service, and IT governance.
PowerProtect Data Manager enables the transformation from traditional centralized protection to
an IT-as-a-service model, based on a self-service design. This design ensures that you can enforce
compliance and other business rules, even when backup responsibilities are decentralized to
individual database administrators and application administrators.
PowerProtect Data Manager key features include:
l
Software-defined data protection with integrated deduplication, replication, and reuse
l
Data backup and recovery self-service operations from native applications that are combined
with central IT governance
l
Multi-cloud optimization with integrated cloud tiering
l
SaaS-based management, compliance, and predictive analytics
l
Modern services-based architecture for ease of deployment, scaling, and upgrading
PowerProtect Data Manager integrates multiple data protection products within the Dell EMC
Data Protection portfolio to enable data protection as a service, providing the following benefits:
l
The data protection team can create data paths with provisioning, automation, and scheduling
to embed protection engines into the infrastructure for high-performance backup and
recovery.
l
For large-scale environments, backup administrators can schedule Microsoft SQL and Oracle
backups from a central location on the PowerProtect Data Manager server.
l
PowerProtect Data Manager uses an agent-based approach to discover the protected and
unprotected databases on an application server.
l
PowerProtect Data Manager enables governed self-service and centralized protection by
providing the ability to monitor and enforce Service Level Objectives (SLOs), identify
violations of Recovery Point Objectives (RPO), and apply retention locks on backups created
using the Microsoft application agent and the Oracle RMAN agent.
l
PowerProtect Data Manager supports deploying an external VM Direct appliance for data
movement with the VM Direct Engine. The PowerProtect Data Manager software comes prebundled with an embedded VM Direct appliance, which is automatically used as a fallback proxy
for performing backup and restore operations when the added external proxies fail or are
disabled. Dell EMC recommends that you always deploy external proxies because the
embedded proxy has limited capacity for performing parallel backups.
l
PowerProtect Data Manager supports integration of Cloud Disaster Recovery (Cloud DR),
including workflows for Cloud DR deployment, protection, and recovery operations in the AWS
cloud.
Accessing the PowerProtect Data Manager UI
PowerProtect Data Manager provides a stand-alone UI that you can use to manage and monitor
system behavior.
Procedure
1. From a host that has network access to the virtual appliance, use Google Chrome to
connect to the appliance:
https://appliance_hostname
14 PowerProtect Data Manager Administration and User Guide
Page 15

Note: You can specify the hostname or the IP address of the appliance.
2. Log in with your user name and password.
If you receive an unsigned certificate warning, see Replacing the default PowerProtect Data
Manager certificate on page 15 for instructions.
The Getting Started page appears.
l
The left pane provides links to the available menu items. Expand a menu item for more
options.
l
The icons in the PowerProtect Data Manager banner provide additional options.
Replacing the default PowerProtect Data Manager certificate
Use this procedure to replace the PowerProtect Data Manager UI and public API facing
certificates with new self-signed or CA signed certificates.
Before you begin
You must have the following keys and certificates in place:
l
/etc/ssl/certificates/customer/customerkey.pem
l
/etc/ssl/certificates/customer/customer.pem
l
/etc/ssl/certificates/customer/customer.keystore
l
/etc/ssl/certificates/customca/customca.truststore
Getting Started
Procedure
1. Log in to the PowerProtect Data Manager system as the root user.
Note:
PowerProtect Data Manager does not support using the ssh command with the
root account. To use ssh to connect to the system and change the password for the
root account, log in to ssh with the admin account, and then use the su command to
change to the root account.
2. Run the following Unix commands:
cd /usr/local/brs/lib/ecdm-ui/app
ln -s /etc/ssl/certificates/customer/customer.pem cert.pem
ln -s /etc/ssl/certificates/customer/customerkey.pem private-key.pem
sudo systemctl restart nginx
3.
Update the /usr/local/brs/lib/zuul/conf/application.yml file with following
parameters:
key-store: Specify the file path where your key-store certificate is kept. For
example: /etc/ssl/certificates/customer/customer.keystore
key-store-password: Specify a key-store password.
key-password: Specify a key password.
key-alias: Specify a key alias.
trust-store: Specify the file path where your trust-store certificate is kept. For
example: /etc/ssl/certificates/customca/customca.truststore
trust-store-password: Specify a trust-store password.
PowerProtect Data Manager Administration and User Guide 15
Page 16

Getting Started
Getting Started
The Getting Started page provides configuration options that are required when the system is
first deployed.
The Getting Started page appears upon first deployment of PowerProtect Data Manager and
opens to this page by default until you click Skip This.
You can access the Getting Started page at any time by selecting System Settings > Getting
Started.
Table 3 PowerProtect Data Manager Getting Started menu items
Options Description
4. Carry out the command: zuul restart
5. Log in to the https://ecdm.customer.com instance.
6. When prompted, accept the certificate.
7. Login to https://ecdm.customer.com:8443.
All external requests are now using your installed certificates.
Support View and configure Secure Remote Services (SRS), Email Setup, Auto
Disaster Recovery
Backup
VMware vCenter Opens the Infrastructure > Asset Sources page where you can add a
Protect Assets Opens the Protection Policies page where you can manage Protection
UI tools and options
Learn about the available tools in the UI.
PowerProtect Data Manager UI tools
Table 4
PowerProtect Data Manager tools
Menu item Description
Dashboard
Support, Logs, System Health.
Configure and manage backups for disaster recovery.
vCenter instance as an asset source so that it can be added to a
protection policy.
Life Cycle workflows for all asset types.
Provides a high-level view of the overall state the PowerProtect Data
Manager system and includes the following information:
l
Alerts—System alerts
l
Protection—Details about protection policies
l
Jobs—Status of all Jobs filtered by a selected time frame or
status type. Select the status in the Jobs pane to open the Jobs
window, where you can manage jobs, search, and view details.
l
Policy—Details include number of successes, failures, and
excluded assets for each asset type
l
Protection Storage—Protection storage usage statistics
16 PowerProtect Data Manager Administration and User Guide
Page 17

Table 4 PowerProtect Data Manager tools (continued)
Menu item Description
l
Recovery—Recovery statistics
l
Health—Details about the health of the system, including
services, licenses, support, protection engines, server backups,
and uptime.
PowerProtect Data Manager refreshes the data hourly unless you run
an ad-hoc discovery.
Click Infrastructure to perform the following tasks:
l
View and manage Virtual Machine, SQL Database, Oracle
Infrastructure
Database, and File System assets
l
Add vCenter and Application and File System Host asset sources
l
View and manage Integrated Storage
l
Add a VM Direct appliance with the VM Direct protection engine
for virtual machine data protection
l
Manage registration of RMAN Agent, Microsoft Application Agent,
and File System Agent
l
View and manage Cloud disaster recovery
Getting Started
Protection
Recovery
Alerts
Administration
Click Protection to perform the following tasks:
l
Add protection policy groups to SQL and Oracle databases, File
Systems, and Virtual Machines
l
Manage SLA
l
Add, edit, and delete Dynamic Groups to SQL and Oracle
databases, File Systems, and Virtual Machines
Click Recovery to perform the following tasks:
l
View asset copy location details and initiate a Restore operation
l
Manage Instant Access Sessions
Click Alerts to perform the following tasks:
l
View and acknowledge alerts and events.
l
View and drill down to Audit Logs.
l
Export audit logs to CSV files.
l
Set audit log boundaries.
Click Administration to perform the following tasks:
l
Configure users and roles
l
Set password credentials and manage key chains
l
Configure alert notifications
l
Add LDAP Identity Sources
Click Jobs to manage jobs, view by completed or running, filter, and
view details.
PowerProtect Data Manager Administration and User Guide 17
Page 18
Getting Started
Table 4 PowerProtect Data Manager tools (continued)
Menu item Description
Jobs
Click Reporting to log in to PowerProtect Central.
Reporting
Additional UI options
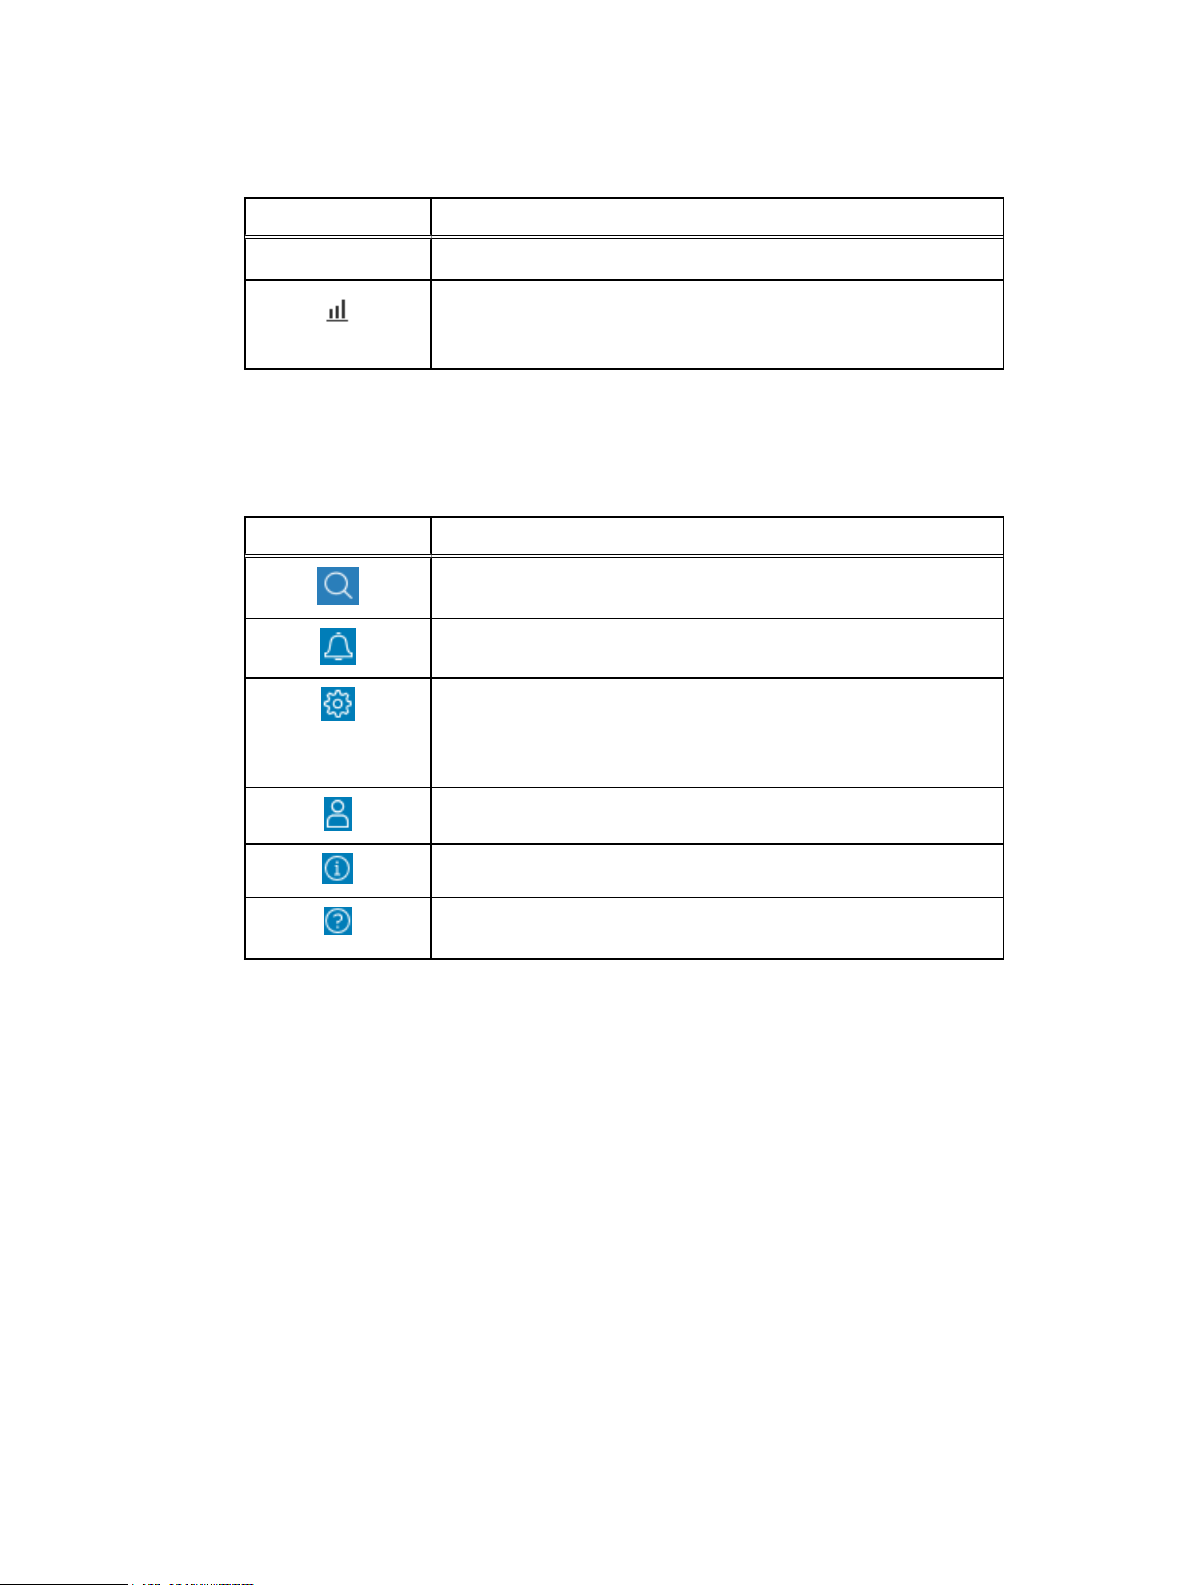
The following table describes the icons located in the PowerProtect Data Manager banner.
Table 5 Additional options
Option Description
Click to enter search criteria to find assets, jobs, logs, and alerts.
Click to see recent alerts.
Click to configure and manage PowerProtect Data Manager system
network, time zone, and NTP settings, DR backups, security, licenses,
upgrades, authentication, agent downloads, and support, and to
access the Getting Started page.
Click to log out and log in as a different user.
Click to see PowerProtect Data Manager version information.
Click to obtain more information about PowerProtect Data Manager
and how it can help you manage your backup copies.
18 PowerProtect Data Manager Administration and User Guide
Page 19

CHAPTER 2
Managing Users
This section includes the following topics:
l
Managing user roles and privileges ....................................................................................... 20
l
Resetting system-generated VM Direct credentials.............................................................. 30
l
Managing LDAP or AD groups............................................................................................... 30
l
Managing keychains...............................................................................................................31
l
LDAP or AD authentication.................................................................................................... 31
PowerProtect Data Manager Administration and User Guide 19
Page 20

Managing Users
Managing user roles and privileges
Users can be defined as either local or LDAP/Active Directory. Users and LDAP groups can access
all protection policies and assets within the PowerProtect Data Manager environment.
The role that is assigned to a user defines the privileges that are associated with the user and
determines the tasks that the user can perform.
Managing users
Only the Admin role can manage users.
The following roles can view users, roles, identity sources, and user groups:
l
Admin
l
User
l
Export and Recovery Admin
Users can see only their own role within their own account.
Note: User authorization grants or denies users access to PowerProtect Data Manager
resources. Authorization is the same for locally authorized users and Microsoft Windows
Active Directory/LDAP users.
Add a user
You can create local users to perform management tasks. When you create a local user account,
you must assign a role to the user.
You must have administrator credentials to add a user.
Procedure
1. Select Administration > Users.
The Users window appears.
2. Click Add.
3. In the New User window, provide the following information:
l
User first name
l
User last name
l
Username
l
Email Address
l
Password
l
Retype to confirm password
l
Force Password Change—Enabled by default. Requires the user to update the
password at first login.
l
Role
4. Click Save.
Results
The newly added user appears in the Users window.
20 PowerProtect Data Manager Administration and User Guide
Page 21

Edit or delete a user
You must have administrator credentials to edit or delete a user.
Procedure
1. Select Administration > Users.
The Users window displays the following information:
l
Username
l
User first name
l
User last name
l
User email address
l
User role
l
Date the user was created
2. Select the user you want to edit or delete.
3. Do one of the following:
l
To delete the user, click Delete.
l
To edit the user, click Edit, modify the user fields, and then click Save.
Managing Users
Reset a password
Results
The changes appear in the Users window.
Local users can reset a forgotten password using this procedure.
Before you begin
l
The user must be a a local user.
l
A reset password mail server must be configured.
l
LDAP and Windows Active Directory users cannot reset their password using this procedure.
Contact the system administrator to reset your password.
About this task
Local users can receive an email with a link to reset their password. The reset password link in the
email expires in 20 minutes, after which time they must request another link.
Procedure
1. In the PowerProtect Data Manager login page, click Forgot Password.
2. In the Forgot Password dialog box, type your user name, click Send Link, and click OK to
dismiss the informational dialog box.
The system sends a message to the email address associated with your user name.
3. Open the email and click the link.
4. In the Reset Password dialog box, type a new password in the New Password and
Confirm New Password fields, and click Save.
The PowerProtect Data Manager login page appears.
5. Log in with your user name and new password.
PowerProtect Data Manager Administration and User Guide 21
Page 22

Managing Users
Default admin user
The default admin user is preassigned the Admin role during PowerProtect Data Manager
installation.
The default admin user has super user control over PowerProtect Data Manager and cannot be
deleted. However, you can modify the attributes of the default admin user.
Roles
A role defines the privileges and permissions that a user has to perform a group of tasks. When a
user is assigned a role, you grant the user all of the privileges that are defined by the role. Only one
role can be associated to a user account.
Admin role
Admin
The Admin role is responsible for setup, configuration, and all PowerProtect Data Manager
management functions. The Admin role provides systemwide access to all functionality across all
organizations. One default Admin role is assigned at PowerProtect Data Manager deployment and
installation. You can add and assign additional Admin roles to users in your organization who
require full access to the system.
This table outlines the privileges and tasks that are associated with the Admin role.
Table 6
Admin role privileges and tasks
Privileges Tasks
Activity Management
Asset Management
Monitoring
Recovery and Reuse
Management
l
l
l
l
l
l
l
l
l
l
l
l
l
l
l
l
Manage Discovery Jobs
Manage Tasks
Workflow Execution
View Data Source Assets
Manage Data Source Assets
View Protection Storage Targets
Manage Protection Storage Targets
Monitor Events
Manage Events
View Historical Data
View Tasks and Activities
View Host
Manage Host
Rollback to Production
Recovery to New Location
Export for Reuse
22 PowerProtect Data Manager Administration and User Guide
Page 23

Table 6 Admin role privileges and tasks (continued)
Privileges Tasks
Managing Users
Service Plan
Management
Security and System
Audit
Storage Management
Support Assistance and
Log Management
System Management
User/Security
Management
l
View Plans
l
Manage Plans
l
Assign Data Source to Plan
l
Monitor Security/System Audit
l
Manage Security/System Audit
l
View Storage Array
l
Manage Storage Array
l
View Inventory Sources
l
Manage Inventory Sources
l
View Diagnostic Logs
l
Manage Diagnostic Logs
l
View System Settings
l
Manage System Settings
l
Manage User Security
l
View User Security
User role
User
The User role is responsible for monitoring the PowerProtect Data Manager Dashboard, Activity
Monitor, and Notifications. The User role provides read-only access to monitor activities and
operations. Assign the User role to users in your organization who monitor Dashboard activities,
Activity Monitor, and Notifications but do not require the ability to configure the system.
This table outlines the privileges and tasks that are associated with the User role.
Table 7
User role privileges and tasks
Privileges Tasks
Activity Management
Asset Management
Monitoring
l
l
l
l
l
l
Workflow Execution
View Data Source Assets
View Protection Storage Targets
Monitor Events
View Historical Data
View Tasks and Activities
PowerProtect Data Manager Administration and User Guide 23
Page 24

Managing Users
Table 7 User role privileges and tasks (continued)
Privileges Tasks
Recovery and Reuse
Management
Service Plan
Management
Security and System
Audit
Storage Management
Support Assistance and
Log Management
System Management
User/Security
Management
Export and Recovery Admin role
Export and Recovery Admin
The Export and Recovery Admin role is defined for a dedicated set of users who are solely
responsible for PowerProtect Data Manager setup, configuration, and execution of data
management tasks such as copy export and recovery operations. The Export and Recovery Admin
role provides access only to those functions required for data export and recovery operations. This
role and its operations are intended for a limited set of users whose actions are solely focused on
data management, export, and recovery; and whose actions are audited routinely for security
purposes. Assign the Export and Recovery Admin role to a user in your organization that requires
access to data only to make it available to others in the organization to maintain a chain of custody
record.
This table outlines the privileges and tasks that are associated with the Export and Recovery
Admin role.
l
View Host
l
View Plans
l
Monitor Security/System Audit
l
View Storage Array
l
View Inventory Sources
l
View Diagnostic Logs
l
View System Settings
l
View User Security
Table 8
Export and Recovery Admin role privileges and tasks
Privileges Tasks
Activity Management None
Asset Management
Monitoring
Recovery and Reuse
Management
24 PowerProtect Data Manager Administration and User Guide
l
View Data Source Assets
l
View Protection Storage Targets
l
Monitor Events
l
View Historical Data
l
View Tasks and Activities
l
View Host
l
Manage Host
Page 25

Table 8 Export and Recovery Admin role privileges and tasks (continued)
Privileges Tasks
l
Rollback to Production
l
Recovery to New Location
l
Export for Reuse
Managing Users
Service Plan
Management
Security and System
Audit
Storage Management
Support Assistance and
Log Management
System Management
User/Security
Management
Privileges
PowerProtect Data Manager privileges define the tasks that a user can perform and these
privileges are assigned to roles.
Activity Management Privileges
This table defines the Activity Management Privileges.
Table 9
Activity Management Privileges
None
None
l
View Storage Array
l
View Diagnostic Logs
l
View System Settings
l
View User Security
Privilege Task
Manage Discovery
Jobs
Manage Task
Workflow Execution
l
l
l
l
l
l
l
l
l
l
Create discovery jobs.
View discovery jobs.
Edit discovery jobs.
Delete discovery jobs.
Create task resources.
View task resources.
Edit task resources.
Start workflow execution.
Cancel workflow execution.
View the status of workflow execution.
PowerProtect Data Manager Administration and User Guide 25
Page 26

Managing Users
Asset Management Privileges
This table defines the Asset Management Privileges.
Table 10 Asset Management Privileges
Privilege Task
Manage Data Source
Assets
Manage Protection
Storage Targets
View Data Source Assets
View Protection Storage
Targets
Monitoring Privileges
This table defines the Monitoring Privileges.
l
Create, read, edit, and delete a data source.
l
Create, view, edit, and delete the policy in the protection
group resource.
l
Create, view, edit, and delete asset group resources.
l
Create, view, edit, patch, and delete tag category resources.
l
Create, view, edit, and delete a data target.
l
Create, view, edit, and delete asset group resources of
protection storage targets.
l
View a data source.
l
View asset group resources.
l
View the policy of the protection group resource.
l
View tag category resources.
l
View a data target.
Table 11
Monitoring Privileges
Privilege Task
View Tasks or Activities
View Historical Data
l
View task resources.
l
View historical data that relates to plans, arrays, data
targets, data sources, and capacity data.
Monitor Events
Manage Events
l
View alerts.
l
View external notifications.
l
Acknowledge alerts and add notes.
l
Create, modify, and delete external notifications.
Service Policy Management Privileges
This table defines the Policy Management Privileges.
26 PowerProtect Data Manager Administration and User Guide
Page 27

Table 12 Policy Management Privileges
Privilege Task
Managing Users
Assign Data Source to
Policy
Manage Policies
View Policies
l
Assign a data source to a protection policy resource.
l
Create, view, edit, and delete the policy for a protection policy
resource.
l
Create, view, edit, and delete a policy definition resource.
l
Create, view, edit, and delete schedule resources.
l
Create, view, edit, and delete an objective definition resource.
l
Create, read, edit, and delete an action definition.
l
View the policy for a protection policy resource.
l
View schedule.
l
View a protection policy definition.
l
View objective definition.
l
View services.
l
View service resources.
l
View assets that are assigned to a protection policy.
l
View action definitions.
l
View asset group resources.
Recovery and Reuse Management Privileges
This table defines the Recovery and Reuse Management Privileges.
Table 13
Privilege Task
Export for Reuse
Roll back to
Production
Recovery to Alternate
Location
Manage Host
View Host
Recovery and Reuse Management Privileges
l
Create, view, edit, and start export and reuse operations.
l
Create, view, edit, and start rollback to production operations.
l
Create, view, edit, and start recovery to alternate location
operations.
l
Create, view, edit and delete a host.
l
View a host.
Storage Management Privileges
This table defines the Storage Management Privileges.
PowerProtect Data Manager Administration and User Guide 27
Page 28

Managing Users
Table 14 Storage Management Privileges
Privilege Task
View Inventory
Sources
View Storage Array
Manage Storage
Array
Manage Inventory
Sources
Security Management Privileges
This table defines the Security Management Privileges.
Table 15
Security Management Privileges
l
View a management interface.
l
Read storage manager resources such as exported, deleted, and
restored copies.
l
View a storage array.
l
Create, view, edit, and delete a storage array.
l
Create storage manager resources and run creation-related
storage array operations.
l
Create exported and restored copies and run restore-related
storage array operations.
l
Create expunged copies and run deletion-related storage array
operations.
l
Create, view, edit, and delete a management interface.
Privilege Task
Manage User Security
View User Security
System Management Privileges
This table defines the System Management Privileges.
Table 16
Privilege Task
View System Settings
System Management Privileges
l
Create, view, edit, and delete users
l
View roles
l
Create, view, edit, and delete identity sources
l
Create, view, edit, and delete user groups
l
Create, view, edit, and delete whitelists
l
View users and roles
l
View identity sources and user groups
l
View whitelists
l
View SRS information.
28 PowerProtect Data Manager Administration and User Guide
Page 29

Table 16 System Management Privileges (continued)
Privilege Task
l
View Server Disaster Recovery artifacts.
l
View Maintenance Mode.
l
View License information.
l
View Server Disaster Recovery Status.
l
View node, Configuration EULA, OS User, Upgrade Package,
Component, Configuration Status, Configuration Logs, Time
Zone, and State resources
Managing Users
Manage System
Settings
l
Manage Server Disaster Recovery activities.
l
Manage SRS Gateway connection and other Telemetry
communications.
l
View and edit Node State resource.
l
Update the license for the appliance.
l
View Component, Configuration Status, Configuration Logs, Time
Zone, and State resources
l
View and edit node, Configuration EULA, OS User, and Lockbox
resouces.
l
Create, view, edit, and delete the Upgrade Package resource
Support Assistance and Log Management Privileges
This table defines the Support Assistance and Log Management Privileges.
Table 17
Privilege Task
View Diagnostic Logs
Support Assistance and Log Management Privileges
l
View Log bundle resources.
l
View Log information resources.
l
View the LogSource resource.
l
View logs.
Manage Diagnostic
Logs
l
l
l
l
Security and System Audit Privileges
This table defines the Security and System Audit Privileges.
Manage Log bundle resources.
Retrieve Log information resources.
Retrieve or edit the LogSource resource.
Export logs.
PowerProtect Data Manager Administration and User Guide 29
Page 30

Managing Users
Table 18 Security and System Audit Privileges
Privilege Task
Monitor Security/
System Audit
Manage Security/
System Audit
l
View Security Audit–related events and activities.
l
Acknowledge Security Audit–related events and activities.
l
Export Audit/Change Log of events and activities.
Resetting system-generated VM Direct credentials
PowerProtect Data Manager deploys the VM Direct Engine during installation with unique admin
and root credentials.
About this task
You must have PowerProtect Data Manager Admin role privileges to edit or delete a user.
Procedure
1. Select Administration > Credentials.
The Credentials Management window appears and displays the type, name, and username.
2. Select a VM Direct user and click Edit.
3. Modify the password in the Edit Credentials window and click Save.
4. Select Infrastructure > Protection Engines > VM Direct Engines.
5. Select a VM Direct Engine.
6. Select redeploy from the ellipsis list.
Managing LDAP or AD groups
PowerProtect Data Manager requires you to configure an LDAP group, and the PowerProtect Data
Manager users must be part of this group. Only the Admin role can create users or LDAP and AD
groups.
Users
You can create local users to perform management tasks. When you create a local user account,
you must assign a role to the user.
LDAP or AD groups
When you configure LDAP or AD authentication in the Authentication Service, use the User Group
resources to assign roles to the LDAP groups. The User Group resource defines the role
assignments for an LDAP or AD user group.
30 PowerProtect Data Manager Administration and User Guide
Page 31

Managing keychains
You can create, edit, delete, and view keychain credentials.
Add credentials
Procedure
1. Select Administration > Credentials > Add.
The Add Credentials window appears.
2. Enter the following information, and then click Save.
l
Type—The type of credential you would like to add
l
Username—The username associated with the credential you are adding
l
Password—The password associated with the username
Managing Users
LDAP or AD authentication
When you authenticate users through an external authentication authority, users can log in with
their authority username and password. The authority username and password are managed by
Lightweight Directory Access Protocol (LDAP), Lightweight Directory Access Protocol over SSL
(LDAPS), Microsoft Active Directory server (AD), or a Microsoft Active Directory server over SSL.
When the user's credentials are validated, the Authentication Service issues a token for the user.
The PowerProtect Data Manager GUI uses the token information to authorize the user's activities.
Note:
You can configure only one authority.
Configuring LDAP or AD authorities and assigning roles
Only the Admin role can configure an external LDAP, LDAPS, or AD authentication authority. You
can configure LDAP or AD roles in Administration > Identity Sources.
Configure LDAP or Active Directory authentication
Only the Admin role can configure an external LDAP, LDAPS, or Active Directory authentication
authority.
Procedure
1. Select Administration > Identity Sources.
The Identity Sources window appears.
2. Click New.
The Identity Source Server window appears.
3. In the Required tab, configure the following attributes:
Attribute
Server Type Select one:
Description
l
Active Directory
PowerProtect Data Manager Administration and User Guide 31
Page 32

Managing Users
Attribute Description
l
LDAP
Server Address Type the protocol and hostname or IP address of the LDAP or
Active Directory server, in the following format:
protocol://hostname_or_ip_address
where:
l
protocol
is ldap for LDAP or Active Directory authorities, and
ldaps for LDAPS or Active Directory over SSL.
For example, to configure an Active Directory server that is
named idd-ad.iddlab.com, type ldap://idd-
ad.iddlab.com
l
hostname_or_ip_address
is the FQDN or IP address of the
external authentication authority.
For example, ldap://[2620:0:170:5a9::1:2]
Note: When you specify the LDAPS protocol, PowerProtect
Data Manager automatically downloads the certificates
required to connect to the authentication authority. Once
downloaded, the Certificate field appears. Click Verify to
compare the displayed certificate information with the
expected authentication authority's certificate information. If
the certificates match, click Accept to continue with the
setup. Otherwise, click Cancel to cancel the setup.
Domain Type the base distinguished name (DN) of the LDAP or Active
Directory authority.
For example, dc=pp_lab, dc=ldap.example.com
Port Type the port number that the external authentication authority
uses.
l
For LDAP and Active Directory, the default port number is 389.
l
For LDAPS and Active Directory over SSL, the default port
number is 636.
User Search
a. Type the
objectClass
that the authentication service uses
when searching for users in the LDAP or AD hierarchy.
b. Ensure that you specify a search path that is relative to the
base DN that you specified in the Domain option.
For example:
l
For an Active Directory configuration, specify the value in the
objectClass
l
For an LDAP configuration, specify the value in the
property for an AD user. For example, type user.
objectClass
property. For example, type account.
Group Search
a. Type the
objectClass
of the search path that you want the
authentication service to use when searching for groups in the
LDAP or AD hierarchy.
b. Ensure that you specify a search path that is relative to the
base DN that you specified in the Domain attribute.
32 PowerProtect Data Manager Administration and User Guide
Page 33

Managing Users
Attribute Description
For example:
l
For an Active Directory configuration, specify the value in the
objectClass
property for an AD group. For example, type
group.
l
For an LDAP configuration, specify the value in the
objectClass
property for an LDAP group. This value should be a structural
objectClass. For example, type group.
Query User Type a user account that has full read access to the LDAP or AD
directory, in the following formats:
l
For Active Directory, the format is user@domain, or the DN
of the query user. For example,
administrator@ldap.example.com or
cn=administrator,dc=example,dc=com.
l
For LDAP, the format is user@domain. For example,
administrator@ldap.example.com.
Query Password Type the password of the user account that you specified in the
Query User attribute.
4. (Optional) In the Advanced tab, configure the following attributes:
Attribute
User Search Path Type the DN of the search path that the authentication service
User Group Search Path Type the DN of the search path that the authentication service
Group Attribute Name Type the attribute that the authentication service should use to
Description
uses when searching for users in the LDAP or AD hierarchy. Ensure
that you specify a search path that is relative to the base DN that
you specified in the Domain option. For example:
l
For an AD configuration, specify the value in the
objectClass
property for an AD user.
l
For an LDAP configuration, specify the value in the
object class.
should use when searching for groups in the LDAP or AD hierarchy.
Ensure that you specify a search path that is relative to the base
DN that you specified in the Domain attribute. For example:
l
For an AD configuration, specify the value in the
objectClass
property for an AD group.
l
For an LDAP configuration, specify the value in the
object class.
validate the group name in the LDAP or AD hierarchy.
For example:
account
posixGroup
l
For an AD configuration, specify
l
For an LDAP configuration, specify cn.
sAMAccountName
.
Group Member Attribute Type the attribute that the authentication service should use to
validate the group member in the LDAP or AD hierarchy.
PowerProtect Data Manager Administration and User Guide 33
Page 34

Managing Users
Attribute Description
User Attribute ID Type the attribute that the authentication service should use to
5. Click Save.
6. Assign LDAP or AD groups to a role. The section Add LDAP group-to-role mapping on page
34 provides instructions.
This step is required before you can log in to the UI with an LDAP or AD account.
Edit an LDAP or AD authority configuration
Only the Admin role can edit an LDAP or AD authority.
Procedure
For example:
l
For an AD configuration, specify
l
For an LDAP configuration, specify
validate the username in the LDAP or AD hierarchy.
For example:
l
For an AD configuration, specify
l
For an LDAP configuration, specify cn.
member
sAMAccountName
.
memberUid
.
.
1. Select Administration > Identity Sources.
2. Select the Identity Source you would like to edit, and then click Edit.
3. Edit the LDAP attributes as required.
4. Click Save.
Delete an LDAP or AD authority configuration
Only the Admin role can delete an existing LDAP or AD authority configuration.
Procedure
1. Select Administration > Identity Sources.
2. Select the Identity Source you would like to delete, and then click Delete.
Add LDAP group-to-role mapping
Only the Admin role can add LDAP group-to-role mapping.
Procedure
1. Select Administration > Identity Sources.
2. Select the identity source for which you would like to add group-to-role mapping, and then
click New Group Map.
3. Assign the LDAP or AD groups to a role.
4. Click Add.
Modify LDAP group-to-role mapping
Only the Admin role can modify LDAP group-to-role mapping.
Procedure
1. Select Administration > Identity Sources.
34 PowerProtect Data Manager Administration and User Guide
Page 35

2. Select the indentity source for which you would like to edit group-to-role mapping, and then
click New Group Map.
3. Assign the same LDAP or AD groups to a different role.
4. Click Add.
Delete LDAP group-to-role mapping
Only the Admin role can delete LDAP group-to-role mapping.
Procedure
1. Select Administration > Identity Sources.
2.
Select the group or group roles you would like to delete, and then click .
Example: Configuring an AD authority
Managing Users
In this example, an AD server that is named
Protection_admins. Protection_admins
idd-ad.iddlab.com
has an AD group called
contains three users: Meghan, Patrick, and Liam. These
users require access to the PowerProtect Data Manager UI with the privileges that are assigned to
the User role.
View the properties of the AD configuration
To view the properties of the AD configuration, use a third-party tool such as the AD Explorer
program.
The following figure provides an example of the key user attributes on the AD server, which are
required to configure
Figure 1
AD and user properties in AD Explorer
idd-ad.iddlab.com
.
Based on this AD configuration, specify the following values for PowerProtect Data Manager LDAP
configuration options:
l
Domain: dc=iddlab, dc=com
l
Hostname: idd-ad-iddlab.com
l
User Search: One of the following values: top, inetOrgPerson, or user
l
User Attribute ID: cn
Configure the idd-ad.iddlab.com authority
The following figure provides an example of the group attributes that are required to configure the
idd-ad.iddlab.com
authority.
PowerProtect Data Manager Administration and User Guide 35
Page 36

Managing Users
Figure 2 AD group properties in AD Explorer
Based on the properties of
Protection_admins
configuration options:
l
Group Search: top or group
l
Group Attribute Name: sAMAccountName
Example: Configuring an LDAP authority
In this example, an LDAP server that is named
AlbertaAllGroups. AlbertaAllGroups
alberta_user3
. These users require access to the PowerProtect Data Manager UI with the
privileges that are assigned to the User role.
View the LDAP configuration properties
To view the properties of the LDAP configuration, use a third party tool such as the LDAP Admin
program.
The following figure provides an example of the key user attributes to use when configuring an
LDAP authority.
Figure 3
LDAP Admin server and group attributes
contains three LDAP users:
, specify the following values for the LDAP
alberta.lss.emc.com
has a group that is named
alberta_user1, alberta_user2
, and
Based on this configuration, specify the following values for the LDAP configuration options:
l
Domain: dc=alberta,dc=emc,dc=com
l
Hostname: alberta.lss.emc.com
l
Group Search: groupOfUniqueNames.
36 PowerProtect Data Manager Administration and User Guide
Page 37

Managing Users
Note: Only structural object classes may be values for the group search. So, in the
example, although top is an object class, only groupOfUniqueNames can be used as a
group search value.
l
Group Attribute Name: cn
Specify values in the user search attribute
The following figure provides an example of the value to specify in the user search attribute.
Figure 4 LDAP Admin user search attribute
Based on this configuration, specify the following values for the LDAP configuration options:
l
User Search: One of the following objectClass values: top, person, organizationalPerson,
or inetOrgPerson
l
User Attribute ID: cn
Troubleshooting LDAP configuration issues
This section provides information about error messages that might appear when you configure an
external authority for authentication.
For more information about LDAP configuration errors, refer to
http://wiki.servicenow.com/index.php?title=LDAP_Error_Codes#gsc.tab=0.
User credentials are incorrect
The following message appears when the user credentials that you specified are not correct:
org.springframework.ldaps.AuthenticationException: [LDAP: error code 49 80090308: LdapErr: DSID-0C0903A9, commentL AcceptSecurityContext error, data
52e, v1db1]
To resolve this issue, ensure that the values in the Query User and Query Password fields are
correct.
Base DN is not correct
The following message appears when Base DN is not correct:
org.springframework.ldap.InvalidNameException: Invalid name: domain_name
To resolve this issue, ensure that the value in the Domain field is correct.
PowerProtect Data Manager Administration and User Guide 37
Page 38

Managing Users
Format of the Server Address field is not correct
The following message appears when the format of the Server Address field is not correct:
org.springframework.ldap.UncategorizedLdapException: Uncategorized Exception
occurred during LDAP processing; nested exception is
javax.naming.NamingException: Cannot parse url: url
To resolve this issue, ensure that you specify the Server Address field in the following format:
l
For an LDAP or Active Directory authority: ldap://hostname_ip_address
l
For an LDAPS or Active Directory over SSL authority: ldaps://hostname_ip_address
38 PowerProtect Data Manager Administration and User Guide
Page 39

CHAPTER 3
Managing Storage
This section includes the following topics:
l
Add protection storage .........................................................................................................40
l
Overview of PowerProtect Data Manager cloud tier..............................................................41
l
Overview of PowerProtect Data Manager Cloud Disaster Recovery...................................... 41
PowerProtect Data Manager Administration and User Guide 39
Page 40

Managing Storage
Add protection storage
About this task
The PowerProtect Data Manager UI enables users with administrator credentials to add the
following storage types:
l
Data Domain Management Center
l
External Data Domain system
Note: References to Data Domain systems in this documentation, in the UI, and elsewhere in
the product include Data Domain systems and the new PowerProtect DD systems.
Procedure
1. Select Infrastructure > Storage.
The Storage window appears.
2. In the Protection Storage tab, click Add.
3. In the Add Storage dialog box, select a storage system (Data Domain System, Data Domain
Management Center).
Note: If using the Storage Direct agent to move snapshot backups from a VMAX storage
array to a Data Domain system, you do not need to add a Data Domain Management
Center.
4. Specify the storage system attributes:
a. In the Name field, specify a storage name.
b. In the Address field, specify the hostname, fully qualified domain name (FQDN), or the
IP address.
If you specify a virtual machine for the storage name, use the FQDN.
c. In the Port field, specify the port for SSL communication.
5. Under Add Credentials, if you have already configured Data Domain credentials that are
common across Data Domain systems, select an existing keychain from the Select
Keychain list. Alternatively, you can add new credentials, and then click Save .
6. If a trusted certificate does not exist on the storage system, a dialog box appears requesting
certificate approval. Review the certificate and then click Verify.
7. Click Save to exit the Add Storage dialog and initiate the discovery of the storage system.
A dialog box appears to indicate that the request to add storage has been initiated.
Note:
Discovery time is based on networking bandwidth. The resources that are
discovered and those that are doing the discovery take a performance hit each time that
you go through a discovery process. It might appear that PowerProtect Data Manager is
not updating the storage data while the discovery is in progress.
PowerProtect Data Manager can add up to three assets of the same type simultaneously
and up to 10 assets simultaneously.
8. In the Storage window, click Discover to refresh the window with any newly discovered
storage systems.
When a discovery completes successfully, the Status column updates to OK.
40 PowerProtect Data Manager Administration and User Guide
Page 41

9. To modify a storage system location:
a. In the Storage window, select the storage system from the table.
b. Click Set Location.
The Set Location window appears.
c. Click Location > Add.
The Add Location window appears.
d. In the Name field, type a location name for the asset, and click Save.
10. To manage MTrees in the Storage window, select the storage system from the table and
click Manage MTrees.
Results
PowerProtect Data Manager displays External Data Domain systems only in the Storage window
Name column. PowerProtect Data Manager displays Data Domain Management Center storage
types in the Managed By column.
Overview of PowerProtect Data Manager cloud tier
Managing Storage
The PowerProtect Data Manager cloud tier feature works in tandem with the Data Domain Cloud
Tier feature to move PowerProtect Data Manager backups from Data Domain systems to the
cloud. This provides long-term storage of PowerProtect Data Manager backups by seamlessly and
securely tiering data to the cloud.
From the PowerProtect Data Manager UI, you configure cloud tier to move PowerProtect Data
Manager backups from Data Domain to the cloud, and you can perform seamless recovery of these
backups.
Data Domain cloud storage units must be pre-configured on the Data Domain system before they
are configured for cloud tier in the PowerProtect Data Manager UI. The
System Administration Guide
provides further information.
Add Data Domain cloud protection storage
You can add cloud tier storage by accessing either the physical or virtual Data Domain system.
Procedure
l
The "DD cloud tier" chapter of the
Support, provides instructions.
Note:
If a protection policy has both replication and tiering objectives defined, ensure that
replication from any system occurs before tiering. For example, create backups to DD A,
replicate from DD A to DD B, and then tier from DD A to Cloud.
DD OS Administration Guide
Data Domain Operating
, available on Dell EMC Online
Overview of PowerProtect Data Manager Cloud Disaster Recovery
The Cloud DR feature enables you to deploy a Cloud DR Server in the public cloud and provide DR
protection to the cloud as part of the PowerProtect Data Manager protection life cycle. From the
PowerProtect Data Manager, you can run DR work flows in the cloud and monitor the progress of
these jobs.
For example, to validate that you can fail over a VM copy to the cloud before a disaster occurs,
from PowerProtect Data Manager, you select a network in the cloud, start a DR test, and monitor
PowerProtect Data Manager Administration and User Guide 41
Page 42

Managing Storage
its progress. If you want to fail over a production VM, from PowerProtect Data Manager, you
select a network in the cloud, start the DR failover operation, and then bring up the restored VM
within AWS.
To learn about Cloud DR work flows within PowerProtect Data Manager, see the
Data Manager Cloud Disaster Recovery Administration and User Guide
.
PowerProtect
42 PowerProtect Data Manager Administration and User Guide
Page 43

CHAPTER 4
Enabling the Microsoft Application Agent for SQL
This section includes the following topics:
l
About the Microsoft application agent for SQL..................................................................... 44
l
Microsoft SQL Server data protection and replication requirements.....................................44
l
Protecting a stand-alone SQL Server.................................................................................... 44
l
Protecting SQL Server clustered environments.................................................................... 45
l
Install and configure the Microsoft application agent for SQL Server....................................46
l
Manage the Microsoft application agent for SQL..................................................................50
l
Support for existing SQL agent backups with PowerProtect Data Manager.......................... 51
PowerProtect Data Manager Administration and User Guide 43
Page 44

Enabling the Microsoft Application Agent for SQL
About the Microsoft application agent for SQL
The Microsoft application agent enables an application administrator to protect and recover the
SQL application data on the application host. PowerProtect Data Manager integrates with the
Microsoft application agent to check and monitor backup compliance against protection policies.
PowerProtect Data Manager also enables central scheduling for backups.
You can install the Microsoft application agent on a Windows SQL Server host by using the install
wizard. Install and configure the Microsoft application agent for SQL Server on page 46 provides
instructions.
Note:
PowerProtect Data Manager supports the co-existence of the Microsoft SQL agent and the
File System agent on Windows.
To enable the discovery and scheduling of backups with PowerProtect Data Manager, you
must approve the client in the PowerProtect Data Manager UI.
Software compatibility information for the PowerProtect Data Manager software and application
agents is provided in the eLab Navigator, available at https://elabnavigator.emc.com/eln/
modernHomeDataProtection.
Microsoft SQL Server data protection and replication requirements
PowerProtect Data Manager can manage and monitor data protection and replication for
Microsoft SQL Server assets through integration with the Microsoft application agent.
After installing the Microsoft application agent, review the following information for additional
requirements before adding the Microsoft application agent as an asset source in PowerProtect
Data Manager and discovering the SQL Server assets.
Verify that the environment meets the following requirements:
l
Ensure that you do not mix 32-bit and 64-bit instances on the same SQL Server host.
PowerProtect Data Manager operations do not support hosts with a mix of 32-bit and 64-bit
SQL Server instances.
l
Ensure that all clocks on the SQL Server host, domain controller, and PowerProtect Data
Manager are time-synced to the local NTP server to ensure discovery of the backups.
l
Ensure that the SQL Server and the PowerProtect Data Manager system network can see and
resolve each other.
l
Ensure that port 7000 is open on the SQL Server host.
l
Ensure that DNS is configured correctly on the Application Agent Host for SQL Server.
Protecting a stand-alone SQL Server
Learn how to configure protection of a stand-alone SQL Server.
Procedure
1. Add storage for Data Domain Management Console or the External Data Domain.
Add protection storage on page 40 provides information.
2. Install the Microsoft application agent on the SQL Server host.
Install the Microsoft application agent on page 46 provides information.
44 PowerProtect Data Manager Administration and User Guide
Page 45

Enabling the Microsoft Application Agent for SQL
3. Add or approve the Microsoft application agent in PowerProtect Data Manager.
Manage the Microsoft application agent for SQL on page 50 provides information.
4. Discover and add the credentials for the SQL application host.
Discover an Oracle or SQL application host on page 111 provides information.
5. Create a protection policy to protect the SQL host.
Add a protection policy for SQL database protection on page 122 provides information.
Note: You cannot perform a backup to a secondary Data Domain device. You can only
restore from a secondary Data Domain device
Protecting SQL Server clustered environments
Learn how to configure protection of SQL Server clustered environments, including Always On
availability groups and Failover Cluster Instances.
About this task
On each node in the cluster. repeat the steps to install the Microsoft application agent, and then
add and discover the application host in PowerProtect Data Manager.
NOTICE Protection of Failover Cluster Instances (FCI) requires that all nodes in the cluster be
registered to the PowerProtect Data Manager server. Prior to registration, the node must be
the active node and own all the disks in the cluster. The recommended method is to failover all
nodes to the registering node. Repeat this step for all nodes in the cluster and any nodes
added to the cluster. Failure to perform this step results in unpredictable results during
protection policy.
Procedure
1. Add a storage system.
Add protection storage on page 40 provides information.
2. Install the Microsoft application agent on each node in the cluster.
Install the Microsoft application agent on page 46 provides information.
3. Configure the required user privileges on each node in the cluster.
Required privileges for backup and recovery of a Failover Cluster Instance or Always On
Failover Cluster Instance on page 50 provides information.
4. Add or approve the Microsoft application agent on each node in the cluster.
Manage the Microsoft application agent for SQL on page 50 provides information.
5. Discover and add the credentials for each SQL application host.
Discover an Oracle or SQL application host on page 111 provides information.
6. Create a protection policy to protect the cluster.
Add a protection policy for SQL database protection on page 122 provides information.
Note:
You cannot perform a backup to a secondary Data Domain device. You can only
restore from a secondary Data Domain device
PowerProtect Data Manager Administration and User Guide 45
Page 46

Enabling the Microsoft Application Agent for SQL
Install and configure the Microsoft application agent for SQL Server
Learn how to install and configure the Microsoft application agent for SQL Server.
Prerequisites
Ensure that a SQL Server environment meets the following prerequisites before you install the
Microsoft application agent:
l
Install the following applications on the Windows host:
n
Microsoft SQL Server
n
The SQL Server Management Studio (SSMS)
n
.NET Framework 4.0
If you are installing ItemPoint for table-level recovery, install .NET Framework 4.5.
l
In the PowerProtect Data Manager UI, select Agent Downloads from the System Settings
menu, select the Microsoft application agent download package,
msappagent192_win_x64.zip, and then download the package to the Windows SQL
Server host.
l
Log in to the SQL Server host as an Administrator to install the Microsoft application agent.
l
To deploy the Common Language Runtime (CLR) assembly, ensure that you have
Administrator access to the SQL Server host and the master database. If the SQL Server host
is running in a domain, ensure that you have access as a Domain administrator.
Install the Microsoft application agent
Learn how to install the Microsoft application agent.
About this task
Note:
In Always On availability group or cluster environments, you must install the Microsoft
application agent on each node in the cluster.
Procedure
1. In the PowerProtect Data Manager UI:
a. Select Agent Downloads from the System Settings menu.
b. Select the Microsoft application agent download package,
msappagent192_win_x64.zip.
c. Download the package to the host where you want to install the Microsoft application
agent.
2. Open msappagent192_win_x64.zip with WinZip.
When you are prompted for a password, type the password that you received with the
software license.
3. Use WinZip to unzip the msappagent192_win_x64.zip file.
4. In the unzipped folder, launch emcmsappagent-19.2.0.0.exe.
The installation wizard appears.
5. On the Welcome Wizard page, select I agree to the license term and agreements, and
then click Next.
46 PowerProtect Data Manager Administration and User Guide
Page 47

Enabling the Microsoft Application Agent for SQL
6. On the Change Install Location page, perform one of the following tasks:
l
To install the Microsoft application agent in the default folder, leave the installation
location as-is.
The default installation folder is C:\Program Files\DPSAPPS\MSAPPAGENT.
l
To specify a different installation location, perform the following steps: .
a. Click Change.
b. In the dialog box that appears, specify the installation location.
c. Click OK.
7. Click Next.
8. On the Configure Installation Options page, specify any of the following installation
options, as required:
l
To integrate the Microsoft application agent with PowerProtect for centralized or selfservice protection of SQL Server data, select the following options, as required:
n
To install the Microsoft application agent software, select Application Direct.
n
To install the SQL Server Management Studio plug-in user interface, select SSMS
Plug-in.
You can use the SSMS plug-in to perform self-service SQL Server backup and
restore operations.
n
To enable table-level restores, select ItemPoint.
This option installs ItemPoint for Microsoft SQL Server, which you can use to
perform table-level restores.
n
You must specify the PowerProtect appliance details by performing the following
steps:
a. Select PowerProtect Data Manager Integration.
b. In the Appliance Hostname or IP address field, type the hostname or IP address
of the PowerProtect server.
Note:
Installation of the Microsoft application agent requires port 7000 on SQL
Server and port 8443 on PowerProtect to be open bidirectionally. These ports
enable communication between the Microsoft application agent and
PowerProtect.
l
To install the VM Direct Engine to recover application-aware SQL virtual machine
backups, select the following options, as required:
Note:
By default, when a SQL Server virtual machine is added to a virtual machine
application-aware protection policy in PowerProtect Data Manager, the Microsoft
application agent and ItemPoint silently install on the protected virtual machine.
When you are restoring a VM Direct Engine backup to an alternate virtual machine
that is not part of a protection policy, you must install the Microsoft application
agent on the target virtual machine.
n
Select VM Direct Engine.
Note:
The PowerProtect appliance details are disabled when you select the VM
Direct Engine option.
n
To install the SQL Server Management Studio plug-in user interface, select SSMS
Plug-in.
n
To enable table-level restores, select ItemPoint.
This option installs ItemPoint for Microsoft SQL Server, which you can use to
perform table-level restores.
PowerProtect Data Manager Administration and User Guide 47
Page 48

Enabling the Microsoft Application Agent for SQL
9. Click Install >.
10. On the CLR assembly deployment wizard page, perform the following steps:
a. Select or clear the SQL Server instances on which you want to deploy the CLR
Assembly. By default, all the SQL Server instances are selected.
b. To deploy CLR Assembly, select one of the following authentication options:
l
Current Windows User
l
Use Windows Authentication
l
Use Database Authentication
c. In the User name and Password fields respectively, type the username and the
password of the user who has the privileges to deploy the CLR Assembly.
d. Click Deploy.
e. Click Install.
f. After the deployment completes, click Next.
11. On the Complete the Setup page, click Finish.
Upgrade the Microsoft application agent
The Microsoft application agent 19.2 does not support a direct upgrade from an earlier version if
you are using an earlier version of PowerProtect Data Manager.
To upgrade to version 19.2, you must uninstall and then reinstall the Microsoft application agent.
The following sections provide instructions:
l
Uninstall the Microsoft application agent with the setup file on page 48
l
Install the Microsoft application agent on page 46
Uninstall the Microsoft application agent with the setup file
About this task
To uninstall the Microsoft application agent for SQL Server with the setup file, perform the
following steps.
Procedure
1. Launch emcmsappagent-19.2.0.0.exe.
2. On the Install Modification page, select Remove, and then click Next.
3. On the Configure Uninstallation Options page, click Remove.
4. On the Removing the CLR assembly page:
a. Select the required SQL Server instances to remove the CLR Assembly.
By default, all the SQL Server instances are selected.
b. Select one of the following options to remove the CLR assembly:
l
Use Windows Authentication
l
Use Database Authentication
c. In the User name and Password fields, type the credentials for the user who has the
privileges to remove CLR assembly.
48 PowerProtect Data Manager Administration and User Guide
Page 49

Enabling the Microsoft Application Agent for SQL
d. Click Remove.
e. After the removal completes, click Next.
5. On the Complete the Setup page, click Finish.
Results
The Microsoft application agent is uninstalled.
Required privileges for backup and recovery of a stand-alone server
Learn about the user requirements for stand-alone backup and recovery.
Required SQL Server roles
Assign the user the following SQL Server roles:
l
sysadmin
l
public
Required Windows user permissions
Create a local or domain Windows user account and assign the following roles:
l
For table-level backup and recovery, assign administrative privileges.
l
For database-level backup and recovery, assign the following permissions:
n
Add the user to the "Create global objects" Windows policy
n
Assign the following permissions to the data and log folder of the database:
– Read
– Write
– List folder contents
The default data and log folder is the SQL Server installation path. For example, for SQL
Server 2012 the default path is C:\Program Files\Microsoft SQL Server
\MSSQL12.MSSQLSERVER\MSSQL\
Required privileges for backup and recovery of an Always On availability group
Learn about the user requirements for stand-alone backup and recovery.
Required SQL Server roles
Assign the user the following SQL Server roles:
l
sysadmin
l
public
Required Windows user permissions
Create a Windows user account with one of the following configurations:
l
The built-in Windows Administrator
l
A domain user added to the Administrators user group
l
A local user account added to the Administrators user group on each node in the cluster. The
username and password must be the same on each node.
Note:
If you are using an account that you created (an account that is not the built-in Windows
Administrator), you must launch the tool where you will perform the backup or recovery with
elevated permissions (run as administrator).
PowerProtect Data Manager Administration and User Guide 49
Page 50

Enabling the Microsoft Application Agent for SQL
Required privileges for backup and recovery of a Failover Cluster Instance or Always On Failover Cluster Instance
Learn about the user requirements for Failover Cluster Instance or Always On Failover Cluster
Instance backup and recovery.
Required SQL Server roles
Assign the user the following SQL Server roles:
l
sysadmin
l
public
Required Windows user permissions
Create a Windows user account with one of the following configurations:
l
The built-in Windows Administrator
l
A domain user added to the Administrators user group
Note: If you are using an account that you created (an account that is not the built-in Windows
Administrator), you must launch the tool where you will perform the backup or recovery with
elevated permissions (run as administrator).
Stagger SQL discovery jobs in host scale-out environments
In the host scale-out environment, where there are large number of SQL hosts to register to
PowerProtect Data Manager, consider the following methods for staggering the SQL discovery
jobs.
Kick off the installer in smaller group of hosts
If you are installing MS appAgent by script, kick off the installer in smaller groups of hosts. The
discovery jobs will kick off after the agent installation; therefore, distributing the installer in smaller
groups will help stagger the incoming discovery results to PowerProtect Data Manager.
Stagger the Schedule Discovery in Inventory Sources
When you create an Inventory Sources custom group for SQL, PowerProtect Data Manager sets
the default schedule to be disabled. If you choose to enable daily discovery, consider staggering
this schedule at different times among different Inventory Sources.
Manage the Microsoft application agent for SQL
You can add a new Microsoft application agent for SQL data protection, approve and reject
pending agent requests, and edit and delete existing agents.
Procedure
1. Go to Infrastructure > Application Agents.
The Application Agents window appears.
2. Click Add.
The Add Application/FS Agent window appears.
3. Select one of the following options:
l
Add IP Address or CSV Filename.
This process is also called
50 PowerProtect Data Manager Administration and User Guide
Whitelisting
.
Page 51

Enabling the Microsoft Application Agent for SQL
n
If you select Add IP Address, perform the following steps:
a. Type the IP Address for the application agent.
b. Specify the date until which the application agent is pre-approved.
c. Click Save.
n
If you select CSV Filename, perform the following steps:
a. Click the Choose File icon.
Note: The contents of the .CSV file must be in the following format, for
example:
"10.25.115.113"
"10.25.115.112"
"10.25.115.145"
Explorer window appears.
The
b. Select the .csv file, and then click Open.
The file displays in the Application/FS Agents window.
c. Select the date until which the application or File System agent is preapproved.
d. Click Save.
l
If you have disabled Auto whitelist, perform the following steps:
The Auto whitelist option enabled by default. When Auto whitelist is enabled,
all pre-approved Application Agents are automatically approved.
a. Select the wanted application agent.
b. Click one of the following options:
n
Approve
n
Reject
n
Edit, then make the wanted changes.
n
Remove
c. Click Save.
After you finish
For application agents, the section Discover an application host describes how to set the host
credentials before you schedule a backup.
Support for existing SQL agent backups with PowerProtect Data Manager
The Microsoft application agent provides the capability to onboard existing stand-alone
deployments, including their existing backups, to PowerProtect Data Manager. Existing backups
are Microsoft application agent backups that you performed before integrating the Microsoft
application agent with the PowerProtect Data Manager software and before adding an asset to a
PowerProtect Data Manager protection policy.
Note:
You can onboard up to three previous months of existing backups.
PowerProtect Data Manager Administration and User Guide 51
Page 52

Enabling the Microsoft Application Agent for SQL
Retention lock is not supported for discovered existing backups in PowerProtect Data
Manager.
Onboarding of DD Boost-over-FC backups is not supported.
With the onboarding capability, PowerProtect provides the following centralized features:
l
Visibility of both existing backups and any new self-service or PowerProtect Data Manager
policy-driven backups of onboarded assets.
l
Automatic configuration of target protection storage based on the PowerProtect Data
Manager protection policies that are used for your database.
l
All the other functionality that is provided for PowerProtect Data Manager protection policies.
When you create a protection policy, the PowerProtect Data Manager software creates a storage
unit on the specified Data Domain backup host that is managed by PowerProtect Data Manager.
All subsequent backups will go to this new storage unit. This implementation overrides the backup
host and storage unit information that is provided in the script with the backup host and storage
unit information that is provided by PowerProtect Data Manager.
Supporting existing SQL agent backups with PowerProtect
Learn how to support existing SQL agent backups.
Procedure
1. Upgrade the Microsoft application agent on the SQL Server host.
Upgrade the Microsoft application agent on page 48 provides information.
2. Run the backup discovery tool, AgentBackupDiscovery.exe, to enable management of
existing SQL agent backups with PowerProtect.
Use the backup discovery tool for PowerProtect Data Manager management of existing
backups on page 53 provides information.
Note:
Step 2 enables the discovery of old backup copies that the Microsoft application
agent created during self-service backups with stand-alone deployments.
3. Register and approve the Microsoft application agent in PowerProtect Data Manager.
Manage the File System agent on page 84 provides information.
After a few minutes of approving the SQL host, all the old backup copies start to be
discovered. Depending on the number of backups, the discovery and subsequent visibility of
the backups in PowerProtect Data Manager can take some time. The retention time of the
discovered existing backup copies will be equal to the retention time set in the protection
policy plus 14 days rounded off to the next day.
4. Discover and add the credentials for the SQL application host.
Discover an Oracle or SQL application host on page 111 provides information.
5. Create a protection policy to protect the SQL host. For onboarding assets, only a subset of
databases can be onboarded. It is not mandatory for all the databases on the host to be
onboarded.
Add a protection policy for SQL database protection on page 122 provides information.
The first backup after onboarding must be a full backup:
l
The first centralized backup is automatically promoted to a full backup.
l
The first self-service backup is automatically performed as a full backup.
52 PowerProtect Data Manager Administration and User Guide
Page 53

Enabling the Microsoft Application Agent for SQL
Note: You cannot perform a backup to a secondary Data Domain device. You can only
restore from a secondary Data Domain device.
6. Perform a self-service backup of the Microsoft SQL databases. Onboarded assets can be
part of either a centralized or self-service protection policy.
Performing self-service backups of Microsoft SQL databases on page 166 provides
information.
Use the backup discovery tool for PowerProtect Data Manager management of existing backups
To enable the PowerProtect Data Manager management of existing backups after you have
upgraded from a previous version of Microsoft application agent, you must run the backup
discovery tool, AgentBackupDiscovery.exe. Existing backups are Microsoft application agent
backups that you performed before integrating the Microsoft application agent with the
PowerProtect Data Manager software.
NOTICE After you run the backup discovery tool, you can continue to use the existing backup
scripts to perform the Microsoft application agent backups. Ensure that all the databases
backed up with a particular script are added to a single protection policy. By default, the
PowerProtect Data Manager overrides the Data Domain details by using the storage unit from
the protection policy. If you do not want the Data Domain details to be overridden, use the -a
"SKIP_DD_OVERRIDE=TRUE" option in the backup scripts.
To discover the existing backups by using the backup discovery tool, perform the following steps.
1. In the Microsoft application agent installation directory, C:\Program Files\DPSAPPS
\MSAPPAGENT\bin, run AgentBackupDiscovery.exe as the administrator.
The Discovery of existing backups dialog box appears.
Note:
If the program does not start but displays the following message, an ongoing backup
discovery process is running, as invoked by the PowerProtect Data Manager:
Backup discovery is in progress. Please wait for it to complete.
When the discovery process is complete, you can run the backup discovery tool.
2. In the Data Domain system list in the dialog box, select the appropriate Data Domain IP address
or hostname, storage unit, and username for the existing backups that you want the
PowerProtect Data Manager software to discover.
Note:
Select only one storage unit at a time. After discovery is complete for the storage
unit, you can run the backup discovery tool again to discover the backups of another
storage unit.
3. In the Client hostname field, you can change the client hostname from the default local
hostname as needed.
To enable the backup discovery for an AAG or FCI, you must specify the appropriate client
hostname:
l
If the host is part of an AAG, specify the Windows cluster name.
l
If the host is part of a SQL virtual server or FCI, specify the virtual server name.
4. In the Backup discovery time period field, select the number of months for the time period,
as the time in the past when the backups were performed. You can select 1 month, 2 months,
or 3 months for the time period.
5. After you have specified the required field values, click Generate.
PowerProtect Data Manager Administration and User Guide 53
Page 54

Enabling the Microsoft Application Agent for SQL
When the PowerProtect Data Manager software completes the generation of the backup
metadata or breadcrumbs, the following message appears in the dialog box. Depending on the
number of old backups, the generation of breadcrumbs can take some time:
Breadcrumbs generated successfully.
The retention time for the discovered backup is calculated as follows:
(Retention time set for the previously performed backup) + (PowerProtect Data Manager
retention value) + (padding to midnight), where the PowerProtect Data Manager retention value
for older backups is 14 days by default.
54 PowerProtect Data Manager Administration and User Guide
Page 55

CHAPTER 5
Enabling the Oracle RMAN Agent
This section includes the following topics:
l
About the Oracle RMAN agent..............................................................................................56
l
Review Oracle data protection and replication requirements.................................................56
l
Protecting a stand-alone Oracle server................................................................................. 57
l
Protecting Oracle RAC environments....................................................................................57
l
Install and configure the Oracle RMAN agent........................................................................58
l
Add or manage the Oracle application agent..........................................................................74
l
Supporting existing Oracle RMAN agent backups with PowerProtect Data Manager............75
PowerProtect Data Manager Administration and User Guide 55
Page 56

Enabling the Oracle RMAN Agent
About the Oracle RMAN agent
The Oracle RMAN agent enables an application administrator to protect and recover the Oracle
data on the application host. PowerProtect Data Manager integrates with the Oracle RMAN agent
to check and monitor backup compliance against protection policies. PowerProtect Data Manager
also enables central scheduling for backups.
The Oracle RMAN agent installation is a command-line process whereby the user installs the
required Oracle RMAN agent and PowerProtect Data Manager software. PowerProtect Data
Manager then sets the Data Domain host, storage unit, user, and password. Install and configure
the Oracle RMAN agent on page 58 provides instructions.
Note: PowerProtect Data Manager supports the coexistence of the Oracle RMAN agent and
the File System agent on Linux.
Software compatibility information for the PowerProtect Data Manager software and application
agents is provided in the eLab Navigator, available at https://elabnavigator.emc.com/eln/
modernHomeDataProtection.
Review Oracle data protection and replication requirements
Prerequisites
PowerProtect Data Manager can manage and monitor data protection and replication for Oracle
assets through integration with the Oracle RMAN agent.
After installing the Oracle RMAN agent, review the following information for additional
requirements before adding the Oracle RMAN agent as an asset source in PowerProtect Data
Manager and discovering the agent assets.
Ensure that you meet the required prerequisites before you add an Oracle asset.
Verify that the environment meets the following requirements:
l
Ensure that all clocks on both the Oracle host and PowerProtect Data Manager are timesynced to the local NTP server to ensure discovery of the backups.
l
Ensure that the Oracle host and the PowerProtect Data Manager network can see and resolve
each other.
l
Ensure that port 7000 is open on the Oracle host.
l
If you are going to register Oracle RAC nodes to PowerProtect Data Manager, set the
db_domain parameter on every RAC node in the RAC database instance:
1. Use sqlplus to log in to your database.
2. Run the command: sqlplus / as sysdba
3. Run the command: show parameters db_domain
The following output is displayed:
NAME TYPE VALUE ------------------------------------ -----------
------------------------------
db_domain string SQL> alter system set db_domain='admdb'
scope=spfile sid='*';
System altered.
56 PowerProtect Data Manager Administration and User Guide
Page 57

1. shutdown immediate;
2. startup;
Protecting a stand-alone Oracle server
Learn how to configure protection of a stand-alone Oracle server.
Procedure
1. Add a storage system.
Add protection storage on page 40 provides information.
2. Install the Oracle RMAN agent on the Oracle server host.
Install the Oracle RMAN agent on page 58 provides information.
3. Add or approve the Oracle RMAN agent in PowerProtect Data Manager.
Add or manage the Oracle application agent on page 74 provides information.
4. Discover and add the credentials for the Oracle application host.
Discover an Oracle or SQL application host on page 111 provides information.
Enabling the Oracle RMAN Agent
5. Create a protection policy to protect the Oracle server host.
Add a protection policy for Oracle database protection on page 125 provides information.
Protecting Oracle RAC environments
Learn how to configure protection of Oracle RAC environments.
About this task
You must repeat the steps to install the Oracle RMAN agent, and then add and discover the
application host in PowerProtect Data Manager on each node in the Oracle RAC environment.
Procedure
1. Add a storage system.
Add protection storage on page 40 provides information.
2. Install the Oracle RMAN agent on each Oracle RAC node.
Install the Oracle RMAN agent on page 58 provides information.
3. Add or approve the Oracle RMAN agent on each Oracle RAC node.
Add or manage the Oracle application agent on page 74 provides information.
4. Discover and add the credentials for each Oracle application host.
Discover an Application Host provides information.
5. Create a protection policy group to protect the Oracle RAC nodes.
Add a protection policy for Oracle database protection on page 125 provides information.
PowerProtect Data Manager Administration and User Guide 57
Page 58

Enabling the Oracle RMAN Agent
Install and configure the Oracle RMAN agent
Learn how to install and configure the Oracle RMAN agent.
Install the Oracle RMAN agent
Learn how to install the Oracle RMAN agent on all the Linux database servers that must access the
Data Domain system.
About this task
NOTICE You must use the Oracle RMAN agent version 19.2 with PowerProtect Data Manager
version 19.2. If a previous version of Oracle RMAN agent is installed, you must upgrade to
version 19.2.
Run the install.sh script to install the Oracle RMAN agent 19.2 or to upgrade from an earlier
version of the Oracle RMAN agent. The script installs the Oracle RMAN agent in a user-specified
directory or in the default installation directory, $HOME/opt/dpsapps/rmanagent.
Run the install.sh -h or install.sh --help command to obtain more information about
the script operation.
Complete the following steps to download the Oracle RMAN agent and perform a new installation
of the software on Linux.
Note:
In a RAC system, you must install the Oracle RMAN agent and PowerProtect Data
Manager agent on each node.
Procedure
1. In the PowerProtect Data Manager UI:
a. Select Agent Downloads from Dashboard > System Settings.
b. Select the Oracle RMAN agent download package, ddrman192_linux_x86_64.tar.
c. Download the package to the Oracle server host on Linux.
Note:
As an alternative, you can download the Oracle RMAN agent package from the
Support website at https://support.emc.com.
2. Change the ownership of the tar file to the oracle user by running the following command:
# chown -R oracle:oinstall ddrman192_linux_x86_64.tar
Uncompress the downloaded tar file using the oracle user by running the following
command:
# tar -vxf ddrman192_linux_x86_64.tar
3. Ensure that no backups are running. Stop the RMAN processes before you install the Oracle
RMAN agent.
4. As one of the system's Oracle users (recommended), run the install.sh script:
$ install.sh
58 PowerProtect Data Manager Administration and User Guide
Page 59

Enabling the Oracle RMAN Agent
5. The install.sh script displays the following prompt:
Do you want to install under the default installation directory /home/
oracle/opt/dpsapps/rmanagent? (y or n)
Type the appropriate value:
l
To install in the default directory, type y.
l
To install in a non-default directory that already exists, type n.
The script then prompts you to enter the installation directory pathname:
Enter the full pathname of the installation destination:
Type the pathname of an already created installation directory.
Note: The user-specified installation directory must be a directory that is created
specifically for the Oracle RMAN agent 19.2 installation, and must not be the
ORACLE_HOME
directory. The complete directory pathname must be specified,
without a slash (/) at the end.
The install.sh script displays the following output:
The lib directory /home/oracle/opt/dpsapps/rmanagent/lib is created.
The config directory /home/oracle/opt/dpsapps/rmanagent/config is created.
The bin directory /home/oracle/opt/dpsapps/rmanagent/bin is created.
The breadcrumbs directory /home/oracle/opt/dpsapps/rmanagent/breadcrumbs
is created.
Installing the Oracle RMAN agent.
Copying the lockbox libraries to /home/oracle/opt/dpsapps/rmanagent/lib/.
Copying libddobk.so to /home/oracle/opt/dpsapps/rmanagent/lib/.
Copying libDDBoost.so to /home/oracle/opt/dpsapps/rmanagent/lib/.
Copying ddutil to /home/oracle/opt/dpsapps/rmanagent/bin/.
Copying the dependency libraries to /home/oracle/opt/dpsapps/rmanagent/
lib/.
Copying the configuration file to /home/oracle/opt/dpsapps/rmanagent/
config/.
Copying the ddbmcon program to /home/oracle/opt/dpsapps/rmanagent/bin/.
Creating the lockbox.
Successfully installed the Oracle RMAN agent.
ORACLE_HOME
6. If
is set in the environment, the install.sh script displays the following
type of prompt. Type n, as required for a new installation:
The Oracle RMAN agent library, libddobk.so, does not exist in /space/
oracle/app/oracle/product/12.1.0/dbhome_1/lib.
Do you want to update settings in /space/oracle/app/oracle/product/
12.1.0/dbhome_1 directory so that RMAN scripts from previous
installation can be reused? (y or n) n
The installation script exits.
7. To verify the installed version of Oracle RMAN agent, run the following command:
$ /home/oracle/opt/dpsapps/rmanagent/bin/ddutil -i
PowerProtect Data Manager Administration and User Guide 59
Page 60

Enabling the Oracle RMAN Agent
Upgrade the Oracle RMAN agent
An upgrade of the Oracle RMAN agent to version 19.2 requires additional steps when the pre-19.2
Oracle RMAN agent is integrated with Enterprise Copy Data Management (eCDM). In that case,
you must also upgrade the eCDM integration to a PowerProtect Data Manager integration.
About this task
Note: If Oracle RMAN agent versions earlier than version 4.0 are installed, refer to the latest
PowerProtect Oracle RMAN Agent Administration Guide
the pre-4.0 versions.
Procedure
1. To obtain details about the Data Domain hosts and storage units that eCDM or
PowerProtect has registered with the Oracle RMAN agent, run the ddutil -s command
on the Oracle RMAN agent client host. For example:
ddutil -s
Data Domain Hostname: 10.36.52.98
for information about how to upgrade
FC Service Name: None
FC Service Enabled: false
Storage Unit: PLC-PROTECTION-1557475568457
User: PLC-PROTECTION-1557475568457
Type: PRIMARY
2. If the pre-19.2 Oracle RMAN agent is integrated with eCDM, perform the following steps to
upgrade the eCDM software to PowerProtect Data Manager software:
a. In the eCDM UI menu, select Upgrade under System Settings.
b. To upload the upgrade package, click Upload Package.
The following message appears when the package has been uploaded:
Package uploaded successfully.
c. To run the upgrade process, click Perform Upgrade.
d. When prompted to verify the certificate details and confirm the upgrade, click Yes.
The following message appears when each package component has been upgraded:
State: UPGRADED
3. To stop the eCDM agent on the Oracle RMAN agent client host, run the following command:
/usr/local/ecdm/ecdm-agent/bin/ecdm-agent.bin stop
The following message appears when the eCDM agent is stopped:
eCDM Agent daemon control 'stop' is successful
60 PowerProtect Data Manager Administration and User Guide
Page 61

Enabling the Oracle RMAN Agent
4. Upgrade the Oracle RMAN agent according to the instructions in Install the Oracle RMAN
agent on page 58.
For example, when you run the install.sh script to perform the upgrade, the following
type of output appears:
install.sh
Do you want to install under the default installation directory /home/
oracle/opt/dpsapps/rmanagent? (y or n) y
An Oracle RMAN agent already exists. Do you want to continue the
installation? (y or n) y
Installing the Oracle RMAN agent.
Copying the lockbox libraries to /home/oracle/opt/dpsapps/rmanagent/
lib/.
Copying libddobk.so to /home/oracle/opt/dpsapps/rmanagent/lib/.
Copying libDDBoost.so to /home/oracle/opt/dpsapps/rmanagent/lib/.
Copying ddutil to /home/oracle/opt/dpsapps/rmanagent/bin/.
Copying the dependency libraries to /home/oracle/opt/dpsapps/rmanagent/
lib/.
Copying the ddbmcon program to /home/oracle/opt/dpsapps/rmanagent/bin/.
Upgrading the lockbox.
Import operation is not needed because the lockbox version is already
updated.
As a PowerProtect Data Manager user, update the existing Data Domain
details? (y or n) y
Data Domain server name: 10.36.52.98
Data Domain Storage Unit name: PLC-PROTECTION-1557475568457
Successfully updated the DD Boost credentials in the lockbox.
As a PowerProtect Data Manager user, update the existing Data Domain
details? (y or n) n
Updated the lockbox.
Successfully installed the Oracle RMAN agent.
Do you want to uninstall the previous Oracle RMAN agent in /u01/app/
oracle/product/12.1.0/dbhome_1 directory? (y or n) y
The Oracle RMAN agent is uninstalled.
Do you want to update settings in /u01/app/oracle/product/12.1.0/
dbhome_1 directory so that RMAN scripts from previous installation can
be reused? (y or n) y
Updating settings in the /u01/app/oracle/product/12.1.0/dbhome_1
directory.
Settings are updated.
Installation is completed.
5. If you upgraded the eCDM software to PowerProtect Data Manager software in step 2,
perform the following steps to uninstall the eCDM agent and install the PowerProtect agent:
a. To uninstall the eCDM agent, run the rpm -e ecdm-agent-3.0.0-15_1.x86_64
command. For example:
rpm -e ecdm-agent-3.0.0-15_1.x86_64
Uninstalling ecdm-agent...
ecdmagent.service - eCDM Agent Service
Loaded: loaded (/etc/systemd/system/ecdmagent.service; enabled)
:
b. To install the PowerProtect agent, run the rpm -ivh adm-agent-19.x.x. rpm
command, where x.x is the current version. For example:
rpm -ivh adm-agent-19.1.0.rpm
warning: adm-agent-19.1.0.rpm: Header V3 RSA/SHA1 Signature, key ID
5301dfb7: NOKEY
Preparing... ################################# [100%]
PowerProtect Data Manager Administration and User Guide 61
Page 62

Enabling the Oracle RMAN Agent
6. To register the Oracle RMAN agent to the PowerProtect server, run the register.sh
Updating / installing...
1:adm-agent-19.1.0-1_SNAPSHOT201904#################################
[100%]
Installing adm-agent...
2019/05/10 14:48:56 Adding current path for configurations: /usr/
local/ecdm/ecdm-agent/bin
2019/05/10 14:48:56 nameLogfile logfile
2019/05/10 14:48:56 Flags &{ControlAction:install Unregister:false
Upgrade:false LogFile:/usr/local/ecdm/ecdm-agent/logs/admagent.log
Port:7000 AgentID: ECDMHost: ECDMPort:8443 ECDMScheme:https
AppAgentPaths:[]}
2019/05/10 14:48:57 ADM Agent daemon control 'install' is successful
Please run /usr/local/ecdm/ecdm-agent/bin/register.sh to register
this system to a Dell EMC PPDM Server.
If OS authentication is disabled for one or more Oracle databases on
the client, refer to Oracle RMAN agent Administration Guide to use
another authentication option for discovery.
script. For example:
/usr/local/ecdm/ecdm-agent/bin/register.sh
2019/05/10 14:49:25 Adding current path for configurations: /usr/local/
ecdm/ecdm-agent/bin
2019/05/10 14:49:25 nameLogfile logfile
2019/05/10 14:49:25 Flags &{ControlAction:stop Unregister:false
Upgrade:false LogFile:/usr/local/ecdm/ecdm-agent/logs/admagent.log
Port:7000 AgentID: ECDMHost: ECDMPort:8443 ECDMScheme:https
AppAgentPaths:[]}
2019/05/10 14:49:25 ADM Agent daemon control 'stop' is successful
Enter PowerProtect Data Manager IP/Hostname: blrv136h018.lss.emc.com
Enter App Agent Home (press enter for default home /home/oracle/opt/
dpsapps/rmanagent):
unregister host
2019/05/10 14:49:35 Adding current path for configurations: /usr/local/
ecdm/ecdm-agent/bin
:
Do you want to set the default retention time for automatic retention
management by PowerProtect of existing backups? (y or n) y
Provide default retention time in number of days: 2
Allow SYSDBA access for RMAN agent? (y or n) y
2019/05/10 14:49:45 Adding current path for configurations: /usr/local/
ecdm/ecdm-agent/bin
2019/05/10 14:49:45 nameLogfile logfile
2019/05/10 14:49:45 Flags &{ControlAction:start Unregister:false
Upgrade:false LogFile:/usr/local/ecdm/ecdm-agent/logs/admagent.log
Port:7000 AgentID: ECDMHost:blrv136h018.lss.emc.com ECDMPort:8443
ECDMScheme:https AppAgentPaths:[/home/oracle/opt/dpsapps/rmanagent]}
2019/05/10 14:49:45 ADM Agent daemon control 'start' is successful
7. To complete the upgrade, manually approve the Oracle RMAN agent from the PowerProtect
Data Manager server. Manage the File System agent on page 84 provides information.
Uninstall the Oracle RMAN agent
Run the uninstall.sh script to uninstall the Oracle RMAN agent 19.2. You can also run the
script to uninstall a previous version of the Oracle RMAN agent.
About this task
Run the uninstall.sh -h or uninstall.sh --help command to obtain more information
about the script operation.
62 PowerProtect Data Manager Administration and User Guide
Page 63

You can run the uninstall.sh script manually or automatically. To enable the automatic
operation, you must set the appropriate environment variables as listed in Table 19 on page 63:
l
When the variables are not set, the script runs manually and prompts for the required values.
l
When the variables are set, the script runs automatically and performs the uninstallation
according to the environment variable settings.
Table 19 Environment variables for uninstallation of Oracle RMAN agent
Environment variable Description Default and valid values
Enabling the Oracle RMAN Agent
RMAN_AGENT_HOME
RMAN_AGENT_UNINSTALL_OPTIO
NS
Note: It is not necessary to uninstall the Oracle RMAN agent for an upgrade. An existing
Oracle RMAN agent is overwritten during an upgrade.
Specifies the installation directory for
the Oracle RMAN agent.
Specifies the software components
to uninstall.
l
/home/oracle1/opt/
dpsapps/rmanagent (default).
l
Valid complete pathname of the
directory for installation of
Oracle RMAN agent.
Note: The directory
pathname must not end with
a slash (/).
l
Undefined (default).
l
NONE or none—Specifies to
keep the Oracle RMAN agent
software, and not perform the
uninstallation.
l
BINARY or binary—Specifies to
uninstall the software, but not
the lockbox or the configuration
file.
l
FULL or full—Specifies to
uninstall the software, lockbox,
and configuration file.
Perform the following steps to uninstall the Oracle RMAN agent.
Procedure
1. Ensure that backup and restore operations are not in progress when you uninstall the Oracle
RMAN agent.
2. If you want the uninstallation script to run automatically, ensure that
RMAN_AGENT_HOME
and
RMAN_AGENT_UNINSTALL_OPTIONS
are set as described in
Table 19 on page 63.
To verify the value of an environment variable, run the echo command. For example:
# echo $RMAN_AGENT_HOME
/home/oracle/opt/dpsapps/rmanagent
To set an environment variable, run the export command. For example:
# export RMAN_AGENT_HOME=/opt/dpsapps/rmanagent
PowerProtect Data Manager Administration and User Guide 63
Page 64

Enabling the Oracle RMAN Agent
3. As an Oracle user, run the uninstall.sh script:
Note: It is recommended that you set the
RMAN_AGENT_HOME
environment variable
before you run the uninstall.sh script.
# ./uninstall.sh
4. If the script does not run automatically, type the appropriate values at the prompts:
a. When prompted, specify whether you want to enter the directory pathname of the
Oracle RMAN agent installation:
An installation directory pathname is not specified. Do you want to
enter the installation pathname? (y or n)
If you type y, then the script prompts for the installation location. Type the complete
pathname of the installation location, without a slash (/) at the end.
b. When prompted, specify whether you want the lockbox and configuration file to be
removed:
Do you want to remove the lockbox and the configuration file? (y or n)
c. If the script detects an additional installation of Oracle RMAN agent, the script prompts
whether to uninstall that version. You can specify to keep or uninstall the software.
The script removes the Oracle RMAN agent software and prints the following message:
The Oracle RMAN agent is uninstalled from the /home/oracle/opt/dpsapps/
rmanagent directory.
Uninstallation is completed.
Integration with PowerProtect Data Manager software
This procedure enables the integration of Oracle RMAN agent with PowerProtect Data Manager,
which enables PowerProtect Data Manager to monitor, manage, and analyze the Oracle RMAN
agent backups on Linux.
NOTICE
PowerProtect Data Manager can create and manage replication copies based on the
protection policies.
PowerProtect Data Manager performs these operations whether the backup is created by the
DBA or by the PowerProtect Data Manager centralized backup scheduler.
Because PowerProtect Data Manager controls the replication, when the Oracle RMAN agent is
deployed with PowerProtect Data Manager, the following self-service replication operations
are disabled:
l
Creation of multiple backup copies with the RMAN BACKUP COPIES command.
l
MTree replication to create backup copies on a secondary Data Domain system.
You can restore from replicated copies of backups that were performed with a previous
version of Oracle RMAN agent.
64 PowerProtect Data Manager Administration and User Guide
Page 65

Enabling the Oracle RMAN Agent
When you perform a self-service backup managed by PowerProtect Data Manager, the
PowerProtect Data Manager protection policy settings for the given database will override the
target protection storage settings specified in the RMAN backup script, including the Data
Domain server hostname and storage unit name.
1. Install and register the required PowerProtect Data Manager application data management
(ADM) agent on the Oracle RMAN agent host as described in Install the PowerProtect Data
Manager agent on page 65.
2. Enable the ddbmcon program to connect to the local Oracle databases during PowerProtect
Data Manager operations. How the Oracle RMAN agent communicates with PowerProtect
Data Manager on page 67 provides details.
3. Verify the connectivity from the ddbmcon program to the Oracle database by using the
ddutil program with the required options. Verify the connectivity from ddbmcon on page
71 provides details.
4. Ensure that the /etc/oratab file contains a complete list of all the Oracle SIDs on the host.
The Oracle RMAN agent uses the information in the file to discover the database resources on
the system, which enables the PowerProtect Data Manager operations.
In an Oracle RAC environment, ensure that the /etc/oratab file contains an entry for each
database instance. Manually add any database instance entries that do not yet exist in the file.
Each entry must have the following format:
<ORACLE_SID>:<ORACLE_HOME>:<N|Y>
Note:
Only with Oracle RAC 12.2 or later, each entry can have the following format:
<DATABASE_UNIQUE_NAME>:<ORACLE_HOME>:<N|Y>
As recommended by Oracle, ensure that all the archived redo logs in the Oracle RAC
environment reside on shared storage or a shared cluster file system that is accessible from all
the RAC nodes. Select one node to be the backup node and set the IS_RAC_BACKUP_NODE
parameter accordingly, as described in Configuration file requirements for connection to local
databases on page 68.
Install the PowerProtect Data Manager agent
You must install the PowerProtect Data Manager agent as the root user on the Oracle RMAN host
so that the Oracle RMAN agent can communicate with the PowerProtect Data Manager server.
About this task
Note:
In a RAC system, you must install the Oracle RMAN agent and PowerProtect Data
Manager agent on each node.
Procedure
1. Log in as the root user on the Oracle RMAN host.
2. To install the PowerProtect Data Manager agent, run the following command:
rpm -ivh adm-agent-19.2.0.rpm
warning: adm-agent-19.2.0.rpm: Header V3 RSA/SHA1 Signature, key ID
5301dfb7: NOKEY
Preparing... ################################# [100%]
PowerProtect Data Manager Administration and User Guide 65
Page 66

Enabling the Oracle RMAN Agent
3. To register the Oracle RMAN agent with the PowerProtect Data Manager server, run the
Updating / installing...
1:admagent-19.2.0-1_SNAPSHOT201904################################# [100%]
Installing adm-agent...
2019/05/10 14:48:56 Adding current path for configurations: /usr/local/
ecdm/ecdm-agent/bin
2019/05/10 14:48:56 nameLogfile logfile
2019/05/10 14:48:56 Flags &{ControlAction:install Unregister:false
Upgrade:false LogFile:/usr/local/ecdm/ecdmagent/logs/admagent.log
Port:7000 AgentID: ECDMHost:ECDMPort:8443 ECDMScheme:https AppAgentPaths:
[]}
2019/05/10 14:48:57 ADM Agent daemon control 'install' is successful
Please run /usr/local/ecdm/ecdm-agent/bin/register.sh to register this
system to a Dell EMC PPDM Server.
If OS authentication is disabled for one or more Oracle databases on the
client, refer to Oracle RMAN Agent Administration Guide to use another
authentication option for discovery.
The adm-agent-19.2.0.rpm file is installed in the /usr/local/ecdm/ecdm-agent
directory.
register.sh script:
/usr/local/ecdm/ecdm-agent/bin/register.sh
2019/05/10 14:49:25 Adding current path for configurations: /usr/local/
ecdm/ecdm-agent/bin
2019/05/10 14:49:25 nameLogfile logfile
2019/05/10 14:49:25 Flags &{ControlAction:stop
Unregister:false Upgrade:false LogFile:/usr/local/ecdm/ecdmagent/
logs/admagent.log Port:7000 AgentID: ECDMHost:
ECDMPort:8443 ECDMScheme:https AppAgentPaths:[]}
2019/05/10 14:49:25 ADM Agent daemon control 'stop' is successful
a. When prompted by the register.sh script, type the hostname or IP address of the
PowerProtect Data Manager home:
Enter PowerProtect Data Manager IP/Hostname:
Enabling the Oracle RMAN application agent blrv136h018.lss.emc.com
b. When prompted, type the location of the Oracle RMAN agent installation:
Enter App Agent Home (press enter for default home /home/oracle/opt/
dpsapps/rmanagent):
c. When prompted, you can set the retention time as the number of days that the
PowerProtect Data Manager will retain any backups that already exist on the system:
Do you want to set the default retention time for automatic retention
management by PowerProtect of existing backups? (y or n) y
Provide default retention time in number of days: 1
d. When prompted, specify whether Oracle OS authentication will use the SYDBDA role
when connecting to Oracle. If you type n, then OS authentication will use the
SYSBACKUP role:
Allow SYSDBA access for RMAN agent? (y or n) y
66 PowerProtect Data Manager Administration and User Guide
Page 67

The script completes by starting the daemon that connects to PowerProtect Data
Manager:
2019/05/10 14:49:45 ADM Agent daemon control 'start' is successful
Uninstall the PowerProtect Data Manager agent
You must uninstall the PowerProtect Data Manager agent as the root user on the Oracle RMAN
host.
Procedure
1. Log in as the root user on the Oracle RMAN host.
2. Query the Oracle client for an installed adm agent by running the following command:
# rpm -qa | grep adm*
adm-agent-19.2.0-1_SNAPSHOT20190530071531.x86_64
3. If the adm agent exists on the Oracle client, uninstall the adm agent by running the following
command:
Enabling the Oracle RMAN Agent
# rpm -e adm-agent-19.2.0-1_SNAPSHOT20190530071531.x86_64
How the Oracle RMAN agent communicates with PowerProtect Data Manager
The Oracle RMAN agent program ddbmcon handles all communication between the Oracle RMAN
agent and PowerProtect Data Manager.
Note:
You cannot run the ddbmcon program manually. The program is only run by the
PowerProtect Data Manager agent.
When the ddbmcon program performs discovery, backup, or deletion operations, it connects to
the Oracle database. The following authentication methods are supported:
1. Database authentication—The ddbmcon program first tries to connect to the Oracle database
instance by using database authentication. The program tries to use the database
administrator username and password to connect to the database instance.
2. Oracle wallet authentication—If database authentication fails or is not enabled, the ddbmcon
program tries to connect by using Oracle wallet authentication. The program tries to use the
parameter settings from the configuration file to connect to the database instance.
3. Operating system authentication—If Oracle wallet authentication also fails or is not enabled,
the ddbmcon program tries to connect by using operating system authentication. The program
tries to change the real process user ID to the Oracle installation user ID, to connect to the
database instance.
The ddbmcon program tries all these authentication methods for each Oracle database instance.
The program reports a connection error if it cannot connect to the database instance by using any
of these methods. If one of these methods succeeds, the ddbmcon program ignores the other
authentication methods and proceeds to retrieve the information as used by the PowerProtect
Data Manager.
Ensure that you enable one of these three authentication methods for the ddbmcon program. For
maximum ease of use, it is recommended that you enable the operating system authentication
PowerProtect Data Manager Administration and User Guide 67
Page 68

Enabling the Oracle RMAN Agent
method. Both the database and Oracle wallet authentication methods require additional
configuration steps on the Oracle host and parameter settings in the configuration file
rman_agent.cfg.
Configuration file requirements for connection to local databases
As required for certain ddbmcon program operations, you must complete the required
configuration settings to enable the authentication method that you want the program to use.
Each authentication method has its own requirements for parameter settings in the configuration
file.
During the Oracle RMAN agent installation, the configuration file template, rman_agent.cfg, is
installed in the $RMAN_AGENT_HOME/config directory. To enable a particular authentication
method, you must set the required parameters in the rman_agent.cfg configuration file.
The configuration file template includes the following information.
# #############################################################################
#
# rman_agent.cfg
#
# All rights reserved.
#
# Oracle RMAN agent 19.2
#
# This template is designed to help users to configure the authentication of
# RMAN agent. Check the product administration guide for a complete list of
# all the supported parameters and rules for editing the configuration file.
#
# Make a copy of this file before making any modifications.
# To enable a parameter, uncomment or add the parameter in the file and
# specify its value.
#
# #############################################################################
#
# #############################################################################
# Oracle parameters.
# There can be repetitive sections of Oracle parameters. The Oracle database
# the parameters belong to is described in the section name: SID_name. The
# name here must be replaced by the SID of the database.
# #############################################################################
[SID_name]
# ORACLE_SERVICE =
# ORACLE_USER =
# ORACLE_OS_USER =
# TNS_ADMIN =
# RMAN_CATALOG_SERVICE =
# RMAN_CATALOG_USER =
# IS_RAC_BACKUP_NODE =
To set a particular parameter in the configuration file, such as ORACLE_SERVICE, remove the #
symbol at the start of the parameter line and add the parameter value after the equal sign (=).
You can complete the following settings in the configuration file:
l
SID_
name
is mandatory for each authentication method when you set any parameters in the
file for a particular system ID (SID). [SID_
separate line before all the parameter settings for the SID:
n
For Oracle 10g, 11g, and non-RAC systems, SID_
oratab file.
n
For Oracle 12c RAC systems, SID_
Note:
Each Oracle SID on the same system requires its own entries in the configuration
file. You must use the same configuration file for all the Oracle SIDs.
68 PowerProtect Data Manager Administration and User Guide
name
] (for example, [SID_orcl]) must appear on a
name
must match the SID in the /etc/
name
must match the SID that runs on the local host.
Page 69

Enabling the Oracle RMAN Agent
l
ORACLE_SERVICE is mandatory for database authentication and Oracle wallet authentication.
Specifies the TNS or Net service name of the Oracle database.
l
ORACLE_USER is mandatory for database authentication only. Specifies the database
username as saved in the lockbox.
l
ORACLE_OS_USER is mandatory for operating system authentication when the username for
connection is different than the ORACLE_OSDBA_USER username. Specifies the operating
system user that will connect to the Oracle database for operating system authentication.
When this parameter is set, ORACLE_OSDBA_USER is ignored.
l
TNS_ADMIN is mandatory for database authentication and Oracle wallet authentication when
the Oracle Net configuration files including tnsnames.ora reside in a non-default directory.
Specifies the pathname of the non-default directory. When this parameter is not set, the
system default directory $ORACLE_HOME/network is used.
l
RMAN_CATALOG_SERVICE is mandatory when an RMAN catalog is used for backup or
recovery of the database. Specifies the TNS name of the RMAN catalog.
l
RMAN_CATALOG_USER is mandatory for each authentication method when an RMAN catalog
is used. Specifies the catalog database username as saved in the lockbox.
l
IS_RAC_BACKUP_NODE is highly recommended in an Oracle RAC environment only. In the
Oracle RAC environment, select a single node to be the backup node and set this parameter to
name
TRUE to specify that the SID_
when the SID_
name
node is not the backup node.
node is the backup node. Set this parameter to FALSE
The following topics provide more details about the configuration requirements of each particular
authentication method.
Authentication requirements
The following subtopics provide details about the three authentication methods that the ddbmcon
program supports.
Database authentication requirements
Before the ddbmcon program can use database authentication to connect to an Oracle database,
you must complete the required configuration to enable the database authentication method.
Database authentication can be used to connect to a target database or catalog database.
To enable the database authentication method, run the ddutil command with the appropriate
options to store the database administrator credentials in the lockbox:
ddutil -C -a USER_TYPE=DATABASE_ADMIN [-a DATABASE_SIDS=<database_SIDs>] [-a
USERNAME=<administator_username>]
Note:
If the lockbox does not exist when you run the ddutil command, the command creates
the lockbox in the default directory.
The options -C and -a USER_TYPE=DATABASE_ADMIN are mandatory. If you do not specify the
other -a options, -a DATABASE_SIDS=
USERNAME=
administrator username. The command always prompts for the administrator password.
<administator_username>
<database_SIDs>
and -a
, the command prompts for the database SIDs and
PowerProtect Data Manager Administration and User Guide 69
Page 70

Enabling the Oracle RMAN Agent
If multiple databases exist on the system and all use the same administrator username and
password, you can add the credentials for all the databases to the lockbox with the same ddutil
command. You must specify the database SIDs as a comma-separated list. For example:
ddutil -C -a USER_TYPE=DATABASE_ADMIN
'RMAN_AGENT_HOME' is retrieved from ddutil runtime location as '/home/
oracle/opt/dpsapps/rmanagent'
Database SIDs (to a maximum of 19 SIDs):
orcl1,orcl2,orcl3,orcl4,orcl5,db1,db2
Database administrator name: SYS
Password: xxxxx
Re-enter password: xxxxx
Successfully set the Oracle database administrator credentials in the lockbox.
Enabling the Oracle RMAN application agent.
The following example command includes all the supported -a options:
ddutil -C -a USER_TYPE=DATABASE_ADMIN -a
DATABASE_SIDS=orcl1,orcl2,orcl3,orcl4,orcl5,db1,db2 -a USERNAME=SYS
'RMAN_AGENT_HOME' is retrieved from ddutil runtime location as '/home/
oracle/opt/dpsapps/rmanagent'
Password: xxxxx
Re-enter password: xxxxx
Successfully set the Oracle database administrator credentials in the lockbox.
To enable the database authentication method, you must also set the following parameters for
each required SID in the rman_agent.cfg configuration file:
l
Set ORACLE_SERVICE and ORACLE_USER. ORACLE_USER must match the username that is
saved in the lockbox.
l
If the Oracle Net configuration files reside in a non-default directory, set TNS_ADMIN to the
directory pathname.
l
If an RMAN catalog is used, set RMAN_CATALOG_SERVICE and RMAN_CATALOG_USER.
For example, the rman_agent.cfg configuration file includes the following settings to enable the
database authentication for the database SID orcl:
[SID_orcl]
ORACLE_SERVICE = DBFS
ORACLE_USER = ORACLE1
TNS_ADMIN = /home/oracle/wallet
To confirm that database authentication is enabled, you can log in as the root user and run the
ddutil commands as described in Verify the connectivity from ddbmcon on page 71.
Oracle wallet authentication requirements
Before the ddbmcon program can use Oracle wallet authentication to connect to an Oracle
database, you must complete the required configuration to enable the Oracle wallet authentication
method. Oracle wallet authentication can be used to connect to a target database or catalog
database.
To enable the Oracle wallet authentication method, you must set the following parameters for
each required SID in the rman_agent.cfg configuration file:
70 PowerProtect Data Manager Administration and User Guide
Page 71

Enabling the Oracle RMAN Agent
l
Set ORACLE_SERVICE to the TNS or Net service name. For example, set the parameter to the
value DBFS.
l
If the Oracle Net configuration files reside in a non-default directory, set TNS_ADMIN to the
directory pathname.
l
If an RMAN catalog is used, set RMAN_CATALOG_SERVICE and RMAN_CATALOG_USER.
For example, the rman_agent.cfg configuration file includes the following settings to enable the
Oracle wallet authentication for the database SID orcl:
[SID_orcl]
ORACLE_SERVICE = DBFS
TNS_ADMIN = /home/oracle/<alternate_TNS_location>
To confirm that Oracle wallet authentication is enabled, you can log in as the root user and run the
ddutil commands as described in Verify the connectivity from ddbmcon on page 71.
Operating system authentication requirements
The operating system authentication method can only be used on systems with a single Oracle
home or with multiple Oracle homes that were all installed by the same user. During authentication,
the ddbmcon program either obtains the Oracle installation user ID or reads the operating system
username from the rman_agent.cfg configuration file. Then the program changes the real user
of the process to the Oracle installation user or the operating system user, to connect to the
database instance.
Note:
The operating system user specified in the configuration file takes precedence over the
Oracle installation user.
When the ddbmcon program uses the authentication method on a system with multiple Oracle
homes that were installed by different users, the program returns information for only one Oracle
home. The program returns a connection error for the other Oracle homes.
During the backup discovery, the ddbmcon program tries to use the operating system
authentication method only after the database authentication and Oracle wallet authentication
methods have both failed to connect to the Oracle database.
To enable the operating system authentication method, you must set the following parameters for
each required SID in the rman_agent.cfg configuration file:
l
If the username to be used for the connection is different than ORACLE_OSDBA_USER, set
ORACLE_OS_USER.
l
If an RMAN catalog is used, set RMAN_CATALOG_SERVICE and RMAN_CATALOG_USER.
For example, the rman_agent.cfg configuration file includes the following settings to enable the
operating system authentication for the database SID orcl:
[SID_orcl]
ORACLE_OS_USER = ORACLE1
To confirm that operating system authentication is enabled, you can log in as the root user and run
the ddutil commands as described in Verify the connectivity from ddbmcon on page 71.
Verify the connectivity from ddbmcon
You can run the ddutil command as the root user with the appropriate -v option to verify the
connectivity from the ddbmcon program to the Oracle database.
The following subtopics describe the three supported levels of verification with the ddutil -v
command:
PowerProtect Data Manager Administration and User Guide 71
Page 72

Enabling the Oracle RMAN Agent
l
Host verification
l
Instance verification
l
RMAN verification
Host verification
To perform the host verification, run the ddutil -v host command as the root user.
The ddutil -v host command output includes the Oracle instances found on the system and
basic information about each Oracle instance.
For example, the following ddutil -v host command lists one Oracle instance and the
authentication method as database authentication:
ddutil -v host
'RMAN_AGENT_HOME' is retrieved from ddutil runtime location as '/opt/dpsapps/
rmanagent'.
The ORACLE_HOME environment variable could not be retrieved.
Reported application instance:
Version: 11.2.0.1.0
Install location: /home/oracer/app/oracer/oracle/product/11.2.0/db_1
Database identifier: 1040017416
Oracle SID: CER
Authentication type: Oracle database user
Instance verification
To perform the instance verification, run the ddutil -v inst command as the root user. The
command tests the OCI connection to the database, and provides similar output to the host
verification command. In addition, the output lists the database objects that are discovered. You
can use the command to determine if the ddbmcon program has the required read access for the
database objects.
For example, the following ddutil -v inst command lists one Oracle instance and the
database objects. The authentication method is listed as database authentication:
ddutil -v inst
'RMAN_AGENT_HOME' is retrieved from ddutil runtime location as '/opt/dpsapps/
rmanagent'.
The ORACLE_HOME environment variable could not be retrieved.
Reported application instance:
Version: 11.2.0.1.0
Install location: /home/oracer/app/oracer/oracle/product/11.2.0/db_1
Database identifier: 1040017416
Oracle SID: CER
Authentication type authentication: Oracle database user
Application instance detailed information:
Database name : CER
Database object : SYSTEM
Database object : SYSAUX
Database object : PSAPUNDO
Database object : PSAPCER
Database object : CATTBS
72 PowerProtect Data Manager Administration and User Guide
Page 73

Enabling the Oracle RMAN Agent
RMAN verification
To perform the RMAN verification, run the ddutil -v rman command as the root user. This
verification is required only if you use an RMAN catalog. Database authentication or Oracle wallet
authentication can be used to connect to an RMAN catalog. (Operating system authentication
cannot be used with the RMAN catalog.)
The ddutil -v rman command tests whether the ddbmcon program can connect to the target
database and catalog database through an RMAN script, as required to perform an active deletion
of Oracle backups.
Note: To enable an active deletion through RMAN, the Data Domain credential must be stored
in the lockbox.
The ddutil -v rman command displays the following three sections of output for the RMAN
verification:
1. Target database connection information:
l
Authentication type, listed as operating system user, Oracle database user, or Oracle wallet
user.
l
For operating system authentication, only the operating system user is listed.
l
For database authentication, the operating system user, Oracle service, and database user
are listed.
l
For Oracle wallet authentication, the Oracle service and TNS_ADMIN value are listed.
2. Catalog database connection information:
l
Authentication method, listed as Oracle database user or Oracle wallet user.
l
For database authentication, the database service and database user are listed.
l
For Oracle wallet authentication, the Oracle service and TNS_ADMIN value are listed.
3. Output of the RMAN script, which shows the connection information and any error messages.
For example, the following ddutil -v rman command displays the three sections of output,
showing that the database authentication method is used for both the target database and catalog
database:
ddutil -v rman
'RMAN_AGENT_HOME' is retrieved from ddutil runtime location as '/opt/dpsapps/
rmanagent'.
The ORACLE_HOME environment variable could not be retrieved.
Reported RMAN instance connection:
Oracle SID: CER
Target database authentication: Oracle database user
Oracle OS dba user: oracer
Oracle service: CER
Oracle database user: system
RMAN catalog authentication: Oracle database user
Catalog database service: SAP.world
Catalog database user: catowner
RMAN output:
Recovery Manager: Release 11.2.0.1.0 - Production on Fri Dec 15 14:30:15 2017
Copyright (c) 1982, 2009, Oracle and/or its affiliates. All rights reserved.
RMAN> connect ********
2>
3> connect *********
PowerProtect Data Manager Administration and User Guide 73
Page 74

Enabling the Oracle RMAN Agent
4>
5>
connected to target database: CER (DBID=1040017416)
connected to recovery catalog database
Recovery Manager complete
Discover the storage units
When a PowerProtect Data Manager protection policy is created, the PowerProtect Data Manager
server assigns its storage unit to the Oracle databases that are protected by the protection policy.
Both the manual backups and scheduled backups of these Oracle databases are sent to this
storage unit.
To display the storage units and their assigned databases on the Oracle RMAN agent host, run the
ddutil -s command.
Note: The ddutil -s command might display a storage unit type of "secondary." However,
you cannot perform a backup to a secondary device. You can only restore from a secondary
device.
For example:
ddutil -s
Data Domain Hostname: 10.36.52.98
FC Service Name: None
FC Service Enabled: false
Storage Unit: RMAN87-SS-CT-blrv35a029-a7bc3
User: RMAN87-SS-CT-blrv35a029-a7bc3
Type: PRIMARY
Storage Unit: RMAN87-SS-CT-blrv35b179-c9de5
User: RMAN87-SS-CT-blrv35b179-c9de5
Type: PRIMARY
Add or manage the Oracle application agent
You can add a new Oracle application agent, approve and reject pending agent requests, and edit
and delete existing agents.
Procedure
1. Go to Infrastructure > Application Agents.
The Application Agents window appears.
2. Click Add.
The Add Application/FS Agent window appears.
3. Select one of the following options:
l
Add IP Address or CSV Filename.
This process is also called
n
If you select Add IP Address, perform the following steps:
Whitelisting
a. Type the IP Address for the application agent.
74 PowerProtect Data Manager Administration and User Guide
.
Page 75

Enabling the Oracle RMAN Agent
b. Specify the date until which the application agent is pre-approved.
c. Click Save.
n
If you select CSV Filename, perform the following steps:
a. Click the Choose File icon.
Note: The contents of the .CSV file must be in the following format, for
example:
"10.25.115.113"
"10.25.115.112"
"10.25.115.145"
The Explorer window appears.
b. Select the .csv file, and then click Open.
The file displays in the Application/FS Agents window.
c. Select the date until which the application or File System agent is preapproved.
d. Click Save.
l
If you have disabled Auto whitelist, perform the following steps:
The Auto whitelist option enabled by default. When Auto whitelist is enabled,
all pre-approved Application Agents are automatically approved.
a. Select the wanted application agent.
b. Click one of the following options:
n
Approve
n
Reject
n
Edit, then make the wanted changes.
n
Remove
c. Click Save.
After you finish
For application agents, the section Discover an application host describes how to set the host
credentials before you schedule a backup.
Supporting existing Oracle RMAN agent backups with PowerProtect Data Manager
The Oracle RMAN agent 19.1 introduced the capability to onboard existing stand-alone
deployments, including their existing backups, to PowerProtect Data Manager. Existing backups
are Oracle RMAN agent backups that you performed before you have integrated the Oracle RMAN
agent with the PowerProtect Data Manager software and added an asset to a PowerProtect Data
Manager protection policy.
Note:
Retention lock is not supported for discovered existing backups in PowerProtect Data
Manager.
Onboarding of DD Boost-over-FC backups is not supported.
With the onboarding capability, PowerProtect Data Manager provides the following centralized
features:
PowerProtect Data Manager Administration and User Guide 75
Page 76

Enabling the Oracle RMAN Agent
l
Visibility of both existing backups and any new self-service or PowerProtect Data Manager
policy-driven backups of onboarded assets.
l
Retention management of all backups. The retention time of existing backups can be set during
the PowerProtect Data Manager registration.
l
Automatic configuration of target protection storage based on the PowerProtect Data
Manager protection policies that are used for your database.
l
All the other functionality that is provided for PowerProtect Data Manager protection policies.
Self-service operations use the Data Domain backup host and storage unit managed by
PowerProtect Data Manager
With Oracle RMAN agent 19.1 or later, you can provide the Data Domain backup host and storage
unit in the RMAN scripts. After you use PowerProtect Data Manager to add an asset to the
protection policy, you might want to keep using the existing RMAN scripts instead of or along with
scheduling backups through PowerProtect Data Manager.
When you create a protection policy, the PowerProtect Data Manager software creates a storage
unit on the specified Data Domain backup host that is managed by PowerProtect Data Manager.
All subsequent backups will go to this new storage unit. This implementation overrides the backup
host and storage unit information that is provided in the script with the backup host and storage
unit information that is provided by PowerProtect Data Manager.
Setting and reporting the retention time for existing backups
With Oracle RMAN Agent 19.1 or later, any backups that are performed before you add an asset to
a PowerProtect Data Manager protection policy are considered existing backups. You can set the
retention time for existing backups during registration with the PowerProtect Data Manager
server by using the register.sh script. This retention time is reported to PowerProtect Data
Manager during backup discovery.
Note:
If a retention time is not specified for existing backups, the backup copies in
PowerProtect Data Manager will never expire.
Support existing Oracle RMAN agent backups with PowerProtect Data Manager
Learn how to support existing Oracle RMAN agent backups.
Procedure
1. Upgrade the Oracle RMAN agent on the Oracle server host.
Upgrade the Oracle RMAN agent on page 60 provides information.
2. Register and approve the Oracle RMAN agent in PowerProtect Data Manager.
Manage the File System agent on page 84 provides information.
After a few minutes of approving the Oracle agent, all the old backup copies start to be
discovered. Depending on the number of backups, the discovery and subsequent visibility of
the backups in PowerProtect Data Manager can take some time. The retention time of the
discovered existing backup copies will be equal to the retention time set in the protection
policy plus 14 days and 1 day.
3. Discover and add the credentials for the Oracle RMAN agent host.
Discover an Oracle or SQL application host on page 111 provides information.
4. Create a protection policy to protect the Oracle RMAN agent host.
Add a protection policy for Oracle database protection on page 125 provides information.
The first backup after onboarding must be a full backup:
76 PowerProtect Data Manager Administration and User Guide
Page 77

Enabling the Oracle RMAN Agent
l
The first centralized backup is automatically promoted to a full backup.
l
For the first self-service backup after onboarding, the Oracle DBA must run a full backup
script.
Note: You cannot perform a backup to a secondary Data Domain device. You can only
restore from a secondary Data Domain device.
5. Perform a self-service Application Direct backup of Oracle databases. Onboarded assets can
be part of either a centralized or self-service protection policy.
Performing self-service backups of Oracle databases on page 166 provides information.
PowerProtect Data Manager Administration and User Guide 77
Page 78

Enabling the Oracle RMAN Agent
78 PowerProtect Data Manager Administration and User Guide
Page 79

CHAPTER 6
Enabling the File System Agent
This section includes the following topics:
l
About the File System agent................................................................................................. 80
l
File System agent prerequisites............................................................................................ 80
l
Roadmap for protection with the File System agent.............................................................. 81
l
Installing and configuring File System agent..........................................................................82
l
Manage the File System agent.............................................................................................. 84
PowerProtect Data Manager Administration and User Guide 79
Page 80

Enabling the File System Agent
About the File System agent
The File System agent enables an application administrator to protect and recover data on the file
system host. PowerProtect Data Manager integrates with the File System agent to check and
monitor backup compliance against protection policies. PowerProtect Data Manager also enables
central scheduling for backups.
You can install the File System agent on the host that you plan to protect by using the installation
wizard. Installing and configuring File System agent on page 82 provides instructions.
Note: PowerProtect Data Manager supports the co-existence of agents on the same Windows
or Linux host for the following:
l
Microsoft SQL agent and the File System agent on Windows.
l
Oracle/RMAN agent and the File System agent on Linux.
Software compatibility information for the PowerProtect Data Manager software and the File
System agent is provided in the eLab Navigator, available at https://elabnavigator.emc.com/eln/
modernHomeDataProtection.
File System agent prerequisites
Review the following prerequisites before installing and enabling the File System agent in
PowerProtect Data Manager and discovering the File System assets.
Windows and Linux prerequisites
l
Both the PowerProtect Data Manager server software and the File System agent have to be
the same version. For example, using a 19.1 version File System agent with PowerProtect Data
Manager version 19.2 is not supported.
l
Ensure that your host is a 64-bit system. PowerProtect Data Manager supports only 64-bit
hosts.
l
Ensure that your host is a supported operating system version.
Software compatibility information for the PowerProtect Data Manager software is provided in
the eLab Navigator, available at https://elabnavigator.emc.com/eln/
modernHomeDataProtection.
l
Ensure that all clocks on both the host and PowerProtect Data Manager are time-synced to
the local NTP server to ensure discovery of the backups.
l
Ensure that the host and the PowerProtect Data Manager network can see and resolve each
other.
l
Note that LVM/VxVM partitions/volumes are supported, but not physical partitions.
l
Each volume group on LVM2 or VxVM must have at least 10% free space for a block based
backup to succeed.
l
Review the limitations in the section File System agent limitations on page 216.
Linux File System prerequisites
l
Ensure that the File System has the /etc/fstab entry. Without the /etc/fstab entry,
discovery fails.
l
If you plan to perform file level restores on SuSE Linux (SLES) versions 11 SP1, SP2, or SP3,
complete the following:
1. Log in to the system you are restoring from as root.
80 PowerProtect Data Manager Administration and User Guide
Page 81

2. In a command prompt, type yast2 iscsi-client .
3. For Service Start, choose Manually, and then click OK.
l
Install the lsb_release package:
1. Mount the ISO:
[root@RHEL73-224-16 ~]# lsblk
NAME MAJ:MIN RM SIZE RO TYPE MOUNTPOINT
sda 8:0 0 30G 0 disk
├─sda1 8:1 0 1G 0 part /boot
└─sda2 8:2 0 14G 0 part
├─rhel-root 253:0 0 12.5G 0 lvm /
└─rhel-swap 253:1 0 1.5G 0 lvm [SWAP]
sdb 8:16 0 30G 0 disk
└─VG1-LV1 253:2 0 2G 0 lvm /volume1_ext3
sr0 11:0 1 3.5G 0 rom /run/media/root/RHEL-7.3 Server.x86_64
[root@RHEL73-224-16 ~]#
2. Add the Local REPO:
[root@RHEL75-224-18 ~]# cat /etc/yum.repos.d/local.repo
[local]
name=local
baseurl=file:///run/media/root/RHEL-7.3\ Server.x86_64
enabled=1
gpgcheck=1
gpgkey=file:///run/media/root/RHEL-7.3\ Server.x86_64/RPM-GPG-KEYredhat-release
*
Enabling the File System Agent
3. Execute the YUM command:
yum install redhat-lsb
As a result, all the dependency packages are installed.
Roadmap for protection with the File System agent
The following roadmap provides the steps required to configure the File System agent in
PowerProtect Data Manager in order to run protection policies.
Procedure
1. Add a storage system.
Add protection storage on page 40 provides information.
2. Install the File System agent on the File System host.
Installing and configuring File System agent on page 82 provides information.
3. Add or approve the File System agent on each File System host.
Manage the File System agent on page 84 provides information.
4. Discover the File system asset.
Discover a File System Host provides information.
5. Create a protection policy to protect the File System.
Add a protection policy for File System protection on page 129 provides information.
PowerProtect Data Manager Administration and User Guide 81
Page 82

Enabling the File System Agent
Note: You cannot perform a backup to a secondary Data Domain device. You can only
restore from a secondary Data Domain device
Installing and configuring File System agent
Learn how to install and configure the File System agent for Linux and Windows.
Install the File System agent on Linux
Learn how to install the File System agent on supported Linux systems.
Before you begin
l
Ensure that you review the prerequisites provided in File System agent prerequisites on page
80.
l
Download the File System agent software package to the Linux host.
Procedure
1. In the PowerProtect Data Manager UI:
a. Select Agent Downloads from the System Settings menu.
b. Select the File System agent download package for Linux,
fsagent192_linux_x86_64.tar.gz.
c. Download the package in the location that you want to install the File System agent.
2. Untar the installer by running - gunzip * followed by tar -xvf .
3. Run the installation script install.sh.
4. Enter the PowerProtect Data Manager server IP address.
Note:
If the File System agent will co-exist with another application agent, ensure that
you register the agent with the existing PowerProtect Data Manager server IP. When
you register the agent with a PowerProtect Data Manager server that is different from
the currently registered server, no warning message displays, and requests are routed to
the newer server instance.
After you finish
If the host is not already whitelisted or approved, add the File System host to the PowerProtect
Data Manager server. Add or manage Application/File System Agents provides more information.
Discover File System assets. Discover a File System Host provides more information.
Install the File System agent on Windows
Learn how to install the File System agent on supported Windows systems.
Before you begin
l
Ensure that you carry out the prerequisites provided in File System agent prerequisites on page
80.
l
Download the File System agent software package.
Procedure
1. In the PowerProtect Data Manager UI:
82 PowerProtect Data Manager Administration and User Guide
Page 83

a. Select Agent Downloads from the System Settings menu.
b. Select the File System agent download package for Windows,
fsagent192_win_x64.zip.
c. Download the package in the location that you want to install the File System agent.
2. Open the fsagent-19.2.0.0.exe installation file.
3. Follow the wizard installation steps to provide the installation location and the PowerProtect
Data Manager server IP address.
4. Click Install.
5. Click Finish.
After you finish
If the host is not already whitelisted or approved, add the File System host to the PowerProtect
Data Manager server. Add or manage Application/File System Agents provides more information.
Discover File System assets. Discover a File System Host provides more information.
Silent installation of File System agent
You can perform a silent installation or uninstallation of the File System agent.
Enabling the File System Agent
Silent installation commands
To perform the silent installation to the default path, run:
fsagent-19.2.0.0.exe /s PPDMHostName=<<PPDM-server-IP>>
To perform the silent installation to a different path, run:
fsagent-19.2.0.0.exe /s PPDMHostName=<<PPDM-server-IP>>
ProductInstallPath="D:\alternate-path"
Note:
PPDMHostName
the product is installed without PowerProtect registration, and no backups can be initiated
from the UI. Specifying
Silent uninstallation commands
To perform a silent uninstall without uninstalling common components (such ADM or BBB), run:
fsagent-19.2.0.0.exe /s /uninstall
To perform a silent uninstall while also uninstalling common components, run:
is a mandatory option in the command line. If a value is not provided,
ProductInstallPath
is optional, but if used, the value cannot be empty.
fsagent-19.2.0.0.exe /s /uninstall UnInstallPPDMAgent="1" UnInstallBBBWT="1"
Uninstalling the File System agent
You can uninstall the File System agent for SQL Server with the setup file.
Procedure
1. Launch DPSFSAgent-19.2.0.0.exe.
2. On the Install Modification page, select Remove, and then click Next.
PowerProtect Data Manager Administration and User Guide 83
Page 84

Enabling the File System Agent
3. On the Complete the Setup page, click Finish.
4. After the uninstall completes you must remove the working directory from C:\Program
Files\DPSFSSGENT.
Upgrade the File System agent
There is no direct upgrade option for the File System agent. If you have the File System agent for
PowerProtect Data Manager 19.1 and you want to upgrade to release 19.2, perform the following
steps.
Procedure
1. Uninstall the PowerProtect Data Manager 19.1 File System agent, but keep the existing
folders. Uninstalling the File System agent on page 83 provides instructions.
2. Install and register the PowerProtect Data Manager 19.2 File System agent for Linux or
Windows with the same PowerProtect Data Manager server in the same location. Install the
File System agent on Linux on page 82 and Install the File System agent on Windows on
page 82 provide instructions.
3. Approve the new instance of the File System agent on the PowerProtect Data Manager
server. Manage the File System agent on page 84 provides instructions.
Manage the File System agent
You can add a File System agent, approve and reject pending agent requests, and edit and delete
existing agents.
About this task
Note:
PowerProtect Data Manager supports the coexistence of the following agents on the
same Windows or Linux host:
l
SQL agent and File System agent on Windows.
l
Oracle/RMAN agent and File System agent on Linux.
Procedure
1. Select Infrastructure > Application Agents.
2. In the Application Agents window, click Add.
3. In the Add Application/FS Agent window, select one of the following options:
Note:
The Auto Whitelist option is enabled by default. When Auto whitelist is
enabled, all pre-approved Application Agents are automatically approved.
l
Add IP Address
Perform the following steps:
a. Type the IP Address for the application agent.
b. Specify the date until which the application agent is pre-approved.
c. Click Save.
l
CSV Filename
Perform the following steps:
a. Click the Choose File icon.
84 PowerProtect Data Manager Administration and User Guide
Page 85

Enabling the File System Agent
Note: The contents of the .CSV file must be in the following format, for example:
"10.25.115.113"
"10.25.115.112"
"10.25.115.145"
The Explorer window appears.
b. Select the .csv file, and then click Open.
The file displays in the Application/FS Agents window.
c. Select the date until which the application or File System agent is preapproved.
d. Click Save.
4. If you have disabled Auto whitelist, select an application agent, and then select one of
the following options:
l
Approve
l
Reject
l
Edit Make the required changes.
l
Remove
PowerProtect Data Manager Administration and User Guide 85
Page 86

Enabling the File System Agent
86 PowerProtect Data Manager Administration and User Guide
Page 87

CHAPTER 7
Enabling the Storage Direct Agent
This section includes the following topics:
l
About the Storage Direct agent.............................................................................................88
l
Storage Direct agent prerequisites........................................................................................88
l
Additional setup and configuration file requirements for existing Storage Direct users......... 89
l
Roadmap for protection with the Storage Direct agent (new users)......................................91
l
Roadmap for protection with the Storage Direct agent (existing Storage Direct users)........93
l
Installing or Upgrading Storage Direct...................................................................................94
l
Manage the Storage Direct agent......................................................................................... 98
PowerProtect Data Manager Administration and User Guide 87
Page 88

Enabling the Storage Direct Agent
About the Storage Direct agent
Storage Direct uses snapshot backup technology to protect data on VMAX storage arrays, moving
storage group data from the VMAX to a Data Domain system. Starting in release 19.2, the
PowerProtect Data Manager software enables an application administrator to configure the
Storage Direct agent and create self-service protection policies within the PowerProtect Data
Manager UI to facilitate the setup of backups for new users and the importing of the setup for
existing users into PowerProtect Data Manager. PowerProtect Data Manager also enables you to
roll back the snapshot backup data to the original location or a different location.
You can install the Storage Direct agent on the host that you plan to protect by using the
installation wizard. Installing or Upgrading Storage Direct on page 94 provides instructions.
When you install and configure the agent, Storage Direct takes the data from VMAX storage
groups, creates a snapshot backup, and transfers the data to a Data Domain system. Using FTS
technology, the host running your applications accesses the source LUNs from the VMAX where
the storage group data resides. A link is then established between FTS devices on the VMAX and
the destination Data Domain system, enabling the creation of a virtual drive (vDisk), vDisk pool,
and mTree on the Data Domain.
Upon the approval/registration of the Storage Direct agent in the PowerProtect Data Manager UI,
and the addition and discovery of Data Domain systems and the SMIS server, the Storage Direct
agent is enabled for use. The storage groups in the VMAX can then be discovered by
PowerProtect Data Manager for the purposes of assigning unprotected storage groups to a
protection policy.
Software compatibility information for the PowerProtect Data Manager software and the Storage
Direct agent is provided in the eLab Navigator, available at https://elabnavigator.emc.com/eln/
modernHomeDataProtection.
Storage Direct agent prerequisites
If you are a new user of Storage Direct, or an existing user updating to the Storage Direct agent
for PowerProtect Data Manager 19.2, review the following prerequisites before enabling the
Storage Direct agent in PowerProtect Data Manager and discovering the VMAX storage groups:
l
Ensure that the vDisk user is an administrator.
l
Ensure that the LUNs of the storage groups to be protected are masked to the host.
l
Ensure that your host is a 64-bit system. PowerProtect Data Manager supports only 64-bit
hosts.
l
Only Windows and Linux platforms are supported through the PowerProtect Data Manager
server.
l
Ensure that your host is a supported operating system version.
Software compatibility information for the PowerProtect Data Manager software is provided in
the eLab Navigator, available at https://elabnavigator.emc.com/eln/
modernHomeDataProtection.
l
After the Data Domain discovery, ensure that the vDisk Pool and DD Boost storage units are
available in PowerProtect Data Manager by navigating to Infrastructure > Storage, selecting
the Data Domain and then selecting Manage Storage Units.
l
Ensure that all clocks on both the host and PowerProtect Data Manager are time-synced to
the local NTP server to ensure discovery of the backups.
88 PowerProtect Data Manager Administration and User Guide
Page 89

Enabling the Storage Direct Agent
l
Ensure that the host and the PowerProtect Data Manager network can see and resolve each
other.
l
If using replication, ensure that you add a secondary Data Domain system.
Additional setup and configuration file requirements for existing Storage Direct users
Existing Storage Direct users who want to enable the Storage Direct agent in PowerProtect Data
Manager 19.2 must satisfy the following additional requirements.
Upgrade requirements
Review the following setup requirements specific to existing Storage Direct users who are
upgrading to the latest Storage Direct agent release for PowerProtect Data Manager 19.2:
l
During the upgrade, on the Configure Installation Options page, click PowerProtect Data
Manager registration, and then provide the PowerProtect Data Manager server IP so that the
Storage Direct agent can register with the PowerProtect Data Manager server.
l
Also during the upgrade, on the Configuration File Input page, click Select the
Configuration Files, browse to the location of your configuration file(s), and for each
configuration file, click Add.
Configuration file requirements
For new users who are installing and configuring the Storage Direct agent for the first time, a
configuration file is created automatically in the C:\Program Files\DPSAPPS\ppfsagent
\config directory upon the addition of storage groups to a VMAX Storage Group protection
policy. This configuration contains information about the VMAX and Data Domain system
attributes and the storage groups being protected by this policy, and is required to perform selfservice backup and restore.
Existing Storage Direct users, however, already have one or more configuration files that contain
this information. In order to ensure that PowerProtect Data Manager can use your existing
configuration file(s), review the file contents and, where required, modify those contents or your
environment to satisfy the following requirements:
l
If importing one configuration file, ensure that all backup vDisks on the Data Domain belong to
the same pool. Device groups, however, can be different. For example, if you have two source
storage groups (SG1 and SG2), you can create one device group for the backup vDisks of SG1,
and another device group for the backup vDisks of SG2.
Note that if importing multiple configuration files per host, vDisks can belong to different
pools.
l
Only storage groups can be added to the file, and not IDs of the source LUNs or details about
the secondary Data Domain system.
l
The file must contain the Ddboost and DdVdiskUser, with their corresponding passwords in
the lockbox.
l
The Devicepath cannot start with a /.
Additionally, the file must be in one of the following formats:
Example 1
Format 1: One restore device group and one restore storage group
This format is optimal when you have one restore device group and one restore
storage group. In this format:
PowerProtect Data Manager Administration and User Guide 89
Page 90

Enabling the Storage Direct Agent
Example 1 Format 1: One restore device group and one restore storage group (continued)
l
There is one entry for RESTORE_DEVICE_GROUP and
VMAX_FASTX_RESTORE_SG for all Source Storage Groups.
l
All Storage Groups map to a single RESTORE_DEVICE_GROUP and
VMAX_FASTX_RESTORE_SG
l
Since only one of the RESTORE_DEVICE_GROUP or
VMAX_FASTX_RESTORE_SG attributes is used, comment the one not in use.
l
If using RESTORE_DEVICE_GROUP, then the corresponding pool information for
RESTORE_DEVICE_POOL must be provided, and the attribute uncommented.
l
If using VMAX_FASTX_RESTORE_SG, then comment the
RESTORE_DEVICE_GROUP and RESTORE_DEVICE_POOL attributes.
The following output shows an example layout of this format.
[PRIMARY_SYSTEM]
DDBOOST_USER = <boost_user>
DEVICE_HOST = <dd_host>
DEVICE_PATH = <ddboost_devPath>
DDVDISK_USER = <vdisk_user>
# RESTORE_DEVICE_POOL = <device_pool>
# RESTORE_DEVICE_GROUP = <device_group>
# DD_BOOST_FC =
# DD_PORT =
VMAX_FASTX_RESTORE_SG = <restore_sg>
# SELECT_VISIBLE_RESTORE_DEVICES =
|
|
|
[BACKUP_SOURCE_DEVICES]
# SRC_DEVICE1 = 000196700638:00F1A
# SRC_DEVICEn =
SRC_GROUP1 = <symmId:SourceGrp1>
SRC_GROUP2 = <symmId:SourceGrp2>
SRC_GROUP3 = <symmId:SourceGrp3>
# SRC_GROUPn =
Example 2 Format 2: Multiple restore device groups and restore storage groups
This format is optimal when you have multiple restore device groups and restore
storage groups. In this format:
l
For each source storage group, there should be a corresponding restore storage
group and restore device group.
l
The same number of entries must exist for RESTORE_DEVICE_GROUP and
VMAX_FASTX_RESTORE_SG as the number of source storage groups in a 1:1
mapping, and the order should be maintained, as in the first
RESTORE_DEVICE_GROUP and VMAX_FASTX_RESTORE_SG entry should correspond
to SRC_GROUP1, the second RESTORE_DEVICE_GROUP and
VMAX_FASTX_RESTORE_SG entry should correspond to SRC_GROUP2, and so on.
l
Since there should only be one entry of RESTORE_DEVICE_GROUP and
VMAX_FASTX_RESTORE_SG, other entries should be commented.
The following output shows an example layout of this format.
90 PowerProtect Data Manager Administration and User Guide
Page 91

Enabling the Storage Direct Agent
Example 2 Format 2: Multiple restore device groups and restore storage groups (continued)
[PRIMARY_SYSTEM]
DDBOOST_USER = <boost_user>
DEVICE_HOST = <dd_host>
DEVICE_PATH = <ddboost_devPath>
DDVDISK_USER = <vdisk_user>
# RESTORE_DEVICE_POOL = <device_pool_sg1>
# RESTORE_DEVICE_GROUP = <device_group_sg1>
# RESTORE_DEVICE_GROUP = <device_group_sg2>
# RESTORE_DEVICE_GROUP = <device_group_sg_3>
# DD_BOOST_FC =
# DD_PORT =
VMAX_FASTX_RESTORE_SG = <restore_sg1>
# VMAX_FASTX_RESTORE_SG = <restore_sg2>
# VMAX_FASTX_RESTORE_SG = <restore_sg3>
# SELECT_VISIBLE_RESTORE_DEVICES =
|
|
|
[BACKUP_SOURCE_DEVICES]
# SRC_DEVICE1 = 000196700638:00F1A
# SRC_DEVICEn =
SRC_GROUP1 = <symmId:SourceGrp1>
SRC_GROUP2 = <symmId:SourceGrp2>
SRC_GROUP3 = <symmId:SourceGrp3>
# SRC_GROUPn =
Roadmap for protection with the Storage Direct agent (new users)
For users new to Storage Direct (ProtectPoint) and PowerProtect Data Manager, the following
roadmap provides the steps required to configure protection of the Storage Direct agent in
PowerProtect Data Manager for movement of snapshot backups from the VMAX storage area to
the DD system.
Before you begin
Review any prerequisites in the section Storage Direct agent prerequisites on page 88, and make
note of any limitations in the section Storage Direct agent limitations on page 218.
Procedure
1. Set up the SMIS server in the PowerProtect Data Manager UI:
a. Add the SMIS server.
b. Initiate a discovery of the SMIS server.
c. Verify that the discovery completed successfully.
Add and discover the SMIS server for the Storage Direct agent on page 113 provides
information.
2. Set up the Data Domain system in the PowerProtect Data Manager UI:
a. Add a primary Data Domain system.
b. (Optional) If using replication, add a secondary Data Domain system.
c. Initiate a discovery of the Data Domain system(s).
d. Verify that the discovery completed successfully.
PowerProtect Data Manager Administration and User Guide 91
Page 92

Enabling the Storage Direct Agent
3. Install the Storage Direct agent on the Storage Direct/ProtectPoint host system.
4. Approve the Storage Direct agent in the PowerProtect Data Manager UI on each Storage
5. Ensure that the Storage Direct agent has been discovered.
6. In the PowerProtect Data Manager UI, verify that the VMAX assets (storage groups) have
Add protection storage on page 40 provides information.
Note: If using the Storage Direct agent to move snapshot backups from a VMAX storage
array to a Data Domain system, you do not need to add a Data Domain Management
Center.
Installing or Upgrading Storage Direct on page 94 provides information.
Direct/ProtectPoint host system.
Manage the Storage Direct agent on page 98 provides information.
Discover a Storage Direct agent host on page 112 provides information.
been discovered, and that the host name appears next to these assets.
Add and discover the SMIS server for the Storage Direct agent on page 113 provides
information about how to verify that these assets have been discovered, and Add a
protection policy for Storage Direct protection on page 132 provides information about
adding assets to a protection policy.
7. Create a protection policy in the PowerProtect Data Manager UI by selecting the Storage
Group policy type and choosing the I want PPDM to automatically provision and manage
all storage needed to achieve this objective option.
Add a protection policy for Storage Direct protection on page 132 provides information.
8. Review the configuration file that is automatically generated upon the successful
configuration of the Storage Direct agent in PowerProtect Data Manager to ensure that the
file contains the information identified in Additional setup and configuration file
requirements for existing Storage Direct users on page 89. This file is required to perform
self-service backup and restore.
Add a protection policy for Storage Direct protection on page 132 provides information
about the type of information that the configuration file contains, and how this file is used
when executing the backup command.
Note:
Do not make any changes to this configuration file.
9. Run the protectpoint snapbackup create command with the configuration file name
specified in order to perform the self-service backup.
The
Storage Direct Agent Installation and Administration Guide
, and the After you finish
section of Add a protection policy for Storage Direct protection on page 132, provide
information about running this command with the configuration file.
92 PowerProtect Data Manager Administration and User Guide
Page 93

Enabling the Storage Direct Agent
Roadmap for protection with the Storage Direct agent (existing Storage Direct users)
For existing users of Storage Direct (ProtectPoint), the following roadmap provides the steps
required to configure protection of the Storage Direct agent in PowerProtect Data Manager for
movement of snapshot backups from the VMAX storage area to the DD system.
Before you begin
Review any prerequisites in the section Storage Direct agent prerequisites on page 88 and
Additional setup and configuration file requirements for existing Storage Direct users on page 89,
and make note of any limitations in the section Storage Direct agent limitations on page 218.
Procedure
1. Set up the SMIS server in the PowerProtect Data Manager UI:
a. Add the SMIS server.
b. Initiate a discovery of the SMIS server.
c. Verify that the discovery completed successfully.
Add and discover the SMIS server for the Storage Direct agent on page 113 provides
information.
2. Set up the Data Domain system in the PowerProtect Data Manager UI:
a. Add a primary Data Domain system.
b. (Optional) If using replication, add a secondary Data Domain system.
c. Initiate a discovery of the Data Domain system(s).
d. Verify that the discovery completed successfully.
Add protection storage on page 40 provides information.
Note:
If using the Storage Direct agent to move snapshot backups from a VMAX storage
array to a Data Domain system, you do not need to add a Data Domain Management
Center.
3. Modify your existing configuration file(s) to ensure that the file contains the information
required by PowerProtect Data Manager to run the VMAX Storage Group policy, and to
ensure the file is in an acceptable format, as described in the section Additional setup and
configuration file requirements for existing Storage Direct users on page 89.
4. Upgrade the Storage Direct agent on the Storage Direct/ProtectPoint host system.
Installing or Upgrading Storage Direct on page 94 provides information.
5. Approve the Storage Direct agent in the PowerProtect Data Manager UI on each Storage
Direct/ProtectPoint host system.
Manage the Storage Direct agent on page 98 provides information.
6. Ensure that the Storage Direct agent has been discovered.
Discover a Storage Direct agent host on page 112 provides information.
7. In the PowerProtect Data Manager UI, verify that the VMAX assets (storage groups) have
been discovered, and that the host name appears next to these assets.
Add and discover the SMIS server for the Storage Direct agent on page 113 provides
information about how to verify that these assets have been discovered, and Add a
PowerProtect Data Manager Administration and User Guide 93
Page 94

Enabling the Storage Direct Agent
8. Create a protection policy in the PowerProtect Data Manager UI by selecting the Storage
9. Review the configuration file that is automatically generated upon the successful
10. Run the protectpoint snapbackup create command with the configuration file name
protection policy for Storage Direct protection on page 132 provides information about
adding assets to a protection policy.
Group policy type and choosing the I will provision and manage my own storage option.
Add a protection policy for Storage Direct protection on page 132 provides information.
configuration of the Storage Direct agent in PowerProtect Data Manager to ensure that the
file contains the information identified in Additional setup and configuration file
requirements for existing Storage Direct users on page 89. This configuration file will be
used going forward instead of your previous configuration file(s) to perform self-service
backup and restore.
Add a protection policy for Storage Direct protection on page 132 provides information
about the type of information that the configuration file contains, and how this file is used
when executing the backup command for the initial snapshot.
Note: Do not make any changes to this configuration file.
specified in order to perform the self-service backup.
The
Storage Direct Agent Installation and Administration Guide
, and the After you finish
section of Add a protection policy for Storage Direct protection on page 132, provide
information about running this command with the configuration file.
Installing or Upgrading Storage Direct
Learn how to install or upgrade Storage Direct to the Storage Direct agent for PowerProtect Data
Manager 19.2.
Install the Storage Direct agent on Linux
Learn how to install the standalone ProtectPoint agent for PowerProtect Data Manager, also
known as the Storage Direct agent, on supported Linux systems.
Before you begin
l
Ensure that you review the prerequisites provided in Storage Direct agent prerequisites on
page 88.
l
Download the Storage Direct agent software package to the Linux host.
Procedure
1. In the PowerProtect Data Manager UI:
a. Select Agent Downloads from the System Settings menu.
b. Select the Storage Direct agent download package for Linux,
storagedirectagent192_linux_x86_64.tar.gz.
c. Download the package to the location where you want to install the Storage Direct
agent.
2. Unpack the Storage Direct software package:
a. Run the following command:
gunzip storagedirectagent192_<platform>.tar.gz
94 PowerProtect Data Manager Administration and User Guide
Page 95

Enabling the Storage Direct Agent
b. Run the following command:
tar -xvf storagedirectagent192_<platform>.tar
c. Run the following command:
rpm -–import RPM_KEY
3. Provide "Execute" +x permissions on the install.sh file.
4. Install the Storage Direct software as the root user by running the installation script:
install.sh
Note: During the installation, you are prompted for the hostname or IP address of the
PowerProtect Data Manager. As an alternative, you can include the --server option
when you run the install.sh installation script, as in the following:
install.sh --server=<PowerProtect_Data_Manager_server_hostname_or_IP>
To obtain a list of all the available command options for the install.sh command, run the
command install.sh --help or install.sh -h. The command also supports the -debug or -d option for debugging purposes.
The product is installed in the /opt/dpsapps/ppfsagent directory. Two rpms are
installed as part of the installation script:
l
adm-agent-rpm-19.2.0.rpm
l
storagedirectagent-19.2.0.0-0.x86_64.rpm
After you finish
Complete the host registration with the PowerProtect Data Manager server. Add and discover the
SMIS server for the Storage Direct agent on page 113 provides more information.
Approve the pending Storage Direct agent request so that you can discover the VMAX assets, also
known as storage groups. Manage the Storage Direct agent on page 98 provides more
information.
Upgrade the Storage Direct agent on Linux
Learn how to upgrade to the standalone ProtectPoint agent for PowerProtect Data Manager, also
known as the Storage Direct agent, on supported Linux systems.
Before you begin
l
Ensure that you review the prerequisites provided in Storage Direct agent prerequisites on
page 88, and the Upgrade requirements section in Additional setup and configuration file
requirements for existing Storage Direct users on page 89.
l
Download the Storage Direct agent software package to the Linux host.
Procedure
1. In the PowerProtect Data Manager UI:
PowerProtect Data Manager Administration and User Guide 95
Page 96

Enabling the Storage Direct Agent
2. Unpack the Storage Direct software package:
a. Select Agent Downloads from the System Settings menu.
b. Select the Storage Direct agent download package for Linux,
storagedirectagent192_linux_x86_64.tar.gz.
c. Download the package to the location where you want to install the Storage Direct
agent.
a. Run the following command:
gunzip storagedirectagent192_<platform>.tar.gz
b. Run the following command:
tar -xvf storagedirectagent192_<platform>.tar
c. Run the following command:
rpm -–import RPM_KEY
3. Provide "Execute" +x permissions on the install.sh file.
4. Upgrade the Storage Direct software as the root user by running the installation script with
the -u option, as in the following:
install.sh -u
Note:
Later in the upgrade, you are prompted for the hostname or IP address of the
PowerProtect Data Manager. As an alternative, you can include the --server option
when you run the install.sh -u command, as in the following:
install.sh -u -server=<PowerProtect_Data_Manager_server_hostname_or_IP>
The product is upgraded in the /opt/dpsapps/ppfsagent directory. Two rpms are
installed as part of the installation script:
l
adm-agent-rpm-19.2.0.rpm
l
storagedirectagent-19.2.0.0-0.x86_64.rpm
5. For Do you wish to give existing config file path?, type y, and then
provide the path to the configuration files.
A prompt appears requesting if you have additional configuration files. If you have more than
one existing configuration file, type y, and provide the additional path.
6. For Do you wish to upgrade adm-agent?, type y.
7. If you did not specify the PowerProtect Data Manager server name when running the
install.sh -u command, a prompt appears requesting if you want to register Storage
Direct with the PowerProtect Data Manager server. Type y, and then type the
PowerProtect Data Manager server FQDN or IP address.
96 PowerProtect Data Manager Administration and User Guide
Page 97

After you finish
Complete the host registration with the PowerProtect Data Manager server. Add and discover the
SMIS server for the Storage Direct agent on page 113 provides more information.
Approve the pending Storage Direct agent request so that you can discover the VMAX assets, also
known as storage groups. Manage the Storage Direct agent on page 98 provides more
information.
Install or Upgrade the Storage Direct agent on Windows
Learn how to install or upgrade to the standalone ProtectPoint agent for PowerProtect Data
Manager, also known as the Storage Direct agent, on supported Windows systems.
Before you begin
l
Ensure that you review the prerequisites provided in Storage Direct agent prerequisites on
page 88, and the Upgrade requirements section in Additional setup and configuration file
requirements for existing Storage Direct users on page 89.
l
Download the Storage Direct agent software package to the Windows host.
Procedure
1. In the PowerProtect Data Manager UI:
Enabling the Storage Direct Agent
a. Select Agent Downloads from the System Settings menu.
b. Select the Storage Direct agent download package for Windows, for example,
storagedirectagent_192_win_x64.zip.
c. Download the package in the location that you want to install the Storage Direct agent.
2. To launch the installer, unzip the storagedirectagent192_win_x64.zip file and then
run the storagedirectagent192_win_x64.exe program.
The installation wizard opens.
3. Click Next.
4. Select I accept the terms in the License Agreement, and then click Next.
5. On the Configure Installation Options page, click PowerProtect Data Manager
registration, and then and type the PowerProtect Data Manager server hostname or IP
address in the Appliance hostname or IP address text box so that the Storage Direct
agent can register with the PowerProtect Data Manager server.
6. If upgrading, on the Configuration File Input page, click Select the Configuration Files,
browse to the location of your configuration file(s), and for each configuration file, click
Add.
7. When completed, click Install.
8. Click Finish to exit the installation wizard.
After you finish
Complete the host registration with the PowerProtect Data Manager server. Add and discover the
SMIS server for the Storage Direct agent on page 113 provides more information.
Approve the pending Storage Direct agent request so that you can discover the VMAX assets, also
known as storage groups. Manage the Storage Direct agent on page 98 provides more
information.
PowerProtect Data Manager Administration and User Guide 97
Page 98

Enabling the Storage Direct Agent
Silent installation of the Storage Direct agent
You can perform a silent installation of the Storage Direct agent on Linux or Windows.
Silent installation commands
To perform the silent installation to the default path:
l
On Linux, run install.sh -- server PPDM server name
l
On Windows, run storagedirectagent-19.2.0.0.exe /s PPDMHostName=<PPDM-server-
IP>
Note:
PPDMHostName
the product is installed without PowerProtect registration, and no backups can be initiated
from the application host. Specifying
cannot be empty.
is a mandatory option in the command line. If a value is not provided,
ProductInstallPath
Uninstall the Storage Direct agent on Linux
You can uninstall the Storage Direct agent by using the uninstall.sh script, which is included
when you untar the installer.
Procedure
is optional, but if used, the value
1. Run uninstall.sh.
2. Type y to confirm that you want to uninstall the agent.
If you have the ADM agent installed as well, a message appears indicating Other
application agents might be using adm agent... Do you wish to
uninstall adm agent[y/n]:
3. Type y or n for the ADM uninstall.
The Storage Direct agent uninstall starts.
4. After the uninstall completes, remove the working directories located at /opt/dpsapps/
and /usr/local/ecdm/.
Uninstall the Storage Direct agent on Windows
You can uninstall the Storage Direct agent by using the setup file.
Procedure
1. Launch storagedirectagent-19.2.0.0.exe.
2. On the Install Modification page, select Remove, and then click Next.
3. On the Complete the Setup page, click Finish.
4. After the uninstall completes, remove the working directory located at C:\Program
Files\DPSAPPS\ppfsagent.
Manage the Storage Direct agent
After the Storage Direct installation completes, an entry with the agent host name appears in the
Infrastructure > Application Agents window of the PowerProtect Data Manager UI. From this
window, you can approve or reject a pending Storage Direct agent request, and edit and delete
existing agents.
About this task
98 PowerProtect Data Manager Administration and User Guide
Page 99

Enabling the Storage Direct Agent
Procedure
1. Select Infrastructure > Application Agents.
2. In the Application Agents window, select the entry that contains the host name, and click
Approve.
The status changes from Awaiting Approval to Registered.
Note: The Auto whitelist option, which enables you to pre-approve application
agents automatically, is disabled by default. When you enable this option, the Storage
Direct agent registration is approved automatically.
PowerProtect Data Manager Administration and User Guide 99
Page 100

Enabling the Storage Direct Agent
100 PowerProtect Data Manager Administration and User Guide
 Loading...