

Page 1
Dell PowerEdge C6320
Getting Started Guide
Guide de mise en route
Guia de Noções Básicas
Guía de introducción
Scan to see how-to videos, documentation,
andtroubleshooting information
Page 2

Page 3

Dell PowerEdge C6320
Getting Started Guide
Page 4

NOTE: A NOTE indicates important information that helps you make better use
of your computer.
CAUTION: A CAUTION indicates either potential damage to hardware or loss
of data and tells you how to avoid the problem.
WARNING: A WARNING indicates a potential for property damage, personal
injury, or death.
Dell End User License Agreement
Before using your system, read the Dell Software License Agreement that shipped with your
system. If you do not accept the terms of agreement, see Dell.com/contactdell.
Save all software media that shipped with your system. These media are backup copies of the
software installed on your system.
Copyright © 2016 Dell Inc. All rights reserved. This product is protected by U.S. and international
copyright and intellectual property laws. Dell™ and the Dell logo are trademarks of Dell Inc. in the
United States and/or other jurisdictions. All other marks and names mentioned herein may be
trademarks of their respective companies.
2016 – 01
P/N NT2RV Rev. A01
Page 5
CAUTION: Restricted Access Location
This server is intended for installation only in restricted access locations as defined
in Cl. 1.2.7.3 of IEC 60950-1: 2001 where both these conditions apply:
• Access can only be gained by service persons or by users who have been
instructed about the reasons for the restrictions applied to the location and
about any precautions that shall be taken.
• Access is through the use of a tool or lock and key, or other means of security,
and is controlled by the authority responsible for the location.
Installation and configuration
WARNING: Before performing the following procedure, read and follow the
safety instructions that came with the system.
Installing the tool-less rail solution
WARNING: Whenever you need to lift the system, get others to assist you.
To avoid injury, do not attempt to lift the system by yourself.
WARNING: To avoid a potential electrical shock hazard, a third wire safety
grounding conductor is necessary for the rack installation. The rack equipment
must provide sufficient airflow to the system to maintain proper cooling.
CAUTION: When installing rails in a square-hole rack it is important to ensure
that the square pegs slide through the square holes.
NOTE: The rails can be used in both square-hole racks (item 1 in the following
figure) and round-hole racks (item 2 in the following figure).
Installation and configuration │ 5
Page 6

1. To open the rail latches, push the latch release buttons on the midpoints of the
1
2
3
end pieces of the rails. See
2. Align the end pieces of the rails on the vertical rack flanges to seat the pegs in
the bottom and top holes of the desired U spaces. See
in figure 1.
in figure 1.
Figure 1: Pushing the latch release buttons
Back View
Front View
Latch Release Button
2
2
1
1
1
3. To lock the latches in place, engage the end of the rails until they seat on the
vertical rack flanges, and release the latch release buttons. See
2
in Figure 2.
Figure 2: Releasing the latch release buttons
Back View
Front View
3
6 │ Installation and configuration
3
Page 7

4. Slide the system into the rack. See 4 in Figure 3.
5
5. Tighten the thumbscrews to secure the rack ears to the rack flanges.
See
in Figure 3.
Figure 3: Installing the chassis onto the rack
Back View
5
4
Front View
5
NOTE: To remove the rails, push the latch release button on the midpoints
of the end piece and unseat each rail.
Installation and configuration │ 7
Page 8
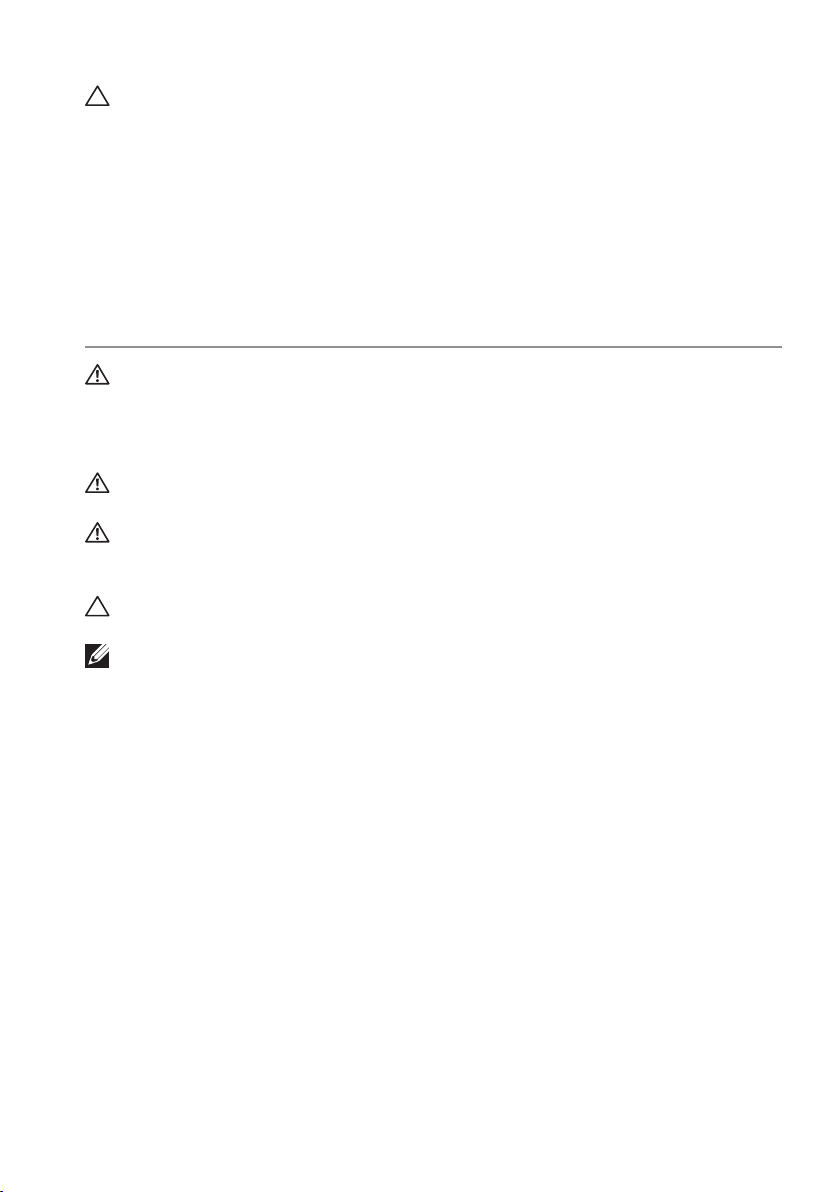
Installing the optional chassis stabilizer
6
7
8
shipping brackets
1. At the back of each vertical rack flange, put two screw bases into the two
square holes above the rail. See
2. Install the optional chassis stabilizer shipping brackets on the rack flanges.
See
in Figure 4.
3. Install and tighten the screws. See
NOTE: To transport systems already installed in the rack, ensure that the two
chassis stabilizer shipping brackets are in place.
Figure 4: Installing the chassis stabilizer shipping brackets
in Figure 4.
in Figure 4.
Back View
6
7
8
8 │ Installation and configuration
Page 9

Optional — Connecting the keyboard, mouse,
and monitor
Connect the keyboard, mouse, and monitor (optional).
The connectors on the back of your system have icons indicating which cable to
plug into each connector. Be sure to tighten the screws (if any) on the monitor’s
cable connector.
NOTE: Note that the system supports only one USB port and a micro USB port. If
you require more than one USB outlet at a time, use USB Hub or Adapter Cable.
Installation and configuration │ 9
Page 10
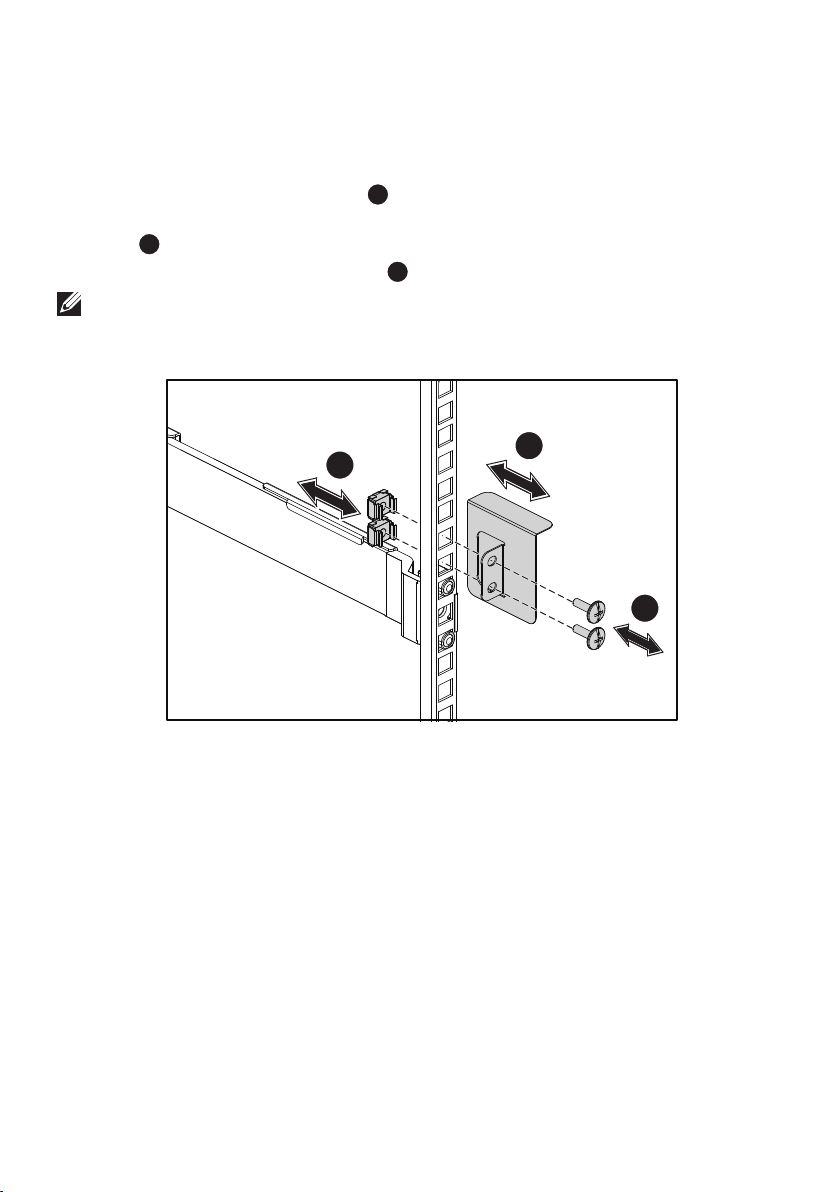
Connecting the power cable(s)
Connect the system’s power cable(s) to the system, and if a monitor is used,
connect the monitor’s power cable to the monitor. Plug the other end of the power
cables into a grounded electrical outlet or a separate power source such as an
uninterrupted power supply or a power distribution unit.
NOTE: The system supports both AC and HVDC power inputs and up to
two1400 W power supply units (200-240 VAC nominal input voltage) or up to
two 1600 W power supply units (200-240 VAC nominal input voltage).
1400 W power supply unit is supported only for China.
10 │ Installation and configuration
Page 11
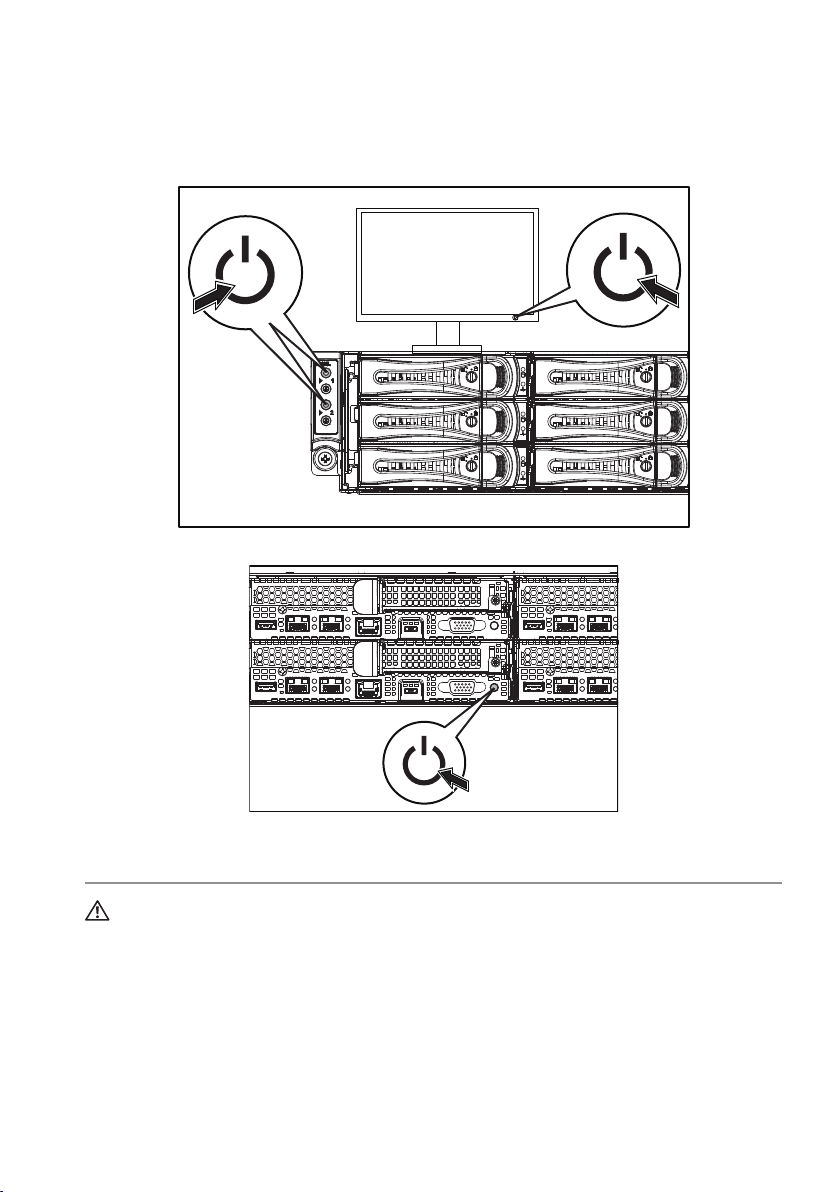
Turning on the system
Press the power button(s) either on the front or at the back of the system. The power
indicators turn green.
Getting help
WARNING: See the safety and regulatory information that shipped with your
system. Warranty information may be included within this document or as
aseparate document.
The Hardware Owner’s Manual provides information about system features and
describes how to troubleshoot the system and install or replace system components.
This document is available at Dell.com/support.
Dell systems management application documentation provides information about
installing and using the systems management software. This document is available
online at Dell.com/support.
Getting help │ 11
Page 12

For an immediate access to your system information:
1. Go to Dell.com/support.
2. Enter your system service tag in the Enter your Service Tag or Express Service
Code field.
3. Click Submit.
4. The support page that lists the system manuals is displayed.
For more information about your system:
1. Go to Dell.com/support.
2. Select your country from the drop-down menu on the bottom right corner
ofthe page.
a. Select your product category.
b. Select your product segment.
c. Select your product.
The support page that lists the various support categories is displayed.
NOTE: Always check for updates on Dell.com/support and read the updates first
because they often supersede information in other documents.
NOM information (Mexico only)
The following information is provided on the device described in this document in
compliance with the requirements of the official Mexican standards (NOM):
Importer Dell Inc. de México, S.A. de C.V.
Paseo de la Reforma 2620-11° Piso
Col. Lomas Atlas
11950 México, D.F.
Model number B08S
Supply voltage 200-240 V AC with 1400 W (for China
only) or 1600 W power supply unit
100-120 V AC with two 1600 W power
supply units
Note: Two power supply units must be
installed for 100-120 V AC
Frequency 50/60 Hz
Current consumption 9 Amps with 1400 W power supply unit
10 Amps with 1600 W power supply unit
12 Amps with two 1600 W power supply
units at 100-120 V AC
12 │ NOM information (Mexico only)
Page 13

Technical specifications
Power
NOTE: The system does not support mixed installation of 1400 W and 1600 W
power supply units.
NOTE: The 1400 W and 1600 W power supply units are hot swappable, and
support hot swap in any condition if the system has the power throttling feature.
AC power supply (per power supply)
Wattage 1400 W (for China only)
Voltage 200-240 VAC, 50/60 Hz, maximum
input current: 9 Amps
Heat dissipation 6024.376 BTU/hr maximum
Maximum inrush current Initial inrush current cannot exceed
55Amps (peak). Secondary inrush
current cannot exceed 25 Amps (peak).
Wattage 1600 W
Voltage 200-240 VAC, 50/60 Hz, maximum
input current: 10 Amps
100-120 VAC / 200-240 VAC, 50/60 Hz,
maximum input current: 12 Amps/10 Amps
Heat dissipation 6033.979 BTU/hr maximum
Maximum inrush current Initial inrush current and secondary
inrush current cannot exceed
50 Amps (peak).
HVDC power supply (per power supply)
Wattage 1400 W (for China only)
Voltage 240 VDC, 50/60 Hz, maximum input
current: 9 Amps
Heat dissipation 5440.614 BTU/hr maximum
Maximum inrush current Initial inrush current cannot exceed
55Amps (peak). Secondary inrush
current cannot exceed 25 Amps (peak).
Technical specifications │ 13
Page 14

Battery (per system board)
System battery 3 V CR2032 lithium coin cell
Environmental
NOTE: For additional information about environmental measurements for specific
system configurations, see Dell.com/environmental_datasheets.
Temperature 10° to 35°C (50° to 95°F) with a
maximum temperature gradation of
10°C per hour
Operating NOTE: For altitudes above 2950 feet,
the maximum operating temperature
isderated 1°F/550 ft.
CAUTION: The maximum number
of memory modules and hard drives
supported on 1U node configuration
with 135W and 145W processors
depends on the power supply installed.
Storage –40° to 65°C (–40° to 149°F) with
amaximum temperature gradation of
20°C per hour
14 │ Technical specifications
Page 15

Dell PowerEdge C6320
Guide de mise en route
Scannez pour voir des didacticiels vidéo, obtenir de
la documentation et des informations de dépannage
Page 16

REMARQUE: une REMARQUE fournit des informations importantes qui vous
aident à mieux utiliser votre ordinateur.
PRÉCAUTION: PRÉCAUTION vous avertit d’un risque de dommage matériel ou
de perte de données et vous indique comment éviter le problème.
AVERTISSEMENT: signale un risque d'endommagement du matériel, de blessure
corporelle, voire de mort.
Contrat de licence utilisateur final Dell
Avant d’utiliser le système, lisez le contrat de licence logicielle Dell fourni avec le système.
Sivous n’acceptez pas les conditions du contrat, rendez-vous sur Dell.com/contactdell.
Conservez tous les supports de logiciel fournis avec le système. Ces supports sont des copies
de sauvegarde du logiciel installé sur le système.
Copyright © 2016 Dell Inc. Tous droits réservés. Le présent produit est protégé par les législations
américaines et internationales sur le droit d’auteur et la propriété intellectuelle. Dell™ et le logo Dell
sont des marques commerciales de DellInc. aux États-Unis et/ou dans d’autres pays. Toutes les
autres marques et noms mentionnés dans le présent document sont des marques commerciales de
leurs propriétaires respectifs.
2016 – 01
N/P NT2RV Rév. A01
Page 17

PRÉCAUTION: zone à accès restreint.
Ce serveur est conçu pour être installé uniquement dans des zones à accès restreint
telles que définies selon la norme Cl. 1.2.7.3 de IEC 60950-1: 2001 où ces deux
conditions s’appliquent en même temps:
• Seuls peuvent avoir accès le personnel d’entretien et les utilisateurs qui ont
été informés des motifs des restrictions appliquées à l’emplacement et des
précautions à prendre.
• L’accès, qui se fait par l’intermédiaire d’un outil ou d’un verrou et d’une clé,
oupar d’autres moyens de sécurité, est contrôlé par le responsable en charge
de l’emplacement.
Installation et configuration
AVERTISSEMENT: avant d’effectuer la procédure suivante, lisez et respectez
les consignes de sécurité fournies avec le système.
Installation des rails sans outils
AVERTISSEMENT: demandez toujours de l’aide avant de soulever le système.
N’essayez pas de le soulever seul, car vous risqueriez de vous blesser.
AVERTISSEMENT: afin d’éviter tout risque d’électrocution, vous devez
disposer d’un troisième conducteur de mise à la terre pour l’installation du
rack. L’équipement du rack doit assurer une ventilation suffisante pour bien
refroidir le système.
PRÉCAUTION: lorsque vous installez des rails dans un rack à trous carrés,
vérifiez que les chevilles à tête carrée glissent bien dans les trous carrés.
REMARQUE: les rails peuvent aussi bien être utilisés dans un rack à trous
carrés(élément1 dans la figure ci-dessous) que dans un rack à trous ronds
(élément2 dans la figure ci-dessous).
Installation et configuration │ 17
Page 18

1. Pour ouvrir le loquet des rails, appuyez sur les boutons de dégagement des
1
2
3
loquets situés au milieu de l’embout des rails. Voir
2. Alignez l’embout des rails sur les brides verticales pour que les chevilles
de fixation s’insèrent dans le trou du bas le trou du haut des espaces
enUsouhaités. Voir
figure1.
figure1.
Figure1: appuyer sur les boutons de dégagement des loquets
Bouton de dégagement du loquet
Vue avant
2
Vue arrière
2
1
1
1
3. Pour verrouiller les loquets, engagez l’extrémité des rails jusqu’à ce qu’ils se
fixent sur les brides verticales du rack et libérez les boutons de dégagement
des loquets. Voir
figure2.
2
Figure2: libérer les boutons de dégagement des loquets
Vue arrière
Vue avant
18 │ Installation et configuration
3
3
Page 19

4. Faites glisser le système dans le rack. Voir 4 figure3.
5
5. Serrez les vis moletées afin de fixer les oreilles sur les brides du rack.
Voir
figure3.
Figure3: installation du châssis dans le rack
Vue arrière
5
4
Vue avant
5
REMARQUE: pour retirer les rails, appuyez sur le bouton de dégagement
des loquets situé au milieu de l’embout et dégagez les rails un par un.
Installation et configuration │ 19
Page 20

Installation des supports d’expédition du
6
7
8
stabilisateur de châssis (en option)
1. À l’arrière de chaque bride verticale, placez deux culots à vis dans les deux
trous carrés situés juste au-dessus du rail. Voir
2. Installez sur les brides du rack les supports d’expédition du stabilisateur de
châssis (en option). Voir
3. Installez et serrez les vis. Voir
REMARQUE: avant de transporter des systèmes déjà installés dans le rack,
assurez-vous que les deux supports d’expédition du stabilisateur de châssis sont
bien en place.
figure4.
figure4.
Figure4: installation des supports d’expédition du stabilisateur
dechâssis
figure4.
Vue arrière
6
7
8
20 │ Installation et configuration
Page 21

Facultatif — Connexion du clavier, de la souris
et du moniteur
Connectez le clavier, la souris et le moniteur (facultatif).
Aidez-vous des icônes des connecteurs situées à l’arrière du système pour savoir où
brancher chaque câble. N’oubliez pas de serrer les vis situées sur le connecteur du
câble du moniteur, s’il en est équipé.
REMARQUE: le système ne prend en charge qu’un seul port USB et qu’un port
micro-USB. Si vous avez besoin de plus d’un port USB, utilisez un concentrateur
USB ou un câble d’adaptateur.
Installation et configuration │ 21
Page 22

Branchement du ou des câbles d’alimentation
Branchez le ou les câbles d’alimentation au système et, si vous utilisez un moniteur,
branchez son câble d’alimentation. Branchez ensuite l’autre extrémité des
câbles d’alimentation sur une prise de courant mise à la terre ou sur une source
d’alimentation autonome (onduleur ou unité de distribution de l’alimentation).
REMARQUE: le système peut accepter en entrée du courant aussi bien CA que
HVDC et il peut prendre en charge jusqu’à deux bloc d’alimentation de 1400W
(tension d’entrée nominale de 200-240VCA) ou jusqu’à deux blocs d’alimentation
de 1600W (tension d’entrée nominale de 200-240VCA). Lesblocs d’alimentation
de 1400W sont pris en charge uniquement pour la Chine.
22 │ Installation et configuration
Page 23

Activation du système
Appuyez sur le ou les boutons d’alimentation situés à l’avant ou à l’arrière du
système. Les voyants d’alimentation s’allument en vert.
Trouver de l’aide
AVERTISSEMENT: voir les informations sur la sécurité et les réglementations
fournies avec votre système. Les informations sur la garantie se trouvent soit
dans ce document, soit dans un document distinct.
Le document Hardware Owner’s Manual (Manuel du propriétaire du matériel)
présente les caractéristiques du système et contient des informations de dépannage
et des instructions d’installation ou de remplacement des composants. Ce document
est disponible sur Dell.com/support.
Trouver de l’aide │ 23
Page 24

La documentation relative aux applications de gestion de systèmes Dell donne
des informations sur l’installation et l’utilisation du logiciel de gestion de systèmes.
Cedocument est disponible en ligne sur Dell.com/support.
Pour accéder immédiatement aux informations de votre système:
1. Allez sur Dell.com/support.
2. Entrez le numéro de service de votre système dans le champ Saisir votre
numéro de service ou dans le champ Code de service express.
3. Cliquez sur Envoyer.
4. La page de support qui répertorie les manuels du système s’affiche.
Pour plus d’informations à propos de votre système:
1. Allez sur Dell.com/support.
2. Sélectionnez votre pays dans la liste déroulante située dans l’angle supérieur
droit de la page.
a. Sélectionnez la catégorie de votre produit.
b. Sélectionnez la gamme de votre produit.
c. Sélectionnez votre produit.
La page de support qui répertorie les différentes catégories de support s’affiche.
REMARQUE: vérifiez toujours sur Dell.com/support si des mises à jour sont
disponibles et ne manquez pas de lire les informations concernant ces mises
àjour, car elles remplacent souvent celles contenues dans les autres documents.
Informations sur la NOM
(Mexique uniquement)
Les informations suivantes sont fournies sur l’appareil décrit dans ce document,
conformément aux exigences de la Norme Officielle Mexicaine (NOM):
Importateur Dell Inc. de México, S.A. de C.V.
Paseo de la Reforma 2620-11° Piso
Col. Lomas Atlas
11950 México, D.F.
Numéro de modèle B08S
Tension d’alimentation 200-240VCA avec un bloc
d’alimentation de 1400W (pour la Chine
uniquement) ou de 1600W
100-120VCA avec des blocs
d’alimentation de 1600W
24 │ Informations sur la NOM (Mexique uniquement)
Page 25

Remarque: deux blocs d’alimentation
doivent être installés pour 100-120VCA
Fréquence 50/60 Hz
Consommation de courant 9A avec bloc d’alimentation de 1400W
10A avec bloc d’alimentation de 1600W
12A avec deux blocs d’alimentation de
1600W à 100-120VCA
Spécifications techniques
Alimentation
REMARQUE: le système ne prend pas en charge une installation mélangeant des
blocs d’alimentation de 1400W et de 1600W.
REMARQUE: les blocs d’alimentation de 1400W et de 1600W sont remplaçables
à chaud et prennent en charge le remplacement à chaud dans n’importe quel état
si le système comporte la fonctionnalité de ralentissement de l’alimentation.
Bloc d’alimentation en CA (par bloc d’alimentation)
Puissance 1400W (pour la Chine uniquement)
Tension 200-240VCA, 50/60Hz, courant
maximal d’entrée: 9A
Dissipation thermique 6024,376BTU/h maximum
Courant d’appel maximal Le courant d’appel initial ne peut
excéder 55A (pointe). Le courant
d’appel secondaire ne peut excéder
25A (pointe).
Puissance 1600W
Tension 200-240VCA, 50/60Hz, courant
maximal d’entrée: 10A
100-120VCA/200-240VCA, 50/60Hz,
courant maximal d’entrée: 12A/10A
Dissipation thermique 6033,979BTU/h maximum
Courant d’appel maximal Le courant d’appel initial et le courant
d’appel secondaire ne peuvent excéder
50A (pointe).
Bloc d’alimentation HVDC
(par bloc d’alimentation)
Spécifications techniques │ 25
Page 26

Alimentation
Puissance 1400W (pour la Chine uniquement)
Tension 240VCC, 50/60Hz, courant maximal
d’entrée: 9A
Dissipation thermique 5440,614BTU/h maximum
Courant d’appel maximal Le courant d’appel initial ne peut
excéder 55A (pointe). Le courant
d’appel secondaire ne peut excéder
25A (pointe).
Pile (par carte système)
Pile du système Pile bouton au lithium 3 V CR2032
Spécifications environnementales
REMARQUE: pour en savoir plus sur les mesures environnementales liées à différentes
configurations particulières, allez sur Dell.com/environmental_datasheets.
Température De 10°C à 35°C (50°F à 95°F) avec un
gradient thermique maximal de 10°C
par heure
En fonctionnement REMARQUE: pour les altitudes supérieures
à 0,90km (2950pieds), la température
maximale de fonctionnement est réduite
à17 °C/0,17km (1°F/550pieds)
PRÉCAUTION: le nombre maximal de
barrettes de mémoire et de disques durs
pris en charge sur une configuration
de nœuds 1U avec des processeurs
de 135W et 145W dépend du bloc
d’alimentation installé.
En entreposage De −40°C à 65°C (−40°F à 149°F)
avec un gradient thermique maximal
de20°C par heure
26 │ Spécifications techniques
Page 27

Dell PowerEdge C6320
Guia de Noções Básicas
Escaneie para ver vídeos de instruções, documentação
e informações para solução de problemas
Page 28

NOTA: Uma NOTA fornece informações importantes para ajudar você a utilizar
melhor o computador.
AVISO: Um AVISO indica um potencial de danos ao hardware ou de perda de
dados e fornece informações para ajudar a evitar o problema.
ADVERTÊNCIA: Uma ADVERTÊNCIA indica possíveis danos à propriedade,
lesões corporais ou risco de morte.
Contrato de licença do usuário final da Dell
Antes de usar seu sistema, leia o Contrato de licença do software da Dell fornecido com
o sistema. Se não aceitar os termos do contrato, consulte Dell.com/contactdell.
Guarde toda a mídia do software fornecida com o sistema. Esses mídias são cópias de backup
do software instalado no sistema.
Copyright © 2016 Dell Inc. Todos os direitos reservados. Este produto está protegido por leis
de copyright e de propriedade intelectual dos EUA e internacionais. Dell™ e o logotipo Dell são
marcas comerciais da Dell Inc. nos Estados Unidos e/ou outras jurisdições. Todas as outras
marcas e nomes mencionados aqui podem ser marcas comerciais das respectivas companhias.
2016 – 01
N/P NT2RV Rev. A01
Page 29

AVISO: Local de acesso restrito
Este servidor destina-se a instalação apenas em locais de acesso restrito,
conforme definido na cláusula 1.2.7.3 da IEC 60950-1: 2001 onde ambas estas
condições se aplicam:
• O acesso pode ser obtido apenas por profissionais de manutenção ou por
usuários que foram instruídos sobre os motivos das restrições aplicadas ao
local e sobre todas as precauções que devem ser adotadas.
• O acesso é feito com o uso de uma ferramenta ou trancado à chave, ou de
outros meios de segurança, sendo controlado pela autoridade responsável
pelo local.
Instalação e configuração
ADVERTÊNCIA: Antes de executar o procedimento a seguir, leia e siga as
instruções de segurança fornecidas com o sistema.
Como instalar a solução de trilho
semferramentas
ADVERTÊNCIA: Sempre que precisar levantar o sistema, conte com outras
pessoas para ajudá-lo. Para evitar ferimentos, não tente levantá-lo por
conta própria.
ADVERTÊNCIA: Para evitar um perigo potencial de choque elétrico,
um terceiro fio condutor de segurança para ligação à terra é necessário
à instalação em rack. O equipamento do rack deve fornecer ventilação
suficiente para que o sistema mantenha o grau de refrigeração adequado.
AVISO: Ao instalar trilhos em um rack com furos quadrados, é importante
assegurar-se de que os pinos quadrados deslizem pelos furos quadrados.
NOTA: Os trilhos podem ser usados tanto em racks com furos quadrados (item 1 na
figura a seguir) quanto em racks com furos redondos (item 2 na figura a seguir).
Instalação e configuração │ 29
Page 30

1. Para abrir as travas do rack, aperte os botões de liberação da trava localizados
1
2
3
nos pontos intermediários das extremidades dos trilhos. Veja
2. Alinhe as extremidades dos trilhos nos flanges verticais do rack para encaixar
os pinos nos furos inferior e superior dos espaços em U desejados. Veja
Figura 1.
na Figura 1.
na
Figura 1: Como pressionar os botões de liberação da trava
Botão de liberação da trava
Vista frontal
2
Vista traseira
2
1
1
1
3. Para prender as travas no lugar, encaixe a extremidades dos trilhos nos flanges
verticais do rack e solte os botões de liberação da trava. Veja
2
na Figura 2.
Figura 2: Como liberar os botões de liberação da trava
Vista traseira
Vista frontal
3
30 │ Instalação e configuração
3
Page 31

4. Deslize o sistema no rack. Veja 4 na Figura 3.
5
5. Aperte os parafusos de aperto manual para prender as abas do rack aos flanges
do rack. Veja
na Figura 3.
Figura 3: Como instalar o chassi no rack
Vista traseira
5
4
Vista frontal
5
NOTA: Para remover os trilhos, aperte o botão de liberação da trava
localizado no ponto intermediário da extremidade e desencaixe cada trilho.
Instalação e configuração │ 31
Page 32

Como instalar os suportes para transporte
6
7
8
opcionais estabilizadores do chassi
1. Na parte traseira de cada flange vertical do rack, coloque dois fundos de rosca
nos dois furos quadrados acima do trilho. Veja
2. Instale os suportes para transporte opcionais estabilizadores do chassi nos
flanges do rack. Veja
3. Coloque e aperte os parafusos. Veja
NOTA: Para transportar sistemas já instalados no rack, assegure-se de que os dois
suportes para transporte opcionais estabilizadores do chassi estejam instalados.
na Figura 4.
na Figura 4.
Figura 4: Como instalar os suportes para transporte opcionais
estabilizadores do chassi
na Figura 4.
Vista traseira
6
7
8
32 │ Instalação e configuração
Page 33

Opcional — Como conectar o teclado,
mousee monitor
Conecte o teclado, o mouse e o monitor (opcional).
Os conectores na parte traseira do sistema têm ícones que indicam quais cabos
devem ser ligados a cada conector. Aperte os parafusos (se houver) do conector do
cabo do monitor.
NOTA: Observe que o sistema oferece suporte apenas a uma porta USB e a uma
porta micro USB. Se você precisar de mais de uma tomada USB de cada vez,
use um hub USB ou um cabo adaptador.
Instalação e configuração │ 33
Page 34

Como conectar o(s) cabo(s) de alimentação
Conecte o(s) cabo(s) de alimentação ao sistema e, se estiver usando um monitor,
conecte seu cabo de alimentação ao monitor. Conecte a outra extremidade dos
cabos de alimentação a uma tomada elétrica aterrada ou a uma fonte de energia
separada, por exemplo, uma fonte de alimentação ininterrupta ou uma unidade de
distribuição de energia.
NOTA: O sistema oferece suporte tanto a entradas de energia CA quanto
HVDC e a até duas unidades de fonte de energia de1400 W (tensão nominal
de entrada de 200-240 V CA) ou a até duas unidades de fonte de energia de
1600 W (tensão nominal de entrada de 200-240 V CA). A unidade de fonte de
alimentação de 1400 W é suportada somente para a China.
34 │ Instalação e configuração
Page 35

Como ligar o sistema
Pressione o botão ou botões liga/desliga na parte frontal ou posterior do sistema.
Os indicadores de energia ficam verdes.
Como obter ajuda
ADVERTÊNCIA: Consulte as informações de segurança e normativas fornecidas
com o sistema. As informações sobre garantia podem estar incluídas neste
documento ou serem fornecidas como um documento separado.
O Manual do Proprietário de Hardware fornece informações sobre os recursos do
sistema e descreve como solucionar problemas do sistema e como instalar ou trocar
os componentes. Esse documento está disponível no site Dell.com/support.
A documentação do aplicativo de gerenciamento de sistemas Dell fornece
informações sobre como instalar e usar o software de gerenciamento de sistemas.
Esse documento está disponível online no site Dell.com/support.
Como obter ajuda │ 35
Page 36

Para um acesso imediato para as informações do sistema:
1. Acesse Dell.com/support.
2. Insira a etiqueta de serviço de seu sistema no campo Digite sua etiqueta de
serviço ou Código de serviço expresso.
3. Clique em Enviar.
4. A página de suporte que mostra os manuais de sistema é exibida.
Para mais informações sobre o sistema, faça o seguinte:
1. Acesse Dell.com/support.
2. Selecione seu país no menu suspenso no canto inferior direito da página.
a. Selecione a sua categoria de produto.
b. Selecione o segmento do produto.
c. Selecione o produto.
A página de suporte que contém a lista das várias categorias de suporte é exibida.
NOTA: Verifique sempre se há atualizações no site Dell.com/support e leia as
atualizações primeiro, visto que com frequência elas substituem as informações
em outros documentos.
Informações sobre NOM
(somente México)
As seguintes informações são fornecidas sobre o dispositivo descrito neste documento
em conformidade com os requisitos das normas oficiais mexicanas (NOM):
Importador: Dell Inc. de México, S.A. de C.V.
Paseo de la Reforma 2620-11° Piso
Col. Lomas Atlas
11950 México, D.F.
Número do modelo B08S
Tensão da fonte de alimentação 200-240 V CA com unidade de fonte
de energia de 1400 W (somente para
China) ou de 1600 W
100-120 V CA com duas unidades de
fonte de energia de 1600 W
Nota: duas unidades de fonte de
energia devem ser instaladas para
100-120 V CA
Frequência 50/60 Hz
36 │ Informações sobre NOM (somente México)
Page 37

Consumo atual 9 A com uma unidade de fonte de
energia de 1400 W
10 A com uma unidade de fonte de
energia de 1600 W
12 A com duas unidades de fonte de
energia de 1600 W a 100-120 V CA
Especificações técnicas
Alimentação
NOTA: O sistema não oferece suporte à instalação mista de unidades de fonte de
energia de 1400 W e 1600 W.
NOTA: As fontes de energia de 1400 W e 1600 W podem ser trocadas a quente
e oferecem suporte à troca a quente em qualquer condição, se o sistema tiver
o recurso de regulagem de energia.
Fonte de alimentação CA (por fonte de alimentação)
Potência 1400 W (somente para a China)
Tensão 200-240 V CA, 50/60 Hz, corrente de
entrada máxima: 9 A
Dissipação de calor 6024,376 BTU/h máximo
Pico máximo de corrente inicial A corrente de partida inicial não pode
exceder 55 A (pico). A corrente de
partida secundária não pode exceder
25 A (pico).
Potência 1600 MHz
Tensão 200-240 V CA, 50/60 Hz, corrente de
entrada máxima: 10 A
100-120 V CA / 200-240 V CA, 50/60 Hz,
corrente de entrada máxima: 12 A/10 A
Dissipação de calor 6033,979 BTU/h máximo
Pico máximo de corrente inicial As correntes de partida inicial
e secundária não podem exceder
50 A (pico).
Fonte de alimentação HVCC
(por fonte de alimentação)
Potência 1400 W (somente para a China)
Especificações técnicas │ 37
Page 38

Alimentação
Tensão 240 V CC, 50/60 Hz, corrente de
entrada máxima: 9 A
Dissipação de calor 5440,614 BTU/h máximo
Pico máximo de corrente inicial A corrente de partida inicial não pode
exceder 55 A (pico). A corrente de
partida secundária não pode exceder
25 A (pico).
Bateria (por placa do sistema)
Bateria do sistema célula tipo moeda de lítio de 3V CR2032
Requisitos ambientais
NOTA: para obter informações adicionais sobre medições ambientais
para configurações de sistemas específicas, consulte o site
Dell.com/environmental_datasheets.
Temperatura 10°C a 35°C (50°F a 95°F) com variação
de temperatura máxima de 10°C por hora
De operação NOTA: para altitudes acima de 900 m
(2950 pés), a temperatura máxima de
operação é deduzida de 1°F a cada
168 m (550 pés).
AVISO: o número máximo de módulos
de memória e discos rígidos com
suporte em uma configuração de nós
de 1U com processadores de 135 W
e 145 W depende da fonte de energia
instalada.
De armazenamento –40°C a 65°C (–40°F a 149°F) com
variação máxima de temperatura de
20°C por hora
38 │ Especificações técnicas
Page 39

Dell PowerEdge C6320
Guía de introducción
Escaneo para ver vídeos sobre procedimientos,
documentación e información para la solución
deproblemas
Page 40

NOTA: Una NOTA proporciona información importante que le ayuda a utilizar su
equipo de la mejor manera posible.
PRECAUCIÓN: Una PRECAUCIÓN indica la posibilidad de daños en el hardware
o la pérdida de datos e informa de cómo evitar el problema.
AVISO: Un AVISO indica el riesgo de daños materiales, lesiones o incluso la muerte.
Contrato de licencia de usuario final de Dell
Antes de usar el sistema, lea el Contrato de licencia de software de Dell que se adjunta. Si no
acepta los términos del contrato, consulte Dell.com/contactdell.
Guarde todos los medios de software que se envían con el sistema. Estos medios son copias de
seguridad del software instalado en el sistema.
Copyright © 2016 Dell Inc. Todos los derechos reservados. Este producto está protegido
por las leyes de EE.UU. y las leyes internacionales sobre el derecho de copia y la propiedad
intelectual. Dell™ y el logotipo de Dell son marcas comerciales de Dell Inc. en Estados Unidos
y otras jurisdicciones. Todas las demás marcas y nombres mencionados aquí pueden ser
marcas comerciales de sus respectivas compañías.
2016 – 01
N/P NT2RV Rev. A01
Page 41

PRECAUCIÓN: Área de acceso restringido
Tal y como se define en la cláusula 1.2.7.3 de la IEC 60950-1: 2001, este servidor
hasido diseñado para su instalación solamente en áreas de acceso restringido,
cuando se aplican las siguientes condiciones:
• Solo pueden tener acceso personas de asistencia técnica o usuarios a los
que se haya informado de las razones de las restricciones que se aplican a la
ubicación y acerca de las precauciones que deban tenerse en cuenta.
• El acceso se realiza mediante una herramienta o una cerradura y una llave,
uotros medios de seguridad, y está controlado por la autoridad responsable
deesta área.
Instalación y configuración
AVISO: Antes de realizar el procedimiento siguiente, lea detenidamente y siga
las instrucciones de seguridad incluidas con el sistema.
Instalación de la solución de rieles de montaje
sin herramientas
AVISO: Si necesita levantar el sistema, pida ayuda. Con el fin de evitar lesiones
personales, no intente levantar el sistema sin ayuda.
AVISO: Para evitar que se produzca una descarga eléctrica, es necesario que la
instalación del bastidor cuente con un tercer conductor de conexión a tierra.
El equipo del bastidor debe proporcionar el suficiente flujo de aire al sistema
para mantener una refrigeración adecuada.
PRECAUCIÓN: A la hora de instalar rieles en un bastidor con orificios
cuadrados, es importante comprobar si la clavija cuadrada se desliza
correctamente a través de los orificios cuadrados.
NOTA: Los rieles pueden utilizarse tanto en bastidores con orificios cuadrados
(elemento 1 de la ilustración siguiente) como con orificios redondos (elemento 2
de la ilustración siguiente).
Instalación y configuración │ 41
Page 42

1. Para abrir los pestillos del riel, presione los botones de liberación de los
1
2
3
pestillos en los puntos medios de las piezas del extremo de los rieles.
Consulte
2. Alinee las piezas del extremo de los rieles con las bridas verticales del bastidor,
einserte las clavijas en los orificios inferior y superior de las posiciones
U deseadas. Consulte
en la ilustración 1.
en la ilustración 1.
Ilustración 1: Cómo presionar los botones de liberación del pestillo
Botón de liberación del seguro
Vista frontal
2
Vista posterior
2
1
1
1
3. Para fijar los pestillos en su lugar, coloque los extremos de los rieles de modo
que encajen en las bridas verticales del bastidor y suelte los botones de
liberación del pestillo. Consulte
en la ilustración 2.
2
Ilustración 2: Cómo liberar los botones de liberación del pestillo
Vista posterior
Vista frontal
42 │ Instalación y configuración
3
3
Page 43

4. Inserte el sistema en el bastidor. Consulte 4 en la ilustración 3.
5
5. Apriete los tornillos mariposa para fijar las orejetas del bastidor a las bridas del
bastidor. Consulte
en la ilustración 3.
Ilustración 3: Cómo instalar el chasis en el bastidor
Vista posterior
5
4
Vista frontal
5
NOTA: Para extraer los rieles, presione el botón de liberación del pestillo en
el punto medio de la pieza del extremo y desencaje cada riel.
Instalación y configuración │ 43
Page 44

Instalación de los soportes opcionales de
6
7
8
transporte para estabilización del chasis
1. En la parte posterior de cada brida vertical del bastidor, coloque dos bases
de tornillo en los dos orificios cuadrados sobre el riel. Consulte
ilustración 4.
2. Instale los soportes opcionales de transporte para estabilización del chasis en
las bridas del bastidor. Consulte
3. Vuelva a colocar los tornillos y apriételos. Consulte
NOTA: Para transportar sistemas que ya están instalados en el bastidor,
asegúrese de que los dos soportes de transporte para estabilización del chasis se
encuentren instalados.
en la ilustración 4.
en la ilustración 4.
Ilustración 4: Cómo instalar los soportes de transporte para
estabilización del chasis
Vista posterior
en la
6
7
8
44 │ Instalación y configuración
Page 45

Conexión del teclado, el mouse y el
monitor(opcional)
Conecte el teclado, el ratón y el monitor (opcional).
Los conectores de la parte posterior del sistema incluyen iconos que indican
qué cable debe enchufarse en cada conector. Asegúrese de apretar los tornillos
(si los hay) del conector del cable del monitor.
NOTA: Tenga en cuenta que el sistema admite sólo un puerto USB y un puerto
micro-USB. Si necesita más de una toma de USB a la vez, utilice el cable de
adaptador o concentrador USB.
Instalación y configuración │ 45
Page 46

Conexión de los cables de alimentación
Conecte los cables de alimentación al sistema y, si se utiliza un monitor, conecte el
cable de alimentación correspondiente al monitor. Conecte el otro extremo de los
cables de alimentación a una toma de corriente con conexión a tierra o a otra fuente
de energía, como por ejemplo un sistema de alimentación ininterrumpida o una
unidad de distribución de alimentación.
NOTA: El sistema puede admitir CA y HVDC, y hasta dos unidades de fuente
de alimentación de 1400W (200 - 240 V CA nominales de voltaje de entrada)
o hasta dos unidades de fuente de alimentación de 1600W (200 - 240 V CA
nominales de voltaje de entrada). La unidad de fuente de alimentación de 1400 W
sólo se admite en China.
46 │ Instalación y configuración
Page 47

Encendido del sistema
Presione el botón de encendido de la parte frontal o posterior del sistema.
Los indicadores de encendido se iluminarán en verde.
Obtención de ayuda
AVISO: Consulte la información sobre normativas y seguridad suministrada
con el sistema. La información sobre la garantía puede estar incluida en este
documento o constar en un documento aparte.
En el Hardware Owner’s Manual (Manual del propietario del hardware) se
proporciona información sobre las características del sistema y se describe
cómo solucionar problemas del sistema e instalar o reemplazar componentes.
Este documento está disponible en Dell.com/support.
Obtención de ayuda │ 47
Page 48

En la documentación de la aplicación de administración de sistemas Dell se
proporciona información sobre cómo instalar y utilizar el software de administración
de sistemas. Este documento está disponible en línea en Dell.com/support.
Para un acceso inmediato a la información del sistema
1. vaya a Dell.com/support.
2. Introduzca la etiqueta de servicio del sistema en el campo Introducir etiqueta
de servicio del sistema o Código de servicio rápido.
3. Haga clic en Enviar.
4. Se muestra la página de asistencia con los manuales del sistema.
Para obtener más información acerca del sistema:
1. Vaya a Dell.com/support.
2. Seleccione su país en el menú desplegable de la esquina inferior derecha de
lapágina.
a. Seleccione la categoría de producto.
b. Seleccione el segmento de producto.
c. Seleccione el producto.
Se muestra la página de asistencia con las diferentes categorías de asistencia.
NOTA: Compruebe siempre si hay actualizaciones en Dell.com/support. Si las
hay, léalas antes de proceder a la instalación, puesto que a menudo sustituyen
lainformación contenida en otros documentos.
Información de la NOM
(sólo para México)
La información que se proporciona a continuación aparece en el dispositivo
descrito en este documento, en cumplimiento con los requisitos de la Norma Oficial
Mexicana (NOM):
Importador Dell Inc. de México, S.A. de C.V.
Paseo de la Reforma 2620-11° Piso
Col. Lomas Atlas
11950 México, D.F.
Número de modelo B08S
Voltaje de alimentación 200-240 V CA con unidad de fuente
de alimentación de 1400W (sólo para
China) o de 1600W
100-120 V CA con dos unidades de
fuente de alimentación de 1600W
48 │ Información de la NOM (sólo para México)
Page 49

Nota: Para 100-120 V CA, se deben
instalar dos unidades de fuente de
alimentación.
Frecuencia 50/60 Hz
Consumo eléctrico 9A con unidad de fuente de
alimentación de 1400W
10A con unidad de fuente de
alimentación de 1600W
12A con dos unidades de fuente de
alimentación de 1600W (100-120 V CA)
Especificaciones técnicas
Alimentación
NOTA: El sistema no admite una instalación combinada de unidades de fuente de
alimentación de 1400W y 1600W.
NOTA: Las unidades de fuente de alimentación de 1400W y 1600W son de
intercambio activo y admiten intercambio activo en cualquier situación si el
sistema tiene la función de limitación de alimentación.
Fuente de alimentación de CA (por fuente de alimentación)
Potencia 1400 W (sólo para China)
Voltaje 200-240 V CA, 50/60 Hz, corriente de
entrada máxima: 9A
Disipación de calor 6024,376 BTU/h máximo
Corriente de conexión máxima La corriente de conexión inicial
no puede superar los 55A (pico).
Lacorriente de conexión secundaria
nopuede superar los 25A (pico).
Potencia 1600 W
Voltaje 200-240 V CA, 50/60 Hz, corriente de
entrada máxima: 10A
100-120 V CA/200 - 240 V CA,
50/ 60 Hz, corriente de entrada
máxima: 12A/10A
Disipación de calor 6033,979 BTU/h máximo
Especificaciones técnicas │ 49
Page 50

Alimentación
Corriente de conexión máxima La corriente de conexión inicial
ysecundaria no puede superar los
50A (pico).
Fuente de alimentación de HVDC
(por fuente de alimentación)
Potencia 1400 W (sólo para China)
Voltaje 240 V CC, 50-60 Hz, corriente de
entrada máxima: 9A
Disipación de calor 5440,614 BTU/h máximo
Corriente de conexión máxima La corriente de conexión inicial
no puede superar los 55A (pico).
Lacorriente de conexión secundaria
nopuede superar los 25A (pico).
Batería (por placa base)
Batería del sistema Batería de tipo botón de litio CR2032 de 3V
Especificaciones ambientales
NOTA: Para obtener información adicional sobre medidas
ambientales para configuraciones del sistema específicas,
consulte dell.com/environmental_datasheets
Temperatura De 10a35°C (de 50 a 95 °F) con una
gradación de temperatura máxima de
10°C por hora
En funcionamiento NOTA: Para altitudes superiores a 900m,
la temperatura máxima de funcionamiento
se reduce 1°C cada 300m.
PRECAUCIÓN: El número máximo de
módulos de memoria y discos duros
admitidos en la configuración del nodo
1U, con procesadores de 145W y 135W,
depende de la fuente de alimentación
instalada.
Almacenamiento De –40 a 65 °C (de –40 a 149 °F) con
una gradación de temperatura máxima
de 20 °C por hora
50 │ Especificaciones técnicas
Page 51

Page 52

Printed in the U.S.A
Imprimé aux U.S.A.
Impresso nos EUA
Impreso en los EE.UU.
 Loading...