

Page 1

Dell Active Pen
PN557W
User’s Guide
Regulatory Model: PN556W
Page 2

Notes, cautions, and warnings
NOTE: A NOTE indicates important information that helps you make
better use of your product.
CAUTION: A CAUTION indicates either potential damage to hardware or
loss of data and tells you how to avoid the problem.
WARNING: A WARNING indicates a potential for property damage,
personal injury, or death.
Copyright © 2016 Dell Inc. or its subsidiaries. All rights reserved. Dell, EMC, and other
trademarks are trademarks of Dell Inc. or its subsidiaries. Other trademarks may be
trademarks of their respective owners.
2016 - 12
Rev. A00
Page 3

Contents
What’s in the box...........................................................5
Features.........................................................................7
Setting up your Dell Active Pen..................................... 9
Installing batteries..................................................................................... 9
Installing the AAAA battery..................................................................9
Installing the coin-cell batteries..........................................................10
Removing the coin-cell battery holder............................................... 12
Pairing with a Bluetooth device................................................................12
Active Pen Control Panel..............................................14
Installing Active Pen Control Panel...........................................................14
Using Active Pen Control Panel............................................................... 15
System Application: Microsoft Windows 10 Anniversary,
Windows Ink Workspace....................................................................17
Holding the Dell Active Pen.......................................... 18
Troubleshooting........................................................... 19
Specifications.............................................................. 22
Getting help and contacting Dell..................................23
Self-help resources................................................................................. 23
Contacting Dell........................................................................................23
Statutory information.................................................. 25
Warranty.................................................................................................25
3
Page 4

Regulatory statement.................................................. 26
FCC notices (U.S. only) and other regulatory information.......................26
4
Page 5
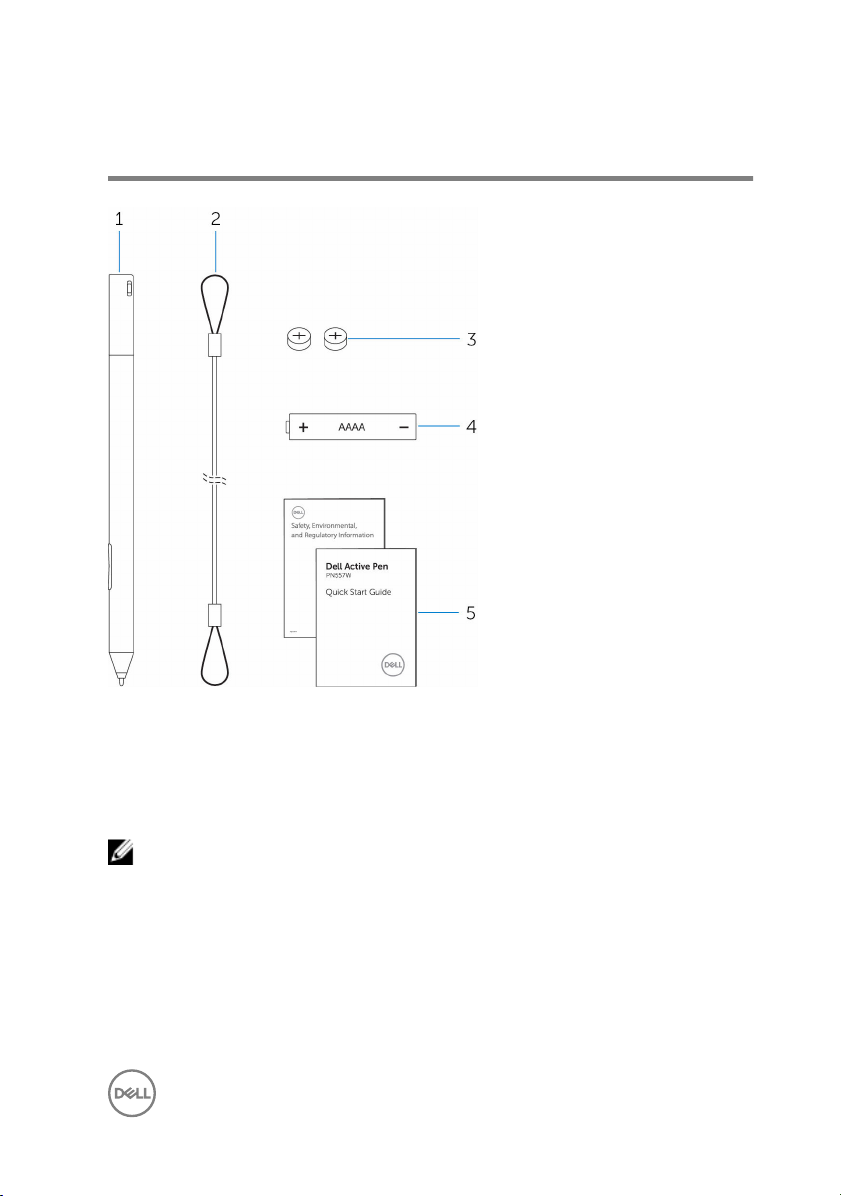
What’s in the box
Figure 1. Contents in the box
1
Dell Active Pen 2 lanyard
3 coin-cell batteries (2) 4 AAAA battery
5 manuals
NOTE: For warranty purpose, note down the PPID number on the box or
retain the box.
5
Page 6
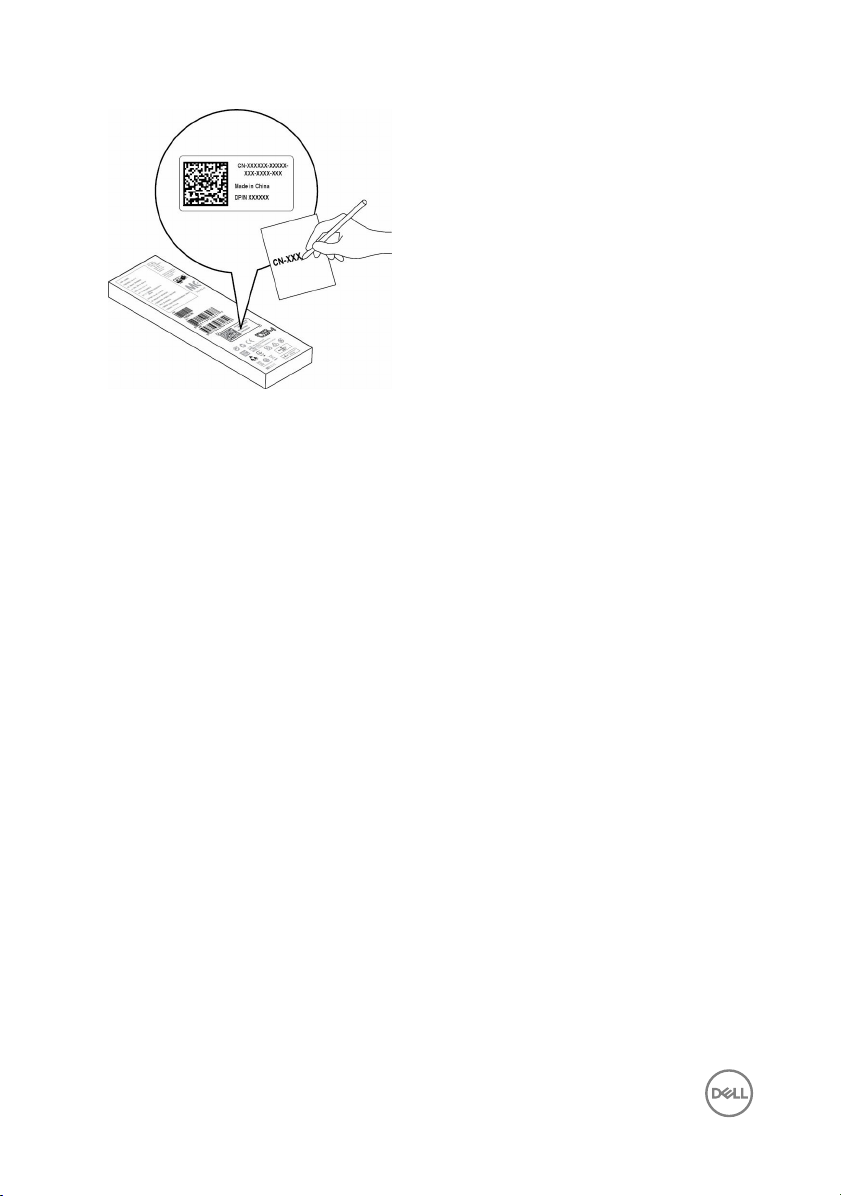
Figure 2. Noting down the PPID number
6
Page 7
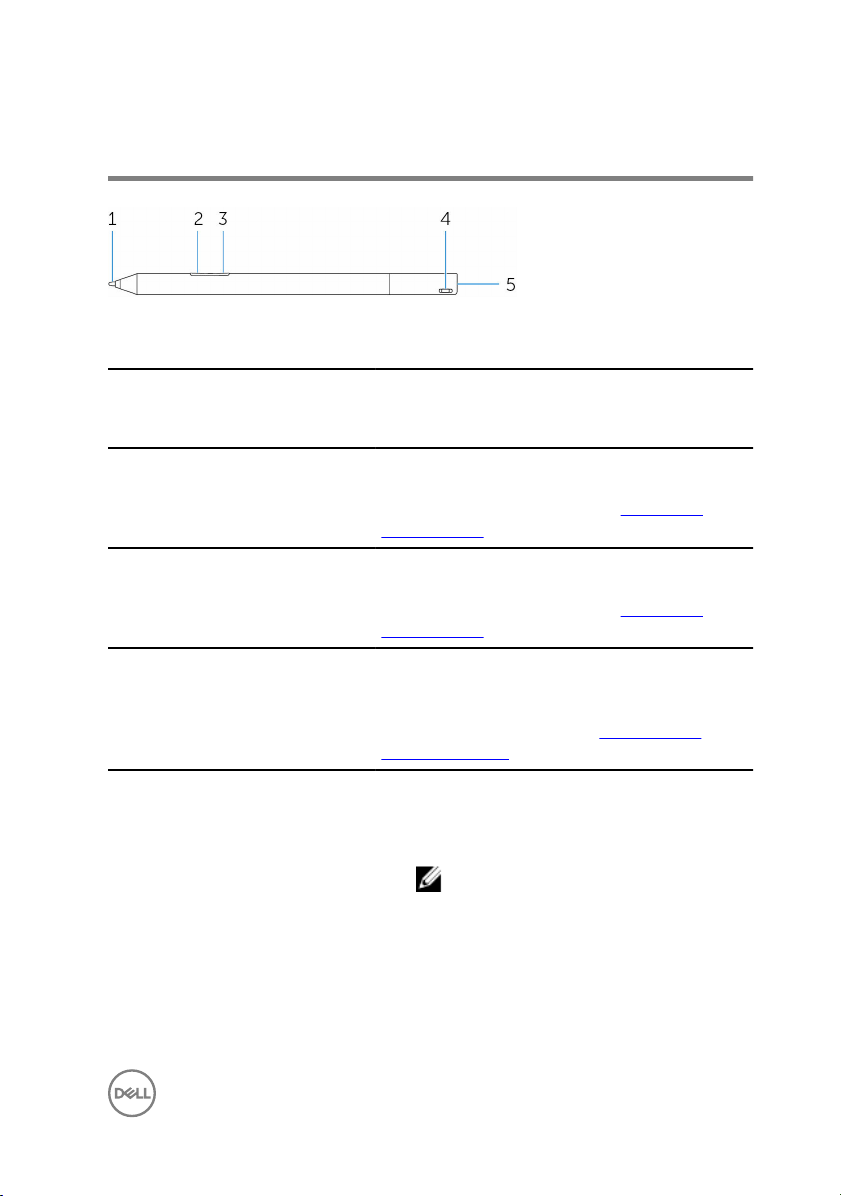
Features
Table 1. Features and functionality of the product
Feature Functionality
1 Tip Move the tip over a touch screen to move the
pointer. Enables you to write, draw, and select
objects.
2 Bottom barrel button Press and hold this button and move the tip
over the area you want to erase. To change the
functionality of this button, see Active Pen
Control Panel.
3 Top barrel button Press this button to open the context menu or
perform a right-click. To change the
functionality of this button, see Active Pen
Control Panel.
4 Bluetooth-pairing light Blinking white light indicates the pairing mode is
enabled. A solid white light indicates the pairing
is complete. For information on pairing the pen
with a Bluetooth device, see Pairing with a
Bluetooth device.
5 Top button
• Press and hold for 3.5 seconds to enable
pairing mode.
• Press and release to open OneNote.
NOTE: This feature works even when
your device screen is locked.
• Press twice in succession to capture a
screenshot.
• Press and hold or press twice in succession
to wake up your computer or tablet from
connected standby mode.
7
Page 8

NOTE: This feature is only available
on devices that support connected
standby feature.
• In presentation mode, press and hold to go
to the next slide and press twice at short
intervals to go to the previous slide.
NOTE: This feature is only available
after installing the Active Pen Control
Panel. For instructions on installing
the Active Pen Control Panel, see
Installing Active Pen Control Panel.
The new Active Pen Control Panel enables the
top button to be programmed to launch specific
applications listed in the content menu, the
default applications launched from the top
button are:
• Single Press — Launch OneNote
• Double Press — Screen Sketch
• Long Press — Launch Cortana
NOTE: These functions are available only
in Windows 10 and Windows 10
Anniversary.
NOTE: These functions are available only
after installing the Active Pen Control
Panel. For instructions on installing the
Active Pen Control Panel, see
Active Pen Control Panel.
Installing
8
Page 9

Setting up your Dell Active Pen
Installing batteries
Dell Active Pen uses one AAAA battery and two coin-cell batteries.
The AAAA battery provides power for the tip and the barrel buttons. The coin-cell
batteries provide power for Bluetooth functionality and top button quick-launch
features.
Installing the AAAA battery
CAUTION: Incorrectly installing the AAAA battery may damage the pen.
1 Remove the top cover from the pen.
Figure 3. Removing the top cover
1
pen 2 top cover
2 Insert the AAAA battery into the pen with the positive side facing in.
Figure 4. Installing the AAAA battery
1
pen 2 AAAA battery
3 Replace the top cover to the pen.
Figure 5. Replacing the top cover
9
Page 10

Installing the coin-cell batteries
CAUTION: Incorrectly installing the coin-cell batteries may damage the pen.
NOTE: Pairing information is lost when you remove the coin-cell batteries.
To pair the pen with your device, see
1 Remove the top cover from the pen.
Figure 6. Removing the top cover
1 pen 2 top cover
2 Remove the coin-cell battery holder.
NOTE: For more information, see Removing the coin-cell battery
holder.
Pairing with a Bluetooth device.
Figure 7. Removing coin-cell battery holder
1
top cover 2 coin-cell battery holder
10
Page 11

3 Insert the coin-cell batteries with the negative side facing in.
Figure 8. Installing the coin-cell batteries
1 coin-cell batteries (2) 2 battery holder
4 Replace the coin-cell battery holder.
Figure 9. Replacing the coin-cell batteries holder
5 Replace the top cover.
Figure 10. Replacing the top cover
11
Page 12

Removing the coin-cell battery holder
Table 2. Removing the coin-cell battery holder by hand
Using your fingertips, unscrew the coincell battery holder from the top cover.
Figure 11. Removing the coin-cell battery
holder by hand
Table 3. Removing the coin-cell battery holder with tools.
If you face difficulties in
removing the coin-cell
battery holder using
fingertips, use a coin or a
flat-head precision
screwdriver.
Figure 12. Removing the
coin-cell battery holder by
hand
Figure 13. Removing the
coin-cell battery holder
using a screwdriver
Pairing with a Bluetooth device
NOTE: You can use Dell Active Pen only with selected Dell computers and
tablets. For the list of supported devices, see
12
www.dell.com.
Page 13

NOTE: If the pen is already listed under Bluetooth devices, remove the pen
from the list before pairing with your device.
1 Press and hold the top button for 3.5 seconds to enable pairing mode.
The Bluetooth-pairing light starts blinking to confirm the pairing mode is enabled.
Figure 14. Turning on Bluetooth
2 In Windows Search, type Bluetooth.
3 From the list that appears, tap or click Bluetooth Settings.
4 Ensure that the Bluetooth is enabled.
5 From the list of devices, tap or click Dell PN557W Pen→ Pair.
NOTE: If Dell PN557W Pen is not listed, ensure pairing mode is enabled
on the pen.
6 Confirm the pairing process on both pen and device.
The Bluetooth-pairing light turns solid white for few seconds to indicate the
pairing is complete and then the light turns off. After the pen and a device are
paired, they connect automatically when bluetooth is enabled and they are within
the bluetooth range.
13
Page 14

Active Pen Control Panel
You can customize the buttons on your pen, change pressure sensitivity, and so on,
using Active Pen Control Panel.
Installing Active Pen Control Panel
To install Active Pen Control Panel:
1 Turn on the computer or tablet.
2 Go to www.dell.com/support/home.
3 Under the Browse for a product section, tap or click View products.
4 Tap or click Electronics & Accessories.
5 Tap or click Styli.
6 Tap or click Dell Active Pen PN557W.
7 Tap or click Drivers & downloads.
8 Tap or click Drivers for OS Deployment.
9 Under Active Pen Control Panel, tap or click Download.
10 Save the file.
11 After the download is complete, open the file and follow the instructions on the
screen to install the Active Pen Control Panel.
14
Page 15

Using Active Pen Control Panel
Figure 15. Active Pen Control Panel
Table 4. Dell Active Pen features
Top Pen Button Select Enable Presentation Mode to use the button to
navigate through a PowerPoint presentation.
Top Barrel Button Enables you to select one of the following functions
when you click the button:
• Context Menu(right-click) (enabled by default)
• Erase (press and hold to erase)
15
Page 16

• Page up
• Page down
• Copy
• Paste
• Undo
• Redo
NOTE: Select Enable barrel buttons while
hovering to enable the selected Top Barrel
Button function while hovering the tip over the
screen without the tip touching the screen.
Bottom Barrel Button Enables you to select one of the following functions
when you click the button:
• Erase (press and hold to erase) (enabled by default)
• Context Menu (right-click)
• Page up
• Page down
• Copy
• Paste
• Undo
• Redo
NOTE: Select Enable barrel buttons while
hovering to enable the selected Top Barrel
Button function while hovering the tip over the
screen without the tip touching the screen.
Pen Tip Options
NOTE: Click Go to Microsoft Pen Control Panel for more configuration
options.
NOTE: When the Active Pen Control Panel is opened it sets the default
configuration for the button press features. Closing the Active Pen Control
Panel enables other applications to set the default configuration for the Dell
Active Pen features.
16
Move the slider to change your pen sensitivity.
Page 17

System Application: Microsoft Windows 10 Anniversary, Windows Ink Workspace
Change the Active Pen Control Panel software context menu settings for Single
Press, Double Press and Long Press to Defined by System. . This sets Microsoft Ink
Workspace as the default configuration for button press features.
17
Page 18

Holding the Dell Active Pen
Hold the Dell Active Pen as you hold a pencil or pen. Adjust the grip so that you can
use the barrel button easily. Ensure not to accidentally press the barrel buttons while
drawing or positioning the Dell Active Pen.
Figure 16. Using the Dell Active Pen hand position
18
Page 19

Troubleshooting
NOTE: You can use Dell Active Pen only with selected Dell computers and
tablets. For a list of supported devices, see www.dell.com.
Table 5. Dell Active Pen troubleshooting
Problems Possible causes Possible solutions
Pen does not work.
• Batteries are installed
incorrectly.
• Ensure the batteries
are correctly installed.
For more information,
see Installing batteries.
Pen does not write and
the barrel buttons do not
work.
Default functions for the
barrel buttons do not
work.
Pressing the top button
once does not open
OneNote.
• Batteries are out of
charge.
AAAA battery is either
incorrectly installed or out
of charge.
Functions not supported
by application.
• OneNote is not
installed.
• Pen is not paired with
your device.
• Coin-cell batteries may
be out of charge.
• Replace the batteries.
For more information,
see Installing batteries.
Replace the AAAA battery.
For more information, see
Installing the AAAA
battery.
Test the barrel buttons in
OneNote or another
application that supports
these features.
• Ensure OneNote is
installed on your
device.
• Ensure the pen is
paired with your
device. For more
information, see
Pairing with a
Bluetooth device.
• Change the coin-cell
batteries. For more
information, see
19
Page 20

Problems Possible causes Possible solutions
Installing coin-cell
batteries.
Pressing the top button
twice in succession does
not capture screenshot.
Unable to pair the pen
with your device.
Pen shows as Not
Connected under
Bluetooth devices list.
• Coin-cell batteries
were replaced and the
pen was not paired
again with your device.
Windows update
KB2968599 is not installed
on your device.
• Unsupported device. • Dell Active Pen works
• Bluetooth driver on
your device is
outdated.
Pen is not paired correctly
with your device.
• Remove the pen from
the list of Bluetooth
devices and re-pair it
with your device. For
more information, see
Pairing with a
Bluetooth device.
Install the Windows
update KB2968599 from
the Microsoft website.
only with Dell devices.
• Install the latest
Bluetooth driver for
your device.
• Install the latest
Bluetooth driver for
your device.
• Remove the pen from
your Bluetooth list and
pair it again. For more
information on pairing
the pen with your
device, see Pairing
with a Bluetooth
device.
Bluetooth-pairing light
does not turn on.
Pressing and holding the
top button or pressing the
top button twice in
succession does not wake
20
Coin-cell batteries may be
out of charge.
Your computer or tablet
may not support the
connected standby
feature.
Change the coin-cell
batteries. For more
information, see Installing
coin-cell batteries.
Ensure to use this feature
on computers and tablets
that support the
connected standby
Page 21

Problems Possible causes Possible solutions
up the computer or tablet
from connected standby.
feature. Search PN557W
on Dell website for a list of
supported devices.
21
Page 22

Specifications
Table 6. Dell Active Pen specifications
Model PN557W
Length 160.59 mm (6.32 in)
Diameter 9.50 mm (0.37 in)
Weight 20 g (0.044 lb)
Wireless Bluetooth Smart Low Energy 4.0
Wireless operating range 10 m (32.80 ft)
Pen tip detectable height 5 mm to 10 mm (0.20 in to 0.39 in)
Batteries
Supported operating system
• AAAA non-rechargeable battery
• 319 coin-cell batteries (2)
• Windows 8.1 with the latest updates
installed
• Windows 10
• Windows 10 Anniversary
22
Page 23

Getting help and contacting Dell
Self-help resources
You can get information and help on Dell products and services using these online
self-help resources:
Table 7. Getting help and contacting Dell
Information about Dell products and
services
Windows 8.1 and Windows 10 Dell Help & Support app
Windows 10 Get started app
Windows 8.1 Help + Tips app
Accessing help in Windows 8.1 and
Windows 10
Online help for operating system www.dell.com/support/windows
Troubleshooting information, user
manuals, setup instructions, product
specifications, technical help blogs,
drivers, software updates, and so on
www.dell.com
In Windows search, type Help and
Support, and press Enter.
www.dell.com/support
Contacting Dell
To contact Dell for sales, technical support, or customer service issues, see
www.dell.com/contactdell.
23
Page 24

NOTE: Availability varies by country and product, and some services may
not be available in your country.
NOTE: If you do not have an active internet connection, you can find
contact information on your purchase invoice, packing slip, bill, or Dell
product catalog.
24
Page 25

Statutory information
Warranty
Limited warranty and return policies
Dell-branded products carry a 1-year limited hardware warranty. If purchased
together with a Dell system, it will follow the system warranty.
For U.S. customers:
This purchase and your use of this product are subject to Dell’s end user agreement,
which you can find at www.dell.com/terms. This document contains a binding
arbitration clause.
For European, Middle Eastern and African customers:
Dell-branded products that are sold and used are subject to applicable national
consumer legal rights, the terms of any retailer sale agreement that you have entered
into (which will apply between you and the retailer) and Dell’s end user contract
terms.
Dell may also provide an additional hardware warranty—full details of the Dell end
user contract and warranty terms can be found by going to www.dell.com, selecting
your country from the list at the bottom of the “home” page and then clicking the
“terms and conditions” link for the end user terms or the “support” link for the
warranty terms.
For non-U.S. customers:
Dell-branded products that are sold and used are subject to applicable national
consumer legal rights, the terms of any retailer sale agreement that you have entered
into (which will apply between you and the retailer) and Dell’s warranty terms. Dell
may also provide an additional hardware warranty—full details of Dell’s warranty
terms can be found by going to www.dell.com, selecting your country from the list at
the bottom of the “home” page and then clicking the “terms and conditions” link or
the “support” link for the warranty terms.
25
Page 26

Regulatory statement
FCC notices (U.S. only) and other regulatory information
For FCC notices and other regulatory information, see the regulatory compliance
website located at www.dell.com/regulatory_compliance.
This device complies with Part 15 of the FCC Rules. Operation is subject to the
following two conditions:
1 This device may not cause harmful interference.
2 This device must accept any interference received including interference that
may cause undesired operation.
CAUTION: Changes or modifications on this unit that are not expressly
approved by the party responsible for compliance which could void the
user’s authority to operate the equipment.
This equipment has been tested and found to comply with the limits for a class B
digital device, pursuant to part 15 of the FCC Rules. These limits are designed to
provide reasonable protection against harmful interference in a residential installation.
This equipment generates, uses and can radiate radio frequency energy and if not
installed and used in accordance with the instructions, may cause harmful
interference to radio communications. However, there is no guarantee that
interference will not occur in a particular installation. If this equipment does cause
harmful interference to radio or television reception, which can be determined by
turning the equipment off and on, the user is encouraged to try to correct the
interference by one or more of the following measures:
• Reorient or relocate the receiving antenna.
• Increase the separation between the equipment and receiver.
• Connect the equipment into an outlet on a circuit different from that to which the
receiver is connected.
• Consult the dealer or an experienced radio/TV technician for help.
Shielded cables must be used with this unit to ensure compliance with the Class B
FCC Limits.
26
 Loading...