

Dell Plasma TV, W4201C, W5001C Owner's Manual
DZ101_UM-ALL.book Page 1 Wednesday, December 28, 2005 6:43 PM
Dell™ Plasma TV
Owner's Manual
FILE LOCATION:
DELL CONFIDENTIAL – PRELIMINARY 12/28/05 – FOR PROOF ONLY
Model W4201C/5001C www.dell.com |
D:\manual\Dell\W4201OM\approval-B\fronte.fm
DZ101_UM-ALL.book Page 2 Wednesday, December 28, 2005 6:43 PM
Notes, Notices, and Cautions
NOTE:
A NOTE indicates important information that helps you make better use of your TV.
NOTICE:
CAUTION:
CAUTION:
A NOTICE indicates either potential damage to hardware and tells you how to avoid the problem.
A CAUTION indicates a potential for property damage, personal injury, or death.
A CAUTION indicates a potential for property damage, personal injury, or death.
_____________________
Information in this document is subject to change without notice.
© 2005 Dell Inc. Allrights reserved.
Reproduction of this document in any manner whatsoever without the written permission of Dell I nc. is strictly forbidden.
Trademarks used in this text: Dell, the DELL logo; TruSurround XT, SRS, and symbol are tr ademarks of SRS Labs, Inc.
3
Dell, Dimen sion , Op tiPl ex, Dell Preci sion, La tit ud e, I nspiron, De llNe t, Power App , Pow erE dg e , Powe rC onn e ct, Powe rVault, and EMC
trademar ks of Dell Inc.
Other trademarks and trade names may be used in this document to refer to either the entities claiming the marks and names or their products.
Dell Inc. disclaims any proprietary intere st in trademarks and trade names other than its own.
November 2005 Rev. A02
are
DZ101_ UM -A LL .bo ok Page 3 Wedn es da y, Decemb er 28 , 20 05 6:4 3 PM
Contents
1 About Your TV
Front View
Right View
Rear View
Package Contents
Caring for Your TV
2 Setting Up Your TV
Proper Location for Your TV
Connecting Your TV
FILE LOCATION:
. . . . . . . . . . . . . . . . . . . . . . . . . . . . . . . . .
. . . . . . . . . . . . . . . . . . . . . . . . . . . . . . . . .
. . . . . . . . . . . . . . . . . . . . . . . . . . . . . . . . . .
. . . . . . . . . . . . . . . . . . . . . . . . . . . . . .
. . . . . . . . . . . . . . . . . . . . . . . . . . . . .
D:\manual\ Dell \W 4201OM \approval -B\D Z101_eyUM .f m
. . . . . . . . . . . . . . . . . . . . . . . .
. . . . . . . . . . . . . . . . . . . . . . . . . . . .
11
13
14
m
o
c
.
l
l
e
d
.
t
r
o
p
p
5
6
7
9
u
s
|
m
o
c
.
l
l
e
d
.
w
w
w
Connecting the Speakers
. . . . . . . . . . . . . . . . . . . . . . . . .
Installing the RCA-Phono Cable With Ferrite Core for your TV
Image Retention and Burn-In
. . . . . . . . . . . . . . . . . . . . . . . .
3 Your Remote Control
Installing Batteries
Using Your Remote Control
Using Your TV With a Universal or Learning Remote Control
. . . . . . . . . . . . . . . . . . . . . . . . . . . .
. . . . . . . . . . . . . . . . . . . . . . . .
4 Using the TV Menu
Using Your Remote Control With the TV Menu
Selecting Your TV Menu Language
Input Select
Picture Menu
. . . . . . . . . . . . . . . . . . . . . . . . . . . . . . . .
. . . . . . . . . . . . . . . . . . . . . . . . . . . . . . .
. . . . . . . . . . . . . . . . . . . . .
. . . . . . . . . . . . . . .
. . . . . . . .
. . . . . . . . .
20
21
22
23
24
26
27
28
28
30
. . . . . . . . . . . . . . . . . . . . . . . . . . . . . . . . . . .
Audio
PIP/POP/PBP
. . . . . . . . . . . . . . . . . . . . . . . . . . . . . . .
DELL CONFIDENTI AL – PRELIM INARY 12/28/05 – FOR PROOF ON LY
30
31
Contents
3
DZ101_ UM -A LL .bo ok Page 4 Wedn es da y, Decemb er 28 , 20 05 6:4 3 PM
FILE LOCATION:
Size
m
m
o
o
c
c
.
.
l
l
l
l
e
e
d
d
.
.
t
t
r
r
o
o
p
p
p
p
u
u
s
s
|
|
m
m
o
o
c
c
.
.
l
l
l
l
e
e
d
d
.
.
w
w
w
w
w
w
5 Troubleshooting Problems With Your TV
. . . . . . . . . . . . . . . . . . . . . . . . . . . . . . . . . . . .
Parental Control
. . . . . . . . . . . . . . . . . . . . . . . . . . . . . . . . . . .
Setup
. . . . . . . . . . . . . . . . . . . . . . . . . . . . . .
Troubleshooting Tips
General Problems
. . . . . . . . . . . . . . . . . . . . . . . . . . . . .
TV Menu Messages
Remote Control Problems
Using the Self-Test Feature when Connected to a Computer
Problems When Using the TV as a Monitor
D:\manual\ Dell \W 4201OM \approval -B\D Z101_eyUM .f m
. . . . . . . . . . . . . . . . . . . . . . . . . . . .
. . . . . . . . . . . . . . . . . . . . . . . . . . . .
. . . . . . . . . . . . . . . . . . . . . . . . . .
. . . . . . . . .
. . . . . . . . . . . . . . . . .
32
32
33
35
36
40
40
41
41
6 Specifications for Your TV
Contacting Dell
Index
. . . . . . . . . . . . . . . . . . . . . . . . . . . . . .
. . . . . . . . . . . . . . . . . . . . . . . . . . . . . . . . . . . .
47
65
DELL CONFIDENTI AL – PRELIM INARY 12/28/05 – FOR PROOF ON LY
4
Contents
DZ101_UM-ALL.book Page 5 Wednesday, December 28, 2005 6:43 PM
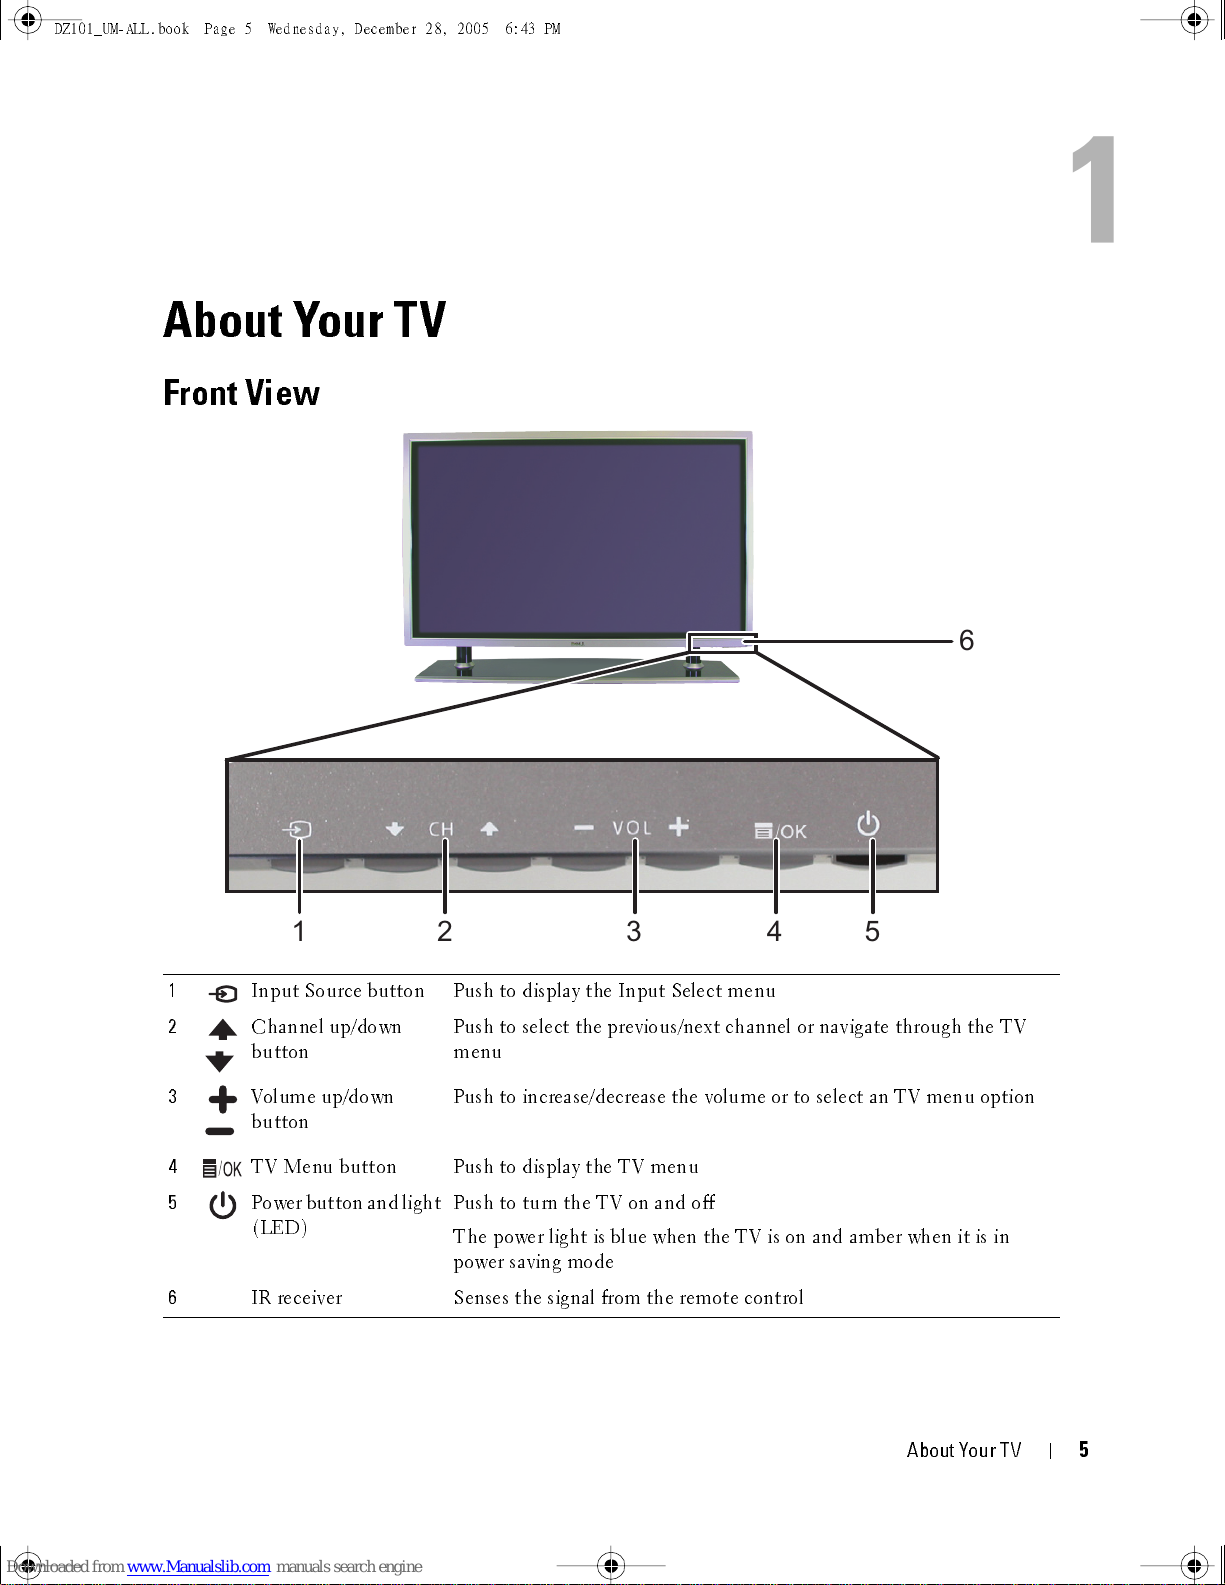
About Your TV
Front View
1
6
12 345
1
2
3
4
5
Input Source button Push to display the Input Select menu
Channe l up/down
button
Volume up/down
button
TV Menu button Push to display the TV menu
Power button and light
(LED)
Push to select the previous/next channel or navigate through the TV
menu
Push to increase/decrease the volume or to select an TV menu option
Push to turn the TV on and off
The power light is blue when the TV is on and amber when it is in
power saving mode
6
IR receiver Senses the sign al from the remot e cont rol
FILE LOCATION:
DELL CONFIDEN TIAL – PRELIM INARY 12/28/05 – FOR PROOF ON LY
D:\ manual \ Del l \W 4 201O M \appr oval -B \ch1e. f m
About Your TV
5

DZ101_UM-ALL.book Page 6 Wednesday, December 28, 2005 6:43 PM
FILE LOCATION:
m
o
c
.
l
l
e
d
.
t
r
o
p
p
u
s
|
m
o
c
.
l
l
e
d
.
w
w
w
Right View
D:\manual \Del l\W 4201OM \appr oval-B \ch1e.f m
1
2
3
4
1
Composite video connector (SIDE) Connect devices such as a VCR or DVD player
2
Audio connector (L) Use this connector if you have connected a device to the
composite conn ect or (SID E) or the S-Video connec tor (SIDE)
3
Audio connector (R) Use this connector if you have connected a device to the
composite conn ect or (SID E) or the S-Video connec tor (SIDE)
4
S-Video input (SIDE) Connect devices such as a video game system, a digital camera,
or a DVD player
DELL CONFIDENTI AL – PRELIM INARY 12/28/05 – FOR PROOF ON LY
6
About Your TV
DZ101_ UM -A LL .bo ok Page 7 Wedn es da y, Decemb er 28 , 20 05 6:4 3 PM
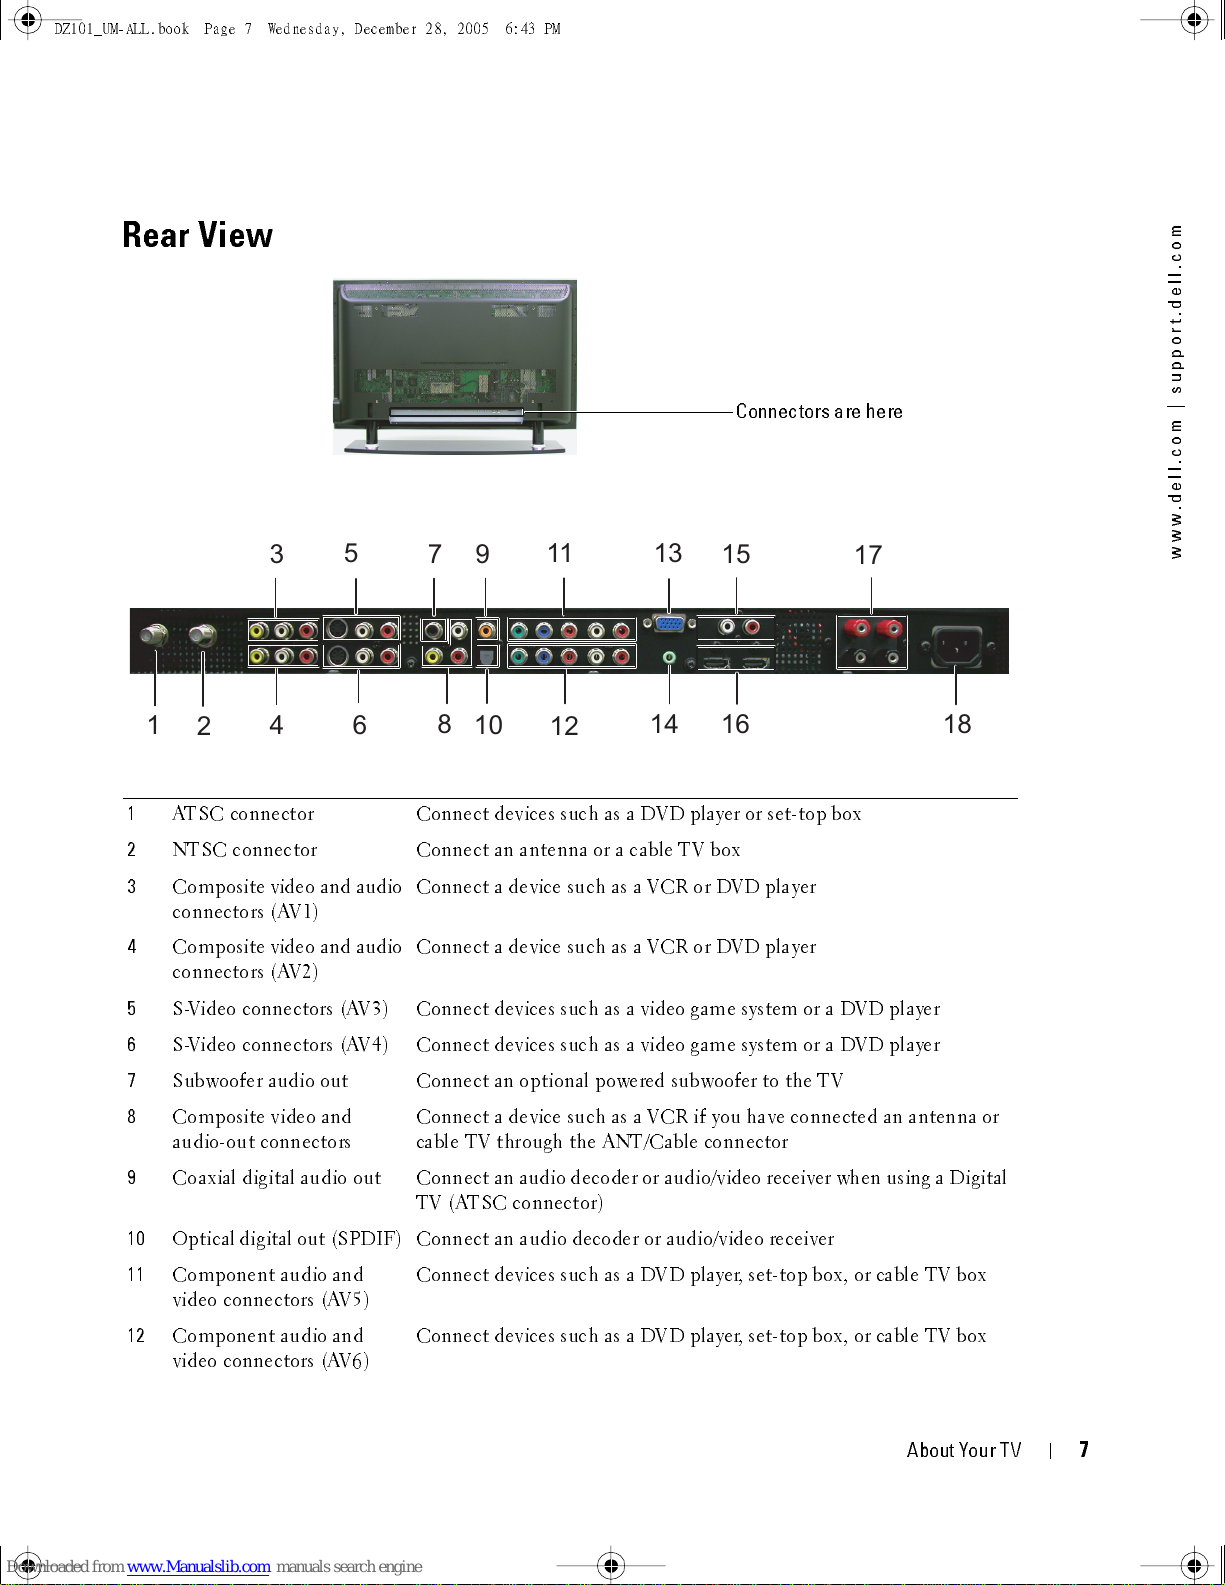
Rear View
1
2
FILE LOCATION:
3
4
5
6
789
D:\manual \Del l\W 4201O M\appr oval-B \ch1e.f m
Connectors are here
13
14
15
16
10
11
12
17
18
m
o
c
.
l
l
e
d
.
t
r
o
p
p
u
s
|
m
o
c
.
l
l
e
d
.
w
w
w
1
ATSC connector Connect devices such as a DVD player or set-top box
2
NTSC connector Connect an antenna or a cable TV box
3
Composite video and audio
connectors (AV1)
4
Composite video and audio
connectors (AV2)
5
S-Video connectors (AV3) Connect devices such as a video game system or a DVD player
6
S-Video connectors (AV4) Connect devices such as a video game system or a DVD player
7
Subwoofer audi o out Connect an option al powered subwoofer to the TV
8
Composite video and
audio-out con n ect ors
9
Coaxial digital audio out Connect an audio decoder or audio/video receiver when using a Digital
10
Optical digital out (SPDIF) Connect an audio decoder or audio/video receiver
11
Component au dio and
video connectors (AV5)
12
Component au dio and
video connectors (AV6)
Connect a device such as a VCR or DVD player
Connect a device such as a VCR or DVD player
Connect a device such as a VCR if you have connected an antenna or
cable TV through the AN T/Cable conn ec tor
TV (ATSC connector)
Connect devices such as a DVD player, set-top box, or cable TV box
Connect devices such as a DVD player, set-top box, or cable TV box
DELL CONFIDENTI AL – PRELIM INARY 12/28/05 – FOR PROOF ON LY
About Your TV
7
DZ101_UM-ALL.book Page 8 Wednesday, December 28, 2005 6:43 PM
FILE LOCATION:
m
o
c
.
l
l
e
d
.
t
r
o
p
p
u
s
|
m
o
c
.
l
l
e
d
.
w
w
w
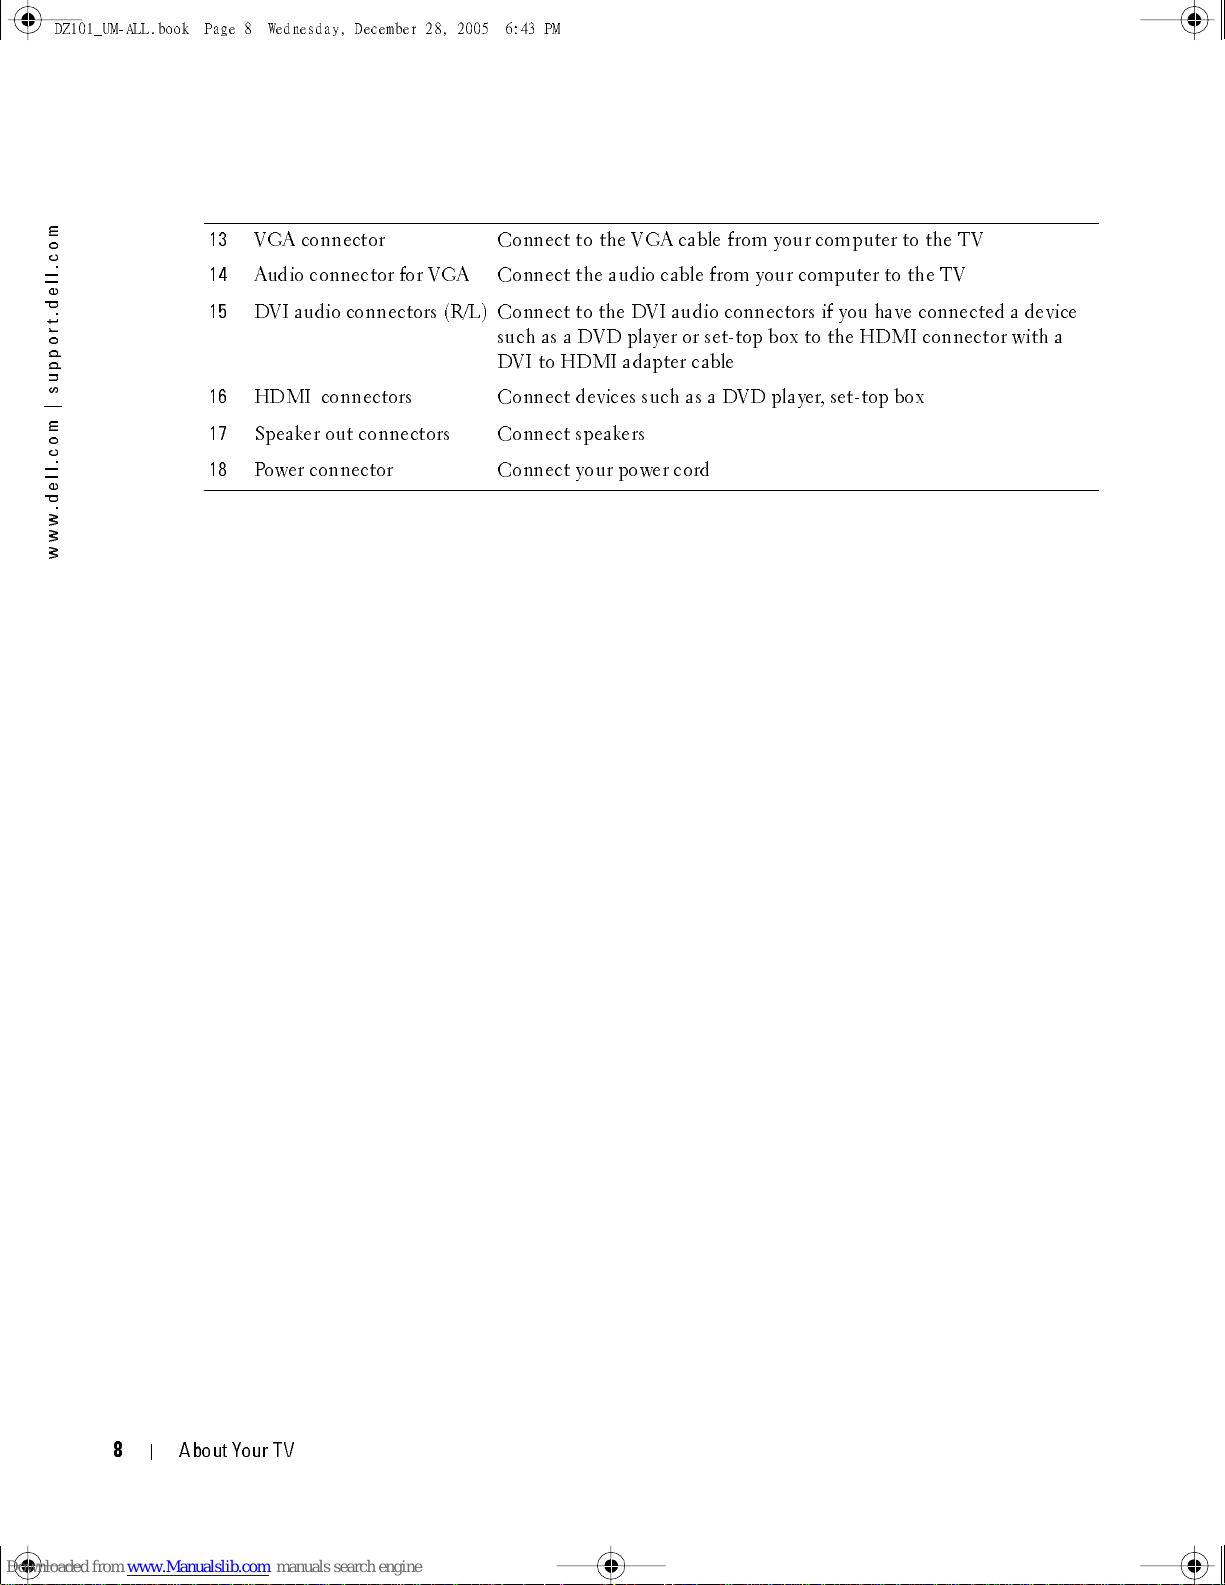
13
VGA conn ect or Conn ec t to the VGA cable from your computer to the TV
14
Audio connector for VGA Connect the audio cable from your computer to the TV
15
DVI audio connectors (R/L) Connect to the DVI audio connectors if you have connected a device
16
HDMI connectors Connect devices such as a DVD player, set-top box
17
Speaker out connectors Connect speakers
18
Power connector Connect your power cord
D:\manual \Del l\W 4201OM \appr oval-B \ch1e.f m
such as a DVD player or set-top box to the HDMI connector with a
DVI to HDMI adapter cable
DELL CONFIDENTI AL – PRELIM INARY 12/28/05 – FOR PROOF ON LY
8
About Your TV
DZ101_ UM -A LL .bo ok Page 9 Wedn es da y, Decemb er 28 , 20 05 6:4 3 PM
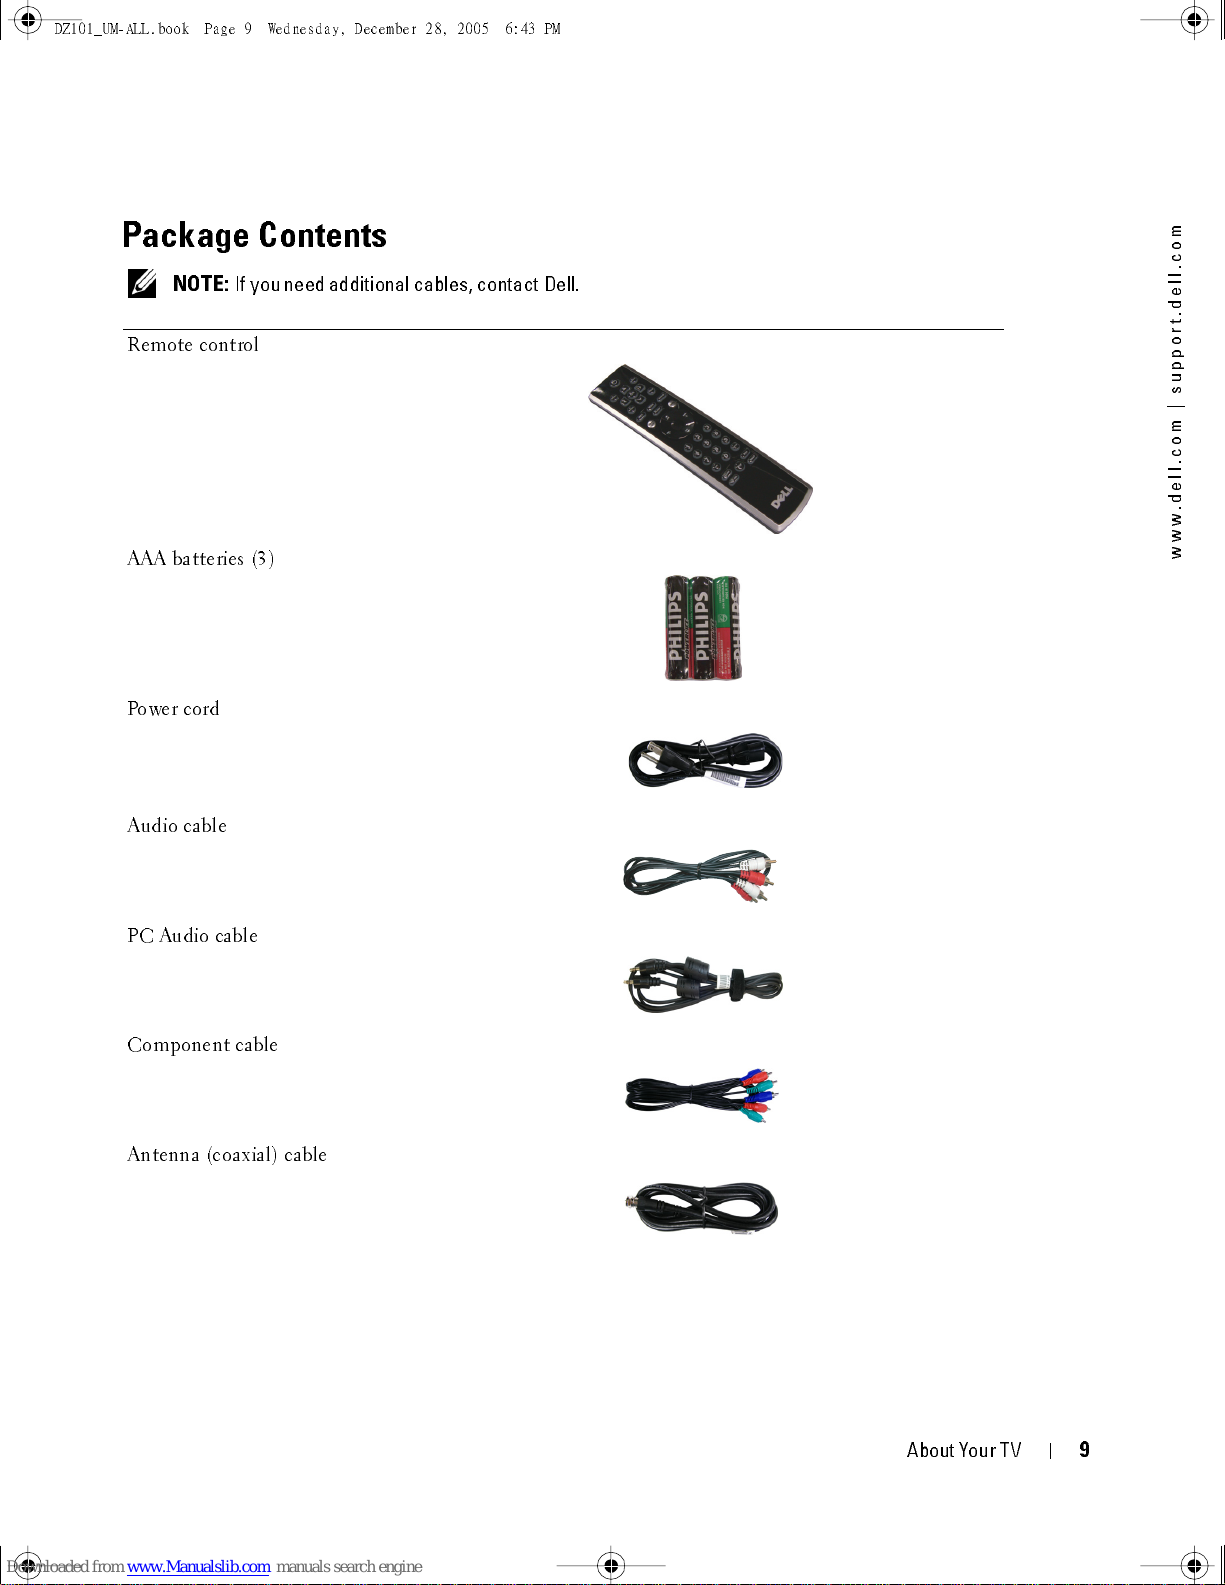
Package Contents
NOTE:
Remote control
AAA batteries (3)
Power cord
If you need additional cables, contact Dell.
FILE LOCATION:
D:\manual \Del l\W 4201O M\appr oval-B \ch1e.f m
m
o
c
.
l
l
e
d
.
t
r
o
p
p
u
s
|
m
o
c
.
l
l
e
d
.
w
w
w
Audio cable
PC Audio cable
Component cable
Antenna (coaxial) cable
DELL CONFIDENTI AL – PRELIM INARY 12/28/05 – FOR PROOF ON LY
About Your TV
9
DZ101_ UM -A LL .bo ok Page 10 Wedne sd ay, Decem ber 28, 2005 6:43 PM
FILE LOCATION:
m
o
c
.
l
l
e
d
.
t
r
o
p
p
u
s
|
m
o
c
.
l
l
e
d
.
w
w
w
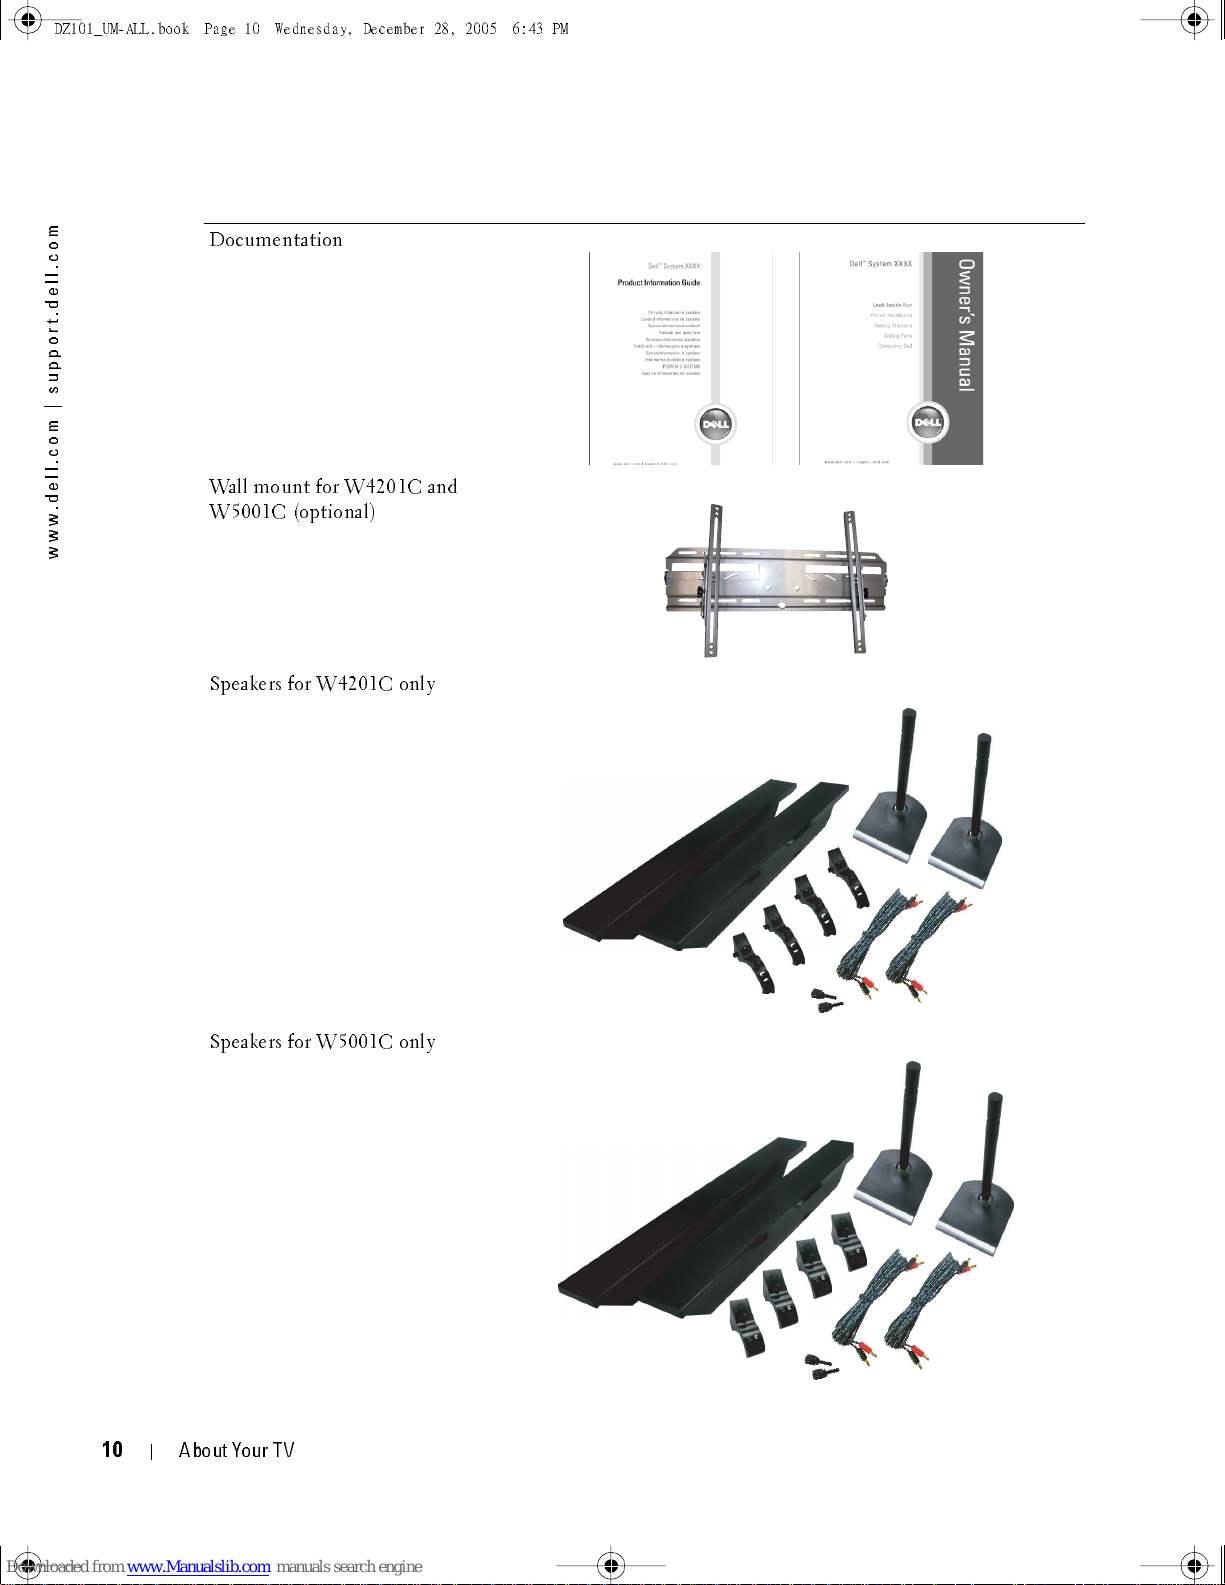
Documentation
Wall mount for W4201C and
W5001C (optional)
D:\manual \Del l\W 4201OM \appr oval-B \ch1e.f m
Speakers for W4201C only
Speakers for W5001C only
DELL CONFIDENTI AL – PRELIM INARY 12/28/05 – FOR PROOF ON LY
10
About Your TV
DZ101_ UM -A LL .bo ok Page 11 Wedne sd ay, Decem ber 28, 2005 6:43 PM
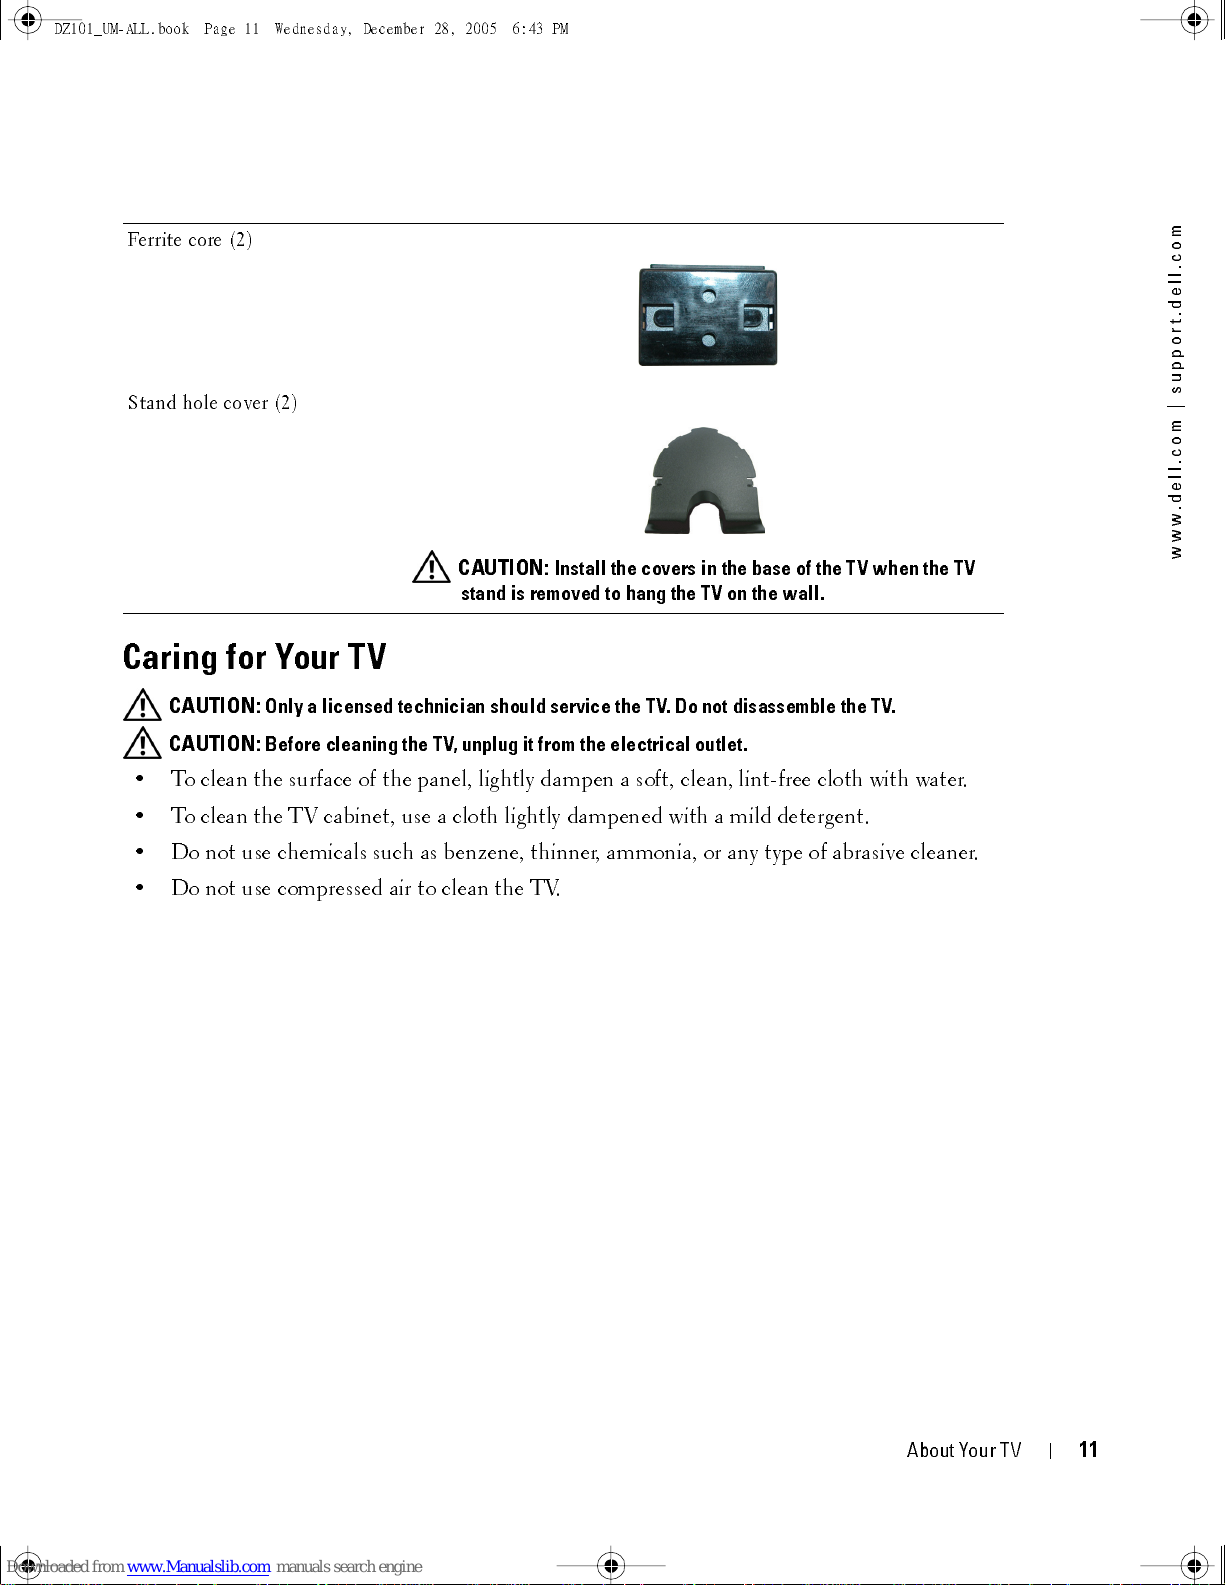
Ferrite core (2)
Stand hole cover (2)
Caring for Your TV
CAUTION:
Only a licensed technician should service the TV. Do not disassemble the TV.
FILE LOCATION:
CAUTION:
stand is removed to hang the TV on the wall.
D:\manual \Del l\W 4201O M\appr oval-B \ch1e.f m
Install the covers in the base of the TV when the TV
m
o
c
.
l
l
e
d
.
t
r
o
p
p
u
s
|
m
o
c
.
l
l
e
d
.
w
w
w
CAUTION:
Before cleaning the TV, unplug it from the electrical outlet.
• To clean the surface of the panel, lightly dampen a soft, clean, lint-free cloth with water.
• To clean the TV cabinet, use a cloth lightly dampened with a mild detergent.
• Do not use chemicals such as benzene, thinner, ammonia, or any type of abrasive cleaner.
• Do not use compressed air to clean the TV.
DELL CONFIDENTI AL – PRELIM INARY 12/28/05 – FOR PROOF ON LY
About Your TV
11

DZ101_ UM -A LL .bo ok Page 12 Wedne sd ay, Decem ber 28, 2005 6:43 PM
FILE LOCATION:
m
o
c
.
l
l
e
d
.
t
r
o
p
p
u
s
|
m
o
c
.
l
l
e
d
.
w
w
w
D:\manual \Del l\W 4201OM \appr oval-B \ch1e.f m
DELL CONFIDENTI AL – PRELIM INARY 12/28/05 – FOR PROOF ON LY
12
About Your TV
DZ101_UM-ALL.book Page 13 Wednesday, December 28, 2005 6:43 PM
Setting Up Your TV
CAUTION:
in the Product Information Guide.
Proper Location for Your TV
Consider the following environmental factors when you are deciding where to put your TV:
• Ensure you allow adequate ventilation.
• Do not store or use the TV in locations that are exposed to high heat, direct sunlight, or
extreme cold.
Before you being any of the setup procedures in this section, follow the safety instructions
2
• Avoid moving the TV between locations with high humidity and dusty environments. For
more information, see "Specifications for Your TV" on page 43.
• Do not subject the TV to severe vibration or high impact conditions. Do not place the TV
inside a car trunk.
• Do not place the TV in a location where water or other liquids could spill on or into the TV.
FILE LOCATION:
DELL CONFIDEN TIAL – PRELIM INARY 12/28/05 – FOR PROOF ON LY
D:\ manual \ Del l \W 4 201O M \appr oval -B \ch2e. f m
Set t ing Up Your T V
1
3
DZ101_UM-ALL.book Page 14 Wednesday, December 28, 2005 6:43 PM
FILE LOCATION:
m
o
c
.
l
l
e
d
.
t
r
o
p
p
u
s
|
m
o
c
.
l
l
e
d
.
w
w
w
Connecting Your TV
The tables below provide a description of the connectors on your TV to help you decide which
connectors to use for your various video devices.
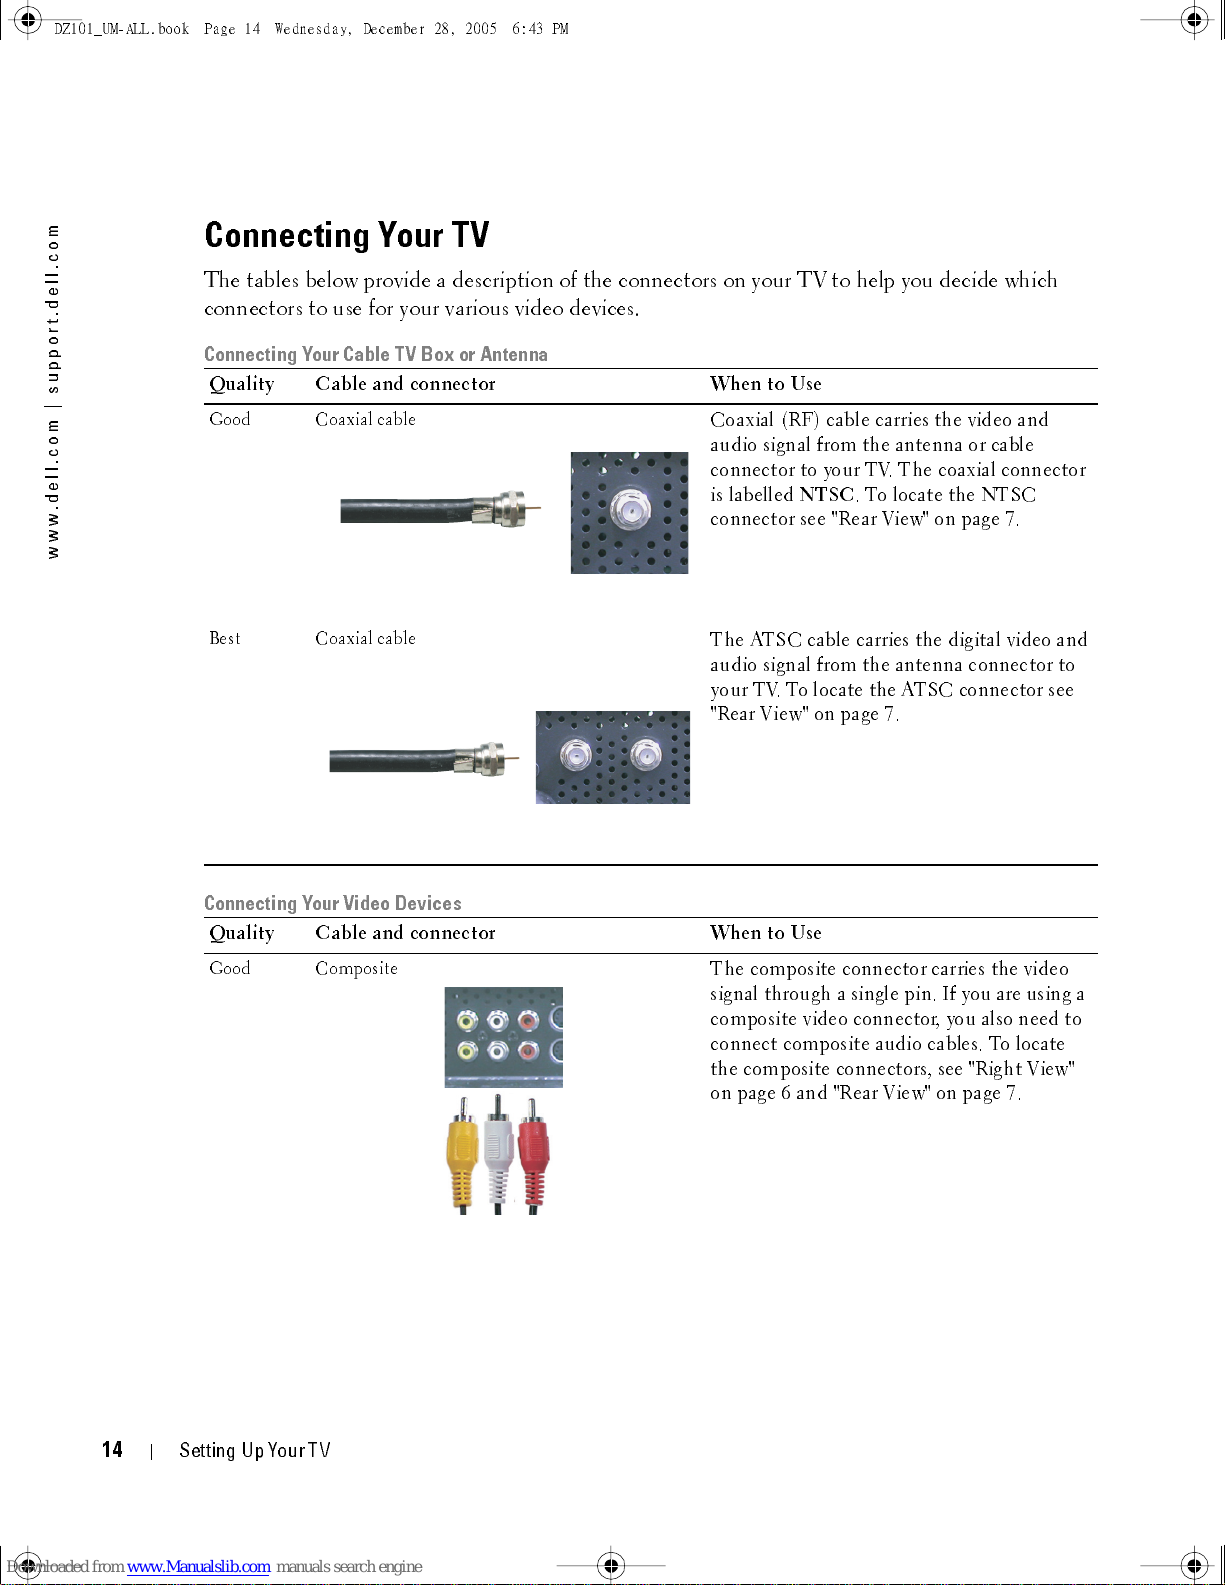
Connecting Your Cable TV Box or Antenna
Qualit y Cable and connec to r When to Use
Good Coaxial cable
Best Coaxial cable
D:\manual \Del l\W 4201OM \appr oval-B \ch2e.f m
Coaxial (RF) cable carries the video and
audio signal from the antenna or cable
connec tor to your TV. The coaxial conn ec tor
is labelled
NTSC
connector see "Rear View" on page 7.
The ATSC cable carries the digital video and
. To locate the NTSC
audio signal from the antenna connector to
your TV. To locate the ATSC connector see
"Rear View" on page 7.
Connecting Your Video Devices
Qualit y Cable and connec to r When to Use
Good Composite
The composite con n ect or car rie s the video
signal throu gh a single pin . If you are using a
composite video connector, you also need to
connec t com posite audi o cables. To locate
the composite con n ect ors, see "Righ t View"
on page 6 and "Rear View" on page 7.
DELL CONFIDENTI AL – PRELIM INARY 12/28/05 – FOR PROOF ON LY
1
4
Setting Up Your TV
DZ101_ UM -A LL .bo ok Page 15 Wedne sd ay, Decem ber 28, 2005 6:43 PM
FILE LOCATION:
D:\manual \Del l\W 4201O M\appr oval-B \ch2e.f m
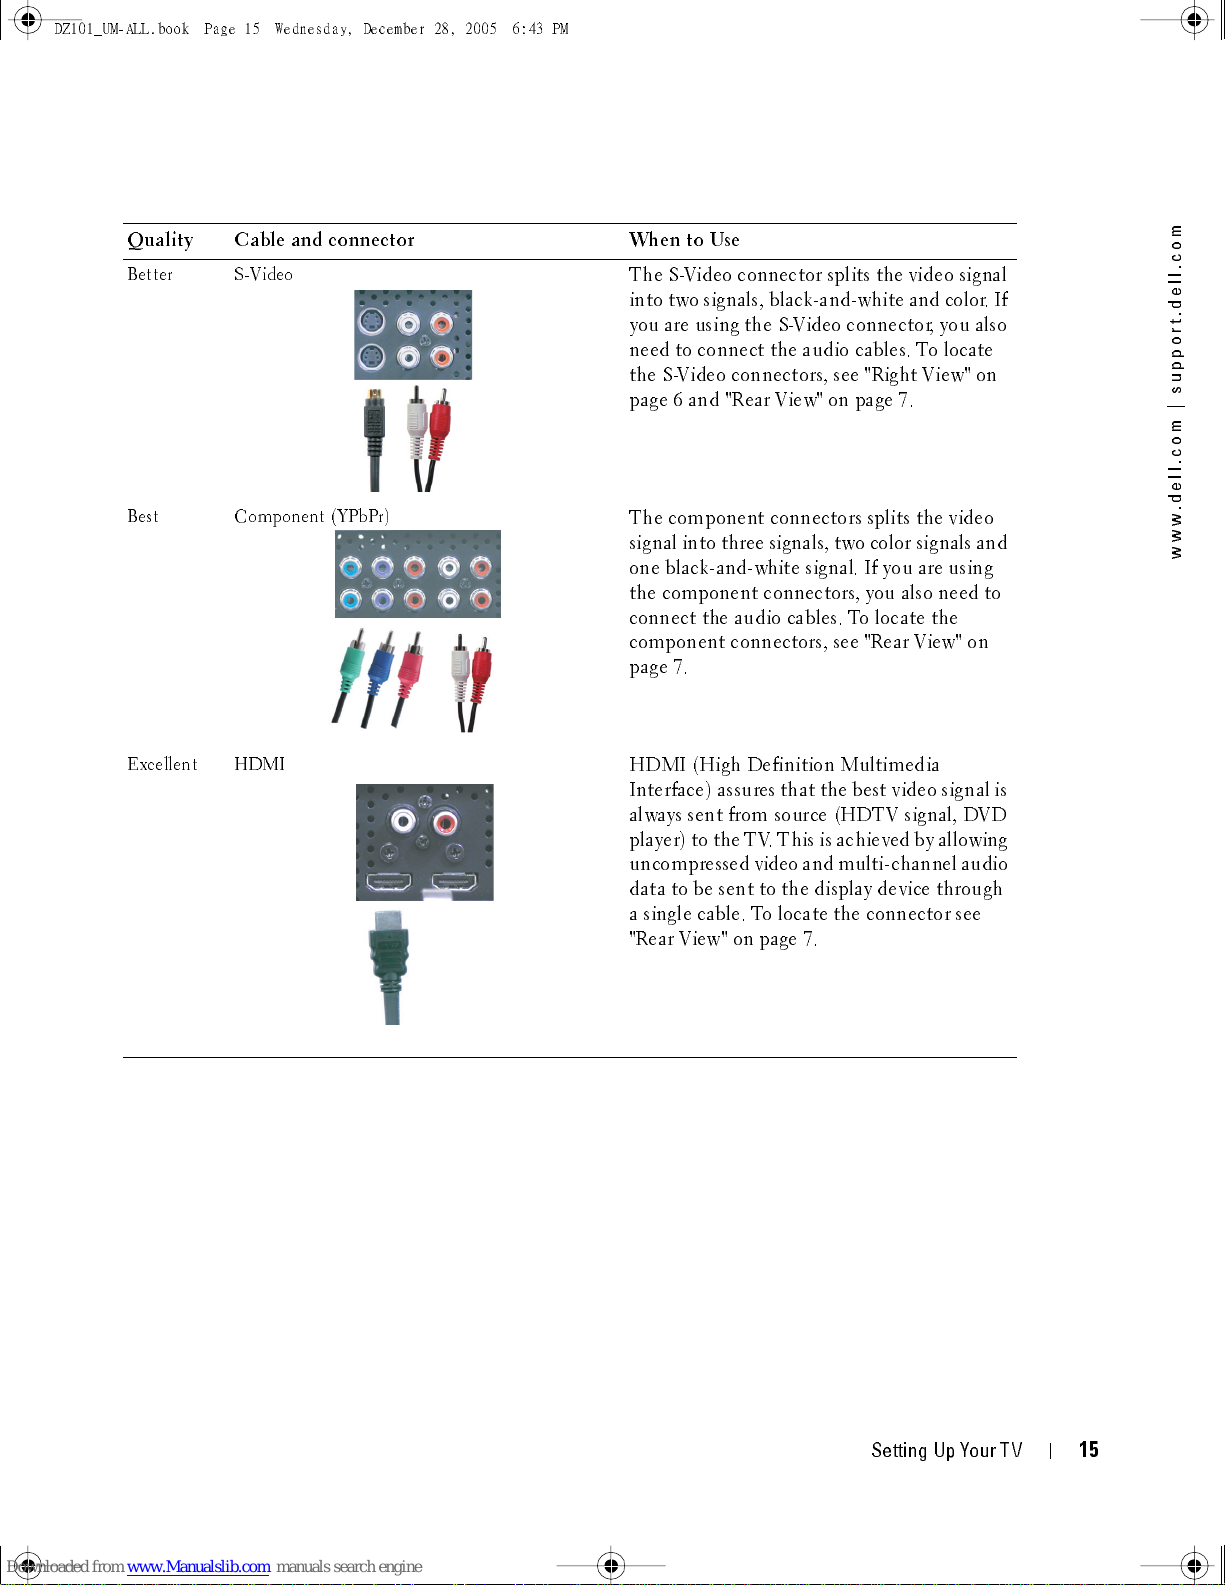
Qualit y Cable and connec to r When to Use
Better S-Video
The S-Video connector splits the video signal
into two signals, black-and-white and color. If
you are using the S-Video connector, you also
need to conne ct th e audio cables. To locate
the S-Video connect ors, see "Righ t View" on
page 6 and "R ear View" on page 7.
Best Component (YPbPr)
The compone nt conn ec tor s splits the video
signal into three signals, two color signals and
one black-and-white signal. If you are using
the component connectors, you also need to
connec t the audio cables. To locate the
component connectors, see "Rear View" on
page 7.
m
o
c
.
l
l
e
d
.
t
r
o
p
p
u
s
|
m
o
c
.
l
l
e
d
.
w
w
w
Excellent HDMI
HDMI (High Definition Multimedia
Interface) assures that the best video signal is
always sent from source (HDTV signal, DVD
player) to the TV. This is achieved by allowing
uncompressed video and multi-channel audio
data to be sent to the display device through
a single cable. To locate the connector see
"Rear View" on page 7.
DELL CONFIDENTI AL – PRELIM INARY 12/28/05 – FOR PROOF ON LY
Set t ing Up Your T V
1
5
DZ101_ UM -A LL .bo ok Page 16 Wedne sd ay, Decem ber 28, 2005 6:43 PM
FILE LOCATION:
m
o
c
.
l
l
e
d
.
t
r
o
p
p
u
s
|
m
o
c
.
l
l
e
d
.
w
w
w
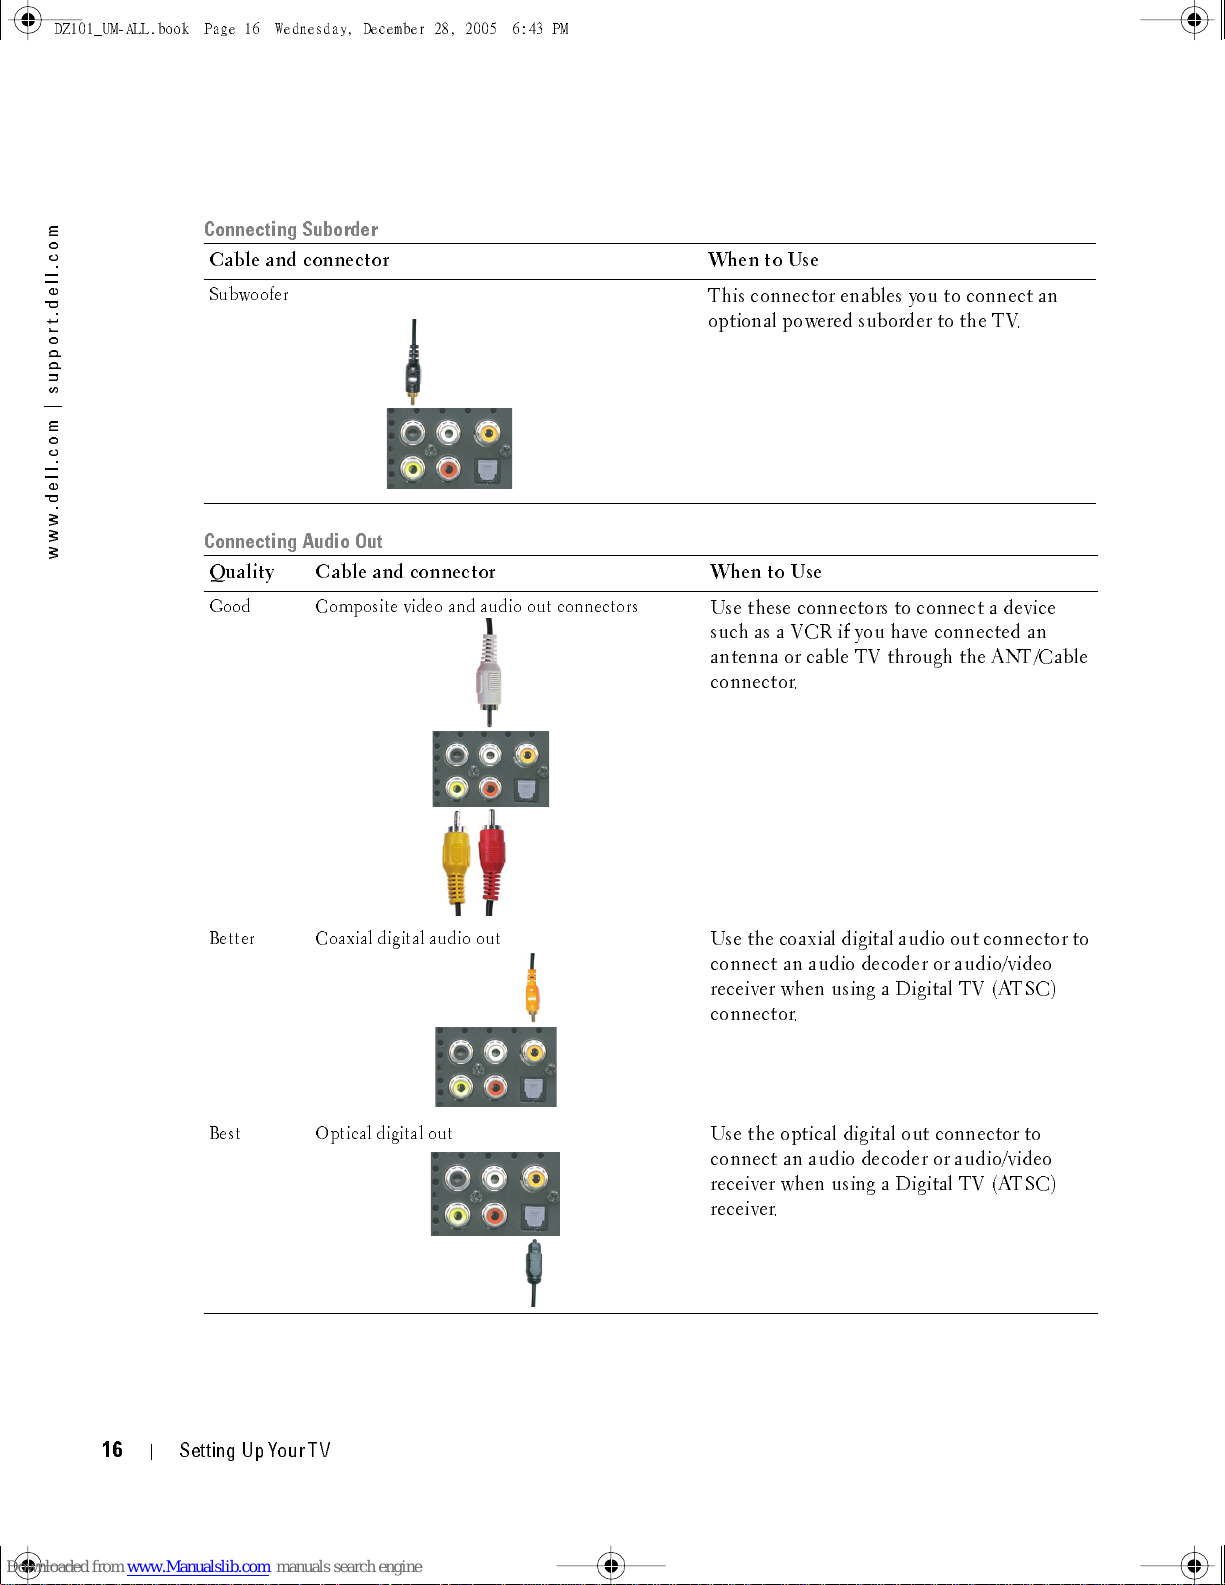
Connecting Suborder
Cable and co nne cto r When to Use
Subwoofer
Connecting Audio Out
D:\manual \Del l\W 4201OM \appr oval-B \ch2e.f m
This connector enables you to connect an
optional powered suborder to the TV.
Qualit y Cable and connec to r When to Use
Good Composite video and audio out connectors
Use these connec tors to conn ec t a device
such as a VCR if you have connected an
antenna or cable TV through the ANT/Cable
connector.
Better Coaxial digital audio out
Use the coaxial digital audio out connector to
connec t an aud io decode r or audi o/video
receiver when usin g a Digit al TV (ATSC)
connector.
Best Optical digital out
Use the optical digital out connector to
connec t an aud io decode r or audi o/video
receiver when usin g a Digit al TV (ATSC)
receiver.
DELL CONFIDENTI AL – PRELIM INARY 12/28/05 – FOR PROOF ON LY
1
6
Setting Up Your TV
DZ101_UM-ALL.book Page 17 Wednesday, December 28, 2005 6:43 PM
FILE LOCATION:
D:\manual \Del l\W 4201O M\appr oval-B \ch2e.f m
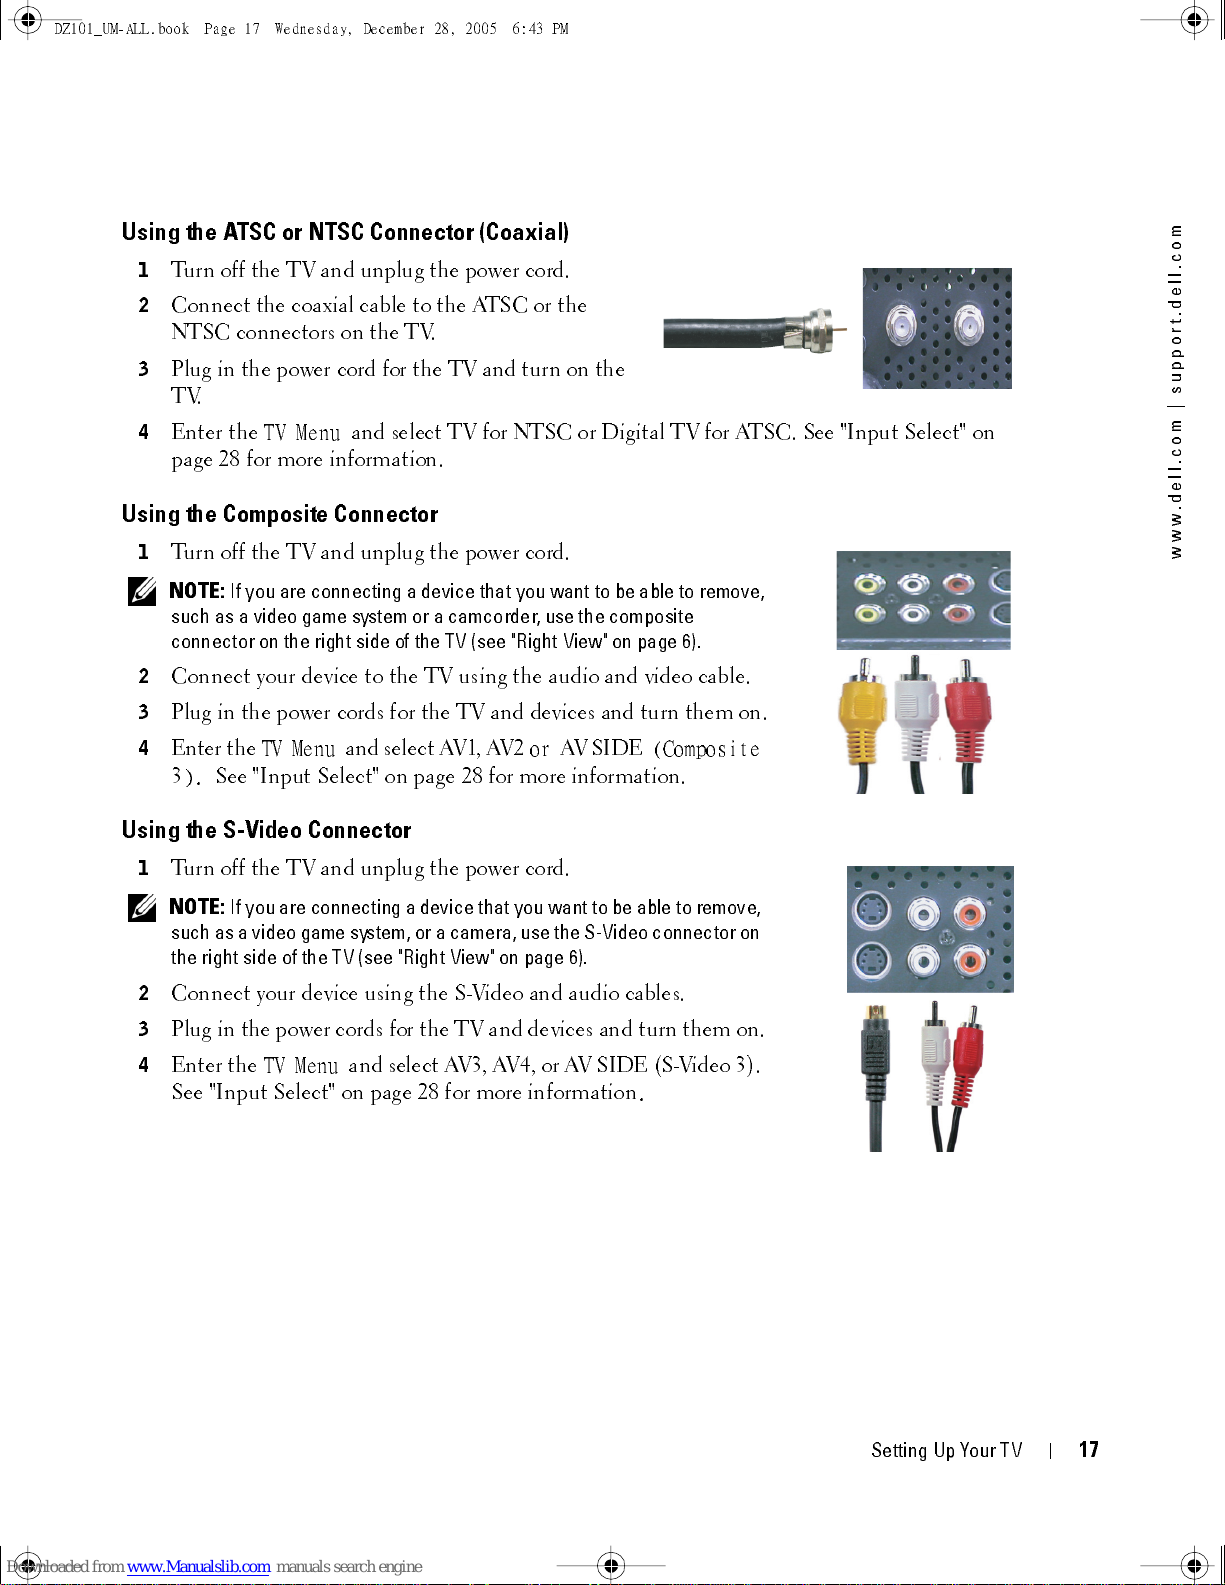
Using the ATSC or NTSC Connector (Coaxial)
1
Turn off the TV and unplug the power cord.
2
Connect the coaxial cable to the ATSC or the
NTSC connectors on the TV.
3
Plug in the power cord for the TV and turn on the
TV.
4
Enter the
TV Menu
and select TV for NTSC or Digital TV for ATSC. See "In p ut Se lect" on
page 28 for more information.
Using the Composite Connector
1
Turn off the TV and unplug the power cord.
NOTE:
2
3
If you are connecting a device that you want to be able to remove,
such as a video game system or a camcorder, use the composite
connector on the right side of the TV (see "Right View" on page 6).
Connect your device to the TV using the audio and video cable.
Plug in the power cords for the TV and devices and turn them on.
m
o
c
.
l
l
e
d
.
t
r
o
p
p
u
s
|
m
o
c
.
l
l
e
d
.
w
w
w
4
Enter th e
3
).
TV Menu
and select AV1, AV2
or
AV SIDE
(Co mposite
See "Input Select" on page 28 for more information.
Using the S-Video Connector
1
Turn off the TV and unplug the power cord.
NOTE:
2
3
4
If you are connecting a device that you want to be able to remove,
such as a video game system, or a camera, use the S-Video connector on
the right side of the TV (see "Right View" on page 6).
Connect your device using the S-Video and audio cables.
Plug in the power cor ds for the T V and device s and tur n them on .
Enter the
See "Input Select" on page 28 for more information
TV Menu
and select AV3, AV4, or AV SIDE (S-Video 3).
.
DELL CONFIDENTI AL – PRELIM INARY 12/28/05 – FOR PROOF ON LY
Set t ing Up Your T V
1
7

DZ101_ UM -A LL .bo ok Page 18 Wedne sd ay, Decem ber 28, 2005 6:43 PM
FILE LOCATION:
m
o
c
.
l
l
e
d
.
t
r
o
p
p
u
s
|
m
o
c
.
l
l
e
d
.
w
w
w
Using the Component Connector
1
Turn off the TV and unplug the power cord.
2
Connect your device using the component video and audio cables.
3
Plug in the power cords for the TV and devices and turn them on.
4
Enter the TV Menu and select AV5 or AV6. See "Input Select" on
page 28 for more information.
Using the HDMI Connector
1
Turn off the TV and unplug the power cord.
2
Connect your device using the HDMI connector.
3
Plug in the power cords for the TV and devices and turn them on.
4
Enter the TV Menu and select HDMI1 or HDMI 2. See "Input
D:\manual \Del l\W 4201OM \appr oval-B \ch2e.f m
Select" on page 28 for more information.
Using the VGA Connector
1
Turn off the TV and unplug the power cord.
NOTE:
2
3
4
Suggest to use a VGA cable which has a ferrite core.
Conn ect the VGA and au dio ca bl es to yo ur TV a nd to yo u r com p ute r.
Plug in the power cords for the TV and devices and turn them on.
Enter the TV Menu and select VGA. See "Input Select" on page 28
for more information.
Using the Subwoofer Connector
1
Turn off the TV and unplug the power cord.
2
Connect a subwoofer cable to your TV and to a powered subwoofer.
3
Plug in the power cords for the TV and subwoofer and turn them on.
DELL CONFIDENTI AL – PRELIM INARY 12/28/05 – FOR PROOF ON LY
1
8
Setting Up Your TV
DZ101_UM-ALL.book Page 19 Wednesday, December 28, 2005 6:43 PM
FILE LOCATION:
D:\manual \Del l\W 4201O M\appr oval-B \ch2e.f m
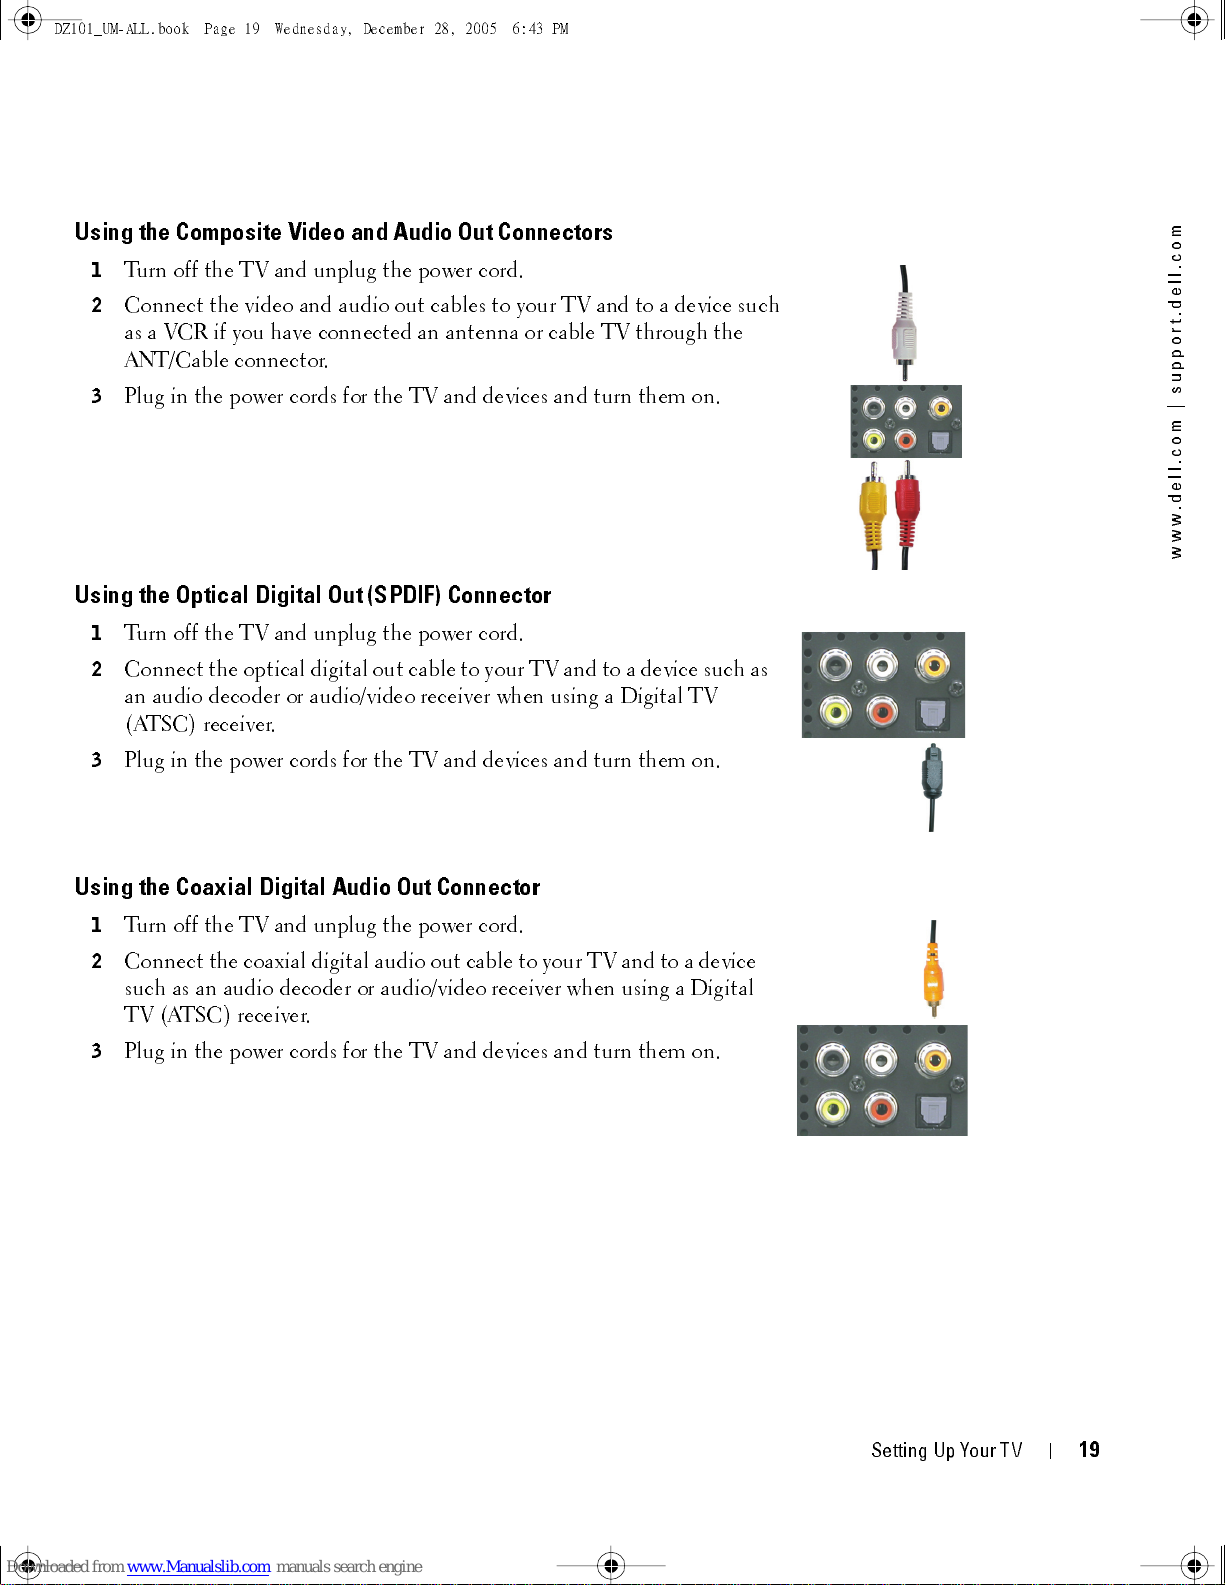
Using the Composite Video and Audio Out Connectors
1
Tu rn off the TV and unplug the power cord.
2
Connect the video and audio out cables to your TV and to a device such
as a VCR if you have connected an antenna or cable TV through the
ANT/Cable connector.
3
Plug in the power cords for the TV and devices and turn them on.
Using the Optical Digital Out (SPDIF) Connector
1
Tu rn off the TV and unplug the power cord.
2
Conne ct the optica l digita l o ut ca ble to yo u r T V an d to a device suc h a s
an audio decoder or audio/video receiver when using a Digital TV
(ATSC) receiver.
m
o
c
.
l
l
e
d
.
t
r
o
p
p
u
s
|
m
o
c
.
l
l
e
d
.
w
w
w
3
Plug in the power cords for the TV and devices and turn them on.
Using the Coaxial Digital Audio Out Connector
1
Tu rn off the TV and unplug the power cord.
2
Conne ct the co ax ia l digital au dio out ca bl e to yo ur TV a nd to a device
such as an audio decoder or audio/video receiver when using a Digital
TV (ATSC) receiver.
3
Plug in the power cords for the TV and devices and turn them on.
DELL CONFIDENTI AL – PRELIM INARY 12/28/05 – FOR PROOF ON LY
Set t ing Up Your T V
1
9
DZ101_ UM -A LL .bo ok Page 20 Wedne sd ay, Decem ber 28, 2005 6:43 PM
FILE LOCATION:
m
o
c
.
l
l
e
d
.
t
r
o
p
p
u
s
|
m
o
c
.
l
l
e
d
.
w
w
w
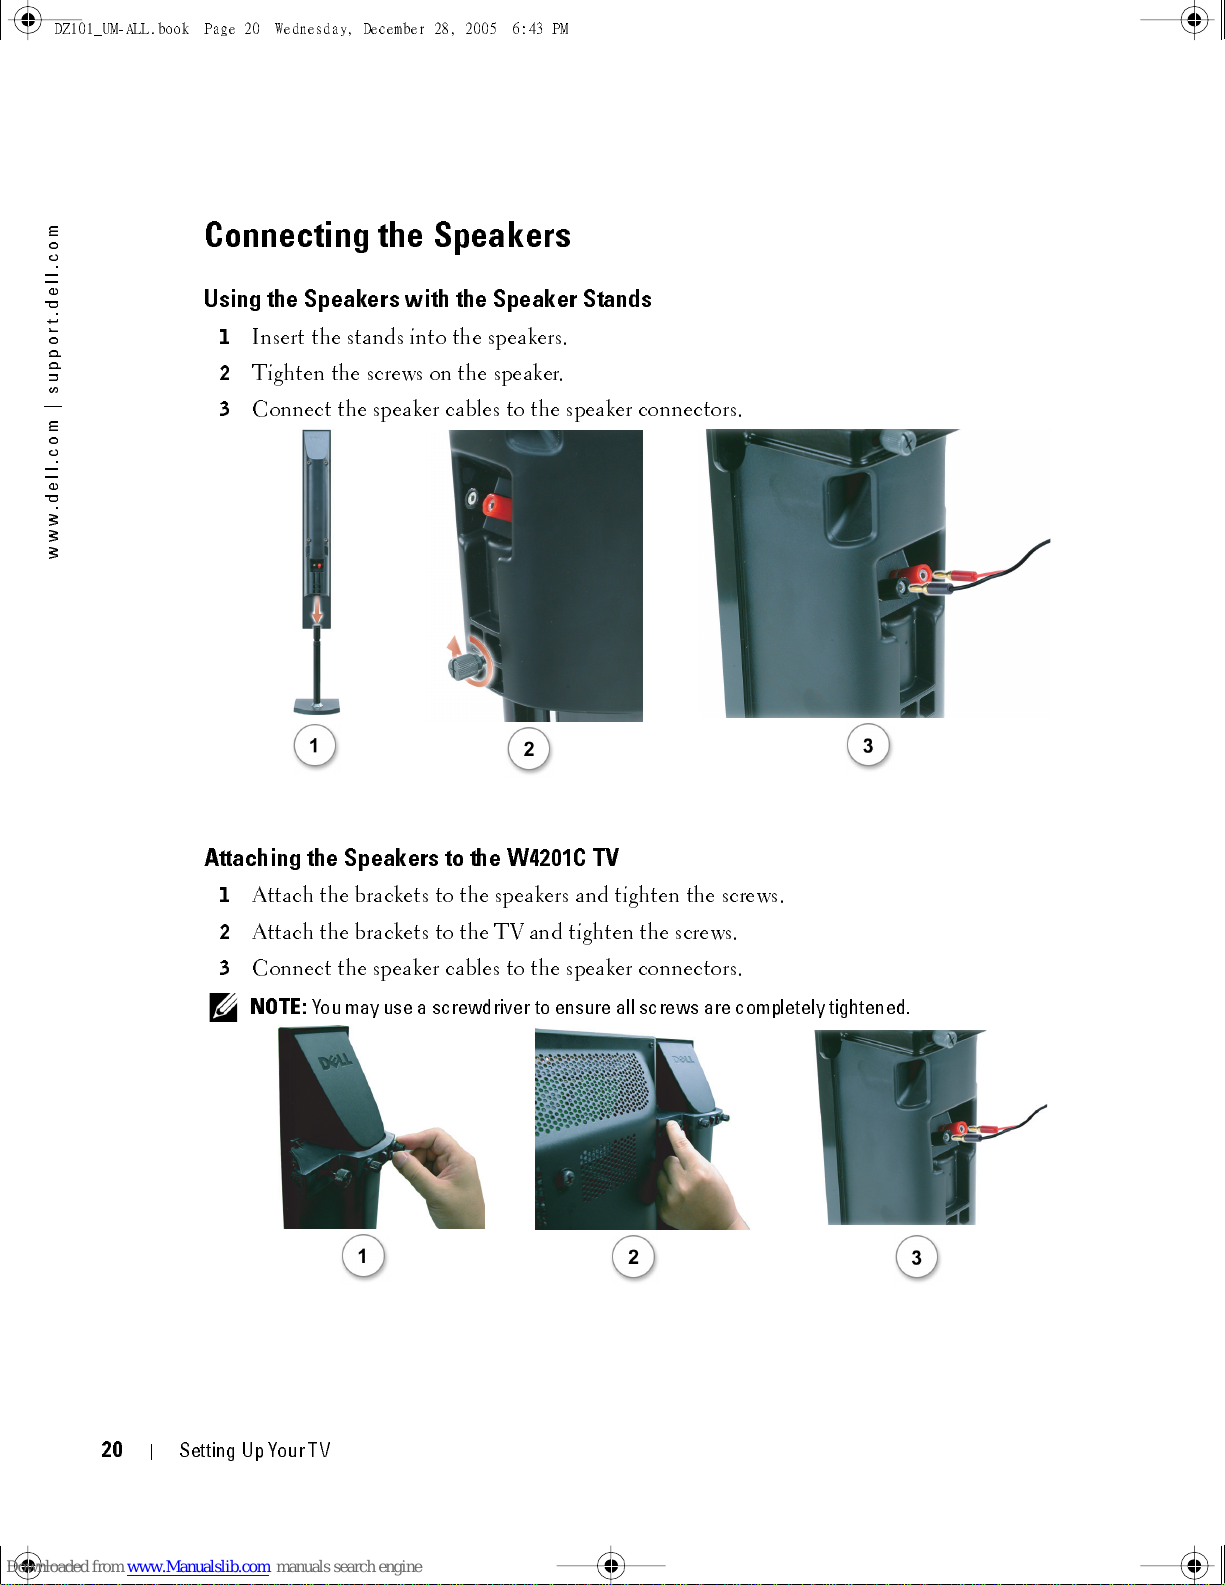
Connecting the Speakers
Using the Speakers with the Speaker Stands
1
Insert the stands into the speakers.
2
Tighten the screws on the speaker.
3
Connect the speaker cables to the speaker connectors.
D:\manual \Del l\W 4201OM \appr oval-B \ch2e.f m
Attaching the Speakers to the W4201C TV
1
Attach the brackets to the speakers and tighten the screws.
2
Attach the brackets to the TV and tighten the screws.
3
Connect the speaker cables to the speaker connectors.
NOTE:
You may use a screwdriver to ensure all screws are completely tightened.
DELL CONFIDENTI AL – PRELIM INARY 12/28/05 – FOR PROOF ON LY
20
Setting Up Your TV
DZ101_ UM -A LL .bo ok Page 21 Wedne sd ay, Decem ber 28, 2005 6:43 PM
FILE LOCATION:
D:\manual \Del l\W 4201O M\appr oval-B \ch2e.f m
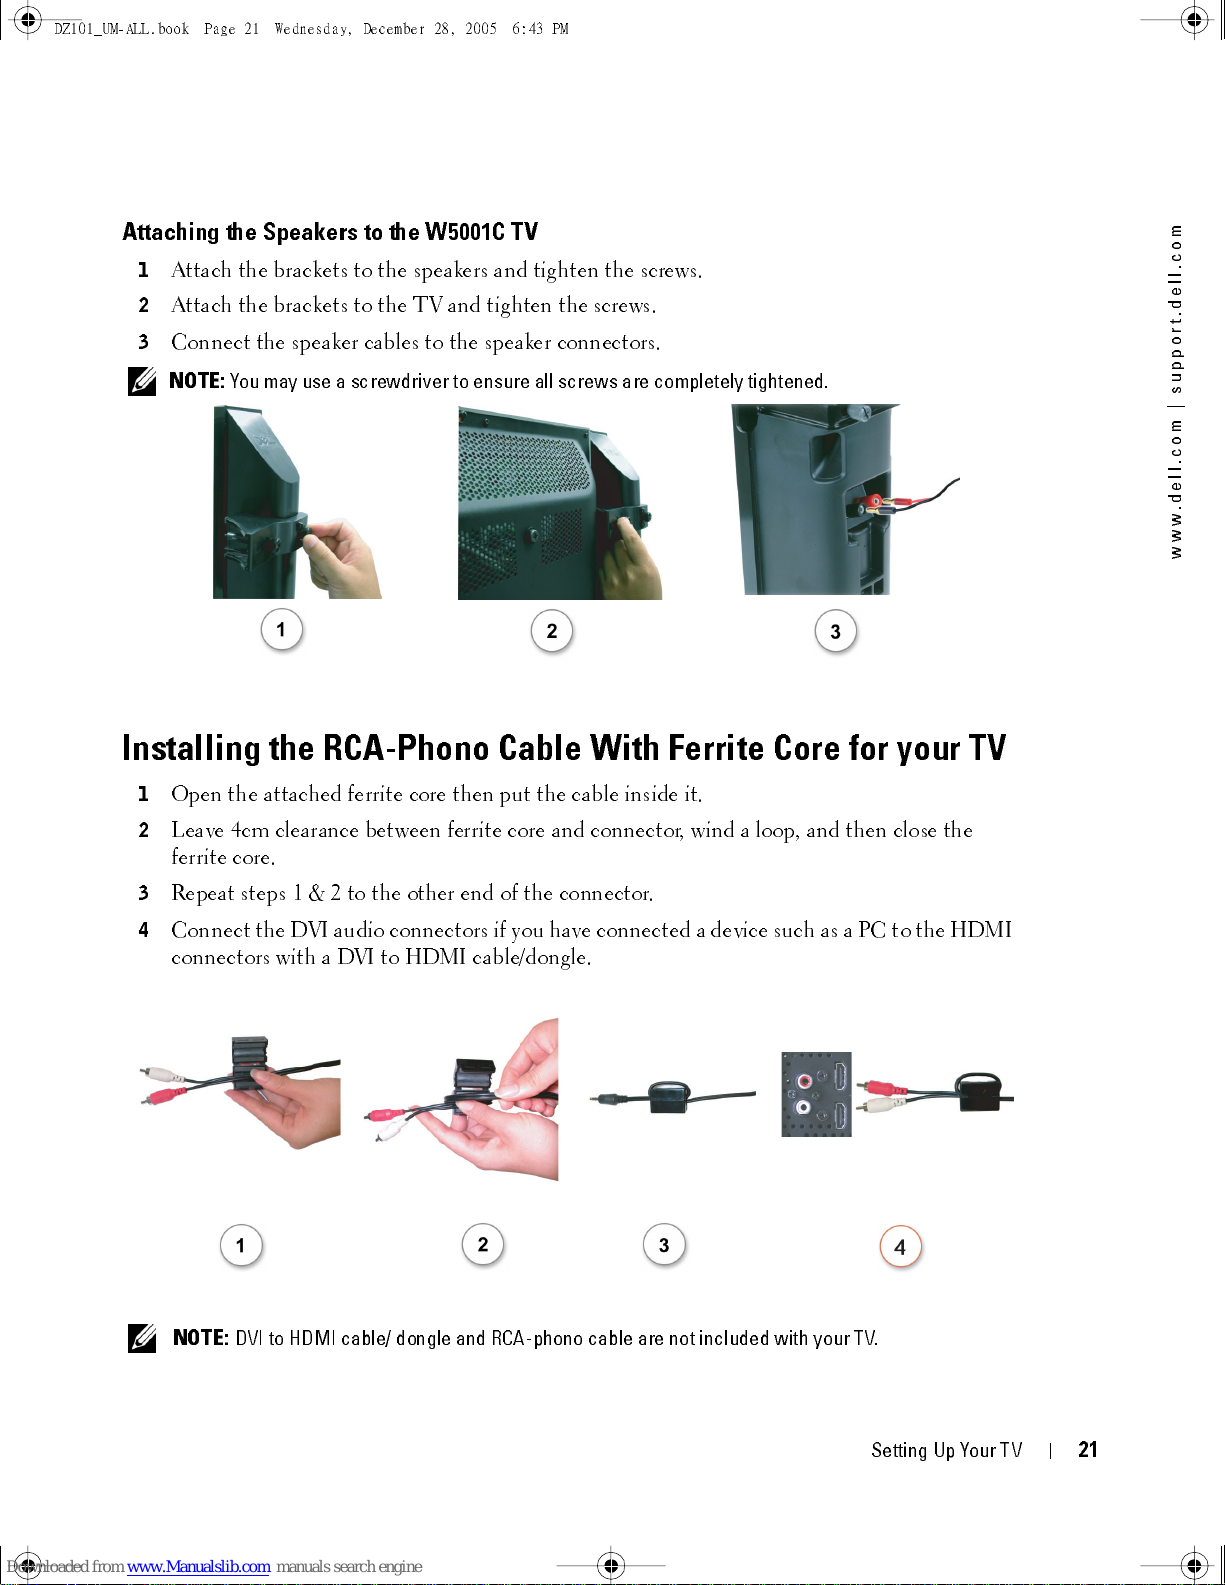
Attaching the Speakers to the W5001C TV
1
Attach the brackets to the speakers and tighten the screws.
2
Attach the brackets to the TV and tighten the screws.
3
Connect the speaker cables to the speaker connectors.
NOTE:
You may use a screwdriver to ensure all screws are completely tightened.
m
o
c
.
l
l
e
d
.
t
r
o
p
p
u
s
|
m
o
c
.
l
l
e
d
.
w
w
w
Installing the RCA-Phono Cable With Ferrite Core for your TV
1
Open the attached ferrite core then put the cable inside it.
2
Leave 4cm clearance between ferrite core and connector, wind a loop, and then close the
ferrite core.
3
Repeat steps 1 & 2 to the other end of the connector.
4
Conn ect the D VI a udio con n ecto rs if yo u h ave con ne cted a device such a s a PC to the HD MI
connectors with a DVI to HDMI cable/dongle.
NOTE:
DVI to HDMI cable/ dongle and RCA-phono cable are not included with your TV.
DELL CONFIDENTI AL – PRELIM INARY 12/28/05 – FOR PROOF ON LY
Set t ing Up Your T V
21
 Loading...