

Dell P2815Qf User Manual

Model No.: P2815Q
Regulatory model: P2815Qf
User‘s Guide
Dell P2815Q

NOTE: A NOTE indicates important information that helps you make
better use of your monitor.
CAUTION: A CAUTION indicates potential damage to hardware or
loss of data if instructions are not followed.
WARNING: A WARNING indicates a potential for property damage,
personal injury, or death.
© 2014 Dell Inc. All rights reserved.
Information in this document is subject to change without notice.
Reproduction of these materials in any manner whatsoever without the
written permission of Dell Inc. is strictly forbidden.
Trademarks used in this text: Dell and the DELL logo are trademarks
of Dell Inc. Microsoft and Windows are either registered trademarks
or trademarks of Microsoft Corporation in the United States and/ or
other countries. ENERGY STAR is a registered trademark of the U.S.
Environmental Protection Agency. As an ENERGY STAR partner, Dell Inc.
has determined that this product meets the ENERGY STAR guidelines for
energy efficiency.
Other trademarks and trade names may be used in this document to refer
to either the entities claiming the marks and names or their products.
Dell Inc. disclaims any proprietary interest in trademarks and trade names
other than its own.
2014 – 01 Rev. A00

3
Contents
Dell Display Manager User's Guide ................6
Overview . . . . . . . . . . . . . . . . . . . . . . . . . . . . . . 6
Using the Quick Settings Dialog . . . . . . . . . . . . . . . . 6
Setting Basic Display Functions . . . . . . . . . . . . . . . . 7
Assigning Preset Modes to Applications . . . . . . . . . . . 7
Applying Energy-Conservation Features . . . . . . . . . . . 9
About Your Monitor ............................10
Package Contents . . . . . . . . . . . . . . . . . . . . . . . 10
Product Features . . . . . . . . . . . . . . . . . . . . . . . . .11
Identifying Parts and Controls . . . . . . . . . . . . . . . . 12
Monitor Specifications . . . . . . . . . . . . . . . . . . . . . 16
Power Management Modes . . . . . . . . . . . . . . . . . . . . . . . 16
Pin Assignments . . . . . . . . . . . . . . . . . . . . . . . . . . . . . . 17
Plug and Play Capability . . . . . . . . . . . . . . . . . . . . 21
Flat-Panel Specifications . . . . . . . . . . . . . . . . . . . . . . . . . 22
Resolution Specifications . . . . . . . . . . . . . . . . . . . . . . . . 23
Electrical Specifications . . . . . . . . . . . . . . . . . . . . . . . . . 23
Preset Display Modes . . . . . . . . . . . . . . . . . . . . . . . . . . . 23
MHL Source Display Modes . . . . . . . . . . . . . . . . . . . . . . . 24
Physical Characteristics . . . . . . . . . . . . . . . . . . . . . . . . . 25
Environmental Characteristics . . . . . . . . . . . . . . . . . . . . . 26
LCD Monitor Quality & Pixel Policy . . . . . . . . . . . . . 26
Maintenance Guidelines . . . . . . . . . . . . . . . . . . . . 27
Caring for Your Monitor . . . . . . . . . . . . . . . . . . . . . . . . . 27

4
Setting Up the Monitor..........................28
Attaching the Monitor . . . . . . . . . . . . . . . . . . . . . 28
Connecting Your Monitor . . . . . . . . . . . . . . . . . . . 29
Connecting the black DisplayPort (DP to DP) cable. . . . . . . . . 29
Connecting the black DisplayPort (Mini DP to DP) cable . . . . . 29
Connecting the black HDMI cable . . . . . . . . . . . . . . . . . . . 30
Connecting the Monitor for DP Multi-Stream Transport (MST)
function . . . . . . . . . . . . . . . . . . . . . . . . . . . . . . . . . . . 30
Connecting the USB 3.0 cable. . . . . . . . . . . . . . . . . . . . . . 31
Using the Mobile-High Definition Link (MHL) . . . . . . . 32
Organizing Your Cables . . . . . . . . . . . . . . . . . . . . 33
Attaching the Cable Cover . . . . . . . . . . . . . . . . . . 33
Removing the Monitor Stand . . . . . . . . . . . . . . . . . 34
Wall Mounting (Optional) . . . . . . . . . . . . . . . . . . . 35
Operating the Monitor ..........................36
Power On the Monitor . . . . . . . . . . . . . . . . . . . . . 36
Using the Front-Panel Controls . . . . . . . . . . . . . . . 36
Front-Panel Keys. . . . . . . . . . . . . . . . . . . . . . . . . . . . . . 37
Using the On-Screen Display (OSD) Menu . . . . . . . . . 38
Accessing the Menu System . . . . . . . . . . . . . . . . . . . . . . . 38
OSD Messages . . . . . . . . . . . . . . . . . . . . . . . . . . 49
Setting the Maximum Resolution . . . . . . . . . . . . . . 52
Using the Tilt, Swivel, and Vertical Extension . . . . . . . 53
Rotating the Monitor. . . . . . . . . . . . . . . . . . . . . . 55
Adjusting the Rotation Display Settings of Your System. 56

5
Troubleshooting ...............................57
Self-Test . . . . . . . . . . . . . . . . . . . . . . . . . . . . . 57
Built-in Diagnostics. . . . . . . . . . . . . . . . . . . . . . . 58
Common Problems . . . . . . . . . . . . . . . . . . . . . . . 59
Product-Specific Problems . . . . . . . . . . . . . . . . . . 62
Universal Serial Bus (USB) Specific Problems . . . . . . . 63
Mobile High-Definition Link (MHL) Specific Problems. . 63
Appendix ......................................64
FCC Notices (U.S. Only) and Other Regulatory Information
64
Contact Dell . . . . . . . . . . . . . . . . . . . . . . . . . . . 64
Setting Up Your Monitor ........................65
Setting the display resolution to 3840 x 2160 (Maximum) 65
If you have a Dell desktop or a Dell portable computer with
Internet access . . . . . . . . . . . . . . . . . . . . . . . . . 66
If you have a non Dell desktop, portable computer, or
graphics card . . . . . . . . . . . . . . . . . . . . . . . . . . 65
Procedures for setting up dual monitors in Windows
Vista® , Windows® 7 or Windows® 8 or Windows® 8.1 67
For Windows Vista®. . . . . . . . . . . . . . . . . . . . . . . . . . . . 67
For Windows® 7 . . . . . . . . . . . . . . . . . . . . . . . . . . . . . . 69
For Windows® 8 or Windows® 8.1. . . . . . . . . . . . . . . . . . . 71
Setting Display Styles For Multiple Monitor . . . . . . . . . . . . . 73

6 Dell Display Manager User's Guide
Dell Display Manager User's Guide
Overview
Dell Display Manager is a Windows application used to manage a monitor
or a group of monitors. It allows manual adjustment of the displayed
image, assignment of automatic settings, energy management, image
rotation and other features on select Dell models. Once installed, Dell
Display Manager will run each time the system starts and will place its
icon in the notification tray. Information about monitors connected to the
system is always available when hovering over the notification tray icon.
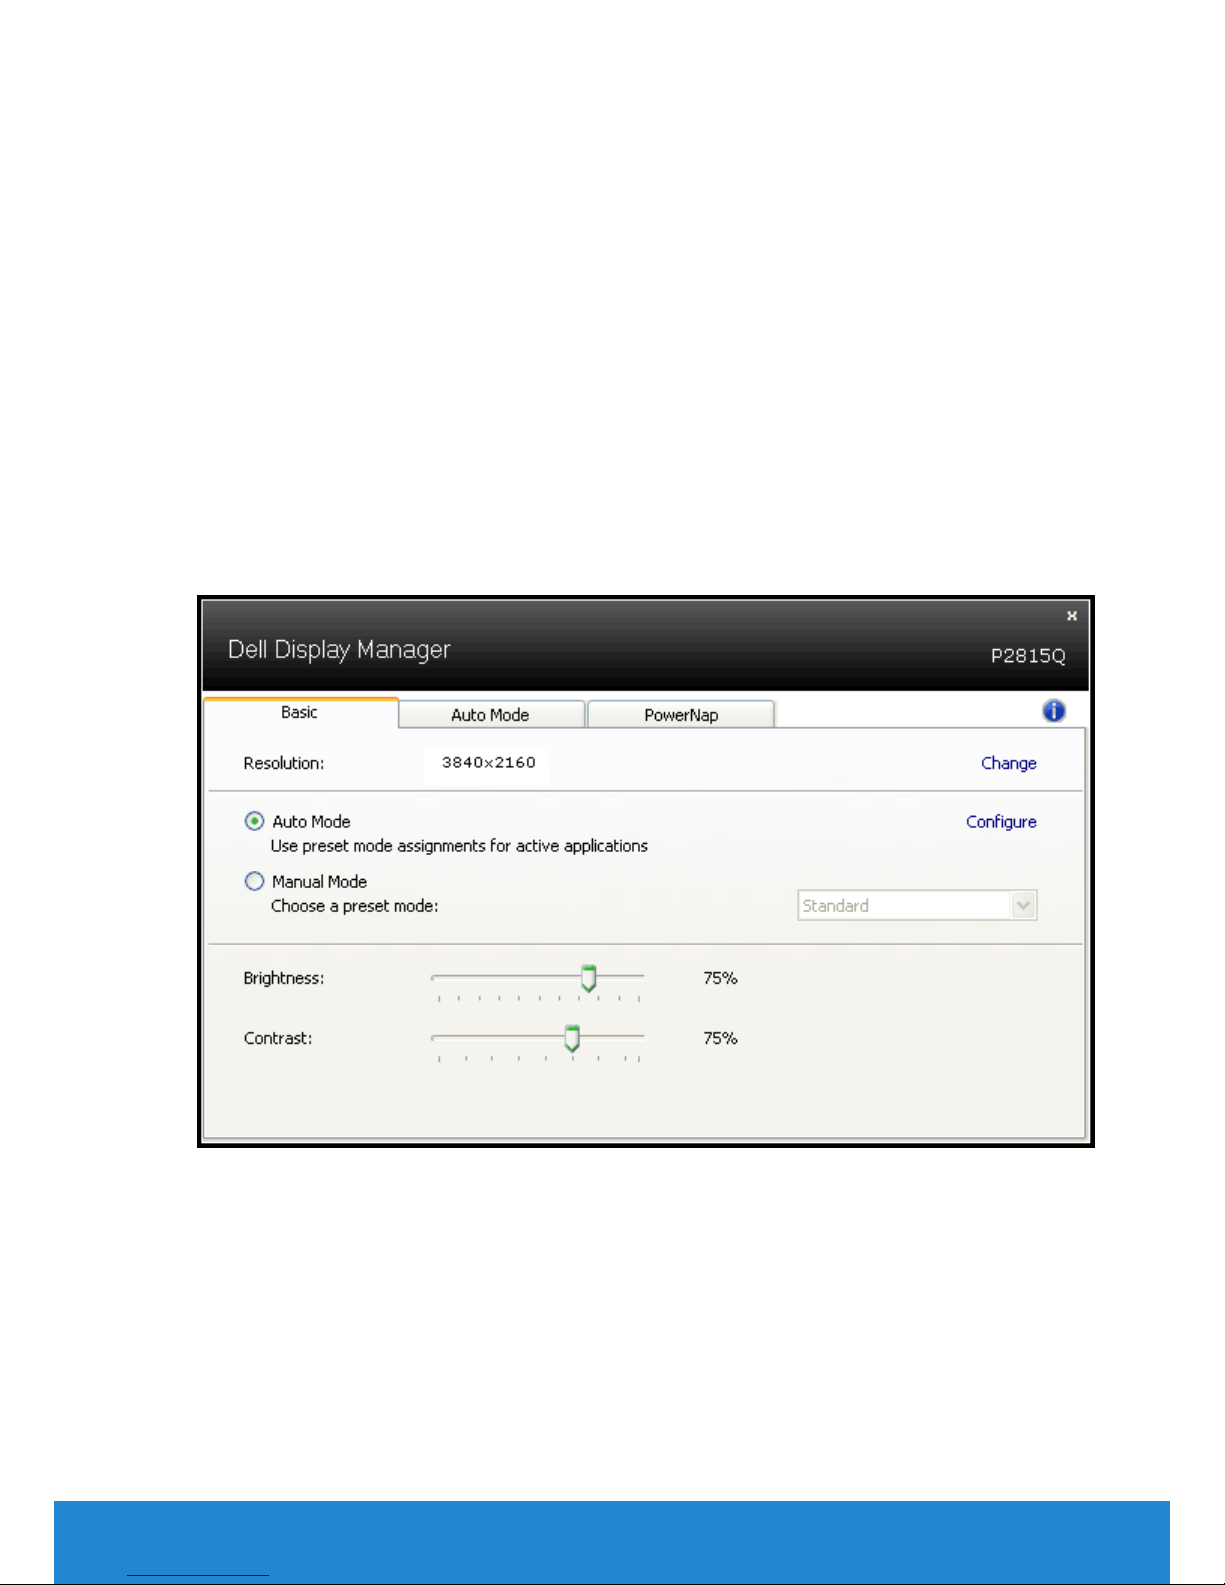
Using the Quick Settings Dialog
Clicking Dell Display Manager’s notification tray icon opens the Quick
Settings dialog box. When more than one supported Dell model is
connected to the system, a specific target monitor can be selected using
the menu provided. The Quick Settings dialog box allows convenient
adjustment of the monitor’s Brightness and Contrast levels, Preset Modes
can be manually selected or set to Auto Mode, and the screen resolution
can be changed.
Dell Display Manager User's Guide 7
The Quick Settings dialog box also provides access to Dell Display
Manager’s advanced user interface which is used to adjust Basic
functions, configure Auto Mode and access other features.
Setting Basic Display Functions
A Preset Mode for the selected monitor can be manually applied using
the menu on the Basic tab. Alternatively, Auto Mode can be enabled. Auto
Mode causes your preferred Preset Mode to be applied automatically
when specific applications are active. An onscreen message momentarily
displays the current Preset Mode whenever it changes.
The selected monitor’s Brightness and Contrast can also be directly
adjusted from the Basic tab.
8 Dell Display Manager User's Guide
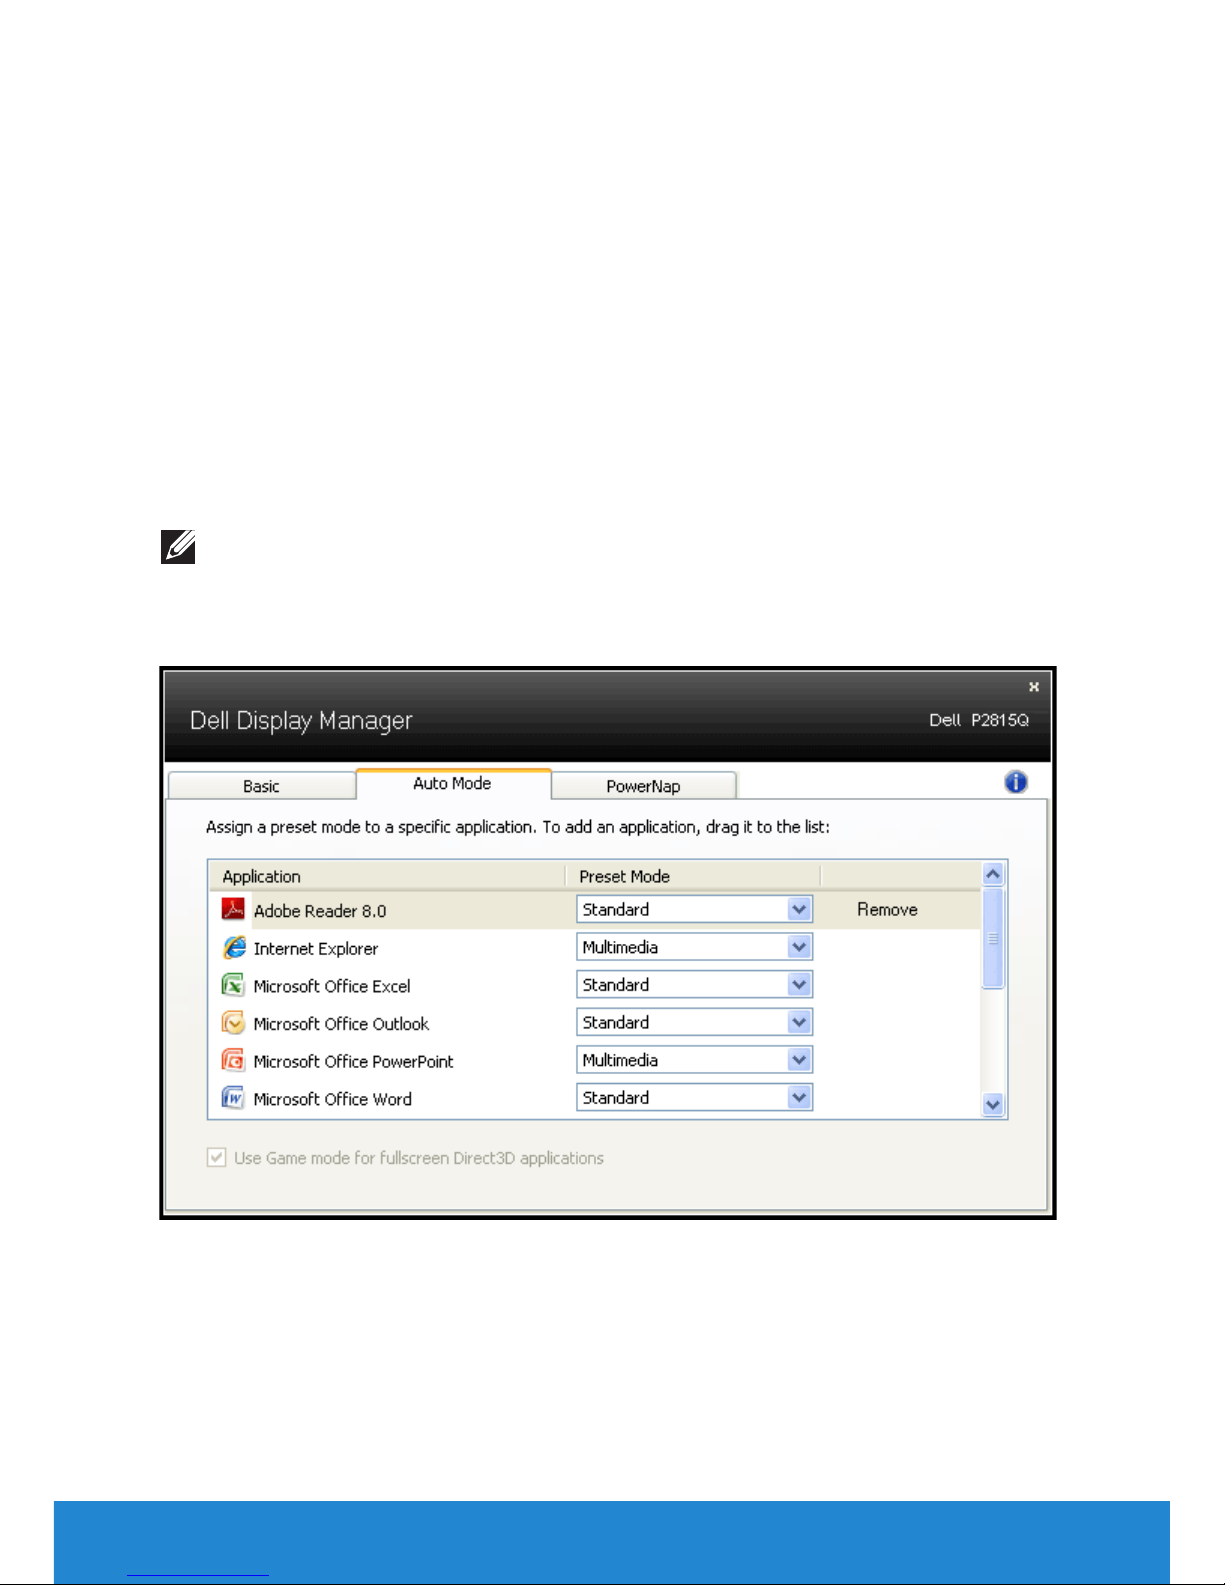
Assigning Preset Modes to Applications
The Auto Mode tab allows you to associate a specific Preset Mode
with a specific application, and apply it automatically. When Auto
Mode is enabled, Dell Display Manager will automatically switch to the
corresponding Preset Mode whenever the associated application is
activated. The Preset Mode assigned to a particular application may be
the same on each connected monitor, or it can vary from one monitor to
the next.
Dell Display Manager is pre-configured for many popular applications. To
add a new application to the assignment list, simply drag the application
from the desktop, Windows Start Menu or elsewhere, and drop it onto the
current list.
NOTE: Preset Mode assignments targeting batch files, scripts, and
loaders, as well as non-executable files such as zip archives or packed
files, are not supported and will be ineective.
Dell Display Manager User's Guide 9
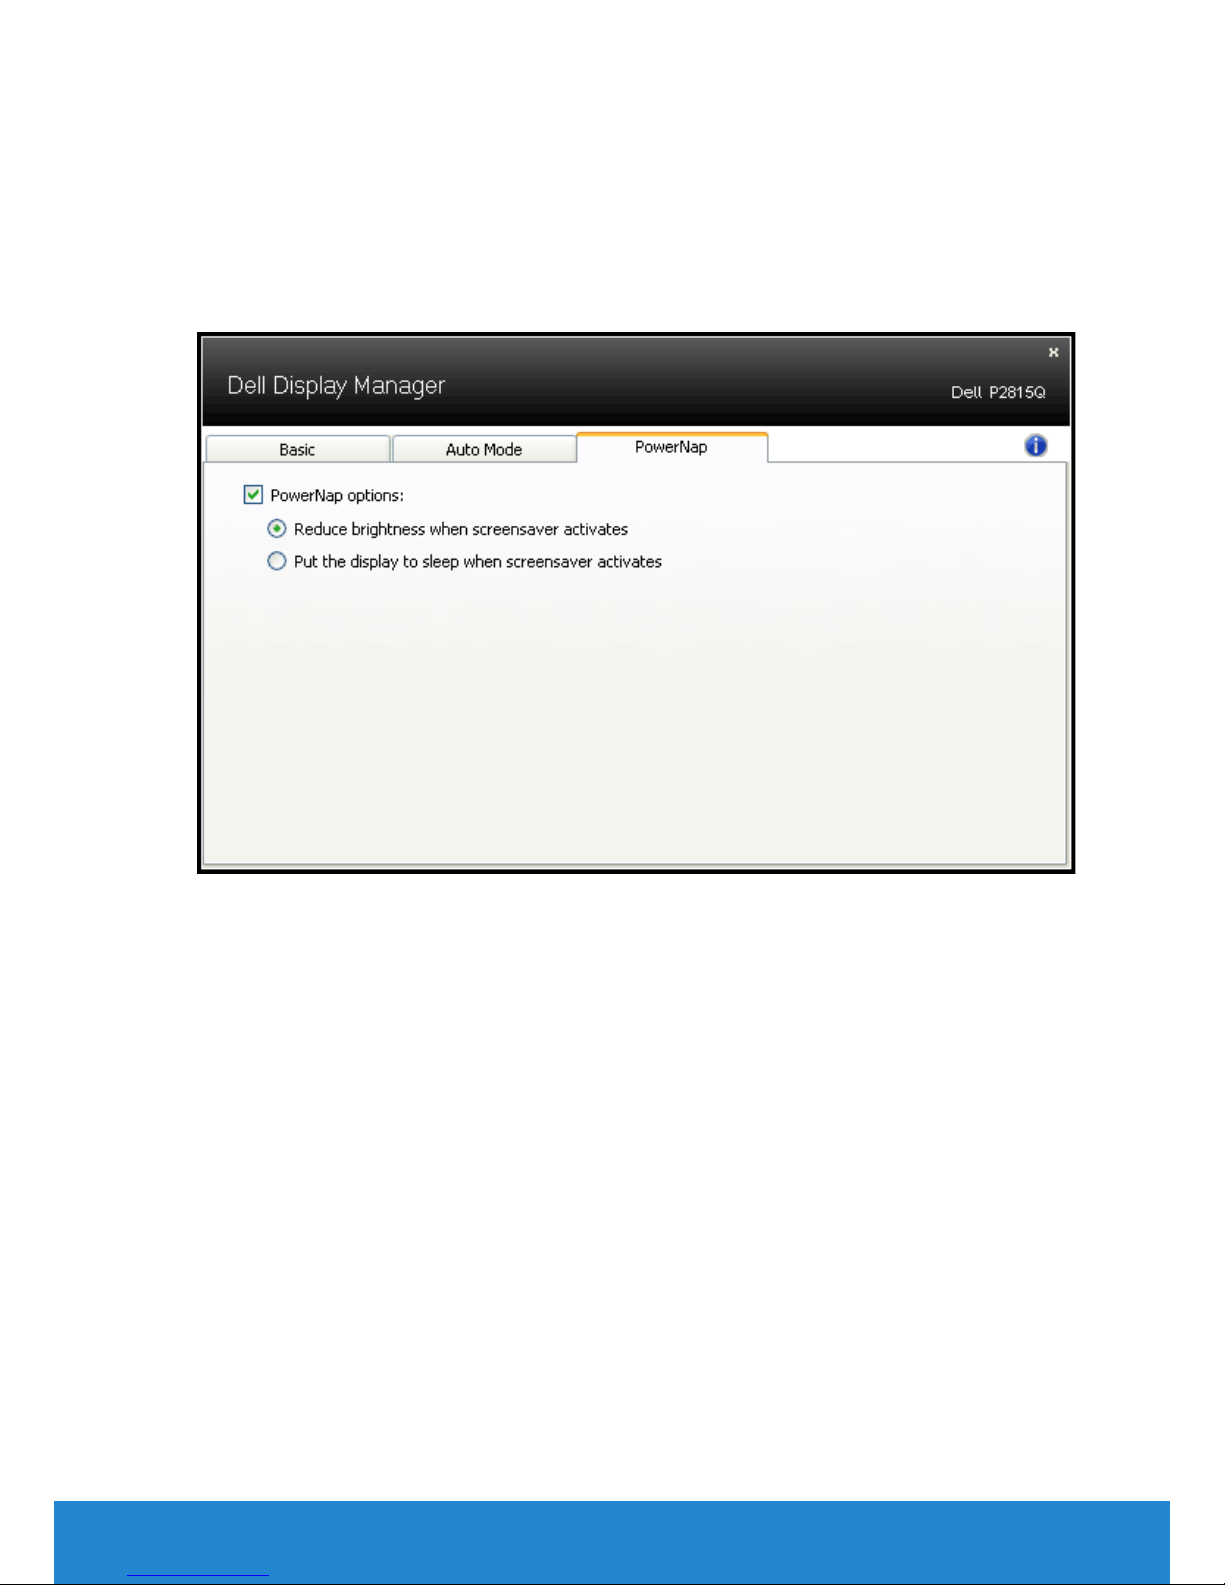
Applying Energy-Conservation Features
On supported Dell models, the PowerNap tab will be available to provide
energy conservation options. When the screensaver activates, the
monitor’s Brightness can automatically be set to minimum level or the
monitor can be put to sleep in order to save additional power.
10 About Your Monitor
About Your Monitor
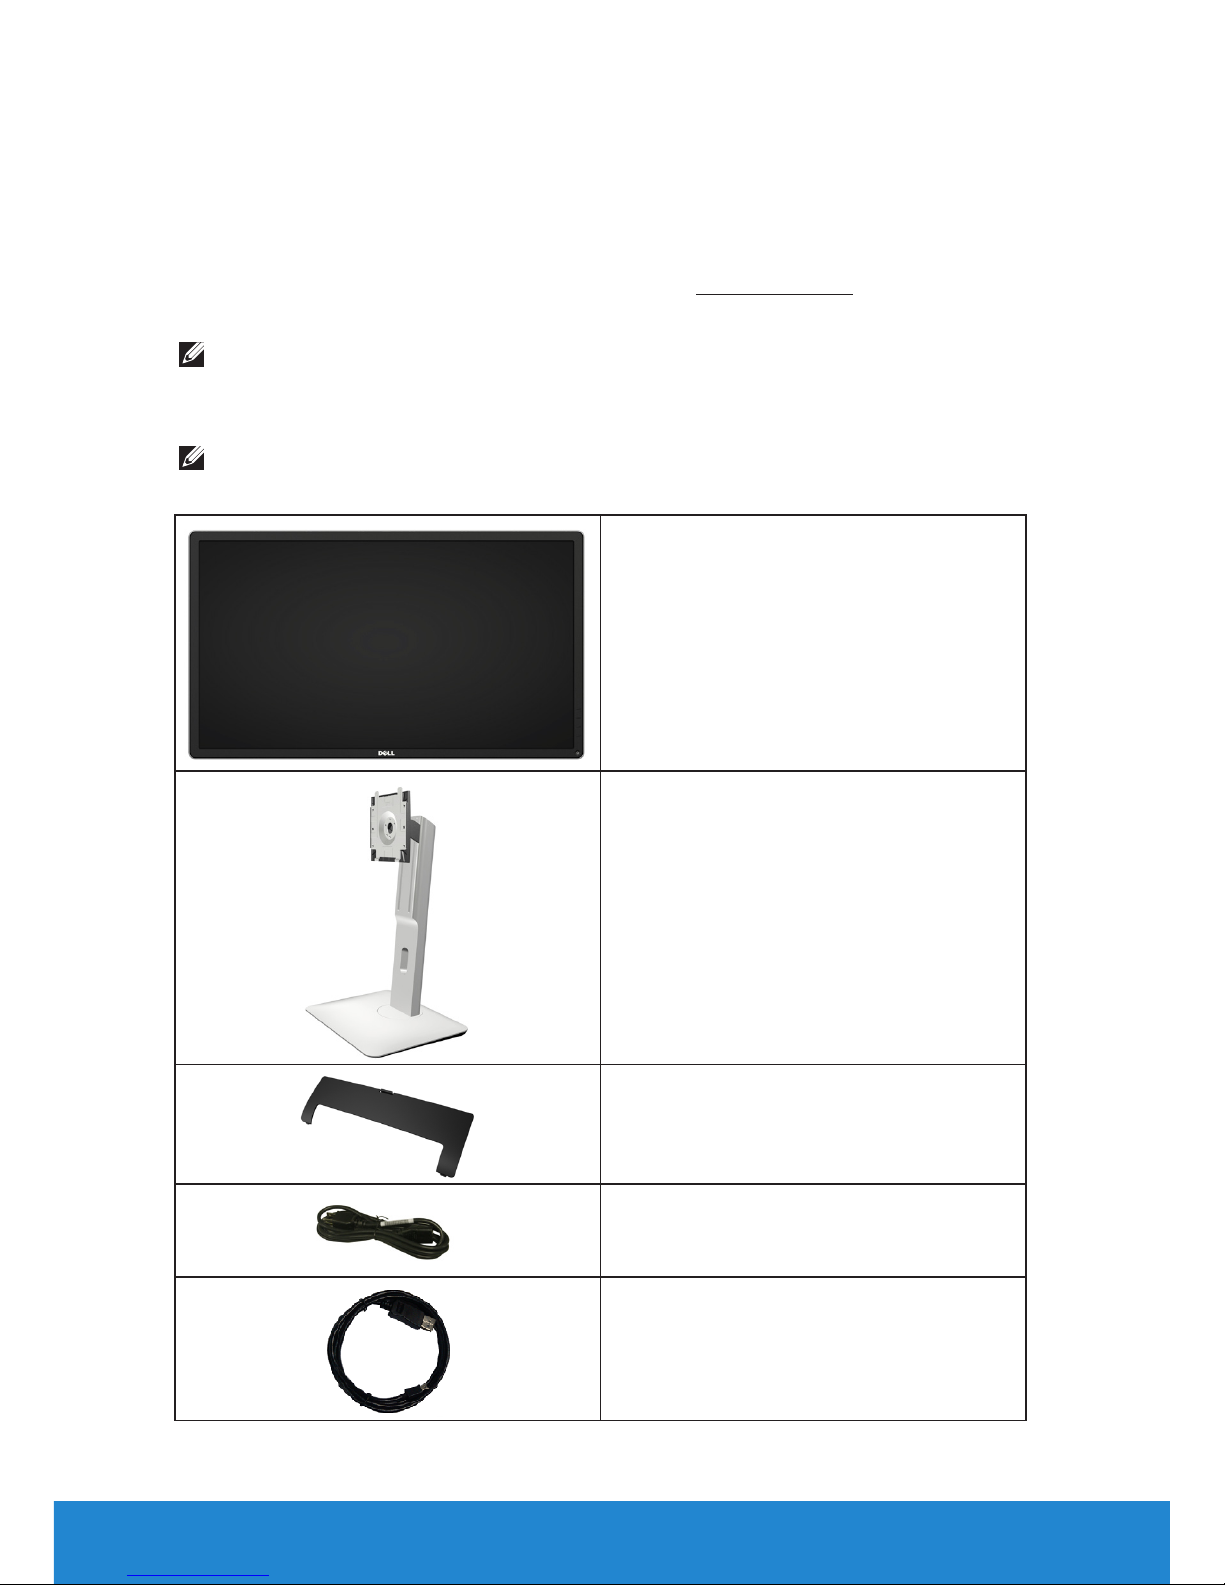
Package Contents
Your monitor ships with all the components shown below. Ensure that
you have received all the components and Contact Dell if anything is
missing.
NOTE: Some items may be optional and may not ship with your
monitor. Some features or media may not be available in certain
countries.
NOTE: To set up with any other stand, please refer to the respective
stand setup guide for setup instructions.
•Monitor
•Stand
•Cable Cover
•Power Cable (varies with countries)
•DisplayPort cable (Mini-DP to DP)
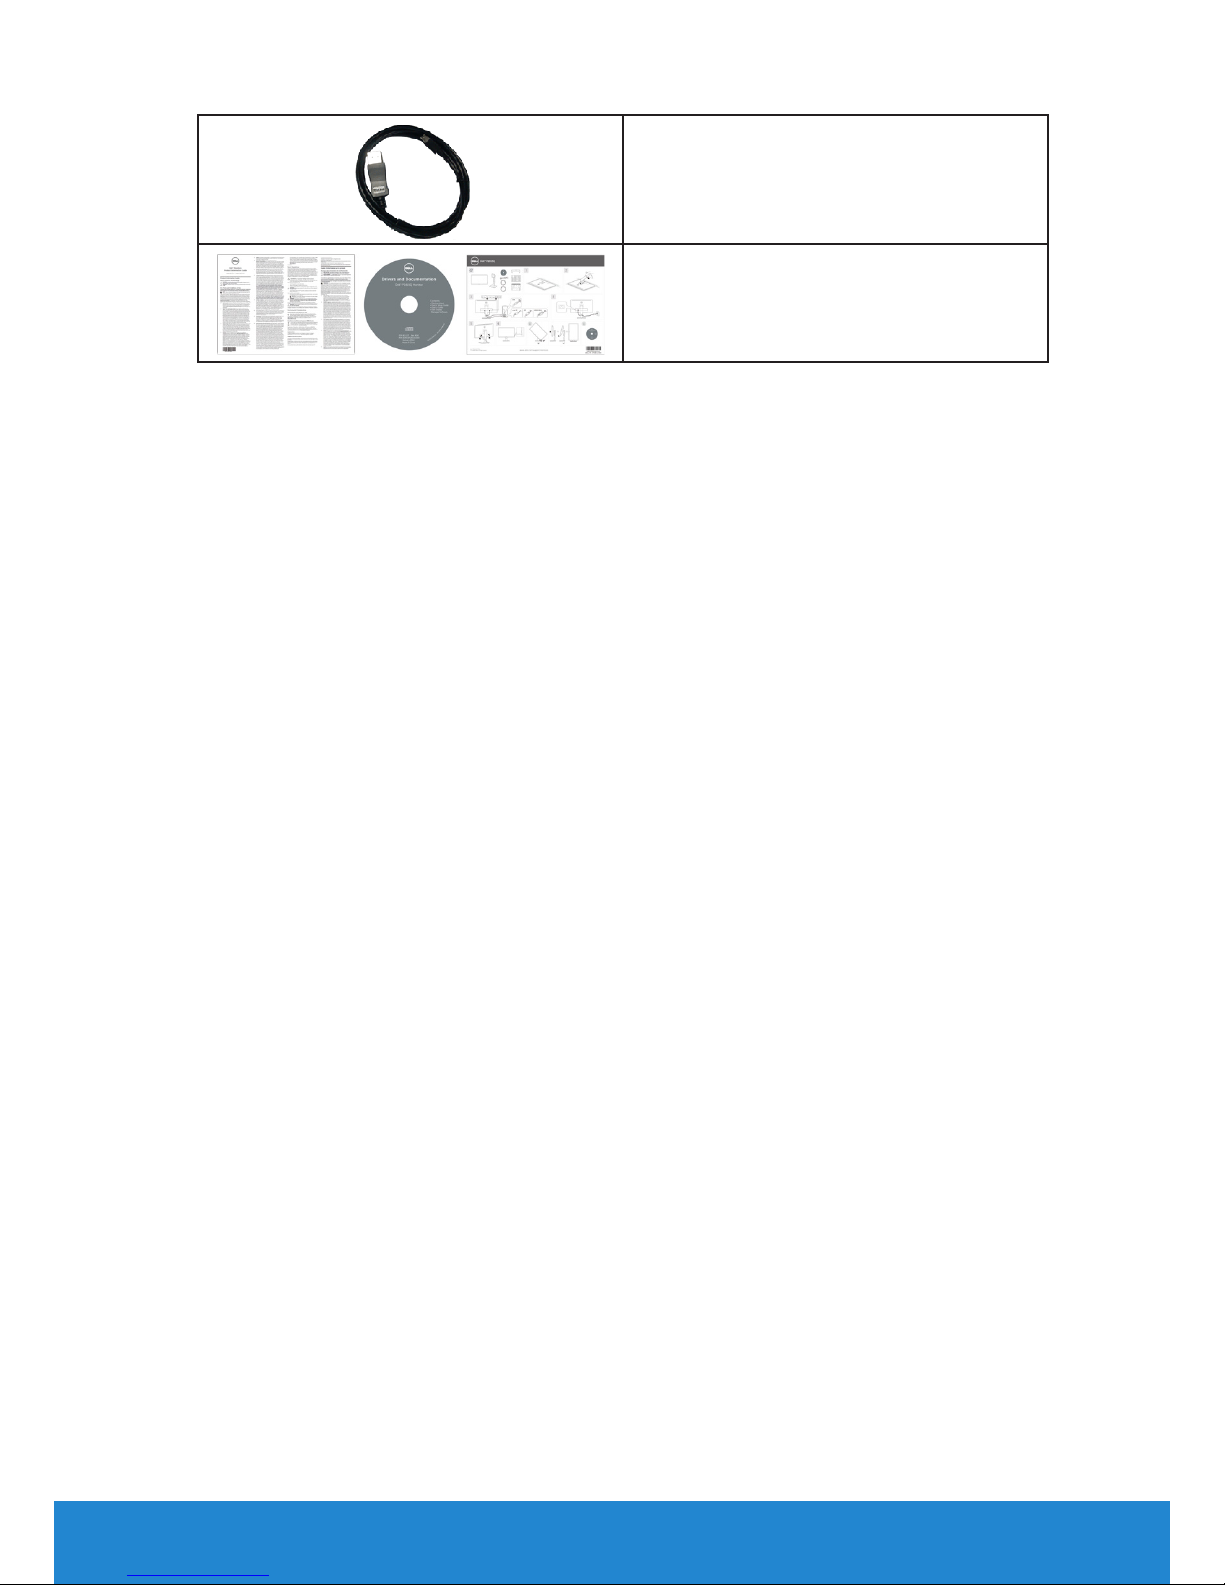
About Your Monitor 11
•USB 3.0 Upstream Cable (Enables
the USB Ports on the Monitor)
•Drivers and Documentation Media
•Quick Setup Guide
•Product and Safety Information
Guide
Product Features
The Dell P2815Q flat-panel display has an active matrix, Thin-Film
Transistor, Liquid Crystal Display (LCD), and LED backlight. The monitor’s
features include:
• 71.12cm (28.0 inches) diagonal viewable image size,3840 x 2160
resolution, plus full-screen support for lower resolutions.
• Wide viewing angle to allow viewing from a sitting or standing position,
or while moving from side-to-side.
• Tilt, swivel, vertical extension and rotate adjustment capabilities.
• Removable pedestal and Video Electronics Standards Association
(VESA) 100 mm mounting holes for flexible mounting solutions.
• Plug and play capability if supported by your system.
• On-Screen Display (OSD) adjustments for ease of set-up and screen
optimization.
• Software and documentation media which includes an information file
(INF), Image Color Matching File (ICM), Dell Display Manager software
application and product documentation.
• ENERGY STAR-compliant.
• Security lock slot.
• Asset Management Capability.
• EPEAT Gold Rating.
• Dell Display Manager software included (comes in the CD shipped with
the monitor).
• BFR/PVC-free (Halogen-free) excluding external cables.
• TCO compliant.
• Energy gauge shows the energy level being consumed by the monitor
in real time.
12 About Your Monitor
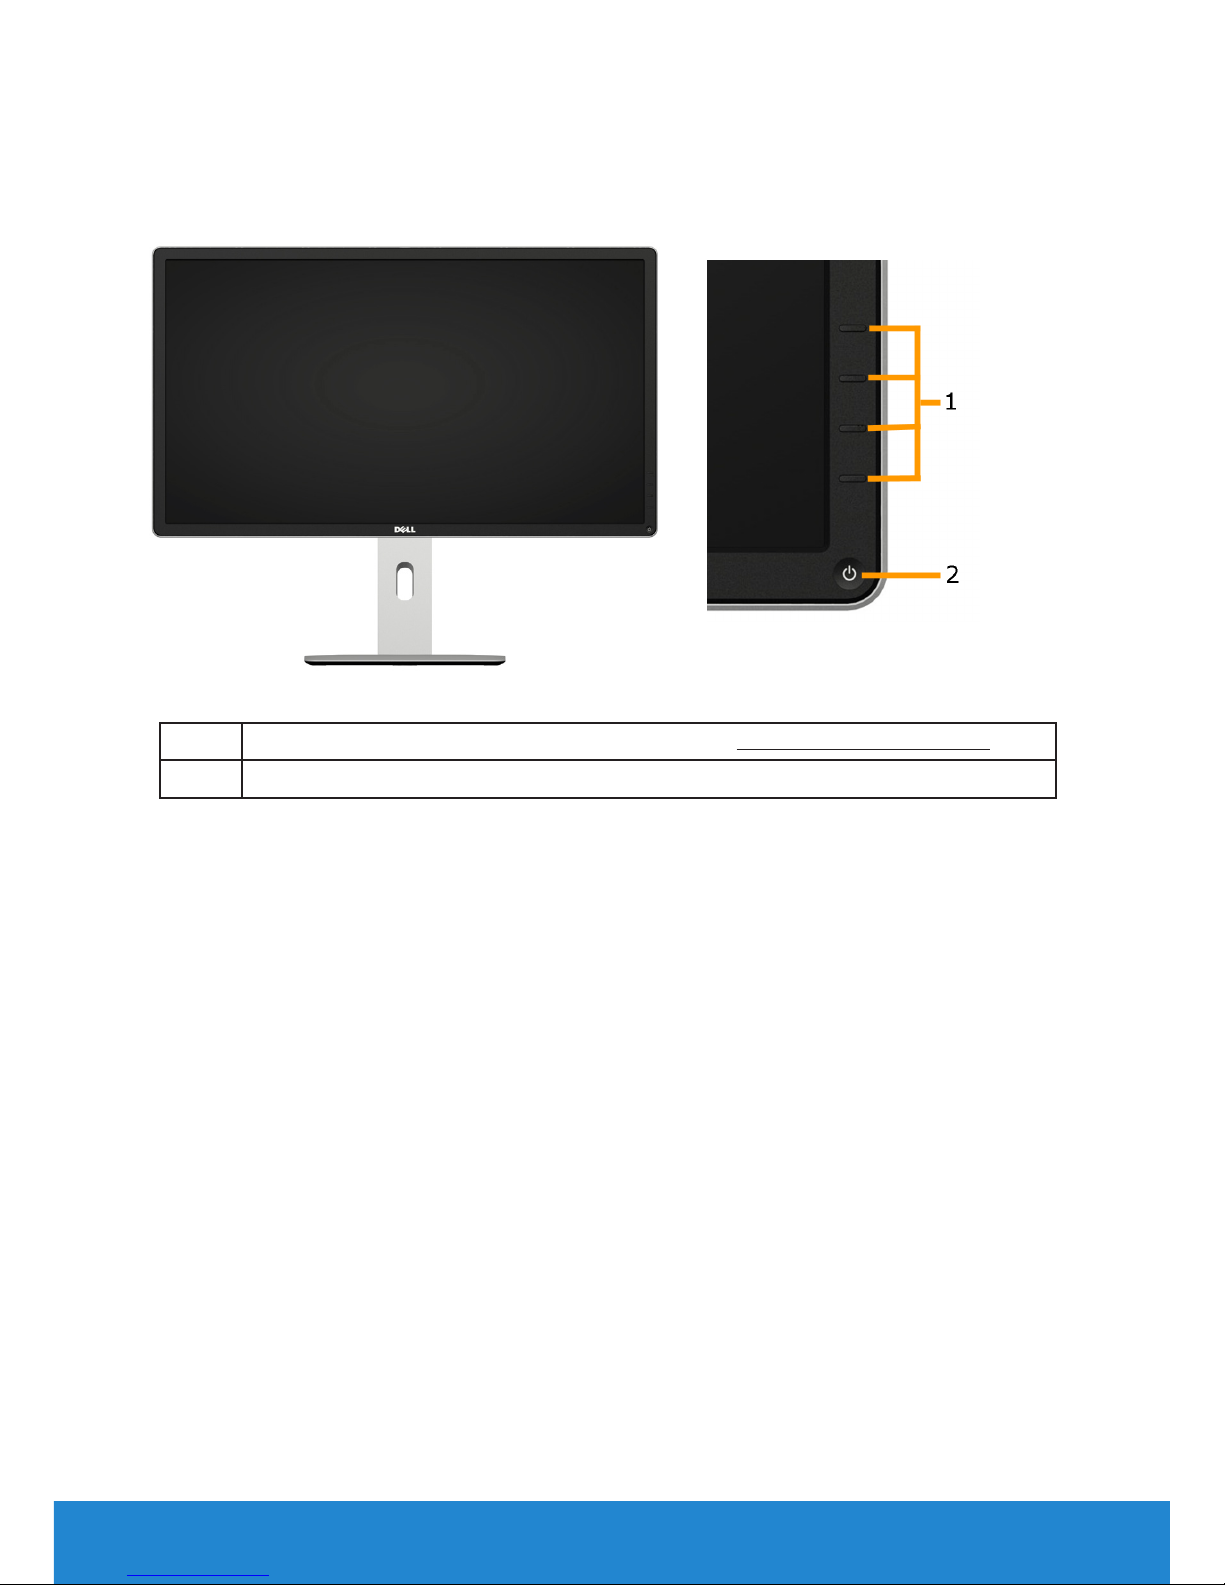
Identifying Parts and Controls
Front View
Front panel controls
1. Function buttons (For more information, see Operating the Monitor)
2 Power On/O button (with LED indicator)
About Your Monitor 13
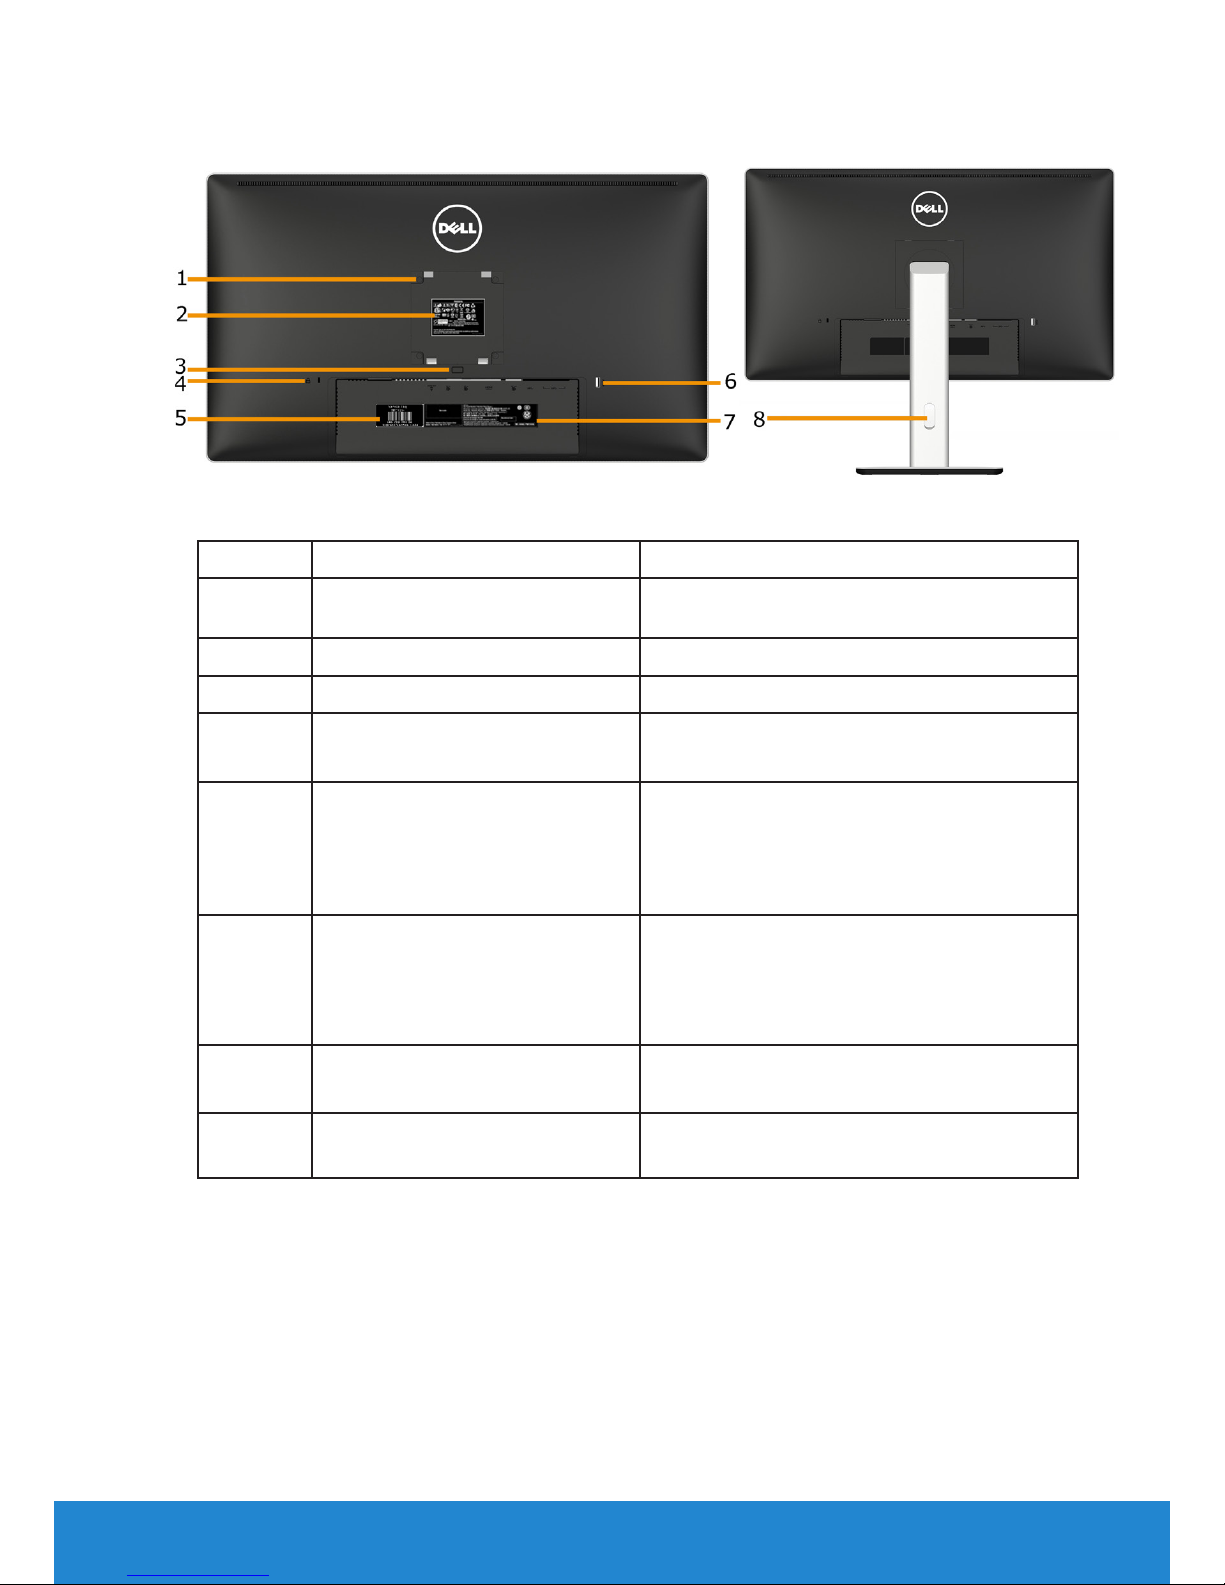
Back View
Back View with monitor stand
Label Description Use
1 VESA mounting holes (100
mm)
To mount the monitor.
2 Regulatory rating label Lists the regulatory approvals.
3 Stand release button Release stand from monitor.
4 Security lock slot
Use a security lock to secure your
monitor. (security lock not included).
5 Service Tag Label The Dell service tag is used for Dell
warranty and customer service
management purposes and for records
of the base system.
6 USB downstream port Connect your USB devices.This USB
port supports BC 1.2 compliance
charging devices, at 1.5A max for fast
charging.
7 Barcode serial number label Refer to this label if you need to
contact Dell for technical support.
8 Cable management slot Use to organize cables by placing them
through the slot.
14 About Your Monitor
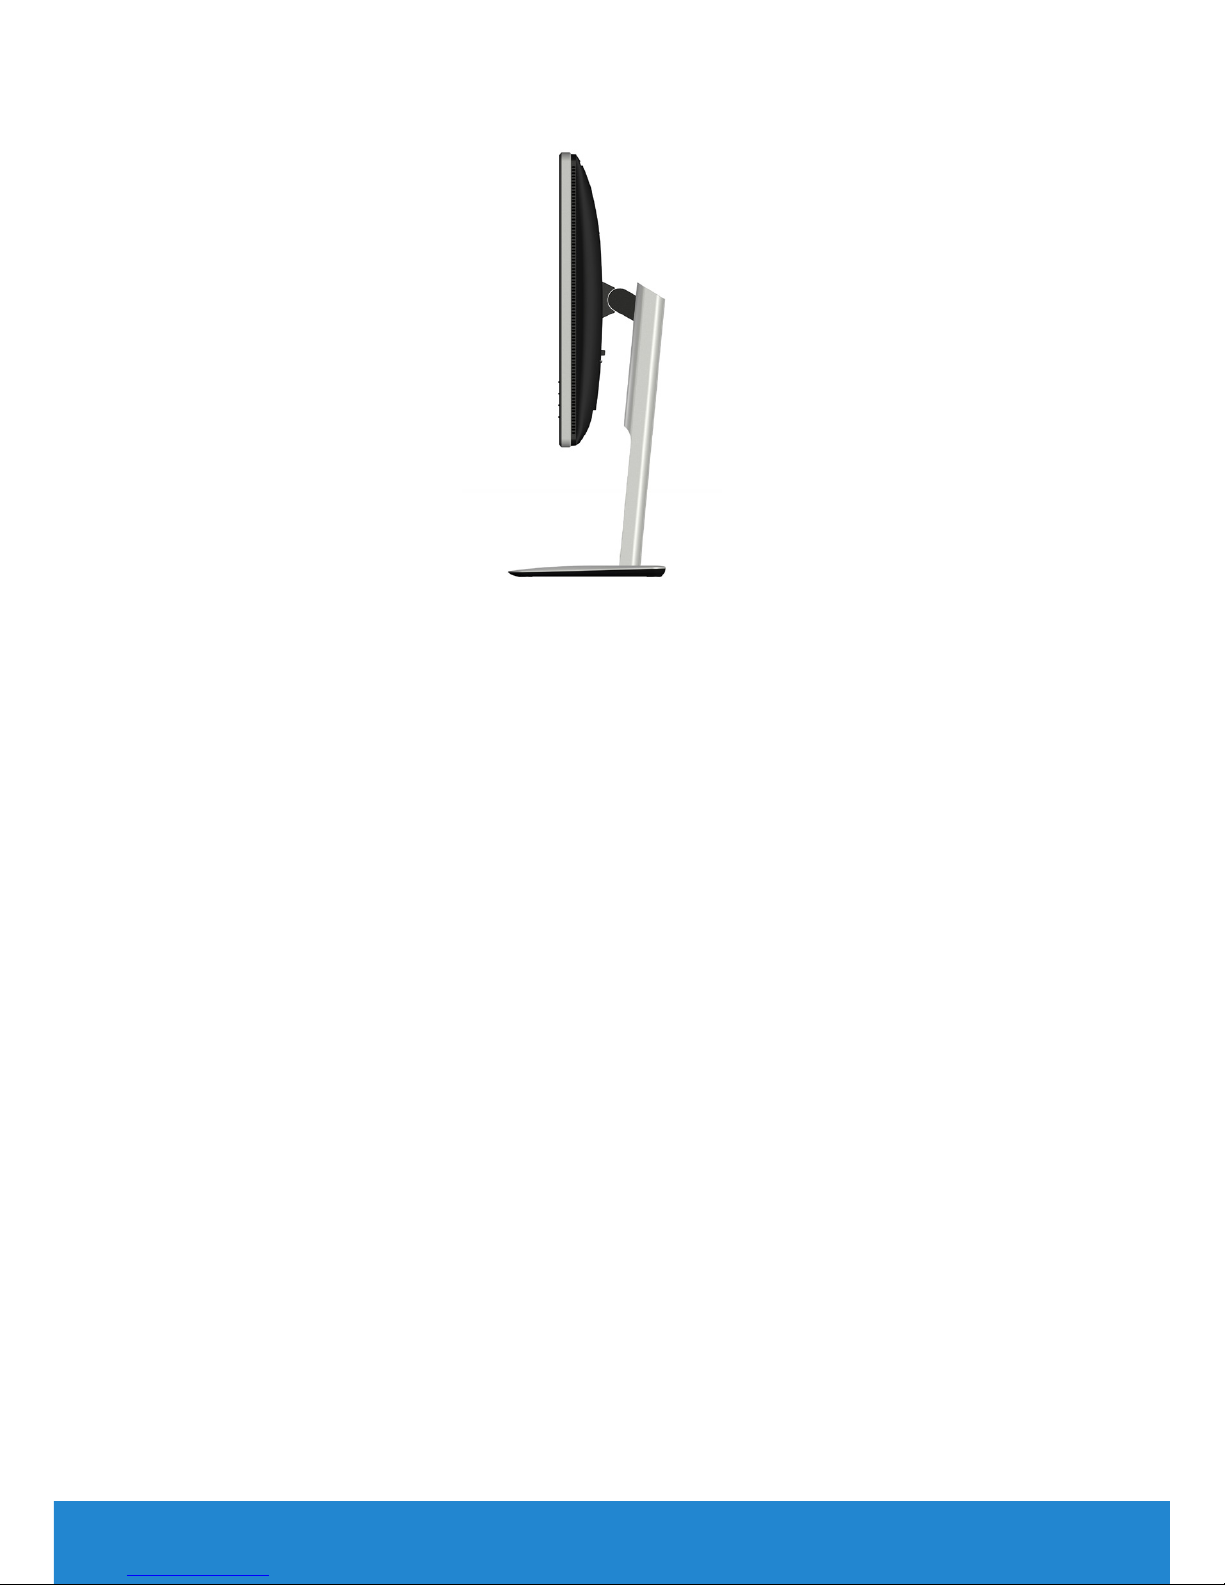
Side View
About Your Monitor 15
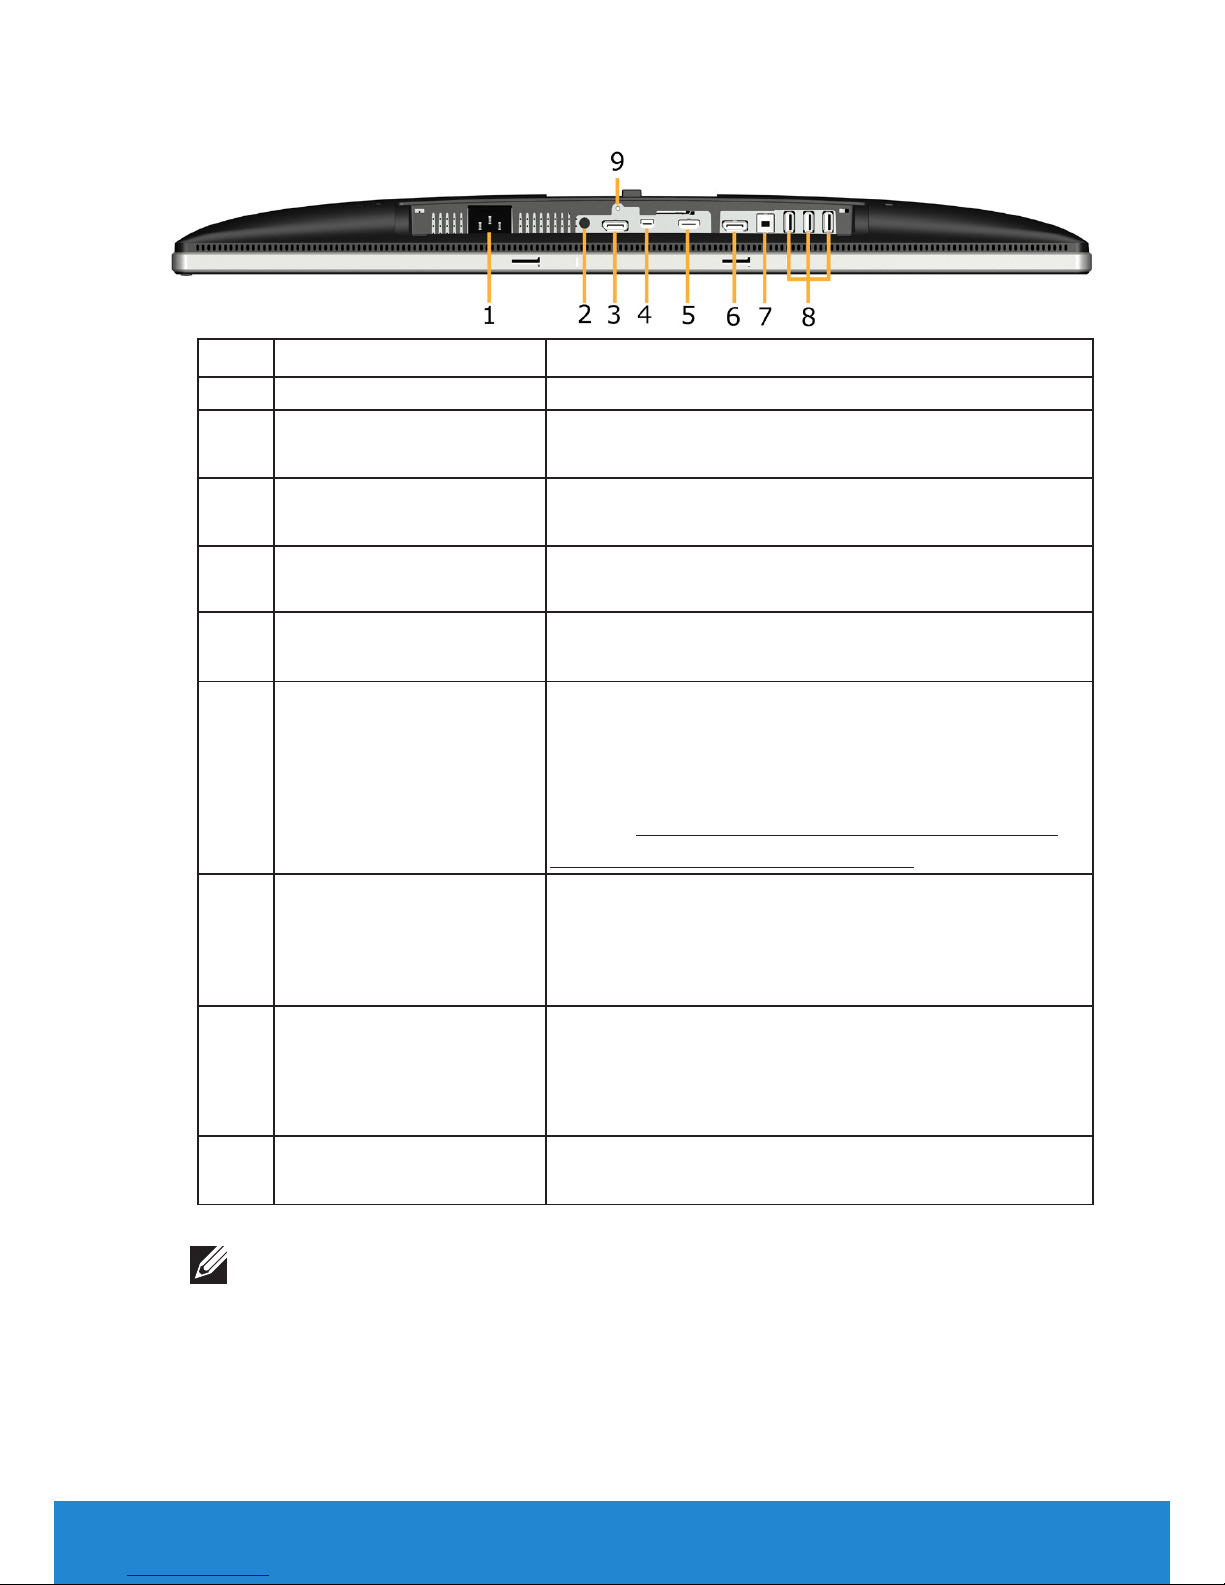
Bottom View
Label Description Use
1 AC power connector To connect the monitor power cable.
2 Audio Out Connect the Soundbar mini stereo plug
(Supports two-channel output ).
3 DisplayPort in
connector
Connect your computer with DP cable.
4 Mini DisplayPort in
connector
Connect your computer with Mini DP to DP
cable.
5 HDMI (MHL) connector Connect your computer with HDMI cable.
Connect your MHL devices with MHL cable.
6 DisplayPort out (MST)
connector
DisplayPort output for MST (Multi-Stream
Transport) capable monitor. DP 1.1 monitor can
only be connected as the last monitor in the
MST chain. To enable MST, refer to instruction on
section Connecting the Monitor for DP Multi-
Stream Transport (MST) function.
7 USB upstream port Connect the USB cable that came with your
monitor to the monitor and the computer. Once
this cable is connected, you can use the USB
connectors on the monitor.
8 USB downstream port Connect your USB device. You can use this
connector only after you have connected the
USB cable to the computer and USB upstream
connector on the monitor.
9 Stand lock feature To lock the stand to the monitor using a M3 x 6
mm screw (screw not included).
NOTE: Headphone usage is not supported for the audio line-out connector.
16 About Your Monitor
Monitor Specifications
The following sections give you information about the various power
management modes and pin assignments for the various connectors of
your monitor.
Power Management Modes
If you have VESA’s DPM compliance display card or software installed
in your PC, the monitor automatically reduces its power consumption
when not in use. This is referred to as Power Save Mode. If the computer
detects input from keyboard, mouse, or other input devices, the monitor
automatically resumes functioning. The following table shows the power
consumption and signaling of this automatic power-saving feature:
VESA Modes
Horizontal
Sync
Vertical
Sync
Video
Power
Indicator
Power
Consumption *
Normal operation Active Active Active White 100 W (Maximum)
**
75 W (Typical)
Active-o mode Inactive Inactive O Glowing
white
Less than 0.5 W
Switch o - - - O Less than 0.5 W *
The OSD will only function in the normal operation mode. When any
button except power button is pressed in Active-off mode, the following
messages will be displayed:
Activate the computer and monitor to gain access to the OSD.
NOTE: The Dell P2815Q monitor is ENERGY STAR®-compliant.
* Zero-power consumption in OFF mode can only be achieved by disconnecting
the main cable from the monitor.
** Maximum power consumption with max luminance and contrast.
About Your Monitor 17
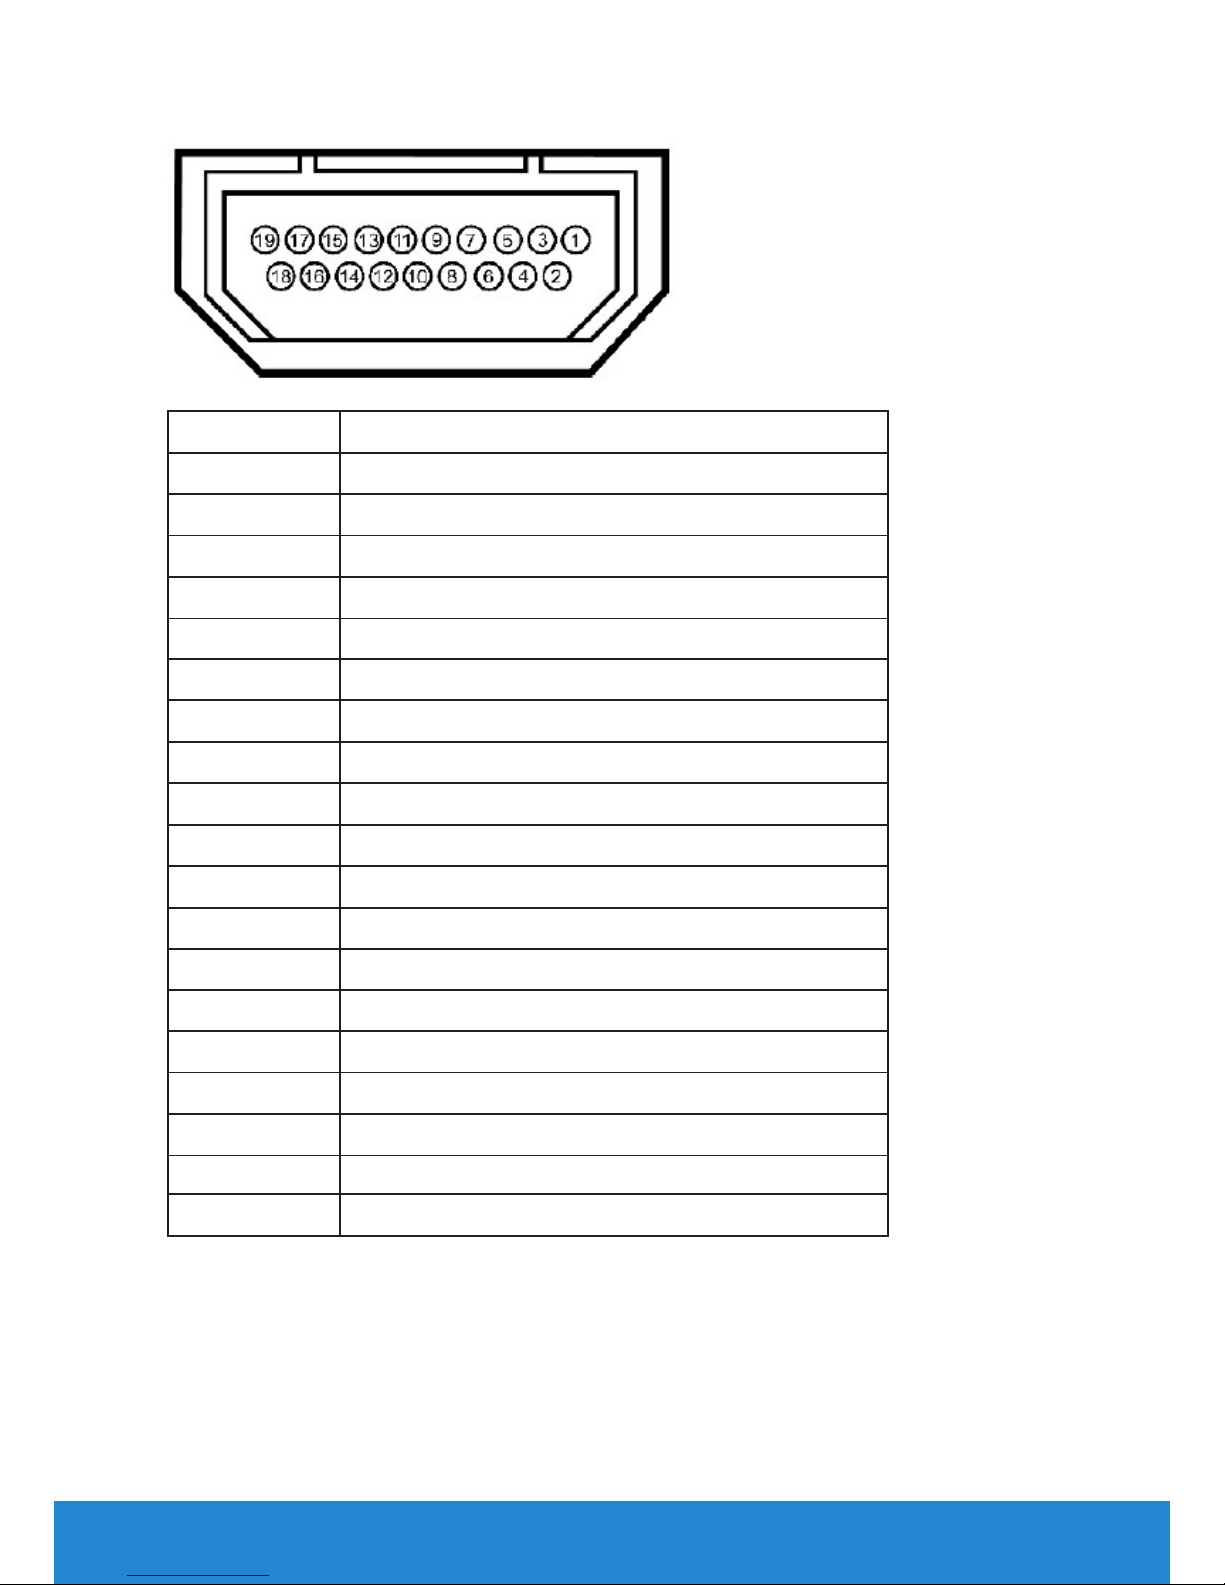
Pin Assignments
DisplayPort connector (DP in and DP out)
Pin Number 20-pin Side of the Connected Signal Cable
1 ML0(p)
2 GND
3 ML0(n)
4 ML1(p)
5 GND
6 ML1(n)
7 ML2(p)
8 GND
9 ML2(n)
10 ML3(p)
11 GND
12 ML3(n)
13 GND
14 GND
15 AUX(p)
16 GND
17 AUX(n)
18 HPD
19 DP_PWR_Return
20 +3.3 V DP_PWR
18 About Your Monitor
Mini DisplayPort Connector
Pin Number 20-pin Side of the Connected Signal Cable
1 GND
2 Hot Plug Detect
3 ML3(n)
4 GND
5 ML3(n)
6 GND
7 GND
8 GND
9 ML2(n)
10 ML0(p)
11 ML2(p)
12 ML0(p)
13 GND
14 GND
15 ML1(n)
16 AUX(p)
17 ML1(p)
18 AUX(n)
19 GND
20 +3.3 V DP_PWR
About Your Monitor 19
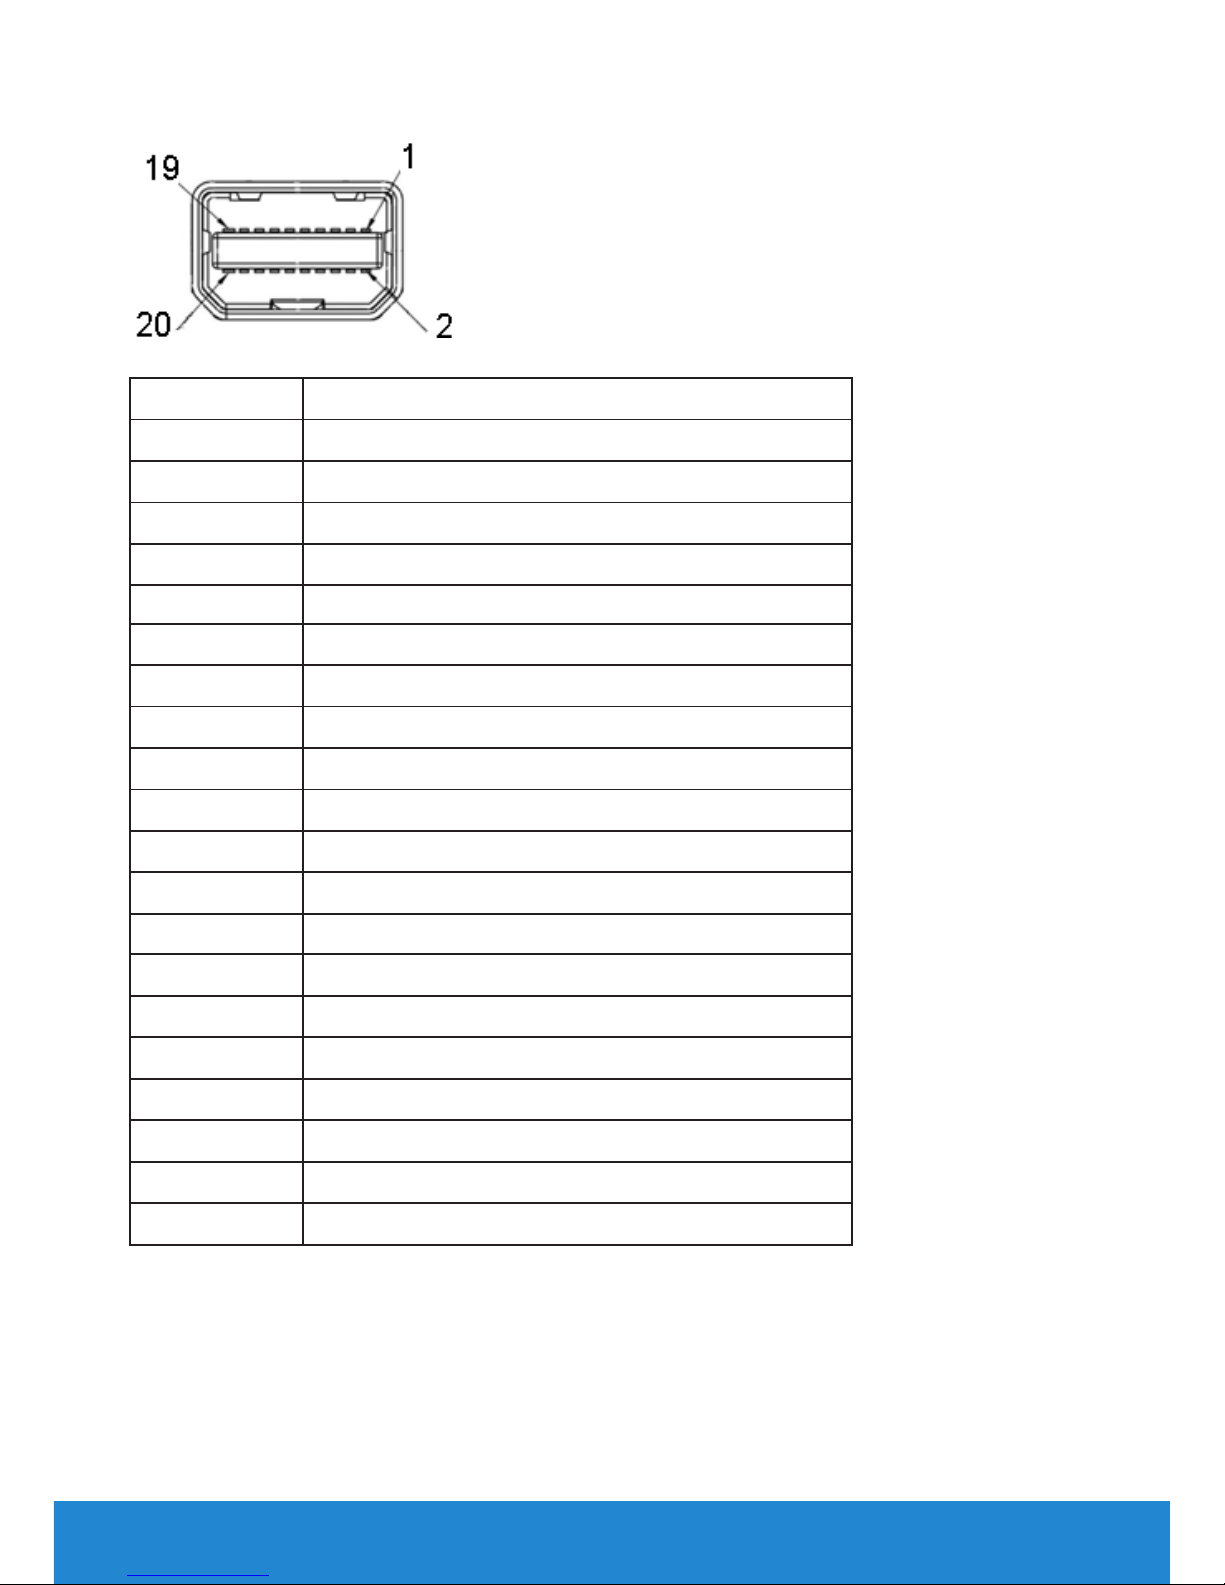
HDMI (MHL) connector
Pin Number 19-pin Side of the Connected Signal Cable
1 TMDS DATA 2+
2 TMDS DATA 2 SHIELD
3 TMDS DATA 24 TMDS DATA 1+
5 TMDS DATA 1 SHIELD
6 TMDS DATA 17 TMDS DATA 0+
8 TMDS DATA 0 SHIELD
9 TMDS DATA 0-
10 TMDS CLOCK
11 TMDS CLOCK SHIELD
12 TMDS CLOCK13 No Connection
14 No Connection
15 DDC CLOCK (SDA)
16 DDC DATA (SDA)
17 GND
18 +5 V POWER
19 HOT PLUG DETECT
20 About Your Monitor
Universal Serial Bus (USB) Interface
This section gives you information about the USB ports that are available on the
monitor.
NOTE: This monitor is Super-Speed USB 3.0 compatible.
Transfer Speed Data Rate Power Consumption
Super-Speed 5 Gbps 4.5W (Max, each port)
High Speed 480 Mbps 4.5W (Max, each port)
Full Speed 12 Mbps 4.5W (Max, each port)
NOTE: Up to 1.5 A on USB downstream port (port with lightning
icon) with BC 1.2 compliant devices.
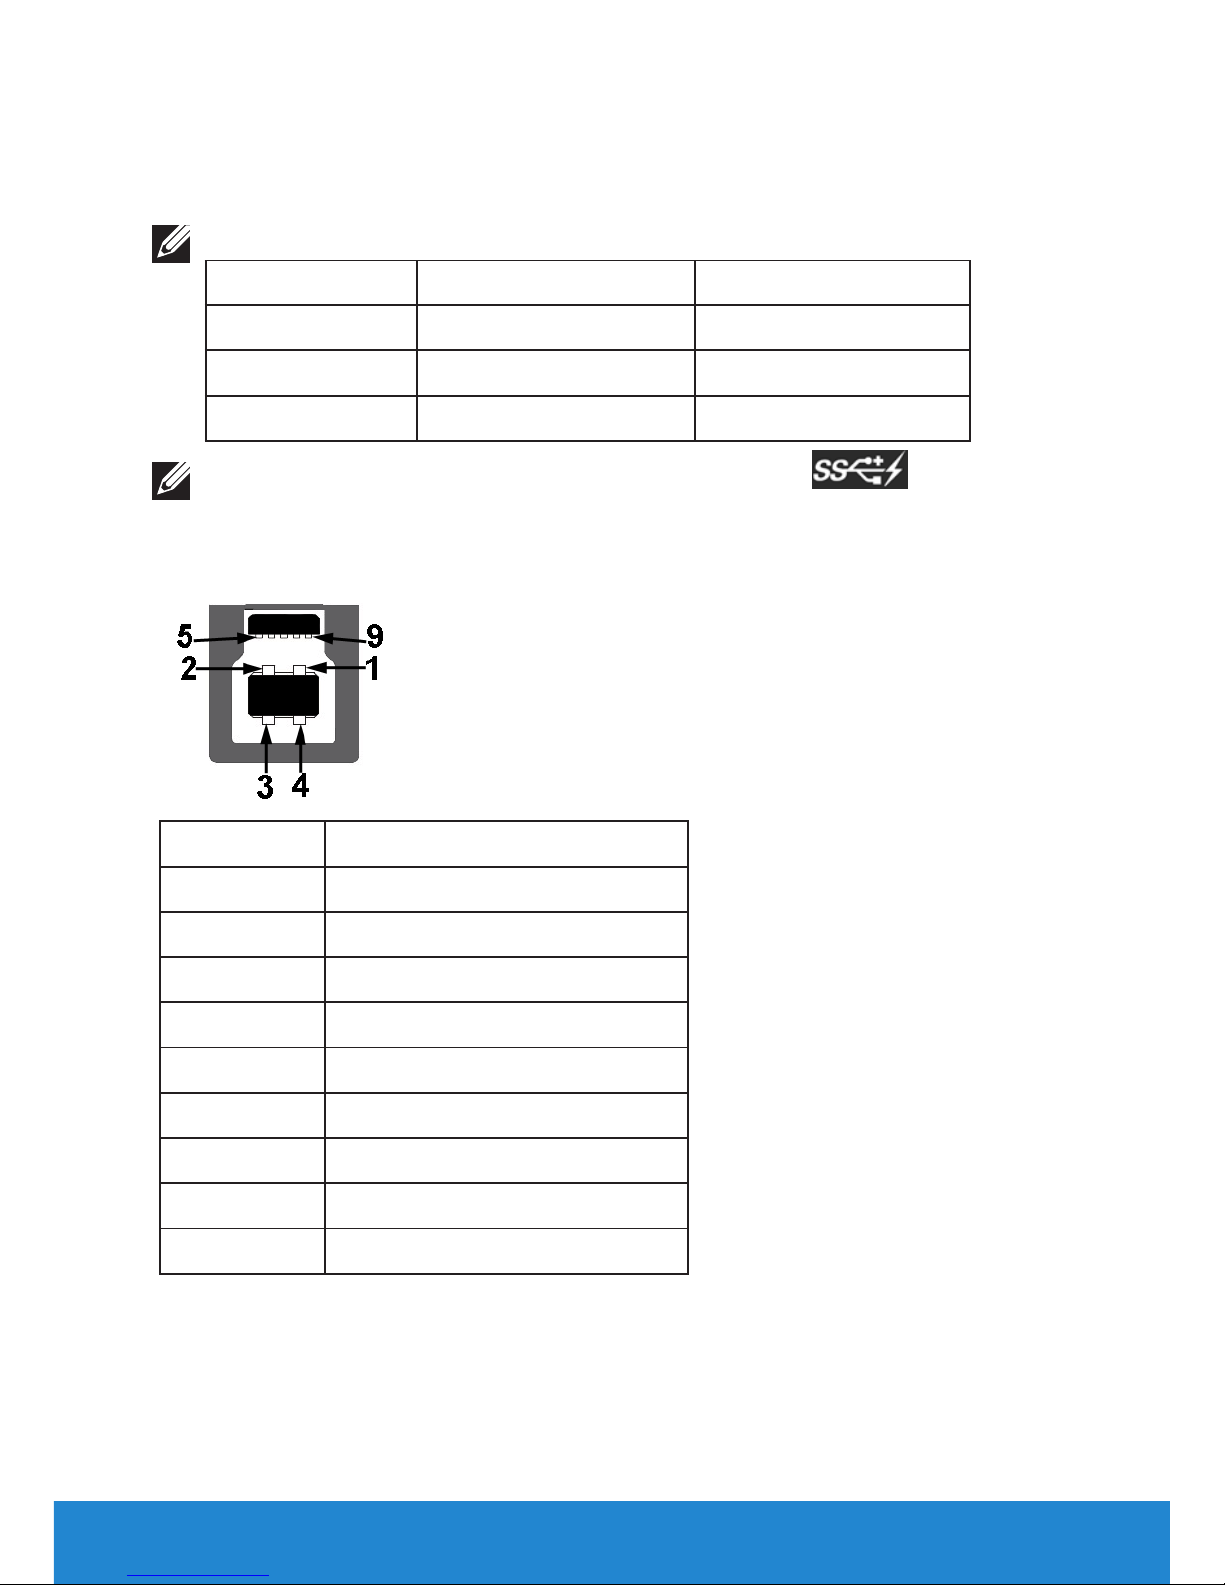
USB Upstream Connector
Pin Number 9-pin Side of the Connector
1 VCC
2 D-
3 D+
4 GND
5 SSTX-
6 SSTX+
7 GND
8 SSTX-
9 SSTX+
About Your Monitor 21
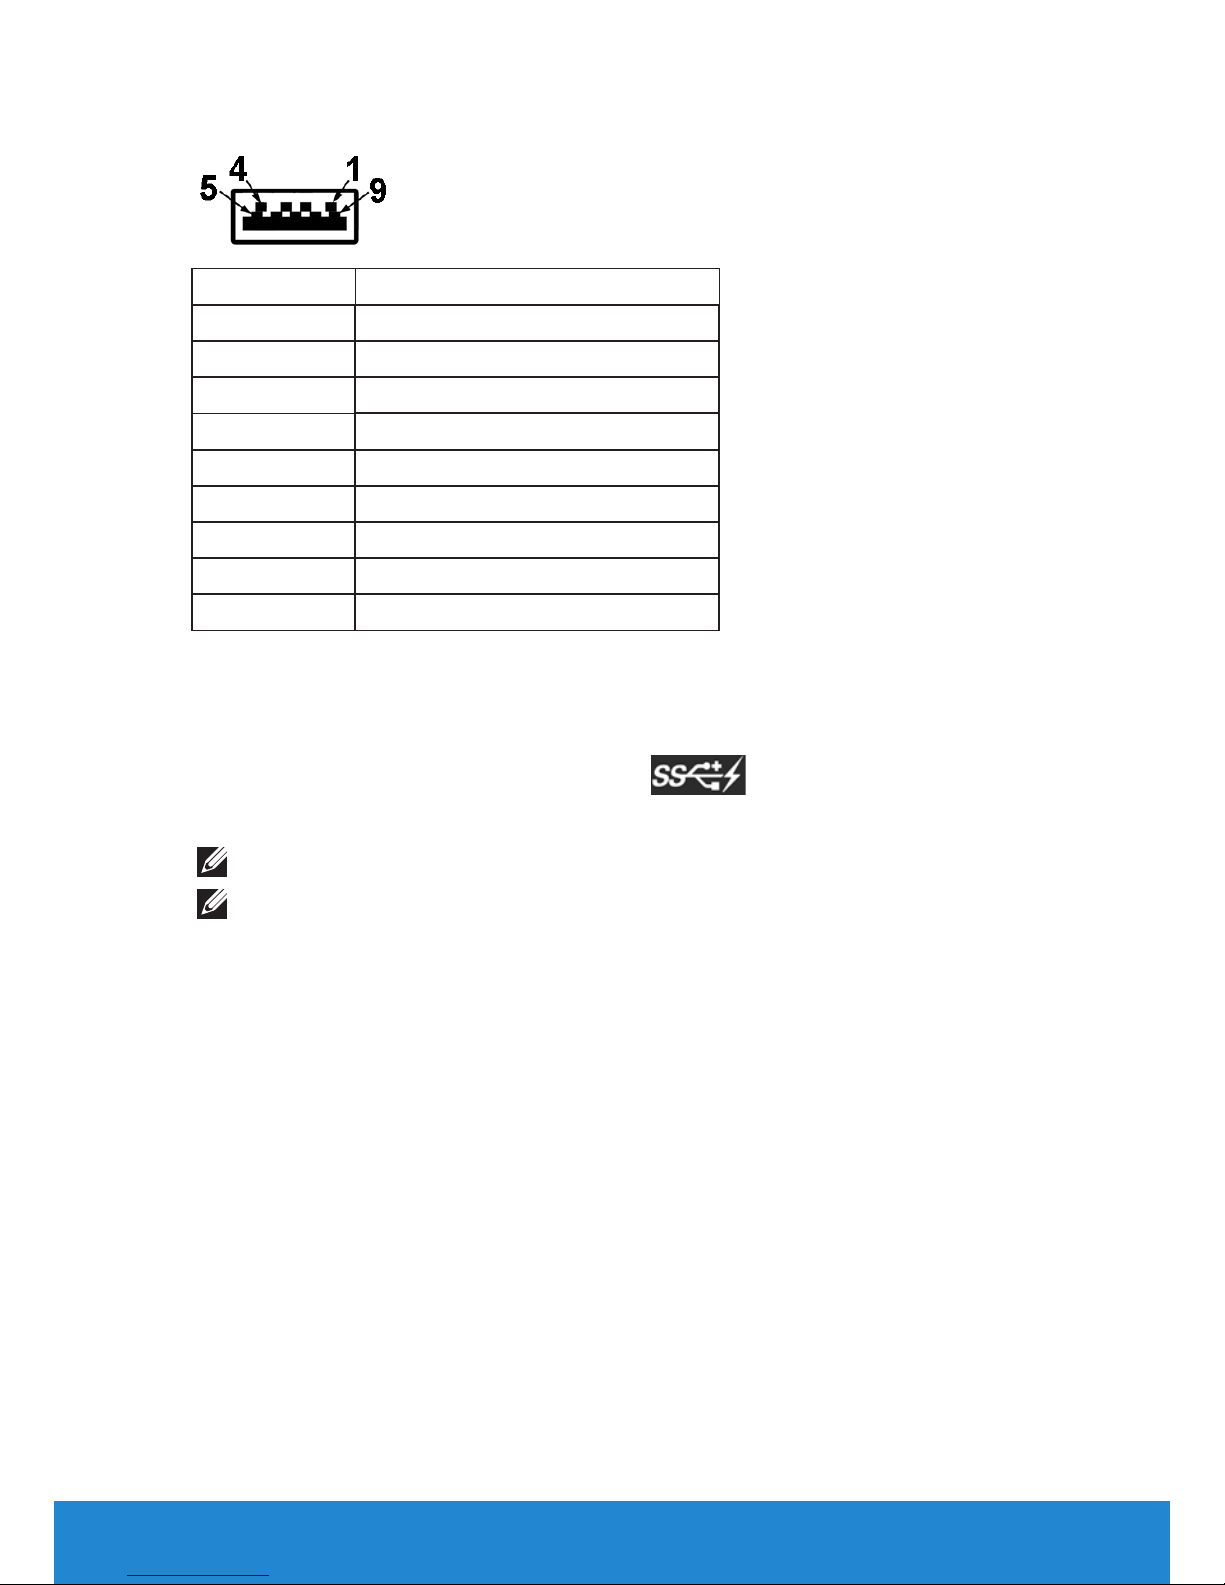
USB Downstream Connector
Pin Number 9-pin Side of the Connector
1 VCC
2 D3 D+
4 GND
5 SSTX6 SSTX+
7 GND
8 SSTX9 SSTX+
USB Ports
• 1 upstream - bottom facing
• 4 downstream - 3 bottom facing and 1 back facing
• Power Charging Port- (USB ports with lightning icon) ; supports fast
current charging capability if the device is BC 1.2 compatible.
NOTE: USB 3.0 functionality requires a USB 3.0-capable computer.
NOTE: The monitor’s USB interface works only when the monitor is On or
in the power-save mode. If you turn O the monitor and then turn it On, the
attached peripherals may take a few seconds to resume normal functionality.
Plug and Play Capability
You can install the monitor in any Plug and Play compatible system. The
monitor automatically provides the computer with its Extended Display
Identification Data (EDID) using Display Data Channel (DDC) protocols
so that the system can configure itself and optimize the monitor settings.
Most monitor installations are automatic. You can select different settings
if required.
22 About Your Monitor
Flat-Panel Specifications
Model number Dell P2815Q monitor
Screen type Active matrix - TFT LCD
Panel Type TN
Viewable image
dimensions:
711.2 mm (28.0 inches)
Diagonal
Horizontal 620.9 mm (24.45 inches)
Vertical 341.3 mm (13.44 inches)
Area 211913.2 mm² (328.61 inches²)
Pixel pitch 0.16 mm
Viewing angle:
Horizontal 170° typical
Vertical 160° typical
Luminance output 300 cd/m² (typical)
Contrast ratio 1000 to 1 (typical)
Faceplate coating Antiglare with hard-coating 3H
Backlight LED light bar system
Response Time 5 ms (typical)
Color Depth 1.073 B colors
Color Gamut 72 % (typical) **
** P2815Q color gamut (typical) is based on CIE1976 (84 %) and CIE1931 (72 %)
test standards.
About Your Monitor 23
Resolution Specifications
Model number Dell P2815Q monitor
Scan range
• Horizontal 31 kHz to 114 kHz (automatic)
• Vertical
24 Hz to 85 Hz (automatic)
Maximum preset
resolution
DP/Mini-DP/HDMI: 3840 x 2160 at 30 Hz
MHL: 1920 x 1080 at 60 Hz
Electrical Specifications
Model number Dell P2815Q monitor
Video input signals • DisplayPort*, 600mV for each dierential line, 100
ohm input impedance per dierential pair
• HDMI (MHL), 600mV for each dierential line, 100
ohm input impedance per dierential pair
Synchronization
input signals
Separate horizontal and vertical synchronizations,
polarity-free TTL level, SOG (Composite SYNC on
green)
AC input voltage /
frequency / current
100 VAC to 240 VAC/50 Hz or 60 Hz ± 3 Hz/1.5 A
(Max.)
Inrush current 120 V: 40 A (Max.) at 0 °C
240 V: 80 A (Max.) at 0 °C
*Supports DP 1.2 (CORE) specification. Excludes Fast AUX transaction, 3D stereo
transport , HBR Audio (or high data rate audio).
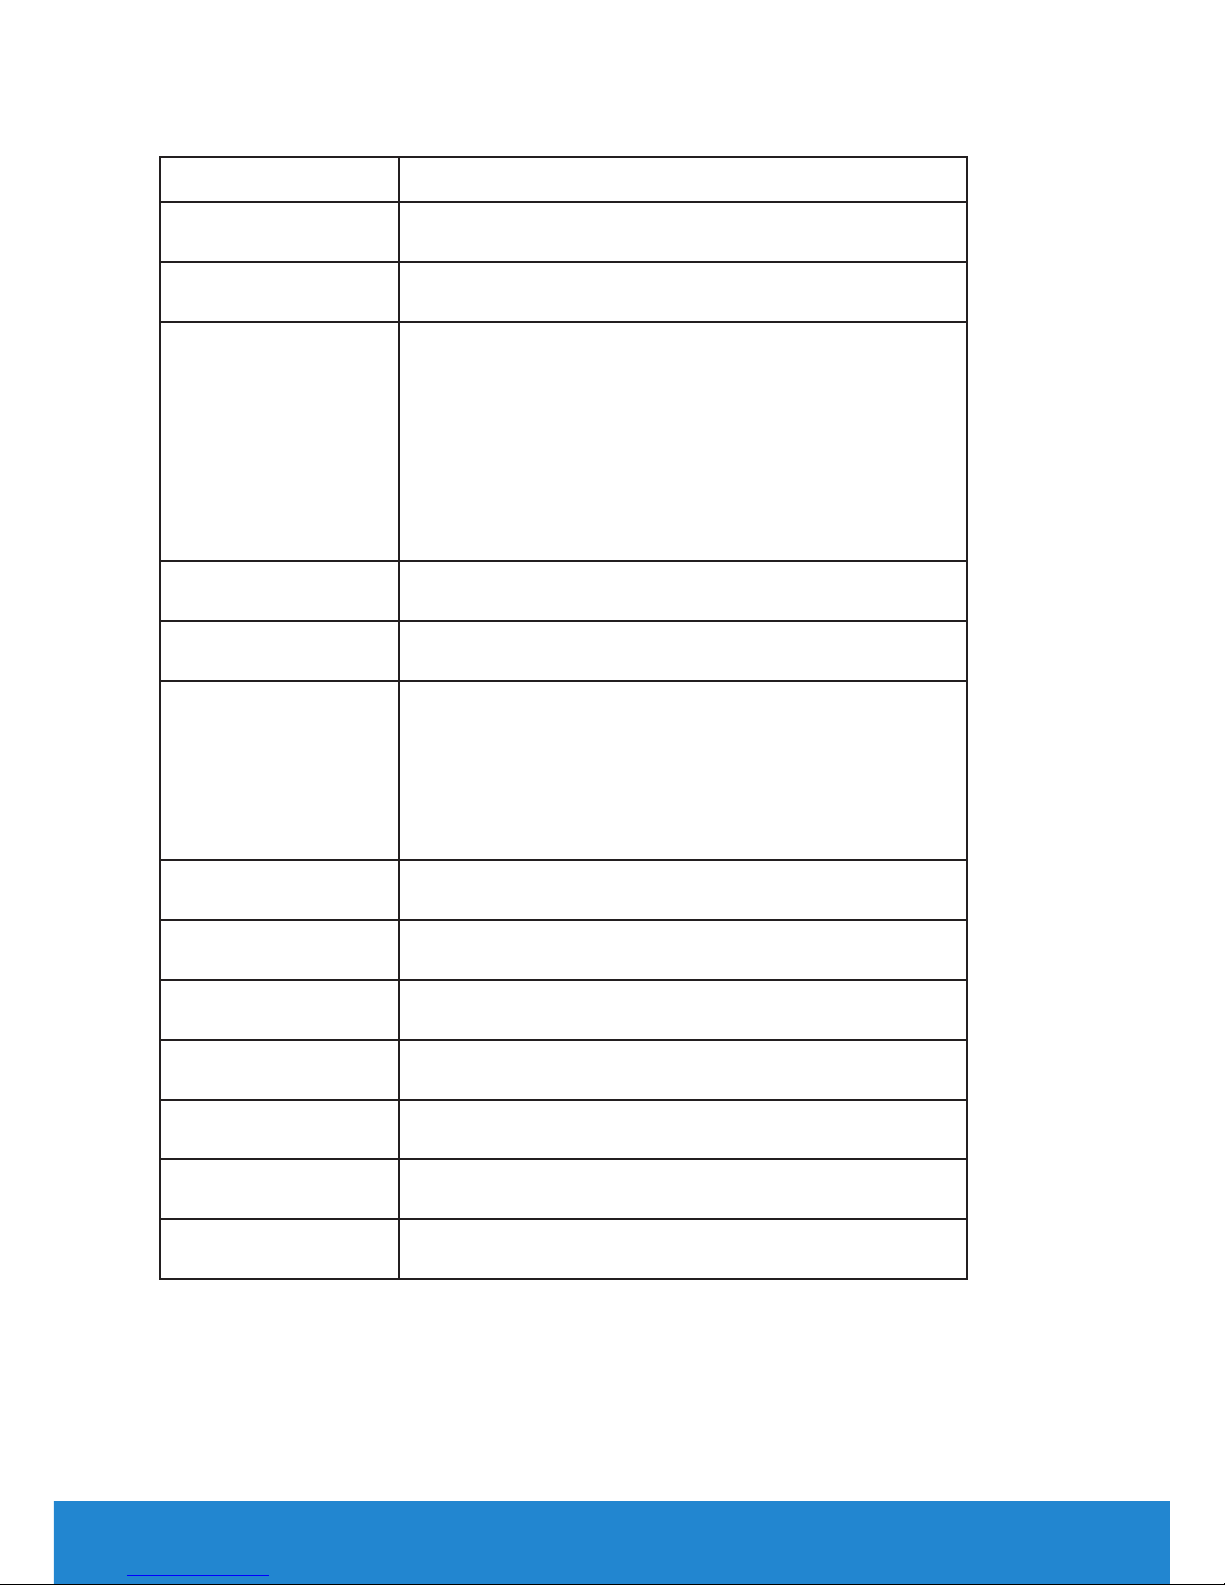
Preset Display Modes
The following table lists the preset modes for which Dell guarantees
image size and centering:
Display Mode
Horizontal
Frequency
(kHz)
Vertical
Frequency
(Hz)
Pixel Clock
(MHz)
Sync Polarity
(Horizontal/
Vertical)
VESA, 720 x 400 31.5 70.0 28.3 -/+
VESA, 640 x 480 31.5 59.9 25.2 -/-
VESA, 640 x 480 37.5 75.0 31.5 -/-
24 About Your Monitor
VESA, 800 x 600 37.9 60.3 40.0 +/+
VESA, 800 x 600 46.9 75.0 49.5 +/+
VESA, 1024 x 768 48.4 60.0 65.0 -/-
VESA, 1024 x 768 60.0 75.0 78.8 +/+
VESA, 1152 x 864 67.5 75.0 108.0 +/+
VESA, 1280 x 800 49.7 59.8 83.5 -/+
VESA, 1280 x 1024 64.0 60.0 108.0 +/+
VESA, 1280 x 1024 80.0 75.0 135.0 +/+
VESA, 1680 x 1050 62.3 60.0 146.3 -/+
VESA, 1600 x 1200 75.0 60.0 162.0 +/+
VESA, 1920 x 1080 67.5 60.0 148.5 +/+
VESA, 1920 x 1200 74.6 59.9 193.3 -/+
VESA, 3840 x 2160 65.7 30.0 262.8 +/+
MHL Source Display Modes
Display Mode Frequency (Hz)
640 x 480p 59.9
720 x 480p 59.9
720 x 576p 50.0
1280 x 720p 60.0
1280 x 720p 50.0
1920 x 1080i 60.0
1920 x 1080i 50.0
1920 x 1080p 24 / 25 / 30 / 60
720 (1440) x 480i 60.0
720 (1440) x 576i 50.0
 Loading...