

Page 1

Dell™ OptiPlex™ Systems
Setup and Quick Reference Guide
Guide de configuration et de référence rapide
Guía de instalación y de referencia rápida
Models DHS, DHP, and DHM
www.dell.com | support.dell.com
Page 2

Page 3

Contents
English
Français
Español
. . . . . . . . . . . . . . . . . . . . . . . . . . . . . . . . . . . . 5
. . . . . . . . . . . . . . . . . . . . . . . . . . . . . . . . . . . . 49
. . . . . . . . . . . . . . . . . . . . . . . . . . . . . . . . . . . . 89
Page 4

Page 5

Dell™ OptiPlex™ Systems
Setup and Quick Reference Guide
www.dell.com | support.dell.com
Page 6

Notes, Notices, and Cautions
NOTE: A NOTE indicates important information that helps you make better use of your computer.
NOTICE: A NOTICE indicates either potential damage to hardware or loss of data and tells you
how to avoid the problem.
CAUTION: A CAUTION indicates a potentially hazardous situation which, if not
avoided, may result in minor or moderate injury.
____________________
Information in this document is subject to change without notice.
© 2000–2001 Dell Computer Corporation. All rights reser ved.
Reproduction in any manner whatsoever without the written permission of Dell Computer Corporation is strictly
forbidden.
Trademarks used in this text:
Microsoft, Windows, Windows NT,
Other trademarks and trade names may be used in this document to refer to either the entities claiming the marks and
names or their products. Dell Computer Corporation disclaims any proprietary interest in trademarks and trade names
other than its own.
July 2001 P/N 81FTK Rev. A04
Dell, OptiPlex
and
MS-DOS
, and the
DELL
are registered trademarks of Microsoft Corporation.
logo are trademarks of Dell Computer Corporation;
Page 7

About This Guide
This document contains getting started/setup; solving problems; and safety,
OptiPlex™
regulatory, and warranty information about your Dell
™
computer.
To obtain the latest versions of the documents on your hard drive, go to the
Dell support website at http://support.dell.com.
Regulatory model numbers appear throughout this document; their chassis
type equivalents are shown below:
Regulatory Model Numbers and Chassis Types
DHS = small desktop (SD) chassis
DHP = small form-factor (SF) chassis
DHM = small mini-tower (SMT) chassis
Finding Information and Assistance
Resources and Support Tools
Resource Contents Using the Resource
Dell OptiPlex ResourceCD
•Dell Diagnostics
•Drivers
• Utilities
•Computer and device
documentation
See the main menu on the ResourceCD that was shipped
with your computer. Use the pull-down menu to make
selections appropriate for your computer. You can perform
the following tasks:
• Diagnose a problem
• Install or reinstall drivers
• Obtain information on your computer and devices
NOTE: User documentation and drivers are already
installed on your computer when shipped from Dell. You
can use this CD to access documentation, reinstall drivers,
or run diagnostics tools.
Setup and Quick Reference Guide 5
Page 8

Resources and Support Tools
(continued)
Resource Contents Using the Resource
Service and Registration
Labels—located on the front or
side of your Dell computer.
• Express Service Code and
The Express Service Code and Service Tag Number are
unique identifiers for your Dell computer.
You may need the Product Key (or Product ID) number to
complete the operating system setup.
Service Tag Number
•Product Key (also called the
Product ID or Certificate of
Authenticity [COA])
Operating system CD To reinstall your operating system, use the operating
www.dell.com | support.dell.com
system CD that was shipped with your computer.
NOTE: The operating system CD may not include all the
latest drivers for your computer. If you reinstall your
operating system, use the
for the devices shipped with your computer.
For more information about reinstalling your operating
system, see the operating system installation
documentation that was shipped with your computer.
Operating system installation
guide
See the operating system installation guide for
information on reinstalling and configuring your
operating system.
Click the Start button and select Help or Help and
Support, depending on your operating system, to obtain
more information on your operating system.
ResourceCD
to reinstall drivers
User’s guides for your computer
and devices
User’s Guides
6 Setup and Quick Reference Guide
Depending on your operating system, double-click the
User’s Guides icon on your desktop, or click the Start
button and then select Help and Support to access the
electronic documentation stored on your hard drive.
Obtain information on the following:
• Using your computer
• Configuring system settings
• Removing and installing parts
• Installing and configuring software
• Diagnosing a problem
• Technical specifications
• Device documentation (on selected operating systems)
• Getting technical assistance
Page 9
Resources and Support Tools
Resource Contents Using the Resource
Dell support website
• Technical support and
• Downloads for your
•Order or delivery status
• Hints and tips, technology
Dell Premier Support website
•Service call status
•Top technical issues by
• Frequently asked questions
• Customized service tags
• System configuration detail
(continued)
information
computer
papers, service information
product
by product number
Go to http://support.dell.com and complete the one-time
registration.
• Get help with general usage, installation, and
troubleshooting questions
• Obtain answers to technical service and support
questions
• Get the latest versions of the drivers for your computer
• Access documentation about your computer and
devices
• Join online discussions with other Dell customers and
Dell technical professionals
• Explore a list of online links to Dell's primary vendors
Go to http://premiersupport.dell.com:
The Dell Premier Support website is customized for
corporate, government, and education customers.
This site may not be available in all regions.
Setup and Quick Reference Guide 7
Page 10
Getting Started/Setup
Use the following steps to connect external devices to your computer via the
input/output (I/O) panel. The back of your Dell system, including the I/O
panel, may look different from the examples shown here.
1
www.dell.com | support.dell.com
8 Setup and Quick Reference Guide
Page 11
NOTE: Connect only one keyboard and one mouse.
NOTE: If you have a Universal Serial Bus (USB)-compliant mouse or
keyboard, use the USB connectors on the back of your system.
Setup and Quick Reference Guide 9
Page 12

System with
2
one video connector
www.dell.com | support.dell.com
video connector
on expansion card
System with
two video connectors
NOTE: If your system has two video connectors, the integrated video
connector is disabled and has a protective cap on it. Use the expansion card
connector, as shown in the illustrations on the right in step 2.
10 Setup and Quick Reference Guide
video connector
on expansion card
Page 13
System with
one video connector
NOTE: If your system has two video connectors, the integrated video
connector is disabled and has a protective cap on it. Use the expansion card
connector, as shown in the illustrations on the right in step 2.
System with
two video connectors
video connector
on expansion card
Setup and Quick Reference Guide 11
Page 14

3
www.dell.com | support.dell.com
diagnostics lights diagnostics lights
diagnostics lights
12 Setup and Quick Reference Guide
Page 15

diagnostics
lights
NOTE: If your system has two audio connectors, use the one on the expansion
card, as shown in the illustrations on the right in step 3.
diagnostics
lights
Setup and Quick Reference Guide 13
Page 16
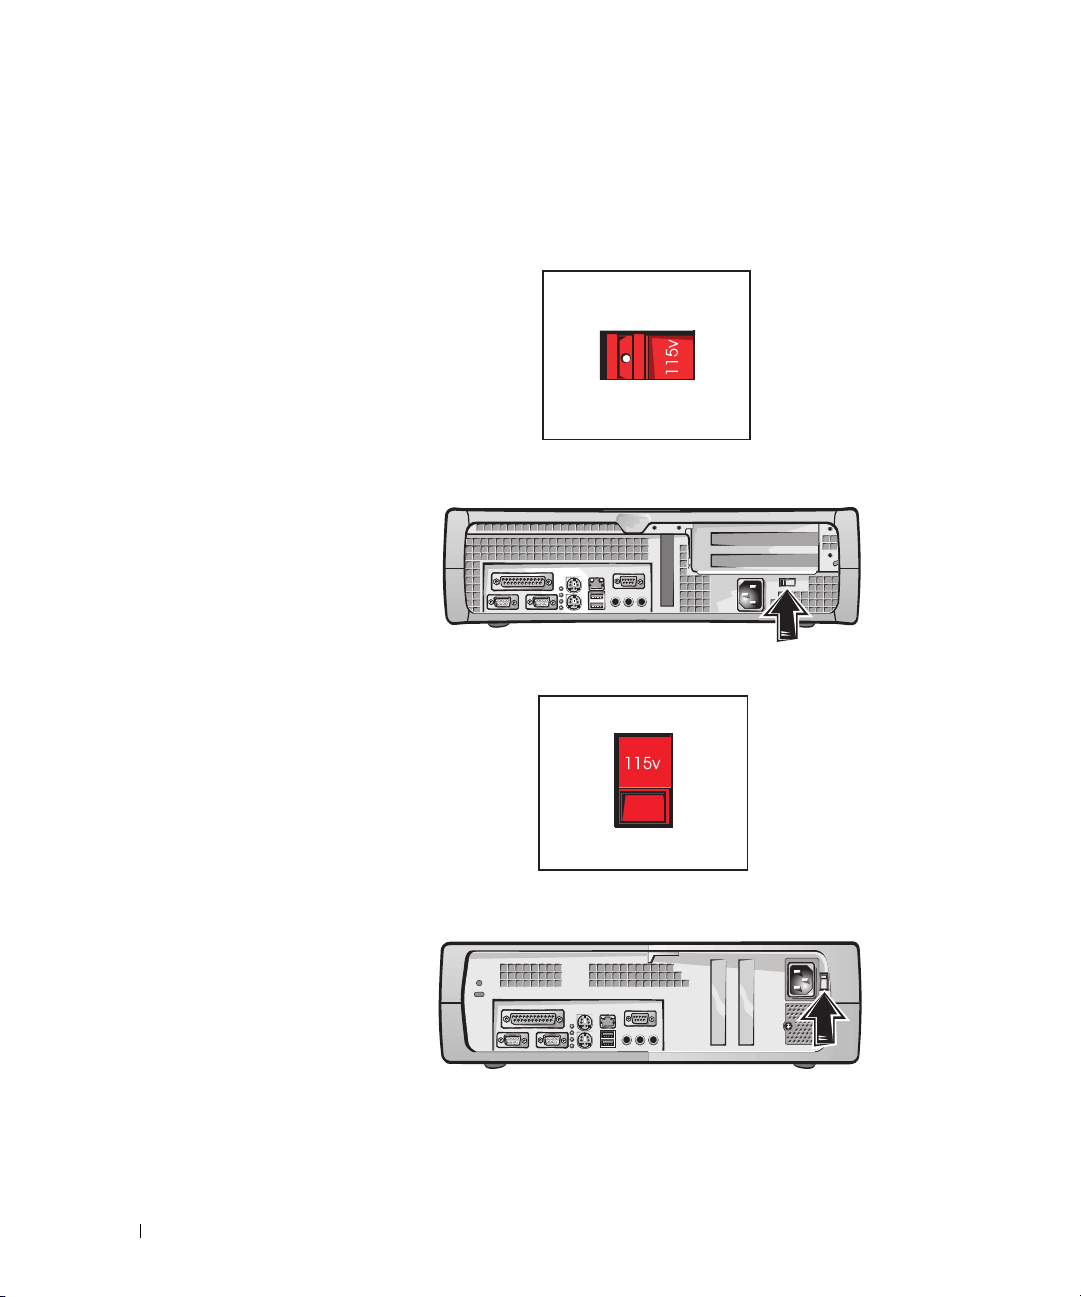
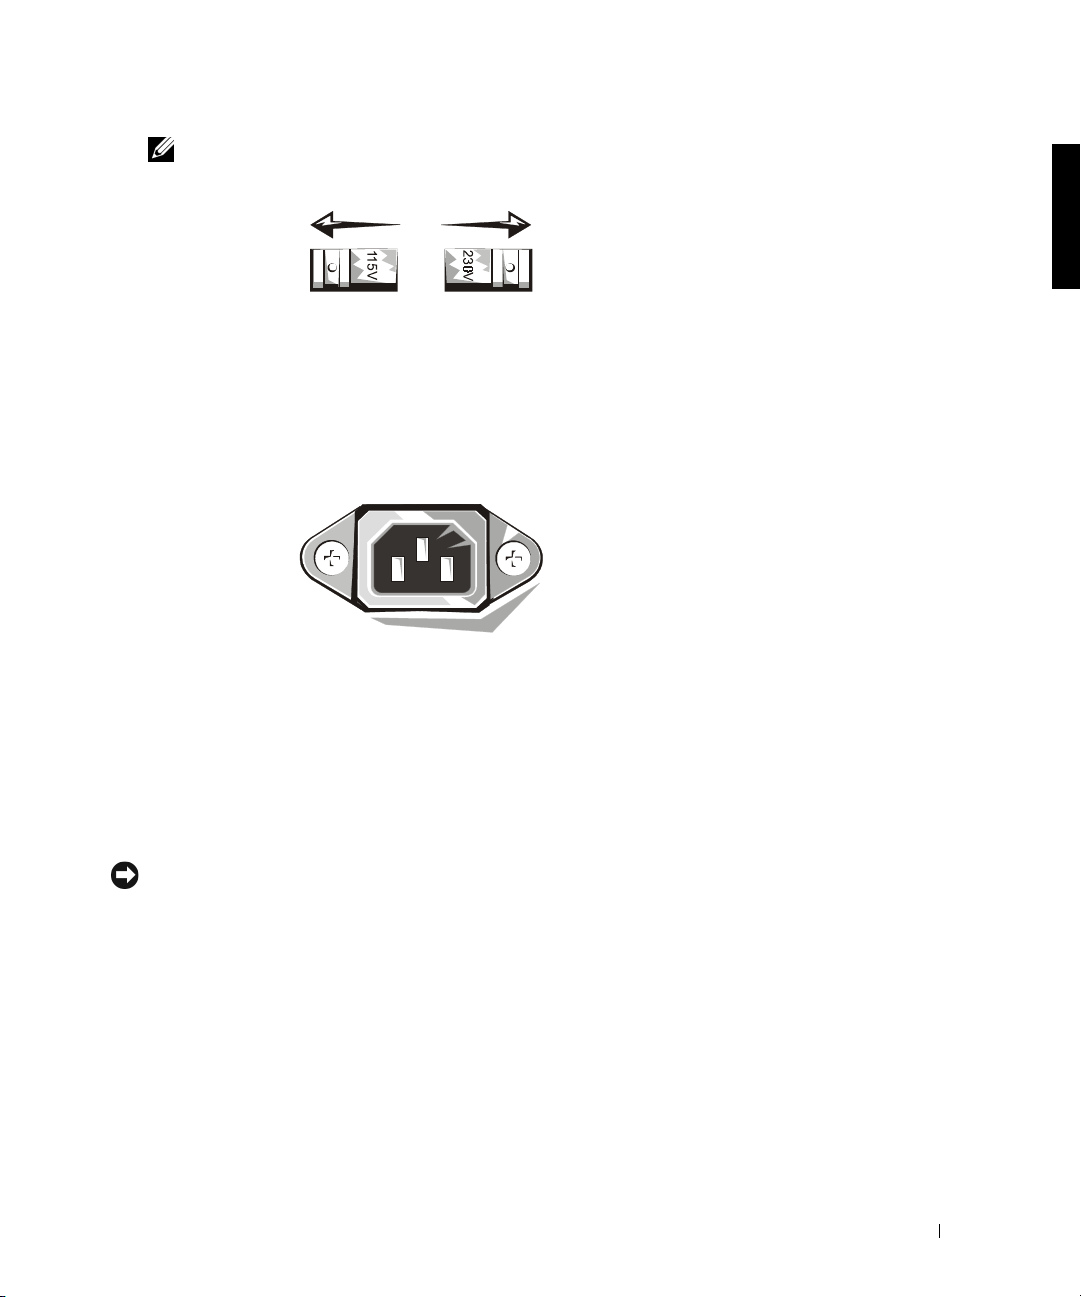
Verify that the voltage selection switch is set correctly for your location. For
more information, see “When Using Your Computer System” found later in
this document.
4
www.dell.com | support.dell.com
14 Setup and Quick Reference Guide
Page 17

Setup and Quick Reference Guide 15
Page 18
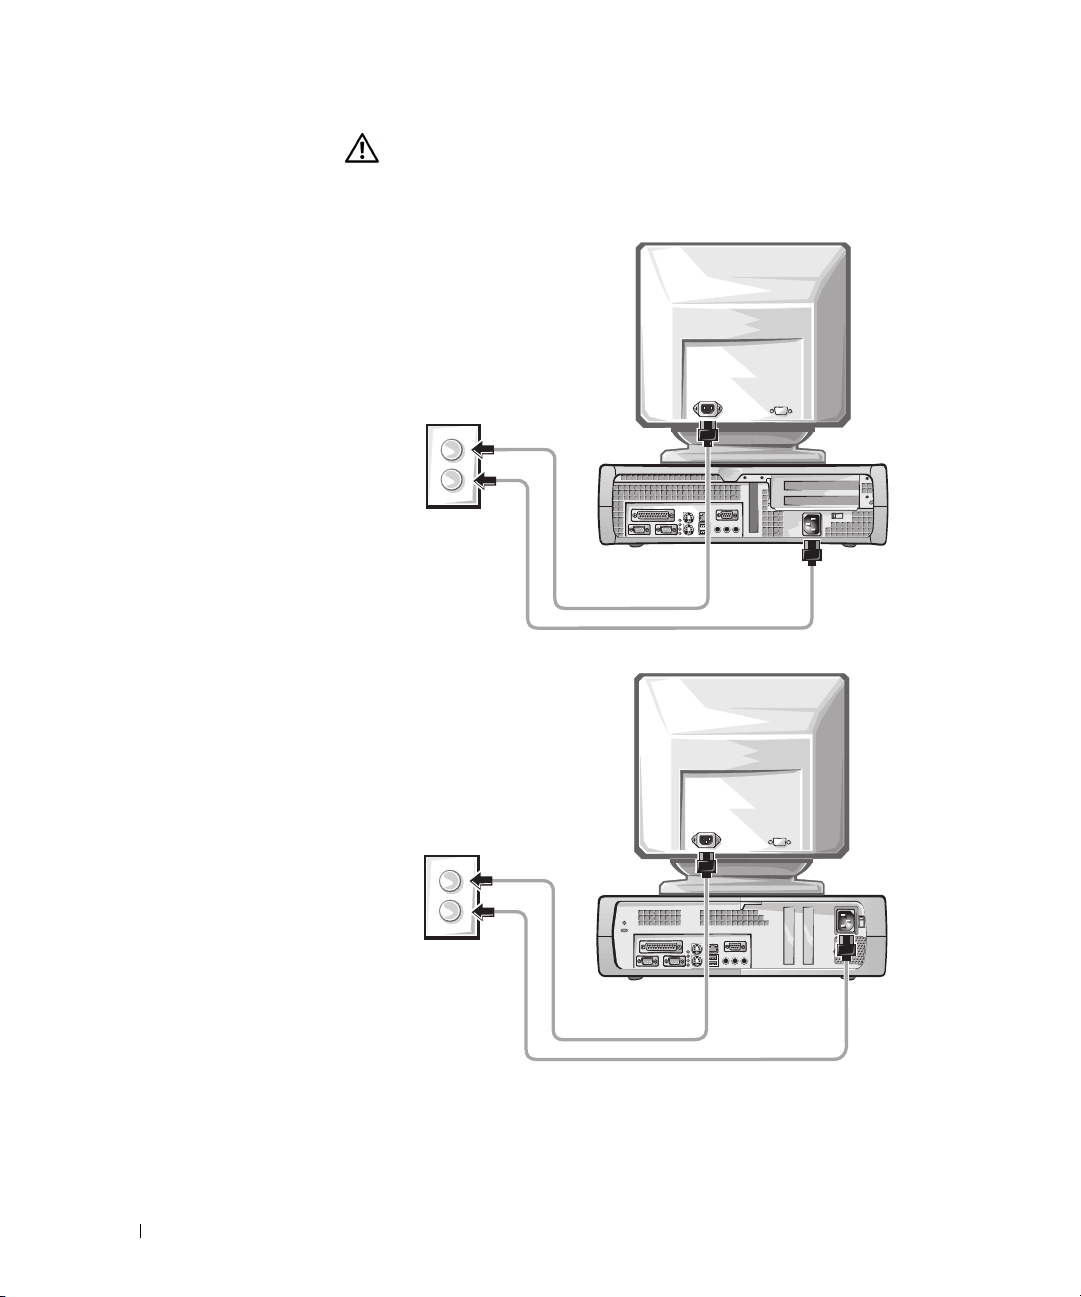
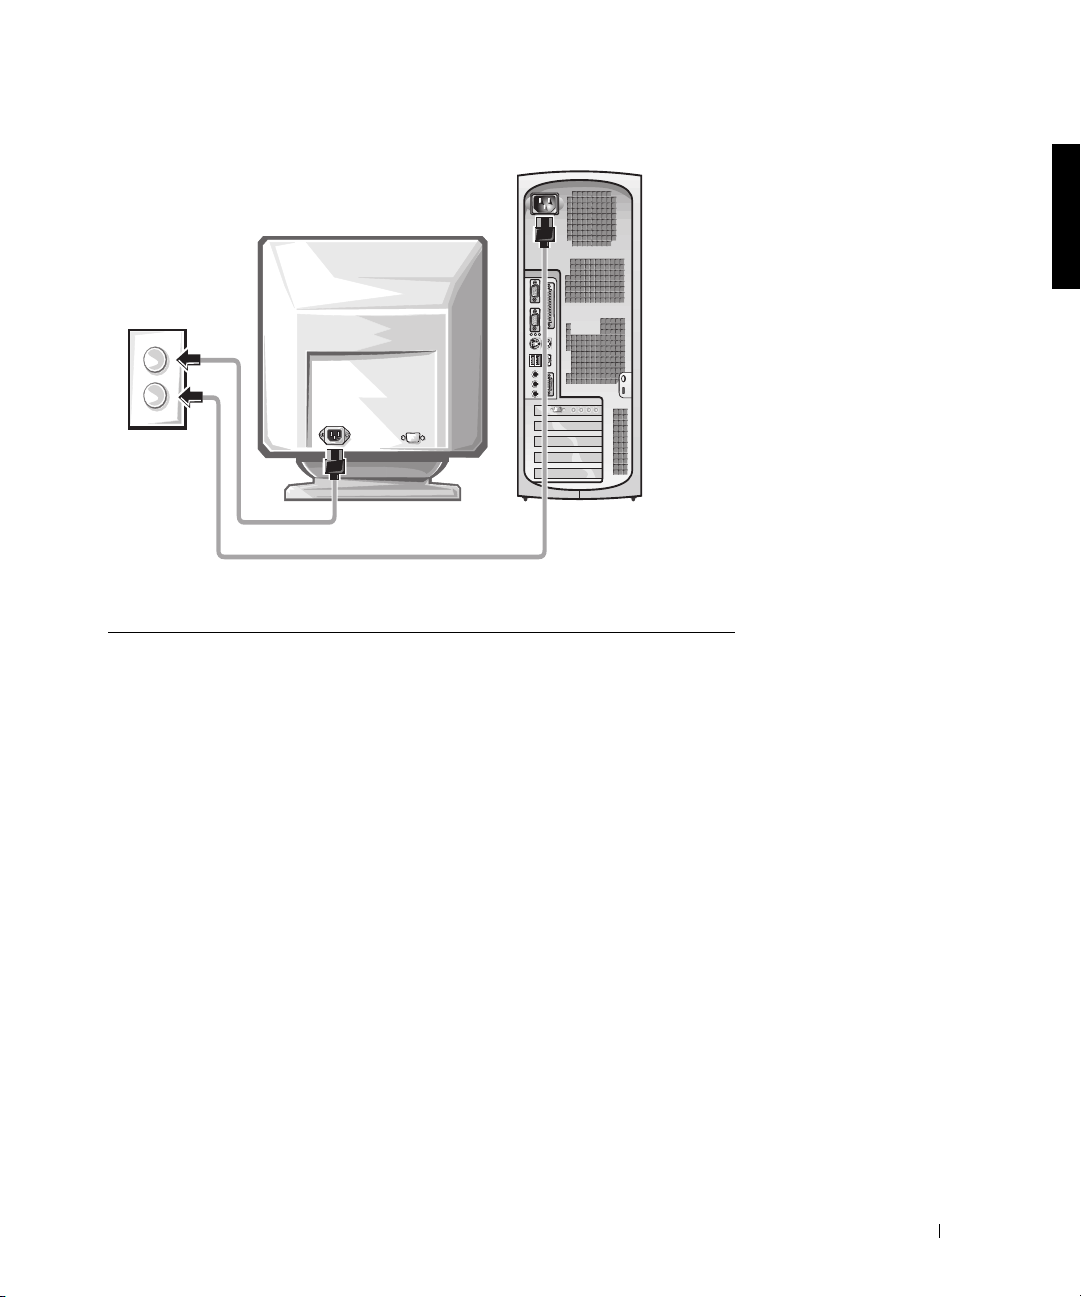
CAUTION: To help prevent electric shock, use only the power
cable provided and ensure that it is plugged into a properly
grounded power source.
5
www.dell.com | support.dell.com
16 Setup and Quick Reference Guide
Page 19
Setup and Quick Reference Guide 17
Page 20
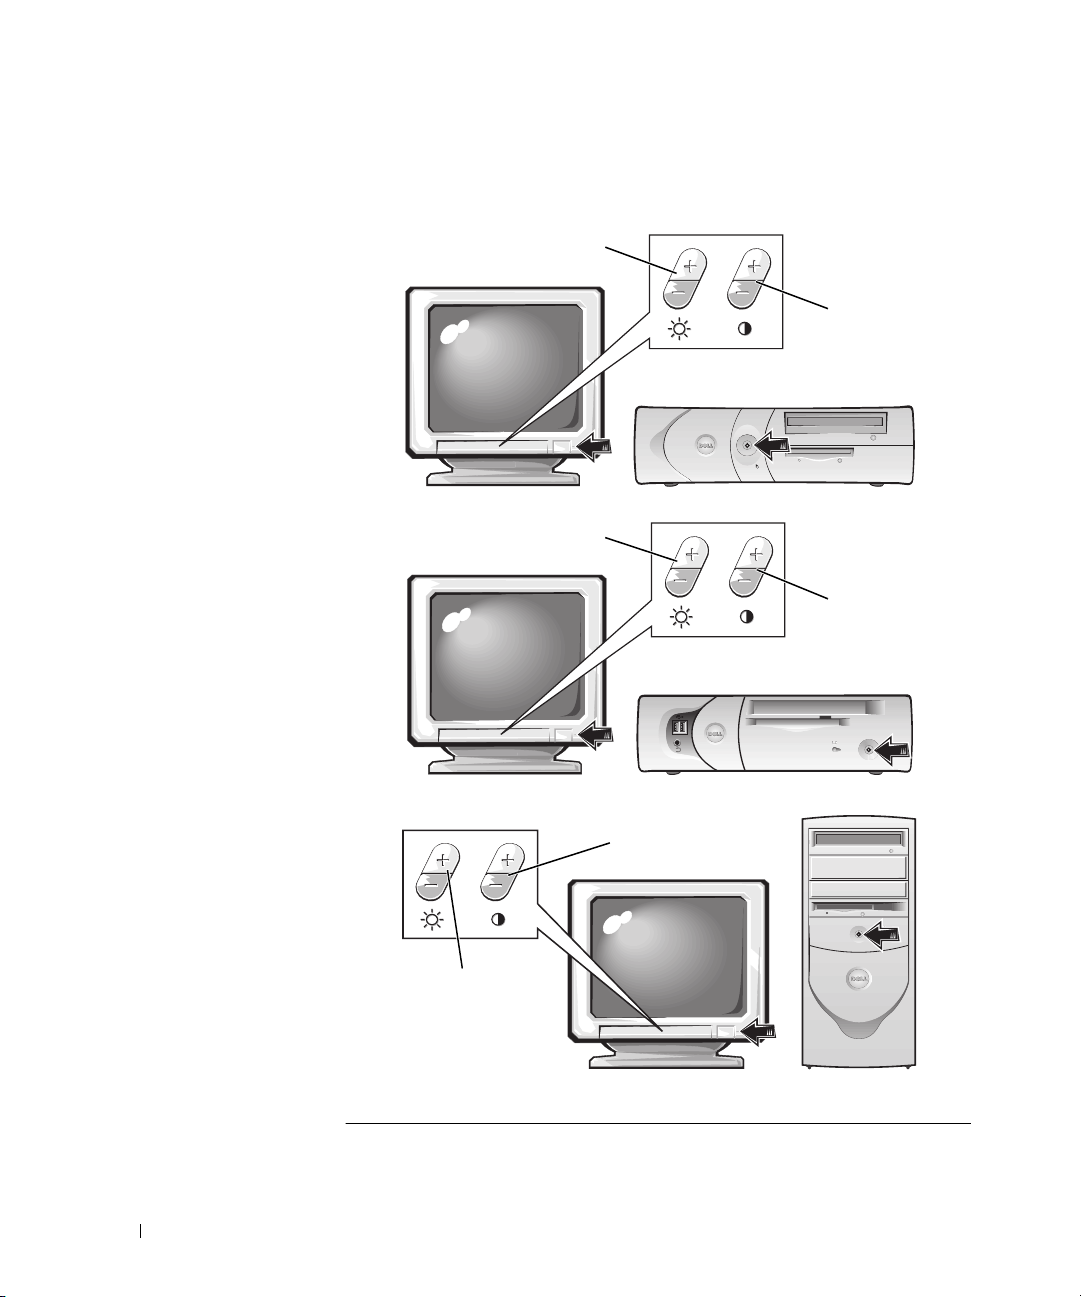
The following illustrations show power button locations and monitor
controls.
6
www.dell.com | support.dell.com
brightness
contrast
brightness
contrast
18 Setup and Quick Reference Guide
contrast
brightness
Page 21

Read the software license agreement and follow the operating system setup
instructions on the screen.
7
Congratulations! You have completed your system setup.
Depending on your operating system, double-click the User’s Guides icon
on your desktop (shown below), or click the Start button and then select
Help and Support to access the electronic documentation stored on your
hard drive.
Setup and Quick Reference Guide 19
Page 22

Solving Problems
Dell provides a number of tools to help you if your system does not perform
as expected. For the latest troubleshooting information available for your
system, see the Dell support website at http://support.dell.com. You can
also find descriptions of Dell troubleshooting tools in the section titled
“Getting Help” in your online User’s Guide.
If computer problems occur that require help from Dell, write a detailed
description of the error, beep codes, or diagnostics light patterns; record
your Express Service Code and Service Tag Number below; and then
contact Dell from the same location as your computer.
www.dell.com | support.dell.com
See “Finding Information and Assistance” on page 5 for an example of the
express service code and service tag numbers.
Express Service Code: ___________________________
Service Tag Number: ___________________________
Your computer includes the following tools that can help you solve a
problem:
D
ELL DIAGNOSTICS
computer and help to identify the cause of computer problems. For more
information, see "Running the Dell Diagnostics" on page 22.
S
YSTEM LIGHTS
indicate a computer problem. For more information, see your User’s Guide.
D
IAGNOSTIC LIGHTS
indicate a computer problem. For more information, see your User’s Guide.
S
YSTEM MESSAGES
current or possible failure. For more information, see your User’s Guide.
B
EEP CODES
help identify a problem. For more information, see your User’s Guide.
20 Setup and Quick Reference Guide
— The Dell Diagnostics test various components in your
— Located on the front of the computer, these lights can
— Located on the back of the computer, these lights can
— The computer reports these messages to warn you of
— A series of audible beep codes emitted by your computer can
Page 23

Using the
Dell OptiPlex ResourceCD
To use the Dell OptiPlex ResourceCD while you are running the Windows
operating system, perform the following steps.
NOTE: To access device drivers and user documentation, you must use the
ResourceCD
Turn on the computer and allow it to boot to the Windows desktop.
1
Insert the Dell OptiPlex ResourceCD into the CD drive.
2
while you are running Windows.
If you are using the Dell OptiPlex ResourceCD for the first time on this
computer, the ResourceCD Installation window opens to inform you
that the ResourceCD is about to begin installation.
Click OK to continue.
3
To complete the installation, respond to the prompts offered by the
installation program.
Click Next at the Welcome Dell System Owner screen.
4
Choose the appropriate System Model, Operating System, Device
5
Ty p e , and To pi c.
Drivers for Your Computer
To display a list of device drivers for your computer, perform the following
steps:
Click My Drivers in the Top i c pull-down menu.
1
The ResourceCD scans your computer’s hardware and operating
system, and then a list of device drivers for your system configuration
is displayed on the screen.
Click the appropriate driver and follow the instructions to download
2
the driver to your computer.
To view all available drivers for your computer, click Drivers from the Top ic
pull-down menu.
Setup and Quick Reference Guide 21
Page 24

Running the Dell Diagnostics
The Dell Diagnostics is a program that tests various components in your
computer. Run this program whenever you have a computer problem to
help you identify the source of the problem.You can run the Dell
Diagnostics from your hard drive or the ResourceCD.
NOTICE: If your hard drive fails, run the Dell Diagnostics from the
ResourceCD
Turn on your computer (if your computer is already on, restart it).
1
.
2
When
F2 = Setup
appears in the upper-right corner of the screen,
press <Ctrl><Alt><F10>.
www.dell.com | support.dell.com
The diagnostics initialization begins immediately; then the
Diagnostics Menu appears.
Select the appropriate diagnostic option for your computer.
3
To use the diagnostics, follow instructions on the screen.
Changing the Boot Sequence
To run the Dell Diagnostics from the ResourceCD, perform the following
steps to enable your computer to boot from the CD:
Insert the Dell OptiPlex ResourceCD into the CD drive.
1
Turn on (or restart) your computer.
2
3
When
F2 = Setup
appears in the upper-right corner of the screen,
press <Ctrl><Alt><F8>.
NOTE: This feature changes the boot sequence for one time only. On the next
start-up, the computer boots according to the devices specified in system setup.
The Boot Device Menu appears.
If you wait too long and the Windows logo appears, continue to wait
until you see the Windows desktop. Then shut down your computer
and try again.
Select the CD-ROM Device option.
4
22 Setup and Quick Reference Guide
Page 25

Running the Dell IDE Hard Drive Diagnostics
The Dell IDE Hard Drive Diagnostics is a utility that tests the hard drive to
troubleshoot or confirm a hard drive failure.
Turn on your computer (if your computer is already on, restart it).
1
2
When
F2 = Setup
appears in the upper-right corner of the screen,
press <Ctrl><Alt><D>.
Follow the instructions on the screen.
3
If a failure is reported, see “Hard Drive Problems” in your User’s Guide.
Safety Instructions
Use the following safety guidelines to help protect your computer system
from potential damage and to ensure your own personal safety.
When Working Inside Your Computer
Before you remove the computer cover, perform the following steps in the
sequence indicated.
NOTICE: Do not attempt to service the computer yourself, except as
explained in your online Dell documentation or otherwise provided to you.
Always follow installation and service instructions closely.
CAUTION: There is a danger of a new battery exploding if it is
incorrectly installed. Replace the battery only with the same or
equivalent type recommended by the manufacturer. Discard used
batteries according to the manufacturer’s instructions.
Turn off your computer and any peripherals.
1
Ground yourself by touching an unpainted metal surface on the
2
chassis, such as the metal around the card-slot openings at the back of
the computer, before touching anything inside your computer.
While you work, periodically touch an unpainted metal surface on the
computer chassis to dissipate any static electricity that might harm
internal components.
Disconnect your computer and peripherals from their power sources.
3
Also, disconnect any telephone or telecommunication lines from the
computer.
Setup and Quick Reference Guide 23
Page 26

Doing so reduces the potential for personal injury or shock.
In addition, take note of these safety guidelines when appropriate:
• To avoid shorting out your computer when disconnecting a network
cable, first unplug the cable from the network interface controller
(NIC) on the back of your computer, and then from the network jack
on the wall. When reconnecting a network cable to your computer,
first plug the cable into the network jack, and then into the NIC.
• When you disconnect a cable, pull on its connector or on its strainrelief loop, not on the cable itself. Some cables have a connector with
locking tabs; if you are disconnecting this type of cable, press in on the
www.dell.com | support.dell.com
locking tabs before disconnecting the cable. As you pull connectors
apart, keep them evenly aligned to avoid bending any connector pins.
Also, before you connect a cable, make sure both connectors are
correctly oriented and aligned.
• Handle components and cards with care. Do not touch the
components or contacts on a card. Hold a card by its edges or by its
metal mounting bracket. Hold a component such as a microprocessor
chip by its edges, not by its pins.
When Using Your Computer System
As you use your computer system, observe the following safety guidelines.
CAUTION: Do not operate your computer system with any cover(s)
(including computer covers, bezels, filler brackets, and frontpanel inserts) removed.
• To help avoid damaging your computer, be sure the voltage selection
switch on the power supply is set to match the AC power available at
your location:
– 115 volts (V)/60 hertz (Hz) in most of North and South America
and some Far Eastern countries such as South Korea and Taiwan
– 100 V/50 Hz in eastern Japan and 100 V/60 Hz in western Japan
NOTE: The voltage selection switch must be set to the 115V position
even though the AC supply in Japan is 100 V.
– 230 V/50 Hz in most of Europe, the Middle East, and the Far East
Also be sure your monitor and attached peripherals are electrically
rated to operate with the AC power available in your location.
24 Setup and Quick Reference Guide
Page 27
NOTE: Auto-select power supplies do not require a voltage selection
switch. Your power supply may not have this switch.
• To help prevent electric shock, plug the computer and peripheral
power cables into properly grounded power sources. These cables are
equipped with three-prong plugs to help ensure proper grounding. Do
not use adapter plugs or remove the grounding prong from a cable. If
you must use an extension cable, use a three-wire cable with properly
grounded plugs.
• Before working inside the computer, unplug the system to help prevent
electric shock or system board damage. Certain system board
components continue to receive power any time the computer is
connected to AC power.
• To help avoid possible damage to the system board, wait 15 seconds
after unplugging the system before disconnecting a device from the
computer.
NOTICE: Observe when the auxiliary power light-emitting diode (LED)
indicator on the system board turns off to verify that system power is off (see
User’s Guide
your
for the location of this LED).
• To help protect your computer system from sudden, transient
increases and decreases in electrical power, use a surge suppressor, line
conditioner, or uninterruptible power supply (UPS).
• Be sure nothing rests on your computer system’s cables and that the
cables are not located where they can be stepped on or tripped over.
• Do not spill food or liquids on your computer. If the computer gets
wet, consult your User’s Guide.
Setup and Quick Reference Guide 25
Page 28

• Do not push any objects into the openings of your computer. Doing so
can cause fire or electric shock by shorting out interior components.
• Keep your computer away from radiators and heat sources. Also, do not
block cooling vents. Avoid placing loose papers underneath your
computer; do not place your computer in a closed-in wall unit or on a
bed, sofa, or rug.
Ergonomic Computing Habits
CAUTION: Improper or prolonged keyboard use may result in
injury.
www.dell.com | support.dell.com
CAUTION: Viewing the monitor screen for extended periods of
time may result in eye strain.
For comfort and efficiency, observe the ergonomic guidelines in your User’s
Guide when setting up and using your computer system.
Regulatory Information
Electromagnetic Interference (EMI) is any signal or emission, radiated in
free space or conducted along power or signal leads, that endangers the
functioning of a radio navigation or other safety service or seriously
degrades, obstructs, or repeatedly interrupts a licensed radio
communications service.
Your Dell computer system is designed to comply with applicable
regulations regarding EMI. Changes or modifications not expressly
approved by Dell could void the user’s authority to operate the equipment.
Dell computer systems are designed, tested, and classified for their
intended electromagnetic environment. These electromagnetic
environment classifications fall into two groups:
• Class A designates a device which may be operated in business or
industrial environments only.
• designates a device which may be operated in residential
settings as well as business or industrial environments.
26 Setup and Quick Reference Guide
Page 29

Class A
Class A equipment has been tested and found to comply with the limits for
a Class A digital device, pursuant to part 15 of the FCC Rules. These limits
are designed to provide reasonable protection against harmful interference
in a commercial environment. This equipment generates, uses, and can
radiate radio frequency energy and, if not installed and used in accordance
with the instructions, may cause harmful interference to radio
communications. Operation of this equipment in a residential area is likely
to cause harmful interference, in which case the user will be required to
correct the interference at his/her own expense.
Class B
Class B equipment has been tested and found to comply with the limits for
a Class B digital device, pursuant to part 15 of the FCC Rules. These limits
are designed to provide reasonable protection against harmful interference
in a residential installation. This equipment generates, uses and can radiate
radio frequency energy and, if not installed and used in accordance with the
instructions, may cause harmful interference to radio communications.
However, there is no guarantee that interference will not occur in a
particular installation. If this equipment does cause harmful interference to
radio or television reception, which can be determined by turning the
equipment off and on, the user is encouraged to try to correct the
interference by one or more of the following measures:
• Reorient or relocate the receiving antenna
• Increase the separation between the equipment and receiver
• Connect the equipment into an outlet on a circuit different from that
to which the receiver is connected
• Consult Dell or an experienced radio/TV technician for help
NOTE: Inspect the regulatory label affixed to the back or bottom of your Dell
system to determine the environments in which your system may be operated.
NOTE: Additional regulatory information regarding your system can be found
in your
User’s Guide
.
Setup and Quick Reference Guide 27
Page 30

NOM Information (Mexico Only)
The following information is provided on the device(s) described in this
document in compliance with the requirements of the official Mexican
standards (NOM):
Exporter: Dell Computer Corporation
One Dell Way
Round Rock, TX 78682
Importer: Dell Computer de México,
S.A. de C.V.
www.dell.com | support.dell.com
Ship to: Dell Computer de México,
Supply voltage: 115/230 VAC
Frequency: 60/50 Hz
Input current rating: DHS—2.0/1.0 A
Paseo de la Reforma 2620 - 11° Piso
Col. Lomas Altas
11950 México, D.F.
S.A. de C.V. al Cuidado
de Kuehne & Nagel de
México S. de R.I.
Avenida Soles No. 55
Col. Peñon de los Baños
15520 México, D.F.
or
DHP—1.5/0.75 A
or
DHM—3.0/1.5 A
28 Setup and Quick Reference Guide
Page 31

Información para NOM (únicamente para México)
La información siguiente se proporciona en el dispositivo o en los
dispositivos descritos en este documento, en cumplimiento con los
requisitos de la Norma Oficial Mexicana (NOM):
Exportador: Dell Computer Corporation
One Dell Way
Round Rock, TX 78682
Importador: Dell Computer de México,
S.A. de C.V.
Paseo de la Reforma 2620 - 11° Piso
Col. Lomas Altas
11950 México, D.F.
Embarcar a: Dell Computer de México,
S.A. de C.V. al Cuidado
de Kuehne & Nagel de
México S. de R.I.
Avenida Soles No. 55
Col. Peñon de los Baños
15520 México, D.F.
Tensión de
alimentación:
Frecuencia: 60/50 Hz
Consumo de
corriente:
115/230 VAC
DHS—2.0/1.0 A
o
DHP—1.5/0.75 A
o
DHM—3.0/1.5 A
Setup and Quick Reference Guide 29
Page 32

Intel Warranty Statement (U.S. and Canada Only)
www.dell.com | support.dell.com
30 Setup and Quick Reference Guide
Page 33

Limited One-Year Warranty (U.S. Only)
Dell Computer Corporation (“Dell”) manufactures its hardware products
from parts and components that are new or equivalent to new in accordance
with industry-standard practices. Dell warrants that the hardware
products it manufactures will be free from defects in materials and
workmanship. The limited warranty term is one year beginning on the date
of invoice, as further described in the following text.
Setup and Quick Reference Guide 31
Page 34

Damage due to shipping the products to you is covered under this limited
warranty. Otherwise, this limited warranty does not cover damage due to
external causes, including accident, abuse, misuse, problems with electrical
power, servicing not authorized by Dell, usage not in accordance with
product instructions, failure to perform required preventive maintenance,
and problems caused by use of parts and components not supplied by Dell.
This limited warranty does not cover any items that are in one or more of
the following categories: software; external devices (except as specifically
noted); accessories or parts added to a Dell system after the system is
shipped from Dell; accessories or parts added to a Dell system through
Dell’s system integration department; accessories or parts that are not
www.dell.com | support.dell.com
installed in the Dell factory; or DellWare™ products. Monitors, keyboards,
and mice that are Dell-branded or that are included on Dell’s standard price
list are covered under this limited warranty; all other monitors, keyboards,
and mice (including those sold through the DellWare program) are not
covered.
Dell will repair or replace products covered under this limited warranty that
are returned to Dell’s facility. To request warranty service, you must contact
Dell’s Customer Technical Support within the limited warranty period. See
“Getting Help” in your User’s Guide to find the appropriate contact
information for obtaining customer assistance. If warranty service is
required, Dell will issue a Return Material Authorization Number. You must
ship the products back to Dell in their original or equivalent packaging,
prepay shipping charges, and insure the shipment or accept the risk of loss
or damage during shipment. Dell will ship the repaired or replacement
products to you (freight prepaid) if you use an address in the continental
U.S., where applicable. Shipments to other locations will be made freight
collect.
NOTE: Before you ship the product(s) to Dell, back up the data on the hard-
disk drive(s) and any other storage device(s) in the product(s). Remove any
removable media, such as diskettes, CDs, or PC Cards.
Dell owns all parts removed from repaired products. Dell uses new and
reconditioned parts made by various manufacturers in performing warranty
repairs and building replacement products. If Dell repairs or replaces a
product, its warranty term is not extended.
32 Setup and Quick Reference Guide
Page 35

THIS LIMITED WARRANTY GIVES YOU SPECIFIC LEGAL RIGHTS,
AND YOU MAY ALSO HAVE OTHER RIGHTS, WHICH VARY FROM
STATE TO STATE (OR JURISDICTION TO JURISDICTION). DELL'S
RESPONSIBILITY FOR MALFUNCTIONS AND DEFECTS IN
HARDWARE IS LIMITED TO REPAIR AND REPLACEMENT AS SET
FORTH IN THIS LIMITED WARRANTY STATEMENT. ALL EXPRESS
AND IMPLIED WARRANTIES FOR THE PRODUCT, INCLUDING
BUT NOT LIMITED TO ANY IMPLIED WARRANTIES OF AND
CONDITIONS OF MERCHANTABILITY AND FITNESS FOR A
PARTICULAR PURPOSE, ARE LIMITED IN DURATION TO THE
WARRANTY PERIOD SET FORTH ABOVE AND NO WARRANTIES,
WHETHER EXPRESS OR IMPLIED, WILL APPLY AFTER SUCH
PERIOD.
SOME STATES (OR JURISDICTIONS) DO NOT ALLOW
LIMITATIONS ON HOW LONG AN IMPLIED WARRANTY LASTS, SO
THE PRECEDING LIMITATION MAY NOT APPLY TO YOU.
DELL DOES NOT ACCEPT LIABILITY BEYOND THE REMEDIES
SET FORTH IN THIS LIMITED WARRANTY STATEMENT OR
LIABILITY FOR INCIDENTAL OR CONSEQUENTIAL DAMAGES,
INCLUDING WITHOUT LIMITATION ANY LIABILITY FOR
PRODUCTS NOT BEING AVAILABLE FOR USE OR FOR LOST DATA
OR SOFTWARE.
SOME STATES (OR JURISDICTIONS) DO NOT ALLOW THE
EXCLUSION OR LIMITATION OF INCIDENTAL OR
CONSEQUENTIAL DAMAGES, SO THE PRECEDING EXCLUSION
OR LIMITATION MAY NOT APPLY TO YOU.
These provisions apply to Dell’s one-year limited warranty only. For
provisions of any service contract covering your system, refer to your invoice
or the separate service contract that you will receive.
If Dell elects to exchange a product or portion of a product, the exchange
will be made in accordance with Dell’s Exchange Policy in effect on the date
of the exchange. In any instance in which Dell issues a Return Material
Authorization Number, Dell must receive the product(s) for repair prior to
the expiration of the warranty period in order for the repair(s) to be covered
by the limited warranty.
Setup and Quick Reference Guide 33
Page 36

One-Year Limited Warranty (Canada Only)
Dell Computer Corporation (“Dell”) manufactures its hardware products
from parts and components that are new or equivalent to new in accordance
with industry-standard practices. Dell warrants that the hardware
products it manufactures will be free from defects in materials and
workmanship. The limited warranty term is one year beginning on the date
of invoice, as further described in the following text.
Damage due to shipping the products to you is covered under this limited
www.dell.com | support.dell.com
warranty. Otherwise, this limited warranty does not cover damage due to
external causes, including accident, abuse, misuse, problems with electrical
power, servicing not authorized by Dell, usage not in accordance with
product instructions, failure to perform required preventive maintenance,
and problems caused by use of parts and components not supplied by Dell.
This limited warranty does not cover any items that are in one or more of
the following categories: software; external devices (except as specifically
noted); accessories or parts added to a Dell system after the system is
shipped from Dell; accessories or parts added to a Dell system through
Dell’s system integration department; accessories or parts that are not
installed in the Dell factory; or DellWare products. Monitors, keyboards,
and mice that are Dell-branded or that are included on Dell’s standard price
list are covered under this limited warranty; all other monitors, keyboards,
and mice (including those sold through the DellWare program) are not
covered.
Dell will repair or replace products covered under this limited warranty that
are returned to Dell’s facility. To request warranty service, you must contact
Dell’s Customer Technical Support within the warranty period. See
“Getting Help” in your User’s Guide to find the appropriate contact
information for obtaining customer assistance. If warranty service is
required, Dell will issue a Return Material Authorization Number. You must
ship the products back to Dell in their original or equivalent packaging,
prepay shipping charges, and insure the shipment or accept the risk of loss
or damage during shipment. Dell will ship the repaired or replacement
products to you (freight prepaid) if you use an address in Canada, where
applicable. Shipments to other locations will be made freight collect.
34 Setup and Quick Reference Guide
Page 37

NOTE: Before you ship the product(s) to Dell, back up the data on the hard-
disk drive(s) and any other storage device(s) in the product(s). Remove any
removable media, such as diskettes, CDs, or PC Cards.
Dell owns all parts removed from repaired products. Dell uses new and
reconditioned parts made by various manufacturers in performing warranty
repairs and building replacement products. If Dell repairs or replaces a
product, its warranty term is not extended.
DELL MAKES NO EXPRESS WARRANTIES OR CONDITIONS
BEYOND THOSE STATED IN THIS LIMITED WARRANTY
STATEMENT. DELL DISCLAIMS ALL OTHER WARRANTIES AND
CONDITIONS, EXPRESS OR IMPLIED, INCLUDING WITHOUT
LIMITATION IMPLIED WARRANTIES AND CONDITIONS OF
MERCHANTABILITY AND FITNESS FOR A PARTICULAR PURPOSE.
SOME STATES (OR JURISDICTIONS) DO NOT ALLOW
LIMITATIONS ON IMPLIED WARRANTIES OR CONDITIONS, SO
THIS LIMITATION MAY NOT APPLY TO YOU.
DELL’S RESPONSIBILITY FOR MALFUNCTIONS AND DEFECTS IN
HARDWARE IS LIMITED TO REPAIR AND REPLACEMENT AS SET
FORTH IN THIS LIMITED WARRANTY STATEMENT. THESE
WARRANTIES GIVE YOU SPECIFIC LEGAL RIGHTS, AND YOU MAY
ALSO HAVE OTHER RIGHTS, WHICH VARY FROM STATE TO
STATE (OR JURISDICTION TO JURISDICTION).
DELL DOES NOT ACCEPT LIABILITY BEYOND THE REMEDIES
SET FORTH IN THIS LIMITED WARRANTY STATEMENT OR
LIABILITY FOR INCIDENTAL OR CONSEQUENTIAL DAMAGES,
INCLUDING WITHOUT LIMITATION ANY LIABILITY FOR
PRODUCTS NOT BEING AVAILABLE FOR USE OR FOR LOST DATA
OR SOFTWARE.
SOME STATES (OR JURISDICTIONS) DO NOT ALLOW THE
EXCLUSION OR LIMITATION OF INCIDENTAL OR
CONSEQUENTIAL DAMAGES, SO THE PRECEDING EXCLUSION
OR LIMITATION MAY NOT APPLY TO YOU.
These provisions apply to Dell’s one-year limited warranty only. For
provisions of any service contract covering your system, refer to your invoice
or the separate service contract that you will receive.
Setup and Quick Reference Guide 35
Page 38

If Dell elects to exchange a product or portion of a product, the exchange
will be made in accordance with Dell’s Exchange Policy in effect on the date
of the exchange. In any instance in which Dell issues a Return Material
Authorization Number, Dell must receive the product(s) for repair prior to
the expiration of the warranty period in order for the repair(s) to be covered
by the limited warranty.
Three-Year Limited Warranty (U.S. Only)
www.dell.com | support.dell.com
Dell Computer Corporation (“Dell”) manufactures its hardware products
from parts and components that are new or equivalent to new in accordance
with industry-standard practices. Dell warrants that the hardware products
it manufactures will be free from defects in materials and workmanship.
The limited warranty term is three years beginning on the date of invoice, as
described in the following text.
Damage due to shipping the products to you is covered under this limited
warranty. Otherwise, this limited warranty does not cover damage due to
external causes, including accident, abuse, misuse, problems with electrical
power, servicing not authorized by Dell, usage not in accordance with
product instructions, failure to perform required preventive maintenance,
and problems caused by use of parts and components not supplied by Dell.
This limited warranty does not cover any items that are in one or more of
the following categories: software; external devices (except as specifically
noted); accessories or parts added to a Dell system after the system is
shipped from Dell; accessories or parts added to a Dell system through
Dell’s system integration department; accessories or parts that are not
installed in the Dell factory; or DellWare™ products. Monitors, keyboards,
and mice that are Dell-branded or that are included on Dell’s standard price
list are covered under this limited warranty; all other monitors, keyboards,
and mice (including those sold through the DellWare program) are not
covered. Batteries for portable computers are covered only during the initial
one-year period of this limited warranty.
36 Setup and Quick Reference Guide
Page 39

Coverage During Year One
During the one-year period beginning on the invoice date, Dell will repair or
replace products covered under this limited warranty that are returned to
Dell’s facility. To request warranty service, you must contact Dell’s
Customer Technical Support within the warranty period. See “Getting
Help” in your User’s Guide to find the appropriate contact information for
obtaining customer assistance. If warranty service is required, Dell will issue
a Return Material Authorization Number. You must ship the products back
to Dell in their original or equivalent packaging, prepay shipping charges,
and insure the shipment or accept the risk of loss or damage during
shipment. Dell will ship the repaired or replacement products to you freight
prepaid if you use an address in the continental U.S., where applicable.
Shipments to other locations will be made freight collect.
NOTE: Before you ship the product(s) to Dell, back up the data on the hard-
disk drive(s) and any other storage device(s) in the product(s). Remove any
removable media, such as diskettes, CDs, or PC Cards. Dell does not accept
liability for lost data or software.
Dell owns all parts removed from repaired products. Dell uses new and
reconditioned parts made by various manufacturers in performing warranty
repairs and building replacement products. If Dell repairs or replaces a
product, its warranty term is not extended.
Coverage During Years Two and Three
During the second and third years of this limited warranty, Dell will provide,
on an exchange basis and subject to Dell’s Exchange Policy in effect on the
date of the exchange, replacement parts for the Dell hardware product(s)
covered under this limited warranty when a part requires replacement. You
must report each instance of hardware failure to Dell’s Customer Technical
Support in advance to obtain Dell’s concurrence that a part should be
replaced and to have Dell ship the replacement part. Dell will ship parts
(freight prepaid) if you use an address in the continental U.S., where
applicable. Shipments to other locations will be made freight collect. Dell
will include a prepaid shipping container with each replacement part for
your use in returning the replaced part to Dell. Replacement parts are new
or reconditioned. Dell may provide replacement parts made by various
manufacturers when supplying parts to you. The warranty term for a
replacement part is the remainder of the limited warranty term.
Setup and Quick Reference Guide 37
Page 40

You will pay Dell for replacement parts if the replaced part is not returned to
Dell. The process for returning replaced parts, and your obligation to pay for
replacement parts if you do not return the replaced parts to Dell, will be in
accordance with Dell’s Exchange Policy in effect on the date of the
exchange.
You accept full responsibility for your software and data. Dell is not required
to advise or remind you of appropriate backup and other procedures.
General Provisions
THIS LIMITED WARRANTY GIVES YOU SPECIFIC LEGAL RIGHTS,
www.dell.com | support.dell.com
AND YOU MAY ALSO HAVE OTHER RIGHTS, WHICH VARY FROM
STATE TO STATE (OR JURISDICTION TO JURISDICTION). DELL'S
RESPONSIBILITY FOR MALFUNCTIONS AND DEFECTS IN
HARDWARE IS LIMITED TO REPAIR AND REPLACEMENT AS SET
FORTH IN THIS LIMITED WARRANTY STATEMENT. ALL EXPRESS
AND IMPLIED WARRANTIES FOR THE PRODUCT, INCLUDING
BUT NOT LIMITED TO ANY IMPLIED WARRANTIES OF AND
CONDITIONS OF MERCHANTABILITY AND FITNESS FOR A
PARTICULAR PURPOSE, ARE LIMITED IN DURATION TO THE
WARRANTY PERIOD SET FORTH ABOVE AND NO WARRANTIES,
WHETHER EXPRESS OR IMPLIED, WILL APPLY AFTER SUCH
PERIOD.
SOME STATES (OR JURISDICTIONS) DO NOT ALLOW
LIMITATIONS ON HOW LONG AN IMPLIED WARRANTY LASTS, SO
THE PRECEDING LIMITATION MAY NOT APPLY TO YOU.
DELL DOES NOT ACCEPT LIABILITY BEYOND THE REMEDIES
SET FORTH IN THIS LIMITED WARRANTY STATEMENT OR
LIABILITY FOR INCIDENTAL OR CONSEQUENTIAL DAMAGES,
INCLUDING WITHOUT LIMITATION ANY LIABILITY FOR
PRODUCTS NOT BEING AVAILABLE FOR USE OR FOR LOST DATA
OR SOFTWARE.
SOME STATES (OR JURISDICTIONS) DO NOT ALLOW THE
EXCLUSION OR LIMITATION OF INCIDENTAL OR
CONSEQUENTIAL DAMAGES, SO THE PRECEDING EXCLUSION
OR LIMITATION MAY NOT APPLY TO YOU.
38 Setup and Quick Reference Guide
Page 41

These provisions apply to Dell’s three-year limited warranty only. For
provisions of any service contract covering your system, refer to your invoice
or the separate service contract that you will receive.
If Dell elects to exchange a system or component, the exchange will be
made in accordance with Dell’s Exchange Policy in effect on the date of the
exchange. In any instance in which Dell issues a Return Material
Authorization Number, Dell must receive the product(s) for repair prior to
the expiration of the warranty period in order for the repair(s) to be covered
by the limited warranty.
NOTE: If you chose one of the available warranty and service options in place
of the standard three-year limited warranty described in the preceding text, the
option you chose will be listed on your invoice.
Three-Year Limited Warranty (Canada Only)
Dell Computer Corporation (“Dell”) manufactures its hardware products
from parts and components that are new or equivalent to new in accordance
with industry-standard practices. Dell warrants that the hardware products
it manufactures will be free from defects in materials and workmanship.
The warranty term is three years beginning on the date of invoice, as
described in the following text.
Damage due to shipping the products to you is covered under this limited
warranty. Otherwise, this limited warranty does not cover damage due to
external causes, including accident, abuse, misuse, problems with electrical
power, servicing not authorized by Dell, usage not in accordance with
product instructions, failure to perform required preventive maintenance,
and problems caused by use of parts and components not supplied by Dell.
Setup and Quick Reference Guide 39
Page 42

This limited warranty does not cover any items that are in one or more of
the following categories: software; external devices (except as specifically
noted); accessories or parts added to a Dell system after the system is
shipped from Dell; accessories or parts added to a Dell system through
Dell’s system integration department; accessories or parts that are not
installed in the Dell factory; or DellWare products. Monitors, keyboards,
and mice that are Dell-branded or that are included on Dell’s standard price
list are covered under this limited warranty; all other monitors, keyboards,
and mice (including those sold through the DellWare program) are not
covered. Batteries for portable computers are covered only during the initial
one-year period of this limited warranty.
www.dell.com | support.dell.com
Coverage During Year One
During the one-year period beginning on the invoice date, Dell will repair or
replace products covered under this limited warranty that are returned to
Dell’s facility. To request warranty service, you must contact Dell’s
Customer Technical Support within the warranty period. See “Getting
Help” in your User’s Guide to find the appropriate contact information for
obtaining customer assistance. If warranty service is required, Dell will issue
a Return Material Authorization Number. You must ship the products back
to Dell in their original or equivalent packaging, prepay shipping charges,
and insure the shipment or accept the risk of loss or damage during
shipment. Dell will ship the repaired or replacement products to you freight
prepaid if you use an address in Canada, where applicable. Shipments to
other locations will be made freight collect.
NOTE: Before you ship the product(s) to Dell, back up the data on the hard-
disk drive(s) and any other storage device(s) in the product(s). Remove any
removable media, such as diskettes, CDs, or PC Cards. Dell does not accept
liability for lost data or software.
Dell owns all parts removed from repaired products. Dell uses new and
reconditioned parts made by various manufacturers in performing warranty
repairs and building replacement products. If Dell repairs or replaces a
product, its warranty term is not extended.
40 Setup and Quick Reference Guide
Page 43

Coverage During Years Two and Three
During the second and third years of this limited warranty, Dell will provide,
on an exchange basis and subject to Dell’s Exchange Policy in effect on the
date of the exchange, replacement parts for the Dell hardware product(s)
covered under this limited warranty when a part requires replacement. You
must report each instance of hardware failure to Dell’s Customer Technical
Support in advance to obtain Dell’s concurrence that a part should be
replaced and to have Dell ship the replacement part. Dell will ship parts
(freight prepaid) if you use an address in Canada, where applicable.
Shipments to other locations will be made freight collect. Dell will include a
prepaid shipping container with each replacement part for your use in
returning the replaced part to Dell. Replacement parts are new or
reconditioned. Dell may provide replacement parts made by various
manufacturers when supplying parts to you. The warranty term for a
replacement part is the remainder of the limited warranty term.
You will pay Dell for replacement parts if the replaced part is not returned to
Dell. The process for returning replaced parts, and your obligation to pay for
replacement parts if you do not return the replaced parts to Dell, will be in
accordance with Dell’s Exchange Policy in effect on the date of the
exchange.
You accept full responsibility for your software and data. Dell is not required
to advise or remind you of appropriate backup and other procedures.
General Provisions
DELL MAKES NO EXPRESS WARRANTIES OR CONDITIONS
BEYOND THOSE STATED IN THIS LIMITED WARRANTY
STATEMENT. DELL DISCLAIMS ALL OTHER WARRANTIES AND
CONDITIONS, EXPRESS OR IMPLIED, INCLUDING WITHOUT
LIMITATION IMPLIED WARRANTIES AND CONDITIONS OF
MERCHANTABILITY AND FITNESS FOR A PARTICULAR PURPOSE.
SOME STATES (OR JURISDICTIONS) DO NOT ALLOW
LIMITATIONS ON IMPLIED WARRANTIES OR CONDITIONS, SO
THIS LIMITATION MAY NOT APPLY TO YOU.
Setup and Quick Reference Guide 41
Page 44

DELL’S RESPONSIBILITY FOR MALFUNCTIONS AND DEFECTS IN
HARDWARE IS LIMITED TO REPAIR AND REPLACEMENT AS SET
FORTH IN THIS LIMITED WARRANTY STATEMENT. THESE
WARRANTIES GIVE YOU SPECIFIC LEGAL RIGHTS, AND YOU MAY
ALSO HAVE OTHER RIGHTS, WHICH VARY FROM STATE TO
STATE (OR JURISDICTION TO JURISDICTION).
DELL DOES NOT ACCEPT LIABILITY BEYOND THE REMEDIES
SET FORTH IN THIS LIMITED WARRANTY STATEMENT OR
LIABILITY FOR INCIDENTAL OR CONSEQUENTIAL DAMAGES,
INCLUDING WITHOUT LIMITATION ANY LIABILITY FOR
PRODUCTS NOT BEING AVAILABLE FOR USE OR FOR LOST DATA
www.dell.com | support.dell.com
OR SOFTWARE.
SOME STATES (OR JURISDICTIONS) DO NOT ALLOW THE
EXCLUSION OR LIMITATION OF INCIDENTAL OR
CONSEQUENTIAL DAMAGES, SO THE PRECEDING EXCLUSION
OR LIMITATION MAY NOT APPLY TO YOU.
These provisions apply to Dell’s three-year limited warranty only. For
provisions of any service contract covering your system, refer to your invoice
or the separate service contract that you will receive.
If Dell elects to exchange a system or component, the exchange will be
made in accordance with Dell’s Exchange Policy in effect on the date of the
exchange. In any instance in which Dell issues a Return Material
Authorization Number, Dell must receive the product(s) for repair prior to
the expiration of the warranty period in order for the repair(s) to be covered
by the limited warranty.
NOTE: If you chose one of the available warranty and service options in place
of the standard three-year limited warranty described in the preceding text, the
option you chose will be listed on your invoice.
42 Setup and Quick Reference Guide
Page 45

One-Year End-User Manufacturer Guarantee (Latin America and the Caribbean Only)
Guarantee
Dell Computer Corporation (“Dell”) warrants to the end user in accordance
with the following provisions that its branded hardware products, purchased
by the end user from a Dell company or an authorized Dell distributor in
Latin America or the Caribbean, will be free from defects in materials,
workmanship, and design affecting normal use, for a period of one year from
the original purchase date. Products for which proper claims are made will,
at Dell’s option, be repaired or replaced at Dell’s expense. Dell owns all
parts removed from repaired products. Dell uses new and reconditioned
parts made by various manufacturers in performing repairs and building
replacement products.
Exclusions
This Guarantee does not apply to defects resulting from: improper or
inadequate installation, use, or maintenance; actions or modifications by
unauthorized third parties or the end user; accidental or willful damage; or
normal wear and tear.
Making a Claim
Claims must be made in Latin America or the Caribbean by contacting the
Dell point of sale within the guarantee period. The end user must always
supply proof of purchase, indicating name and address of the seller, date of
purchase, model and serial number, name and address of the customer, and
details of symptoms and configuration at the time of malfunction,
including peripherals and software used. Otherwise, Dell may refuse the
guarantee claim. Upon diagnosis of a warranted defect, Dell will make
arrangements and pay for ground freight and insurance to and from Dell’s
repair/replacement center. The end user must ensure that the defective
product is available for collection properly packed in original or equally
protective packaging together with the details listed above and the return
number provided to the end user by Dell.
Setup and Quick Reference Guide 43
Page 46

Limitation and Statutory Rights
Dell makes no other warranty, guarantee or like statement other than as
explicitly stated above, and this Guarantee is given in place of all other
guarantees whatsoever, to the fullest extent permitted by law. In the absence
of applicable legislation, this Guarantee will be the end user’s sole and
exclusive remedy against Dell or any of its affiliates, and neither Dell nor
any of its affiliates shall be liable for loss of profit or contracts, or any other
indirect or consequential loss arising from negligence, breach of contract, or
howsoever.
This Guarantee does not impair or affect mandatory statutory rights of the
www.dell.com | support.dell.com
end user against and/or any rights resulting from other contracts
concluded by the end user with Dell and/or any other seller.
Dell World Trade LP
One Dell Way, Round Rock, TX 78682, USA
Dell Computadores do Brasil Ltda (CNPJ No. 72.381.189/0001-10)/
Dell Commercial do Brasil Ltda (CNPJ No. 03 405 822/0001-40)
Avenida Industrial Belgraf, 400
92990-000 - Eldorado do Sul – RS - Brasil
Dell Computer de Chile Ltda
Coyancura 2283, Piso 3- Of.302,
Providencia, Santiago - Chile
Dell Computer de Colombia Corporation
Carrera 7 #115-33 Oficina 603
Bogota, Colombia
Dell Computer de Mexico SA de CV
Paseo de la Reforma 2620 - 11° Piso
Col. Lomas Altas
11950 México, D.F.
44 Setup and Quick Reference Guide
Page 47

“Total Satisfaction” Return Policy (U.S. and Canada Only)
If you are an end-user customer who bought new products directly from a
Dell company, you may return them to Dell within 30 days of the date of
invoice for a refund or credit of the product purchase price. If you are an
end-user customer who bought reconditioned or refurbished products from
a Dell company, you may return them to Dell within 14 days of the date of
invoice for a refund or credit of the product purchase price. In either case,
the refund or credit will not include any shipping and handling charges
shown on your invoice. If you are an organization that bought the products
under a written agreement with Dell, the agreement may contain different
terms for the return of products than specified by this policy.
To return products, you must contact Dell Customer Service to receive a
Credit Return Authorization Number. See “Getting Help” in your User’s
Guide to find the appropriate contact information for obtaining customer
assistance. To expedite the processing of your refund or credit, Dell expects
you to return the products to Dell in their original packaging within five
days of the date that Dell issues the Credit Return Authorization Number.
You must also prepay shipping charges and insure the shipment or accept
the risk of loss or damage during shipment. You may return software for
refund or credit only if the sealed package containing the diskette(s) or
CD(s) is unopened. Returned products must be in as-new condition, and all
of the manuals, diskette(s), CD(s), power cables, and other items included
with a product must be returned with it. For customers who want to return,
for refund or credit only, either applications software or an operating system
that has been installed by Dell, the whole system must be returned, along
with any media and documentation that may have been included in the
original shipment.
This “Total Satisfaction” Return Policy does not apply to DellWare
products, which may be returned under DellWare's then-current return
policy. In addition, reconditioned parts purchased through Dell Spare Parts
Sales in Canada are nonreturnable.
Setup and Quick Reference Guide 45
Page 48

www.dell.com | support.dell.com
46 Setup and Quick Reference Guide
Page 49

Systèmes Dell™ OptiPlex™
Guide de configuration et de
référence rapide
www.dell.com | support.dell.com
Page 50

Remarques, avis et précautions
REMARQUE : Une REMARQUE indique une information importante qui peut vous aider à
mieux utiliser votre ordinateur.
AVIS : Un AVIS vous avertit d’un risque de dommage matériel ou de perte de données et vous
indique comment éviter le problème.
PRÉCAUTION: Une PRÉCAUTION vous avertit d’une situation qui, si elle n'est pas
évitée, peut entraîner des blessures plus ou moins graves.
____________________
Les informations contenues dans ce document sont sujettes à modification sans préavis.
© 2000 –2001 Dell Computer Corporation. Tous droits réservés.
Toute reproduction, sous quelque forme que ce soit, sans l'autorisation écrite de Dell Computer Corporation, est
strictement interdite.
Marques utilisées dans ce texte†:
Microsoft, Windows, Windows NT et MS-DOS
D'autres marques et noms commerciaux peuvent être utilisés dans ce document pour faire référence aux entités se
réclamant de ces marques et de ces noms ou à leurs produits. Dell Computer Corporation dénie tout intérêt propriétaire
vis-à-vis des marques et des noms commerciaux autres que les siens.
Juillet 2001 P/N 81FTK Rév. A04
Dell, OptiPlex
et le logo
sont des marques déposées de Microsoft Corporation.
DELL
sont des marques de Dell Computer Corporation ;
Page 51

À propos de ce guide
Ce document contient des informations concernant la mise en route/configuration, la résolution de problèmes et la sécurité, les réglementations et la
OptiPlex™.
garantie de votre système Dell
™
Pour obtenir les versions les plus récentes de ces documents sur votre
unité de disque dur, allez sur le site de support Web Dell à l'adresse
http://support.dell.com.
Des numéros de modèle réglementaires apparaissent tout au long de ce
document ; leurs types de châssis correspondants sont présentés ci-dessous :
Numéros de modèle réglementaires et types de
châssis
DHS = petit châssis de bureau
DHP = châssis de faible encombrement
DHM = châssis micro-tour
Obtention d'informations et
d'assistance
Ressources et outils de support
Ressource Sommaire : Utilisation de la ressource
Cédérom Dell OptiPlex
ResourceCD
• Diagnostics Dell
•Pilotes
• Utilitaires
• Documentation sur
l'ordinateur et sur les
périphériques
Guide de configuration et de référence rapide 49
Consultez le menu principal sur le cédérom ResourceCD
qui a été livré avec votre ordinateur. Utilisez le menu
déroulant pour sélectionner les choix correspondant à
votre ordinateur. Vous pouvez réaliser les tâches
suivantes :
• diagnostiquer un problème
• installer ou réinstaller des pilotes
• obtenir les informations concernant votre ordinateur et
ses périphériques
REMARQUE : La documentation utilisateur et les
pilotes sont déjà installés dans votre ordinateur lorsqu'il
est expédié de l'usine Dell. Vous pouvez utiliser ce
cédérom pour accéder à la documentation, réinstaller les
pilotes ou exécuter les outils de diagnostic.
Page 52

Ressources et outils de support
(suite)
Ressource Sommaire : Utilisation de la ressource
Étiquettes d'enregistrement et
de service situées sur l'avant ou
le côté de votre ordinateur Dell.
• Express Service Code (Code
de service express) et Service
Un code de service express et un numéro de service
identifient votre ordinateur Dell de manière exclusive.
Il vous faudra peut-être un code clé du produit (ou l'ID du
produit) pour réaliser la configuration du système
d'exploitation.
Tag Number (Numéro de
service)
• Product Key (Code clé du
produit) (appelé aussi
Product ID [ID du produit]
www.dell.com | support.dell.com
ou COA, pour Certificate of
Authenticity [certificat
d'authenticité])
Cédérom du système
d'exploitation
Pour réinstaller le système d'exploitation, utilisez le
cédérom du système d'exploitation livré avec votre
ordinateur.
REMARQUE : Il est possible que le cédérom du système
d'exploitation ne comprenne pas tous les pilotes les plus
récents pour votre ordinateur. Si vous réinstallez votre
système d'exploitation, utilisez le cédérom
pour réinstaller les pilotes pour les périphériques livrés
avec votre ordinateur.
Pour de plus amples renseignements concernant la
réinstallation du système d'exploitation, consultez la
documentation sur l'installation du système d'exploitation
qui a été livrée avec votre ordinateur.
Guide d'installation du système
d'exploitation
Reportez-vous au guide d'installation du système
d'exploitation pour les informations sur la réinstallation et
la configuration du système d'exploitation.
En fonction de votre système d'exploitation, cliquez sur le
bouton Start (Démarrer) et sélectionnez Help (Aide) ou
Help and Support (Aide et assistance) pour obtenir de
plus amples renseignements sur votre système
d'exploitation.
ResourceCD
50 Guide de configuration et de référence rapide
Page 53

Ressources et outils de support
Ressource Sommaire : Utilisation de la ressource
Guides d'utilisation de votre
ordinateur et de ses
périphériques
Guides d'utilisation
Site Web de support de Dell
• Les renseignements et
l'assistance techniques
• Les téléchargements pour
votre ordinateur
• Le suivi des commandes ou
des livraisons
• Des conseils et des astuces,
des articles technologiques,
des informations sur les
services
(suite)
En fonction de votre système d'exploitation, doublecliquez sur l'icône User’s Guides (Guides d'utilisation)
de votre bureau ou cliquez sur le bouton Démarrer puis
sélectionnez Aide et assistance pour accéder à la
documentation électronique stockée sur votre unité de
disque dur.
Vous obtiendrez ainsi des informations sur les points
suivants :
• l'utilisation de votre ordinateur
• la configuration des paramètres système
• le retrait et l'installation de pièces
• l'installation et la configuration des logiciels
• le diagnostic d'un problème
• les spécifications techniques
• la documentation sur les périphériques (sur certains
systèmes d'exploitation)
• l'obtention d'assistance technique
Allez à http://support.dell.com et remplissez une fois
pour toutes le formulaire d'enregistrement.
• Obtenez de l'aide concernant les questions sur l'usage
général, l'installation et le dépannage
• Obtenez des réponses à vos questions concernant les
services et l'assistance techniques
• Procurez-vous les versions les plus récentes des pilotes
pour votre ordinateur
• Accédez à la documentation se rapportant à votre
ordinateur et à ses périphériques
• Prenez part à des discussions en ligne avec d'autres
clients de Dell et des spécialistes du service technique
de Dell
• Consultez la liste des liens en ligne des principaux
revendeurs de Dell
Guide de configuration et de référence rapide 51
Page 54

Ressources et outils de support
(suite)
Ressource Sommaire : Utilisation de la ressource
Site Web « Dell Premier
Support »
• État de l'appel de service
• Problèmes techniques
principaux par produit
• Questions les plus
Allez sur le site http://premiersupport.dell.com :
Le site Web Dell Premier Support est conçu pour les
grandes entreprises, les gouvernements et les institutions
d'enseignement.
Ce site n'est pas disponible partout.
fréquentes par numéro de
produit
• Étiquettes de service
personnalisées
www.dell.com | support.dell.com
• Détail de configuration du
système
52 Guide de configuration et de référence rapide
Page 55

Mise en route/Configuration
Suivez les étapes ci-après pour connecter des périphériques externes à votre
ordinateur par le biais du panneau d'E/S (Entrées/Sorties). Il est possible
que l'arrière de votre système Dell, notamment le panneau d'E/S, soit différent des exemples présentés ci-dessous.
1
Guide de configuration et de référence rapide 53
Page 56

www.dell.com | support.dell.com
REMARQUE : Ne connectez qu'un clavier et qu'une souris.
REMARQUE : Si vous avez un clavier ou une souris compatible USB
(Universal Serial Bus [bus série universel]), utilisez les connecteurs USB
situés à l'arrière de votre système.
54 Guide de configuration et de référence rapide
Page 57

Système avec un
2
connecteur vidéo
Système avec deux
connecteurs vidéo
connecteur vidéo
de carte d’extension
connecteur vidéo
de carte d’extension
. REMARQUE : Si votre système a deux connecteurs vidéo, le connecteur
vidéo intégré est désactivé et recouvert d'une plaque protectrice. Utilisez le
connecteur de carte d'extension comme le montrent les illustrations de droite
de l'étape 2.
Guide de configuration et de référence rapide 55
Page 58

Système avec un
connecteur vidéo
www.dell.com | support.dell.com
Système avec deux
connecteurs vidéo
connecteur vidéo
de carte d’extension
. REMARQUE : Si votre système a deux connecteurs vidéo, le connecteur
vidéo intégré est désactivé et recouvert d'une plaque protectrice. Utilisez le
connecteur de carte d'extension comme le montrent les illustrations de droite
de l'étape 2.
56 Guide de configuration et de référence rapide
Page 59

3
voyants de
diagnostic
voyants de
diagnostic
voyants de
diagnostic
Guide de configuration et de référence rapide 57
Page 60

voyants de
diagnostic
www.dell.com | support.dell.com
voyants de
diagnostic
REMARQUE : Si votre système a deux connecteurs audio, utilisez celui de la
carte d'extension comme l'indiquent les illustrations de droite de l'étape 3.
58 Guide de configuration et de référence rapide
Page 61

Vérifiez que le réglage du sélecteur de tension correspond à votre zone géographique. Pour de plus amples renseignements, consultez la section
« Lorsque vous utilisez votre système informatique » plus loin dans ce
document.
4
Guide de configuration et de référence rapide 59
Page 62

www.dell.com | support.dell.com
PRÉCAUTION : Pour éviter de vous faire électrocuter, n'utilisez
que le câble d'alimentation fourni et assurez-vous qu'il est
branché à une source d'alimentation correctement mise à la terre.
60 Guide de configuration et de référence rapide
Page 63

5
Guide de configuration et de référence rapide 61
Page 64

www.dell.com | support.dell.com
62 Guide de configuration et de référence rapide
Page 65

Les illustrations suivantes présentent les emplacements des différents boutons d'alimentation et des commandes du moniteur.
6
luminosité
contraste
luminosité
contraste
luminosité
contraste
Guide de configuration et de référence rapide 63
Page 66

Lisez le contrat de licence du logiciel et suivez les instructions de configuration de votre système d'exploitation à l'écran.
7
www.dell.com | support.dell.com
Félicitations ! La configuration de votre système est terminée.
En fonction de votre système d'exploitation, double-cliquez sur l'icône
User's guides (Guides d'utilisation) de votre bureau (comme indiqué cidessous) ou cliquez sur le bouton Start (Démarrer) puis sélectionnez Help
and Support (Aide et assistance) pour accéder à la documentation électronique stockée sur votre unité de disque dur.
64 Guide de configuration et de référence rapide
Page 67

Résolution de problèmes
Dell met à votre disposition plusieurs outils d'aide si votre système ne fonctionne pas comme prévu. Pour obtenir les dernières informations disponibles concernant le dépannage de votre système, allez sur le site de support
Web Dell à l'adresse http://support.dell.com. Vous trouverez également
une description des outils de dépannage Dell dans la section intitulée
« Obtention d'aide » de votre Guide d'utilisation en ligne.
Si vous avez des problèmes d'ordinateur qui requièrent l'intervention de
Dell, détaillez par écrit la description des erreurs, des codes sonores et des
voyants de diagnostic ; notez le code de service express et le numéro de
service en dessous puis placez-vous près de votre ordinateur pour contacter
Dell.
Reportez-vous à la section « Obtention d'informations et d'assistance »,
page 49, pour obtenir un exemple de code de service express et de numéro
de service..
Code de service express :___________________________
Numéro de service : ___________________________
Guide de configuration et de référence rapide 65
Page 68

Votre ordinateur dispose des outils suivants pour vous aider à résoudre un
problème :
D
IAGNOSTICS DELL
— Les Diagnostics Dell servent à tester divers composants
de votre ordinateur et vous aident à identifier la source des problèmes de
l'ordinateur. Pour obtenir de plus amples renseignements, consultez la section
« Exécution des Diagnostics Dell », page 68.
V
OYANTS DU SYSTÈME
— Situés à l'avant de l'ordinateur, ces voyants peuvent
indiquer un problème de l'ordinateur. Pour de plus amples renseignements,
consultez votre Guide d'utilisation.
www.dell.com | support.dell.com
V
OYANTS DE DIAGNOSTIC
— Situés à l'arrière de l'ordinateur, ces voyants
peuvent indiquer un problème de l'ordinateur. Pour de plus amples
renseignements, consultez votre Guide d'utilisation.
M
ESSAGES DU SYSTÈME
— L'ordinateur affiche ces messages pour vous
alerter de pannes en cours ou éventuelles. Pour de plus amples renseignements,
consultez votre Guide d'utilisation.
C
ODES SONORES
— Une série de codes sonores émis par votre ordinateur peut
vous aider à identifier un problème. Pour de plus amples informations, consultez
votre Guide d'utilisation.
66 Guide de configuration et de référence rapide
Page 69

Utilisation du cédérom
Dell OptiPlex ResourceCD
Pour utiliser le cédérom ResourceCD Dell OptiPlex pendant que vous
exécutez le système d'exploitation Windows, effectuez les étapes suivantes.
REMARQUE : Pour accéder aux pilotes de périphériques et à la documenta-
tion d'utilisation, vous devez utiliser le cédérom
Windows.
1
Allumez l'ordinateur et attendez que le bureau Windows ait démarré.
Insérez le cédérom Dell OptiPlex ResourceCD dans le lecteur de
2
ResourceCD
en exécutant
CD-ROM.
La première fois que vous utilisez le cédérom Dell OptiPlex
ResourceCD sur cet ordinateur, la fenêtre ResourceCD Installation
(Installation du cédérom ResourceCD) s'ouvre pour vous informer
que le cédérom ResourceCD va démarrer l'installation.
Cliquez sur OK pour continuer.
3
Pour terminer l'installation, répondez aux invites proposées par le programme d'installation.
Cliquez sur Next (Suivant) dans l'écran Welcome Dell System Owner
4
(Bienvenue au propriétaire du système Dell).
Sélectionnez les System Model (Modèle du système), Operating Sys-
5
tem (Système d'exploitation), Device Type (Type de périphérique) et
Topic (Rubrique) appropriés.
Pilotes pour votre ordinateur
Pour afficher une liste des pilotes de périphériques pour votre ordinateur,
effectuez les étapes ci-après :
Cliquez sur My Drivers (Mes pilotes) dans le menu déroulant
1
Rubrique.
Le cédérom ResourceCD explore le matériel et le système d'exploitation de votre ordinateur, puis une liste des pilotes de périphériques
correspondant à la configuration de votre système apparaît.
Cliquez sur le pilote qui convient et suivez les instructions pour télé-
2
charger le pilote sur votre ordinateur.
Pour afficher tous les pilotes disponibles pour votre ordinateur, cliquez sur
Pilotes dans le menu déroulant Rubrique.
Guide de configuration et de référence rapide 67
Page 70

Exécution des Diagnostics Dell
Les Diagnostics Dell correspondent à un programme qui sert à tester divers
composants de votre ordinateur. Exécutez ce programme dès que vous avez
un problème pour vous aider à en identifier la source. Vous pouvez exécuter
les Diagnostics Dell à partir de votre unité de disque dur ou à partir du
cédérom ResourceCD.
NOTICE: Si votre unité de disque dur est en panne, exécutez les Diagnostics
Dell à partir du cédérom
Allumez votre ordinateur (s'il l'est déjà, redémarrez-le).
1
ResourceCD
.
Quand
www.dell.com | support.dell.com
2
rieur droit de l'écran, appuyez sur <Ctrl><Alt><F10>.
F2 = Setup (Installation)
apparaît dans le coin supé-
L'initialisation des diagnostics commence immédiatement puis le Dia-
gnostics Menu (Menu des diagnostics) apparaît.
Sélectionnez l'option de diagnostic qui correspond à votre ordinateur.
3
Pour utiliser les diagnostics, suivez les instructions qui s'affichent à
l'écran.
Modification de la séquence d'amorçage
Pour exécuter les Diagnostics Dell à partir du cédérom ResourceCD, effectuez les étapes suivantes afin de permettre à votre ordinateur de démarrer à
partir du cédérom :
Insérez le cédérom Dell OptiPlex ResourceCD dans le lecteur de
1
CD-ROM.
Allumez (ou redémarrez) votre ordinateur.
2
3
Quand
F2 = Setup (Installation)
apparaît dans le coin supé-
rieur droit de l'écran, appuyez sur <Ctrl><Alt><F8>.
REMARQUE : Cette fonction modifie la séquence d'amorçage pour un seul
démarrage. Au démarrage suivant, l'ordinateur s'initialise en fonction des
périphériques spécifiés dans la configuration du système.
Le Boot Device Menu (Menu des périphériques d'amorçage)
apparaît.
68 Guide de configuration et de référence rapide
Page 71

Si vous attendez trop longtemps et que le logo Windows apparaît,
patientez jusqu'à ce que le bureau de Windows apparaisse. Éteignez
ensuite votre ordinateur et essayez de nouveau.
Sélectionnez l'option CD-ROM Device (Lecteur de CD-ROM).
4
Exécution du Dell IDE Hard Drive Diagnostics.
Le Dell IDE Hard Drive Diagnostics est un utilitaire qui teste votre unité de
disque dur pour dépanner ou confirmer une panne d'unité de disque dur.
Allumez votre ordinateur (s'il l'est déjà, redémarrez-le).
1
2
Quand
F2 = Setup (Installation)
apparaît dans le coin supé-
rieur droit de l'écran, appuyez sur <Ctrl><Alt><D>.
Suivez les instructions qui s'affichent à l'écran.
3
Si une panne est signalée, reportez-vous à la section « Problèmes
d'unité de disque dur » de votre Guide d'utilisation.
Consignes de sécurité
Observez les consignes de sécurité suivantes afin d'assurer votre propre
sécurité et de vous aider à protéger votre ordinateur contre d'éventuels
dmmages.
Interventions à l'intérieur de l'ordinateur
Avant de retirer le capot de l'ordinateur, suivez les étapes suivantes, dans
l'ordre indiqué.
NOTICE: Ne tentez pas de réparer le système informatique vous-même, si ce
n'est en suivant les explications dans la documentation en ligne de Dell ou celles qui vous sont fournies. Suivez toujours scrupuleusement les instructions
d'installation et de maintenance.
PRÉCAUTION : Une nouvelle pile mal installée risque d’exploser.
Remplacez la pile par une pile de type identique ou d'un type équivalent recommandé par le fabricant. Débarrassez-vous des piles
usagées selon les instructions du fabricant.
Guide de configuration et de référence rapide 69
Page 72

Éteignez votre ordinateur et tous ses périphériques.
1
Mettez-vous à la terre en touchant une surface métallique non peinte
2
du châssis, comme le métal autour des ouvertures du connecteur de
carte à l'arrière de l'ordinateur, avant de toucher quoi que ce soit à
l'intérieur de votre ordinateur.
Pendant que vous effectuez des manipulations, touchez périodiquement une surface métallique non peinte du châssis de l'ordinateur
pour dissiper l'électricité statique qui pourrait endommager les composants internes.
Débranchez votre ordinateur et ses périphériques de leurs sources
3
www.dell.com | support.dell.com
d'alimentation. Débranchez également tous les fils de téléphone et de
télécommunications de l’ordinateur.
Cela réduit les possibilités d'électrocution ou de blessure.
En outre, observez ces consignes de sécurité, si nécessaire :
• Pour éviter de couper l'alimentation de votre ordinateur lorsque vous
déconnectez un câble réseau, débranchez d'abord le câble du NIC
(Network Interface Controller [contrôleur d'interface réseau]) à
l'arrière de votre ordinateur, puis de la prise réseau murale. Lorsque
vous reconnectez un câble réseau à votre ordinateur, branchez d'abord
le câble dans la prise réseau, puis dans le NIC.
• Lorsque vous débranchez un câble, tirez sur sa prise ou sur sa boucle
de serrage, jamais sur le câble lui-même. Certains câbles sont munis
d'un connecteur à languettes verrouillables ; si vous déconnectez un
câble de ce type, appuyez sur les languettes verrouillables avant de
déconnecter le câble. Quand vous séparez les connecteurs en tirant
dessus, veillez à les maintenir alignés pour ne pas plier de broche de
connecteur. Avant de connecter un câble, vérifiez également que les
deux connecteurs sont bien orientés et alignés.
• Manipulez les composants et les cartes avec soin. Ne touchez ni les
composants ni les broches de contact d'une carte. Tenez une carte par
ses bords ou par sa patte pour montage métallique. Tenez un composant tel qu'une puce de microprocesseur par ses bords, non pas par ses
broches.
70 Guide de configuration et de référence rapide
Page 73

Lorsque vous utilisez votre système informatique
Quand vous utilisez votre système informatique, respectez les consignes de
sécurité ci-après.
PRÉCAUTION : N'uitlisez pas votre système informatique si un
capot (y compris les capots de l'ordinateur, les cadres, les languettes métalliques et les caches de panneau avant) est retiré.
• Pour ne pas endommager votre ordinateur, vérifiez que le sélecteur de
tension du bloc d’alimentation est bien réglé sur la tension en CA disponible là où vous vous trouvez†:
– 115 volts (V)/60 hertz (Hz) dans la plupart des pays d’Amérique
du Nord et du Sud, et dans certains pays d’Extrême-Orient,
comme la Corée du Sud et Taïwan
– 100 V/50 Hz dans l'est du Japon et 100 V/60 Hz dans l'ouest du
Japon
REMARQUE : Le sélecteur de tension doit être réglé sur la position
115 V même si l'alimentation en CA au Japon est de 100 V.
– 230 V/50 Hz dans presque toute l’Europe, au Moyen-Orient et en
Extrême-Orient
Assurez-vous également que votre moniteur et les périphériques connectés sont approuvés pour fonctionner avec l'alimentation disponible
là où vous vous trouvez.
REMARQUE : Les blocs d'alimentation à sélection automatique ne
nécessitent pas de sélecteur de tension. Votre bloc d'alimentation n'est
peut-être pas muni de ce sélecteur.
• Pour éliminer les risques de décharges électriques, branchez
l'ordinateur et les câbles d'alimentation des périphériques dans des
prises de terre. Ces câbles sont équipés de prises à trois broches pour
assurer une mise à la terre correcte. N’utilisez pas d'adaptateur et
n’essayez pas de retirer la broche de mise à la terre d’un câble. Si vous
devez utiliser une rallonge, utilisez une rallonge munie de prises de
terre.
Guide de configuration et de référence rapide 71
Page 74

• Avant de manipuler des éléments internes de votre ordinateur, débranchez le système afin d'éviter de vous électrocuter ou d'endommager la
carte système. Certains composants de la carte système continuent à
être alimentés tant que le système est connecté à une source
d'alimentation en CA.
www.dell.com | support.dell.com
• Pour ne pas endommager la carte système, patientez 15 secondes après
avoir débranché votre système avant de déconnecter un périphérique
de votre ordinateur.
NOTICE: Attendez que le voyant LED (Light Emitting Diode [diode électrolu-
minescente]) d'alimentation auxiliaire s'éteigne pour être sûr que l'alimentation
de votre système est coupée (reportez-vous au
tre l'emplacement de cette LED).
Guide d'utilisation
pour connaî-
• Afin de protéger votre système informatique des augmentations et
diminutions soudaines et passagères de courant, utilisez un limiteur de
surtension, un onduleur ou un UPS (Uninterruptible Power Supply
[système d'alimentation sans coupure]).
• Assurez-vous que rien ne repose sur les câbles de votre ordinateur et
qu'ils ne sont pas disposés de façon à ce que quelqu'un marche ou trébuche dessus.
• Ne renversez ni nourriture, ni liquide, sur votre ordinateur. Si vous
mouillez l'ordinateur, consultez le Guide d'utilisation.
• N’insérez pas d’objets dans les ouvertures de votre ordinateur. Cela
riquerait de court-circuiter des composants internes et de causer un
incendie ou de provoquer des décharges électriques.
• Placez l'ordinateur à l'écart des radiateurs et des autres sources de
chaleur. Ne bloquez pas les grilles de refroidissement. Évitez de placer
des feuilles volantes sous votre ordinateur ; ne placez pas votre ordinateur dans un espace mural renfermé, ni sur un lit, un canapé ou un
tapis.
72 Guide de configuration et de référence rapide
Page 75

Conseils en ergonomie
PRÉCAUTION : Une mauvaise utilisation ou une utilisation prolon-
gée du clavier peut être nuisible à la santé.
PRÉCAUTION : Le fait de regarder l'écran du moniteur pendant de
longues périodes d'affilée peut provoquer une fatigue oculaire.
Pour un maximum de confort et d'efficacité, suivez les conseils d'ordre ergonomique de votre Guide d'utilisation lors de l'installation et de l'utilisation
de votre système informatique.
Informations sur les réglementations
Une EMI (ElectroMagnetic Interference [interférence électromagnétique])
est un signal ou une émission, rayonné en espace libre ou transmis par
conduction le long des fils électriques ou d’interface. Cette perturbation
nuit au fonctionnement de la radionavigation et d’autres systèmes de sécurité ou dégrade sérieusement, empêche ou interrompt de façon répétée un
service de radiocommunication autorisé.
Votre système informatique Dell est conçu de façon à être conforme aux
réglementations en vigueur sur les EMI. Les changements et modifications
non explicitement approuvés par Dell peuvent résilier le droit de
l'utilisateur d’utiliser cet équipement.
Les systèmes informatiques Dell sont conçus, testés et classés pour
l’environnement électromagnétique dans lequel ils vont fonctionner. Ces
classifications sur l'environnement électromagnétique se répartissent en
deux groupes :
• La Classe A désigne les appareils qui ne peuvent être utilisés que dans
un environnement commercial ou industriel.
• La Classe B désigne les appareils qui peuvent être utilisés dans un
environnement résidentiel aussi bien que commercial ou industriel.
Guide de configuration et de référence rapide 73
Page 76

Classe A
Cet équipement de Classe A a été testé et reconnu conforme aux limites
des appareils numériques de Classe A, en vertu de l’alinéa 15 de la réglementation de la FCC. Ces limites sont conçues pour fournir une protection
raisonnable contre les perturbations nuisibles quand l’équipement est utilisé dans un environnement commercial. Cet équipement crée, utilise et
peut émettre de l'énergie de fréquence radio et risque, s'il n'est pas installé
et utilisé conformément aux instructions, de produire des perturbations
nuisibles aux radiocommunications. L’utilisation de cet équipement dans
une zone résidentielle peut créer des perturbations nuisibles que
l'utilisateur devra corriger à ses propres frais.
www.dell.com | support.dell.com
Classe B
Cet équipement de Classe B a été testé et reconnu conforme aux limites
des appareils numériques de Classe B, en vertu de l’alinéa 15 de la réglementation de la FCC. Ces limites sont conçues pour fournir une protection
raisonnable contre les perturbations nuisibles quand l’équipement est utilisé dans un environnement résidentiel. Cet équipement crée, utilise et
peut émettre de l'énergie de fréquence radio et risque, s'il n'est pas installé
et utilisé conformément aux instructions, de produire des perturbations
nuisibles aux radiocommunications. Il n’est cependant pas garanti qu'il n'y
aura pas de perturbations au cours d'une installation particulière. Si cet
équipement crée des perturbations nuisibles à la réception radio et à la
réception de télévision, ce qui peut être déterminé en l’allumant et
l’éteignant, l'utilisateur devrait essayer de les corriger en prenant une ou
plusieurs des mesures suivantes :
• Changez l'orientation ou l'emplacement de l'antenne de réception.
• Éloignez l'équipement du récepteur.
• Ne branchez pas l'équipement et le récepteur sur le même circuit.
• Consultez Dell ou un technicien qualifié en radio/télévision pour
obtenir de l'aide
REMARQUE : Inspectez l'étiquette réglementaire collée à l'arrière de votre
système Dell pour déterminer les environnements dans lesquels vous pouvez
l'utiliser.
REMARQUE : Vous trouverez d'autres renseignements sur les réglementa-
tions qui s'appliquent à votre système dans le
74 Guide de configuration et de référence rapide
Guide d'utilisation
.
Page 77

Informations sur les NOM (Mexique uniquement)
Les informations suivantes sur le ou les dispositifs décrits dans ce document
sont fournies conformément aux exigences des normes mexicaines
officielles (NOM) :
Exportateur : Dell Computer Corporation
One Dell Way
Round Rock, TX 78682
Importateur : Dell Computer de México,
S.A. de C.V.
Paseo de la Reforma 2620 - 11° Piso
Col. Lomas Altas
11950 México, D.F.
Expédier à : Dell Computer de México,
S.A. de C.V. al Cuidado
de Kuehne & Nagel de
México S. de R.I.
Avenida Soles No. 55
Col. Peñon de los Baños
15520 México, D.F.
Tension
d'alimentation : 115/230 VCA
Fréquence : 60/50 Hz
Courant d'entrée
nominal : DHS — 2,0/1,0 Aou
DHP — 1,5/0,75 A
ou
DHM—3,0/1,5 A
Guide de configuration et de référence rapide 75
Page 78

Información para NOM (únicamente para México)
La información siguiente se proporciona en el dispositivo o en los dispositivos descritos en este documento, en cumplimiento con los requisitos de la
Norma Oficial Mexicana (NOM):
Exportador: Dell Computer Corporation
One Dell Way
Round Rock, TX 78682
Importador : Dell Computer de México,
S.A. de C.V.
www.dell.com | support.dell.com
Embarcar a: Dell Computer de México,
Tensión de
alimentación: 115/230 VAC
Frecuencia: 60/50 Hz
Consumo de
corriente: DHS—2.0/1.0 A
Paseo de la Reforma 2620 - 11° Piso
Col. Lomas Altas
11950 México, D.F.
S.A. de C.V. al Cuidado
de Kuehne & Nagel de
México S. de R.I.
Avenida Soles No. 55
Col. Peñon de los Baños
15520 México, D.F.
o
DHP—1.5/0.75 A
o
DHM—3.0/1.5 A
76 Guide de configuration et de référence rapide
Page 79

Déclaration de garantie Intel (États-Unis. et Canada seulement)
Guide de configuration et de référence rapide 77
Page 80

www.dell.com | support.dell.com
Garantie limitée d'un an (Canada
uniquement)
Dell Computer Corporation (« Dell ») fabrique ses produits matériels à
partir de pièces et de composants neufs ou équivalents, conformément aux
normes de l'industrie en vigueur. Dell garantit le matériel qu’il fabrique
contre tout défaut de pièces et de fabrication. Cette garantie est en vigueur
pendant un an à compter de la date de facturation, selon les modalités
énoncées ci-après.
78 Guide de configuration et de référence rapide
Page 81

Cette garantie limitée couvre tout dommage éventuellement survenu pendant l'expédition des produits. Sinon, cette garantie ne s'applique pas à tout
dommage attribuable à une cause extérieure, notamment : accident, négligence, usage abusif, problèmes d'alimentation électrique, service d'entretien
non agréé par Dell, utilisation non conforme aux instructions, défaut
d'exécution de la maintenance préventive requise et problèmes causés par
l'utilisation de pièces et de composants non fournis par Dell.
Cette garantie limitée ne couvre aucun élément faisant partie d'une ou plusieurs des rubriques suivantes : logiciels, périphériques externes (sauf
indication contraire), accessoires ou pièces ajoutés à un système Dell après
expédition du système par Dell, accessoires ou pièces ajoutés à un système
Dell par le service d'intégration de système de Dell, accessoires ou pièces
qui ne sont pas installés à l'usine Dell, produits DellWare. Cette garantie
couvre les moniteurs, claviers et souris de la marque Dell ou qui sont inclus
dans la liste des prix standard de Dell ; tous les autres moniteurs, claviers et
souris (y compris ceux vendus dans le cadre du programme DellWare) ne
sont pas couverts.
Dell réparera ou remplacera les produits couverts par cette garantie limitée
qui sont renvoyés à l'usine Dell. Pour faire une demande de service dans le
cadre de la garantie, vous devez contacter le support technique clientèle de
Dell au cours de la période de garantie. Consultez la section « Obtention
d’aide » de votre Guide d'utilisation pour trouver les informations de con-
tact pour obtenir une assistance clientèle. Si cette demande est acceptée,
Dell émet un numéro d’autorisation de retour du matériel. Le client doit
expédier les produits à Dell dans leur emballage d’origine ou équivalent, en
payant les frais d'expédition et en assurant le colis, à moins d'assumer les
risques de perte ou de dommages en cours d'expédition. Dans la mesure du
possible, Dell renvoie le produit réparé ou de remplacement à ses frais s'il
s'agit d'une adresse au Canada. Les envois aux autres adresses se font port
dû.
REMARQUE : Avant d’expédier le ou les produits, Dell vous conseille de
sauvegarder les données des unités de disque dur et les autres dispositifs de
stockage des produits. Retirez les média amovibles comme les disquettes, les
cédéroms ou les cartes PC.
Guide de configuration et de référence rapide 79
Page 82

Toutes les pièces retirées des produits réparés sont la propriété de Dell. Pour
effectuer les réparations sous garantie et fabriquer des produits de remplacement, Dell utilise des pièces neuves et remises en état fournies par différents fabricants. La réparation ou le remplacement d'un produit par Dell ne
prolonge pas les termes de la garantie.
DELL N'ASSURE AUCUNE GARANTIE OU CONDITION EXPRESSES
AU-DELÀ DE CE QUI EST STIPULÉ DANS CE CONTRAT DE
GARANTIE. DELL N'ACCORDE AUCUNES AUTRES GARANTIES
ET CONDITIONS, EXPRESSES OU TACITES, NOTAMMENT, ET CE,
SANS S'Y LIMITER, LES GARANTIES ET CONDITIONS TACITES DE
QUALITÉ MARCHANDE ET D'ADAPTATION À UN USAGE PARTI-
www.dell.com | support.dell.com
CULIER. DANS LES ÉTATS (OU JURIDICTIONS) QUI N'AUTORISENT PAS DE LIMITATION SUR LES GARANTIES OU CONDITIONS
TACITES, CETTE LIMITATION NE S'APPLIQUE PAS.
EN CE QUI CONCERNE LE MAUVAIS FONCTIONNEMENT OU LES
DÉFAUTS ÉVENTUELS DU MATÉRIEL, LA RESPONSABILITÉ DE
DELL EST LIMITÉE À LA RÉPARATION ET AU REMPLACEMENT
DUDIT MATÉRIEL, TEL QU'INDIQUÉ PLUS HAUT. CES GARANTIES VOUS DONNENT DES DROITS SPÉCIFIQUES RECONNUS
PAR LA LOI ET VOUS POUVEZ AUSSI DISPOSER D'AUTRES
DROITS SELON LES ÉTATS (OU LES JURIDICTIONS).
DELL DÉCLINE TOUTE RESPONSABILITÉ ALLANT AU-DELÀ DES
TERMES DE LA PRÉSENTE GARANTIE, AINSI QUE TOUTE RESPONSABILITÉ RELATIVE À TOUT DOMMAGE ACCESSOIRE
OU INDIRECT, Y COMPRIS, ET CE, SANS S'Y LIMITER,
L'INDISPONIBILITÉ DES PRODUITS OU LES PERTES DE
DONNÉES OU DE LOGICIEL.
DANS LES ÉTATS (OU JURIDICTIONS) QUI NE PERMETTENT PAS
D'EXCLUSION OU DE LIMITES AUX DOMMAGES ACCIDENTELS
OU INDUITS, L'EXCLUSION OU LES LIMITES PRÉCÉDENTES NE
S'APPLIQUENT PAS.
Ces dispositions ne sont valables que pour la garantie limitée d'un an de
Dell. Pour les clauses des contrats de service couvrant votre système,
veuillez vous reporter à votre facture ou au contrat de service distinct qui
vous sera remis.
80 Guide de configuration et de référence rapide
Page 83

Dans le cas d'un échange de produit ou de pièce, l'échange sera fait en conformité avec la politique d'échange de Dell en vigueur à la date de l'échange.
Dans le cas où un numéro d'autorisation de retour de matériel (Return
Material Authorization Number) est émis par Dell, le ou les produits à réparer doivent être reçus avant la date d'expiration de la période de garantie
pour que les réparations puissent continuer à être sous garantie.
Garantie limitée de trois ans (Canada uniquement)
Dell Computer Corporation (« Dell ») fabrique ses produits matériels à partir de pièces et de composants neufs ou équivalents, conformément aux
normes de l'industrie en vigueur. Dell garantit le matériel qu'elle vend contre tout défaut de pièces et de fabrication. Cette garantie est en vigueur
pendant trois ans à compter de la date de facturation, conformément aux
modalités ci-après.
Cette garantie limitée couvre tout dommage éventuellement survenu pendant l'expédition des produits. Sinon, cette garantie ne s'applique pas à tout
dommage attribuable à une cause extérieure, notamment : accident, négligence, usage abusif, problèmes d'alimentation électrique, service d'entretien
non agréé par Dell, utilisation non conforme aux instructions, défaut
d'exécution de la maintenance préventive requise et problèmes causés par
l'utilisation de pièces et de composants non fournis par Dell.
Cette garantie limitée ne couvre aucun élément faisant partie d'une ou plusieurs des rubriques suivantes : logiciels, périphériques externes (sauf indication contraire), accessoires ou pièces ajoutés à un système Dell après
expédition du système par Dell, accessoires ou pièces ajoutés à un système
Dell par le service d'intégration de système de Dell, accessoires ou pièces
qui ne sont pas installés à l'usine Dell, produits DellWare. Cette garantie
couvre les moniteurs, claviers et souris de la marque Dell ou qui sont inclus
dans la liste des prix standard de Dell ; tous les autres moniteurs, claviers et
souris (y compris ceux vendus dans le cadre du programme DellWare) ne
sont pas couverts. Les batteries pour ordinateurs portables ne sont sous
garantie que pendant la première année de cette garantie limitée.
Guide de configuration et de référence rapide 81
Page 84

Garantie pendant la première année
Pendant la première année à partir de la date de facturation, Dell s'engage à
réparer ou remplacer les produits couverts par cette garantie qui sont renvoyés à son établissement. Pour faire une demande de service dans le cadre
de la garantie, vous devez contacter le support technique clientèle de Dell
pendant la période de garantie. Consultez la section « Obtention d’aide » de
votre Guide d'utilisation pour trouver les informations de contact pour obtenir une assistance clientèle. Si cette demande est acceptée, Dell émet un
numéro d’autorisation de retour du matériel. Le client doit expédier les produits à Dell dans leur emballage d’origine ou dans un emballage équivalent,
payer les frais d'expédition et assurer le colis, à moins d'assumer les risques
www.dell.com | support.dell.com
de perte ou de dommages en cours d'expédition. Dans la mesure du possible, Dell renvoie le produit réparé ou de remplacement à ses frais s'il s'agit
d'une adresse au Canada. Les envois aux autres adresses se font port dû.
REMARQUE : Avant d’expédier le ou les produits, Dell vous conseille de
sauvegarder les données des unités de disque dur et les autres dispositifs de
stockage des produits. Retirez les média amovibles comme les disquettes, les
cédéroms ou les cartes PC. Aucune responsabilité ne peut être engagée par
Dell sur les pertes de données ou de logiciel.
Toutes les pièces retirées des produits réparés sont la propriété de Dell. Pour
effectuer les réparations sous garantie et fabriquer des produits de remplacement, Dell utilise des pièces neuves et remises en état fournies par différents fabricants. La réparation ou le remplacement d'un produit par Dell ne
prolonge pas les termes de la garantie.
82 Guide de configuration et de référence rapide
Page 85

Garantie pendant la deuxième et la troisième années
Au cours de la deuxième et la troisième années de cette garantie limitée,
Dell s'engage à fournir si besoin, en conformité avec la politique d'échange
de Dell en vigueur à la date de l'échange, les pièces de rechange du matériel
Dell sous garantie. Le client doit d'abord donner un compte-rendu de chaque panne de matériel au service après-vente technique de Dell pour que
Dell accepte de remplacer une pièce et d'envoyer une pièce de rechange.
Dans la mesure du posssible, Dell renvoie les pièces de rechange à ses frais
s'il s'agit d'une adresse au Canada. Les envois aux autres adresses se font
port dû. Avec chaque pièce de rechange, Dell inclut un emballage affranchi
pour permettre au client de renvoyer à Dell la pièce remplacée. Les pièces
de rechange sont soit neuves, soit remises en état . Dell utilise des pièces de
rechange fournies par différents fabricants. Dans le cas d'une pièce de
rechange, le produit est couvert pour la durée restante de la garantie initiale.
Vous devrez la pièce de remplacement si la pièce remplacée n’est pas renvoyée à Dell. Les modalités de renvoi des pièces à remplacer et cette
obligation de payer les pièces de rechange se feront en conformité avec la
politique d'échange de Dell en vigueur à la date de l'échange.
Vous assumez la responsabilité de vos logiciels et de vos données. Dell n’est
pas tenu responsable de vous indiquer ou de vous rappeler les procédures de
sauvegarde et les autres procédures appropriées.
Conditions générales
DELL N'ASSURE AUCUNE GARANTIE OU CONDITION EXPRESSES
AU-DELÀ DE CE QUI EST STIPULÉ DANS CE CONTRAT DE
GARANTIE. DELL N'ACCORDE AUCUNES AUTRES GARANTIES ET
CONDITIONS, EXPRESSES OU TACITES, NOTAMMENT, ET CE,
SANS S'Y LIMITER, LES GARANTIES ET CONDITIONS TACITES
DE QUALITÉ MARCHANDE ET D'ADAPTATION À UN USAGE
PARTICULIER. DANS LES ÉTATS (OU JURIDICTIONS) QUI
N'AUTORISENT PAS DE LIMITATION SUR LES GARANTIES OU
CONDITIONS TACITES, CETTE LIMITATION NE S'APPLIQUE PAS.
Guide de configuration et de référence rapide 83
Page 86

EN CE QUI CONCERNE LE MAUVAIS FONCTIONNEMENT OU LES
DÉFAUTS ÉVENTUELS DU MATÉRIEL, LA RESPONSABILITÉ DE
DELL EST LIMITÉE À LA RÉPARATION ET AU REMPLACEMENT
DUDIT MATÉRIEL, TEL QU'INDIQUÉ PLUS HAUT. CES GARANTIES VOUS DONNENT DES DROITS SPÉCIFIQUES RECONNUS
PAR LA LOI ET VOUS POUVEZ AUSSI DISPOSER D'AUTRES
DROITS SELON LES ÉTATS (OU LES JURIDICTIONS).
DELL DÉCLINE TOUTE RESPONSABILITÉ ALLANT AU-DELÀ DES
TERMES DE LA PRÉSENTE GARANTIE, AINSI QUE TOUTE RESPONSABILITÉ RELATIVE À TOUT DOMMAGE ACCESSOIRE OU
INDIRECT, Y COMPRIS, ET CE, SANS S'Y LIMITER, L'INDISPONIBI-
www.dell.com | support.dell.com
LITÉ DES PRODUITS OU LES PERTES DE DONNÉES OU DE
LOGICIEL.
DANS LES ÉTATS (OU JURIDICTIONS) QUI NE PERMETTENT PAS
D'EXCLUSION OU DE LIMITES AUX DOMMAGES ACCIDENTELS
OU INDUITS, L'EXCLUSION OU LES LIMITES PRÉCÉDENTES NE
S'APPLIQUENT PAS.
Ces conditions ne s'appliquent qu'à la garantie limitée de trois ans de Dell.
Pour les clauses des contrats de service couvrant votre système, veuillez vous
reporter à votre facture ou au contrat de service distinct qui vous sera remis.
Dans le cas d'un échange de système ou de pièce, l'échange sera fait en conformité avec la politique d'échange de Dell en vigueur à la date de l'échange.
Dans le cas où un numéro d'autorisation de retour de matériel (Return
Material Authorization Number) est émis par Dell, le ou les produits à
réparer doivent être reçus avant la date d'expiration de la période de garantie pour que les réparations puissent continuer à être sous garantie.
REMARQUE : Dans le cas où le client choisit l'une des options de garantie
et d'entretien, au lieu de la garantie limitée à trois ans standard mentionnée
ci-dessus, ladite option sera stipulée sur la facture.
84 Guide de configuration et de référence rapide
Page 87

Politique de retour « Satisfait ou
remboursé » (États-Unis et Canada
uniquement)
Si vous avez acquis des produits neufs directement auprès d'une société
Dell, vous pouvez les renvoyer à Dell dans les 30 jours suivant la date de
facturation pour obtenir le remboursement intégral du prix d'achat ou un
remboursement sous forme de crédit. Si vous avez acquis des produits
reconditionnés ou remis à neuf auprès d’une société Dell, vous pouvez les
renvoyer à Dell dans les 14 jours suivant la date de facturation pour obtenir
le remboursement intégral du prix d'achat ou un remboursement sous
forme de crédit. Dans les deux cas, le remboursement intégral ou sous
forme de crédit exclut les frais de livraison et de manutention indiqués sur
votre facture. Si un organisme a acquis des produits dans le cadre d'un contrat écrit avec une société Dell, des restrictions en vertu de la présente
garantie peuvent s'appliquer en ce qui concerne le retour des produits.
Pour retourner des produits, vous devez contacter le service clientèle de
Dell afin d'obtenir un numéro d’autorisation de retour pour remboursement. Consultez la section « Obtention d’aide » de votre Guide d'utilisation
pour trouver les informations de contact pour obtenir l’assistance clientèle.
Pour accélérer votre demande de remboursement intégral ou sous forme de
crédit, vous devez expédier les produits à Dell dans leur emballage d'origine
dans les cinq jours à partir de la date d’émission de votre numéro
d’autorisation de retour pour remboursement. Vous devez aussi payer
les frais d'expédition et assurer le colis à moins d'assumer les risques de
perte ou de dommages en cours d'expédition. Les logiciels ne peuvent être
renvoyés contre un remboursement intégral ou sous forme de crédit que si
l'emballage scellé contenant les disquettes ou les cédéroms n'a pas été
ouvert. Les produits retournés doivent être à l'état neuf et accompagnés de
l'ensemble des manuels, disquettes, cédéroms, câbles d'alimentation et
autres éléments d'origine. Pour les clients souhaitant renvoyer (contre
remboursement intégral ou sous forme de crédit uniquement) des logiciels
d’application ou un système d’exploitation installé par Dell, le système
entier doit être renvoyé, accompagné de l'ensemble des supports et de la
documentation d’origine.
Guide de configuration et de référence rapide 85
Page 88

Cette politique de retour « Satisfait ou remboursé » ne s'applique pas aux
produits DellWare, qui peuvent être renvoyés en suivant la politique de
retour DellWare en vigueur. D'autre part, les pièces remises à neuf acquises
auprès du service de ventes des pièces détachées Dell au Canada ne peuvent
pas être retournées.
www.dell.com | support.dell.com
86 Guide de configuration et de référence rapide
Page 89

Sistemas Dell™ OptiPlex™
Guía de instalación y de referencia
rápida
www.dell.com | support.dell.com
Page 90

Notas, avisos y precauciones
NOTA: Una NOTA indica información importante que le ayuda a conseguir un mejor rendimiento
de su equipo.
AVISO: Un AVISO indica la posibilidad de daños al hardware o pérdida de datos y le explica
cómo evitar el problema.
PRECAUTIÓN: Una PRECAUCIÓN indica una situación potencialmente peligrosa
que, si no se evita, puede provocar lesiones menores o moderadas.
____________________
La información contenida en este documento puede modificarse sin aviso previo.
© 2000–2001 Dell Computer Corporation. Quedan reservados todos los derechos.
Queda estrictamente prohibida la reproducción de este documento en cualquier forma sin la autorización por escrito
de Dell Computer Corporation.
Marcas comerciales utilizadas en este texto:
Dell Computer Corporation;
Microsoft Corporation.
Otras marcas y otros nombres comerciales pueden utilizarse en este documento para hacer referencia a las entidades
que los poseen o a sus productos. Dell Computer Corporation renuncia a cualquier interés sobre la propiedad de marcas
y nombres comerciales que no sean los suyos.
Julio del 2001 P/N 81FTK Rev. A04
Microsoft Windows, Windows NT y MS-DOS
Dell, OptiPlex
y el logotipo
DELL
son marcas comerciales de
son marcas comerciales registradas de
Page 91

Acerca de esta guía
Este documento contiene la introducción/configuración, resolución de problemas, e información sobre la garantía, seguridad y regulaciones del equipo
OptiPlex™
™
Dell
Para obtener las versiones más recientes de los documentos sobre la unidad
de disco duro, visite la web de asistencia de Dell en http://support.dell.com.
Los números de modelos exigidos por la normativa aparecen a lo largo de
este documento; a continuación se muestran los equivalentes del tipo de
chasis:
Números de modelos exigidos por la normativa
y tipos de chasis
DHS = chasis de escritorio pequeño (SD)
DHP = chasis de factor de forma pequeño (SF)
DHM = chasis de minigabinete vertical pequeño
(SMT)
Búsqueda de información y asistencia
Recursos y herramientas de asistencia
Recurso Contenido Utilización del recurso
Dell OptiPlex ResourceCD
• Diagnósticos Dell:
• Controladores
•Utilidades
• Documentación del equipo
y de los dispositivos
Consulte el menú principal del ResourceCD que se
entregó con su equipo. Use el menú desplegable para
realizar las selecciones apropiadas para su equipo. Puede
realizar las tareas siguientes:
• Diagnóstico un problema
• Instalar o reinstalar controladores
• Obtener información sobre su equipo y sus dispositivos
NOTA: La documentación del usuario y los controladores
ya vienen instalados en el equipo cuando Dell lo envía.
Puede utilizar este CD para acceder a la documentación,
instalar controladores o ejecutar las herramientas de
diagnóstico.
Guía de instalación y de referencia rápida 89
Page 92

Recursos y herramientas de asistencia
(continuación)
Recurso Contenido Utilización del recurso
Etiquetas de servicio y registro,
situadas en la parte delantera o
lateral de su equipo Dell™.
• Código de servicio rápido y
número de etiqueta de
El Código de servicio rápido y el Número de etiqueta de
servicio son identificadores únicos de su equipo Dell.
Es posible que necesite el número de código del producto
(o identificación del producto) para completar la
instalación del sistema operativo.
servicio
• Clave del producto (llamada
también identificación del
producto o COA (Certificate
of Authenticity [Certificado
www.dell.com | support.dell.com
de autenticidad])
CD del sistema operativo. Para volver a instalar el sistema operativo, use el CD del
sistema operativo que se entrega con su equipo.
NOTA: Es posible que el CD de sistema operativo no
incluya todos los controladores más recientes para el
equipo. Si reinstala el sistema operativo, utilice el
ResourceCD
para reinstalar los controladores para los
dispositivos incluidos con el equipo.
Para obtener más información sobre cómo reinstalar el
sistema operativo, consulte la documentación de
instalación del sistema operativo incluida con el equipo.
Guía de instalación del sistema
operativo
Para obtener información sobre cómo reinstalar y
configurar el sistema operativo, consulte la guía de
instalación del sistema operativo.
Haga clic en el botón Start (Inicio) y seleccione Help
(Ayuda) o Help and Support (Ayuda y asistencia),
dependiendo del sistema operativo, para obtener más
información sobre el sistema operativo.
90 Guía de instalación y de referencia rápida
Page 93

Recursos y herramientas de asistencia
Recurso Contenido Utilización del recurso
Guías de usuario del equipo y
los dispositivos
Guías del usuario
Sitio web de asistencia de Dell
• Asistencia técnica e
información
• Descargas para su equipo
• Estado del pedido o entrega
• Sugerencias, documentos
sobre tecnología,
información de servicio
Sitio web de Asistencia Premier
de Dell
• Estado de llamadas de
servicio
• Aspectos técnicos
principales por producto
• Preguntas frecuentes según
número de producto
• Etiquetas de servicio
personalizadas
• detalles de la configuración
del sistema
(continuación)
Dependiendo de su sistema operativo, haga doble clic en
el icono User’s Guides (Guía del usuario) en el escritorio,
o haga clic en el botón Inicio y seleccione Ayuda y
asistencia para acceder a la documentación electrónica
almacenada en la unidad de disco duro.
Obtenga información sobre lo siguiente:
•Uso del equipo
• Configuración de los valores del sistema
• Desmontaje y instalación de piezas
• Instalación y configuración de software
• Diagnóstico de un problema
• Especificaciones técnicas
• Documentación del dispositivo (en los sistemas
operativos seleccionados)
• Obtención de asistencia técnica
Vaya a http://support.dell.com y complete el registro:
• Obtenga ayuda mediante preguntas sobre uso,
instalación y solución de problemas
• Obtenga respuesta a preguntas sobre asistencia o
servicio técnico
• Obtenga las últimas versiones de los controladores del
equipo
• Acceda a la documentación sobre su equipo y
dispositivos
• Participe en discusiones en línea con otros clientes de
Dell y con profesionales técnicos de Dell
• Explore una lista de vínculos en línea a los principales
proveedores de Dell
Diríjase a http://premiersupport.dell.com:
El sitio web de Asistencia Premier de Dell está
personalizado para clientes corporativos, gubernamentales
y del ámbito educativo.
Puede que este sitio no esté disponible en todas las
regiones.
Guía de instalación y de referencia rápida 91
Page 94

Para comenzar/Configuración
Siga los siguientes pasos para conectar dispositivos externos al equipo por
medio del panel de E/S (entrada/salida). La parte posterior de su sistema
Dell, incluido el panel de E/S, puede ser distinta a los ejemplos que se
muestran aquí.
1
www.dell.com | support.dell.com
92 Guía de instalación y de referencia rápida
Page 95

NOTA: Conecte sólo un teclado y un mouse.
NOTA: Si tiene un mouse o teclado compatible con un Bus serie universal
(USB), utilice los conectores USB de la parte posterior del sistema.
Guía de instalación y de referencia rápida 93
Page 96

Sistema con un
2
conector de vídeo
www.dell.com | support.dell.com
conector de vídeo en
la tarjeta de expansión
Sistema con dos
conectores de vídeo
NOTA: Si su equipo cuenta con dos conectores de vídeo, el conector de vídeo
integrado está desactivado y tiene una tapa protectora. Utilice el conector de
la tarjeta de expansión, como se muestra en las ilustraciones de la derecha en
el paso 2.
94 Guía de instalación y de referencia rápida
conector de vídeo en
la tarjeta de expansión
Page 97

Sistema con un
conector de vídeo
conector de vídeo en
la tarjeta de expansión
NOTA: Si su equipo cuenta con dos conectores de vídeo, el conector de vídeo
integrado está desactivado y tiene una tapa protectora. Utilice el conector de
la tarjeta de expansión, como se muestra en las ilustraciones de la derecha en
el paso 2.
Sistema con dos
conectores de vídeo
Guía de instalación y de referencia rápida 95
Page 98

3
www.dell.com | support.dell.com
luces de diagnósticos luces de diagnósticos
luces de diagnósticos
96 Guía de instalación y de referencia rápida
Page 99

luces de
diagnósticos
NOTA: Si su sistema dispone de dos conectores de audio, utilice el que se
encuentra en la tarjeta de expansión, como se muestra en las ilustraciones de
la derecha en el paso 3.
luces de
diagnósticos
Guía de instalación y de referencia rápida 97
Page 100

Compruebe que el interruptor de selección de voltaje está en la posición
correcta para su área. Para obtener más información, consulte “Cuando
utilice el sistema” más adelante en este documento.
4
www.dell.com | support.dell.com
98 Guía de instalación y de referencia rápida
 Loading...