

Page 1
About Warning
WARNING: A WARNING indicates a potential for property damage, personal injury,
or death.
CAUTION: Turn off the computer and monitor before starting. Remove all cables from the
chassic and from the cable management slot of the monitor.
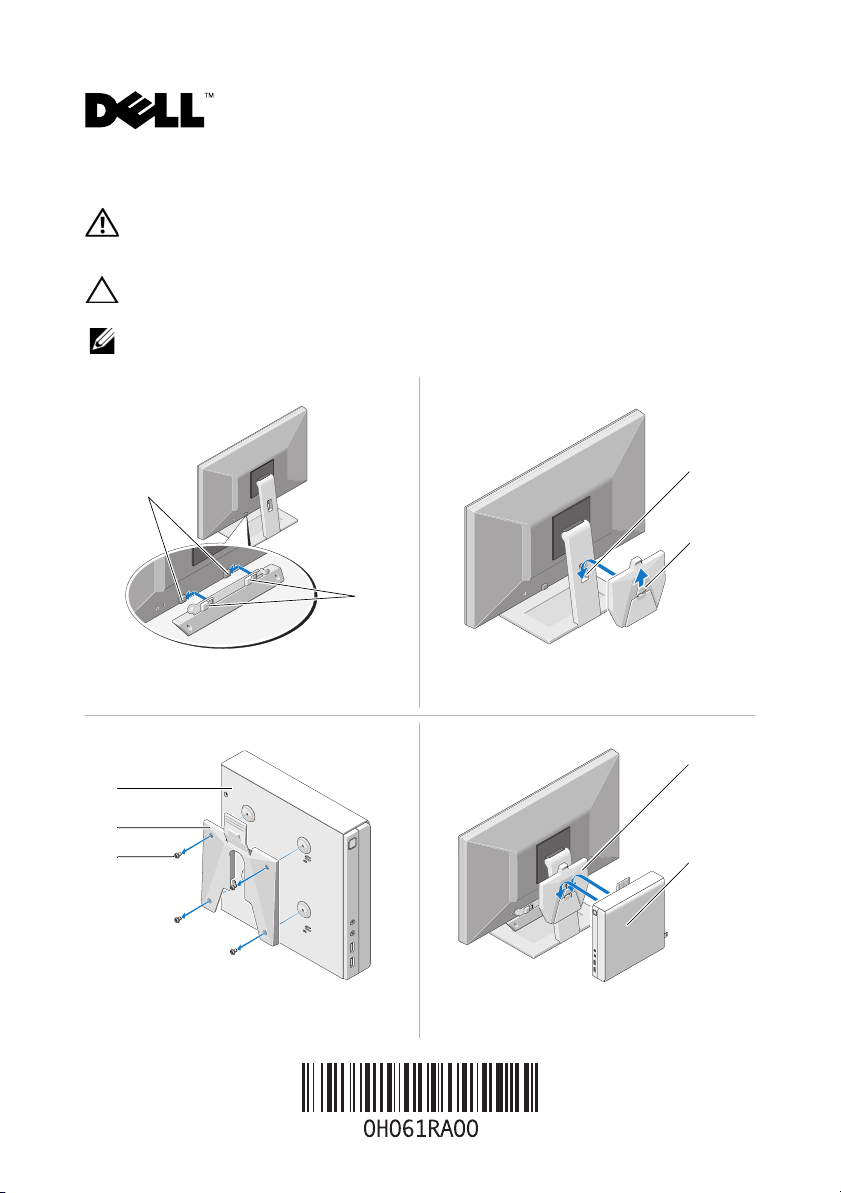
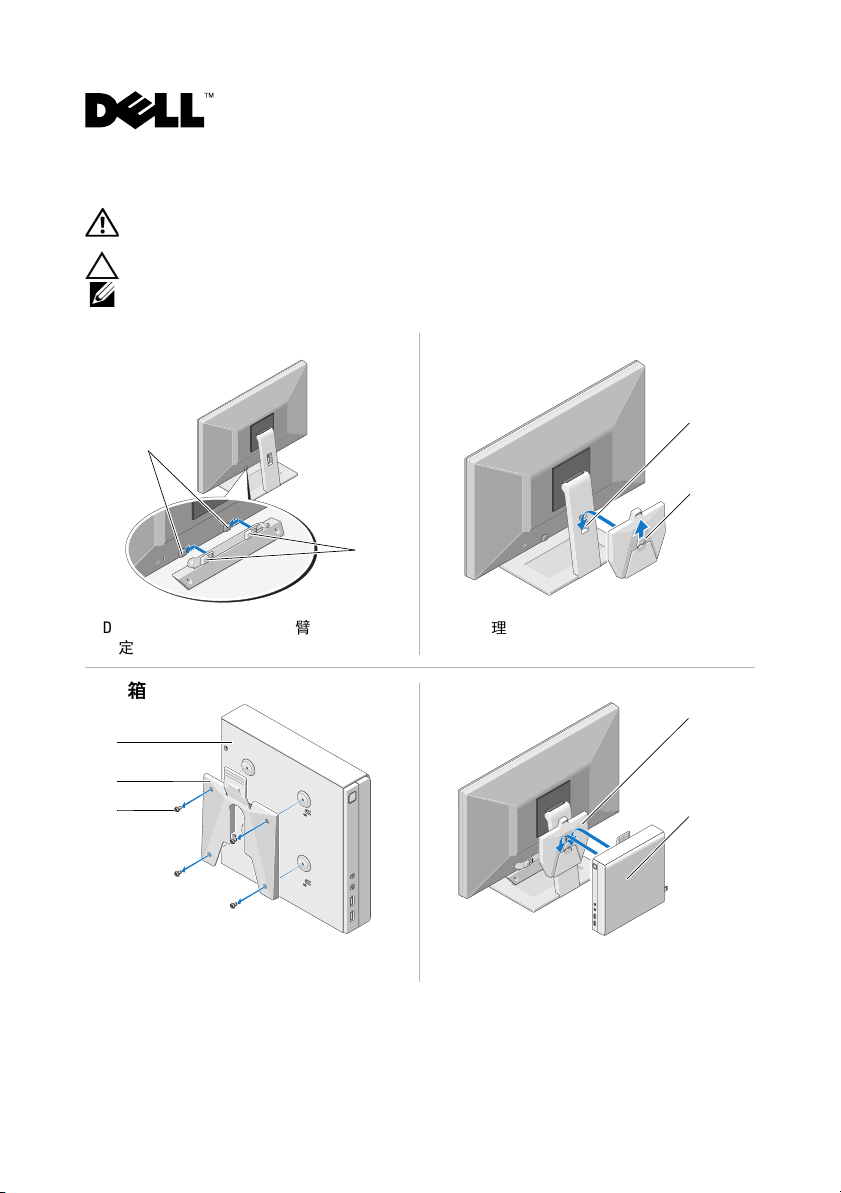
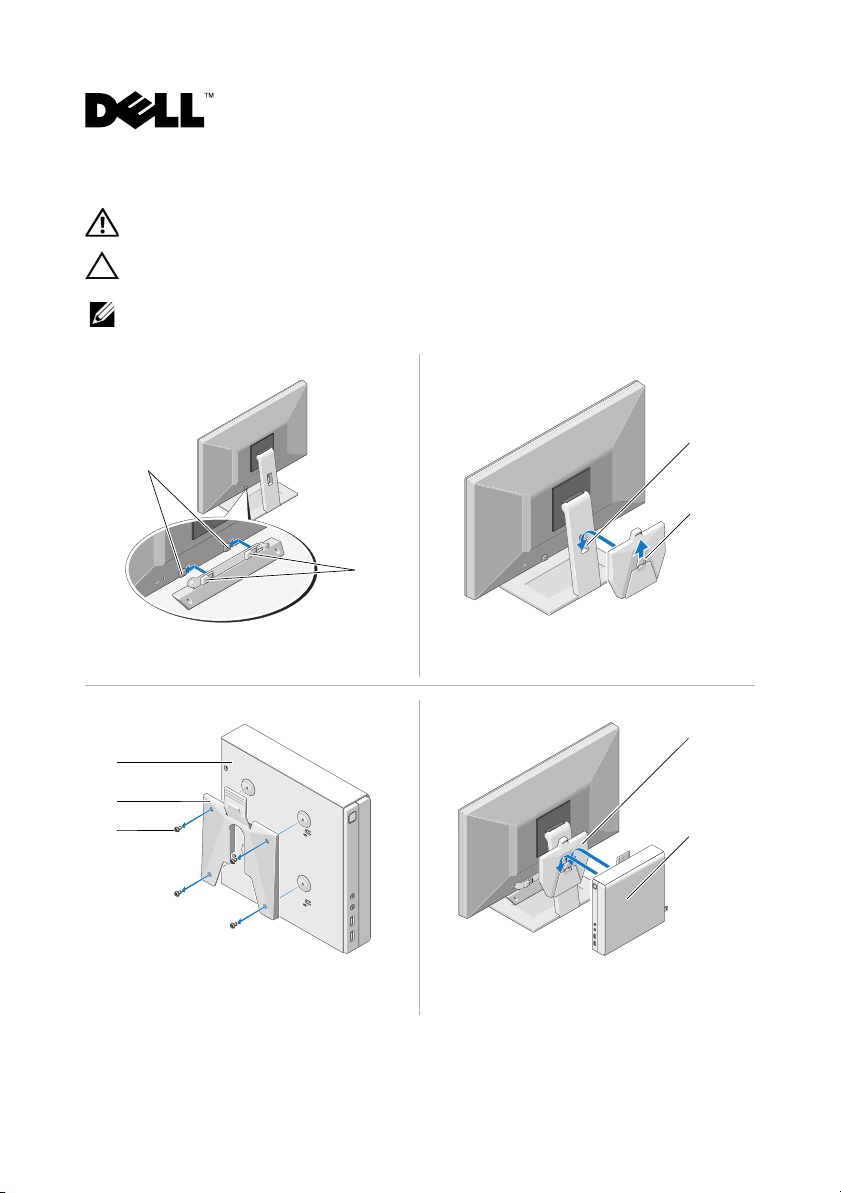
NOTE: The counter balance utilizes the Dell™ Soundbar mounting brackets on the monitor.
The mounting bracket utilizes the cable management slot on the Dell monitor.
Mounting Counter Balance to the Monitor Mounting the Bracket to the Monitor
1
2
1
2
1 Dell Soundbar
mounting bracket
2 counter balance
alignments notches
1 cable management slot 2 handle
Mounting the Chassis to the Plate Mounting the Chassis to the Monitor
1
2
3
1 Chassis 2 chassis
mounting plate
February 2009
3 M4 screws (4) 1 bracket mounted to
monitor stand
2 chassis with mounting
plate attached
1
2
Page 2
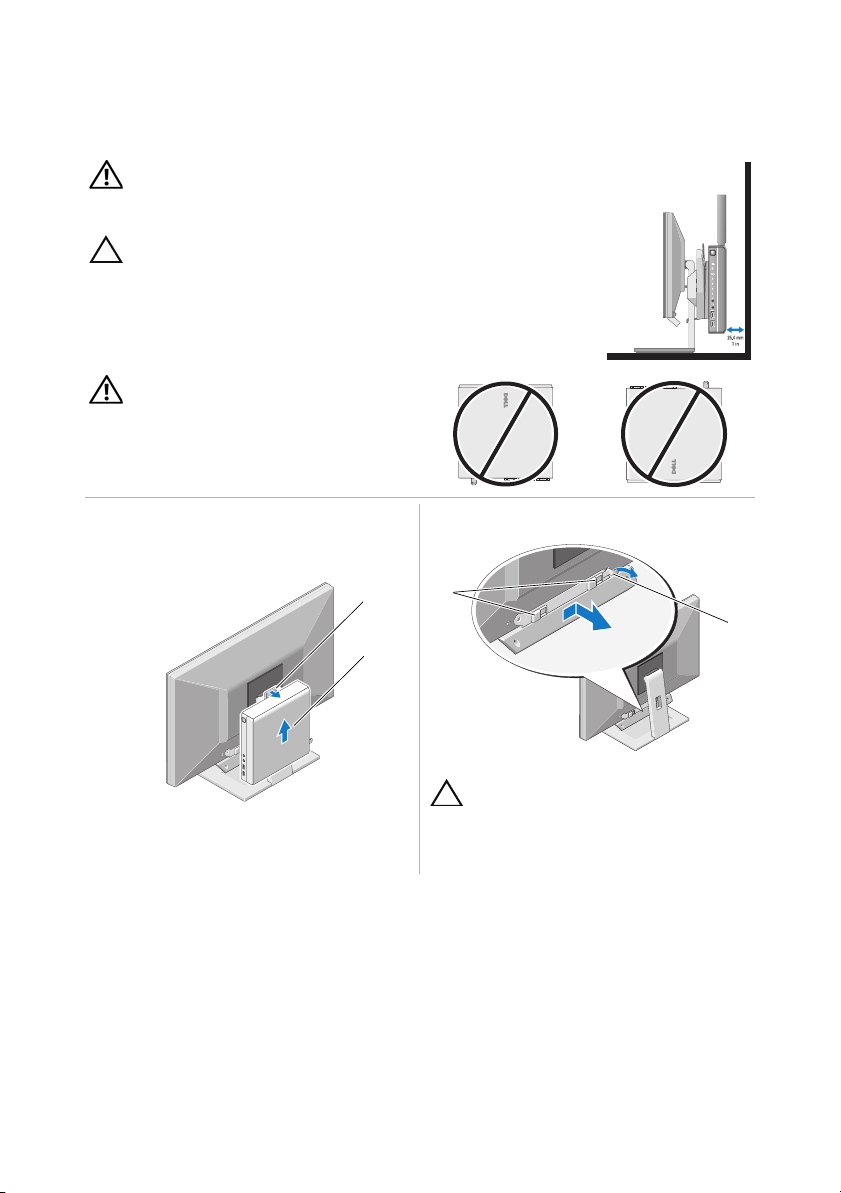
WARNING: Before mounting the chassis to the monitor, ensure that
none of the vents (OptiPlex™ FX160/160 has ventilation on four of the six
primary surfaces) are blocked on the system.
CAUTION: Before installing your computer in an enclosure,
read the safety instructions that shipped with your computer.
Thermal Restrictions
There must be at least 1 inch (25.4mm) clearance at the back of the chassis
for optimal system cooling.
WARNING: Chassis front face should not
be placed in the up or down position.
Removing Chassis From Monitor Bracket Removing Counter Balance From Monitor
1
2
1
2
CAUTION: Before removing the counter
balance, ensure the chassis is removed
from the monitor bracket.
1 release tab 2 chassis 1 mounting slots 2 release tab
____________________
Information in this document is subject to change without notice.
© 2009Dell Inc. All rights reserved. Printed in China. Printed on Recycled Paper.
Reproduction of these materials in any manner whatsoever without the written permission of Dell Inc.
is strictly forbidden.
Trademarks used in this text: Dell, the DELL logo, and OptiPlex are trademarks of Dell Inc.
Other trademarks and trade names may be used in this document to refer to either the entities claiming the
marks and names or their products. Dell Inc. disclaims any proprietary interest in trademarks and trade
names other than its own.
Page 3
关于警告
警告: “警告”表示可能会造成财产损失、人身伤害甚至死亡。
小心:
开始前关闭计算机和显示器。从机箱和显示器的电缆管理插槽拔下所有电缆。
注:
平衡臂利用了显示器上的 Dell™ Soundbar 固定支架。固定支架利用了戴尔显示器上
的电缆管理插槽
将平衡臂安装到显示器上 将支架安装到显示器上
1
2
1
2
1 Dell Soundbar
固定支架
2
平衡臂定位闩锁 1 电缆管理插槽 2 把手
将机箱安装到固定板上 将机箱安装到显示器上
1
2
3
1 机箱 2 机箱固定板 3M4 螺钉 (4) 1 安装到显示器支架
的支架
2 带有固定板的机箱
1
2
Page 4

警告:
(
未阻塞。
在将机箱安装到显示器之前,请确保系统上的任何通风孔
OptiPlex™ FX160/160在6
个主表面中的4个上具有通风装置)均
小心: 在将计算机安装到机壳中之前,请阅读计算机附带
的安全说明。
散热限制
机箱后部必须至少保留 1 英寸 (25.4 毫米)的空隙以达到最佳系统冷却
效果。
警告:
机箱正面不应向上或向下放置。
从显示器支架上卸下机箱 从显示器上卸下平衡臂
1
2
1
释放卡舌 2 机箱 1 固定插槽 2 释放卡舌
1
小心:
显示器支架上卸下机箱。
在卸下平衡臂前,请确保已从
____________________
本说明文件中的信息如有更改,恕不另行通知。
© 2009 Dell Inc.。版权所有,翻印必究。中国印制。用再生纸印制。
未经 Dell Inc. 书面许可,严禁以任何形式复制这些材料。
本文中使用的商标:Dell、 DELL 徽标和 OptiPlex 是 Dell Inc. 的商标。
本说明文件中述及的其它商标和商品名称是指拥有相应标记和名称的公司或其制造的产品。
Dell Inc. 对其它公司的商标和产品名称不拥有任何所有权。
2
Page 5
關於警告
警告: 「警告」表示有可能會導致財產損失、人身傷害甚至死亡。
註:
將平衡架安裝至顯示器 將固定托架安裝至顯示器
Dell Soundbar
1
固定托架
將機箱安裝至固定板上 將機箱安裝至顯示器上
1
警示:
開始前請先關閉電腦與顯示器電源。拔掉機箱及顯示器纜線管理插槽中所有的
纜線。
平衡架需安裝至顯示器上的 Dell™ Soundbar 固定托架。固定托架則安裝至 Dell 顯示
器上的纜線管理插槽。
1
2
2
平衡架定位槽口
1
纜線管理插槽
2
1
2
手柄
1
1
2
3
機箱
2
機箱固定板
3
M4 螺絲 (4)
1
固定托架與顯示器
支架連接示意圖
2
2
固定板與機箱連接
示意圖
Page 6

警告:
FX160/160
警示:
將機箱安裝至顯示器前,請先確定系統的通風孔
機箱六面內其中四面設有通風孔) 皆未被擋住。
將電腦安裝在封閉環境中之前,請閱讀電腦隨附的
(OptiPlex™
安全說明。
散熱限制
機箱背面必須預留 1 英吋 (25.4 公釐 ) 以上的間隙,以利系統冷卻。
警告: 機箱正面勿朝上或朝下
放置
。
將機箱從顯示器托架卸下 將平衡架從顯示器卸下
1
否已從顯示器托架上卸下。
拆卸平衡架前,請檢查機箱是
1
固定插槽
警示:
2
釋放彈片
1
釋放彈片
2
機箱:
1
2
____________________
本文件中的資訊如有更改,恕不另行通知。
© 2009 Dell Inc. 版權所有,翻印必究。中國印製。以再造紙印製。
未經 Dell Inc. 的書面許可,嚴格禁止以任何形式複製這些內容。
本文中使用的商標:Dell、DELL 徽標和 OptiPlex 是 Dell Inc. 的商標。
本說明文件中使用的其他商標及商品名稱,係指擁有這些商標及商品名稱的公司或其製造的產
品。Dell Inc. 對本公司之外的商標和產品名稱不擁有任何專有權益。
2
Page 7

À propos de l'avertissement
AVERTISSEMENT: un AVERTISSEMENT vous indique un risque d'endommagement
du matériel, de blessure corporelle ou de mort.
PRÉCAUTION : avant de commencer, éteignez l'ordinateur et le moniteur. Retirez tous les
câbles du châssis et de la fente de gestion des câbles du moniteur.
REMARQUE : le contrepoids utilise les montages métalliques de la barre de son Dell™ sur le
moniteur. Le montage métallique utilise la fente de gestion des câbles du moniteur Dell.
Montage du contrepoids sur le moniteur Montage du support sur le moniteur
1
2
1
2
1 Montage métallique de
la barre de son Dell
2 Encoches d'alignement
du contrepoids
1 Fente de gestion des
câbles
2 Poignée
Montage du châssis sur la plaque Montage du châssis sur le moniteur
1
2
3
1 Châssis 2 Plaque de
montage du
châssis
3 Vis M4 (4) 1 Support monté sur le
socle du moniteur
2 Châssis avec plaque
de montage fixée
1
2
Page 8

AVERTISSEMENT: avant de monter le châssis sur le moniteur,
assurez-vous qu'aucune entrée d'air du système n'est obstruée (le
système OptiPlex™ FX160/160 dispose d'entrées d'air sur quatre des six
surfaces principales).
PRÉCAUTION : avant d'installer votre ordinateur dans un
espace fermé, lisez les consignes de sécurité qui
l'accompagnent.
Restrictions relatives à la ventilation
Laissez un dégagement d'au moins 25,4 mm (1 po) à l'arrière du
châssis afin de permettre un refroidissement optimal du système.
AVERTISSEMENT: la façade du
châssis ne doit pas être vers le haut ni vers
le bas.
Retrait du châssis du support du moniteur Retrait du contrepoids du moniteur
1
2
1
PRÉCAUTION : avant de retirer le
contrepoids, assurez-vous que le châssis
est retiré du support du moniteur.
1 Patte de dégagement 2 Châssis 1 Fentes de montage 2 Patte de dégagement
____________________
Les informations de ce document sont sujettes à modification sans préavis.
© 2009 Dell Inc. Tous droits réservés. Imprimé en Chine. Imprimé sur du papier recyclé.
La reproduction de ce document, de quelque manière que ce soit, sans l'autorisation écrite de Dell Inc.
est strictement interdite.
Marques utilisées dans ce document : Dell, le logo DELL et OptiPlex sont des marques de Dell Inc.
Les autres marques et noms de produits pouvant être utilisés dans ce document sont reconnus comme
appartenant à leurs propriétaires respectifs. Dell Inc. rejette tout intérêt dans l'utilisation des marques
déposées et des noms de marques ne lui appartenant pas.
2
Page 9

Warnhinweise
WARNUNG: Mit WARNUNG wird auf eine potenziell gefährliche Situation hingewiesen,
die zu Sachschäden, Verletzungen oder zum Tod führen könnte.
VORSICHT: Schalten Sie Computer und Monitor aus, bevor Sie beginnen. Entfernen Sie alle Kabel
vom Gehäuse und aus der Kabelführung an der Monitorrückseite.
ANMERKUNG: Das Gegengewicht nutzt die Dell™ Soundbar-Montagehalterung am Monitor. Die
Montagehalterung nutzt die Kabelführung am Dell-Monitor.
Befestigen des Gegengewichts am Monitor Befestigen der Montagehalterung am Monitor
1
2
1
2
1 Dell Soundbar-
Montagehalterung
2 Gegengewicht-
Ausrichtungskerben
Befestigen des Gehäuses an der
Montagehalterung
1
2
3
1 Gehäuse 2 Montage-
halterung für das
Gehäuse
3 M4-Schrauben
(4)
1 Kabelführung 2 Griff
Befestigen des Gehäuses am Monitor
1 Montagehalterung am
Monitorstandrahmen
befestigt
2 Gehäuse mit befestigter
Montagehalterung
1
2
Page 10

WARNUNG: Bevor Sie das Gehäuse am Monitor befestigen, stellen Sie
sicher, dass keine Lüftungsschlitze des Systems blockiert sind. – Vier der
insgesamt sechs Hauptoberflächen des OptiPlex™ FX160/160 verfügen über
Belüftungsöffnungen.
VORSICHT: Lesen Sie die Sicherheitshinweise, die im Lieferumfang
Ihres Computers enthalten waren, bevor Sie den Computer in einem
Schrank installieren.
Temperaturbeschränkungen
Damit eine optimale Kühlung des Systems sichergestellt ist, muss ein Freiraum
von mindestens 25,4 mm (1 Zoll) an der Rückseite des Gehäuses bestehen.
WARNUNG: Das Gehäuse darf nicht mit der
Vorderseite nach oben oder unten ausgerichtet
sein.
25,44 mm
(1 Zoll)
Entfernen des Gehäuses von der
Entfernen des Gegengewichts vom Monitor
Monitormontagehalterung
1
1
2
2
VORSICHT: Bevor Sie das Gegengewicht
entfernen, stellen Sie sicher, dass das
Gehäuse von der Monitormontagehalterung
entfernt wurde.
1 Freigabelasche 2 Gehäuse 1 Montagesteckplätze 2 Freigabelasche
____________________
Irrtümer und technische Änderungen vorbehalten.
© 2009 Dell Inc. AlleRechte vorbehalten. Gedruckt in China. Auf Recyclepapier gedruckt.
Die V ervielfältigung dieser Materialien in jeglicher W eise ohne vorherige schriftliche Genehmigung v on Dell Inc.
ist strengstens untersagt.
In diesem Text verwendete Marken: Dell, das DELL-Logo und OptiPlex sind Marken von Dell Inc.
Alle anderen in dieser Dokumentation genannten Marken und Handelsbezeichnungen sind Eigentum der
entsprechenden Hersteller und Firmen. Dell Inc. erhebt keinen Anspruch auf Marken und Handelsbezeichnungen
mit Ausnahme der eigenen.
Page 11

Informazioni sulle avvertenze
AVVERTENZA Un messaggio di AVVERTENZA indica un rischio di danni alla
proprietà, lesioni personali o morte.
ATTENZIONE Prima di cominciare, spegnere il computer e il monitor. Rimuovere tutti i cavi
dal telaio e dallo slot di gestione dei cavi del monitor.
NOTA Il contrappeso utilizza le staffe di montaggio di Dell™ Soundbar sul monitor. La staffa
di montaggio utilizza lo slot di gestione dei cavi del monitor Dell.
Montaggio del contrappeso al monitor Montaggio della staffa al monitor
1
2
1
2
1 Staffa di montaggio di
Dell Soundbar
2 Tacche di allineamento
del contrappeso
1 Slot di gestione dei cavi 2 Maniglia
Montaggio del telaio alla piastra Montaggio del telaio al monitor
1
2
3
1 Telaio: 2 Piastra di
montaggio del
telaio
3 Viti M4 (4) 1 Supporto montato sul
piedistallo del monitor
2 Telaio con piastra di
montaggio collegata
1
2
Page 12

AVVERTENZA Prima di montare il telaio al monitor, accertarsi che
nessuna presa d'aria sia ostruita (OptiPlex™ FX160/160 dispone di
ventilazione su quattro delle sei superfici principali).
ATTENZIONE Prima di installare il computer in un cabinet,
leggere le istruzioni di sicurezza fornite con il computer.
Restrizioni termiche
Per un sistema di raffreddamento ottimale lasciare uno spazio di 25,4 mm sul
retro del telaio.
AVVERTENZA La parte anteriore del
telaio non deve essere posizionata verso
l'alto o verso il basso.
Rimozione del telaio dalla staffa del
Rimozione del contrappeso dal monitor
monitor
1
1
2
2
ATTENZIONE Prima di rimuovere il
contrappeso, verificare che il telaio sia
stato staccato dalla staffa del monitor.
1 Linguetta di scatto 2 Telaio 1 Slot di montaggio 2 Linguetta di scatto
____________________
Le informazioni contenute nel presente documento sono soggette a modifiche senza preavviso.
© 2009 Dell Inc. Tutti i diritti riservati. Stampato in Cina. Stampato su carta riciclata.
È severamente vietata la riproduzione di questi materiali, con qualsiasi strumento, senza l'autorizzazione
scritta di Dell Inc.
Marchi utilizzati in questo documento: Dell, il logo DELL e OptiPlex sono marchi di Dell Inc.
Altri marchi e nomi commerciali possono essere utilizzati in questo documento sia in riferimento alle
aziende che rivendicano il marchio e i nomi che ai prodotti stessi. Dell Inc. nega qualsiasi partecipazione
di proprietà relativa a marchi e nomi commerciali diversi da quelli di sua proprietà.
Page 13

「警告」の表記について
危険: 物的損害、けが、または死亡の原因となる可能性があることを示しています。
注意:作業を開始する前に、コンピュータとモニタの電源を切ります。シャーシ、およびモニター
のケーブル管理スロットに接続されているすべてのケーブルを取り外してください。
メモ:カウンタバランスは、Dell™ Soundbar の取り付けブラケットを使用してモニターに取り付
けます。取り付けブラケットは、デルのモニターのケーブル管理スロットに取り付けます。
カウンタバランスをモニターに取り付ける ブラケットをモニターに取り付ける
1
2
1
2
1
Dell Soundbar 取り付け
ブラケット
2
カウンタバランス
位置合わせノッチ
1
ケーブル管理スロット
2
ハンドル
シャーシをプレートに取り付ける シャーシをモニターに取り付ける
1
2
3
1
シャーシ2シャーシ取り付け
プレート
3
M4 ネジ(4)1ブラケットが取り付け
られたモニタースタンド
2
プレートが装着された
シャーシ
1
2
Page 14

警告: シャーシをモニターに取り付ける前に、通気孔がふさがれていな
いことを確認してください(OptiPlex™ FX160/160 には 6 面のうち 4 面に
通気孔があります)。
警告:コンピュータをエンクロージャに設置する前に、お使いの
コンピュータに付属しているガイドの安全にお使いいただくため
の注意事項をお読みください。
熱対策の制約
システムの冷却効率を最適化するため、シャーシの背面に少なくとも約
25.4 mm の空間を確保してください。
警告: シャーシの正面の向きに注意して
設置してください。
モニターのブラケットからシャーシを
取り外す
1
2
モニターからカウンタバランスを
取り外す
1
2
カウンタバランスを取り外す前に、
必ずモニタのブラケットからシャーシを
取り外してください。
1
リリースタブ 2シャーシ
注意:
1
取り付けスロット2リリースタブ
____________________
この文書の情報は、事前の通知なく変更されることがあります。
© 2009 すべての著作権は Dell Inc. にあります。Printed in China. Printed on Recycled Paper.
Dell Inc. の書面による許可のない複製は、いかなる形態においても厳重に禁じられています。
本書で使用されている商標について:Dell、DELL ロゴ、および OptiPlex は Dell Inc. の商標です。
この文書では、上記記載以外の商標および会社名が使用されている場合があります。それらの商標や会社名
は、一切 Dell Inc. に帰属するものではありません。
Page 15

경고 정보
경고: "경고"는 재산상의 피해나 심각한 부상 또는 사망을 유발할 수 있는 위험이
있음을 알려줍니다.
주의: 시작하기 전에 먼저 컴퓨터와 모니터를 끄십시오. 섀시와 모니터의 케이블 관리 슬
롯에서 케이블을 모두 분리하십시오.
주: 카운터 밸런스는 모니터에 있는 Dell™ Soundbar 장착 브래킷을 사용합니다. 장착 브래
킷은 Dell 모니터에 있는 케이블 관리 슬롯을 사용합니다.
모니터에 카운터 밸런스 장착 모니터에 브래킷 장착
1
2
1
2
1
Dell Soundbar 장착
브래킷
2
카운터 밸런스 정렬
노치
1
케이블 관리 슬롯
플레이트에 섀시 장착 모니터에 섀시 장착
1
2
3
1
섀시
2
섀시 장착 플
레이트
3
M4 나사(4개)
1
모니터 받침대에 장
착된 브래킷
2
손잡이
1
2
2
장착 플레이트가 부
착된 섀시
Page 16

경고: 모니터에 섀시를 장착하기 전에 시스템에 차단된 환풍구
(OptiPlex™ FX160/160의 경우 6면 중 4면에 환풍구가 있음)가 없는지
확인하십시오.
주의: 인클로저에 컴퓨터를 설치하기 전에 컴퓨터와 함께
제공된 안전 지침을 숙지하십시오.
열 제한 사항
시스템 쿨링을 최적화할 수 있도록 섀시 뒷면에 최소
25.4mm(1인치)의 공간을 두어야 합니다.
경고: 섀시 앞면이 위쪽 또는 아래쪽을
향하게 두지 마십시오.
장착 브래킷에서 섀시 분리 모니터에서 카운터 밸런스 분리
1
2
1
2
주의: 카운터 밸런스를 분리하기 전에
모니터 브래킷에서 섀시가 분리되었는
지 확인하십시오.
1
분리 탭
2
섀시
1
장착 슬롯
2
분리 탭
____________________
본 설명서에 수록된 정보는 사전 통보 없이 변경될 수 있습니다.
© 2009 Dell Inc. 저작권 본사 소유. 중국에서 인쇄. 재활용지에 인쇄.
Dell Inc.의 서면 승인 없이 어떠한 방식으로든 본 자료를 무단 복제하는 행위는 엄격히
금지됩니다.
본 설명서에 사용된 상표: Dell, DELL 로고 및 OptiPlex는 Dell Inc.의 상표입니다.
본 설명서에서 특정 회사의 상표 및 회사 이름
용할 수도 있습니다. Dell Inc.는 자사가 소유하고 있는 것 이외에 기타 모든 상표 및 상호에 대한
어떠한 소유권도 갖고 있지 않습니다.
또는 제품을 지칭하기 위해 기타 상표 및 상호를 사
Page 17

Предупреждения и примечания
ВНИМАНИЕ!
получения травм или угрозу для жизни.
ОСТОРОЖНО!
кабели от корпуса; извлеките кабели из гнезда кабельного органайзера монитора.
ПРИМЕЧАНИЕ.
на мониторе. Для держателя используется гнездо кабельного органайзера монитора Dell.
Установка противовеса на монитор Установка держателя на монитор
1
— указывает на потенциальную опасность повреждения оборудования,
Выключите компьютер и монитор перед началом работ. Отсоедините все
Для установки противовеса используется держатель модуля Dell™ Soundbar
2
1
2
1 Держатель модуля
Dell Soundbar
2 Фиксаторы
противовеса
Установка корпуса на крепежную
панель
1
2
3
1 Корпус 2 Крепежная
панель
корпуса
3 Винты M4 (4) 1 Держатель,
1 Гнездо кабельного
органайзера
2Ручка
Установка корпуса на монитор
установленный на
подставку монитора
2Корпус с
установленной
крепежной панелью
1
2
Page 18

ВНИМАНИЕ!
одно из вентиляционных отверстий не заблокировано (вентиляционные
отверстия располагаются на четырех из шести поверхностей системы
OptiPlex™ FX160/160).
ОСТОРОЖНО!
Перед установкой корпуса на монитор убедитесь, что ни
Перед установкой компьютера в замкнутом
пространстве прочтите инструкции по технике безопасности,
прилагаемые к компьютеру.
Температурные ограничения
Для обеспечения оптимального охлаждения системы позади корпуса
должен оставаться зазор на менее 25,4 мм.
ВНИМАНИЕ!
не должна находиться в верхнем или
нижнем положении.
Лицевая панель корпуса
Снятие корпуса с держателя монитора Снятие противовеса с монитора
1
2
1 Фиксатор 2 Корпус 1 Крепежные разъемы 2 Фиксатор
1
ОСТОРОЖНО!
противовеса убедитесь, что корпус снят
с держателя монитора.
Перед снятием
2
____________________
Информация, содержащаяся в настоящем документе, может быть изменена без
предварительного уведомления.
© Корпорация Dell, 2009. Все права защищены. Напечатано в Китае. Напечатано на бумаге
из вторичного сырья.
Воспроизведение настоящих материалов в любой форме без письменного разрешения корпорации
Dell строго запрещено.
Права собственности на использованные в настоящем документе товарные знаки Dell, логотип
DELL и Latitude
Прочие товарные знаки и торговые наименования могут использоваться в настоящем документе
для обозначения компаний, заявляющих права на такие товарные знаки и наименования, либо для
обозначения продукции этих компаний. Корпорация Dell не претендует на права собственности в
отношении товарных знаков и торговых наименований других компаний.
принадлежат корпорации Dell.
Page 19

Acerca de las advertencias
AVISO: un mensaje de AVISO indica el riesgo de daños materiales, lesiones o incluso
la muerte.
PRECAUCIÓN: antes de empezar, apague el ordenador y el monitor. Desconecte todos los
cables del chasis y de la ranura para el cable del monitor.
NOTA: el contrapeso aprovecha los soportes de montaje Dell™ Soundbar del monitor.
El soporte de montaje, asimismo, aprovecha la ranura del cable del monitor Dell.
Montaje del contrapeso en el monitor Montaje del soporte en el monitor
1
2
1
2
1 Soporte de montaje
Dell Soundbar
2 Muescas de alineación
del contrapeso
1 Ranura para el cable 2 Manija
Montaje del chasis en la placa Montaje del chasis en el monitor
1
2
3
1 Chasis 2 Placa de
montaje del
chasis
3 Tornillos M4 (4) 1 Soporte montado en
la base del monitor
2 Chasis con la placa de
montaje fijada
1
2
Page 20

AVISO: antes de fijar el chasis al monitor, asegúrese de que no ha
bloqueado ninguna de las rejillas del sistema (OptiPlex™ FX160/160
cuenta con ventilación en cuatro de las seis superficies primarias).
PRECAUCIÓN: antes de instalar el equipo en un mueble, lea
cuidadosamente las instrucciones que acompañaban su
equipo.
Especificaciones térmicas
Debe haber al menos 25,4 mm (1 pulgada) de espacio libre en la parte
posterior del chasis para que el sistema se pueda refrigerar correctamente.
AVISO: la parte delantera del chasis no
podrá estar bocarriba ni bocabajo.
Extracción del chasis del soporte del
Extracción del contrapeso del monitor
monitor
1
2
1
2
PRECAUCIÓN: antes de retirar el
contrapeso, asegúrese de que ha extraído
el chasis del soporte del monitor.
1 Lengüeta de
liberación
2 Chasis 1 Ranuras de
montaje
2 Lengüeta de
liberación
____________________
La información contenida en este documento puede modificarse sin notificación previa.
© 2009 Dell Inc. Todos los derechos reservados. Impreso en China. Impreso en papel reciclable.
La reproducción por cualquier medio de este documento sin el consentimiento por escrito de Dell Inc.
está terminantemente prohibida.
Marcas comerciales usadas en este texto: Dell, el logotipo de DELL y OptiPlex son marcas comerciales
registradas de Dell Inc.
Otras marcas y otros nombres comerciales pueden utilizarse en este documento para hacer referencia a las
entidades que los poseen o a sus productos. Dell Inc. renuncia a cualquier interés sobre la propiedad de
marcas y nombres comerciales que no sean los suyos.
 Loading...