

Page 1

NAV3000
User Manual and Mounting Instructions
Instrucciones de manejo y de montaje
English
Español
Page 2

Attention!
Only use this system when it is safe to do so. It is more important to keep your eyes on
the road and your hands on the wheel.
Due to constantly changing traffic conditions, we unfortunately cannot guarantee
100 % precision under all circumstances.
¡Atención!
Utilice el sistema sólo si lo permite el nivel de seguridad. Es más importante atender al
tráfico y mantener las manos en el volante.
Debido a que las rutas cambian constantemente, lamentamos no poder garantizar un
100 % de exactitud en cualquier ocasión.
3
2
Page 3
1
2
3
4
5
6
POWER
NAVIGATION SYSTEM
3
Page 4

4
Page 5

Operating instructions Page 7
Illustrations Pages 3, ?? - ??
Mounting instructions Page 47
Instrucciones de manejo Página 51
Ilustraciones Páginas 3, ?? - ??
Manual de instalación Página 93
English
Español
5
Page 6

6
Page 7

CONTENTS
System Overview (see illustration on page 3). . . . . . . . . . . . . . . . . . . . . . . 8
GENERAL INFORMATION . . . . . . . . . . . . . . . . . . . . . . . . . . . . . . . . . . . 9
Tips on the use of this manual . . . . . . . . . . . . . . . . . . . . . . . . . . . . . . 9
ATTENTION! Important notes for safe usage . . . . . . . . . . . . . . . . . . . . . . . 9
Guidelines and recommendations for safe use of the Navigation System . . . . . . . 10
How does Audiovox Navigation work ? . . . . . . . . . . . . . . . . . . . . . . . . . 11
The digital road map . . . . . . . . . . . . . . . . . . . . . . . . . . . . . . . . . . . 14
Latest map CDs . . . . . . . . . . . . . . . . . . . . . . . . . . . . . . . . . . . . . . 14
OPERATION . . . . . . . . . . . . . . . . . . . . . . . . . . . . . . . . . . . . . . . . . 15
LCD monitor. . . . . . . . . . . . . . . . . . . . . . . . . . . . . . . . . . . . . . . .15
Remote control . . . . . . . . . . . . . . . . . . . . . . . . . . . . . . . . . . . . . . 15
Switching on / off . . . . . . . . . . . . . . . . . . . . . . . . . . . . . . . . . . . . . 16
Stand-by mode . . . . . . . . . . . . . . . . . . . . . . . . . . . . . . . . . . . . . . 16
Volume . . . . . . . . . . . . . . . . . . . . . . . . . . . . . . . . . . . . . . . . . . 16
MENUS . . . . . . . . . . . . . . . . . . . . . . . . . . . . . . . . . . . . . . . . . . . . 17
Cursor . . . . . . . . . . . . . . . . . . . . . . . . . . . . . . . . . . . . . . . . . . . 17
Scroll bars . . . . . . . . . . . . . . . . . . . . . . . . . . . . . . . . . . . . . . . . . 17
Character input . . . . . . . . . . . . . . . . . . . . . . . . . . . . . . . . . . . . . . 17
Main menu . . . . . . . . . . . . . . . . . . . . . . . . . . . . . . . . . . . . . . . . 19
DESTINATION INPUT . . . . . . . . . . . . . . . . . . . . . . . . . . . . . . . . . . . . 20
Destination input menu . . . . . . . . . . . . . . . . . . . . . . . . . . . . . . . . . 20
Entering a destination address. . . . . . . . . . . . . . . . . . . . . . . . . . . . . . 21
Points of interest . . . . . . . . . . . . . . . . . . . . . . . . . . . . . . . . . . . . . 23
GUIDANCE . . . . . . . . . . . . . . . . . . . . . . . . . . . . . . . . . . . . . . . . . . 25
Guidance screen . . . . . . . . . . . . . . . . . . . . . . . . . . . . . . . . . . . . . 25
Voice messages . . . . . . . . . . . . . . . . . . . . . . . . . . . . . . . . . . . . . . 26
You ignored the last guidance advice? . . . . . . . . . . . . . . . . . . . . . . . . . 26
Guidance in partly digitized areas . . . . . . . . . . . . . . . . . . . . . . . . . . . . 27
Areas with limited road attributes. . . . . . . . . . . . . . . . . . . . . . . . . . . . 27
Display of the route list. . . . . . . . . . . . . . . . . . . . . . . . . . . . . . . . . . 28
Information screens. . . . . . . . . . . . . . . . . . . . . . . . . . . . . . . . . . . . 28
ALTERNATIVE ROUTE . . . . . . . . . . . . . . . . . . . . . . . . . . . . . . . . . . . . 30
Changing the distance . . . . . . . . . . . . . . . . . . . . . . . . . . . . . . . . . . 30
ADDRESS BOOK . . . . . . . . . . . . . . . . . . . . . . . . . . . . . . . . . . . . . . . 31
Contents of an address book entry . . . . . . . . . . . . . . . . . . . . . . . . . . . 32
Storing addresses in the personal address book . . . . . . . . . . . . . . . . . . . . 32
Loading addresses from the address book . . . . . . . . . . . . . . . . . . . . . . . 32
Loading one of the destinations last used. . . . . . . . . . . . . . . . . . . . . . . . 32
Storing the current location . . . . . . . . . . . . . . . . . . . . . . . . . . . . . . . 33
Deleting addresses from the address book . . . . . . . . . . . . . . . . . . . . . . . 33
English
7
Page 8

CONTENTS
SYSTEM SETTINGS . . . . . . . . . . . . . . . . . . . . . . . . . . . . . . . . . . . . . . 34
Display. . . . . . . . . . . . . . . . . . . . . . . . . . . . . . . . . . . . . . . . . . . 35
Volume . . . . . . . . . . . . . . . . . . . . . . . . . . . . . . . . . . . . . . . . . . 35
Route selection . . . . . . . . . . . . . . . . . . . . . . . . . . . . . . . . . . . . . . 35
Language . . . . . . . . . . . . . . . . . . . . . . . . . . . . . . . . . . . . . . . . .36
Guidance screen . . . . . . . . . . . . . . . . . . . . . . . . . . . . . . . . . . . . . 36
Measuring units. . . . . . . . . . . . . . . . . . . . . . . . . . . . . . . . . . . . . . 36
Speed correction . . . . . . . . . . . . . . . . . . . . . . . . . . . . . . . . . . . . . 36
Date / Clock . . . . . . . . . . . . . . . . . . . . . . . . . . . . . . . . . . . . . . . . 37
SDVC Mode (Speed Dependent Volume Control) . . . . . . . . . . . . . . . . . . . . 38
System information . . . . . . . . . . . . . . . . . . . . . . . . . . . . . . . . . . . . 38
Service . . . . . . . . . . . . . . . . . . . . . . . . . . . . . . . . . . . . . . . . . . . 38
Trip Computer . . . . . . . . . . . . . . . . . . . . . . . . . . . . . . . . . . . . . . 38
MAP CDs . . . . . . . . . . . . . . . . . . . . . . . . . . . . . . . . . . . . . . . . . . . 39
Changing the map CD . . . . . . . . . . . . . . . . . . . . . . . . . . . . . . . . . . 39
Map CDs with travel guide information . . . . . . . . . . . . . . . . . . . . . . . . . 40
MAINTENANCE & CARE . . . . . . . . . . . . . . . . . . . . . . . . . . . . . . . . . . . 41
Replacing batteries of the remote control . . . . . . . . . . . . . . . . . . . . . . . 41
Cleaning of the remote control and the monitor . . . . . . . . . . . . . . . . . . . . 41
TROUBLESHOOTING. . . . . . . . . . . . . . . . . . . . . . . . . . . . . . . . . . . . . 42
MENU OVERVIEW . . . . . . . . . . . . . . . . . . . . . . . . . . . . . . . . . . . . . . 44
MOUNTING INSTRUCTIONS . . . . . . . . . . . . . . . . . . . . . . . . . . . . . . . . . 45
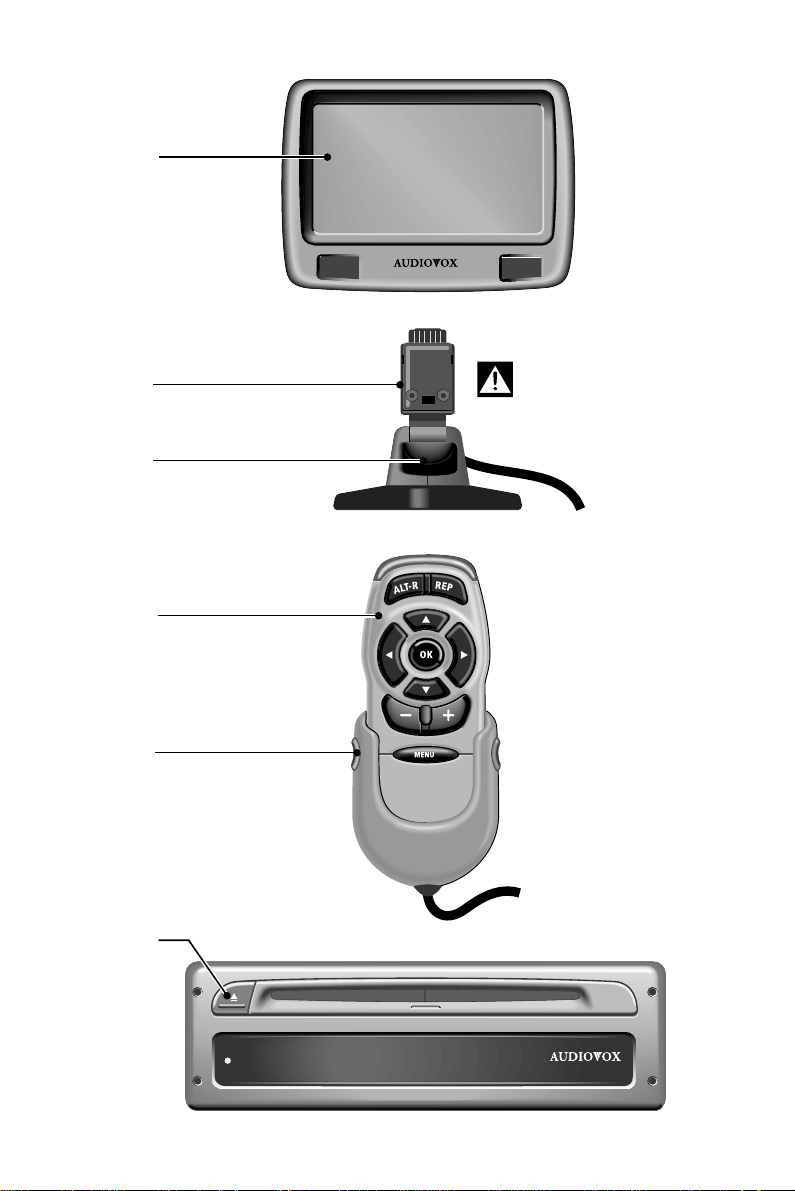
System Overview (see illustration on page 3)
1 Detachable LCD monitor.
A
Always push release button 2 on the back of the monitor support to remove the
monitor!
2 Release button for monitor (on the back of the support).
Press release button and gently pull the monitor upwards to detach.
3 Monitor support, turnable and tiltable.
Press button on the support to tilt the monitor
4 Infrared remote control
5 Holder for remote control (wired to the navigation computer).
Press buttons on the left and right to release.
6 Eject CD. If ignition is turned off press key twice.
8
Page 9

GENERAL INFORMATION
Tips on the use of this manual
To make reading this manual easier you are given the following aids:
informs you to do something.
☞
shows the reaction of the set.
:
marks an enumeration.
–
This is a security or warning advice. It contains important information on the safe use
A
of your navigation sytem. In case of disregard of this advice the danger of material damage,
injury or even death may result. Please observe this advice carefully.
ATTENTION!
Important notes for safe usage
Operating the Navigation System while you are driving can distract your attention
A
from the road, and possibly cause an accident. Enter information into the system yourself
only when the vehicle is stopped.
The directions provided by the system are suggestions only. The driver is ultimately
A
responsible for the safe operation of the vehicle and therefore evaluate whether it is safe
to follow these directions. Always use good judgment and common sense.
Obey all traffic signs and laws while driving.
A
Only use the Navigation System when it is safe to do so. It is more important to keep
A
your eyes on the road and your hands on the wheel.
A
Do not change system settings or enter destinations while driving. If a prolonged view
of the display is required, pull over in a safe and legal matter.
A
Keep away small articles from children. Store small articles (batteries, screws) in places
not accessible to children. If swallowed, consult a physician immediately.
A
Do not disassemble or alter. Attempts to disassemble or alter may lead to an accident
and/or fire.
A
Due to constantly changing traffic conditions, we unfortunately cannot guarantee
100 % precision under all circumstances.
A
In some areas it is possible that not all information for a road is covered. For example
prohibited entry into pedestrian precincts, the driving direction of a one-way street or
turning restrictions are not available. In these areas the navigation system gives a warning.
Always obey road signs and traffic regulations.
English
9
Page 10

GENERAL INFORMATION
Guidelines and recommendations for safe
use of the Navigation System
Glance at the display only when necessary and safe to do so. If prolonged viewing of
A
the screen is necessary, pull over and stop in a safe and legal manner.
Do not input destinations, change settings or access any functions requiring a
A
prolonged view of the display and/or remote control while you are driving. Pull over and
stop in a safe and legal manner before attempting to access the system.
Make certain that the volume level of the Navigation System is set to a level which still
A
allows you to hear outside traffic and emergency services.
The guiding advice provided by the Navigation System are suggestions only. The driver
A
is ultimately responsible for the safe operation of the vehicle and therefore evaluate
whether it is safe to follow these directions.
In case you decide not to follow the suggested route, the Navigation System will
automatically calculate a new route and provide new suggestions (automatic re-routing
function).
The Audiovox Navigation System (like all car navigation systems available today), is an
A
evolving technology. Under certain circumstances, the directions given by the system could
be inaccurate or conflict with current road conditions. New road maps or exit ramps not yet
available on the CD-ROM may present a conflict to the driver.
In case you need to find an emergency service do not use the Navigation System. It can
A
not be guaranteed that the used database CD contains all available emergency services in
your neighborhood. Use your own judgment and abilities to ask for directions in such a
situation.
A
The Navigation System does not take into account the relative safety of the suggested
routes. The suggested routes do not reflect road closures or construction, weight or height
restrictions, traffic or weather conditions, or any other factors which may affect the safety
or timing of the routes. Use your personal judgment for verification of the suggested
routes. Use the alternative route function or the via point function to get better route
suggestions, or simply drive the preferred route and let the automatic re-routing function
calculate the preferred route.
A
Please take care that everybody using the Navigation System has access to these
directions for use and reads the given recommendations and guidelines carefully before the
first use of the system.
A
Remember to wear your seat belt at all times when the car is in motion. This will help
you avoid impact with anything in the car’s interior.
A
The remote control contains batteries. Do not expose the remote control to direct sun
light and do not put it in your pockets. Exposure to high temperature may cause leakage of
the batteries. If you use the remote control exclusively in the holder, we recommend
removing the batteries.
10
Page 11
GENERAL INFORMATION
How does Audiovox Navigation work ?
The Audiovox Navigation System is a powerful tool to assist the driver in daily traffic.
Automatic route planning and guidance allows you to concentrate on the essential
things in today’s growing traffic – especially in congested areas. Complicated and
time-consuming planning with conventional city and road maps is no longer required.
You simply enter the destination before driving off, activate ‘Guidance’ and the
Navigation System does the rest. It offers you guidance advice in both an audible and
visual way. Few controls and a simple menu structure ensure ease of use.
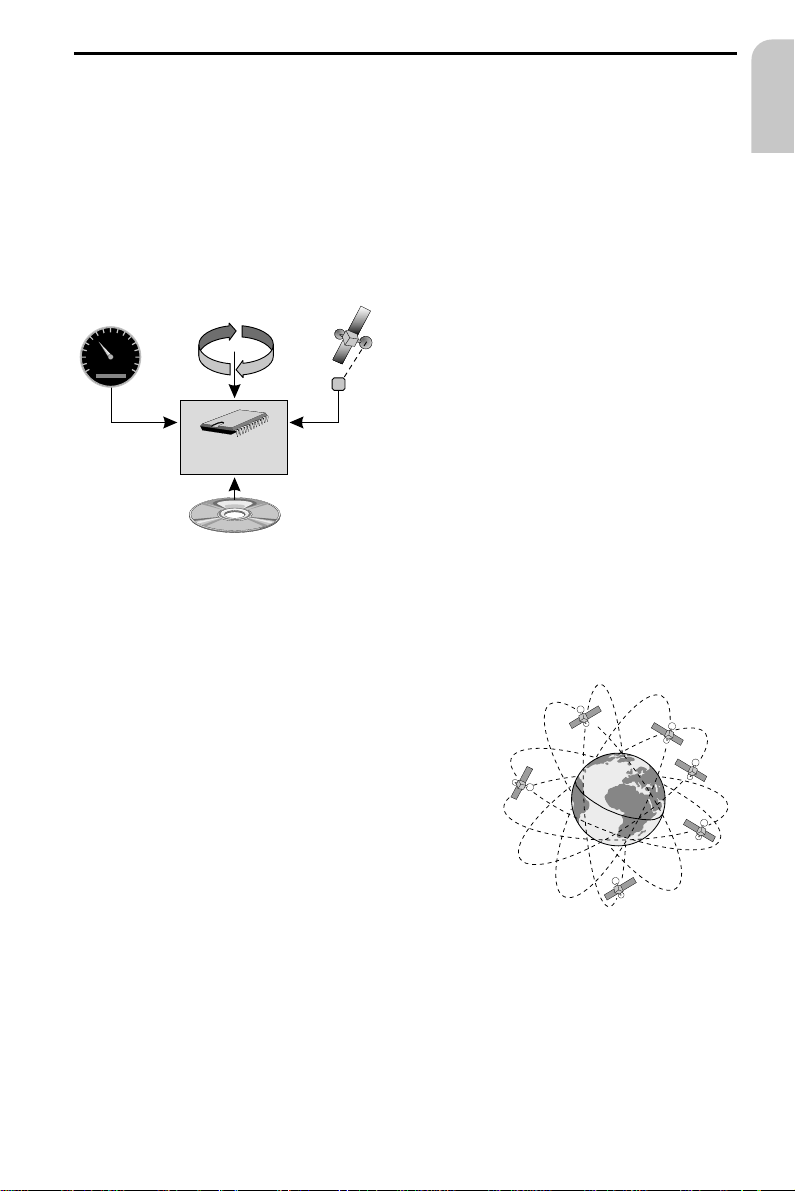
Determination of the vehicle position
The movement of the vehicle is measured
80
60
100
120
40
140
20
0
160
054.346.3
Speedometer
signal
Gyroscope
Navigation
computer
GPS signal
Digital roadmap
Data from these sensors, in conjunction with positional information received from the
Global Positioning System is transmitted to the navigation computer. The resultant
calculated position is then compared against the road network data stored on the
CD-ROM in order to display the current vehicle position.
by sensors that are integrated into the
Navigation System. The distance driven is
recorded by an electronic signal from
the speedometer and the rotary
movements of turns by the gyroscope
(a rotary measurement system).
The information from these sensors is,
however, not always exact as the values
can be affected by tire slippage, varying
tire pressure due to changes in
temperature, etc.
English
GPS (Global Positioning System)
The Global Positioning System is based on the reception
of navigation signals from a total of currently 27 GPS
satellites orbiting the earth at a height of
13,000 miles. To determine a 3D position (with
longitude, latitude and height), signals from at
least 4 satellites must be received.
The built-in GPS receiver can handle up to 8 satellite
signals simultaneously. This allows an accuracy of
about 20 ft to 60 ft which is further improved by the
other sensors.
11
Page 12

GENERAL INFORMATION
Important notes on the function of your Navigation
System
In general the navigation system is operational even with bad GPS reception (GPS =
Global Positioning System by satellites), but the accuracy of positioning may decrease
and errors in position evaluation may occur, resulting in wrong position display.
Start-up behaviour
When the vehicle is parked for a long period of
time, the satellites change their orbital positions.
Therefore, when the ignition is turned on again
it can take a few minutes before the Navigation
System can pick up enough satellites and
evaluate the received signals.
When starting up, the Navigation System may tell you: “You are leaving the digitized
area”. It supposes the vehicle in an off-road position. If there are other roads in this
position, the Navigation System may send inappropriate messages. This means that it
supposes the vehicle is on one of the other roads.
When the vehicle has been parked for a long period of time, the navigation function
may be temporarily inhibited. The Navigation System will operate reliably again once
GPS reception is available for a few minutes.
Notes
After transport of the car by a tow truck, car train or in a car ferry the navigation
system may need a few minutes outdoors for exact repositioning.
After the car battery has been disconnected, the system may need up to 15 minutes
for exact repositioning. The car has to be situated outdoors and the system has to be
switched on to receive the GPS satellites.
12
Page 13

GENERAL INFORMATION
Limited GPS Reception
System performance may adversely affected if GPS reception is interrupted or
interference occurs over a distance of several miles. GPS reception may be interrupted
or interference could occur:
In between tall buildings.
–
In multi-level parking garages, in tunnels and under bridges.
–
In forests or tree-lined avenues.
–
During heavy rain showers and thunderstorms.
–
Unfavorable satellite positions in conjunction with the position of the installed GPS
–
antenna (in this case GPS reception may be obstructed for a longer period).
In valleys and in mountainous regions.
–
However, the Navigation Computer is able to compensate reception problems over a
period of a few minutes without functional interference.
If the GPS antenna has been properly installed, sufficient GPS reception should be
present about 95 % of the driving time. If interference in the reception occurs more
frequently, improper mounting of the GPS antenna may be the cause. In this case, we
recommend you to contact your Audiovox dealer.
To avoid faulty operation or interference of the system do not cover the GPS antenna
(GPS = Global Positioning System).
It is recommended that metallic window tinting or any kind of stickers not be applied
in the area surrounding the antenna.
English
13
Page 14
GENERAL INFORMATION
The digital road map
To plan a route to a destination address not only the current car position is needed by
the navigation system but also a digital road map is required where the destination
address itself as well as the roads leading to the destination address are stored. This
digital road map is located on the map CD you insert in your navigation computer.
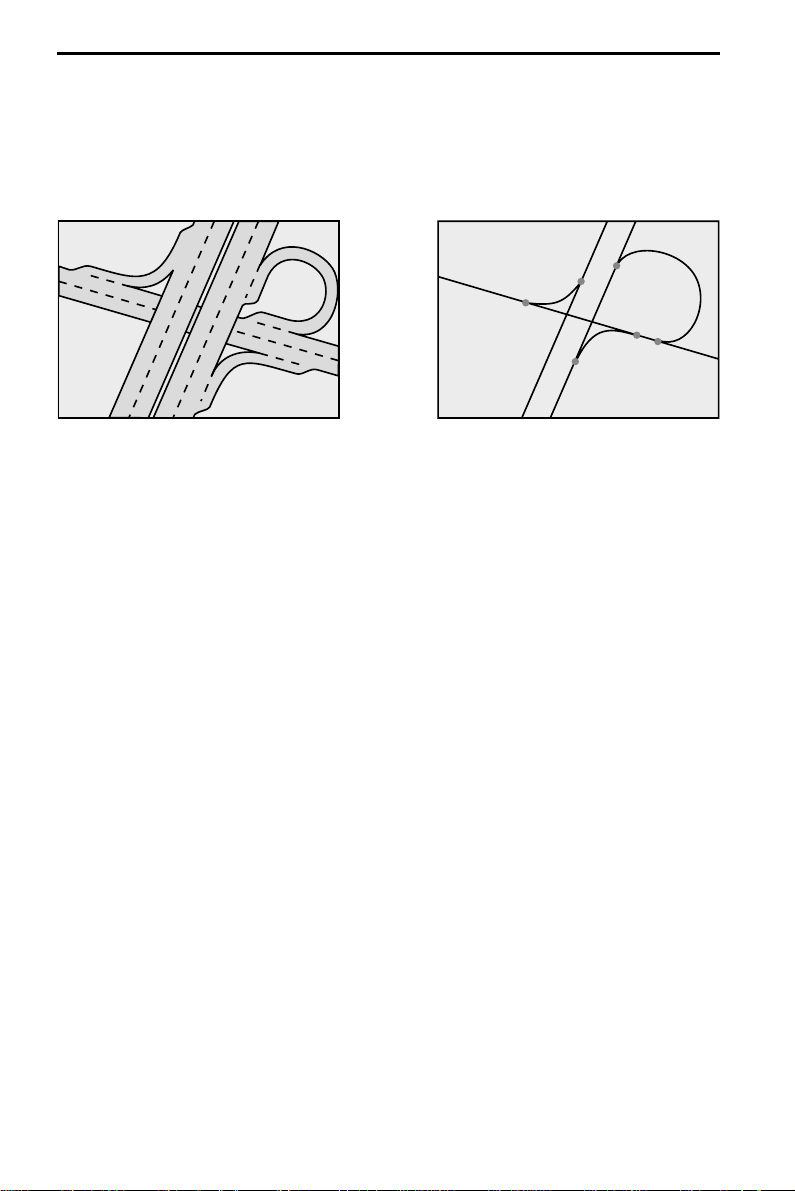
Real road network Line pattern of the digital map
On the map CD the road network is stored as a line pattern, which means that even
extensive intersections only have one center point all roads lead to. That’s why the
navigation system indicates the distance to the next turn as the distance to the center
of the intersection. Therefore the distance indications for highway exits given by the
navigation system may be different from those on the highway signs. The highway
signs refer to the distance to the beginning of the exit.
Areas with limited road attributes
In some areas not all attributes of a road are available on the map CD. For example
information on prohibited turning, one way streets or pedestrian areas are missing.
If you are entering this kind of area the navigation system will show you a warning.
The local traffic regulations always have priority over the advice given by the
navigation system. Always obey road signs and traffic regulations.
Latest map CDs
Approximately 10-15 % of the traffic network is changing each year. Due to this
constantly changing conditions (newly built roads, traffic restrictions, etc.), a 100 %
correspondence of the digital road map with reality cannot be achieved under all
circumstances. We recommend to always use the latest version of the map CD for
navigation.
14
Page 15

OPERATION
Monitor
If mounted on the supplied support, the monitor can be removed from the holder for
advanced theft protection.
Removing the monitor
Push the release button on the back of the support and gently pull the monitor
☞
upwards.
Do not push on the display screen to avoid damage of the LCD.
A
Installing the monitor
Gently slide the monitor onto the support until it clicks into position.
☞
Adjusting the LCD monitor
If mounted on the supplied support, the monitor can be adjusted to your viewing
angle.
Turn the monitor until the best angle of view is reached.
☞
Press the release button on the monitor support to tilt the monitor to its best
☞
position.
Remote control
The Audiovox Navigation System is controlled by an infrared remote control.
Press the release keys at both sides of the holder to remove the remote control.
☞
English
A
Before driving off, slide the remote control back into the holder until it clicks into
position.
The keys on the remote control have the following functions:
ALT-R Plan an alternative route.
REP Repeat current acoustical guidance advice.
8 Cursor key upwards; select options.
4 Cursor key left; select options.
6 Cursor key right; select options.
2 Cursor key downwards; select options.
OK OK key; confirm a selection.
- Decrease voice volume of guidance advice.
+ Increase voice volume of guidance advice.
MENU Show main menu.
If you use your remote control in its holder, the internal batteries are not used.
When the batteries are exhausted the navigation system may no longer react on key
presses.
Slide the remote control into its holder to resume normal operation.
☞
Replace the batteries.
☞
15
Page 16

OPERATION
Keyboard illumination
The keyboard of the remote control is illuminated when you press one of the keys. The
illumination is switched off automatically after a few seconds. When inserted in the
holder the keyboard is illuminated permanently as long as the ignition is switched on.
Switching on / off
The navigation system is switched on / off together with the ignition.
Turn on the ignition.
☞
As soon as the navigation system is operable, a safety notification for usage of the
:
system appears on the display.
Read and accept this notification by pressing OK on the remote control.
☞
The “Main menu” appears.
:
After a few seconds the system is initialized and you can select the navigation
functions (options in highlighted letters).
Stand-by mode
If you do not wish to hear guidance advice, you can set the navigation system to its
stand-by mode.
Select “Stand-by” from the main menu.
☞
The display is turned off and audible guidance advice is muted.
:
Press one of the cursor keys 4, 6, 8, 2 or the OK key on the remote control to
☞
resume normal operation.
If the navigation system was turned off in stand-by mode, it restarts in stand-by mode
when turning the ignition on again.
Volume
You can adjust the volume of the audible guidance advice as follows:
Push the + key once or more than once to increase the volume of the voice
☞
messages.
Push the - key once or more than once to decrease the volume of the voice
☞
messages.
The adjusted volume is announced.
:
16
Page 17
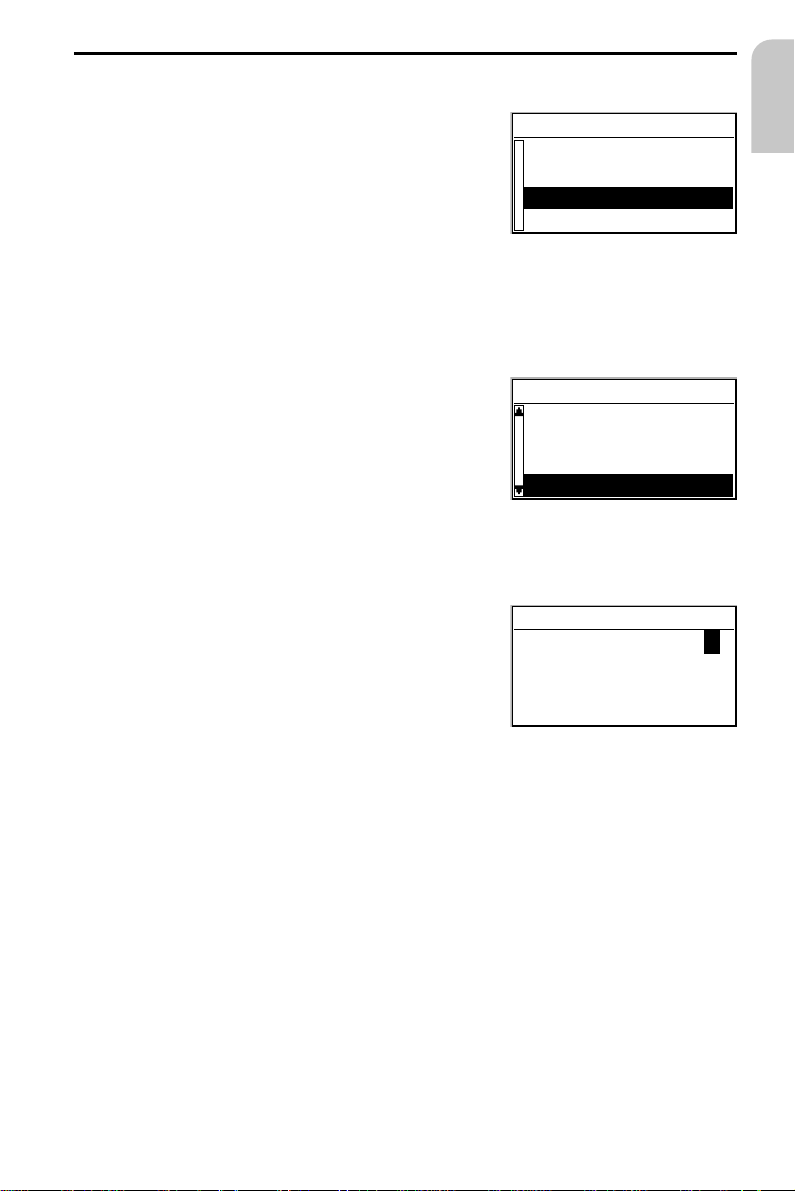
Cursor
The cursor is used to select menu options or
characters. It is shown as white characters on black
background.
For moving the cursor use the cursor keys
☞
8, 2, 4 or 6.
Confirm your selection by pressing the OK key.
☞
The cursor is briefly displayed as a frame around
:
the selected field.
Options currently not available are shown in faint.
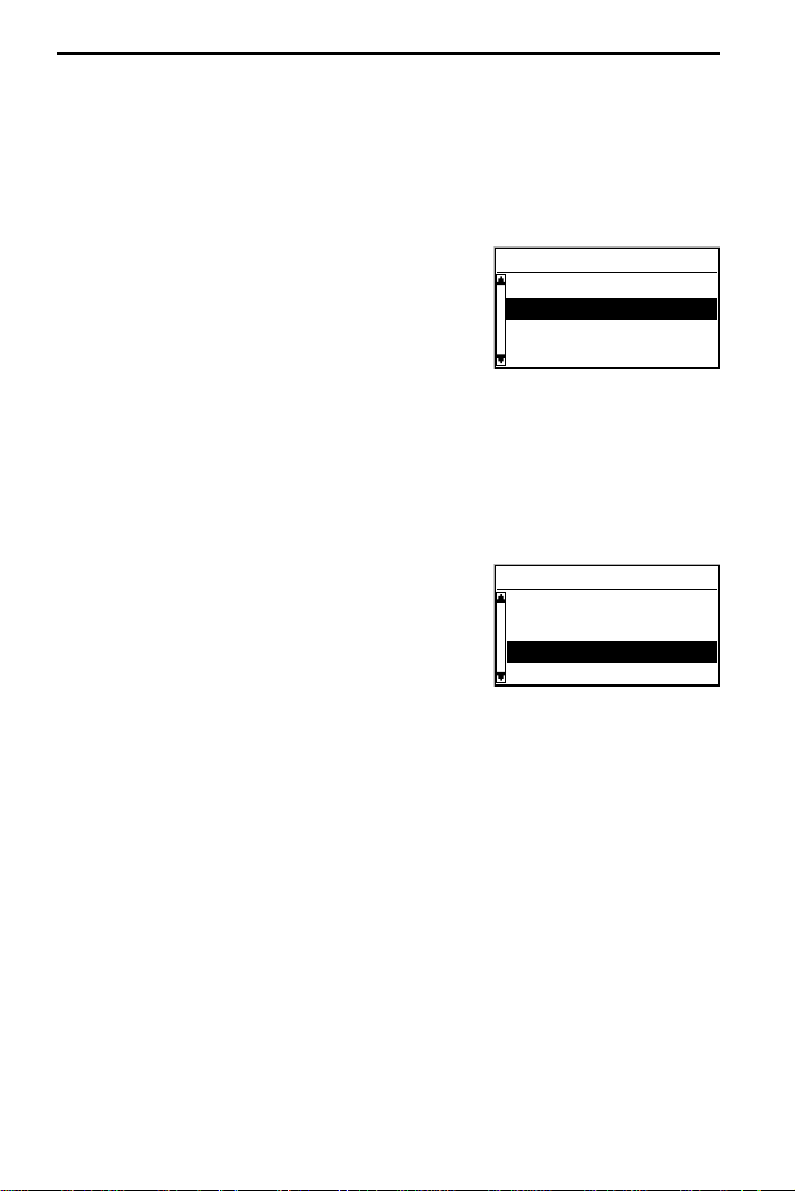
Scroll bars
Several menus have more than four options.
In this case a scroll bar with black arrows is displayed
on the left margin of the screen.
Move the cursor to a menu option on the upper
☞
or lower margin of the screen using the cursor
keys 8 or 2.
Continue pushing the same key.
☞
Further menu options are shown automatically.
:
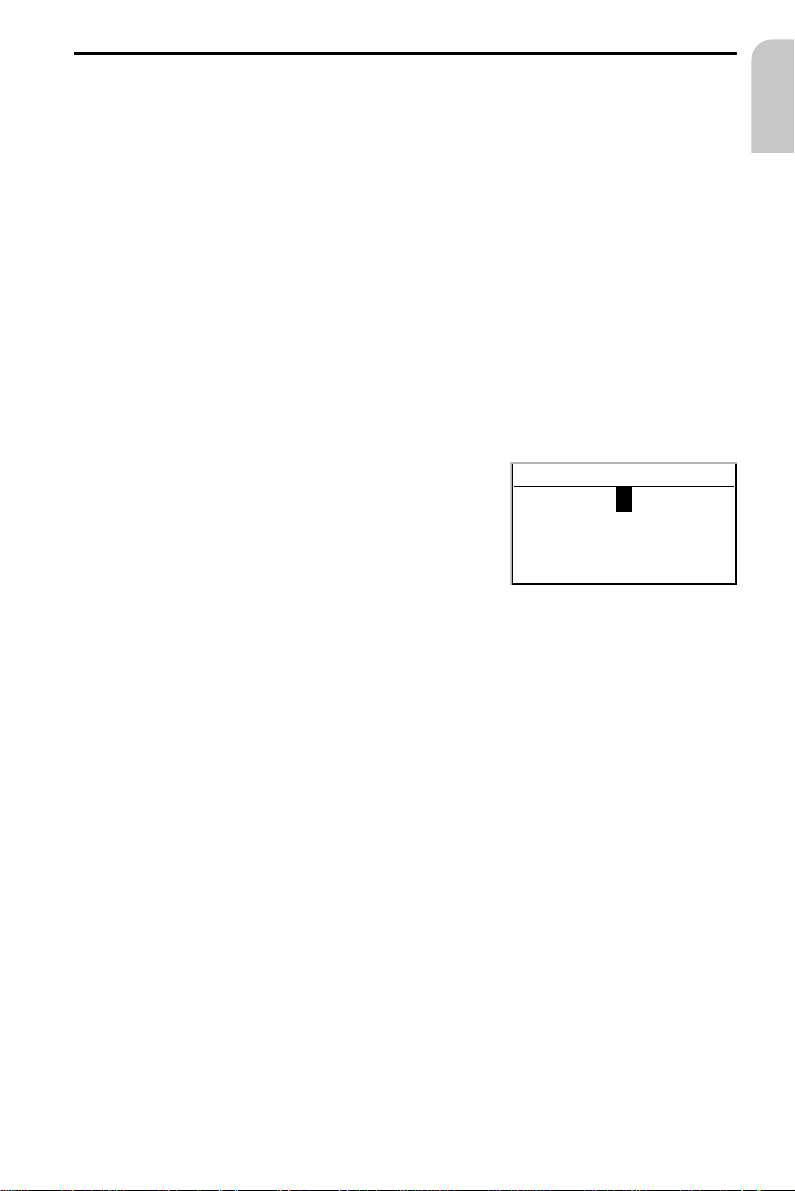
Character input
Names are entered by selecting characters from a list.
This kind of character entry will simply be called
“keyboard” further on in the manual.
To select a character place the cursor on the
☞
desired character by using the cursor keys 4, 6,
8 and 2.
Confirm your selection by pressing the OK key on
☞
the remote control.
Characters which are not available are skipped automatically.
City:_
ABCDEFGHIJKLM O
PQRSTUVWXYZ—
MENUS
Menu title
Active option 1
Active option 2
Active option 3
Inactive option
Menu title
Active option 2
Active option 3
Active option 4
Active option 5
OK¡¢ £
English
N
Input options
During character input the following options are also available.
Place the cursor on one of the following icons:
☞
¡ : Delete the last entered character.
¢ : Display a list of database entries.
OK : Confirm the last entered character sequence.
£ : Quit data input and return to the previous menu.
17
Page 18

MENUS
Intelligent “keyboard”
When entering names for a city, road or point of interest the system compares the
character sequence already entered with that of the database on the map CD.
If you have already entered one character you will note, that only certain letters are
still selectable. The navigation system automatically fills in the missing characters if
there is only one possible entry left.
If there is more than one database entry with the same name, the cursor is
automatically placed on the list icon ¢. Select the desired entry from the list. If the
number of data entries is very large, setting up the list may take a few seconds.
Database entries which are not unique are distinguished by additional information. If
for example a road name is not unique in the city entered before, a list of all district
names referring to this road is presented.
Different ways of data entry
When entering city or road names with more than one word the database allows you
to start your entry with any part of the name.
If for example you want to enter “5 NORTH BEVERLY DRIVE” you can start data entry
with each of the name contents, for example “DRIVE” or “NORTH”.
Entering special characters
On the “keyboard” you have access to different country specific characters depending
on the language you selected.
Delete invalid entry
What can you do, if you selected and confirmed an incorrect character?
Place the cursor on the ¡ icon.
☞
Confirm your selection.
☞
The character last entered is deleted.
:
If the system added characters automatically when entering the last character, all
these characters are erased when deleting the last entered character.
18
Page 19

MENUS
Main menu
You can select the following menu options in the
main menu:
Destination input
This option enters the “Destination input” menu. Select this option to enter the
city, road, intersection or a point of interest as the destination.
Guidance
This option enters the guidance screen and activates the guidance function (only if a
destination address is entered).
In addition you have access to different information screens, for example with your
current car position, the trip computer or the “Alternative route” menu.
Stand-by
This option switches off the visual and acoustic guidance advice. The navigation system
remains active in the background. The display shows the radio information.
Press one of the keys on the remote control to resume normal operation.
☞
Settings
This option enters the “System Settings” menu. Select this option to set your own
preferences.
Main menu
Destination input
Guidance
Stand-by
Settings
English
19
Page 20
DESTINATION INPUT
Destination input menu
Select “Destination input” from the main menu.
☞
The Destination input menu is shown.
:
The following options are available:
Country
To select the destination country, if more than one
country is stored on the inserted map CD.
City/Road
To enter the city name and the road name of the
destination address.
Intersection
To enter an intersection for a more precise destination selection.
Guidance
Selecting “Guidance” makes the navigation system plan a route, activate the guidance
function and enter the guidance screen.
It also gives you access to information screens and to alternative route planning.
Address book
To store destination addresses in a private database
or to recall the last used destination addresses.
Points of interest
To select a facility (special destination) stored in the
database (such as airports, hotels, restaurants, gas
stations, etc.) as the destination address.
Destination input
Country
City/Road
Intersection
Guidance
Destination input
Guidance
Address book
Points of interest
Return
Return
To return to the main menu.
20
Page 21
DESTINATION INPUT
Entering a destination address
You can enter a destination address in various different ways:
enter city, road and intersection letter-by-letter by means of the “keyboard”;
–
load an address from the personal address book;
–
select a Point of interest (hotels, gas stations, etc.) from the database stored on the
–
map CD;
load one of the 10 destination addresses last used.
–
Entering city and road
Select “Destination input” in the main menu.
☞
The “Destination input” menu is displayed.
:
Select “Country” if you first want to change the destination country.
☞
This option is only available, if more than one country is stored on the currently
inserted map CD.
Select “City/Road”.
☞
The display shows “City:” and the keyboard
:
window.
Enter the city name using the “keyboard”
☞
City:WET_
A...E.G I.KLM..
H
P.RST.....Z_
or:
Select the ¢ icon and choose one of the database entries.
☞
If a city name in the wrong state is displayed after selecting ‘OK’, check the list with
¢ in case the desired destination is represented as ‘..., TOWN OF’ or ‘... TWP’ in the
database.
If more than one entry with the same name is stored in the database, the cursor is
automatically placed on the ¢ icon. In this case select the desired entry from the list.
If the number of possible entries is large, it can take some seconds until the list is
displayed.
English
OK¡¢ £
Confirm your entry by selecting “OK” or select an entry from the list.
☞
The “Road:” input menu appears.
:
If less than 5 roads are available in the specified city, town or village the list of
roads is shown automatically.
Enter the road name using the “keyboard” or select the ¢ icon and choose one of
☞
the database entries.
Unincorporated county listings require a street or a Point of interest to activate
guidance.
21
Page 22

DESTINATION INPUT
Entering house numbers
In 100% digitized areas, house numbers are available in the data base. After entering
the road name with the “keyboard” you can also enter the desired house number.
Entering an intersection
You can specify your destination address more precisely by entering an intersection:
Select “Intersection” from the destination input menu.
☞
The “Intersection:” input menu appears.
:
Enter the intersection name using the “keyboard” or select the ¢ icon and choose
☞
one of the database entries.
If the number of available intersections is small (usually for small cities, towns and
villages), the list of available intersections is shown automatically.
Entering the city only
If you want to be guided to the city boundaries proceed as follows:
Enter the city name as described before.
☞
The “Road:” input menu appears.
:
Select the £ icon from the road input menu.
☞
Select ”Guidance” from the destination input menu.
☞
You will be guided to the city boundaries of the specified destination.
Activating guidance
Select “Guidance” in the destination input menu or in the main menu.
☞
The guidance screen appears and the navigation system starts route planning.
:
As soon as a route is planned the navigation system gives you audible and visual
guidance advice.
For detailed information on guidance see chapter “GUIDANCE” on page 25.
22
Page 23

DESTINATION INPUT
Points of interest
You can also specify your destination by selecting a
Point of interest (special facility) stored in the
database.
This could be for example:
airports,
–
hotels,
–
gas stations,
–
garages, etc.
–
Depending on which information you have already entered in the destination input
menu you are presented with a list of facilities of general interest stored on the
inserted map CD.
Points of interest related to the destination address
Enter the city name of the destination address in the destination input menu.
☞
Select “Points of interest” from the destination input menu.
☞
Select “Info on dest.”.
☞
The “City:” input menu appears.
:
Confirm the displayed city name by selecting “OK” or enter a new city name.
☞
A list of categories specifying the special facilities is presented.
:
For small cities and villages usually only the option “City center” is available. If
you choose this option, the navigation system will guide you to the center of the
city or town.
Points of interest
Info on dest.
Info on car pos.
National import.
Return
English
Select the desired category (for example HOTEL, GAS STATION ...)
☞
If more than five facilities of the chosen category are available in the database, the
:
keyboard window is opened.
If up to 5 facilities are stored, the list is shown immediately.
:
Enter the name of the desired facility or select the ¢ icon for the list.
☞
Confirm your entry with “OK” or select the desired facility from the list.
☞
Select “Guidance”.
☞
23
Page 24

DESTINATION INPUT
Facilities of national importance
Select “Points of interest” from the destination input menu.
☞
Select “Nation. importance”.
☞
A list of categories specifying the facilities of national importance is presented (for
:
example AIRPORT, PARK / RECREATION / FITNESS...).
Continue as described on page 21.
☞
Note: Some map CDs may not support the “National importance” option. In this case
enter a city as your destination address and select the “Info on dest.” option to search
for facilities of major importance in this city.
Facilities located around the current car position
You can also specify a destination address by selecting a Point of interest in vicinity of
the current car position.
Select “Points of interest” from the destination input menu.
☞
Select “Info on car pos.”.
☞
A list of categories specifying the Points of interest is presented.
:
Select the desired category.
☞
A list of Points of interest situated around the current car position is presented.
:
Continue as described on page 21.
☞
Note:
A list of facilities from “Info on car pos.” is always shown, even if no facility of the
chosen category is located directly at the car position.
The displayed facilities are presented in order related to the distance from the current
car position. The nearest facility is placed on the top of the list.
24
Page 25
GUIDANCE
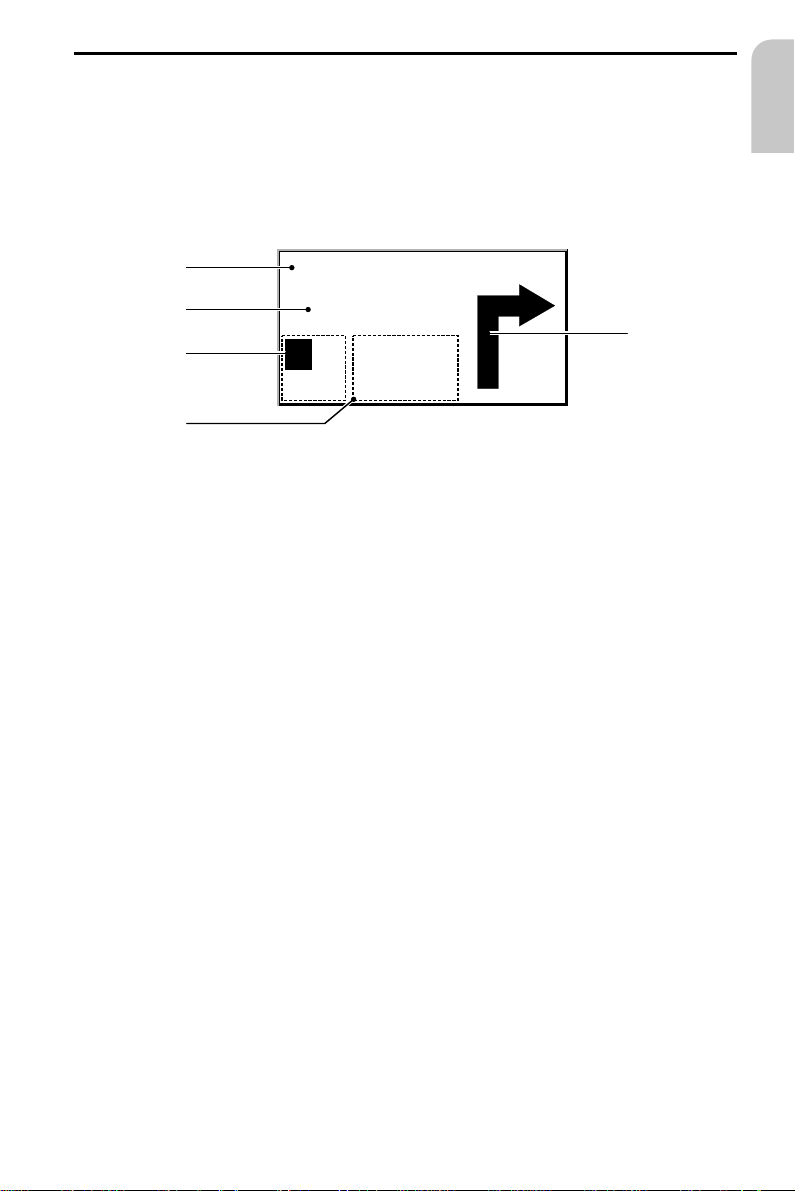
Guidance screen
The guidance screen appears as soon as you have:
entered a valid destination address and
–
selected “Guidance” in the main menu or the destination input menu
–
See the following example for the information offered by the guidance screen:
English
2
3
4
Main St
400 ft
7,7mls
£
¦
ª
¢
14:45
5
1 Visual guidance advice: Diagram of the next junction or turning.
In addition, direction changes are announced by voice messages.
2 Road you have to turn into next.
3 Distance to the next direction change*.
4 Options field. Place cursor on the desired icon and press OK:
¦: Repeat the current voice message (guidance advice).
¢: Display the route list (sections of the planned route)
£: Return to the main menu.
ª: Jump to “Alternative route” menu. See page 30.
5 Status field. Possibility to display the following information:
– Remaining travel distance
– Remaining travel time
– Estimated time of arrival
– Current time
You can configure the status field in the “System settings” menu. See page 36.
1
* The measuring units are dependent on the system settings. See chapter “System
Settings”, page 34.
25
Page 26
GUIDANCE
Voice messages
As soon as you have activated the guidance function the Navigation System will give
you verbal guidance advice in addition to the diagrams in the guidance screen.
Usually a guidance advice consists of two messages:
preliminary advice
W CHEYENNE AVE
1.5 mls
6,5mls
£
¦
ª
¢
02:45
turning advice
W CHEYENNE AVE
400 ft
4,1mls
£
¦
ª
¢
02:45
Repeating a voice message
You missed one of the voice messages or you didn’t understand it during guidance ?
Push the REP key on the remote control,
☞
or:
Move the cursor to the “¦” icon and press OK.
☞
You hear the current verbal guidance advice.
:
You ignored the last guidance advice?
If you didn’t follow the last guidance advice or it is not possible to follow it due to
traffic demands (road construction etc.), the system automatically plans a new route
within a few seconds.
26
Page 27
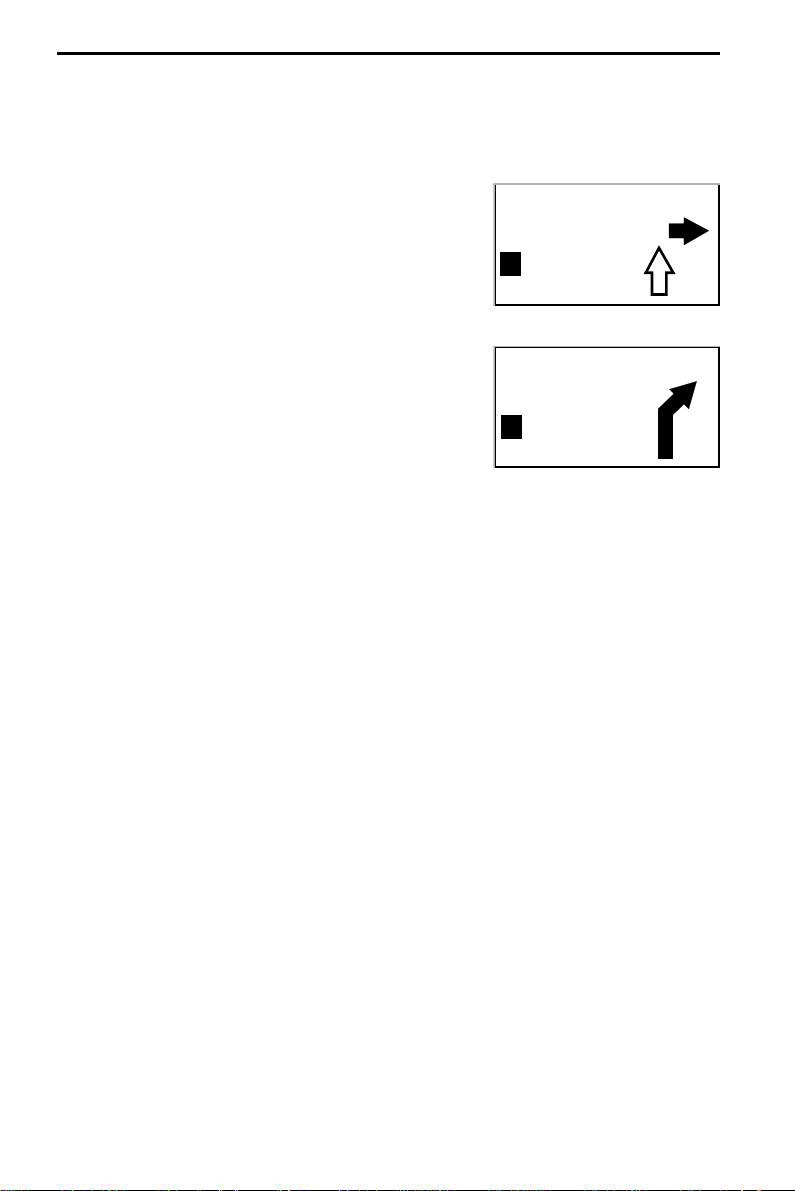
GUIDANCE
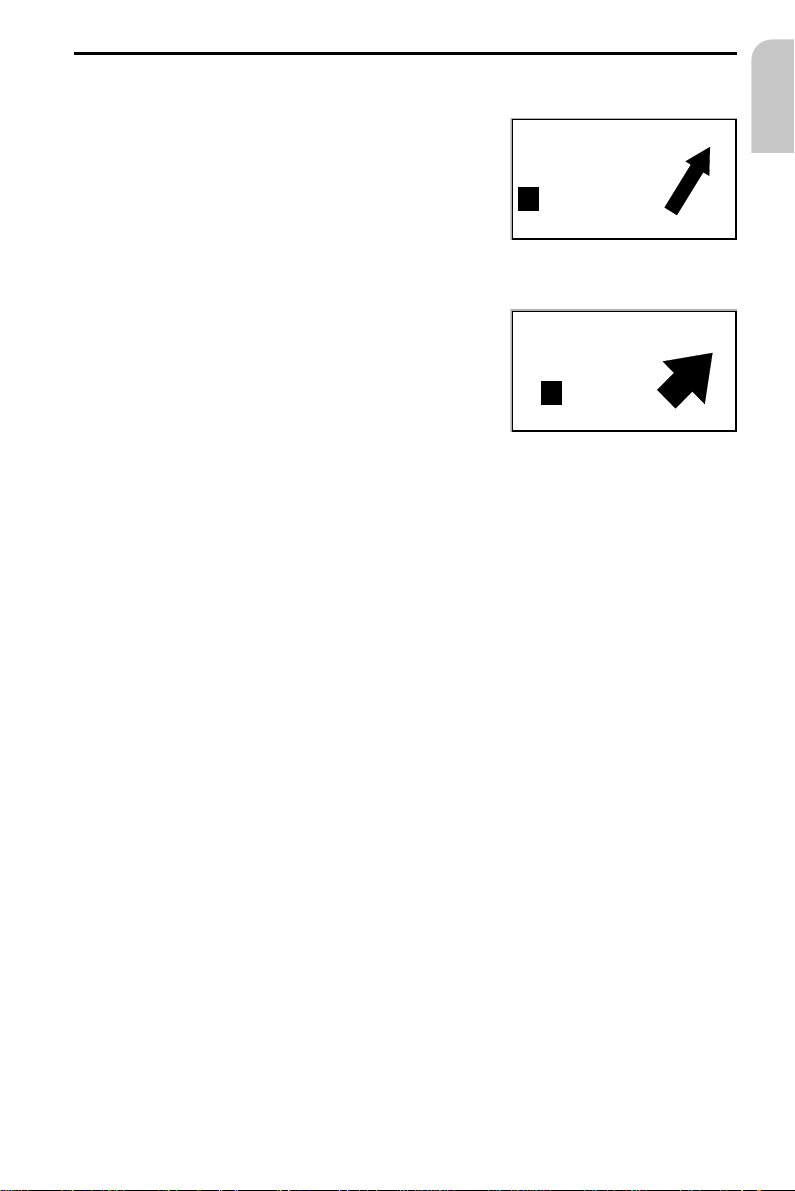
Guidance in partly digitized areas
As long as you are driving on digitized roads the
navigation system will give you guidance advice. On
the open road without junctions or exits the display
shows a direction arrow which follows the course of
the road.
Leaving the digitized area
In rural areas and smaller cities it may occur that not
every road is digitized (stored on the map CD). When
you leave a digitized road, the system automatically
shows the direction arrow and the direct distance to
the destination. You will hear “You are leaving the
digitized area”.
Drive in the direction of the displayed direction
☞
arrow to a digitized road.
As soon as you reach a digitized road, the system automatically switches back to
guidance and plans a new route.
AVORY DRV
2.8 mls
4,1mls
£
¦
ª
¢
02:45
Follow the arrow
6 mls
£
¦
ª
¢
Areas with limited road attributes
In some areas not all attributes of a road are available on the map CD. For example
the driving direction of a one way street or the information about the restricted entry
of a pedestrian precinct may be missing.
If you are entering this kind of area the Navigation System will show a warning. The
local traffic regulations always have priority over the advice given by the navigation
system.
English
A
Always obey road signs and traffic regulations!
27
Page 28
GUIDANCE
Display of the route list
As soon as a route is planned this option is available in the guidance screen.
Confirm the “¢” icon in the guidance screen.
☞
The list of sections of the planned route is shown.
:
Push the cursor keys 8 or 2 to scroll through the list.
☞
Select “Quit” to leave the route list.
☞
The route list is only available if you are on a digitized road.
Information screens
During guidance you have access to different information screens.
Push the 2 or 8 key on the remote control once or more than once to enter the
☞
desired information screen.
The following information screens are available:
i1 Car position
Shows the current car position with country code,
city and road.
i2 Destination
Shows the current destination address with name
(only if entered), country code, city, road and
intersection.
i3 GPS position
Shows the calculated geographical position received
by the Global Positioning System.
In addition the number of received satellites is
shown.
With a clear view of the sky the number of received
satellites varies between 4 and 8.
Car position
i1
NORTH LAS VEGAS
N MARTIN L KING BL
Destination
i2
DOROTHY
LOS ANGELES
S FETTERLY AVE
EAST LOS ANGELES M
GPS position
i3
Long-/latitude
115°09'43" West
36°14'21" North
No. of satell.: 5
USA
USA
28
Page 29
GUIDANCE
i4 Trip computer
The trip computer shows you the following
information:
Current vehicle speed
–
Average vehicle speed
–
Elapsed travel distance
–
Elapsed travel time
–
Resetting trip computer
Select “Settings” from the main menu.
☞
Select “Trip computer” from the “System settings” menu.
☞
Select “Reset Trip comp” to set all values to zero.
☞
Speed warning
You can specify a speed limit in the trip computer. A warning signal will be heard as
soon as you exceed the specified speed.
For setting the speed limit see “Trip computer”, page 38.
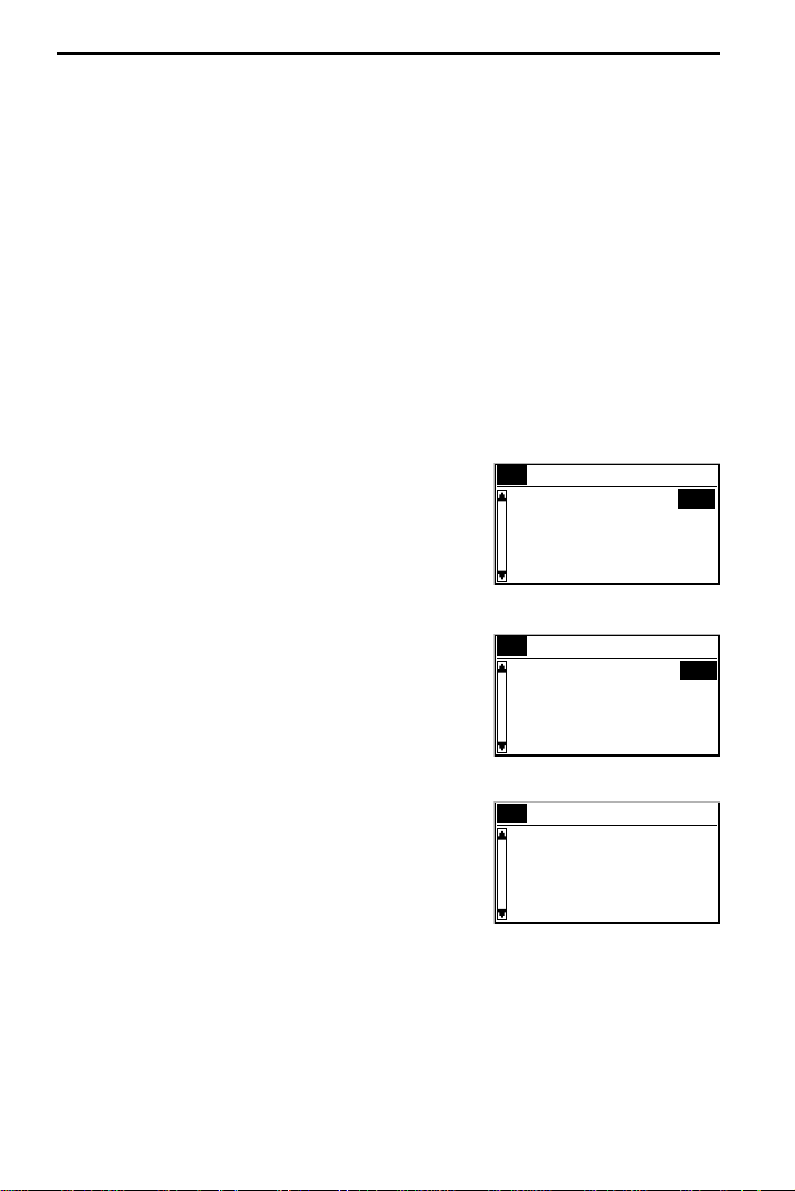
i5 Current settings
Shows the current system settings and gives you the
possibilty to change the route planning criterion.
The following information is shown:
1. Selected route planning criterion
–
N: Along main roads
–
M: No main roads
–
C: Optimize time
–
V: Optimize distance
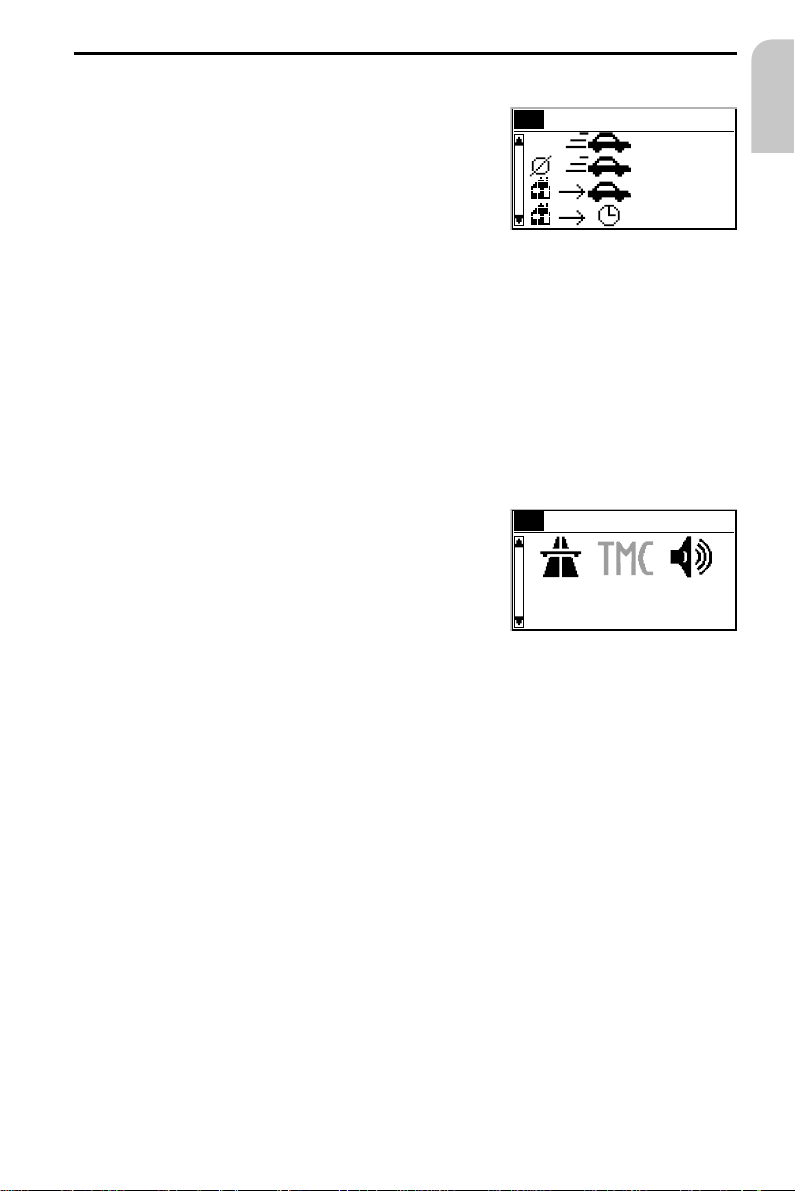
2. Status of RDS TMC
RDS TMC is not available in the U.S.
3. Audible guidance advice:
–
D: Voice messages on
–
F: Voice messages off
4. Time and date
Trip computer
i4
35 mph
24 mph
235 mls
12:08 h
Current settingsi5
08:17 pm 11/02/99
English
29
Page 30
ALTERNATIVE ROUTE
Alternative route
You can force the Navigation System to calculate an alternative route during
guidance. Use this function for example to get around traffic jams or if you don’t
agree with the planned route.
The alternative route is calculated from the current car position for the selected
distance.
The following points have to be fulfilled to plan an alternative route:
a route has to be planned by the system, and
–
the system has to be in guidance screen mode.
–
Place the cursor on the ª icon and confirm by
☞
pressing the OK key,
or:
Push the ALT-R key on the remote control.
☞
If you agree with the displayed distance, simply
☞
confirm with “OK”.
The display shows the guidance screen again.
:
The system plans an alternative route for the displayed distance.
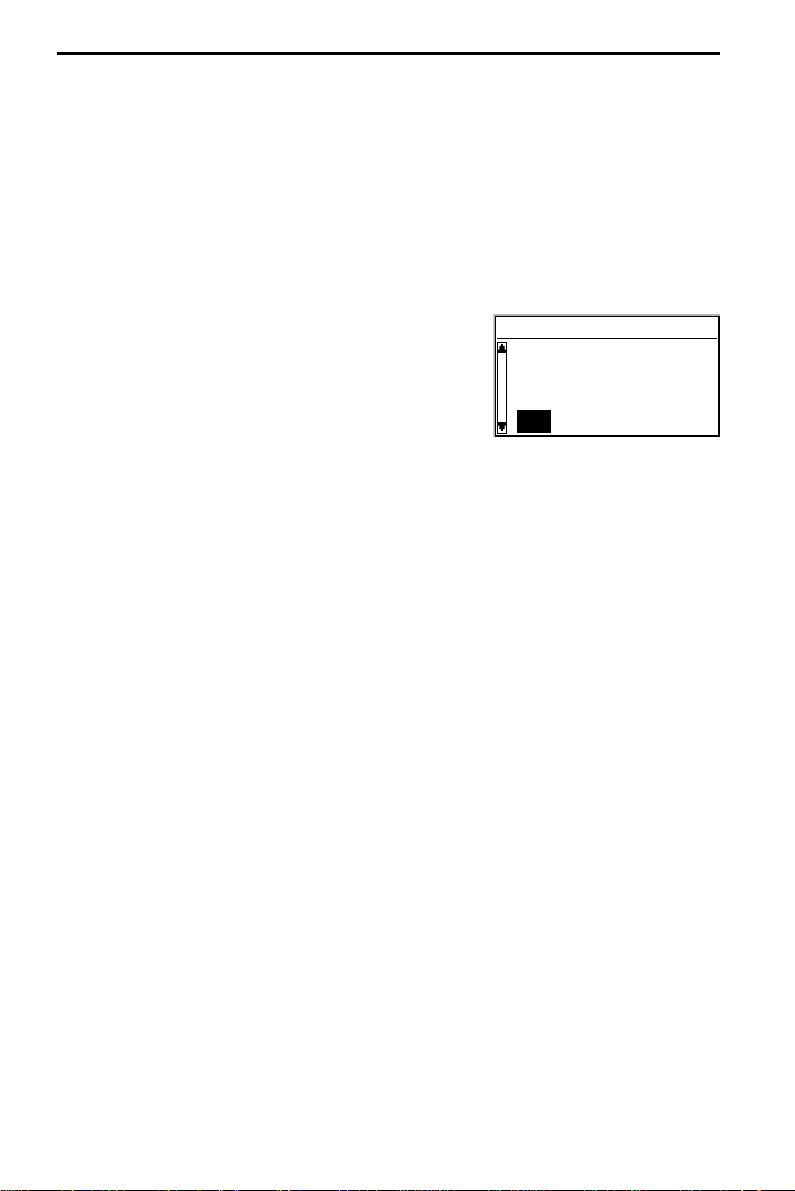
Abort alternative route planning
Place the cursor on “Return” and confirm by pressing the OK key.
☞
Alternative route
for: 6 mls
OK Return
Changing the distance
If you wish to have a distance other than the distance shown, proceed as follows:
Push the OK key on the remote control.
☞
Adjust the displayed distance between 1 and 6 miles by pushing the cursor keys
☞
4 or 6.
Again press the OK key.
☞
The cursor is placed on “OK”.
:
Confirm by pressing the OK key.
☞
The display shows the guidance screen again.
:
The system plans an alternative route for the displayed distance.
30
Page 31

ADDRESS BOOK
Address book
The Audiovox Navigation System allows you to store 30 destination addresses in a
personal address book. The destination store gives you additional helpful functions.
Select “Address book” from the destination input menu.
☞
The address book menu is shown.
:
The following menu options are available:
Load address
To recall a destination address previously stored in
the personal address book.
Load last dest.
To reload one of the 10 destinations last used for
guidance into the destination input menu.
Store address
To store the current destination address in the address book.
Store current loc.
To store the current car position in the address book.
Delete address
To delete an entry from the address book.
Delete last dest.
To delete the 10 destination addresses last entered.
Address book
Load address
Load last dest.
Store address
Store current loc.
English
Return
To leave the address book menu.
Notes:
You can store at least 30 entries in the personal address book. The number of entries
can increase up to 100 depending on the kind of information stored (with or without
name, etc.).
If no address is stored in the address book, the “Load address” and “Delete
address” options cannot be selected.
If the memory is full, the “Store address” option can no longer be selected.
31
Page 32

ADDRESS BOOK
Contents of an address book entry
You can store the following data in an address book entry:
Name: A name of your choice for the destination address consisting of a maximum
–
of 10 characters *;
City: The city name of the destination address;
–
Road: The road name of the destination address*;
–
Intersection: An intersection to specify your destination more precisely*;
–
or a facility from “Points of interest”*.
–
* optional input
Storing addresses in the personal address book
If you have not entered a destination address yet:
Enter the data (city, road, junction or special facility) of the desired destination
☞
address in the destination input menu.
Select “Address book” from the destination input menu.
☞
Select “Store address”.
☞
The keyboard menu for name entry appears.
:
Enter any character string of up to 10 characters with the “keyboard” to assign a
☞
name to the address. Confirm your entry by selecting “OK”.
If you don't want to assign a name, directly select “OK”.
Now the address is stored in the address book.
:
Loading addresses from the address book
Select “Load address” from the address book menu.
☞
The list of addresses already stored in the address book is shown.
:
Select the desired address from the list and confirm.
☞
The selected address is registered as the new destination address.
:
Loading one of the destinations last used
If you want to load one of the 10 destinations last used from the address book:
Select “Load last dest.” from the address book menu.
☞
Select the desired destination from the list.
☞
32
Page 33

ADDRESS BOOK
Storing the current location
Do you want to store for example a new restaurant you have found? Then just store
your current vehicle position as follows:
Select “Store current loc.” from the address book menu.
☞
The keyboard menu for name entry appears.
:
Enter a name or abort name entry by selecting £.
☞
The current vehicle position is stored in the address book.
:
Deleting addresses from the address book
You should delete addresses you no longer need for guidance to free memory for new
addresses.
Select “Delete address” from the address book menu.
☞
The list of stored addresses is shown.
:
Select the address to be deleted and confirm by pressing the OK key.
☞
The selected address is deleted from the personal address book.
:
Deleting the list of destinations last used
Select “Delete last dest.” from the address book menu.
☞
The list of the destinations last used for guidance is deleted.
:
English
33
Page 34

SYSTEM SETTINGS
System settings
To adjust the Navigation System to your own preferences you can modify various
settings.
Select “Settings” from the main menu.
☞
The “System settings” menu is shown. The
:
following options are available:
Display
To rotate the display contents 180 degrees for
over-head mounting of the display.
Volume
To adjust the volume level of voice messages and to turn off verbal guidance advice.
Route selection
To select criteria which influence the route planning.
Language
To load languages for verbal advice and menu text from a separate language CD.
Guidance screen
To select the information shown in the status field of the guidance screen.
Measuring units
To select the measuring units for the displayed distances.
Mounting angle
To set the mounting angle of the navigation computer. See “Mounting instructions”
on page 49.
System settings
Display
Volume
Route selection
Language
Speed correction
To set a correction factor for calculation of the estimated time of arrival and the
remaining travel time.
Date / Time
To set the time and date format and to adjust the offset for different time zones.
SDVC Mode
To adjust the speed dependent volume control.
System information
To get information on the hardware and software versions of the set (important in
case of service).
Service
Code protected menu for diagnostic purposes.
Trip computer
To set and activate a speed warning and to reset the trip computer.
Return
To return to the main menu.
34
Page 35

SYSTEM SETTINGS
Display
For overhead mounting of the display it is possible to rotate the display contents 180
degrees.
Select the “Display” option from the “System settings” menu.
☞
Select the desired setting according to the mounting position of the display.
☞
Volume
Select the “Volume” option from the “System settings” menu.
☞
A volume slider with the current volume setting is shown.
:
Adjusting the volume:
Place the cursor on the volume slider.
☞
Confirm by pushing the OK key.
☞
The volume adjustment is activated now.
:
Adjust the desired volume level with the cursor keys 4 or 6.
☞
The selected volume setting is announced.
:
Push OK to store the setting.
☞
Voice messages on/off:
Move the cursor on the “Mode:” option.
☞
Push OK.
☞
Select Mode “On” or “Off”.
☞
– On: Voice on D
–
Off: Voice off F
Push OK to store this selection.
☞
The icon for voice on/off is shown in information screen i5 (Current settings).
English
Route selection
Select the “Route selection” option from the system settings menu.
☞
The cursor is placed on the criterion currently selected.
:
Select the desired criterion:
☞
–
Along main roads N (Prefers highways for route planning)
–
No main roads M (Avoids highways for route planning)
–
Optimize time C (Prefers the fastest route)
–
Optimize distance V (Prefers the shortest route)
The icon for the selected criterion is shown in the information screen i5 (Current
settings).
Furthermore you have the opportunity to minimize the use of toll routes. If you do not
want the navigation system to use toll routes for route planning:
Activate the ”No toll routes“ option in the route selection list.
☞
A tick appears before the option.
:
If no toll-free roads are available for route planning, toll roads are used.
Note: If this option is activated, route planning may take longer. Therefore it is
recommended to use this function only if it is necessary.
35
Page 36

SYSTEM SETTINGS
Language
Select the “Language” option from the “System settings” menu.
☞
Select one of the languages loaded in the system,
☞
or:
Select “Other language” to replace one of the loaded languages with a different
☞
one from the supplied system software CD.
Select the language to be replaced.
☞
You are prompted to insert the software CD.
:
Insert the Audiovox system software CD in the navigation computer.
☞
Follow the instructions given by the system to load other languages.
☞
Guidance screen
Select the “Guidance screen” option from the “System settings” menu.
☞
Select between the following information to be shown in the status field of the
☞
guidance screen:
Remaining dist. (on/off)
–
and one of the following time indications:
Arrival time
–
Remaining travel time
–
Actual time
–
No time display
–
Measuring units
Select the “Measuring units” option from the system settings menu.
☞
The cursor is placed on the measuring unit currently selected.
:
Select between the following measuring units:
☞
–
Metric: display in kilometers and meters;
–
Anglo: display in miles and yards;
–
American: display in miles, half and quarter miles and feet.
Speed correction
Select the “Speed correction” option from the “System settings” menu.
☞
Select the desired speed correction setting with the cursor keys 4 or 6.
☞
Push the OK key to store the selection.
☞
36
Page 37

SYSTEM SETTINGS
Date / Clock
Select the “Date/Clock” option from the “System settings” menu.
☞
The currently selected timezone (offset) and the date and time are shown.
:
You can set the format for time and date display as well as the timezone.
Timezone:
The Navigation System receives the Universal Time Co-ordinates (UTC) via the GPS
system.
Time: Standard Daylight Saving
EST - 5.0 - 4.0
CST - 6.0 - 5.0
MST - 7.0 - 6.0
PST - 8.0 - 7.0
To adjust the difference between your local time and UTC:
Move the cursor on the value next to “Timezone:”.
☞
Push the OK key.
☞
Adjust the time offset with cursor keys 4 and 6.
☞
Push OK to store the setting.
☞
The displayed time is updated.
:
Time format:
Move the cursor to the time item.
☞
Push the OK key.
☞
Select between 12 hour format and 24 hour format.
☞
Push the OK key to store the selection.
☞
Date format:
Move the cursor to the time item.
☞
Push the OK key.
☞
Select between “day.month.year” and “month/day/year” format.
☞
English
37
Page 38

SYSTEM SETTINGS
SDVC Mode (Speed Dependent Volume Control)
This is to compensate the surrounding noise by increasing the volume level of
guidance advice depending on the vehicle’s speed.
You can select between 5 different SDVC settings (OFF = off; 4 = maximum increase).
Move the cursor to the Mode value.
☞
Push the OK key.
☞
Select the desired SDVC mode.
☞
Push the OK key to store the selection.
☞
Find a suitable compensation by trying out the different modes.
System information
The “System information” menu shows you information on soft- and hardware
versions of the system (for service purposes).
Service
For analysing hardware and software problems (code protected).
The “Service” menu should only be entered for service of the Navigation System by an
authorized service center.
Trip Computer
Select the “Trip computer” option from the “System settings” menu.
☞
You can perform the following settings within the trip computer menu:
Speed limit:
Move the cursor on the value next to “Limit:”.
☞
Push the OK key.
☞
Select the desired speed setting with the cursor keys 4 or 6.
☞
Push the OK key to confirm the selection.
☞
Enable/disable speed warning:
Move the cursor on the option next to “Speed warning:”.
☞
Push the OK key.
☞
Select “On” or “Off”.
☞
Push the OK key to confirm the selection.
☞
If you have enabled the speed warning, a warning beep is heard and a warning
message appears on the display each time you exceed the value stored under “Limit”.
Resetting the trip computer:
Move the cursor on “Reset Trip comp”.
☞
Push the OK key.
☞
All values (except the speed limit) are set to zero.
:
38
Page 39

MAP CDs
Map CDs
The Audiovox Navigation System is based on a database stored in a special format on a
CD. It is recommended always to use the latest update of this map CD.
Changing the map CD
Press the W key on the navigation computer once, if the red power LED is on
☞
(normally when the ignition is switched on).
Press the W key twice, if the red power LED is not on.
☞
The CD is ejected.
:
Take out the CD and gently insert the new map CD with the printed side facing up
☞
until it is retracted.
The system needs a few seconds for initialization after changing the map CD.
Notes:
The CD player of the navigation system does not play any other CDs (i.e. Audio CDs).
Always store map CDs in their protective cases.
If the last entered destination address is not (or only partly) on the map CD you
inserted, the whole address (or only the not existing part) is deleted.
English
r
e
d
ie
n
h
c
s
n
e
t
h
c
ü
F
n
o
g
E
d
n
lf
a
o
B
R
d
n
a
39
Page 40

MAP CDs
Map CDs with travel guide information
You can recognize map CDs containing travel guide information on special
destinations by the I icon in the display. If you have inserted such a map CD, you will
get additional information on many of the stored special destinations.
You can for example inform yourself about the room rate when looking for a hotel
and recall the phone number for reservation.
Select the desired facility by means of one of the options from the “Points of
☞
interst” menu.
The address of the selected facility is shown.
:
Scroll through the travel guide information of the selected facility by using the
☞
cursor keys 8 or 2.
If you want to store this facility as the next destination for guidance:
Move the cursor onto the address.
☞
Push the OK key.
☞
Then select “Activate”.
☞
The selected facility is stored as the new destination address for guidance.
:
Select “Return” if you don’t want to store the selected facility as the destination
address.
The display again shows the list of special destinations.
:
40
Page 41

MAINTENANCE & CARE
Replacing batteries of the remote control
You have to replace the batteries of the remote control, if you use the remote control
outside of its holder and the navigation system does no longer respond to key presses.
Open the battery compartment on the back
☞
of the remote control.
Remove the discharged batteries.
☞
Insert two new LR6 type (Size AA) batteries.
☞
Pay attention to correct polarity (marked in
the compartment).
Close the battery compartment.
☞
Notes:
In many countries exhausted batteries may not be disposed of with your household
A
waste. Please determine how to dispose of exhausted batteries according to local
regulations.
Only use leak-proof batteries. Battery leakage can cause damage to the remote control
A
or to your car.
Never expose the remote control to direct sunlight or extreme heat. The batteries are
A
discharged and the risk of leakage is increased.
If you permanently use your remote control in its holder, we recommend that you
remove the batteries from the remote control.
English
Cleaning of the remote control and the monitor
Do not use lighter fluid, methyl alcohol or other solvents for cleaning. Only use a
damp cloth.
41
Page 42

TROUBLESHOOTING
There may be times when you suspect that your Audiovox Navigation System is not
functioning as you expect it to. Before calling for service please read the operating
instructions and check the following list. You may find that an apparent malfunction
can easily be rectified.
Symptoms Possible cause / Remedy
System dos not start. Nothing on the
display.
After some time of normal operation,
the system switches off.
System reacts very slowly to data entries
or calculates very slowly.
“Guidance” option can not be selected
from the main menu.
System plans no route although a
destination was entered.
Only “Stand-by” can be selected in the
main menu after turning on the ignition.
Number of received satellites in info
screen “i3 GPS Position” is zero.
Guidance advice not audible. • Make sure that the volume is not set to minimum.
Display shows “Please insert CD” or
“Please insert correct CD”
Map CD is ejected unintentionally
without pressing the W key.
Not possible to store address in the
address book.
Guidance is not precise. Inaccuracy of a max. of 100 ft. is within the limit.
Displayed car position does not match
actual car position.
Guidance advice does not correspond
with actual traffic situation.
Specification changes and errors reserved.
• Turn on the ignition.
Ignition already turned on:
System is in stand-by mode.
• Push one of the keys on the remote control.
Monitor connector is not locked correctly.
• Slide the monitor onto the support (connector) until it clicks
into position correctly.
At extreme high or low temperatures the built-in protection
circuit switches off the system automatically.
• Operation of the system is resumed as soon as the
temperature returns to a normal level.
You are in a very densely digitized area. The navigation system
has to read a large amount of data from the CD-ROM.
• Make sure that you entered a destination address.
Car is not on a digitized road.
• Drive in the direction of the displayed arrow to a digitized
road.
• Wait a few seconds until the system has initialized (options
appear in highlighted letters).
• Make sure the GPS antenna is not covered by any objects.
• Drive outdoors, if you are in a garage, a car park or a tunnel.
• Make sure that an appropriate CD is inserted with the
printed side facing up in the navigation computer.
The CD might be dirty.
• Try to clean the CD with a special CD cleaning fluid.
Address book is full.
• Delete one or more entries no longer required.
• If you frequently discover greater inaccuracy, contact an
authorized service center.
Bad GPS reception for a long period of time. When sufficient
GPS reception is resumed the position is corrected
automatically.
• If necessary wait a few minutes.
It is possible that the car position calculated by the navigation
system is currently wrong.
The route may have been changed and does not correspond
with the information stored on the map CD.
42
Page 43

MENU OVERVIEW
Date / Clock
Speed correction
SDVC Mode
Service
System information
English
Return
Trip computer
Settings
Stand-by
Guidance
Destination input
System settings
AVORY BLVD
1.5 mls
Destination input
Route selection
: Route list
:Altern.route
¢
ª
Intersection
Language
i2
i1 Car position
Guidance
Measuring units
Guidance screen
i3
GPS position
Destination
Address book
Points of interest
Mounting angle
i4
Trip computer
Return
i5 Current settings
Volume
Display
6,5mls
02:45
£
ª
¦
¢
Country
:Return
:Repeat
¦
£
City/Road
Main menu
Menu
Menu title
Menu option
Menu option
43
Page 44

44
Page 45

MOUNTING INSTRUCTIONS
IMPORTANT NOTES
Installation may only be carried out by trained specialists!
A
Observe all quality standards of the automobile industry!
A
Fire hazard! When drilling pay attention to the location of cable harnesses, tank and
A
fuel pipes!
Never drill into car parts which are load bearing or are important for safety reasons!
A
When installing components in the interior of the car remember the following:
The driver's field of vision must not be obstructed!
A
Increased risk of injury in accidents! Do not mount components in an area where the
A
airbag will inflate or where head or knees could impact in the event of an accident!
Installation may only be made in vehicles with 12 V board voltage and negative pole on
A
car body. Installation in unsuitable vehicles could result in malfunction, damage or fire!
Checking the scope of delivery, ill. 1
1 Navigation computer with mounting sleeve and 2 mounting hooks
2 Monitor, monitor connector with cable, monitor holder with mounting plate,
double-sided self-adhesive tape and 4 screws
3 IR remote control
4 Holder for remote control with installation parts
5 Signal cable
6 Power supply cable
7 GPS antenna with metal plate and cable
8 Mounting brackets with mounting material
English
Take safety precautions
A
Before starting work disconnect the negative car battery terminal! When doing so
make sure to observe manufacturer's safety instructions (alarm system, airbag, immobilizer,
radio coding, etc.)!
Installing metal sleeve, ill 2 - 3
The computer can be mounted in a DIN radio opening of the vehicle with the supplied
metal sleeve.
Please note before mounting, ill. 4:
–
To ensure access to the CD opening a free space of at least 130 mm has to be in
front of the navigation computer.
–
For sufficient air circulation a free space of at least 50 mm has to be behind the
navigation computer.
–
The navigation computer has to be installed in horizontal position. Deviations of
-10 to +30 degrees can be adjusted in the “Mounting angle” menu (see “Initial
start-up”). A greater deviation can cause malfunctions.
–
A stable connection to the car body is necessary for the computer to function
correctly!
45
Page 46

MOUNTING INSTRUCTIONS
Insert metal sleeve into the DIN opening and press appropriate tags outwards with a
screwdriver. Take care not to damage hidden parts in the dashboard.
Mounting the navigation computer with brackets
If the navigation computer should or can not be installed in a DIN opening, it can be
mounted with the supplied mounting brackets in other places, for example in the
glove compartment, in the luggage boot or under the seats.
Therefor the two springs at either side of the navigation computer first have to be
unscrewed. The two TORX screws are required for later fastening of the two mounting
brackets.
Mounting the brackets, ill. 5
1. Put the bracket with the punched-out strap to the left or right rear edge of the
housing of the navigation computer. Take care that the strap completely moves into
gear with the metal body of the housing.
2. Turn bracket to the front while applying pressure to the rear edge of the bracket to
ensure a tight fitting of the bracket to the housing of the computer.
3. Fix the brackets to the housing with the two TORX screws.
Now the navigation computer can be mounted to the desired mounting position with
the supplied screws.
Suspended mounting
If the navigation computer has to be mounted in suspended position (for example
under the hat shelf), the mounting brackets can be fixed the other way round.
Installing GPS antenna, ill. 6 - 7
The GPS antenna can be mounted in the vehicle interior, for example on the
dashboard or on the rear deck. The antenna must have clear “view” of the sky.
–
In vehicles with metallic window tinting the GPS antenna should be mounted
outside on the vehicle body, for example on the roof or in the plastic bumper.
–
On metal surfaces the antenna can be fixed magnetically. Therefor remove the
metal plate from the bottom of the antenna and place the antenna on the cleaned
surface.
–
When mounting on other surfaces the metal plate has to remain below the
antenna. In this case stick install antenna with double-sided adhesive tape.
Note: To ensure perfect function please keep a distance of at least 4 inches from
metall parts like window frame.
46
Page 47

MOUNTING INSTRUCTIONS
Mounting monitor, ill. 8
Never install the monitor in an area where the head could impact in case of an
A
accident!
The monitor can be fastened with the supplied support either in normal or in
suspended position. If it is mounted in suspended position, make sure that the display
contents is rotated 180 degrees (“System settings” menu, option “Display”).
Glueing the support
1. Fix the mounting plate with two Phillips head screws to the bottom of the monitor
support.
2. Install monitor connector with the two countersunk screws to the monitor support,
see ill. 9.
3. Slide monitor on the connector until it clicks into position.
4. Determine the mounting position of the monitor.
5. Remove the monitor from the support.
CAUTION: When removing the monitor from the support, always make sure to press
the release key on the rear of the connector!
6. Clean the surface from grease and dust with methyl alcohol.
7. Remove protective paper from one side of the supplied adhesive tape and stick it to
the bottom of the mounting plate.
8. Remove protective paper from the lower side of the adhesive tape and place the
monitor support onto mounting surface and press firmly.
Note: Mounting temperature should be at least 60 degrees Fahrenheit to ensure the
full adhesive effect of the tape.
Screwing the monitor support
Screw monitor support without mounting plate directly in place with two appropriate
screws.
English
Alternative mounting
To extend the mounting possibilities you can also mount the monitor without the
supplied support:
Directly stick the monitor on the dashboard with double-sided self-adhesive tape.
See your dealer for other alternative mounting possibilities.
A
Observe safety warnings concerning driver’s sight and airbag inflation area!
Installing holder for the remote control, ill. 10 - 11
Mounting on angle bracket
Screw holder to angle bracket. Either insert angle bracket into an available slot or
screw it in place.
Mounting with adhesive plate
Snap holder onto plastic plate. Remove protective paper from adhesive tape. Stick
holder with adhesive plate onto mounting surface and press firmly.
Note: Mounting temperature should be at least 60 degrees Fahrenheit to ensure the
full adhesive effect of the tape.
47
Page 48

MOUNTING INSTRUCTIONS
Completing electrical connections, ill. 12
Lay all cables carefully. Refer to the connecting diagram on the fold-out page at the
end of the booklet and to the table below.
Power supply cable 6 (ISO connector A):
Pin no. Cable color Connection
A1 black/white speedometer signal input
A2 white/yellow back-up lights (reversing signal)
A3 white/brown mute signal output (open collector)
A4 red +12V permanent power supply (via cable fuse 10 A if necessary)
A7 violet +12V switched (must not be interrupted during engine start)
A8 brown negative battery pole
Only connect electrical signals to appropriate terminals in the vehicle.
A
In the case of a direct connection to the battery secure the positive connection (red
A
lead) with a 10 A fuse close to the battery (max. 4 - 6 inches).
1. Connect the free cable ends A4, A7 and A8 of the power supply cable 6 to suitable
terminals in the vehicle according to the connecting diagram and the table.
2. Do not cut off unused cables! Wind them together and tie them back! They may be
used later to install additional features.
Speedometer signal (ISO connector A):
Connect the black/white cable A1 from cable harness to the tapping position of the
speedometer signal.
Note: Many cars are supplied with the speedometer signal on one of the car radio
connectors. Ask your car dealer for more information.
A
Never tap the speedometer signal from the ABS control!
Further signals (ISO connector A):
Connect the white/yellow cable (A2) to a suitable connecting point of the back up
lights (positive pole of the reversing lamp).
Connecting system components (ISO connector B):
Connect the plug of the remote control cable to the socket on the signal cable
harness 5.
Connect the loudspeaker (accessory) with the 3.5 mm jack to the 3.5 mm plug of the
signal cable harness 5.
The loudspeaker impedance should be between 4 and 8 Ohms.
48
Page 49

MOUNTING INSTRUCTIONS
Mounting the navigation computer
1. Connect the GPS antenna.
2. Connect power supply cable 6 to ISO connector A’ at the navigation computer.
3. Connect signal cable 5 to ISO connector B’ at the navigation computer.
4. Insert yellow plug C1 of the monitor cable into the left chamber of ISO connector C1’
at the navigation computer.
5. If you want to connect system extensions, take care to slide all the C plugs together
before connecting them to ISO connector C’ at the navigation connector.
Green plug C2 (optional): middle part (C2) of ISO connector C2’
Blue plug C3 (optional): right chamber of ISO connector C3’.
6. Screw the rubber buffer onto the rear support stud of the navigation computer and
slide the computer into the metal sleeve until it clicks into position.
Caution: First mount the navigation computer firmly, then make the connection to
the vehicle’s power supply. Otherwise a wrong calibration of the gyro sensor may
result.
Initial start-up
1. Reconnect the car battery.
2. Restore perfect functioning of the electrical system (clock, onboard computer, alarm
system, airbag, immobilizer, radio coding, etc.).
3. Switch on the ignition.
4. Insert map CD into the navigation computer.
5. Insert batteries (not supplied) in the battery compartment of the remote control (see
user manual of the navigation system).
6. Park the car so that the GPS antenna has free “visual contact” to the sky.
7. Start the engine.
The monitor display appears (user advice).
8. Confirm the user advice by pressing OK key on the remote control.
The start menu appears, initialization of the navigation computer then begins
(duration between 2 and 10 minutes).
English
Adjusting the mounting angle
To ensure a perfect function of the system, the navigation computer has to be
adjusted to the given mounting position (for example in the dashboard).
1. Select “Mounting angle” from the “System settings” menu.
2. Adjust the mounting angle between -10 to +30 degrees according to the mounting
situation. The system does not distinguish between negative and positive values.
Therefore for example set the value to “10” even if the mounting angle is -10
degrees.
49
Page 50

MOUNTING INSTRUCTIONS
Checking the car functions
Only check safety functions when the car is standing still or driving at low speed!
A
Always carry out checks in open areas!
Check brake system, alarm system, lights, immobilizer, speedometer, trip computer,
radio (coding) and hi-fi stereo, clock.
Checking the navigation functions
Check the following functions when the car is stationary:
Remote control
Put remote control in the holder.
The keys on the remote control must light up.
GPS reception
Enter a destination and select “Guidance”. Select info screen i3 “GPS position” and
check the number of received satellites. For sufficient positioning the number should
be between 4 and 8.
Calibration
Make a short test drive (approx. 10 minutes) on digitized streets for automatic
calibration. Change direction several times.
Cross different junctions and check the indicated position in info screen i1 “Car
position”. If the indicated position matches the true car position, calibration is
finished.
Specification changes and errors reserved.
50
Page 51

CONTENIDO
Orientación breve. . . . . . . . . . . . . . . . . . . . . . . . . . . . . . . . . . . . . 52
INFORMACIÓN GENERAL . . . . . . . . . . . . . . . . . . . . . . . . . . . . . . . . . . 53
Indicaciones relativas a las instrucciones de manejo . . . . . . . . . . . . . . . . . . . 53
¡ATENCIÓN! Indicaciones importantes para el uso seguro . . . . . . . . . . . . . . . 53
¿Cómo funciona el sistema de navegación?. . . . . . . . . . . . . . . . . . . . . . . 55
El mapa digital de carreteras. . . . . . . . . . . . . . . . . . . . . . . . . . . . . . . 58
MANEJO . . . . . . . . . . . . . . . . . . . . . . . . . . . . . . . . . . . . . . . . . . . 59
Monitor LCD . . . . . . . . . . . . . . . . . . . . . . . . . . . . . . . . . . . . . . . 59
Telemando . . . . . . . . . . . . . . . . . . . . . . . . . . . . . . . . . . . . . . . . 59
Encender/Apagar . . . . . . . . . . . . . . . . . . . . . . . . . . . . . . . . . . . . . 60
Modo Stand-by . . . . . . . . . . . . . . . . . . . . . . . . . . . . . . . . . . . . . . 60
Ajuste de volumen . . . . . . . . . . . . . . . . . . . . . . . . . . . . . . . . . . . . 60
MENÚS . . . . . . . . . . . . . . . . . . . . . . . . . . . . . . . . . . . . . . . . . . . . 61
Cursor . . . . . . . . . . . . . . . . . . . . . . . . . . . . . . . . . . . . . . . . . . . 61
Cursor deslizante . . . . . . . . . . . . . . . . . . . . . . . . . . . . . . . . . . . . . 61
Introducción de letras . . . . . . . . . . . . . . . . . . . . . . . . . . . . . . . . . . 61
Diferentes posibilidades de introducción de datos . . . . . . . . . . . . . . . . . . . 62
Introducción de caracteres especiales . . . . . . . . . . . . . . . . . . . . . . . . . . 62
Borrado de un dato erróneo . . . . . . . . . . . . . . . . . . . . . . . . . . . . . . . 62
Menú principal . . . . . . . . . . . . . . . . . . . . . . . . . . . . . . . . . . . . . . 63
INTRODUCIR DESTINO. . . . . . . . . . . . . . . . . . . . . . . . . . . . . . . . . . . . 64
Menú “Introducir destino” . . . . . . . . . . . . . . . . . . . . . . . . . . . . . . . . 64
Introducir dirección de destino . . . . . . . . . . . . . . . . . . . . . . . . . . . . . 65
Destinos especiales . . . . . . . . . . . . . . . . . . . . . . . . . . . . . . . . . . . . 67
GUIA META . . . . . . . . . . . . . . . . . . . . . . . . . . . . . . . . . . . . . . . . . 69
Pantalla de guía a la meta . . . . . . . . . . . . . . . . . . . . . . . . . . . . . . . . 69
Mensajes acústicos . . . . . . . . . . . . . . . . . . . . . . . . . . . . . . . . . . . . 70
¿No ha respetado el último aviso? . . . . . . . . . . . . . . . . . . . . . . . . . . . . 70
Guía a la meta en zonas de digitalización parcial. . . . . . . . . . . . . . . . . . . . 71
Zonas con información de calles limitada . . . . . . . . . . . . . . . . . . . . . . . . 71
Visualización del listado de vías . . . . . . . . . . . . . . . . . . . . . . . . . . . . . 72
Pantallas de información . . . . . . . . . . . . . . . . . . . . . . . . . . . . . . . . . 72
RUTA ALTERNATIVA . . . . . . . . . . . . . . . . . . . . . . . . . . . . . . . . . . . . 74
Modificar la distancia. . . . . . . . . . . . . . . . . . . . . . . . . . . . . . . . . . . 74
MEMORIA DE DESTINO . . . . . . . . . . . . . . . . . . . . . . . . . . . . . . . . . . . 75
Contenido de un registro de la agenda . . . . . . . . . . . . . . . . . . . . . . . . . 76
Almacenar direcciones en la agenda . . . . . . . . . . . . . . . . . . . . . . . . . . 76
Cargar direcciones de la agenda . . . . . . . . . . . . . . . . . . . . . . . . . . . . . 76
Cargar uno de los últimos destinos utilizados. . . . . . . . . . . . . . . . . . . . . . 76
Almacenar posición . . . . . . . . . . . . . . . . . . . . . . . . . . . . . . . . . . . . 77
Borrar direcciones. . . . . . . . . . . . . . . . . . . . . . . . . . . . . . . . . . . . . 77
Borrar la lista de los últimos destinos utilizados . . . . . . . . . . . . . . . . . . . . 77
Español
51
Page 52

CONTENIDO
CONFIGURACION . . . . . . . . . . . . . . . . . . . . . . . . . . . . . . . . . . . . . . 78
Display. . . . . . . . . . . . . . . . . . . . . . . . . . . . . . . . . . . . . . . . . . . 79
Volumen. . . . . . . . . . . . . . . . . . . . . . . . . . . . . . . . . . . . . . . . . . 79
Selección de ruta . . . . . . . . . . . . . . . . . . . . . . . . . . . . . . . . . . . . . 79
Idioma . . . . . . . . . . . . . . . . . . . . . . . . . . . . . . . . . . . . . . . . . . . 80
Pantalla de guía. . . . . . . . . . . . . . . . . . . . . . . . . . . . . . . . . . . . . .80
Unidades de medida . . . . . . . . . . . . . . . . . . . . . . . . . . . . . . . . . . . 80
Corrección de velocidad . . . . . . . . . . . . . . . . . . . . . . . . . . . . . . . . . 81
Fecha / Hora . . . . . . . . . . . . . . . . . . . . . . . . . . . . . . . . . . . . . . . . 81
Modo SDVC . . . . . . . . . . . . . . . . . . . . . . . . . . . . . . . . . . . . . . . . 82
Información de sistema. . . . . . . . . . . . . . . . . . . . . . . . . . . . . . . . . . 82
Servicio . . . . . . . . . . . . . . . . . . . . . . . . . . . . . . . . . . . . . . . . . . 82
Ordenador de a bordo . . . . . . . . . . . . . . . . . . . . . . . . . . . . . . . . . . 82
CD DE MAPAS . . . . . . . . . . . . . . . . . . . . . . . . . . . . . . . . . . . . . . . .83
Cambio de un CD de mapas . . . . . . . . . . . . . . . . . . . . . . . . . . . . . . . 83
CDs de mapas con información de ruta . . . . . . . . . . . . . . . . . . . . . . . . . 84
MANTENIMIENTO Y CONSERVACION . . . . . . . . . . . . . . . . . . . . . . . . . . . 85
Cambio de pilas . . . . . . . . . . . . . . . . . . . . . . . . . . . . . . . . . . . . . . 85
Limpieza del telemando y del monitor . . . . . . . . . . . . . . . . . . . . . . . . . 85
LOCALIZAR FALLOS . . . . . . . . . . . . . . . . . . . . . . . . . . . . . . . . . . . . . 86
VISTA GENERAL DE MENÚS . . . . . . . . . . . . . . . . . . . . . . . . . . . . . . . . . 88
INSTRUCCIONES DE MONTAJE . . . . . . . . . . . . . . . . . . . . . . . . . . . . . . . 89
Orientación breve
En la página 3 (página desplegable) figura una orientación breve sobre los componentes del sistema.
1 Monitor LCD extraíble.
A
Para desmontar el monitor es imprescindible presionar la tecla de desbloqueo 2
situada en la parte posterior del soporte del monitor.
2 Tecla de desbloqueo para el monitor (en la parte trasera del conector del monitor).
Para retirarlo, hay que pulsar la tecla de desbloqueo situada al dorso del soporte del
monitor y tirar con cuidado hacia arriba.
3 Soporte del monitor, giratorio y pivotante.
Para pivotarlo hay que pulsar la tecla del soporte.
4 Telemando de infrarrojos.
5 Soporte del telemando (con conexión al ordenador de navegación).
Para desbloquear, pulse las teclas a izquierda y derecha.
6 Expulsar el CD. Con el encendido desconectado, pulse la tecla dos veces.
52
Page 53

INFORMACIÓN GENERAL
Indicaciones relativas a las instrucciones de manejo
Para facilitar la lectura de las instrucciones, se utilizará la siguiente ayuda:
le exigirá que haga algo.
☞
muestra la reacción del aparato.
:
caracteriza una enumeración.
–
Las indicaciones de seguridad o de advertencia contienen información muy importante
A
para la utilización segura del equipo. Si no se tienen en cuenta estas indicaciones pueden
existir riesgos de daños materiales o peligro para la vida o integridad física. Por ello deben
tenerse especialmente en cuenta.
¡ATENCIÓN!
Indicaciones importantes para el uso seguro
La utilización del sistema de navegación no exime en ningún caso de la responsabilidad
A
propia del conductor. Hay que tener siempre en cuenta las normas de tráfico aplicables en
cada momento. Observe en todo momento las condiciones actuales del tráfico.
Las normas de tráfico siempre tienen preferencia sobre las indicaciones del sistema de
A
navegación cuando las condiciones del tráfico en ese momento se contradigan con las indi
caciones del sistema de navegación.
Por motivos de seguridad, la introducción de datos en el sistema de navegación debe
A
realizarse antes de iniciar la marcha, y en cualquier caso siempre con el vehículo parado.
A En algunas zonas determinadas no se han incluido calles de dirección prohibida, prohi-
biciones de giro y prohibiciones de circulación (por ejemplo, zonas peatonales). En estas zo-
nas, el sistema de navegación proporciona un aviso de advertencia. En esas zonas debe
prestarse especial atención a las calles de dirección prohibida, a las prohibiciones de giro y
de paso.
Español
-
53
Page 54

INFORMACIÓN GENERAL
Directrices y recomendaciones para el manejo
seguro
Mire la pantalla sólo cuando sea posible hacerlo sin peligro. Si debe Ud. mirar la
A
pantalla de forma prolongada, detenga el vehículo en un lugar apropiado.
Le recomendamos que los ajustes y la introducción de nuevas metas sólo se realicen
A
con el vehículo parado, o por parte del acompañante.
Las indicaciones de guía a la meta proporcionadas por el sistema de navegación consti
A
tuyen meras propuestas. El conductor es el responsable último de la conducción segura del
vehículo, por lo que debería comprobar siempre si resulta seguro seguir las instrucciones.
Las reglas de tráfico siempre tienen preferencia ante las indicaciones dadas por el sistema
de navegación, cuando las situaciones de tráfico momentáneas se contradigan con las indi
caciones del sistema.
Si decide usted no seguir la ruta propuesta, el sistema de navegación calculará automá
A
ticamente una nueva y proporcionará nuevas indicaciones de guía a la meta (función de re
cálculo automático de ruta)
Los valores de velocidad actual, tiempo de viaje y distancia recorrida indicados en el
A
menú “Ordenador de a bordo” del sistema se obtienen mediante cálculos. La precisión no
puede garantizarse en todos los casos.
En algunas zonas determinadas no se han incluido calles de sentido único, prohibiciones
A
de giro y zonas de prohibición de tráfico (por ejemplo, zonas peatonales). En estas zonas, el
sistema de navegación emite un aviso de advertencia. Aquí deberá prestarse especial atención a las calles de dirección prohibida, a las prohibiciones de giro y de paso.
A
El sistema no tiene en cuenta la seguridad relativa de las rutas propuestas. En las rutas
propuestas no se tienen en cuenta los cortes de carretera, obras, limitaciones de altura o
peso, condiciones meteorológicas o de tráfico y otras influencias sobre la seguridad o
tiempo de recorrido. Utilice su propio criterio para decidir si las rutas propuestas son adecuadas. Utilice la función “ruta alternativa” para obtener una propuesta de ruta mejor, o
emprenda simplemente el camino preferido por usted y deje que el recálculo automático de
ruta planifique la nueva ruta.
A
Si está buscando ayuda en caso de emergencia (policía, bomberos, etc.), no recurra úni
camente al sistema de navegación. No puede garantizarse que todos los servicios de emer
gencia de las proximidades estén almacenados en la base de datos del CD. Actúe según su
propio criterio y sus posibilidades de obtener ayuda en una situación semejante.
A
Puede usted equipar el mando a distancia con pilas (no incluidas). En ese caso, no ex
ponga el mando a distancia a la radiación solar directa. (Las pilas se descargan a altas
temperaturas y existe el riesgo de derrames).
-
-
-
-
-
-
-
54
Page 55

INFORMACIÓN GENERAL
¿Cómo funciona el sistema de navegación?
El sistema de navegación Audiovox les ofrece un instrumento eficiente para prestar ayu
da al conductor en el tráfico cotidiano. La planificación automática de las rutas y la guía
al destino, les permite una mejor concentración en el tráfico cotidiano, cada vez más
denso - sobre todo en aglomeraciones urbanas -. Quedan por tanto relegados al olvido
los mapas de carreteras y ciudades convencionales. Usted introduce el destino deseado
antes de comenzar el trayecto, activando “Guía meta”, y de todo lo demás se encarga
el sistema de navegación Audiovox.
El sistema de navegación Audiovox le da instrucciones de guiado en forma acústica y
visual. Mediante unas pocas manipulaciones y una estructura simple de los menús, el
manejo de este sistema es cosa de niños.
Localización de la posición del vehículo
El sistema de navegación detecta la posi
40
20
0
60
053.450.3
80
100
120
140
160
Giróscopo
ción y los movimientos del vehículo me
diante sensores. El trayecto recorrido se
calcula por medio de un velocímetro elec
trónico y los movimientos de giro en cur
vas por un giróscopo (brújula inercial). Sin
Vel ocím etro
Computador
de navegación
Señal-GPS
embargo, la información de estos sensores
no es siempre exacta. Fisuras en las ruedas,
cambios en la presión de aire de los neumáticos como consecuencia de los cambios
Mapa digital
de carreteras
de temperatura, etc. originan modificaciones en los valores de los sensores. Comparando las señales con el mapa digital es
posible corregir por tiempo limitado (durante unos minutos) las inexactitudes de los sensores. Para la corrección de los datos
durante un tiempo más prolongado se precisará la señal de los satélites GPS.
-
-
-
-
Español
-
GPS (Sistema de Posicionamiento Global)
El sistema GPS se basa en la recepción de señales de nave
gación, actualmente de un total de 27 satélites GPS, que
rodean la tierra una vez cada 12 horas aproximada
mente a una altura de 21.000 km. Al menos hay que
recibir 4 satélites para poder determinar la posición
tridimensional, es decir la Longitud, Latitud y Altura.
La exactitud lograda se situará alrededor de los 30 m
a 100 m. Si sólo se pudieran recibir 3 satélites, única
mente sería posible determinar la posición en forma
bidimensional, es decir, sin indicación de la Altura.
Debido a ello disminuiría la exactitud de la posición
calculada.
El receptor GPS integrado en el sistema de navegación
puede recibir hasta 8 satélites simultáneamente.
-
-
-
55
Page 56

INFORMACIÓN GENERAL
Observaciones importantes sobre el funcionamiento de
su sistema de navegación
En principio, el sistema también funciona aunque la recepción GPS sea mala; sin em
bargo, en caso de recepción GPS mala o defectuosa puede reducirse la precisión de la
determinación de posición o pueden aparecer fallos en la misma que den lugar a indi
caciones de posición erróneas.
Comportamiento de arranque
Cuando el vehículo esté aparcado durante un
largo tiempo, los satélites se seguirán moviendo
durante ese tiempo. Después del encendido
puede que sistema de navegación necesite unos
minutos hasta que haya recibido las señales
necesarias de los satélites y las pueda valorar.
Durante el procedimiento de arranque, puede ocurrir que el sistema de navegación
comunique: “Usted está abandonando la zona digitalizada”. El sistema de navegación
supone que el vehículo se encuentra en una calle no digitalizada. Si en esa zona se
encuentran otras calles, el sistema puede transmitir mensajes inapropiados. El sistema
de navegación supone que el vehículo se encuentra en una de esas otras calles.
Después de una larga parada del vehículo, el funcionamiento del sistema de
navegación se puede ver limitado temporalmente. En cuanto la recepción GPS sea
suficiente, el sistema de navegación volverá a trabajar de forma fiable.
-
-
Observaciones
Después del transporte del vehículo en un tren de carga o en un transbordador (ferry),
el sistema de navegación puede necesitar unos minutos para encontrar la posición
exacta.
Después de haber desembornado la batería del vehículo pueden ser necesarios hasta
15 minutos para encontrar la posición exacta. Para ello, el vehículo se tiene que
encontrar al aire libre y el sistema tiene que estar conectado, a fin de poder recibir la
señal del satélite GPS.
56
Page 57

INFORMACIÓN GENERAL
Recepción GPS limitada
Cuando tras varios kilómetros de trayecto se hayan producido interrupciones o interfe
rencias en el receptor GPS, pueden suceder igualmente limitaciones en el funciona
miento. No tener recepción GPS o tener interferencias se puede deber a:
Encontrarse entre dos edificios altos.
–
Encontrarse en garajes, túneles o debajo de puentes.
–
Encontrarse en bosques o avenidas.
–
Encontrarse bajo lluvias fuertes o en tormentas.
–
Un posicionamiento desfavorable de satélites, en conexión con la ubicación de la
–
antena GPS (en dicho caso, la recepción puede estar interrumpida durante un largo
tiempo).
Encontrarse en valles entre montañas.
–
-
-
Español
El sistema funcionará aunque la recepción del GPS fuera mala, sin embargo la exacti
tud de la posición se puede ver disminuida.
Con una antena GPS bien instalada se debería disponer de una recepción suficiente
durante un 95% del trayecto. Si la recepción estuviera alterada frecuentemente, po
dría deberse a la mala instalación de la antena GPS. En estos casos, diríjanse al taller
responsable de la instalación del Audiovox.
El sistema de navegación puede compensar durante algunos minutos así como durante
varios kilómetros los problemas de recepción GPS, sin que por ello se origine una limitación en el funcionamiento.
Para impedir perturbaciones o mal funcionamiento del sistema, no se debe tapar la antena GPS con ningún objeto (GPS = Sistema de Posicionamiento Global por Satélite).
Las pegatinas en la luna delantera del vehículo cerca de la antena GPS pueden perturbar la recepción.
-
-
57
Page 58

INFORMACIÓN GENERAL
El mapa digital de carreteras
Para poder planificar una ruta a una dirección de destino, el sistema de navegación no
sólo necesita la posición actual del vehículo, sino también un mapa digital de carrete
ras donde están almacenadas la dirección de destino y las carreteras y calles que llevan
a dicha dirección. Este mapa digital de carreteras se encuentra en el CD de mapas, que
debe introducir en el ordenador de navegación.
En el CD de mapas, la red de carreteras está representada como un modelo de líneas;
Red de carreteras actual Modelo de líneas digital
es decir, incluso los cruces de gran tamaño sólo tienen un punto central hacia el que
convergen todas las carreteras en forma de línea. Por ello, el sistema de navegación indica la distancia al punto de giro como distancia al centro del cruce. Esto hace que en
las salidas de las autopistas las indicaciones de distancia del sistema de navegación no
coincidan con las de las señales de tráfico. Las señales muestran la distancia hasta el
comienzo de la salida.
-
Zonas con información de calles limitada
Algunas zonas no disponen de suficiente información acerca de una calle en el CD de
mapas. Así pues pueden faltar prohibiciones de giro, indicaciones sobre dirección
prohibida o paso prohibido en zonas peatonales. Al entrar en una de estas zonas, el
sistema de navegación mostrará un aviso de advertencia. Las normas de tráfico siem
pre tienen preferencia sobre las instrucciones que dé el sistema de navegación. Respe
te en todo caso las señales de tráfico y el código de la circulación.
Actualización de los CD de mapas
Se estima que entre el 10% y el 15% de las características de la red de carreteras cam
bia cada año. Debido a esta modificación constante de las rutas (nuevas carreteras, li
mitación del tráfico, etc.) no puede lograrse una coincidencia total del mapa de carre
teras digital con las condiciones de tráfico existentes. Le recomendamos emplear siem
pre para la navegación la versión más reciente de los CD de mapas.
58
-
-
-
-
-
-
Page 59

MANEJO
Monitor LCD
Si el monitor fue montado con el soporte suministrado, podrá ser retirado para una
protección antirrobo adicional.
Retirar el monitor
Pulse la tecla de desbloqueo situada al dorso del soporte del monitor y retire el mo
☞
nitor con cuidado hacia arriba.
No toque la pantalla del monitor para evitar que se dañe la indicación LCD.
A
Colocar el monitor
Coloque el monitor con cuidado sobre su soporte hasta que encastre.
☞
Ajuste del monitor
Si el monitor está sujeto al soporte suministrado, podrá ajustarlo perfectamente a su
ángulo visual.
Gire el monitor hasta alcanzar el mejor ángulo visual.
☞
Pulse la tecla de desbloqueo en la base del monitor, con el fin de pivotarlo hasta el
☞
ángulo óptimo.
Telemando
El sistema de navegación Audiovox es manejado mediante un telemando de infrarrojos.
Para retirar el telemando, pulse las dos teclas laterales del soporte.
☞
-
Español
A
Para guardarlo o antes de comenzar un trayecto, introduzca el telemando en el soporte
hasta que encastre.
Las teclas del telemando cumplen con las siguientes funciones:
ALT-R Planificar una ruta alternativa.
REP Repetir o solicitar la indicación acústica actual de guía a la meta.
8 Tecla de cursor hacia arriba; Selección de opciones.
4 Tecla de cursor a la izquierda; Selección de opciones.
6 Tecla de cursor a la derecha; Selección de opciones.
2 Tecla de cursor hacia abajo; Selección de opciones.
OK Tecla OK; Confirmación de una selección.
- Bajada de volumen para indicaciones habladas.
+ Subida de volumen para indicaciones habladas.
MENU Acceso al menú principal.
Si utiliza el telemando montado en el soporte, no necesitará las pilas internas.
Si las pilas del telemando están descargadas, el sistema de navegación no reaccionará
al apretar las teclas:
Introduzca el telemando en el soporte, para poder continuar manejando el sistema.
☞
Cambie las pilas.
☞
59
Page 60

MANEJO
Iluminación de teclas
Las teclas del telemando se iluminan cuando son activadas. La luz se apagará automá
ticamente al cabo de unos momentos. Introducido en su soporte, el telemando estará
siempre iluminado cuando el encendido esté conectado.
Encender/Apagar
El ordenador de navegación es encendido y apagado junto con el encendido del vehículo.
Conecte el encendido del vehículo.
☞
Tan pronto el sistema de navegación esté preparado para funcionar, aparecerá un
:
aviso en el display que le permitirá utilizar el sistema.
Lea este aviso y confírmelo apretando la tecla OK del telemando.
☞
Aparece el menú principal.
:
Transcurridos unos segundos, se habrá iniciado el sistema y se podrán elegir las funcio
nes de navegación (las opciones aparecerán con letras resaltadas).
Modo Stand-by
Si no desea escuchar indicaciones de guía a la meta, podrá conmutar el sistema al
modo Stand-by.
Seleccione “Stand-by” en el menú principal.
☞
Tanto el display como las indicaciones acústicas de guía a la meta se desconectarán.
:
Pulse una de las teclas de cursor 4, 6, 8, 2 o la tecla OK del telemando, para vol-
☞
ver a abandonar el modo Stand-by.
Si el sistema de navegación es desconectado en el modo Stand-by, permanecerá en ese
modo incluso tras volver a conectar el encendido del vehículo.
-
-
Ajuste de volumen
El volumen de las indicaciones acústicas de guía a la meta se puede ajustar de la si
guiente manera:
Pulse una o varias veces la tecla +, para subir el volumen de las indicaciones acústicas.
☞
Pulse una o varias veces la tecla -, para bajar el volumen de las indicaciones acústicas.
☞
Se comunicará el volumen actual.
:
60
-
Page 61

Cursor
Se denomina cursor a la línea elegida así como al
campo seleccionado de la pantalla. El cursor será mos
trado mediante una inversión del color de las letras
(letras en blanco en fondo negro).
Desplace el cursor mediante las teclas 8, 2, 4 ó 6.
☞
Confirme su selección pulsando la tecla OK.
☞
Para la confirmación, el cursor se muestra breve
:
mente en forma de recuadro alrededor del campo
seleccionado.
Las opciones no elegidas en ese momento aparecen inactivas.
-
-
Título del menú
Opción activa
Opción activa12
Opción activa 3
Opción n ctivaia
Cursor deslizante
Algunos menús disponen de más de 4 opciones. Si
este fuera el caso, se mostrará en el margen izquierdo
de la pantalla un cursor deslizante con flechas.
Mueva el cursor con la tecla 8 ó 2 sobre una op
☞
ción de menú situada en el margen superior o in
ferior de la pantalla.
Pulse nuevamente la misma tecla.
☞
En la pantalla aparecen automáticamente las si-
:
guientes opciones de menú.
-
-
Título del menú
Opción activa
Opción activa
Opción activa
Opción activa 5
Introducción de letras
La introducción de caracteres se realiza seleccionando
letras de una lista de letras.
A este tipo de introducción de datos lo llamaremos en
adelante “Máquina de escribir”.
Desplace el cursor mediante las teclas 4, 6, 8 y 2
☞
sobre la letra deseada.
Confirme su selección pulsando la tecla OK.
☞
El cursor omitirá automáticamente las letras que no puedan ser seleccionadas.
Ciudad:_
ABCDEFGHIJKLM O
PQRSTUVWXYZ—БАЙ
ИНМУТЪЩС
MENÚS
Español
2
3
4
N
OK¡¢ £
Opciones durante la introducción
Durante la introducción de letras dispondrá de las opciones especificadas a continua
ción.
Mueva el cursor a través de la lista de letras hasta situarlo sobre uno de los siguien
☞
tes símbolos:
¡ : Borrar el último carácter introducido.
¢ : Mostrar una lista de entradas de la base de datos.
OK: Aceptación de las letras introducidas.
£ : Cancelación y vuelta al menú anterior.
-
-
61
Page 62

MENÚS
“Máquina de escribir” inteligente
Al introducir nombres de ciudades y calles así como destinos especiales, el sistema com
parará el orden de las letras seleccionadas con todo el contenido de la base de datos
del CD de mapas.
Cuando haya seleccionado una letra, observará que se sólo se mostrarán determinadas
letras. El sistema de navegación completa automáticamente los datos, cuando ya sólo
quede una posibilidad de entrada.
Si el nombre de una ciudad, calle o enclave se encontrara repetido en la base de datos,
el sistema de navegación mostrará una lista de todos los datos con nombres iguales,
que se diferencian por informaciones adicionales. Por ejemplo, si un nombre de calle
aparece varias veces en la ciudad introducida anteriormente, aparece una lista con to
dos los nombres de ciudad o de barrio en los que aparece ese nombre de calle.
Si la cantidad de los registros fuese muy grande, la reconstrucción de la lista podría
tardar unos segundos.
Diferentes posibilidades de introducción de datos
La base de datos le ofrece la posibilidad de introducir diferentes partes de los nombres
compuestos de localidades y calles.
Por ejemplo: Podrá comenzar a introducir los datos de la ciudad “5 NORTH BEVERLY
DRIVE” con “DRIVE” o “NORTH”.
Introducción de caracteres especiales
En la “Máquina de escribir” figuran los caracteres especiales y específicos según los
países e idiomas.
-
-
Borrado de un dato erróneo
¿Qué ocurre si ha introducido un dato erróneo y lo ha confirmado?
Mueva el cursor hasta situarlo sobre el símbolo ¡.
☞
Confirme la selección.
☞
Se borrará la última letra introducida.
:
Si el sistema de navegación hubiera añadido caracteres automáticamente tras la in
troducción de la última letra, éstos también se borrarán.
62
-
Page 63

MENÚS
Menú principal
En el menú principal se dispone de las siguientes op
ciones:
Introducir destino
Esta opción activa el menú “Introducir destino”. Seleccione esta opción para intro
ducir ciudad, calle, cruce o un enclave de interés general como dirección de destino.
Guía meta
Con esta opción llegará hasta la pantalla de guía meta, para activar la función de guía
a la meta (siempre que haya indicado una dirección de destino).
Además puede usted acceder a diversas pantallas de información, por ejemplo con su
posición actual, el ordenador de a bordo o el menú “Ruta alternativa“.
Stand-by
Con esta opción se desconecta el display de navegación y las indicaciones acústicas. Las
funciones de navegación del sistema se mantienen activas en un segundo plano.
Pulse una de las teclas del telemando para abandonar el modo Stand-by.
☞
Ajustes
Esta opción activa el menú “Ajustes”. Seleccione esta opción para adaptar el sistema
a sus deseos personales.
-
Menú principal
Introducir destino
Guía meta
Stand-by
Ajustes
Español
-
63
Page 64

INTRODUCIR DESTINO
Menú “Introducir destino”
Seleccione en el menú principal la opción “Introducir destino”.
☞
El menú “Introducir destino” será visualizado.
:
Dispondrá de las siguientes opciones de menú:
País
Selección del país de destino, cuando en el CD de ma
pas introducido se encuentre almacenado más de un
país.
Ciudad/Calle
Introducir ciudad y calle de la dirección de destino.
Cruce
Introducir un cruce de referencia para conseguir datos más precisos.
Guía meta
Hace que el sistema de navegación planifique una ruta, activa la guía a la meta y pasa
a la pantalla de guía meta.
Posibilita además el acceso a menús de información y la planificación de una ruta alternativa.
Memoria destino
Almacena direcciones de destino en una base de datos personal o llama las últimas direcciones utilizadas.
Destino especial
Llamada a una lista de enclaves de interés general
(aeropuertos, hoteles, restaurantes, gasolineras, etc.).
Retorno
Retorno al menú principal.
-
Introducir destino
País
Ciudad/Calle
Cruce
Guía meta
Introducir destino
Guía meta
Memoria destino
Destino especial
Retorno
64
Page 65

INTRODUCIR DESTINO
Introducir dirección de destino
Las direcciones se pueden introducir de las siguientes maneras:
Introducir ciudad, calle y cruce, letra por letra con la “Máquina de escribir”.
–
Cargar una dirección memorizada de la agenda personal;
–
Selección de un destino especial (por ejemplo: hotel, gasolinera, estación) obtenido
–
del banco de datos y disponible en el CD de mapas.
Llamada a los últimos 10 destinos utilizados.
–
Introducir ciudad y calle
Seleccione en el menú principal la opción “Introducir destino”.
☞
El menú “Introducir destino” será visualizado.
:
Seleccione “País” si desea cambiar primero el país de destino.
☞
Esta opción sólo es posible si en el CD de mapas se encuentra almacenado más de
un país.
Seleccione “Ciudad/Calle”.
☞
En el display aparecerá “Ciudad:” junto con la
:
máquina de escribir.
Introduzca el nombre de la ciudad con la “Má-
☞
quina de escribir”,
o bien:
Seleccione el símbolo ¢ y busque un registro en la base de datos.
☞
Si hubiera varios registros en la base de datos con el mismo nombre, el cursor se situaría automáticamente sobre el símbolo ¢. Seleccione entonces de la lista el registro deseado.
Si la cantidad de los registros fuese muy grande, la reconstrucción de la lista podría
tardar unos segundos.
Confirme la introducción de los datos con “OK” o seleccione un registro de la lista.
☞
Aparecerá el menú “Calle:”.
:
Si hubiera menos de 5 calles disponibles en el lugar seleccionado, aparecerá auto
máticamente la lista de calles disponibles.
Ciudad:WET_
A...E.GHI.KLM..
P.RST..... .ÁÀÉ
ИНМУТЪЩС
Español
Z
OK¡¢ £
-
Introduzca el nombre de la calle con la “Máquina de escribir” o seleccione con el
☞
símbolo ¢ un registro de la lista.
65
Page 66

INTRODUCIR DESTINO
Introducción de números de portal
En algunas ciudades podrá seleccionar aparte del nombre de la calle también el núme
ro del portal, mediante la “Máquina de escribir”, y de esta forma podrá definir más
concretamente su destino.
Introducción de un cruce
Para determinar con más exactitud la dirección de destino podrá introducir un cruce:
Seleccione “Cruce” en el menú de introducción de destino.
☞
Aparecerá el menú “Cruce:”.
:
Introduzca el cruce con la “Máquina de escribir” o seleccione con el símbolo ¢ un
☞
registro de la lista.
Al disponer de pocos cruces (normalmente en ciudades pequeñas), automática
mente se mostrará una lista con todos los cruces disponibles.
-
Introducir sólo el nombre de una localidad
En caso de querer ir hasta la demarcación de una ciudad o localidad, prosiga de la si
guiente manera:
Introduzca el nombre de la ciudad según se ha descrito anteriormente.
☞
Aparecerá el menú “Calle:”.
:
Seleccione el símbolo £ en el menú.
☞
Será conducido a la demarcación de la ciudad o localidad.
-
Activación de guía a la meta
Seleccione “Guía meta” en el menú de introducir destino o en el menú principal.
☞
Aparece la pantalla de guía a la meta y el sistema de navegación comienza con la
:
planificación de la ruta.
En cuanto esté planeada la ruta, el sistema de navegación dará instrucciones de guía a
la meta tanto acústicas como visuales.
Obtendrá más información referente a este tema en el capítulo “GUÍA META” en pagi
na 69.
-
-
66
Page 67

INTRODUCIR DESTINO
Destinos especiales
También puede introducir la dirección de destino, se
leccionando destinos especiales que se encuentren al
macenados en la base de datos. Dichos destinos pue
den ser:
Aeropuertos,
–
Hoteles,
–
Gasolineras,
–
Talleres de reparaciones,
–
Aparcamientos, etc.
–
Dependiendo de la información que se haya introducido en el menú de introducir des
tino, se mostrará una lista con los enclaves de interés general, la cual está almacenada
en el CD de mapas.
Enclaves especiales que están relacionados con el lugar
de destino
Introduzca en el menú de introducir destino el nombre del destino deseado.
☞
Seleccione en dicho menú la opción “Destino especial”.
☞
Seleccione “Info sobre destino”
☞
Aparecerá el menú “Ciudad:”.
:
Confirme el nombre de la ciudad con “OK” o introduzca un nuevo nombre.
☞
Se mostrará una lista de enclaves especiales por categorías.
:
A menudo, en ciudades pequeñas se tendrá únicamente la opción “CENTRO CIUDAD”.
Si selecciona esta opción, el sistema de navegación le conducirá hasta el centro de la
ciudad.
Seleccione la categoría deseada (por ejemplo, HOTEL, GASOLINERA...).
☞
Si la base de datos tuviera memorizada más de 5 enclaves de interés general de la
:
categoría seleccionada, aparecerá la “Máquina de escribir”.
Si tuviera memorizada hasta 5 enclaves, aparecerá inmediatamente la lista.
Introduzca el nombre del enclave deseado o seleccione el símbolo ¢ para ver la
☞
lista.
Confirme la introducción de los datos con “OK” o seleccione un registro de la lista.
☞
Si tuviera introducido un CD de mapas especial con información de ruta, en primer
lugar se mostrarán más informaciones acerca del enclave seleccionado. Lea para ello
el párrafo “CDs de mapas con información de ruta” en página 84.
-
Destino especial
-
Info sobre destino
-
Info pos. coche
Interés nacional
Retorno
Español
-
Seleccione “Guía meta”.
☞
67
Page 68

INTRODUCIR DESTINO
Enclaves especiales de interés nacional
Seleccione “Destino especial” en el menú de introducir destino.
☞
Seleccione “Interés nacional”.
☞
Se mostrará una lista de los enclaves de interés nacional por categorías (por ejem
:
plo, AEROPUERTO, FERRY...).
Continúe como se describe en página 65.
☞
-
Enclaves especiales alrededor de la posición momentánea
También puede definir una dirección de destino seleccionando un enclave especial que
se encuentre en los alrededores de la posición momentánea del vehículo.
Seleccione “Destino especial” en el menú de introducir destino.
☞
Seleccione “Info pos. coche”.
☞
Se mostrará una lista de enclaves especiales clasificados por categorías.
:
Seleccione la categoría deseada.
☞
Se mostrará una lista de enclaves de la categoría seleccionada, que se encuentren
:
cerca de la posición actual del vehículo.
Continúe como se describe en página 65.
☞
Observación:
Siempre se mostrará una lista de enclaves en la opción “Info. pos. coche”, aunque
cerca de la posición actual del vehículo no se encuentre ningún enclave de la categoría
seleccionada.
Los enclaves indicados se ordenan según la distancia a la posición del vehículo, es decir
que el enclave más próximo a la posición del vehículo aparecerá en la primera línea de
la lista.
68
Page 69

GUIA META
Pantalla de guía a la meta
La pantalla de guía a la meta aparecerá en el momento en que Ud.
haya introducido una dirección de destino y
–
haya seleccionado “Guía meta” en el menú principal o en el menú de introducir
–
destino.
Se mostrarán las siguientes informaciones en la pantalla de guía a la meta:
Español
2
3
Main St
400 ft
1
4
¦
¢
£
ª
14:45
7,7mls
5
1 Aviso de guía a la meta: Representación gráfica del siguiente cruce o desvío. Los
cambios de dirección se comunicarán además por mensajes acústicos.
2 La calle en la que habría que girar en el próximo aviso.
3 La distancia hasta el próximo cambio de dirección*.
4 Campo de opción. Coloque el cursor sobre el símbolo deseado y pulse OK.
¦ : Repetir el aviso acústico actual
¢ : Mostrar el listado de vías (tramos de la ruta planificada)
£ : Volver al menú principal
ª : Ir al menú “Ruta alternativa“. Véase página 262.
5 Campo de estado. Posibilidad de indicar las siguientes informaciones:
– Recorrido restante
– Tiempo de viaje restante
– Hora de llegada prevista
– Hora actual
El campo de estado puede configurarse en el menú “Configuración”. Véase
página 80.
* Las unidades de medida dependen de la configuración del sistema. Véase el capítulo
“Configuración” en página 78.
69
Page 70

GUIA META
Mensajes acústicos
En cuanto haya seleccionado la guía a la meta, el sistema de navegación le dará ins
trucciones acústicas de recorrido - aparte de los símbolos en la pantalla de guía a la
meta -. Por lo general, una instrucción de giro consiste de dos mensajes acústicos:
Un aviso preliminar
W CHEYENNE AVE
1.5 mls
6,5mls
£
y
¦
¢
ª
02:45
-
un aviso de giro
W CHEYENNE AVE
400 ft
4,1mls
£
¦
ª
¢
02:45
Repetición de un mensaje acústico
Durante la guía a la meta, ¿no ha entendido bien o no ha oído el último aviso?
Apriete la tecla REP en el telemando.
☞
o bien:
Mueva el cursor hasta situarlo sobre el símbolo ¦ y pulse OK.
☞
Oirá el aviso actual de guía a la meta.
:
¿No ha respetado el último aviso?
Si no ha oído el último aviso o no se ha fijado por motivos técnicos del trafico (por
ejemplo obras), el sistema planea en unos pocos segundos una ruta nueva, partiendo
desde la posición actual del vehículo.
70
Page 71

GUIA META
Guía a la meta en zonas de digitalización parcial
Mientras se esté moviendo en zonas digitalizadas, el sis
tema de navegación le mostrará indicaciones de guía a
la meta. En largos trayectos largos sin desvíos o sin cru
ces, se mostrará una flecha de dirección que seguirá el
recorrido de la carretera.
Salida de la zona digitalizada
En zonas rurales y ciudades pequeñas puede ocurrir que
no estén todas las calles digitalizadas (memorizadas en el
CD de mapas).
Cuando abandone una calle digitalizada, se mostrará au
tomáticamente la flecha de dirección al destino y la dis
tancia en línea recta al destino. Oirá el aviso “Está aban
donando la zona digitalizada”.
En estos casos conduzca hacia una calle digitalizada, en la dirección que la flecha le
☞
indique.
En cuanto alcance una calle digitalizada, el sistema automáticamente se conectará de
nuevo con la guía a la meta y planeará una nueva ruta.
-
AVORY DRV
2.8 mls
-
£
¦
ª
¢
Siga la flecha
6 mls
-
£
¦
-
ª
¢
-
4,1mls
02:45
Zonas con información de calles limitada
Algunas zonas no disponen de suficiente información acerca de una calle en el CD de
mapas. Así pues pueden faltar prohibiciones de giro, indicaciones sobre dirección
prohibida o paso prohibido en zonas peatonales. Si condujera hacia una de estas zonas, el sistema de navegación mostrará un aviso de advertencia. Las normas de tráfico
siempre tienen preferencia ante las instrucciones que dé el sistema de navegación.
En la parte superior izquierda de la pantalla de guía al destino aparece el símbolo !
mientras se encuentre en una zona con información de carreteras limitada.
A
Respete en todo caso las señales de tráfico y el reglamento de circulación.
Español
71
Page 72

GUIA META
Visualización del listado de vías
En cuanto haya planeado una ruta, tendrá además a disposición en esta pantalla la op
ción “Listado de vías”.
Confirme “¢” en la pantalla de guía a meta.
☞
Aparecerá la lista de tramos de la ruta planeada.
:
Con las teclas de cursor 2 y 8 puede ir desplazando la lista línea a línea.
☞
Seleccione “Retorno” para abandonar el listado de vías.
☞
El listado de vías sólo está disponible si se encuentra usted en una vía digitalizada.
Pantallas de información
Durante la guía al destino puede usted acceder a diferentes pantallas de información:
Pulse una de las teclas de cursor 2 o 8 una o varias veces para acceder a la pantalla
☞
de información deseada.
Las siguientes pantallas de información están disponibles:
i1 Posición actual
Indicación de la posición actual del vehículo con distintivo del país, localidad y calle.
Posición actuali1
USA
NORTH LAS VEGAS
N MARTIN L KING BL
-
i2 Destino
Indicación de la dirección de destino actual con nombre
(si se ha introducido), código, ciudad, calle y cruce.
i3 Posición GPS
Indicación de la posición geográfica del vehículo, lo
calizada a través del Sistema de Posicionamiento Glo
bal.
Además se muestra el numero de los satélites GPS re
cibidos.
Si la visibilidad del cielo es buena, tendrá una indica
ción de4a8satélites.
72
Destinoi2
DOROTHY
LOS ANGELES
S FETTERLY AVE
EAST LOS ANGELES M
-
-
-
Posición GPS
i3
Longitud/Latitud
115°09'43"
36°14'21"
-
Nro. satélites 5
USA
Norte
Este
Page 73

i4 Ordenador de a bordo
En el ordenador de a bordo se visualizan las siguien
tes informaciones:
Velocidad actual
–
Velocidad media
–
Distancia recorrida
–
Tiempo de viaje transcurrido
–
GUIA META
-
Ord. abordo
i4
35 mph
24 mph
235 mls
12:08 h
Inicialización del ordenador de a bordo
Seleccione “Configuración” en el menú principal.
☞
Seleccione “Ord. abordo” en el menú “Configuración”.
☞
Seleccione “Reset” para poner a cero todos los valores.
☞
Aviso de exceso de velocidad
Puede usted especificar en el ordenador de a bordo una velocidad máxima; si se
supera dicha velocidad se producirá un aviso acústico.
Para el ajuste del límite de velocidad, véase “Ordenador de a bordo”, página 82.
i5 Ajustes
Indicación de la configuración actual del sistema.
Se mostrarán las siguientes informaciones:
1.Criterio de planificación de ruta seleccionado:
Ajustesi5
– N : Por autovías
–
M : No por autovías
–
C : Tiempo óptimo
–
V : Distancia óptima
2. Estado del TMC:
TMC aún no se ha puesto en práctica en todos los países.
3. Indicaciones acústicas:
–
D : Indicaciones acústicas activadas
–
F : Indicaciones acústicas desactivadas
4. Hora y fecha
08:17 pm 11/02/99
Español
73
Page 74

RUTA ALTERNATIVA
Ruta alternativa
Puede ordenar al sistema de navegación que durante la guía a la meta planifique una
ruta alternativa. Utilice esta función, si por ejemplo desea desviarse de un atasco o si
desea planear otra ruta.
La ruta alternativa se calcula desde la posición actual del vehículo hasta la distancia se
leccionada.
Hay que cumplir con las siguientes exigencias para poder planear una ruta alternativa:
Tiene que haber sido planeada ya una ruta, y
–
el sistema debe encontrarse en la pantalla de guía a la meta.
–
Lleve el cursor sobre el símbolo ª y confirme con la tecla OK,
☞
o bien:
pulse la tecla ALT-R del telemando.
☞
Si está de acuerdo con la distancia mostrada, con
☞
fírmelo mediante “OK”.
En el display aparecerá de nuevo la pantalla de
:
guía a la meta.
El sistema planea una ruta alternativa para el trayecto indicado.
Interrumpir el proceso
Lleve el cursor a “Retorno” y pulse la tecla OK.
☞
-
Ruta Alternativa
hasta: 6 mls
OK Retorno
-
Modificar la distancia
Si desea una distancia distinta a la indicada, proceda de la siguiente manera:
Sitúe el cursor sobre la indicación de la distancia.
☞
Pulse la tecla OK.
☞
Modifique la distancia indicada entre 1 .... 6 mls con las teclas de cursor 4 ó 6.
☞
Pulse nuevamente la tecla OK.
☞
El cursor se sitúa en “OK”.
:
Confirme “OK”.
☞
En el display aparecerá de nuevo la pantalla de guía a la meta.
:
El sistema planea una ruta alternativa para el trayecto indicado.
74
Page 75

MEMORIA DE DESTINO
Memoria de destino
El sistema de navegación Audiovox le ofrece la posibilidad de memorizar hasta 30 di
recciones de destino en una agenda personal. Además esta memoria dispone de otras
funciones muy útiles.
Seleccione la opción “Memoria de dest.” en el menú de introducir destino y con
☞
firme la selección.
Se mostrará el menú de memoria de destino.
:
Se dispone de las siguientes opciones:
Cargar dirección
Solicitar una dirección de destino almacenada en la
agenda.
Ultimo destino
Cargar en el menú de introducir destino las últimas
10 direcciones utilizadas para la guía a la meta.
Almacenar dirección
Almacenar en la agenda la dirección de destino actual.
Almacenar posición
Almacenar la posición actual del vehículo en la memoria de destino.
Borrar dirección
Borrar una dirección de la agenda.
Memoria de dest.
Cargar dirección
Ultimo destino
Almacenar direcc.
Almacenar posición
-
-
Español
Borr. últ. destino
Borrar las últimas 10 direcciones de destino introducidas.
Retorno
Salir del menú memoria de destino.
Observaciones:
La agenda de direcciones permite un mínimo de 30 registros. Esta cantidad puede lle
gar hasta 100 dependiendo de los datos introducidos (p.ej., con o sin nombre, etc.).
Si en la agenda aún no se hubiera introducido ninguna dirección, no se podrán selec
cionar las opciones “Cargar dirección”y“Borrar dirección”.
Si la agenda estuviera completa, no se podrá seleccionar la opción “Almacenar direcc.”.
-
-
75
Page 76

MEMORIA DE DESTINO
Contenido de un registro de la agenda
Podrá almacenar los siguientes datos en un registro de la agenda:
Nombre: Un nombre de libre selección para la dirección de destino compuesto de
–
un máximo de 10 caracteres*;
Ciudad: El nombre de la ciudad de destino;
–
Calle: El nombre de la calle de destino*;
–
Cruce: Un cruce para una especificación más exacta de la dirección de destino* o
–
un enclave de interés general del menú “Destino especial”.
–
* Estas entradas son opcionales
Almacenar direcciones en la agenda
Si todavía no ha introducido alguna dirección de destino:
Introduzca los datos de la dirección de destino deseada (ciudad, calle, cruce o en
☞
clave de interés general) en el menú introducir destino.
Seleccione en dicho menú la opción “Memoria de dest.”.
☞
A continuación, seleccione “Almacenar direcc.”.
☞
Seleccione primero “Nombre” si desea asignarle un nombre a la dirección de des
:
tino.
Introduzca con la “Máquina de escribir” cualquier secuencia de caracteres, con un
☞
máximo de 10. Finalice la introducción con “OK”.
Si no desea introducir un nombre, seleccione directamente “Almacenar direcc.”.
Ahora se ha almacenado la dirección en la agenda.
:
-
-
Cargar direcciones de la agenda
Seleccione “Cargar dirección” en el menú memoria de destino.
☞
Se mostrará la lista de las direcciones ya almacenadas en la agenda.
:
Seleccione la dirección deseada de la lista y confírmela.
☞
La dirección seleccionada será aceptada como dirección de destino.
:
Cargar uno de los últimos destinos utilizados
Si desea recuperar de la memoria de destino uno de los últimos 10 destinos utilizados:
Seleccione “Ultimo destino”.
☞
Seleccione de la lista la dirección deseada.
☞
76
Page 77

MEMORIA DE DESTINO
Almacenar posición
¿Desea almacenar en la memoria de destino, por ejemplo, un restaurante que le guste?
Entonces almacene su posición de la siguiente manera:
Seleccione “Almacenar posición” en el menú memoria de destino.
☞
Aparecerá el menú para introducir el nombre.
:
Introduzca un nombre o interrumpa la introducción del nombre mediante £.
☞
La posición actual del vehículo se almacenará como dirección.
:
Borrar direcciones
Las direcciones que no vaya a utilizar más, deberían ser borradas de la agenda para de
jar espacio para nuevas direcciones de destino.
Seleccione “Borrar dirección” en el menú memoria de destino.
☞
Se mostrará la lista de las direcciones almacenadas en la agenda.
:
Seleccione la dirección que desea borrar de la lista y confírmela.
☞
La dirección seleccionada será borrada de la memoria.
:
Borrar la lista de los últimos destinos utilizados
Seleccione “Borr. últ. destino” en el menú memoria de destino.
☞
Se borrará la lista de los últimos destinos utilizados para la guía a la meta.
:
Español
-
77
Page 78

CONFIGURACION
Configuración
Para ajustar el sistema de navegación a sus exigencias
personales, podrá modificar muchos ajustes.
Seleccione “Ajustes” en el menú principal.
☞
El menú “Configuración” será visualizado. Dis
:
pondrá de las siguientes opciones de menú:
-
Display
Giro de 180° del contenido de la pantalla, para mon
taje del monitor por encima de la cabeza.
-
Volumen
Configuración del volumen así como conexión o desconexión de los avisos acústicos de
guía a la meta.
Selección de ruta
Selección del criterio de planificación de rutas.
Idioma
Cargar idiomas para los avisos acústicos y textos del menú, de un CD de idiomas aparte.
Pantalla de guía
Selección de las indicaciones para el campo de estado en la pantalla de guía al destino.
Unidades de medida
Selección de unidades de medida para la indicación de las distancias.
Ángulo de montaje
Descripción: véase “Instrucciones de montaje”, página 93.
Configuración
Display
Volumen
Selección de ruta
Idioma
Corrección veloci.
Selección de un factor de corrección para el cálculo de la hora prevista de llegada y del
tiempo de viaje restante.
Fecha / Hora
Selección de los formatos de indicación para fecha / hora y ajuste de la hora zonal.
Modo SDVC
Ajuste de la adaptación de volumen dependiente de la velocidad.
Informac. sistema
Información de las versiones de Hardware y Software del equipo (importante para el
servicio técnico).
Servicio
Menú con código protegido para fines de diagnóstico.
Ord. abordo
Ajuste y activación de un aviso de exceso de velocidad e inicialización del ordenador
de a bordo.
Retorno
Retorno al menú principal.
78
Page 79

CONFIGURACION
Display
Para montar el monitor por encima de la cabeza, es posible girar el contenido de la
pantalla en 180°.
Seleccione “Display” en el menú “Configuración”.
☞
Escoja el ajuste deseado de acuerdo a la posición de montaje del monitor.
☞
Volumen
Seleccione “Volumen” en el menú “Configuración”.
☞
Aparecerá un regulador deslizante que le mostrará el ajuste actual del volumen.
:
Ajustar el volumen:
Marque el regulador deslizante con la ayuda del cursor.
☞
Confirme pulsando la tecla OK.
☞
La regulación del volumen está activada.
:
Ajuste el volumen deseado mediante las teclas de cursor 4 ó 6.
☞
Se comunicará el volumen ajustado.
:
Para almacenar este ajuste, pulse nuevamente la tecla OK.
☞
Conexión/Desconexión de avisos acústicos:
Mueva el cursor hasta situarlo sobre la opción al lado de “Modo:”.
☞
Pulse la tecla OK.
☞
Seleccione “Con” o “Des”.
☞
–
Con: avisos acústicos conectados D
–
Des: avisos acústicos desconectados F
Para almacenar este ajuste, pulse nuevamente la tecla OK.
☞
El símbolo para avisos acústicos conectados/desconectados solamente se visualizará en
la pantalla de información i5 “Configuración”.
Selección de ruta
Selección del criterio de planificación de rutas.
Elija “Selección de ruta” en el menú “Configuración”.
☞
El cursor se sitúa encima del criterio seleccionado.
:
Seleccione el criterio que más prefiera:
☞
–
N : Por autovía (prefiere autovías en la planificación de rutas)
–
M : No por autovía (evita autovías en la planificación de rutas)
–
C : Tiempo óptimo (prefiere el trayecto más rápido)
–
V : Distancia óptima (prefiere el trayecto más corto)
El símbolo para la selección de ruta se mostrará en la pantalla de información i5 (confi
guración).
Español
-
79
Page 80

CONFIGURACION
Además tiene la posibilidad de excluir carreteras de peaje al planear la ruta:
Active la opción “No por peajes”, si desea utilizar la mayor cantidad posible de ca
☞
rreteras libres de pago.
Aparecerá una marca delante de la opción.
:
Si no hubiera carreteras libres de pago, también se seleccionarán carreteras de
peaje en la planificación de la ruta.
Aviso: Si está activada esta opción, la planificación de la ruta podría tardar más que si
la función estuviera desactivada. Por ello debería activar esta función sólo si la necesi
ta.
Idioma
Seleccione “Idioma” en el menú “Configuración”.
☞
Seleccione uno de los dos idiomas cargados en el sistema,
☞
o bien:
Seleccione “Otro idioma” para sustituir uno de los dos idiomas cargados por otro
☞
idioma del CD de software de sistema suministrado.
Seleccione el idioma que desea sustituir.
☞
Se le pedirá que introduzca el CD de software.
:
Introduzca el CD con el software de sistema de Audiovox en el ordenador de nave-
☞
gación.
Siga las instrucciones del sistema para cargar otros idiomas.
☞
Pantalla de guía
Elija “Pantalla de guía” en el menú “Configuración”.
☞
Elija entre las siguientes indicaciones que aparecen en el campo de estado de la
☞
pantalla de guía al destino:
–
Distan. recorrida (con./des.)
y una de las siguientes indicaciones de tiempo:
–
Tiempo llegada
–
Tiempo viaje
–
Hora actual
–
No hay hora disp.
-
-
Unidades de medida
Seleccione “Unidades de medida” en el menú “Configuración”.
☞
El cursor se sitúa sobre las unidades de medida elegidas.
:
Seleccione entre las siguientes unidades de medida para indicar la distancia:
☞
–
Métrico: Indicación en kilómetros y metros.
–
Anglo-americano: Indicación en millas y yardas.
–
Americano: Indicación en millas, medias millas, cuartos de milla y pies.
80
Page 81

CONFIGURACION
Corrección de velocidad
Seleccione “Corrección veloci.” en el menú “Configuración“.
☞
Ajuste la corrección de velocidad deseada mediante las teclas de cursor 4 ó 6.
☞
Pulse OK para almacenar el ajuste.
☞
Fecha / Hora
Seleccione “Fecha / Hora” en el menú “Configuración”.
☞
Se indicará la hora zonal ajustada actualmente (Offset) así como la hora y la fecha.
:
Existe la posibilidad de ajustar el formato para hora y fecha así como la hora zonal.
Hora zonal:
El sistema de navegación recibe la hora mundial actual (UTC) a través del sistema GPS.
Español
Zona
Horario:
EST - 5.0 - 4.0
CST - 6.0 - 5.0
MST - 7.0 - 6.0
PST - 8.0 - 7.0
Para ajustar la diferencia entre la hora local y la hora mundial, proceda de la manera
siguiente:
Desplace el cursor sobre el valor detrás de “Hora zonal”.
☞
Pulse la tecla OK.
☞
Ajuste la diferencia de hora mediante las teclas de cursor 4 y 6.
☞
Pulse nuevamente la tecla OK para confirmar el ajuste.
☞
La hora indicada será modificada.
:
Formato de hora:
Sitúe el cursor sobre la hora.
☞
Pulse la tecla OK.
☞
Elija entre un formato de 12 o de 24 horas.
☞
Pulse nuevamente la tecla OK para confirmar el ajuste.
☞
Formato de fecha:
Sitúe el cursor sobre la fecha.
☞
Pulse la tecla OK.
☞
Elija la indicación “Día.Mes.Año” o “Mes/Día/Año”.
☞
Horario de
invierno
Horario de verano
81
Page 82

CONFIGURACION
Modo SDVC
Para compensar los ruidos del entorno, el volumen de los avisos acústicos será elevado
en función de la velocidad del vehículo.
Tendrá la posibilidad de elegir entre cinco diferentes niveles (DES = sin elevación;
4 = máxima elevación).
Sitúe el cursor sobre el valor ajustado.
☞
Pulse la tecla OK.
☞
Seleccione el modo SDVC deseado.
☞
Pulse nuevamente la tecla OK para confirmar el ajuste.
☞
Pruebe diferentes opciones para descubrir el modo SDVC más idóneo para su vehículo.
Información de sistema
El menú “Informac. sistema” muestra informaciones acerca de las versiones de Soft
ware y Hardware (para fines del servicio técnico).
Servicio
Para analizar los problemas de Hardware y Software (código protegido).
La opción “Servicio” del sistema de navegación está prevista para ser utilizada exclu-
sivamente por el servicio técnico autorizado.
Ordenador de a bordo
Seleccione ”Ord. abordo” en el menú ”Configuración”.
☞
En el ordenador de a bordo pueden realizarse los siguientes ajustes:
-
Límite de velocidad:
Mueva el cursor hasta el valor situado detrás de “Límite:”.
☞
Pulse la tecla OK.
☞
Ajuste la velocidad deseada mediante las teclas de cursor 4 y 6.
☞
Pulse nuevamente la tecla OK para confirmar el ajuste.
☞
Activar / desactivar el aviso de exceso de velocidad:
Mueva el cursor sobre la opción situada junto a “Aviso velocidad”.
☞
Pulse la tecla OK.
☞
Seleccione “Con” o “Des”.
☞
Pulse nuevamente la tecla OK para confirmar el ajuste.
☞
Si el aviso de exceso de velocidad está activado, cada vez que se supere la velocidad se
leccionada en “Límite” se producirá un aviso acústico y aparecerá una advertencia en
la pantalla.
Inicializar el ordenador de a bordo
Lleve el cursor a la opción “Reset”.
☞
Pulse la tecla OK.
☞
Todos los valores (salvo el límite de velocidad) se ponen a cero.
:
82
-
Page 83

CD DE MAPAS
CDs de mapas
El sistema de navegación Audiovox se fundamenta en una base de datos, que está al
macenada en un CD en un formato especial. Recomendamos que utilice siempre la últi
ma edición de este CD de mapas.
Cambio de un CD de mapas
Cuando se ilumine el diodo luminescente (LED) rojo, pulse una sola vez la tecla de
☞
expulsión
tado el encendido del vehículo).
Si no se iluminara el diodo LED, pulse dos veces la tecla de expulsión W.
☞
El CD será expulsado.
:
Retire el CD e introduzca con cuidado el nuevo CD de mapas con el rótulo hacia
☞
arriba dentro del lector de CD.
Después de cambiar el CD de mapas, el sistema necesitará unos segundos para ini
ciarse.
Observaciones:
El lector de CD del sistema de navegación no reproduce otros CDs (por ejemplo, CDs de
audio).
Conserve los CDs de mapas en las fundas previstas para ello.
Si la última dirección de destino introducida no se encontrara en el nuevo CD de ma-
pas o si sólo se encontrara una parte, se borrará la dirección o las partes no disponibles.
W en el ordenador de navegación (éste será el caso cuando esté conec
-
-
-
-
Español
r
e
d
ie
n
h
c
s
n
e
t
h
c
ü
F
n
o
g
E
d
n
lf
a
o
B
R
d
n
a
83
Page 84

CD DE MAPAS
CDs de mapas con información de ruta
Los CDs de mapas con información de ruta para destinos especiales llevan el símbolo I
en el display. Si hubiera introducido un CD de mapas de este tipo, recibirá informacio
nes adicionales acerca de muchos de los destinos especiales almacenados.
Así pues se podrá informar, por ejemplo, cuando seleccione un hotel, sobre los precios
de las habitaciones y podrá llamar al número de teléfono para hacer la reserva.
Seleccione el enclave deseado mediante una de las opciones del menú “Destino
☞
especial”.
Se mostrará la dirección del enclave seleccionado.
:
Con las teclas de cursor 8 y 2 puede ir desplazándose línea a línea en la informa
☞
ción rutera del enclave seleccionado.
Incluir el enclave seleccionado en la guía a la meta:
Sitúe el cursor sobre la dirección.
☞
Pulse la tecla OK.
☞
Seleccione entonces “Activar”.
☞
El enclave seleccionado se incluirá en la guía a la meta como dirección de destino.
:
Si no desea almacenar el enclave seleccionado como dirección de destino, seleccione
“Retorno”.
En el display aparecerá de nuevo la lista de los destinos especiales.
:
-
-
84
Page 85

MANTENIMIENTO Y CONSERVACION
Cambio de pilas
Las pilas del telemando deben ser cambiadas cuando se utilice el telemando fuera del
soporte y el sistema de navegación no reaccione más al pulsar las teclas.
Abra el compartimento de pilas que se
☞
encuentra al dorso del telemando.
Retire las pilas gastadas.
☞
Introduzca dos nuevas pilas del tipo AA
☞
(Mignon, LR 6). Preste atención a la pola
ridad correcta (impresa en el comparti
mento de pilas).
Vuelva a cerrar el compartimento de
☞
pilas.
Indicaciones:
En muchos países no está permitido desechar las pilas gastadas junto con la basura nor
A
mal. Haga el favor de informarse acerca de las disposiciones locales en materia de desecho
de pilas gastadas.
Utilice exclusivamente pilas que no se derramen. Las pilas que se derraman pueden ocasio-
A
nar daños en el telemando o en su vehículo.
Proteja el telemando contra el calor y la radiación solar directa. Las pilas se descargan
A
a altas temperaturas y existe el riesgo de derrames.
Si únicamente utiliza el telemando metido en el soporte, le recomendamos que saque
las pilas.
-
-
Español
-
Limpieza del telemando y del monitor
No utilice para la limpieza gasolina, alcohol u otros disolventes. Utilice únicamente un
paño húmedo.
85
Page 86

LOCALIZAR FALLOS
En casos muy raros, puede ocurrir que el sistema de navegación no funcione como
Usted esperaba. Antes de llamar al servicio técnico, léase detenidamente las instruccio
nes de uso y verifique la lista de comprobación, ya que una aparente avería se puede a
veces eliminar muy fácilmente.
Síntomas Posible causa / Solución
El sistema no arranca. En monitor no
indica nada.
El sistema se desconecta por sí mismo
después de un cierto tiempo de
operación.
El sistema reacciona muy lentamente a
los datos introducidos o calcula muy
despacio.
En el menú principal no se puede
seleccionar “Guía meta”.
El sistema no planea la ruta, aunque se ha
introducido una dirección de destino.
En el menú principal se puede seleccionar
sólo la opción “Stand-by” tras haber
conectado el encendido.
El número de satélites en la pantalla de
información i3 “Posición GPS” es 0.
No se oyen avisos de guía a la meta. • Compruebe si el volumen está en cero.
En el display aparece “Por favor introducir
CD” o “Por favor introd. CD correcto”.
El CD de mapas ha sido expulsado por el
sistema de navegación sin haber pulsado
la tecla W.
La dirección no se puede almacenar en la
agenda.
La guía a la meta no es exacta. Una inexactitud de aprox. 100 ft se halla dentro del margen
• Conecte el encendido del vehículo.
El encendido ya está conectado:
Sistema de navegación en el modo Stand-by
• Pulse una tecla del telemando.
El enchufe no quedó encastrado bien en el monitor.
• Coloque el monitor sobre el soporte (enchufe) hasta que
encastre correctamente.
En caso de temperaturas demasiado bajas o altas, el sistema
se desconectará por un tiempo para protegerse contra daños.
• El sistema se volverá a conectar tan pronto se haya
normalizado la temperatura.
Usted se encuentra en una zona digitalizada muy densa. Para
leer cantidades grandes de datos, el sistema necesita un
tiempo largo.
• Compruebe si ha introducido una dirección de destino.
El vehículo no se encuentra en una calle digitalizada.
• Conduzca hacia una calle digitalizada (flecha en la pantalla
de guía a la meta).
• Espere unos segundos hasta que el sistema se haya
inicializado (las opciones se mostrarán en letra normal).
• Compruebe si la antena GPS está tapada con algún objeto.
• Conduzca hacia el exterior cuando se encuentre en un
garaje, un aparcamiento o un túnel.
• Compruebe si ha introducido el CD apropiado con el rótulo
hacia arriba en el ordenador de navegación.
Puede ser que el CD esté sucio.
• Limpie el CD con un líquido de limpieza especial para CD.
Agenda completa.
• Borre de la agenda uno o más apuntes que no vaya a
necesitar.
de tolerancia.
• Si surgieran repetidas veces inexactitudes mayores, llame al
comerciante autorizado.
-
86
Page 87

LOCALIZAR FALLOS
Síntomas Posible causa / Solución
La posición indicada no coincide con la
posición real del vehículo.
Los avisos no coinciden con la situación
real del tráfico.
Reservado el derecho a introducir modificaciones técnicas. No se descartan posibles
errores.
La recepción GPS sufrió interferencias durante demasiado
tiempo (p.ej., debido a malas condiciones de recepción).
Teniendo una recepción GPS satisfactoria, la posición se
corregirá automáticamente.
• Dado el caso, espere unos cuantos minutos.
Probablemente la posición determinada por el sistema de
navegación sea incorrecta en ese momento.
La ruta puede haber cambiado eventualmente y no coincide
con la información suministrada por el CD de mapas.
Español
87
Page 88

VISTA GENERAL DE MENÚS
Opción del menú
Título del menú
Menú principal
Opción del menú
Menú
i5 Ajustes
Retorno
Ord. abordo
i4
Destino especial
Posición GPS
i3
Memoria destino
Destino
i2
Guía meta
i1 Posición actual
Cruce
¢
ª
:
:
Ruta alternativa
Listado de vías
Ciudad/Calle
País
¦
£
:
:
Aviso
Retorno
Introducir destino
Introducir destino
¦
¢
1.5 mls
AVORY BLVD
£
ª
6,5mls
02:45
Guía meta
Stand-by
88
Mounting angle
Retorno
Unidades de medida
Ord. abordo
Pantalla de guia
Servicio
Idioma
Informac. sistema
Selección de ruta
Modo SDVC
Volumen
Fecha / Hora
Display
Correción veloci.
Configuración
Ajustes
Page 89

INSTRUCCIONES DE MONTAJE
NOTAS IMPORTANTES
¡El sistema sólo debe ser montado por personal especializado debidamente formado!
A
¡Deben respetarse las normas de calidad propias de los trabajos en el automóvil!
A
¡Peligro de incendio! ¡Al taladrar debe tenerse cuidado de no dañar mazos de cables
A
ocultos ni el depósito o las conducciones de combustible!
¡No debe taladrarse nunca en piezas de la carrocería con función estructural o impor
A
tante para la seguridad!
Al montar componentes en el habitáculo debe tenerse en cuenta lo siguiente:
¡Garantizar una visión sin obstáculos para el conductor!
A
¡Peligro de lesiones en caso de accidente! ¡Los componentes no deben montarse en la
A
zona de inflado del airbag ni en la zona de impacto de la cabeza o las rodillas!
¡El equipo sólo debe montarse en vehículos con tensión de a bordo de 12 V y polo nega
A
tivo en la carrocería! ¡Peligro de fallos de funcionamiento, daños e incendio del vehículo en
caso de montaje en vehículos inadecuados (p.ej. camiones, autobuses)!
Alcance del suministro, fig. 1
1 Ordenador de navegación con bastidor de montaje universal y 2 estribos de desbloqueo
2 Monitor, conector de monitor con cable, pedestal de monitor con placa de montaje,
panel adhesivo bilateral y 4 tornillos
3 Telemando de infrarrojos
4 Soporte del telemando con material de montaje
5 Cable de señal
6 Cable de alimentación
7 Antena GPS con placa metálica y cable
8 Estribo de montaje con material de montaje
-
Español
-
Medidas de seguridad
A
¡Antes de comenzar los trabajos, desemborne el cable de masa del polo negativo de la
batería del vehículo a fin de evitar cortocircuitos! ¡Tenga en cuenta las indicaciones de seguri
dad del fabricante del vehículo (alarma, airbag, inmovilizador, codificación de la radio, etc.)!
Instalación del bastidor de montaje, Figs. 2-3
El ordenador puede montarse con el bastidor de montaje suministrado en el hueco
para radio del vehículo siempre que dicho hueco cumpla la norma DIN.
-
89
Page 90

INSTRUCCIONES DE MONTAJE
Consideraciones a tener en cuenta antes del montaje, Fig. 4:
Para acceder a la ranura de CD, delante del ordenador de navegación debe existir
–
un espacio libre de al menos 130 mm.
Para una ventilación suficiente, detrás del ordenador de navegación debe existir un
–
espacio libre de al menos 50 mm.
El ordenador debe montarse horizontalmente. Pueden seleccionarse desviaciones
–
entre -10 y +30 grados en el menú “Ángulo de montaje”, véase “Primera puesta en
marcha”. Una discrepancia mayor puede provocar fallos de funcionamiento.
¡Para un funcionamiento correcto es imprescindible una unión rígida a la carrocería!
–
Coloque el bastidor de montaje en el hueco DIN y doble hacia dentro las pestañas de
chapa correspondientes utilizando un destornillador. Asegúrese de no dañar ninguna
pieza oculta del salpicadero.
Fijación del ordenador con el estribo de montaje
Si no se puede o no se quiere montar el ordenador de navegación en un hueco DIN, es
posible montarlo en otros lugares (p.ej. en la guantera, en el maletero o bajo los
asientos) con ayuda de los estribos de montaje suministrados.
Para ello, primero es necesario destornillar los dos flejes de encaje laterales del
ordenador de navegación.
Los dos tornillos Torx se necesitan posteriormente para fijar los estribos de montaje.
Colocación del estribo de montaje, Fig. 5
1. Colocar el estribo con la pestaña troquelada en el borde posterior derecho o izquierdo de la carcasa del ordenador. Hay que asegurarse de que la pestaña rodee
completamente la chapa del ordenador.
2. Bascular el estribo hacia delante a la vez que se ejerce presión sobre el borde posterior del estribo, a fin de que haga contacto con la carcasa del ordenador.
3. Atornillar los estribos a la carcasa del ordenador utilizando los dos tornillos Torx.
A continuación, el ordenador puede atornillarse con los tornillos suministrados en el
lugar deseado.
Montaje suspendido
Si el ordenador desea montarse de forma suspendida (p.ej. debajo de la bandeja
trasera), los estribos de montaje pueden fijarse al ordenador en sentido contrario.
Montaje de la antena GPS, Figs. 6-7
La antena GPS puede montarse en el habitáculo, por ejemplo sobre el salpicadero o la
bandeja trasera. La antena debe tener un “contacto visual” directo con el cielo.
–
En los vehículos con cristales metalizados, la antena debe colocarse en la puerta del
maletero, en el techo o en el parachoques de plástico.
–
Si la base es metálica, la antena puede fijarse magnéticamente. Para ello, retire la
placa metálica situada bajo la antena y coloque la antena sobre la superficie limpia.
–
En todas las demás superficies, la placa metálica debe permanecer bajo la antena.
En ese caso, la antena se fija con la cinta adhesiva de doble cara.
Nota: ¡Durante el montaje debe respetarse una distancia mínima de 4 ‘’ a las partes
metálicas (marcos de las lunas, etc.) para garantizar el buen funcionamiento!
90
Page 91

INSTRUCCIONES DE MONTAJE
Montaje del monitor, Fig. 8
¡El monitor no debe montarse nunca en la zona de impacto de la cabeza!
A
El monitor puede montarse con el soporte suministrado, bien apoyado o bien colgado.
En caso de montaje colgado, el contenido del display debe girarse 180º (menú “Confi
guración”, opción “Display”).
Adherir el soporte del monitor
1. Atornillar la placa de montaje con los 2 tornillos de estrella debajo del soporte del
monitor.
2. Atornillar el conector del monitor al pedestal del monitor con los 2 tornillos de ca
beza avellanada, Fig. 9.
3. Enchufar el monitor al conector del monitor hasta que encaje.
4. Determinar la posición de montaje para el monitor.
5. Desenchufar de nuevo el monitor del conector.
Importante: ¡Para desenchufar el monitor es imprescindible presionar la tecla de
desbloqueo situada en la parte posterior del conector del monitor!
6. Limpiar las superficies de montaje de suciedad y grasa utilizando alcohol metílico.
7. Retirar la lámina protectora de una de las caras del panel adhesivo bilateral y pegar
el panel adhesivo sobre la cara inferior de la placa de montaje.
8. Retirar la lámina protectora de la cara inferior del panel adhesivo, colocar el soporte
del monitor sobre la superficie de montaje y apretar con fuerza.
Nota: La temperatura de montaje debe ser de al menos 60º Fahrenheit para que la
cinta adhesiva pueda desarrollar toda su fuerza de adhesión.
Atornillar directamente el soporte del monitor
Atornillar el soporte sin placa de montaje en el lugar deseado utilizando dos tornillos
adecuados.
-
-
Español
Montaje alternativo
Para ampliar las posibilidades de montaje, el monitor también puede montarse sin el
soporte suministrado:
Adhiera el monitor directamente al salpicadero sin el pedestal de monitor (p.ej. me
diante la cinta adhesiva de doble cara).
En los comercios de accesorios se venden diferentes soportes alternativos para el mon
taje del monitor.
A
¡Tenga siempre en cuenta las medidas de seguridad relativas al campo de visión del
conductor y a la zona de inflado del airbag!
-
Montaje del soporte del telemando, Figs. 10-11
Fijación del soporte con ángulo
Atornille el soporte al ángulo. Encaje o atornille el ángulo.
Adhesión del soporte con placa de plástico
Encaje el soporte en la placa de plástico. Retire la lámina protectora de la placa de plás
tico autoadhesiva. Adhiera el soporte junto con la placa de plástico y apriete con fuerza.
Nota: La temperatura de montaje debe ser de al menos 60º Fahrenheit para que la cinta
adhesiva pueda desarrollar toda su fuerza de adhesión.
-
-
91
Page 92

INSTRUCCIONES DE MONTAJE
Conexiones eléctricas, Fig. 12
Tienda todos los cables cuidadosamente. En relación con el cableado, consulte el dia
grama de conexiones de la solapa posterior y la tabla situada a continuación.
Cable de alimentación 6 (Cámara ISO A):
Patilla Color del cable Conexión
A1 negro/blanco Entrada señal del tacómetro
A2 blanco/amarillo Entrada de conmutación de la señal de marcha atrás (positivo de la luz de mar
A3 blanco/marrón Salida de conmutación de supresión de volumen (colector abierto)
A4 rojo positivo permanente + 12 V; (en su caso, a través del fusible de cable de 10 A)
A7 violeta positivo del encendido + 12 V; (sin desconexión al arrancar el motor)
A8 marrón negativo de la batería
Las señales eléctricas sólo deben conectarse a puntos de conexión adecuados en el
A
vehículo.
En caso de conexión directa a la batería, proteja el cable de positivo (cable rojo) me-
A
diante un fusible de 10A próximo a la batería (máx. 4 - 6 ‘’.
1. Conecte los extremos libres A4, A7 y A8 del cable de alimentación 6 a puntos de conexión adecuados en el vehículo, de acuerdo con el diagrama de conexiones y la tabla.
2. ¡No corte los cables no conectados: enróllelos y fíjelos! Pueden ser necesarios para el
reequipamiento de funciones adicionales.
cha atrás)
-
-
Señal del tacómetro (cámara ISO A):
Lleve el cable negro/blanco del mazo de cables al punto de toma de la señal del tacómetro.
Nota: Muchos vehículos están equipados con una señal de tacómetro en uno de los co
nectores para radio. Puede informarse al respecto en su concesionario de automóviles.
A
¡La señal del tacómetro nunca debe tomarse del sistema de control del ABS!
Señales adicionales (cámara ISO A):
Conecte el cable blanco/amarillo (A2) en un punto adecuado de la señal de marcha
atrás (cable de positivo de la luz de marcha atrás).
Conexión de los componentes del sistema
Enchufe el conector del cable del telemando en la hembrilla del cable de señal 5.
Enchufe el altavoz (accesorio) con el conector de trinquete de 3,5 mm en la hembrilla
de trinquete del cable de señal 5.
La impedancia del altavoz debe estar entre4y8ohmios.
92
-
Page 93

INSTRUCCIONES DE MONTAJE
Montaje del ordenador
1. Conecte la antena GPS.
2. Enchufe el cable de alimentación 6 en la hembrilla ISO A’ del ordenador de navegación.
3. Enchufe el cable de señal 5 en la hembrilla ISO B’ del ordenador de navegación.
4. Enchufe el conector amarillo C1 del cable del monitor en la cámara izquierda de la
hembrilla ISO C1’ del ordenador de navegación.
5. Si van a conectarse ampliaciones del sistema, primero deben juntarse todos los conecto
res individuales y después enchufarse en la cámara ISO C’ del ordenador de navegación.
Conector verde C2 (opcional): cámara central de la hembrilla ISO C2’
Conector azul C3 (opcional): cámara derecha de la hembrilla ISO C3’
6. Colocar el tope de goma en el tornillo de la parte trasera del ordenador e introducir
el ordenador en el bastidor de montaje hasta que quede encajado.
Nota: siempre debe fijarse en primer lugar el ordenador de a bordo y después
conectar la alimentación de corriente. En caso contrario existe el peligro de un
calibrado erróneo del sensor giroscópico.
-
Primera puesta en marcha
1. Vuelva a embornar la batería.
2. Restablezca el funcionamiento correcto del sistema eléctrico (reloj, ordenador de a
bordo, alarma, airbag, inmovilizador, codificación de la radio, etc.).
3. Conecte el encendido.
4. Introduzca el CD de mapas en el ordenador.
5. Introduzca las pilas (no incluidas) en el compartimento para pilas del telemando (ver
manual de instrucciones del sistema de navegación).
6. Aparque el vehículo al aire libre para obtener una recepción GPS correcta.
7. Arranque el motor.Aparecerá una indicación en el monitor (observación para el usuario).
8. Confirme la indicación para el usuario con la tecla OK del telemando. Aparecerá el menú
principal. Ahora, el ordenador de navegación se inicializa (duración 2-10 minutos aprox.).
Español
Ajuste del ángulo de montaje
Para garantizar el perfecto funcionamiento del sistema, el ordenador debe
configurarse para el ángulo de montaje existente (p.ej. en el cuadro de instrumentos).
1. En el menú “Configuración”, seleccione la opción “Ángulo de montaje”.
2. Seleccione un ángulo entre -10 y +30 grados según la situación de montaje.
El sistema no distingue entre ángulos negativos y positivos. Por ello también debe
seleccionarse un valor de “10” si el ángulo de montaje es de -10 grados.
93
Page 94

INSTRUCCIONES DE MONTAJE
Compruebe las funciones del vehículo
¡Las funciones del vehículo importantes para la seguridad sólo deben comprobarse con
A
el vehículo parado o a velocidad lenta! ¡Las pruebas siempre deben realizarse en un recinto
abierto!
Sistema de frenado, alarma, iluminación, inmovilizador, tacómetro, ordenador de a
bordo, radio (¡codificación!) y equipo de audio, reloj
Comprobación de las funciones de navegación
Con el vehículo parado, compruebe las dos funciones siguientes:
Telemando
Coloque el telemando en el soporte: Las teclas del telemando deben iluminarse.
Recepción GPS
Introduzca un destino y seleccione “Guía meta”. Seleccionar la pantalla informativa i3
“Posición GPS” y compruebe el número de satélites. Para una determinación suficien
temente precisa de la posición, el número debe estar entre4y8.
Calibración
Para la calibración automática, realice un recorrido de prueba breve (aprox. 10 minutos)
por calles digitalizadas. Cambie de dirección varias veces.
Atraviese varios cruces y observe la posición actual del vehículo en la pantalla i1 “Posición actual”. Cuando la posición indicada coincida con la posición real del vehículo, la
calibración ha finalizado.
-
Reservado el derecho a introducir modificaciones técnicas. No se descartan posibles
errores.
94
Page 95

95
Page 96

1
96
2
3
Page 97

40
A
B
20
0
80
60
053.450.3
R 1
100
234
GPS
120
140
160
NAV
C1
C'
B'
A'
A
B
A1
5
A2
ø 3,5 mm
4 - 8
A3
A7
12 V
10 A
A4
A8
97
Page 98

NAV3000 11/00 ri
 Loading...