

Page 1
media control
buttons
back
Dell™ Media Center
User’s Guide
standby
Media Center
start menu
volume
mute
recorded TV
guide
numeric
buttons
clear
more info
arrow buttons
channel/page
live TV
DVD menu
enter
NOTE: The remote control that you received with your computer may be slightly
different than the one described in this document.
NOTE: When entering text in a Media Center search or text box on a computer
running the Japanese Microsoft
operating system, you can enter extended characters using the numeric buttons.
Follow the instructions on the screen.
®
Windows® XP Media Center Edition 2005
www.dell.com | support.dell.com
Page 2

Notes and Notices
NOTE: A NOTE indicates important information that helps you make better use of your computer.
NOTICE: A NOTICE indicates either potential damage to hardware or loss of data and tells you how to avoid the
problem.
____________________
Information in this document is subject to change without notice.
© 2004 Dell Inc. All rights reserved.
Reproduction in any manner whatsoever without the written permission of Dell Inc. is strictly forbidden.
Trademarks used in this text: Dell and the DELL logo are trademarks of Dell Inc.; Microsoft and Windows are registered trademarks of Microsoft
Corporation.
Other trademarks and trade names may be used in this document to refer to either the entities claiming the marks and names or their products.
Dell Inc. disclaims any proprietary interest in trademarks and trade names other than its own.
September 2004 P/N P6712 Rev. A00
Page 3

Contents
1 Quick Start
Remote Control Buttons . . . . . . . . . . . . . . . . . . . . . . . . 6
Starting Media Center
Exiting Media Center
. . . . . . . . . . . . . . . . . . . . . . . . . 7
. . . . . . . . . . . . . . . . . . . . . . . . . 7
Playing DVDs
Playing a DVD Movie
Playing a DVD Already in Your Drive
Watching a DVD Movie in a Resized Window
Viewing Your Pictures (Digital Photos)
Viewing Pictures in Media Center
Viewing Pictures as a Slide Show
Sorting Pictures
Viewing a Slide Show With Music
. . . . . . . . . . . . . . . . . . . . . . . . . . . . . . . 7
. . . . . . . . . . . . . . . . . . . . . . . . . 7
. . . . . . . . . . . . . . . . . . 9
. . . . . . . . . . . . . . 9
. . . . . . . . . . . . . . . . . . . 9
. . . . . . . . . . . . . . . . . . . 10
. . . . . . . . . . . . . . . . . . . 10
. . . . . . . . . . . . . . . . . . . . . . . . . . . . 11
. . . . . . . . . . . . . . . . . . . 11
2 If Your Computer Has an Optional TV Tuner
Watching a TV Program . . . . . . . . . . . . . . . . . . . . . . . . . . 13
Television Program Guide
Using the Television Program Guide
Recording TV Programs
Recording a Program Using the Television Program Guide
Recording a TV Program Using the Search Option
Recording a TV Program Manually
Changing Your TV Program Guide Settings
Changing Recording Priorities
. . . . . . . . . . . . . . . . . . . . . . . . . 13
. . . . . . . . . . . . . . . . . . 14
. . . . . . . . . . . . . . . . . . . . . . . . . . 15
. . . . . . . . 15
. . . . . . . . . . . 17
. . . . . . . . . . . . . . . . . . . 19
. . . . . . . . . . . . . . . . . 20
. . . . . . . . . . . . . . . . . . . . . 20
Watching Recorded TV Programs
Playing a Recorded TV Program
. . . . . . . . . . . . . . . . . . . . . . 21
. . . . . . . . . . . . . . . . . . . . 21
Contents 3
Page 4

3 Other Features
Using My Music . . . . . . . . . . . . . . . . . . . . . . . . . . . . . . 23
Copying a CD to the Media Library
Creating a Queue and Saving it as a Playlist
Playing Music
. . . . . . . . . . . . . . . . . . . . . . . . . . . . . 24
. . . . . . . . . . . . . . . . . . . 23
. . . . . . . . . . . . . . 24
Using My Videos
Organizing Your Videos
Playing Digital Videos
Using More Programs
Sync to Device (Synchronization)
. . . . . . . . . . . . . . . . . . . . . . . . . . . . . . 26
. . . . . . . . . . . . . . . . . . . . . . . . 26
. . . . . . . . . . . . . . . . . . . . . . . . . 26
. . . . . . . . . . . . . . . . . . . . . . . . . . . 27
. . . . . . . . . . . . . . . . . . . 27
Index . . . . . . . . . . . . . . . . . . . . . . . . . . . . . . . . . . . . 29
4 Contents
Page 5
Quick Start
The Dell™ Media Center is your all-in-one computer entertainment center. Whether you want to
watch or record TV programs, play or create CDs and DVDs, or view digital photos or videos from
your video camera, Media Center does it all.
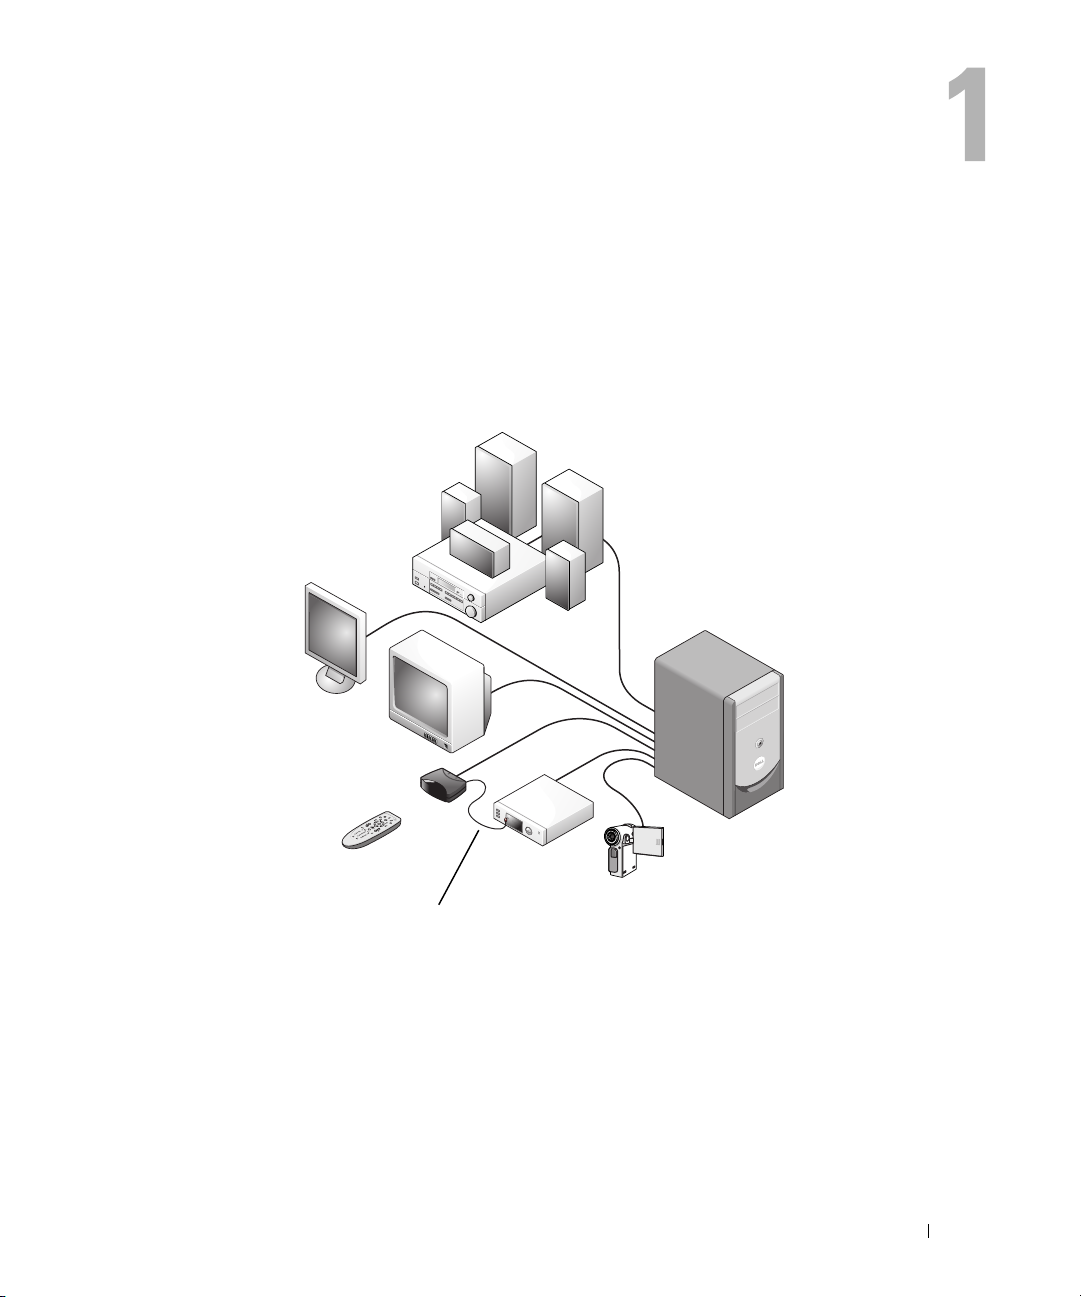
Here’s how your audio and video components work together with your Dell Media Center
computer.
speaker system
flat-panel
monitor
TV
remote sensor
remote control satellite or
infrared transmitter
cable receiver
Dell Media Center computer
digital camcorder
You use the infrared (IR) transmitter if you have connected a digital cable TV box or a satellite
receiver to your Media Center. Then, by pointing the remote control at the remote sensor you can
control Media Center functions and change channels on your television through your digital cable
TV box or satellite receiver.
The following instructions explain how to explore some of the more common functions of the
Microsoft
mouse/keyboard or the all-in-one remote control. For additional information, click
®
Windows® XP Media Center Edition 2005 operating system, using either your
?
to access the
Media Center online help.
Quick Start 5
Page 6
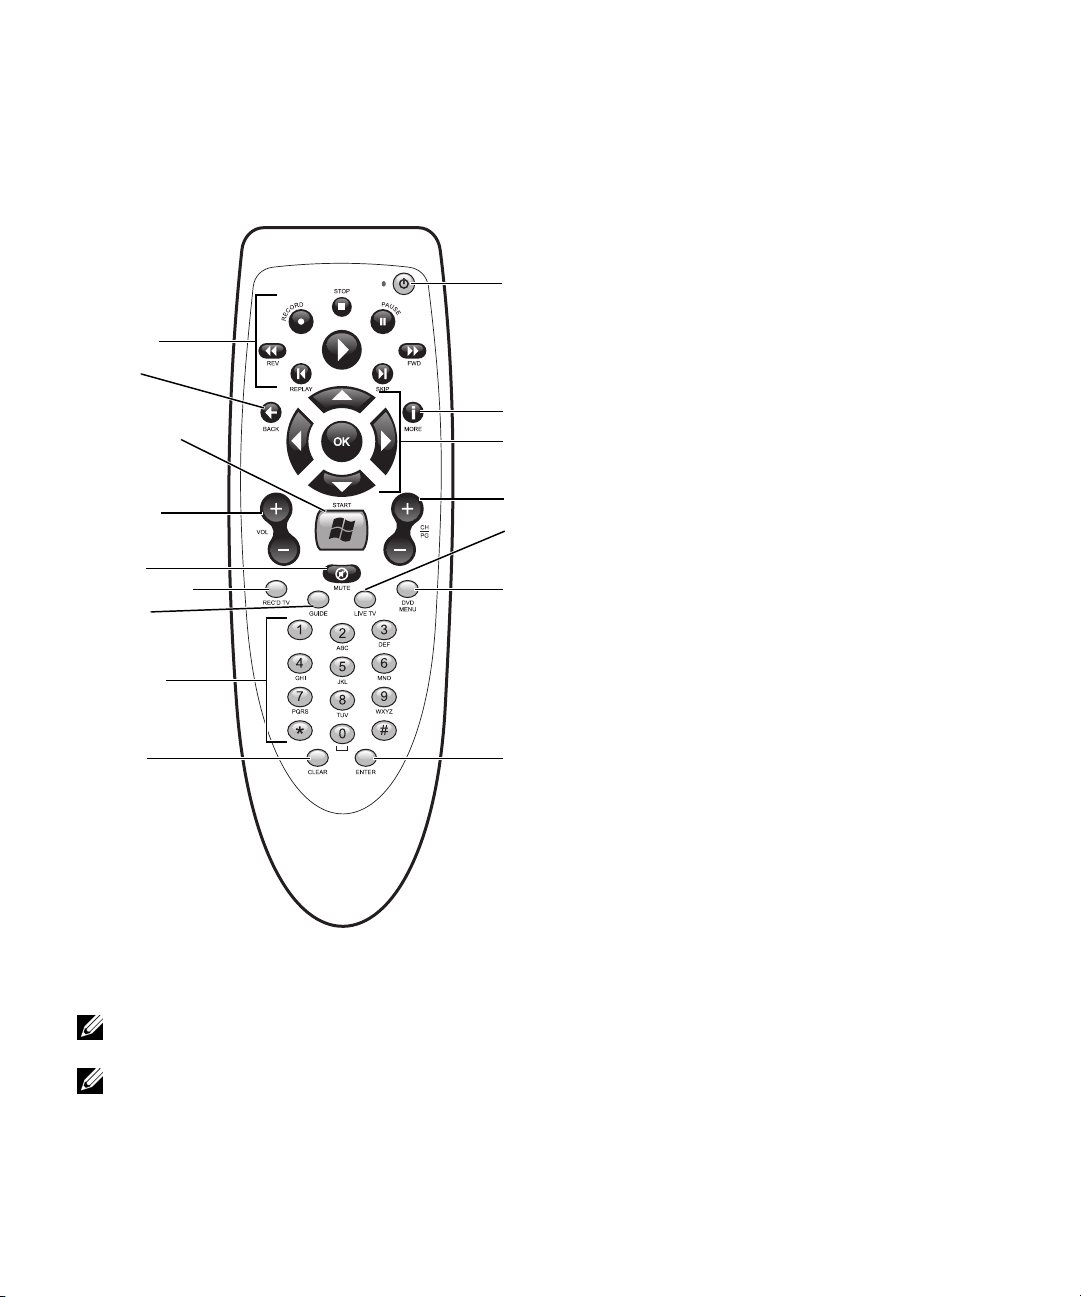
Remote Control Buttons
NOTE: The remote control that you receive with
your computer may be slightly different than the
one described in this document.
www.dell.com | support.dell.com
1
2
3
4
5
6
7
8
9
10
1 media control
buttons
2 BACK Returns the computer to the previous window
3 OK Activates Media Center options you select.
4 START Starts Media Center and opens the Media
11
5 VOL Increases (+) and decreases (–) sound
6 MUTE Mutes the sound.
7 REC’D TV
12
13
14
15
16
17
(recorded TV)
8 GUIDE Opens the Guide (television program guide)
9 numeric
buttons
10 CLEAR Deletes the selection and functions like the
11 standby Puts the computer into a reduced power
12 MORE Provides more information about TV
13 arrow buttons Helps navigate within all Media Center
14 CH/PG
(channel/page)
15 LIVE TV A shortcut to the full-screen view of live TV. It
16 DVD MENU A shortcut to the main menu for your DVD.
17 ENTER Selects the desired action or window option.
Controls features for a TV, DVD, and CD.
within Media Center.
Center start menu window (see page 7).
volume.
A shortcut to the Recorded TV main menu.
(see page 13) to display available TV channels
and programs you can watch and record.
Changes channels or enters text into the
Media Center search or text box.
NOTE: When entering text in a Media Center
search or text box on a computer running
Japanese Microsoft Windows XP, you can
enter extended characters using the numeric
buttons. Follow the instructions on the screen.
<Backspace> key on your keyboard.
mode.
programs you can watch and record.
windows.
Changes the TV channel and moves up (+)
and down (–), depending on available options.
also moves to the current point of a live TV
program after you pause the program.
6 Quick Start
Page 7
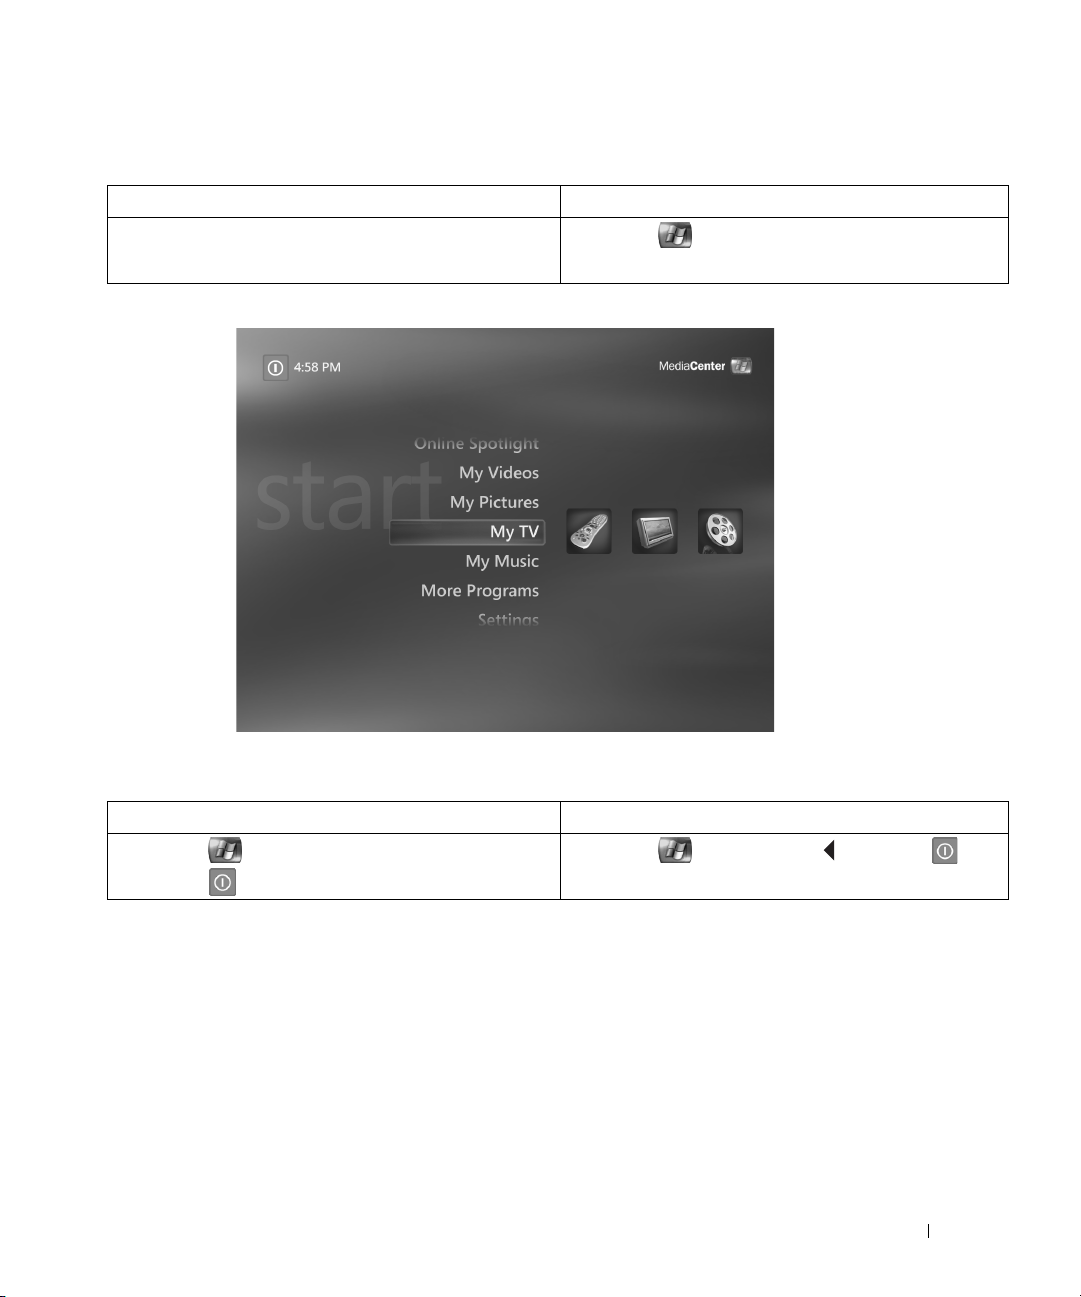
Starting Media Center
Using the Mouse and Keyboard Using the Remote Control
Click the
1
The Media Center
Start
button and click
start menu window opens.
Media Center
.
1
Press .
The Media Center
start menu window opens.
Exiting Media Center
Using the Mouse and Keyboard Using the Remote Control
Click .
1
2
Click .
1
Press and then press to move to .
2
Press the OK button.
Playing DVDs
Media Center allows you to watch DVD movies while using your remote control or mouse to
control the DVD menu items. If you play your DVD in another program, the use of some remote
control buttons is not supported.
Playing a DVD Movie
• Although Media Center supports closed captioning, subtitles, and multiple languages, these
options appear only if the DVD movie includes them.
Quick Start 7
Page 8
• If your DVD includes its own playback software, Media Center may not start when you insert
the DVD.
• To watch your DVD movie in Media Center, cancel the messages on the screen to use the
DVD player software and then start Media Center.
Using the Mouse and Keyboard Using the Remote Control
Start Media Center (see page 7).
1
2
With the Media Center start menu window
open, insert the DVD into the drive.
The DVD plays automatically after a few
www.dell.com | support.dell.com
seconds.
If you have another media playing, Media Center
asks if you want to play the DVD. If
to play the DVD, click the
an option, the DVD autoplays in full-screen
mode after a few seconds.
3
If a DVD menu appears, click the menu items
to control the DVD movie playback.
4
Click
Stop
to stop playing the DVD.
The
Stopped
menu appears with the following
options:
don’t want
X
. If you don’t click
1
Start Media Center (see page 7).
2
With the Media Center start menu window
open, insert the DVD into the drive.
The DVD plays automatically after a few
seconds.
If you have another media playing, Media Center
asks if you want to play the DVD. If you don’t
want to play the DVD, press the arrow buttons,
, to highlight the
button
.
If you don’t select an option, the DVD
autoplays in full-screen mode after a few seconds.
3
If a DVD menu appears, use the menu items to
control the DVD movie playback.
4
Press
STOP
Stopped
The
options:
X,
and then press the OK
to stop playing the DVD.
menu appears with the following
•
Resume
— Begins playing the DVD where it
was previously stopped.
•
Restart
— Begins playing the DVD at the
beginning.
•
Title Menu
— Allows you to go to the DVD
main menu, if available.
•
DVD Languages
— Allows you to change
the language for the DVD sound track,
subtitles, and menu.
Eject
•
5
To change the window size, click on the
— Opens the disc tray.
taskbar of the DVD window.
8 Quick Start
•
Resume
— Begins playing the DVD where it
was previously stopped.
•
Restart
— Begins playing the DVD at the
beginning.
•
Title Menu
— Allows you to go to the DVD
main menu, if available.
•
DVD Languages
— Allows you to change
the language for the DVD sound track,
subtitles, and menu.
Eject
•
5
To change the window size, you must use the
— Opens the disc tray.
mouse. Click on the taskbar of the DVD
window.
Page 9
Playing a DVD Already in Your Drive
Using the Mouse and Keyboard Using the Remote Control
Start Media Center (see page 7).
1
2
Click
Play DVD
.
NOTE: If you do not see the Play DVD option, press on
your keyboard to scroll through the list.
1
Start Media Center (see page 7).
2
Press the arrow buttons, , to highlight
DVD
and press the OK button.
NOTE: If you do not see the Play DVD option, scroll through
the list by pressing .
The DVD movie begins playing in full-screen
mode.
The DVD movie begins playing in full-screen
mode.
Watching a DVD Movie in a Resized Window
Using the Mouse and Keyboard Using the Remote Control
1
While the DVD movie is playing, click .
The Media Center start menu window opens
with the DVD playing in the inset window.
2
To resize the window, click on the taskbar
and then manually adjust the window size.
NOTE: If you manually resize the Media Center window, the
DVD movie plays in the same window size.
While the DVD movie is playing, press .
1
The Media Center start menu window opens
with the DVD playing in the inset window.
2
To resize the window, you must use the mouse.
Click on the taskbar and then manually
adjust the window size.
NOTE: If you manually resize the Media Center window, the
DVD movie plays in the same window size.
Play
Viewing Your Pictures (Digital Photos)
Media Center allows you to view your pictures (digital photos) individually, as a slide show, or as a
slide show with music. You must organize your pictures in the
Explorer to view them in Media Center.
My Pictures
folder in Windows
Quick Start 9
Page 10

Viewing Pictures in Media Center
Using the Mouse and Keyboard Using the Remote Control
Start Media Center (see page 7).
1
2
Click
My Pictures
.
NOTE: If you do not see the My Pictures option, press
on your keyboard to scroll through the list.
1
Start Media Center (see page 7).
2
Highlight
The right side of the window displays thumbnails
and folder icons, if you have organized your
pictures into folders.
The right side of the window displays thumbnails
3
and folder icons, if you have organized your
pictures into folders.
www.dell.com | support.dell.com
3
Click the picture or click the folder to view the
pictures inside the folder. The selected picture
opens in full-screen mode.
4
To view additional pictures not displayed in the
window, click in the window or press
on your keyboard to scroll to other pages of
picture files and folders.
Press to move through your picture files and
folder files.
4
Highlight the picture or the folder to view the
pictures inside the folder and press the OK
button. The selected picture opens in full-screen
mode.
5
To view additional pictures not displayed in the
window, press to scroll to other pages of
picture files and folders.
Viewing Pictures as a Slide Show
Using the Mouse and Keyboard Using the Remote Control
Start Media Center (see page 7).
1
2
Click
My Pictures
.
NOTE: If you do not see the My Pictures option, press
on your keyboard to scroll through the list.
Click the folder of pictures you want to view.
3
4
Click
Play slide show
to display your pictures
automatically. You can also press on the
keyboard to manually go to the next or previous
picture.
If you do not select the pictures you want to view
as a slide show, Media Center uses the first folder
listed.
1
Start Media Center (see page 7).
2
Highlight
3
Highlight the folder of pictures you want to view
and press the OK button.
4
Highlight
button to display your pictures automatically.
You can also press to manually go to the
next or previous picture.
If you do not select the pictures you want to view
as a slide show, Media Center uses the first folder
listed.
My Pictures
My Pictures
and press the OK button.
and press the OK button.
Play slide show
and press the OK
10 Quick Start
Page 11

Sorting Pictures
Using the Mouse and Keyboard Using the Remote Control
Start Media Center (see page 7).
1
2
Click
My Pictures
.
NOTE: If you do not see the My Pictures option, press
on your keyboard to scroll through the list.
Click
3
Sort by Name
or
Sort by Date
.
1
Start Media Center (see page 7).
2
Highlight
3
Highlight
My Pictures
Sort by Name
press the OK button.
Viewing a Slide Show With Music
Using the Mouse and Keyboard Using the Remote Control
1
Start Media Center (see page 7).
2
Click
My Music
.
NOTE: If you do not see the My Music option, press on
your keyboard to scroll through the list.
3
Click the song you want to play.
4
If the music doesn’t automatically start, click
on the bottom Media Center toolbar.
5
Click
.
6
Click
My Pictures
.
NOTE: If you do not see the My Pictures option, press
on your keyboard to scroll through the list.
Click the folder with the pictures you want to
7
view.
8
Click
Play slide show
.
When Media Center switches to full-screen
mode, the inset window disappears and the
music continues to play.
1
Start Media Center (see page 7).
2
Highlight
3
Highlight the song and press the OK button.
4
If the music doesn’t automatically start, press the
My Music
Play button, .
5
Press
, highlight
OK button.
6
Highlight the folder with the pictures you want
to view and press the OK button.
7
Highlight
Play slide show
button.
When Media Center switches to full-screen
mode, the inset window disappears and the
music continues to play.
8
To stop the slide show, press STOP; press STOP
again to stop the music.
and press the OK button.
or
Sort by Date
and
and press the OK button.
My Pictures
, and press the
and press the OK
9
To stop the slide show, click . To stop the
music, click
Stop
on the DVD menu.
Quick Start 11
Page 12

www.dell.com | support.dell.com
12 Quick Start
Page 13

If Your Computer Has an Optional TV Tuner
Media Center allows you to watch on your TV or your computer monitor any program offered by
your TV service provider. However, before you can watch TV using Media Center, you must
correctly set up your computer for the TV signal source (cable, satellite, and so on) and run the
software wizard. For more information on hardware setup, see the setup diagrams that came with
your computer.
NOTE: A TV tuner card is required for using the TV features.
Watching a TV Program
Using the Mouse and Keyboard Using the Remote Control
Start Media Center (see page 7).
1
2
Click
My TV
3
Click
4
To change channels, click on the
bottom Media Center toolbar or press the
channel number on your keyboard
(<Num Lock> must be enabled).
NOTE: The Media Center toolbars appear when you move
the mouse.
To minimize the TV window, click on the top
5
Media Center toolbar. You can further change the
window size with the mouse. To maximize the
TV window to full-screen mode, click on the TV
image.
Live TV
.
.
1
Start Media Center (see page 7).
2
Highlight
3
Click
4
To change channels, press the CH/PG button or
enter the channel number by using the numeric
buttons.
5
To minimize the TV window, press to return
to the Media Center start menu
return to full-screen mode, press the left-arrow
button, , to scroll down to the inset window,
and then press the OK button.
My TV
Live TV
and press the OK button.
.
window. To
Television Program Guide
Media Center provides a television program guide that allows you to scroll through a list of the
current TV programs and channels available from your TV service provider. The television program
guide displays the channel and network, as well as the program title and scheduled time block. The
number of days displayed in the television program guide depends on your TV service provider.
When you select a program title, a detailed description of the program appears at the bottom of
the window.
If Your Computer Has an Optional TV Tuner 13
Page 14

Using the Television Program Guide
• The television program guide is a shared programming schedule that is visible to all users.
When someone attempts to schedule a recording when another recording is scheduled, a
message appears explaining the conflict.
• If the television program guide is not updated, the number of calendar days displayed
decreases each day.
• You can have Media Center automatically connect to the Internet and update your television
program guide. Not all Internet Service Providers (ISPs) support this feature. Check with
your ISP.
If your ISP does not support automatic television program guide updates, you must update
www.dell.com | support.dell.com
the television program guide manually in the
television program guide at any time even if you have set up automatic updates.
• If the television program guide is not updated, the following message appears next to each
channel:
• Your TV service provider determines the number of channels and calendar days that appear.
• The television program guide does not display past TV listings.
NOTE: If you are using your remote control to navigate through Media Center, you must use the arrow
buttons to highlight a specific function.
No data available
Settings
window. You can manually update the
.
14 If Your Computer Has an Optional TV Tuner
Page 15

Using the Mouse and Keyboard Using the Remote Control
Start Media Center (see page 7).
1
2
Click
My TV
.
3
Click
Guide
.
4
To see a program description, move the cursor
over the program.
The description appears at the bottom of the
window. If you cannot see the complete
description, right-click the mouse.
5
To navigate through the channels, click in
the window or press on your keyboard. To
get to a specific channel, type the channel
number.
6
To watch a program, click the program.
7
To view upcoming programs on a specific
channel, move your cursor over the channel
1
Press the GUIDE button.
2
To see a program description, highlight the
program and the description appears at the
bottom of the window. If you cannot see the
complete description, press the MORE button.
3
To navigate through the channels, press .
To get to a specific channel, specify the channel
number by pressing the numeric buttons.
4
To watch a program, highlight the program and
press the OK button.
5
To view upcoming programs on a specific
channel, highlight the channel number and
station call letters. Future programs appear at the
bottom of the window.
You can also press to scroll through future
programs for the channels that are displayed.
number and station call letters. Future programs
appear at the bottom of the window.
You can also click in the window to scroll
through future programs for the channels that are
displayed.
Recording TV Programs
Media Center allows you to record TV programs so that you can watch them at your convenience.
You can record the program you are watching, a future program, or a program series by using the
television program guide, the
programs or a program series, you can change the priority order in the
. See "Changing Recording Priorities" on page 20.
TV
Recording a Program Using the Television Program Guide
NOTE: Depending on the time of day, some networks share the same channel. The television program
guide may display the programming for one network, which can cause recording options to be
unavailable. You may need to manually update the television program guide before scheduling a
recording.
NOTE: During scheduled recordings, you can only watch the program being recorded. If you change
channels while recording, the recording stops.
Search
option, or manually. If you schedule the recording of several
Recorded TV
If Your Computer Has an Optional TV Tuner 15
window in
My
Page 16

Using the Mouse and Keyboard Using the Remote Control
Start Media Center (see page 7).
1
2
Click
My TV.
3
Click
Guide
.
4
To navigate to the program you want to record,
click in the window or press on your
keyboard. If the program is scheduled at a future
time and does not appear, click in the window
or press on your keyboard to scroll through
www.dell.com | support.dell.com
future programs.
5
Click the program.
6
Click
Record
Record series
The
Record
to record the program or click
to record the program series.
or
Record
appears in the television program guide next to
the program.
series icon
1
Start Media Center (see page 7).
2
Highlight
3
Highlight
4
To navigate to the program you want to record,
press . If the program is scheduled at a
future time and does not appear, press to
scroll through future programs.
5
Highlight the program and press the OK button.
6
Highlight
record the program or highlight
and press the OK button
series.
The
Record
appears in the television program guide next to
the program.
NOTE: When you schedule a recording in the television
program guide, you can press the REC’D TV button once to
record a program, twice to record a series, or three times to
cancel the scheduled recording you just selected.
My TV
Guide
Record
and press the OK button.
and press the OK button.
and press the OK button to
to record the program
or
Record
series icon
Record series
16 If Your Computer Has an Optional TV Tuner
Page 17

Recording a TV Program Using the Search Option
NOTE: During scheduled recordings, you can only watch the program being recorded. If you change
channels while recording, the recording stops.
NOTE: If you go to another area in Media Center, the TV channel you last selected is displayed in the
inset window at the bottom of the window.
Using the Mouse and Keyboard Using the Remote Control
Start Media Center (see page 7).
1
2
Click
My TV.
3
Click
Search
.
A window appears with the following options:
1
Start Media Center (see page 7).
2
Highlight
3
Highlight
My TV
and press the OK button.
Search
and press the OK button.
A window appears with the following options:
Categories
•
including
well as
•
Title
— Displays general categories
Educational, Kids
, and
Sports as
subcategories to find your program.
— Displays a search box for you to
type in the program name using the
keyboard. Media Center automatically
searches for the program based on each
character you type. The more characters you
type, the more specific the search results.
•
Keyword
— Displays a search box for you to
type in a keyword using the keyboard. Media
Center automatically searches for the word
in the program title or program description
based on each character you type. The more
characters you enter, the more specific the
search results.
• When the search is complete, a list of
programs appears.
4
To navigate through the list and find the
program you want to record, click in the
window or press on your keyboard.
5
Click the program. If it is a program series, click
on the specific episode you want to record.
Categories
•
including
well as
•
Title
— Displays general categories
Educational, Kids
, and
Sports as
subcategories to find your program.
— Displays a search box for you to enter
in the program name using the numeric
buttons. Media Center automatically
searches for the program based on each
character you enter. The more characters you
enter, the more specific the search results.
•
Keyword
— Displays a search box for you to
enter in a keyword using the numeric
buttons. Media Center automatically
searches for the word in the program title or
program description based on each character
you enter. The more characters you enter, the
more specific the search results.
• When the search is complete, a list of
programs appears.
4
To navigate through the list and find the program
you want to record, press .
5
Highlight the program and press the OK button.
If it is a program series, highlight the specific
episode you want to record and press the OK
button.
If Your Computer Has an Optional TV Tuner 17
Page 18

Using the Mouse and Keyboard Using the Remote Control
Click
Record
6
Record series
The
Record
to record the specific program or
to record the program series.
or
Record
series icon
appears in the television program guide next to
the program.
NOTE: If there is a recording conflict, Media Center displays
a message and allows you to select the program you want to
record.
Click to return to the Media Center start
7
www.dell.com | support.dell.com
menu window.
6
Highlight
record the program, or highlight
and press the OK button to record the program
series.
Record
The
appears in the television program guide next to
the program.
NOTE: If there is a recording conflict, Media Center displays
a message and allows you to select the program you want to
record.
Press to return to the Media Center start
7
menu
window.
Record
and press the OK button to
or
Record series
Record series
icon
18 If Your Computer Has an Optional TV Tuner
Page 19

Recording a TV Program Manually
Media Center allows you to begin recording before the scheduled TV program begins.
Using the Mouse and Keyboard Using the Remote Control
1
Start Media Center (see page 7).
2
Click
My TV
3
Click
4
Click
5
Click
and time or keyword
.
Recorded TV
Add Recording
.
.
Create a custom recording with channel
.
• To create a custom recording by specifying
the channel and time:
– Enter the channel number by using the
numeric buttons on your keyboard.
– Click to adjust the following settings:
recording frequency, date, start and stop
times, storage, and quality options. You can
also enter start and stop times by using the
numeric buttons on the keyboard.
• To create a custom recording by specifying a
keyword:
– Use the keyboard to specify an actor’s name,
a director’s name, a movie title, or a generic
keyword.
6
When you complete the changes, click
Record
NOTE: If there is a recording conflict, Media Center displays
a message and allows you to select the program you want to
record.
Click to return to the Media Center start
7
window.
menu
1
Start Media Center (see page 7).
2
Highlight
3
Highlight
My TV
and press the OK button.
Recorded TV
button.
4
Highlight
Add Recording
button.
5
Highlight
Create a custom recording with
channel and time or keyword
button.
• To create a custom recording by specifying
the channel and time:
– Enter the channel number using the
numeric buttons on your keyboard.
– Press to select and adjust the
following settings: recording frequency, date,
start and stop times, storage, and quality
options. You can also enter start and stop
times by using the numeric buttons.
• To create a custom recording by specifying a
keyword:
.
– Use the numeric keypad to specify an actor’s
name, a director’s name, a movie title, or a
generic keyword.
6
Press the OK button to confirm each setting
change. When you complete the changes,
highlight
Record
and press the OK button.
NOTE: If there is a recording conflict, Media Center displays
a message and allows you to select the program you want to
record.
Press to return to the Media Center start
7
menu window.
and press the OK
and press the OK
and press the OK
If Your Computer Has an Optional TV Tuner 19
Page 20

Changing Your TV Program Guide Settings
Media Center allows you to change the settings for playing and recording TV programs as well as
playing DVDs. If you set up a program recording and another program is scheduled at the same
time, you can enable Media Center to resolve the conflict.
Changing Recording Priorities
Using the Mouse and Keyboard Using the Remote Control
Start Media Center (see page 7).
1
2
Click
My TV.
www.dell.com | support.dell.com
3
Click
4
Recorded TV
options:
and
Click
Sort by Date, Sort by Title, Scheduled
Add Recording
Scheduled
to display the following
.
to display the following options:
Sort by Date, Sort by Title, Series
5
Click the desired option to find the program you
want to change.
6
Click the program you want to change.
A window appears with the following options:
Cast & More
•
— Lists the cast and provides
additional information.
•
Record Settings
start and stop times and other recording
settings.
Do not Record
•
— Cancels the scheduled
recording.
•
Keep Until
— Keeps a program until you
want to remove it.
•
Other Showings
showings.
7
Click to return to the Media Center start
window.
menu
, and
History
— Displays the recording
— Lists additional program
1
Start Media Center (see page 7).
2
Highlight
3
Highlight
,
button to display the following options:
Date, Sort by Title, Scheduled
Recording
.
4
Highlight
to display the following options:
Sort by Title, Series
5
Highlight the desired option to find the
program you want to change and press the OK
button.
6
Highlight the program you want to change and
press the OK button.
A window appears with the following options:
Cast & More
•
additional information.
•
Record Settings
start and stop times and other recording
settings.
Do not Record
•
recording.
•
Keep Until
want to remove it.
•
Other Showings
program showings.
7
Press to return to the Media Center start
window.
menu
My TV
and press the OK button.
Recorded TV
and press the OK
, and
.
Scheduled
and press the OK button
Sort by Date
, and
History
.
— Lists the cast and provides
— Displays the recording
— Cancels the scheduled
— Keeps a program until you
— Lists additional
Add
Sort by
,
20 If Your Computer Has an Optional TV Tuner
Page 21

Watching Recorded TV Programs
Media Center stores all your recorded programs in
Recorded TV
. In the
Recorded TV
window, you
can sort the programs by name, date, or category. You can also delete a recorded program or
program series and check for any recording errors.
Playing a Recorded TV Program
Using the Mouse and Keyboard Using the Remote Control
Start Media Center (see page 7).
1
2
Click
My TV
.
3
Click
Recorded TV.
• A window appears with the following
options:
Sort by Date
•
— Organizes all recorded
programs by date.
•
Sort by Title
— Organizes all recorded
programs by name.
•
Scheduled
— Provides a list of all
programs scheduled to be recorded.
•
Add Recording
— Adds a program or a
program series that you want to record.
4
Click either
Sort by Date
or
Sort by Title
click the program you want to watch.
5
Click
Play
.
, and
1
Start Media Center (see page 7).
2
Highlight
3
Highlight
My TV
and press the OK button.
Recorded TV
and press the OK button.
A window appears with the following options:
Sort by Date
•
— Organizes all recorded
programs by date.
•
Sort by Title
— Organizes all recorded
programs by name.
•
Scheduled
— Provides a list of all programs
scheduled to be recorded.
•
Add Recording
— Adds a program or a
program series that you want to record.
4
Highlight either
Sort by Date
or
press the OK button.
5
Highlight the program you want to watch, and
press the OK button.
6
Highlight
Play
and press the OK button.
Sort by Title
and
If Your Computer Has an Optional TV Tuner 21
Page 22

www.dell.com | support.dell.com
22 If Your Computer Has an Optional TV Tuner
Page 23

Other Features
Using My Music
Media Center allows you to copy, organize, and play CDs or digital music files in your music library
(Media Library).
Copying a CD to the Media Library
Using the Mouse and Keyboard Using the Remote Control
Start Media Center (see page 7).
1
2
Click
My Music
3
Insert a CD.
Media Center displays the title of the CD
you inserted plus all available CDs in your
Media Library.
4
Click the CD you want to copy, and then
click
Copy CD
The copy options are displayed, including
the option that allows you to add copy
protection for your music.
5
Select the copy option you prefer.
6
Click
Copy CD
7
You are asked to confirm whether or not
you want to copy the CD into your Media
Library. Click
A message displays when the copying is
complete.
Yes
.
.
.
.
1
Start Media Center (see page 7).
2
Highlight
button.
3
Insert a CD.
Media Center displays the title of the CD
you inserted plus all available CDs in your
Media Library.
4
Highlight
button.
5
Highlight the CD you want to copy, and
then highlight
The copy options are displayed allowing
you to add copy protection for your music
or not.
6
Highlight the copy option you prefer.
7
Highlight
button.
You are asked to confirm whether or not
you want to copy the CD into your Media
Library. Highlight
button.
My Music
Copy CD
Copy CD
Copy CD
Yes
and press the OK
and press the OK
.
and press the OK
and press the OK
A message displays when the copying is
complete.
Other Features 23
Page 24

Creating a Queue and Saving it as a Playlist
The queue is a temporary list of songs to be played in
as a playlist to add to your permanent set of playlists. Once you have created the playlists, you can
access them in Media Center.
To create and save a playlist, perform the following steps:
1
Press
2
Navigate to the music you want to add to the playlist by highlighting one of the music
categories (
3
Highlight your music choice, press OK to select the music, and then select
4
www.dell.com | support.dell.com
Press the OK button.
A confirmation of your choice is displayed.
5
Repeat steps 3 and 4 until you have selected all of the music for your playlist.
6
Press the arrow buttons to navigate to the inset window in the lower-left corner of the window
to go to
7
On the
8
Press the numeric buttons to enter a name for the playlist, and then select
You will see your new playlist the next time you go to
Playing Music
You can use
artists, playlists, and genres. The following table shows how to set and play music grouped by the
album category.
My Music
, highlight
My Music
, and press the OK button.
Albums, Artists, Playlists, Songs
Queue
, and press the OK button.
Queue
screen, select
Edit Queue
to play music grouped in a variety of different categories including albums,
My Music
, or
Genres)
, and press the OK button.
, and then select
My Music
. You can create a queue and save it
Save As Playlist
Add To Queue
.
Save
.
.
.
24 Other Features
Page 25

Using the Mouse and Keyboard Using the Remote Control
1
Start Media Center (see page 7).
2
Click
3
Click
My Music
Albums
.
.
A window displays icons of all available album
titles with pictures of each album cover.
4
Click the album title/cover icon.
A window displays the following options:
Play
•
•
— Plays the selected album.
Add to Queue
— Adds the album to the
queue.
•
Create CD/DVD
— Creates a CD or a DVD
from digital music or video files on your hard
drive.
•
Edit Info
— Modifies the information about
the album.
•
Delete
— Deletes an album from the
computer.
5
Click
Play
to start playing the CD (album).
A window appears with the following options:
View Cover
•
— Organizes the albums by
cover.
•
View Queue
— Displays the queue of
albums.
•
Shuffle
— Rearranges the music tracks on
the album.
Repeat
•
•
— Replays the album.
Buy Music
— Allows you to connect to the
Internet, find CD information, and buy
music CDs.
•
Visualize
— Changes the graphics displayed
when playing music.
•
Edit Queue
— Modifies the queue.
1
Start Media Center (see page 7).
2
Highlight
3
Highlight
My Music
Albums
A window displays icons of all available album
titles with pictures of each album cover.
4
Highlight the album title/cover icon and press
the OK button.
A window displays the following options:
•
Play
— Plays the selected album.
Add to Queue
•
queue.
•
Create CD/DVD
from digital music or video files on your hard
drive.
•
Edit Info
— Modifies the information about
the album.
•
Delete
— Deletes an album from the
computer.
5
Highlight
Play
and press the OK button to start
playing the CD (album).
A window appears with the following options:
View Cover
•
cover.
•
View Queue
albums.
•
Shuffle
— Rearranges the music tracks on
the album.
•
Repeat
— Replays the album.
•
Buy Music
— Allows you to connect to the
Internet, find CD information, and buy
music CDs.
•
Visualize
— Changes the graphics displayed
when playing music.
•
Edit Queue
and press the OK button.
and press the OK button.
— Adds the album to the
— Creates a CD or a DVD
— Organizes the albums by
— Displays the queue of
— Modifies the queue.
Other Features 25
Page 26

Using My Videos
Media Center allows you to organize and play videos on your computer.
Organizing Your Videos
When you attach a digital video camera to your computer, Windows XP asks how you want to
capture the video. Various programs allow you to capture and edit video files. Most programs
automatically save the file to the
your videos into the
in Media Center. When you have placed all your videos into the
you can rename, add, delete, and organize them into folders.
www.dell.com | support.dell.com
To organize and store your videos in the
1
Click the
2
Double-click the
If you want to share your videos with others, place them in the
and store your videos in the
1
Click the
2
Under
Other Places
3
Double-click the
Playing Digital Videos
My Videos
Start
button and click
My Videos
Start
button and click
, click
Shared Video
My Videos
or
Shared Video
My Videos
My Documents
folder.
Shared Video
folder in Windows Explorer:
My Documents
Shared Documents
folder.
folder in Windows Explorer. If not, you must move
folder in Windows Explorer in order to play them
My Videos
or
Shared Video
folder,
folder in Windows Explorer:
.
Shared Video
folder. To organize
.
.
Using the Mouse and Keyboard Using the Remote Control
Start Media Center (see page 7).
1
2
Click
My Videos
.
The right side of the window displays small
images of your video files and folder icons, if you
organized your videos into folders.
3
Click an image to play the video.
The selected video plays in full-screen mode, or
the folder opens displaying a list of video files.
1
Start Media Center (see page 7).
2
Highlight
My Videos
The right side of the window displays small
images of your video files and folder icons, if you
organized your videos into folders.
3
Press to highlight an image and press the
OK button to play the video. The selected video
plays in full-screen mode, or the folder opens and
displays a list of video files.
If you want to play the video in the smaller
window, click the BACK button.
4
To view additional videos not displayed in the
window, click in the window or press
on your keyboard to scroll to other pages of video
files and folders.
If you want to play the video in the smaller
window, press the BACK button.
4
To view additional videos not displayed in the
window, press to scroll to other pages of
video files and folders.
26 Other Features
and press the OK button.
Page 27

Using More Programs
Sync to Device (Synchronization)
When you connect a universal serial bus (USB) device that is compatible with Media Center, you
are prompted to synchronize the device.
To synchronize media to a portable media device:
1
Connect your portable media device to the Media Center computer.
2
Press the START button on the remote.
3
Highlight
4
Highlight
For additional information, click
More Programs
Sync To Device
and press the OK button.
and press the OK button.
?
to access the Media Center online help.
Other Features 27
Page 28

www.dell.com | support.dell.com
28 Other Features
Page 29

Index
D
DVDs
playing, 7
resizing window, 9
I
infrared transmitter, 5
M
Media Center
controlling, 5
exiting, 7
overview, 5
start menu, 7
starting, 7
Media Library
copying CD, 23
music
playing, 24
pictures
as slide show, 10
sorting, 11
viewing, 9
viewing with music, 11
playlist
creating, 24
R
recording a TV program, 15
manually, 19
using the Search option, 17
using the television program
guide, 15
while watching a program, 21
remote control
buttons, 6
S
synchronization, 27
TV program
recording, 15
recording and the television
program guide, 15
recording and watching, 21
recording manually, 19
recording using the Search, 17
TV tuner
optional, 13
V
videos
organizing, 26
playing, 26
O
optional TV tuner, 13
P
photos
See pictures
T
television program guide
changing settings, 20
recording from, 15
using, 13
Index 29
Page 30

30 Index
 Loading...