

Page 1

Dell™ Latitude™ D531
Quick Reference Guide
Model PP04X
www.dell.com | support.dell.com
Page 2
Notes, Notices, and Cautions
NOTE: A NOTE indicates important information that helps you make better use of your computer.
NOTICE: A NOTICE indicates either potential damage to hardware or loss of data and tells you how to avoid the problem.
CAUTION: A CAUTION indicates a potential for property damage, personal injury, or death.
Abbreviations and Acronyms
For a complete list of abbreviations and acronyms, see the Glossary in your
If you purchased a Dell™ n Series computer, any references in this document to Microsoft
User’s Guide
.
®
Windows®
operating systems are not applicable.
NOTE: Some features or media may be optional and may not ship with your computer. Some features or media may not
be available in certain countries.
____________________
Information in this document is subject to change without notice.
© 2007 Dell Inc. All rights reserved.
Reproduction in any manner whatsoever without the written permission of Dell Inc. is strictly forbidden.
Trademarks used in this text: Dell, the DELL logo, Latitude, and ExpressCharge are trademarks of Dell Inc.; AMD is a trademark of
Advanced Micro Devices, Inc.; Microsoft, Outlook, and Windows are registered trademarks of Microsoft Corporation. Windows Vista and the
Windows Vista Start button are trademarks of Microsoft Corporation.
Other trademarks and trade names may be used in this document to refer to either the entities claiming the marks and names or their products.
Dell Inc. disclaims any proprietary interest in trademarks and trade names other than its own.
Model PP04X
April 2007 P/N YK560 Rev. A00
Page 3

Contents
Finding Information . . . . . . . . . . . . . . . . . . . . . . . . . . . . . . . . 5
Setting Up Your Computer
About Your Computer
Using a Battery
Troubleshooting
. . . . . . . . . . . . . . . . . . . . . . . . . . . . . . . . 9
. . . . . . . . . . . . . . . . . . . . . . . . . . . . . . . . . . 12
. . . . . . . . . . . . . . . . . . . . . . . . . . . . . . . . . 16
. . . . . . . . . . . . . . . . . . . . . . . . . . . . . 8
Contents 3
Page 4

4 Contents
Page 5
Finding Information
NOTE: Some features or media may be optional and may not ship with your computer. Some features or media may
not be available in certain countries.
NOTE: Additional information may ship with your computer.
What Are You Looking For? Find It Here
• A diagnostic program for my computer
• Drivers for my computer
• My device documentation
• Notebook System Software (NSS)
• Warranty information
• Terms and Conditions (U.S. only)
• Safety instructions
• Regulatory information
• Ergonomics information
• End User License Agreement
Drivers and Utilities Media
NOTE: The Drivers and Utilities media may be optional and
may not ship with your computer.
Documentation and drivers are already installed on your
computer. You can use the media to reinstall drivers and to
run the Dell Diagnostics (see "Dell Diagnostics" on page 17).
Readme files may be
included on your media to
provide last-minute updates
about technical changes to
your computer or advanced
technical-reference material
for technicians or
experienced users.
NOTE: Drivers and documentation updates can be found at
support.dell.com.
NOTE: The Drivers and Utilities media may be optional and
may not ship with your computer.
Dell™ Product Information Guide
• How to remove and replace parts
• Specifications
• How to configure system settings
• How to troubleshoot and solve problems
User’s Guide
Microsoft Windows Help and Support Center
1
Click
Start
or
→
Help and Support→Dell User
→
and System Guides
2
Click the
User’s Guide
System Guides
for your computer.
Quick Reference Guide 5
.
Page 6
What Are You Looking For? Find It Here
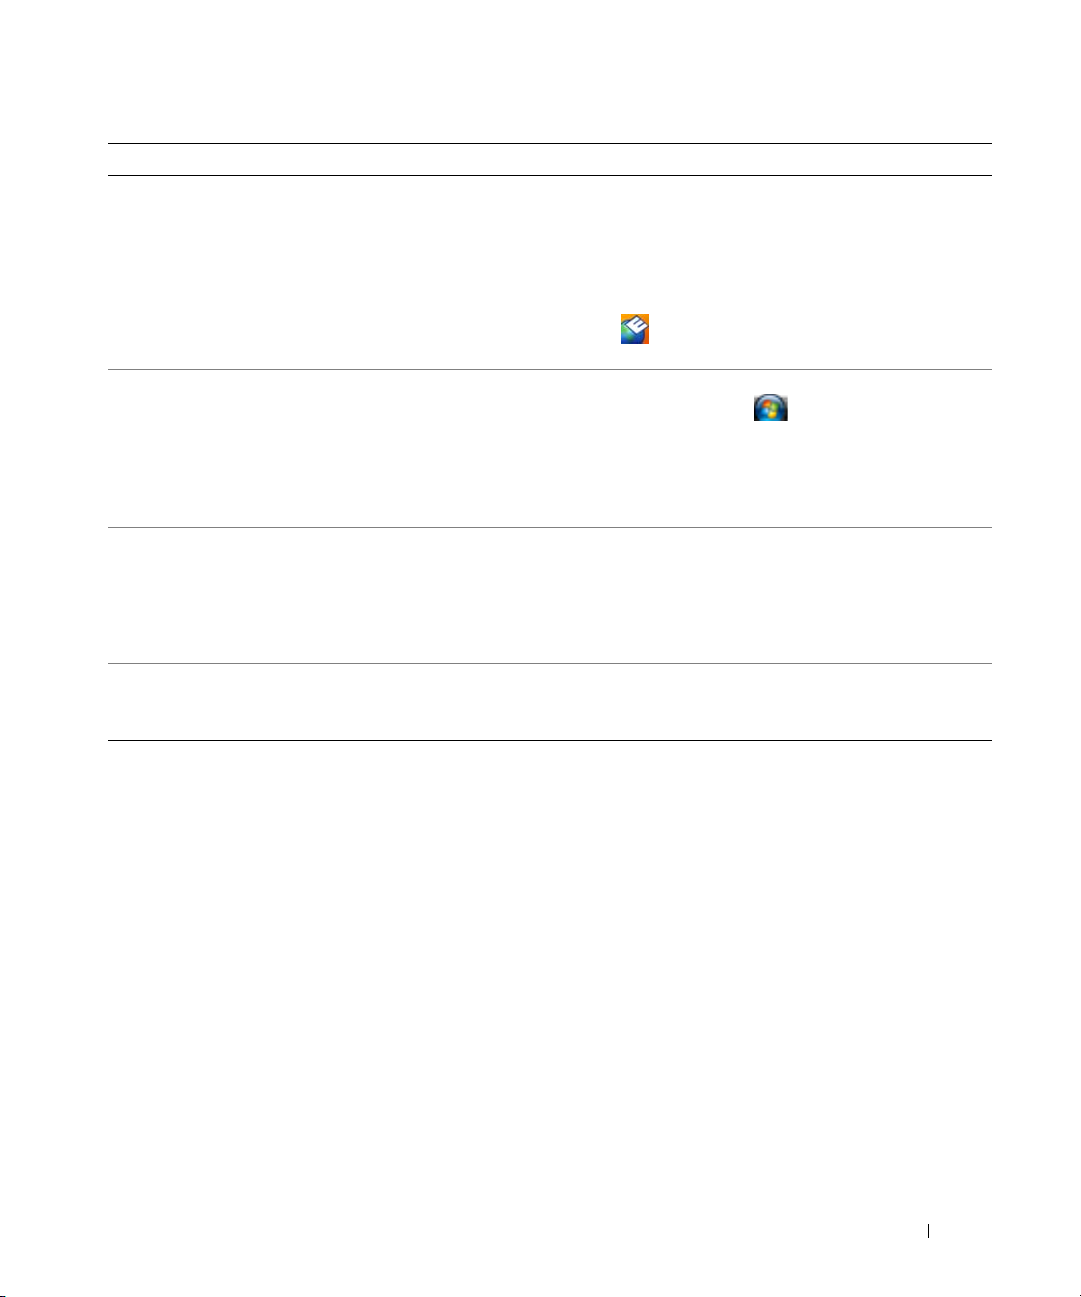
• Service Tag and Express Service Code
• Microsoft Windows License Label
Service Tag and Microsoft® Windows® License
These labels are located on your computer.
• Use the Service Tag to identify your computer when you
support.dell.com
use
• Enter the Express
Service Code to direct
your call when
contacting support.
NOTE: The Microsoft Windows License label has been
redesigned with a hole, or "security portal," as an increased
security measure.
• Solutions — Troubleshooting hints and tips, articles
from technicians, online courses, and frequently
asked questions
• Community — Online discussion with other
Dell customers
• Upgrades — Upgrade information for components, such
as memory, the hard drive, and the operating system
• Customer Care — Contact information, service call and
order status, warranty, and repair information
• Service and support — Service call status and support
history, service contract, online discussions with
technical support
• Reference — Computer documentation, details on my
computer configuration, product specifications, and
white papers
• Downloads — Certified drivers, patches, and software
updates
• Notebook System Software (NSS) — If you reinstall the
operating system for your computer, you should also
reinstall the NSS utility. NSS provides critical updates
for your operating system and support for Dell™
3.5-inch USB floppy drives, AMD™ processors,
optical drives, and USB devices. NSS is necessary for
correct operation of your Dell computer. The software
automatically detects your computer and operating
system and installs the updates appropriate for your
configuration.
Dell Support Website — support.dell.com
NOTE: Select your region or business segment to view the
appropriate support site.
To download Notebook System Software:
1
Go to
support.dell.com
segment, and enter your Service Tag
2
Select
3
Click your operating system and search for the keyword
Notebook System Software
NOTE: The support.dell.com user interface may vary
depending on your selections.
or contact support.
, select your region or business
Drivers & Downloads
.
.
and click Go.
6 Quick Reference Guide
Page 7
What Are You Looking For? Find It Here
• Software upgrades and troubleshooting hints —
Frequently asked questions, hot topics, and general
health of your computing environment
Dell Support Utility
The Dell Support Utility is an automated upgrade and
notification system installed on your computer.
This support provides real-time health scans of your
computing environment, software updates, and relevant
self-support information. Access the Dell Support Utility
from the
see "Dell Support Utility" in your
• How to use Windows operating systems
• How to work with programs and files
• How to personalize my desktop
Windows Help and Support Center
1
Click the
2
Type a word or phrase that describes your problem and
click the arrow icon.
3
Click the topic that describes your problem.
4
Follow the instructions on the screen.
• Information on network activity, the Power Management
Wizard, hotkeys, and other items controlled by Dell
QuickSet.
Dell QuickSet Help
To view
Dell QuickSet Help, right-click the QuickSet icon
in the Microsoft
For more information on Dell QuickSet, see
"Dell™ QuickSet" in your User’s Guide.
• How to reinstall my operating system
The operating system is already installed on your computer.
See "Restoring Your Operating System" in your
User’s Guide.
icon in the task bar. For more information,
Start
button or
®
Windows® task bar.
User’s Guide
→
Help and Support.
.
Quick Reference Guide 7
Page 8

Setting Up Your Computer
CAUTION: Before you begin any of the procedures in this section, follow the safety instructions in the
Product Information Guide.
1
Unpack the accessories box.
2
Set aside the contents of the accessories box, which you will need to complete the setup of your
computer.
The accessories box also contains user documentation and any software or additional hardware (such
as PC Cards, drives, or batteries) that you have ordered.
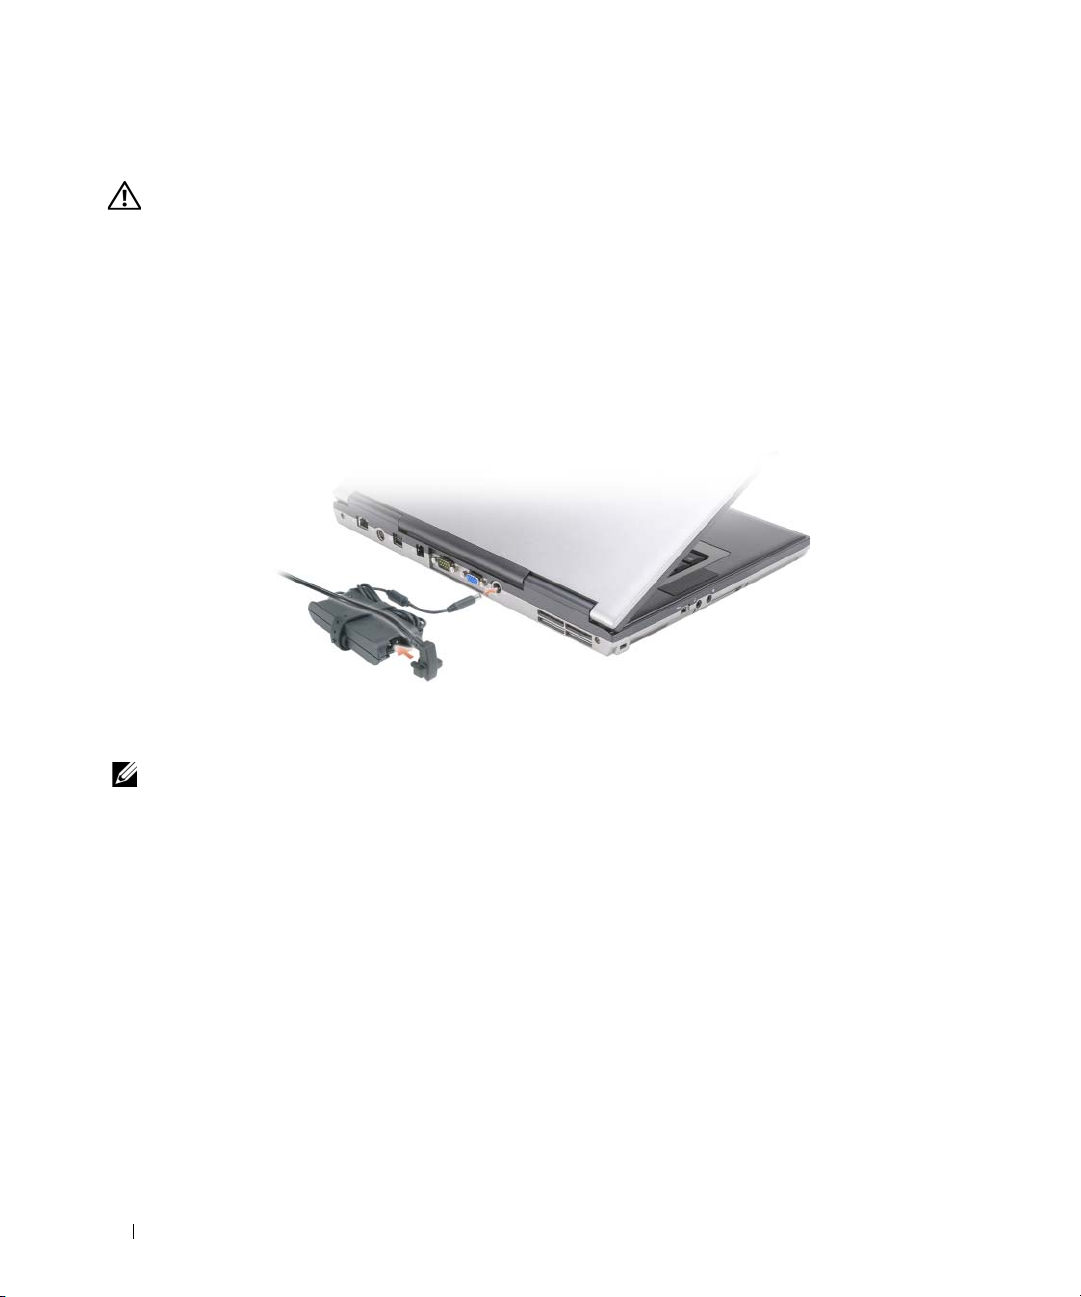
3
Connect the AC adapter to the AC adapter connector on the computer and to the electrical outlet.
4
Open the computer display and press the power button to turn on the computer (see "Front View" on
page 9).
NOTE: It is recommended that you turn on and shut down your computer at least once before you install any cards
or connect the computer to a docking device or other external device, such as a printer.
8 Quick Reference Guide
Page 9
About Your Computer
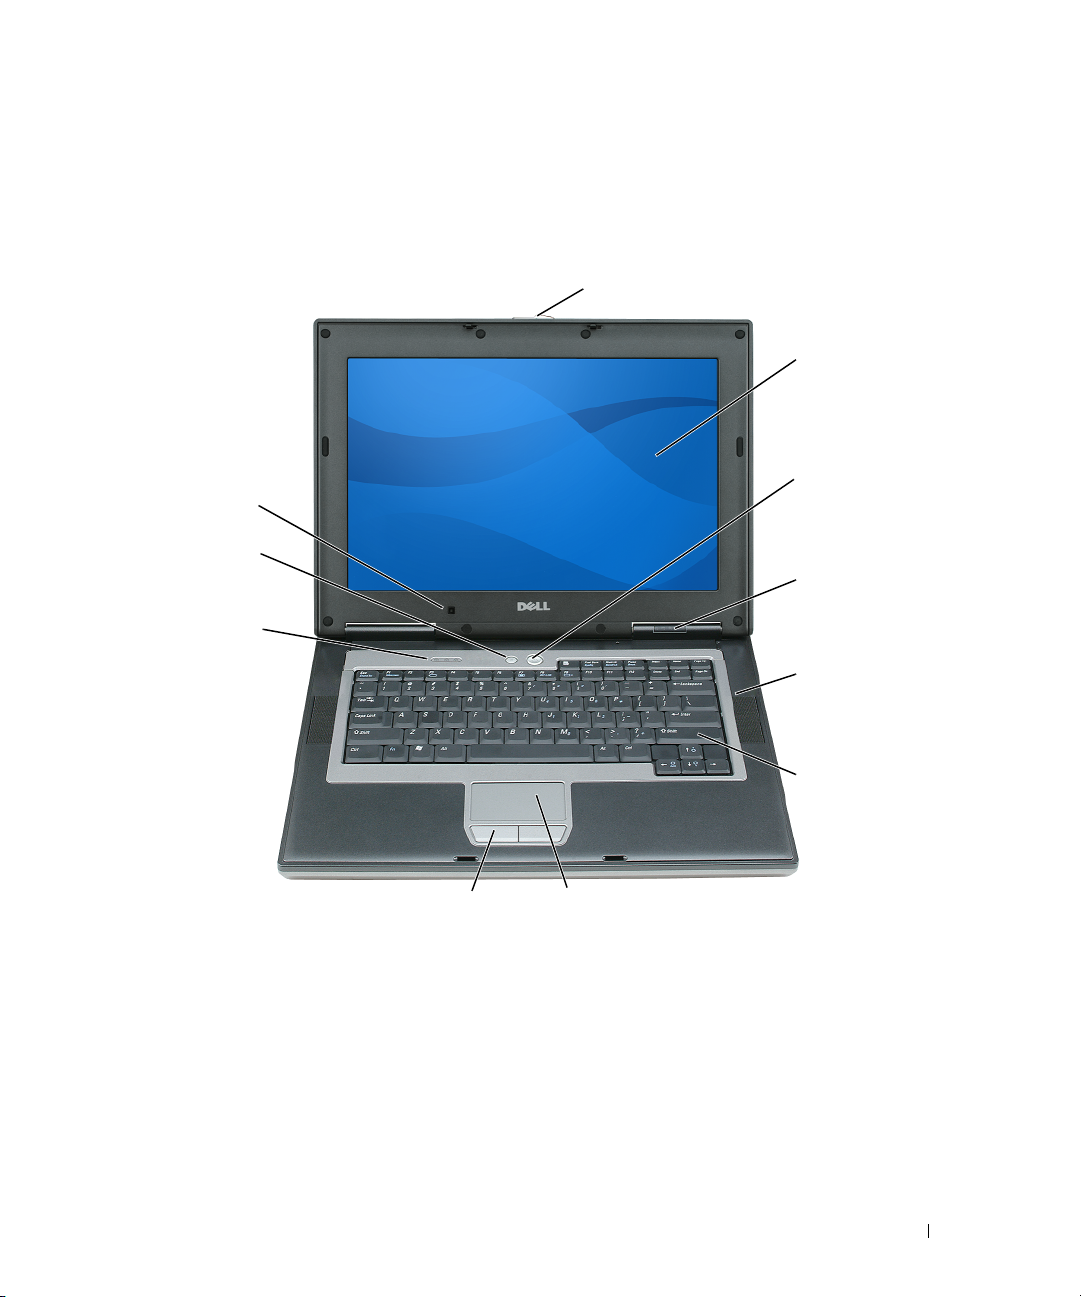
Front View
11
10
9
1
2
3
4
5
6
8
1 display latch 2 display 3 power button
4 device status lights 5 speakers (2) 6 keyboard
7 touch pad 8 touch pad buttons 9 keyboard status lights
10 wireless enable/disable
button
11 ambient light sensor
7
Quick Reference Guide 9
Page 10
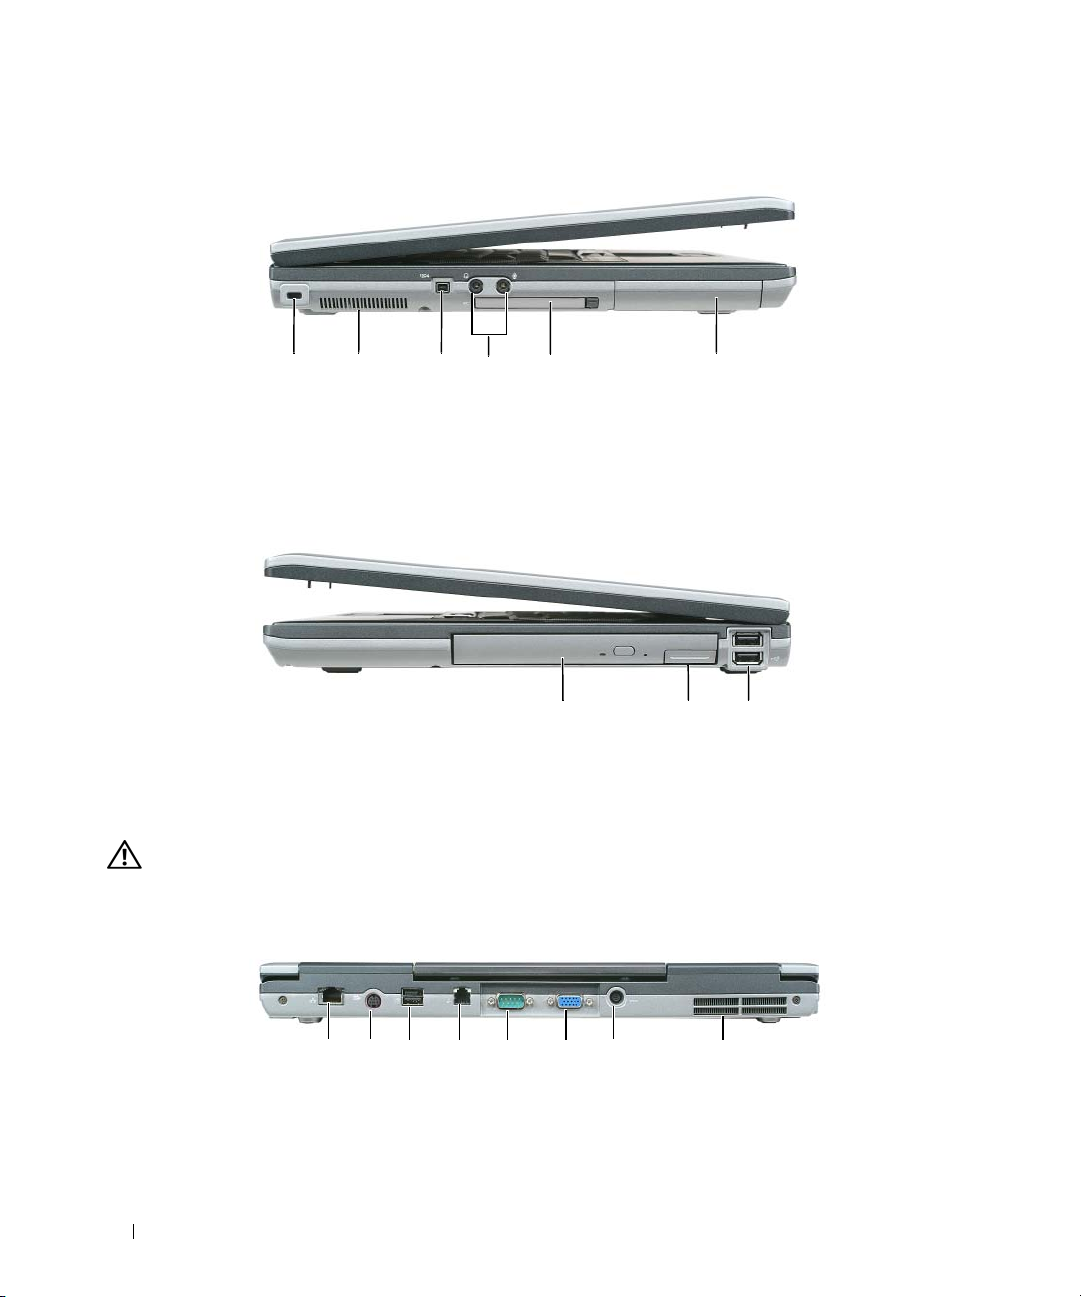
Left Side View
43 51 62
1 security cable slot 2 air vent 3 IEEE 1394 connector
4 audio connectors (2) 5 PC Card slot 6 hard drive
Right Side View
1 23
1 media bay 2 device latch release 3 USB connectors (2)
Back View
CAUTION: Do not block, push objects into, or allow dust to accumulate in the air vents. Do not store your
computer in a low-airflow environment, such as a closed briefcase, while it is running. Restricting the airflow
can damage the computer or cause a fire.
8123 4 5 6 7
1 network connector (RJ-45) 2 S-video TV-out connector 3 USB connectors (2)
4 modem connector (RJ-11) 5 serial connector 6 VGA connector
7 AC adapter connector 8 air vents
10 Quick Reference Guide
Page 11
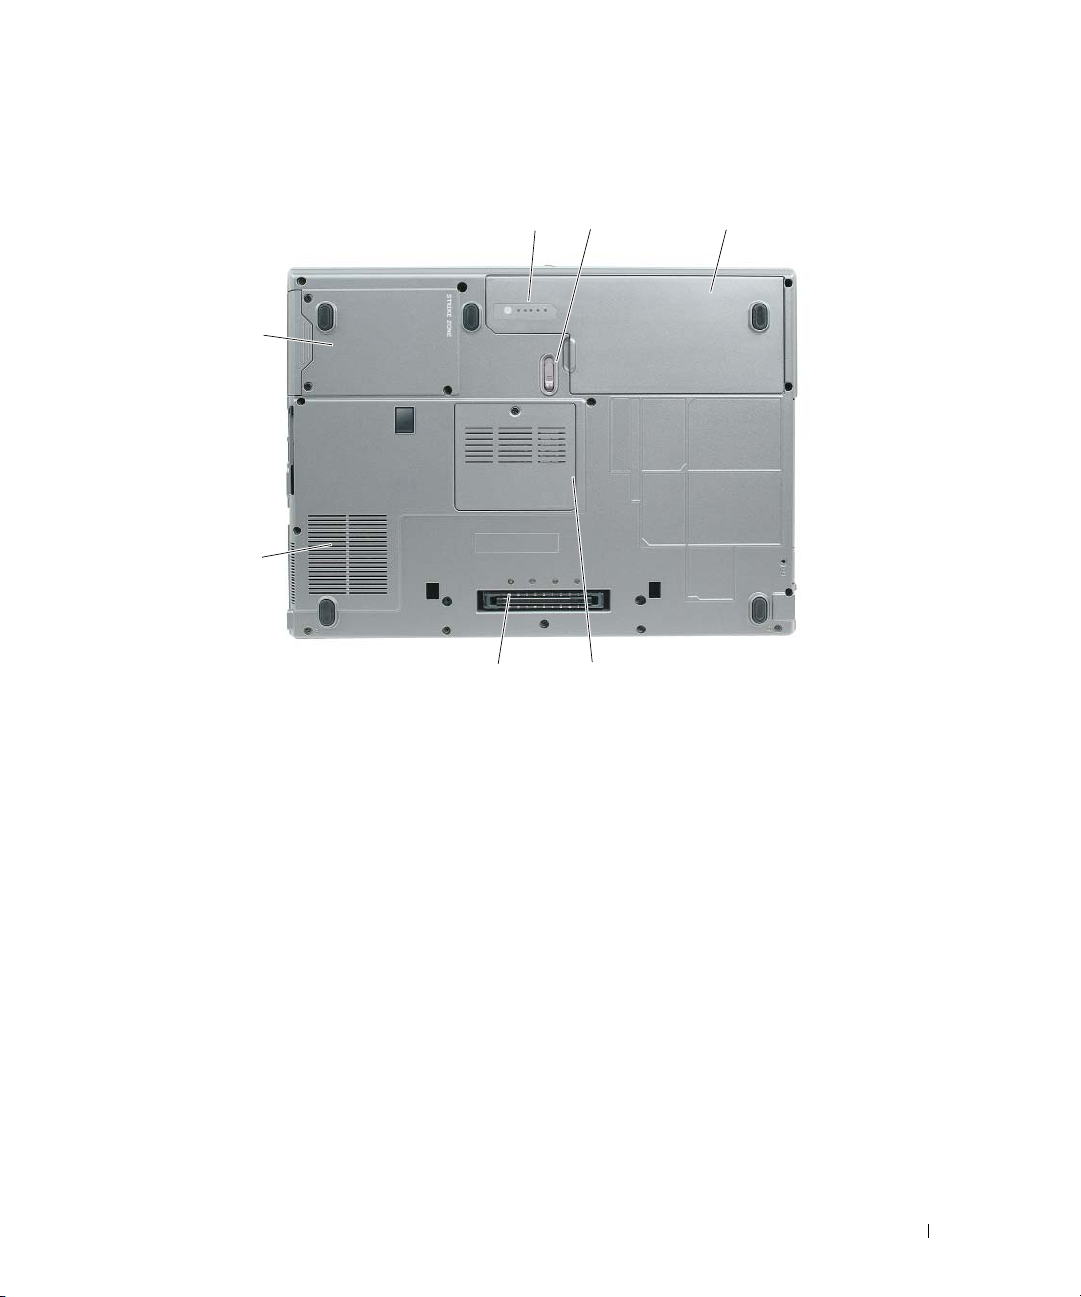
Bottom View
1 3
2
7
6
5
1 battery charge gauge 2 battery-bay latch release 3 battery
4 memory module/coin-cell battery cover 5 docking device slot 6 air vents
7 hard drive
4
Quick Reference Guide 11
Page 12

Using a Battery
Battery Performance
NOTE: For information about the Dell warranty for your computer, see the Product Information Guide or separate
paper warranty document that shipped with your computer.
For optimal computer performance and to help preserve BIOS settings, operate your Dell™ portable computer
with the main battery installed at all times. One battery is supplied as standard equipment in the battery bay.
NOTE: Because the battery may not be fully charged, use the AC adapter to connect your new computer to an electrical
outlet the first time you use the computer. For best results, operate the computer with the AC adapter until the battery is
→
fully charged. To view battery charge status, click Start
NOTE: Battery operating time (the time the battery can hold a charge) decreases over time. Depending on how
often the battery is used and the conditions under which it is used, you may need to purchase a new battery during
the life of your computer.
Battery operating time varies depending on operating conditions. You can install an optional second
battery in the media bay to significantly increase operating time.
Operating time is significantly reduced when you perform operations including, but not limited to,
the following:
• Using optical drives
• Using wireless communications devices, PC Cards, ExpressCards, media memory cards, or USB devices
• Using high-brightness display settings, 3D screen savers, or other power-intensive programs such as
complex 3D graphics applications
• Running the computer in maximum performance mode (see "Configuring Power Management
Settings" in your
User’s Guide
).
Control Panel→ Power Options→ Power Meter.
NOTE: It is recommended that you connect your computer to an electrical outlet when writing to a CD or DVD.
You can check the battery charge before you insert the battery into the computer (see "Checking the
Battery Charge" on page 13). You can also set power management options to alert you when the battery
charge is low
CAUTION: Using an incompatible battery may increase the risk of fire or explosion. Replace the battery only
with a compatible battery purchased from Dell. The lithium-ion battery is designed to work with your Dell
computer. Do not use a battery from other computers with your computer.
CAUTION: Do not dispose of batteries with household waste. When your battery no longer holds a charge, call
your local waste disposal or environmental agency for advice on disposing of a lithium-ion battery. See "Battery
Disposal" in the Product Information Guide.
CAUTION: Misuse of the battery may increase the risk of fire or chemical burn. Do not puncture, incinerate,
disassemble, or expose the battery to temperatures above 60°C (140°F). Keep the battery away from children.
Handle damaged or leaking batteries with extreme care. Damaged batteries may leak and cause personal injury
or equipment damage.
(see "Configuring Power Management Settings" in your
User’s Guide
).
12 Quick Reference Guide
Page 13
Checking the Battery Charge
The Dell QuickSet Battery Meter, the Microsoft Windows Power Meter window and icon, the
battery charge gauge and health gauge, and the low-battery warning provide information on the battery
charge.
Dell™ QuickSet Battery Meter
If Dell QuickSet is installed, press <Fn><F3> to display the QuickSet Battery Meter. The Battery Meter
displays status, battery health, charge level, and charge completion time for the battery in your computer.
For more information about QuickSet, right-click the QuickSet icon in the task bar, and click Help.
Microsoft® Windows® Power Meter
The Windows Power Meter indicates the remaining battery charge. To check the Power Meter, double-click
the icon on the task bar.
If the computer is connected to an electrical outlet, a icon appears.
Charge Gauge
By either pressing once or pressing and holding the status button on the charge gauge on the battery,
you can check:
• Battery charge (check by pressing and
• Battery health (check by pressing and
The battery operating time is largely determined by the number of times it is charged. After hundreds of
charge and discharge cycles, batteries lose some charge capacity—or battery health. That is, a battery can
show a status of "charged" but maintain a reduced charge capacity (health).
releasing
holding
the status button)
the status button)
Check the Battery Charge
To check the battery charge, press and release the status button on the battery charge gauge to illuminate
the charge-level lights. Each light represents approximately 20 percent of the total battery charge.
For example, if the battery has 80 percent of its charge remaining, four of the lights are on. If no lights
appear, the battery has no charge.
Check the Battery Health
NOTE: You can check battery health in one of two ways: by using the charge gauge on the battery as described
below and by using the Battery Meter in Dell QuickSet. For information about QuickSet, right-click the QuickSet
icon in the task bar, and click Help.
To check the battery health using the charge gauge, press and hold the status button on the battery
charge gauge for at least 3 seconds. If no lights appear, the battery is in good condition, and more than
80 percent of its original charge capacity remains. Each light represents incremental degradation. If five
lights appear, less than 60 percent of the charge capacity remains, and you should consider replacing the
battery. See "Specifications" in your User’s Guide for more information about the battery operating time.
Quick Reference Guide 13
Page 14

Low-Battery Warning
NOTICE: To avoid losing or corrupting data, save your work immediately after a low-battery warning.
Then connect the computer to an electrical outlet, or install a second battery in the media bay. If the battery runs
completely out of power, hibernate mode begins automatically.
By default, a pop-up window warns you when the battery charge is approximately 90 percent depleted.
You can change the settings for the battery alarms in QuickSet or the Power Options Properties window.
See
"Configuring Power Management Settings" in your
User’s Guide
for information about accessing
QuickSet or the Power Options Properties window.
Charging the Battery
NOTE: With Dell™ ExpressCharge™, when the computer is turned off, the AC adapter charges a completely
discharged battery to 80 percent in about 1 hour and to 100 percent in approximately 2 hours. Charge time is longer
with the computer turned on. You can leave the battery in the computer for as long as you like. The battery’s internal
circuitry prevents the battery from overcharging.
NOTE: You must use a 90-Watt AC adaptor to use ExpressCharge a 9-cell battery.
When you connect the computer to an electrical outlet or install a battery while the computer is
connected to an electrical outlet, the computer checks the battery charge and temperature. If necessary,
the AC adapter then charges the battery and maintains the battery charge.
If the battery is hot from being used in your computer or being in a hot environment, the battery may
not charge when you connect the computer to an electrical outlet.
The battery is too hot to start charging if the light flashes alternately green and orange. Disconnect
the computer from the electrical outlet and allow the computer and the battery to cool to room
temperature. Then connect the computer to an electrical outlet to continue charging the battery.
For more information about resolving problems with a battery, see "Power Problems" in your User’s Guide.
Removing the Battery
CAUTION: Before performing these procedures, turn off the computer, disconnect the AC adapter from the
electrical outlet and the computer, disconnect the modem from the wall connector and computer, and remove any
other external cables from the computer.
CAUTION: Using an incompatible battery may increase the risk of fire or explosion. Replace the battery only
with a compatible battery purchased from Dell. The battery is designed to work with your Dell™ computer. Do not
use a battery from other computers with your computer.
NOTICE: You must remove all external cables from the computer to avoid possible connector damage. For
information about replacing the second battery, which is located in the media bay, see "Using Multimedia" in your
User’s Guide.
14 Quick Reference Guide
Page 15
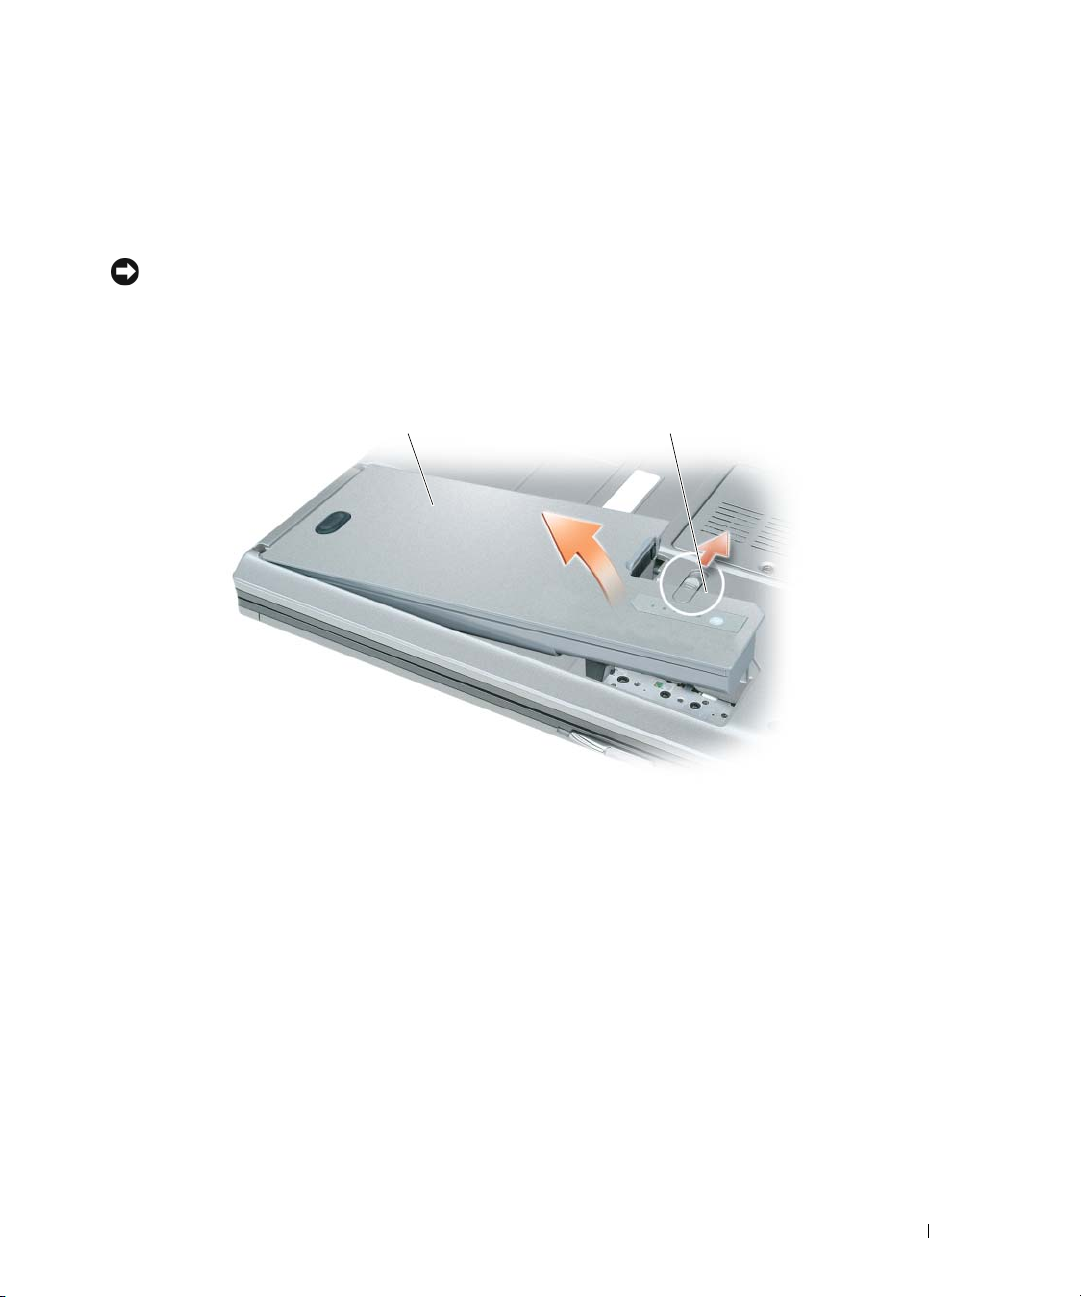
To remove the battery:
1
If the computer is connected to a docking device (docked), undock it. See the documentation that
came with your docking device for instructions.
2
Ensure that the computer is turned off, in hibernate mode, or connected to AC adapter.
NOTICE: Removing the battery in while the computer is in standby mode (without AC power) causes the computer
to shut down and may result in loss of data.
3
Slide and hold the battery-bay latch release on the bottom of the computer.
4
Lift the battery out of the battery bay.
1 2
1 battery 2 battery-bay latch release
To replace the battery, place the battery in the bay and press down until the battery-bay latch release clicks.
Storing a Battery
Remove the battery when you store your computer for an extended period of time. A battery discharges
during prolonged storage. After a long storage period, recharge the battery fully before you use it
(see "Charging the Battery" on page 14).
Quick Reference Guide 15
Page 16

Troubleshooting
Lockups and Software Problems
CAUTION: Before you begin any of the procedures in this section, follow the safety instructions in the
Product Information Guide.
The computer does not start up
ENSURE THAT THE AC ADAPTER IS FIRMLY CONNECTED TO THE COMPUTER AND TO THE ELECTRICAL OUTLET.
The computer stops responding
NOTICE: You might lose data if you are unable to perform an operating system shutdown.
URN THE COMPUTER OFF — If you are unable to get a response by pressing a key on your keyboard or moving
T
your mouse, press and hold the power button for at least 8 to 10 seconds until the computer turns off.
Then restart your computer.
A program stops responding or crashes repeatedly
NOTE: Software usually includes installation instructions in its documentation or on a floppy disk or CD.
E
ND THE PROGRAM —
1
Press <Ctrl><Shift><Esc> simultaneously.
2
Click
Task Manager
3
Click
Applications
4
Click the program that is no longer responding.
5
Click
End Task
CHECK THE SOFTWARE DOCUMENTATION — If necessary, uninstall and then reinstall the program.
.
.
.
A program is designed for an earlier operating system version
RUN THE PROGRAM COMPATIBILITY WIZARD — The Program Compatibility Wizard configures a program
so that it runs in an environment similar to non-Windows XP operating system environments.
1
Click
Start→
2
Follow the instructions on the screen.
A solid blue screen appears
TURN THE COMPUTER OFF — If you are unable to get a response by pressing a key on your keyboard or
All Programs→
Accessories→
Program Compatibility Wizard→
Next
.
moving your mouse, press and hold the power button for at least 8 to 10 seconds until the computer
turns off. Then restart your computer.
16 Quick Reference Guide
Page 17

Other software problems
CHECK THE SOFTWARE DOCUMENTATION OR CONTACT THE SOFTWARE MANUFACTURER FOR TROUBLESHOOTING
INFORMATION —
• Ensure that the program is compatible with the operating system installed on your computer.
• Ensure that your computer meets the minimum hardware requirements needed to run the software.
See the software documentation for information.
• Ensure that the program is installed and configured properly.
• Verify that the device drivers do not conflict with the program.
• If necessary, uninstall and then reinstall the program.
BACK UP YOUR FILES IMMEDIATELY.
SE A VIRUS- SCANNING PROGRAM TO CHECK THE HARD DRIVE, FLOPPY DISKS, OR CDS .
U
AVE AND CLOSE ANY OPEN FILES OR PROGRAMS AND SHUT DOWN YOUR COMPUTER THROUGH THE Start MENU.
S
S
CAN THE COMPUTER FOR SPYWARE — If you are experiencing slow computer performance, you frequently
receive pop-up advertisements, or you are having problems connecting to the Internet, your computer
might be infected with spyware. Use an anti-virus program that includes anti-spyware protection (your
program may require an upgrade) to scan the computer and remove spyware. For more information, go to
support.dell.com and search for the keyword spyware.
RUN THE DELL DIAGNOSTICS — See "Dell Diagnostics" on page 17. If all tests run successfully, the error
condition is related to a software problem.
Dell Diagnostics
CAUTION: Before you begin any of the procedures in this section, follow the safety instructions in the
Product Information Guide.
When to Use the Dell Diagnostics
If you experience a problem with your computer, perform the checks in "Lockups and Software
Problems" on page 16 and run the Dell Diagnostics before you contact Dell for technical assistance.
It is recommended that you print these procedures before you begin.
NOTICE: The Dell Diagnostics works only on Dell™ computers.
NOTE: The Drivers and Utilities Media is optional and may not ship with your computer.
Start the Dell Diagnostics from either your hard drive or from the Drivers and Utilities media.
Starting the Dell Diagnostics From Your Hard Drive
The Dell Diagnostics is located on a hidden diagnostic utility partition on your hard drive.
NOTE: If your computer cannot display a screen image, contact Dell (see "Contacting Dell" in your User’s Guide).
NOTE: If the computer is connected to a docking device (docked), undock it. See the documentation that came
with your docking device for instructions.
Quick Reference Guide 17
Page 18

1
Ensure that the computer is connected to an electrical outlet that is known to be working properly.
2
Turn on (or restart) your computer.
3
Start the Dell Diagnostics in one of the following two ways:
a
When the DELL™ logo appears, press <F12> immediately. Select
Diagnostics
from the boot
menu and press <Enter>.
NOTE: If you wait too long and the operating system logo appears, continue to wait until you see the
Microsoft
NOTE: Before attempting option b, the computer must be powered down completely.
Press and hold the <Fn> key while powering the computer on.
b
NOTE: If you see a message stating that no diagnostics utility partition has been found, run the
Dell Diagnostics from the Drivers and Utilities media.
®
Windows® desktop; then, shut down your computer and try again.
The computer runs the Pre-boot System Assessment (PSA), a series of initial tests of your system
board, keyboard, display, memory, hard drive, and so on.
• During the assessment, answer any questions that appear.
• If failures are detected during the Pre-boot System Assessment, write down the error code(s) and
see "Contacting Dell"
4
If the Pre-boot System Assessment completes successfully, you will receive the message, "
Dell Diagnostic Utility Partition
5
Press any key to start the Dell Diagnostics from the diagnostics utility partition on your hard drive.
Starting the Dell Diagnostics From the Drivers and Utilities Media
1
Insert the
2
Shut down and restart the computer.
Drivers and Utilities
in your User’s Guide
Media.
.
.
Press any key to continue"
Booting
.
When the DELL logo appears, press <F12> immediately.
NOTE: If you wait too long and the operating system logo appears, continue to wait until you see the
Microsoft
®
Windows® desktop; then, shut down your computer and try again.
NOTE: The next steps change the boot sequence for one time only. On the next start-up, the computer boots
according to the devices specified in the system setup program.
3
When the boot device list appears, highlight
4
Select the
5
Ty p e 1 to start the menu and press <Enter> to proceed.
6
Select
Boot from CD-ROM
Run the 32 Bit Dell Diagnostics
the version appropriate for your computer.
7
When the Dell Diagnostics
18 Quick Reference Guide
CD/DVD/CD-RW Drive
and press <Enter>.
option from the menu that appears and press <Enter>.
from the numbered list. If multiple versions are listed, select
Main Menu
appears, select the test you want to run.
Page 19
Dell Diagnostics Main Menu
1
After the Dell Diagnostics loads and the
Main Menu
screen appears, click the button for the option
you want.
NOTE: It is recommended that you select Test System to run a complete test on your computer.
Option Function
Test Memory
Test System
Exit
2
After you have selected the
NOTE: It is recommended that you select Extended Test from the menu below to run a more thorough check
of devices in the computer.
Option Function
Express Test
Extended Test
Custom Test
Symptom Tree
Runs the stand-alone memory test
Runs System Diagnostics
Exits the Diagnostics
Test System
Performs a quick test of devices in the system. This typically can take
10 to 20 minutes.
Performs a thorough check of devices in the system. This typically can
take an hour or more.
Use to test a specific device or customize the tests to be run.
This option allows you to select tests based on a symptom of the
problem you are having. This option lists the most common symptoms.
option from the main menu, the following menu appears.
3
If a problem is encountered during a test, a message appears with an error code and a description of the
problem. Write down the error code and problem description and contact Dell (see Contacting Dell in
your
User’s Guide
NOTE: The Service Tag for your computer is located at the top of each test screen. If you contact Dell,
technical support will ask for your Service Tag.
).
Quick Reference Guide 19
Page 20

4
If you run a test from the
Custom Test
or
Symptom Tree
option, click the applicable tab
described in the following table for more information.
Tab Function
Results Displays the results of the test and any error conditions encountered.
Errors Displays error conditions encountered, error codes, and the problem
description.
Help Describes the test and may indicate requirements for running the test.
Configuration Displays your hardware configuration for the selected device.
The Dell Diagnostics obtains configuration information for all devices
from system setup, memory, and various internal tests, and it displays
the information in the device list in the left pane of the screen. The
device list may not display the names of all the components installed
on your computer or all devices attached to your computer.
Parameters Allows you to customize the test by changing the test settings.
5
When the tests are complete, close the test screen to return to the
Diagnostics and restart the computer, close the
6
Remove the Dell
Drivers and Utilities
media (if applicable).
Main Menu
screen.
Main Menu
screen. To exit the Dell
20 Quick Reference Guide
Page 21

Index
A
anti-virus software, 17
B
battery
charge gauge, 13
charging, 14
checking the charge, 13
performance, 12
power meter, 13
removing, 14
storing, 15
C
computer
crashes, 16
stops responding, 16
D
Dell Diagnostics
about, 17
starting from the Drivers and
Utilities Media, 18
starting from the hard
drive, 17
using, 17
Dell support site, 6
diagnostics
Dell, 17
documentation
End User License
Agreement, 5
ergonomics, 5
online, 6
Product Information Guide, 5
regulatory, 5
safety, 5
User’s Guide, 5
warranty, 5
E
End User License
Agreement, 5
ergonomics information, 5
H
hardware
Dell Diagnostics, 17
Help and Support Center, 7
help file
Windows Help and Support
Center, 7
L
labels
Microsoft Windows, 6
Service Tag, 6
M
Media
Drivers and Utilities, 5
P
problems
blue screen, 16
computer crashes, 16
computer does not start up, 16
computer stops responding, 16
Dell Diagnostics, 17
lockups, 16
program crashes, 16
program stops responding, 16
programs and Windows
compatibility, 16
software, 16-17
Product Information Guide, 5
Q
QuickSet Help, 7
R
regulatory information, 5
ResourceCD
Dell Diagnostics, 17
Index 21
Page 22

S
safety instructions, 5
Service Tag, 6
software
problems, 16-17
support website, 6
system views
back, 10
bottom, 10-11
front, 9
left side, 10
right side, 10
T
troubleshooting
Dell Diagnostics, 17
Help and Support Center, 7
lockups and software
problems, 16
U
User’s Guide, 5
W
warranty information, 5
Windows
Help and Support Center, 7
Program Compatibility
Wizard, 16
wizards
Program Compatibility
Wizard, 16
22 Index
Page 23

Dell™ Latitude™ D531
Priručnik za brzo snalaženje
Model PP04X
www.dell.com | support.dell.com
Page 24

Napomena, obavijest i oprez
NAPOMENA:
računalo.
OBAVIJEST:
možete izbjeći.
OPREZ:
NAPOMENA označava važne informacije koje vam pomažu da na što bolji način iskoristite svoje
OBAVIJEST označava ili moguće oštećenje hardvera ili gubitak podataka i informira vas kako taj problem
OPREZ označava moguću opasnost od kvarova, fizičkih ozljeda ili smrtnih slučajeva.
Skraćenice i akronimi
Cijeli popis skraćenica i kratica potražite u Glosaru u Priručniku za korisnika.
™
Ako ste kupili Dell
u ovom dokumentu.
NAPOMENA:
značajke ili mediji možda nisu dostupni u određenim zemljama.
računalo iz Serije n, za vas ne vrijede reference operativnih sustava Microsoft® Windows®
Neke značajke ili mediji mogu biti neobavezni i možda se neće isporučivati s vašim računalom. Neke
____________________
Informacije u ovom dokumentu podložne su promjeni bez prethodne najave.
© 2007 Dell Inc. Sva prava pridržana.
Bilo kakva reprodukcija bez pisane dozvole tvrtke Dell Inc. strogo je zabranjena.
Trgovački znakovi koji se koriste u ovom tekstu: Dell, i DELL logotip, Latitude, i ExpressCharge su zaštitne marke Dell Inc.; AMD je zaštitna
marka Advanced Micro Devices, Inc.; Microsoft, Outlook i Windows su zaštitne marke Microsoft Corporation. Windows Vista i
Windows Vista Start button su zaštitne marke Microsoft Corporation.
U dokumentu se možda koriste i drugi trgovački znakovi i zaštićeni nazivi koji označavaju ili entitete koji su vlasnici tih znakova ili njihove
proizvode. Dell Inc. odriče se bilo kakvih vlasničkih interesa za navedene trgovačke znakove i zaštićene nazive, osim vlastitih.
Model PP04X
Travanj 2007. P/N YK560 Rev. A00
Page 25

Sadržaj
Pronalaženje informacija
Postavljanje računala
O vašem računalu
Korištenje baterije
Rješavanje problema
. . . . . . . . . . . . . . . . . . . . . . . . . . . .
. . . . . . . . . . . . . . . . . . . . . . . . . . . . . .
. . . . . . . . . . . . . . . . . . . . . . . . . . . . . .
. . . . . . . . . . . . . . . . . . . . . . . . . . . .
. . . . . . . . . . . . . . . . . . . . . . . . . .
27
30
31
34
38
Sadržaj
25
Page 26

26
Sadržaj
Page 27
Pronalaženje informacija
NAPOMENA:
Neke značajke ili mediji možda nisu dostupni u određenim zemljama.
NAPOMENA:
Što tražite? Pronađite to ovdje
•
Dijagnostički program za moje računalo
•
Upravljačke programe za moje računalo
•
Dokumentaciju za moje računalo
•
Softver za sustav prijenosnog računala (NSS)
•
Informacije o jamstvu
•
Uvjete i pravila korištenja (samo za SAD)
•
Sigurnosne upute
•
Regulatorne informacije
•
Informacije o ergonomiji
•
Licenčni sporazum s krajnjim korisnikom
Neke značajke ili mediji mogu biti neobavezni i možda se neće isporučivati s vašim računalom.
S vašim se računalom mogu isporučiti dodatne informacije.
Medij Drivers and Utilities
NAPOMENA:
ga nećete dobiti prilikom kupnje računala.
Dokumentacija i upravljački programi već su instalirani na
vašem računalu. Medije možete koristiti za ponovno instaliranje
upravljačkih programa i za pokretanje Dell Diagnostics (vidi “Dell
Diagnostics” Na stranici 39).
NAPOMENA:
ga nećete dobiti prilikom kupnje računala.
Dell™ priručnik s informacijama o proizvodu
Medij
Medij
Drivers and Utilities
Readme datoteke su uključene na
mediju za omogućavanje
posljednjih ažuriranja tehničkih
promjena na računalu ili dodatnih
tehničkih uputa za tehničare ili
iskusne korisnike.
NAPOMENA:
informacije o upravljačkim
programima i dokumentaciji možete
pronaći na
Drivers and Utilities
nije obavezan i možda
Najnovije
support.dell.com
nije obavezan i možda
.
•
Kako ukloniti i zamijeniti dijelove
•
Specifikacije
•
Kako konfigurirati postavke sustava
•
Kako rješavati i riješiti probleme
Korisnički priručnik
Centar za pomoć i podršku sustava Microsoft Windows
1
Pritisnite
podrška)
priručnici i priručnici za sustav Dell)
(Priručnici za sustav).
2
Kliknite na
računalo.
Start
ili
→
Help and Support
→
Dell User and System Guides
User’s Guide
(Priručnik za korisnika) za svoje
Priručnik za brzo snalaženje
(Pomoć i
(Korisnički
→
System Guides
27
Page 28

Što tražite? Pronađite to ovdje
•
Servisna oznaka i Express kod usluge
•
Oznaka za Microsoft Windows licencu
Licence Service Tag i Microsoft® Windows
Ovi natpisi se nalaze na vašem računalu.
•
Servisnu oznaku koristite za identifikaciju računala prilikom
korištenja web-stranice
službi za podršku.
•
Express kod usluge unesite
za usmjeravanje poziva
prilikom kontaktiranja službi
za podršku.
support.dell.com
®
ili kontaktiranja
•
Rješenja — Upute i savjeti za otklanjanje kvarova,
tehnički članci, tečajevi na Internetu i česta pitanja
•
Community — Online rasprava s ostalim Dell
korisnicima
•
Upgrades — Informacije za nadogradnju
komponenata, poput memorije, tvrdog diska te
operativnog sustava
•
Customer Care — Kontakt informacije, servisni pozivi
i stanje narudžbe, jamstva te informacije o popravcima
•
Service and support — Status poziva za servis i
prethodne pružene podrške, servisni ugovor, online
diskusije s tehničkom podrškom
•
Reference — Dokumentacija računala, pojedinosti o
konfiguraciji računala, specifikacije proizvoda i bijeli
papiri
•
Downloads — Certificirani upravljački programi,
zakrpe te ažuriranja softvera
•
Notebook System Software (NSS) — Ako instalirate
operativni sustav na svoje računalo, trebali biste
instalirati i NSS upravljački program. NSS omogućuje
nužno ažuriranje operativnog sustava i podršku za
™
3.5-inčni USB disketni pogon, AMD
Dell
™
procesore, optičke pogone i USB uređaje. NSS je
neophodan za ispravan rad vašeg Dell računala.
Softver automatski prepoznaje vaše računalo i
operativni sustav i instalira ažuriranja koja odgovaraju
vašoj konfiguraciji.
NAPOMENA:
Oznaka licence Microsoft Windows ima novi
izgled s otvorom ili “sigurnosnim portalom”, koji čini pojačanu
sigurnosnu zaštitu.
Web-stranica za podršku Dell-u — support.dell.com
NAPOMENA:
Odaberite odjeljak za područja ili poduzeća za
prikaz odgovarajuće stranice podrške.
Za preuzimanje Notebook System Software (Softver za sustav
prijenosnog računala):
1
Idite na
support.dell.com
, odaberite svoju regiju ili poslovni
segment i unesite svoju servisnu oznaku.
2
Odaberite
učitavanje) i kliknite na
3
Kliknite na svoj operativni sustav i potražite ključnu riječ
Notebook System Software
NAPOMENA:
Drivers & Downloads
Go
(Kreni).
.
Korisničko sučelje
(Upravljački programi i
support.dell.com
može se
razlikovati ovisno o vašim odabirima.
28
Priručnik za brzo snalaženje
Page 29
Što tražite? Pronađite to ovdje
•
Nadogradnje sustava i savjeti za rješavanje
problema — Često postavljana pitanja, vruće teme i
općenito zdravlje vaše računalne okoline
Dell Support Utility (Uslužni program za podršku)
Dell Support Utility (Uslužni program za podršku) je
automatizirani sustav nadogradnje i obavješćivanja instaliran na
vaše računalo. Omogućuje skeniranje stanja vaše računalne
okoline u realnom vremenu, ažuriranje softvera i daje relevantne
informacije za samostalnu podršku.
ikone na alatnoj traci. Više
“Dell Support Utility”
•
Kako koristiti operativni sustav Windows
•
Kako koristiti programe i datoteke
•
Kako prilagoditi radnu površinu
Windows centar za pomoć i podršku
1
Kliknite na
Start
(Pomoć i podrška).
2
Utipkajte riječ ili frazu koja opisuje vaš problem i pritisnite
ikonu sa strelicom.
3
Pritisnite temu koja opisuje vaš problem.
4
Slijedite upute na ekranu.
•
Informacije o mrežnoj aktivnosti, Čarobnjak
upravljanja energijom, hotkey i druge stavke koje
kontrolira Dell QuickSet.
Dell QuickSet Help (QuickSet pomoć)
Za prikaz
Dell QuickSet Help, desnom tipkom miša kliknite
ikonu QuickSet na alatnoj traci Microsoft
Više informacija o Dell QuickSet potražite na “Dell
u Priručniku za korisnika.
•
Kako ponovno instalirati operativni sustav
Operativni sustav je već instaliran na vašem računalu. Vidi
“Restoring Your Operating System” (Obnavljanje operativnog
sustava) u Priručniku za korisnika.
Programu pristupite preko
informacija potražite u poglavlju
Priručnika za korisnike
(Kreni) ili
→
.
Help and Support
®
Windows®.
™
QuickSet”
Priručnik za brzo snalaženje
29
Page 30
Postavljanje računala
OPREZ:
informacijama o proizvodu
1
Otpakirajte kutiju s dodatnom opremom.
2
Sa strane ostavite sadržaj kutije s dodatnom opremom koji će vam trebati za dovršavanje postavljanja
računala.
U kutiji s dodatnom opremom nalazi se i dokumentacija za korisnika i sve programe i dodatni hardver
(npr. PC kartice, upravljački pogoni ili baterije) koje ste naručili.
3
Spojite AC adapter na priključak za AC adapter na računalu i na električnu utičnicu.
4
Otvorite zaslon računala i pritisnite gumb za uključivanje/isključivanje kako biste uključili računalo (vidi
“Prikaz sprijeda” Na stranici 31).
Prije nego započnete bilo koji postupak u ovom odjeljku slijedite sigurnosne upute u
.
Priručniku s
NAPOMENA:
spojite računalo na uređaj za spajanje ili drugi vanjski uređaj, poput pisača.
30
Priručnik za brzo snalaženje
Preporuča se da uključite i isključite računalo barem jednom prije nego instalirate bilo koju karticu ili
Page 31

O vašem računalu
Prikaz sprijeda
11
10
9
1
2
3
4
5
6
8
1 brava za otvaranje zaslona 2 zaslon 3 gumb za
4 statusne lampice 5 zvučnici (2) 6 tipkovnica
7 touch pad 8 touch pad tipke 9 statusne lampice tipkovnice
10 gumb za
omogućavanje/onemogućavanje
bežičnog povezivanja
11 senzor za osvijetljenost
prostora
7
uključivanje/isključivanje
Priručnik za brzo snalaženje
31
Page 32

Prikaz lijeve strane
43 51 62
1 sigurnosni utor za kabel 2 ventilacijski otvor 3 IEEE 1394 priključak
4 audio priključci (2) 5 utor za PC Card 6 tvrdi disk
Prikaz desne strane
1 23
1 odjeljak 2 brava za otpuštanje uređaja 3 USB priključci (2)
Prikaz stražnje strane
OPREZ:
da se u njima nagomila prašina. Uključeno računalo ne odlažite na mjestima sa slabom ventilacijom, na
primjer u kovčegu. Ograničeni protok zraka može uzrokovati kvar na računalu ili požar.
1 mrežni priključak (RJ-45) 2 S-video TV-out priključak 3 USB priključci (2)
4 modemski priključak (RJ-11) 5 serijski priključak 6 VGA priključak
7 priključak AC adaptera 8 ventilacijski otvori
32
Priručnik za brzo snalaženje
Ventilacijske otvore nemojte blokirati, nemojte u njih gurati različite predmete i nemojte dopustiti
8123 4 5 6 7
Page 33

Prikaz dna
1 3
2
7
6
5
1 mjerač napunjenosti baterije 2 brava na pregradi za bateriju 3 baterija
4 memorijski modul/poklopac za ćeliju
baterije
7 tvrdi disk
5 utor uređaja za spajanje 6 ventilacijski otvori
4
Priručnik za brzo snalaženje
33
Page 34

Korištenje baterije
Učinak baterije
NAPOMENA:
zasebnom dokumentu s jamstvom koji ste dobili s računalom.
Za optimalan rad računala te za čuvanje BIOS postavke, neka glavna baterija bude uvijek instalirana dok radite na
svom Dell
™
prijenosnom računalu. Jedna baterija je isporučena kao serijska oprema u utoru za baterije.
NAPOMENA:
računalo priključili na električnu utičnicu prilikom prvog korištenja računala. Za najbolje rezultate koristite računalo s AC
adapterom dok u potpunosti ne napunite bateriju. Za pregled statusa baterije kliknite na
Power Options→
NAPOMENA:
tome koliko se često koristi baterija i uvjetima u kojima se koristi, možda ćete morati kupiti novu bateriju za vrijeme
životnog vijeka računala.
Vrijeme rada baterije varira ovisno o uvjetima rada. Možete instalirati i dodatnu bateriju u pregradu za
bateriju kako biste značajno povećali operativno vrijeme.
Vrijeme rada se znatno smanjuje kada izvodite operacije koje uključuju, ali nisu ograničene na, sljedeće:
•
Korištenje optičkih pogona
•
Korištenje bežičnih uređaja za komunikaciju, kartica ExpressCard, media memory kartica ili USB uređaja
•
Korištenje postavki velike svjetline zaslona, 3D čuvari zaslona i ostali programi koji zahtijevaju mnogo
energije, poput složenih 3D grafičkih aplikacija
•
Rad računala na maksimalno podešenoj snazi (vidi “Configuring Power Management Settings”
(Konfiguriranje postavki upravljanja napajanjem) u
Informacije o Dell jamstvu za svoje računalo potražite u
Budući da baterija možda nije u potpunosti napunjena, koristite AC adapter kako biste svoje novo
Power Meter
Operativno vrijeme baterije (vrijeme koje baterija ima energije) smanjuje se s vremenom. Ovisno o
.
Priručniku za korisnika
Priručniku s informacijama o proizvodu
Start→
Control Panel→
ili
).
NAPOMENA:
Preporuča se povezati računalo na mrežu napajanja prilikom snimanja na CD ili DVD.
Prije umetanja baterije u računalo možete provjeriti njenu napunjenost (vidi “Provjera napunjenosti baterije”
Na stranici 35). Također možete podesiti opcije za kontrolu napajanja koje će vas upozoriti kada vam se
baterija ispraznila
napajanjem) u
OPREZ:
isključivo s kompatibilnom baterijom kupljenom u tvrtci Dell. Litium-ionske baterije izrađene su za rad u
Dell računalima. Bateriju iz drugog računala nemojte koristiti u svom računalu.
OPREZ:
agenciju za zbrinjavanje otpada ili agenciju za očuvanje okoliša kako bi vas savjetovali o zbrinjavanju
litij-ionskih baterija. Vidi “Zbrinjavanje baterija” u
OPREZ:
paliti, rastavljati ili izlagati temperaturama iznad 60°C (140°F). Držite bateriju izvan dosega djece. Postupajte
pažljivo s oštećenim baterijama ili onima koje cure. Oštećene baterije mogu curiti i prouzročiti ozljede ljudi
ili štetu na opremi.
34
Priručnik za brzo snalaženje
(vidi “Configuring Power Management Settings” (Konfiguriranje postavki upravljanja
Priručniku za korisnika
Korištenje nekompatibilne baterije može povećati rizik od požara ili eksplozije. Bateriju zamijenite
Ne bacajte baterije u kućni otpad. Kada vam se baterija potpuno isprazni, kontaktirajte lokalnu
Pogrešna upotreba baterije može povećati rizik od požara ili kemijskih opeklina. Nemojte je bušiti,
).
Priručniku s informacijama o proizvodu
.
Page 35

Provjera napunjenosti baterije
Dellov QuickSet mjerač napunjenosti baterije, Microsoft Windows Power Meter (Mjerač napajanja) i ikona
mjerač napunjenosti baterije i mjerač ispravnosti, a upozorenje o ispražnjenosti baterije daje
,
informaciju o napunjenosti baterije.
Dell™ QuickSet mjerač napunjenosti baterije
Ako je instaliran Dell QuickSet, pritisnite <Fn><F3> za prikaz QuickSet Mjerača napunjenosti baterije. Mjerilo
napunjenosti baterije prikazuje status, zdravlje baterije, razinu napunjenosti te vrijeme dovršetka napunjenosti za
bateriju u vašem računalu.
Za više informacija o QuickSet desnom tipkom miša kliknite na ikonu na alatnoj traci i zatim na Help
(Pomoć).
Microsoft® Windows® Mjerač napajanja
Windows Mjerač napajanja pokazuje preostalo punjenje baterije. Za provjeru mjerača dvaput kliknite
na ikonu na alatnoj traci.
Ako je računalo uključeno u utičnicu, pojavljuje se ikona
Mjerač napunjenosti
Bilo da pritisnete jednom ili pritisnete i držite statusni gumb na mjeraču napunjenosti na bateriji, možete
provjeriti:
•
Napunjenost baterije (provjerite pritiskom i
•
Status baterije (provjeri pritiskom i
držanjem
otpuštanjem
statusnog gumba)
Vrijeme rada baterije je uvelike određeno brojem punjenja. Nakon stotina ciklusa punjenja i pražnjenja,
baterije gube kapacitet punjenja—ili zdravlje baterije. To znači da baterije mogu pokazivati da su
“napunjene”, ali imati smanjeni kapacitet punjenja (zdravlje).
.
statusnog gumba)
Provjerite punjenja baterije
Kako biste provjerili napunjenost baterije, pritisnite i otpustite statusni gumb na mjeraču napunjenosti
baterije kako bi osvijetlili razinu punjenja. Svaka lampica predstavlja otprilike 20 posto ukupne
napunjenosti baterije. Primjerice, ukoliko su upaljene četiri lampice, baterija je puna još 80 %. Ako nema
lampica, baterija je prazna.
Provjera zdravlja baterije
NAPOMENA:
bateriji, kako je opisano ispod i korištenjem mjerača baterije u Dellovom QuickSetu. Za informacije o QuickSet-u,
denom tipkom miša kliknite na ikonu QuickSet ina alatnoj traci i zatim na
Zdravlje baterije možete provjeriti na jedan od dva načina: korištenjem mjere napunjenosti na
Help
(Pomoć).
Kako biste provjerili stanje baterije pomoću mjerača napunjenosti, pritisnite i držite statusni gumb na
mjeraču napunjenosti baterije najmanje 3 sekunde. Ako se ne pojavi nijedno svjetlo, baterija je u dobrom
stanju, te ostaje više od 80 posto njenog originalnog kapaciteta punjenja. Svaka lampica predstavlja
postupno opadanje. Ukoliko se pojavi pet lampica, ostalo je manje od 60 posto kapaciteta napajanja, te biste
trebali razmisliti o zamjeni baterije. Vidi “Specifications” (Specifikacija) u Priručniku za korisnika za
dodatne informacije o vremenu rada baterije.
Priručnik za brzo snalaženje
35
Page 36

Upozorenje o praznoj bateriji
OBAVIJEST:
upozorenja. Zatim računalo uključite u utičnicu ili u pregradu za medije instalirajte drugu bateriju. Ukoliko se baterija
potpuno isprazni, način rada hibernacije se odmah uključi.
Kako biste izbjegli gubljenje ili oštećenje podataka, spremite svoj rad odmah nakon što čujete ton
Vidi Konfiguracija postavki za upravljanje energijom za informacije o pristupu prozoru Power Options
Properties (Značajke opcija napajanja). Postavke za alarme baterije možete promijeniti u QuickSetu ili
prozoru Svojstva mogućnosti napajanja. Vidi
postavki za upravljanje napajanjem) u
ili Power Options Properties
Priručniku za korisnika
(Opcijama napajanja).
“Configuring Power Management Settings” (Konfiguriranje
za sve informacije o pristupu prozoru QuickSet
Punjenje baterije
NAPOMENA:
bateriju na 80 posto za 1 sat i na 100 posto za oko 2 sata. Vrijeme punjenja je dulje ako je računalo uključeno.
Bateriju u računalu možete ostaviti koliko god želite. Interni sklopovi baterije sprečavaju prekomjerno punjenje
baterije.
NAPOMENA:
Kada spojite računalo na izvor napajanja ili instalirate bateriju dok je računalo priključeno na izvor energije,
računalo provjerava napunjenost baterije i temperaturu. Po potrebi, AC adapter zatim puni bateriju i
odražava bateriju punom.
Ukoliko je baterija vruća od korištenja u računalu ili je u vrućem okolišu, baterija se možda neće puniti kada
priključite računalo na izvor napajanja.
Baterija je prevruća za punjenje ako lampica svijetli naizmjence zeleno i narančasto. Isključite računalo
iz izvora napajanja i dopustite računalu i bateriji da se ohladi na sobnu temperaturu. Zatim priključite
računalo na izvor napajanja kako biste nastavili puniti bateriju.
Više informacija o rješavanju problema s baterijom potražite u poglavlju “Power Problems” (Problemi s
napajanjem) u Priručniku za korisnika.
Pomoću Dell™ ExpressCharge™ kad je računalo isključeno, AC adapter puni potpuno ispražnjenu
Potrebno je koristiti AC adapter od 90 vata za korištenje ExpressCharge baterije od 9 ćelija.
Vađenje baterije
36
OPREZ:
računala, isključite modem iz zidnog konektora i računala, te uklonite sve vanjske kabele iz računala.
OPREZ:
isključivo s kompatibilnom baterijom kupljenom u tvrtci Dell. Baterija je proizvedena da radi u vašem Dell
računalu. Bateriju iz drugog računala nemojte koristiti u svojem računalu.
OBAVIJEST:
informacija o zamjeni druge baterij, koja se nalazi u pretincu za medije potražite u poglavlju “Using Multimedia”
(Korištenje multimedije) u
Priručnik za brzo snalaženje
Prije nego provedete ove postupke, isključite računalo, odvojite AC adapter iz izvora napajanja i
Korištenje nekompatibilne baterije može povećati rizik od požara ili eksplozije. Bateriju zamijenite
Morate ukloniti sve vanjske kabele iz računala kako bi izbjegli moguća oštećenja konektora. Više
Priručniku za korisnika
.
Page 37

Za uklanjanje baterije:
1
Ako je računalo spojeno na uređaj za spajanje, isključite ga. Vodite računa da je računalo isključeno.
2
Provjerite je li računalo ugašeno, na stand-by-u ili je priključeno na AC adapter.
OBAVIJEST:
računala i može doći do gubitka podataka.
3
Izvucite i držite poklopac za otvaranje pretinca za bateriju na donjoj strani računala.
4
Podignite i izvadite bateriju iz pretinca za bateriju.
Uklanjanje baterije dok je računalo u stanju mirovanja (bez mrežnog napajanja) uzrokuje isključenje
1 2
1 baterija 2 brava na pregradi za bateriju
Za zamjenu baterije bateriju postavite u odjeljak i pritisnite dok zasun na odjeljku baterije ne škljocne.
Pohrana baterije
Izvadite bateriju kada pohranjujete računalo na duži period. Baterija se prazni za vrijeme duljeg stajanja.
Nakon dužeg razdoblja pohrane, potpuno napunite bateriju (vidi prije korištenja “Punjenje baterije” Na
stranici 36).
Priručnik za brzo snalaženje
37
Page 38

Rješavanje problema
Zaključavanje i problemi s programima
OPREZ:
informacijama o proizvodu
Računalo se ne uključuje
P
ROVJERITE JE LI
Računalo prestaje reagirati
OBAVIJEST:
I
SKLJUČ ITE RAČ UNALO
pritisnite i držite gumb za napajanje najmanje 8 do 10 sekundi dok se računalo ne isključi. Zatim ponovno
pokrenite računalo.
Program prestaje reagirati ili se stalno ruši
NAPOMENA:
Z
ATVORITE PROGRAM
1
Istodobno pritisnite <Ctrl><Shift><Esc>.
2
Kliknite na
3
Kliknite na
4
Pritisnite program koji više ne reagira.
5
Pritisnite
P
ROVJERITE DOKUMENTACIJU SOFTVERA
Prije nego započnete bilo koji postupak u ovom odjeljku slijedite sigurnosne upute u
.
AC
ADAPTER Č VRSTO PRIKLJUČ EN NA RAČ UNALO I NA ELEKTRIČ NU UTIČ NICU
Postoji mogućnost da izgubite podatke Ako ne možete zatvoriti operativni sustav.
—
Ako ne dobijete odgovor pritiskom na tipku na tipkovnici ili pomicanjem miša,
Softver obično uključuje upute za instalaciju u svojoj dokumentaciji ili na disketi ili CD-u.
—
Task Manager
Applications
End Task
(Upravitelj zadacima).
(Aplikacije).
(Završi zadatak).
—
Po potrebi deinstalirajte i zatim ponovno instalirajte program.
Priručniku s
.
Program je izrađen za ranije inačice operativnog sustava inačica
P
OKRENITE ČAROBNJAKA ZA KOMPATIBILNOST PROGRAMA
—
Čarobnjak za kompatibilnost programa
konfigurira program tako da ga pokreće u okruženju sličnom operativnom sustavu ne-Windows XP.
1
Kliknite na
Wizard
2
Slijedite upute na ekranu.
Start→
All Programs
(Svi programi)→
Accessories
(Čarobnjak za kompatibilnost programa)→ Next
(Dodaci)→
(Sljedeće).
Program Compatibility
Pojavljuje se plavi zaslon
I
SKLJUČ ITE RAČ UNALO
—
Ako ne dobijete odgovor pritiskom na tipku na tipkovnici ili pomicanjem miša,
pritisnite i držite gumb za napajanje energijom najmanje 8 do 10 sekundi dok se računalo ne isključi. Zatim
ponovno pokrenite računalo.
38
Priručnik za brzo snalaženje
Page 39

Ostali problemi sa softverom
P
ROUČ ITE DOKUMENTACIJU SOFTVERA ILI KONTAKTIRAJTE PROIZVOĐ A ČA SOFTVERA ZA INFORMACIJE O
RJEŠAVANJU PROBLEMA
•
Provjerite je li program kompatibilan s operativnim sustavom instaliranim na vašem računalu.
•
Provjerite zadovoljava li vaše računalo minimalne zahtjeve hardvera potrebne za pokretanje softvera.
—
Pogledajte dokumentaciju softvera za informacije.
•
Provjerite je li program ispravno instaliran i konfiguriran.
•
Provjerite jesu li pogonski programi uređaja u konfliktu s programom.
•
Po potrebi deinstalirajte i zatim ponovno instalirajte program.
O
DMAH NAPRAVITE SIGURNOSNU KOPIJU SVOJIH DATOTEKA
ORISTITE PROGRAM ZA SKENIRANJE VIRUSA ZA PROVJERU TVRDOG DISKA, DISKETA ILI
K
PREMITE I ZATVORITE SVE OTVORENE DATOTEKE ILI PROGRAME TE ISKLJUČITE RAČ UNALO PREKO
S
IZBORNIKA
BAVITE PREGLED RAČ UNALA NA SPYWARE
O
Start.
—
Ako vam računalo sporije radi, često vam iskaču prozori s
.
CD-
OVA
.
reklamama ili imate problema s priključivanjem na Internet, vaše je računalo možda zaraženo sa spywareom. Koristite anti-virusni program koji uključuje zaštitu od spywarea (vašem je programu možda potrebna
nadogradnja) kako bi skenirali računalo i uklonili spyware. Za više informacija idite na support.dell.com i
potražite ključnu riječ spyware.
P
OKRENITE DELL DIJAGNOSTIKU
—
Vidi “Dell Diagnostics” Na stranici 39. Ako se testovi uspješno
pokreću, stanje pogreške je povezano s problemom softvera.
Dell Diagnostics
OPREZ:
informacijama o proizvodu
Prije nego započnete bilo koji postupak u ovom odjeljku slijedite sigurnosne upute u
.
Priručniku s
Kada koristiti Dell Diagnostic.
Ako imate problema s računalom, izvršite provjere u i pokrenite Dell dijagnostiku prije nego se obratite
tvrtki Dell radi tehničke pomoći “Zaključavanje i problemi s programima” Na stranici 38.
Preporučuje se da ispišete ove postupke prije nego započnete.
OBAVIJEST:
NAPOMENA:
Dell Diagnostics radi samo s Dell™ računala.
Medij
Drivers and Utilities
nije obavezan i možda ga nećete dobiti prilikom kupnje računala.
Dell Diagnostics pokrenite ili s tvrdog diska računala ili s medija Drivers and Utilities.
Pokretanje Dell Diagnostics s tvrdog diska
Dell Dijagnostika je smještena na skrivenoj uslužnoj particiji za dijagnozu na vašem tvrdom disku.
NAPOMENA:
korisnika
ako na zaslonu računala nema slike, obratite se Dell-u (vidi “Kontartiranje Dell-a” u
).
Priručnik za brzo snalaženje
Priručniku za
39
Page 40

NAPOMENA:
isključeno.
1
Pazite na to da računalo bude uključeno u električnu mrežu koja ispravno radi.
2
Uključite (ili ponovno pokrenite) svoje računalo.
3
Pokrenite opciju Dell Diagnostics (Dijagnostika) na sljedeći način:
a
Kad se pojavi DELL™ logo, odmah <F12>. iz izbornika za pokretanje odaberite
Ako je računalo spojeno na uređaj za spajanje, isključite ga. Vodite računa da je računalo
Diagnostics
(Dijagnostika) i pritisnite <Enter>.
NAPOMENA:
vidjeli radnu površinu Microsoft
NAPOMENA:
b
Pritisnite i držite tipku <Fn> dok uključujete računalo.
NAPOMENA:
Dijagnostika) s medija
Ako predugo čekate i pojavi se logo operativnog sustava, nastavite čekati dok ne budete
Prije korištenja mogućnosti b, računalo mora biti isključeno.
Ako pogledajtete poruku da nije pronađena particija, pokrenite opciju Dell Diagnostics (Dell
®
Windows®; zatim, isključite računalo i pokušajte ponovo.
Drivers and Utilities
(Pokretački i pomoćni programi).
Računalo pokreće Pre-boot System Assessment (PSA), niz inicijalnih testova ploče sustava, tipkovnice,
zaslona, memorije, tvrdog diska i tako dalje.
•
Za vrijeme procjene odgovarajte na sva pitanja koja se pojave.
•
Ako se tijekom ocjene Pre-boot sustava pojave greške, zapišite broj greške i pogledajte poglavlje
“Kontaktiranje Dell-a”
4
Ako je ocjena Pre-boot sustava uspješna dobit ćete poruku, “
Utility Partition. Press any key to continue
u Priručniku za korisnika
.
Booting Dell Diagnostic
”. (Učitavanje uslužne particije za Dell
dijagnostiku. Za nastavak pritisnike bilo koju tipku).
5
Pritisnite bilo koji gumb kako biste pokrenuli Dell Dijagnostiku iz uslužne particije za dijagnostiku na
tvrdom disku.
Pokretanje Dell Diagnostics s medija Drivers and Utilities
1
Umetnite medij
2
Isključite i ponovno pokrenite računalo.
Drivers and Utilities
.
Kad se pojavi DELL odmah pritisnite <F12>.
NAPOMENA:
vidjeli radnu površinu Microsoft
NAPOMENA:
programu za postavljanje sustava. Prilikom sljedećeg pokretanja, računalu se podiže sustav sukladno
uređajima navedemi u programu za postavljanje sustava.
3
Kad se pojavi popis, označite
4
Iz izbornika koji se pojavi odaberite opciju
Ako predugo čekate i pojavi se logo operativnog sustava, nastavite čekati dok ne budete
Prilikom sljedećeg pokretanja, računalu se podiže sustav sukladno uređajima navedenima u
®
Windows®; zatim, isključite računalo i pokušajte ponovo.
CD/DVD/CD-RW Drive
Boot from CD-ROM
<Enter>.
40
Priručnik za brzo snalaženje
i pritisnite <Enter>.
(Pokreni s CD-ROM-a) i pritisnite
Page 41

5
Pritisnite tipku 1 za pokretanje izbornika i pritisnite <Enter> za nastavak.
6
Odaberite
Run the 32 Bit Dell Diagnostics
(Pokretanje 32-bitne Dell dijagnostike) s numeriranog popisa.
Ako je navedeno više verzija, odaberite onu koja je prikladna za vaše računalo.
7
Kada se pojavi
Main Menu
(Glavni izbornik) Dell dijagnostike, odaberite test koji želite pokrenuti.
Glavni izbornik Dell Dijagnostike
1
Nakon što se Dell dijagnostika učita i pojavi se ekran
Main Menu
opciju koju želite.
NAPOMENA:
Opcija Funkcija
Test Memory
(Testiranje memorije)
Test System
(Testiranje sustava)
Exit (Izlaz) Izlaz iz Diagnostics
2
Nakon odabira opcije
Preporučuje se da odaberete
Provodi stand-alone testiranje memorije
Pokreće System Diagnostics
Test System
(Testiranje sustava) iz glavnog izbornika pojavljuje se sljedeći
Test System
(Testiranje sustava) za kompletno testiranje sustava.
izbornik.
NAPOMENA:
detaljniju provjeru uređaja u računalu.
Preporučuje se da odaberete
Extended Test
(Prošireni test) iz donjeg izbornika kako biste izvršili
(Glavni izbornik) pritisnite gumb za
Opcija Funkcija
Express test
(Brzi test)
Extended Test
(Prošireni test)
Custom Test
(Uobičajeni test)
Symptom Tree
(Stablo simptoma)
3
Ako se za vrijeme testa naiđe na problem, pojavljuje se poruka s šifrom pogreške i opisom problema.
Zapišite šifru greške i opis problema i kontaktirajte Dell (vidi Kontaktiranje Dell-a u
korisnike
).
NAPOMENA:
tvrtci Dell, tehnička podrška će vas pitati za servisnu oznaku.
Obavlja brzo testiranje uređaja u sustavu. To može potrajati 10 do
20 minuta.
Obavlja detaljnu provjeru uređaja u sustavu. Obično traje oko jedan sat
ili više.
Koristite ga za testiranje specifičnih uređaja ili prilagođavanje testova
koje treba obaviti.
Ova opcija omogućuje vam odabir testova na osnovi simptoma problema
koje imate. Ova opcija navodi uobičajene simptome.
Priručniku za
Servisna oznaka za vaše računalo se nalazi na vrhu svakog testnog ekrana. Ako se obratite
Priručnik za brzo snalaženje
41
Page 42

4
Ako pokrenete test iz opcije ili
Custom Test
(Uobičajeni test) ili
Symptom Tree
(Stablo simptoma)
za više informacija kliknite na odgovarajući pretinac opisan u nastavku.
Pretinac Funkcija
Results (Rezultati) Prikazuje rezultate testa i sve pogreške koje su pronađene.
Errors (Greške) Prikazuje sve pogreške koje su pronađene, šifre pogrešaka te opis
problema.
Help (Pomoć) Prikazuje test i može naznačiti zahtjeve koji su potrebni za pokretanje
testa.
Configuration
(Konfiguracija)
Parameters
(Parametri)
5
Kad su testovi gotovi, zatvorite zaslon s testovima kako biste se vratili na zaslon
Prikazuje konfiguraciju vašeg hardvera za odabrani uređaj.
Dell Dijagnostika dobija informacije o konfiguraciji za sve uređaje iz
postavljanja sustava, memorije i svih različitih vanjskih testova te
prikazuje informacije na popisu uređaja u lijevom prozoru na zaslonu.
Popis uređaja možda neće prikazati imena svih komponenti instaliranih
na vašem računalu ili svih uređaja priključenih na vaše računalo.
Dozvoljavaju vam da prilagodite test izmjenom postavki testa.
Main Menu
izbornik) screen. Za izlazak iz Dell dijagnostike i ponovno pokretanje računala, pritisnite ekran
Menu
(Glavni izbornik).
6
Uklonite Dellov medij
Drivers and Utilities
(Pokretački i pomoćni programi) (ako je primijenjen).
(Glavni
Main
42
Priručnik za brzo snalaženje
Page 43

Indeks
A
antivirusni softver,39
B
baterija
mjerač napajanja,35
mjerač napunjenosti,35
pohrana,37
provjera napunjenosti,35
punjenje,36
učinak,34
vađenje,36
C
Centar za pomoć i podršku,29
D
Datoteka za pomoć
Windows centar za pomoć i
podršku,29
Dell Diagnostics
O,39
pokretanje s medija Drivers and
Utilities,40
pokretanje s tvrdog diska,39
uporaba,39
dijagnostici
Dell,39
dokumentacija
ergonomiija,27
jamstvo,27
Korisnički priručnik,27
Licencni sporazum s krajnjim
korisnikom,27
online,28
Priručnik s informacijama o
proizvodu,27
regulatorne,27
sigurnost,27
E
čarobnjaci
Čarobnjak za komptibilnost
programa,38
H
hardver
Dell Diagnostics,39
I
informacije o ergonomiji,27
informacije o jamstvu,27
K
Korisnički priručnik,27
L
Licencni sporazum s krajnjim
korisnikom,27
M
Medij
Drivers and Utilities,27
N
natpisi
Microsoft Windows,28
Service Tag,28
P
pregledi sustava
desna strana,32
lijeva strana,32
odozdola,32
sprijeda,31
straga,32
prikazi sustava
dno,33
Priručnik s informacijama o
proizvodu,27
Indeks
43
Page 44

problemi
Dell Diagnostics,39
kompatibolnost s programima i
Windows-ima
programi, 38
plavi zaslon,38
program prestaje reagirati,38
program se ruši,38
programi,38
računalo prestaje reagirati,38
računalo se ne uključuje,38
računalo se ruši,38
softver, 38-39
zaključavanje,38
programi
programi,38
Q
QuickSet Help (QuickSet
pomoć),29
S
Service Tag,28
sigurnosne upute,27
softver
problemi,39
stranica za podršku Dell-u,28
W
web-stranica za podršku,28
Windows
Centar za pomoć i podršku,29
Čarobnjaci za komptibilnost
programa,38
R
računalo
prestaje reagirati,38
rušenja sustava,38
rušenje sustava,38
regulatorne informacije,27
ResourceCD
Dell Diagnostics,39
rješavanje problema
Centar za pomoć i podršku,29
Dell Diagnostics,39
zaključavanje i problemi s
programima,38
44
Indeks
Page 45

Dell™ Latitude™ D531
Hurtig Referenceguide
Model PP04X
www.dell.com | support.dell.com
Page 46

Obs, meddelelser og advarsler
OBS! Angiver vigtige oplysninger, som du kan bruge for at udnytte computeren optimalt.
BEMÆRKNING: Angiver enten en mulig beskadigelse af hardware eller tab af data og oplyser dig om, hvordan du kan
undgå dette problem.
ADVARSEL: Angiver mulig tingskade, legemsbeskadigelse eller død.
Forkortelser og akronymer
For en komplet liste over akronymer, se ordlisten i
Hvis du købte en Dell™ n Series-computer, er eventuelle referencer i dette dokument til Microsoft
Brugervejledning
.
®
Windows®
styresystemerne ikke gældende.
OBS! Nogle elementer eller medier er ekstraudstyr og medfølger måske ikke din computer. Nogle elementer vil måske
ikke være tilgængelige i visse lande.
____________________
Oplysningerne i dette dokument kan ændres uden varsel.
© 2007 Dell Inc. Alle rettigheder forbeholdes.
Enhver form for gengivelse uden skriftlig tilladelse fra Dell Inc. er strengt forbudt.
Anvendte varemærker i denne tekst: Dell, DELL-logoet, Latitude og ExpressCharge er varemærker tilhørende Dell Inc.; AMD er et varemærke
tilhørende Micro Devices, Inc.; Microsoft, Outlook og Windows er registrerede varemærker tilhørende Microsoft Corporation. Windows Vista
og Windows Vista Start button er varemærker tilhørende Microsoft Corporation.
Andre varemærker og firmanavne kan være brugt i dette dokument til at henvise til enten de fysiske eller juridiske personer, som gør krav på
mærkerne og navnene eller til deres produkter. Del l Inc. fraskriver sig enhver tingslig rettighed, for så vidt angår varemærker og firmanavne,
som ikke er deres egne.
Model PP04X
April 2007 P/N YK560 Rev. A00
Page 47

Indholdsfortegnelse
Sådan finder du information . . . . . . . . . . . . . . . . . . . . . . . . . . . 49
Opstilling af computeren
Om computeren
Anvendelse af et batteri
Problemløsning
. . . . . . . . . . . . . . . . . . . . . . . . . . . . . . . . . 53
. . . . . . . . . . . . . . . . . . . . . . . . . . . . . . . . . 60
. . . . . . . . . . . . . . . . . . . . . . . . . . . . . 52
. . . . . . . . . . . . . . . . . . . . . . . . . . . . . 56
Indholdsfortegnelse 47
Page 48

48 Indholdsfortegnelse
Page 49

Sådan finder du information
OBS! Nogle elementer eller medier er ekstraudstyr og medfølger måske ikke din computer. Nogle elementer vil
måske ikke være tilgængelige i visse lande.
OBS! Yderligere information kan blive afsendt med computeren.
Hvad søger du efter? Find det her
• Et diagnosticeringsprogram til computeren
• Drivere til computeren
• Dokumentationen til enheden
• Notebook System Software (NSS)
• Garantioplysninger
• Handelsbetingelser (Kun USA)
• Sikkerhedsinstruktioner
• Kontrolinformation
• Ergonomi-information
• Licensaftale for slutbrugere
Mediet Drivers and Utilities (Drivere og hjælpeværktøjer)
OBS! Mediet Drivers and Utilities (Drivere og hjælpeværktøjer)
er ekstraudstyr og leveres muligvis ikke med din computer.
Dokumentationen og driverne er allerede installeret på
computeren. Du kan bruge mediet til at geninstallere drivere til
at kører Dell-diagnosticering (se
"Dell-diagnosticering" på side 62
På mediet kan der være
readme-filer (Vigtigt-filer),
som indeholder sidste
øjebliks-opdateringer om
tekniske ændringer eller
avanceret teknisk
referencemateriale til
teknikere eller erfarne brugere.
OBS! Opdatering af drivere og dokumentation kan findes på
support.dell.com.
OBS! Mediet Drivers and Utilities (Drivere og hjælpeværktøjer)
er ekstraudstyr og leveres muligvis ikke med din computer.
Dell™ Produktinformationsvejledning
).
• Afmontering og udskiftning af dele
• Specifikationer
• Konfiguration af systemindstillinger
• Fejlfinding og løsning af problemer
User’s Guide (Brugervejledning)
Microsoft Windows Hjælp og supportcenter
1
Klik på
Start
eller
systemvejledninger
2
Klik på
User’s Guide
→ Hjælp og support Dell Bruger- og
Systemvejledninger
(Brugervejledning) for din computer.
Hurtig Referenceguide 49
.
Page 50

Hvad søger du efter? Find det her
• Servicemærke og ekspresservicekode
• Microsoft Windows-licensetiket
Servicemærke og Microsoft® Windows® Licens
Disse mærkater findes på computeren.
• Brug servicemærket til at identificere computeren, når du
bruger
•Indtast
ekspressservicekoden for
at anvise opkaldet, når du
kontakter teknisk support.
OBS! Microsoft Windows-licensetiket er blevet ændret med et
hul eller en "sikkerhedsportal," som en øget
sikkerhedsforanstaltning.
• Løsninger — Problemløsning og tips, tekniske artikler,
onlinekurser og ofte stillede spørgsmål
• Kundeforum — Online-diskussion med andre Dellkunder
• Opgraderinger — Opgraderingoplysninger om
komponenter, f.eks. hukommelse, harddisk og
styresystem
• Kundepleje — Kontaktoplysninger, serviceopkald og
ordrestatus, garanti- og reparationsoplysninger
• Service og support — Status på serviceopkald og
supporthistorie, servicekontrakt, online-diskussioner
med teknisk support
• Reference — Computer-dokumentation, detaljer om
min computerkonfiguration, produktspecifikationer og
hvidbøger
• Overførsler — Godkendte drivere, programrettelser og
softwareopdateringer
• Notebook System Software (NSS) — Hvis du
geninstallerer styresystemet på computeren, skal du også
geninstallere NSS-hjælpeværktøjet. NSS giver vigtige
opdateringer til styresystemet og support til Dell™
3,5-tomme USB-diskettedrev, AMD -processorer, optiske
drev og USB-enheder.NSS er nødvendig til korrekt brug
af din Dell-computer. Softwaren opdager automatisk din
computer, dit styresystem og installerer de opdateringer,
der passer til din konfiguration.
Dell Support-website — support.dell.com
OBS! Vælg dit område eller forretningssegment for at se den
pågældende supportside.
Sådan hentes Notebook System-softwaren:
1
Gå til
support.dell.com
forretningssegment, og indtast dit servicemærke
2
Væ lg
Drivere og overførsler
3
Klik på dit styresystem, og søg efter nøgleordet Notebook
system-software
OBS! support.dell.com -brugergrænseflade kan variere alt
efter dine valg.
support.dell.com
.
eller kontakter support.
, vælg dit område eller
, og klik på
Kør
.
.
50 Hurtig Referenceguide
Page 51

Hvad søger du efter? Find det her
• Software-opgradering og fejlfindingsoplysninger — Ofte
stillede spørgsmål, top-ti og generel tilstand af dit
computermiljø
Dell support-hjælpeværktøj
Dell support-hjælpeværktøj er et automatisk opgraderingsog beskedsystem, der er installeret på din computer. Denne
support giver tidstro tilstandsscanning af dit computermiljø,
software-opgradering og relevant selvhjælpsinformation. Få
adgang til Dell-hjælpeværktøj fra
værktøjslinjen. For nærmere oplysninger, se "Dell-supporthjælpeværktøj" i
• Sådan anvendes Windows-styresystemer
• Sådan bruges programmer og filer
• Sådan personliggør jeg mit skrivebord
Windows Help and Support Center (Hjælp og supportcenter)
1
Klik på knappen
2
Skriv et ord eller en sætning, der beskriver problemet, og klik
på pileikonet.
3
Klik på det emne, der beskriver problemet.
4
Følg vejledningen på skærmen.
• Information om netværksaktivitet, Strømsstyringsguide,
genvejstaster og andre punkter, der kontrolleres af Dell
QuickSet
Dell QuickSet Hjælp
For at s e
Dell QuickSet-hjælp
ikonet i Microsoft
For nærmere oplysninger om Dell QuickSet, se
"Dell™ QuickSet" i User’s Guide (Brugervejledning).
• Geninstallation af styresystemet
Operativsystemet er allerede installeret på computeren. Se
"Gendannelse af styresystem" i Brugervejledning.
User’s Guide
Start
®
Windows®-opgavebjælke.
(Brugervejledning).
eller
→
skal du højreklikke på
Hjælp og support.
-ikonet på
QuickSet-
Hurtig Referenceguide 51
Page 52

Opstilling af computeren
ADVARSEL: Før udførelse af nogle af procedurerne i dette afsnit skal sikkerhedsinstruktionerne i
Produktinformationsguiden følges.
1
Åbn æsken med tilbehør, og tag delene ud.
2
Tag de dele fra, som du skal bruge til opsætning af din computer.
Æsken med tilbehør indeholder også brugerdokumentation, programmer og ekstra hardware (f.eks. PC
Cards, drev eller batterier), som du har bestilt.
3
Tilslut vekselstrømsadapteren til vekselstrømsadapterstikket på computeren og til stikkontakten.
4
Tænd for computerskærmen, og tryk på tænd/sluk-knappen for at tænde computeren (se "Visning
forfra" på side 54).
OBS! Det anbefales, at du tænder og slukker computeren mindst en gang, før du installerer nogen kort eller
tilslutter computeren til en docking-station eller anden ekstern enhed, som f.eks. en printer.
52 Hurtig Referenceguide
Page 53

Om computeren
Visning forfra
11
10
9
1
2
3
4
5
6
8
1 skærmlås 2 skærm 3 tænd/sluk-knap
4 enhedsstatuslamper 5 højttalere (2) 6 tastatur
7 pegeplade 8 knapper til touchpad 9 tastaturstatuslamper
10 knap til aktivering/deaktivering
af trådløs forbindelse
11 omgivende lysføler
7
Hurtig Referenceguide 53
Page 54

Visning fra venstre
43 51 62
1 stik til sikkerhedskabel 2 luftventilation 3 IEEE 1394-stik
4 lydstik (2) 5 stik til PC Card 6 harddisk
Visning fra højre
1 23
1 mediebås 2 frigørelseshåndtag til enhed 3 USB-stik (2)
Visning bagfra
ADVARSEL: Undgå at blokere, skubbe genstande ind i eller lade støv samle sig i ventilationshullerne. Opbevar
ikke computeren et sted med lav luftgennemstrømning, f.eks. en lukket mappe, når den er tændt. Dette kan
beskadige computeren eller forårsage brand.
8123 4 5 6 7
1 netværksstik (RJ-45) 2 S-video TV-out-stik 3 USB-stik (2)
4 modemstik (RJ-11) 5 seriel port 6 VGA-stik
7 vekselstrømsadapterstik 8 lufthuller
54 Hurtig Referenceguide
Page 55

Visning af bunden
7
6
1 3
2
5
1 spændingsmåler til batteri 2 pal til frigørelse af batterirum 3 batteri
4 hukommelsesmodul/dæksel til
møntcellebatteri
7 harddisk
5 stik til dockingenhed 6 lufthuller
4
Hurtig Referenceguide 55
Page 56

Anvendelse af et batteri
Batteriydelse
OBS! For oplysninger om Dell-garanti for computeren, se afsnittet i Produktinformationsvejledning eller det
separate garantidokument, der blev fremsendt sammen med computeren.
For optimal computerydelse og hjælp til bevaring af BIOS-opsætning og betjening af din Dell™ bærbare
computer, skal du altid bruge den sammen med det installerede batteri. Der medfølger et batteri som
standardudstyr i batterirummet.
OBS! Da batteriet måske ikke er fuldt opladet, skal du bruge vekselstrøms-adapteren til at tilslutte din nye computer til en
elektrisk stikkontakt, første gang du skal bruge computeren. For at opnå de bedste resultater, skal du bruge computeren
med vekselstrøms-adapteren, indtil batteriet er fuldt opladet. For at se batteriopladningsstatus skal du klikke på Start
→
Kontrolpanel
OBS! Batterilevetiden (den tid som et batteri kan fungere på en opladning) falder med tiden. Afhængig af, hvor ofte
batteriet bruges og de betingelser, hvorunder det bruges, kan du få brug for at købe et nyt batteri i løbet af
computerens levetid.
Batterilevetid varierer alt afhængig af vilkårene for anvendelsen. Du kan installere et ekstra batteri i
mediebåsen for at øge driftstiden væsentligt.
Brugstiden reduceres væsentligt, hvis du bruger den til noget, der indebærer og ikke blot begrænses til
følgende:
• Brug af optiske drev
• Brug af trådløse kommunikationsenheder, PC Cards, ExpressCards, hukommelseskort eller USB-enheder
• Brug af skærmindstillinger med høj lysintensitet, 3D-pauseskærme eller andre strømforbrugende
programmer, som f.eks. komplekse 3D-grafikprogrammer
• Brug af computeren i maksimal ydelsesfunktion (se "Konfiguration af strømstyringsindstillinger" i
User’s Guide
Strømstyring→ Spændingsmåler.
(Brugervejledning)).
→
OBS! Det anbefales, at computeren tilsluttes en stikkontakt, når der skrives til en cd eller dvd.
Du kan kontrollere batteriopladningen, før du sætter batteriet i computeren (se "Kontrol af
batteriopladning" på side 58). Du kan også indstille strømstyringen, så du advares, når batteriopladningen
er lav
(se "Konfiguration af strømstyringsindstillinger" i
ADVARSEL: Brug af et inkompatibelt batteri kan øge risikoen for ild eller eksplosion. Udskift kun batteriet med
et kompatibelt batteri købt af Dell. Lithium-ion-batteriet er beregnet til at fungere sammen med din Dell-computer.
Brug ikke batterier fra andre computere sammen med din computer.
ADVARSEL: Batterier bør ikke bortskaffes sammen med køkkenaffald. Når dit batteri ikke længere holder
opladningen, skal du kontakte din lokale renovatør eller genbrugsstation for råd vedrørende bortskaffelse af et
Lithium-ion-batteri. Se "Bortskaffelse af batteri" i Produktionformationsguiden.
User’s Guide
(Brugervejledning)).
56 Hurtig Referenceguide
Page 57

ADVARSEL: Misbrug af batteriet kan øge risikoen for brand eller kemisk forbrænding. Punkter, brænd eller
adskil ikke batteriet, eller udsæt det for temperaturer over 60°C (140°F). Batteriet opbevares utilgængeligt for
børn. Håndtér beskadigede eller lækkende batterier med ekstrem omhu. Beskadigede batterier kan lække og
medføre personskade eller skade på udstyr.
Kontrol af batteriopladning
Dell QuickSet-batterimåler, Microsoft Windows Power Meter vindue og -ikon,
batteriopladningsmåler/tilstandsmåler og advarsel om lavt batteri giver oplysninger om batteriopladningen.
Dell™ QuickSet-batterimåler
Hvis Dell QuickSet er installeret, trykkes på <Fn><F3> for at få vist QuickSet Battery Meter.
Batterimåleren viser status, batteritilstand, opladningsniveau og tid for opladningsafslutning på din
computer.
For nærmere oplysninger om QuickSet skal du højreklikke på QuickSet-ikonet på menubjælken og klikke
på Hjælp.
Microsoft® Windows® Power Meter
Windows Power Meter viser den resterende batteriopladning. For at kontrollere Power Meter skal du
dobbeltklikke på -ikonet på menubjælken.
Hvis computeren er tilsluttet en stikkontakt vises et -ikon.
Opladningsmåler
Ved enten at trykke en gang eller ved at trykke og holde på statusknappen på opladermåleren på batteriet
kan du kontrollere:
• Batteriopladning (kontrollér ved at trykke og
• Batteritilstand (kontrollér ved at trykke og
Batteriets funktionstid er stort set bestemt af det antal gange det oplades. Efter hundredvis af op- og
afladningscyklusser mister batterier noget opladningskapacitet— eller batteritilstand. Det vil være, f.eks.
hvis et batteri viser status "opladet", men opretholder en nedsat opladningskapacitet (tilstand).
slippe
statusknappen)
holde
statusknappen)
Kontrol af batteriopladning
For at kontrollere batteriopladningen skal du trykke og slippe statusknappen på batteriopladningsmåleren
for at tænde lysene til niveau for opladning. Hvert lys repræsenterer ca. 20 % af total batteriopladning.
Hvis batteriet f.eks. har 80 % af opladningen tilbage, vil fire lys være tændt. Hvis ingen lys vises, er
batteriet ikke opladet.
Kontrol af batteritilstand
OBS! Du kan kontrollere batteritilstanden på en af to følgende måder: Ved at bruge opladningsmåleren på batteriet
som beskrevet nedenfor og ved at bruge batterimåleren i Dell QuickSet. For nærmere oplysninger om QuickSet skal
du højreklikke på QuickSet-ikonet på menubjælken og klikke på Hjælp.
Hurtig Referenceguide 57
Page 58

For at kontrollere batteriets tilstand med opladningsmåleren skal du trykke og holde statusknappen på
batteriopladningsmåleren i mindst 3 sekunder. Hvis der ikke vises nogen lys, fungerer batteriet fint, og
mere end 80 % af dens oprindelige opladningskapacitet er tilbage. Hvert lys viser en trinvis forringelse.
Hvis fem lys vises, er mindre end 60 % af opladningskapaciteten tilbage, og du bør overveje at udskifte
batteriet. Se "Specifikationer" i User’s Guide (Brugervejledning) for nærmere oplysninger om
batteribrugstid.
Advarsel om lavt batteri
BEMÆRKNING: For at undgå at miste eller ødelægge data, så gem dit arbejde straks efter en advarsel om lavt
batteri. Tilslut derefter computeren til en stikkontakt, eller installer et sekundært batteri i mediebåsen. Hvis batteriet
løber helt tør for strøm, så starter dvalefunktionen automatisk.
Som standard vises et pop-up-vindue, når batteriladningen er ca. 90 % brugt. Du kan ændre instillinger
for batterialarmer i QuickSet eller i vinduet Egenskaber for strømstyring. Se
strømstyringsindstilling" i
User’s Guide
(Brugervejledning) for nærmere oplysninger om QuickSet eller
"Konfiguration af
Strømstyringsegenskaber- vinduet.
Opladning af batteri
OBS! Med Dell™ ExpressCharge™, når der er slukket for computeren, kan vekselstrøms-adapteren oplade et fuldt
afladet batteri til 80 procent på ca. 1 time og til 100 procent på ca. 2 timer. Opladningstiden er længere, når
computeren er tændt. Du kan lade batteriet sidde i computeren, så længe du vil. Batteriets interne kredsløb
forhindrer, at batteriet bliver overbelastet.
OBS! Du kan bruge en 90-Watt-vekselstrømsadapter til ExpressCharge med et 9-celles-batteri.
Når du tilslutter din computer til en stikkontakt eller isætter et batteri, mens computeren er tilsluttet til
en stikkontakt, vil computeren kontrollere batteriopladning og temperatur. Om nødvendigt vil
vekselstrømsadapteren oplade batteriet og opretholde batteriopladningen.
Hvis batteriet er varmt efter at være brugt i din computer eller anvendes i varme omgivelser, kan det ske,
at batteriet ikke oplades, når du tilslutter computeren til en stikkontakt.
Batteriet er for varmt til at starte opladning, hvis -lampen blinker skiftevis grønt og orange. Fjern
computeren fra stikkontakten, og lad computer og batteri afkøle til stuetemperatur. Tilslut derefter
computeren til en stikkontakt for at fortsætte opladning.
For nærmere oplysninger om løsning af batteriproblemer, se "Strømproblemer" i User’s Guide
(Brugervejledning).
Udskiftning af batteri
ADVARSEL: Før du udfører disse procedurer skal du slukke for computeren, fjerne vekselstrømsadapteren fra
stikkontakten og computeren, fjerne modemmet fra vægstikket og computeren, og fjerne alle eksterne kabler fra
computeren.
ADVARSEL: Brug af et inkompatibelt batteri kan øge risikoen for ild eller eksplosion. Udskift kun batteriet med
et kompatibelt batteri købt af Dell. Batteriet er beregnet til din Dell™-computer. Brug ikke batterier fra andre
computere sammen med din computer.
58 Hurtig Referenceguide
Page 59

BEMÆRKNING: Du skal fjerne alle eksterne kabler fra computeren for at undgå risiko for beskadigelse af
stikkene. For oplysninger om udskiftning af sekundært batteri, der findes i mediebåsen, se "Brug af multimedier" i
User’s Guide (Brugervejledning).
Fjernelse af batteri:
Hvis computeren er tilsluttet til en docking-enhed, skal du tage den ud af enheden. Se den
1
dokumentation, der fulgte med docking-enheden, hvis du ønsker yderligere oplysninger.
2
Kontroller, at computeren er slukket, i dvalefunktion eller tilsluttet en vekselstrømsadapter.
BEMÆRKNING: Fjernelse af batteri mens computeren er i standby (uden vekselstrøm) kan få computeren til at
lukke ned og kan medføre tab af data.
3
Skub og hold batterirummets frigørelseshåndtag i bunden af computeren.
4
Løft for at fjerne batteriet fra båsen.
1 2
1 batteri 2 pal til frigørelse af batterirum
For at udskifte batteriet sættes batteriet i båsen og trykkes ned, til batterirummets frigørelseshåndtag
klikker.
Opbevaring af batteri
Fjern batteriet, når du skal opbevare din computer i en længere periode. Et batteri aflades under
længerevarende opbevaring. Efter en lang opbevaringsperiode skal batteriet oplades helt, før du bruger
det (se "Opladning af batteri" på side 59).
Hurtig Referenceguide 59
Page 60

Problemløsning
Llockups- og softwareproblemer
ADVARSEL: Før udførelse af nogle af procedurerne i dette afsnit skal sikkerhedsinstruktionerne i
Produktinformationsguiden følges.
Computeren starter ikke op
KONTROLLER, AT VEKSELSTRØMSADAPTEREN ER KORREKT TILSLUTTET TIL COMPUTEREN OG STIKKONTAKTEN.
Computeren reagerer ikke
BEMÆRKNING: Du kan miste data, hvis du ikke kan udføre en nedlukning af styresystemet.
LUK FOR COMPUTEREN — Hvis du ikke er i stand til at få svar ved at trykke på en tast på tastaturet eller
S
ved at bevæge musen, skal trykke og holde på strømforsyningsknappen i 8-10 sekunder, indtil
computeren slukkes. Genstart derefter din computer.
Et program svarer ikke eller lukker ned gentagne gange
OBS! Software indeholder almindeligvis installationsoplysninger i dokumentationen eller på en diskette eller cd.
A
FSLUT PROGRAMMET —
1
Tryk <Ctrl><Shift><Esc> samtidigt.
2
Klik på
3
Klik på
4
Klik på det program, der ikke længere svarer.
5
Klik på
KONTROLLER SOFTWARE-DOKUMENTATION — Om nødvendigt afinstallér, og geninstallér derefter
programmet.
Jobliste
.
Programmer
Afslut
.
.
Et program er beregnet til en tidligere version af Windows styresystem version
KØR GUIDEN PROGRAMKOMPATIBILITET — Guiden programkompatibilitet konfigurerer et program, så det
kører i et miljø svarende til et ikke-Windows XP-styresystem.
1
Klik på
2
Følg vejledningen på skærmen.
En hel blå skærm kommer frem
SLUK FOR COMPUTEREN — Hvis du ikke er i stand til at få svar ved at trykke på en tast på tastaturet eller
Start→
Alle programmer→
Tilbehør→ Programkompatiblitetsguide→ Næste
.
ved at bevæge musen, skal du trykke og holde på strømforsyningsknappen i 8-10 sekunder, indtil
computeren slukkes. Genstart derefter din computer.
60 Hurtig Referenceguide
Page 61

Andre softwareproblemer
SE I SOFTWAREDOKUMENTATIONEN, ELLER KONTAKT SOFTWAREFABRIKANTEN FOR OPLYSNINGER OM
PROBLEMLØSNING —
• Kontroller, at programmet er kompatibelt med det styresystem, der er installeret på din computer.
• Kontroller, at computeren opfylder de nødvendige minimumskrav, der behøves til at køre softwaren. Se
i softwaredokumentationen for oplysninger.
• Kontroller, at programmet er installeret og konfigureret rigtigt.
• Undersøg, at enhedsdriverne ikke er i konflikt med programmet.
• Om nødvendigt afinstalleres og geninstalleres programmet.
LAV STRAKS BACK- UP AF DINE FILER.
RUG ET VIRUS-SCANNINGSPROGRAM FOR AT KONTROLLERE HARDDISKEN, DISKETTER ELLER CD'ER.
B
EM OG LUK ALLE ÅBNE FILER ELLER PROGRAMMER, OG LUK NED FOR COMPUTEREN VIA start MENUEN.
G
U
NDERSØG COMPUTEREN FOR SPYWARE — Hvis du oplever langsom computerydeevne, ofte modtager pop-
up-reklamer, eller hvis du har problemer med at koble dig på internettet, kan din computer være inficeret
med spyware. Brug et anti-virus-program, der indeholder beskyttelse mod anti-spyware (det er muligt, at
dit program skal opgraderes) for at scanne computeren og fjerne spyware. For flere oplysninger, gå til
support.dell.com, og søg efter nøgleordet spyware.
KØR DELL-DIAGNOSTICERING — Se "Dell-diagnosticering" på side 62. Hvis alle testerne kører korrekt,
skyldes fejltilstanden et softwareproblem.
Dell-diagnosticering
ADVARSEL: Før udførelse af nogle af procedurerne i dette afsnit skal sikkerhedsinstruktionerne i
Produktinformationsguiden følges.
Hvornår skal jeg bruge Dell-diagnosticering
Hvis du kommer ud for et problem med computeren, skal du foretage eftersyn i og køre Delldiagnosticering, før du kontakter Dell for teknisk hjælp "Llockups- og softwareproblemer" på side 61.
Det anbefales at udskrive disse procedurer, før du begynder.
BEMÆRKNING: Dell-diagnosticering fungerer kun på Dell™ computere.
OBS! Mediet Drivers and Utilities (Drivere og hjælpeværktøjer) er ekstraudstyr og leveres muligvis ikke med din
computer.
Start Dell-diagnosticering enten fra din harddisk eller fra Mediet Drivers and Utilities (Drivere og
hjælpeværktøjer).
Hurtig Referenceguide 61
Page 62

Start Dell-diagnosticering fra din harddisk
Dell-diagnosticering findes på en skjult partition med diagnosticeringsværktøjer på harddisken.
OBS! Hvis computeren ikke kan vise et skærmbillede, kontakt Dell. (se "Kontakt Dell" i User’s Guide
(Brugervejledning)).
OBS! Hvis computeren er tilsluttet til en docking-enhed, skal du tage den ud af enheden. Se den dokumentation,
der fulgte med docking-enheden, hvis du ønsker yderligere oplysninger.
1
Kontroller, at computeren er tilsluttet til en stikkontakt, der normalt fungerer korrekt.
2
Tænd (eller genstart) din computer.
3
Start Dell-diagnosticering på en af følgende to måder:
a
Når DELL™-logoet vises, skal du trykke <F12> med det samme. Vælg
Diagnosticering
bootmenuen, og tryk på <Enter>.
fra
OBS! Hvis du venter for længe, og styresystemets logo vises, skal du fortsætte med at vente, indtil du ser
Microsoft
OBS! Før du prøver mulighed b, skal computeren være lukket helt ned.
Tryk og hold på tasten<Fn>, mens du tænder for computeren.
b
OBS! Hvis du ser en meddelelse om, at der ikke blev fundet en partition med diagnosticeringsværktøjet,
køres Dell-diagnosticering fra mediet Diagnostics (Diagnosticering) fra mediet Drivers and Utilities (Drivere
og hjælpeværktøjer).
®
Windows® -skrivebordet, og derefter skal du lukke ned for computeren og forsøge igen.
Computeren kører Pre-boot System Assessment (PSA), en vurdering af systemet før start, dvs. en
række tests af systemkortet, tastaturet, harddisken og skærmen m.v.
• Besvar eventuelle spørgsmål, der stilles under testen.
• Hvis der registreres fejl under en vurdering af systemet før start, skal du notere
fejlkoden/fejlkoderne ned og kontakte Dell (se "Kontakt til Dell" i din online
i User’s Guide
(Brugervejledning).
4
Hvis før-start-testen afvikles korrekt, modtager du meddelelsen "
Utility Partition. Press any key to continue"
Booting Dell Diagnostic
. (Booter Dells værktøjspartition til
diagnosticering. Tryk på en tast for at fortsætte).
5
Tryk på en vilkårlig tast for at starte Dell-diagnosticering fra partitionen med diagnosticeringsværktøjet
på harddisken.
Start af Dell-diagnosticering fra Mediet Drivers and Utilities (Drivere og hjælpevæktøjer)
1
Isæt Mediet
2
Luk computeren, og genstart den.
Drivers and Utilities
(Drivere og hjælpeværktøjer).
Når DELL-logoet vises, skal du trykke på <F12> med det samme.
OBS! Hvis du venter for længe, og styresystemets logo vises, skal du fortsætte med at vente, indtil du ser
Microsoft
®
Windows® -skrivebord, og derefter skal du lukke ned for computeren og forsøge igen.
62 Hurtig Referenceguide
Page 63

OBS! De næste trin ændrer kun boot-sekvensen denne ene gang. Ved den næste opstart starter computeren
op i overensstemmelse med enhederne, der er angivet i systemets opsætningsprogram.
3
Når listen med boot-enheder vises, fremhæves
4
Vælg optionen
5
Skriv 1 for at starte -menuen, og tryk på <Enter> for at fortsætte.
6
Væ lg
Run the 32 Bit Dell Diagnostics
Boot from CD-ROM
(Boot fra cd-rom) fra den menu, der vises, og tryk på <Enter>.
(Kør 32 bit Dell-diagnosticering) fra den nummererede liste.
CD/DVD/CD-RW-drev
og tryk på <Enter>.
Hvis der er anført flere versioner, vælges versionen, som er passende for computeren.
7
Når Dell-diagnosticering
Hovedmenu
vises vælges den test, som du vil køre.
Hovedmenu for Dell-diagnosticering
1
Når Dell-diagnosticering er indlæst, og skærmbilledet
Hovedmenu
vises, skal du klikke på knappen for
den ønskede indstilling.
OBS! Det anbefales, at du vælger Test system for at køre en komplet test på computeren.
Valgmulighed Funktion
Test Memory
(Testhukommelse)
Test System
(Test system)
Exit (Afslut) Afslutter diagnosticering
Kører stand-alone-hukommelsestest
Kører system-diagnosticering
2
Når du har valgt
OBS! Det anbefales, at du vælger Extended Test (Udvidet test) fra menuen nedenfor for at køre en mere
omfattende test af enhederne i computeren.
Valgmulighed Funktion
Express Test
(Ekspresstest)
Extended Test
(Udvidet test)
Custom Test
(Brugerdefineret test)
Symptom Tree
(Liste over symptomer)
Test system
Udfører en hurtig test af enhederne i systemet. Dette tager typisk 10 til
20 minutter.
Udfører en omfattende kontrol af enhederne i systemet. Dette kan
typisk tage en time eller mere.
Bruges for at teste en specifik enhed eller brugerdefinerede tests, der
skal køres.
Med denne indstilling kan du vælge tests, der er baseret på symptomet
på det problem du har. Denne indstilling oplister de mest almindelige
symptomer.
fra hovedmenuen, vises følgende menu.
Hurtig Referenceguide 63
Page 64

3
Hvis der opdages et problem under en test, vises der en meddelelse med en fejlkode og en beskrivelse
af problemet. Skriv fejlkoden og problembeskrivelsen ned, og kontakt Dell (se Kontakt Dell i
Guide
(Brugervejledning)).
OBS! Servicemærket til computeren findes øverst på hver testskærm. Hvis du kontakter Dell, vil Teknisk
Support bede om servicemærket.
4
Hvis du kører en test via indstillingen
Tree
(Liste over symptomer), skal du klikke på den relevante fane, som er beskrevet i nedenstående
Custom Test
(Brugerdefineret test) eller via
User’s
Symptom
tabel, for at få yderligere oplysninger.
Fane Funktion
Results (Resultater) Her vises testresultaterne og eventuelle fejl, som opstod.
Errors (Fejl) Her vises, hvilke fejl der opstod, fejlkoder og beskrivelser af problemet.
Help (Hjælp) Her får du en beskrivelse af testen og evt. hvilke krav, der stilles til
udførelse af testen.
Configuration
(Konfiguration)
Parameters
(Parametre)
Her vises hardwarekonfigurationen for den valgte enhed.
Dell-diagnosticering henter konfigurationsoplysningerne for alle
enheder fra systemets installation, hukommelse og forskellige interne
tests samt viser oplysningerne i enhedslisten i den venstre rude på
skærmen. Det er ikke sikkert, at alle komponenter, som er installeret på
computeren eller alle enheder, som er tilsluttet til computeren, vises på
listen over enheder.
Giver dig mulighed for at tilpasse testen ved at ændre
testindstillingerne.
5
Når testerne er færdige, skal du lukke testskærmen for at vende tilbage til skærmen
at forlade Dell-diagnosticering og genstarte computeren lukkes skærmen
6
Fjern evt. Dell-mediet
64 Hurtig Referenceguide
Drivers and Utilities
(Drivere og hjælpeværktøjer).
Hovedmenu
Main Menu
. For
(Hovedmenu).
Page 65

Indeks
A
anti-virus-software, 61
B
batteri
fjernelse, 58
opbevaring, 59
opladning, 58
opladningsmåler, 57
spændingsmåler, 57
ydelse, 56
Batterikontrol af
batteriopladning, 57
C
computer
går ned, 60
reagerer ikke, 60
diagnosticering
Dell, 61
dokumentation
ergonomi, 49
garanti, 49
Licensaftale for
slutbrugere, 49
online, 50
Produktinformationsvejlednin
g, 49
regulerende, 49
sikkerhed, 49
-dokumentation User’s Guide
(Brugerhåndbog), 49
E
ergonomi-information, 49
G
garantiinformation, 49
Help and Support Center
(Hjælp og
supportcenter), 51
hjælpefil
Windows Help and Support
Center (Hjælp og
supportcenter), 51
L
Licensaftale for
slutbrugere, 49
M
mærker
Microsoft Windows, 50
Servicemærke, 50
Mediet
Drivers and Utilities (Drivere
og hjælpeværktøjer), 49
D
Dell-diagnosticering
brug af, 61
om, 61
start fra harddisken, 62
start fra mediet Drivers and
Utilities (Drivere og
hjælpeværktøjer), 62
Dell-supportside, 50
guider
Programkompatibilitetsguide,
60
H
hardware
Dell-diagnosticering, 61
Indeks 65
Page 66

P
S
problemer
blå skærm, 60
computer går ned, 60
computeren reagerer ikke, 60
computeren starter ikke op, 60
Dell-diagnosticering, 61
lockups, 60
program lukker ned, 60
program svarer ikke, 60
programmer og Windows-
kompatibilitet, 60
software, 60-61
problemløsning
Dell-diagnosticering, 61
Help and Support Center
(Hjælp og
supportcenter, 51
lockups- og
softwareproblemer, 60
Produktinformationsvejledni
ng, 49
Servicemærke, 50
sikkerhedsinstrukser, 49
software
problemer, 60-61
support-website, 50
systemvisning
venstre side, 54
systemvisninger
bagfra, 54
bunden, 54-55
forfra, 53
højre side, 54
U
User’s Guide
(Brugerhåndbog), 49
W
Q
QuickSet-hjælp, 51
R
regulerende information, 49
ResourceCD (Resurse-cd'en)
Dell-diagnosticering, 61
66 Indeks
Windows
Help and Support Center
(Hjælp og
supportcenter), 51
Programkompatibilitetsguide,
60
Page 67

Dell™ Latitude™ D531
Pikaopas
Malli PP04X
www.dell.com | support.dell.com
Page 68

Huomautukset, varoitukset ja vaara
HUOMAUTUS: HUOMAUTUKSET ovat tärkeitä tietoja, joiden avulla voit käyttää tietokonetta entistä paremmin.
VAROITUS: VAROITUKSET ovat ilmoituksia tilanteista, joissa laitteisto voi vahingoittua tai joissa tietoja voidaan menettää.
Niissä kerrotaan myös, miten nämä tilanteet voidaan välttää.
VAARA: VAARAT kertovat tilanteista, joihin saattaa liittyä omaisuusvahinkojen, loukkaantumisen tai kuoleman vaara.
Lyhenteet
Täydellinen luettelo lyhenteistä on
Jos ostit Dellin™ n-sarjan tietokoneen, mitkään tässä asiakirjassa esitettävät viittaukset Microsoft
käyttöoppaan
sanastossa.
®
Windows®
-käyttöjärjestelmiin eivät koske sinua.
HUOMAUTUS: Jotkin ominaisuudet tai levyt voivat olla valinnaisia, eikä niitä välttämättä toimiteta tietokoneen
mukana. Jotkin ominaisuudet eivät ehkä ole käytettävissä tietyissä maissa.
____________________
Tämän asiakirjan tiedot voivat muuttua ilman erillistä ilmoitusta.
© 2007 Dell Inc. Kaikki oikeudet pidätetään.
Tämän tekstin kaikenlainen kopioiminen ilman Dell Inc:n kirjallista lupaa on ehdottomasti kielletty.
Tekstissä käytetyt tavaramerkit: Dell, DELL-logo, Latitude ja ExpressCharge ovat Dell Inc:n tavaramerkkejä; AMD on Advanced Micro
Devices, Inc:n tavaramerkki; Microsoft, Outlook ja Windows ovat Microsoft Corporationin rekisteröityjä tavaramerkkejä. Windows Vista ja
Windows Vistan Käynnistä-painike ovat Microsoft Corporationin tavaramerkkejä.
Muut tekstissä mahdollisesti käytetyt tavaramerkit ja tuotenimet viittaavat joko merkkien ja nimien haltijoihin tai näiden tuotteisiin. Dell Inc.
kieltää omistusoikeuden muihin kuin omiin tavaramerkkeihinsä ja tuotenimiinsä.
Malli PP04X
Huhtikuu 2007 Tuotenro YK560 Versio A00
Page 69

Sisältö
Tietojen etsiminen . . . . . . . . . . . . . . . . . . . . . . . . . . . . . . . . 71
Tietokoneen käyttöönotto
Tietoja tietokoneesta
Akun käyttö
Vianmääritys
. . . . . . . . . . . . . . . . . . . . . . . . . . . . . . . . . . . . 78
. . . . . . . . . . . . . . . . . . . . . . . . . . . . . . . . . . . 82
. . . . . . . . . . . . . . . . . . . . . . . . . . . . . . 75
. . . . . . . . . . . . . . . . . . . . . . . . . . . . 74
Sisältö 69
Page 70

70 Sisältö
Page 71

Tietojen etsiminen
HUOMAUTUS: Jotkin ominaisuudet tai levyt voivat olla valinnaisia, eikä niitä välttämättä toimiteta tietokoneen
mukana. Jotkin ominaisuudet eivät ehkä ole käytettävissä tietyissä maissa.
HUOMAUTUS: Tietokoneen kanssa voidaan toimittaa lisätietoja.
Mitä etsit? Tietolähde:
• Tietokoneen diagnostiikkaohjelma
• Tietokoneen ajurit
• Laitteen ohjeet
• Notebook System Software (NSS)
• Takuutiedot
• Ehdot (vain Yhdysvallat)
• Turvallisuustiedot
• Säädöksiin liittyvät tiedot
• Ergonomiatiedot
• Loppukäyttäjän lisenssisopimus
Drivers and Utilities -levy
HUOMAUTUS: Drivers and Utilities -levy voi olla valinnainen,
eikä sitä välttämättä toimiteta tietokoneen mukana.
Ohjeet ja ajurit on asennettu tietokoneeseen valmiiksi. Voit
käyttää levyä ajurien uudelleen asentamiseen ja kun haluat
suorittaa Dell-diagnostiikkaohjelman (katso kohtaa Delldiagnostiikkaohjelma sivulla 83).
Levyllä saattaa olla Lueminuttiedostoja, joissa on
viimeisimpiä päivityksiä
tietokoneen teknisistä
muutoksista tai teknisiä
lisätietoja teknikoille tai
kokeneille käyttäjille.
HUOMAUTUS: Ajuri- ja
ohjepäivityksiä on osoitteessa
support.dell.com.
HUOMAUTUS: Drivers and Utilities -levy voi olla valinnainen,
eikä sitä välttämättä toimiteta tietokoneen mukana.
Dell™-tuotetieto-opas
• Osien poistaminen ja vaihtaminen
• Tekniset tiedot
• Järjestelmäasetusten määrittäminen
• Ongelmien vianmääritys ja ratkaiseminen
Käyttöopas
Microsoft Windowsin Ohje- ja tukikeskus
1
Va li t se
Käynnistä
ja järjestelmäoppaat
2
Valitse tietokoneellesi tarkoitettu
tai
→ Ohje ja tuki→ Dellin käyttö-
→ Järjestelmäoppaat
käyttöopas
.
.
Pikaopas 71
Page 72

Mitä etsit? Tietolähde:
• Huoltotunnus ja pikapalvelukoodi
• Microsoft Windowsin käyttöoikeustarra
Huoltotunnus ja Microsoft® Windows® -käyttöoikeus
Tarrat ovat tietokoneessa.
• Huoltotunnuksen avulla voit tunnistaa tietokoneesi, kun
käytät
• Anna pikapalvelukoodi,
joka ohjaa puheluasi
ottaessasi yhteyden
tukeen.
HUOMAUTUS: Microsoft Windowsin käyttöoikeustarraa on
muutettu siten, että siinä on reikä eli "turvallisuusportaali"
uutena turvallisuustekijänä.
• Solutions (ratkaisuja) — vianmääritysohjeita, teknisten
asiantuntijoiden kirjoittamia artikkeleja, online-kursseja
ja usein kysyttyjä kysymyksiä
• Community (yhteisö) — online-keskustelua muiden
Dellin asiakkaiden kanssa
• Upgrades (päivityksiä) — komponenttien
päivitysohjeita, esimerkiksi muistin, kiintolevyaseman ja
käyttöjärjestelmän päivitysohjeet
• Customer Care (asiakaspalvelu) — yhteystiedot,
palvelupuhelu- ja tilaustiedot sekä takuu- ja
korjaustiedot
• Service and support (palvelut ja tuki) —
palvelupuhelujen tila ja tukitapahtumat,
palvelusopimukset, online-keskustelut teknisen tuen
kanssa
• Reference (viittaukset) — tietokoneen ohjeet,
laitekokoonpanon tiedot, tuotetekniset tiedot ja white
paper -raportit
• Downloads (ladattavat tiedostot) — sertifioidut ajurit,
korjaustiedostot ja ohjelmapäivitykset
• Notebook System Software (NSS) — Jos
käyttöjärjestelmä asennetaan uudelleen tietokoneeseen,
myös NSS-apuohjelma pitää asentaa uudelleen. NSS
sisältää tärkeitä käyttöjärjestelmäpäivityksiä ja tukea
Dellin™ 3,5 tuuman USB-levyasemille, AMD™suorittimille, optisille asemille ja USB-laitteille. NSS on
välttämätön, jotta Dell-tietokone toimii oikein. Ohjelma
tunnistaa automaattisesti tietokoneen ja
käyttöjärjestelmän ja asentaa niiden kokoonpanojen
mukaiset päivitykset.
Dell-tukisivusto — support.dell.com
HUOMAUTUS: Valitsemalla oman alueesi tai liiketoiminta-alan
näet siihen liittyvän tukisivuston.
Notebook System Software -ohjelmiston lataaminen:
1
Siirry osoitteeseen
liiketoiminta-alasi ja anna huoltotunnuksesi
2
Va li t se
3
Valitse käyttöjärjestelmäsi ja etsi hakusanalla Notebook
System Software
HUOMAUTUS: Support.dell.com-sivuston käyttöliittymä voi
vaihdella valintojesi mukaan.
support.dell.com
Ajurit ja ladattavat tiedostot
-sivustoa tai otat yhteyden tukeen.
support.dell.com
.
, valitse alueesi tai
.
ja
Siirry
.
72 Pikaopas
Page 73

Mitä etsit? Tietolähde:
• Ohjelmapäivityksiä ja vianmääritysaiheita — usein
kysyttyjä kysymyksiä, ajankohtaisia aiheita ja
tietokoneympäristön yleinen tila
Dell Support -apuohjelma
Dell Support -apuohjelma on tietokoneeseen asennettu
automaattinen päivitys- ja ilmoitusjärjestelmä. Tämä
tukiapuohjelma tekee tosiaikaisia tietokoneympäristön
terveystarkastuksia, sisältää ohjelmistopäivityksiä ja niihin
liittyviä tukitietoja. Avaa Dell Support -apuohjelma
tehtäväpalkin
Käyttöoppaassa
.
1
Napsauta
tuki.
2
Kirjoita ongelmaa kuvaava sana tai lause ja napsauta
• Tietoja Windows-käyttöjärjestelmien käytöstä
• Ohjelmien ja tiedostojen käyttäminen
• Työpöydän mukauttaminen
kohdassa
Windowsin Ohje- ja tukikeskus
nuolikuvaketta.
3
Napsauta ohjeaihetta, joka kuvaa ongelmaa.
4
Noudata näytön ohjeita.
• ITietoja verkon toiminnasta, ohjatusta
virranhallintatoiminnosta, pikanäppäimistä ja muista
Dell QuickSetin hallitsemista kohteista.
Dell QuickSet Hohje
Avaa
Dell QuickSet -ohje napsauttamalla hiiren
kakkospainikkeella Microsoft
QuickSet-kuvaketta.
Lisätietoja Dell QuickSetistä on käyttöoppaan
Dell™ QuickSet -ohjelmistoa koskevassa kohdassa.
• Käyttöjärjestelmän uudelleenasentaminen
Käyttöjärjestelmä on jo asennettu tietokoneeseen. Katso
käyttöoppaan kohtaa Käyttöjärjestelmän palauttaminen.
-kuvakkeella. Lisätietoja on tietokoneen
Dell Support -apuohjelman käyttöä koskevassa
Käynnistä
-painiketta tai valitse
®
Windowsin® tehtäväpalkin
→
Ohje ja
Pikaopas 73
Page 74

Tietokoneen käyttöönotto
VAARA: Ennen kuin suoritat mitään tässä osassa mainittuja toimia, noudata Tuotetieto-oppaassa olevia
turvallisuusohjeita.
1
Pura lisävarusteet pakkauksesta.
2
Aseta pakkauksessa olevat lisävarusteet esille. Tarvitset niitä valmistellessasi tietokonetta
käyttöönottoa varten.
Lisävarustepakkauksessa on lisäksi käyttöohjeita sekä tilaamiasi muita ohjelmistoja tai laitteita (PCkortteja, levyasemia tai akkuja).
3
Kytke verkkolaite tietokoneen verkkolaiteliittimeen ja pistorasiaan.
4
Avaa tietokoneen näyttö ja käynnistä tietokone painamalla virtapainiketta (katso kohtaa Näkymä
edestä sivulla 75).
HUOMAUTUS: On suositeltavaa, että sammutat tietokoneen virran ja käynnistät sen vähintään kerran, ennen kuin
asennat kortteja tai liität tietokoneen telakointilaitteeseen tai muuhun ulkoiseen laitteeseen, kuten tulostimeen.
74 Pikaopas
Page 75

Tietoja tietokoneesta
Näkymä edestä
11
10
9
1
2
3
4
5
6
8
1 näytön salpa 2 näyttö 3 virtapainike
4 laitteen tilailmaisimet 5 kaiuttimet (2) 6 näppäimistö
7 kosketuslevy 8 ohjaussauvan painikkeet 9 näppäimistön tilailmaisimet
10 langattomuuden
käyttöönottopainike
11 ympäristön valotunnistin
7
Pikaopas 75
Page 76

Näkymä vasemmalta
43 51 62
1 suojakaapelin paikka 2 ilmanpoistoaukko 3 IEEE 1394 -liitin
4 ääniliittimet (2) 5 PC-korttipaikka 6 kiintolevy
Näkymä oikealta
1 23
1 levyasema 2 laitteen salvan vapautin 3 USB-liittimet (2)
Näkymä takaa
VAARA: Älä peitä ilma-aukkoja, älä työnnä niihin esineitä äläkä anna pölyn kerääntyä niihin. Älä säilytä
käynnissä olevaa tietokonetta ilmatiiviissä tilassa, kuten suljetussa salkussa. Jos ilman vaihtuminen estetään,
tietokone voi vahingoittua tai voi syttyä tulipalo.
8123 4 5 6 7
1 verkkoliitin (RJ-45) 2 S-video-liitin/TV-lähtöliitin 3 USB-liittimet (2)
4 modeemiliitin (RJ-11) 5 sarjaliitin 6 VGA-liitin
7 verkkolaitteen liitin 8 tuuletusaukot
76 Pikaopas
Page 77

Näkymä pohjasta
1 3
2
7
6
5
1 akun latausmittari 2 akkupaikan salvan vapautin 3 akku
4 muistimoduulin / nappipariston kansi 5 telakointilaitteen paikka 6 tuuletusaukot
7 kiintolevy
4
Pikaopas 77
Page 78

Akun käyttö
Akun suoritusteho
HUOMAUTUS: Katso Tuotetieto-oppaasta tai tietokoneen mukana toimitetusta erillisestä takuuasiakirjasta, mitä
tietokoneesi Dell-takuu kattaa.
Parhaiten kannettava Dell™-tietokoneesi toimii ja BIOS-asetukset säilyvät, kun pääakku on aina asennettuna
tietokoneeseen sitä käytettäessä. Tietokoneen mukana toimitetaan yksi akku vakiovarusteena ja akkupaikkaan
asennettuna.
HUOMAUTUS: Koska akku ei ehkä ole täyteen ladattu, kytke uusi tietokone sähköpistorasiaan verkkolaitteen avulla, kun
käytät tietokonetta ensimmäisen kerran. Parhaiten laite toimii, kun käytät tietokonetta verkkolaitteen avulla, kunnes akku
on ladattu täyteen. Jos haluat nähdä akun lataustilan, valitse Käynnistä
Akkumittari.
HUOMAUTUS: Akun käyttöaika (aika, jollloin se pysyy ladattuna) vähenee ajan myötä. Sen mukaan, miten usein ja
missä oloissa akkua käytetään, voit joutua hankkimaan uuden akun tietokoneen käyttöiän aikana.
Akun käyttöaika vaihtelee käyttöolojen mukaan. Voit asentaa valinnaisen toisen akun levyasemapaikkaan,
jolloin käyttöaika pitenee huomattavasti.
Käyttöaika lyhenee huomattavasti, kun teet esimerkiksi seuraavia toimia:
• käytät optisia asemia
• käytät langattomia tietoliikennelaitteita, PC-kortteja, ExpressCard-kortteja, levymuistikortteja tai USBlaitteita
• käytät erittäin kirkkaan näytön asetuksia, 3D-näytönsäästäjiä tai muita virtaa paljon käyttäviä ohjelmia,
kuten monimutkaisia 3D-grafiikkasovelluksia
• käytät tietokonetta suurimmassa mahdollisessa suoritustilassa (lisätietoja on
Virranhallinta-asetusten määrittäminen).
→
Ohjauspaneeli→ Virranhallinta-asetukset→
käyttöoppaan
kohdassa
HUOMAUTUS: On suositeltavaa, että liität tietokoneen pistorasiaan, kun kirjoitat CD- tai DVD-asemaan.
Voit tarkistaa akun latauksen (katso kohtaa Akun latauksen tarkistus sivulla 79), ennen kuin asennat
akun tietokoneeseen. Voit myös määrittää virranhallinta-asetukset ilmoittamaan silloin, kun akun lataus
on vähissä
(katso
käyttöoppaan
VAARA: Yhteensopimattoman akun käyttö voi lisätä tulipalon tai räjähdyksen vaaraa. Vaihda akku vain Delliltä
hankkimaasi yhteensopivaan akkuun. Litium-ioniakku on suunniteltu toimimaan Dell-tietokoneen kanssa. Älä
käytä. toisen tietokoneen akkua omassa tietokoneessasi.
VAARA: Älä hävitä akkuja talousjätteen mukana. Kun akkusi ei enää lataudu, ota yhteys paikalliseen jätehuolto-
tai ympäristöviranomaiseen ja kysy tietoja litium-ioniakun hävittämisestä. Katso Tuotetieto-oppaan kohtaa Akun
hävittäminen.
VAARA: Akun väärä käyttö voi lisätä tulipalon tai kemiallisen palovamman vaaraa. Älä puhkaise, polta, pura tai
altista akkua yli 60 °C:n lämpötiloille. Pidä akku poissa lasten ulottuvilta. Käsittele vahingoittunutta tai vuotavaa
akkua erittäin huolellisesti. Vahingoittuneet akut voivat vuotaa ja aiheuttaa ruumiinvammoja tai aineellisia
vahinkoja.
kohtaa Virranhallinta-asetusten määrittäminen).
78 Pikaopas
Page 79

Akun latauksen tarkistus
Dell QuickSet -akkumittari, Microsoft Windowsin Akkumittari-ikkuna ja -kuvake, akunvarausmittari
ja käyttöikämittari ja akun alhaisen varauksen varoitus antavat tietoa akun latauksesta.
Dell™ QuickSet -akkumittari
Jos Dell QuickSet on asennettu, tuo QuickSet-akkumittari näyttöön painamalla näppäimiä <Fn><F3>.
Akkumittari-ikkunassa näkyy tietokoneen akun tila, käyttöikä, lataustaso ja latauksen päättymisaika.
Lisätietoja QuickSet-toiminnosta saat napsauttamalla tehtäväpalkin QuickSet-kuvaketta ja valitsemalla
Ohje.
Microsoft® Windowsin® akkumittari
Windowsin akkumittari näyttää jäljellä olevan akun lataustason. Voit tarkistaa akkumittarin
kaksoisnapsauttamalla työkalurivin -kuvaketta.
Jos tietokone on liitetty pistorasiaan, -kuvake tulee näyttöön.
Latausmittari
Painamalla akun latausmittarin tilapainiketta kerran tai painamalla ja pitämällä sitä alhaalla voit
tarkistaa:
• Akun latauksen (tarkista painamalla tilapainiketta ja
• Akun käyttöiän (tarkista painamalla tilapainiketta ja
Akun käyttöaika määräytyy paljolti sen mukaan, miten monta kertaa se on ladattu. Satojen lataus- ja
käyttökertojen jälkeen akut menettävät osan varauskapasiteetistaan eli käyttöiästään. Eli akku voi näyttää
olevan ladattu, mutta sen latauskapasiteetti (käyttöikä) on rajallinen.
vapauttamalla
se)
pitämällä sitä alhaalla
)
Akun latauksen tarkistus
Voit tarkistaa akun latauksen painamalla akun latausmittarin tilapainiketta ja vapauttamalla sen, jolloin
lataustason ilmaisinvalot syttyvät. Kukin ilmaisin vastaa noin 20:tä prosenttia akun kokonaislatauksen
määrästä. Esimerkiksi jos akussa on 80 prosenttia latauksesta jäljellä, neljä ilmaisinvaloa palaa. Jos
ilmaisinvalot eivät pala, akku on tyhjä.
Akun käyttöiän tarkistus
HUOMAUTUS: Voit tarkistaa akun käyttöiän jommallakummalla seuraavista tavoista: käytä akun latausmittaria
seuraavan ohjeen mukaisesti tai käytä Dell QuickSet -ohjelmiston akkumittaria. Tietoja QuickSet-toiminnosta saat
napsauttamalla hiiren kakkospainikkeella QuickSet-kuvaketta ja valitsemalla Ohje.
Voit tarkistaa akun käyttöiän latausmittarin avulla painamalla akun latausmittarin tilapainiketta ja
pitämällä sitä painettuna vähintään 3 sekuntia. Jos yhtään ilmaisinvaloa ei syty, akku on hyvässä kunnossa ja
yli 80 prosenttia alkuperäisestä latauskapasiteetista on vielä jäljellä. Mitä useampi ilmaisinvalo palaa, sen
lyhyempi on käyttöikä. Jos viisi ilmaisinvaloa syttyy, latauskapasiteetista on jäljellä alle 60 prosenttia ja on aika
hankkia uusi akku. Lisätietoja akun käyttöajasta on käyttöoppaan kohdassa Tekniset tiedot.
Pikaopas 79
Page 80

Akun lataus on vähissä -varoitus
VAROITUS: Vältä tietojen menetys tai vahingoittuminen tallentamalla työsi heti saatuasi akun
tyhjenemisvaroituksen. Kytke sitten tietokone sähköpistorasiaan tai asenna toinen akku levyasemapaikkaan. Jos
akku tyhjenee kokonaan, tietokoneen lepotila alkaa automaattisesti.
Oletusarvoisesti näyttöön avautuva ikkuna varoittaa, kun noin 90 prosenttia akun latauksesta on
kulunut. Voit vaihtaa akkuvaroitusten asetuksia QuickSetissä tai Virranhallinta-asetukset-ikkunassa.
Lisätietoja QuickSet-toiminnon tai Virranhallinta-asetukset-ikkunan käyttämisestä on
käyttöoppaan
kohdassa Virranhallinta-asetusten määrittäminen.
Akun lataaminen
HUOMAUTUS: Kun käytössa on Dell™ ExpressCharge™ ja tietokoneen virta on sammutettu, verkkolaite lataa
täysin tyhjentyneen akun 80-prosenttisesti noin 1 tunnissa ja 100-prosenttisesti noin 2 tunnissa. Latausaika on
pitempi, jos tietokone on käynnissä. Voit jättää akun tietokoneeseen niin pitkäksi aikaa kuin haluat. Akun sisäiset
piirit estävät sen ylilatauksen.
HUOMAUTUS: Jotta ExpressCharge-ominaisuutta voi käyttää 9-kennoisen akun kanssa, on käytettävä 90 W:n
verkkolaitetta.
Kun liität tietokoneen pistorasiaan tai asennat akun tietokoneen ollessa liitettynä pistorasiaan, tietokone
tarkistaa akun latauksen ja lämpötilan. Verkkolaite lataa akun tarvittaessa ja ylläpitää sen latausta.
Jos akku on kuuma sen jälkeen, kun sitä on käytetty tietokoneessa tai kuumassa ympäristössä, akku ei
ehkä lataudu, kun tietokone liitetään pistorasiaan.
Akku on liian kuuma ladattavaksi, jos -valo vilkkuu vuorotellen vihreänä ja oranssina. Irrota tietokone
pistorasiasta ja anna tietokoneen ja akun jäähtyä huoneenlämpöisiksi. Liitä sitten tietokone pistorasiaan
ja jatka akun lataamista.
Lisätietoja akkuongelmien ratkaisemisesta on käyttöoppaan kohdassa Virtaongelmat.
Akun vaihtaminen
VAARA: Ennen kuin suoritat nämä toimet, sammuta tietokone, irrota verkkolaite sähköpistorasiasta ja
tietokoneesta, irrota modeemi seinäliittimestä ja tietokoneesta ja irrota tietokoneen kaikki muutkin ulkoiset
kaapelit.
VAARA: Yhteensopimattoman akun käyttö voi lisätä tulipalon tai räjähdyksen vaaraa. Vaihda akku vain Delliltä
hankkimaasi yhteensopivaan akkuun. Akku on suunniteltu toimimaan Dell™-tietokoneen kanssa. Älä käytä
toisen tietokoneen akkua omassa tietokoneessasi.
VAROITUS: Sinun täytyy irrottaa kaikki ulkoiset kaapelit tietokoneesta mahdollisten liitinvaurioiden välttämiseksi.
Tietoja tietovälinepaikassa olevan toisen akun vaihtamisesta on käyttöoppaan multimedian käyttöä koskevassa
kohdassa.
80 Pikaopas
Page 81

Akun irrotus:
1
Jos tietokone on kiinnitetty telakointilaitteeseen, irrota se telakoinnista. Lisätietoja saat käyttämäsi
telakointilaitteen ohjeesta.
2
Varmista, että tietokone on sammutettu, lepotilassa tai kytkettynä verkkolaitteeseen.
VAROITUS: Jos akku irrotetaan tietokoneesta valmiustilan aikana (ilman verkkovirtaa), tietokone sammuu ja
tietoja voidaan menettää.
3
Liu'uta tietokoneen pohjassa olevaa akkupaikan vapautinta ja pidä siitä kiinni.
4
Nosta akku paikastaan.
1 2
1 akku 2 akkupaikan salvan vapautin
Jos haluat vaihtaa akun, aseta akku paikalleen ja paina sitä alas, kunnes akkupaikan salvan vapautin
napsahtaa.
Akun säilytys
Irrota akku, jos et käytä tietokonettasi pitkään aikaan. Akku tyhjenee pitkän säilytyksen aikana. Pitkän
säilytysajan jälkeen lataa akku täyteen, ennen kuin käytät sitä (katso kohtaa Akun lataaminen sivulla 80).
Pikaopas 81
Page 82

Vianmääritys
Lukitukset ja ohjelmisto-ongelmat
VAARA: Ennen kuin suoritat mitään tässä osassa mainittuja toimia, noudata Tuotetieto-oppaassa olevia
turvallisuusohjeita.
Tietokone ei käynnisty.
VARMISTA, ETTÄ VERKKOLAITE ON LIITETTY TIETOKONEESEEN JA PISTORASIAAN.
Tietokone lakkaa toimimasta
VAROITUS: Voit menettää tietoja, jos et pysty sammuttamaan käyttöjärjestelmää.
AMMUTA TIETOKONEEN VIRTA — Jos mitään ei tapahdu, kun painat näppäintä tai liikutat hiirtä, paina
S
virtapainiketta vähintään 8 - 10 sekuntia, kunnes tietokone sammuu. Käynnistä sitten tietokone
uudelleen.
Ohjelma lakkaa toimimasta tai kaatuu toistuvasti
HUOMAUTUS: Ohjelmasta on yleensä asennusohjeet sen oppaissa tai levykkeellä tai CD-levyllä.
L
OPETA OHJELMA —
1
Paina <Ctrl>-, <Vaihto>- ja <Esc>-näppäimiä samanaikaisesti.
2
Va li t se
Laitehallinta
3
Va li t se
Sovellukset
4
Napsauta ohjelmaa, joka ei enää vastaa.
5
Va li t se
Lopeta tehtävä
TARKISTA OHJELMAN OHJEET — Poista ohjelma ja asenna se tarvittaessa uudelleen.
.
.
.
Ohjelma on suunniteltu aikaisemmalle käyttöjärjestelmän versiolle
SUORITA OHJATTU OHJELMAN YHTEENSOPIVUUDEN VARMISTAMINEN — Ohjattu ohjelman
yhteensopivuuden varmistaminen määrittää ohjelman, joten se toimii ympäristössä, joka muistuttaa
muita kuin Windows XP -käyttöjärjestelmäympäristöjä.
Va li t se
1
Käynnistä→
varmistaminen
2
Noudata näytön ohjeita.
Näyttö muuttuu täysin siniseksi
SAMMUTA TIETOKONEEN VIRTA — Jos tietokone ei tee mitään, kun painat näppäintä tai liikutat hiirtä,
Kaikki ohjelmat→
→
Seuraava
.
Apuohjelmat→ Ohjattu ohjelman yhteensopivuuden
paina virtapainiketta vähintään 8 - 10 sekuntia, kunnes tietokone sammuu. Käynnistä sitten tietokone
uudelleen.
82 Pikaopas
Page 83

Muita ohjelmisto-ongelmia
TARKISTA OHJELMAN OHJEET TAI PYYDÄ VIANMÄÄRITYSTIETOJA OHJELMAN VALMISTAJALTA —
• Varmista, että ohjelma on yhteensopiva tietokoneesi käyttöjärjestelmän kanssa.
• Varmista, että tietokone vastaa ohjelman vähimmäisvaatimuksia. Katso tietoja ohjelman ohjeista.
• Varmista, että ohjelma on asennettu ja määritetty oikein.
• Tarkista, että laitteen ajurit eivät ole ristiriidassa ohjelman kanssa.
• Poista ohjelma ja asenna se tarvittaessa uudelleen.
TEE HETI VARMUUSKOPIOT TIEDOSTOISTASI.
ÄYTÄ VIRUSTENTORJUTAOHJELMAA JA TARKISTA KIINTOLEVY, LEVYKKEET TAI CD-LEVYT.
K
T
ALLENNA JA SULJE KAIKKI AVATUT TIEDOSTOT TAI OHJELMAT JA SAMMUTA TIETOKONE Käynnistä-
VALIKOSTA.
ARKISTA, ONKO TIETOKONEESSA VAKOILUOHJELMIA — Jos tietokoneesi toimii hitaasti, saat usein muut
T
ikkunat peittäviä mainoksia tai sinulla on ongelmia Internet-yhteyden muodostamisessa, tietokoneeseesi
on voinut tunkeutua vakoiluohjelma. Käytä virustentorjuntaohjelmaa, jossa on myös
vakoiluohjelmasuojaus (ohjelmasi voi edellyttää päivitystä) ja joka käy läpi tietokoneen sisällön ja poistaa
vakoiluohjelmat. Lisätietoja saat siirtymällä osoitteeseen support.dell.com ja tekemällä haun hakusanalla
spyware (vakoiluohjelma).
SUORITA DELL-DIAGNOSTIIKKAOHJELMA — Katso kohtaa Dell-diagnostiikkaohjelma sivulla 83. Jos kaikki
testit onnistuvat, virhetila liittyy ohjelmaongelmaan.
Dell-diagnostiikkaohjelma
VAARA: Ennen kuin suoritat mitään tässä osassa mainittuja toimia, noudata Tuotetieto-oppaassa olevia
turvallisuusohjeita.
Dell-diagnostiikkaohjelman käyttös
Jos tietokoneessasi on jotain ongelmia, suorita kohdassa Lukitukset ja ohjelmisto-ongelmat sivulla 82
mainitut tarkistukset ja suorita Dell-diagnostiikkaohjelma, ennen kuin otat yhteyden Dellin tekniseen
tukeen.
Suosittelemme näiden ohjeiden tulostamista ennen aloittamista.
VAROITUS: Dell-diagnostiikkaohjelma toimii Dell™ tietokoneissa.
HUOMAUTUS: Drivers and Utilities -levy on valinnainen, eikä sitä välttämättä toimiteta tietokoneen mukana.
Aloita Dell-diagnostiikkaohjelma joko kiintolevyltä tai Drivers and Utilities -levy.
Dell-diagnostiikkaohjelman käynnistäminen kiintolevyltä
Dell-diagnostiikkaohjelma sijaitsee kiintolevyllä piilotettuna olevassa Diagnostic utility -osiossa.
HUOMAUTUS: Jos tietokoneessasi ei näy näyttökuvaa, ota yhteys Delliin (lisätietoja on käyttöoppaan kohdassa
Yhteyden ottaminen Delliin).
Pikaopas 83
Page 84

HUOMAUTUS: Jos tietokone on kiinnitetty telakointilaitteeseen, irrota se telakoinnista. Lisätietoja saat
käyttämäsi telakointilaitteen ohjeesta.
1
Varmista, että tietokone on kytketty virtalähteeseen, jonka tiedät toimivan oikein.
2
Käynnistä (tai käynnistä uudelleen) tietokone.
3
Käynnistä Dell-diagnostiikkaohjelma jommallakummalla seuraavista tavoista:
a
Kun DELL™-logo tulee näkyviin, paina heti <F12>-näppäintä. Valitse käynnistysvalikosta
Diagnostics
ja paina <Enter>-näppäintä.
HUOMAUTUS: Jos odotusaika on liian pitkä ja käyttöjärjestelmän logo tulee näkyviin, odota, kunnes
Microsoft
HUOMAUTUS: Ennen kuin kokeilet vaihtoehtoa b, tietokoneen virta on sammutettava kokonaan.
Paina <Fn>-näppäintä ja pidä sitä alhaalla, kun käynnistät tietokoneen.
b
HUOMAUTUS: Jos näyttöön tulee sanoma, joka ilmaisee, että diagnostiikka-apuohjelman osiota ei löydy,
suorita Dell-diagnostiikka Drivers and Utilities -levyltä.
®
Windows® -työpöytä tulee näkyviin, sammuta sitten tietokone ja yritä uudelleen.
Tietokone suorittaa PSA (Pre-boot System Assessment) -toiminnon, joka on sarja emolevyn,
näppäimistön, näytön, muistin, kiintolevyn ja muiden osien toimintaa alustavasti testaavia
diagnostiikkatestejä.
• Testin aikana sinun on ehkä vastattava joihinkin kysymyksiin.
• Jos PSA-toiminnon aikana havaitaan virheitä, kirjoita virhekoodi(t) muistiin ja katso
kohtaa Yhteyden ottaminen Delliin
4
Jos PSA-toiminto suoritetaan loppuun asti, näyttöön tulee viesti
Utility Partition
.
Press any key to continue
osio käynnistetään. Jatka painamalla jotain näppäintä).
Painamalla jotain näppäintä käynnistät Dell-diagnostiikkaohjelman kiintolevyn diagnostiikka-
5
.
Booting Dell Diagnostic
(Dellin diagnostiikka-apuohjelman
apuohjelman osiolta.
Dell-diagnostiikkaohjelman käynnistäminen Drivers and Utilities -tietovälineeltä
1
Aseta
Drivers and Utilities
2
Sammuta tietokone ja käynnistä se sitten uudelleen.
-levy.
Kun DELL-logo tulee näkyviin, paina heti <F12>-näppäintä.
käyttöoppaan
HUOMAUTUS: Jos odotusaika on liian pitkä ja käyttöjärjestelmän logo tulee näkyviin, odota, kunnes
Microsoft
HUOMAUTUS: Seuraavat ohjeet muuttavat käynnistysjakson vain yhdeksi kerraksi. Seuraavan kerran
tietokonetta käynnistettäessä se käynnistää järjestelmäasetusohjelmassa määritetyt laitteet.
3
Kun käynnistyslaiteluettelo tulee näkyviin, korosta
näppäintä.
84 Pikaopas
®
Windows® -työpöytä tulee näkyviin, sammuta sitten tietokone ja yritä uudelleen.
CD/DVD/CD-RW-asema
ja paina <Enter>-
Page 85

4
Valitse näyttöön tulevasta valikosta vaihtoehto
Käynnistä CD-ROM-asemasta
ja paina <Enter>-
näppäintä.
5
Kirjoita 1, jolloin valikko käynnistyy, ja jatka painamalla <Enter>-painiketta.
6
Va li t se
Run the 32 Bit Dell Diagnostics
numeroidusta luettelosta. Jos luettelossa on useita versioita,
valitse tietokoneellesi sopiva versio.
7
Kun Dell-diagnostiikkaohjelman
Dell-diagnostiikkaohjelman päävalikko
1
Kun Dell-diagnostiikkaohjelma on latautunut ja
päävalikko
tulee näkyviin, valitse suoritettava testi.
päävalikko
avautuu, napsauta haluamaasi
vaihtoehtoa.
HUOMAUTUS: On suositeltavaa valita Test System, kun halutaan testata koko tietokone.
Vaihtoehto Toiminto
Test Memory
Test System
Exit
2
Kun olet valinnut päävalikosta
Suorittaa yksittäisen muistin testauksen
Suorittaa järjestelmän diagnostiikkatestin
Lopettaa diagnostiikkaohjelman
Test System
(Testaa järjestelmä) -vaihtoehdon, näyttöön tulee
seuraava valikko.
HUOMAUTUS: On suositeltavaa, että valitset seuraavasta valikosta kohda Extended Test (Laaja testi), kun
haluat suorittaa tietokoneen laitteita koskevan perusteellisen testin.
Vaihtoehto Toiminto
Express Test
(Pikatesti)
Extended Test
(Laaja testi)
Custom Test
(Mukautettu testi)
Symptom Tree
(Ilmenemispuu)
3
Jos ongelma löydetään testin aikana, näyttöön tulee sanoma, jossa ilmoitetaan virhekoodi ja ongelman
Testaa laitteet nopeasti. Testaaminen vie yleensä 10–20 minuuttia.
Testaa laitteet perusteellisesti. Testi kestää yleensä tunnin tai
kauemmin.
Testaa tietyn laitteen ja mukauttaa suoritettavia testejä.
Voit valita testin, joka perustuu ongelman ilmenemistapaan. Näyttää
luettelon tavallisimmista ongelmien ilmenemistavoista.
kuvaus. Kirjoita virhekoodi ja ongelman kuvaus muistiin ja ota yhteys Delliin (lisätietoja on
käyttöoppaan
HUOMAUTUS: Tietokoneen huoltotunnus näkyy kunkin näytön yläosassa. Jos otat yhteyden Delliin,
tekninen tuki kysyy huoltotunnustasi.
kohdassa Yhteyden ottaminen Delliin).
Pikaopas 85
Page 86

4
Jos teet testin käyttämällä
Custom Test
(Mukautettu testi)- tai
Symptom Tree
-vaihtoehtoa, saat lisätietoja napsauttamalla seuraavassa taulukossa kuvattuja välilehtiä.
Välilehti: Toiminto
Results (Tulokset) Näyttää testin tulokset ja havaitut virhetilanteet.
Errors (Virheet) Näyttää havaitut virhetilanteet, virhekoodit ja ongelman kuvauksen.
Help (Ohje) Sisältää kuvauksen testistä ja saattaa ilmoittaa testin suorittamiseen
liittyviä vaatimuksia.
Configuration
(Kokoonpano)
Parameters
(Parametrit)
5
Kun testit on tehty, palaa
diagnostiikkaohjelman käytön ja käynnistää tietokoneen uudelleen sulkemalla
6
Poista Dell
Drivers and Utilities
Näyttää valitun laitteen laitteistokokoonpanon.
Dell-diagnostiikkaohjelma saa kaikkien laitteiden kokoonpanotiedot
järjestelmän asennusohjelmasta, muistista ja sisäisistä testeistä. Kaikki
tiedot näytetään vasemmassa reunassa olevassa laiteluettelossa.
Laiteluettelossa ei välttämättä ole kaikkien tietokoneeseen
asennettujen komponenttien tai tietokoneeseen liitettyjen laitteiden
nimiä.
Voit mukauttaa testiä muuttamalla testiasetuksia.
Päävalikkoon
sulkemalla testinäyttö. Voit lopettaa Dell-
päävalikkonäytön
-levy asemasta (jos se on käytössä).
(Ilmenemispuu)
.
86 Pikaopas
Page 87

Hakemisto
A
akku
akkumittari, 79
irrottaminen, 80
lataaminen, 80
latauksen tarkistus, 79
latausmittari, 79
suoritusteho, 78
säilytys, 81
D
Dell-diagnostiikka
käynnistäminen Drivers and
Utilities -levyltä, 84
käynnistäminen
kiintolevyltä, 83
käyttäminen, 83
tietoja, 83
Dell-tukisivusto, 72
diagnostiikka
Dell, 83
E
ergonomiatiedot, 71
H
J
järjestelmänäkymät
edestä, 75
oikea puoli, 76
pohja, 76-77
takaa, 76
vasen puoli, 76
K
käyttöoikeussopimus, 71
Käyttöopas, 71
L
laitteisto
Dell-diagnostiikka, 83
Levyt
Drivers and Utilities, 71
O
ohjatut toiminnot
Ohjattu ohjelman
yhteensopivuuden
varmistaminen, 82
Ohje- ja tukikeskus, 73
ohjeet
ergonomia, 71
käyttöoikeussopimus, 71
Käyttöopas, 71
online, 72
säädökset, 71
takuu, 71
Tuotetieto-opas, 71
turvallisuus, 71
ohjelmisto
ongelmat, 82-83
ohjetiedosto
Windowsin Ohje- ja
tukikeskus, 73
ongelma
tietokone kaatuu, 82
ongelmat
Dell-diagnostiikka, 83
lukitukset, 82
ohjelma kaatuu, 82
ohjelma lakkaa toimimasta, 82
ohjelmien ja Windowsin
yhteensopivuus, 82
ohjelmisto, 82-83
sininen näyttö, 82
tietokone ei käynnisty, 82
tietokone kaatuu, 82
tietokone lakkaa
toimimasta, 82
huoltotunnus, 72
Hakemisto 87
Page 88

Q
W
QuickSet, 73
R
Resurssilevy
Dell-diagnostiikka, 83
T
takuutiedot, 71
tarrat
huoltotunnus, 72
Microsoft Windows, 72
tiedot säädöksistä, 71
tietokone
kaatumiset, 82
lakkaa vastaamasta, 82
tukisivusto, 72
Tuotetieto-opas, 71
turvallisuusohjeet, 71
Windows
Ohjattu ohjelman
yhteensopivuuden
varmistaminen, 82
Ohje- ja tukikeskus, 73
V
vianmääritys
Dell-diagnostiikka, 83
lukitukset ja ohjelmisto-
ongelmat, 82
Ohje- ja tukikeskus, 73
virustentorjuntaohjelma, 83
88 Hakemisto
Page 89

Dell™ Latitude™ D531
Σύντοµος Οδηγός Αναφοράς
Μοντέλο
PP04X
www.dell.com | support.dell.com
Page 90

Σηµείωση, ειδοποίηση και προσοχή
ΣΗΜΕΙΩΣΗ:
υπολογιστή σας.
ΕΙ∆ΟΠΟΙΗΣΗ:
τρόπο µε τον οποίο µπορείτε να αποφύγετε το πρόβληµα.
ΠΡΟΣΟΧΗ:
Η ΣΗΜΕΙΩΣΗ υποδεικνύει σηµαντικές πληροφορίες που σας βοηθούν να χρησιµοποιείτε καλύτερα τον
Η ΕΙ∆ΟΠΟΙΗΣΗ υποδηλώνει είτε δυνητική βλάβη υλικού είτε απώλεια δεδοµένων και υποδεικνύει τον
Η ΠΡΟΣΟΧΗ επισηµαίνει κίνδυνο βλάβης υλικού, τραυµατισµού ή θανάτου.
Συντοµεύσεις και ακρωνύµια
Για µια πλήρη λίστα συντοµεύσεων και ακρωνυµίων, ανατρέξτε στο Γλωσσάρι στον
Εάν αγοράσατε έναν υπολογιστή Dell™ της σειράς n, οι αναφορές του παρόντος για τα λειτουργικά συστήµατα
Microsoft
®
Windows® δεν είναι εφαρµόσιµες.
ΣΗΜΕΙΩΣΗ:
υπολογιστή σας. Ορισµένες λειτουργίες ή µέσα µπορεί να µην είναι διαθέσιµα σε ορισµένες χώρες.
Ορισµένες λειτουργίες ή µέσα µπορεί να είναι προαιρετικά και µπορεί να µην αποστέλλονται µε τον
Οδηγό χρήσης
.
____________________
Οι πληροφορίες αυτού του εγγράφου µπορεί να αλλάξουν χωρίς προειδοποίηση.
© 2007 Dell Inc. Με επιφύλαξη παντός δικαιώµατος.
Απαγορεύεται αυστηρά η αναπαραγωγή µε οποιονδήποτε τρόπο χωρίς τη γραπτή άδεια της Dell Inc.
Εµπορικά σήµατα που χρησιµοποιούνται στο παρόν: Η ονοµασία Dell, το λογότυπο DELL, οι ονοµασίες Latitude και ExpressCharge είναι
εµπορικά σήµατα της Dell Inc. Η ονοµασία AMD
και Windows είναι σήµατα κατατεθέντα της Microsoft Corporation. Οι ονοµασίες Windows Vista και το κουµπί έναρξης των Windows Vista
είναι εµπορικά σήµατα Microsoft Corporation.
Άλλα εµπορικά σήµ ατα και εµ πορικές ονοµασίες µπορεί να χρησιµοποιούνται στο παρόν έγγραφο αναφερόµ ενα είτε στους κατόχους των
σηµάτων
τρίτων.
και των ονοµάτων είτε στα προϊόντα τους. Η Dell Inc. παραιτείται από κάθε δικαίωµα σε εµπορικά σήµατα και εµπορικές ονοµασίες
είναι εµπορικό σήµα της Advanced Micro Devices, Inc. Οι ονοµασίες Microsoft, Outlook
Μοντέλο PP04X
Απρίλιος 2007 P/N YK560 Αναθ. A00
Page 91

Περιεχόµενα
Εύρεση πληροφοριών
Ρύθµιση του υπολογιστή σας
Πληροφορίες για τον υπολογιστή σας
Χρήση της µπαταρίας
Αντιµετώπιση προβληµάτων
. . . . . . . . . . . . . . . . . . . . . . . . . . . . .
. . . . . . . . . . . . . . . . . . . . . . . . .
. . . . . . . . . . . . . . . . . . . . . . . . . . . .
. . . . . . . . . . . . . . . . . . . . . . . .
. . . . . . . . . . . . . . . . . . . .
93
97
98
101
105
Περιεχόµενα
91
Page 92

92
Περιεχόµενα
Page 93

Εύρεση πληροφοριών
ΣΗΜΕΙΩΣΗ:
υπολογιστή σας. Ορισµένες λειτουργίες ή µέσα µπορεί να µην είναι διαθέσιµα σε ορισµένες χώρες.
ΣΗΜΕΙΩΣΗ:
Τι ψάχνετε; Βρείτε το εδώ
• Ένα διαγνωστικό πρόγραµµα για τον υπολογιστή µου
• Προγράµµατα οδήγησης για τον υπολογιστή µου
• Την τεκµηρίωση της συσκευής µου
• Λογισµικό συστήµατος φορητού υπολογιστή (NSS)
• Πληροφορίες εγγύησης
• Όροι και συνθήκες (µόνο για ΗΠΑ)
• Οδηγίες ασφαλείας
• Πληροφορίες κανονισµών
• Πληροφορίες εργονοµίας
• Άδεια Χρήσης Τελ ικο ύ Χρήστη
Ορισµένες λειτουργίες ή µέσα µπορεί να είναι προαιρετικά και µπορεί να µην αποστέλλονται µε τον
Πρόσθετες πληροφορίες µπορούν να αποσταλούν µαζί µε τον υπολογιστή σας.
CD/DVD Προγράµµατα οδήγησης και βοηθητικές
εφαρµογές
ΣΗΜΕΙΩΣΗ:
βοηθητικές εφαρµογές είναι προαιρετικό και µπορεί να µην
αποσταλεί µε τον υπολογιστή σας.
Η τεκµηρίωση και τα προγράµµατα οδήγησης είναι ήδη
εγκατεστηµένα στον υπολογιστή σας. Μπορείτε να
χρησιµοποιήσετε το CD/DVD για να εγκαταστήσετε ξανά
προγράµµατα οδήγησης και για να εκτελέστε το διαγνωστικό
πρόγραµµα της Dell (δείτε «∆ιαγνωστικό πρόγραµµα της Dell»
Στη σελίδα 107).
ΣΗΜΕΙΩΣΗ:
τεκµηρίωσης θα βρείτε στη διεύθυνση
ΣΗΜΕΙΩΣΗ:
βοηθητικές εφαρµογές είναι προαιρετικό και µπορεί να µην
αποσταλεί µε τον υπολογιστή σας.
Οδηγός πληροφοριών προϊόντος Dell™
Το CD/DVD Προγράµµατα οδήγησης και
Προγράµµατα οδήγησης και ενηµερώσεις
Το CD/DVD Προγράµµατα οδήγησης και
Τα αρχεία Readme ενδέχεται να
περιλαµβάνονται στο CD/DVD
για να παρέχουν τις πιο
πρόσφατες ενηµερώσεις
σχετικά µε
στον υπολογιστή σας ή
εξελιγµένο υλικό αναφοράς
τεχνικού περιεχοµένου για
έµπειρους χρήστες ή τεχνικούς.
τεχνικές αλλαγές
support.dell.com
.
Σύντοµος οδηγός αναφοράς
93
Page 94

Τι ψάχνετε; Βρείτε το εδώ
• Αποµάκρυνση και αντικατάσταση τµηµάτων
• Προδιαγραφές
• ∆ιαµόρφωση των ρυθµίσεων του συστήµατος
• Τρόπος αντιµετώπισης και επίλυσης προβληµάτων
Οδηγός χρήσης
Κέντρο Βοήθειας και υποστήριξης Microsoft Windows
1
Κάντε κλικ στο
(Βοήθεια και Υποστήριξη)→ Dell User and System
→
Guides
2
Κάντε κλικ στο
System Guides
υπολογιστή σας.
• Ετικέτα εξυπηρέτησης και κωδικός ταχείας εξυπηρέτησης
• Ετικέτα Άδειας των Microsoft Windows
Ετικέτα εξυπηρέτησης και Άδεια των Microsoft® Windows
Οι ετικέτες αυτές βρίσκονται επάνω στον υπολογιστή σας.
• Χρησιµοποιήστε την ετικέτα εξυπηρέτησης για την
αναγνώριση της συσκευής σας όταν χρησιµοποιείτε τη
διεύθυνση
υποστήριξη.
• Χρησιµοποιήστε τον
κωδικό ταχείας
εξυπηρέτησης όταν έρθετε
σε επαφή µε την
υποστήριξη.
Start
(Έναρξη)
.
System Guides
support.dell.com
ή
→
Help and Support
(Οδηγοί συστήµατος) για τον
ή έρχεστε σε επαφή µε την
®
94
Οδηγός Αναφοράς
ΣΗΜΕΙΩΣΗ:
Η ετικέτα Άδειας των Microsoft Windows έχει
σχεδιαστεί εκ νέου µε µια οπή ή «security portal», ως µέτρο
αυξηµένης ασφάλειας.
Page 95

Τι ψάχνετε; Βρείτε το εδώ
• Λύσεις — Οδηγίες και συµβουλές αντιµετώπισης
προβληµάτων, άρθρα από τεχνικούς, online µαθήµατα,
και συχνές ερωτήσεις
• Φόρουµ επικοινωνίας — Online συζητήσεις µε άλλους
πελάτες της Dell
• Αναβαθµίσεις — Πληροφορίες αναβάθµισης για
συστατικά στοιχεία όπως η µνήµη, η µονάδα σκληρού
δίσκου και το λειτουργικό σύστηµα.
• Εξυπηρέτηση Πελατών — Πληροφορίες επαφών, κλήση
σέρβις και παραγγελίες, εγγύηση και πληροφορίες
επισκευών
•
Σέρβις και υποστήριξη — Κλήση σέρβις και ιστορικό
υποστήριξης, online συζητήσεις µε την τεχνική
υποστήριξη
• Παραποµπές — Εγχειρίδια υπολογιστή, αναλυτικά
στοιχεία για τη διαµόρφωση του υπολογιστή µου,
προδιαγραφές προϊόντος και επίσηµα έγγραφα
• Λήψη αρχείων — Πιστοποιηµένα προγράµµατα
οδήγησης, αναβάθµισης και ενηµέρωσης λογισµικού
• Notebook System Software (NSS) — Σε περίπτωση που
χρειαστεί να εγκαταστήσετε ξανά το λειτουργικό σύστηµα
στον υπολογιστή σας
ξανά το βοηθητικό πρόγραµµα NSS. Το NSS παρέχει
σηµαντικές ενηµερώσεις για το λειτουργικό σας σύστηµα
και υποστήριξη για µονάδες δισκέτας USB 3,5 ιντσών της
Dell™, επεξεργαστές AMD™, µονάδες οπτικών δίσκων
και συσκευές USB. Το NSS είναι απαραίτητο για τη
σωστή λειτουργία του υπολογιστή Dell. Το λογισµικό
εντοπίζει αυτόµατα τον υπολογιστή σας και το
λειτουργικό
ενηµερώσεις για τη δική σας διαµόρφωση.
• Συµβουλές για αναβαθµίσεις λογισµικού και
αντιµετώπιση προβληµάτων — Συχνές ερωτήσεις,
σηµαντικά θέµατα, και γενική κατάσταση του
συστήµατος του υπολογιστή σας
σύστηµα και εγκαθιστά τις απαραίτητες
, θα πρέπει επίσης να εγκαταστήσετε
Ιστοχώρος υποστήριξης της Dell — support.dell.com
ΣΗΜΕΙΩΣΗ:
αντίστοιχη τοποθεσία υποστήριξης.
Για λήψη του NSS (Notebook System Software - λογισµικό
συστήµατος φορητού υπολογιστή):
1
Επισκεφθείτε τη διεύθυνση
αντίστοιχη περιοχή ή τµήµα, και πληκτρολογήστε την ετικέτα
εξυπηρέτησης
2
Επιλέξτε
λήψεις) και κάντε κλικ στο
3
Κάντε κλικ στο λειτουργικό σας σύστηµα και κάντε
αναζήτηση για
Drivers & Downloads
ΣΗΜΕΙΩΣΗ:
ενδεχοµένως να διαφέρει ανάλογα µε τις επιλογές σας.
Βοηθητική εφαρµογή υποστήριξης της Dell
Η βοηθητική εφαρµογή υποστήριξης της Dell είναι ένα
αυτοµατοποιηµένο σύστηµα αναβάθµισης και ειδοποίησης που
είναι εγκατεστηµένο στον υπολογιστή σας. Παρέχει ελέγχους
του συστήµατός σας σε πραγµατικό χρόνο, ενηµερώσεις
λογισµικού, και σχετικές πληροφορίες αυτο-υποστήριξης.
Ανοίξτε τη βοηθητική εφαρµογή υποστήριξης της Dell από το
εικονίδιο
πληροφορίες, δείτε «Bοηθητική εφαρµογή υποστήριξης της
Dell» στον
Οδηγό χρήσης
Επιλέξτε την περιοχή σας για να εµφανίσετε την
support.dell.com
.
(Προγράµµατα οδήγησης &
Go
(Μετάβαση).
Notebook System Software
Το περιβάλλον του
στη γραµµή εργασιών. Για περισσότερες
.
support.dell.com
, επιλέξτε την
.
Σύντοµος οδηγός αναφοράς
95
Page 96

Τι ψάχνετε; Βρείτε το εδώ
• Χρήση λειτουργικών συστηµάτων Windows
• Εργασία µε προγράµµατα και αρχεία
• Προσαρµογή της επιφάνειας εργασίας
Κέντρο Βοήθειας και υποστήριξης των Windows
1
Κάντε κλικ στο κουµπί
and Support
2
Πληκτρολογήστε µια λέξη ή φράση που περιγράφει το
πρόβληµα και κάντε κλικ στο εικονίδιο του βέλους.
3
Κάντε κλικ στα θέµατα που περιγράφουν το πρόβληµα που
αντιµετωπίζετε.
4
Ακολουθήστε τις οδηγίες στην οθόνη.
• Πληροφορίες για δραστηριότητα δικτύου, ο οδηγός
διαχείρισης ενέργειας, πλήκτρα λειτουργιών, και άλλα
στοιχεία που ελέγχονται από το Dell QuickSet
Βοήθεια για το Dell QuickSet
Για πρόσβαση στο
εικονίδιο QuickSet στη γραµµή εργασιών των Microsoft
Windows
®
.
Για περισσότερες πληροφορίες για το Dell QuickSet, δείτε
«Dell™ QuickSet» στον Οδηγό χρήσης.
• Επανεγκατάσταση του λειτουργικού συστήµατος
Το λειτουργικό σύστηµα είναι ήδη εγκατεστηµένο στον
υπολογιστή σας. ∆είτε «Επαναφορά του λειτουργικού σας
συστήµατος» στον Οδηγό χρήσης)
Start
(Έναρξη) ή στο
→ Help
(Βοήθεια και Υποστήριξη).
Dell QuickSet Help, κάντε δεξί κλικ στο
®
96
Οδηγός Αναφοράς
Page 97

Ρύθµιση του υπολογιστή σας
ΠΡΟΣΟΧΗ:
ακολουθήστε τις οδηγίες ασφαλείας που βρίσκονται στον Οδηγό
1
Αφαιρέστε τη συσκευασία των εξαρτηµάτων.
2
Φυλάξτε τα περιεχόµενα της συσκευασίας των εξαρτηµάτων που διατίθενται ξεχωριστά, τα οποία θα
χρειαστείτε για να ολοκληρώσετε την προετοιµασία του υπολογιστή σας.
Στη συσκευασία περιλαµβάνεται επίσης η τεκµηρίωση χρήσης και τυχόν λογισµικό ή πρόσθετος υλικός
εξοπλισµός (κάρτες PC, µονάδες δίσκου ή µπαταρίες) που παραγγείλατε.
3
Συνδέστε το µετασχηµατιστή AC µε την αντίστοιχη υποδοχή στον υπολογιστή και σε µια πρίζα.
4
Ανοίξτε την οθόνη του υπολογιστή και πατήστε το κουµπί λειτουργίας για να ενεργοποιήσετε τον
υπολογιστή (δείτε «Μπροστινή όψη» Στη σελίδα 98).
Πριν ξεκινήσετε οποιαδήποτε από τις διαδικασίες που αναφέρονται σε αυτή την ενότητα,
πληροφοριών προϊόντος.
ΣΗΜΕΙΩΣΗ:
πριν εγκαταστήσετε κάρτες ή συνδέσετε τον υπολογιστή σε µια συσκευή σύνδεσης ή άλλη εξωτερική συσκευή,
όπως π.χ. εκτυπωτή.
Συνιστάται να ενεργοποιήσετε και να απενεργοποιήσετε τον υπολογιστή σας τουλάχιστον µία φορά
Σύντοµος οδηγός αναφοράς
97
Page 98

Πληροφορίες για τον υπολογιστή σας
Μπροστινή όψη
1
11
10
9
2
3
4
5
8
1 ασφάλεια οθόνης 2 οθόνη 3 κουµπί λειτουργίας
4 λυχνίες κατάστασης συσκευών 5 ηχεία (2) 6 πληκτρολόγιο
7 επιφάνεια αφής 8 κουµπιά επιφάνειας αφής 9 λυχνίες κατάστασης
98
10 κουµπί
ενεργοποίησης/απενεργοποίησ
ης ασύρµατης σύνδεσης
Οδηγός Αναφοράς
11 αισθητήρας φωτισµού
περιβάλλοντος
7
πληκτρολογίου
6
Page 99

Αριστερή όψη
43 51 62
1 υποδοχή καλωδίου ασφαλείας 2 αεραγωγός 3 θύρα IEEE 1394
4 θύρες σύνδεσης ήχου (2) 5 υποδοχή κάρτας PC 6 µονάδα σκληρού δίσκου
∆εξιά όψη
1 23
1 τµήµα µέσων 2 ασφάλεια της συσκευής 3 θύρες USB (2)
Πίσω όψη
ΠΡΟΣΟΧΗ:
αεραγωγούς. Μην αποθηκεύετε τον υπολογιστή σας σε περιβάλλον χαµηλής ροής αέρα, όπως, για
παράδειγµα, σε χαρτοφύλακα, ενώ λειτουργεί. Ο περιορισµός της ροής αέρα µπορεί να προκαλέσει βλάβη
στον υπολογιστή ή πυρκαγιά.
1 θύρα δικτύου (RJ-45) 2 θύρα S-video TV-out 3 θύρες USB (2)
4 θύρα µόντεµ (RJ-11) 5 σειριακή θύρα 6 θύρα VGA
7 θύρα µετασχηµατιστή AC 8 θυρίδες εξαερισµού
Μην εµποδίζετε, εισάγετε αντικείµενα ή επιτρέπετε τη συσσώρευση σκόνης στους
8123 4 5 6 7
Σύντοµος οδηγός αναφοράς
99
Page 100

Κάτω όψη
1 3
2
7
6
5
1 µετρητής φόρτισης µπαταρίας 2 ασφάλειας της θήκης µπαταρίας 3 µπαταρία
4 µονάδα µνήµης/κάλυµµα επίπεδης
µπαταρίας
7 µονάδα σκληρού δίσκου
100
Οδηγός Αναφοράς
5 υποδοχή συσκευής σύνδεσης 6 θυρίδες εξαερισµού
4
 Loading...