

Page 1

Dell™ Latitude™ D530
Quick Reference Guide
Model PP17L
www.dell.com | support.dell.com
Page 2

Notes, Notices, and Cautions
NOTE: A NOTE indicates important information that helps you make better use of
your computer.
NOTICE: A NOTICE indicates either potential damage to hardware or loss of data
and tells you how to avoid the problem.
CAUTION: A CAUTION indicates a potential for property damage, personal injury,
or death.
____________________
Information in this document is subject to change without notice.
© 2007 Dell Inc. All rights reserved.
Reproduction in any manner whatsoever without the written permission of Dell Inc. is strictly
forbidden.
Trademarks used in this text: Dell, the DELL logo, Latitude, ExpressCharge, and Undock & Go are
trademarks of Dell Inc.; Microsoft, Windows, Outlook, and Windows Vista are either trademarks or
registered trademarks of Microsoft Corporation in the United States and/or other countries; Bluetooth
is a registered trademark owned by Bluetooth SIG, Inc. and is used by Dell under license.
Other trademarks and trade names may be used in this document to refer to either the entities claiming
the marks and names or their products. Dell Inc. disclaims any proprietary interest in trademarks and
trade names other than its own.
Model PP17L
September 2007 P/N KY045 Rev. A00
Page 3

Contents
Finding Information . . . . . . . . . . . . . . . . . . . . 5
Setting Up Your Computer
. . . . . . . . . . . . . . . . 11
Transferring Information to a New
Computer
Turning Off Your Computer
. . . . . . . . . . . . . . . . . . . . . . 11
. . . . . . . . . . . . . 16
About Your Computer . . . . . . . . . . . . . . . . . . 17
Front View
Left Side View
Right Side View
Back View
Bottom View
Using a Battery
Battery Performance
Checking the Battery Charge
Power Management Modes
Configuring Power Management Settings
Accessing Power Options Properties
Charging the Battery
Replacing the Battery
Storing a Battery
. . . . . . . . . . . . . . . . . . . . . 17
. . . . . . . . . . . . . . . . . . . 18
. . . . . . . . . . . . . . . . . . 18
. . . . . . . . . . . . . . . . . . . . . 19
. . . . . . . . . . . . . . . . . . . . 20
. . . . . . . . . . . . . . . . . . . . . 21
. . . . . . . . . . . . . . . . 21
. . . . . . . . . . . 22
. . . . . . . . . . . . 24
. . . . . 26
. . . . . . . 26
. . . . . . . . . . . . . . . . 26
. . . . . . . . . . . . . . . 27
. . . . . . . . . . . . . . . . . . 28
Troubleshooting
Lockups and Software Problems
Dell Diagnostics
. . . . . . . . . . . . . . . . . . . . . 28
. . . . . . . . . 29
. . . . . . . . . . . . . . . . . . 30
Index . . . . . . . . . . . . . . . . . . . . . . . . . . . . . . . 35
Contents 3
Page 4

4 Contents
Page 5

Finding Information
NOTE: Some features or media may be optional and may not ship with your
computer. Some features or media may not be available in certain countries.
NOTE: Additional information may ship with your computer.
What Are You Looking For? Find It Here
• A diagnostic program for my computer
• Drivers for my computer
• My device documentation
• Notebook System Software (NSS)
Drivers and Utilities Disc
Documentation and drivers are already
installed on your computer. You can use
the disc to reinstall drivers (see
"Reinstalling Drivers and Utilities" in
your User’s Guide) or to run the Dell
Diagnostics (see "Starting the Dell
Diagnostics From the Optional Drivers
and Utilities Disc" on page 32).
Readme files may be included on your
disc to provide last-minute updates
about technical changes to your
computer or advanced technicalreference material for technicians or
experienced users.
NOTE: Drivers and documentation
updates can be found at support.dell.com.
NOTE: The Drivers and Utilities disc may
be optional and may not ship with your
computer.
Quick Reference Guide 5
Page 6

What Are You Looking For? Find It Here
• Warranty information
Dell™ Product Information Guide
• Terms and Conditions (U.S. only)
• Safety instructions
• Regulatory information
• Ergonomics information
• End User License Agreement
• Specifications
• How to configure system settings
• How to troubleshoot and solve
problems
Dell Latitude™ User’s Guide
®
Microsoft
Windows® XP and Windows
Vista™ Help and Support Center
1
Click
Start→
Help and Support→
Dell User and System Guides
System Guides
2
Click the
.
User’s Guide
for your
computer.
→
6 Quick Reference Guide
Page 7
What Are You Looking For? Find It Here
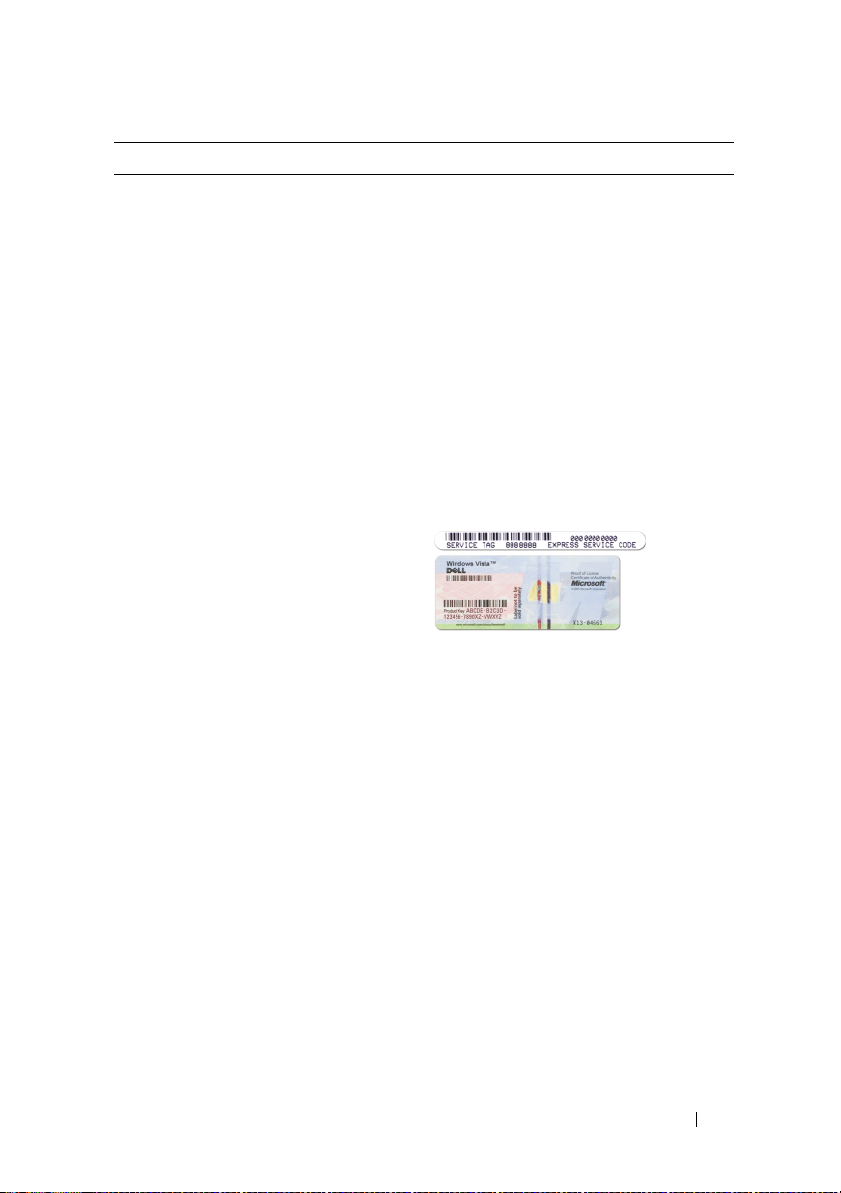
• Service Tag and Express Service Code
• Microsoft Windows License Label
Service Tag and Microsoft® Windows®
License
NOTE: Your computer’s Service Tag and
Microsoft Windows License labels are
located on your computer.
Your computer’s Service Tag contains
both a Service Tag number and an
Express Service Code.
• Use the Service Tag to identify your
computer when you use
support.dell.com
• Enter the Express Service Code to
direct your call when contacting
support.
• Use the product key on the License
Label if you need to reinstall your
operating system.
NOTE: As an increased security measure,
the newly designed Microsoft Windows
license label incorporates a missing
portion or "hole" to discourage removal of
the label.
or contact support.
Quick Reference Guide 7
Page 8

What Are You Looking For? Find It Here
• Solutions — Troubleshooting hints
and tips, articles from technicians, and
online courses, frequently asked
questions
• Community — Online discussion with
other Dell customers
• Upgrades — Upgrade information for
components, such as memory, the hard
drive, and the operating system
• Customer Care — Contact
information, service call and order
status, warranty, and repair
information
• Service and support — Service call
status and support history, service
contract, online discussions with
technical support
• Dell Technical Update Service —
Proactive e-mail notification of
software and hardware updates for
your computer
• Reference — Computer
documentation, details on my
computer configuration, product
specifications, and white papers
• Downloads — Certified drivers,
patches, and software updates
Dell Support Website — support.dell.com
NOTE: Select your region or business
segment to view the appropriate support
site.
8 Quick Reference Guide
Page 9

What Are You Looking For? Find It Here
• Notebook System Software (NSS) —
If you reinstall the operating system
for your computer, you should also
reinstall the NSS utility. NSS provides
critical updates for your operating
system and support for processors,
optical drives, USB devices, and so on.
NSS is necessary for correct operation
of your Dell computer. The software
automatically detects your computer
and operating system and installs the
updates appropriate for your
configuration.
To download Notebook System
Software:
1
Go to
support.dell.com
Drivers & Downloads
2
Enter your Service Tag and click Go, or
select your Product Type and Product
Model and click
3
Click the plus sign (
Utilities
Software
4
Click
Run
NOTE: The support.dell.com user
interface may vary depending on your
selections.
• Software upgrades and
troubleshooting hints — Frequently
asked questions, hot topics, and
general health of your computing
environment
Dell Support Utility
The Dell Support Utility is an
automated upgrade and notification
system installed on your computer. This
support provides real-time health scans
of your computing environment,
software updates, and relevant selfsupport information. Access the Dell
Support Utility from the
taskbar.
• How to find information about my
computer and its components
• How to connect to the Internet
• How to add user accounts for different
people
• How to transfer files and settings from
another computer
Windows Welcome Center
The Windows Welcome Center
automatically appears when you use the
computer for the first tme. You can
choose to have it appear every time you
start your PC by placing a check in the
Run at startup checkbox. Another
method of accessing the Welcome
Center is to click the Windows Vista
Start button , and then click
Welcome Center
Confirm
+)
, click
Notebook System
, and click
Download Now
to run the utility.
.
and click
.
.
by
System
icon in the
.
Quick Reference Guide 9
Page 10

What Are You Looking For? Find It Here
• How to use Microsoft Windows XP
• How to use Microsoft Windows Vista
• How to work with programs and files
• How to personalize my desktop
Windows Help and Support
Microsoft Windows XP:
1
Click the
and Support
2
Either select one of the topics listed, or
type a word or phrase that describes
your problem into the
click the arrow icon, and then click the
topic that describes your problem.
3
Follow the instructions on the screen.
Microsoft Windows Vista:
1
Click the Windows Vista Start button
, and then click
2
In
Search Help
that describes your problem, and then
press <Enter> or click the magnifying
glass.
3
Click the topic that describes your
problem.
4
Follow the instructions on the screen.
• Information on network activity, the
Power Management Wizard, hotkeys,
and other items controlled by Dell
QuickSet.
Dell QuickSet Help
To view
Dell QuickSet Help, right-click
the QuickSet icon in the Microsoft
Windows taskbar, and select Help. The
taskbar is located in the lower-right
corner of your screen.
• How to reinstall my operating system
Operating System Disc
NOTE: The Operating System disc may be
optional and may not ship with your
computer.
NOTE: Pre-installed operating systems
include a recover partition to restore your
PC operating system.
Start
button and click
.
Search
Help and Support
, type a word or phrase
Help
box,
.
10 Quick Reference Guide
Page 11
What Are You Looking For? Find It Here
The operating system is already installed
on your computer. To reinstall your
operating system, use the Operating
System disc.
After you reinstall your operating
system, use the Drivers and Utilities disc
to reinstall drivers for the devices that
came with your computer.
Your operating system product key label
is located on your computer.
NOTE: The color of your disc varies
based on the operating system you
ordered.
Setting Up Your Computer
Transferring Information to a New Computer
You can use your operating system "wizards" to help you transfer files and
other data from one computer to another—for example, from an old
computer to a new computer. For instructions, see the following section that
corresponds to the operating system that your computer is running.
Quick Reference Guide 11
Page 12

Microsoft Windows XP
The Microsoft Windows XP operating system provides the Files and Settings
Transfer Wizard to move data from a source computer to a new computer.
You can transfer data, such as:
• E-mail messages
• Toolbar settings
• Window sizes
• Internet bookmarks
You can transfer the data to the new computer over a network or serial
connection, or you can store it on removable media, such as a writable CD,
for transfer to the new computer.
NOTE: You can transfer information from an old computer to a new computer by
directly connecting a serial cable to the input/output (I/O) ports of the two
computers. To transfer data over a serial connection, you must access the Network
Connections utility from the Control Panel and perform additional configuration
steps, such as setting up an advanced connection and designating the host
computer and the guest computer.
For instructions on setting up a direct cable connection between two computers,
see Microsoft Knowledge Base Article #305621, titled How to Set Up a Direct Cable
Connection Between Two Computers in Windows XP. This information may not be
available in certain countries.
For transferring information to a new computer, you must run the Files and
Settings Transfer Wizard. You can use the optional Operating System disc for
this process or you can create a wizard disk with the Files and Settings
Transfer Wizard.
Running the Files and Settings Transfer Wizard With the Operating System Disc
NOTE: This procedure requires the Operating System disc. This disc is optional and
may not be included with certain computers.
To prepare a new computer for the file transfer:
1
Open the Files and Settings Transfer Wizard: click
Accessories→ System Tools→
2
When the
click
Files and Settings Transfer Wizard
Next
.
Files and Settings Transfer Wizard
Start→
All Programs→
.
welcome screen appears,
12 Quick Reference Guide
Page 13

3
On the
4
On the
from the Windows XP CD
5
When the
source computer. Do
Which computer is this?
screen, click
Do you have a Windows XP CD?
→ Next
.
Now go to your old computer
not
click
Next
at this time.
New Computer→
screen, click
I will use the wizard
screen appears, go to your old or
To copy data from the old computer:
1
On the old computer, insert the Windows XP
2
On the
additional tasks
3
Under
4
On the
5
On the
Welcome to Microsoft Windows XP
.
What do you want to do?
Which computer is this?
Select a transfer method
, click
screen, click
screen, click the transfer method you
Operating System
screen, click
Perform
Transfer files and settings→ Next
Old Computer→
prefer.
6
On the
transfer and click
After the information has been copied, the
Phase
7
Click
What do you want to transfer?
Next
.
screen appears.
Finish
.
screen, select the items you want to
Completing the Collection
To transfer data to the new computer:
On the
1
Next
2
On the
chose for transferring your settings and files and click
Now go to your old computer
.
Where are the files and settings?
screen on the new computer, click
screen, select the method you
Next
.
The wizard reads the collected files and settings and applies them to your
new computer.
Next
disc.
Next
.
.
.
When all of the settings and files have been applied, the
appears.
3
Click
Finished
and restart the new computer.
Quick Reference Guide 13
Finished
screen
Page 14

Running the Files and Settings Transfer Wizard Without the Operating System
Disc
To run the Files and Settings Transfer Wizard without the Operating System
disc, you must create a wizard disc that will allow you to create a backup
image file to removable media.
To create a wizard disk, use your new computer with Windows XP and
perform the following steps:
1
Open the Files and Settings Transfer Wizard: click
Accessories→ System Tools→
2
When the
click
3
On the
4
On the
Files and Settings Transfer Wizard
Next
.
Which computer is this?
Do you have a Windows XP CD?
Wizard Disk in the following drive
5
Insert the removable media, such as a writable CD, and click OK.
6
When the disk creation completes and the
computer
7
Go to the old computer.
message appears,
Files and Settings Transfer Wizard
screen, click
screen, click
→
Next.
do not
click
Next
Start→
All Programs→
.
welcome screen appears,
New Computer→
Next
.
I want to create a
Now go to your old
.
To copy data from the old computer:
1
On the old computer, insert the wizard disk.
2
Click
Start→
3
In the
the appropriate removable media) and click
4
On the
5
On the
6
On the
Run
.
Open
field on the
Run
window, browse to the path for
Files and Settings Transfer Wizard
Which computer is this?
Select a transfer method
screen, click
screen, click the transfer method you
fastwiz
OK
.
welcome screen, click
Old Computer→
Next
Next
(on
.
.
prefer.
7
On the
transfer and click
After the information has been copied, the
Phase
What do you want to transfer?
Next
.
screen appears.
screen, select the items you want to
Completing the Collection
8
Click
Finish
.
14 Quick Reference Guide
Page 15

To transfer data to the new computer:
1
On the
Next
2
On the
chose for transferring your settings and files and click
Now go to your old computer
.
Where are the files and settings?
screen on the new computer, click
screen, select the method you
Next
. Follow the
instructions on the screen.
The wizard reads the collected files and settings and applies them to your
new computer.
When all of the settings and files have been applied, the
Finished
screen
appears.
3
Click
Finished
NOTE: For more information about this procedure, search support.dell.com for
document #154781 (What Are The Different Methods To Transfer Files From My Old
Computer To My New Dell™ Computer Using the Microsoft
Operating System?).
NOTE: Access to the Dell Knowledge Base document may not be available in
certain countries.
Microsoft Windows Vista
1
Click the Windows Vista Start button , and then click
and settings
2
In the
User Account Control
3
Click
Start a new transfer
and restart the new computer.
→ Start Windows Easy Transfer
dialog box, click
or
Continue a transfer in progress
.
Continue
®
Windows® XP
Transfer files
.
.
Follow the instructions provided on the screen by the Windows Easy Transfer
wizard.
Quick Reference Guide 15
Page 16

Turning Off Your Computer
NOTICE: To avoid losing data, save and close all open files and exit all open
programs before you turn off your computer.
1
Shut down the operating system:
a
Save and close all open files and exit all open programs.
b
In the Microsoft Windows XP operating system
Down
→ Shut down
.
In the Microsoft Windows Vista™ operating system,
Vista Start button , click the arrow in the lower-right corner of the
Start menu as shown below, and then click
The computer turns off after the operating system shutdown process
is complete.
2
Ensure that the computer and all attached devices are turned off. If your
computer and attached devices did not automatically turn off when you
shut down your operating system, press and hold the power button for
about 4 seconds to turn them off.
, click
Start→
click the Windows
Shut Down
.
Shut
16 Quick Reference Guide
Page 17
About Your Computer
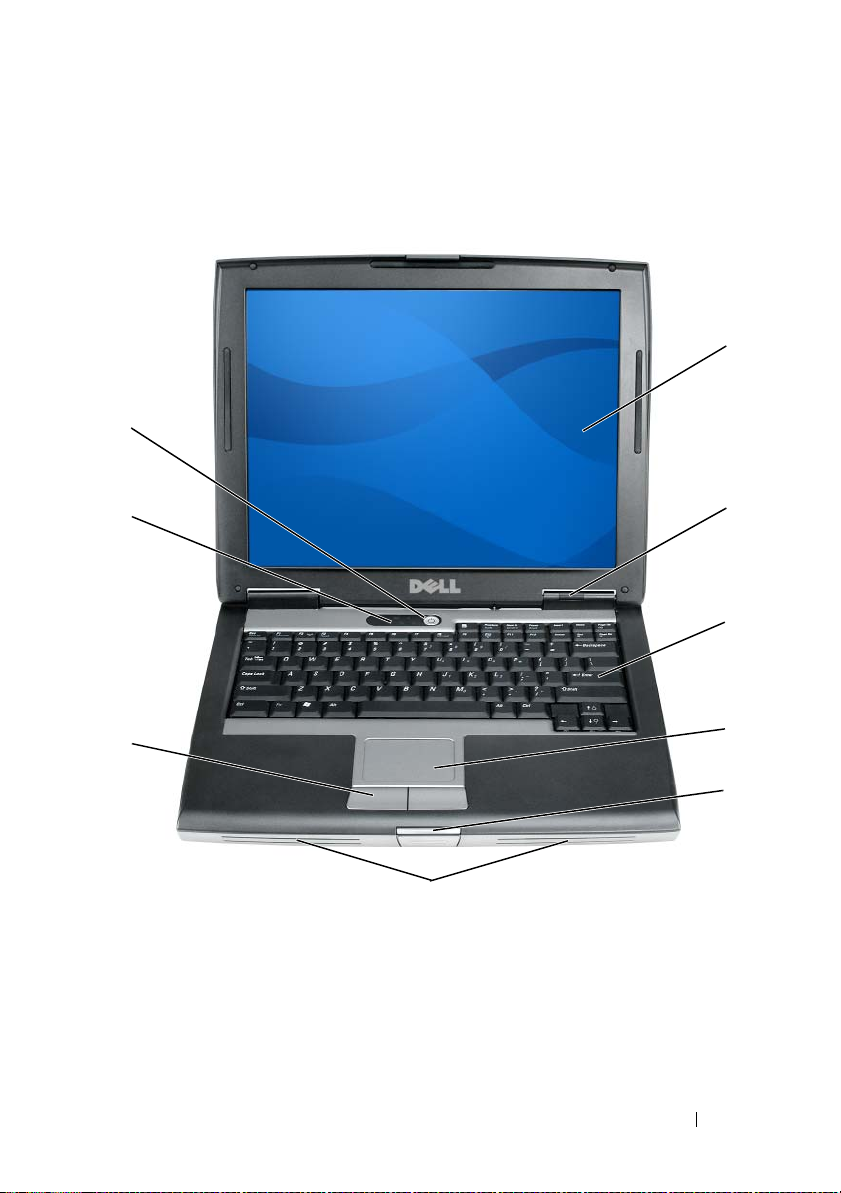
Front View
9
1
8
7
6
1 display 2 device status lights
3 keyboard 4 touch pad
5 display latch 6 speaker
7 touch pad buttons 8 keyboard status lights
9 power button
2
3
4
5
Quick Reference Guide 17
Page 18
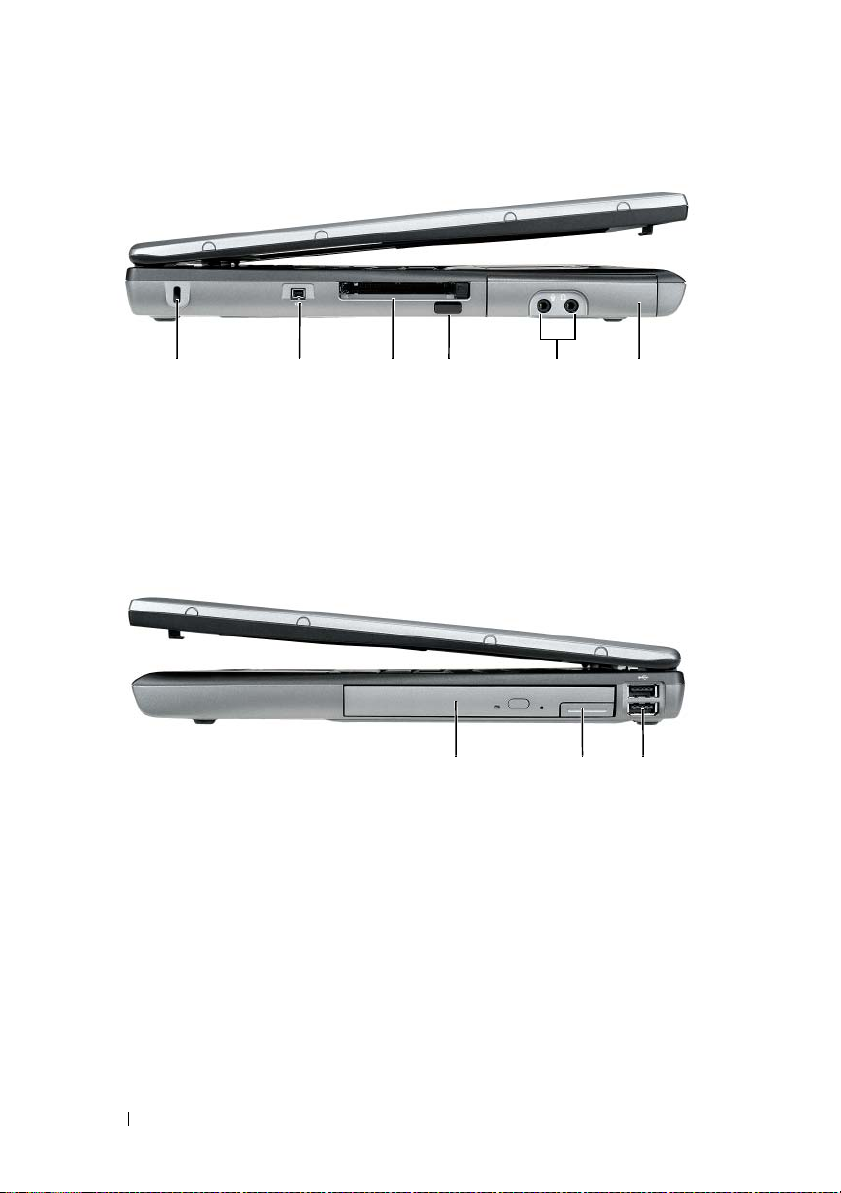
Left Side View
1 security cable slot 2 IEEE 1394 Connector
3 PC Card/ExpressCard slot 4 infrared sensor
5 audio connectors (2) 6 hard drive
Right Side View
352 41 6
1 media bay 2 device latch release
3 USB connectors (2)
18 Quick Reference Guide
1 23
Page 19
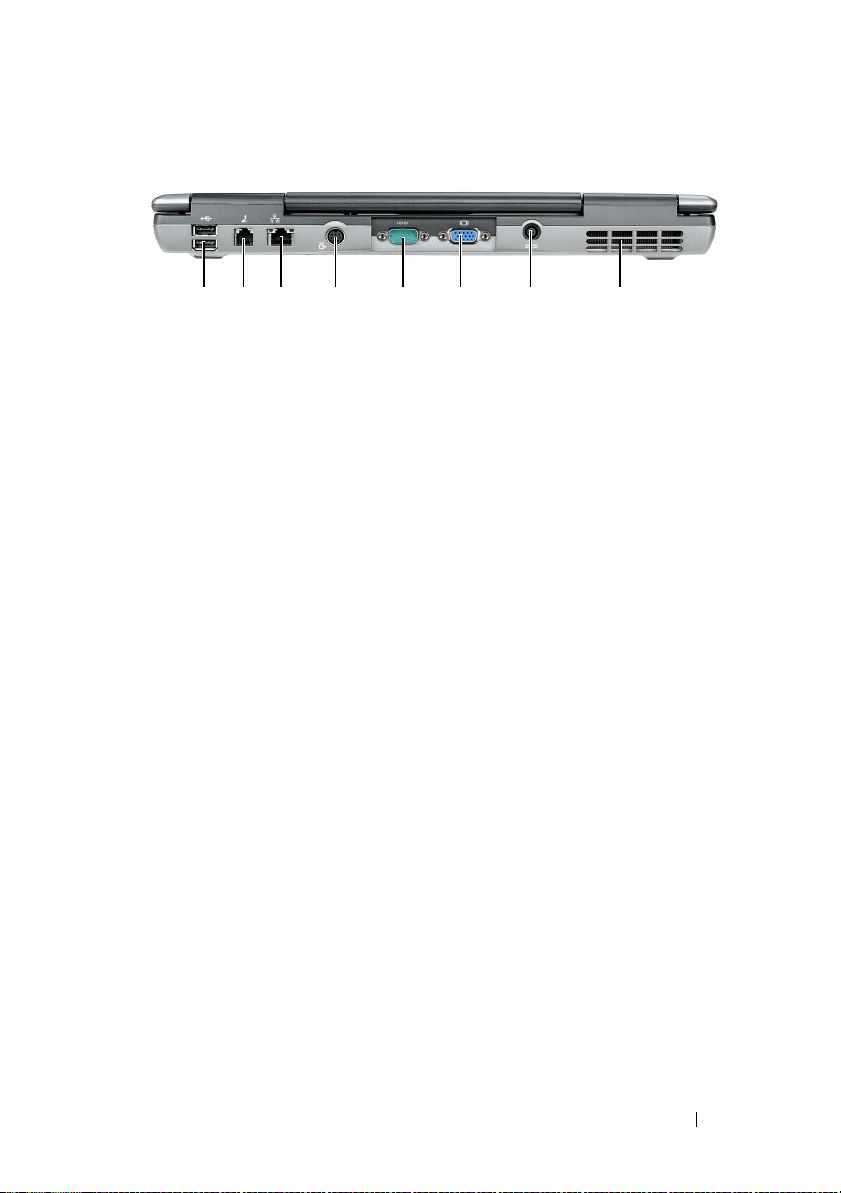
Back View
1 USB connectors (2) 2 modem connector (RJ-11)
3 network connector (RJ-45) 4 S-video TV-out connector
5 serial connector 6 video connector
7 AC adapter connector 8 air vents
8123 4 5 6 7
Quick Reference Guide 19
Page 20
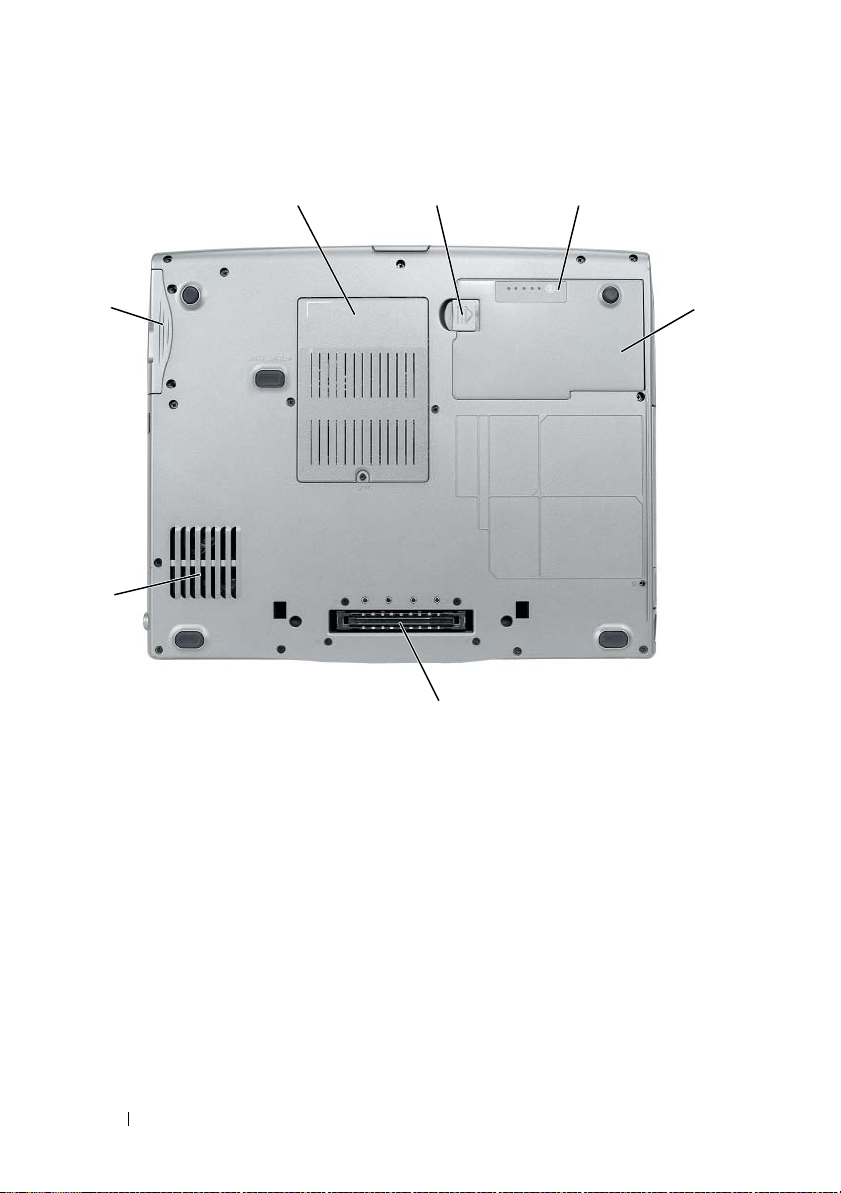
Bottom View
1
7
6
1 memory module/modem/WLAN
Mini-Card/coin-cell battery
cover
3 battery charge gauge/health
gauge
5 docking-device connector 6 air vents
7 hard drive
2
5
2 battery-bay latch release
4battery
3
4
20 Quick Reference Guide
Page 21

Using a Battery
Battery Performance
NOTE: For information about the Dell warranty for your computer, see the Product
Information Guide or separate paper warranty document that shipped with your
computer.
For optimal computer performance and to help preserve BIOS settings,
operate your Dell portable computer with the main battery installed at all
times. One battery is supplied as standard equipment in the battery bay.
NOTE: Because the battery may not be fully charged, use the AC adapter to
connect your new computer to an electrical outlet the first time you use the
computer. For best results, operate the computer with the AC adapter until the
battery is fully charged. To view battery charge status, check the Power Meter in
Power Options (see "Accessing Power Options Properties" on page 26).
NOTE: Battery operating time (the time the battery can hold a charge) decreases
over time. Depending on how often the battery is used and the conditions under
which it is used, you may need to purchase a new battery during the life of your
computer.
NOTE: It is recommended that you connect your computer to an electrical outlet
when writing to a CD or DVD.
Operating time is significantly reduced when you perform operations
including, but not limited to, the following:
• Using optical drives.
• Using wireless communications devices, PC Cards, Express Cards, media
memory cards, or USB devices.
• Using high-brightness display settings, 3D screen savers, or other powerintensive programs such as complex 3D graphics applications.
• Running the computer in maximum performance mode. See "Configuring
Power Management Settings" on page 26 for information about accessing
Windows Power Options Properties or Dell QuickSet, which you can use
to configure power management settings.
You can check the battery charge before you insert the battery into the
computer. You can also set power management options to alert you when the
battery charge is low.
Quick Reference Guide 21
Page 22

CAUTION: Using an incompatible battery may increase the risk of fire or
explosion. Replace the battery only with a compatible battery purchased from
Dell. The battery is designed to work with your Dell computer. Do not use a battery
from other computers with your computer.
CAUTION: Do not dispose of batteries with household waste. When your battery
no longer holds a charge, call your local waste disposal or environmental agency
for advice on disposing of a lithium-ion battery. See "Battery Disposal" in the
Product Information Guide.
CAUTION: Misuse of the battery may increase the risk of fire or chemical burn.
Do not puncture, incinerate, disassemble, or expose the battery to temperatures
above 65°C (149°F). Keep the battery away from children. Handle damaged or
leaking batteries with extreme care. Damaged batteries may leak and cause
personal injury or equipment damage.
Checking the Battery Charge
The Dell QuickSet Battery Meter, the Microsoft Windows Power Meter
window and icon, the battery charge gauge and health gauge, and the
low-battery warning provide information on the battery charge.
Dell QuickSet Battery Meter
If Dell QuickSet is installed, press <Fn><F3> to display the QuickSet
Battery Meter. The Battery Meter displays status, battery health, charge level,
and charge completion time for the battery in your computer.
For more information about QuickSet, right-click the QuickSet icon in the
taskbar, and click Help.
Microsoft Windows Power Meter
The Windows Power Meter indicates the remaining battery charge. To check
the Power Meter, double-click the icon on the taskbar.
If the computer is connected to an electrical outlet, a icon appears.
Charge Gauge
By either pressing once or pressing and holding the status button on the
charge gauge on the battery, you can check:
• Battery charge (check by pressing and
• Battery health (check by pressing and
releasing
holding
the status button)
the status button)
22 Quick Reference Guide
Page 23

The battery operating time is largely determined by the number of times it is
charged. After hundreds of charge and discharge cycles, batteries lose some
charge capacity—or battery health. That is, a battery can show a status of
"charged" but maintain a reduced charge capacity (health).
Check the Battery Charge
To check the battery charge, press and release the status button on the battery
charge gauge to illuminate the charge-level lights. Each light represents
approximately 20 percent of the total battery charge. For example, if the
battery has 80 percent of its charge remaining, four of the lights are on. If no
lights appear, the battery has no charge.
Check the Battery Health
NOTE: You can check battery health in one of two ways: by using the charge gauge
on the battery as described below and by using the Battery Meter in Dell QuickSet.
For information about QuickSet, right-click the icon in the taskbar, and click Help.
To check the battery health using the charge gauge, press and hold the status
button on the battery charge gauge for at least 3 seconds. If no lights appear,
the battery is in good condition, and more than 80 percent of its original
charge capacity remains. Each light represents incremental degradation. If
five lights appear, less than 60 percent of the charge capacity remains, and you
should consider replacing the battery. See "Using a Battery" on page 21 for
more information about the battery operating time.
Low-Battery Warning
NOTICE: To avoid losing or corrupting data, save your work immediately after a
low-battery warning. Then connect the computer to an electrical outlet, or install a
second battery in the media bay. If the battery runs completely out of power,
hibernate mode begins automatically.
A pop-up window warns you when the battery charge is approximately
90 percent depleted. If two batteries are installed, the low-battery warning
means that the combined charge of both batteries is approximately
90 percent depleted. The computer enters hibernate mode when the battery
charge is at a critically low level.
Quick Reference Guide 23
Page 24

You can change the settings for the battery alarms in QuickSet or the Power
Options Properties window. See "Configuring Power Management Settings"
on page 26 for information about accessing QuickSet or the Power Options
Properties window.
Conserving Battery Power
Perform the following actions to conserve battery power:
• Connect the computer to an electrical outlet when possible because
battery life is largely determined by the number of times the battery is
used and recharged.
• Place the computer in standby mode or hibernate mode when you leave
the computer unattended for long periods of time. See "Power
Management Modes" on page 24.
• Use the Power Management Wizard or the
Power Options Properties
window to select options to optimize your computer’s power usage. These
options can also be set to change when you press the power button, close
the display, or press <Fn><Esc>.
NOTE: See "Configuring Power Management Settings" on page 26 for information
on conserving battery power.
Power Management Modes
Standby and Sleep Mode
Standby mode (sleep mode in Microsoft Windows Vista) conserves power by
turning off the display and the hard drive after a predetermined period of
inactivity (a time-out). When the computer exits standby or sleep mode, it
returns to the same operating state it was in before entering standby or sleep
mode.
NOTICE: If your computer loses AC and battery power while in standby or sleep
mode, it may lose data.
To enter standby mode in Windows XP, click the Start button, click Turn off
computer, and then click Stand by.
To enter sleep mode in Windows Vista, click the Windows Vista Start button
, and then click Sleep.
24 Quick Reference Guide
Page 25

Depending on how you set the power management options in the Power
Options Properties window or the QuickSet Power Management Wizard, you
may also use one of the following methods:
• Press the power button.
• Close the display.
• Press <Fn><Esc>.
To exit standby or sleep mode, press the power button or open the display,
depending on how you set the power management options. You cannot make
the computer exit standby or sleep mode by pressing a key or touching the
touch pad.
Hibernate Mode
Hibernate mode conserves power by copying system data to a reserved area on
the hard drive and then completely turning off the computer. When the
computer exits hibernate mode, it returns to the same operating state it was
in before entering hibernate mode.
NOTICE: You cannot remove devices or undock your computer while your
computer is in hibernate mode.
Your computer enters hibernate mode if the battery charge level becomes
critically low.
To manually enter hibernate mode in Windows XP, click the Start button,
click Turn off computer, press and hold <Shift>, and then click Hibernate.
To manually enter hibernate mode in Windows Vista, click the Windows
Vista Start button , and then click Hibernate.
Depending on how you set the power management options in the Power
Options Properties window or the QuickSet Power Management Wizard, you
may also use one of the following methods to enter hibernate mode:
• Press the power button.
• Close the display.
• Press <Fn><Esc>.
NOTE: Some PC Cards or Express Cards may not operate correctly after the
computer exits hibernate mode. Remove and reinsert the card, or simply restart
(reboot) your computer.
Quick Reference Guide 25
Page 26

To exit hibernate mode, press the power button. The computer may take a
short time to exit hibernate mode. You cannot make the computer exit
hibernate mode by pressing a key or touching the touch pad. For more
information on hibernate mode, see the documentation that came with your
operating system.
Configuring Power Management Settings
You can use the QuickSet Power Management Wizard or Windows Power
Options Properties to configure the power management settings on your
computer. For more information about QuickSet, right-click the QuickSet
icon in the taskbar and click Help.
Accessing Power Options Properties
Windows XP
Click the Start button, point to Control Panel→ Performance and
Maintenance, and then click Power Options
Windows Vista
Click the Windows Vista Start button , click Control Panel, click System
and Maintenance, and then click Power Options.
Charging the Battery
When you connect the computer to an electrical outlet or install a battery
while the computer is connected to an electrical outlet, the computer checks
the battery charge and temperature. If necessary, the AC adapter then charges
the battery and maintains the battery charge.
NOTE: With Dell ExpressCharge™, when the computer is turned off, the AC
adapter charges a completely discharged battery to 80 percent in about 1 hour and
to 100 percent in approximately 2 hours. Charge time is longer with the computer
turned on. You can leave the battery in the computer for as long as you like. The
battery’s internal circuitry prevents the battery from overcharging.
If the battery is hot from being used in your computer or being in a hot
environment, the battery may not charge when you connect the computer to
an electrical outlet.
26 Quick Reference Guide
Page 27

The battery is too hot to start charging if the light flashes alternately
green and orange. Disconnect the computer from the electrical outlet and
allow the computer and the battery to cool to room temperature. Then
connect the computer to an electrical outlet to continue charging the battery.
For information about resolving problems with a battery, see "Power Problems
in your User’s Guide.
Replacing the Battery
CAUTION: Using an incompatible battery may increase the risk of fire or
explosion. Replace the battery only with a compatible battery purchased from
Dell. The battery is designed to work with your Dell™ computer. Do not use a
battery from other computers with your computer.
CAUTION: Before performing these procedures, turn off the computer, disconnect
the AC adapter from the electrical outlet and the computer, disconnect the modem
from the wall connector and computer, and remove any other external cables from
the computer.
NOTICE: You must remove all external cables from the computer to avoid possible
connector damage.
For information about replacing the second battery, which is located in the
media bay, see the User’s Guide for your system on support.dell.com.
To remove the battery:
1
If the computer is connected to a docking device (docked), undock it. See
the documentation that came with your docking device for instructions.
2
Ensure that the computer is turned off.
3
Slide the battery-bay latch release on the bottom of the computer, and
then remove the battery from the bay.
Quick Reference Guide 27
Page 28
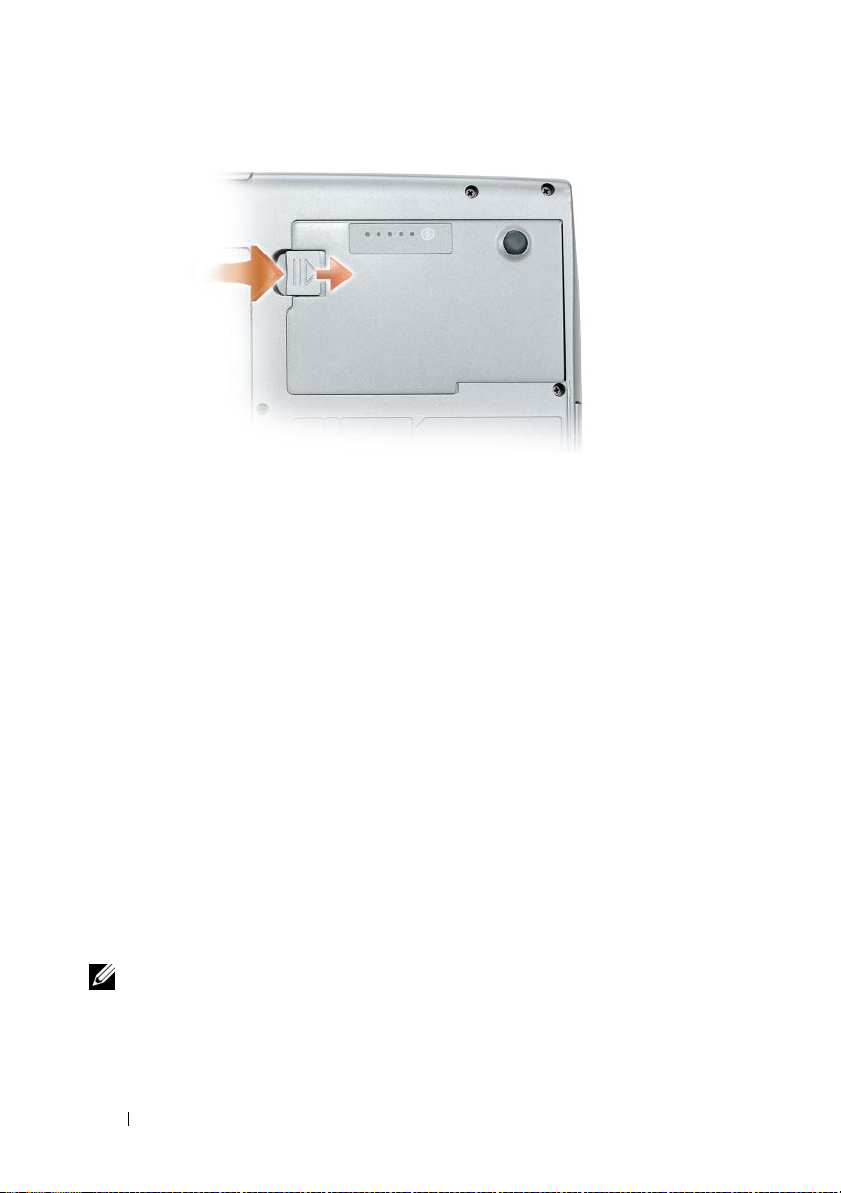
To replace the battery, follow the removal procedure in reverse order and press
down until the battery-bay latch release fully engages.
Storing a Battery
Remove the battery when you store your computer for an extended period of
time. A battery discharges during prolonged storage. After a long storage
period, recharge the battery fully (see "Charging the Battery" on page 26)
before you use it.
Troubleshooting
Follow these tips when you troubleshoot your computer:
• If you added or removed a part before the problem started, review the
installation procedures and ensure that the part is correctly installed.
• If a peripheral device does not work, ensure that the device is properly
connected.
• If an error message appears on the screen, write down the exact message.
This message may help support personnel diagnose and fix the problem(s).
• If an error message occurs in a program, see the program’s documentation.
NOTE: The procedures in this document were written for the Windows default
view, so they may not apply if you set your Dell computer to the Windows Classic
view.
28 Quick Reference Guide
Page 29

Lockups and Software Problems
CAUTION: Before you begin any of the procedures in this section, follow the
safety instructions in the Product Information Guide.
The computer does not start up
ENSURE THAT THE POWER CABLE IS FIRMLY CONNECTED TO THE COMPUTER AND TO
THE ELECTRICAL OUTLET
The computer stops responding
NOTICE: You may lose data if you are unable to perform an operating system
shutdown.
URN THE COMPUTER OFF — If you are unable to get a response by pressing a key on
T
your keyboard or moving your mouse, press and hold the power button for at least 8 to
10 seconds (until the computer turns off), and then restart your computer.
A program stops responding
END THE PROGRAM —
1
Press <Ctrl><Shift><Esc> simultaneously to access the Task Manager.
2
Click the
3
Click to select the program that is no longer responding.
4
Click
A program crashes repeatedly
Applications
End Task
tab.
.
NOTE: Most software includes installation instructions in its documentation or on a
floppy disk, CD, or DVD.
HECK THE SOFTWARE DOCUMENTATION — If necessary, uninstall and then reinstall
C
the program.
A program is designed for an earlier Windows operating system
RUN THE PROGRAM COMPATIBILITY WIZARD —
Windows XP:
The Program Compatibility Wizard configures a program so that it runs in an
environment similar to non-XP operating system environments.
1
Click
Start→
All Programs→ Accessories→ Program Compatibility Wizard→ Next
2
Follow the instructions on the screen.
Quick Reference Guide 29
.
Page 30

Windows Vista:
The Program Compatibility Wizard configures a program so that it runs in an
environment similar to non-Windows Vista operating system environments.
1
Click
Start
→
Control Panel→ Programs→ Use an older program with this
version of Windows.
2
In the welcome screen, click
3
Follow the instructions on the screen.
Next
.
A solid blue screen appears
TURN THE COMPUTER OFF — If you are unable to get a response by pressing a
key on your keyboard or moving your mouse, press and hold the power button
for at least 8 to 10 seconds (until the computer turns off), and then restart
your computer.
Other software problems
CHECK THE SOFTWARE DOCUMENTATION OR CONTACT THE SOFTWARE
MANUFACTURER FOR TROUBLESHOOTING INFORMATION —
• Ensure that the program is compatible with the operating system installed on your
computer.
• Ensure that your computer meets the minimum hardware requirements needed to
run the software. See the software documentation for information.
• Ensure that the program is installed and configured properly.
• Verify that the device drivers do not conflict with the program.
• If necessary, uninstall and then reinstall the program.
BACK UP YOUR FILES IMMEDIATELY
USE A VIRUS-SCANNING PROGRAM TO CHECK THE HARD DRIVE, FLOPPY DISKS,
S , OR DVDS
CD
SAVE AND CLOSE ANY OPEN FILES OR PROGRAMS AND SHUT DOWN YOUR
COMPUTER THROUGH THE START MENU
Dell Diagnostics
CAUTION: Before you begin any of the procedures in this section, follow the
safety instructions in the Product Information Guide.
30 Quick Reference Guide
Page 31

When to Use the Dell Diagnostics
If you experience a problem with your computer, perform the checks in
"Lockups and Software Problems" on page 29 and run the Dell Diagnostics
before you contact Dell for technical assistance.
It is recommended that you print these procedures before you begin.
NOTICE: The Dell Diagnostics works only on Dell computers.
NOTE: The Drivers and Utilities disc is optional and may not ship with your
computer.
Start the Dell Diagnostics from either your hard drive or from the optional
Drivers and Utilities disc.
Starting the Dell Diagnostics From Your Hard Drive
The Dell Diagnostics is located on a hidden diagnostic utility partition on
your hard drive.
NOTE: If your computer cannot display a screen image, contact Dell (see
"Contacting Dell" in your User’s Guide).
1
Shut down the computer.
2
If the computer is connected to a docking device (docked), undock it. See
the documentation that came with your docking device for instructions.
3
Connect the computer to an electrical outlet.
4
The Dell Diagnostics can be invoked in one of two ways:
• Turn on the computer. When the DELL™ logo appears, press <F12>
immediately. Select
Diagnostics
from the boot menu and press
<Enter>.
NOTE: If you wait too long and the operating system logo appears, continue to
wait until you see the Microsoft Windows desktop. Then shut down your
computer and try again.
• Press and hold the <Fn> key while powering the computer on.
NOTE: If you see a message stating that no diagnostics utility partition has
been found, run the Dell Diagnostics from the optional Drivers and Utilities
disc.
The computer runs the Pre-boot System Assessment, a series of initial
tests of your system board, keyboard, hard drive, and display.
Quick Reference Guide 31
Page 32

• During the assessment, answer any questions that appear.
• If a failure is detected, the computer stops and beeps. To stop the
assessment and restart the computer, press <Esc>; to continue to the
next test, press <y>; to retest the component that failed, press <r>.
• If failures are detected during the Pre-boot System Assessment, write
down the error code(s) and contact Dell (see "Contacting Dell" in
your
User’s Guide
)
.
If the Pre-boot System Assessment completes successfully, you receive the
message
Press any key to continue
5
Press any key to start the Dell Diagnostics from the diagnostics utility
Booting Dell Diagnostic Utility Partition.
.
partition on your hard drive.
Starting the Dell Diagnostics From the Optional Drivers and Utilities Disc
1
Insert the
2
Shut down and restart the computer.
Drivers and Utilities
disc.
When the DELL logo appears, press <F12> immediately.
If you wait too long and the Windows logo appears, continue to wait until
you see the Windows desktop. Then shut down your computer and try
again.
NOTE: The next steps change the boot sequence for one time only. On the
next start-up, the computer boots according to the devices specified in the
system setup program.
3
When the boot device list appears, highlight
CD/DVD/CD-RW Drive
and press <Enter>.
4
Select the
Boot from CD-ROM
option from the menu that appears and
press <Enter>.
5
Ty p e 1 to start the menu and press <Enter> to proceed.
6
Select
Run the 32 Bit Dell Diagnostics
from the numbered list. If
multiple versions are listed, select the version appropriate for your
computer.
7
When the Dell Diagnostics
Main Menu
appears, select the test that you
want to run.
32 Quick Reference Guide
Page 33

Dell Diagnostics Main Menu
1
After the Dell Diagnostics loads and the
Main Menu
screen appears, click
the button for the option you want.
Option Function
Express Test Performs a quick test of devices. The test typically takes
10 to 20 minutes and requires no interaction on your
part. Run Express Test first to increase the possibility of
tracing the problem quickly.
Extended Test Performs a thorough check of devices. The test typically
takes 1 hour or more and requires you to answer
questions periodically
Custom Test Tests a specific device. You can customize the tests you
want to run.
Symptom Tree Lists the most common symptoms encountered and
allows you to select a test based on the symptom of the
problem you are having.
2
If a problem is encountered during a test, a message appears with an error
code and a description of the problem. Write down the error code and
problem description and follow the instructions on the screen.
If you cannot resolve the error condition, contact Dell (see "Contacting
Dell" in your
User’s Guide
).
NOTE: The Service Tag for your computer is located at the top of each test
screen. If you contact Dell, technical support will ask for your Service Tag.
3
If you run a test from the
Custom Test
or
Symptom Tree
option, click the
applicable tab described in the following table for more information.
Ta b Function
Results Displays the results of the test and any error conditions
encountered.
Errors Displays error conditions encountered, error codes, and
the problem description.
Help Describes the test and may indicate requirements for
running the test.
Quick Reference Guide 33
Page 34

Ta b Function
Configuration Displays your hardware configuration for the selected
device.
The Dell Diagnostics obtains configuration information
for all devices from system setup, memory, and various
internal tests, and it displays the information in the
device list in the left pane of the screen. The device list
may not display the names of all the components
installed on your computer or all devices attached to your
computer.
Parameters Allows you to customize the test by changing the test
settings.
4
When the tests are completed, if you are running the Dell Diagnostics
from the
5
When the tests are complete, close the test screen to return to the
Menu
the
Drivers and Utilities
screen. To exit the Dell Diagnostics and restart the computer, close
Main Menu
screen.
disc, remove the disc.
Main
34 Quick Reference Guide
Page 35

Index
B
battery
charge gauge, 22
charging, 26
checking the charge, 22
performance, 21
power meter, 22
removing, 27
storing, 28
C
computer
crashes, 29-30
stops responding, 29
D
Dell Diagnostics, 30
Dell support site, 8
diagnostics
Dell, 30
documentation (continued)
User’s Guide, 6
warranty, 6
Drivers and Utilities disc
Dell Diagnostics, 30
E
End User License Agreement, 6
ergonomics information, 6
H
hardware
Dell Diagnostics, 30
hibernate mode, 25
I
installing parts
turning off your computer, 16
documentation
End User License Agreement, 6
ergonomics, 6
online, 8
Product Information Guide, 6
regulatory, 6
safety, 6
L
labels
Microsoft Windows, 7
Service Tag, 7
Index 35
Page 36

O
S
operating system
reinstalling, 10
Operating System disc, 10
P
power
hibernate mode, 25
standby mode, 24
problems
blue screen, 30
computer crashes, 29-30
computer stops responding, 29
Dell Diagnostics, 30
general, 29
program crashes, 29
program stops responding, 29
software, 29-30
Product Information Guide, 6
safety instructions, 6
Service Tag, 7
software
problems, 29-30
standby mode
about, 24
Starting the Dell Diagnostics
From the Drivers and
Utilities Disc, 32
Starting the Dell Diagnostics
From Your Hard Drive, 31
support website, 8
T
troubleshooting
Dell Diagnostics, 30
U
Q
QuickSet Help, 10
R
regulatory information, 6
36 Index
User’s Guide, 6
W
warranty information, 6
Windows 2000
hibernate mode, 25
standby mode, 24
Page 37

Windows Vista
reinstalling, 10
Windows XP
hibernate mode, 25
reinstalling, 10
standby mode, 24
Index 37
Page 38

38 Index
Page 39

Dell™ Latitude™ D530
Guide de référence rapide
Modèle PP17L
www.dell.com | support.dell.com
Page 40

Remarques, avis et précautions
REMARQUE : Une REMARQUE indique des informations importantes qui peuvent
vous aider à mieux utiliser votre ordinateur.
AVIS : Un AVIS vous avertit d’un risque d'endommagement du matériel ou de perte
de données et vous indique comment éviter le problème.
PRÉCAUTION : Une PRÉCAUTION indique un risque potentiel d'endommagement
du matériel, de blessure corporelle ou de mort.
____________________
Les informations de ce document sont sujettes à modification sans préavis.
© 2007 Dell Inc. Tous droits réservés.
La reproduction de ce document, de quelque manière que ce soit, sans l'autorisation écrite de Dell Inc.
est strictement interdite.
Marques utilisées dans ce document : Dell, le logo DELL, Latitude, ExpressCharge et Undock & Go
sont des marques de Dell Inc. ; Microsoft, Windows, Outlook et Windows Vista sont des marques ou
des marques déposées de Microsoft Corporation aux États-Unis et/ou dans d'autres pays ; Bluetooth
est une marque déposée appartenant à Bluetooth SIG, Inc., et utilisée par Dell sous licence.
D'autres marques et noms commerciaux peuvent être utilisés dans ce document pour faire référence
aux entités se réclamant de ces marques et de ces noms ou à leurs produits. Dell Inc. rejette tout intérêt
propriétaire dans les marques et les noms commerciaux autres que les siens.
Modèle PP17L
Septembre 2007 Réf. KY045 Rév. A00
Page 41

Table des matières
Recherche d'informations . . . . . . . . . . . . . . . 43
Configuration de votre ordinateur
. . . . . . . . . . . 50
Transfert d'informations vers un nouvel
ordinateur
. . . . . . . . . . . . . . . . . . . . . 50
Mise hors tension de l'ordinateur . . . . . . . . . 54
À propos de votre ordinateur
Vue frontale
. . . . . . . . . . . . . . . . . . . . 55
Vue du côté gauche
. . . . . . . . . . . . . . 55
. . . . . . . . . . . . . . . . 56
Vue du côté droit . . . . . . . . . . . . . . . . . . 56
Vue arrière
. . . . . . . . . . . . . . . . . . . . . 57
Vue de dessous . . . . . . . . . . . . . . . . . . 58
Utilisation d'une batterie
Performances de la batterie
. . . . . . . . . . . . . . . . 59
. . . . . . . . . . . . 59
Vérification de la charge de la batterie . . . . . . 60
Modes d'économie d'énergie
. . . . . . . . . . . 63
Configuration des paramètres de gestion de
l'alimentation
. . . . . . . . . . . . . . . . . . . . 64
Accès aux propriétés des options
d'alimentation
Chargement de la batterie
Remplacement de la batterie
Stockage de la batterie
. . . . . . . . . . . . . . . . . . . 65
. . . . . . . . . . . . . 65
. . . . . . . . . . . 66
. . . . . . . . . . . . . . 67
Dépannage
. . . . . . . . . . . . . . . . . . . . . . . 67
Problèmes de blocages et logiciels
. . . . . . . . 67
Dell Diagnostics . . . . . . . . . . . . . . . . . . 69
Indice analitico . . . . . . . . . . . . . . . . . . . . . . . 75
Table des matières 41
Page 42

42 Table des matières
Page 43

Recherche d'informations
REMARQUE : Il se peut que certaines fonctionnalités et certains supports soient
en option et ne soient pas livrés avec votre ordinateur. Certaines fonctionnalités ne
sont pas nécessairement disponibles dans tous les pays.
REMARQUE : Il est possible que des informations supplémentaires soient fournies
avec votre ordinateur.
Que recherchez-vous ? Cherchez ici
• Programme de diagnostic pour mon
ordinateur
• Pilotes pour mon ordinateur
• La documentation concernant mon
appareil
• NSS (Notebook System Software)
Disque Drivers and Utilities (Pilotes et
utilitaires)
La documentation et les pilotes sont déjà
installés sur l'ordinateur. Vous pouvez utiliser
le disque pour réinstaller les pilotes (reportezvous à la section « Réinstallation des pilotes et
des utilitaires » de votre Guide d'utilisation) ou
exécuter Dell Diagnostics (reportez-vous à la
section « Lancer Dell Diagnostics à partir du
disque Drivers and Utilities en option » à la
page 71).
Des fichiers Lisez-moi, éventuellement inclus
sur votre disque, fournissent des informations
sur les modifications techniques apportées en
dernière minute à votre système ou des
informations de référence destinées aux
techniciens ou aux utilisateurs expérimentés.
REMARQUE : Les dernières mises à jour des
pilotes et de la documentation se trouvent à
l'adresse support.dell.com.
REMARQUE : Il se peut que le disque Drivers
and Utilities soit en option et qu'il ne soit pas
livré avec tous les ordinateurs.
Guide de référence rapide 43
Page 44

Que recherchez-vous ? Cherchez ici
• Informations sur les garanties
Guide d'information sur le produit Dell™
• Termes et Conditions (États-Unis
uniquement)
• Consignes de sécurité
• Informations sur les
réglementations
• Informations relatives à l'ergonomie
• Contrat de licence pour utilisateur
final
• Caractéristiques
• Comment configurer les
paramètres du système
• Comment déterminer et résoudre
des problèmes
Guide d'utilisation Dell Latitude™
Centre d'aide et de support de Microsoft
Windows
®
XP et Windows Vista™
1
Cliquez sur
Démarrer→
Aide et support→
Dell User and System Guides
d'utilisation du système Dell)
Guides
(Guides du système).
2
Cliquez sur le
Guide d'utilisation
(Guides
→ System
de votre
ordinateur.
®
44 Guide de référence rapide
Page 45

Que recherchez-vous ? Cherchez ici
• Numéro de service et code de
service express
• Étiquette de licence Microsoft
Windows
®
Numéro de service et licence Microsoft®
Windows
®
REMARQUE : Le numéro de service de votre
®
ordinateur et les étiquettes de licence de
Microsoft Windows se trouvent sur votre
ordinateur.
Le numéro de service de votre ordinateur
inclut tant un numéro de service qu'un code
de service express.
• Utilisez le numéro de service pour identifier
votre ordinateur lorsque vous accédez au site
support.dell.com
We b
contactez le service de support.
• Entrez le code de service express pour
orienter votre appel lorsque vous contactez le
service de support.
• Si vous devez réinstaller le système
d'exploitation, utilisez la clé de produit
située sur l'étiquette de licence.
REMARQUE : Par mesure de sécurité, la
nouvelle étiquette de licence de Microsoft
Windows intègre une partie manquante afin
d'éviter qu'elle ne soit enlevée.
ou lorsque vous
Guide de référence rapide 45
Page 46

Que recherchez-vous ? Cherchez ici
• Solutions — Conseils et astuces de
dépannage, articles de techniciens,
cours en ligne et questions
fréquemment posées
• Forum clients — Discussion en
ligne avec d'autres clients Dell
• Mises à niveau — Informations sur
les mises à niveau des composants,
comme la mémoire, l'unité de
disque dur et le système
d'exploitation
• Service clientèle — Coordonnées,
appels de service et état des
commandes, garantie et
informations sur les réparations
• Service et support — État des
appels de service et historique du
support, contrat de service,
discussions en ligne avec le support
technique
• Service Dell Technical Update —
Notification proactive par e-mail
des mises à jour logicielles et
matérielles de votre ordinateur
• Référence — Documentation de
l'ordinateur, détails sur la
configuration de l'ordinateur,
caractéristiques de produit et livres
blancs
• Téléchargements — Pilotes,
correctifs et mises à jour logicielles
agréés
Site Web de support de Dell —
support.dell.com
REMARQUE : Sélectionnez votre région ou
votre secteur d'activité pour afficher le site de
support qui vous concerne.
46 Guide de référence rapide
Page 47

Que recherchez-vous ? Cherchez ici
• NSS (Notebook System Software Logiciel système de portable) — Si
vous réinstallez le système
d'exploitation de votre ordinateur,
vous devez également réinstaller
l'utilitaire NSS. NSS fournit des
mises à jour essentielles pour le
système d'exploitation et la prise en
charge des processeurs, des lecteurs
optiques, des périphériques USB,
etc. NSS est requis pour le bon
fonctionnement de votre
ordinateur Dell. Ce logiciel détecte
automatiquement votre ordinateur
et son système d'exploitation, et
installe les mises à jour appropriées
à votre configuration.
Pour télécharger NSS :
1
Rendez-vous sur
sur
Drivers & Downloads
téléchargements).
2
Entrez votre numéro de service et cliquez sur
OK/Go,
de votre produit, puis cliquez sur
(Valider).
3
Cliquez sur le signe plus (+) en regard de
System Utilities
cliquez sur
(Logiciel système de portable), puis sur
Download Now
4
Cliquez sur
REMARQUE : L'interface utilisateur
support.dell.com peut varier selon vos
sélections.
• Mises à niveau logicielles et astuces
de dépannage — Questions
fréquemment posées, sujets
d'actualité et état général de votre
environnement informatique
Utilitaire de support de Dell
L'utilitaire de support de Dell est un système
de mise à niveau et de notification
automatique installé sur votre ordinateur. Il
permet de réaliser des balayages en temps réel
de l'état de votre environnement informatique
et des mises à jour logicielles et fournit des
informations de support automatique
appropriées. Accédez à l'utilitaire de support
de Dell à l'aide de l'icône
barre des tâches.
support.dell.com
et cliquez
(Pilotes et
ou sélectionnez le type et le modèle
Confirm
(Utilitaires système),
Notebook System Software
(Télécharger maintenant).
Exécuter
pour lancer l'utilitaire.
située dans la
Guide de référence rapide 47
Page 48

Que recherchez-vous ? Cherchez ici
• Comment trouver des informations
sur mon ordinateur et ses
composants
• Comment se connecter à Internet
• Comment ajouter des comptes
d'utilisateur pour différents
utilisateurs
• Comment transférer des fichiers et
des paramètres à partir d'un autre
ordinateur
• Comment utiliser Microsoft
Windows XP
• Comment utiliser Microsoft
Windows Vista
• Comment utiliser des programmes
et des fichiers
• Comment personnaliser mon
bureau
Centre d'accueil de Windows
Le Centre d'accueil de Windows s'affiche
automatiquement lors de l'utilisation initiale
de l'ordinateur. Vous pouvez choisir de le faire
apparaître à chaque démarrage du PC. Pour ce
faire, cochez la case Run at startup (Exécuter
au démarrage). Vous pouvez utiliser une autre
méthode pour accéder au Centre d'accueil :
cliquez sur le bouton Démarrer de Windows
Vista , puis sur Centre d'accueil
Aide et support de Windows
Microsoft Windows XP :
1
Cliquez sur le bouton
Aide et Support
2
Sélectionnez l'une des rubriques répertoriées
ou entrez un terme ou une expression
décrivant votre problème dans la zone
(Rechercher), cliquez sur l'icône en forme de
flèche puis sur la rubrique qui décrit votre
problème.
3
Suivez les instructions qui s'affichent à
l'écran.
Microsoft Windows Vista :
1
Cliquez sur le bouton Démarrer de Windows
Vista , puis sur
2
Dans
Recherche d'aide
expression qui décrit votre problème, puis
appuyez sur <Entrée> ou cliquez sur la
loupe.
3
Cliquez sur la rubrique qui décrit votre
problème.
4
Suivez les instructions qui s'affichent à
l'écran.
Démarrer
, puis sur
.
Aide et support
, entrez un mot ou une
.
.
Search
48 Guide de référence rapide
Page 49

Que recherchez-vous ? Cherchez ici
• Informations sur l'activité réseau,
l'Assistant Gestion de
l'alimentation, les touches de
raccourci et les éléments contrôlés
par Dell QuickSet.
• Comment réinstaller mon système
d'exploitation
Aide Dell QuickSet
Pour afficher l'
le bouton droit de la souris sur l'icône
QuickSet dans la barre des tâches de Microsoft
Windows, puis sélectionnez Aide. La barre des
tâches se trouve dans le coin inférieur droit de
l'écran.
Disque Operating System
REMARQUE : Il se peut que le disque Operating
System soit en option et qu'il ne vous ait pas été
livré avec votre ordinateur.
REMARQUE :
incluent une partition de récupération qui permet
de restaurer le système d'exploitation du PC.
Le système d'exploitation est déjà installé sur
votre ordinateur. Pour réinstaller le système
d'exploitation, utilisez le disque Operating
System.
Aide Dell QuickSet, cliquez avec
Les systèmes pré-installés
Après la réinstallation de votre système
d'exploitation, utilisez le disque Drivers and
Utilities pour réinstaller les pilotes des
périphériques fournis avec l'ordinateur.
L'étiquette de la Clé de produit du système
d'exploitation est apposée sur l'ordinateur.
REMARQUE : La couleur du disque varie selon
le système d'exploitation que vous avez
commandé.
Guide de référence rapide 49
Page 50

Configuration de votre ordinateur
Transfert d'informations vers un nouvel ordinateur
Utilisez les « Assistants » de votre système d'exploitation pour faciliter le
transfert de fichiers et de toute autre donnée d'un ordinateur à l'autre, par
exemple, d'un ancien ordinateur vers un nouvel ordinateur. Pour plus
d'informations, reportez-vous à la section correspondant au système
d'exploitation que vous utilisez.
Microsoft Windows XP
Le système d'exploitation Microsoft Windows XP inclut l'Assistant Transfert
de fichiers et de paramètres qui permet de déplacer les données de
l'ordinateur source vers un nouvel ordinateur. Vous pouvez transférer des
données telles que :
• messages e-mail
• paramètres de la barre d'outils
• tailles de fenêtre
• signets Internet
Vous pouvez transférer les données vers un nouvel ordinateur en utilisant une
connexion réseau ou série, ou les stocker sur un support amovible, comme un
CD inscriptible.
REMARQUE : Vous pouvez transférer les informations d'un ancien ordinateur vers
un nouveau en connectant directement un câble série aux ports d'entrée/sortie
(E/S) des deux ordinateurs. Pour le transfert de données par connexion série, vous
devez accéder à l'utilitaire Connexions réseau depuis le Panneau de configuration
et passer par des étapes de configuration supplémentaires, comme le paramétrage
d'une connexion avancée et la désignation de l'ordinateur hôte et invité.
Pour des instructions sur la configuration d'une connexion à câble directe entre
deux ordinateurs, reportez-vous à la base de connaissances de Microsoft Article
nº 305621, intitulé How to Set Up a Direct Cable Connection Between Two
Computers in Windows XP (Comment configurer une connexion à câble directe
entre deux ordinateurs sous Windows XP). Il se peut que ces informations ne soient
pas disponibles dans certains pays.
Pour transférer des informations vers un nouvel ordinateur, vous devez lancer
l'Assistant Transfert de fichiers et de paramètres. Pour ce faire, utilisez le
disque Operating System en option ou créez un disque Assistant contenant
l'Assistant Transfert de fichiers et de paramètres.
50 Guide de référence rapide
Page 51

Exécution de l'Assistant Transfert de fichiers et de paramètres avec le disque
Operating System
REMARQUE : Le disque Operating system est requis. Toutefois, ce disque est en
option et n'est pas obligatoirement expédié avec certains ordinateurs.
Pour préparer un nouvel ordinateur au transfert de fichiers :
1
Ouvrez l'Assistant Transfert de fichiers et de paramètres : cliquez sur
Démarrer→
Assistant Transfert de fichiers et de paramètres
2
Lorsque l'écran de bienvenue de l'
paramètres
3
Dans l'écran
puis sur
4
Dans l'écran
J'utiliserai l'Assistant du CD de Windows XP→
5
Lorsque l'écran
à l'ancien ordinateur ou ordinateur source. Ne cliquez
Tous les programmes→
Accessoires→ Outils système→
Assistant Transfert de fichiers et de
s'affiche, cliquez sur
De quel ordinateur s'agit-il ?
Suivant
.
Suivant
.
, cliquez sur
Avez-vous un CD-ROM de Windows XP ?
Allez maintenant à votre ancien ordinateur
.
Nouvel ordinateur
, cliquez sur
Suivant
pas
.
sur
s'affiche, allez
Suivant
pour
le moment.
Pour copier les données à partir de l'ancien ordinateur :
1
Sur l'ancien ordinateur, insérez le disque
Operating System
pour
Windows XP.
2
Dans l'écran
Effectuer des tâches supplémentaires
3
Sous
paramètres
4
Dans l'écran
ordinateur
5
Dans l'écran
Bienvenue dans Microsoft Windows XP
Que voulez-vous faire ?
→
Suivant
, cliquez sur
.
De quel ordinateur s'agit-il ?
→ Suivant
.
Sélectionnez une méthode de transfert
, cliquez sur
.
Transférer des fichiers et des
, cliquez sur
Ancien
, cliquez sur la
méthode de transfert de votre choix.
6
Dans l'écran
transférer, puis cliquez sur
Une fois les informations copiées, l'écran
données
Que voulez-vous transférer ?
Suivant
apparaît.
, sélectionnez les éléments à
.
Fin de la phase de collecte des
,
7
Cliquez sur
Te rm i ne r
.
Guide de référence rapide 51
Page 52

Pour transférer les données vers le nouvel ordinateur :
1
Dans l'écran
ordinateur, cliquez sur
2
Dans l'écran
Allez maintenant à votre ancien ordinateur
Suivant
Où sont les fichiers et les paramètres ?
.
, sélectionnez la
sur le nouvel
méthode de transfert de vos paramètres et fichiers, puis cliquez sur
Suivant
.
L'Assistant lit les paramètres et fichiers recueillis, puis les applique à votre
nouvel ordinateur.
Lorsque tous les paramètres et fichiers ont été appliqués, l'écran
Te rm i né
s'affiche.
3
Cliquez sur
Exécution de l'Assistant Transfert de fichiers et de paramètres sans le disque
Operating System
Terminé
et redémarrez le nouvel ordinateur.
Pour exécuter l'Assistant Transfert de fichiers et de paramètres sans le disque
Operating System, vous devez créer un disque Assistant qui va permettre la
création d'un fichier d'image de sauvegarde pour support amovible.
Pour créer un disque Assistant, servez-vous de votre nouvel ordinateur doté de
Windows XP et suivez les étapes suivantes :
1
Ouvrez l'Assistant Transfert de fichiers et de paramètres : cliquez sur
Démarrer→
Assistant Transfert de fichiers et de paramètres
2
Lorsque l'écran de bienvenue de l'
paramètres
3
Dans l'écran
ordinateur
4
Dans l'écran
désire créer un disque Assistant dans le lecteur suivant
5
Insérez le support amovible, tel qu'un CD inscriptible, puis cliquez sur
OK
.
6
Lorsque la création du disque est terminée et que le message
your old computer
apparaît,
7
Allez à votre ancien ordinateur.
Tous les programmes→
Accessoires→ Outils système→
.
Assistant Transfert de fichiers et de
s'affiche, cliquez sur
De quel ordinateur s'agit-il ?
→
puis sur
Suivant
Suivant
.
.
, cliquez sur
Avez-vous un CD-ROM de Windows XP ?
(Allez maintenant à votre ancien ordinateur)
ne cliquez pas
sur
Suivant
.
Nouvel
, cliquez sur
→
Suivant.
Now go to
Je
52 Guide de référence rapide
Page 53

Pour copier les données à partir de l'ancien ordinateur :
1
Insérez le disque Assistant sur l'ancien ordinateur.
2
Cliquez sur
3
Dans le champ
(pour le support amovible approprié) et cliquez sur
4
Dans l'écran de bienvenue de l'
paramètres
5
Dans l'écran
ordinateur
6
Dans l'écran
Démarrer→
Ouvrir
Exécuter
de la fenêtre
.
Exécuter
, recherchez le chemin
Assistant Transfert de fichiers et de
, cliquez sur
De quel ordinateur s'agit-il ?
→ Suivant
Suivant
.
.
, cliquez sur
Sélectionnez une méthode de transfert
OK
.
Ancien
, cliquez sur la
méthode de transfert de votre choix.
7
Dans l'écran
transférer, puis cliquez sur
Une fois les informations copiées, l'écran
données
8
Cliquez sur
Que voulez-vous transférer ?
Suivant
apparaît.
Te rm i ne r
.
, sélectionnez les éléments à
.
Fin de la phase de collecte des
Pour transférer les données vers le nouvel ordinateur :
Dans l'écran
1
ordinateur, cliquez sur
2
Dans l'écran
Allez maintenant à votre ancien ordinateur
Suivant
Où sont les fichiers et les paramètres ?
.
, sélectionnez la
sur le nouvel
méthode de transfert de vos paramètres et fichiers, puis cliquez sur
Suivant
. Suivez les instructions qui s'affichent à l'écran.
L'Assistant lit les paramètres et fichiers recueillis, puis les applique à votre
nouvel ordinateur.
fastwiz
Lorsque tous les paramètres et fichiers ont été appliqués, l'écran
Te rm i né
s'affiche.
3
Cliquez sur
REMARQUE : Pour plus d'informations sur cette procédure, rendez-vous sur le
site Web support.dell.com pour accéder au document nº 154781 (What Are The
Different Methods To Transfer Files From My Old Computer To My New Dell™
Computer Using the Microsoft
différentes méthodes de transfert de fichiers à partir de mon ancien ordinateur vers
mon nouvel ordinateur Dell™ à l'aide du système d'exploitation Microsoft
Windows
®
XP ?]).
Te rm i né
et redémarrez le nouvel ordinateur.
®
Windows® XP Operating System? [Quelles sont les
Guide de référence rapide 53
®
Page 54

REMARQUE : Certains pays peuvent ne pas avoir accès au document de la base
de connaissances Dell.
Microsoft Windows Vista
1
Cliquez sur le bouton Démarrer de Windows Vista , puis sur
des fichiers et des paramètres
2
Dans la boîte de dialogue
Continuer
3
Cliquez sur
cours
.
Lancer un nouveau transfert
.
→ Lancer le transfert facile de Windows
Contrôle de compte d'utilisateur
ou
Continuer un transfert en
Transférer
.
, cliquez sur
Suivez les instructions affichées à l'écran par l'Assistant Transfert de fichiers
et de paramètres Windows.
Mise hors tension de l'ordinateur
AVIS : Pour éviter de perdre des données, enregistrez tous les fichiers ouverts,
fermez-les et quittez toutes les applications en cours avant de procéder à l'arrêt du
système.
1
Arrêtez le système d'exploitation :
a
Enregistrez et fermez tous les fichiers ouverts et quittez tous les
programmes ouverts.
b
Sous le système d'exploitation Microsoft Windows XP
Démarrer→
Shut Down (Arrêter)→
Shut down
Sous le système d'exploitation Microsoft Windows Vista™,
bouton Démarrer de Windows Vista , cliquez sur la flèche présente
dans le coin inférieur droit du menu Démarrer comme illustré
ci-après, puis cliquez sur
Shut Down
(Arrêter).
, cliquez sur
(Arrêter).
cliquez sur le
L'ordinateur s'éteint automatiquement une fois le processus d'arrêt du
système d'exploitation terminé.
2
Vérifiez que l'ordinateur et tous les périphériques reliés sont éteints. Si
votre ordinateur et les périphériques reliés ne s'éteignent pas
automatiquement lorsque vous arrêtez le système d'exploitation, appuyez
sur le bouton d'alimentation et maintenez-le enfoncé pendant environ 4
secondes pour les éteindre.
54 Guide de référence rapide
Page 55

À propos de votre ordinateur
Vue frontale
9
1
8
7
6
1 écran 2 voyants d'état de l'appareil
3 clavier 4 tablette tactile
5 loquet de l'écran 6 haut-parleur
7 boutons de la tablette tactile 8 voyants d'état du clavier
9 bouton d'alimentation
2
3
4
5
Guide de référence rapide 55
Page 56

Vue du côté gauche
352 41 6
1 emplacement pour câble
de sécurité
3 logement de carte
PC/ExpressCard
5 connecteurs audio (2) 6 disque dur
Vue du côté droit
1 baie de média 2 loquet de fermeture de l'appareil
3 connecteurs USB ( 2)
2 connecteur IEEE 1394
4 capteur infrarouge
1 23
56 Guide de référence rapide
Page 57

Vue arrière
8123 4 5 6 7
1 connecteurs USB (2) 2 connecteur modem (RJ-11)
3 connecteur réseau (RJ-45) 4 connecteur de sortie TV S-vidéo
5 connecteur série 6 connecteur vidéo
7 connecteur d'adaptateur secteur 8 entrées d'air
Guide de référence rapide 57
Page 58

Vue de dessous
1
7
6
1 module de mémoire/modem/Carte Mini
WLAN/cache de pile bouton
3 indicateur de charge/jauge d'état de la
batterie
5 connecteur de la station d'accueil 6 entrées d'air
7 unité de disque dur
2
5
2 loquet de fermeture de la
baie de batterie
4 batterie
3
4
58 Guide de référence rapide
Page 59

Utilisation d'une batterie
Performances de la batterie
REMARQUE : Pour obtenir des informations sur la garantie Dell de votre
ordinateur, reportez-vous au Guide d'information sur le produit ou au document de
garantie fourni avec votre ordinateur.
Pour un fonctionnement optimal et afin de préserver les paramètres du BIOS,
laissez la batterie principale installée en permanence dans votre ordinateur
portable Dell. Votre ordinateur est livré avec une batterie, installée dans la
baie.
REMARQUE : Lors de la première utilisation de votre ordinateur, la batterie n'étant
pas obligatoirement complètement chargée, utilisez l'adaptateur secteur pour
raccorder votre nouvel ordinateur à une prise secteur. Pour de meilleurs résultats,
utilisez l'adaptateur secteur tant que la batterie n'est pas complètement chargée.
Pour afficher le niveau de charge de la batterie, cliquez sur Jauge dans Options
d'alimentation (reportez-vous à la section « Accès aux propriétés des options
d'alimentation » à la page 65).
REMARQUE : L'autonomie de la batterie (la période durant laquelle la batterie
reste chargée) diminue avec le temps. Selon la fréquence d'utilisation et les
conditions de fonctionnement de la batterie, il est possible que vous deviez en
acheter une autre au cours de la durée de vie de votre ordinateur.
REMARQUE : Il est recommandé de connecter l'ordinateur à une prise électrique
avant de graver un CD ou DVD.
Cette durée est considérablement réduite par l'exécution de certaines
opérations, notamment, sans que cela soit limitatif :
• Utilisation de lecteurs optiques.
• Utilisation de périphériques de communications sans fil, de cartes PC, de
cartes ExpressCard, de cartes mémoire multimédia ou de périphériques
USB
• Utilisation de paramètres d'affichage de luminosité élevée, d'écrans de
veille en 3D ou d'autres programmes gourmands en ressources tels que des
applications graphiques en 3D complexes.
• Exécution de l'ordinateur en mode Performances maximales. Pour des
informations sur l'accès à la fenêtre Propriétés des options d'alimentation
de Windows et à Dell Quickset, que vous pouvez utiliser pour configurer
les paramètres de gestion de l'alimentation, reportez-vous à la section
« Configuration des paramètres de gestion de l'alimentation » à la page 64.
Guide de référence rapide 59
Page 60

Vous pouvez vérifier le niveau de charge de la batterie avant de l'insérer dans
l'ordinateur. Vous pouvez également définir des options de gestion de
l'alimentation afin que l'ordinateur vous alerte lorsque le niveau de charge de
la batterie est bas.
PRÉCAUTION : L'utilisation d'une batterie non compatible peut accroître le
risque d'incendie ou d'explosion. Ne remplacez la batterie que par une batterie
compatible achetée auprès de Dell. La batterie est conçue pour fonctionner avec
votre ordinateur Dell. N'utilisez pas la batterie d'un autre ordinateur.
PRÉCAUTION : Ne jetez pas les batteries avec les ordures ménagères. Lorsque
votre batterie ne tient plus sa charge, contactez votre service municipal de
traitement des déchets pour savoir comment vous en débarrasser. Reportez-vous à
la section « Mise au rebut de la batterie » du Guide d'information sur le produit.
PRÉCAUTION : Une utilisation inadéquate de la batterie peut augmenter le
risque d'incendie ou de brûlure chimique. Prenez soin de ne pas la percer,
l'incinérer, la démonter ou l'exposer à une température supérieure à 65 °C (149 °F).
Conservez la batterie hors de portée des enfants. Manipulez les batteries
endommagées ou percées avec d'extrêmes précautions. Les batteries
endommagées peuvent fuir et causer des dommages personnels ou matériels.
Vérification de la charge de la batterie
La jauge de batterie Dell QuickSet, la fenêtre Jauge de Microsoft Windows et
l'icône , l'indicateur de charge et la jauge d'état de la batterie ainsi que
l'alerte de batterie faible donnent des informations sur le niveau de charge de
la batterie.
Jauge de batterie Dell QuickSet
Si Dell QuickSet est installé, appuyez sur <Fn><F3> pour afficher la jauge
de batterie QuickSet. La fenêtre Jauge de batterie affiche l'état, l'état de
fonctionnement de la batterie, le niveau de charge et la durée nécessaire au
chargement de la batterie de votre ordinateur.
Pour plus d'informations sur QuickSet, cliquez avec le bouton droit de la
souris sur l'icône QuickSet dans la barre des tâches, puis cliquez sur Aide.
Jauge d'alimentation Microsoft Windows
La jauge de Windows indique la charge de batterie restante. Pour consulter la
jauge, double-cliquez sur l'icône de la barre des tâches.
Si l'ordinateur est relié à une prise secteur, l'icône apparaît.
60 Guide de référence rapide
Page 61

Indicateur de charge
En appuyant une fois sur le bouton d'état de l'indicateur de charge de la
batterie ou en appuyant et en maintenant enfoncé ce bouton, vous pouvez
vérifier les éléments suivants :
• Le niveau de charge de la batterie (appuyez et
• L'état de fonctionnement de la batterie (appuyez et
relâchez
le bouton d'état)
maintenez enfoncé
le
bouton d'état)
L'autonomie de la batterie est déterminée en grande partie par le nombre de
charges qu'elle reçoit. Après des centaines de cycles de charge et de décharge,
la capacité de charge des batteries diminue et l'état des batteries se dégrade.
C'est pourquoi, une batterie peut afficher l'état « chargé » tout en maintenant
un niveau de charge réduit (état).
Vérification du niveau de charge de la batterie
Pour vérifier le niveau de charge de la batterie, appuyez sur le bouton d'état,
situé sur l'indicateur de charge de la batterie, et relâchez-le pour allumer les
voyants de niveau de charge. Chaque voyant représente environ 20 pour cent
de la charge totale de la batterie. S'il reste, par exemple, 80 pour cent de la
charge de la batterie, quatre des voyants sont allumés. Si aucun voyant n'est
allumé, la batterie est complètement déchargée.
Vérification de l'état de fonctionnement de la batterie
REMARQUE : Vous pouvez vérifier l'état de fonctionnement de la batterie de l'une
des deux manières suivantes : en utilisant l'indicateur de charge de la batterie
comme décrit ci-dessous et en utilisant la jauge de batterie de Dell QuickSet. Pour
des informations sur QuickSet, cliquez avec le bouton droit de la souris sur l'icône
de la barre des tâches, puis cliquez sur Aide.
Pour vérifier l'état de fonctionnement de la batterie à l'aide de l'indicateur de
charge, appuyez sur le bouton d'état de l'indicateur de charge de la batterie et
maintenez-le enfoncé pendant au moins 3 secondes. Si aucun voyant ne
s'allume, la batterie est en bon état et elle dispose encore de plus de 80 pour
cent de sa capacité de charge d'origine. Chaque voyant représente une
dégradation incrémentielle. Si cinq voyants s'allument, la batterie dispose de
moins de 60 pour cent de sa capacité de charge et vous devez envisager son
remplacement. Pour plus d'informations sur l'autonomie de la batterie,
reportez-vous à la section « Utilisation d'une batterie » à la page 59.
Guide de référence rapide 61
Page 62

Alerte de batterie faible
AVIS : Pour éviter la perte ou la corruption de vos données, enregistrez votre
travail immédiatement après avoir reçu une alerte de niveau de batterie faible.
Branchez ensuite l'ordinateur sur une prise secteur ou installez une seconde
batterie dans la baie de média. Si la batterie est complètement déchargée,
l'ordinateur passe automatiquement en mode Mise en veille prolongée.
Une fenêtre pop-up affiche un message d'avertissement lorsque la batterie est
déchargée à environ 90 pour cent. Si deux batteries sont installées, l'alerte de
batterie faible indique que les deux batteries sont déchargées à environ 90
pour cent. L'ordinateur passe en mode Mise en veille prolongée lorsque la
charge de la batterie est extrêmement faible.
Vous pouvez modifier les paramètres d'alerte de la batterie dans QuickSet ou
dans la fenêtre Propriétés des options d'alimentation. Pour des informations
sur l'accès à Quickset ou à la fenêtre Propriétés des options d'alimentation,
reportez-vous à la section « Configuration des paramètres de gestion de
l'alimentation » à la page 64.
Préservation de l'alimentation de la batterie
Procédez comme suit pour économiser l'alimentation de la batterie :
• Connectez l'ordinateur à une prise secteur aussi souvent que possible car la
durée de vie de la batterie est largement déterminée par le nombre
d'utilisations et de recharges.
• Mettez l'ordinateur en mode Veille ou en mode Mise en veille prolongée
lorsque vous le laissez allumé sans l'utiliser pendant de longs laps de
temps. Reportez-vous à la section « Modes d'économie d'énergie » à la
page 63.
• Afin d'optimiser l'utilisation de l'énergie de votre ordinateur, sélectionnez
des options à l'aide de l'Assistant Gestion de l'alimentation ou de la fenêtre
Propriétés des options d'alimentation
. Vous pouvez également configurer
ces options pour changer lorsque vous appuyez sur le bouton
d'alimentation, fermez l'écran ou appuyez sur <Fn><Échap>.
REMARQUE : Pour savoir comment économiser l'énergie de la batterie, reportez-
vous à la section « Configuration des paramètres de gestion de l'alimentation » à la
page 64.
62 Guide de référence rapide
Page 63

Modes d'économie d'énergie
Mode Veille
Le mode Veille (mode de mise en veille sous Microsoft Windows Vista)
conserve l'énergie en éteignant l'écran et le disque dur au bout d'une période
d'inactivité prédéterminée (un délai). Lorsque l'ordinateur quitte le mode
Veille, il retourne à son état précédent.
AVIS : Si l'alimentation secteur ou sur batterie est coupée lorsque l'ordinateur est
en mode Veille, vous risquez de perdre des données.
Pour passer en mode Veille sous Windows XP, cliquez sur le bouton Démarrer,
sur Turn off computer (Éteindre l'ordinateur), puis sur Stand by (Veille).
Pour passer en mode Veille sous Windows Vista, cliquez sur le bouton
Démarrer de Windows Vista , puis cliquez sur Sleep (Veille).
Selon les options de gestion de l'alimentation configurées dans la fenêtre
Propriétés des options d'alimentation ou dans l'Assistant Gestion de
l'alimentation QuickSet, vous pouvez également utiliser l'une des méthodes
suivantes :
• Appuyez sur le bouton d'alimentation.
• Fermez l'écran.
• Appuyez sur <Fn><Échap>.
En fonction de la configuration des options de gestion de l'alimentation,
appuyez sur le bouton d'alimentation ou ouvrez l'écran pour quitter le mode
Veille. Vous ne pouvez pas quitter le mode Veille au moyen d'une touche ou
de la tablette tactile.
Mode Mise en veille prolongée
Le mode Mise en veille prolongée économise l'énergie en copiant les données
système dans une zone réservée du disque dur avant d'éteindre complètement
l'ordinateur. Lorsque l'ordinateur quitte le mode Mise en veille prolongée, il
retourne à son état précédent.
AVIS : Vous ne pouvez ni retirer des périphériques ni déconnecter votre ordinateur
de la station d'accueil lorsqu'il est en mode Mise en veille prolongée.
Votre ordinateur passe en mode Mise en veille prolongée quand le niveau de
charge de la batterie devient insuffisant.
Guide de référence rapide 63
Page 64

Pour passer manuellement en mode Mise en veille prolongée sous Windows XP,
cliquez sur le bouton
touche <Maj> enfoncée et cliquez sur
Démarrer
, puis sur
Arrêter l'ordinateur
, maintenez la
Mettre en veille prolongée
.
Pour passer manuellement en mode Mise en veille prolongée sous Windows
Vista, cliquez sur le bouton Démarrer de Windows Vista , puis cliquez sur
Mettre en veille prolongée.
Selon les options de gestion de l'alimentation configurées dans la fenêtre
Propriétés des options d'alimentation ou dans l'Assistant Gestion de
l'alimentation QuickSet, vous pouvez également utiliser l'une des méthodes
suivantes pour passer en mode Mise en veille prolongée :
• Appuyez sur le bouton d'alimentation.
• Fermez l'écran.
• Appuyez sur <Fn><Échap>.
REMARQUE : Certaines cartes PC ou ExpressCard peuvent ne pas fonctionner
correctement lorsque l'ordinateur sort du mode Mise en veille prolongée. Retirez et
replacez la carte ou tout simplement redémarrez (réinitialisez) l'ordinateur.
Pour quitter le mode Mise en veille prolongée, appuyez sur le bouton
d'alimentation. L'ordinateur peut mettre quelques instants à quitter le mode
Mise en veille prolongée. Vous ne pouvez pas quitter le mode Mise en veille
prolongée au moyen d'une touche ou de la tablette tactile. Pour plus
d'informations sur le mode Mise en veille prolongée, consultez la
documentation livrée avec votre système d'exploitation.
Configuration des paramètres de gestion de l'alimentation
Vous pouvez utiliser l'Assistant Gestion de l'alimentation de QuickSet ou les
propriétés des options d'alimentation de Windows pour configurer les
paramètres de gestion de l'alimentation sur votre ordinateur. Pour en savoir
plus QuickSet, cliquez avec le bouton droit de la souris sur l'icône QuickSet
dans la barre des tâches, puis sur Aide.
64 Guide de référence rapide
Page 65

Accès aux propriétés des options d'alimentation
Windows XP
Cliquez sur le bouton Démarrer, pointez sur Panneau de configuration→
Performances et maintenance, puis cliquez sur Options d'alimentation.
Windows Vista
Cliquez sur le bouton Démarrer de Windows Vista , sur
configuration
, sur
Système et Maintenance
, puis sur
Panneau de
Options d'alimentation
Chargement de la batterie
Lorsque vous branchez l'ordinateur sur une prise secteur ou que vous installez
une batterie pendant que l'ordinateur est branché sur une prise secteur,
l'ordinateur vérifie le niveau de charge et la température de la batterie. Au
besoin, l'adaptateur secteur charge alors la batterie et maintient le niveau de
charge.
REMARQUE : À l'aide de Dell™ ExpressCharge™, l'adaptateur secteur charge une
batterie complètement déchargée à 80 pour cent en environ 1 heure et à 100 pour
cent en environ 2 heures, lorsque l'ordinateur est hors tension. La durée de
chargement est plus longue lorsque l'ordinateur est sous tension. Vous pouvez
laisser la batterie dans l'ordinateur aussi longtemps que vous le souhaitez. Les
circuits internes de la batterie préviennent toute surcharge.
Si la batterie est chaude parce qu'elle se trouvait dans l'ordinateur en cours de
fonctionnement ou en raison de la température extérieure, il est probable
qu'elle ne se charge pas lorsque vous branchez l'ordinateur sur une prise
secteur.
La batterie est trop chaude pour démarrer le processus de recharge si le
voyant clignote affichant alternativement les couleurs verte et orange.
Débranchez l'ordinateur de la prise secteur et laissez refroidir l'ordinateur et la
batterie jusqu'à ce qu'ils atteignent la température ambiante. Branchez alors
l'ordinateur sur une prise secteur et continuez à charger la batterie.
Pour des informations supplémentaires sur la résolution des problèmes de
batterie, reportez-vous à la section « Problèmes d'alimentation » du Guide
d'utilisation.
.
Guide de référence rapide 65
Page 66

Remplacement de la batterie
PRÉCAUTION : L'utilisation d'une batterie non compatible peut accroître le
risque d'incendie ou d'explosion. Ne remplacez la batterie que par une batterie
compatible achetée auprès de Dell. La batterie est conçue pour fonctionner avec
votre ordinateur Dell™. N'utilisez pas la batterie d'un autre ordinateur.
PRÉCAUTION : Avant d'exécuter ces procédures, éteignez votre ordinateur,
débranchez l'adaptateur secteur de la prise secteur et de l'ordinateur, débranchez
le modem de la prise murale et de l'ordinateur et retirez les autres câbles externes
de l'ordinateur.
AVIS : Vous devez retirer tous les câbles externes de l'ordinateur pour éviter
d'endommager les connecteurs.
Pour des informations sur le remplacement de la seconde batterie, qui se
trouve dans la baie de média, reportez-vous au Guide d'utilisation de votre
système à l'adresse support.dell.com.
Pour retirer la batterie :
1
Si l'ordinateur est installé dans une station d'accueil, retirez-le. Pour
obtenir des instructions, consultez la documentation qui accompagne
celle-ci.
2
Assurez-vous que l'ordinateur est éteint.
3
Faites glisser le loquet de la baie de batterie situé sur le dessous de
l'ordinateur, puis retirez la batterie de la baie.
66 Guide de référence rapide
Page 67

Pour remplacer la batterie, suivez la procédure de retrait en ordre inverse et
appuyez sur le loquet de fermeture de la baie de batterie jusqu'à ce qu'il
s'enclenche complètement.
Stockage de la batterie
Retirez la batterie de l'ordinateur lorsque vous rangez ce dernier pendant une
période prolongée. Sinon, la batterie finira par se décharger. Après une longue
période de stockage, rechargez complètement la batterie avant de l'utiliser
(reportez-vous à la section « Chargement de la batterie » à la page 65).
Dépannage
Suivez les conseils ci-dessous lorsque vous dépannez votre ordinateur :
• Si vous avez ajouté ou retiré une pièce avant de rencontrer le problème,
consultez les procédures d'installation et assurez-vous que la pièce est
correctement installée.
• Si un périphérique ne fonctionne pas, vérifiez qu'il est correctement
connecté.
• Si un message d'erreur s'affiche à l'écran, notez sur un papier son intitulé
exact. Ce message peut aider le personnel du support technique à
diagnostiquer et résoudre le(s) problème(s).
• Si un message d'erreur apparaît dans un programme, reportez-vous à la
documentation du programme en question.
REMARQUE : Les procédures présentées dans ce document concernent
l'affichage par défaut de Windows. Par conséquent, elles risquent de ne pas
fonctionner si votre ordinateur Dell est réglé sur le mode d'affichage classique
de Windows.
Problèmes de blocages et logiciels
PRÉCAUTION : Avant de commencer toute procédure de cette section, consultez
et respectez les consignes de sécurité du Guide d'information sur le produit.
L'ordinateur ne démarre pas
VÉRIFIEZ QUE LE CÂBLE D ' ALIMENTATION EST BIEN BRANCHÉ SUR L 'ORDINATEUR
ET SUR LA PRISE SECTEUR.
Guide de référence rapide 67
Page 68

L'ordinateur ne répond plus
AVIS : Vous pouvez perdre des données si vous n'arrivez pas à arrêter
correctement le système d'exploitation.
É
TEIGNEZ L 'ORDINATEUR — Si vous n'obtenez aucune réponse lorsque vous appuyez
sur une touche du clavier ou lorsque vous déplacez la souris, appuyez sur le bouton
d'alimentation et maintenez-le enfoncé pendant au moins 8 à 10 secondes jusqu'à ce
que l'ordinateur s'éteigne, puis redémarrez l'ordinateur.
Un programme ne répond plus
FIN DU PROGRAMME —
1
Appuyez simultanément sur <Ctrl><Maj><Échap> pour accéder au Gestionnaire
des tâches.
2
Cliquez sur l'onglet
3
Cliquez pour sélectionner le programme qui ne répond plus.
4
Cliquez sur
Applications
Fin de tâche
.
.
Un programme se bloque régulièrement
REMARQUE : En général, un logiciel est livré avec des instructions d'installation,
dans la documentation ou sur la disquette, le CD ou le DVD qui l'accompagne.
ONSULTEZ LA DOCUMENTATION DU LOGICIEL — Le cas échéant, supprimez, puis
C
réinstallez le programme.
Un programme est conçu pour une version antérieure d'un système d'exploitation
Windows
EXÉCUTEZ L 'ASSISTANT COMPATIBILITÉ DES PROGRAMMES —
Windo ws XP :
L'Assistant Compatibilité des programmes configure un programme pour qu'il
fonctionne dans un environnement similaire aux environnements des systèmes
d'exploitation autres que Windows XP.
1
Cliquez sur
Compatibilité des programmes
2
Suivez les instructions qui s'affichent à l'écran.
Démarrer→
Tous les programmes→ Accessoires→ Assistant
→
Suivant
.
Windows Vista :
L'Assistant Compatibilité des programmes configure un programme pour qu'il
fonctionne dans un environnement similaire aux environnements des systèmes
d'exploitation autres que Windows Vista.
68 Guide de référence rapide
Page 69

1
Cliquez sur
older program with this version of Windows
Démarrer
→ Panneau de configuration→ Programmes→ Use an
(Utiliser un programme antérieur avec
cette version de Windows).
2
Dans l'écran d'accueil, cliquez sur
3
Suivez les instructions qui s'affichent à l'écran.
Suivant
.
Un écran bleu uni apparaît
ÉTEIGNEZ L ' ORDINATEUR — Si vous n'obtenez aucune réponse lorsque vous appuyez
sur une touche du clavier ou lorsque vous déplacez la souris, appuyez sur le bouton
d'alimentation et maintenez-le enfoncé pendant au moins 8 à 10 secondes (jusqu'à ce
que l'ordinateur s'éteigne), puis redémarrez l'ordinateur.
Autres problèmes logiciels
CONSULTEZ LA DOCUMENTATION DU LOGICIEL OU CONTACTEZ LE FABRICANT POUR
OBTENIR DES INFORMATIONS DE DÉPANNAGE —
• Assurez-vous que le programme est compatible avec le système d'exploitation installé
sur votre ordinateur.
• Assurez-vous que l'ordinateur est conforme aux exigences matérielles requises pour
que le logiciel fonctionne. Consultez la documentation du logiciel pour de plus
amples informations.
• Assurez-vous que le programme est correctement installé et configuré.
• Assurez-vous que les pilotes de périphérique n'entrent pas en conflit avec le
programme.
• Le cas échéant, supprimez, puis réinstallez le programme.
SAUVEGARDEZ IMMÉDIATEMENT VOS FICHIERS
UTILISEZ UN PROGRAMME DE RECHERCHE DES VIRUS POUR VÉRIFIER LE DISQUE
DUR, LES DISQUETTES, LES CD OU LES DVD
NREGISTREZ ET QUITTEZ TOUS LES PROGRAMMES ET LES FICHIERS OUVERTS, PUIS
E
ARRÊTEZ L 'ORDINATEUR VIA LE MENU DÉMARRER
Dell Diagnostics
PRÉCAUTION : Avant de commencer toute procédure de cette section, consultez
et respectez les consignes de sécurité du Guide d'information sur le produit.
Quand utiliser Dell Diagnostics
Si des problèmes surviennent lors de l'utilisation de votre ordinateur,
effectuez les vérifications indiquées à la section « Problèmes de blocages et
logiciels » à la page 67 et exécutez Dell Diagnostics avant de contacter Dell
Guide de référence rapide 69
Page 70

pour obtenir de l'aide.
Nous vous recommandons d'imprimer ces procédures avant de commencer.
AVIS : Dell Diagnostics ne fonctionne qu'avec les ordinateurs Dell.
REMARQUE : Il se peut que le disque Drivers and Utilities soit en option et qu'il ne
vous ait pas été livré avec votre ordinateur.
Lancez Dell Diagnostics à partir de votre disque dur ou du disque Drivers and
Utilities en option.
Démarrage de Dell Diagnostics à partir du disque dur
Dell Diagnostics se trouve dans une partition cachée (utilitaire de
diagnostics) de votre disque dur.
REMARQUE : Si aucune image n'apparaît sur l'écran de votre ordinateur,
contactez Dell (reportez-vous à la section « Contacter Dell » de votre
Guide d'utilisation).
1
Éteignez l'ordinateur.
2
Si l'ordinateur est installé dans une station d'accueil, retirez-le. Pour
obtenir des instructions, consultez la documentation qui accompagne
celle-ci.
3
Connectez l'ordinateur à une prise secteur.
4
Dell Diagnostics peut être appelé de l'une des deux manières suivantes :
• Allumez l'ordinateur. Lorsque le logo DELL™ apparaît, appuyez
immédiatement sur <F12>. Sélectionnez
Diagnostics
à partir du
menu de démarrage et appuyez sur <Entrée>.
REMARQUE :
système d'exploitation apparaît. Attendez jusqu'à ce que le bureau Microsoft
Windows
tentative.
Si vous n'avez pas appuyé sur la touche assez vite, le logo du
®
s'affiche. Éteignez alors votre ordinateur et faites une nouvelle
• Appuyez sur la touche <Fn> et maintenez-la enfoncée lors de la mise
sous tension du système.
REMARQUE : Si un message vous indique qu'aucune partition d'utilitaire de
diagnostics n'a été trouvée, exécutez Dell Diagnostics à partir du disque
Drivers and Utilities en option.
70 Guide de référence rapide
®
Page 71

L'ordinateur lance l'évaluation du système de préamorçage avec une série
de diagnostics intégrés qui effectue un test préalable de la carte système,
du clavier, du disque dur et de l'écran.
• Répondez à toutes les questions qui s'affichent pendant l'évaluation.
• Si une défaillance de composant est détectée, l'ordinateur s'arrête et
émet un signal sonore. Pour arrêter l'évaluation et redémarrer
l'ordinateur, appuyez sur <Échap> ; pour passer au test suivant,
appuyez sur <y> ; pour retester le composant défectueux, appuyez
sur <r>.
• Si des défaillances sont détectées lors de l'évaluation du système de
préamorçage, notez le ou les codes d'erreur et contactez Dell
(reportez-vous à la section « Contacter Dell » du
Guide d'utilisation
Si l'évaluation de préamorçage du système se déroule sans problème, le
message
Press any key to continue
Booting Dell Diagnostic Utility Partition.
s'affiche (Amorçage de la partition
de l'utilitaire Dell Diagnostics. Appuyez sur une touche pour continuer).
5
Appuyez sur une touche pour démarrer Dell Diagnostics à partir de la
partition de diagnostics du disque dur.
Lancer Dell Diagnostics à partir du disque Drivers and Utilities en option
1
Insérez le disque
2
Arrêtez, puis redémarrez l'ordinateur.
Drivers and Utilities
.
Lorsque le logo DELL apparaît, appuyez immédiatement sur <F12>.
)
.
Si vous attendez trop longtemps et que le logo Windows apparaît,
attendez encore jusqu'à ce que le bureau Windows s'affiche. Éteignez alors
votre ordinateur et faites une nouvelle tentative.
REMARQUE : Les étapes suivantes modifient la séquence d'amorçage pour
une seule exécution. Au démarrage suivant, l'ordinateur démarre en fonction
des périphériques définis dans le programme de configuration du système.
3
Lorsque la liste des périphériques d'amorçage s'affiche, mettez en
surbrillance
CD/DVD/CD-RW Drive
(Lecteur de CD/DVD/CD-RW) et
appuyez sur <Entrée>.
4
Sélectionnez l'option
Boot from CD-ROM
(Amorcer à partir du
CD-ROM) dans le menu qui s'affiche, puis appuyez sur <Entrée>.
Guide de référence rapide 71
Page 72

5
Ta p e z 1 pour démarrer le menu, puis appuyez sur <Entrée> pour
continuer.
6
Sélectionnez
Exécuter Dell Diagnostics 32 bits
dans la liste numérotée. Si
plusieurs versions sont répertoriées, sélectionnez la version appropriée à
votre ordinateur.
7
Lorsque le
menu principal
de Dell Diagnostics apparaît, sélectionnez le
test à effectuer.
Menu principal de Dell Diagnostics
1
Une fois Dell Diagnostics chargé et lorsque l'écran
Menu principal
s'affiche, cliquez sur le bouton de l'option de votre choix.
Option Fonction
Express Test
(Test rapide)
Extended Test
(Test approfondi)
Custom Test
(Test personnalisé)
Symptom Tree
(Arborescence des
symptômes)
Exécute un test rapide des périphériques. En règle
générale, ce test nécessite de 10 à 20 minutes et n'exige
aucune intervention de votre part. Lancez le test rapide
en premier pour trouver le problème plus rapidement.
Exécute un test approfondi des périphériques. En règle
générale, ce test prend une heure ou plus et nécessite que
vous répondiez régulièrement à des questions
Teste un périphérique spécifique. Vous pouvez
personnaliser les tests à exécuter.
Répertorie les symptômes couramment rencontrés et
permet de sélectionner un test en fonction du symptôme
du problème.
2
Si un problème survient pendant un test, un message indiquant le code
d'erreur et une description du problème s'affiche. Notez le code d'erreur et
la description du problème et suivez les instructions à l'écran.
Si vous ne pouvez pas résoudre le problème, contactez Dell (reportez-vous
à la section « Contacter Dell » du
REMARQUE : Le numéro de service de votre ordinateur est situé en haut de
chaque écran de test. Lorsque vous contacterez le support technique de Dell,
ce numéro de service vous sera demandé.
Guide d'utilisation
).
72 Guide de référence rapide
Page 73

3
Si vous exécutez un test à partir de l'option
personnalisé) ou
Symptom Tree
(Arborescence des symptômes), cliquez
Custom Test
(Test
sur l'onglet approprié décrit dans le tableau suivant pour obtenir plus
d'informations.
Onglet Fonction
Results (Résultats) Affiche les résultats du test et les conditions d'erreur
rencontrées.
Errors (Erreurs) Affiche les conditions d'erreur rencontrées, les codes
d'erreur et la description du problème.
Help (Aide) Décrit le test et peut indiquer les conditions requises
pour exécuter le test.
Configuration
(Configuration)
Parameters (Paramètres) Vous permet de personnaliser le test en modifiant ses
Affiche la configuration matérielle du périphérique
sélectionné.
Dell Diagnostics obtient les informations de
configuration de tous les périphériques à partir du
programme de configuration du système, de la mémoire
et de divers tests internes, et les affiche dans la liste des
périphériques située dans le volet gauche de l'écran. La
liste des périphériques risque de ne pas afficher les noms
de tous les composants installés sur votre ordinateur ou
de tous les périphériques reliés à celui-ci.
paramètres.
4
Si vous exécutez Dell Diagnostics à partir du disque
Drivers and Utilities
retirez celui-ci une fois les tests effectués.
5
Une fois les tests effectués, fermez l'écran de test pour revenir à l'écran du
menu principal
fermez l'écran
. Pour quitter Dell Diagnostics et redémarrer l'ordinateur,
Menu principal
.
Guide de référence rapide 73
,
Page 74

74 Guide de référence rapide
Page 75

Indice analitico
A
Aide QuickSet, 49
alimentation
mode Mise en veille prolongée, 63
mode Veille, 63
B
batterie
chargement, 65
indicateur de charge, 61
jauge d'alimentation, 60
performances, 59
retrait, 66
stockage, 67
vérification de la charge, 60
C
consignes de sécurité, 44
contrat de licence pour
utilisateur final, 44
D
Dell Diagnostics, 69
Démarrage de Dell Diagnostics à
partir du disque dur, 70
dépannage
Dell Diagnostics, 69
diagnostics
Dell, 69
disque Drivers and Utilities
Dell Diagnostics, 69
disque du système
d'exploitation, 49
documentation
contrat de licence pour utilisateur
final, 44
en ligne, 46
ergonomie, 44
garantie, 44
Guide d'information sur le
produit, 44
Guide d'utilisation, 44
réglementation, 44
sécurité, 44
Indice analitico 75
Page 76

E
M
étiquettes
Microsoft Windows, 45
numéro de service, 45
G
Guide d'information sur le
produit, 44
Guide d'utilisation, 44
I
informations relatives à
l'ergonomie, 44
informations relatives à la
garantie, 44
informations sur les
réglementations, 44
installation de pièces
mise hors tension de
l'ordinateur, 54
L
Lancer Dell Diagnostics à partir
du disque Drivers and
Utilities, 71
logiciels
problèmes, 68-69
matériel
Dell Diagnostics, 69
mode Mise en veille
prolongée, 63
mode Veille
à propos de, 63
N
numéro de service, 45
O
ordinateur
absence de réponse, 67
blocages, 67-69
ne répond plus, 68
P
problèmes
blocages d'ordinateur, 68
blocages de l'ordinateur, 67, 69
Dell Diagnostics, 69
écran bleu, 69
généralités, 67
l'ordinateur ne répond plus, 67- 68
logiciels, 68-69
un programme ne répond plus, 68
un programme se bloque, 68
76 Indice analitico
Page 77

S
site de support de Dell, 46
site Web de support, 46
système d'exploitation
réinstallation, 49
W
Windows 2000
mode Mise en veille prolongée, 63
mode Veille, 63
Windows Vista
réinstallation, 49
Windows XP
mode Mise en veille prolongée, 63
mode Veille, 63
réinstallation, 49
Indice analitico 77
Page 78

78 Indice analitico
Page 79

Dell™ Latitude™ D530
Schnellreferenzhandbuch
Model. PP17L
www.dell.com | support.dell.com
Page 80

Anmerkungen, Hinweise und Vorsichtshinweise
ANMERKUNG: Eine ANMERKUNG macht auf wichtige Informationen aufmerk-
sam, mit denen Sie den Computer besser einsetzen können.
HINWEIS: Ein HINWEIS warnt vor möglichen Beschädigungen der Hardware oder
vor Datenverlust und erläutert, wie das vermieden werden kann.
VORSICHT: Durch VORSICHT werden Sie auf Gefahrenquellen hingewiesen, die
materielle Schäden, Verletzungen oder sogar den Tod von Personen zur Folge
haben können.
____________________
Die in diesem Dokument enthaltenen Informationen können sich ohne vorherige
Ankündigung ändern.
© 2007 Dell Inc. Alle Rechte vorbehalten.
Die Vervielfältigung oder Wiedergabe in jeglicher Weise ist ohne schriftliche Genehmigung von
Dell Inc. strengstens untersagt.
In diesem Text verwendete Marken: Dell, das DELL Logo, Latitude, ExpressCharge, und Undock &
Go sind Marken von Dell Inc.; Microsoft, Windows, Outlook, und Windows Vista sind entweder Marken
oder eingetragene Marken der Microsoft Corporation in den Vereinigten Staaten und/oder anderen
Ländern; Bluetooth ist eine eingetragene Marke von Bluetooth SIG, Inc. und wird von Dell unter
Lizenz benutzt.
Alle anderen in dieser Dokumentation genannten Marken und Handelsbezeichnungen sind Eigentum
der entsprechenden Hersteller und Firmen. Dell Inc. verzichtet auf alle Besitzrechte an Marken und
Handelsbezeichnungen, die nicht Eigentum von Dell sind.
Modell PP17L
September 2007 TEILENR. KY045 Rev. A00
Page 81

Inhalt
InInformationsquellen . . . . . . . . . . . . . . . . . . 83
Einrichten des Computers
. . . . . . . . . . . . . . . . 90
Übertragen von Daten auf einen neuen
Computer
Computer ausschalten
. . . . . . . . . . . . . . . . . . . . . . 90
. . . . . . . . . . . . . . . 95
Wissenswertes über Ihren Computer
Vorderansicht
Linke Seitenansicht
Rechte Seitenansicht
Rückansicht
Unterseite
Verwenden eines Akkus
Akkuleistung
. . . . . . . . . . . . . . . . . . . 96
. . . . . . . . . . . . . . . . 97
. . . . . . . . . . . . . . . 97
. . . . . . . . . . . . . . . . . . . . 98
. . . . . . . . . . . . . . . . . . . . . 99
. . . . . . . . . . . . . . . . 100
. . . . . . . . . . . . . . . . . . . . 100
Prüfen des Akkuladezustands
Energieverwaltungsmodi
. . . . . . . . . . . . . 104
Konfigurieren der Energieverwaltungseinstellungen
. . . . . . . . . . . . . . . . . . . . 105
Öffnen der Eigenschaften von
Energieoptionen
Aufladen des Akkus
Austauschen des Akkus
Lagern eines Akkus
. . . . . . . . . . . . . . . . . . 106
. . . . . . . . . . . . . . . . 106
. . . . . . . . . . . . . . 107
. . . . . . . . . . . . . . . . 108
. . . . . . . . . . 96
. . . . . . . . . . . 101
Fehlerbehebung
Probleme mit Absturz und Software
Dell Diagnostics
. . . . . . . . . . . . . . . . . . . . . 108
. . . . . . . . 108
. . . . . . . . . . . . . . . . . . 111
Stichwortverzeichnis . . . . . . . . . . . . . . . . . 115
Inhalt 81
Page 82

82 Inhalt
Page 83

InInformationsquellen
ANMERKUNG: Einige Leistungsmerkmale sind möglicherweise optional und
werden nicht mit Ihrem Computer geliefert. Einige Funktionen oder Datenträger sind
möglicherweise in bestimmten Ländern nicht verfügbar.
ANMERKUNG: Weiteres Informationsmaterial ist möglicherweise im Lieferum-
fang des Computers enthalten.
Welche Informationen benötigen Sie? Hier finden Sie das Gesuchte:
• Ein Diagnoseprogramm für den
Computer
• Treiber für den Computer
• Dokumentation zum Gerät
• Notebook-System-Software (NSS)
Drivers and Utilities-Disc
Dokumentation und Treiber sind bereits auf
dem Computer installiert. Sie können die CD
dazu verwenden, Treiber neu zu installieren
(siehe „Treiber und Dienstprogramme neu
installieren” in Ihrem
um Dell Diagnostics auszuführen (siehe „Wenn
eine Meldung angezeigt wird, dass keine
Partition für ein Diagnose-Dienstprogramm
gefunden wurde, starten Sie Dell Diagnostics
von Ihrer optionalen Drivers and Utilities CD.”
auf seite 112).
Möglicherweise finden Sie auf der Disc
Readme-Dateien. Diese Dateien enthalten
Angaben zu den neuesten technischen Änderungen bzw. Detailinformationen zu technischen Fragen für erfahrene Benutzer oder
Techniker.
Benutzerhandbuch
) oder
ANMERKUNG: Treiber und Dokumentationsak-
tualisierungen finden Sie unter support.dell.com.
ANMERKUNG: Der Drivers and Utilities-Daten-
träger ist optional und möglicherweise nicht im
Lieferumfang Ihres Computers enthalten.
Schnellreferenzhandbuch 83
Page 84

Welche Informationen benötigen Sie? Hier finden Sie das Gesuchte:
• Garantieinformationen
Dell™ Produktinformationshandbuch
• Verkaufs- und Lieferbedingungen
(nur für die USA)
• Sicherheitshinweise
• Zulassungsinformationen
• Informationen zur Ergonomie
• Endbenutzer-Lizenzvereinbarung
• Technische Daten
• Anleitungen zum Konfigurieren
der Systemeinstellungen
• Fehlerbehebung und
Problemlösung
Dell Latitude™ Benutzerhandbuch
®
Microsoft
Windows® XP und Windows Vista™
Hilfe- und Supportcenter
1
Klicken Sie auf
Start→
Hilfe und Support→
Dell Benutzer- und Systemhandbücher
Systemhandbücher
2
Klicken Sie auf das
.
Benutzerhandbuch
Ihren Computer.
→
für
84 Schnellreferenzhandbuch
Page 85

Welche Informationen benötigen Sie? Hier finden Sie das Gesuchte:
• Service-Tag-Nummer und ExpressServicecode
®
• Microsoft
Windows®-
Lizenzaufkleber
Service-Tag-Nummer und Microsoft®
Windows
®
Lizenz
ANMERKUNG: Die Service-Tag-Nummer des
Computers und der Lizenzaufkleber von Microsoft
Windows befinden sich auf Ihrem Computer.
Die Service-Tag-Nummer Ihres Computers
weist sowohl eine Service-Tag-Nummer als auch
einen Express-Servicecode auf.
• Geben Sie die Service-Tag-Nummer auf der
We bs it e
support.dell.com
beim Support an, um den Computer zu
identifizieren.
• Geben Sie beim Anruf beim Technischen
Support den Express-Servicecode an, um zum
geeigneten Ansprechpartner weitergeleitet zu
werden.
• Geben Sie den Product Key auf dem Lizenzaufkleber ein, wenn das Betriebssystem neu
installiert wird.
ANMERKUNG: Um die Sicherheit zu erhöhen,
enthält das neue Microsoft Windows-Lizenzetikett eine Fehlerstelle oder ein so genanntes
„hole“ (Loch), um das Entfernen des Etiketts zu
verhindern.
oder beim Anruf
Schnellreferenzhandbuch 85
Page 86

Welche Informationen benötigen Sie? Hier finden Sie das Gesuchte:
• Lösungen – Hinweise zum Beheben von Störungen, Veröffentlichungen von Technikern, OnlineSchulungen, häufig gestellte
Fragen (FAQs)
• Community – Online-Diskussionen mit anderen Dell-Kunden
• Aufrüstungen – Informationen zur
Aufrüstung von Komponenten, wie
z. B. Speicher, Festplatte und
Betriebssystem
• Kundenbetreuung – Kontaktinformationen, Serviceanfrage und
Bestellstatus, Garantie und Reparaturinformationen
• Service und Support – Status von
Serviceanfragen und Support-Verlauf, Service-Vertrag, Online-Diskussionen mit dem technischen
Support
• Technischer Update Service von
Dell – erstellt eigenständig E-MailBenachrichtigungen über Softwareund Hardware-Aktualisierungen für
Ihren Computer.
• Referenz – Computerdokumentation, Einzelheiten über die Computerkonfiguration, Produktangaben und Whitepaper
• Downloads – Zugelassene Treiber,
Patches und SoftwareAktualisierungen
Dell Support-Website – support.euro.dell.com
ANMERKUNG: Wählen Sie Ihre Region oder
Ihren Geschäftsbereich aus, um die entsprechende Support-Site angezeigt zu bekommen.
86 Schnellreferenzhandbuch
Page 87

Welche Informationen benötigen Sie? Hier finden Sie das Gesuchte:
•
Notebook-System-Software (NSS) –
Wenn Sie das Betriebssystem auf
Ihrem Computer neu installieren,
sollten Sie auch das NSS-Dienstprogramm neu installieren. NSS
sorgt dafür, dass wichtige Aktualisierungen für Ihr Betriebssystem
durchgeführt werden und bietet
Support für Prozessoren, optische
Laufwerke, USB-Geräte usw. NSS
ist für den ordnungsmäßigen Betrieb des Dell Computers notwendig. Die Software erkennt automatisch Ihren Computertyp und das
Betriebssystem und installiert die
für Ihre Konfiguration geeigneten
Aktualisierungen.
Zum Herunterladen von Notebook-SystemSoftware gehen Sie folgendermaßen vor:
1
Gehen Sie auf die Website
support.euro.dell.com
Treiber und Downloads
auf
2
Geben Sie Ihre Service-Tag-Nummer ein und
klicken Sie auf
und klicken Sie dort
Los,
oder wählen Sie den Produkttyp und das Produktmodell aus und
klicken Sie auf
3
Klicken Sie auf das Pluszeichen (
Systemprogramme
System-Software
herunterladen
4
Klicken Sie auf
Bestätigen
, klicken Sie auf
, und klicken Sie auf
.
Ausführen,
programm auszuführen.
ANMERKUNG: Die support.dell.com Benut-
zeroberfläche ist je nach Ihrer Auswahl
verschieden.
• Software-Erweiterungen und Hinweise zum Beheben von Störungen
– Häufig gestellte Fragen (FAQs),
aktuelle Themen und Hinweise
zum allgemeinen Zustand Ihres
Computersystems
Dell Support-Dienstprogramm
Das Dell Support-Dienstprogramm ist ein automatisches Aktualisierungs- und Benachrichtigungssystem, das auf Ihrem Computer installiert ist. Dieses Support-Dienstprogramm bietet Zustandserfassungen Ihrer Rechnerumgebung, Software-Aktualisierungen und relevante
Informationen zur Selbsthilfe in Echtzeit.
Öffnen Sie das Dell Support-Dienstprogramm
Symbols in der Taskleiste.
• Anleitung zum Finden von Informationen über Ihren Computer
und die zugehörigen Komponenten
• Anleitung zum Herstellen einer
Verbindung mit dem Internet
• Anleitung zum Hinzufügen von
Benutzerkonten für verschiedene
Benutzer
• Anleitung zum Übertragen von
Dateien und Einstellungen von
einem anderen Computer
mithilfe des
Windows Begrüßungscenter
Der Windows Begrüßungscenter wird automatisch bei der ersten Benutzung Ihres Computers
angezeigt. Sie können entscheiden, ob er bei
jedem Neustart Ihres PCs angezeigt werden
soll, indem Sie ein Häkchen in das Kontrollkästchen Beim Systemstart starten setzen. Sie
können auf den Begrüßungscenter auch zugreifen, indem Sie auf die Windows Vista-Schaltfläche „Start“ , und dann auf Begrüßungs-
klicken.
center
.
.
+)
neben
Notebook-
um das Dienst-
Jetzt
Schnellreferenzhandbuch 87
Page 88

Welche Informationen benötigen Sie? Hier finden Sie das Gesuchte:
• Verwenden von Microsoft
Windows XP
• Verwenden von Microsoft
Windows Vista
• So arbeiten Sie mit Programmen
und Dateien
• So können Sie Ihren Desktop
individuell gestalten
Windows Hilfe und Support
Microsoft Windows XP:
1
Klicken Sie auf die Schaltfläche
anschließend auf
2
Wählen Sie entweder eines der aufgeführten
Hilfe und Support
Themen aus oder geben Sie ein Wort oder
eine Wendung im
Suchfeld
lem beschreibt, klicken Sie auf das Pfeilsymbol und dann auf das Thema, das Ihr Problem
beschreibt.
3
Befolgen Sie die Anleitungen auf dem
Bildschirm.
Microsoft Windows Vista:
1
Klicken Sie auf die Windows Vista-Schaltfläche „Start“ , und klicken Sie anschließend auf
Help and Support
Support).
2
Geben Sie in das Feld
Search Help
ein Wort oder eine Wendung ein, die Ihr
Problem näher beschreibt, und drücken Sie
anschließend auf die <Eingabetaste>, oder
klicken Sie auf die Lupe.
3
Klicken Sie auf das Thema, das Ihr Problem
beschreibt.
4
Befolgen Sie die Anleitungen auf dem
Bildschirm.
• Informationen zur Netzwerkaktivität, dem Assistenten für die Energieverwaltung, Schnelltasten und
anderen von Dell QuickSet gesteuerten Elementen
Dell QuickSet Hilfe
Zum Anzeigen der
Dell QuickSet-Hilfe klicken
Sie mit der rechten Maustaste auf das
QuickSet-Symbol in der Microsoft WindowsTaskleiste und wählen Sie Hilfe. Die Taskleiste
befindet sich in der unteren rechten Ecke Ihres
Bildschirms.
Start
und
.
ein, die Ihr Prob-
(Hilfe und
(Suchen)
88 Schnellreferenzhandbuch
Page 89

Welche Informationen benötigen Sie? Hier finden Sie das Gesuchte:
• Anleitungen zur Neuinstallation
des Betriebssystems
Betriebssystem-Disc
ANMERKUNG: Die Betriebssystem-Disc ist
optional und ist möglicherweise nicht im Lieferumfang Ihres Computers enthalten.
ANMERKUNG: Vorinstallierte Betriebssysteme
enthalten eine Partition, mit der das Betriebssystem auf Ihrem PC wiederhergestellt werden kann.
Das Betriebssystem ist bereits auf dem Computer installiert. Verwenden Sie zur Neuinstallation des Betriebssystems die BetriebssystemDisc.
Nach der Neuinstallation Ihres Betriebssystem
können Sie die Drivers and Utilities-Disc verwenden, um Treiber für die Geräte zu installieren, die im Lieferumfang Ihres Computers
enthalten waren.
Das Etikett mit dem Product Key des Betriebssystems finden Sie am Computer.
ANMERKUNG: Die Farbe der Disc hängt von
dem von Ihnen bestellten Betriebssystem ab.
Schnellreferenzhandbuch 89
Page 90

Einrichten des Computers
Übertragen von Daten auf einen neuen Computer
Über Assistenten in Ihrem Betriebssystem können Sie Dateien und andere
Daten von einem Computer auf einen anderen übertragen – beispielsweise
von einem alten Quellcomputer auf einen neuen Zielcomputer. Weitere Anweisungen finden Sie im folgenden Abschnitt, der dem auf Ihrem Computer
installierten Betriebssystem entspricht.
Microsoft Windows XP
Das Betriebssystem Microsoft Windows XP verfügt über einen Assistenten
zum Übertragen von Dateien und Einstellungen, mit dem Daten vom Quellcomputer auf einen Zielcomputer übertragen werden können. Es können
folgende Daten übertragen werden:
•E-Mails
• Einstellungen für Symbolleisten
• Fenstergrößen
• Internet-Lesezeichen
Sie können die Daten über ein Netzwerk oder einen seriellen Anschluss auf
den neuen Computer übertragen oder Sie können sie auf Wechselmedien,
wie z. B. CD-R (CD-Recordable), zur Übertragung auf den neuen Computer
speichern.
ANMERKUNG: Sie können Daten eines Quellcomputers auf einen neuen Com-
puter übertragen, indem Sie an beiden Computern ein serielles Kabel direkt an den
jeweiligen E/A-Anschluss (Eingabe/Ausgabe) anschließen. Um Daten über eine
serielle Verbindung zu übertragen, müssen Sie das Dienstprogramm Netzwerkanschlüsse in der Systemsteuerung öffnen und zusätzliche Konfigurationsschritte
ausführen, wie z. B. Einrichten einer erweiterten Verbindung und Zuweisen von
Host- und Gast-Computer.
Anweisungen zum Einrichten einer direkten Kabelverbindung zwischen zwei
Computern finden Sie im Microsoft Knowledge Base-Artikel #305621 mit dem Titel
How to Set Up a Direct Cable Connection Between Two Computers in Windows XP
(in englischer Sprache). Diese Software ist möglicherweise in bestimmten Ländern
nicht verfügbar.
90 Schnellreferenzhandbuch
Page 91

Um Daten auf einen neuen Computer zu übertragen, müssen Sie den Assistenten zum Übertragen von Dateien und Einstellungen ausführen. Für
diesen Vorgang können Sie die optionale Betriebssystem-Disc verwenden oder
eine Assistent-Diskette mit dem Assistenten zum Übertragen von Dateien
und Einstellungen erstellen.
Ausführen des Assistenten zum Übertragen von Dateien und Einstellungen
mithilfe der Betriebssystem-Disc
ANMERKUNG: Für diesen Vorgang benötigen Sie die Betriebssystem-Disc. Diese
Disc ist optional und deshalb möglicherweise bei bestimmten Computern nicht im
Lieferumfang enthalten.
So bereiten Sie einen Zielcomputer auf die Dateiübertragung vor:
1
Öffnen Sie den Assistenten zum Übertragen von Dateien und Einstellungen: Klicken Sie auf
programme
2
Wenn der Begrüßungsbildschirm
→
und Einstellungen
3
In der Anzeige
Neuer Computer→
4
In der Anzeige
Start→
Assistent zum Übertragen von Dateien und Einstellungen
erscheint, klicken Sie auf
Um welchen Computer handelt es sich?
Weite r
Verfügen Sie über eine Windows XP-CD?
Ich werde den Assistenten der CD Windows XP verwenden→
5
Wenn der Bildschirm
Alle Programme→
Zubehör→ System-
Assistent zum Übertragen von Dateien
Weite r
.
klicken Sie auf
.
klicken Sie auf
Wechseln Sie jetzt zum Quellcomputer
Weite r
.
angezeigt
wird, wechseln Sie zu Ihrem alten oder Quellcomputer. Klicken Sie zu
diesem Zeitpunkt
nicht
auf
Weiter
.
So kopieren Sie Daten vom Quellcomputer:
Legen Sie die Windows XP
1
Betriebssystem
-Disc in den alten Quellcom-
puter ein.
2
Klicken Sie auf dem Bildschirm
auf
Zusätzliche Aufgaben durchführen
3
Bei
Wie möchten Sie vorgehen?
und Einstellungen
4
In der Anzeige
Alter Computer→
5
Klicken Sie in der Anzeige
→
Next
Um welchen Computer handelt es sich?
Weiter
Willkommen bei Microsoft Windows XP
.
klicken Sie auf
Übertragen von Dateien
(Weiter).
klicken Sie auf
.
Übertragungsmethode auswählen
auf die von
Ihnen bevorzugte Übertragungsmethode.
.
Schnellreferenzhandbuch 91
Page 92

6
Wählen Sie in der Anzeige
die Sie übertragen möchten, und klicken Sie auf
Nachdem alle Daten kopiert wurden, erscheint das Fenster
des Sammlungsvorgangs
7
Klicken Sie auf
Fertig stellen
Was soll übertragen werden?
Weite r
.
.
die Elemente aus,
.
Fertig stellen
So übertragen Sie die Daten auf den Zielcomputer:
Klicken Sie auf dem neuen Computer im Fenster
1
Quellcomputer
2
Wählen Sie in der Anzeige
gen?
die von Ihnen für die Übertragung Ihrer Einstellungen und Dateien
auf
Weiter
.
Wo befinden sich die Dateien und Einstellun-
bevorzugte Methode aus und klicken Sie auf
Wechseln Sie jetzt zum
Weite r
.
Der Assistent liest die gesammelten Dateien und Einstellungen und überträgt sie auf den Zielcomputer.
Nachdem alle Einstellungen und Dateien übernommen wurden, erscheint
das Fenster
3
Klicken Sie auf
Ausführen des Assistenten zum Übertragen von Dateien und Einstellungen ohne
Betriebssystem-Disc
Beendet
.
Fertig stellen
und starten Sie den neuen Computer neu.
Um den Assistenten zum Übertragen von Dateien und Einstellungen ohne
die Betriebssystem-Disc auszuführen, müssen Sie eine Assistent-Diskette
erstellen, mit der Sie eine Speicher-Abbilddatei auf einem Wechselmedium
erstellen können.
Um eine Assistent-Diskette zu erstellen, verwenden Sie Ihren neuen Computer, auf dem Windows XP läuft, und führen Sie die folgenden Schritte aus:
1
Öffnen Sie den Assistenten zum Übertragen von Dateien und Einstellungen: Klicken Sie auf
programme
2
Wenn der Begrüßungsbildschirm
→
und Einstellungen
3
In der Anzeige
Neuer Computer→
4
In der Anzeige
Start→
Assistent zum Übertragen von Dateien und Einstellungen
erscheint, klicken Sie auf
Um welchen Computer handelt es sich?
Weiter
Verfügen Sie über eine Windows XP-CD?
Alle Programme→
Zubehör→ System-
Assistent zum Übertragen von Dateien
Weite r
.
klicken Sie auf
.
klicken Sie auf
Assistent-Diskette auf dem folgenden Laufwerk erstellen→ Weiter.
.
92 Schnellreferenzhandbuch
Page 93

5
Legen Sie ein Wechselmedium ein, z. B. eine beschreibbare CD, und
klicken Sie auf
6
Wenn der Erstellungsvorgang abgeschlossen ist und die Meldung
Wechseln Sie jetzt zum Quellcomputer
klicken Sie
7
Wechseln Sie zum alten Quellcomputer.
nicht
OK
auf
.
Weiter
angezeigt wird,
.
So kopieren Sie Daten vom Quellcomputer:
Legen Sie die Assistent-Diskette in den alten Quellcomputer ein.
1
2
Klicken Sie auf
3
Gehen Sie im Fenster
fastwiz
(auf dem entsprechenden Wechselmedium) und klicken Sie auf
OK
.
4
Klicken Sie im Begrüßungsbildschirm von
Dateien und Einstellungen
5
In der Anzeige
Alter Computer→
6
Klicken Sie in der Anzeige
Start→
Ausführen
Ausführen
.
im Feld
Öffnen
zum Speicherort von
Assistent zum Übertragen von
auf
Weiter
.
Um welchen Computer handelt es sich?
Weiter
.
Übertragungsmethode auswählen
klicken Sie auf
Ihnen bevorzugte Übertragungsmethode.
7
Wählen Sie in der Anzeige
die Sie übertragen möchten, und klicken Sie auf
Was soll übertragen werden?
Weite r
die Elemente aus,
.
Nachdem alle Daten kopiert wurden, erscheint das Fenster
des Sammlungsvorgangs
.
auf die von
Fertig stellen
8
Klicken Sie auf
Fertig stellen
.
So übertragen Sie die Daten auf den Zielcomputer:
1
Klicken Sie auf dem neuen Computer im Fenster
Quellcomputer
2
Wählen Sie in der Anzeige
gen?
die von Ihnen für die Übertragung Ihrer Einstellungen und Dateien
auf
Weite r
.
Wo befinden sich die Dateien und Einstellun-
bevorzugte Methode aus und klicken Sie auf
Wechseln Sie jetzt zum
Weiter
. Befolgen Sie die An-
leitungen auf dem Bildschirm.
Der Assistent liest die gesammelten Dateien und Einstellungen und
überträgt sie auf den Zielcomputer.
Schnellreferenzhandbuch 93
Page 94

Nachdem alle Einstellungen und Dateien übernommen wurden, erscheint
das Fenster
3
Klicken Sie auf
ANMERKUNG: Weitere Informationen zu dieser Vorgehensweise finden Sie unter
support.dell.com im Dokument mit der Nummer 154781 (What Are The Different
Methods To Transfer Files From My Old Computer To My New Dell™ Computer
Using the Microsoft
zum Übertragen von Dateien von meinem alten Computer auf den neuen Dell™
Computer mithilfe des Microsoft
ANMERKUNG: Möglicherweise können Sie in einigen Ländern nicht auf das Dell
Wissensdatenbankdokument zugreifen.
Microsoft Windows Vista
1
Klicken Sie auf die Windows Vista Start-Taste und dann auf
gen von Dateien und Einstellungen
starten
2
Klicken Sie im Dialogfeld
3
Klicken Sie auf
fortsetzen
.
Beendet
.
Fertig stellen
®
Windows® XP Operating System? (Welche Verfahren gibt es
und starten Sie den neuen Computer neu.
®
Benutzerkontenschutz
Neue Übertragung starten
.
Windows® XP-Betriebssystems?).
→
Windows einfache Übertragung
auf
Weite r
oder
Aktive Übertragung
Übertra-
.
Folgen Sie den Anweisungen des Windows Easy Transfer-Assistenten auf dem
Bildschirm.
94 Schnellreferenzhandbuch
Page 95

Computer ausschalten
HINWEIS: Um Datenverluste zu vermeiden, speichern und schließen Sie alle
geöffneten Dateien, und beenden Sie alle aktiven Programme, bevor Sie den
Computer herunterfahren.
1
Fahren Sie das Betriebssystem herunter.
a
Speichern und schließen Sie alle geöffneten Dateien und beenden Sie
alle aktiven Programme.
b
Klicken Sie im
Herunterfahren→
Klicken Sie in Microsoft® Windows Vista™ auf die
, klicken Sie dann im rechten unteren Bereich des Startmenüs auf
den Pfeil (siehe Abbildung) und wählen Sie
Der Computer schaltet sich aus, wenn das Herunterfahren des
Betriebssystems abgeschlossen ist.
2
Stellen Sie sicher, dass der Computer und alle angeschlossenen Geräte
ausgeschaltet sind. Wenn der Computer und die angeschlossenen Geräte
nicht automatisch beim Herunterfahren des Betriebssystems ausgeschaltet
wurden, halten Sie den Netzschalter ungefähr 4 Sekunden lang gedrückt,
um den Computer und die Geräte auszuschalten.
Microsoft® Windows® XP-Betriebssystem
Herunterfahren
.
Schaltfläche „Start“
Herunterfahren
auf
Start→
.
Schnellreferenzhandbuch 95
Page 96

Wissenswertes über Ihren Computer
Vorderansicht
9
1
8
7
6
1 Bildschirm 2 Gerätestatusanzeige
3 Tastatur 4 Touchpad
5 Bildschirmverriegelung 6 Lautsprecher
7 Touchpad-Tasten 8 Tastaturstatusanzeigen
9 Betriebsschalter
2
3
4
5
96 Schnellreferenzhandbuch
Page 97

Linke Seitenansicht
1 Sicherheitskabeleinschub 2 IEEE 1394-Anschluss
3 Steckplatz für PC
Card/ExpressCard
5 Audioanschlüsse (2) 6 Festplatte
Rechte Seitenansicht
352 41 6
4 Infrarotsensor
1 23
1 Modulschacht 2 Komponentenfreigabevorrichtung
3 USB-Anschlüsse (2)
Schnellreferenzhandbuch 97
Page 98

Rückansicht
8123 4 5 6 7
1 USB-Anschlüsse (2) 2 Modemanschluss (RJ-11)
3 Netzwerkanschluss (RJ-45) 4 S-Video-Fernsehausgangsanschluss
5 Serieller Anschluss 6 Monitoranschluss
7 Netzteilanschluss 8 Lüftungsschlitze
98 Schnellreferenzhandbuch
Page 99

Unterseite
1
7
6
1 Speichermodul/Modem/WLAN
Mini-Card/Abdeckung der
Knopfzellenbatterie
3 Akku-Ladestandanzeige/
Zustandsanzeige
5 Docking-Gerätanschluss 6 Lüftungsschlitze
7 Festplatte
2
5
2 Akkufachfreigabevorrichtung
4 Akku
3
4
Schnellreferenzhandbuch 99
Page 100

Verwenden eines Akkus
Akkuleistung
ANMERKUNG: Informationen zur Dell-Garantie für Ihren Computer finden Sie im
Produktinformationshandbuch oder auf dem separaten Garantiedokument, das im
Lieferumfang des Computers enthalten ist.
Für eine optimale Leistung des Computers und zur Beibehaltung der BIOSEinstellungen betreiben Sie Ihr Notebook von Dell immer mit eingesetztem
Hauptakku. Bei Auslieferung ist standardmäßig bereits ein Akku im Akkufach
installiert.
ANMERKUNG: Da der Akku beim Kauf des Computers möglicherweise nicht
vollständig geladen ist, verwenden Sie ein Netzteil, um Ihren neuen Computer vor
der ersten Verwendung an eine Steckdose anzuschließen und den Akku zu laden.
Sie erzielen die besten Ergebnisse, wenn Sie den Computer so lange über ein
Netzteil betreiben, bis der Akku vollständig geladen ist. Zum Anzeigen des Akkuladestatus, überprüfen Sie die Energieanzeige in den Energieoptionen (siehe „Öffnen
der Eigenschaften von Energieoptionen” auf seite 106).
ANMERKUNG: Die Betriebsdauer eines Akkus (die Zeit, wie lange eine Akkula-
dung vorhält) nimmt mit der Zeit ab. Je nachdem, wie oft und unter welchen Bedingungen der Akku verwendet wird, müssen Sie möglicherweise noch vor Ende
der Laufzeit Ihres Computers den Akku ersetzen.
ANMERKUNG: Es wird empfohlen, den Computer beim Beschreiben von CDs oder
DVDs an das Stromnetz anzuschließen.
Die Betriebsdauer wird stark beeinträchtigt, wenn Sie bestimmte Vorgänge
durchführen. Dazu gehören u. A.:
• Verwenden von optischen Laufwerken
• Verwenden von Wireless-Kommunikationsgeräten, PC-Karten, ExpressKarten, Media-Speicherkarten oder USB-Geräten
• Verwenden von sehr hellen Bildschirmeinstellungen, von 3D-Bildschirmschonern oder anderen Programmen, die viel Strom benötigen wie z. B.
3D-Grafik-Anwendungen
• Betrieb des Computers mit maximaler Leistung. Siehe „Konfigurieren der
Energieverwaltungseinstellungen” auf seite 105, um Informationen über
Zugang zu den Eigenschaften von Energieoptionen in Windows oder zu
Dell QuickSet zu erhalten, die Sie dazu benutzen können, Energieverwaltungseinstellungen einzurichten.
100 Schnellreferenzhandbuch
 Loading...