

Page 1

Dell Latitude Tablet and 2-in-1 System Reimage “How-To” Guide
Dell
Business Client
Re-Image “How-To” Guide
Latitude Tablet and 2-in-1 System
Revision 1.0
Feb 29th, 2016
A01
Page 2

Dell Latitude Tablet and 2-in-1 System Reimage “How-To” Guide
Contents
1 Overview .............................................................................................................................................................................. 3
2 “How-To” ............................................................................................................................................................................. 3
Supported Operating Systems ................................................................................................................................. 3 2.1
Latest Drivers / Applications and Utilities .............................................................................................................. 3 2.2
Installation Sequence Overview .............................................................................................................................. 4 2.3
BIOS ............................................................................................................................................................................... 5 2.4
3 OS ........................................................................................................................................................................................... 8
3.1 Two basic methods to install OS image ............................................................................................................................... 8
3.2 Recommended Drivers / Applications Installation Order ................................................................................................. 14
4 To install the OS with a bootable USB flash drive/SCCM:.................................................................................................... 17
Page 3

Dell Latitude Tablet and 2-in-1 System Reimage “How-To” Guide
Win8.1 64bit
Win10 64bit
Latitude 5175
Latitude 5179
Latitude 7275
XPS 9250
1 Overview
The purpose of this document is for reimaging Dell Latitude Tablet. These images include the Dell
recommended software stack and settings, drivers, and applications which are tested and validated with
the system.
Drivers and applications must be installed on Dell Latitude Tablet in a prescribed order to ensure
optimal performance. Failure to install drivers and applications in this document may result in
undesirable performance.
Dell provides drivers and applications that are not included in Microsoft Operating Systems. These
drivers are required to enable the new technologies and features of Dell Latitude Tablet. Reinstalled
images should be built from a clean hand installed OS load and following the steps in this guide. Dell
does not recommend starting from an image built on previous generations of products or other
computer systems.
Dell recommends ensuring BIOS settings are correctly set and using the latest device drivers and
applications when imaging their systems.
This “How-To” guide applies to the following systems:
Latitude 5175
Latitude 5179
Latitude 7275
XPS 9250
2 “How-To”
Supported Operating Systems 2.1
The following Microsoft operating systems have been validated for use on Dell Latitude Tablet
Latest Drivers / Applications and Utilities 2.2
Dell recommends always obtaining the latest and most updated BIOS, drivers, firmware, and
applications. Dell validated and tested drivers and applications are located on Dell’s support web
site http://www.dell.com/support
o Enter the Service Tag or select the product model and the model number
o Select Operating System (Win8.1 64-Bit or Win10 64-Bit version must be selected)
o Choose drivers and downloads
Page 4
Dell Latitude Tablet and 2-in-1 System Reimage “How-To” Guide
These drivers are required to enable the features of the Dell Latitude 5175/5179/7275 and Dell XPS 9250.
The needed drivers and their supporting applications can be retrieved from the following URLs:
Latitude 5175: http://www.dell.com/support/home/us/en/04/product-support/product/latitude-5175-laptop/drivers
Latitude 5179: http://www.dell.com/support/home/us/en/04/product-support/product/latitude-5179-laptop/drivers
Latitude 7275: http://www.dell.com/support/home/us/en/19/product-support/product/latitude-7275-laptop/drivers
XPS 9250: http://www.dell.com/support/home/us/en/19/product-support/product/xps-12-9250/drivers
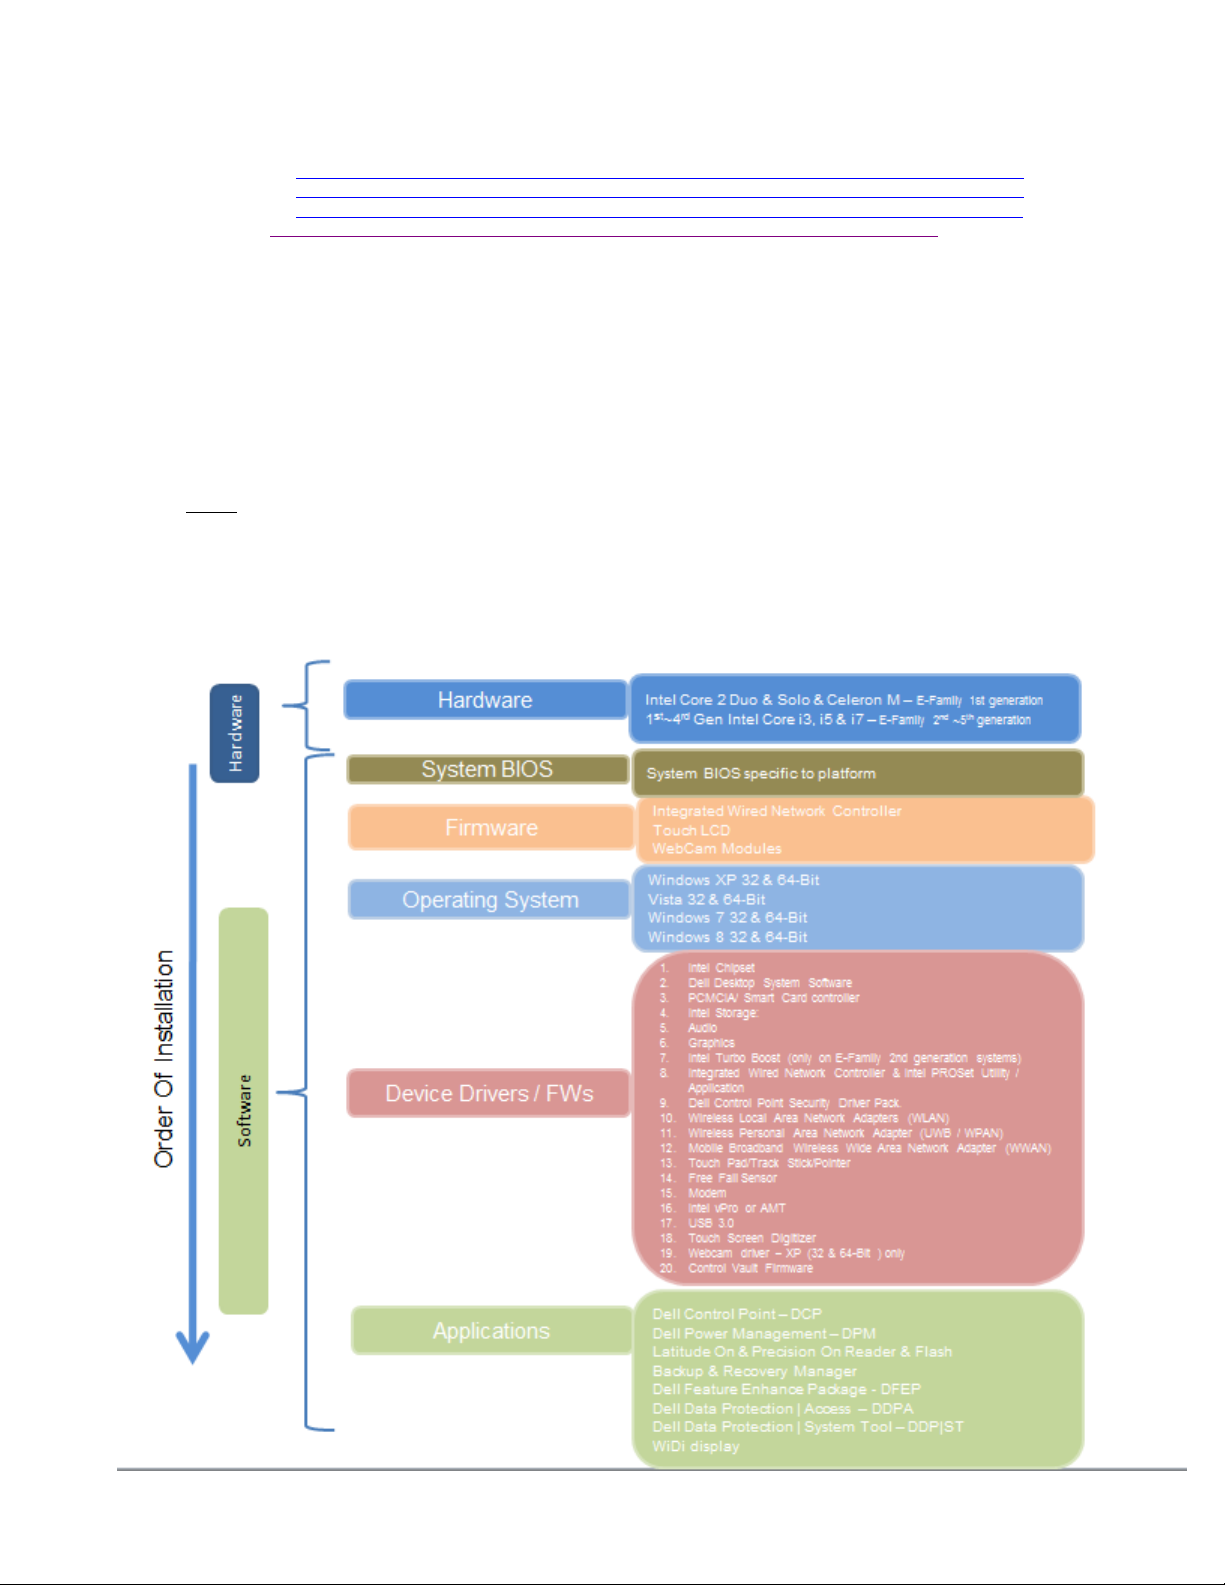
Installation Sequence Overview 2.3
The list below is a general overview of drivers and applications that should be installed on Dell
Latitude systems in a prescribed order to ensure optimal performance. Actual system
configurations may vary.
Note: Dell Alienware, Inspiron, Studio, XPS and Vostro Laptops may have different installation
sequence. Please refer to Dell Support Website for these Laptops.
2.3.1 Installation Sequence Overview
Page 5
Dell Latitude Tablet and 2-in-1 System Reimage “How-To” Guide
BIOS 2.4
Dell recommends flashing the latest BIOS available to system. This is posted on Dell’s driver &
downloads support web site (dell.com/support) under the “BIOS” section.
Some of the BIOS settings are critical to Operating System performance and installation. These are
recommended settings as follows:
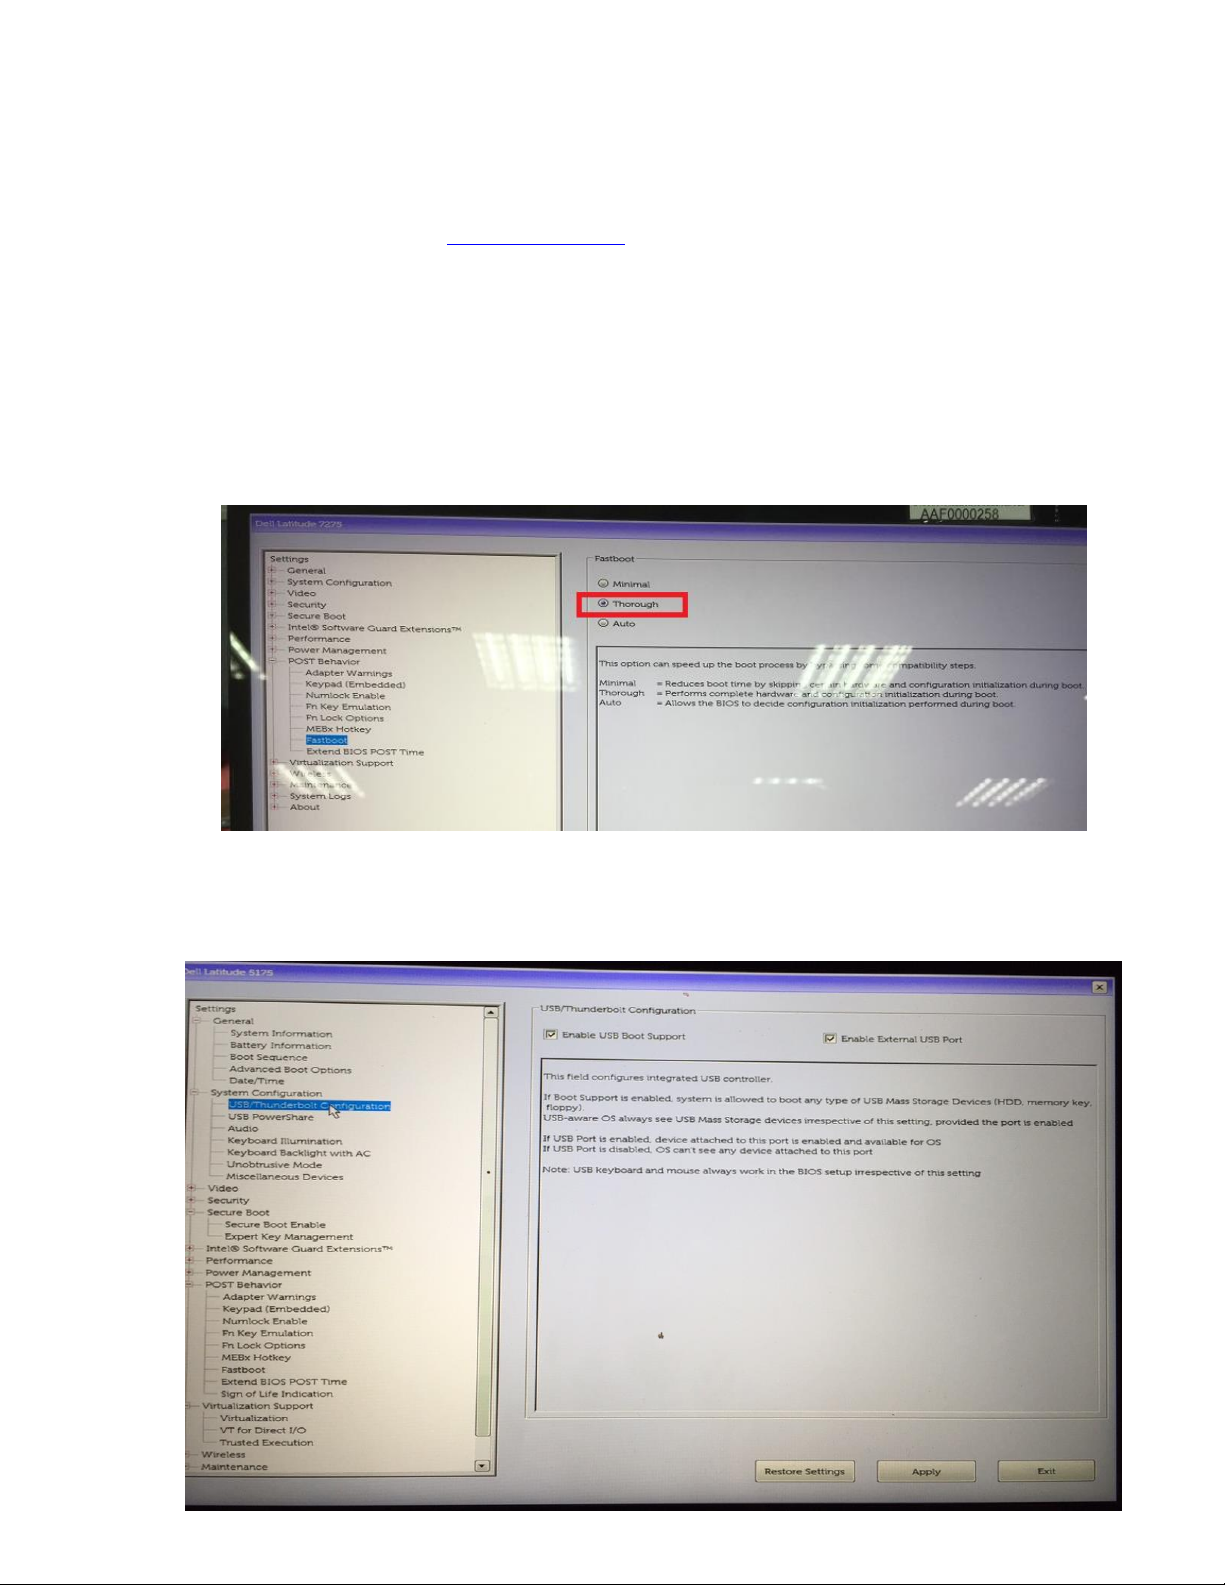
1. POST Behavior-> Fastboot->Thorough
The system USB configuration must be set to allow for USB boot. Change the BIOS default seting from
Minimal mode to Thorough.
2. System Configuration->USB/Thunderbolat Configuration
For Latitude 5175/5179: System Configuration->USB/Thunderbolat Configuration->Enable Boot
Support - Enable
Page 6
Dell Latitude Tablet and 2-in-1 System Reimage “How-To” Guide
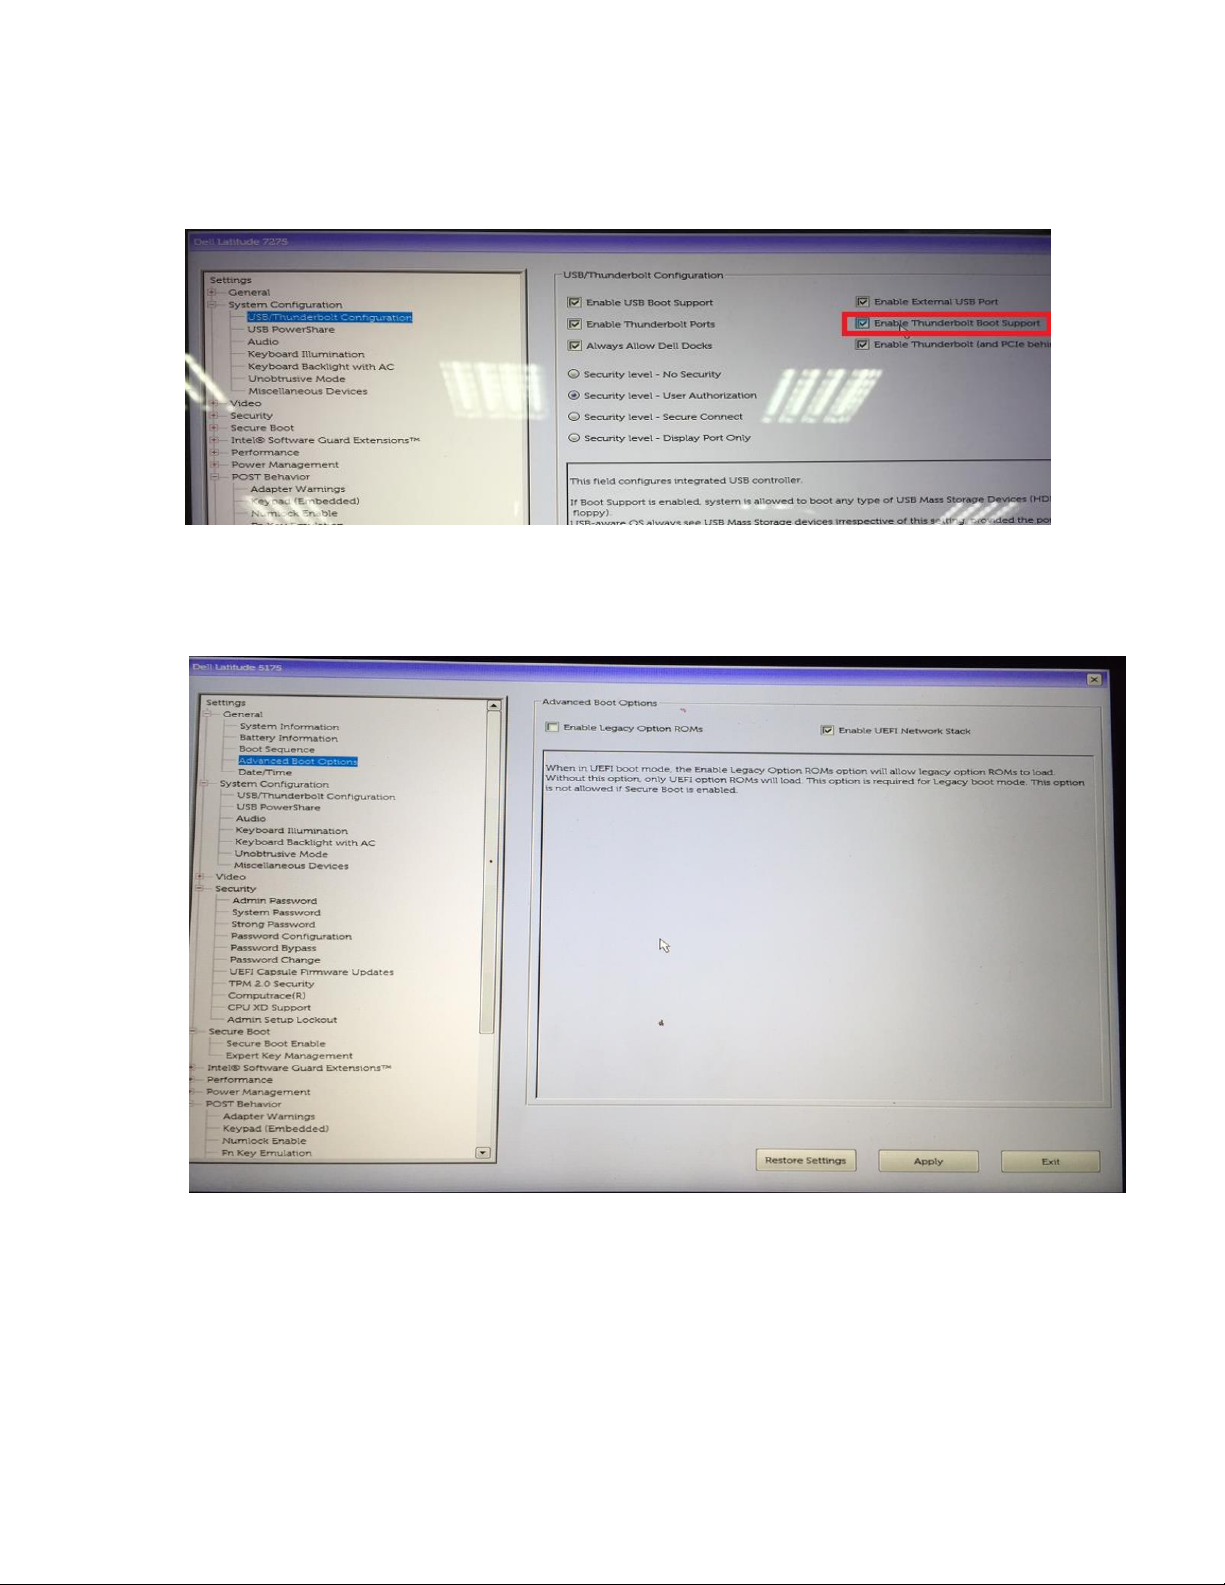
For Latitude 7275/XPS 9250, we recommended to additional enable Thunderbolt Boot Support for
TypeC USB Dock device. System Configuration->USB/Thunderbolt Configuration->Enable Thunderbolt Boot
Support. The Type-C device will be identified and boot to external device via Type-C.
2. In order to boot to PXE from an Ethernet network device, the UEFI network stack must be enabled.
General->Advanced Boot Options->Enable Legacy Option ROMs/Enable UEFI Network Stacks
For UEFI Mode: Enable IEFI Netork Stack
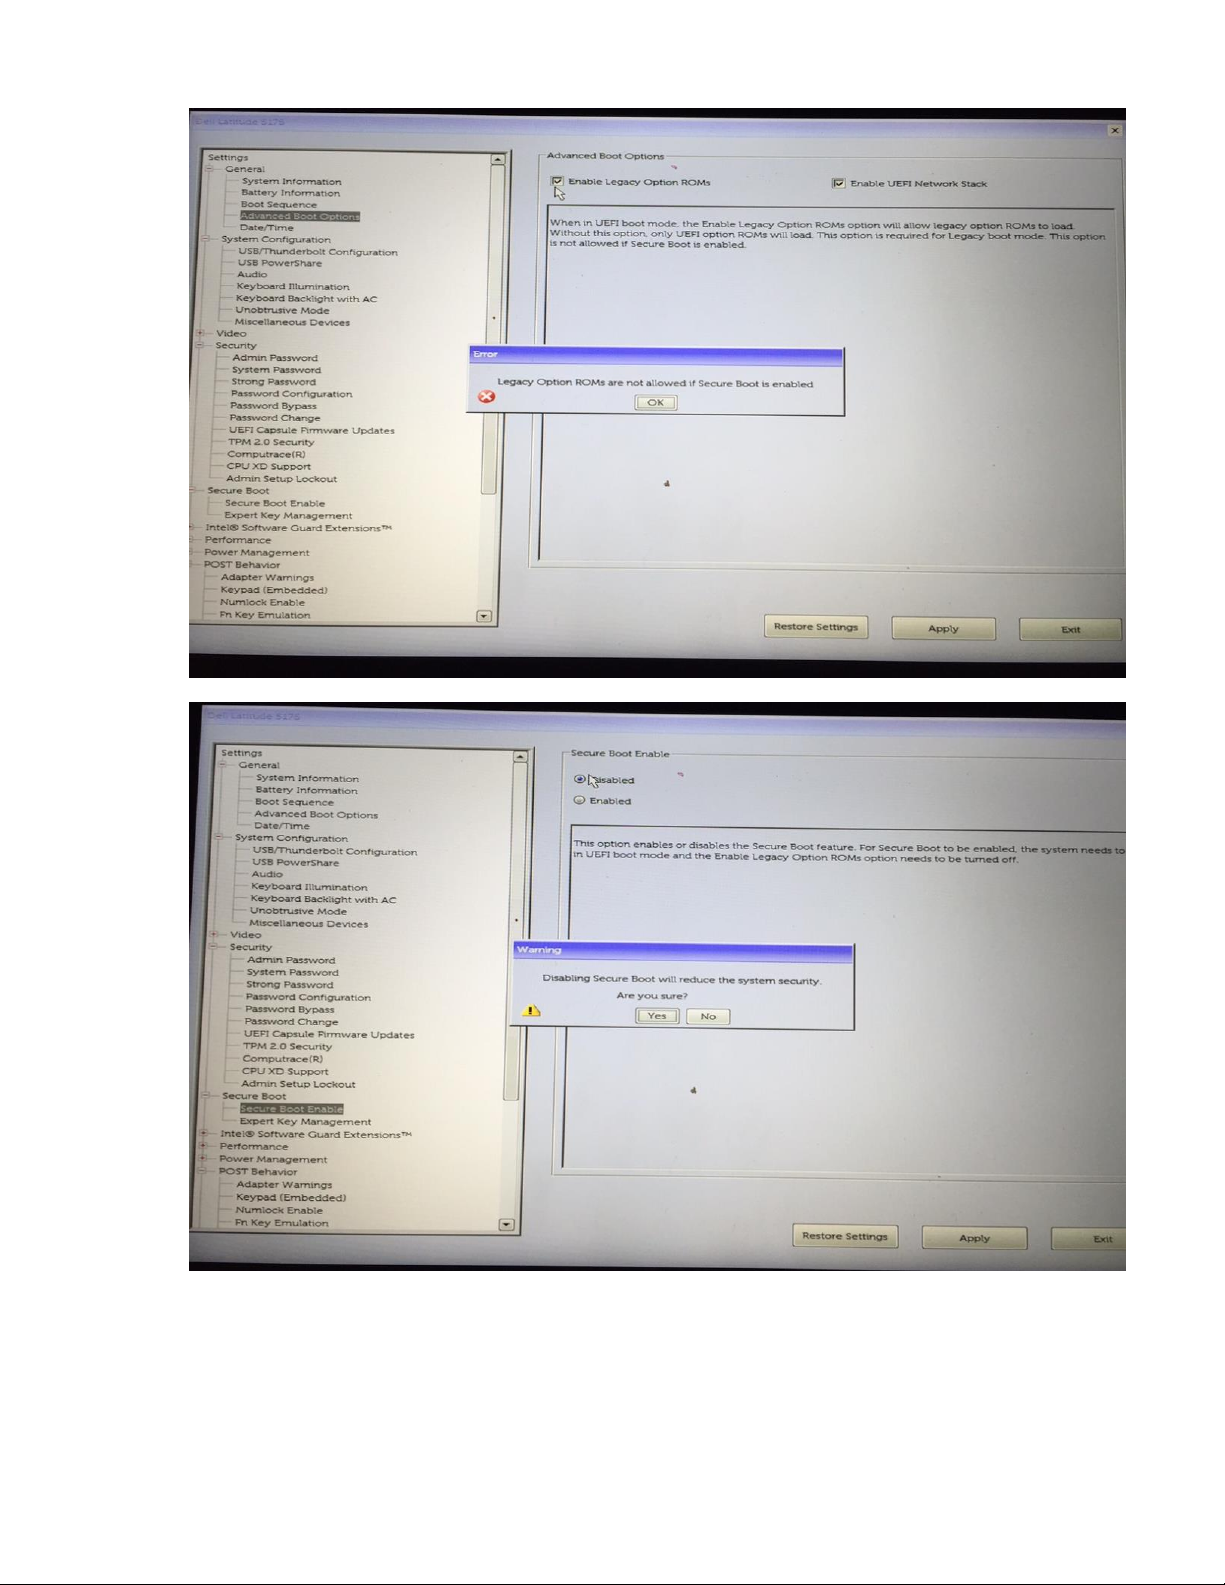
For Legacy Mode: Enable Legacy Option (The additional seeting for Enable Legacy Option ROM, Secure
Boot Enable > Disable)
Page 7
Dell Latitude Tablet and 2-in-1 System Reimage “How-To” Guide
Page 8

Dell Latitude Tablet and 2-in-1 System Reimage “How-To” Guide
3 OS
Two basic methods to install OS image 3.1
1. Hand install from UEFI bootable USB flash drive that contains the OS install files.
2. Automated image install/deployment through Enterprise solutions such as Microsoft’s SCCM.
3.1.2 Hand Install through USB Flash Drive
Microsoft™ has made is easier than ever to create USB flash drive install media. Just download the “Media
Creation Tool” (MCT) available from these URLs for the desired OS.
Windows 10 - 64 Bit - https://www.microsoft.com/en-us/software-download/windows10
Windows 8.1 - 64 Bit - http://windows.microsoft.com/en-us/windows-8/create-reset-refresh-media
3.1.2.1.1 Windows 10 – USB install media creation
Download the Windows 10 MCT to any workstation running Windows 7 or higher. Run the tool as admin and
follow the prompts.
1. Accept the EULA.
2. Select “Create installation media for another PC”.
Page 9

Dell Latitude Tablet and 2-in-1 System Reimage “How-To” Guide
Page 10

Dell Latitude Tablet and 2-in-1 System Reimage “How-To” Guide
3. Select “Language, Edition and Architecture”.
Page 11

Dell Latitude Tablet and 2-in-1 System Reimage “How-To” Guide
4. The MCT can create an ISO image or prepare a USB flash drive to boot the installer. Select “USB flash
drive” and click next.
Page 12

Dell Latitude Tablet and 2-in-1 System Reimage “How-To” Guide
5. The MCT will show a list of USB flash drives that it has detected, select the drive to be used as the install
device from the list and click next. It is recommended that the USB flash drive have storage space of 4GB
or greater. The MCT will download the Windows 10 install files and create a bootable USB flash drive. The
process will take several minutes.
Page 13

Dell Latitude Tablet and 2-in-1 System Reimage “How-To” Guide
6. When the MCT has completed, select Finish. The USB flash drive is now ready to boot the Windows 10
installer.
Page 14

Dell Latitude Tablet and 2-in-1 System Reimage “How-To” Guide
3.1.2.1.2 Windows 8.1 – USB install media creation
Download the Windows 8.1 MCT to any workstation running Windows 7 or higher. Run the tool as admin and
follow the prompts.
1. When 1
st
run, the tool prompts for selection of Language, OS edition and Architecture. Select the
required settings and then click next. The rest of the process is similar to the process previously outlined
for Windows 10.
Recommended Drivers / Applications Installation Order
Page 15

Dell Latitude Tablet and 2-in-1 System Reimage “How-To” Guide
Sub Function
Category
Systems
Latitude
5175
Latitude
5179
Latitude
7275
XPS
9250
R: Request O: Option X: Not support
Intel Chipset Device Software
Chipset
R R R
R
Intel(R) USB 3.0 eXtensible Host
Controller Adaption Driver
(Win8.1 only)
Chipset
R R R
R
Realtek USB GBE Ethernet
Controller Driver
Networks
R R R
R
Windows Update 1
N/A
R R R
R
Intel HD, 5300, 5500, 6000, 515,
520, 530, P530, Iris 540 Graphics
driver
Video
R R R
R
Realtek High-Definition Audio
Driver
Audio
R R R
R
Intel Rapid Storage Technology
Driver and Management Console2
Serial ATA
R R R
R
Intel 8260/7265/3165/7260 WiFi
Driver
Networks
R R R
R
Intel 8260/7265/3165 Bluetooth
Driver
Networks
R R R
R
INTEL 8260/7265 WAPI
Application
Networks
R R R
R
Intel 8260/7265/7260/3165 WiDi
Utility
Networks
R R R
R
INTEL 8260/7265 WAPI
Application
Networks
R R R
R
Intel(R) Management Engine
Components Installer Driver
Chipset
R R R
R
Intel Dynamic Platform and
Thermal Framework
Chipset
R R R
R
Intel Integrated Sensor Solution
Chipset
R R R
R
Intel HID Event Filter Driver
Chipset
R R R
R
Realtek PCI-E Memory Card
Reader Driver
Chipset
R R R
R
Intel Serial IO Driver(Win8.1)
System Utilities
R R R
R
Intel Virtual Button Driver
System Utilities
R R R
R
Connected Standby Battery Saver
Settings (Win10)
System Utilities
R R R
X
Power Saving - Hibernate after
CS(Win8.1)
System Utilities
R R R
X
Intel(R) Thunderbolt(TM)
Controller Driver 3
Chipset
X X R
R
Dell recommends always obtaining the latest and most updated drivers, firmware, and applications
on Dell’s support web site http://www.dell.com/support
For best results, Dell recommends installing drivers / applications one by one - by following driver
sequence in below table
Page 16

Dell Latitude Tablet and 2-in-1 System Reimage “How-To” Guide
Intel(R) Thunderbolt(TM) 3
Firmware Update 3
Chipset or
Docks/Stands
X X R
R
Realtek USB GBE Ethernet
Controller Driver for Dell
Thunderbolt Dock and Dell Dock 3
Docks/
Stands
R R R
R
Realtek USB Audio Driver for Dell
Wireless Dock, Dell Thunderbolt
Dock, and Dell Dock 3
Docks/
Stands
R R R
R
Update for the USB audio/mouse
on Dell Thunderbolt Dock and
Dell Dock 3
Docks/
Stands
X X R
R
ASMedia USB 3.0 Extended Host
Controller Driver for Dell
Thunderbolt Dock 3
Docks/
Stands
X X R
R
Active Pen Control Panel
Drivers for OS
Deployment
R R X
X
ALPS Track Pad Firmware Update
Utility
Mouse, Keyboard
& Input Devices
X X R
R
Intel 2D imaging Driver
Mouse, Keyboard
& Input Devices
R R R
R
Dell Unifying Application
Mouse, Keyboard
& Input Devices
X X X
R
Intel/NXP Near Field
Communications Driver
Modem/
Communications
R R X
X
Dell Wireless 5811e LTE Mobile
Broadband Driver and GPS Driver
Modem/
Communications
R R R
R
Dell ControlVault2 Driver
Security
X R X
X
Dell ControlVault2 Firmware
Security
X R X
X
Dell Help & Support Application
Application
X X X
O
Dell Foundation Services
Application
O O O
O
Dell Digital Delivery Application
Application
O O O
O
Dell Update Application
Application
O O O
O
Dell Data Protection | Security
Tools
Dell Data
Protection
O O O
O
Dell Data Protection|Encryption
Dell Data
Protection
O O O
O
Dell Data Protection | Endpoint
Recovery
Dell Data
Protection
X X O
O
Dell Data Protection | Endpoint
Security Suite
Dell Data
Protection
X X O
O
Dell Data Protection | Protected
Workspace
Dell Data
Protection
X X O
O
SanDisk X300 Series SSD Firmware
Update
Serial ATA
O O O
O
SanDisk Z400s Series SSD
Firmware Update
Serial ATA
X X X
O
Dell Command | Power Manager
System Utilities
O O O
O
Dell Command | Configure
Systems
Management
O O O
O
Dell Command | Deploy WinPE
Systems
O O O
O
Page 17

Dell Latitude Tablet and 2-in-1 System Reimage “How-To” Guide
Driver Pack
Management
Dell Command | Monitor
Systems
Management
O O O
O
Dell Command | Deploy Driver
Pack
Systems
Management
O O O
O
Dell Command | Update
Systems
Management
O O O
O
Dell Command | Intel® vPro™
Out of Band
Systems
Management
X X O
O
Dell Command | Integration Suite
for System Center 2012
Systems
Management
X X O
O
1.
Dell recommends performing Microsoft Windows updates to ensure the latest security, reliability, and compatibility
updates are installed. These updates can be downloaded from Windowsupdate.Microsoft.com
2
Intel Rapid Storage Technology (IRST) driver is required to be installed on Operating Systems in AHCI, IRRT, RAID
On, and RAID SATA modes
3
Dell Dock (WD15) and Dell Thunderbolt Dock (TB15) Driver Set: to fully support new generation Dell Dock and
Dell Thunderbolt Dock, DELL highly recommend installing the following BIOS/Drivers step by step
1. Flash the latest BIOS available to the system. This is posted on Dell’s driver & downloads support web
site (dell.com/support) under the “BIOS” section. Restart system before next step.
2. Install Intel(R) Thunderbolt Controller Driver available to the system. This is posted on Dell’s driver &
downloads support web site (dell.com/support) under the “Chipset” section. Restart system before next
step.
3. Install Intel(R) Thunderbolt 3 Firmware Update available to the system. This is posted on Dell’s driver &
downloads support web site (dell.com/support) under the “Docks/Stands” section. Restart system before
next step.
4. Install Realtek USB GBE Ethernet Controller Driver for Dell Thunderbolt Dock and Dell Dock available to
the system. This is posted on Dell’s driver & downloads support web site (dell.com/support) under the
“Docks/Stands” section.
5. Install Realtek USB Audio Driver for Dell Wireless Dock, Dell Thunderbolt Dock, and Dell Dock available
to the system. This is posted on Dell’s driver & downloads support web site (dell.com/support) under
the “Docks/Stands” section.
6. For Windows 8.1 and Windows 10 OS only, install Patch for the USB audio/mouse issue on Dell
Thunderbolt Dock and Dell Dock available to the system. This is posted on Dell’s driver & downloads
support web site (dell.com/support) under the “Docks/Stands” section. Restart system.
7.
For Dell Thunderbolt Dock only, install ASMedia USB 3.0 Extended Host Controller Driver for Dell
Thunderbolt Dock available to the system. This is posted on Dell’s driver & downloads support web site
(dell.com/support) under the “Docks/Stands” section. Restart system
NOTE: Dock is required to connect to system during driver installation
4 To install the OS with a bootable USB flash drive/SCCM:
4.1.1.1 To install the OS using a UEFI bootable USB flash drive with a USB-C dock:
Page 18

Dell Latitude Tablet and 2-in-1 System Reimage “How-To” Guide
As soon as the Dell splash screen is displayed, press the F12 to bring up the one-time boot selection
menu. For this example, the Dell Dock TB15 was used in conjunction with a Latitude 7275. The
process for the XPS 9250/Latutude 5179/5175 would be similar.
After pressing enter, the system will then boot to the USB flash drive and start the OS installer. Follow
the OS installer prompts to complete the OS install process.
After the OS is installed, the device drivers and supporting application must be installed in order to
provide full system functionality.
The drivers and apps can be downloaded from Dell web site and placed on a USB flash drive and then
copied to a scratch or temporary folder on the system. After the driver files and apps have been copied
to the system, they can be manually installed or installed by script(s).
The recommended install order for device drivers and apps is outlined below in paragraph “3.2
Recommended Drivers / Applications Installation Order”
4.1.2 Installation through Microsoft’s SCCM
Latitude 5175/5179/7250 and XPS 9250 supports PXE network booting for connection to automated
install and deployment servers. It is recommended to use the network capabilities of the USB to
Ethernet adapters or docking unit to provide PXE boot and network support for the system. With UEFI
boot mode, the PXE boot image provided by the PXE server must be a WinPE boot.wim that can boot
in UEFI mode. In order for WinPE to connect to the network image server after startup, the boot wim
Page 19

Dell Latitude Tablet and 2-in-1 System Reimage “How-To” Guide
image file must have the drivers installed for the Latitude/XPS system’s network device. Latitude and
XPS can boot both standard PXE DOS (initrd) and EUFI images; dependent on BIOS boot mode and
USB to Ethernet adapters.
Support PXE network booting for connection to automated install and deployment servers. It is
recommended to use the network capabilities of the docking unit to provide PXE boot and network
support for the system.
As an example of Latitude 5175/5179 boot up system wtih Ethernet connection to the WD15 docking,
as soon as the Dell splash screen is displayed, press the F12 to bring up the one-time boot selection
menu.
For UEFI mode, Use the arrow keys to highlight “USB NIC (IPV4)” or “USB NIC (IPV6)” and press Enter.
Page 20

Dell Latitude Tablet and 2-in-1 System Reimage “How-To” Guide
If the network topology is IPv4: Use the keyboard arrow keys or the system’s Volume-Up
button to highlight, “Onboard NIC (IPv4)” then press Enter or press the Volume-Down
button on the tablet.
If the network topology is IPv6: Use the keyboard arrow keys or the system’s Volume-Up
button to highlight, “Onboard NIC (IPv6)” then press Enter or press the Volume-Down
button on the system.
For Legacy mode, use the arrow keys to highlight the “USB NIC” then press enter.
Page 21

Dell Latitude Tablet and 2-in-1 System Reimage “How-To” Guide
USB-C/Thunderbolt to Ethernet Controller
Dell P/N: D59GG (USB-C to Gigabit Ethernet)
Dell P/N: 5FDDV (Dell Dock WD15)
Dell P/N: J00G9 (Dell Dock TB15)
Latitude 5175/5179/7250 and XPS 9250 have PXE code included in the UEFI BIOS that can boot the
following USB-C network devices.
4.1.3 Device Drivers / Apps
Dell provides pre-packaged driver and app Cab files for OS deployment through SCCM or other
deployment services. The Cab files can be downloaded from:
Latitude 5175:
http://www.dell.com/support/home/us/en/04/product-support/product/latitude-5175-laptop/drivers
Latitude 5179:
http://www.dell.com/support/home/us/en/04/product-support/product/latitude-5179-laptop/drivers
Latitude 7275:
http://www.dell.com/support/home/us/en/19/product-support/product/latitude-7275-laptop/drivers
XPS 9250:
http://www.dell.com/support/home/us/en/19/product-support/product/xps-12-9250/drivers
Page 22

Dell Latitude Tablet and 2-in-1 System Reimage “How-To” Guide
4.1.3.1 SCCM System Drive Partition Setup
Follow Microsoft’s recommended drive partition guidelines for UEFI based systems located
at this URL,
https://msdn.microsoft.com/en-us/library/windows/hardware/dn898510(v=vs.85).aspx
The guideline includes a “Diskpart” script example for creating the required OS partitions.
More information with respect to capturing and applying Windows, System, and Recovery
Partitions can be found here:
https://msdn.microsoft.com/en-us/library/windows/hardware/dn898498(v=vs.85).aspx
4.1.3.2 Other Useful Information:
Deploying Windows 10 through SCCM:
https://technet.microsoft.com/en-us/library/mt297520(v=vs.85).aspx
Deploying Windows 8.1 through SCCM:
https://technet.microsoft.com/en-us/library/dn744284.aspx
 Loading...