

Page 1

Dell Multifunction Printer | E515dw
Dell Multifunction Printer | E515dn
Dell Multifunction Printer | E514dw
User’s Guide
Regulatory Model: Dell E515dw / E515dn / E514dw
Page 2

Page 3

Contents
Before You Use Your Dell Machine . . . . . . . . . . . . . . . . . . . . . . . . . . . . . . . . . . . . . . . 23
Applicable Models . . . . . . . . . . . . . . . . . . . . . . . . . . . . . . . . . . . . . . . . . . . . . . . . . . . . . . . . . . . . . . . . 23
Definitions of Notes . . . . . . . . . . . . . . . . . . . . . . . . . . . . . . . . . . . . . . . . . . . . . . . . . . . . . . . . . . . . . . . 23
Important Note . . . . . . . . . . . . . . . . . . . . . . . . . . . . . . . . . . . . . . . . . . . . . . . . . . . . . . . . . . . . . . . . . . . 24
1 Introduction to Your Dell Machine . . . . . . . . . . . . . . . . . . . . . . . . . . . . . . . . . . . . . 27
Control Panel Overview . . . . . . . . . . . . . . . . . . . . . . . . . . . . . . . . . . . . . . . . . . . . . . . . . . . . . . . . . . . . 27
Dell E515dn/Dell E515dw . . . . . . . . . . . . . . . . . . . . . . . . . . . . . . . . . . . . . . . . . . . . . . . . . . . . . . . . . . . . . . . . . . . . . . . . . . . . . . . . . .27
Dell E514dw . . . . . . . . . . . . . . . . . . . . . . . . . . . . . . . . . . . . . . . . . . . . . . . . . . . . . . . . . . . . . . . . . . . . . . . . . . . . . . . . . . . . . . . . . . . . 30
Dell Printer Hub (Windows® Only) . . . . . . . . . . . . . . . . . . . . . . . . . . . . . . . . . . . . . . . . . . . . . . . . . . . 32
2 Paper Handling . . . . . . . . . . . . . . . . . . . . . . . . . . . . . . . . . . . . . . . . . . . . . . . . . . . . . . 35
Load Paper . . . . . . . . . . . . . . . . . . . . . . . . . . . . . . . . . . . . . . . . . . . . . . . . . . . . . . . . . . . . . . . . . . . . . . . 35
Load and Print using the Paper Tray . . . . . . . . . . . . . . . . . . . . . . . . . . . . . . . . . . . . . . . . . . . . . . . . . . . . . . . . . . . . . . . . . . . . . . . .35
Load and Print Paper in the Manual Feed Slot . . . . . . . . . . . . . . . . . . . . . . . . . . . . . . . . . . . . . . . . . . . . . . . . . . . . . . . . . . . . . . 38
Load and Print Plain Paper, Thin Paper, Recycled Paper and Bond Paper in the Manual Feed Slot . . . . . . . . . . . . 38
Load and Print on Thick Paper and Labels in the Manual Feed Slot . . . . . . . . . . . . . . . . . . . . . . . . . . . . . . . . . . . . . . . . 40
Load and Print on Envelopes in the Manual Feed Slot . . . . . . . . . . . . . . . . . . . . . . . . . . . . . . . . . . . . . . . . . . . . . . . . . . . . .42
Paper Settings . . . . . . . . . . . . . . . . . . . . . . . . . . . . . . . . . . . . . . . . . . . . . . . . . . . . . . . . . . . . . . . . . . . . 44
Change the Paper Size . . . . . . . . . . . . . . . . . . . . . . . . . . . . . . . . . . . . . . . . . . . . . . . . . . . . . . . . . . . . . . . . . . . . . . . . . . . . . . . . . . . .45
Change the Paper Type . . . . . . . . . . . . . . . . . . . . . . . . . . . . . . . . . . . . . . . . . . . . . . . . . . . . . . . . . . . . . . . . . . . . . . . . . . . . . . . . . . .45
Set the Check Size . . . . . . . . . . . . . . . . . . . . . . . . . . . . . . . . . . . . . . . . . . . . . . . . . . . . . . . . . . . . . . . . . . . . . . . . . . . . . . . . . . . . . . .45
Unscannable and Unprintable Areas . . . . . . . . . . . . . . . . . . . . . . . . . . . . . . . . . . . . . . . . . . . . . . . . . 46
Using Special Paper . . . . . . . . . . . . . . . . . . . . . . . . . . . . . . . . . . . . . . . . . . . . . . . . . . . . . . . . . . . . . . . 46
Load Documents . . . . . . . . . . . . . . . . . . . . . . . . . . . . . . . . . . . . . . . . . . . . . . . . . . . . . . . . . . . . . . . . . . 47
Load Documents in the Automatic Document Feeder (ADF) . . . . . . . . . . . . . . . . . . . . . . . . . . . . . . . . . . . . . . . . . . . . . . . . . .47
Load Documents on the Scanner Glass . . . . . . . . . . . . . . . . . . . . . . . . . . . . . . . . . . . . . . . . . . . . . . . . . . . . . . . . . . . . . . . . . . . . 48
3 Print . . . . . . . . . . . . . . . . . . . . . . . . . . . . . . . . . . . . . . . . . . . . . . . . . . . . . . . . . . . . . . . 53
3Contents
Page 4

Before Printing . . . . . . . . . . . . . . . . . . . . . . . . . . . . . . . . . . . . . . . . . . . . . . . . . . . . . . . . . . . . . . . . . . . 53
Print from Your Computer (Windows
Basic Printing Methods (Windows®) . . . . . . . . . . . . . . . . . . . . . . . . . . . . . . . . . . . . . . . . . . . . . . . . . . . . . . . . . . . . . . . . . . . . . . 53
®
Print a Document (Windows
Print Preview (Windows
Change the Paper Size (Windows
Change the Orientation of Your Print (Portrait or Landscape) (Windows
Print Multiple Copies of the Same Document (Windows
Change the Media Type ( Windows
Change the Resolution (Windows
Change the Print Set tings (Windows
Improve Gray Printing (W indows
Improve Pattern Printing (Windows
Improve Thin Line (Windows
Print More Than One Page on a Single Sheet of Paper (N in 1) (Windows
) . . . . . . . . . . . . . . . . . . . . . . . . . . . . . . . . . . . . . . . . . . . . . . . . . . . . . . . . . . . . . . . . . . . . . . . . . 54
®
) . . . . . . . . . . . . . . . . . . . . . . . . . . . . . . . . . . . . . . . . . . . . . . . . . . . . . . . . . . . . . . . . . . . . . . . . . . . . .55
®
®
) . . . . . . . . . . . . . . . . . . . . . . . . . . . . . . . . . . . . . . . . . . . . . . . 53
®
) . . . . . . . . . . . . . . . . . . . . . . . . . . . . . . . . . . . . . . . . . . . . . . . . . . . . . . . . . . . . . . . . . . . . .55
®
) . . . . . . . . . . . . . . . . . . . . . . . . . . . . . . . . . 56
®
) . . . . . . . . . . . . . . . . . . . . . . . . . . . . . . . . . . . . . . . . . . . . . . . . .57
®
) . . . . . . . . . . . . . . . . . . . . . . . . . . . . . . . . . . . . . . . . . . . . . . . . . . . . . . . . . . . . . . . . . . . .57
®
) . . . . . . . . . . . . . . . . . . . . . . . . . . . . . . . . . . . . . . . . . . . . . . . . . . . . . . . . . . . . . . . . . . . . .58
®
) . . . . . . . . . . . . . . . . . . . . . . . . . . . . . . . . . . . . . . . . . . . . . . . . . . . . . . . . . . . . . . . . . .58
®
) . . . . . . . . . . . . . . . . . . . . . . . . . . . . . . . . . . . . . . . . . . . . . . . . . . . . . . . . . . . . . . . . . . . . .59
®
) . . . . . . . . . . . . . . . . . . . . . . . . . . . . . . . . . . . . . . . . . . . . . . . . . . . . . . . . . . . . . . . . . . 60
) . . . . . . . . . . . . . . . . . . . . . . . . . . . . . . . . . . . . . . . . . . . . . . . . . . . . . . . . . . . . . . . . . . . . . . . . 60
®
) . . . . . . . . . . . . . . . . . . . . . . . . . . . . . . . . 60
®
Print as a Poster (Windows
Print on Both Sides of the Paper (Windows
Print as a Booklet (Windows
Change the Paper Source (W indows
Advanced Printing Methods (Windows
Print in Toner Save Mode (Windows
Scaled Print (Windows
Reverse Print (W indows
Add a Watermark to the Printed Document (Windows
) . . . . . . . . . . . . . . . . . . . . . . . . . . . . . . . . . . . . . . . . . . . . . . . . . . . . . . . . . . . . . . . . . . . . . . . . . .61
®
) . . . . . . . . . . . . . . . . . . . . . . . . . . . . . . . . . . . . . . . . . . . . . . . . . . . . . . . . . . . .62
®
) . . . . . . . . . . . . . . . . . . . . . . . . . . . . . . . . . . . . . . . . . . . . . . . . . . . . . . . . . . . . . . . . . . . . . . . . 64
®
) . . . . . . . . . . . . . . . . . . . . . . . . . . . . . . . . . . . . . . . . . . . . . . . . . . . . . . . . . . . . . . . . . .67
®
). . . . . . . . . . . . . . . . . . . . . . . . . . . . . . . . . . . . . . . . . . . . . . . . . . . . . . . . . . . . . . . . . . .67
®
) . . . . . . . . . . . . . . . . . . . . . . . . . . . . . . . . . . . . . . . . . . . . . . . . . . . . . . . . . . . . . . . . . .68
®
) . . . . . . . . . . . . . . . . . . . . . . . . . . . . . . . . . . . . . . . . . . . . . . . . . . . . . . . . . . . . . . . . . . . . . . . . . . . . . .69
®
) . . . . . . . . . . . . . . . . . . . . . . . . . . . . . . . . . . . . . . . . . . . . . . . . . . . . . . . . . . . . . . . . . . . . . . . . . . . . .69
®
) . . . . . . . . . . . . . . . . . . . . . . . . . . . . . . . . . . . . . . . . . . . . . . . . . .70
Print the Date, Time and PC Login User Name on the Document (Header-Footer Print) ( Windows
®
Use a Macro from Your Computer (Windows
®
Adjust the Print Densit y (Windows
Reduce Paper Curl (Windows
Improve Toner Fixing (Windows
Skip Blank Page (Windows
®
) . . . . . . . . . . . . . . . . . . . . . . . . . . . . . . . . . . . . . . . . . . . . . . . . . . . . . . . . . . . . . . . . . . . .72
®
) . . . . . . . . . . . . . . . . . . . . . . . . . . . . . . . . . . . . . . . . . . . . . . . . . . . . . . . . . . . . . . . . . . . . . . . .73
®
) . . . . . . . . . . . . . . . . . . . . . . . . . . . . . . . . . . . . . . . . . . . . . . . . . . . . . . . . . . . . . . . . . . . . . .73
) . . . . . . . . . . . . . . . . . . . . . . . . . . . . . . . . . . . . . . . . . . . . . . . . . . . . . . . . . . . . . . . . . . . . . . . . . . .74
) . . . . . . . . . . . . . . . . . . . . . . . . . . . . . . . . . . . . . . . . . . . . . . . . . . . . . . . . . . .71
®
) . . . . . . . . . . .71
4 Contents
Page 5

Print Text in Black (Windows®) . . . . . . . . . . . . . . . . . . . . . . . . . . . . . . . . . . . . . . . . . . . . . . . . . . . . . . . . . . . . . . . . . . . . . . . . .74
®
Save an Archive File of the Print Data (W indows
®
Select a Print Profile (Windows
) . . . . . . . . . . . . . . . . . . . . . . . . . . . . . . . . . . . . . . . . . . . . . . . . . . . . . . . . . . . . . . . . . . . . . . . . .75
) . . . . . . . . . . . . . . . . . . . . . . . . . . . . . . . . . . . . . . . . . . . . . . . . . . . . . . .75
Add a Print Profile . . . . . . . . . . . . . . . . . . . . . . . . . . . . . . . . . . . . . . . . . . . . . . . . . . . . . . . . . . . . . . . . . . . . . . . . . . . . . . . . . . . . .76
Delete a Print Profile . . . . . . . . . . . . . . . . . . . . . . . . . . . . . . . . . . . . . . . . . . . . . . . . . . . . . . . . . . . . . . . . . . . . . . . . . . . . . . . . . .76
®
Change the Default Print Settings (Windows
Print a Document Using the Dell Emulate PS Printer Driver (PostScript
) . . . . . . . . . . . . . . . . . . . . . . . . . . . . . . . . . . . . . . . . . . . . . . . . . . . . . . . . . . . . .77
®
3™ Language Emulation) (W indows®) . . .77
Print from Your Computer (Macintosh) . . . . . . . . . . . . . . . . . . . . . . . . . . . . . . . . . . . . . . . . . . . . . . . 78
Print a Document (Macintosh) . . . . . . . . . . . . . . . . . . . . . . . . . . . . . . . . . . . . . . . . . . . . . . . . . . . . . . . . . . . . . . . . . . . . . . . . . . . . .78
Set Print Options (Macintosh) . . . . . . . . . . . . . . . . . . . . . . . . . . . . . . . . . . . . . . . . . . . . . . . . . . . . . . . . . . . . . . . . . . . . . . . . . . . . .79
Print in Toner Save Mode (Macintosh). . . . . . . . . . . . . . . . . . . . . . . . . . . . . . . . . . . . . . . . . . . . . . . . . . . . . . . . . . . . . . . . . . .80
Print Multiple Copies of the Same Document (Macintosh) . . . . . . . . . . . . . . . . . . . . . . . . . . . . . . . . . . . . . . . . . . . . . . . . .80
Print on Both Sides of the Paper (Macintosh) . . . . . . . . . . . . . . . . . . . . . . . . . . . . . . . . . . . . . . . . . . . . . . . . . . . . . . . . . . . .81
Change the Paper Size (Macintosh) . . . . . . . . . . . . . . . . . . . . . . . . . . . . . . . . . . . . . . . . . . . . . . . . . . . . . . . . . . . . . . . . . . . . .82
Change the Orientation of Your Print (Portrait or Landscape) (Macintosh). . . . . . . . . . . . . . . . . . . . . . . . . . . . . . . . . . 83
Print More Than One Page on a Single Sheet of Paper (N in 1) (Macintosh) . . . . . . . . . . . . . . . . . . . . . . . . . . . . . . . . . 83
Reverse Print (Macintosh) . . . . . . . . . . . . . . . . . . . . . . . . . . . . . . . . . . . . . . . . . . . . . . . . . . . . . . . . . . . . . . . . . . . . . . . . . . . . 84
Flip Horizontally (Macintosh) . . . . . . . . . . . . . . . . . . . . . . . . . . . . . . . . . . . . . . . . . . . . . . . . . . . . . . . . . . . . . . . . . . . . . . . . . . 84
Scaled Print (Macintosh) . . . . . . . . . . . . . . . . . . . . . . . . . . . . . . . . . . . . . . . . . . . . . . . . . . . . . . . . . . . . . . . . . . . . . . . . . . . . . .85
Change the Media Type (Macintosh) . . . . . . . . . . . . . . . . . . . . . . . . . . . . . . . . . . . . . . . . . . . . . . . . . . . . . . . . . . . . . . . . . . . .85
Change the Resolution (Macintosh) . . . . . . . . . . . . . . . . . . . . . . . . . . . . . . . . . . . . . . . . . . . . . . . . . . . . . . . . . . . . . . . . . . . . .86
Reduce or Enlarge Document Layout (Macintosh) . . . . . . . . . . . . . . . . . . . . . . . . . . . . . . . . . . . . . . . . . . . . . . . . . . . . . . . .86
Change the Paper Source (Macintosh) . . . . . . . . . . . . . . . . . . . . . . . . . . . . . . . . . . . . . . . . . . . . . . . . . . . . . . . . . . . . . . . . . .86
Reduce Paper Curl (Macintosh) . . . . . . . . . . . . . . . . . . . . . . . . . . . . . . . . . . . . . . . . . . . . . . . . . . . . . . . . . . . . . . . . . . . . . . . . .88
Improve Toner Fixing (Macintosh) . . . . . . . . . . . . . . . . . . . . . . . . . . . . . . . . . . . . . . . . . . . . . . . . . . . . . . . . . . . . . . . . . . . . . .88
Adjust the Print Densit y (Macintosh) . . . . . . . . . . . . . . . . . . . . . . . . . . . . . . . . . . . . . . . . . . . . . . . . . . . . . . . . . . . . . . . . . . . .89
Skip Blank Page (Macintosh) . . . . . . . . . . . . . . . . . . . . . . . . . . . . . . . . . . . . . . . . . . . . . . . . . . . . . . . . . . . . . . . . . . . . . . . . . . .89
®
Print a Document Using the Dell Emulate PS Printer Driver (PostScript
3™ language emulation) (Macintosh) . . . .89
Monitor the Status of the Machine from Your Computer (Macintosh) . . . . . . . . . . . . . . . . . . . . . . . . . . . . . . . . . . . . . . . . . 90
Adjust Print Settings from the Machine’s Control Panel . . . . . . . . . . . . . . . . . . . . . . . . . . . . . . . . 90
5Contents
Page 6

Cancel a Print Job . . . . . . . . . . . . . . . . . . . . . . . . . . . . . . . . . . . . . . . . . . . . . . . . . . . . . . . . . . . . . . . . . . . . . . . . . . . . . . . . . . . . . . .91
Change the Printer Emulation Mode . . . . . . . . . . . . . . . . . . . . . . . . . . . . . . . . . . . . . . . . . . . . . . . . . . . . . . . . . . . . . . . . . . . . . . .91
Change 2-Sided Print Settings . . . . . . . . . . . . . . . . . . . . . . . . . . . . . . . . . . . . . . . . . . . . . . . . . . . . . . . . . . . . . . . . . . . . . . . . . . . .92
Auto Continue . . . . . . . . . . . . . . . . . . . . . . . . . . . . . . . . . . . . . . . . . . . . . . . . . . . . . . . . . . . . . . . . . . . . . . . . . . . . . . . . . . . . . . . . . . .92
Restore Printer Factory Settings . . . . . . . . . . . . . . . . . . . . . . . . . . . . . . . . . . . . . . . . . . . . . . . . . . . . . . . . . . . . . . . . . . . . . . . . . .92
Print the Internal Font List . . . . . . . . . . . . . . . . . . . . . . . . . . . . . . . . . . . . . . . . . . . . . . . . . . . . . . . . . . . . . . . . . . . . . . . . . . . . . . . 9 3
Print a List of Printer Set tings . . . . . . . . . . . . . . . . . . . . . . . . . . . . . . . . . . . . . . . . . . . . . . . . . . . . . . . . . . . . . . . . . . . . . . . . . . . . 93
Test Print . . . . . . . . . . . . . . . . . . . . . . . . . . . . . . . . . . . . . . . . . . . . . . . . . . . . . . . . . . . . . . . . . . . . . . . . . . . . . . . . . . . . . . . . . . . . . . 93
4 Scan . . . . . . . . . . . . . . . . . . . . . . . . . . . . . . . . . . . . . . . . . . . . . . . . . . . . . . . . . . . . . . . 97
Before Scanning . . . . . . . . . . . . . . . . . . . . . . . . . . . . . . . . . . . . . . . . . . . . . . . . . . . . . . . . . . . . . . . . . . 97
Configure Network Scanning for Windows® . . . . . . . . . . . . . . . . . . . . . . . . . . . . . . . . . . . . . . . . . . . . . . . . . . . . . . . . . . . . . . .97
Configure Network Scanning for Macintosh . . . . . . . . . . . . . . . . . . . . . . . . . . . . . . . . . . . . . . . . . . . . . . . . . . . . . . . . . . . . . . . .99
Scan Using the Scan Button on Your Dell Machine . . . . . . . . . . . . . . . . . . . . . . . . . . . . . . . . . . . . 99
Scan Photos and Graphics . . . . . . . . . . . . . . . . . . . . . . . . . . . . . . . . . . . . . . . . . . . . . . . . . . . . . . . . . . . . . . . . . . . . . . . . . . . . . . 100
Save Scanned Data to a Folder as a PDF File . . . . . . . . . . . . . . . . . . . . . . . . . . . . . . . . . . . . . . . . . . . . . . . . . . . . . . . . . . . . . . .101
®
Web Services for Scanning on Your Network (Windows Vista
Scan Using Web Services from the Dell Machine (Windows Vista
8) . . . . . . . . . . . . . . . . . . . . . . . . . . . . . . . . . . . . . . . . . . . . . . . . . . . . . . . . . . . . . . . . . . . . . . . . . . . . . . . . . . . . . . . . . . . . . . . . . . .102
Configure Scan Settings for Web Services . . . . . . . . . . . . . . . . . . . . . . . . . . . . . . . . . . . . . . . . . . . . . . . . . . . . . . . . . . . . .102
Change Scan Button Settings from ControlCenter (Macintosh) . . . . . . . . . . . . . . . . . . . . . . . . . . . . . . . . . . . . . . . . . . . . . 103
SP2 or greater, Windows® 7 and Windows® 8) . . .101
®
SP2 or greater, Windows® 7 and Windows®
Scan from Your Computer (Windows®) . . . . . . . . . . . . . . . . . . . . . . . . . . . . . . . . . . . . . . . . . . . . . 106
Scan from Your Computer (Macintosh) . . . . . . . . . . . . . . . . . . . . . . . . . . . . . . . . . . . . . . . . . . . . . . 106
Scan Using ControlCenter (Macintosh) . . . . . . . . . . . . . . . . . . . . . . . . . . . . . . . . . . . . . . . . . . . . . . . . . . . . . . . . . . . . . . . . . . . 106
Scan Documents and Photos Using ControlCenter (Macintosh) . . . . . . . . . . . . . . . . . . . . . . . . . . . . . . . . . . . . . . . . . . .107
Save Scanned Data to a Folder as a PDF File Using ControlCenter (Macintosh) . . . . . . . . . . . . . . . . . . . . . . . . . . . . 108
Scan Both Sides of an ID Card Using ControlCenter . . . . . . . . . . . . . . . . . . . . . . . . . . . . . . . . . . . . . . . . . . . . . . . . . . . . 10 9
Scan to E-mail Attachment Using ControlCenter (Macintosh) . . . . . . . . . . . . . . . . . . . . . . . . . . . . . . . . . . . . . . . . . . . . .110
Scan to an Editable Text File (OCR) Using ControlCenter (Macintosh) . . . . . . . . . . . . . . . . . . . . . . . . . . . . . . . . . . . . . . 111
Scan Using TWAIN-Compliant Applications (Macintosh) . . . . . . . . . . . . . . . . . . . . . . . . . . . . . . . . . . . . . . . . . . . . . . . . . . .112
6 Contents
TWAIN Driver Settings (Macintosh) . . . . . . . . . . . . . . . . . . . . . . . . . . . . . . . . . . . . . . . . . . . . . . . . . . . . . . . . . . . . . . . . . . .113
Page 7

ICA Driver Settings . . . . . . . . . . . . . . . . . . . . . . . . . . . . . . . . . . . . . . . . . . . . . . . . . . . . . . . . . . . . . . . . . . . . . . . . . . . . . . . . . . . 117
5 Copy . . . . . . . . . . . . . . . . . . . . . . . . . . . . . . . . . . . . . . . . . . . . . . . . . . . . . . . . . . . . . . 121
Copy a Document . . . . . . . . . . . . . . . . . . . . . . . . . . . . . . . . . . . . . . . . . . . . . . . . . . . . . . . . . . . . . . . . 121
Copy Option . . . . . . . . . . . . . . . . . . . . . . . . . . . . . . . . . . . . . . . . . . . . . . . . . . . . . . . . . . . . . . . . . . . . . 122
Enlarge or Reduce Copied Images . . . . . . . . . . . . . . . . . . . . . . . . . . . . . . . . . . . . . . . . . . . . . . . . . . 124
Adjust the Copy Contrast . . . . . . . . . . . . . . . . . . . . . . . . . . . . . . . . . . . . . . . . . . . . . . . . . . . . . . . . . . 124
Adjust the Copy Density (Brightness) . . . . . . . . . . . . . . . . . . . . . . . . . . . . . . . . . . . . . . . . . . . . . . . 125
Make N in 1 Copies Using the Page Layout Feature . . . . . . . . . . . . . . . . . . . . . . . . . . . . . . . . . . . 125
Sort Copies . . . . . . . . . . . . . . . . . . . . . . . . . . . . . . . . . . . . . . . . . . . . . . . . . . . . . . . . . . . . . . . . . . . . . . 127
Copy Both Sides of an ID Card onto One Page . . . . . . . . . . . . . . . . . . . . . . . . . . . . . . . . . . . . . . . 128
Copy on Both Sides of the Paper (2-sided Copy) . . . . . . . . . . . . . . . . . . . . . . . . . . . . . . . . . . . . . . 130
6 Fax . . . . . . . . . . . . . . . . . . . . . . . . . . . . . . . . . . . . . . . . . . . . . . . . . . . . . . . . . . . . . . . 137
Send a Fax . . . . . . . . . . . . . . . . . . . . . . . . . . . . . . . . . . . . . . . . . . . . . . . . . . . . . . . . . . . . . . . . . . . . . . 137
Send a Fax . . . . . . . . . . . . . . . . . . . . . . . . . . . . . . . . . . . . . . . . . . . . . . . . . . . . . . . . . . . . . . . . . . . . . . . . . . . . . . . . . . . . . . . . . . . . 138
Select or Change Settings for Sending a Fax . . . . . . . . . . . . . . . . . . . . . . . . . . . . . . . . . . . . . . . . . . . . . . . . . . . . . . . . . . . . . . 14 0
Change the Fax Resolution . . . . . . . . . . . . . . . . . . . . . . . . . . . . . . . . . . . . . . . . . . . . . . . . . . . . . . . . . . . . . . . . . . . . . . . . . . . . . . 14 0
Change the Fax Contrast . . . . . . . . . . . . . . . . . . . . . . . . . . . . . . . . . . . . . . . . . . . . . . . . . . . . . . . . . . . . . . . . . . . . . . . . . . . . . . . . .141
Send a Fax Manually . . . . . . . . . . . . . . . . . . . . . . . . . . . . . . . . . . . . . . . . . . . . . . . . . . . . . . . . . . . . . . . . . . . . . . . . . . . . . . . . . . . .141
Set Glass Scan Size for Faxing . . . . . . . . . . . . . . . . . . . . . . . . . . . . . . . . . . . . . . . . . . . . . . . . . . . . . . . . . . . . . . . . . . . . . . . . . . .142
Send a Fax at the End of a Conversation . . . . . . . . . . . . . . . . . . . . . . . . . . . . . . . . . . . . . . . . . . . . . . . . . . . . . . . . . . . . . . . . . . .142
Use Dual Access to Dial, Scan, Send, and Receive Faxes Simultaneously . . . . . . . . . . . . . . . . . . . . . . . . . . . . . . . . . . . . .142
Send the Same Fax to More than One Recipient (Broadcasting). . . . . . . . . . . . . . . . . . . . . . . . . . . . . . . . . . . . . . . . . . . . . .142
Cancel a Broadcast in Progress . . . . . . . . . . . . . . . . . . . . . . . . . . . . . . . . . . . . . . . . . . . . . . . . . . . . . . . . . . . . . . . . . . . . . . 143
Send a Fax in Real Time . . . . . . . . . . . . . . . . . . . . . . . . . . . . . . . . . . . . . . . . . . . . . . . . . . . . . . . . . . . . . . . . . . . . . . . . . . . . . . . . 14 3
Send a Fax Overseas . . . . . . . . . . . . . . . . . . . . . . . . . . . . . . . . . . . . . . . . . . . . . . . . . . . . . . . . . . . . . . . . . . . . . . . . . . . . . . . . . . . 14 4
Send a Fax at a Specified Time (Delayed Fax) . . . . . . . . . . . . . . . . . . . . . . . . . . . . . . . . . . . . . . . . . . . . . . . . . . . . . . . . . . . . . 145
Add a Cover Page to Your Fax . . . . . . . . . . . . . . . . . . . . . . . . . . . . . . . . . . . . . . . . . . . . . . . . . . . . . . . . . . . . . . . . . . . . . . . . . . . 145
Compose Your Own Comments . . . . . . . . . . . . . . . . . . . . . . . . . . . . . . . . . . . . . . . . . . . . . . . . . . . . . . . . . . . . . . . . . . . . . . . 146
Turn Off the Destination Information Display . . . . . . . . . . . . . . . . . . . . . . . . . . . . . . . . . . . . . . . . . . . . . . . . . . . . . . . . . . . . . . 146
7Contents
Page 8

Cancel a Fax in Progress. . . . . . . . . . . . . . . . . . . . . . . . . . . . . . . . . . . . . . . . . . . . . . . . . . . . . . . . . . . . . . . . . . . . . . . . . . . . . . . . .147
Receive a Fax . . . . . . . . . . . . . . . . . . . . . . . . . . . . . . . . . . . . . . . . . . . . . . . . . . . . . . . . . . . . . . . . . . . . 147
Receive Mode Settings . . . . . . . . . . . . . . . . . . . . . . . . . . . . . . . . . . . . . . . . . . . . . . . . . . . . . . . . . . . . . . . . . . . . . . . . . . . . . . . . . .147
Receive Modes . . . . . . . . . . . . . . . . . . . . . . . . . . . . . . . . . . . . . . . . . . . . . . . . . . . . . . . . . . . . . . . . . . . . . . . . . . . . . . . . . . . . . 148
Choose the Correct Receive Mode . . . . . . . . . . . . . . . . . . . . . . . . . . . . . . . . . . . . . . . . . . . . . . . . . . . . . . . . . . . . . . . . . . . . 149
Set the Number of Rings Before the Machine Answers (Ring Delay) . . . . . . . . . . . . . . . . . . . . . . . . . . . . . . . . . . . . . . 14 9
Set the F/ T Ring Time (Pseudo/Double-ring) . . . . . . . . . . . . . . . . . . . . . . . . . . . . . . . . . . . . . . . . . . . . . . . . . . . . . . . . . . . .150
Set the Easy Receive . . . . . . . . . . . . . . . . . . . . . . . . . . . . . . . . . . . . . . . . . . . . . . . . . . . . . . . . . . . . . . . . . . . . . . . . . . . . . . . . .151
Additional Receiving Operations . . . . . . . . . . . . . . . . . . . . . . . . . . . . . . . . . . . . . . . . . . . . . . . . . . . . . . . . . . . . . . . . . . . . . . . . .151
Shrink Page Size of an Oversized Incoming Fax . . . . . . . . . . . . . . . . . . . . . . . . . . . . . . . . . . . . . . . . . . . . . . . . . . . . . . . . .152
Set the 2-sided Printing for Received Faxes . . . . . . . . . . . . . . . . . . . . . . . . . . . . . . . . . . . . . . . . . . . . . . . . . . . . . . . . . . . . .152
Set the Fax Receive Stamp . . . . . . . . . . . . . . . . . . . . . . . . . . . . . . . . . . . . . . . . . . . . . . . . . . . . . . . . . . . . . . . . . . . . . . . . . . . .152
Receive a Fax at the End of a Telephone Conversation . . . . . . . . . . . . . . . . . . . . . . . . . . . . . . . . . . . . . . . . . . . . . . . . . . .153
Avoid Incoming Fax from Specific Numbers . . . . . . . . . . . . . . . . . . . . . . . . . . . . . . . . . . . . . . . . . . . . . . . . . . . . . . . . . . . . .153
Memory Receive (Remote Fax) Options . . . . . . . . . . . . . . . . . . . . . . . . . . . . . . . . . . . . . . . . . . . . . . . . . . . . . . . . . . . . . . . . . . .154
Forward Incoming Faxes to Another Machine . . . . . . . . . . . . . . . . . . . . . . . . . . . . . . . . . . . . . . . . . . . . . . . . . . . . . . . . . . .155
Store Incoming Faxes in the Machine’s Memor y . . . . . . . . . . . . . . . . . . . . . . . . . . . . . . . . . . . . . . . . . . . . . . . . . . . . . . . .155
Change Memory Receive (Remote Fax) Options . . . . . . . . . . . . . . . . . . . . . . . . . . . . . . . . . . . . . . . . . . . . . . . . . . . . . . . . .155
Turn off Memory Receive (Remote Fax) Options . . . . . . . . . . . . . . . . . . . . . . . . . . . . . . . . . . . . . . . . . . . . . . . . . . . . . . . . .156
Print a Fax Stored in the Machine’s Memory . . . . . . . . . . . . . . . . . . . . . . . . . . . . . . . . . . . . . . . . . . . . . . . . . . . . . . . . . . . .156
Remote Retrieval . . . . . . . . . . . . . . . . . . . . . . . . . . . . . . . . . . . . . . . . . . . . . . . . . . . . . . . . . . . . . . . . . . . . . . . . . . . . . . . . . . . . . . .156
Set a Remote Access Code. . . . . . . . . . . . . . . . . . . . . . . . . . . . . . . . . . . . . . . . . . . . . . . . . . . . . . . . . . . . . . . . . . . . . . . . . . . .157
Use Your Remote Access Code . . . . . . . . . . . . . . . . . . . . . . . . . . . . . . . . . . . . . . . . . . . . . . . . . . . . . . . . . . . . . . . . . . . . . . . .157
Remote Retrieval Commands . . . . . . . . . . . . . . . . . . . . . . . . . . . . . . . . . . . . . . . . . . . . . . . . . . . . . . . . . . . . . . . . . . . . . . . . . .157
Forward Faxes Remotely. . . . . . . . . . . . . . . . . . . . . . . . . . . . . . . . . . . . . . . . . . . . . . . . . . . . . . . . . . . . . . . . . . . . . . . . . . . . . .158
Change the Fax Forwarding Number . . . . . . . . . . . . . . . . . . . . . . . . . . . . . . . . . . . . . . . . . . . . . . . . . . . . . . . . . . . . . . . . . . .159
Receive Faxes into Memory When the Paper Tray is Empty . . . . . . . . . . . . . . . . . . . . . . . . . . . . . . . . . . . . . . . . . . . . . . . . .159
Dial and Store Fax Numbers . . . . . . . . . . . . . . . . . . . . . . . . . . . . . . . . . . . . . . . . . . . . . . . . . . . . . . . 159
How to Dial . . . . . . . . . . . . . . . . . . . . . . . . . . . . . . . . . . . . . . . . . . . . . . . . . . . . . . . . . . . . . . . . . . . . . . . . . . . . . . . . . . . . . . . . . . . . .159
Dial Manually . . . . . . . . . . . . . . . . . . . . . . . . . . . . . . . . . . . . . . . . . . . . . . . . . . . . . . . . . . . . . . . . . . . . . . . . . . . . . . . . . . . . . . . 160
8 Contents
Page 9

Dial a Number Using One Touch Dial . . . . . . . . . . . . . . . . . . . . . . . . . . . . . . . . . . . . . . . . . . . . . . . . . . . . . . . . . . . . . . . . . . 160
Dial a Number Using Speed Dial . . . . . . . . . . . . . . . . . . . . . . . . . . . . . . . . . . . . . . . . . . . . . . . . . . . . . . . . . . . . . . . . . . . . . . 16 0
Redial a Fax Number . . . . . . . . . . . . . . . . . . . . . . . . . . . . . . . . . . . . . . . . . . . . . . . . . . . . . . . . . . . . . . . . . . . . . . . . . . . . . . . . .161
Voice Operations . . . . . . . . . . . . . . . . . . . . . . . . . . . . . . . . . . . . . . . . . . . . . . . . . . . . . . . . . . . . . . . . . . . . . . . . . . . . . . . . . . . . . . .161
Send Tone Signals . . . . . . . . . . . . . . . . . . . . . . . . . . . . . . . . . . . . . . . . . . . . . . . . . . . . . . . . . . . . . . . . . . . . . . . . . . . . . . . . . . . .161
Pick up a Voice Call in Fax/Tel Receive Mode . . . . . . . . . . . . . . . . . . . . . . . . . . . . . . . . . . . . . . . . . . . . . . . . . . . . . . . . . . .161
Special Line Considerations . . . . . . . . . . . . . . . . . . . . . . . . . . . . . . . . . . . . . . . . . . . . . . . . . . . . . . . . . . . . . . . . . . . . . . . . . . .162
Additional Dialing Operations . . . . . . . . . . . . . . . . . . . . . . . . . . . . . . . . . . . . . . . . . . . . . . . . . . . . . . . . . . . . . . . . . . . . . . . . . . . 164
Dial Access Codes and Credit Card Numbers . . . . . . . . . . . . . . . . . . . . . . . . . . . . . . . . . . . . . . . . . . . . . . . . . . . . . . . . . . 16 4
How to Store Numbers . . . . . . . . . . . . . . . . . . . . . . . . . . . . . . . . . . . . . . . . . . . . . . . . . . . . . . . . . . . . . . . . . . . . . . . . . . . . . . . . . .165
Store Numbers . . . . . . . . . . . . . . . . . . . . . . . . . . . . . . . . . . . . . . . . . . . . . . . . . . . . . . . . . . . . . . . . . . . . . . . . . . . . . . . . . . . . . .165
Set up Groups for Broadcasting . . . . . . . . . . . . . . . . . . . . . . . . . . . . . . . . . . . . . . . . . . . . . . . . . . . . . . . . . . . . . . . . . . . . . . .167
Telephone Services and External Devices . . . . . . . . . . . . . . . . . . . . . . . . . . . . . . . . . . . . . . . . . . . 169
Voice Mail . . . . . . . . . . . . . . . . . . . . . . . . . . . . . . . . . . . . . . . . . . . . . . . . . . . . . . . . . . . . . . . . . . . . . . . . . . . . . . . . . . . . . . . . . . . . . .169
Distinctive Ring . . . . . . . . . . . . . . . . . . . . . . . . . . . . . . . . . . . . . . . . . . . . . . . . . . . . . . . . . . . . . . . . . . . . . . . . . . . . . . . . . . . . . . . . .170
Register the Distinctive Ring Pattern . . . . . . . . . . . . . . . . . . . . . . . . . . . . . . . . . . . . . . . . . . . . . . . . . . . . . . . . . . . . . . . . . . .171
Turn Off Distinctive Ring . . . . . . . . . . . . . . . . . . . . . . . . . . . . . . . . . . . . . . . . . . . . . . . . . . . . . . . . . . . . . . . . . . . . . . . . . . . . . .172
Caller ID . . . . . . . . . . . . . . . . . . . . . . . . . . . . . . . . . . . . . . . . . . . . . . . . . . . . . . . . . . . . . . . . . . . . . . . . . . . . . . . . . . . . . . . . . . . . . . .172
External TAD (Telephone Answering Device) . . . . . . . . . . . . . . . . . . . . . . . . . . . . . . . . . . . . . . . . . . . . . . . . . . . . . . . . . . . . . .173
Connect an Ex ternal TAD . . . . . . . . . . . . . . . . . . . . . . . . . . . . . . . . . . . . . . . . . . . . . . . . . . . . . . . . . . . . . . . . . . . . . . . . . . . . .174
Record an Outgoing Message (OGM) on the External TAD . . . . . . . . . . . . . . . . . . . . . . . . . . . . . . . . . . . . . . . . . . . . . . . .174
Multi-line Connections (PBX) . . . . . . . . . . . . . . . . . . . . . . . . . . . . . . . . . . . . . . . . . . . . . . . . . . . . . . . . . . . . . . . . . . . . . . . . .174
External and Extension Telephones . . . . . . . . . . . . . . . . . . . . . . . . . . . . . . . . . . . . . . . . . . . . . . . . . . . . . . . . . . . . . . . . . . . . . . .175
Connect an Ex ternal or Extension Telephone . . . . . . . . . . . . . . . . . . . . . . . . . . . . . . . . . . . . . . . . . . . . . . . . . . . . . . . . . . .175
Operation from External and E xtension Telephones . . . . . . . . . . . . . . . . . . . . . . . . . . . . . . . . . . . . . . . . . . . . . . . . . . . . .175
Use a Non-Dell Cordless External Handset . . . . . . . . . . . . . . . . . . . . . . . . . . . . . . . . . . . . . . . . . . . . . . . . . . . . . . . . . . . . .176
Use the Remote Codes . . . . . . . . . . . . . . . . . . . . . . . . . . . . . . . . . . . . . . . . . . . . . . . . . . . . . . . . . . . . . . . . . . . . . . . . . . . . . . . .176
Fax Reports . . . . . . . . . . . . . . . . . . . . . . . . . . . . . . . . . . . . . . . . . . . . . . . . . . . . . . . . . . . . . . . . . . . . . 177
Print a Transmission Verification Report . . . . . . . . . . . . . . . . . . . . . . . . . . . . . . . . . . . . . . . . . . . . . . . . . . . . . . . . . . . . . . . . . .177
Print a Fax Journal . . . . . . . . . . . . . . . . . . . . . . . . . . . . . . . . . . . . . . . . . . . . . . . . . . . . . . . . . . . . . . . . . . . . . . . . . . . . . . . . . . . . . .178
9Contents
Page 10

PC-FAX . . . . . . . . . . . . . . . . . . . . . . . . . . . . . . . . . . . . . . . . . . . . . . . . . . . . . . . . . . . . . . . . . . . . . . . . . 178
PC-FAX for Windows® . . . . . . . . . . . . . . . . . . . . . . . . . . . . . . . . . . . . . . . . . . . . . . . . . . . . . . . . . . . . . . . . . . . . . . . . . . . . . . . . . .178
®
PC-FAX Overview (Windows
PC-FAX for Macintosh. . . . . . . . . . . . . . . . . . . . . . . . . . . . . . . . . . . . . . . . . . . . . . . . . . . . . . . . . . . . . . . . . . . . . . . . . . . . . . . . . . 190
PC-FAX Overview (Macintosh) . . . . . . . . . . . . . . . . . . . . . . . . . . . . . . . . . . . . . . . . . . . . . . . . . . . . . . . . . . . . . . . . . . . . . . . 190
Send Faxes from Your Application (Macintosh) . . . . . . . . . . . . . . . . . . . . . . . . . . . . . . . . . . . . . . . . . . . . . . . . . . . . . . . . . 190
) . . . . . . . . . . . . . . . . . . . . . . . . . . . . . . . . . . . . . . . . . . . . . . . . . . . . . . . . . . . . . . . . . . . . . . . .179
7 Network . . . . . . . . . . . . . . . . . . . . . . . . . . . . . . . . . . . . . . . . . . . . . . . . . . . . . . . . . . . 195
Get Started . . . . . . . . . . . . . . . . . . . . . . . . . . . . . . . . . . . . . . . . . . . . . . . . . . . . . . . . . . . . . . . . . . . . . . 195
Suppor ted Basic Net work Features . . . . . . . . . . . . . . . . . . . . . . . . . . . . . . . . . . . . . . . . . . . . . . . . . . . . . . . . . . . . . . . . . . . . . . .195
Select Your Network Connection Type . . . . . . . . . . . . . . . . . . . . . . . . . . . . . . . . . . . . . . . . . . . . . . 196
Wired Network Connection E xamples . . . . . . . . . . . . . . . . . . . . . . . . . . . . . . . . . . . . . . . . . . . . . . . . . . . . . . . . . . . . . . . . . . . 196
Peer-to-Peer Printing Using TCP/IP . . . . . . . . . . . . . . . . . . . . . . . . . . . . . . . . . . . . . . . . . . . . . . . . . . . . . . . . . . . . . . . . . . . 196
Network Shared Printing . . . . . . . . . . . . . . . . . . . . . . . . . . . . . . . . . . . . . . . . . . . . . . . . . . . . . . . . . . . . . . . . . . . . . . . . . . . . .197
Wireless Network Connection Examples . . . . . . . . . . . . . . . . . . . . . . . . . . . . . . . . . . . . . . . . . . . . . . . . . . . . . . . . . . . . . . . . . .197
Connected to a Computer with a Wireless LAN Access Point Router in the Network (Infrastructure Mode) . . .198
Connected to a W ireless Computer without a Wireless L AN Access Point Router in the Network (Ad-Hoc
Mode) . . . . . . . . . . . . . . . . . . . . . . . . . . . . . . . . . . . . . . . . . . . . . . . . . . . . . . . . . . . . . . . . . . . . . . . . . . . . . . . . . . . . . . . . . . . . . . .198
Learn to Use Network Management Utilities . . . . . . . . . . . . . . . . . . . . . . . . . . . . . . . . . . . . . . . . 199
Learn about Network Management Utlilities . . . . . . . . . . . . . . . . . . . . . . . . . . . . . . . . . . . . . . . . . . . . . . . . . . . . . . . . . . . . . . .199
What is Web Based Management? . . . . . . . . . . . . . . . . . . . . . . . . . . . . . . . . . . . . . . . . . . . . . . . . . . . . . . . . . . . . . . . . . . . .199
Access Network Management Software and Utilities . . . . . . . . . . . . . . . . . . . . . . . . . . . . . . . . . . . . . . . . . . . . . . . . . . . . . .199
Access Web Based Management . . . . . . . . . . . . . . . . . . . . . . . . . . . . . . . . . . . . . . . . . . . . . . . . . . . . . . . . . . . . . . . . . . . . . .199
Locate the Machine’s Network Settings . . . . . . . . . . . . . . . . . . . . . . . . . . . . . . . . . . . . . . . . . . . . 201
Locate Net work Set tings When Using the Dell Control Panel . . . . . . . . . . . . . . . . . . . . . . . . . . . . . . . . . . . . . . . . . . . . . . . 201
Locate Net work Set tings When Using Web Based Management . . . . . . . . . . . . . . . . . . . . . . . . . . . . . . . . . . . . . . . . . . . 201
Additional Methods of Configuring Your Dell Machine for a Wireless Network. . . . . . . . . . . 202
Before Configuring Your Dell Machine for a Wireless Net work . . . . . . . . . . . . . . . . . . . . . . . . . . . . . . . . . . . . . . . . . . . . . 202
Configure Your Machine for a Wireless Net work Using the One Push Method of Wi-Fi Protected Setup™ (WPS) or
AOSS™ . . . . . . . . . . . . . . . . . . . . . . . . . . . . . . . . . . . . . . . . . . . . . . . . . . . . . . . . . . . . . . . . . . . . . . . . . . . . . . . . . . . . . . . . . . . . . . . 20 2
10 Contents
How to Configure Your Wireless Network Using the One Push Method of WPS or AOSS™ . . . . . . . . . . . . . . . . . 20 3
Page 11

Configure Your Machine for a Wireless Net work Using the PIN Method of Wi-Fi Protected Setup™ (WPS) . . . . . 204
Two Wireless Network Connection Types Using the PIN Method of Wi-Fi Protected Setup™ (WPS) . . . . . . . . 204
How to Configure Your Wireless Network Using the PIN Method of Wi-Fi Protected Setup™ (WPS) . . . . . . . . 205
Configure Your Machine for a Wireless Net work in Ad-Hoc Mode (For IEEE 802 .11b/g/n) . . . . . . . . . . . . . . . . . . . . . . 206
Configure Your Machine for a Wireless Net work in Ad-Hoc Mode Using a New SSID . . . . . . . . . . . . . . . . . . . . . . 207
Configure Your Machine for a Wireless Net work in Ad-Hoc Mode Using an Existing SSID . . . . . . . . . . . . . . . . . . 208
Configure Your Machine for a Wireless Net work Using the Machine’s Control Panel Setup Wizard . . . . . . . . . . . . 209
Configure Your Machine for a Wireless Net work When the SSID Is Not Broadcast . . . . . . . . . . . . . . . . . . . . . . . . . . . .210
Use Wi-Fi Direct™ . . . . . . . . . . . . . . . . . . . . . . . . . . . . . . . . . . . . . . . . . . . . . . . . . . . . . . . . . . . . . . . . . . . . . . . . . . . . . . . . . . . . . .212
Print or Scan from Your Mobile Device Using Wi-Fi Direct . . . . . . . . . . . . . . . . . . . . . . . . . . . . . . . . . . . . . . . . . . . . . . . .212
Mobile Printing . . . . . . . . . . . . . . . . . . . . . . . . . . . . . . . . . . . . . . . . . . . . . . . . . . . . . . . . . . . . . . . . . . . . . . . . . . . . . . . . . . . . . .213
Configure Your Wi-Fi Direct Net work . . . . . . . . . . . . . . . . . . . . . . . . . . . . . . . . . . . . . . . . . . . . . . . . . . . . . . . . . . . . . . . . . .213
Advanced Network Features . . . . . . . . . . . . . . . . . . . . . . . . . . . . . . . . . . . . . . . . . . . . . . . . . . . . . . 217
Print the Network Configuration Report . . . . . . . . . . . . . . . . . . . . . . . . . . . . . . . . . . . . . . . . . . . . . . . . . . . . . . . . . . . . . . . . . . .218
Configure Your Mail Server Set tings Using Web Based Management . . . . . . . . . . . . . . . . . . . . . . . . . . . . . . . . . . . . . . . .218
Configure the Dell Machine for Email or I-Fax . . . . . . . . . . . . . . . . . . . . . . . . . . . . . . . . . . . . . . . . . . . . . . . . . . . . . . . . . . . . . .219
Fax Using the Internet (I-Fax) . . . . . . . . . . . . . . . . . . . . . . . . . . . . . . . . . . . . . . . . . . . . . . . . . . . . . . . . . . . . . . . . . . . . . . . . 220
Initial Setup for Email or I-Fax . . . . . . . . . . . . . . . . . . . . . . . . . . . . . . . . . . . . . . . . . . . . . . . . . . . . . . . . . . . . . . . . . . . . . . . . 221
Send an I-Fax . . . . . . . . . . . . . . . . . . . . . . . . . . . . . . . . . . . . . . . . . . . . . . . . . . . . . . . . . . . . . . . . . . . . . . . . . . . . . . . . . . . . . . . 221
How Your Dell Machine Receives an Email or I-Fax . . . . . . . . . . . . . . . . . . . . . . . . . . . . . . . . . . . . . . . . . . . . . . . . . . . . . 222
Poll the Server Manually . . . . . . . . . . . . . . . . . . . . . . . . . . . . . . . . . . . . . . . . . . . . . . . . . . . . . . . . . . . . . . . . . . . . . . . . . . . . . 2 23
How Your Computer Receives an I-Fax . . . . . . . . . . . . . . . . . . . . . . . . . . . . . . . . . . . . . . . . . . . . . . . . . . . . . . . . . . . . . . . . 223
Forward Received Email and Fax Messages . . . . . . . . . . . . . . . . . . . . . . . . . . . . . . . . . . . . . . . . . . . . . . . . . . . . . . . . . . . 223
Relay Broadcast . . . . . . . . . . . . . . . . . . . . . . . . . . . . . . . . . . . . . . . . . . . . . . . . . . . . . . . . . . . . . . . . . . . . . . . . . . . . . . . . . . . . 2 24
I-Fax Options . . . . . . . . . . . . . . . . . . . . . . . . . . . . . . . . . . . . . . . . . . . . . . . . . . . . . . . . . . . . . . . . . . . . . . . . . . . . . . . . . . . . . . . . . . 226
Transmission (T X) Verification Mail . . . . . . . . . . . . . . . . . . . . . . . . . . . . . . . . . . . . . . . . . . . . . . . . . . . . . . . . . . . . . . . . . . . 226
Error Mail . . . . . . . . . . . . . . . . . . . . . . . . . . . . . . . . . . . . . . . . . . . . . . . . . . . . . . . . . . . . . . . . . . . . . . . . . . . . . . . . . . . . . . . . . . 228
Use the Send Fax to Ser ver Feature . . . . . . . . . . . . . . . . . . . . . . . . . . . . . . . . . . . . . . . . . . . . . . . . . . . . . . . . . . . . . . . . . . . . . . 228
Before Sending a Fax to the Fax Server . . . . . . . . . . . . . . . . . . . . . . . . . . . . . . . . . . . . . . . . . . . . . . . . . . . . . . . . . . . . . . . 228
Set Fax to Server to On . . . . . . . . . . . . . . . . . . . . . . . . . . . . . . . . . . . . . . . . . . . . . . . . . . . . . . . . . . . . . . . . . . . . . . . . . . . . . . 228
11Contents
Page 12

Operate Fax to Server . . . . . . . . . . . . . . . . . . . . . . . . . . . . . . . . . . . . . . . . . . . . . . . . . . . . . . . . . . . . . . . . . . . . . . . . . . . . . . . 229
Synchronize Time with the SNTP Server Using Web Based Management . . . . . . . . . . . . . . . . . . . . . . . . . . . . . . . . . . . 22 9
Configure Date and Time Using Web Based Management . . . . . . . . . . . . . . . . . . . . . . . . . . . . . . . . . . . . . . . . . . . . . . . 229
Configure the SNTP Protocol Using Web Based Management . . . . . . . . . . . . . . . . . . . . . . . . . . . . . . . . . . . . . . . . . . . 230
Technical Information for Advanced Users . . . . . . . . . . . . . . . . . . . . . . . . . . . . . . . . . . . . . . . . . . 231
Additional Network Settings for Windows® . . . . . . . . . . . . . . . . . . . . . . . . . . . . . . . . . . . . . . . . . . . . . . . . . . . . . . . . . . . . . . 232
Before Configuring Additional Network Settings . . . . . . . . . . . . . . . . . . . . . . . . . . . . . . . . . . . . . . . . . . . . . . . . . . . . . . . 2 32
®
Use Web Ser vices to Install Drivers Used for Printing and Scanning (Windows Vista
®
Windows
8) . . . . . . . . . . . . . . . . . . . . . . . . . . . . . . . . . . . . . . . . . . . . . . . . . . . . . . . . . . . . . . . . . . . . . . . . . . . . . . . . . . . . . . . 232
Use Web Ser vices to Uninstall Drivers Used for Printing and Scanning (Windows Vista
®
Windows
8) . . . . . . . . . . . . . . . . . . . . . . . . . . . . . . . . . . . . . . . . . . . . . . . . . . . . . . . . . . . . . . . . . . . . . . . . . . . . . . . . . . . . . . . 233
Use Vertical Pairing to Install Drivers Used for Printing and Scanning in Infrastructure Mode (Windows
®
Windows
8) . . . . . . . . . . . . . . . . . . . . . . . . . . . . . . . . . . . . . . . . . . . . . . . . . . . . . . . . . . . . . . . . . . . . . . . . . . . . . . . . . . . . . . . 234
Use Vertical Pairing to Install Drivers Used for Printing from the Wi-Fi Direct Net work (Windows
Available Services . . . . . . . . . . . . . . . . . . . . . . . . . . . . . . . . . . . . . . . . . . . . . . . . . . . . . . . . . . . . . . . . . . . . . . . . . . . . . . . . . . . . . 2 36
, Windows® 7 and
®
, Windows® 7 and
®
8.1) . . . . . . 235
®
7 and
Other Ways to Configure the IP Address . . . . . . . . . . . . . . . . . . . . . . . . . . . . . . . . . . . . . . . . . . . . . . . . . . . . . . . . . . . . . . . . . 2 36
Configure the IP Address Using DHCP . . . . . . . . . . . . . . . . . . . . . . . . . . . . . . . . . . . . . . . . . . . . . . . . . . . . . . . . . . . . . . . . . 236
Configure the IP Address Using BOOTP . . . . . . . . . . . . . . . . . . . . . . . . . . . . . . . . . . . . . . . . . . . . . . . . . . . . . . . . . . . . . . . 237
Configure the IP Address Using RARP . . . . . . . . . . . . . . . . . . . . . . . . . . . . . . . . . . . . . . . . . . . . . . . . . . . . . . . . . . . . . . . . . 237
Configure the IP Address Using APIPA . . . . . . . . . . . . . . . . . . . . . . . . . . . . . . . . . . . . . . . . . . . . . . . . . . . . . . . . . . . . . . . . 238
Configure the IP Address Using ARP . . . . . . . . . . . . . . . . . . . . . . . . . . . . . . . . . . . . . . . . . . . . . . . . . . . . . . . . . . . . . . . . . . 238
Reset the Network Settings to the Factory Settings . . . . . . . . . . . . . . . . . . . . . . . . . . . . . . . . . . . . . . . . . . . . . . . . . . . . . . . 2 38
Print the WLAN Report . . . . . . . . . . . . . . . . . . . . . . . . . . . . . . . . . . . . . . . . . . . . . . . . . . . . . . . . . . . . . . . . . . . . . . . . . . . . . . . . . 239
Wireless L AN Repor t Error Codes . . . . . . . . . . . . . . . . . . . . . . . . . . . . . . . . . . . . . . . . . . . . . . . . . . . . . . . . . . . . . . . . . . . . 239
Network Menu on the Dell Control Panel . . . . . . . . . . . . . . . . . . . . . . . . . . . . . . . . . . . . . . . . . . . . 240
TCP/IP . . . . . . . . . . . . . . . . . . . . . . . . . . . . . . . . . . . . . . . . . . . . . . . . . . . . . . . . . . . . . . . . . . . . . . . . . . . . . . . . . . . . . . . . . . . . . . . . 240
Ethernet (Wired Network Only) . . . . . . . . . . . . . . . . . . . . . . . . . . . . . . . . . . . . . . . . . . . . . . . . . . . . . . . . . . . . . . . . . . . . . . . . . 242
Wired Status . . . . . . . . . . . . . . . . . . . . . . . . . . . . . . . . . . . . . . . . . . . . . . . . . . . . . . . . . . . . . . . . . . . . . . . . . . . . . . . . . . . . . . . . . . 242
MAC Address . . . . . . . . . . . . . . . . . . . . . . . . . . . . . . . . . . . . . . . . . . . . . . . . . . . . . . . . . . . . . . . . . . . . . . . . . . . . . . . . . . . . . . . . . 243
Setup Wizard (Wireless Network Only) . . . . . . . . . . . . . . . . . . . . . . . . . . . . . . . . . . . . . . . . . . . . . . . . . . . . . . . . . . . . . . . . . . 243
WPS/AOSS™ ( Wireless Network Only) . . . . . . . . . . . . . . . . . . . . . . . . . . . . . . . . . . . . . . . . . . . . . . . . . . . . . . . . . . . . . . . . . . 243
12 Contents
Page 13

WPS w/PIN Code (Wireless Network Only) . . . . . . . . . . . . . . . . . . . . . . . . . . . . . . . . . . . . . . . . . . . . . . . . . . . . . . . . . . . . . . . 243
WL AN Status (Wireless Network Only) . . . . . . . . . . . . . . . . . . . . . . . . . . . . . . . . . . . . . . . . . . . . . . . . . . . . . . . . . . . . . . . . . . 243
Set to Default . . . . . . . . . . . . . . . . . . . . . . . . . . . . . . . . . . . . . . . . . . . . . . . . . . . . . . . . . . . . . . . . . . . . . . . . . . . . . . . . . . . . . . . . . . 24 3
Wired Enable ( Wired Network Only) . . . . . . . . . . . . . . . . . . . . . . . . . . . . . . . . . . . . . . . . . . . . . . . . . . . . . . . . . . . . . . . . . . . . . 244
WL AN Enable (Wireless Network Only) . . . . . . . . . . . . . . . . . . . . . . . . . . . . . . . . . . . . . . . . . . . . . . . . . . . . . . . . . . . . . . . . . . 244
Wi-Fi Direct . . . . . . . . . . . . . . . . . . . . . . . . . . . . . . . . . . . . . . . . . . . . . . . . . . . . . . . . . . . . . . . . . . . . . . . . . . . . . . . . . . . . . . . . . . . 244
Email I-Fax . . . . . . . . . . . . . . . . . . . . . . . . . . . . . . . . . . . . . . . . . . . . . . . . . . . . . . . . . . . . . . . . . . . . . . . . . . . . . . . . . . . . . . . . . . . . 24 4
Mail Address . . . . . . . . . . . . . . . . . . . . . . . . . . . . . . . . . . . . . . . . . . . . . . . . . . . . . . . . . . . . . . . . . . . . . . . . . . . . . . . . . . . . . . . 244
Setup Server . . . . . . . . . . . . . . . . . . . . . . . . . . . . . . . . . . . . . . . . . . . . . . . . . . . . . . . . . . . . . . . . . . . . . . . . . . . . . . . . . . . . . . . 244
Setup Mail RX . . . . . . . . . . . . . . . . . . . . . . . . . . . . . . . . . . . . . . . . . . . . . . . . . . . . . . . . . . . . . . . . . . . . . . . . . . . . . . . . . . . . . . 245
Setup Mail TX . . . . . . . . . . . . . . . . . . . . . . . . . . . . . . . . . . . . . . . . . . . . . . . . . . . . . . . . . . . . . . . . . . . . . . . . . . . . . . . . . . . . . . 245
Setup Relay . . . . . . . . . . . . . . . . . . . . . . . . . . . . . . . . . . . . . . . . . . . . . . . . . . . . . . . . . . . . . . . . . . . . . . . . . . . . . . . . . . . . . . . . 24 6
Scan to E-mail . . . . . . . . . . . . . . . . . . . . . . . . . . . . . . . . . . . . . . . . . . . . . . . . . . . . . . . . . . . . . . . . . . . . . . . . . . . . . . . . . . . . . . . . . 246
Scan to F TP . . . . . . . . . . . . . . . . . . . . . . . . . . . . . . . . . . . . . . . . . . . . . . . . . . . . . . . . . . . . . . . . . . . . . . . . . . . . . . . . . . . . . . . . . . . 246
Fax to Server . . . . . . . . . . . . . . . . . . . . . . . . . . . . . . . . . . . . . . . . . . . . . . . . . . . . . . . . . . . . . . . . . . . . . . . . . . . . . . . . . . . . . . . . . . 24 6
Network Reset . . . . . . . . . . . . . . . . . . . . . . . . . . . . . . . . . . . . . . . . . . . . . . . . . . . . . . . . . . . . . . . . . . . . . . . . . . . . . . . . . . . . . . . . 24 6
8 Security . . . . . . . . . . . . . . . . . . . . . . . . . . . . . . . . . . . . . . . . . . . . . . . . . . . . . . . . . . . 249
Lock the Machine Settings . . . . . . . . . . . . . . . . . . . . . . . . . . . . . . . . . . . . . . . . . . . . . . . . . . . . . . . . 249
About Using T X Lock . . . . . . . . . . . . . . . . . . . . . . . . . . . . . . . . . . . . . . . . . . . . . . . . . . . . . . . . . . . . . . . . . . . . . . . . . . . . . . . . . . . 249
Set the TX Lock Password . . . . . . . . . . . . . . . . . . . . . . . . . . . . . . . . . . . . . . . . . . . . . . . . . . . . . . . . . . . . . . . . . . . . . . . . . . . 249
Change the TX Lock Password . . . . . . . . . . . . . . . . . . . . . . . . . . . . . . . . . . . . . . . . . . . . . . . . . . . . . . . . . . . . . . . . . . . . . . . 250
Turn TX Lock On/Off . . . . . . . . . . . . . . . . . . . . . . . . . . . . . . . . . . . . . . . . . . . . . . . . . . . . . . . . . . . . . . . . . . . . . . . . . . . . . . . . . 250
About Using Setting Lock . . . . . . . . . . . . . . . . . . . . . . . . . . . . . . . . . . . . . . . . . . . . . . . . . . . . . . . . . . . . . . . . . . . . . . . . . . . . . . . 251
Set the Set ting Lock Password . . . . . . . . . . . . . . . . . . . . . . . . . . . . . . . . . . . . . . . . . . . . . . . . . . . . . . . . . . . . . . . . . . . . . . . 251
Change the Set ting Lock Password . . . . . . . . . . . . . . . . . . . . . . . . . . . . . . . . . . . . . . . . . . . . . . . . . . . . . . . . . . . . . . . . . . . 251
Turn Setting Lock On or Off . . . . . . . . . . . . . . . . . . . . . . . . . . . . . . . . . . . . . . . . . . . . . . . . . . . . . . . . . . . . . . . . . . . . . . . . . . 252
Before Using Network Security Features . . . . . . . . . . . . . . . . . . . . . . . . . . . . . . . . . . . . . . . . . . . 252
Supported Security Protocols and Features . . . . . . . . . . . . . . . . . . . . . . . . . . . . . . . . . . . . . . . . . 253
Security Protocols . . . . . . . . . . . . . . . . . . . . . . . . . . . . . . . . . . . . . . . . . . . . . . . . . . . . . . . . . . . . . . . . . . . . . . . . . . . . . . . . . . . . . 253
Security Methods for Sending and Receiving Email . . . . . . . . . . . . . . . . . . . . . . . . . . . . . . . . . . . . . . . . . . . . . . . . . . . . . . . 253
13Contents
Page 14

Manage Your Network Machine Securely Using Web Based Management (Web Browser) . . . . . . . . . . . . . . . . . . . . 2 53
Send or Receive an Email Securely . . . . . . . . . . . . . . . . . . . . . . . . . . . . . . . . . . . . . . . . . . . . . . . . . 254
Configure Email Sending or Receiving Using Web Based Management . . . . . . . . . . . . . . . . . . . . . . . . . . . . . . . . . . . . . . 25 4
Send an Email with User Authentication . . . . . . . . . . . . . . . . . . . . . . . . . . . . . . . . . . . . . . . . . . . . . . . . . . . . . . . . . . . . . . . . . 255
9 ControlCenter . . . . . . . . . . . . . . . . . . . . . . . . . . . . . . . . . . . . . . . . . . . . . . . . . . . . . . 259
ControlCenter (Macintosh) . . . . . . . . . . . . . . . . . . . . . . . . . . . . . . . . . . . . . . . . . . . . . . . . . . . . . . . . 259
Scan Using ControlCenter (Macintosh) . . . . . . . . . . . . . . . . . . . . . . . . . . . . . . . . . . . . . . . . . . . . . . . . . . . . . . . . . . . . . . . . . . . 259
Scan Settings for ControlCenter (Macintosh) . . . . . . . . . . . . . . . . . . . . . . . . . . . . . . . . . . . . . . . . . . . . . . . . . . . . . . . . . . . . . 259
10 Troubleshooting . . . . . . . . . . . . . . . . . . . . . . . . . . . . . . . . . . . . . . . . . . . . . . . . . . . 265
Printing Problems . . . . . . . . . . . . . . . . . . . . . . . . . . . . . . . . . . . . . . . . . . . . . . . . . . . . . . . . . . . . . . . . 266
Telephone and Fax Problems . . . . . . . . . . . . . . . . . . . . . . . . . . . . . . . . . . . . . . . . . . . . . . . . . . . . . . 267
Set Dial Tone Detection . . . . . . . . . . . . . . . . . . . . . . . . . . . . . . . . . . . . . . . . . . . . . . . . . . . . . . . . . . . . . . . . . . . . . . . . . . . . . . . . . 270
Set Telephone Line Compatibility for Interference and VoIP Systems . . . . . . . . . . . . . . . . . . . . . . . . . . . . . . . . . . . . . . . 270
Network Problems . . . . . . . . . . . . . . . . . . . . . . . . . . . . . . . . . . . . . . . . . . . . . . . . . . . . . . . . . . . . . . . 271
Error Messages . . . . . . . . . . . . . . . . . . . . . . . . . . . . . . . . . . . . . . . . . . . . . . . . . . . . . . . . . . . . . . . . . . . . . . . . . . . . . . . . . . . . . . . 271
Where Can I Find My Dell Machine’s Network Settings? . . . . . . . . . . . . . . . . . . . . . . . . . . . . . . . . . . . . . . . . . . . . . . . . . . . 272
I Cannot Complete the Wireless Network Setup Configuration. . . . . . . . . . . . . . . . . . . . . . . . . . . . . . . . . . . . . . . . . . . . . . 272
My Dell Machine Cannot Print or Scan over the Network. . . . . . . . . . . . . . . . . . . . . . . . . . . . . . . . . . . . . . . . . . . . . . . . . . . .274
My Security Settings are not Working Properly. . . . . . . . . . . . . . . . . . . . . . . . . . . . . . . . . . . . . . . . . . . . . . . . . . . . . . . . . . . 276
Other Problems . . . . . . . . . . . . . . . . . . . . . . . . . . . . . . . . . . . . . . . . . . . . . . . . . . . . . . . . . . . . . . . . . . 277
Error and Maintenance Messages . . . . . . . . . . . . . . . . . . . . . . . . . . . . . . . . . . . . . . . . . . . . . . . . . 279
Transfer Your Faxes or Fax Journal Report . . . . . . . . . . . . . . . . . . . . . . . . . . . . . . . . . . . . . . . . . . 282
Transfer Faxes to Another Fax Machine . . . . . . . . . . . . . . . . . . . . . . . . . . . . . . . . . . . . . . . . . . . . . . . . . . . . . . . . . . . . . . . . . . 28 2
Transfer the Fax Journal Report to Another Fax Machine . . . . . . . . . . . . . . . . . . . . . . . . . . . . . . . . . . . . . . . . . . . . . . . . . . 283
Document Jams . . . . . . . . . . . . . . . . . . . . . . . . . . . . . . . . . . . . . . . . . . . . . . . . . . . . . . . . . . . . . . . . . . 283
Document is Jammed in the Top of the A DF Unit . . . . . . . . . . . . . . . . . . . . . . . . . . . . . . . . . . . . . . . . . . . . . . . . . . . . . . . . . . . 28 3
Document is Jammed under the Document Cover . . . . . . . . . . . . . . . . . . . . . . . . . . . . . . . . . . . . . . . . . . . . . . . . . . . . . . . . . 283
Remove Small Scraps of Paper Jammed in the ADF . . . . . . . . . . . . . . . . . . . . . . . . . . . . . . . . . . . . . . . . . . . . . . . . . . . . . . . . 2 84
Paper Jams . . . . . . . . . . . . . . . . . . . . . . . . . . . . . . . . . . . . . . . . . . . . . . . . . . . . . . . . . . . . . . . . . . . . . 285
14 Contents
Page 15

Paper is Jammed in the Paper Tray . . . . . . . . . . . . . . . . . . . . . . . . . . . . . . . . . . . . . . . . . . . . . . . . . . . . . . . . . . . . . . . . . . . . . . 285
Paper is Jammed in the Output Paper Tray . . . . . . . . . . . . . . . . . . . . . . . . . . . . . . . . . . . . . . . . . . . . . . . . . . . . . . . . . . . . . . . . 286
Paper is Jammed at the Back of the Machine . . . . . . . . . . . . . . . . . . . . . . . . . . . . . . . . . . . . . . . . . . . . . . . . . . . . . . . . . . . . . 288
Paper is Jammed inside the Machine . . . . . . . . . . . . . . . . . . . . . . . . . . . . . . . . . . . . . . . . . . . . . . . . . . . . . . . . . . . . . . . . . . . . 2 90
Paper is Jammed in the 2-sided Tray . . . . . . . . . . . . . . . . . . . . . . . . . . . . . . . . . . . . . . . . . . . . . . . . . . . . . . . . . . . . . . . . . . . . . 292
Improve the Print Quality . . . . . . . . . . . . . . . . . . . . . . . . . . . . . . . . . . . . . . . . . . . . . . . . . . . . . . . . . . 295
Check the Serial Number . . . . . . . . . . . . . . . . . . . . . . . . . . . . . . . . . . . . . . . . . . . . . . . . . . . . . . . . . . . . . . . . . . . . . . . . . . . . . . . 301
Check the Firmware Version . . . . . . . . . . . . . . . . . . . . . . . . . . . . . . . . . . . . . . . . . . . . . . . . . . . . . . . . . . . . . . . . . . . . . . . . . . . . 301
Reset Functions . . . . . . . . . . . . . . . . . . . . . . . . . . . . . . . . . . . . . . . . . . . . . . . . . . . . . . . . . . . . . . . . . . . . . . . . . . . . . . . . . . . . . . . 301
How to Reset the Machine . . . . . . . . . . . . . . . . . . . . . . . . . . . . . . . . . . . . . . . . . . . . . . . . . . . . . . . . . . . . . . . . . . . . . . . . . . . . . . 302
11 Routine Maintenance . . . . . . . . . . . . . . . . . . . . . . . . . . . . . . . . . . . . . . . . . . . . . . . 307
Replace Supplies . . . . . . . . . . . . . . . . . . . . . . . . . . . . . . . . . . . . . . . . . . . . . . . . . . . . . . . . . . . . . . . . . 307
Learn About The Toner Car tridge . . . . . . . . . . . . . . . . . . . . . . . . . . . . . . . . . . . . . . . . . . . . . . . . . . . . . . . . . . . . . . . . . . . . . . . . 30 9
Replace the Toner Cartridge . . . . . . . . . . . . . . . . . . . . . . . . . . . . . . . . . . . . . . . . . . . . . . . . . . . . . . . . . . . . . . . . . . . . . . . . . . . . 3 09
Learn About The Drum Unit . . . . . . . . . . . . . . . . . . . . . . . . . . . . . . . . . . . . . . . . . . . . . . . . . . . . . . . . . . . . . . . . . . . . . . . . . . . . . .312
Replace the Drum Unit . . . . . . . . . . . . . . . . . . . . . . . . . . . . . . . . . . . . . . . . . . . . . . . . . . . . . . . . . . . . . . . . . . . . . . . . . . . . . . . . . . .313
Reset the Drum Counter . . . . . . . . . . . . . . . . . . . . . . . . . . . . . . . . . . . . . . . . . . . . . . . . . . . . . . . . . . . . . . . . . . . . . . . . . . . . . . . . .315
Clean the Machine . . . . . . . . . . . . . . . . . . . . . . . . . . . . . . . . . . . . . . . . . . . . . . . . . . . . . . . . . . . . . . . 316
Clean the Scanner . . . . . . . . . . . . . . . . . . . . . . . . . . . . . . . . . . . . . . . . . . . . . . . . . . . . . . . . . . . . . . . . . . . . . . . . . . . . . . . . . . . . . .318
Clean the Corona Wire . . . . . . . . . . . . . . . . . . . . . . . . . . . . . . . . . . . . . . . . . . . . . . . . . . . . . . . . . . . . . . . . . . . . . . . . . . . . . . . . . .318
Clean the Drum Unit . . . . . . . . . . . . . . . . . . . . . . . . . . . . . . . . . . . . . . . . . . . . . . . . . . . . . . . . . . . . . . . . . . . . . . . . . . . . . . . . . . . . 320
Clean the Paper Pick-up Rollers . . . . . . . . . . . . . . . . . . . . . . . . . . . . . . . . . . . . . . . . . . . . . . . . . . . . . . . . . . . . . . . . . . . . . . . . . 324
Check the Remaining Life of Parts . . . . . . . . . . . . . . . . . . . . . . . . . . . . . . . . . . . . . . . . . . . . . . . . . . 325
Pack and Ship Your Dell Machine . . . . . . . . . . . . . . . . . . . . . . . . . . . . . . . . . . . . . . . . . . . . . . . . . . 325
12 Machine Settings . . . . . . . . . . . . . . . . . . . . . . . . . . . . . . . . . . . . . . . . . . . . . . . . . . 331
General Settings . . . . . . . . . . . . . . . . . . . . . . . . . . . . . . . . . . . . . . . . . . . . . . . . . . . . . . . . . . . . . . . . . 331
Change the Default Mode . . . . . . . . . . . . . . . . . . . . . . . . . . . . . . . . . . . . . . . . . . . . . . . . . . . . . . . . . . . . . . . . . . . . . . . . . . . . . . . 332
Set the Mode Timer . . . . . . . . . . . . . . . . . . . . . . . . . . . . . . . . . . . . . . . . . . . . . . . . . . . . . . . . . . . . . . . . . . . . . . . . . . . . . . . . . . . . 332
Adjust the Machine Volume . . . . . . . . . . . . . . . . . . . . . . . . . . . . . . . . . . . . . . . . . . . . . . . . . . . . . . . . . . . . . . . . . . . . . . . . . . . . . 33 3
15Contents
Page 16

Adjust the Ring Volume . . . . . . . . . . . . . . . . . . . . . . . . . . . . . . . . . . . . . . . . . . . . . . . . . . . . . . . . . . . . . . . . . . . . . . . . . . . . . . 333
Adjust the Beeper Volume . . . . . . . . . . . . . . . . . . . . . . . . . . . . . . . . . . . . . . . . . . . . . . . . . . . . . . . . . . . . . . . . . . . . . . . . . . . 333
Adjust the Speaker Volume . . . . . . . . . . . . . . . . . . . . . . . . . . . . . . . . . . . . . . . . . . . . . . . . . . . . . . . . . . . . . . . . . . . . . . . . . . . 334
Change for Daylight Saving Time Automatically . . . . . . . . . . . . . . . . . . . . . . . . . . . . . . . . . . . . . . . . . . . . . . . . . . . . . . . . . . . 334
Set the Sleep Mode Countdown . . . . . . . . . . . . . . . . . . . . . . . . . . . . . . . . . . . . . . . . . . . . . . . . . . . . . . . . . . . . . . . . . . . . . . . . . 33 4
About Deep Sleep Mode . . . . . . . . . . . . . . . . . . . . . . . . . . . . . . . . . . . . . . . . . . . . . . . . . . . . . . . . . . . . . . . . . . . . . . . . . . . . . . . . 335
Set Auto Power Of f Mode . . . . . . . . . . . . . . . . . . . . . . . . . . . . . . . . . . . . . . . . . . . . . . . . . . . . . . . . . . . . . . . . . . . . . . . . . . . . . . . 335
Set the Date and Time . . . . . . . . . . . . . . . . . . . . . . . . . . . . . . . . . . . . . . . . . . . . . . . . . . . . . . . . . . . . . . . . . . . . . . . . . . . . . . . . . . 335
Set the Time Zone . . . . . . . . . . . . . . . . . . . . . . . . . . . . . . . . . . . . . . . . . . . . . . . . . . . . . . . . . . . . . . . . . . . . . . . . . . . . . . . . . . . . . . 336
Adjust the LCD Contrast . . . . . . . . . . . . . . . . . . . . . . . . . . . . . . . . . . . . . . . . . . . . . . . . . . . . . . . . . . . . . . . . . . . . . . . . . . . . . . . . 3 36
Reduce Toner Consumption . . . . . . . . . . . . . . . . . . . . . . . . . . . . . . . . . . . . . . . . . . . . . . . . . . . . . . . . . . . . . . . . . . . . . . . . . . . . . 337
Set the Continue Mode . . . . . . . . . . . . . . . . . . . . . . . . . . . . . . . . . . . . . . . . . . . . . . . . . . . . . . . . . . . . . . . . . . . . . . . . . . . . . . . . . 337
Learn About the Receiving faxes in Continue Mode . . . . . . . . . . . . . . . . . . . . . . . . . . . . . . . . . . . . . . . . . . . . . . . . . . . . . . . 338
Set Your Station ID . . . . . . . . . . . . . . . . . . . . . . . . . . . . . . . . . . . . . . . . . . . . . . . . . . . . . . . . . . . . . . . . . . . . . . . . . . . . . . . . . . . . . 338
Set Tone or Pulse Dialing Mode . . . . . . . . . . . . . . . . . . . . . . . . . . . . . . . . . . . . . . . . . . . . . . . . . . . . . . . . . . . . . . . . . . . . . . . . . 339
Add a Prefix to Ever y Fax Number . . . . . . . . . . . . . . . . . . . . . . . . . . . . . . . . . . . . . . . . . . . . . . . . . . . . . . . . . . . . . . . . . . . . . . . 339
Prevent Dialing a Wrong Number (Dial Restriction) . . . . . . . . . . . . . . . . . . . . . . . . . . . . . . . . . . . . . . . . . . . . . . . . . . . . . . . . 339
Set Quiet Mode . . . . . . . . . . . . . . . . . . . . . . . . . . . . . . . . . . . . . . . . . . . . . . . . . . . . . . . . . . . . . . . . . . . . . . . . . . . . . . . . . . . . . . . . 340
In the Event of Power Failure (Memory Storage) . . . . . . . . . . . . . . . . . . . . . . . . . . . . . . . . . . . . . . . . . . . . . . . . . . . . . . . . . . 3 40
Change the Language on the LCD . . . . . . . . . . . . . . . . . . . . . . . . . . . . . . . . . . . . . . . . . . . . . . . . . . . . . . . . . . . . . . . . . . . . . . . . 34 0
Dell E514dw . . . . . . . . . . . . . . . . . . . . . . . . . . . . . . . . . . . . . . . . . . . . . . . . . . . . . . . . . . . . . . . . . . . . . . . . . . . . . . . . . . . . . . . . 3 41
Dell E515dn/Dell E515dw . . . . . . . . . . . . . . . . . . . . . . . . . . . . . . . . . . . . . . . . . . . . . . . . . . . . . . . . . . . . . . . . . . . . . . . . . . . . . 3 41
Print Reports . . . . . . . . . . . . . . . . . . . . . . . . . . . . . . . . . . . . . . . . . . . . . . . . . . . . . . . . . . . . . . . . . . . . 341
Reports . . . . . . . . . . . . . . . . . . . . . . . . . . . . . . . . . . . . . . . . . . . . . . . . . . . . . . . . . . . . . . . . . . . . . . . . . . . . . . . . . . . . . . . . . . . . . . . 341
Print a Repor t . . . . . . . . . . . . . . . . . . . . . . . . . . . . . . . . . . . . . . . . . . . . . . . . . . . . . . . . . . . . . . . . . . . . . . . . . . . . . . . . . . . . . . . . . 342
Settings and Features Tables . . . . . . . . . . . . . . . . . . . . . . . . . . . . . . . . . . . . . . . . . . . . . . . . . . . . . . 342
Set tings Tables (Dell E515dn/Dell E515dw) . . . . . . . . . . . . . . . . . . . . . . . . . . . . . . . . . . . . . . . . . . . . . . . . . . . . . . . . . . . . . . . 342
General Setup . . . . . . . . . . . . . . . . . . . . . . . . . . . . . . . . . . . . . . . . . . . . . . . . . . . . . . . . . . . . . . . . . . . . . . . . . . . . . . . . . . . . . . 3 42
Fax . . . . . . . . . . . . . . . . . . . . . . . . . . . . . . . . . . . . . . . . . . . . . . . . . . . . . . . . . . . . . . . . . . . . . . . . . . . . . . . . . . . . . . . . . . . . . . . . 3 43
Printer . . . . . . . . . . . . . . . . . . . . . . . . . . . . . . . . . . . . . . . . . . . . . . . . . . . . . . . . . . . . . . . . . . . . . . . . . . . . . . . . . . . . . . . . . . . . . 3 45
16 Contents
Page 17

Print Repor ts . . . . . . . . . . . . . . . . . . . . . . . . . . . . . . . . . . . . . . . . . . . . . . . . . . . . . . . . . . . . . . . . . . . . . . . . . . . . . . . . . . . . . . . 3 45
Network . . . . . . . . . . . . . . . . . . . . . . . . . . . . . . . . . . . . . . . . . . . . . . . . . . . . . . . . . . . . . . . . . . . . . . . . . . . . . . . . . . . . . . . . . . . 346
For Dell E515dw . . . . . . . . . . . . . . . . . . . . . . . . . . . . . . . . . . . . . . . . . . . . . . . . . . . . . . . . . . . . . . . . . . . . . . . . . . . . . . . . . . . . 346
For Dell E515dn . . . . . . . . . . . . . . . . . . . . . . . . . . . . . . . . . . . . . . . . . . . . . . . . . . . . . . . . . . . . . . . . . . . . . . . . . . . . . . . . . . . . . 34 8
Machine Info. . . . . . . . . . . . . . . . . . . . . . . . . . . . . . . . . . . . . . . . . . . . . . . . . . . . . . . . . . . . . . . . . . . . . . . . . . . . . . . . . . . . . . . . 3 48
Set tings Tables (Dell E514dw) . . . . . . . . . . . . . . . . . . . . . . . . . . . . . . . . . . . . . . . . . . . . . . . . . . . . . . . . . . . . . . . . . . . . . . . . . . . 34 9
General Setup . . . . . . . . . . . . . . . . . . . . . . . . . . . . . . . . . . . . . . . . . . . . . . . . . . . . . . . . . . . . . . . . . . . . . . . . . . . . . . . . . . . . . . 349
Copy . . . . . . . . . . . . . . . . . . . . . . . . . . . . . . . . . . . . . . . . . . . . . . . . . . . . . . . . . . . . . . . . . . . . . . . . . . . . . . . . . . . . . . . . . . . . . . . 349
For wired and wireless network models . . . . . . . . . . . . . . . . . . . . . . . . . . . . . . . . . . . . . . . . . . . . . . . . . . . . . . . . . . . . . . 351
Machine Info. . . . . . . . . . . . . . . . . . . . . . . . . . . . . . . . . . . . . . . . . . . . . . . . . . . . . . . . . . . . . . . . . . . . . . . . . . . . . . . . . . . . . . . . 353
Appendix . . . . . . . . . . . . . . . . . . . . . . . . . . . . . . . . . . . . . . . . . . . . . . . . . . . . . . . . . . . . 357
Specifications . . . . . . . . . . . . . . . . . . . . . . . . . . . . . . . . . . . . . . . . . . . . . . . . . . . . . . . . . . . . . . . . . . . 357
General Specifications . . . . . . . . . . . . . . . . . . . . . . . . . . . . . . . . . . . . . . . . . . . . . . . . . . . . . . . . . . . . . . . . . . . . . . . . . . . . . . . . . 357
Document Size Specification . . . . . . . . . . . . . . . . . . . . . . . . . . . . . . . . . . . . . . . . . . . . . . . . . . . . . . . . . . . . . . . . . . . . . . . . . . . . 358
Fax Specifications . . . . . . . . . . . . . . . . . . . . . . . . . . . . . . . . . . . . . . . . . . . . . . . . . . . . . . . . . . . . . . . . . . . . . . . . . . . . . . . . . . . . . 3 59
Copy Specification . . . . . . . . . . . . . . . . . . . . . . . . . . . . . . . . . . . . . . . . . . . . . . . . . . . . . . . . . . . . . . . . . . . . . . . . . . . . . . . . . . . . . 360
Scanner Specifications . . . . . . . . . . . . . . . . . . . . . . . . . . . . . . . . . . . . . . . . . . . . . . . . . . . . . . . . . . . . . . . . . . . . . . . . . . . . . . . . . 360
Printer Specifications . . . . . . . . . . . . . . . . . . . . . . . . . . . . . . . . . . . . . . . . . . . . . . . . . . . . . . . . . . . . . . . . . . . . . . . . . . . . . . . . . . 36 0
Interface Specifications . . . . . . . . . . . . . . . . . . . . . . . . . . . . . . . . . . . . . . . . . . . . . . . . . . . . . . . . . . . . . . . . . . . . . . . . . . . . . . . . 360
Suppor ted Protocols and Security Features . . . . . . . . . . . . . . . . . . . . . . . . . . . . . . . . . . . . . . . . . . . . . . . . . . . . . . . . . . . . . . 361
Computer Requirements Specifications . . . . . . . . . . . . . . . . . . . . . . . . . . . . . . . . . . . . . . . . . . . . . . . . . . . . . . . . . . . . . . . . . . 361
How to Enter Text on Your Dell Machine . . . . . . . . . . . . . . . . . . . . . . . . . . . . . . . . . . . . . . . . . . . . 362
Dell E514dw . . . . . . . . . . . . . . . . . . . . . . . . . . . . . . . . . . . . . . . . . . . . . . . . . . . . . . . . . . . . . . . . . . . . . . . . . . . . . . . . . . . . . . . . . . . 362
Dell E515dn/Dell E515dw . . . . . . . . . . . . . . . . . . . . . . . . . . . . . . . . . . . . . . . . . . . . . . . . . . . . . . . . . . . . . . . . . . . . . . . . . . . . . . . . 363
Environmental Information Notice . . . . . . . . . . . . . . . . . . . . . . . . . . . . . . . . . . . . . . . . . . . . . . . . . . 364
Dell Technical Support Policy . . . . . . . . . . . . . . . . . . . . . . . . . . . . . . . . . . . . . . . . . . . . . . . . . . . . . . 364
Warranty and Return Policy . . . . . . . . . . . . . . . . . . . . . . . . . . . . . . . . . . . . . . . . . . . . . . . . . . . . . . . 365
Contacting Dell . . . . . . . . . . . . . . . . . . . . . . . . . . . . . . . . . . . . . . . . . . . . . . . . . . . . . . . . . . . . . . . . . . 365
Additional documents for Important Information . . . . . . . . . . . . . . . . . . . . . . . . . . . . . . . . . . . . . 367
SAFETY: Laser Printer . . . . . . . . . . . . . . . . . . . . . . . . . . . . . . . . . . . . . . . . . . . . . . . . . . . . . . . . . . . . . . . . . . . . . . . . . . . . . . . . . . 367
17Contents
Page 18

SAFETY: General Safety . . . . . . . . . . . . . . . . . . . . . . . . . . . . . . . . . . . . . . . . . . . . . . . . . . . . . . . . . . . . . . . . . . . . . . . . . . . . . . . . 367
FCC Part 68 comment, . . . . . . . . . . . . . . . . . . . . . . . . . . . . . . . . . . . . . . . . . . . . . . . . . . . . . . . . . . . . . . . . . . . . . . . . . . . . . . . . . . 367
Information regarding recycled paper . . . . . . . . . . . . . . . . . . . . . . . . . . . . . . . . . . . . . . . . . . . . . . . . . . . . . . . . . . . . . . . . . . . 367
Requisite for R&TTE . . . . . . . . . . . . . . . . . . . . . . . . . . . . . . . . . . . . . . . . . . . . . . . . . . . . . . . . . . . . . . . . . . . . . . . . . . . . . . . . . . . 367
Additional information for installation . . . . . . . . . . . . . . . . . . . . . . . . . . . . . . . . . . . . . . . . . . . . . . . . . . . . . . . . . . . . . . . . . . . . 368
Printing With Mopria ™ . . . . . . . . . . . . . . . . . . . . . . . . . . . . . . . . . . . . . . . . . . . . . . . . . . . . . . . . . . . 368
Glossary . . . . . . . . . . . . . . . . . . . . . . . . . . . . . . . . . . . . . . . . . . . . . . . . . . . . . . . . . . . . . 371
A . . . . . . . . . . . . . . . . . . . . . . . . . . . . . . . . . . . . . . . . . . . . . . . . . . . . . . . . . . . . . . . . . . . . . . . . . . . . . . . . . . . . . . . . . . . . . . . . . . . . . 371
B . . . . . . . . . . . . . . . . . . . . . . . . . . . . . . . . . . . . . . . . . . . . . . . . . . . . . . . . . . . . . . . . . . . . . . . . . . . . . . . . . . . . . . . . . . . . . . . . . . . . . 372
C . . . . . . . . . . . . . . . . . . . . . . . . . . . . . . . . . . . . . . . . . . . . . . . . . . . . . . . . . . . . . . . . . . . . . . . . . . . . . . . . . . . . . . . . . . . . . . . . . . . . . 372
D . . . . . . . . . . . . . . . . . . . . . . . . . . . . . . . . . . . . . . . . . . . . . . . . . . . . . . . . . . . . . . . . . . . . . . . . . . . . . . . . . . . . . . . . . . . . . . . . . . . . . 373
E . . . . . . . . . . . . . . . . . . . . . . . . . . . . . . . . . . . . . . . . . . . . . . . . . . . . . . . . . . . . . . . . . . . . . . . . . . . . . . . . . . . . . . . . . . . . . . . . . . . . . 373
F . . . . . . . . . . . . . . . . . . . . . . . . . . . . . . . . . . . . . . . . . . . . . . . . . . . . . . . . . . . . . . . . . . . . . . . . . . . . . . . . . . . . . . . . . . . . . . . . . . . . . .374
G . . . . . . . . . . . . . . . . . . . . . . . . . . . . . . . . . . . . . . . . . . . . . . . . . . . . . . . . . . . . . . . . . . . . . . . . . . . . . . . . . . . . . . . . . . . . . . . . . . . . . 375
H . . . . . . . . . . . . . . . . . . . . . . . . . . . . . . . . . . . . . . . . . . . . . . . . . . . . . . . . . . . . . . . . . . . . . . . . . . . . . . . . . . . . . . . . . . . . . . . . . . . . . 375
I . . . . . . . . . . . . . . . . . . . . . . . . . . . . . . . . . . . . . . . . . . . . . . . . . . . . . . . . . . . . . . . . . . . . . . . . . . . . . . . . . . . . . . . . . . . . . . . . . . . . . . 375
J . . . . . . . . . . . . . . . . . . . . . . . . . . . . . . . . . . . . . . . . . . . . . . . . . . . . . . . . . . . . . . . . . . . . . . . . . . . . . . . . . . . . . . . . . . . . . . . . . . . . . 376
L . . . . . . . . . . . . . . . . . . . . . . . . . . . . . . . . . . . . . . . . . . . . . . . . . . . . . . . . . . . . . . . . . . . . . . . . . . . . . . . . . . . . . . . . . . . . . . . . . . . . . 376
M . . . . . . . . . . . . . . . . . . . . . . . . . . . . . . . . . . . . . . . . . . . . . . . . . . . . . . . . . . . . . . . . . . . . . . . . . . . . . . . . . . . . . . . . . . . . . . . . . . . . 376
N . . . . . . . . . . . . . . . . . . . . . . . . . . . . . . . . . . . . . . . . . . . . . . . . . . . . . . . . . . . . . . . . . . . . . . . . . . . . . . . . . . . . . . . . . . . . . . . . . . . . . 377
O . . . . . . . . . . . . . . . . . . . . . . . . . . . . . . . . . . . . . . . . . . . . . . . . . . . . . . . . . . . . . . . . . . . . . . . . . . . . . . . . . . . . . . . . . . . . . . . . . . . . . 378
P . . . . . . . . . . . . . . . . . . . . . . . . . . . . . . . . . . . . . . . . . . . . . . . . . . . . . . . . . . . . . . . . . . . . . . . . . . . . . . . . . . . . . . . . . . . . . . . . . . . . . 378
R . . . . . . . . . . . . . . . . . . . . . . . . . . . . . . . . . . . . . . . . . . . . . . . . . . . . . . . . . . . . . . . . . . . . . . . . . . . . . . . . . . . . . . . . . . . . . . . . . . . . . 378
S . . . . . . . . . . . . . . . . . . . . . . . . . . . . . . . . . . . . . . . . . . . . . . . . . . . . . . . . . . . . . . . . . . . . . . . . . . . . . . . . . . . . . . . . . . . . . . . . . . . . . 379
T . . . . . . . . . . . . . . . . . . . . . . . . . . . . . . . . . . . . . . . . . . . . . . . . . . . . . . . . . . . . . . . . . . . . . . . . . . . . . . . . . . . . . . . . . . . . . . . . . . . . . 380
U . . . . . . . . . . . . . . . . . . . . . . . . . . . . . . . . . . . . . . . . . . . . . . . . . . . . . . . . . . . . . . . . . . . . . . . . . . . . . . . . . . . . . . . . . . . . . . . . . . . . . 381
V . . . . . . . . . . . . . . . . . . . . . . . . . . . . . . . . . . . . . . . . . . . . . . . . . . . . . . . . . . . . . . . . . . . . . . . . . . . . . . . . . . . . . . . . . . . . . . . . . . . . . 3 81
W . . . . . . . . . . . . . . . . . . . . . . . . . . . . . . . . . . . . . . . . . . . . . . . . . . . . . . . . . . . . . . . . . . . . . . . . . . . . . . . . . . . . . . . . . . . . . . . . . . . . 381
X . . . . . . . . . . . . . . . . . . . . . . . . . . . . . . . . . . . . . . . . . . . . . . . . . . . . . . . . . . . . . . . . . . . . . . . . . . . . . . . . . . . . . . . . . . . . . . . . . . . . . 382
INDEX . . . . . . . . . . . . . . . . . . . . . . . . . . . . . . . . . . . . . . . . . . . . . . . . . . . . . . . . . . . . . . . . . . . . . . . . . . 383
18 Contents
Page 19

Before You Use Your Dell Machine . . . . . . . . . . . . . . . . . . . . . . . . . . . . . . . . . . . . . . . 21
Applicable Models . . . . . . . . . . . . . . . . . . . . . . . . . . . . . . . . . . . . . . . . . . . . . . . . . . . . . . . . . . . . . . . . 21
Definitions of Notes . . . . . . . . . . . . . . . . . . . . . . . . . . . . . . . . . . . . . . . . . . . . . . . . . . . . . . . . . . . . . . . 21
Important Note . . . . . . . . . . . . . . . . . . . . . . . . . . . . . . . . . . . . . . . . . . . . . . . . . . . . . . . . . . . . . . . . . . . 22
19
Page 20

20
Page 21
Before You Use Your Dell Machine
• Applicable Models
• Definitions of Notes
• Important Note
Applicable Models
This User's Guide applies to the following models:
Dell Multifunction Printer | E515dw
Dell Multifunction Printer | E515dn
Dell Multifunction Printer | E514dw
Definitions of Notes
We use the following symbols and conventions throughout this User's Guide:
WARNING
CAUTION
IMPORTANT
NOTE
Bold
WARNING indicates a potentially hazardous situation which, if not avoided, could
result in death or serious injuries.
CAUTION indicates a potentially hazardous situation which, if not avoided, may result
in minor or moderate injuries.
IMPORTANT indicates a potentially hazardous situation which, if not avoided, may
result in damage to property or loss of product functionality.
NOTE specifies the operating environment, conditions for installation, or special
conditions of use.
Tips icons provide helpful hints and supplementary information.
Electrical Hazard icons alert you to possible electrical shock.
Fire Hazard icons alert you to the possibility of a fire.
Hot Surface icons warn you not to touch hot machine parts.
Prohibition icons indicate actions you must not perform.
Bold style identifies buttons on the machine's control panel or computer screen.
Italics
Courier New
Italicized style emphasizes an important point or refers you to a related topic.
Courier New font identifies messages shown on the machine's LCD.
21Before You Use Your Dell Machine
Page 22

Important Note
• This product is approved for use in the country of purchase only. Do not use this product outside the country of
purchase as it may violate the wireless telecommunication and power regulations of that country.
• Windows Server® 2003 in this document represents Windows Server® 2003, Windows Server® 2003 x64 Edition,
Windows Server® 2003 R2 and Windows Server® 2003 R2 x64 Edition.
• Windows Server® 2008 in this document represents Windows Server® 2008 and Windows Server® 2008 R2.
• In this User's Guide, the LCD messages of the Dell E515dw is used unless otherwise specified.
• In this User's Guide, the illustrations of the Dell E515dw is used unless otherwise specified.
• Unless otherwise specified, the screens in this manual are from Windows® 7 and OS X v10.8.x. Screens on your
computer may vary depending on your operating system.
• If the LCD messages, control panel key names, and other indications are different depending on the country, the
indications for each country will be shown.
• The contents of this guide and the specifications of this product are subject to change without notice.
• Locate this product in a well-ventilated area. Do not obstruct ventilation openings of the product. Keep the
minimum clearance as follows for ventilation and an access to the power plug. Unplug the product if an abnormal
condition is noted.
• Ventilate well during extended operation or mass copying. It may affect the office air environment due to
odor such as ozone in a poorly ventilated room. Provide proper ventilation to ensure the comfortable and safe
environment.
• Connect this product to the LAN connection which is not subjected to over voltages.
• IT Power system (For Norway Only)
This product is also designed for IT power system with phase to phase voltage 230V.
22 Before You Use Your Dell Machine
Page 23

Introduction to Your Dell Machine . . . . . . . . . . . . . . . . . . . . . . . . . . . . . . . . . . . . . . . 25
Control Panel Overview . . . . . . . . . . . . . . . . . . . . . . . . . . . . . . . . . . . . . . . . . . . . . . . . . . . . . . . . . . . . 25
Dell E515dn/Dell E515dw . . . . . . . . . . . . . . . . . . . . . . . . . . . . . . . . . . . . . . . . . . . . . . . . . . . . . . . . . . . . . . . . . . . . . . . . . . . . . . . . . .25
Dell E514dw . . . . . . . . . . . . . . . . . . . . . . . . . . . . . . . . . . . . . . . . . . . . . . . . . . . . . . . . . . . . . . . . . . . . . . . . . . . . . . . . . . . . . . . . . . . . .28
Dell Printer Hub (Windows® Only) . . . . . . . . . . . . . . . . . . . . . . . . . . . . . . . . . . . . . . . . . . . . . . . . . . . 30
23
Page 24

24
Page 25

Introduction to Your Dell Machine
• Control Panel Overview
• Dell Printer Hub (Windows® Only)
Control Panel Overview
The control panel will vary depending on your model.
Dell E515dn/Dell E515dw
Dell E514dw
Dell E515dn/Dell E515dw
1
1. One Touch buttons
Store and recall up to eight fax and telephone numbers.
To access stored One Touch fax and telephone numbers 1-4, press the One Touch button assigned to that
number. To access stored One Touch fax and telephone numbers 5-8, hold down (Shift) as you press the number.
2. Fax buttons
(Redial/Pause)
Press to dial the last numbers you called. This button also inserts a pause when programming quick dial numbers
or when dialing a number manually.
(Hook)
Press Hook before dialing to ensure a fax machine answers, and then press
If the machine is in Fax/Tel (F/T) Mode and you pick up the handset of an external telephone during the F/T
ring (pseudo double-rings), press Hook to talk.
3. Wi-Fi (for Dell E515dw)
Press the Wi-Fi button and launch the wireless installer on your computer. Follow the on-screen instructions to
set up a wireless connection between your machine and your network.
When the Wi-Fi light is on, your Dell machine is connected to a wireless access point. When the Wi-Fi light
blinks, the wireless connection is down, or your machine is in the process of connecting to a wireless access point.
While Wi-Fi is on, if you push the Wi-Fi button, the wireless connection is down.
(Start).
25Introduction to Your Dell Machine
Page 26

Resolution (for Dell E515dn)
Press to change the Fax resolution.
4. Liquid Crystal Display (LCD)
Displays messages to help you set up and use the machine.
If the machine is in Fax Mode, the LCD displays:
a. Date & Time
b. Receive Mode
When you press Copy, the LCD displays:
c. Type of copy
d. Number of copies
e. Quality
f. Contrast
g. Copy ratio
5. Mode buttons
(Fax)
Press to switch the machine to FAX Mode.
(Scan)
Press to switch the machine to SCAN Mode.
(Copy)
Press to switch the machine to COPY Mode.
6. Copy buttons
(Options)
Press to access temporary settings for copying.
(ID Copy)
Press to copy both sides of an identification card onto a single page.
26 Introduction to Your Dell Machine
Page 27
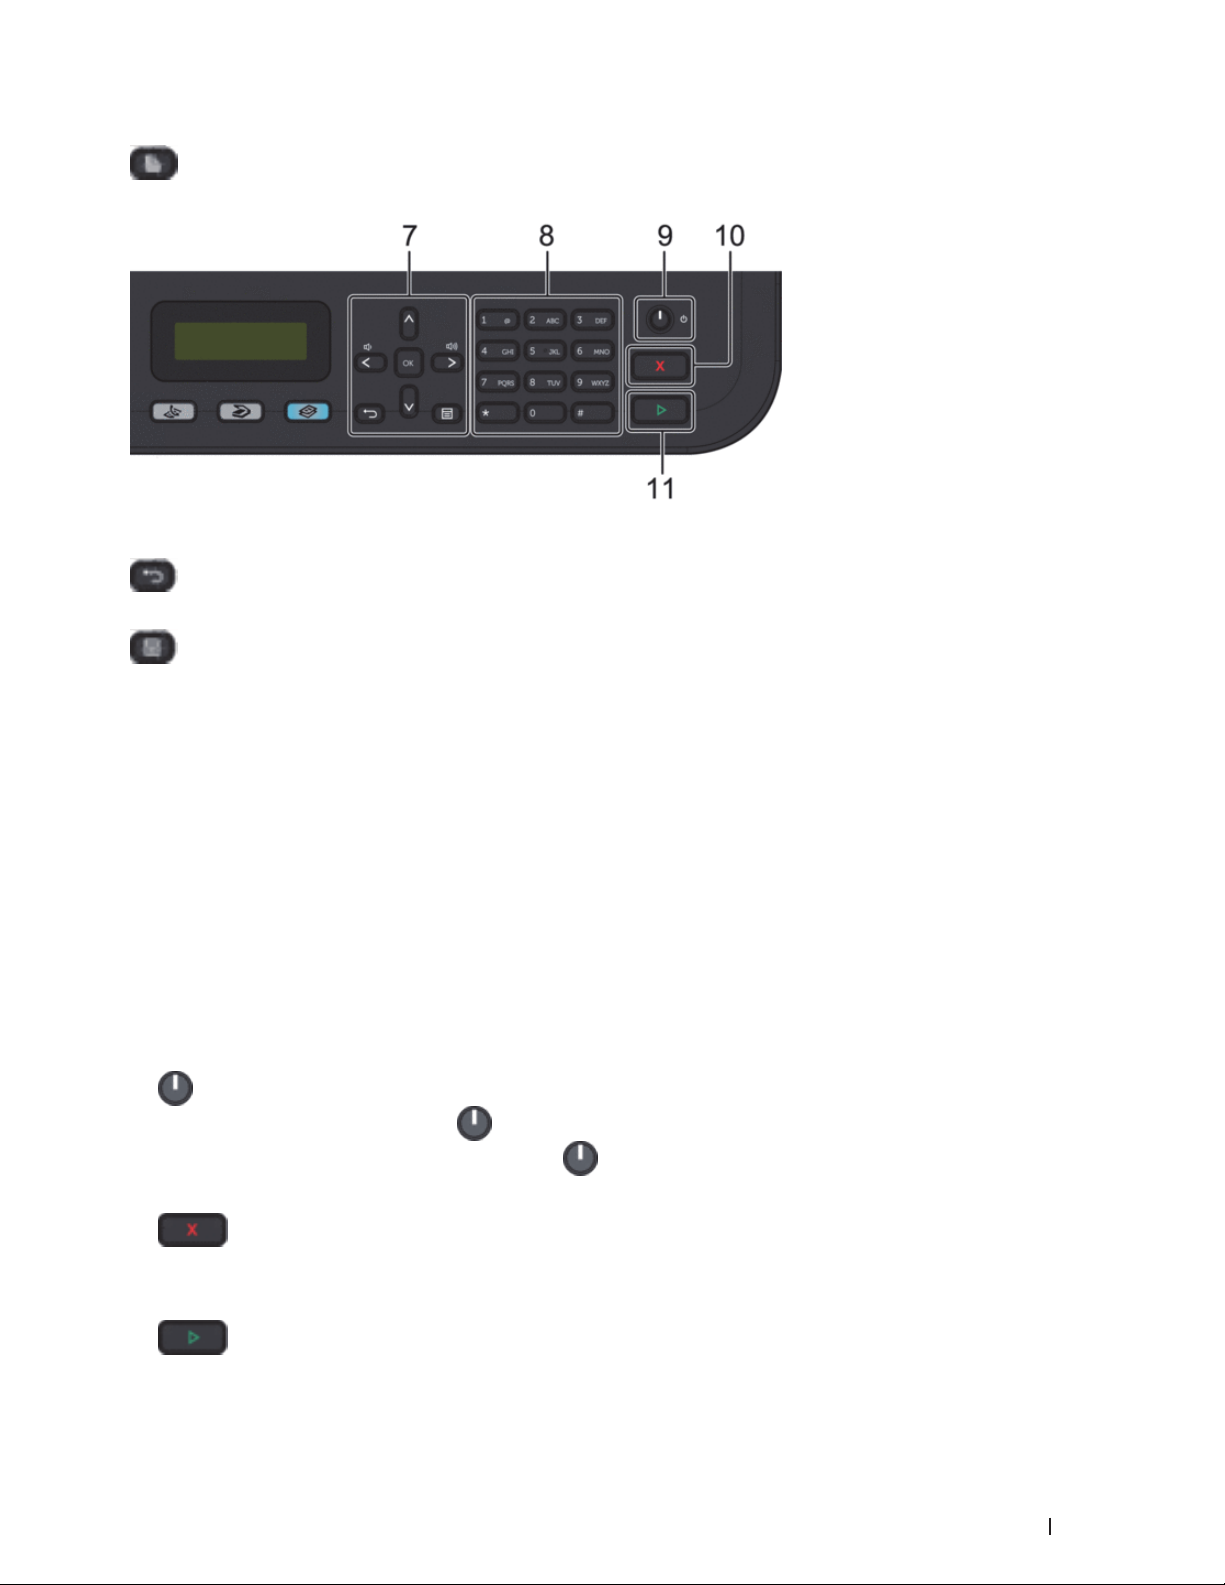
(2-sided)
Press to copy on both sides of a sheet of paper.
7. Menu buttons
(Clear)
Press to delete entered data or cancel the current setting.
(Menu)
Press to access the Menu for programming your machine settings.
OK
Press to store your machine settings.
or
Press to scroll back or forward through menu selections.
p or q
• Press to scroll up or down through menus and options.
• Press to change the resolution in Fax Mode.
p
Press p to access speed dial numbers.
8. Dial Pad
• Use to dial fax and telephone numbers.
• Use as a keyboard to enter text or characters.
9.
10.
11.
Power On/Off
• Turn on the machine by pressing .
• Turn off the machine by pressing and holding . The LCD displays Shutting Down and stays on for a
few seconds before turning off. If you have an external telephone or TAD connected, it is always available.
(Cancel)
• Press to stop an operation.
• Press to exit from a menu.
(Start)
• Press to start sending faxes.
27Introduction to Your Dell Machine
Page 28
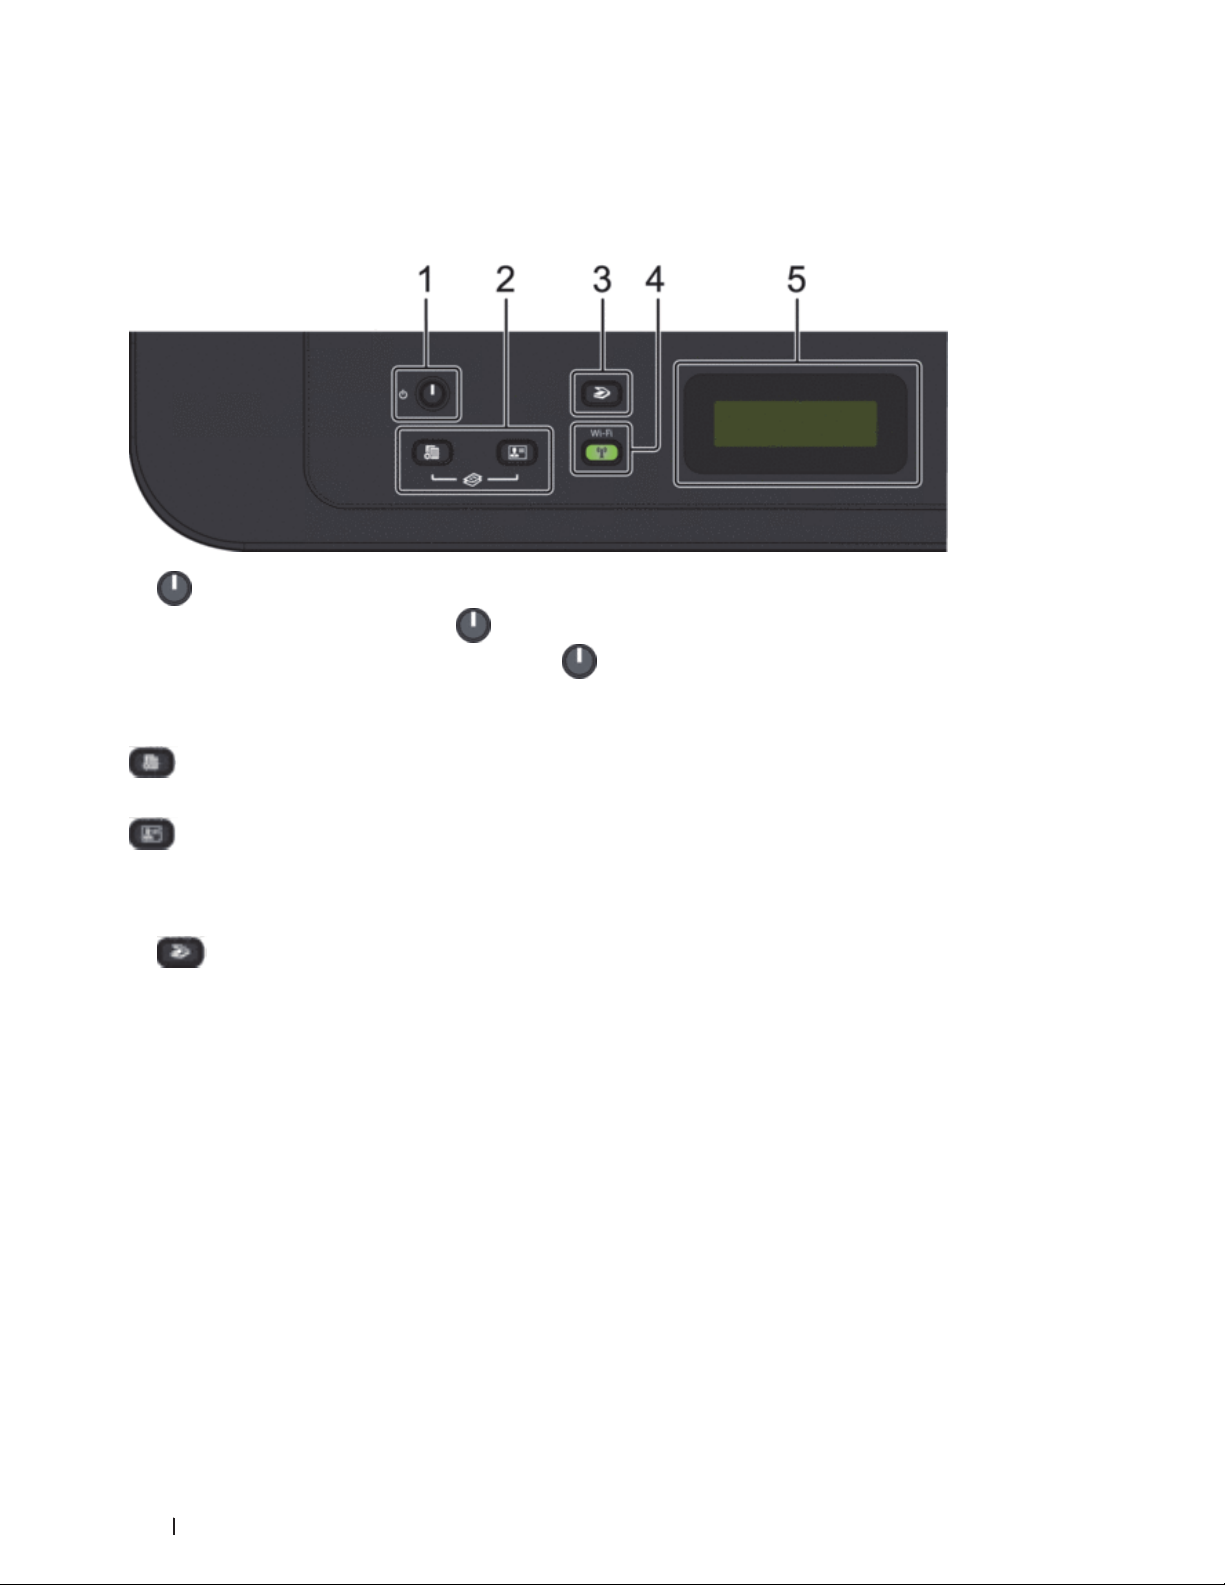
• Press to start copying.
• Press to start scanning documents.
Dell E514dw
1.
2. Copy buttons
NOTE: Two functions are assigned to one button on some models.
3.
4. Wi-Fi
Power On/Off
• Turn on the machine by pressing
• Turn off the machine by pressing and holding
few seconds before turning off.
(Options)
Press to access temporary settings for copying.
(ID Copy)
Press to copy both sides of an identification card onto a single page.
(Scan)
Press to switch the machine to Scan Mode.
Press the Wi-Fi button and launch the wireless installer on your computer. Follow the on-screen instructions to
set up a wireless connection between your machine and your network.
When the Wi-Fi light is on, your Dell machine is connected to a wireless access point. When the Wi-Fi light
blinks, the wireless connection is down, or your machine is in the process of connecting to a wireless access point.
.
. The LCD displays Shutting Down and stays on for a
5. Liquid Crystal Display (LCD)
Displays messages to help you set up and use the machine.
If the machine is in Ready Mode or COPY Mode, the LCD displays:
28 Introduction to Your Dell Machine
Page 29
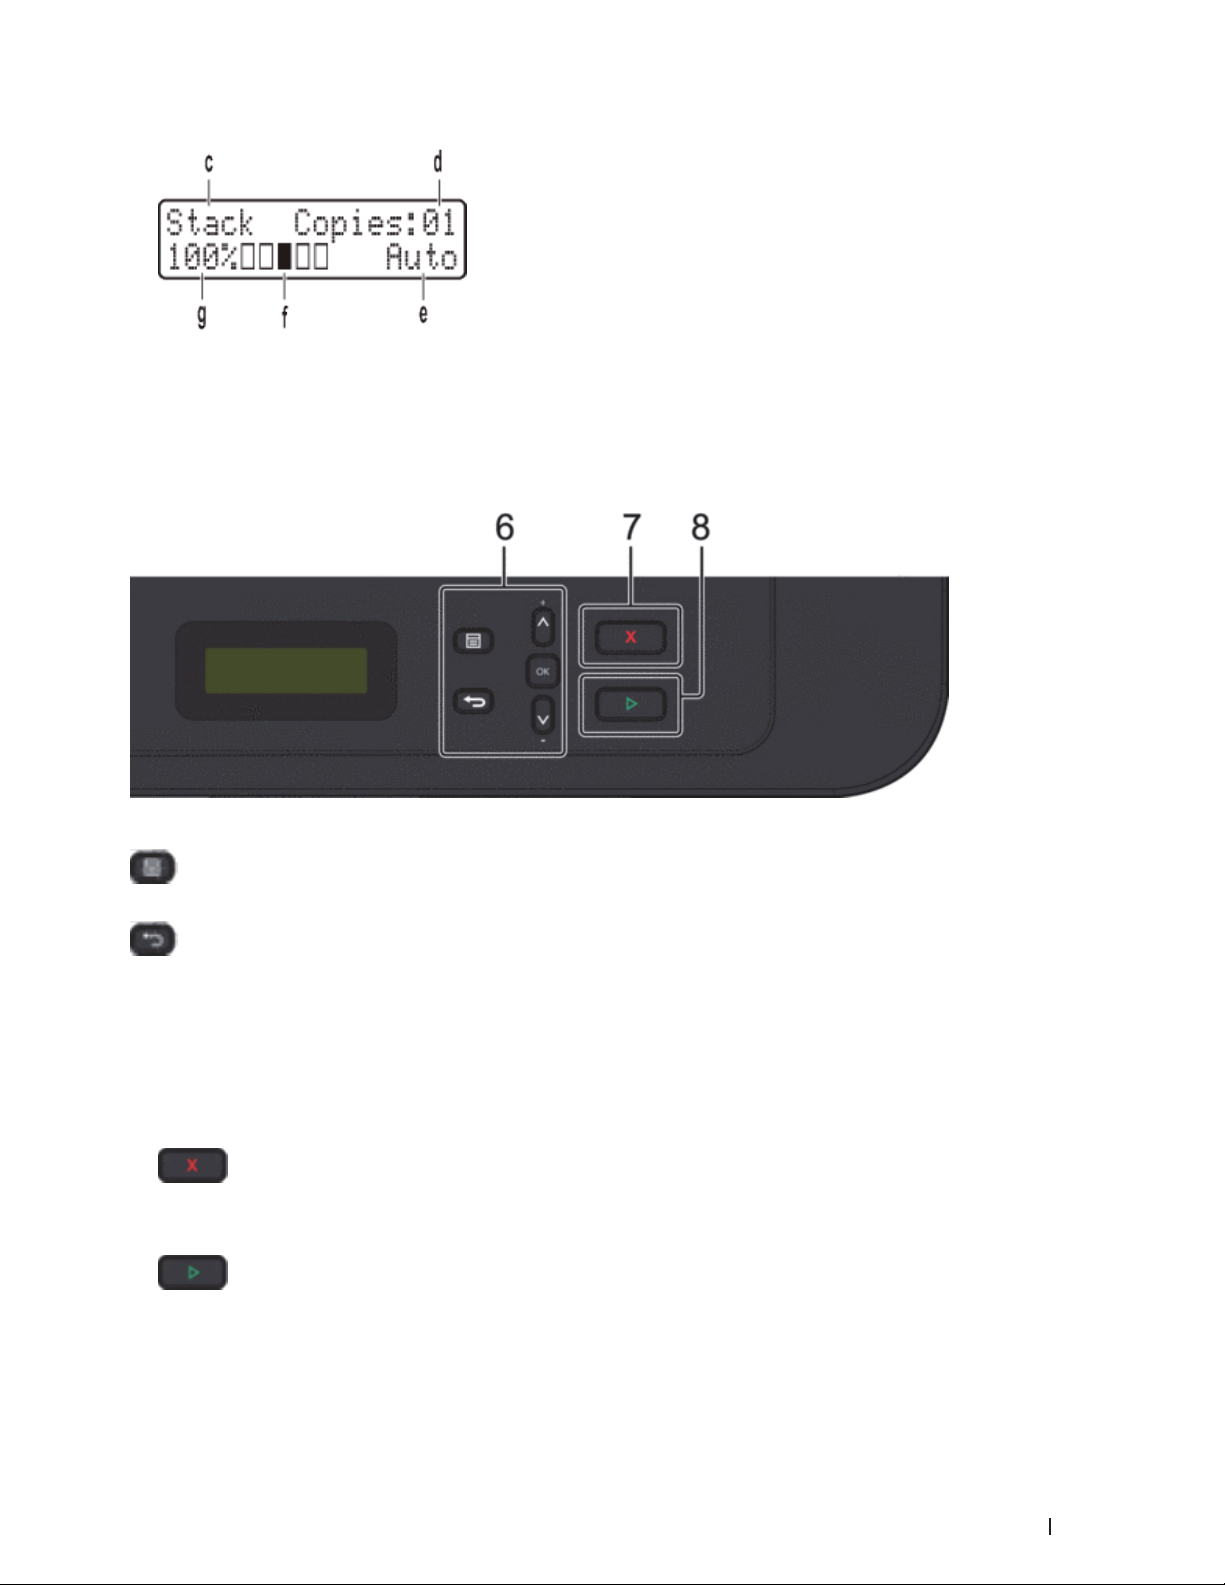
a. Type of copy
b. Number of copies
c. Quality
d. Contrast
e. Copy ratio
6. Menu buttons
(Menu)
Press to access the Menu for programming your machine settings.
(Clear)
• Press to delete entered data.
• Press to cancel the current setting.
OK
Press to store your machine setting.
p or q
Press to scroll up or down through menus and options.
7.
• Press to stop an operation.
• Press to exit from a menu.
8.
• Press to start copying.
• Press to start scanning documents.
(Cancel)
(Start)
29Introduction to Your Dell Machine
Page 30

Dell Printer Hub (Windows® Only)
This software allows you to share, print, scan, and store digital documents with cloud services. It also notifies you
of the firmware/software updates, printer status and toner level. For more information, open the program and click
on the top right of the main window to see the FAQs.
30 Introduction to Your Dell Machine
Page 31

Paper Handling . . . . . . . . . . . . . . . . . . . . . . . . . . . . . . . . . . . . . . . . . . . . . . . . . . . . . . . . 33
Load Paper . . . . . . . . . . . . . . . . . . . . . . . . . . . . . . . . . . . . . . . . . . . . . . . . . . . . . . . . . . . . . . . . . . . . . . . 33
Paper Settings . . . . . . . . . . . . . . . . . . . . . . . . . . . . . . . . . . . . . . . . . . . . . . . . . . . . . . . . . . . . . . . . . . . . 42
Unscannable and Unprintable Areas . . . . . . . . . . . . . . . . . . . . . . . . . . . . . . . . . . . . . . . . . . . . . . . . . 44
Using Special Paper . . . . . . . . . . . . . . . . . . . . . . . . . . . . . . . . . . . . . . . . . . . . . . . . . . . . . . . . . . . . . . . 44
Load Documents . . . . . . . . . . . . . . . . . . . . . . . . . . . . . . . . . . . . . . . . . . . . . . . . . . . . . . . . . . . . . . . . . . 45
31
Page 32

32
Page 33

Paper Handling
• Load Paper
• Paper Settings
• Unscannable and Unprintable Areas
The figures in the table show maximum unscannable and unprintable areas from the edges of the most
commonly-used paper sizes. These measurements may vary depending on the paper size or settings in the
application you are using.
• Using Special Paper
Always test paper samples before purchasing them to ensure desirable performance.
• Load Documents
You can send a fax, make copies and scan from the Automatic Document Feeder (ADF) and from the scanner
glass.
Load Paper
• Load and Print using the Paper Tray
• Load and Print Paper in the Manual Feed Slot
2
Load and Print using the Paper Tray
• If the Check Size setting is set to On and you pull the paper tray out of the machine, a message appears on
the LCD asking if you want to change the paper size. Change the paper size and paper type settings if needed,
following the on-screen instructions.
• When you load a different paper size in the tray, you must change the paper size setting in the machine or on
your computer at the same time.
1. Pull the paper tray completely out of the machine.
2. Press and slide the paper guides to fit the paper.
Press the release levers to slide the paper guides.
33Paper Handling
Page 34

NOTE: For Legal or Folio size paper, press the release button (1) in the bottom of the paper tray and then pull out
the back of the paper tray. (Legal and Folio size paper are not available in some regions.)
3. Fan the stack of paper well.
4. Load paper with the printing surface
NOTE: DO NOT load different types of paper in the paper tray at the same time. Doing this may cause the paper to
jam or misfeed.
34 Paper Handling
face down
in the paper tray.
Page 35

5. Make sure the paper is below the "MAX" mark.
Overfilling the paper tray will cause paper jams.
6. Slowly push the paper tray completely into the machine.
7. Lift the flap to prevent paper from sliding off the output tray.
8. Send your print job to the machine.
NOTE: Change your print preferences in the Print dialog box before sending the print job from your computer.
35Paper Handling
Page 36

Load and Print Paper in the Manual Feed Slot
• Load and Print Plain Paper, Thin Paper, Recycled Paper and Bond Paper in the Manual Feed Slot
• Load and Print on Thick Paper and Labels in the Manual Feed Slot
• Load and Print on Envelopes in the Manual Feed Slot
• Printing Problems
• Error and Maintenance Messages
Load and Print Plain Paper, Thin Paper, Recycled Paper and Bond Paper in the Manual Feed Slot
When you load a different paper size in the tray, you must change the paper size setting in the machine or on your
computer at the same time.
1. Lift the support flap to prevent paper from sliding off the face-down output tray.
2. Open the manual feed slot cover.
36 Paper Handling
Page 37

3. Use both hands to slide the manual feed slot paper guides to fit the width of the paper you are using.
4. Using both hands, put one full sheet of paper in the manual feed slot until the front edge touches the paper
feed roller. When you feel the machine pull it in, let go.
NOTE: Load paper into the manual feed slot with the printing surface facing up.
NOTE: Make sure the paper is straight and in the correct position in the manual feed slot. If it is not, the paper may
not be fed correctly, resulting in a skewed printout or a paper jam.
NOTE: To remove a small printout from the output tray, use both hands to lift up the scanner cover.
37Paper Handling
Page 38

NOTE: You can still use the machine while the scanner cover is up. To close the scanner cover, push it down with
both hands.
5. Send your print job to the machine.
NOTE: Change your print preferences in the Print screen before sending the print job from your computer.
6. After the printed page comes out from the machine, load the next sheet of paper in the manual feed slot.
Repeat for each page that you want to print.
Load and Print on Thick Paper and Labels in the Manual Feed Slot
When you load a different paper size in the tray, you must change the paper size setting in the machine or on your
computer at the same time.
1. Open the machine's back cover (the face-up output tray).
38 Paper Handling
Page 39

NOTE: The machine automatically turns on Manual Feed mode when you load paper in the manual feed slot.
2. On the front of the machine, open the manual feed slot cover.
3. Use both hands to slide the manual feed slot paper guides to fit the width of the paper that you are using.
4. Using both hands, put one full sheet of paper in the manual feed slot until the front edge touches the paper
feed roller. When you feel the machine pull it in, let go.
39Paper Handling
Page 40

NOTE: Load paper into the manual feed slot with the printing surface facing up.
NOTE: Pull the paper out completely if you must reload the paper into the manual feed slot.
NOTE: Do not put more than one sheet of paper in the manual feed slot at one time, as it may cause a jam.
NOTE: Make sure the paper is straight and in the correct position in the manual feed slot. If it is not, the paper may
not be fed correctly, resulting in a skewed printout or a paper jam.
5. Send your print job to the machine.
NOTE: Change your print preferences in the Print screen before sending the print job from your computer.
6. After the printed page comes out from the back of the machine, load the next sheet of paper in the manual
feed slot. Repeat for each page that you want to print.
7. Close the back cover (the face-up output tray) until it locks in the closed position.
Load and Print on Envelopes in the Manual Feed Slot
When you load a different paper size in the tray, you must change the paper size setting in the machine or on your
computer at the same time.
1. Open the machine's back cover (the face-up output tray).
NOTE: The machine automatically turns on Manual Feed mode when you load paper in the manual feed slot.
2. Pull down the two levers, one on the left side and one on the right side, as shown in the illustration.
40 Paper Handling
Page 41

3. On the front of the machine, open the manual feed slot cover.
4. Use both hands to slide the manual feed slot paper guides to fit the width of the paper that you are using.
5. Using both hands, put one envelope in the manual feed slot until the front edge touches the paper feed roller.
When you feel the machine pull it in, let go.
41Paper Handling
Page 42

NOTE: Load the envelope into the manual feed slot with the printing surface facing up.
NOTE: Pull the envelope out completely when you reload the envelope into the manual feed slot.
NOTE: Do not put more than one envelope in the manual feed slot at one time, as it may cause a jam.
NOTE: Make sure the envelope is straight and in the correct position on the manual feed slot. If it is not, the
envelope may not be fed correctly, resulting in a skewed printout or a paper jam.
6. Send your print job to the machine.
NOTE: Change your print preferences in the Print dialog box before sending the print job from your computer.
Settings Options for Envelopes
Paper Size Com-10
DL
C5
Monarch
Media Type Envelopes
Env. Thick
Env. Thin
7. After the printed envelope comes out of the machine, put in the next envelope. Repeat for each envelope that
you want to print.
8. When you have finished printing, return the two levers that you adjusted in former step back to their original
positions.
9. Close the back cover (the face-up output tray) until it locks in the closed position.
Paper Settings
• Change the Paper Size
When you change the size of the paper you load in the tray, you must change the paper size setting on the LCD
at the same time.
• Change the Paper Type
To get the best print quality, set the machine for the type of paper you are using.
• Set the Check Size
42 Paper Handling
Page 43

Your Dell machine's Check Size setting causes the machine to display a message when you remove the paper tray
from the machine, asking if you changed the paper size.
Change the Paper Size
When you change the size of the paper you load in the tray, you must change the paper size setting on the LCD at
the same time.
1. Press Menu.
2. Press p or q to display the General Setup option, and then press OK.
3. Press p or q to display the Paper option, and then press OK.
4. Press p or q to display the Paper Size option, and then press OK.
5. Press p or q to display the Letter, Legal, Executive, A5, A5 L, A6, Folio, or A4 option, and then press
OK.
6. Press Cancel.
Change the Paper Type
To get the best print quality, set the machine for the type of paper you are using.
1. Press Menu.
2. Press p or q to display the General Setup option, and then press OK.
3. Press p or q to display the Paper option, and then press OK.
4. Press p or q to display the Paper Type option, and then press OK.
5. Press p or q to display the Thin, Plain, Thick, Thicker, or Recycled Paper option, and then press
OK.
6. Press Cancel.
Set the Check Size
Your Dell machine's Check Size setting causes the machine to display a message when you remove the paper tray
from the machine, asking if you changed the paper size.
The default setting is On.
1. Press Menu.
2. Press p or q to display the General Setup option, and then press OK.
3. Press p or q to display the Paper option, and then press OK.
4. Press p or q to display the Check Size option, and then press OK.
5. Press p or q to select the On or Off option, and then press OK.
6. Press Cancel.
43Paper Handling
Page 44

Unscannable and Unprintable Areas
The figures in the table show maximum unscannable and unprintable areas from the edges of the most commonlyused paper sizes. These measurements may vary depending on the paper size or settings in the application you are
using.
NOTE: Do not attempt to scan, copy, or print into these areas; your output will not reflect anything in these areas.
Usage Document Size Top (1)
Bottom (3)
Fax (Sending) Letter, Legal (ADF) 0.12 in. (3 mm) 0.16 in. (4 mm)
A4 0.12 in. (3 mm) (ADF)
1
Copy*
Scan Letter 0.12 in. (3 mm) 0.12 in. (3 mm)
Print Letter, Legal 0.16 in. (4.2 mm) 0.16 in. (4.2 mm)
*1
: a single copy or a 1 in 1 copy
Letter, Legal (ADF) 0.16 in. (4 mm) 0.12 in. (3 mm)
A4 0.16 in. (4 mm) 0.12 in. (3 mm)
A4 0.12 in. (3 mm) 0.12 in. (3 mm)
Legal (ADF) Approximately 0.12 in. (3 mm) Approximately 0.12 in. (3 mm)
A4 0.16 in. (4.2 mm) 0.16 in. (4.2 mm)
Left (2)
Right (4)
0.04 in. (1 mm)
(Scanner Glass)
0.12 in. (3 mm)
Using Special Paper
Always test paper samples before purchasing them to ensure desirable performance.
WARNING
Do not use conductive paper such as origami paper, carbonic paper or conductively-coated paper. When paper jam
occurs, it may cause short-circuit and eventually a fire accident.
• DO NOT use inkjet paper; it may cause a paper jam or damage your machine.
• If you use bond paper, paper with a rough surface, or paper that is wrinkled or creased, the paper may exhibit
degraded performance.
44 Paper Handling
Page 45

IMPORTANT
Some types of paper may not perform well or may cause damage to your machine.
DO NOT use paper:
• that is highly textured
• that is extremely smooth or shiny
• that is curled or warped
• that is coated or has a chemical finish
• that is damaged, creased or folded
• that exceeds the recommended weight specification in this guide
• with tabs and staples
• with letterheads using low temperature dyes or thermography
• that is multipart or carbonless
• that is designed for inkjet printing
If you use any of the types of paper listed above, they may damage your machine. This damage is not covered under
any Dell warranty or service agreement.
Load Documents
You can send a fax, make copies and scan from the Automatic Document Feeder (ADF) and from the scanner glass.
• Load Documents in the Automatic Document Feeder (ADF)
Use the ADF when copying or scanning multiple-page, standard-sized documents.
• Load Documents on the Scanner Glass
Use the scanner glass to fax, copy, or scan one page at a time.
Load Documents in the Automatic Document Feeder (ADF)
Use the ADF when copying or scanning multiple-page, standard-sized documents.
• The ADF can hold up to 35 pages and feed each sheet individually.
• Use standard 20 lb (80 g/m2) paper.
• Make sure documents with correction fluid or written in ink are completely dry.
IMPORTANT
• DO NOT leave thick documents on the scanner glass. If you do this, the ADF may jam.
• DO NOT use paper that is curled, wrinkled, folded, ripped, stapled, paper-clipped, pasted, or taped.
• DO NOT use cardboard, newspaper, or fabric.
• To avoid damaging your machine while using the ADF, DO NOT pull on the document while it is feeding.
45Paper Handling
Page 46

Document Sizes Supported
Length: 5.8 in. to 14.0 in. (147.3 to 355.6 mm)
Width: 5.8 in. to 8.5 in. (147.3 to 215.9 mm)
2
Weight: 17 to 24 lb (64 to 90 g/m
)
1. Unfold the ADF document support.
Lift and unfold the ADF document output support flap.
2. Fan the pages well.
3. Stagger the pages of your document and load it
face up
and
illustration.
4. Adjust the paper guides to fit the width of your document.
Load Documents on the Scanner Glass
Use the scanner glass to fax, copy, or scan one page at a time.
Document Sizes Supported
Length: Up to 11.8 in. (300.0 mm)
Width: Up to 8.5 in. (215.9 mm)
Weight: Up to 4.4 lb (2.0 kg)
top edge first
, into the ADF as shown in the
NOTE: To use the scanner glass, the ADF must be empty.
1. Lift the document cover.
2. Place the document on the scanner glass
face down
46 Paper Handling
.
Page 47

3. Place the corner of the page in the upper left corner of the scanner glass.
4. Close the document cover.
If the document is a book or is thick, gently press on the document cover.
47Paper Handling
Page 48

48 Paper Handling
Page 49

Print . . . . . . . . . . . . . . . . . . . . . . . . . . . . . . . . . . . . . . . . . . . . . . . . . . . . . . . . . . . . . . . . . 51
Before Printing . . . . . . . . . . . . . . . . . . . . . . . . . . . . . . . . . . . . . . . . . . . . . . . . . . . . . . . . . . . . . . . . . . . 51
Print from Your Computer (Windows
Print from Your Computer (Macintosh) . . . . . . . . . . . . . . . . . . . . . . . . . . . . . . . . . . . . . . . . . . . . . . . 76
Adjust Print Settings from the Machine’s Control Panel . . . . . . . . . . . . . . . . . . . . . . . . . . . . . . . . 88
®
) . . . . . . . . . . . . . . . . . . . . . . . . . . . . . . . . . . . . . . . . . . . . . . . 51
49
Page 50

50
Page 51

3
• Before Printing
• Print from Your Computer (Windows®)
• Print from Your Computer (Macintosh)
• Adjust Print Settings from the Machine's Control Panel
Before Printing
Before attempting any printing operation, confirm the following:
• The instructions for printer driver are described based on PCL driver. Since the XPS printer driver is installed as
the default printer driver for Windows® 8, the function may vary from the instructions on this user guide.
• For USB or network cable users: Make sure the interface cable is physically secure.
Simultaneous printing, scanning and faxing
Your machine can print from your computer while sending or receiving a fax in memory or while scanning a
document into the computer. Fax sending will not be stopped during printing from your computer. However, when
the machine is copying or receiving a fax on paper, it pauses the printing operation, and then continues printing
when copying or fax receiving has finished.
NOTE: Dell E514dw does not support the fax feature.
Firewall (Windows
If your computer is protected by a firewall and you are unable to network print, network scan, or PC-FAX, you may
need to configure the firewall settings. If you are using any other personal firewall software, see the User's Guide for
your software or contact the software manufacturer.
®
)
Print from Your Computer (Windows®)
Basic Printing Methods (Windows®)
• Print a Document (Windows®)
• Print Preview (Windows®)
• Change the Paper Size (Windows®)
The Paper Size options offer a large selection of standard paper sizes.
• Change the Orientation of Your Print (Portrait or Landscape) (Windows®)
• Print Multiple Copies of the Same Document (Windows®)
• Change the Media Type (Windows®)
To achieve the best print results, the media being printed on should be selected in the driver. The machine
changes the way it prints depending on the selected media type.
• Change the Resolution (Windows®)
You can choose the print resolution. As print resolution and speed are related, the higher the resolution, the
longer it will take to print the document.
• Change the Print Settings (Windows®)
51Print
Page 52

The Print Settings selection lets you choose the print resolution. As print quality and speed are related, the
higher the quality, the longer it takes to print the document.
• Improve Gray Printing (Windows®)
You can improve the image quality of a shaded area.
• Improve Pattern Printing (Windows®)
You can improve the pattern printing if printed fills and patterns are different from the fills and patterns you see
on your computer screen.
• Improve Thin Line (Windows®)
Use this option to improve the image quality of thin lines.
• Print More Than One Page on a Single Sheet of Paper (N in 1) (Windows®)
• Print as a Poster (Windows®)
Enlarge your print size and print the document in poster mode.
• Print on Both Sides of the Paper (Windows®)
• Print as a Booklet (Windows®)
Use this option to print a document in booklet format using 2-sided printing. The document's pages will be
arranged according to the correct page number and will allow you to fold the print output at the center and read
the booklet pages numerically, without having to change the order of the printed pages.
• Change the Paper Source (Windows
®
)
Select a paper source setting that matches your print conditions or purpose.
Print a Document (Windows®)
1. Select the print command in your application.
2. Select Dell MFP EXXXX (where XXXX is the name of your model), and then click the printing properties or
preferences button.
The printer driver window appears.
3. Make sure you have loaded the correct size paper in the paper tray.
4. Click the Paper Size drop-down list, and then select your paper size.
5. In the Orientation field, select either Portrait or Landscape option to set the orientation of your printout.
NOTE: If your application software contains a similar layout feature, we recommend using the one in the
application.
6. Type the number of copies (1-999) you want in the Copies field.
7. Click the Media Type drop-down list, and then select the type of paper you are using.
8. To print multiple pages on a single sheet of paper or print one page of your document on multiple sheets, click
the Multiple Page drop-down list, and then select your options.
9. Change other printer settings if needed.
10. Click OK.
11. Complete your print operation.
52 Print
Page 53

Print Preview (Windows®)
1. Select the print command in your application.
2. Select Dell MFP EXXXX (where XXXX is the name of your model), and then click the printing properties or
preferences button.
The printer driver window appears.
3. Select the Print Preview check box.
4. Change other printer settings if needed.
5. Click OK.
6. Click the proceed or next button in your application dialog box.
The PrintPreview viewer opens before printing starts.
7. Select the page(s) you want to print from the list in the Print Page field.
The print results will be displayed in the preview area. By default, all pages are selected. To print only some
pages, clear the check boxes for the pages you do not want to print.
NOTE: If the 2-sided / Booklet setting is selected in the printer driver, you cannot select the Print Page check box.
8. Click File, and then click Print to start printing.
Change the Paper Size (Windows®)
The Paper Size options offer a large selection of standard paper sizes.
1. Select the print command in your application.
2. Select Dell MFP EXXXX (where XXXX is the name of your model), and then click the printing properties or
preferences button.
The printer driver window appears.
3. Click the Paper Size drop-down list, and then select your paper size.
4. Click OK.
5. Complete your print operation.
Create a Custom Paper Size (Windows®)
1. Do one of the following:
• (For Windows Server® 2003)
Click Start > Printers and Faxes.
• (For Windows Vista® and Windows Server® 2008)
Click
• (For Windows® 7 and Windows Server® 2008 R2)
Click
• (For Windows® 8)
Move your mouse to the lower right corner of your desktop. When the menu bar appears, click Settings, and
then click Control Panel. In the Hardware and Sound group, click View devices and printers.
(Start) > Control Panel > Hardware and Sound > Printers.
(Start) >Devices and Printers.
53Print
Page 54

• (For Windows Server® 2012)
Move your mouse to the lower right corner of your desktop. When the menu bar appears, click Settings, and
then click Control Panel. In the Hardware group, click View devices and printers.
• (For Windows Server® 2012 R2)
Click Control Panel on the Start screen. In the Hardware group, click View devices and printers.
2. Right-click the Dell MFP EXXXX icon (where XXXX is your model name), and then select Printer properties. If
printer driver options appear, select your printer driver.
3. Click the General tab, and then click the Printing Preferences... or Preferences... button.
The printer driver dialog box appears.
NOTE: To configure the tray settings, click the Device Settings tab.
NOTE: To change the printer port, click the Ports tab.
4. Click the Paper Size drop-down list, and then select User Defined.
5. Type a name for this custom size in the Custom Paper Size Name field.
6. Specify the Width and Height values.
7. Click Save.
8. Click OK.
9. Click OK.
10. Close the printer properties dialog box.
Change the Orientation of Your Print (Portrait or Landscape) (Windows®)
Portrait Landscape
1. Select the print command in your application.
2. Select Dell MFP EXXXX (where XXXX is the name of your model), and then click the printing properties or
preferences button.
The printer driver window appears.
3. In the Orientation field, select either Portrait or Landscape option to set the orientation of your printout.
NOTE: If your application software contains a similar layout feature, we recommend using the one in the
application.
54 Print
Page 55

4. Click OK.
5. Complete your print operation.
Print Multiple Copies of the Same Document (Windows®)
1. Select the print command in your application.
2. Select Dell MFP EXXXX (where XXXX is the name of your model), and then click the printing properties or
preferences button.
The printer driver window appears.
3. Type the number of copies (1-999) you want in the Copies field.
4. Select the Collate check box, if needed.
Collate
When the Collate check box is selected, one complete copy of your document will be printed, and then reprinted
according to the number of copies you choose. If the Collate check box is not selected, then each page will be
printed according to the number of copies chosen before the next page of the document is printed.
5. Change other printer settings if needed.
6. Click OK.
7. Complete your print operation.
Change the Media Type (Windows®)
To achieve the best print results, the media being printed on should be selected in the driver. The machine changes
the way it prints depending on the selected media type.
1. Select the print command in your application.
2. Select Dell MFP EXXXX (where XXXX is the name of your model), and then click the printing properties or
preferences button.
The printer driver window appears.
3. Click the Media Type drop-down list, and then select the media type you want to use.
Select this Media Type For this paper
Plain Paper Ordinary plain paper
Thin Paper Ordinary thin paper
Thick Paper Rough paper or thicker paper
Thicker Paper
Bond Paper Bond paper
Envelopes Envelopes
Env. Thick Select this option if the toner does not correctly stick to the
Env. Thin Select this option if the envelope is crumpled when the
Recycled Paper Recycled paper
Label Label
Select this option if you have selected Thick Paper, and toner
smudges while printing.
envelope when the Envelopes option is selected.
Envelopes option is selected.
55Print
Page 56

4. Click OK.
5. Complete your print operation.
Change the Resolution (Windows®)
You can choose the print resolution. As print resolution and speed are related, the higher the resolution, the longer it
will take to print the document.
1. Select the print command in your application.
2. Select Dell MFP EXXXX (where XXXX is the name of your model), and then click the printing properties or
preferences button.
The printer driver window appears.
3. Click the Resolution drop down list and click the print resolution you want to use.
• 300 dpi
• 600 dpi
• HQ 1200
4. Click OK.
5. Complete your print operation.
Change the Print Settings (Windows®)
The Print Settings selection lets you choose the print resolution. As print quality and speed are related, the higher
the quality, the longer it takes to print the document.
1. Select the print command in your application.
2. Select Dell MFP EXXXX (where XXXX is the name of your model), and then click the printing properties or
preferences button.
The printer driver window appears.
3. Click the Print Settings drop down list and click the print settings you want to use.
Option Description
Graphics This is the best mode for printing documents that contain
graphics.
Text This is the best mode for printing text documents.
Manual You can change the advanced settings manually.
4. To change more advanced settings such as brightness, contrast, and other settings, select Manual and click
Manual Settings....
56 Print
Page 57

5. Click OK.
6. Complete your print operation.
Improve Gray Printing (Windows®)
You can improve the image quality of a shaded area.
1. Select the print command in your application.
2. Select Dell MFP EXXXX (where XXXX is the name of your model), and then click the printing properties or
preferences button.
The printer driver window appears.
3. Click the Print Settings drop-down list, select Manual, and then click the Manual Settings... button.
4. Select the Improve Gray Printing check box.
5. Click OK to return to the printer driver window.
6. Click OK.
7. Complete your print operation.
57Print
Page 58

Improve Pattern Printing (Windows®)
You can improve the pattern printing if printed fills and patterns are different from the fills and patterns you see on
your computer screen.
1. Select the print command in your application.
2. Select Dell MFP EXXXX (where XXXX is the name of your model), and then click the printing properties or
preferences button.
The printer driver window appears.
3. Click the Print Settings drop-down list, select Manual, and then click the Manual Settings... button.
4. Select the Improve Pattern Printing check box.
5. Click OK to return to the printer driver window.
6. Click OK.
7. Complete your print operation.
Improve Thin Line (Windows®)
Use this option to improve the image quality of thin lines.
1. Select the print command in your application.
2. Select Dell MFP EXXXX (where XXXX is the name of your model), and then click the printing properties or
preferences button.
The printer driver window appears.
3. Click the Print Settings drop-down list, select Manual, and then click the Manual Settings... button.
4. Confirm that the Improve Thin Line check box is selected.
5. Click OK to return to the printer driver window.
6. Click OK.
7. Complete your print operation.
Print More Than One Page on a Single Sheet of Paper (N in 1) (Windows®)
1. Select the print command in your application.
58 Print
Page 59

2. Select Dell MFP EXXXX (where XXXX is the name of your model), and then click the printing properties or
preferences button.
The printer driver window appears.
3. In the Orientation field, select either Portrait or Landscape option to set the orientation of your printout.
NOTE: If your application software contains a similar layout feature, we recommend using the one in the
application.
4. Click the Multiple Page drop-down list, and then select the 2 in 1, 4 in 1, 9 in 1, 16 in 1, or 25 in 1 option.
5. Click the Page Order drop-down list, and then select your page order.
6. Click the Border Line drop-down list, and then select your border line type.
7. Change other printer settings if needed.
8. Click OK.
9. Complete your print operation.
Print as a Poster (Windows®)
Enlarge your print size and print the document in poster mode.
1. Select the print command in your application.
2. Select Dell MFP EXXXX (where XXXX is the name of your model), and then click the printing properties or
preferences button.
The printer driver window appears.
3. Click the Multiple Page drop-down list, and then select the 1 in 2x2 Pages, 1 in 3x3 Pages, 1 in 4x4 Pages, or 1
in 5x5 Pages option.
4. Select the Print cut-out line check box, if needed.
Print cut-out line
Prints a faint cut-out line around the printable area so that you can easily cut it out.
5. Change other printer settings if needed.
6. Click OK.
7. Complete your print operation.
59Print
Page 60

Print on Both Sides of the Paper (Windows®)
• Select Letter, Legal, or Folio sized paper when using the automatic 2-sided printing function.
• Make sure the back cover is closed.
• If paper is curled, straighten it and put it back in the paper tray.
• Use regular paper or thin paper. DO NOT use bond paper.
• If the paper is too thin, it may wrinkle.
• When you use the manual 2-sided printing function, it is possible there may be paper jams or poor print quality.
1. Select the print command in your application.
2. Select Dell MFP EXXXX (where XXXX is the name of your model), and then click the printing properties or
preferences button.
The printer driver window appears.
3. In the Orientation field, select either Portrait or Landscape option to set the orientation of your printout.
NOTE: If your application software contains a similar layout feature, we recommend using the one in the
application.
4. Click the 2-sided / Booklet drop-down list, and then select the 2-sided or 2-sided (Manual) option.
Option Description
2-sided (available only for certain models) Automatically prints on both sides of the paper.
2-sided (Manual) The machine prints all the even-numbered pages on one side
of the paper first. Then, the printer driver instructs you (with a
pop-up message) to reinsert the paper.
5. Click the 2-sided Settings button.
6. Select one of the options from the 2-sided Type menu.
When 2-sided is selected, four types of 2-sided binding are available for each orientation:
60 Print
Page 61

Option for Portrait Description
Long Edge (Left)
Long Edge (Right)
Short Edge (Top)
Short Edge (Bottom)
Option for Landscape Description
61Print
Page 62

Long Edge (Top)
Long Edge (Bottom)
Short Edge (Right)
Short Edge (Left)
7. Select the Binding Offset check box if you want to specify the offset for binding in inches or millimeters.
8. Click OK.
9. Change other printer settings if needed.
10. Do one of the following:
• For automatic 2-sided printing, click OK again, and then complete your print operation.
• For manual 2-sided printing, click OK again and follow the screen instructions.
If the paper is not feeding correctly, it may be curled. Remove the paper, straighten it, and put it back in the paper
tray.
Print as a Booklet (Windows®)
Use this option to print a document in booklet format using 2-sided printing. The document's pages will be arranged
according to the correct page number and will allow you to fold the print output at the center and read the booklet
pages numerically, without having to change the order of the printed pages.
62 Print
Page 63

• Select Letter, Legal, or Folio sized paper when using the automatic 2-sided printing function.
• Make sure the back cover is closed.
• If paper is curled, straighten it and put it back in the paper tray.
• Use regular paper or thin paper. DO NOT use bond paper.
• If the paper is too thin, it may wrinkle.
• When you use the manual 2-sided printing function, it is possible there may be paper jams or poor print quality.
1. Select the print command in your application.
2. Select Dell MFP EXXXX (where XXXX is the name of your model), and then click the printing properties or
preferences button.
The printer driver window appears.
3. In the Orientation field, select either Portrait or Landscape option to set the orientation of your printout.
NOTE: If your application software contains a similar layout feature, we recommend using the one in the
application.
4. Click the 2-sided / Booklet drop-down list, and then select the Booklet or Booklet (Manual) option.
Option Description
Booklet (available only for certain models) Automatically prints as a booklet.
Booklet (Manual) Manually prints as a booklet.
5. Click the 2-sided Settings button.
6. Select the one of the options from the 2-sided Type menu.
There are two types of 2-sided binding directions available for each orientation:
63Print
Page 64

Option for Portrait Description
Left Binding
Right Binding
Option for Landscape Description
Top Binding
Bottom Binding
7. Select one of the options from the Booklet Printing Method menu.
Option Description
All Pages at Once Every page will be printed in booklet format (four pages
to every piece of paper, two pages per side). Fold your
printout in the middle to create the booklet.
64 Print
Page 65

Divide into Sets This option prints the whole booklet in smaller individual
booklet sets, allowing you to fold at the center of the
smaller individual booklet sets without having to change
the order of the printed pages. You can specify the number
of sheets in each smaller booklet set (from 1-15). This
option can be helpful when folding a printed booklet that
has a large number of pages.
8. Select the Binding Offset check box if you want to specify the offset for binding in inches or millimeters.
9. Click OK.
10. Change other printer settings if needed.
11. Do one of the following:
• For automatic booklet printing, click OK again, and then complete your print operation.
• For manual booklet printing, click OK again and follow the screen instructions.
Change the Paper Source (Windows®)
Select a paper source setting that matches your print conditions or purpose.
1. Select the print command in your application.
2. Select Dell MFP EXXXX (where XXXX is the name of your model), and then click the printing properties or
preferences button.
The printer driver window appears.
3. Click the First Page and Other Pages drop-down lists to select your paper tray from each list.
Option Description
Auto Select The machine will automatically select the tray to use if the
paper type and paper size configured on the machine match
the printer driver settings. The paper size and paper type for
each tray must be configured correctly on the machine.
Tray1 The machine will exclusively use tray #1 when printing.
Manual The machine will exclusively use the Manual Feed Slot when
printing.
NOTE: You can specify different trays for printing the first page of your document and for printing from the second
page onwards.
4. Click OK.
5. Complete your print operation.
Advanced Printing Methods (Windows®)
• Print in Toner Save Mode (Windows®)
65Print
Page 66

This feature conserves your toner by using less toner to print documents; print appears lighter, but is still
readable.
• Scaled Print (Windows®)
This option lets you enlarge or reduce the pages in your document to fit your printed paper size.
• Reverse Print (Windows®)
This setting rotates the printed image 180 degrees.
• Add a Watermark to the Printed Document (Windows®)
Print a logo or text onto your document as a watermark. Select one of the preset watermarks, add a new
watermark, or use an image file you have created.
• Print the Date, Time and PC Login User Name on the Document (Header-Footer Print) (Windows®)
• Use a Macro from Your Computer (Windows®)
If you have stored the electronic forms (macros) in your machine's memory, you can use the macro to print the
data as an overlay on the print job you want.
• Adjust the Print Density (Windows®)
You can increase or decrease the print density.
• Reduce Paper Curl (Windows®)
• Improve Toner Fixing (Windows®)
• Skip Blank Page (Windows®)
Use this option to allow the printer driver to automatically detect blank pages and exclude them from printing.
• Print Text in Black (Windows®)
Use this option when you want to print color text in black.
• Save an Archive File of the Print Data (Windows®)
Print data can be saved as a PDF file to your computer.
Print in Toner Save Mode (Windows®)
This feature conserves your toner by using less toner to print documents; print appears lighter, but is still readable.
NOTE: We do not recommend using this mode for printing photo or grayscale images.
1. Select the print command in your application.
2. Select Dell MFP EXXXX (where XXXX is the name of your model), and then click the printing properties or
preferences button.
66 Print
Page 67

The printer driver window appears.
3. Click the Advanced tab.
4. Select the Toner Save Mode check box.
5. Change other printer settings if needed.
6. Click OK.
7. Complete your print operation.
Scaled Print (Windows®)
This option lets you enlarge or reduce the pages in your document to fit your printed paper size.
1. Select the print command in your application.
2. Select Dell MFP EXXXX (where XXXX is the name of your model), and then click the printing properties or
preferences button.
The printer driver window appears.
3. Click the Advanced tab.
4. Do one of the following:
• Select the Fit to Paper Size option to enlarge or reduce the document to fit your printed paper size, and then
select the paper size from the drop-down list.
• Select the Free option to enlarge or reduce the document's page size manually, and then type a value into the
field.
5. Change other printer settings if needed.
6. Click OK.
7. Complete your print operation.
Reverse Print (Windows®)
This setting rotates the printed image 180 degrees.
1. Select the print command in your application.
2. Select Dell MFP EXXXX (where XXXX is the name of your model), and then click the printing properties or
preferences button.
The printer driver window appears.
3. Click the Advanced tab.
67Print
Page 68

4. Select the Reverse Print check box.
5. Change other printer settings if needed.
6. Click OK.
7. Complete your print operation.
Add a Watermark to the Printed Document (Windows®)
Print a logo or text onto your document as a watermark. Select one of the preset watermarks, add a new watermark,
or use an image file you have created.
1. Select the print command in your application.
2. Select Dell MFP EXXXX (where XXXX is the name of your model), and then click the printing properties or
preferences button.
The printer driver window appears.
3. Click the Advanced tab.
4. Select the Use Watermark check box, and then click the Settings button.
5. Select the watermark you want to use from the Select Watermark list, or create a new watermark.
• To create a new watermark, click Add.
a. Select either the Use Text or Use Image File option in the Watermark Style field.
b. Type a title for the watermark in the Title field.
c. If you select the Use Text option:
• Select your Text, Font, Style, Size and Darkness options.
d. If you select the Use Image File option:
• Type the file name and location of your image in the File field or click the Browse button to search for
the file.
• Once an image selected, you can scale the size of the image.
e. To move the position of the watermark on the page, adjust it in the Position field.
• To modify an existing watermark, select the watermark, and then click the Settings button.
Bring To Front
This option will overlay the watermark on your printed document.
In Outline Text
Select the In Outline Text check box to print only an outline of the watermark. This feature is available only when
using a text watermark.
Custom Settings
Select where your watermark will print. Include it on all pages, on the first page only, or on all pages except the
first page.
6. Click OK.
7. Change other printer settings if needed.
8. Click OK.
9. Complete your print operation.
68 Print
Page 69

Print the Date, Time and PC Login User Name on the Document (Header-Footer Print) (Windows®)
1. Select the print command in your application.
2. Select Dell MFP EXXXX (where XXXX is the name of your model), and then click the printing properties or
preferences button.
The printer driver window appears.
3. Click the Advanced tab.
4. Select the Header-Footer Print check box, and then click the Settings button.
5. Select the options you want from the following settings: Format, Position, Font and Background.
ID Print
Select your computer login user name or custom text as a header or footer using one of the following methods:
• Select the Login User Name option to print your computer login user name.
• Select the Custom option to print the text you enter in the Custom field.
6. Click OK to return to the printer driver window.
7. Change other printer settings if needed.
8. Click OK.
9. Complete your print operation.
Use a Macro from Your Computer (Windows®)
If you have stored the electronic forms (macros) in your machine's memory, you can use the macro to print the data
as an overlay on the print job you want.
1. Select the print command in your application.
2. Select Dell MFP EXXXX (where XXXX is the name of your model), and then click the printing properties or
preferences button.
The printer driver window appears.
3. Click the Advanced tab.
4. Click the Other Print Options button.
5. Select Macro.
6. Click the Macro Settings button.
69Print
Page 70

7. Enter Macro ID and Macro Name you want to use.
8. Select Insert Macro Command.
9. Select the page to overlay the macro data.
Option Description
All Pages Lets you insert the macro onto all pages.
Page Lets you insert the macro onto a specific page. Select this
option, and then enter a page number within the range 1 to
255.
Add to Top of Page Send the macro data to the top of the page.
Add to End of Page Send the macro data to the bottom of the page.
NOTE: When Booklet has been selected, the Page setting in Insert Macro Command is disabled.
10. Click OK.
11. Click OK to return to the printer driver window.
12. Click OK.
13. Complete your print operation.
The macro data is printed as an overlay.
Adjust the Print Density (Windows®)
You can increase or decrease the print density.
1. Select the print command in your application.
2. Select Dell MFP EXXXX (where XXXX is the name of your model), and then click the printing properties or
preferences button.
The printer driver window appears.
3. Click the Advanced tab.
4. Click the Other Print Options button.
5. Select Density Adjustment.
6. Clear the Printer Default check box.
7. To increase or decrease the print density, move the slide bar to the right or left.
8. Click OK to return to the printer driver window.
9. Click OK.
10. Complete your print operation.
70 Print
Page 71

Reduce Paper Curl (Windows®)
If you are printing only a few pages, you do not need to select this setting. If paper curls excessively, we recommend
changing the Media Type setting in the printer driver to the Thin Paper or Env. Thin setting.
NOTE: This setting decreases the temperature of the machine's fusing process, which reduces paper curl.
1. Select the print command in your application.
2. Select Dell MFP EXXXX (where XXXX is the name of your model), and then click the printing properties or
preferences button.
The printer driver window appears.
3. Click the Advanced tab.
4. Click the Other Print Options button.
5. Select the Improve Print Output option from the Printer Function list.
6. Select the Reduce Paper Curl radio button.
7. Click OK to return to the printer driver window.
8. Click OK.
9. Complete your print operation.
Improve Toner Fixing (Windows®)
NOTE: This setting increases the temperature of the machine's fusing process, which improves toner's ability to stick
to paper.
71Print
Page 72

1. Select the print command in your application.
2. Select Dell MFP EXXXX (where XXXX is the name of your model), and then click the printing properties or
preferences button.
The printer driver window appears.
3. Click the Advanced tab.
4. Click the Other Print Options button.
5. Select the Improve Print Output option from the Printer Function list.
6. Select the Improve Toner Fixing radio button.
7. Click OK to return to the printer driver window.
8. Click OK.
9. Complete your print operation.
If this selection does not provide enough improvement, change the Media Type setting in the printer driver to the
Thick Paper or Env. Thick setting.
Skip Blank Page (Windows®)
Use this option to allow the printer driver to automatically detect blank pages and exclude them from printing.
This option does not work if the following settings are active:
• Use Watermark
• Header-Footer Print
• N in 1 or 1 in NxN Pages in the Multiple Page drop-down list
• 2-sided (Manual), Booklet, Booklet (Manual) and Binding Offset.
1. Select the print command in your application.
2. Select Dell MFP EXXXX (where XXXX is the name of your model), and then click the printing properties or
preferences button.
The printer driver window appears.
3. Click the Advanced tab.
4. Click the Other Print Options button.
5. Select the Skip Blank Page option from the Printer Function list.
6. Select the Skip Blank Page check box.
7. Click OK to return to the printer driver window.
8. Click OK.
9. Complete your print operation.
Print Text in Black (Windows®)
Use this option when you want to print color text in black.
72 Print
Page 73

NOTE: The Print Text in Black option may not work with certain data.
1. Select the print command in your application.
2. Select Dell MFP EXXXX (where XXXX is the name of your model), and then click the printing properties or
preferences button.
The printer driver window appears.
3. Click the Advanced tab.
4. Click the Other Print Options button.
5. Select the Print Text in Black option from the Printer Function list.
6. Select the Print Text in Black check box.
7. Click OK to return to the printer driver window.
8. Click OK.
9. Complete your print operation.
Save an Archive File of the Print Data (Windows®)
Print data can be saved as a PDF file to your computer.
1. Select the print command in your application.
2. Select Dell MFP EXXXX (where XXXX is the name of your model), and then click the printing properties or
preferences button.
The printer driver window appears.
3. Click the Advanced tab.
4. Click the Other Print Options button.
5. Select the Print Archive option from the Printer Function list.
6. Select the Print Archive check box.
7. Change the file size by moving the File Size slider to the right or left.
The resolution is set according to the file size.
8. Click OK to return to the printer driver window.
9. Click OK.
10. Complete your print operation.
The machine prints the data and saves the archive file to your computer.
Select a Print Profile (Windows®)
Print Profiles are presets designed to give you quick access to frequently-used printing configurations.
1. Select the print command in your application.
2. Select Dell MFP EXXXX (where XXXX is the name of your model), and then click the printing properties or
preferences button.
The printer driver window appears.
3. Click the Print Profiles tab.
73Print
Page 74

4. Select your profile from the print profile list.
The profile settings are shown on the left side of the printer driver window.
5. Do one of the following:
• If the settings are correct for your print job, click OK.
• To change the settings, go back to the Basic or Advanced tab, change settings, and then click OK.
NOTE: To display the Print Profiles tab at the front of the window the next time you print, select the Always show
Print Profiles tab first. check box.
Add a Print Profile
Add up to 20 new print profiles with customized settings.
1. Select the print command in your application.
2. Select Dell MFP EXXXX (where XXXX is the name of your model), and then click the printing properties or
preferences button.
The printer driver window appears.
3. Click the Basic tab and the Advanced tab, and configure the print settings you want for the new Print Profile.
4. Click the Print Profiles tab.
5. Click Add Profile.
The Add Profile dialog box appears.
6. Type the new print profile name in the Name field.
7. Click the icon you want to use to represent this profile from the icon list.
8. Click OK.
The new Print Profile name is added to the list in the Print Profiles tab.
Delete a Print Profile
1. Select the print command in your application.
2. Select Dell MFP EXXXX (where XXXX is the name of your model), and then click the printing properties or
preferences button.
The printer driver window appears.
3. Click the Print Profiles tab.
4. Click Delete Profile.
The Delete Profile dialog box appears.
5. Select the profile you want to delete.
6. Click Delete.
7. Click Yes.
8. Click Close.
74 Print
Page 75

Change the Default Print Settings (Windows®)
When you change print settings from within a program, the changes apply only to the items you are printing in that
program, at that time. To select print settings to use for all of your Windows® programs, all the time, use these steps
to change the default print settings.
1. Do one of the following:
• (For Windows Server
Click Start > Printers and Faxes.
• (For Windows Vista® and Windows Server® 2008)
®
2003)
Click
• (For Windows® 7 and Windows Server® 2008 R2)
Click
• (For Windows® 8)
Move your mouse to the lower right corner of your desktop. When the menu bar appears, click Settings, and
then click Control Panel. In the Hardware and Sound group, click View devices and printers.
• (For Windows Server
Move your mouse to the lower right corner of your desktop. When the menu bar appears, click Settings, and
then click Control Panel. In the Hardware group, click View devices and printers.
• (For Windows Server® 2012 R2)
Click Control Panel on the Start screen. In the Hardware group, click View devices and printers.
2. Right-click the Dell MFP EXXXX icon (where XXXX is your model name), and then select Printer properties. If
printer driver options appear, select your printer driver.
3. Click the General tab, and then click the Printing Preferences... or Preferences... button.
The printer driver dialog box appears.
NOTE: To configure the tray settings, click the Device Settings tab.
NOTE: To change the printer port, click the Ports tab.
4. Select the print settings you want to use as defaults for all of your Windows
(Start) > Control Panel > Hardware and Sound > Printers.
(Start) > Devices and Printers.
®
2012)
®
programs.
5. Click OK.
6. Close the printer properties dialog box.
Print a Document Using the Dell Emulate PS Printer Driver (PostScript® 3™
®
Language Emulation) (Windows
The Dell emulate PS printer driver lets you print PostScript® data more clearly.
1. Select the print command in your application.
2. Select Dell MFP EXXXX PS emulate (where XXXX is the name of your model), and then click the printing
properties or preferences button.
The printer driver window appears.
)
75Print
Page 76

3. Click the Layout or Paper/Quality tab to change basic print settings.
Click the Advanced... button to change advanced print settings.
4. Click OK.
5. Complete your print operation.
Print from Your Computer (Macintosh)
• Print a Document (Macintosh)
• Set Print Options (Macintosh)
• Print a Document Using the Dell Emulate PS Printer Driver (PostScript® 3™ language emulation) (Macintosh)
The Dell emulate PS printer driver lets you print PostScript® data more clearly.
• Monitor the Status of the Machine from Your Computer (Macintosh)
The Status Monitor utility is a configurable software tool for monitoring the status of a device, allowing you to
get immediate notification of error messages, such as paper empty or paper jam, at pre-set update intervals. You
can also access Web Based Management.
Print a Document (Macintosh)
1. Make sure you have loaded the correct size paper in the paper tray.
2. From an application, such as Apple TextEdit, click the File menu, and then select Print.
3. Select Dell MFP EXXXX (where XXXX is your model name).
76 Print
Page 77

NOTE: For more page setup options, click the Show Details button.
4. Type the number of copies you want in the Copies field.
5. Click the Paper Size pop-up menu, and then select your paper size.
6. Select the Orientation option that matches the way you want the document to print.
7. Click the application pop-up menu, and then select Print Settings.
The Print Settings options appear.
8. Click the Media Type pop-up menu, and then select the type of paper you are using.
9. Change other printer settings, if needed.
10. Click Print.
Set Print Options (Macintosh)
• Print in Toner Save Mode (Macintosh)
This feature conserves your toner by using less toner to print documents; print appears lighter, but is still
readable.
• Print Multiple Copies of the Same Document (Macintosh)
• Print on Both Sides of the Paper (Macintosh)
• Change the Paper Size (Macintosh)
Paper Size choices include a large selection of standard paper sizes.
• Change the Orientation of Your Print (Portrait or Landscape) (Macintosh)
• Print More Than One Page on a Single Sheet of Paper (N in 1) (Macintosh)
• Reverse Print (Macintosh)
This setting rotates the printed image 180 degrees.
• Flip Horizontally (Macintosh)
The Flip horizontally option reverses the printout horizontally from left to right.
• Scaled Print (Macintosh)
This option lets you enlarge or reduce the pages in your document to fit your printed paper size.
• Change the Media Type (Macintosh)
To achieve the best print results, the media being printed on should be selected in the driver. The machine
changes the way it prints depending on the selected media type.
• Change the Resolution (Macintosh)
You can choose the print resolution. As print resolution and speed are related, the higher the resolution, the
longer it will take to print the document.
• Reduce or Enlarge Document Layout (Macintosh)
You can reduce or enlarge the layout of a document by scaling it to a percentage of the document's original size.
• Change the Paper Source (Macintosh)
Select a paper source setting that matches your print conditions or purpose.
• Change the Graphic Quality (Macintosh)
You can change the print quality.
• Reduce Paper Curl (Macintosh)
• Improve Toner Fixing (Macintosh)
77Print
Page 78

• Adjust the Print Density (Macintosh)
You can increase or decrease the print density.
• Skip Blank Page (Macintosh)
Use this option to allow the printer driver to automatically detect blank pages and exclude them from printing.
Print in Toner Save Mode (Macintosh)
This feature conserves your toner by using less toner to print documents; print appears lighter, but is still readable.
NOTE: We do not recommend using this mode for printing photo or grayscale images.
1. From an application, such as Apple TextEdit, click the File menu, and then select Print.
2. Select Dell MFP EXXXX (where XXXX is your model name).
NOTE: For more page setup options, click the Show Details button.
3. Click the application pop-up menu, and then select Print Settings.
The Print Settings options appear.
4. Click the Advanced print settings list.
5. Click Toner Save Mode.
6. Check the Toner Save Mode check box.
7. Change other printer settings if needed.
8. Click Print.
Print Multiple Copies of the Same Document (Macintosh)
1. From an application, such as Apple TextEdit, click the File menu, and then select Print.
2. Select Dell MFP EXXXX (where XXXX is your model name).
NOTE: For more page setup options, click the Show Details button.
3. Type the number of copies you want in the Copies field.
4. Click the application pop-up menu, and then select Paper Handling.
The Paper Handling options appear.
5. Select the Collate pages check box, if needed.
78 Print
Page 79

Collate pages
When the Collate pages check box is selected, one complete copy of your document will be printed, and then
reprinted according to the number of copies you select. If the Collate pages check box is not selected, then each
page will be printed according to the number of copies selected before the next page of the document is printed.
6. Change other printer settings, if needed.
7. Click Print.
Print on Both Sides of the Paper (Macintosh)
• Select Letter, Legal, or Folio sized paper when using the automatic 2-sided printing function.
• Make sure the back cover is closed.
• If paper is curled, straighten it and put it back in the paper tray.
• Use regular paper or thin paper. DO NOT use bond paper.
• If the paper is too thin, it may wrinkle.
• When you use the manual 2-sided printing function, it is possible there may be paper jams or poor print quality.
1. From an application, such as Apple TextEdit, click the File menu, and then select Print.
2. Select Dell MFP EXXXX (where XXXX is your model name).
NOTE: For more page setup options, click the Show Details button.
3. Select the Orientation option that matches the way you want the document to print.
4. For automatic 2-sided printing, do the following:
a. Click the application pop-up menu, and then select Layout.
The Layout setting options appear.
b. In the Two-Sided section, select the Short-Edge binding or Long-Edge binding option.
c. Change other printer settings, if needed.
d. Click Print.
5. For manual 2-sided printing, do the following:
a. Click the application pop-up menu, and then select Paper Handling.
79Print
Page 80

The Paper Handling options appear.
b. In the Pages to Print pop-up menu, select Even Only.
c. Change other print settings, if needed.
d. Click the Print button.
e. After the machine prints the even-numbered pages, remove the printed pages from the output paper tray.
f. Make sure the pages are completely flat, and put the paper back in the tray, blank side facing down.
g. Repeat steps 1-3, selecting the same printer and settings you used to print the even-numbered pages.
h. Click the application pop-up menu, and then select Paper Handling. The Paper Handling options appear.
i. In the Pages to Print pop-up menu, select Odd Only.
j. Click Print.
Change the Paper Size (Macintosh)
Paper Size choices include a large selection of standard paper sizes.
1. From an application, such as Apple TextEdit, click the File menu, and then select Print.
2. Select Dell MFP EXXXX (where XXXX is your model name).
NOTE: For more page setup options, click the Show Details button.
3. Click the Paper Size pop-up menu, and then select your paper size.
4. Change other printer settings, if needed.
5. Click Print.
Create Custom Size (Macintosh)
1. Click the Paper Size pop-up menu, and then select Manage Custom Sizes....
2. Click
3. Type the name for this custom size.
4. Type size and margin values in the Paper Size and Non-Printable Area fields.
5. Click OK.
.
80 Print
Page 81

Change the Orientation of Your Print (Portrait or Landscape) (Macintosh)
Portrait Landscape
1. From an application, such as Apple TextEdit, click the File menu, and then select Print.
2. Select Dell MFP EXXXX (where XXXX is your model name).
NOTE: For more page setup options, click the Show Details button.
3. Select the Orientation option that matches the way you want the document to print.
4. Change other printer settings, if needed.
5. Click Print.
Print More Than One Page on a Single Sheet of Paper (N in 1) (Macintosh)
1. From an application, such as Apple TextEdit, click the File menu, and then select Print.
2. Select Dell MFP EXXXX (where XXXX is your model name).
NOTE: For more page setup options, click the Show Details button.
3. Click the application pop-up menu, and then select Layout.
The Layout setting options appear.
4. Click the Pages per Sheet pop-up menu, and then select the number of pages to print on each sheet.
5. Click the Layout Direction menu, and then select how you want the pages ordered.
6. Click the Border pop-up menu, and then select your border line type.
81Print
Page 82

7. Change other printer settings if needed.
8. Click Print.
Reverse Print (Macintosh)
This setting rotates the printed image 180 degrees.
1. From an application, such as Apple TextEdit, click the File menu, and then select Print.
2. Select Dell MFP EXXXX (where XXXX is your model name).
NOTE: For more page setup options, click the Show Details button.
3. Click the application pop-up menu, and then select Layout.
The Layout setting options appear.
4. Select the Reverse page orientation check box.
5. Change other printer settings, if needed.
6. Click Print.
Flip Horizontally (Macintosh)
The Flip horizontally option reverses the printout horizontally from left to right.
1. From an application, such as Apple TextEdit, click the File menu, and then select Print.
2. Select Dell MFP EXXXX (where XXXX is your model name).
NOTE: For more page setup options, click the Show Details button.
3. Click the application pop-up menu, and then select Layout.
82 Print
Page 83

The Layout setting options appear.
4. Select the Flip horizontally check box.
5. Change other printer settings, if needed.
6. Click Print.
Scaled Print (Macintosh)
This option lets you enlarge or reduce the pages in your document to fit your printed paper size.
1. From an application, such as Apple TextEdit, click the File menu, and then select Print.
2. Select Dell MFP EXXXX (where XXXX is your model name).
NOTE: For more page setup options, click the Show Details button.
3. Click the application pop-up menu, and then select Paper Handling.
The Paper Handling options appear.
4. Select the Scale to fit paper size check box, and then choose your paper size from the Destination Paper Size
pop-up menu.
NOTE: If you want to scale the document because it is too big for your paper, select Scale down only. If this option
is selected and the document is formatted for paper that is smaller than the paper you have, the document prints at
its original size.
5. Change other printer settings if needed.
6. Click Print.
Change the Media Type (Macintosh)
To achieve the best print results, the media being printed on should be selected in the driver. The machine changes
the way it prints depending on the selected media type.
1. From an application, such as Apple TextEdit, click the File menu, and then select Print.
2. Select Dell MFP EXXXX (where XXXX is your model name).
NOTE: For more page setup options, click the Show Details button.
3. Click the application pop-up menu, and then select Print Settings.
The Print Settings options appear.
4. Click the Media Type pop-up menu, and then select the media type you want to use.
Select this Media Type For this paper
Plain Paper Ordinary plain paper
Thin Paper Ordinary thin paper
Thick Paper Rough paper or thicker paper
Thicker Paper
Bond Paper Bond paper
Envelopes Envelopes
Select this option if you have selected Thick Paper, and toner
smudges while printing.
83Print
Page 84

Env. Thick Select this option if the toner does not correctly stick to the
envelope when the Envelopes option is selected.
Env. Thin Select this option if the envelope is crumpled when the
Envelopes option is selected.
Recycled Paper Recycled paper
Label Label
5. Change other printer settings, if needed.
6. Click Print.
Change the Resolution (Macintosh)
You can choose the print resolution. As print resolution and speed are related, the higher the resolution, the longer it
will take to print the document.
1. From an application, such as Apple TextEdit, click the File menu, and then select Print.
2. Select Dell MFP EXXXX (where XXXX is your model name).
NOTE: For more page setup options, click the Show Details button.
3. Click the application pop-up menu, and then select Print Settings.
The Print Settings options appear.
4. Click the Resolution pop-up menu, and then select the print resolution you want to use.
• 300 dpi
• 600 dpi
• HQ 1200
5. Change other printer settings, if needed.
6. Click Print.
Reduce or Enlarge Document Layout (Macintosh)
You can reduce or enlarge the layout of a document by scaling it to a percentage of the document's original size.
1. From an application, such as Apple TextEdit, click the File menu, and then select Page Setup.
2. Select Dell MFP EXXXX (where XXXX is your model name).
3. Type the percentage by which you want to reduce or enlarge the printout in the Scale field.
4. Change other printer settings, if needed.
5. Click OK.
6. From an application, such as Apple TextEdit, click the File menu, and then select Print.
7. Click Print.
Change the Paper Source (Macintosh)
Select a paper source setting that matches your print conditions or purpose.
84 Print
Page 85

If you load one sheet of paper in the manual feed slot, the paper is automatically pulled from this slot. Do not load
any paper in the manual feed slot when printing from paper tray.
1. From an application, such as Apple TextEdit, click the File menu, and then select Print.
2. Select Dell MFP EXXXX (where XXXX is your model name).
NOTE: For more page setup options, click the Show Details button.
3. Click the application pop-up menu, and then select Print Settings.
The Print Settings options appear.
4. Click the Paper Source pop-up menu, and then select your paper tray.
Option Description
Auto Select The machine will automatically select the tray to use if the
paper type and paper size configured on the machine match
the printer driver settings. The paper size and paper type for
each tray must be configured correctly on the machine.
Tray1 The machine will exclusively use tray #1 when printing.
Manual The machine will exclusively use the Manual Feed Slot when
printing.
5. Change other printer settings, if needed.
6. Click Print.
Change the Graphic Quality (Macintosh)
You can change the print quality.
1. From an application, such as Apple TextEdit, click the File menu, and then select Print.
2. Select Dell MFP EXXXX (where XXXX is your model name).
NOTE: For more page setup options, click the Show Details button.
3. Click the application pop-up menu, and then select Print Settings.
The Print Settings options appear.
4. Click the Advanced print settings list.
5. Click Graphics Quality, and then select the print quality you want to use.
Option Description
Graphics The Graphics mode prioritizes contrast. Choose this setting
for printing text and figures, such as business and presentation
documents. You can represent sharp contrasts in shaded areas.
Text This is the best mode for printing text documents.
6. Click Print.
85Print
Page 86

Reduce Paper Curl (Macintosh)
If you are printing only a few pages, you do not need to select this setting. If paper curls excessively, we recommend
changing the Media Type setting in the printer driver to the Thin Paper or Env. Thin setting.
NOTE: This setting decreases the temperature of the machine's fusing process, which reduces paper curl.
1. From an application, such as Apple TextEdit, click the File menu, and then select Print.
2. Select Dell MFP EXXXX (where XXXX is your model name).
NOTE: For more page setup options, click the Show Details button.
3. Click the application pop-up menu, and then select Print Settings.
The Print Settings options appear.
4. Click the Advanced print settings list.
5. Select the Improve Print Output option.
6. Select the Reduce Paper Curl option.
7. Click Print.
Improve Toner Fixing (Macintosh)
NOTE: This setting increases the temperature of the machine's fusing process, which improves toner's ability to stick
to paper.
1. From an application, such as Apple TextEdit, click the File menu, and then select Print.
2. Select Dell MFP EXXXX (where XXXX is your model name).
86 Print
Page 87

NOTE: For more page setup options, click the Show Details button.
3. Click the application pop-up menu, and then select Print Settings.
The Print Settings options appear.
4. Click the Advanced print settings list.
5. Select the Improve Print Output option.
6. Select Improve Toner Fixing.
7. Click Print.
Adjust the Print Density (Macintosh)
You can increase or decrease the print density.
1. From an application, such as Apple TextEdit, click the File menu, and then select Print.
2. Select Dell MFP EXXXX (where XXXX is your model name).
NOTE: For more page setup options, click the Show Details button.
3. Click the application pop-up menu, and then select Print Settings.
The Print Settings options appear.
4. Click the Advanced print settings list.
5. Click Density Adjustment.
6. Clear the Printer Default check box.
7. To increase or decrease the print density, move the slide bar to the right or left.
8. Click Print.
Skip Blank Page (Macintosh)
Use this option to allow the printer driver to automatically detect blank pages and exclude them from printing.
1. From an application, such as Apple TextEdit, click the File menu, and then select Print.
2. Select Dell MFP EXXXX (where XXXX is your model name).
NOTE: For more page setup options, click the Show Details button.
3. Click the application pop-up menu, and then select Print Settings.
The Print Settings options appear.
4. Click the Advanced print settings list.
5. Click the Other Print Options menu.
6. Select the Skip Blank Page check box.
7. Click Print.
Print a Document Using the Dell Emulate PS Printer Driver (PostScript® 3™ language emulation) (Macintosh)
The Dell emulate PS printer driver lets you print PostScript® data more clearly.
87Print
Page 88

• Make sure you have added the Dell emulate PS printer driver from Print & Scan or Printers & Scanners in the
System Preferences list on your Macintosh.
1. Make sure you have loaded the correct size paper in the paper tray.
2. From an application, such as Apple TextEdit, click the File menu, and then select Print.
3. Select Dell MFP EXXXX PS emulate (where XXXX is your model name).
NOTE: For more page setup options, click the Show Details button.
4. Type the number of copies you want in the Copies field.
5. Click the Paper Size pop-up menu, and then select your paper size.
6. Select the Orientation option that matches the way you want the document to print.
7. Click the print options pop-up menu, and then click Printer Features.
The Printer Features options appear.
8. Click the Resolution pop-up menu, and then select the resolution.
9. Click the Media Type pop-up menu, and then select the type of paper you are using.
10. Change other printer settings, if needed.
11. Click Print.
Monitor the Status of the Machine from Your Computer (Macintosh)
The Status Monitor utility is a configurable software tool for monitoring the status of a device, allowing you to get
immediate notification of error messages, such as paper empty or paper jam, at pre-set update intervals. You can also
access Web Based Management.
1. Click the System Preferences menu, select Print & Scan or Printers & Scanners, and then select your machine.
2. Click the Options & Supplies button.
3. Click the Utility tab, and then click the Open Printer Utility button.
Status Monitor starts.
Updating the machine's status
To view the latest machine status while the Status Monitor window is open, click the
interval at which the software updates machine status information. Click Status Monitor in the menu bar, and
then select Preferences.
Web Based Management (Network Connection Only)
Access the Web Based Management System by clicking the machine icon on the Status Monitor screen. You can
use a standard Web Browser to manage your machine using HTTP (Hyper Text Transfer Protocol).
icon. You can set the
Adjust Print Settings from the Machine’s Control Panel
• Cancel a Print Job
• Change the Printer Emulation Mode
88 Print
Page 89

We recommend setting Printer Emulation mode using your application software or network server. If the setting
does not work correctly, select the required emulation mode manually using the machine's control panel.
• Change 2-Sided Print Settings
Change the settings for printing on both sides of the paper from your machine's control panel.
• Auto Continue
This setting enables the machine to automatically clear a paper size error and use any compatible paper from
other paper trays to complete the print job.
• Restore Printer Factory Settings
Use this function to return the machine's printer settings to the factory settings.
• Print the Internal Font List
Print a list of the machine's internal (also called resident) fonts to see how each font looks before you select it.
• Print a List of Printer Settings
• Test Print
If there are problems with print quality, follow these instructions to do a test print.
Cancel a Print Job
1. Press Cancel.
Change the Printer Emulation Mode
We recommend setting Printer Emulation mode using your application software or network server. If the setting
does not work correctly, select the required emulation mode manually using the machine's control panel.
Your machine will receive print commands in a printer job language, or emulation. Different operating systems
and applications send the print commands in different languages. Your machine can receive print commands in a
variety of emulations and has an automatic emulation selection feature. When the machine receives data from the
computer, it automatically selects the emulation mode. The default setting is Auto.
PCL Setting Mode
PCL Setting mode is the emulation mode in which this printer supports the PCL6 language of a HewlettPackard LaserJet laser printer. Many applications support this type of laser printer. Using this mode will allow
your machine to run at its best with those applications.
Dell emulate PS Mode
Dell emulate PS is an original Dell page description language and a PostScript® language emulation interpreter.
This machine supports PostScript® 3™. The Dell emulate PS interpreter of this machine allows you to control
text and graphics on the page.
For technical information about PostScript
• Adobe Systems Incorporated. PostScript® Language Reference, 3rd edition. Addison-Wesley Professional,
1999. ISBN: 0-201-37922-8
• Adobe Systems Incorporated. PostScript® Language Program Design. Addison-Wesley Professional, 1988.
ISBN: 0-201-14396-8
• Adobe Systems Incorporated. PostScript® Language Tutorial and Cookbook. Addison-Wesley Professional,
1985. ISBN: 0-201-10179-3
®
commands, see the following manuals:
1. Press Menu.
89Print
Page 90

2. Press p or q to display the Printer option, and then press OK.
3. Press p or q to display the Emulation option, and then press OK.
4. Select the emulation mode you want.
5. Press Cancel.
Change 2-Sided Print Settings
Change the settings for printing on both sides of the paper from your machine's control panel.
Settings in the printer driver always take priority over settings you change manually on the control panel. If you do
not print 2-sided frequently, select None for the 2-sided / Booklet pull down list in the printer driver, and use the
control panel to turn it on manually only when you want to print on both sides of the paper.
1. Press Menu.
2. Press p or q to display the Printer option, and then press OK.
3. Press p or q to display the 2-sided option, and then press OK.
4. Press p or q to display the Off, On(Long Edge), or On(Short Edge) option, and then press OK.
5. Press Cancel.
Auto Continue
This setting enables the machine to automatically clear a paper size error and use any compatible paper from other
paper trays to complete the print job.
1. Press Menu.
2. Press p or q to display the Printer option, and then press OK.
3. Press p or q to display the Auto Continue option, and then press OK.
4. Press p or q to display the On or Off option, and then press OK.
5. Press Cancel.
Restore Printer Factory Settings
Use this function to return the machine's printer settings to the factory settings.
This will not reset the network settings.
1. Press Menu.
2. Press p or q to display the Printer option, and then press OK.
3. Press p or q to display the Reset Printer option, and then press OK.
4. Follow the machine's instruction to reset printer settings.
5. Press Cancel.
90 Print
Page 91

Print the Internal Font List
Print a list of the machine's internal (also called resident) fonts to see how each font looks before you select it.
1. Press Menu.
2. Press p or q to display the Printer option, and then press OK.
3. Press p or q to display the Print Options option, and then press OK.
4. Press p or q to display the INTERNAL FONT option, and then press OK.
5. Press the PCL Setting or PS Emulate option.
6. Press Cancel.
Print a List of Printer Settings
1. Press Menu.
2. Do one of the following:
• For Dell E515dn/Dell E515dw
Press p or q to display the Print Reports option, and then press OK.
• For Dell E514dw
Press p or q to display the Machine Info. option, and then press OK.
3. Press p or q to display the Print Settings option, and then press OK.
The machine prints the Printer Settings.
Test Print
If there are problems with print quality, follow these instructions to do a test print.
1. Press Menu.
2. Press p or q to display the Printer option, and then press OK.
3. (For Printer Emulation Supported models)
Press p or q to display the Print Options option, and then press OK.
4. Press p or q to display the Test Print option, and then press OK.
5. Press Start.
The machine prints a Test Print page.
6. Press Cancel.
91Print
Page 92

92 Print
Page 93

Scan . . . . . . . . . . . . . . . . . . . . . . . . . . . . . . . . . . . . . . . . . . . . . . . . . . . . . . . . . . . . . . . . . 95
Before Scanning . . . . . . . . . . . . . . . . . . . . . . . . . . . . . . . . . . . . . . . . . . . . . . . . . . . . . . . . . . . . . . . . . . 95
Scan Using the Scan Button on Your Dell Machine . . . . . . . . . . . . . . . . . . . . . . . . . . . . . . . . . . . . 97
Scan from Your Computer (Windows
Scan from Your Computer (Macintosh) . . . . . . . . . . . . . . . . . . . . . . . . . . . . . . . . . . . . . . . . . . . . . . 104
®
) . . . . . . . . . . . . . . . . . . . . . . . . . . . . . . . . . . . . . . . . . . . . . 104
93
Page 94

94
Page 95

4
Scan
• Before Scanning
• Scan Using the Scan Button on Your Dell Machine
• Scan from Your Computer (Windows®)
• Scan from Your Computer (Macintosh)
There are several ways you can use your Macintosh to scan photos and documents on your Dell machine. Use the
software applications provided by Dell or your favorite scanning application.
Before Scanning
Before attempting to scan, confirm the following:
• For USB or network cable users: Make sure the interface cable is correctly inserted.
Configure Network Scanning for Windows®
To use the machine as a network scanner, the machine must be configured with a TCP/IP address.
• If you installed the machine following the instructions for a network user, then the machine should already be
configured for your network.
• If your computer is protected by a firewall and is unable to scan when connecting over the network, you may need
to configure the firewall settings.
• For network scanning, a maximum of 25 clients can be connected to one machine on a network.
1. Do one of the following:
• (Windows Vista
Click
• (Windows® 7)
Click
Click the drop-down list and select your model name (if not already selected). Click SCAN in the left
navigation bar, and then click Scanners and Cameras.
• (Windows® 8)
Dell Printer Hub, and then click the drop-down list and select your model name (if not already selected). Click
SCAN in the left navigation bar, and then click Scanners and Cameras.
2. Do one of the following:
• (Windows Vista
Click the Properties button.
NOTE: (Windows Vista
If the User Account Control screen appears, do the following:
• For users who have administrator rights: Click Continue or Yes.
®
)
(Start) > Control Panel > Hardware and Sound > Scanners and Cameras.
(Start) > All Programs > Dell Printers.
®
, Windows® 7 and Windows® 8)
®
, Windows® 7 and Windows® 8)
95Scan
Page 96

• For users who do not have administrator rights: Type the administrator password, and then click OK or
Yes.
3. Click the Network Setting tab, and then select the appropriate connection method.
• Specify your machine by address.
Type the machine's IP address in the IP Address field, and then click OK.
• Specify your machine by name.
Type the machine's node name in the Node Name field, or click Browse to search for a device, and then select
the machine you want to use. Click OK.
4. Click the Scan To Button tab, and then type your computer's name in the Display Name (Max 15 characters)
field. The machine's LCD displays the name you type. The default setting is your computer's name. You can
type any name you like.
5. To avoid receiving unwanted documents, type a four-digit PIN in the Pin number and Retype Pin number fields.
To send data to a computer protected by a PIN, the LCD prompts you to enter the PIN before the document
can be scanned and sent to the computer.
96 Scan
Page 97

Configure Network Scanning for Macintosh
To use the machine as a network scanner, the machine must be configured with a TCP/IP address.
• If you installed the machine following the instructions for a network user, the machine should already be
configured for your network.
• To use the machine as a network scanner, the machine must be configured with a TCP/IP address. You can set or
change the address settings from the machine's control panel.
• To scan from the machine on a network, you must select the networked machine in the Device Selector
application.
1. In the Finder menu bar, click Go > Applications > Dell Printers, and then double-click the
(ControlCenter) icon.
The ControlCenter screen appears.
2. Click the Model pop-up menu, and then select Other....
The Device Selector window appears.
3. Click the + button.
4. Select a machine from the list of available machines, and then click Add. You can also specify your machine by
IP address. Click the IP button, and then type the IP address.
5. Click OK.
NOTE: To use the Scan button features on the machine, select the Scan Key Setting check box to register your
computer with the "Scan To" features at the machine. Type the name for your Macintosh that you want to be
displayed on the machine's LCD (up to 15 characters).
NOTE: To avoid receiving unwanted documents, select the Enable PIN code protection check box, and then type
a four-digit PIN in the PIN code and Verify fields. To send data to a computer protected by a PIN, the LCD prompts
you to type the PIN before the document can be scanned and sent to the computer.
Scan Using the Scan Button on Your Dell Machine
• Scan Photos and Graphics
Send scanned photos or graphics directly to your computer. Dell's ControlCenter software (for Macintosh only)
will launch the default graphics application on your computer and open your scanned document automatically.
• Save Scanned Data to a Folder as a PDF File
Scan documents and save them to a folder on your computer as PDF files.
• Web Services for Scanning on Your Network (Windows Vista® SP2 or greater, Windows® 7 and Windows® 8)
The Web Services protocol enables Windows Vista® (SP2 or greater), Windows® 7 and Windows® 8 users to scan
using a Dell machine on the network. You must install the driver via Web Services.
• Change Scan Button Settings from ControlCenter (Macintosh)
97Scan
Page 98

Scan Photos and Graphics
Send scanned photos or graphics directly to your computer. Dell's ControlCenter software (for Macintosh only) will
launch the default graphics application on your computer and open your scanned document automatically.
Use the Scan button on the machine to make temporary changes to the scan settings. To make permanent changes,
use Dell's ControlCenter software (for Macintosh only).
1. Load your document.
2. Press
3. Press p or q to select the Scan to PC option, and then press OK.
4. Press p or q to select the Image option, and then press OK.
5. If the machine is connected over the network, select the destination computer.
6. Press OK.
NOTE: If the LCD prompts you to enter a PIN, enter the four-digit PIN for the destination computer on the LCD.
7. Do one of the following:
• To change the scan settings for this document, press p or q to select Yes, and then press OK. Go to the next
step.
• To use the default scan settings, press p or q to select No, and then press OK. Press Start.
The machine starts scanning. If you are using the machine's scanner glass, follow the LCD instructions to
complete the scanning job.
NOTE: In order to change scan settings, Dell's Control Center software (for Macintosh only) must be installed on a
computer connected to the machine.
NOTE: (For Windows) In order to change scan settings, see the FAQ in Dell Printer Hub software.
8. Select the scan settings you want to change:
• Scan Type
• Resolution
• File Type
• Scan Size
• Remove Bkg. Clr
(available only for the Color and Gray options.)
(Scan).
9. Press Start.
The machine starts scanning. If you are using the machine's scanner glass, follow the LCD instructions to
complete the scanning job.
98 Scan
Page 99

Save Scanned Data to a Folder as a PDF File
Scan documents and save them to a folder on your computer as PDF files.
Use the Scan button on the machine to make temporary changes to the scan settings. To make permanent changes,
use Dell's ControlCenter software (for Macintosh only).
1. Load your document.
2. Press
3. Press p or q to select the Scan to PC option, and then press OK.
4. Press p or q to select the File option, and then press OK.
5. If the machine is connected over the network, select the destination computer.
6. Press OK.
NOTE: If the LCD prompts you to enter a PIN, enter the four-digit PIN for the destination computer on the LCD.
7. Do one of the following:
• To change the scan settings for this document, press p or q to select Yes, and then press OK. Go to the next
step.
• To use the default scan settings, press p or q to select No, and then press OK. Press Start. The machine starts
scanning. If you are using the machine's scanner glass, follow the LCD instructions to complete the scanning
job.
NOTE: In order to change scan settings, Dell's Control Center software (for Macintosh only) must be installed on a
computer connected to the machine.
NOTE: (For Windows) In order to change scan settings, see the FAQ in Dell Printer Hub software.
8. Select the scan settings you want to change:
• Scan Type
• Resolution
• File Type
• Scan Size
• Remove Bkg. Clr
(available only for the Color and Gray options.)
(Scan).
9. Press Start.
The machine starts scanning. If you are using the machine's scanner glass, follow the LCD instructions to
complete the scanning job.
Web Services for Scanning on Your Network (Windows Vista® SP2 or greater,
®
Windows
The Web Services protocol enables Windows Vista® (SP2 or greater), Windows® 7 and Windows® 8 users to scan
using a Dell machine on the network. You must install the driver via Web Services.
7 and Windows® 8)
99Scan
Page 100

• Scan Using Web Services from the Dell Machine (Windows Vista® SP2 or greater, Windows® 7 and Windows®
8)
If you have installed the driver for scanning via Web Services, you can access the Web Services scanning menu
on your Dell machine's LCD.
• Configure Scan Settings for Web Services
Scan Using Web Services from the Dell Machine (Windows Vista® SP2 or greater, Windows® 7 and Windows® 8)
If you have installed the driver for scanning via Web Services, you can access the Web Services scanning menu on
your Dell machine's LCD.
Certain characters in the messages displayed on the LCD may be replaced with spaces if the language settings of
your OS and your Dell machine are different.
1. Load your document.
2. Press
(Scan).
3. Press p or q to select the Web Service option, and then press OK.
4. Press p or q to select the type of scan you want to do, and then press OK.
5. Press p or q to select the destination computer where you want to send the scan, and then press OK.
6. Press Start.
The machine starts scanning.
Configure Scan Settings for Web Services
1. Do one of the following:
• (Windows Vista®)
Click
• (Windows® 7)
Click
• (Windows
Move your mouse to the lower right corner of your desktop. When the menu bar appears, click Settings, and
then click Control Panel. In the Hardware and Sound group, click View devices and printers.
2. Do one of the following:
• (Windows Vista
Click your machine, and then click the Scan Profiles button. The Scan Profiles dialog box appears.
• (Windows® 7) and (Windows® 8)
Right-click on the machine icon, and then select Scan profiles.... The Scan Profiles dialog box appears.
(Start) > Control Panel > Hardware and Sound > Scanners and Cameras.
(Start) > Devices and Printers.
®
8)
®
)
3. Select the scan profile you want to use.
4. Make sure the scanner selected in the Scanner list is a Dell machine that supports Web Services for scanning,
100 Scan
 Loading...