

Page 1
Laptop Guide
Getting to Know Your TU Laptop
OTS PUBLICATION
Getting to Know Your TU Laptop
This section contains excerpts from the Dell User’s Guide for your
new Towson University laptop.
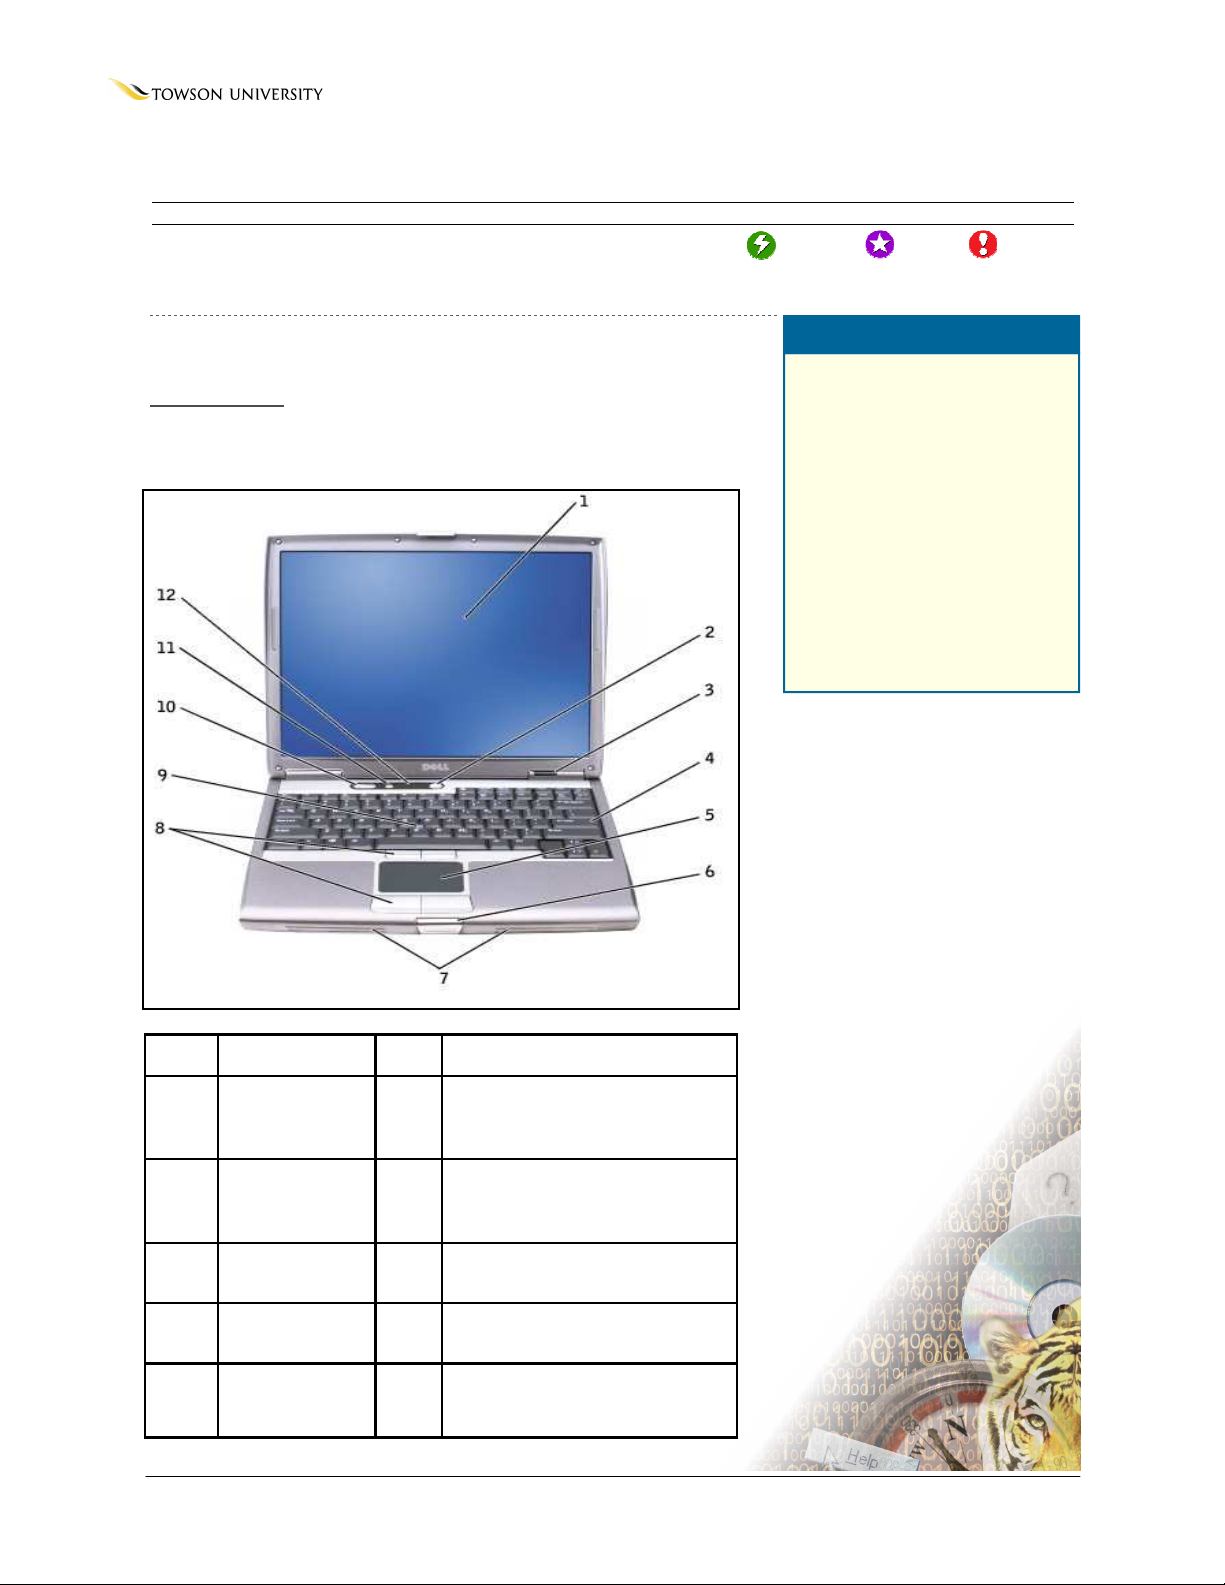
Front View
This is a front view of the Dell Latitude D610 laptop (Figure 1,1).
Figure 1
: WIN19 •
REVISED
3/26/2007
• T
RAINING@TOWSON.EDU
•
OFFICE OF TECHNOLOGY SERVICES
=Shortcut =Advice =Caution
Summary
Online Editing
1. Getting to Know Your
Laptop
2. Logging on for the First
Time
3. Storing Your Laptop
4. Data Storage Techniques
5. Software
6. Purchasing Accessories
7. Traveling with Your TU
Laptop
8. Glossary
1 Display 7 Speakers
2 Power Button 8 Track Stick/Touch Pad Buttons
3 Service Status
Lights
4 Keyboard 10 Volume Control Buttons
9 Track Stick
5 Touch Pad 11 Mute Button
6 Display Latch 12 Keyboard and Wireless Status
lights
© 2006 Towson University -This work is licensed under the Creative Commons Attribution-NonCommercial-NoDerivs License.
Details available at http://www.towson.edu/OTStraining. 410-704-4070.
Page 2

L
APTOP MANUAL
: G
ETTING TO KNOW YOUR
Symbols
Different symbols on the laptop inform you of functions or alerts. (Figure 2)
TU L
APTOP
Lights up when you turn on the computer and
blinks when the computer is in a power
management mode.
Lights up when the computer reads or writes data.
Lit or blinking: Indicates battery charge status.=
Off: The battery is adequately charged (or the
computer is turned off).=
Flashing orange: The battery charge is low.=
Solid orange: The battery charge is critically low.
Turns on when the numeric keypad is enabled.
Turns on when wireless networking (Wi-Fi) is
enabled.
Turns on when the uppercase letter function is
enabled.
Turns on when Mini PCI functionality and
Bluetooth wireless technology are enabled. To
enable or disable Mini PCI functionality and
Bluetooth wireless technology, press <Fn><F2>.=
NOTE: Bluetooth wireless technology is an
optional feature. The icon only turns on if you
ordered Bluetooth wireless technology with your
computer.
Figure 2
Figure 3
Turns on when the scroll lock function is enabled.
Left View
1 Security Cable slot 4 PC Card slot
2 Audio connectors (2) 5 Smart Card slot
3 Infrared Sensor 6 Hard Drive
2
Page 3

Right View
Figure 4
L
APTOP MANUAL
: G
ETTING TO KNOW YOUR
TU L
APTOP
Back View
1 Network connector
(Ethernet)
2 S-video TV-Out
connector
3 USB connectors (2) 8 AC Adapter
4 Modem connector
(Telephone)
5 Parallel connector
6 Serial connector
7 Video connector
connector
9 Air vents
== ==
Figure 5
1 Module Bay
2 Device Latch Release
3 USB connectors (2)
Bottom View
Figure 6
NOTE: The fan inside the laptop will turn on when the internal laptop components get hot. Fan noise
is normal, and does not indicate a problem with the fan or computer.
1 Service cover 5 Docking Device
slot
2 Battery-Bay
Latch Release
3 Battery
Charge gauge
4 Battery 8 Service cover
6 Fan
7 Service cover
3
Page 4

L
APTOP MANUAL
: G
ETTING TO KNOW YOUR
TU L
Logging on for the First Time
This section covers the basics of logging onto your Towson University laptop for the first time.
1. Any first time user must connect the laptop to the University network through an Ethernet
cable before logging on. Connect the cable to an available network port in your office or in a
conference room.
2. Log-on to the laptop using your TowsonU username and password (Figure 7,1).
APTOP
Figure 7
1
NOTE: Once you’ve successfully logged onto the laptop, it will remember your username and
password allowing you to log on even when you aren’t connected to the university network.
Storing Your Laptop
Each Towson University laptop comes with a padded laptop bag that provides protection, and room
to carry documents and accessories. This is an ideal way to store or travel with your laptop.
Keep your laptop in a separate compartment from other accessories or components in the case (i.e.
external drives, the power adapter, CDs or DVDs, mouse, etc.). This keeps both the laptop and
accessories from being damaged while stored.
•
Be wary of drastic temperature changes. Over time, temperature-related problems will begin to
appear. For example, don’t leave your laptop in your car for extended periods of time, as heat
and cold can damage its components.
NOTE: Keep in mind, a laptop in a car is an easy target for theft!
Data Storage Techniques
Safely and properly storing your data on a laptop is a tougher task than with a desktop computer, as
one of the key benefits of having a laptop is portability.
•
When you are traveling off-campus, your O: and H: drives are still accessible through the Virtual
Workspace. You can access the Virtual Workspace at: https://virtualworkspace.towson.edu
If you know you will be traveling somewhere without an Internet connection, it is useful to make
copies of the documents you’ll be using from your O: or H: drives onto your C: drive (also known as
your local hard drive).
If you need more information regarding Citrix or VPN connections, information is available at the OTS
Training website (http://wwwnew.towson.edu/adminfinance/ots/training/techdocs.asp)
4
Page 5

L
As always, it is very important that you back up your information. Anything saved on the O: or H:
drive is backed up every night, so that it is safe. However, the only person who can back up your C:
drive is you. Flash Memory devices, such as “thumb drives”, are often a convenient way to keep data
backed up, however they are very easily lost. If something should happen to your laptop, and the
hard drive was damaged or inaccessible, the only way to recover data would be to use the backup
that you had made.
APTOP MANUAL
: G
ETTING TO KNOW YOUR
TU L
APTOP
Software
•
Your new Towson University laptop comes with all the software that is installed on desktop PCs.
This includes Adobe Acrobat Reader, Citrix, Microsoft Office 2003, Microsoft Internet Explorer,
Netscape 7.0, McAfee Virus Scan, Real Player, Roxio Easy CD Creator, WS-FTP and more. In
addition, Towson University Remote Access Client and Towson University Dial-up networking
connections are installed for working remotely.
Traveling With Your Laptop
•
According to the Transportation Security Administration, you should carry your laptop in your
carry on baggage and tape your business card to the laptop. You should keep your laptop in your
possession at all times. For more information about airport security, visit http://www.tsa.gov.
•
Some planes are equipped with power receptacles near some seats. On planes with this feature,
you have the option of powering your laptop with a battery or by plugging it into a power
receptacle.
Lost/Stolen or Damaged Laptop
•
It is a good idea to write down the model number (i.e. Dell Latitude D610) serial number (labeled
“Service Tag” on the bottom of Dell laptops) & TU Tag (labeled “Towson University” on the
bottom of your laptop) number of your laptop and keep it with you, but away from the laptop. In
case of theft, you will need this information to report to the police.
•
Stolen laptops are not covered under the warranty and your department will be responsible for
replacement costs. Furthermore, consider all of the sensitive data possibly stored on the laptop.
Remember, the portability of a laptop is a security issue. A laptop is much easier to steal than a
desktop computer, and any data stored on the local hard drive of the laptop would be stolen with
it. If this information includes information such as University documents, medical records, financial records, or personal or student information, the risk of identity theft or leaked information is
high for you, and the University.
•
If your laptop becomes damaged, call the OTS Help Center at 410-704-5151 as soon as possible
to have them give you advice on the next steps to take. If OTS ordered the laptop since 2004, it
has been ordered with the Dell Complete Care warranty that covers most accidental damage
(drops, spills, etc.) for three years from the original date of purchase. OTS will take care of any
warranty replacements that need to be done. If your laptop is out of warranty or the damage
isn’t covered by the warranty, your department would be responsible for repair or replacement
costs.
5
Page 6

L
APTOP MANUAL
: G
ETTING TO KNOW YOUR
TU L
APTOP
Glossary
Below are commonly used terms when working with your TU laptop.
Bluetooth – Technology that allows you to wirelessly connect mobile devices such as laptops,
phones, printers, PDAs, headsets, etc. so they can communicate with each other. Bluetooth travels
a maximum of 100 yards.
Dial-up – A connection to the Internet made via a modem over analog phone lines.
Ethernet – The most commonly used type of wired network. The plug looks like a larger phone
plug, but is slighter wider.
Flash Memory– also called “Thumb drives” or “USB Memory” are small data storing devices that
are often a convenient way to keep data backed up, however they can also easily get lost or stolen.
Towson Unplugged – Towson University’s campus-wide wireless network. For more details, visit
http://www.towson.edu/unplugged.
Virtual Workspace - This is an online service provided by Towson University which allows you to
easily access many of the campus applications and network files from anywhere on the Internet by
just your web browser!
Wired Network – A group of computers connected together with network cables.
Wireless Network – A connection to a network made without cables. All OTS ordered laptops
come with wireless networking capabilities. Also known as Wi-Fi, 802.11b/g.
Contact Information
•
In the event that you have particular needs for other software,
please contact the Help Center and discuss your needs with a Help
Desk technician.
TU Help Center 410-704-5151
•
If your TU laptop is stolen on campus, report the theft immediately
to TU Police.
TU Police 410-704-2134
6
 Loading...