

Page 1

DellTM Universal Dock
D6000
User Guide
Page 2

NOTE: A NOTE indicates important information that helps you make
better use of your computer.
CAUTION: A CAUTION indicates potential damage to hardware or loss
of data if instructions are not followed.
WARNING: A WARNING indicates a potential for property damage,
personal injury, or death.
© 2017 Dell Inc. All rights reserved.
Information in this document is subject to change without notice. Reproduction of these
materials in any manner whatsoever without the written permission of Dell Inc. is strictly
forbidden.
Trademarks used in this text: Dell and the Dell logo are trademarks of Dell Inc., Intel
Centrino®, Core™, and Atom™ are either trademarks or registered trademarks of Intel
Corporation in the U.S. and other countries; Microsoft®, Windows®, and Windows start button
logo are either trademarks or registered trademarks of Microsoft Corporation in the United
States and/or other countries; Bluetooth® is a registered trademark owned by Bluetooth SIG,
Inc. and is used by Dell under license; Blu-ray Disc™ is a trademark owned by the Blu-ray Disc
Association(BDA) and licensed for use on discs and players; Other trademarks and trade names
may be used in this document to refer to either the entities claiming the marks and names or
their products. Dell Inc. disclaims any proprietary interest in trademarks and trade names other
than its own.
2017 – 03 Rev. A00
®
,
Page 3

Package Contents
a. Dell Universal Dock (D6000)
b. Power adapter and power cord
a b
Specifications
Upstream
• USB 3.0 Type A (Via C-to-A converter)
• USB-C (Support power delivery up to 65W)
Downstream
• 3 x USB 3.0 Type A
• 1 x USB 3.0 Type A (front, PowerShare)
• 1 x USB-C (front, Data only, and PowerShare)
• 1 x HDMI
• 2 x DisplayPort
• Gigabit Ethernet
• Combo Audio (Headphone/Mic)
• Audio Line out
Supports USB 3.1 Gen1.
• Product capability : product signals at 5 Gbps
• Marketing name: SuperSpeed USB
• Note: USB 3.1 Gen1 and USB 3.0 terms are synonymous
Power LED Indication
Normal working mode: White light
Platform standby: Amber light
Power O: Light O
LAN port LED Indication
Connection: Green (Solid green)
Active Link: Amber (blinking)
3
Page 4

Maximum resolution and refresh rate supported for your display:
Note: Maximum Resolution/Refresh Rate will also depend on EDID table of monitors
USB-C platform users with driver install
OutputInputs (plug in)
DP-1 DP-2 HDMI DP-1 DP-2 HDMI
DP-1
DP-2
HDMI
4K@60Hz
4K@60Hz
4K@30Hz
DP-1
DP-1
DP-1
DP-1
* If without DisplayLink driver, HDMI out will be from Alt-mode and 4K@ 30Hz.
USB-3.0 platform users with driver install
DP-1 DP-2 HDMI DP-1 DP-2 HDMI
DP-1
DP-1
DP-1
DP-1
DP-2
DP-2
DP-2
DP-2
DP-2
DP-2
DP-2
DP-2
HDMI
HDMI
HDMI
HDMI
HDMI
HDMI
HDMI
HDMI
4K@60Hz
4K@60Hz
4K@60Hz
4K@60Hz
5K@60Hz
4K@60Hz
4K@60Hz
5K@60Hz
4K@60Hz
4K@60Hz
4K@60Hz
OutputInputs (plug in)
4K@60Hz
4K@60Hz
4K@60Hz
4K@30Hz
4K@60Hz
4K@60Hz
4K@60Hz
N.A.**
N.A.**
4K@60Hz
4K@60Hz
DP-1
DP-2
** : No Alt-mode support
4
HDMI
4K@60Hz
4K@60Hz
4K@60Hz
Page 5

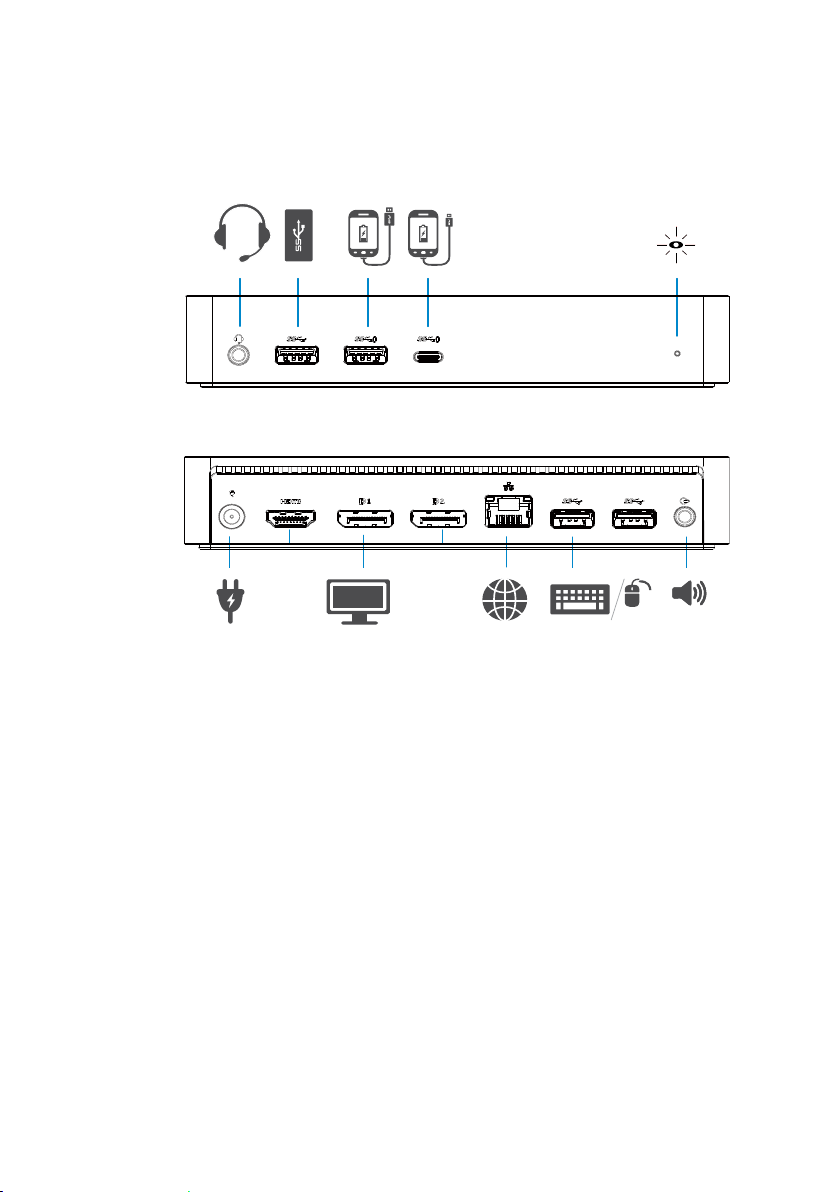
Product Overview
Front View
Back View
Audio Combo
USB 3.0
USB-C
USB 3.0
Power in
HDMI
DP
DP
Ethernet
Audio line out
USB 3.0
USB 3.0
5
Page 6

Recommended System Requirements
Hardware
DL-6xxx devices (4K UHD resolutions)
Minimum Requirements for Oce, Productivity, Web
Processor: Intel Core i3 2+GHz / Intel Core M / AMD Trinity or better
Memory: 4GB
Video Card: Intel HD 4000, ATI Radeon HD7xxx, NVidia GeForce 5xxM or better, with
drivers released specifically for the Windows version.
USB: USB 2.0 but USB 3.0 recommended
Minimum Requirements for Full-Screen Video Playback
Processor: Intel SkyLake i3 or Intel Core i7 2+GHz / AMD Richland A10-575x / AMD
Kaveri A10-7400P or better
Memory: 8GB
Video Card: Intel HD 4000, ATI Radeon HD 8650, NVidia GeForce 7xxM or better, with
drivers released specifically for the Windows version.
USB: USB 3.0
Disk: 7200RPM or SSD
If playing UHD content (4K), the system must be capable of decoding the 4K video in
the GPU.
Operating System
Wins OS (Win 7, 8, 8.1, 10); 32/64 bits (with DisplayLink Driver version: 8.2 onwards).
Ubuntu OS 14.04.2 or greater.
Chrome OS Build 58 onwards.
Recommended 130W Power adapter
AC/DC
Adapter
Input voltage/
frequency/
current
Output voltage/
current
1.Lite-On (DPN: VJCH5) adapter:
100 VAC to 240 VAC/50 Hz to 60 Hz.
2.Chicony (DPN: 6G99N) adapter:
100 VAC to 240 VAC/50 Hz to 60 Hz.
Output: 19.5VDC/6.7A
Operating Temperature
Max. operating temperature is 40 oC
6
Page 7
Windows 7/8/8.1/10 Setup
1. Start to install the drivers first before connecting the Dock to your computer.
It is recommended to download the latest drivers from below support website:
· dell.com/support
· displaylink.com/downloads
For network/IT administrators, please visit
this link for a corporate installation software
package. (*User registration required)
http://www.displaylink.com/corporateinstall/
Note: Windows will start installing the DisplayLink driver automatically
if connected to Internet.
2. Follow the screen instructions until the installation is complete.
7
Page 8

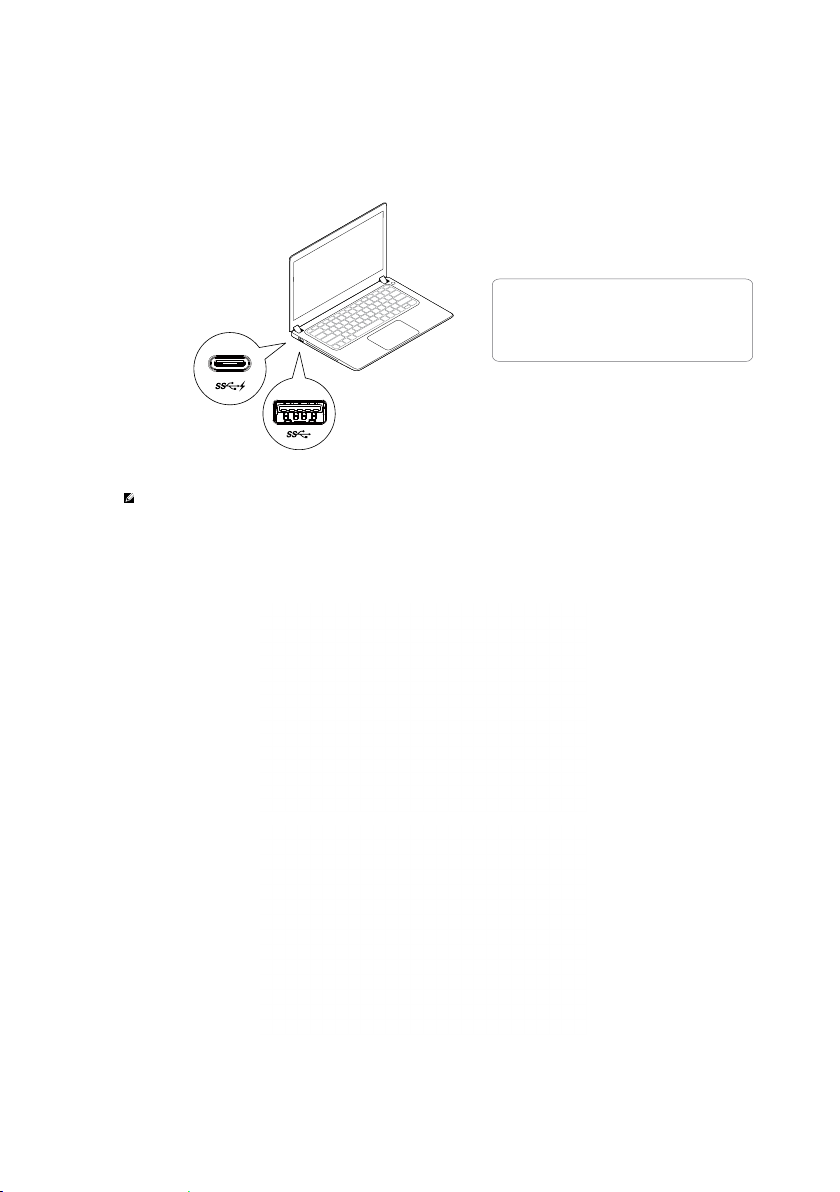
3-1-a. USB-C platform/connection
3-1-b. Connect your dock and peripherals to your PC.
3-2-a. USB 3.0 Type A platform/connection
USB-C
3-2-b. Connect your dock and peripherals to your PC.
(Only two video at one time)
8
USB-A
Page 9
Features
9
Page 10

DisplayLink Manager Menu
Menu Option
DisplayLink Manager
Check for Updates
DisplayLink Devices
Audio Setup
Video Setup
Screen Resolution
Screen Rotation
Extend To
Extend
Set as Main Monitor
Notebook Monitor O
Mirror
O
Fit to TV
Description
Clicking on this item will show the version of DisplayLink
software installed.
Windows update checking.
Connected DisplayLink devices checking.
Opens the Windows Audio Configuration window.
Opens the Windows Screen Resolution window.
Displays a list of available resolutions.
Rotates the screen in clockwise or counter-clockwise direction.
Extends the display to the right or left of the main display.
Extends the Windows desktop onto the display.
Sets this screen as the main display.
Switches o the display of the notebook and makes the
DisplayLink display the main display.
Copies what is on the main display and reproduces it on
this display.
Switches o the display.
Use this function to adjust the size of the windows to fit the
TV screen.
To set the display into extended mode
1. Click on the DisplayLink icon.
2. Select Extend.
The device is now extended in the direction it was the last time the display was in this
mode. For more control, use the Extend To submenu and select one of the options. This
puts the device into extend mode, and places it to the Left/Right/Above/Below the main
(primary) monitor.
To set the display into mirror mode
1. Click on the DisplayLink icon.
2. Select Mirror.
The resolution, colour depth and refresh rate of the primary screen are replicated on
the monitor connected to the DisplayLink USB Graphics device.
10
Page 11

Fit to TV configuration
1. To configure Fit to TV, choose the option from the DisplayLink GUI.
The following interface appears:
2. You will also see a red border on the DisplayLink screen.
The red border shows the size of the new Windows desktop. Use the “+” and “-”
controls on the Fit to TV GUI to change the size of the red border until it fits on the TV
screen.
Note: Finer configuration of the size of the border can be achieved by holding down
the CTRL key and clicking the “+” and “-”.
3. Once the red border is at the edges of the TV screen, click Apply to resize the
Windows desktop.
11
Page 12

FAQs of Dell Universal Dock - D6000
Troubleshooting
There is no video on the monitor
attached to the dock.
The video on the attached monitor
is distorted or corrupted.
The video on the attached monitor
is not displaying in extended mode.
The audio jacks are not functioning.
USB ports are not functioning on
the dock.
HDCP content is not able to
display on the attached monitor.
Suggested Solutions
Check the video connection cables.
Unplug from the power, wait 10 seconds, and then reconnect.
Check video connection cables.
Check the video resolution under Control Panel Items\
Display\Change Display Setting.
Change the settings by either:
• Configuring under Control Panel Items\Display\
Change Display Setting.
• Switch by cycling the “ +P”.
Check the settings under Control Panel\All Control Panel
Items\Sound to make sure the USB Audio device is available
and set to default. Right click to show all available options.
Unplug from the power, wait 10 seconds, and then reconnect.
Update to the latest USB 3.0 host controller driver.
HDCP content support is currently not available.
Displaylink Driver is not able to install.
Laptop failed to boot with dock
connected.
12
Get the driver by either:
• Downloading the latest driver from the Displaylink website or
• Connect to Windows Update with dock.
(by using Wi-Fi or Ethernet port of the laptop).
Remove all USB devices connected to the dock; some
unqualified boot devices may cause lock up at boot screen.
Page 13

Troubleshooting
First time Internet access causing
error message
Insucient system resources
exist to complete the requested
service
Suggested Solutions
Download the driver from an Internet connected computer
and copy the driver over USB flash drive, and run the setup.
This can occur when entering extend mode with low
system resources. The PC does not have enough memory
to start an extend display.
Close down any unused applications. The situation may
also be improved by rebooting the PC.
Incompatible Display Driver
Laptop failed to wake up from
Ethernet port
Laptop fail to power charge when
the dock is connected to your
computer.
This message will appear if the primary graphics card drivers
installed are not WDDM compatible. Windows 7 onwards is
not designed to operate without WDDM drivers.
Download and install the latest graphics drivers for your
primary graphics card.
Check the settings under BIOS Items to make sure laptop
supports wake-up-from-Ethernet port function.
1. Make sure the dock is connected properly to its own
power adapter.
2. Make sure the LED of your dock is ON (White LED).
Disconnect and re-connect the dock cable to your
computer.
3. Make sure the notebook’s USB-C port accept power
charging.
4. Check with your notebook manufacturer to confirm
power charging compatibility with the dock.
13
Page 14

Troubleshooting Suggested Solutions
No video on the monitors
attached to High Definition
Multimedia Interface (HDMI),
or DisplayPort (DP) port on the
dock.
1. If your monitor is connected to the dock, the video
output on your computer may be disabled. You can
enable the video output under Control Panel
Items\Display\Change Display Setting.
2. Check the resolution settings on your computer. Your
monitor may support higher resolutions than what the
dock is able to support. Refer to the Display Resolution
Table in the User Guide of your dock for more
information on maximum resolution capacity.
3. Make sure the video cable (HDMI or DisplayPort) is
connected properly to the monitor and the dock.
Ensure to select the correct video source on your
monitor (refer to your monitors documentation for more
information about changing the video source).
4. If only one monitor is shown and the other monitor is
not. Download the latest driver from the Displaylink
website to install or Connect to Windows Update with
dock (by using Wi-Fi or Ethernet port of the laptop).
5. Try with a dierent monitor and Laptop computer that is
known to be good, if possible.
Regulatory Information
Dell Universal Dock-D6000 complies with the FCC/CE rules and abides by worldwide
regulatory compliance, engineering, and environmental aairs.
Contacting Dell:
1. Visit www.dell.com/support
2. Select your support category
3. Select the appropriate service or support link based on your need.
Or Visit:
R
http://www.displaylink.com/support/.
14
 Loading...