

Page 1

Dell™ Latitude™ D600
System Information Guide
Systeeminformatiegids
Guide d'information sur le système
Systeminformationshandbuch
Informazioni di sistema
Manual de informações do sistema
Guía de información del sistema
Model PP05L
www.dell.com | support.euro.dell.com
Page 2

Page 3

Dell™ Latitude™ D600
System Information Guide
www.dell.com | support.euro.dell.com
Page 4

Notes, Notices, and Cautions
NOTE: A NOTE indicates important information that helps you make better
use of your computer.
NOTICE: A NOTICE indicates either potential damage to hardware or loss of
data and tells you how to avoid the problem.
CAUTION: A CAUTION indicates a potential for property damage,
personal injury, or death.
Abbreviations and Acronyms
For a complete list of abbreviations and acronyms, see the User’s Guide
(depending on your operating system, double-click the User’s Guide icon
on your desktop, or click the Start button, click Help and Support Center,
and then click User and system guides).
If you purchased a Dell™ n Series computer, any references in this
®
document to Microsoft
Windows® operating systems are not applicable.
____________________
Information in this document is subject to change without notice.
© 2002 Dell Computer Corporation. All rights reserved.
Reproduction in any manner whatsoever without the written permission of Dell Computer
Corporation is strictly forbidden.
Trademarks used in this text: Dell, the DELL logo, Inspiron, Dell Precision, Dimension, OptiPlex,
and Latitude are trademarks of Dell Computer Corporation; Intel, Pentium, and Celeron are
registered trademarks of Intel Corporation; Microsoft and Windows are registered trademarks of
Microsoft Corporation; EMC is a registered trademark of EMC Corporation.
Other trademarks and trade names may be used in this document to refer to either the entities claiming
the marks and names or their products. Dell Computer Corporation disclaims any proprietary interest
in trademarks and trade names other than its own.
December 2002 P/N 2N659 Rev. A00
Page 5

Contents
CAUTION: Safety Instructions . . . . . . . . . . . . . . . . . . . 5
General
Power
Battery
Air Travel
EMC Instructions
California Residents
. . . . . . . . . . . . . . . . . . . . . . . . . . . . . 5
. . . . . . . . . . . . . . . . . . . . . . . . . . . . . . 6
. . . . . . . . . . . . . . . . . . . . . . . . . . . . . 7
. . . . . . . . . . . . . . . . . . . . . . . . . . . . 8
. . . . . . . . . . . . . . . . . . . . . . . . 8
. . . . . . . . . . . . . . . . . . . . . . . 8
When Using Your Computer
Ergonomic Computing Habits
. . . . . . . . . . . . . . . . . . . . 9
. . . . . . . . . . . . . . . . . . 10
When Working Inside Your Computer
Protecting Against Electrostatic Discharge
Battery Disposal
. . . . . . . . . . . . . . . . . . . . . . . . 11
Finding Information for Your Computer
Setting Up Your Computer
About Your Computer
Front View
Left View
Right View
Back View
Bottom View
. . . . . . . . . . . . . . . . . . . . . . . . . . . 16
. . . . . . . . . . . . . . . . . . . . . . . . . . . . 17
. . . . . . . . . . . . . . . . . . . . . . . . . . . 18
. . . . . . . . . . . . . . . . . . . . . . . . . . . 19
. . . . . . . . . . . . . . . . . . . . . . . . . . 20
Removing a Battery
. . . . . . . . . . . . . . . . . . . . . 13
. . . . . . . . . . . . . . . . . . . . . . . 15
. . . . . . . . . . . . . . . . . . . . . . . . . 21
Removing and Installing a Reserve Battery
Installing a Battery
Running the Dell Diagnostics
. . . . . . . . . . . . . . . . . . . . . . . . . 24
. . . . . . . . . . . . . . . . . . . . 25
. . . . . . . . . . . . . . 10
. . . . . . . . . . . 11
. . . . . . . . . . . . . . 12
. . . . . . . . . . . . 22
Regulatory Notices
. . . . . . . . . . . . . . . . . . . . . . . . . 28
Contents 3
Page 6

4 Contents
Page 7

CAUTION: Safety Instructions
Use the following safety guidelines to help ensure your own personal safety and to help protect
your computer and working environment from potential damage.
General
• Do not attempt to service the computer yourself unless you are a trained service
technician. Always follow installation instructions closely.
• If you use an extension power cable with your AC adapter, ensure that the total ampere
rating of the products plugged in to the extension power cable does not exceed the
ampere rating of the extension cable.
• Do not push objects into air vents or openings of your computer. Doing so can cause fire
or electric shock by shorting out interior components.
• Do not store your computer in a low-airflow environment, such as a carrying case or a
closed briefcase, while the computer is turned on. Restricting airflow can damage the
computer or cause a fire.
• Keep your computer away from radiators and heat sources. Also, do not block cooling
vents. Avoid placing loose papers underneath your computer; do not place your computer
in a closed-in wall unit or on a bed, sofa, or rug.
• Place the AC adapter in a ventilated area, such as a desk top or on the floor, when you
use it to run the computer or to charge the battery. Do not cover the AC adapter with
papers or other items that will reduce cooling; also, do not use the AC adapter inside a
carrying case.
• The AC adapter may become hot during normal operation of your computer. Use care
when handling the adapter during or immediately after operation.
• Do not allow your portable computer to operate with the base resting directly on exposed
skin for extended periods of time. The surface temperature of the base will rise during
normal operation (particularly when AC power is present). Allowing sustained contact
with exposed skin can cause discomfort or, eventually, a burn.
• Do not use your computer in a wet environment, for example, near a bath tub, sink, or
swimming pool or in a wet basement
• If your computer includes an integrated or optional (PC Card) modem, disconnect the
modem cable if an electrical storm is approaching to avoid the remote risk of electric
shock from lightning via the telephone line.
System Information Guide 5
Page 8

CAUTION: Safety Instructions (continued)
• To help avoid the potential hazard of electric shock, do not connect or disconnect any
cables or perform maintenance or reconfiguration of this product during an electrical
storm. Do not use your computer during an electrical storm unless all cables have been
disconnected and the computer is operating on battery power.
• If your computer includes a modem, the cable used with the modem should be
manufactured with a minimum wire size of 26 American wire gauge (AWG) and an FCCcompliant RJ-11 modular plug.
• Before you open the memory module/Mini PCI card/modem cover on the bottom of your
computer, disconnect all cables from their electrical outlets and disconnect the telephone
cable.
www.dell.com | support.euro.dell.com
• If your computer has a modem RJ-11 connector and a network RJ-45 connector, insert the
telephone cable into the RJ-11 connector, not the RJ-45 connector.
• PC Cards may become very warm during normal operation. Use care when removing PC
Cards after their continuous operation.
• Before you clean your computer, disconnect the computer from the electrical outlet.
Clean your computer with a soft cloth dampened with water. Do not use liquid or aerosol
cleaners, which may contain flammable substances.
Power
• Use only the Dell-provided AC adapter approved for use with this computer. Use of
another AC adapter may cause a fire or explosion.
• Before you connect the computer to an electrical outlet, check the AC adapter voltage
rating to ensure that the required voltage and frequency match the available power
source.
• To remove the computer from all power sources, turn the computer off, remove the
battery pack, and disconnect the AC adapter from the electrical outlet.
• To help prevent electric shock, plug the AC adapter and device power cables into properly
grounded power sources. These power cables may be equipped with 3-prong plugs to
provide an earth grounding connection. Do not use adapter plugs or remove the
grounding prong from the power cable plug. If you use a power extension cable, use the
appropriate type, 2-prong or 3-prong, to mate with the AC adapter power cable.
6 System Information Guide
Page 9

CAUTION: Safety Instructions (continued)
• Be sure that nothing rests on your AC adapter’s power cable and that the cable is not
located where it can be tripped over or stepped on.
• If you are using a multiple-outlet power strip, use caution when plugging the AC
adapter’s power cable into the power strip. Some power strips may allow you to insert the
plug incorrectly. Incorrect insertion of the power plug could result in permanent damage
to your computer, as well as risk of electric shock and/or fire. Ensure that the ground
prong of the power plug is inserted into the mating ground contact of the power strip.
Battery
• Use only Dell™ battery modules that are approved for use with this computer. Use of
other types may increase the risk of fire or explosion.
• Do not carry a battery pack in your pocket, purse, or other container where metal objects
(such as car keys or paper clips) could short-circuit the battery terminals. The resulting
excessive current flow can cause extremely high temperatures and may result in damage
to the battery pack or cause fire or burns.
• The battery poses a burn hazard if you handle it improperly. Do not disassemble it.
Handle a damaged or leaking battery pack with extreme care. If the battery is damaged,
electrolyte may leak from the cells and may cause personal injury.
• Keep the battery away from children.
• Do not store or leave your computer or battery pack near a heat source such as a radiator,
fireplace, stove, electric heater, or other heat-generating appliance or otherwise expose it
to temperatures in excess of 60ºC (140ºF). When heated to excessive temperatures,
battery cells could explode or vent, posing a risk of fire.
• Do not dispose of your computer’s battery in a fire or with normal household waste.
Battery cells may explode. Discard a used battery according to the manufacturer’s
instructions or contact your local waste disposal agency for disposal instructions. Dispose
of a spent or damaged battery promptly.
System Information Guide 7
Page 10
CAUTION: Safety Instructions (continued)
Air Travel
• Certain Federal Aviation Administration regulations and/or airline-specific restrictions
may apply to the operation of your Dell computer while you are on board an aircraft. For
example, such regulations/restrictions may prohibit the use of any personal electronic
device (PED) that has the capacity for intentional transmission of radio frequency or
other electromagnetic signals while on an aircraft.
– In order to best comply with all such restrictions, if your Dell portable computer is
equipped with Dell TrueMobile™ or some other wireless communication device,
press to disable this device before you board the aircraft and follow all
www.dell.com | support.euro.dell.com
EMC Instructions
Use shielded signal cables to ensure that you maintain the appropriate EMC classification for
the intended environment. For parallel printers, a cable is available from Dell. If you prefer, you
can order a cable from Dell at its worldwide website at www.dell.com.
instructions provided by airline personnel with regard to such device.
– Additionally, the use of any PED, such as a portable computer, may be prohibited in
aircraft during certain critical phases of flight, for example, takeoff and landing. Some
airlines may further define the critical flight phase as any time the aircraft is below
3,050 m (10,000 ft). Please follow the airline’s specific instructions as to when the use
of a PED is allowed.
Static electricity can harm electronic components inside your computer. To prevent static
damage, discharge static electricity from your body before you touch any of your computer’s
electronic components, such as a memory module. You can do so by touching an unpainted
metal surface on the computer’s input/output panel.
California Residents
WARNING: Handling the cord on this product, or cords associated with accessories sold with
this product, will expose you to lead, a chemical known to the State of California to cause birth
defects or other reproductive harm.
8 System Information Guide
Wash your hands after handling the cord
.
Page 11

When Using Your Computer
Observe the following safe-handling guidelines to prevent damage to your computer:
• When setting up the computer for work, place it on a level surface.
• When traveling, do not check the computer as baggage. You can put your computer
through an X-ray security machine, but never put your computer through a metal
detector. If you have the computer checked by hand, be sure to have a charged battery
available in case you are asked to turn on the computer.
• When traveling with the hard drive removed from the computer, wrap the drive in a
nonconducting material, such as cloth or paper. If you have the drive checked by hand, be
ready to install the drive in the computer. You can put the hard drive through an X-ray
security machine, but never put the drive through a metal detector.
• When traveling, do not place the computer in overhead storage compartments where it
could slide around. Do not drop your computer or subject it to other mechanical shocks.
• Protect your computer, battery, and hard drive from environmental hazards such as dirt,
dust, food, liquids, temperature extremes, and overexposure to sunlight.
• When you move your computer between environments with very different temperature
and/or humidity ranges, condensation may form on or within the computer. To avoid
damaging the computer, allow sufficient time for the moisture to evaporate before using
the computer.
NOTICE: When taking the computer from low-temperature conditions into a warmer environment
or from high-temperature conditions into a cooler environment, allow the computer to acclimate to
room temperature before turning on power.
• When you disconnect a cable, pull on its connector or on its strain-relief loop, not on the
cable itself. As you pull out the connector, keep it evenly aligned to avoid bending any
connector pins. Also, before you connect a cable make sure both connectors are correctly
oriented and aligned.
• Handle components with care. Hold a component such as a memory module by its edges,
not its pins.
• When preparing to remove a memory module from the system board or disconnect a
device from the computer, turn off the computer, disconnect the AC adapter cable, and
then wait 5 seconds before proceeding to help avoid possible damage to the system board.
System Information Guide 9
Page 12

When Using Your Computer (continued)
• Clean the display with a soft, clean cloth and water. Apply the water to the cloth; then
stroke the cloth across the display in one direction, moving from the top of the display to
the bottom. Remove moisture from the display quickly and keep the display dry. Longterm exposure to moisture can damage the display. Do not use a commercial window
cleaner to clean your display.
• If your computer gets wet or is damaged, follow the procedures described in “Solving
Problems” in your User’s Guide. If, after following these procedures, you confirm that
your computer is not operating properly, contact Dell (see “Getting Help” in your User’s
Guide for the appropriate contact information).
Ergonomic Computing Habits
www.dell.com | support.euro.dell.com
CAUTION: Improper or prolonged keyboard use may result in injury.
CAUTION: Viewing the display or external monitor screen for extended periods of
time may result in eye strain.
For comfort and efficiency, observe the ergonomic guidelines in the Appendix of your online
User’s Guide when setting up and using your computer.
This portable computer is not designed for continuous operation as office equipment. For
extended use in an office, it is recommended that you connect an external keyboard.
When Working Inside Your Computer
Before removing or installing memory modules, Mini PCI cards, or modems, perform the
following steps in the sequence indicated.
NOTICE: The only time you should ever access the inside of your computer is when you are
installing memory modules, a Mini PCI card, or a modem.
NOTICE: Wait 5 seconds after turning off the computer before disconnecting a device or removing
a memory module, Mini PCI card, or modem to help prevent possible damage to the system board.
Shut down your computer and turn off any attached devices.
1
2 Disconnect your computer and devices from electrical outlets to reduce the potential for
personal injury or shock. Also, disconnect any telephone or telecommunication lines from
the computer.
3 Remove the main battery from the battery bay and, if necessary, the second battery from
the module bay.
10 System Information Guide
Page 13

When Using Your Computer (continued)
4 Ground yourself by touching the unpainted metal surface of the I/O panel on the back of
the computer.
While you work, periodically touch the I/O panel to dissipate any static electricity that
might harm internal components.
Protecting Against Electrostatic Discharge
Static electricity can harm electronic components inside your computer. To prevent static
damage, discharge static electricity from your body before you touch any of your computer’s
electronic components, such as a memory module. You can do so by touching an unpainted
metal surface on the computer’s I/O panel.
As you continue to work inside the computer, periodically touch an I/O connector to remove
any static charge your body may have accumulated.
You can also take the following steps to prevent damage from electrostatic discharge (ESD):
• When unpacking a static-sensitive component from its shipping carton, do not remove
the component from the antistatic packing material until you are ready to install the
component. Just before unwrapping the antistatic packaging, be sure to discharge static
electricity from your body.
• When transporting a sensitive component, first place it in an antistatic container or
packaging.
• Handle all sensitive components in a static-safe area. If possible, use antistatic floor pads
and workbench pads.
Battery Disposal
Your computer uses a lithium-ion battery. For instructions about replacing the lithium-ion
battery in your computer, see “Removing a Battery” later in this document and “Using a
Battery” in your online User’s Guide.
Do not dispose of the battery along with household waste. Contact your local waste disposal
agency for the address of the nearest battery deposit site.
System Information Guide 11
Page 14
Finding Information for Your Computer
What are you looking for? Find It Here
• A diagnostic program for my computer
• Drivers for my computer
• My computer documentation
• My device documentation
www.dell.com | support.euro.dell.com
Drivers and Utilities CD (also known as the
ResourceCD)
Documentation and drivers are already
installed on your computer when shipped
from Dell. You can use the CD to
reinstall drivers, run the Dell Diagnostics,
or access your documentation.
Readme files may be included on your
CD to provide last-minute updates about
technical changes to your computer or
advanced technical-reference material for
experienced users or technicians.
• Express Service Code and Service Tag
• Microsoft
• Latest drivers for my computer
• Answers to technical service and
support questions
• Online discussions with other users
and technical support
• Documentation for my computer
®
Windows® License Label
Express Service Code and Product Key
These labels are located on your
computer.
Dell Support Website
The Dell Support website provides several online tools, including:
• Solutions — Troubleshooting hints and tips, articles from
technicians, and online courses
• Community Forum — Online discussion with other Dell customers
• Upgrades — Upgrade information for components, such as memory,
the hard drive, and the operating system
• Customer Care — Contact information, order status, warranty, and
repair information
• Downloads — Drivers, patches, and software updates
• Reference — Computer documentation, product specifications, and
white papers
12 System Information Guide
Page 15
What are you looking for? Find It Here
• How to use Windows XP
• Documentation for my computer
• Documentation for devices (such as a
modem)
• How to reinstall my operating system Operating System CD
Windows Help and Support Center
1 Click the Start button and click Help and Support.
2 Type a word or phrase that describes your problem and click the
arrow icon.
3 Click the topic that describes your problem.
4 Follow the instructions on the screen.
Setting Up Your Computer
1 Unpack the accessories box.
2 Set aside the contents of the accessories box, which you will need to
complete the setup of your computer.
If you reinstall your operating system,
use the Drivers and Utilities CD to
reinstall drivers for the devices that came
with your computer.
The product key for your operating
system is located on your computer.
The accessories box also contains user documentation and any
software or additional hardware (such as PC Cards, drives, or batteries)
you have ordered.
3 Connect the AC adapter to the AC adapter connector and to the
electrical outlet.
NOTICE: When you turn on your computer, you might receive a message
stating that you need to shut down your computer and upgrade your computer
memory. If this message appears, see your User’s Guide on the Dell Support
website (support.dell.com) for instructions about upgrading your computer
memory.
System Information Guide 13
Page 16
NOTE: Do not dock the
computer until it has been
turned on and shut down
at least once.
www.dell.com | support.euro.dell.com
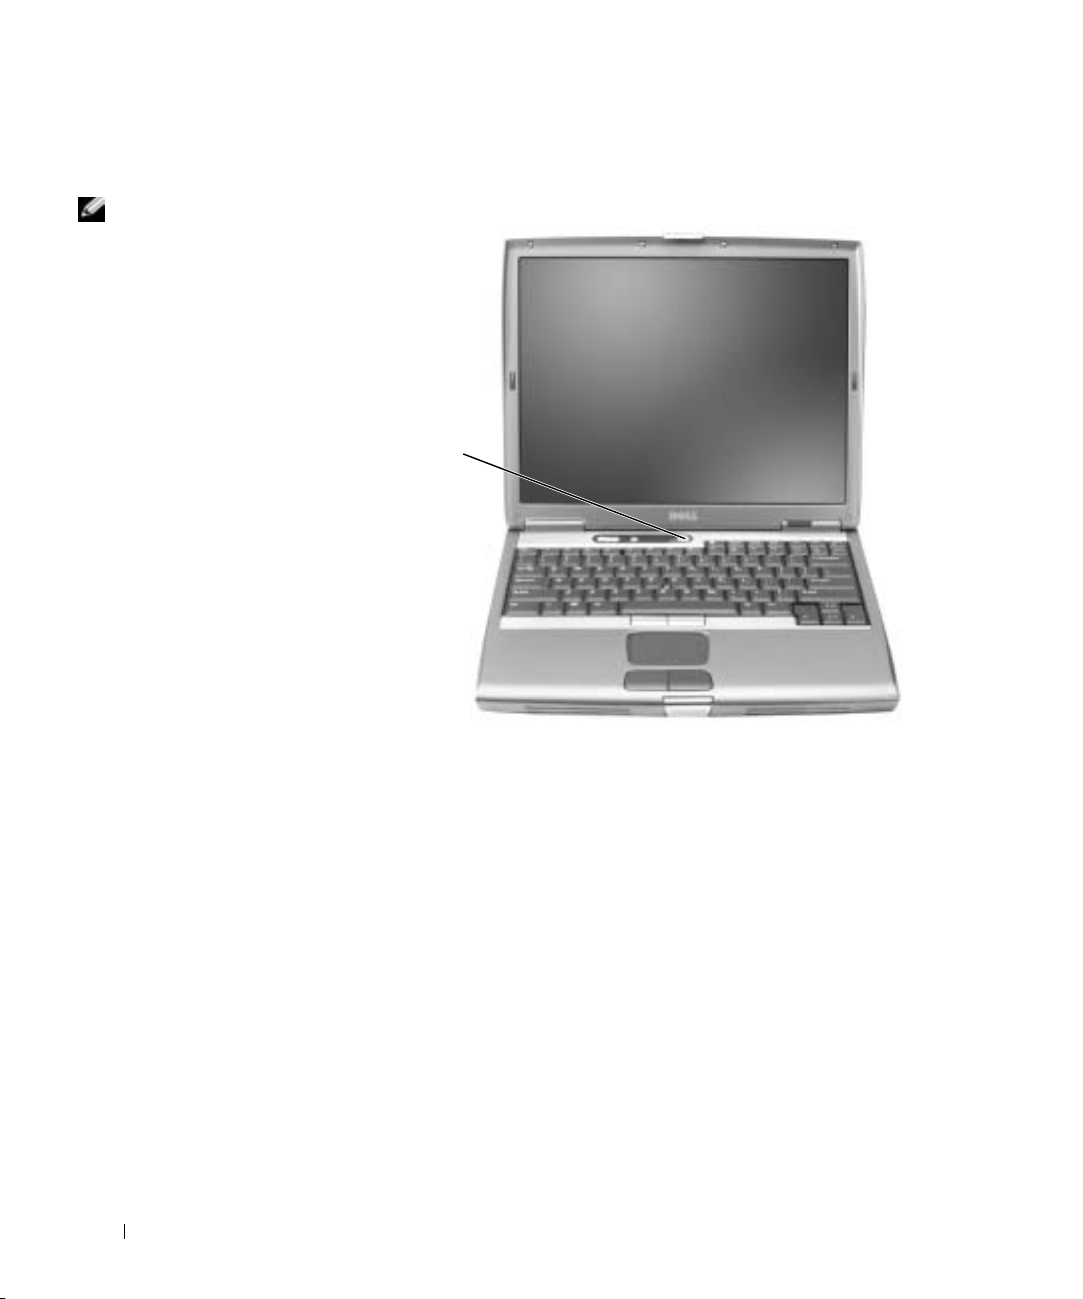
4 Open the computer display and press the power button to turn on the
computer.
power button
14 System Information Guide
Page 17

About Your Computer
See your online User’s Guide for detailed information about the computer.
Depending on your operating system, double-click the User’s Guide icon on
your desktop, or click the Start button, click Help and Support Center, and
then click User and system guides. The following items address some of the
more commonly asked questions about the computer.
• Modem and network adapter: The computer may include both a v.92
56K modem and a 10/100/1000 Ethernet LOM network adapter. For
connector locations, see “Right View” later in this document. For more
information on ports and connectors, see “About Your Computer” in
your online User’s Guide.
• Battery life and usage: Various batteries are available for use with your
computer. Using the 4460-mAh battery that comes standard with the
computer, you can expect from 3 to 4 hours of operating time from a
single fully charged battery with average usage. Performing certain
types of operations, such as extended wireless operation, can
significantly reduce battery life.
– For more information on battery performance, usage, and
conserving power, see “Using a Battery” and “Power Management”
in the User’s Guide.
– For information on an optional second battery, see “Using the
Module Bay” in the User’s Guide.
• Module bay devices: For information on the module bay and the
devices it supports, see “Using the Module Bay” in the User’s Guide.
• Docking devices: Your computer supports the Dell D/Dock Expansion
Station and the Dell D/Port Advanced Port Replicator.
– For information on your optional docking device, see the
documentation that accompanied the device.
– For information on obtaining optimal performance when using a
docking device with this computer, see “Solving Problems” in the
User’s Guide.
System Information Guide 15
NOTE: Docking devices
may not be available in
all countries.
Page 18
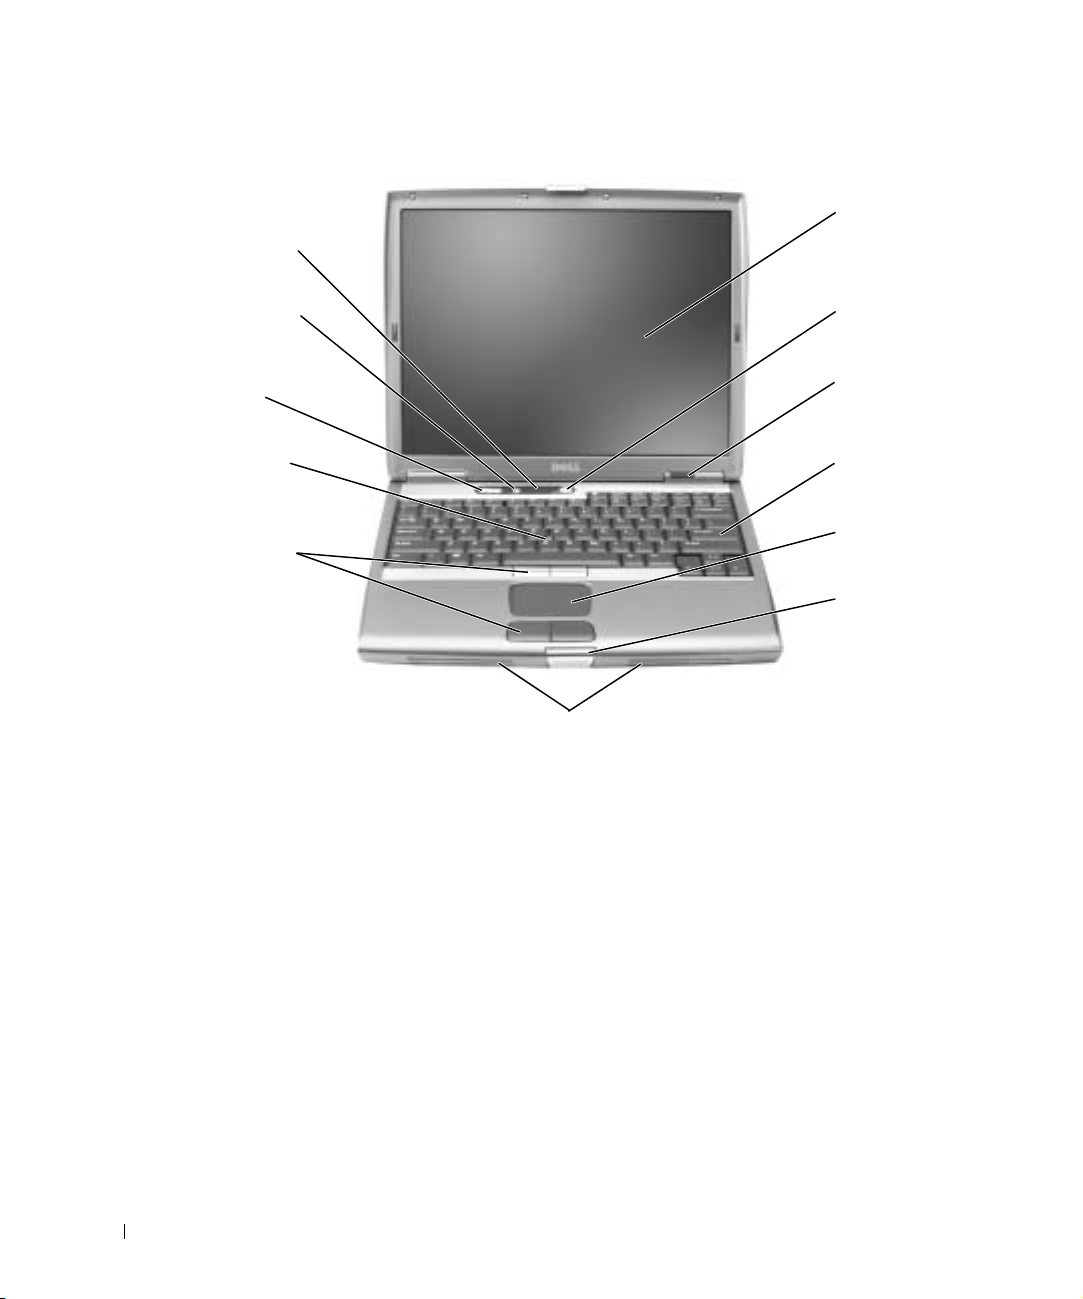
Front View
keyboard
status lights
mute button
volume control
buttons
track stick
www.dell.com | support.euro.dell.com
track stick/touch
pad buttons
display
power button
device status
lights
keyboard
touch pad
display latch
speakers
16 System Information Guide
Page 19
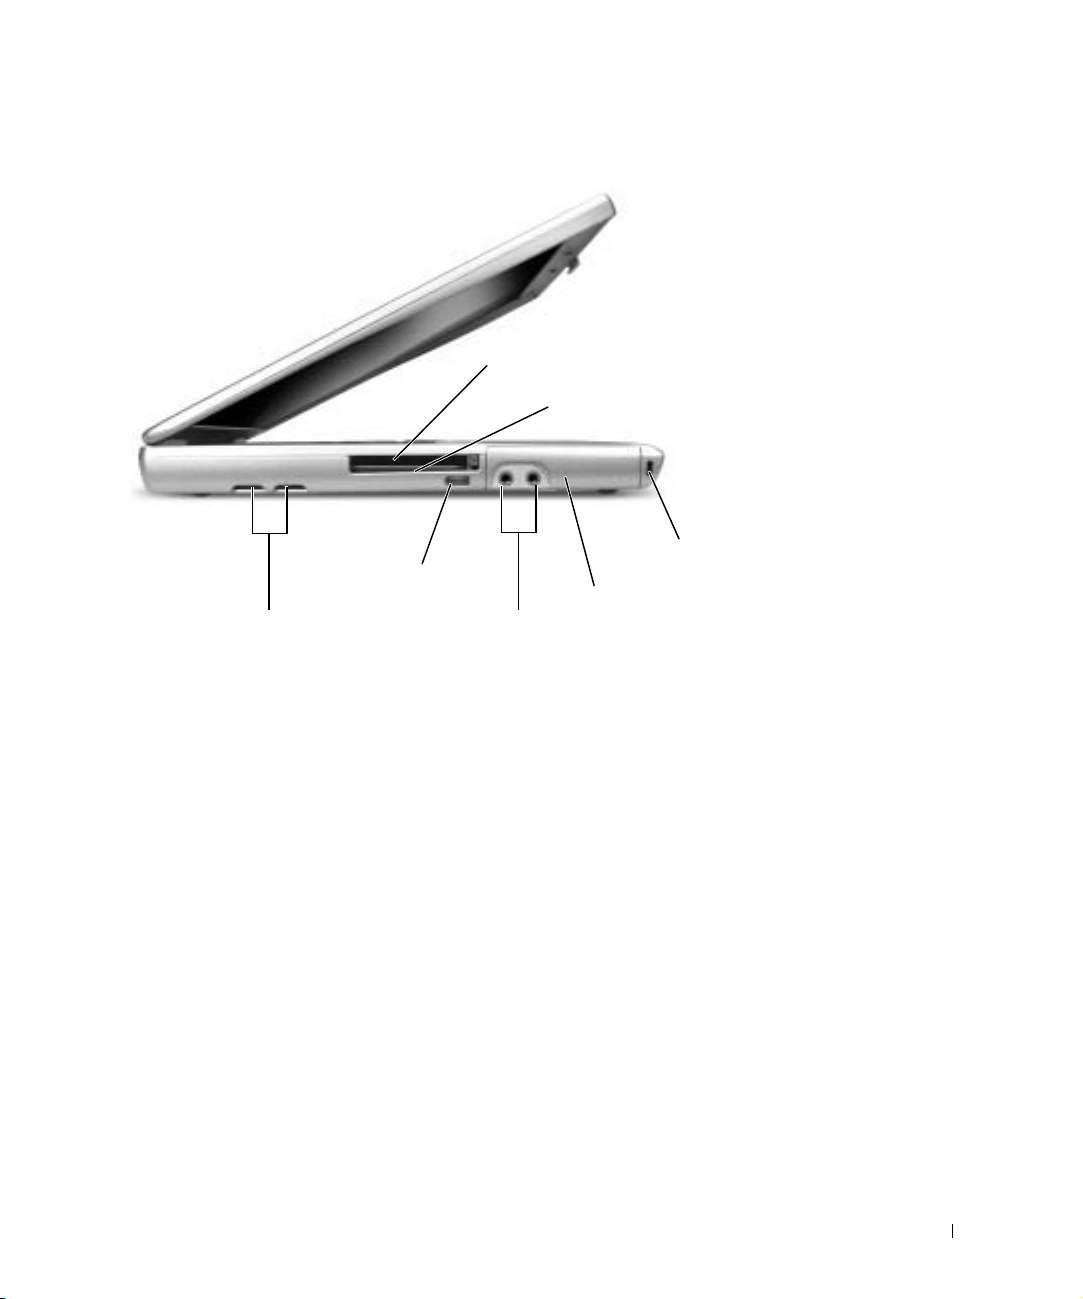
Left View
air vents (2)
PC Card slot
smart card slot
security cable slot
infrared sensor
hard drive
audio connectors (2)
System Information Guide 17
Page 20
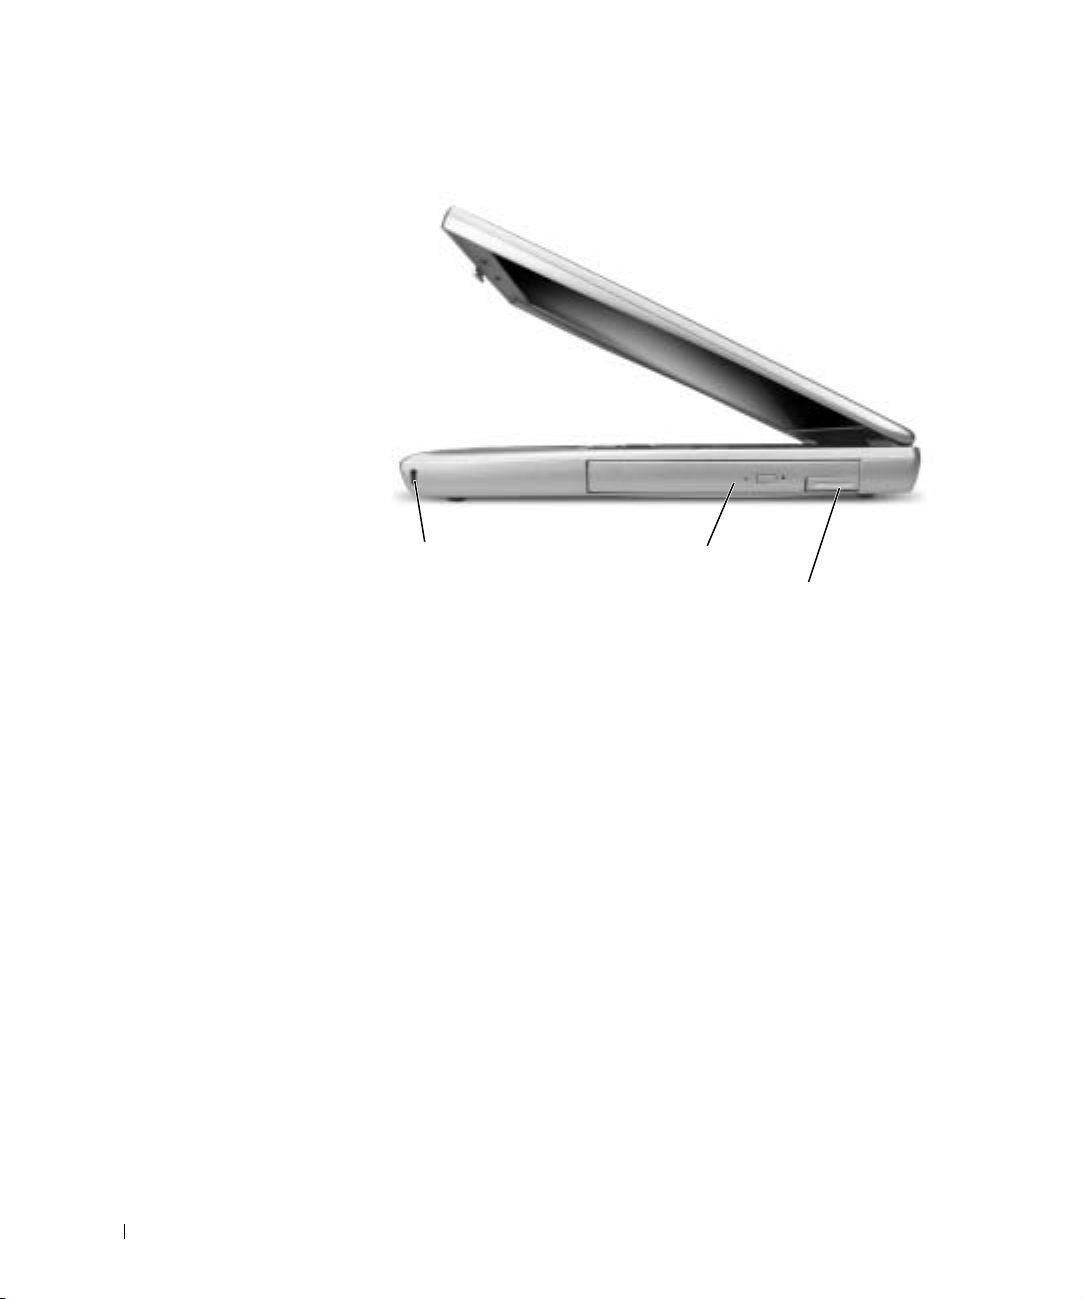
Right View
www.dell.com | support.euro.dell.com
security cable slot module bay
device latch release
18 System Information Guide
Page 21

Back View
NOTICE: To avoid damaging the computer, wait 5 seconds after turning off
the computer before you disconnect an external device.
CAUTION: Do not block, push objects into, or allow dust to
accumulate in the air vents. Do not store your computer in a lowairflow environment, such as a closed briefcase, while it is
running. Restricting the airflow can damage the computer or
cause a fire.
modem connector
(RJ-11) (optional)
network connector
(RJ-45)
S-video TV-out connector
USB connectors (2)
video connector
parallel connector
air vents
AC adapter connector
serial connector
System Information Guide 19
Page 22
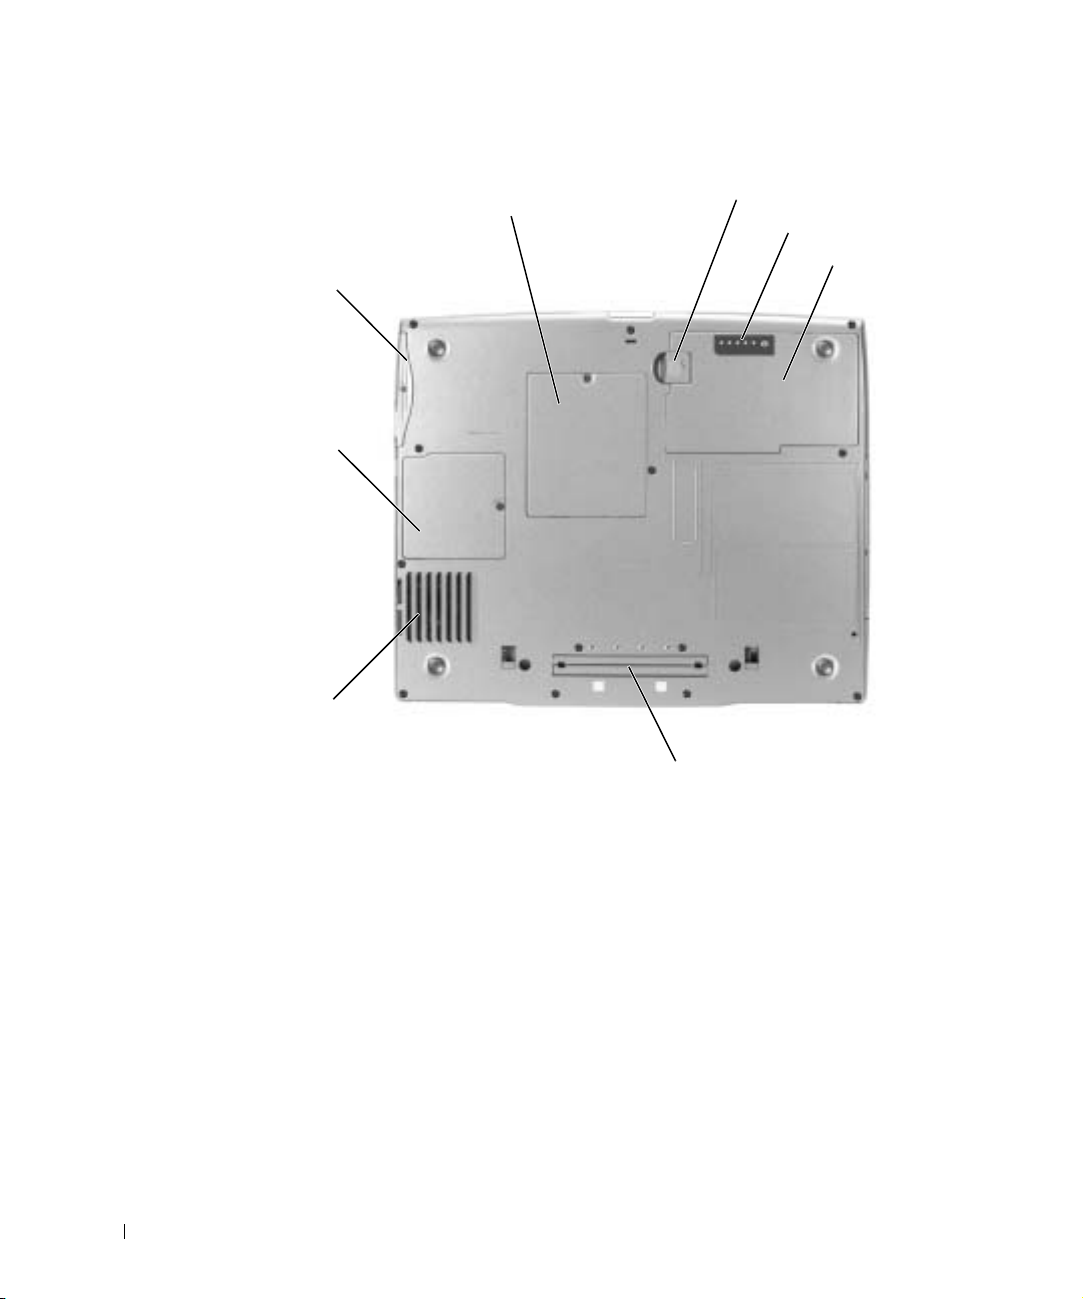
Bottom View
memory module cover
hard drive
Mini PCI
card cover
www.dell.com | support.euro.dell.com
fan
battery-bay latch release
battery charge gauge
battery
docking device slot
20 System Information Guide
Page 23
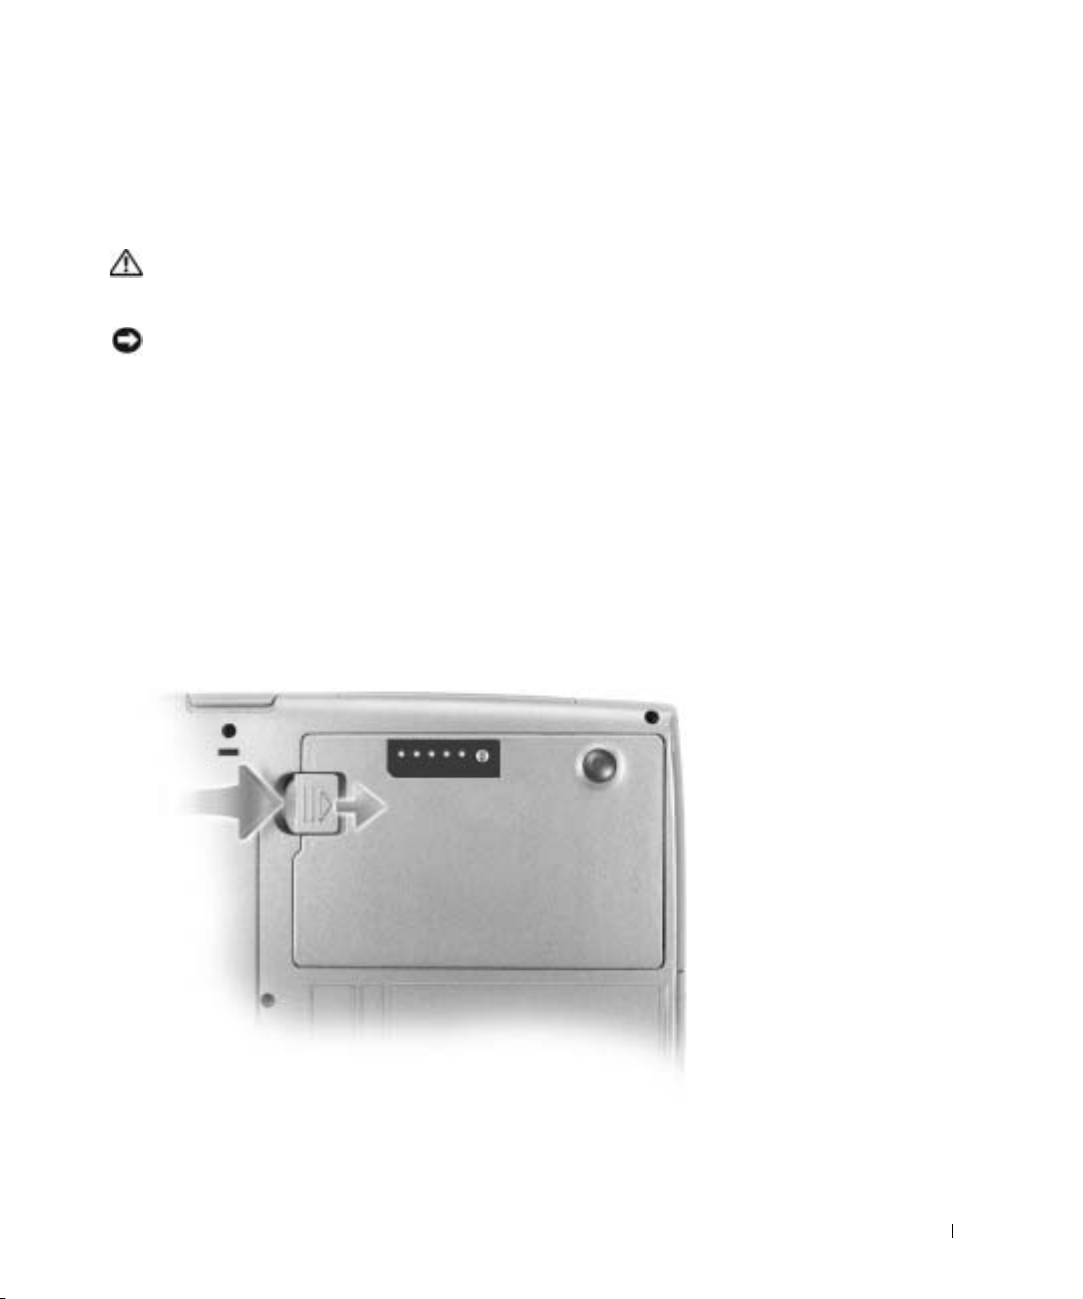
Removing a Battery
For more information about removing the second battery, see “Using the
Module Bay” in your online User’s Guide.
CAUTION: Before performing these procedures, turn off the
computer, disconnect it from the electrical outlet, and disconnect
the modem from the telephone wall jack.
NOTICE: If you choose to replace the battery with the computer in standby
mode, you have up to 90 seconds to complete the battery replacement before
the computer shuts down and loses any unsaved data.
1
Ensure that the computer is turned off, disconnected from an
electrical outlet, and disconnected from the telephone wall jack.
2 If the computer is connected to a docking device (docked), undock it.
See the documentation that came with your docking device for
instructions.
3 Slide and hold the battery-bay latch release on the bottom of the
computer, and then remove the battery from the bay.
System Information Guide 21
Page 24
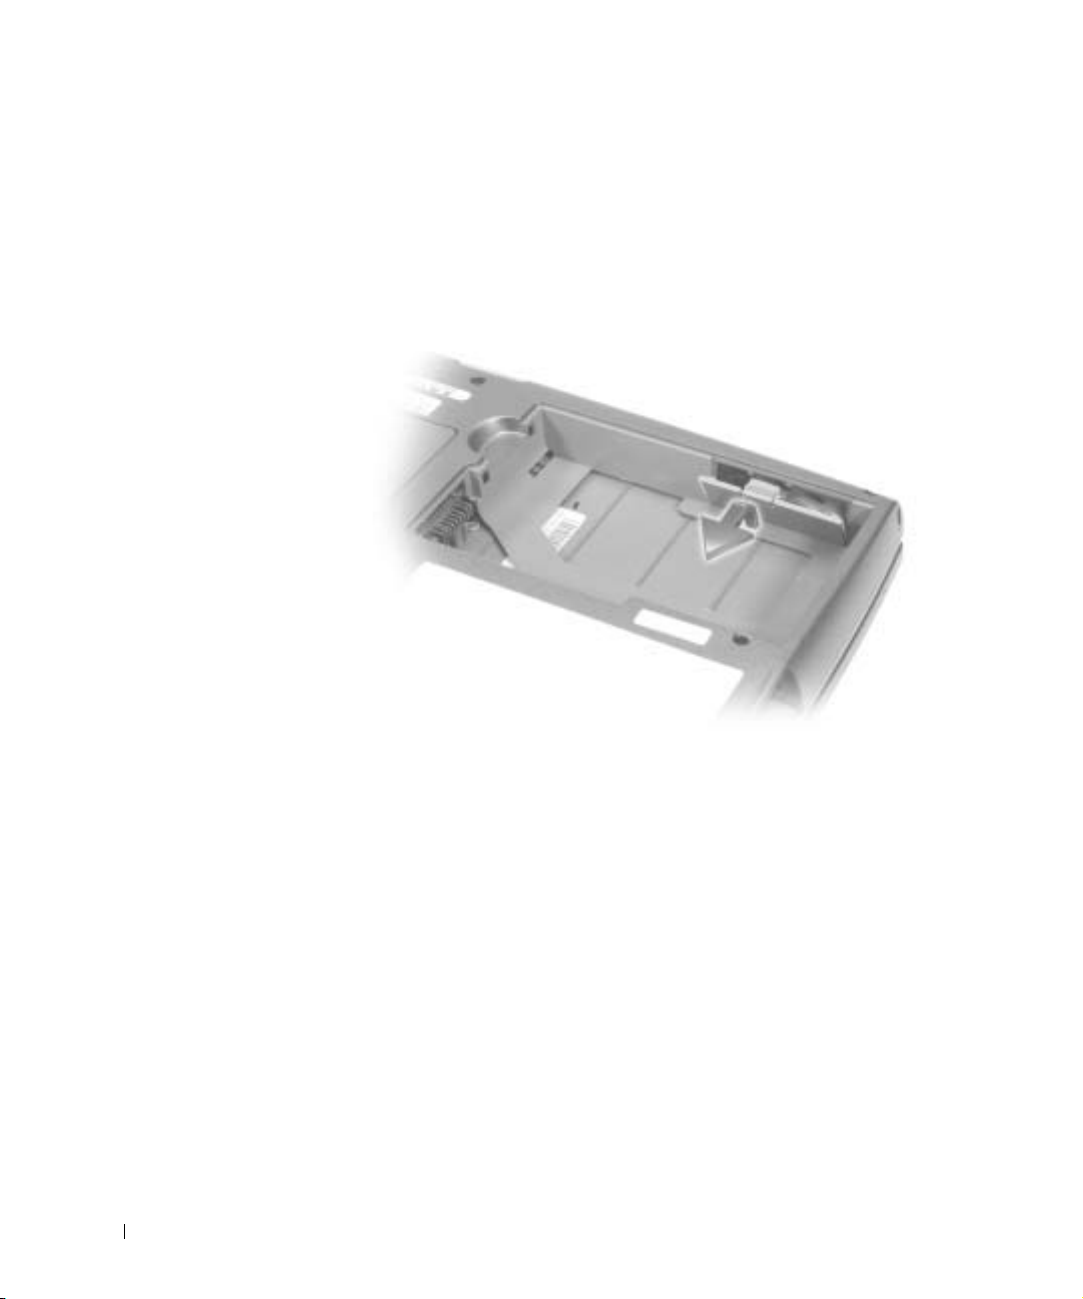
Removing and Installing a Reserve Battery
www.dell.com | support.euro.dell.com
1 Remove the battery.
2 Remove the reserve battery cover.
22 System Information Guide
Page 25
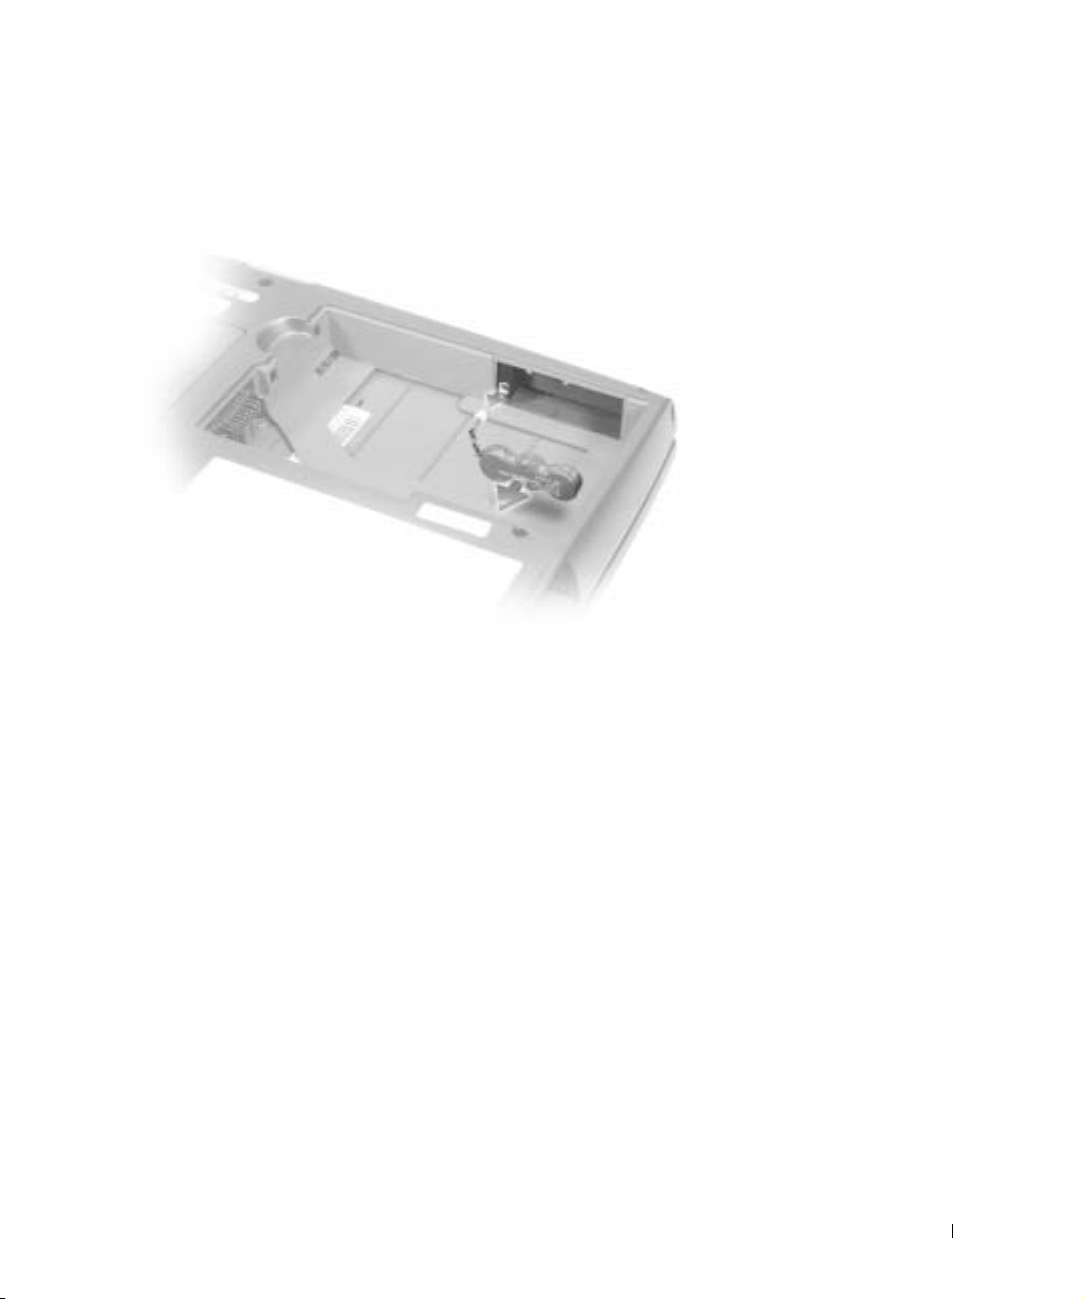
3 Pull the reserve battery out of its compartment, and disconnect the
cable from the connector.
4 Connect the reserve battery cable to the connector in the reserve
battery compartment.
System Information Guide 23
Page 26
www.dell.com | support.euro.dell.com
Installing a Battery
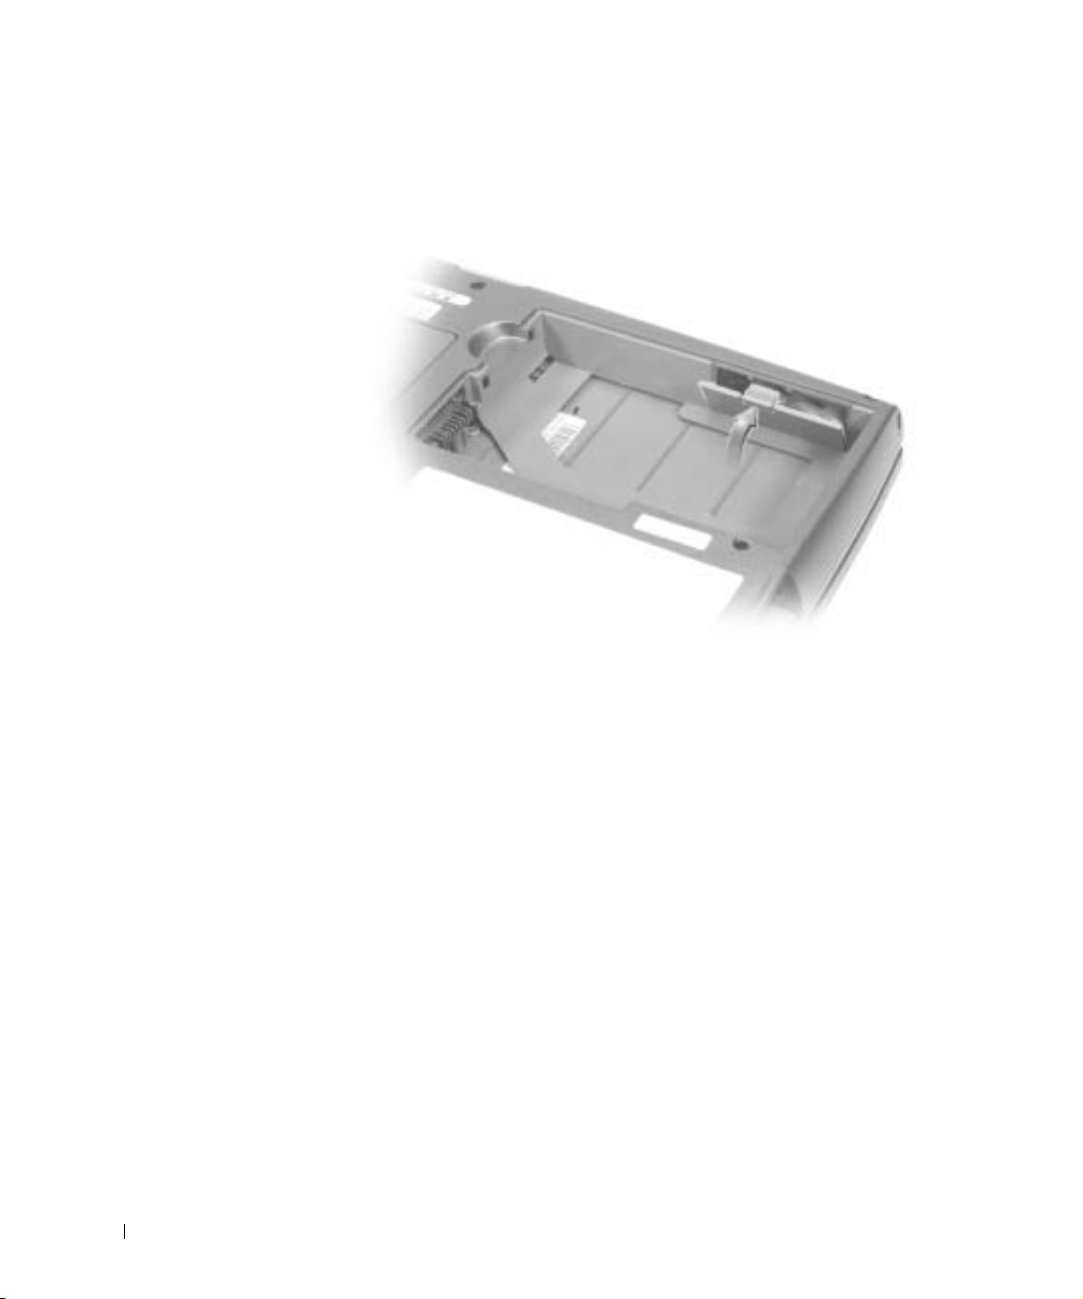
5 Place the reserve battery in the compartment, and replace the reserve
battery cover.
Slide the battery into the bay until the latch release clicks.
For more information about installing the second battery, see “Using the
Module Bay” in your online User’s Guide.
24 System Information Guide
Page 27
Running the Dell Diagnostics
The Dell Diagnostics is located on a hidden Diagnostic utility partition on
your hard drive.
Shut down the computer.
1
2 If the computer is connected to a docking device (docked), undock it.
See the documentation that came with your docking device for
instructions.
3 Connect the computer to an electrical outlet.
Turn on the computer. When the DELL™ logo appears, press
4
immediately. If you wait too long and the Microsoft
®
Windows® logo
appears, continue to wait until you see the Windows desktop. Then
shut down your computer and try again.
5 When the boot device list appears, highlight Diagnostics and press
.
The computer begins to run the Pre-boot System Assessment, a series
of embedded diagnostics that perform initial testing on your system
board, keyboard, hard drive, and display.
• During the assessment, answer any questions that appear.
• If a component failure is detected, the computer stops and beeps.
To stop the assessment and reboot to the operating system, press
; to continue to the next test, press ; to retest the
NOTE: If your computer
cannot display a screen
image, contact Dell (see
“Getting Help” in your
User’s Guide for the
appropriate contact
information).
NOTE: If you cannot see
anything on your display,
you can hold down the
mute button and press the
power button (instead of
F12) to begin the Dell
Diagnostics. You do not
need to highlight
Diagnostics and press
. The
computer automatically
runs the Pre-boot System
Assessment.
component that failed, press .
• If failures are detected during the Pre-boot System Assessment,
write down the error code(s) and contact Dell (see “Getting Help”
in your User’s Guide for the appropriate contact information)
before continuing on to the Dell Diagnostics.
• If you receive a message stating that no Diagnostics utility
partition has been found, follow the instructions on the screen to
run the Dell Diagnostics from your Drivers and Utilities CD.
If the Pre-boot System Assessment completes successfully, you receive
the message
Press any key to continue
Booting Dell Diagnostic Utility Partition.
.
System Information Guide 25
Page 28

NOTE: The service tag
for your computer is
located in the title bar of
each screen.
6 Press any key to start the Dell Diagnostics from the Diagnostics utility
partition on your hard drive.
7 After the Dell Diagnostics loads and the Main Menu screen appears,
click the button for the option you want.
Option Function
Express Test Performs a quick test of devices. The test typically takes 10 to
20 minutes and requires no interaction on your part. Run
Express Test first to increase the possibility of tracing the
problem quickly.
www.dell.com | support.euro.dell.com
Extended Test Performs a thorough check of devices. The test typically takes
1 hour or more and requires you to answer questions
periodically.
Custom Test Tests a specific device. You can customize the tests to be run.
Symptom Tree Allows you to select tests based on a symptom of the problem
you are experiencing. The option lists the most common
symptoms.
8
If a problem is encountered during a test, a message appears,
displaying the error code and a description of the problem. Write
down the error code and problem description and follow the
instructions on the screen. If you cannot resolve the error condition,
contact Dell (see “Getting Help” in your User’s Guide for the
appropriate contact information).
26 System Information Guide
Page 29

9 If you run a test from the Custom Test or Symptom Tree option, click
the applicable tab described in the following table for more
information.
Tab Function
Results Displays the results of the test and any error conditions
encountered.
Errors Displays error conditions encountered, error codes, and
problem description.
Help Describes the test and may indicate requirements for
running the test.
Configuration Displays your hardware configuration for the selected
device.
The Dell Diagnostics obtains your configuration
information for all devices from the system setup
program, memory, and various internal tests and displays
the information in the device list in the left pane of the
screen. The device list may not display the names of all
the components installed on your computer or all
devices attached to your computer.
Parameters Allows you to customize the test by changing the test
settings.
10 When you have finished running a test, close the screen to return to
the Main Menu screen. To exit the Dell Diagnostics and reboot the
computer, close the Main Menu screen.
System Information Guide 27
Page 30

Regulatory Notices
Electromagnetic Interference (EMI) is any signal or emission, radiated in
free space or conducted along power or signal leads, that endangers the
functioning of a radio navigation or other safety service or seriously
degrades, obstructs, or repeatedly interrupts a licensed radio
communications service. Radio communications services include but are
not limited to AM/FM commercial broadcast, television, cellular services,
radar, air-traffic control, pager, and Personal Communication Services
(PCS). These licensed services, along with unintentional radiators such as
digital devices, including computers, contribute to the electromagnetic
environment.
www.dell.com | support.euro.dell.com
Electromagnetic Compatibility (EMC) is the ability of items of electronic
equipment to function properly together in the electronic environment.
While this computer has been designed and determined to be compliant
with regulatory agency limits for EMI, there is no guarantee that
interference will not occur in a particular installation. If this equipment
does cause interference with radio communications services, which can be
determined by turning the equipment off and on, you are encouraged to try
to correct the interference by one or more of the following measures:
If necessary, consult a Dell Technical Support representative or an
experienced radio/television technician for additional suggestions.
For additional regulatory information, see “Regulatory Notices” in the
Appendix of your online User’s Guide. The sections specific to each
regulatory agency provide country-specific EMC/EMI or product safety
information.
• Reorient the receiving antenna.
• Relocate the computer with respect to the receiver.
• Move the computer away from the receiver.
• Plug the computer into a different outlet so that the computer and the
receiver are on different branch circuits.
28 System Information Guide
Page 31

Dell™ Latitude™ D600
Systeeminformatiegids
www.dell.com | support.euro.dell.com
Page 32

Opmerkingen, kennisgevingen en
waarschuwingen
OPMERKING: Een OPMERKING duidt belangrijke informatie aan voor een
beter gebruik van de computer.
KENNISGEVING: Een KENNISGEVING duidt mogelijke beschadiging van
de hardware of gegevensverlies aan en geeft aan hoe u dergelijke problemen
kunt voorkomen.
WAARSCHUWING: Een WAARSCHUWING duidt het risico van
schade aan eigendommen, lichamelijk letsel of overlijden aan.
Afkortingen en acroniemen
Raadpleeg de User’s Guide (Gebruikershandleiding) voor een
volledige lijst van afkortingen en acroniemen (afhankelijk van het
besturingssysteem dubbelklikt u hiervoor op het pictogram User’s Guide
(Gebruikershandleiding) op het bureaublad of klikt u op de knop Start
en vervolgens op Help en Support Center en vervolgens op User and
system guides (Gebruikers- en systeemhandleidingen)).
Als u een Dell™-computer uit de n-serie hebt aangeschaft, zijn de
®
verwijzingen naar de Microsoft
Windows®-besturingssystemen in
dit document niet van toepassing.
____________________
De informatie in dit document kan zonder voorafgaande kennisgeving worden gewijzigd.
© 2002 Dell Computer Corporation. Alle rechtenvoorbehouden.
V erveelv oudiging van dit materiaal, op welk e wijze dan ook, is alleen toe gestaan na uitdrukkelijke,
schriftelijke toestemming van Dell Computer Corporation.
Handelsmerken in dit document: Dell, het DELL-logo, Inspiron, Dell Precision, Dimension,
OptiPlex en Latitude zijn handelsmerken van Dell Computer Corporation; Intel, Pentium, en Celeron
zijn gedeponeerde handelsmerken van Intel Corporation; Microsoft en Windows zijn gedeponeerde
handelsmerken van Microsoft Corporation; EMC is een gedeponeerd handelsmerk van EMC
Corporation.
Andere handelsmerken en handelsnamen die mogelijk in dit document worden gebruikt, dienen ter
aanduiding van de rechthebbenden met betrekking tot de merken en namen of ter aanduiding van
hun producten. Dell Computer Corporation claimt op geen enkele wijze enig eigendomsrecht ten
aanzien van andere handelsmerken of handelsnamen dan haar eigen handelsmerken en
handelsnamen.
December 2002 Artikelnr. 2N659 Rev. A00
Page 33

Inhoud
WAARSCHUWING: Veiligheidsinstructies . . . . . . . . . . . . . 33
Algemeen
Voeding
Batterij
Luchtverkeer
EMC-instructies
. . . . . . . . . . . . . . . . . . . . . . . . . . . . 33
. . . . . . . . . . . . . . . . . . . . . . . . . . . . . 34
. . . . . . . . . . . . . . . . . . . . . . . . . . . . . 35
. . . . . . . . . . . . . . . . . . . . . . . . . . 36
. . . . . . . . . . . . . . . . . . . . . . . . 36
Inwoners van Californië
. . . . . . . . . . . . . . . . . . . . . 36
Bij gebruik van de computer
. . . . . . . . . . . . . . . . . . . . 37
Ergonomische overwegingen bij het werken met
de computer
De computer openen voor onderhoud
. . . . . . . . . . . . . . . . . . . . . . . . . . . 38
. . . . . . . . . . . . . . 38
Bescherming tegen elektrostatische ontlading
De batterij verwijderen
Informatie over uw computer vinden
De computer instellen
Over de computer
Voorkant
. . . . . . . . . . . . . . . . . . . . . . . . . . 42
. . . . . . . . . . . . . . . . . . . . . . . . . . . . 44
Zijaanzicht, links
Zijaanzicht, rechts
Achterkant
Onderaanzicht
. . . . . . . . . . . . . . . . . . . . . . . . . . . 47
. . . . . . . . . . . . . . . . . . . . . . . . . . 48
Een batterij verwijderen
. . . . . . . . . . . . . . . . . . . . . 39
. . . . . . . . . . . . . . . 40
. . . . . . . . . . . . . . . . . . . . . . . 41
. . . . . . . . . . . . . . . . . . . . . . . . 45
. . . . . . . . . . . . . . . . . . . . . . . 46
. . . . . . . . . . . . . . . . . . . . . . 49
Een reservebatterij verwijderen en installeren
Een batterij installeren
. . . . . . . . . . . . . . . . . . . . . . . 52
. . . . . . . . . . 39
. . . . . . . . . . 50
Dell-diagnoseprogramma uitvoeren
Internationale kennisgevingen
. . . . . . . . . . . . . . . . . . . 56
. . . . . . . . . . . . . . . . 52
Inhoud 31
Page 34

32 Inhoud
Page 35

WAARSCHUWING: Veiligheidsinstructies
Houd u aan de volgende veiligheidsrichtlijnen om uw eigen veiligheid te garanderen en de computer
en werkomgeving te beschermen tegen mogelijke schade.
Algemeen
• Probeer niet zelf onderhoud te plegen aan de computer, tenzij u een opgeleide servicemonteur
bent. Volg altijd de installatie-instructies nauwlettend op.
• Als u de netadapter gebruikt in combinatie met een verlengsnoer, moet u erop letten dat het
totale stroomverbruik van de producten die u op het verlengsnoer aansluit, niet de maximale
stroombelasting van het verlengsnoer overschrijdt.
• Duw geen voorwerpen in de lucht- of andere openingen van de computer. Doet u dat wel, dan
loopt u het risico brand of een elektrische schok te veroorzaken door kortsluiting in de interne
onderdelen.
• Plaats de computer niet in een omgeving waar weinig lucht beschikbaar is, zoals een draagtas of
een gesloten koffer, als de computer is ingeschakeld. Als u dat toch doet, loopt u het risico van
brand of beschadiging van de computer.
• Plaats de computer niet in de buurt van radiatoren en andere warmtebronnen. Blokkeer nooit de
ventilatieopeningen. Leg geen losse papieren onder de computer en plaats de computer niet in
een ingesloten ruimte in of tegen de muur, noch op een bed, bank of vloerkleed.
• Plaats de netadapter bij het werken met de computer of het opladen van de batterij op een plaats
waar voldoende luchtcirculatie is, bijvoorbeeld op een bureau of op de vloer. Dek de netadapter
niet af met papier of andere voorwerpen die de koeling belemmeren. Gebruik de netadapter niet
terwijl deze zich in een draagtas bevindt.
• De stroomadapter kan bij normaal gebruik van de computer heet worden. Ga tijdens of direct na
het gebruik voorzichtig met de adapter om.
• Als u de draagbare computer gebruikt, moet u deze niet gedurende langere tijd op de blote huid
plaatsen. De oppervlaktetemperatuur van het apparaat stijgt bij normaal gebruik (met name bij
het gebruik van wisselstroom). Hierdoor zou u brandwonden kunnen oplopen.
• Gebruik de computer niet op een vochtige plaats, bijvoorbeeld bij een bad, gootsteen of
zwembad of in een vochtig souterrain.
• Als de computer is voorzien van een geïntegreerde of optionele (pc-kaart) modem, moet u de
modemkabel tijdens onweer loskoppelen om het (geringe) risico van een elektrische schok door
blikseminslag via de telefoonlijn te vermijden.
Systeeminformatiegids 33
Page 36

WAARSCHUWING: Veiligheidsinstructies (vervolg)
• U kunt het risico van elektrische schokken vermijden door tijdens onweer geen kabels aan te
sluiten of los te maken, geen onderhoud aan dit product te plegen en het product niet opnieuw
te configureren. Gebruik de computer niet tijdens onweer tenzij alle kabels zijn losgemaakt en
de computer uitsluitend op batterijen werkt.
• Als de computer is voorzien van een modem, moet de modemkabel een minimumgrootte van
26 AWG (American Wire Gauge) hebben en een FCC-compatibele RJ-11 modulaire stekker.
• Voordat u de kap voor de geheugenmodule/mini-PCI-kaart/modem onder aan de computer
opent, moet u alle kabels uit het stopcontact halen en de telefoonkabel losmaken.
• Als de computer een modem-RJ-11-connector en een netwerk-RJ-45-connector heeft,
stopt u de telefoonkabel in de RJ-11-connector en niet in de RJ-45-connector.
www.dell.com | support.euro.dell.com
• Pc-kaarten kunnen erg warm worden tijdens normaal gebruik. Wees voorzichtig als u na
langdurig gebruik van de computer een pc-kaart verwijdert.
• Voordat u de computer schoonmaakt, moet u de stekker van de computer uit het
stopcontact halen. Maak de computer schoon met een zachte doek die met water vochtig
is gemaakt. Gebruik geen vloeibare schoonmaakmiddelen of middelen in een spuitbus.
Deze schoonmaakmiddelen kunnen ontvlambare stoffen bevatten.
Voeding
• Gebruik alleen de door Dell meegeleverde AC-adapter die is goedgekeurd voor gebruik met
deze computer. Als u een andere AC-adapter gebruikt, kan dit brand of een explosie veroorzaken.
• Voordat u de computer op een elektriciteitsbron aansluit, moet u ervoor zorgen dat het voltage
van de stroomadapter overeenkomt met dat van de beschikbare elektriciteitsbron.
• U verwijdert de computer van alle stroombronnen door de computer uit te zetten, de batterij te
verwijderen en de stroomadapter uit het stopcontact te halen.
• U kunt een elektrische schok voorkomen door de AC-adapter en de stroomkabels van eventuele
randapparatuur aan te sluiten op een geaard stopcontact. Deze stroomkabels kunnen zijn
voorzien van een stekker met drie pennen voor de aarding. Gebruik geen adapterstekkers en
verwijder de aardingspool niet uit de stekker. Wanneer u een verlengsnoer gebruikt, moet u het
juiste type gebruiken (met twee of drie pinnen), dat past op de stroomkabel van de netadapter.
34 Systeeminformatiegids
Page 37

WAARSCHUWING: Veiligheidsinstructies (vervolg)
• Zorg dat er niets op de stroomkabel van de adapter ligt en dat niemand op deze kabel kan
stappen of erover kan struikelen.
• Als u een stekkerdoos gebruikt, moet u voorzichtig zijn als u de stroomkabel van de adapter in
de stekkerdoos steekt. Bij sommige stekkerdozen bestaat het gevaar dat u de stekker op onjuiste
wijze aansluit. Het incorrect aansluiten van de stekker kan blijvende schade aan uw computer
veroorzaken en leiden tot gevaar voor elektrische schokken of brand. Zorg ervoor dat u de
aardingspool van de stekker aansluit op het bijbehorende contactpunt van de stekkerdoos.
Batterij
• Gebruik alleen Dell™-batterijen die zijn goedgekeurd voor gebruik met deze computer.
Als u een ander type gebruikt, kan dit brand of een ontploffing veroorzaken.
• Bewaar de batterij van de computer niet in uw broekzak of jaszak, portemonnee of ergens
anders waar zich metalen voorwerpen zoals autosleutels of paperclips bevinden. Door overmatige
stroomafgifte kunnen extreem hoge temperaturen ontstaan die schade aan de batterij of brand
en brandwonden kunnen veroorzaken.
• Als u de batterij verkeerd gebruikt, kan deze brandgevaar opleveren. Haal de batterij niet uit
elkaar. U moet een beschadigde of lekkende batterij met de grootste voorzichtigheid behandelen.
Als de batterij is beschadigd, kan er elektrolyt uit de cellen lekken, wat lichamelijk letsel kan
veroorzaken.
• Houd de batterij buiten bereik van kinderen.
• Laat uw computer of batterij nooit in de buurt van een warmtebron liggen, zoals een radiator,
open haard, oven, elektrische kachel of andere warmteproducerende apparaten. Stel de computer
of batterij ook op geen enkele andere wijze bloot aan temperaturen van meer dan 60°C (140°F).
Als batterijcellen overmatig worden verhit, kunnen ze exploderen of kan inhoud wegstromen,
waardoor brand kan ontstaan.
• Gooi oude batterijen niet weg met het huisvuil en gooi ze niet in vuur. Batterijcellen kunnen
exploderen. Houd u bij het weggooien van oude batterijen aan de richtlijnen van de fabrikant
of neem contact op met de plaatselijke afvalverwerking voor instructies. Gooi een gebruikte of
beschadigde batterij direct weg.
Systeeminformatiegids 35
Page 38

WAARSCHUWING: Veiligheidsinstructies (vervolg)
Luchtverkeer
• Als u uw Dell-computer meeneemt in het vliegtuig, kunnen bepaalde regels van de
luchtvaartmaatschappij van kracht zijn. Het kan bijvoorbeeld verboden zijn in het
vliegtuig persoonlijke elektronische apparaten te gebruiken die radiofrequenties of
andere elektromagnetische signalen kunnen uitzenden.
– Als uw draagbare Dell-computer is voorzien van Dell TrueMobile™ of een ander apparaat
voor draadloze communicatie, moet u dit, voordat u aan boord gaat, uitschakelen door op
te drukken en alle instructies van het cabinepersoneel omtrent dergelijke
apparaten strikt opvolgen.
www.dell.com | support.euro.dell.com
– Bovendien kan het gebruik van dit soort apparaten, zoals een draagbare computer, in
vliegtuigen verboden zijn op bepaalde momenten tijdens de vlucht, zoals tijdens de start en
de landing. Sommige luchtvaartmaatschappijen bepalen dat op geen enkel moment onder
een vlieghoogte van 3.050 m (10.000 voet) gebruik mag worden gemaakt van persoonlijke
elektronische apparaten. Volg de instructies van de luchtvaartmaatschappij met betrekking
tot het gebruik van elektronische apparaten strikt op.
EMC-instructies
Wanneer u afgeschermde signaalkabels gebruikt, bent u er zeker van dat de juiste EMC-classificatie
voor de bedoelde omgeving wordt gehandhaafd. Voor parallelle printers is een speciale kabel
verkrijgbaar bij Dell. U kunt deze kabel bij Dell bestellen via de website op www.dell.com.
Door statische elektriciteit kunnen de elektronische onderdelen in de computer beschadigd raken.
U kunt beschadiging ten gevolge van statische elektriciteit voorkomen door de statische elektriciteit
in uw lichaam te ontladen voordat u elektronische onderdelen van de computer (zoals een
geheugenmodule) aanraakt. U doet dit door eerst een ongeverfd metalen oppervlak op het I/O-paneel
van de computer aan te raken.
Inwoners van Californië
WAARSCHUWING: Als u de snoeren van dit product of de snoeren van acessoires die bij dit product
worden geleverd, aanraakt, kunt u in contact komen met lood. De staat Californië acht het bewezen
dat lood negatieve gevolgen kan hebben tijdens de geboorte en overige afwijkingen kan veroorzaken
tijdens de voortplanting.
36 Systeeminformatiegids
Was uw handen nadat u een snoer hebt aangeraakt
.
Page 39

Bij gebruik van de computer
Neem de volgende veiligheidsmaatregelen in acht om schade aan de computer te voorkomen.
• Als u de computer voorbereidt op gebruik, moet u deze op een effen oppervlak plaatsen.
• Check bij een vliegreis de computer niet als bagage in. De computer kan zonder enig bezwaar
door de röntgencontrole, maar niet langs de metaaldetector. Als u de computer als handbagage
meeneemt, moet u ervoor zorgen dat de batterij is opgeladen voor het geval u wordt gevraagd de
computer aan te zetten.
• Als u de computer meeneemt op reis en u hebt de vaste schijf uit de computer verwijderd, moet
u het schijfstation in niet-geleidend materiaal, zoals een doek of papier, verpakken. Als u het
station als handbagage meeneemt, moet u dat op verzoek in de computer kunnen installeren.
De vaste schijf kan zonder enig bezwaar door de röntgencontrole, maar niet langs de
metaaldetector.
• Plaats de computer niet in de bagageruimte boven u. Tijdens de vliegreis kan de computer
gaan schuiven. Laat de computer niet vallen en stel het apparaat niet bloot aan mechanische
schokken.
• Bescherm de computer, batterij en vaste schijf tegen vuil, stof, voedsel, vloeistoffen, bijzonder
hoge of lage temperaturen en leg deze niet in de zon.
• Als u de computer naar verschillende omgevingen verplaatst met verschillende temperaturen
en/of vochtigheidsgraden, kan zich condensatie voordoen op of in de computer. U voorkomt
beschadiging van de computer door voldoende tijd te nemen voor het verdampen van het vocht
voordat u de computer gebruikt.
KENNISGEVING: Als u de computer van een omgeving met een lage temperatuur naar een omgeving met
een hogere temperatuur brengt of andersom, moet u de computer aan de kamertemperatuur laten wennen
voordat u deze aanzet.
• Maak een kabel los door aan de connector of aan het beugeltje voor trekontlasting te trekken
en niet aan de kabel zelf. Als u de kabel uit de connector trekt, moet u ervoor zorgen dat u
de connector recht uit de aansluiting trekt zodat de pinnen van de connector niet verbuigen.
Als u een kabel aansluit, moet u beide connectoren op de juiste manier in de aansluiting steken.
• Hanteer alle onderdelen met zorg. Houd onderdelen, zoals een geheugenmodule, vast aan de
randen en niet aan de pennen.
• Als u een geheugenmodule uit de systeemkaart wilt verwijderen of een apparaat wilt loskoppelen
van de computer, moet u de computer uitzetten, de stroomadapterkabel losmaken en vervolgens
5 seconden wachten voordat u verdergaat, zodat eventuele schade aan de systeemkaart wordt
voorkomen.
Systeeminformatiegids 37
Page 40

Bij gebruik van de computer (vervolg)
• U kunt het beeldscherm reinigen met een schone, zachte doek en water. Breng water aan op de
doek en wrijf vervolgens met de doek in één richting over het scherm, van boven naar beneden.
Verwijder vocht zo snel mogelijk van het beeldscherm en houd het beeldscherm droog. Te lange
blootstelling aan vocht kan het beeldscherm beschadigen. Gebruik geen reinigingsmiddel voor
glas om het beeldscherm te reinigen.
• Als de computer nat of beschadigd is, moet u de procedures volgen die staan beschreven in het
gedeelte 'Problemen met de computer oplossen' in de Gebruikershandleiding. Als u, nadat u deze
procedures hebt gevolgd, vaststelt dat uw computer niet correct functioneert, kunt u contact
opnemen met Dell (zie 'Getting Help' (Help opvragen) in de 'User’s Guide'
(Gebruikershandleiding) voor de juiste contactgegevens).
Ergonomische overwegingen bij het werken met de computer
www.dell.com | support.euro.dell.com
WAARSCHUWING: Onjuist of langdurig gebruik van het toetsenbord kan leiden tot
lichamelijk ongemak en zelfs letsel.
WAARSCHUWING: Langdurig naar het beeldscherm of de externe monitor kijken,
kan tot vermoeidheid van de ogen leiden.
Houd u aan de ergonomische richtlijnen in het appendix van de on line Gebruikershandleiding
voor comfortabel en efficiënt werken als u de computer opstelt en gaat gebruiken.
Dit is een draagbare computer die niet is ontwikkeld voor continu gebruik als kantoorapparatuur.
Bij langdurig gebruik op een kantoor, wordt u aangeraden een extern toetsenbord aan te sluiten.
De computer openen voor onderhoud
Voordat u geheugenmodules, mini-PCI-kaarten of modems verwijdert of installeert, moet u de
volgende stappen in de aangegeven volgorde uitvoeren.
KENNISGEVING: U moet de computer alleen openmaken als u een geheugenmodule een mini-PCI-kaart
of een modem installeert.
KENNISGEVING: Voordat u een apparaat loskoppelt of een geheugenmodule, mini-PCI-kaart of een
modem verwijdert, moet u 5 seconden wachten nadat u de computer hebt uitgezet om eventuele schade aan
de systeemkaart te voorkomen.
Schakel de computer en eventueel aangekoppelde apparaten uit.
1
2 Haal de stekkers van de computer en apparatuur uit het stopcontact om lichamelijk letsel of
schokken te voorkomen. Koppel tevens eventuele telefoon- of telecommunicatielijnen los van
de computer.
3 Haal de hoofdbatterij uit de batterijhouder en, indien nodig, de tweede batterij uit de
modulaire houder.
38 Systeeminformatiegids
Page 41

Bij gebruik van de computer (vervolg)
4 Zorg dat u bent geaard door het ongeverfde metalen oppervlak op het I/O-paneel aan de
achterzijde van de computer aan te raken.
Raak tijdens het werken zo nu en dan het I/O-paneel aan om eventuele statische elektriciteit
te ontladen die de interne onderdelen kan beschadigen.
Bescherming tegen elektrostatische ontlading
Door statische elektriciteit kunnen de elektronische onderdelen in de computer beschadigd raken.
U kunt beschadiging ten gevolge van statische elektriciteit voorkomen door de statische elektriciteit
in uw lichaam te ontladen voordat u elektronische onderdelen van de computer (zoals een
geheugenmodule) aanraakt. U doet dit door een ongeverfd metalen oppervlak op het I/O-paneel
van de computer aan te raken.
Als u aan de interne onderdelen van de computer werkt, moet u zo nu en dan een I/O-connector
aanraken om eventuele statische elektriciteit in uw lichaam te ontladen.
U kunt ook de volgende voorzorgsmaatregelen nemen om beschadiging ten gevolge van
elektrostatische ontlading (ESD) te voorkomen:
• Als u een voor statische elektriciteit gevoelig onderdeel uit de verpakking haalt, moet u het
onderdeel in de antistatische verpakking laten totdat u het onderdeel gaat installeren. Voordat u
het onderdeel uit de antistatische verpakking haalt, moet u eerst de statische elektriciteit in uw
lichaam ontladen.
• Als u een gevoelig onderdeel wilt vervoeren, moet u dat in een antistatische verpakking plaatsen.
• Hanteer alle gevoelige onderdelen alleen in een ruimte die vrij is van statische elektriciteit.
Gebruik, indien mogelijk, antistatische matten voor vloer en werkbank.
De batterij verwijderen
De computer maakt gebruik van een lithiumion-batterij. Raadpleeg 'Een Batterij verwijderen'
verderop in dit document en 'Using a Battery' (Een batterij gebruiken) in de on line User’s Guide
(Gebruikershandleiding) voor aanwijzingen bij het vervangen van de lithiumion-batterij.
Gooi oude batterijen niet weg met het huisvuil. Lever ze in bij een chemokar of neem contact op
met het plaatselijke vuilnisbedrijf voor het dichtstbijzijnde adres waar u batterijen kunt inleveren.
Systeeminformatiegids 39
Page 42

Informatie over uw computer vinden
Waar bent u naar op zoek? Hier kunt u het vinden
• Een diagnostisch programma voor
de computer
• Stuurprogramma's voor de computer
• Documentatie voor de computer
• Documentatie voor een apparaat
www.dell.com | support.euro.dell.com
• Express Service Code en servicelabel
• Microsoft
®
Windows®-licentielabel
De cd Drivers and Utilities (Stuur- en
hulpprogramma's), ook wel de ResourceCD
of bron-cd genoemd
Documentatie en stuurprogramma’s zijn
al op de computer geïnstalleerd als deze
door Dell is geleverd. U kunt deze cd
gebruiken voor het opnieuw installeren
van stuurprogramma’s, het uitvoeren van
diagnostische hulpprogramma’s en het
lezen van documentatie.
De cd kan readme (leesmij)-bestanden
bevatten met de meest recente updates
over technische wijzigingen aan de
computer, of geavanceerd technisch
referentiemateriaal voor ervaren gebruikers of technici.
Express Service Code en productcode
Deze labels bevinden zich op
de computer.
• De meest recente stuurprogramma's
voor de computer
• Antwoorden op vragen op het gebied
van technische diensten en
ondersteuning
• On line discussies met andere
gebruikers en technische
ondersteuning
• Documentatie voor de computer
40 Systeeminformatiegids
Dell Support-website
De Dell Support-website biedt verschillende on line hulpprogramma's,
waaronder:
• Solutions (Oplossingen) — hints en tips voor het oplossen
van problemen, artikelen van technici en on line cursussen
• Community Forum (Community-forum) — on line discussies
met andere gebruikers van Dell-producten
• Upgrades — upgrade-informatie voor onderdelen zoals
het geheugen, de vaste schijf en het besturingssysteem.
• Customer Care (Klantenzorg) — contactinformatie, een
statusoverzicht van bestellingen, informatie over garantie
en reparaties
• Downloads — stuurprogramma's, patches en software-updates
• Reference (Naslag) — computerdocumentatie, productspecificaties
en andere documenten
Page 43

Waar bent u naar op zoek? Hier kunt u het vinden
• Met Windows XP werken
• Documentatie voor de computer
• Documentatie voor apparaten
(zoals een modem)
• Het besturingssysteem opnieuw
installeren
Help and Support Center van Windows
1 Klik op de knop Start en klik vervolgens op Help and Support
(Help en ondersteuning).
2 Geef met een of meer woorden een beschrijving aan van
het probleem en klik vervolgens op het pijlpictogram.
3 Klik op het onderwerp dat uw probleem beschrijft.
4 Volg de instructies op het scherm.
Cd Operating System (Besturingssysteem)
De computer instellen
1 Haal de onderdelen uit de accessoiredoos.
Als u het besturingssysteem opnieuw
wilt installeren, gebruikt u de cd
Drivers and Utilities (Stuur- en
hulpprogramma’s) om de
stuurprogramma’s voor de apparaten die
bij de computer zijn geleverd, opnieuw
te installeren.
De productcode voor uw
besturingssysteem bevindt zich op uw
computer.
2 Leg de onderdelen terzijde. U hebt deze nodig om het instellen van
de computer te kunnen voltooien.
De accessoiredoos bevat tevens gebruikersdocumentatie en eventuele
software of extra hardware die u hebt besteld (zoals pc-kaarten,
stations of batterijen).
3 Sluit de AC-adapter aan op de connector en de netspanning.
KENNISGEVING: Als u de computer inschakelt, verschijnt mogelijk een
bericht waarin wordt gemeld dat u de computer moet uitschakelen en het
geheugen van de computer moet uitbreiden. Raadpleeg in dat geval de User’s
Guide (Gebruikershandleiding) op de Dell Support-website (support.dell.com)
voor aanwijzingen bij het uitbreiden van het geheugen van de computer.
Open de computerdisplay en druk op de Aan/uit-knop om de
4
computer in te schakelen.
Systeeminformatiegids 41
Page 44

OPMERKING: Sluit de
computer alleen aan op
een dockingstation als
de computer ten minste
één keer is in- en
uitgeschakeld.
www.dell.com | support.euro.dell.com
aan/uit-knop
42 Systeeminformatiegids
Over de computer
Raadpleeg de on line User’s Guide (Gebruikershandleiding) voor
gedetailleerde informatie over de computer. Afhankelijk van uw
besturingssysteem kunt u dubbelklikken op het pictogram User’s Guide
(gebruikershandleiding) op het bureaublad, of klikken op de knop Start
en vervolgens op Help and Support Center en op User and system guides
(Gebruikers- en systeemhandleidingen). De volgende punten hebben
betrekking op een of meer vaak gestelde vragen over de computer.
• Modem en netwerkadapter: De computer kan zowel een v.92 56K-
modem als een 10/100/1000 Ethernet LOM-netwerkadapter bevatten.
Raadpleeg 'Zijaanzicht, rechts' voor een overzicht van de connectors.
Raadpleeg 'About Your Computer' (Over de computer) in de on line
User’s Guide (Gebruikershandleiding) voor meer informatie over
poorten en connectoren.
Page 45

• Levensduur en gebruik van de batterij: U kunt verschillende batterijen
gebruiken voor uw computer. De 4460-mAh-batterij die standaard
wordt geleverd bij de computer, levert drie tot vier uur energie, bij een
enkele, volledig opgeladen batterij en normaal gebruik. De levensduur
van een batterij kan aanmerkelijk worden verlaagd door het uitvoeren
van bepaalde bewerkingen, zoals een uitgebreide draadloos gebruik.
– Raadpleeg 'Using a Battery' (Een batterij gebruiken) en
'Power Management' (Energiebeheer) in de User’s Guide
(Gebruikershandleiding) voor meer informatie over
batterijprestaties, het gebruik van een batterij en het
besparen van energie.
– Raadpleeg 'Using the Module Bay' (De modulehouder gebruiken)
in de User’s Guide (Gebruikershandleiding) voor informatie over
het gebruik van een optionele tweede batterij.
• Modulehouderapparaten: Raadpleeg voor meer informatie over de
modulehouder en de ondersteunde apparaten 'Using the Module Bay'
(De modulehouder gebruiken) in de User’s Guide
(Gebruikershandleiding)).
• Dockingstations: Uw computer ondersteunt het Dell D/Dock
Expansion Station en de Dell D/Port Advanced Port Replicator.
– Raadpleeg de documentatie van het betreffende apparaat voor
meer informatie over uw optionele dockingstation.
– Raadpleeg 'Solving Problems' (Problemen oplossen) in de User’s
Guide (Gebruikershandleiding) voor informatie over het verkrijgen
van de beste prestaties wanneer een dockingstation op de
computer wordt aangesloten.
OPMERKING: Mogelijk
zijn dockingstations niet
in elk land beschikbaar.
Systeeminformatiegids 43
Page 46

Voorkant
toetsenbordsta
tuslampjes
knop voor
geluid uit/aan
volumeregelknoppen
track stick
www.dell.com | support.euro.dell.com
track stick/touch
pad-knoppen
beeldscherm
aan/uit-knop
apparaatstatuslampjes
toetsenbord
touch pad
schuifje van
beeldscherm
luidsprekers
44 Systeeminformatiegids
Page 47

Zijaanzicht, links
luchtopeningen (2)
infraroodsensor
audioconnectoren (2)
pc-kaartslot
smart card-slot
sleuf voor
beveiligingskabel
vaste schijf
Systeeminformatiegids 45
Page 48

Zijaanzicht, rechts
www.dell.com | support.euro.dell.com
sleuf voor
beveiligingskabel
modulehouder
apparaatvergrendelingen
46 Systeeminformatiegids
Page 49

Achterkant
KENNISGEVING: Wacht 5 seconden na het uitschakelen van de computer
met het loskoppelen van een extern apparaat. Doet u dat niet, dan loopt u het
risico de computer te beschadigen.
WAARSCHUWING: Blokkeer de luchtopeningen niet, duw er geen
voorwerpen in en zorg dat er zich geen stof in ophoopt. Plaats de
computer niet in een omgeving waar weinig lucht beschikbaar is,
zoals een gesloten koffer, als de computer is ingeschakeld. Als u
dat toch doet, loopt u het risico van brand of beschadiging van de
computer.
modemconnector
(RJ-11) (optioneel)
netwerkconnector
(RJ-45)
parallelle connector
connector voor S-video tv-uitgang
USB-connectoren (2)
videoconnector
seriële connector
luchtopeningen
connector voor
netadapter
Systeeminformatiegids 47
Page 50

Onderaanzicht
vaste schijf
mini-PCIkaartkap
www.dell.com | support.euro.dell.com
ventilator
geheugenmodulekap
ontgrendelingsschuifje van
batterijhouder
batterijoplaadmeter
batterij
slot voor dockingstation
48 Systeeminformatiegids
Page 51

Een batterij verwijderen
Raadpleeg 'Using the Module Bay' (De modulehouder gebruiken) in de
on line User’s Guide (Gebruikershandleiding) voor meer informatie over
het verwijderen van de tweede batterij.
WAARSCHUWING: Voordat u deze handelingen uitvoert, moet u
de computer uitschakelen, de stekkers uit het stopcontact halen
en de modem loskoppelen van de telefoonaansluiting.
KENNISGEVING: Als u de computer in de modus Stand-by hebt geplaatst,
hebt u 90 seconden de tijd om de batterij te vervangen, voordat de computer
wordt uitgeschakeld en niet-opgeslagen gegevens verloren gaan.
1
Zorg dat de computer is uitgeschakeld, dat de stekkers uit
het stopcontact zijn en dat de modem is losgekoppeld van
de telefoonaansluiting.
2 Als de computer is aangesloten op een dockingstation, koppelt u het
dockingstation los. Raadpleeg de documentatie bij het dockingstation
voor instructies over het loskoppelen.
3 Open het ontgrendelingsschuifje van de batterijhouder aan de
onderkant van de computer en verwijder de batterij uit de houder.
Systeeminformatiegids 49
Page 52

Een reservebatterij verwijderen en installeren
www.dell.com | support.euro.dell.com
1 Verwijder de batterij.
2 Open het ontgrendelingsschuifje van de reservebatterij.
50 Systeeminformatiegids
Page 53

3 Verwijder de reservebatterij uit het compartiment en haal de kabel
uit de connector.
4 Sluit de kabel van de reservebatterij aan op de connector in
het compartiment voor de reservebatterij.
5 Plaats de reservebatterij in het compartiment en plaats
het ontgrendelingsschuifje voor de reservebatterij terug.
Systeeminformatiegids 51
Page 54

www.dell.com | support.euro.dell.com
Een batterij installeren
Schuif de nieuwe batterij in de batterijhouder tot het schuifje vastklikt.
Raadpleeg 'Using the Module Bay' (De modulehouder gebruiken) in de
on line User’s Guide (Gebruikershandleiding) voor meer informatie over
het installeren van de tweede batterij.
Dell-diagnoseprogramma uitvoeren
Het Dell-diagnoseprogramma bevindt zich op een verborgen partitie op
de vaste schijf.
OPMERKING: Als op
uw computer geen beeld
kan worden weergegeven,
neemt u contact op met
Dell (raadpleeg 'Getting
Help' (Help opvragen)
in de User’s Guide
(Gebruikershandleiding)
voor de juiste
contactinformatie).
52 Systeeminformatiegids
Sluit de computer af.
1
2 Als de computer is aangesloten op een dockingstation, koppelt u het
dockingstation los. Raadpleeg de documentatie bij het dockingstation
voor instructies over het loskoppelen.
3 Steek de stekker van de computer in het stopcontact.
Page 55

Zet de computer aan. Druk zodra het DELL™-logo wordt
4
weergegeven onmiddellijk op . Als u te lang hebt gewacht en het
Microsoft
®
Windows®-logo wordt weergegeven, moet u wachten tot u
het bureaublad van Windows ziet. Sluit de computer vervolgens af en
probeer het opnieuw.
5 Selecteer in de lijst met opstartapparaten 'Diagnostics'
(Diagnoseprogramma) en druk op .
Op de computer wordt nu de 'Pre-boot System Assessment'
(systeemanalyse) uitgevoerd. Dit is een aantal diagnostische
programma's waarmee controles worden uitgevoerd op het
moederbord, het toetsenbord, de vaste schijf en het beeldscherm.
• Beantwoord tijdens de analyse eventuele vragen die worden
gesteld.
• Als een onderdeel niet correct werkt, stopt de computer en hoort
u een piepsignaal. Druk op om de analyse te onderbreken
en het besturingssysteem op te starten. Druk op om naar
de volgende test te gaan. Druk op om het onderdeel dat
niet juist werkt opnieuw te testen.
• Als er tijdens de Pre-boot System Assessment fouten worden
aangetroffen, kunt u de foutcode(s) opschrijven en contact
opnemen met Dell (zie 'Getting Help' (Help opvragen) in
de User’s Guide (gebruikershandleiding) voor de juiste
contactinformatie) voordat u doorgaat met de Dell Diagnostics
(Dell-diagnostiek).
• Als een bericht wordt weergegeven dat geen partitie is
aangetroffen met het Dell-diagnoseprogramma, volgt u de
instructies op het scherm voor het uitvoeren van het Delldiagnoseprogramma vanaf de cd Drivers and Utilities
(Stuur- en hulpprogramma's).
Als de Pre-boot System Assessment succesvol wordt voltooid, ziet
u de melding
(Opstarten vanaf partitie met Dell-diagnoseprogramma).
Druk op een willekeurige toets om door te gaan
Booting Dell Diagnostic Utility Partition
.
OPMERKING:
Als u niets ziet op het
beeldscherm, kunt u de
knop voor geluid uit/aan
ingedrukt houden en op de
aan-/uitknop drukken (in
plaats van op F12) om het
Dell-diagnoseprogramma
uit te voeren. U hoeft niet
Diagnoseprogramma te
selecteren en op
te drukken.
Op de computer wordt
automatisch de 'Pre-boot
System Assessment'
(systeemanalyse)
uitgevoerd voordat
de computer wordt
opgestart.
Systeeminformatiegids 53
Page 56

OPMERKING: In de
titelbalk van elk scherm
ziet u het servicelabel
voor uw computer.
www.dell.com | support.euro.dell.com
6 Druk op een willekeurige toets om de Dell Diagnostics (Dell-
diagnostiek) uit te voeren vanaf de partitie van de vaste schijf met
het Dell-diagnoseprogramma.
7 Nadat het Dell-diagnoseprogramma is geladen en het scherm met
het hoofdmenu wordt weergegeven, klikt u op de knop voor de
gewenste optie.
Optie Functie
Snelle test Hiermee wordt een snelle test uitgevoerd van
apparaten. Deze test neemt doorgaans tien tot twintig
minuten in beslag. Er is geen interactie vereist. Als u de
snelle test eerst uitvoert, vergroot u de kans om het
probleem snel op te sporen.
Uitgebreide test Hiermee wordt een grondige controle van apparaten
uitgevoerd. Deze test neemt doorgaans een uur of
langer in beslag. U moet af en toe vragen
beantwoorden.
Aangepaste test Hiermee kunt u een bepaald apparaat testen.
U kunt de uit te voeren tests aanpassen.
54 Systeeminformatiegids
Symptomenstructuur Hiermee kunt u tests selecteren op basis van een
symptoom van het probleem dat u ondervindt.
Met de optie worden de meest voorkomende
symptomen weergegeven.
8
Als tijdens het uitvoeren van een test een probleem wordt
aangetroffen, wordt een bericht weergegeven met de foutcode en een
beschrijving van het probleem. Noteer de foutcode en de beschrijving
van het probleem en volg de instructies op het scherm. Als u de
foutconditie niet kunt verhelpen, kunt u contact opnemen met
Dell (zie 'Getting Help' (Help opvragen) in de User’s Guide
(gebruikershandleiding) voor de juiste contactinformatie).
Page 57

9 Wanneer u een test uitvoert van de optie Custom Test (Aangepaste
test) of Symptom Tree (Symptomenstructuur), kunt u voor meer
informatie over de test op een van de tabbladen klikken die in de
volgende tabel worden beschreven.
Tabblad Functie
Results
(Resultaten)
Errors
(Fouten)
Help Hier wordt de test beschreven en worden eventuele
Configuration
(Configuratie)
Parameters Hiermee kunt u de test aanpassen door de
Hier worden de resultaten van de test weergegeven,
samen met eventuele foutcondities die zijn aangetroffen.
Hier worden aangetroffen foutcondities, foutcodes
en probleembeschrijvingen weergegeven.
vereisten voor het uitvoeren van de test vermeld.
Hier wordt de hardwareconfiguratie beschreven voor het
geselecteerde apparaat.
Het Dell-diagnoseprogramma verkrijgt de
configuratiegegevens voor alle apparaten van het
Setup-programma van het systeem, het geheugen
en verschillende interne tests. Deze gegevens worden
weergegeven in het linkerdeelvenster van het scherm.
Mogelijk worden in het apparaatoverzicht niet de namen
van alle onderdelen weergegeven die zijn geïnstalleerd in
of aangesloten op de computer.
testinstellingen te wijzigen.
10 Als u klaar bent met het uitvoeren van een test, sluit u het venster
om terug te keren naar het scherm met het hoofdmenu. Als u het
Dell-diagnoseprogramma wilt afsluiten en de computer opnieuw
wilt opstarten, sluit u het scherm met het hoofdmenu.
Systeeminformatiegids 55
Page 58

Internationale kennisgevingen
Elektromagnetische storingen (EMI) zijn in de vrije ruimte uitgestraalde
of langs elektriciteits- of signaalkabels geleide emissiesignalen die de goede
werking van radionavigatiediensten of andere veiligheidsdiensten in gevaar
brengen, de kwaliteit van een gemachtigde radiocommunicatiedienst
ernstig aantasten of deze dienst hinderen of herhaaldelijk onderbreken.
Radiocommunicatiediensten omvatten, maar zijn niet beperkt tot,
commerciële uitzendingen via AM/FM-radio, televisie-uitzendingen,
mobiele diensten, radar, luchtverkeer, semafoons en persoonlijke
communicatiediensten. Deze gemachtigde diensten dragen samen met
apparaten die onopzettelijk straling veroorzaken, waaronder digitale
apparaten zoals computersystemen, bij aan de elektromagnetische
www.dell.com | support.euro.dell.com
omgeving.
Met elektromagnetische compatibiliteit (EMC) wordt het vermogen van
elektronische apparatuur aangeduid om probleemloos in een elektronische
omgeving te kunnen functioneren. Hoewel deze computer conform de door
de overheid voorgeschreven EMI-limieten is ontworpen en goedgekeurd,
bestaat er geen zekerheid dat zich geen storingen zullen voordoen in een
bepaalde installatie. Als door deze apparatuur radiocommunicatiediensten
worden gestoord, hetgeen u kunt vaststellen door de apparatuur uit te
schakelen en vervolgens weer in te schakelen, kunt u de storing als volgt
proberen op te heffen:
56 Systeeminformatiegids
• Richt de ontvangstantenne een andere kant op.
• Verplaats de computer ten opzichte van de ontvanger.
• Zet de computer verder af van de ontvanger.
• Sluit het netsnoer van de computer aan op een ander stopcontact,
zodat de computer en de ontvanger niet op dezelfde groep zijn
aangesloten.
Raadpleeg zo nodig een medewerker van de technische
ondersteuningsafdeling van Dell of een ervaren radio- of
televisiereparateur voor aanvullend advies.
Raadpleeg de 'Regulatory Notices' (Internationale kennisgevingen)
in het appendix van de on line User’s Guide (gebruikershandleiding).
In de gedeelten die specifiek zijn voor elke regelgevende instantie, vindt
u landspecifieke informatie over EMC/EMI en productbeveiliging.
Page 59

Dell™ Latitude™ D600
Guide d'information sur le système
www.dell.com | support.euro.dell.com
Page 60

Remarques, avis et précautions
REMARQUE : Une REMARQUE indique des informations importantes qui
vous aident à mieux utiliser votre ordinateur.
AVIS : Un AVIS vous avertit d'un risque de dommage matériel ou de perte de
données et vous indique comment éviter le problème.
PRÉCAUTION : Une PRÉCAUTION indique un risque potentiel
d'endommagement du matériel, de blessure corporelle ou de mort.
Abréviations et acronymes
Pour obtenir une liste complète des abréviations et des acronymes,
reportez-vous au Guide d'utilisation. En fonction du système d'exploitation
installé sur votre ordinateur, double-cliquez sur l'icône User's Guide (Guide
d'utilisation) située sur le bureau ou cliquez sur le bouton Start (Démarrer)
et cliquez successivement sur Help and Support (Aide et support) et User
and system guides (Guides de l'utilisateur et du système).
Si vous avez acheté un ordinateur Dell™ de la série n, toutes les références
®
faites aux systèmes d'exploitation Microsoft
Windows® ne sont pas
applicables.
____________________
Les informations de ce document sont sujettes à modifications sans préavis.
© 2002 Dell Computer Corporation. Tous droits réservés.
Toute reproduction sous quelque forme que ce soit sans l'autorisation écrite de
Dell Computer Corporation est strictement interdite.
Marques utilisées dans ce document : Dell, le logo DELL, Inspiron, Dell Precision,
Dimension, OptiPlex et Latitude sont des marques de Dell Computer Corporation ; Intel, Pentium
et Celeron sont des marques déposées de Intel Corporation ; Microsoft et Windows sont des
marques déposées de Microsoft Corporation ; EMC est une marque déposée de EMC Corporation.
D'autres marques et noms commerciaux peuvent être utilisés dans ce document pour
faire référence aux entités se réclamant de ces marques et de ces noms ou à leurs produits.
Dell Computer Corporation dénie tout intérêt propriétaire aux marques et aux noms commerciaux
autres que les siens.
Décembre 2002 Réf 2N659 Rév. A00
Page 61

Sommaire
PRÉCAUTION : Consignes de sécurité . . . . . . . . . . . . . . . 61
Généralités
Alimentation
Batterie
Voyages en avion
Instructions de CEM
Utilisateurs résidant en Californie
. . . . . . . . . . . . . . . . . . . . . . . . . . . 61
. . . . . . . . . . . . . . . . . . . . . . . . . . 62
. . . . . . . . . . . . . . . . . . . . . . . . . . . . . 63
. . . . . . . . . . . . . . . . . . . . . . . . 64
. . . . . . . . . . . . . . . . . . . . . . 64
. . . . . . . . . . . . . . . . 64
Lors de l'utilisation de votre ordinateur
Précautions ergonomiques
. . . . . . . . . . . . . . . . . . . . 66
. . . . . . . . . . . . . . 65
Intervention à l'intérieur de votre ordinateur
Protection contre les décharges électrostatiques
Enlèvement de la batterie
. . . . . . . . . . . . . . . . . . . . 67
Recherche d'informations sur votre ordinateur
Configuration de votre ordinateur
À propos de votre ordinateur
Vue avant
Vue du côté gauche
Vue du côté droit
Vue arrière
Vue de dessous
Retrait d'une batterie
. . . . . . . . . . . . . . . . . . . . . . . . . . . . 72
. . . . . . . . . . . . . . . . . . . . . . . 73
. . . . . . . . . . . . . . . . . . . . . . . . 74
. . . . . . . . . . . . . . . . . . . . . . . . . . . 75
. . . . . . . . . . . . . . . . . . . . . . . . . 76
. . . . . . . . . . . . . . . . . . . . . . . . 77
. . . . . . . . . . . . . . . . . 69
. . . . . . . . . . . . . . . . . . . . 70
Retrait et installation d'une batterie de réserve
Installation d'une batterie
Exécution des diagnostics Dell
. . . . . . . . . . . . . . . . . . . . . 80
. . . . . . . . . . . . . . . . . . . 80
. . . . . . . . . . 66
. . . . . . . . . 67
. . . . . . . . . . 68
. . . . . . . . . . 78
Réglementations
. . . . . . . . . . . . . . . . . . . . . . . . . . 83
Sommaire 59
Page 62

60 Sommaire
Page 63

PRÉCAUTION : Consignes de sécurité
Utilisez les consignes de sécurité suivantes pour vous aider à protéger votre ordinateur de dommages
éventuels et pour garantir votre sécurité personnelle.
Généralités
• N'essayez pas de réparer l'ordinateur vous-même à moins que vous ne soyez un technicien
qualifié. Suivez toujours scrupuleusement les instructions d'installation.
• Si vous raccordez une rallonge à votre adaptateur CA/CC, assurez-vous que l'intensité totale du
courant drainé par tous les appareils raccordés à cette rallonge ne dépasse pas la limite de cette
dernière.
• N'insérez pas d'objets dans les orifices d'aération ou dans les ouvertures de votre ordinateur.
Cela risquerait de provoquer un incendie ou un choc électrique dû à un court-circuit des
composants internes.
• Ne rangez pas votre ordinateur dans un environnement faiblement aéré, dans une sacoche de
transport ou une valise fermée par exemple, lorsque celui-ci est allumé. Le manque d'aération
peut endommager l'ordinateur ou provoquer un incendie.
• Gardez votre ordinateur loin des radiateurs et des sources de chaleur. Ne bloquez pas non plus les
orifices de refroidissement. Évitez de placer des papiers volants sous votre ordinateur ; ne placez
pas votre ordinateur dans une unité murale fermée ou sur un lit, un canapé ou un tapis.
• L'adaptateur CA/CC doit se trouver dans une zone aérée, par exemple sur un bureau ou sur
le sol, lorsqu'il est utilisé pour alimenter l'ordinateur ou pour charger la batterie. Ne recouvrez
pas l'adaptateur CA/CC de papiers ou autres objets susceptibles d'entraver le refroidissement.
De même, n'utilisez pas l'adaptateur CA/CC dans une mallette de transport.
• L'adaptateur CA/CC peut chauffer en cours d'utilisation de votre ordinateur. Faites donc
très attention lorsque vous manipulez l'adaptateur pendant ou après son fonctionnement.
• Évitez de poser votre ordinateur portable en fonctionnement à même la peau pendant
une période prolongée. La température augmente sur la surface de la base pendant le
fonctionnement normal de l'ordinateur (notamment s'il est alimenté par le secteur).
Le contact prolongé avec la peau peut provoquer inconfort ou brûlure.
• N'utilisez pas votre ordinateur dans un environnement humide, par exemple près d'une
baignoire, d'un évier, d'une piscine ou dans un sous-sol humide
• Si votre ordinateur comprend un modem intégré ou en option (carte PC), débranchez le câble
du modem en cas d'orage afin d'éviter tout risque de décharge électrique transmise par un éclair
via la ligne téléphonique.
Guide d'information sur le système 61
Page 64

PRÉCAUTION : Consignes de sécurité (suite)
• Pour éviter tout risque de décharge électrique, n'effectuez aucun branchement ou
débranchement, ni aucune opération de maintenance ou de reconfiguration de ce produit
pendant un orage. N'utilisez pas votre ordinateur pendant un orage, à moins qu'il n'ait été
déconnecté de tous ses câbles et qu'il fonctionne sur batterie.
• Si votre ordinateur comprend un modem, le câble utilisé avec ce modem doit être de type
26 AWG (American wire gauge), et comporter une fiche modulaire RJ-11 conforme à la
norme FCC.
• Avant d'ouvrir le couvercle du module de mémoire, de la carte Mini PCI ou du modem au bas
de l'ordinateur, déconnectez tous les câbles de leur source d'alimentation et débranchez le câble
téléphonique.
www.dell.com | support.euro.dell.com
• Si votre ordinateur dispose d'un connecteur modem RJ-11 et d'un connecteur réseau RJ-45,
branchez le câble téléphonique dans le connecteur RJ-11 et non pas dans le connecteur RJ-45.
• Une carte PC peut chauffer considérablement en fonctionnement normal. Faites donc très
attention lorsque vous les retirez après une utilisation prolongée.
• Avant de nettoyer votre ordinateur, débranchez-le de la prise électrique. Nettoyez votre
ordinateur avec un tissu doux et humidifié avec de l'eau. N'utilisez pas de liquide ni d'aérosol
nettoyants, ceux-ci peuvent contenir des substances inflammables.
Alimentation
• Utilisez uniquement l'adaptateur CA/CC fourni par Dell et homologué pour cet ordinateur.
L'utilisation d'un autre adaptateur CA/CC peut provoquer un incendie ou une explosion.
• Avant de raccorder l'ordinateur à une prise électrique, assurez-vous que la tension du secteur
est compatible avec la tension d'entrée de l'adaptateur de CA/CC.
• Pour mettre l'ordinateur totalement hors tension, éteignez-le, retirez sa batterie et débranchez
l'adaptateur CA/CC de la prise de courant.
• Pour éviter tout risque de décharge électrique, branchez l'adaptateur CA/CC et les cordons
d'alimentation de l'ordinateur et de ses périphériques sur des prises possédant un circuit de mise
à la terre adéquat. Il se peut que ces câbles d'alimentation soient équipés de connecteurs à trois
fiches afin de fournir une mise à la terre. N'utilisez pas de fiches intermédiaires ou retirez la
broche de masse du câble d'alimentation. Si vous utilisez une rallonge électrique, veillez à
ce qu'elle comporte des prises à deux ou trois fiches, afin de pouvoir la raccorder au câble
d'alimentation de l'adaptateur CA/CC.
62 Guide d'information sur le système
Page 65

PRÉCAUTION : Consignes de sécurité (suite)
• Assurez-vous que rien ne repose sur le cordon d'alimentation de l'adaptateur CA/CC et que
ce cordon n'est pas placé dans un endroit où l'on pourrait marcher ou trébucher dessus.
• Si vous utilisez une barrette d'alimentation multiprise, soyez prudent lorsque vous y raccordez
le cordon de l'adaptateur CA/CC. Certaines barrettes d'alimentation risquent d'empêcher
l'insertion correcte de la prise. L'insertion incorrecte de la prise de courant peut provoquer
un dommage irréparable sur votre ordinateur, ainsi qu'un risque de décharge électrique et/ou
d'incendie. Assurez-vous que le contact de mise à la terre de la prise de courant est inséré dans
le contact de mise à la terre correspondant de la barrette d'alimentation.
Batterie
• Utilisez uniquement des modules de batterie Dell™ homologués pour cet ordinateur.
L'utilisation d'autres types de modules peut présenter un risque d'incendie ou d'explosion.
• Ne transportez pas de batterie d'ordinateur dans votre poche, dans votre sac ou dans tout
autre conteneur contenant également des objets métalliques (clés ou trombones, par exemple)
susceptibles de court-circuiter les bornes de la batterie. L'excès de flux de courant qui en
résulterait pourrait entraîner des températures extrêmement élevées et provoquer ainsi des
dommages sur la conception de la batterie ou provoquer une flamme ou des brûlures.
• En cas de traitement impropre, la batterie représente un danger de brûlure. Ne démontez
pas la batterie. Manipulez les batteries endommagées ou percées avec une extrême précaution.
Lorsqu'une batterie est endommagée, des électrolytes peuvent fuir des cellules et provoquer des
dommages corporels.
• Conservez la batterie hors de portée des enfants.
• Ne rangez pas et ne laissez pas votre ordinateur ou votre batterie près d'une source de chaleur
telle qu'un radiateur, une cheminée, une poêle, un appareil de chauffage électrique ou tout autre
appareil générateur de chaleur et ne l'exposez pas à des températures supérieures à 60ºC (140ºF).
Lorsque les batteries atteignent une température excessive, les cellules de la batterie peuvent
exploser ou imploser, représentant alors un risque d'incendie.
• Ne jetez pas la batterie de votre ordinateur au feu ni avec les ordures ménagères. Les cellules de
la batterie risquent d'exploser. Débarrassez-vous de la batterie usagée selon les instructions du
fabricant ou contactez votre entreprise locale de ramassage des ordures afin de connaître les
instructions de mise au rebut. Débarrassez-vous rapidement d'une batterie usagée ou
endommagée.
Guide d'information sur le système 63
Page 66

PRÉCAUTION : Consignes de sécurité (suite)
Voyages en avion
• Les réglementations de certaines administrations fédérales d'aviation et/ou les restrictions
propres à chaque compagnie aérienne peuvent s'appliquer au fonctionnement de
votre ordinateur Dell pendant que vous voyagez à bord d'un avion. Par exemple, ces
réglementations/restrictions peuvent interdire l'utilisation de tout appareil électronique
personnel ayant la capacité de transmettre intentionnellement des fréquences radio ou
d'autres signaux électromagnétiques au cours d'un vol aérien.
– Afin de respecter au mieux ces instructions, si votre ordinateur portable Dell est équipé
de Dell TrueMobile™ ou d'autres dispositifs de communication sans fil, appuyez sur
pour désactiver votre appareil avant de monter à bord de l'avion et suivre les
www.dell.com | support.euro.dell.com
Instructions de CEM
Utilisez des câbles de transmission blindés afin d'être assuré de conserver la classification CEM
adaptée à l'environnement donné. Dell propose un câble pour les imprimantes utilisant le port
parallèle. Ce câble est disponible sur le site Internet de Dell à l'adresse suivante : www.dell.com.
instructions qui sont fournies par le personnel à bord concernant l'utilisation de ce type
d'appareils.
– En outre, l'utilisation d'appareils électroniques personnels, comme un ordinateur portable,
peut être interdite pendant certaines phases critiques du vol, par exemple pendant le
décollage et l'atterrissage. Certaines compagnies aériennes déterminent parfois la phase
critique à n'importe quel moment du vol, dans la mesure où l'avion vole au-dessous de
3 050 m (10 000 pieds). Veuillez vous reporter aux consignes propres à chaque compagnie
aérienne pour connaître les modalités d'utilisation des appareils électroniques personnels.
L'électricité statique peut endommager les composants internes de votre ordinateur. Pour éviter
de tels dommages, déchargez l'électricité statique de votre corps avant de toucher tout composant
électronique de votre ordinateur, comme par exemple, un module de mémoire. Pour ce faire, vous
pouvez toucher une surface métallique non peinte du panneau d'E/S de l'ordinateur.
Utilisateurs résidant en Californie
AVERTISSEMENT : Manipuler les câbles de ce produit, ou les câbles des accessoires vendus avec ce
produit vous expose à du plomb, un produit chimique reconnu par l'état de Californie pour provoquer
des anomalies congénitales ou des problèmes de fertilité.
les câbles
64 Guide d'information sur le système
.
Lavez-vous les mains après avoir manipulé
Page 67

Lors de l'utilisation de votre ordinateur
Suivez les consignes de sécurité suivantes afin d'éviter d'endommager votre ordinateur :
• Lorsque vous installez l'ordinateur pour travailler, placez-le sur une surface plane.
• Lorsque vous vous déplacez en avion, ne faites pas enregistrer votre ordinateur comme bagage.
Vous pouvez soumettre votre ordinateur à la détection d'un dispositif de sécurité à rayons X, mais
jamais à un détecteur de métaux. Veillez à toujours disposer d'une batterie chargée, au cas où l'on
vous demanderait, lors d'un contrôle manuel, d'allumer l'ordinateur.
• Si vous êtes amené à voyager en ayant préalablement retiré l'unité de disque dur de l'ordinateur,
veillez à envelopper le disque dur dans un matériau non-conducteur, tissu ou papier, par
exemple. Si un contrôle manuel est effectué sur l'unité, soyez prêt à la réinstaller dans
l'ordinateur. Vous pouvez soumettre le disque dur à la détection d'un dispositif de
sécurité à rayons X, mais jamais à un détecteur de métaux.
• Lorsque vous voyagez, ne placez pas l'ordinateur dans les compartiments de rangement dans
lesquels il risquerait de glisser et de se cogner contre les parois. Évitez de laisser tomber votre
ordinateur et de le soumettre à tout autre choc mécanique.
• Protégez l'ordinateur, les batteries et l'unité de disque dur contre les risques liés à
l'environnement : poussière, nourriture, liquides, températures extrêmes et exposition
prolongée aux rayons du soleil.
• Lorsque vous exposez votre ordinateur à des environnements présentant des différences de
température et/ou d'humidité très marquées, de la condensation peut se former sur l'ordinateur
ou à l'intérieur. Dans ce cas, attendez l'évaporation complète de cette humidité avant de
réutiliser votre ordinateur, afin de pas l'endommager.
AVIS : Lorsque vous faites passer l'ordinateur d'un environnement à basse température à un environnement
plus chaud, ou vice versa, laissez-le s'acclimater à la température ambiante avant de l'allumer.
• Lorsque vous débranchez un câble, tirez sur la prise ou sur la boucle prévue à cet effet, jamais sur
le câble lui-même. Si vous tirez sur l'extrémité connecteur, maintenez ce dernier correctement
aligné, afin d'éviter tout risque de torsion des broches. Pour la même raison, lors du
raccordement d'un câble, vérifiez bien l'orientation et l'alignement des deux connecteurs.
• Manipulez les composants avec précaution. Un composant tel qu'un module de mémoire doit
être tenu par les bords, pas par les broches.
• Avant de retirer un module de mémoire de la carte système ou de déconnecter un périphérique
de l'ordinateur, patientez cinq secondes après avoir éteint l'ordinateur afin d'éviter
d'endommager la carte système.
Guide d'information sur le système 65
Page 68

Lors de l'utilisation de votre ordinateur (suite)
• Nettoyez l'écran avec un tissu propre et doux et l'eau. Appliquez l'eau sur le chiffon, et non
directement sur l'écran, puis passez le chiffon sur l'écran toujours dans le même sens, de haut en
bas. Retirez l'humidité de l'écran rapidement et séchez l'écran. Une exposition prolongée avec de
l'eau peut endommager l'écran. N'utilisez pas de produit nettoyant pour vitres pour nettoyer
votre écran.
• Si votre ordinateur est mouillé ou endommagé, suivez les procédures décrites dans la
section « Résolution de problèmes » du Guide d'utilisation en ligne. Si, après avoir effectué ces
procédures, vous constatez que votre ordinateur ne fonctionne pas correctement, contactez Dell
(reportez-vous à la section « Aide et assistance » du Guide d'utilisation en ligne pour obtenir les
numéros de téléphones appropriés).
Précautions ergonomiques
www.dell.com | support.euro.dell.com
PRÉCAUTION : Une utilisation prolongée ou inappropriée du clavier peut provoquer
des blessures.
PRÉCAUTION : Une exposition prolongée devant l'écran intégré ou le moniteur externe
peut occasionner des troubles de la vue.
Pour travailler efficacement et confortablement, observez les conseils relatifs à l'ergonomie de l'annexe
de votre Guide d'utilisation en ligne lorsque vous vous installez à votre poste de travail.
Cet ordinateur est un ordinateur portable qui n'est pas conçu pour une utilisation prolongée dans un
cadre professionnel. Pour une utilisation prolongée dans un cadre professionnel, il est recommandé de
connecter un clavier externe.
Intervention à l'intérieur de votre ordinateur
Avant de retirer ou d'installer des modules de mémoire, des cartes Mini PCI ou des modems, suivez les
étapes ci-après dans l'ordre indiqué.
AVIS : Vous ne devez accéder à l'intérieur de votre ordinateur que pour installer des modules de mémoire,
une carte Mini PCI ou une carte modem.
AVIS : Patientez 5 secondes après avoir éteint l'ordinateur pour déconnecter un périphérique ou retirer un
module de mémoire ou une carte Mini PCI, afin d'éviter d'endommager la carte système.
Éteignez l'ordinateur ainsi que tous les périphériques connectés.
1
2 Débranchez votre ordinateur et tous les périphériques connectés de leurs prises électriques pour
réduire le risque de blessure ou de décharge électrique. Déconnectez également de l'ordinateur
les lignes téléphoniques ou de télécommunication.
3 Retirez la batterie principale de la baie de batterie et, si nécessaire, la batterie secondaire de la
baie modulaire.
66 Guide d'information sur le système
Page 69

Lors de l'utilisation de votre ordinateur (suite)
4 Mettez-vous à la masse en touchant la surface métallique non peinte du panneau d'E/S situé à
l'arrière de l'ordinateur.
Pendant votre intervention, touchez régulièrement le panneau E/S pour dissiper toute électricité
statique qui pourrait endommager les composants internes.
Protection contre les décharges électrostatiques
L'électricité statique peut endommager les composants internes de votre ordinateur. Pour éviter de
tels dommages, déchargez l'électricité statique de votre corps avant de toucher tout composant
électronique de votre ordinateur, comme par exemple, un module de mémoire. Il vous suffit pour
cela de toucher une surface métallique non peinte sur le panneau d'E/S de l'ordinateur.
Tandis que vous continuez à travailler à l'intérieur de l'ordinateur, pensez à toucher un connecteur
d'E/S de temps à autre pour vous débarrasser de la charge statique accumulée par votre corps.
Vous pouvez également prendre les mesures suivantes pour prévenir les dommages dus aux
perturbations électrostatiques (ESD) :
• Lorsque vous déballez un composant sensible à l'électricité statique de son carton d'emballage,
n'enlevez le composant de ce carton d'emballage antistatique que lorsque vous êtes prêt à
l'installer. Juste avant d'ôter l'emballage antistatique, veillez à décharger votre corps de son
électricité statique.
• Quand vous transportez un composant sensible, placez-le d'abord dans un emballage ou un
conteneur antistatique.
• Manipulez tous les composants sensibles dans une zone antistatique. Si possible, utilisez des
tapis antistatiques sur le sol et sur votre plan de travail.
Enlèvement de la batterie
Votre ordinateur utilise une pile au lithium-ion. Pour obtenir des instructions sur le remplacement de
la batterie au lithium-ion de votre ordinateur, consultez les sections « Retrait d'une batterie » plus loin
dans ce document et « Installation d'une batterie » de votre Guide d'utilisation en ligne.
Ne jetez pas la batterie avec les ordures ménagères. Contactez service municipal de traitement des
déchets pour connaître l'adresse du site de dépôt de batteries le plus proche de votre domicile.
Guide d'information sur le système 67
Page 70

Recherche d'informations sur votre ordinateur
Que recherchez-vous ? Retrouvez les éléments ici
• Un programme de diagnostics pour
mon ordinateur
• Des pilotes pour mon ordinateur
• La documentation de mon ordinateur
• La documentation de mon
périphérique
www.dell.com | support.euro.dell.com
• Le code de service express et numéro
de service
• L'étiquette de licence Microsoft
Windows
®
CD Pilotes et utilitaires (appelé aussi
ResourceCD)
La documentation et les pilotes sont déjà
installés sur votre ordinateur lorsqu'il est
livré par Dell. Vous pouvez utiliser ce CD
pour réinstaller des pilotes, exécuter les
Diagnostics Dell ou accéder à votre
documentation.
Des fichiers d'informations techniques
— parfois appelés fichiers «readme» —
peuvent être inclus sur votre CD afin de
fournir des mises à jour de dernière
minute concernant des modifications
techniques apportées à votre système ou des informations
de référence destinées aux utilisateurs expérimentés.
Code de service express et clé du produit
®
Ces étiquettes sont apposées sur votre
ordinateur.
• Des pilotes récents pour mon
ordinateur
• Des réponses aux questions sur
le service et le support technique.
• Des discussions en ligne avec d'autres
utilisateurs et le support technique
• De la documentation pour mon
ordinateur
68 Guide d'information sur le système
Site Web de support technique de Dell
Le site Web de support technique propose plusieurs outils en ligne,
notamment :
• Solutions — Conseils et astuces de dépannage, articles de
techniciens et cours en ligne
• Forum clients — Discussion en ligne avec d'autres clients Dell
• Mises à niveau — Informations de mise à niveau pour les
composants tels que la mémoire, le disque dur et le système
d'exploitation
• Service clientèle — Informations sur les contacts, état des
commandes, garantie et informations sur les réparations
• Téléchargements — Pilotes, correctifs et mises à jour logicielles
• Référence — Documentation de l'ordinateur, caractéristiques de
produits et livres blancs
Page 71

Que recherchez-vous ? Retrouvez les éléments ici
• Comment utiliser Windows XP
• Documentation pour mon ordinateur
• De la documentation pour les
périphériques (pour un modem
par exemple)
• Comment réinstaller mon système
d'exploitation
Centre d'aide et de support Windows
1 Cliquez sur le bouton Démarrer, puis sur Help and Support
(Aide et support).
2 Entrez un mot ou une expression décrivant votre problème,
puis cliquez sur l'icône en forme de flèche.
3 Cliquez sur la rubrique qui décrit votre problème.
4 Suivez les instructions qui s'affichent à l'écran.
CD Système d'exploitation
Configuration de votre ordinateur
1 Déballez la boîte d'accessoires.
Si vous réinstallez le système
d'exploitation, utilisez le CD Pilotes
et utilitaires pour réinstaller les pilotes
des périphériques fournis avec votre
ordinateur.
La clé de produit de votre système
d'exploitation se trouve sur votre
ordinateur.
2 Mettez de côté le contenu de la boîte d'accessoires ; vous en
aurez besoin ultérieurement pour compléter la configuration.
Cette boîte contient également la documentation utilisateur et
tout autre logiciel ou matériel supplémentaire (cartes PC, lecteurs,
batteries, etc.) que vous avez commandé.
3 Reliez l'adaptateur CA/CC au connecteur de l'adaptateur CA/CC et
à une prise électrique.
AVIS : Lorsque vous allumez votre ordinateur, un message vous informant
que vous devez redémarrer votre ordinateur et mettre à niveau la mémoire
de l'ordinateur peut s'afficher. Si ce message s'affiche, consultez votre Guide
d'utilisation sur le site Web de support technique de Dell (support.dell.com)
pour obtenir des instructions pour mettre à niveau la mémoire de votre
ordinateur.
Ouvrez l'écran et appuyez sur le bouton d'alimentation pour mettre
4
l'ordinateur sous tension.
Guide d'information sur le système 69
Page 72

REMARQUE :
N'amarrez pas
l'ordinateur tant qu'il
n'a pas été mis sous
tension et arrêté au
moins une fois.
www.dell.com | support.euro.dell.com
bouton
d'alimentation
À propos de votre ordinateur
Consultez votre Guide d'utilisation en ligne pour obtenir des informations
détaillées sur votre ordinateur. En fonction du système d'exploitation
installé sur votre ordinateur, double-cliquez sur l'icône User's Guides
(Guides d'utilisation), située sur le bureau, ou cliquez sur le bouton Start
(Démarrer) puis sélectionnez Help and Support Center (Centre d'aide et
support) puis cliquez sur User and system guides (Guides de l'utilisateur
et du système). Les articles suivants répondent aux questions les plus
fréquemment posées à propos de l'ordinateur.
• Adaptateur réseau et modem : L'ordinateur peut comporter à la fois un
modem v.92 56K et un adaptateur réseau Ethernet LOM 10/100/1000.
Pour connaître l'emplacement des connecteurs, consultez « Vue du
côté droit », plus loin dans ce document. Pour plus d'informations
sur les ports e les connecteurs, consultez la section « À propos de
votre ordinateur » du Guide d'utilisation en ligne.
70 Guide d'information sur le système
Page 73

• Durée de vie et utilisation de la batterie : Plusieurs batteries peuvent
être utilisées avec votre ordinateur. En utilisant la batterie 4 460 mAh
fournie avec votre ordinateur, vous pouvez espérer une durée de
fonctionnement comprise entre 3 et 4 heures à partir d'une seule
batterie complètement chargée, en fonctionnement normal. Lors de
certaines utilisations, un fonctionnement sans fil prolongé par
exemple, la durée de vie de la batterie est considérablement réduite.
– Pour plus d'informations sur les performances de la batterie et
l'économie d'énergie, consultez les sections « Utilisation d'une
batterie » et « Gestion de l'énergie » du Guide d'utilisation.
– Pour plus d'informations sur l'utilisation d'une deuxième batterie
en option, consultez la section « Utilisation de la baie modulaire »
dans le Guide d'utilisation de votre ordinateur.
• Périphériques de la baie modulaire : Pour plus d'informations sur la baie
modulaire et les périphériques qu'elle prend en charge, consultez la
section « Utilisation de la baie modulaire » du Guide d'utilisation.
• Périphérique d'amarrage : Votre ordinateur prend en charge la station
d'accueil Dell D/Dock et le réplicateur de port avancé (APR) Dell
D/Port.
– Pour obtenir des informations sur votre périphérique d'amarrage
en option, consultez la documentation fournie avec celui-ci.
– Pour plus d'information sur l'obtention de performances optimales
lors de l'utilisation d'un périphérique d'amarrage avec cet
ordinateur, consultez la section « Résolution des problèmes »
du Guide d'utilisation.
Guide d'information sur le système 71
REMARQUE : Il se
peut que les périphériques
d'amarrage ne soient pas
disponibles dans tous
les pays.
Page 74

Vue avant
voyants d'état
du clavier
bouton de mise
en sourdine
boutons du
contrôle du
volume
trackstick
www.dell.com | support.euro.dell.com
boutons du
trackstick ou
du touchpad
écran
bouton
d'alimentation
voyants de
l'état du
périphérique
clavier
touchpad
dispositif de
blocage de
l'écran
haut-parleurs
72 Guide d'information sur le système
Page 75

Vue du côté gauche
capteur infrarouge
orifices
d'aération (2)
emplacement pour carte PC
connecteurs audio (2)
emplacement pour
carte intelligente
emplacement pour
câble de sécurité
unité de
disque dur
Guide d'information sur le système 73
Page 76

Vue du côté droit
www.dell.com | support.euro.dell.com
emplacement pour
câble de sécurité
loquet de verrouillage du périphérique
baie modulaire
74 Guide d'information sur le système
Page 77

Vue arrière
AVIS : Pour éviter d'endommager l'ordinateur, patientez 5 secondes après
l'avoir éteint pour déconnecter un périphérique externe.
PRÉCAUTION : Ne bloquez pas et n'insérez pas d'objets dans les
orifices d'aération de l'ordinateur et évitez toute accumulation de
poussière. Ne rangez pas votre ordinateur dans un environnement
faiblement aéré, dans une valise fermée par exemple, lorsque
celui-ci est allumé. Le manque d'aération peut endommager
l'ordinateur ou provoquer un incendie.
connecteur de modem
(RJ-11) (en option)
connecteur réseau
(RJ-45)
connecteur parallèle
connecteur de sortie TV S-vidéo
connecteurs USB (2)
connecteur vidéo
connecteur série
orifices d'aération
connecteur de
l'adaptateur CA/CC
Guide d'information sur le système 75
Page 78

Vue de dessous
capot du module de mémoire
unité de
disque dur
capot de la carte
Mini PCI
www.dell.com | support.euro.dell.com
ventilateur
loquet de verrouillage de la
baie de batterie
indicateur de charge
de la batterie
batterie
emplacement du
périphérique d'amarrage
76 Guide d'information sur le système
Page 79

Retrait d'une batterie
Pour plus d'informations sur le retrait de la deuxième batterie en option,
consultez la section « Utilisation de la baie modulaire » dans le Guide
d'utilisation en ligne.
PRÉCAUTION : Avant d'exécuter les procédures suivantes,
éteignez l'ordinateur, déconnectez-le de la prise électrique et
déconnectez le modem de la prise jack téléphonique murale.
AVIS : Si vous souhaitez remplacer la batterie alors que l'ordinateur est en
mode attente, vous avez jusqu'à 90 secondes pour effectuer cette opération.
Une fois ce délai écoulé, l'ordinateur s'arrête et toutes les données non
enregistrées sont définitivement perdues.
1
Assurez-vous que l'ordinateur est bien éteint, déconnecté de la prise
électrique et de la prise jack téléphonique murale.
2 Si l'ordinateur est connecté à un périphérique d'amarrage (amarré),
déconnectez-le. Pour plus d'informations, consultez la documentation
qui accompagne le périphérique d'amarrage.
3 Faites glisser et maintenez le loquet de verrouillage de la baie de
batterie vers le bas de l'ordinateur, puis retirez la batterie de la baie.
Guide d'information sur le système 77
Page 80

Retrait et installation d'une batterie de réserve
www.dell.com | support.euro.dell.com
1 Retirez la batterie.
2 Retirez la protection de la batterie de réserve.
78 Guide d'information sur le système
Page 81

3 Retirez la batterie de réserve de son compartiment et déconnectez le
câble du connecteur.
4 Connectez le câble de la batterie de réserve au connecteur du
compartiment de la batterie de réserve.
5 Placez le câble de la batterie de réserve dans le compartiment
et remettez le capot.
Guide d'information sur le système 79
Page 82

www.dell.com | support.euro.dell.com
Installation d'une batterie
Faites glisser la batterie dans la baie jusqu'à ce que le loquet de verrouillage
s'enclenche.
Pour plus d'informations sur l'installation de la deuxième batterie en option,
consultez la section « Utilisation de la baie modulaire » dans le Guide
d'utilisation en ligne.
Exécution des diagnostics Dell
Les diagnostics Dell se trouvent dans une partition cachée (utilitaire de
diagnostics) de votre unité de disque dur.
REMARQUE : Si
aucune image ne s'affiche
sur l'écran de votre
ordinateur, contactez
Dell (consultez la section
« Obtenir de l'aide » du
Guide d'utilisation pour
connaître les coordonnées
du contact approprié).
80 Guide d'information sur le système
Éteignez l'ordinateur.
1
2 Si l'ordinateur est connecté à un périphérique d'amarrage (amarré),
déconnectez-le. Pour plus d'informations, consultez la documentation
qui accompagne le périphérique d'amarrage.
3 Connectez votre ordinateur à une prise électrique.
Page 83

Allumez l'ordinateur. Lorsque le logo DELL™ apparaît, appuyez
4
immédiatement sur . Si vous attendez trop longtemps et que le
®
logo
Windows® apparaît, attendez encore jusqu'à ce que le bureau
Windows s'affiche. Éteignez alors votre ordinateur et faites une
nouvelle tentative.
5 Lorsque la liste des périphériques d'initialisation s'affiche, mettez en
surbrillance l'option Diagnostics et appuyez sur .
L'ordinateur commence l'évaluation du système avant initialisation
par une série de diagnostics intégrés. Des tests préalables de la carte
mère, du clavier, du disque dur et de l'écran sont effectués.
• Répondez toutes les questions qui s'affichent pendant
l'évaluation.
• Si un composant défectueux est détecté, l'ordinateur s'interrompt
et émet un signal sonore. Pour arrêter l'évaluation et redémarrer le
système d'exploitation, appuyez sur ; pour passer au test
suivant, appuyez sur ; pour retester le composant
défectueux, appuyez sur .
• Si des défaillances sont détectées lors du diagnostique système
avant initialisation, notez les codes d'erreur et contactez Dell
(consultez la section « Obtenir de l'aide » du Guide d'utilisation
pour connaître les coordonnées du contact approprié) avant de
continuer les diagnostics Dell.
• Si un message vous informe qu'aucune partition d'utilitaire de
diagnostics n'a été trouvée, suivez les instructions qui s'affichent
à l'écran pour exécuter les Diagnostics Dell à partir de votre CD
Drivers and Utilities (Pilotes et utilitaires) .
Si l'évaluation du système se déroule sans problème, vous recevez
le message
(initialisation à partir de la partition l'utilitaire
de diagnostics Dell). Appuyez sur une touche pour
continuer
Booting Dell Diagnostic Utility Partition
.
REMARQUE : Si rien
ne s'affiche sur votre
écran, maintenez enfoncé
le bouton de mise en
sourdine et appuyez sur
le bouton d'alimentation
(au lieu de la touche F12)
pour lancer les
Diagnostics Dell. Il
n'est pas nécessaire de
sélectionner Diagnostics
et d'appuyer sur
.
L'ordinateur lance
automatiquement
l'évaluation du système
avant initialisation.
6 Appuyez sur n'importe quelle touche pour lancer les Diagnostics Dell à
partir de la partition de l'utilitaire de diagnostics de votre disque dur.
7 Une fois les Diagnostics Dell chargés et l'écran Main Menu (Menu
principal) affiché, cliquez sur le bouton correspondant à l'option
requise.
Guide d'information sur le système 81
Page 84

REMARQUE : Le
numéro de service de
votre ordinateur est
affiché dans la barre de
titre de chaque écran.
Option Fonction
Express Test
(Test express)
Effectue un test rapide des périphériques. Ce test
dure généralement de 10 à 20 minutes et ne requiert
aucune intervention de votre part. Commencez par
exécuter ce test pour augmenter vos chances
d'identifier rapidement le problème.
www.dell.com | support.euro.dell.com
Extended Test
(Test complet)
Custom Test
(Test personnalisé)
Symptom Tree
(Liste des symptômes)
8
Si un problème survient durant l'exécution d'un test, un message
Effectue une vérification approfondie des
périphériques. Ce test dure généralement une heure
au minimum et vous devrez répondre à des questions
à intervalles réguliers.
Teste un périphérique spécifique. Vous pouvez
personnaliser les tests à exécuter.
Vous permet de sélectionner les tests en fonction
du problème rencontré. Cette option répertorie les
problèmes les plus susceptibles de se produire.
affiche le code d'erreur et une description du problème. Notez ces
informations et suivez les instructions affichées à l'écran. Si vous ne
parvenez pas à résoudre le problème, contactez Dell (consultez la
section « Obtenir de l'aide » du Guide d'utilisation pour connaître
les coordonnées du contact approprié).
9 Si vous exécutez un test à partir de l'option Test personnalisé ou Liste
des symptômes, cliquez sur l'onglet approprié, tel que décrit dans le
tableau suivant, pour obtenir de plus amples informations.
Onglet Fonction
Results
(Résultats)
Errors
(Erreurs)
Help (Aide) Décrit le test et indique éventuellement les conditions
Affiche les résultats du test et les erreurs rencontrées,
le cas échéant.
Répertorie les erreurs rencontrées, les codes d'erreur
ainsi qu'une description des problèmes.
requises pour son exécution.
82 Guide d'information sur le système
Page 85

Configuration Affiche la configuration matérielle du périphérique
sélectionné.
Les Diagnostics Dell obtiennent les informations se
rapportant à votre configuration à partir du programme
de configuration du système, de la mémoire et de divers
tests internes. Ces informations sont affichées dans la
liste de périphériques, dans la partie gauche de l'écran.
Il est possible que la liste des périphériques ne répertorie
pas les noms de tous les composants installés sur votre
ordinateur, ou de tous les périphériques connectés à ce
dernier.
Parameters
(Paramètres)
10 Lorsque vous avez terminé un test, fermez l'écran pour revenir à l'écran
Vous permet de personnaliser le test en modifiant ses
paramètres.
Main Menu (Menu principal). Pour quitter les Diagnostics Dell et
redémarrer l'ordinateur, fermez l'écran Menu principal.
Réglementations
Une interférence électromagnétique (EMI - Electromagnetic Interference)
est un signal ou une émission, véhiculé(e) dans l'espace libre ou par des
conducteurs électriques ou de signaux, qui peut mettre en danger le
fonctionnement d'une radionavigation ou autre service de sécurité ou
sérieusement dégrader, obstruer ou interrompre à maintes reprises un
service de communications radio autorisé. Les services de communications
radio incluent, de manière non limitative, les services de radiodiffusion
commerciale AM/FM, la télévision, les services de téléphonie cellulaire,
la radiodétection, le contrôle de la circulation aérienne, les récepteurs de
radiomessagerie et les systèmes GSM. Ces services autorisés, ainsi que
les éléments rayonnants parasites involontaires tels que les dispositifs
numériques, y compris les ordinateurs, contribuent à l'environnement
électromagnétique.
Guide d'information sur le système 83
Page 86

La compatibilité électromagnétique (CEM) est la capacité des
éléments d'un équipement électronique à interagir correctement dans
l'environnement électronique. Bien que cet ordinateur ait été conçu dans
le respect de cette compatibilité et soit conforme aux seuils fixés en matière
d'interférences électromagnétiques par l'organisme de réglementation, il n'y
a aucune garantie concernant les interférences susceptibles de se produire
sur une installation particulière. Si l'équipement crée effectivement des
interférences avec des services de communications radio (ce qui peut être
déterminé en l'éteignant et en l'allumant), l'utilisateur est encouragé à
essayer de corriger ce phénomène en prenant l'une ou l'ensemble des
mesures suivantes :
• Changer l'orientation de l'antenne de réception.
www.dell.com | support.euro.dell.com
Si nécessaire, consulter un membre de l'équipe du support technique de
Dell ou un technicien radio/télévision expérimenté pour des suggestions
supplémentaires.
Pour des informations complémentaires sur les réglementations, consultez
la section « Réglementations » dans l'annexe de votre Guide d'utilisation
en ligne. Les sections spécifiques à chaque organisme de réglementation
proposent, de façon spécifique pour tel(le) pays ou zone géographique,
des informations CEM/EMI ou relatives à la sécurité des produits.
• Repositionner l'ordinateur en fonction du récepteur.
• Éloigner l'ordinateur du récepteur.
• Brancher l'ordinateur sur une autre prise, pour faire en sorte que
l'ordinateur et le récepteur se trouvent sur des circuits de dérivation
différents.
84 Guide d'information sur le système
Page 87

Dell™ Latitude™ D600
Systeminformationshandbuch
www.dell.com | support.euro.dell.com
Page 88

Hinweise, Vorsichtshinweise und
Warnungen
HINWEIS: Ein HINWEIS macht auf wichtige Informationen aufmerksam,
mit denen Sie das System besser einsetzen können.
VORSICHT: VORSICHT warnt vor möglichen Beschädigungen der Hardware
oder vor Datenverlust und zeigt, wie diese vermieden werden können.
WARNUNG: Eine WARNUNG weist auf Gefahrenquellen hin,
die materielle Schäden, Verletzungen oder sogar den Tod von
Personen zur Folge haben können.
Abkürzungen und Akronyme
Eine vollständige Liste von Abkürzungen und Akronymen finden Sie im
Benutzerhandbuch. (Je nach Betriebssystem doppelklicken Sie auf dem
Desktop auf das Symbol User’s Guide [Benutzerhandbuch], oder klicken
Sie auf die Schaltfläche Start und anschließend auf Help and Support
Center (Hilfe- und Supportcenter). Klicken Sie anschließend auf User and
system guides [Benutzer- und Systemhandbücher]).
Wenn Sie einen Dell™-Computer der N-Serie besitzen, treffen alle
®
Referenzen dieses Dokuments auf die Microsoft
Windows®-
Betriebssysteme nicht zu.
____________________
Irrtümer und technische Änderungen vorbehalten.
© 2002 Dell Computer Corporation. Alle Rechte vorbehalten.
Nachdrucke jeglicher Art ohne die vorherige schriftliche Genehmigung der Dell Computer
Corporation sind strengstens untersagt.
Marken in diesem Te xt: Dell, das DELL-Logo, Inspiron, Dell Pr ecision, Dimension, OptiPlex und
Latitude sind Marken der Dell Computer Corporation; Intel, Pentium und Celeron sind eingetragene
Marken der Intel Corporation; Microsoft und Windows sind eingetragene Marken der Microsoft
Corporation; EMC ist eine eingetragene Marke der EMC Corporation.
Alle anderen in dieser Dokumentation genannten Marken und Handelsbezeichnungen sind
Eigentum der entsprechenden Hersteller und Firmen. Die Dell Computer Corporation verzichtet
auf alle Besitzrechte an Marken und Handelsbezeichnungen, die nicht ihr Eigentum sind.
Dezember 2002 P/N 2N659 Rev. A00
Page 89

Inhalt
WARNUNG: Sicherheitshinweise . . . . . . . . . . . . . . . . . . 89
Allgemein
Stromversorgung
Akku
Reisen mit dem Flugzeug
EMV-Richtlinien
Benutzer in Kalifornien
. . . . . . . . . . . . . . . . . . . . . . . . . . . . 89
. . . . . . . . . . . . . . . . . . . . . . . . 90
. . . . . . . . . . . . . . . . . . . . . . . . . . . . . . 91
. . . . . . . . . . . . . . . . . . . . 92
. . . . . . . . . . . . . . . . . . . . . . . . 92
. . . . . . . . . . . . . . . . . . . . . 92
Arbeiten mit dem Computer
. . . . . . . . . . . . . . . . . . . . 93
Ergonomische Haltung beim Arbeiten mit dem Computer
Bei der Arbeit an Komponenten im Inneren des Computers
Schutz vor elektrostatischen Entladungen
Entsorgen von Akkus
. . . . . . . . . . . . . . . . . . . . . . 96
. . . . . . . . . . . . 96
Suchen nach Informationen über den Computer
Einrichten des Computers
Wissenswertes über den Computer
Vorderseite
. . . . . . . . . . . . . . . . . . . . . . . . . . 101
Linke Seitenansicht
Rechte Seitenansicht
Rückseite
Unterseite
. . . . . . . . . . . . . . . . . . . . . . . . . . . 103
. . . . . . . . . . . . . . . . . . . . . . . . . . . 104
Entfernen des Akkus
Ein- und Ausbauen eines Reserveakkus
Einsetzen eines Akkus
Ausführen des Dell-Diagnoseprogramms
. . . . . . . . . . . . . . . . . . . . . 99
. . . . . . . . . . . . . . . . 100
. . . . . . . . . . . . . . . . . . . . . . 102
. . . . . . . . . . . . . . . . . . . . . 102
. . . . . . . . . . . . . . . . . . . . . . . 105
. . . . . . . . . . . . . 106
. . . . . . . . . . . . . . . . . . . . . . 108
. . . . . . . . . . . . . 108
. . . . 94
. . . 95
. . . . . . . . . 97
Betriebsbestimmungen
. . . . . . . . . . . . . . . . . . . . . . 111
Inhalt 87
Page 90

88 Inhalt
Page 91

WARNUNG: Sicherheitshinweise
Die folgenden Sicherheitshinweise schützen den Computer sowie die Arbeitsumgebung vor
möglichen Schäden und dienen der persönlichen Sicherheit des Benutzers.
Allgemein
• Wartungsarbeiten dürfen nur von qualifizierten Servicetechnikern vorgenommen werden.
Beachten Sie alle Installationsanweisungen stets genau.
• Wenn Sie ein Verlängerungskabel an den Netzadapter anschließen, stellen Sie sicher, dass der
Nennstrom aller an das Verlängerungskabel angeschlossenen Geräte nicht größer ist als der
zulässige Nennstrom des Verlängerungskabels.
• Schieben Sie keine Gegenstände in die Lüftungsschlitze oder Öffnungen des Computers.
Dies kann zu einem Kurzschluss der internen Komponenten führen und folglich einen Brand
oder einen Stromschlag verursachen.
• Bewahren Sie Ihren Computer im eingeschalteten Zustand nicht in einer Umgebung mit
schlechter Luftzirkulation, etwa in einer Tragetasche oder einem geschlossenen Aktenkoffer,
auf. Andernfalls können Schäden am Computer oder sogar ein Brand verursacht werden.
• Stellen Sie den Computer nicht in der Nähe von Heizgeräten und anderen Wärmequellen
auf. Achten Sie darauf, die Belüftungsöffnungen nicht zu blockieren. Legen Sie kein Papier
unter das System, und stellen Sie das System nicht in einem Schrank oder auf einem Bett,
Sofa oder Teppich auf.
• Wenn der Netzadapter für die Stromversorgung des Computers oder zum Aufladen des
Akkus verwendet wird, sollte er sich in einem gut belüfteten Bereich befinden, z. B. auf einer
Schreibtischoberfläche oder auf dem Boden. Achten Sie darauf, dass auf dem Netzadapter
weder Papier noch Gegenstände liegen, die die Kühlung beeinträchtigen. Verwenden Sie den
Netzadapter auch nicht in einer Tragetasche.
• Der Netzadapter kann während des Normalbetriebs des Computers heiß werden. Gehen Sie
vorsichtig vor, wenn Sie den Netzadapter während oder direkt nach dem Betrieb berühren.
• Legen Sie den tragbaren Computer zum Arbeiten nicht über längere Zeit unmittelbar auf
Ihren Beinen ab. Während des normalen Betriebs erhitzt sich die Computerunterseite (vor
allem bei Betrieb mit Netzstrom). Ein anhaltender Hautkontakt kann unangenehm werden
oder sogar zu Verbrennungen führen.
• Verwenden Sie den Computer nicht in einer feuchten Umgebung, z. B. in der Nähe einer
Badewanne, eines Waschbeckens, eines Schwimmbeckens oder in einem feuchten Keller.
Systeminformationshandbuch 89
Page 92

WARNUNG: Sicherheitshinweise (Fortsetzung)
• Wenn Ihr Computer mit einem integrierten oder optionalen (PC-Karten-)Modem ausgestattet ist, ziehen Sie das Modemkabel bei Herannahen eines Gewitters ab, um die Gefahr
eines Blitzeinschlages zu vermeiden.
• Um das Risiko eines Stromschlages zu vermeiden, sollten Sie bei einem Gewitter weder
Kabel anschließen oder abziehen noch eine Wartung oder Neukonfiguration des Gerätes
vornehmen. Verwenden Sie den Computer nicht während eines Gewitters, es sei denn, der
Computer wird mit Akkustrom versorgt und ist nicht an das Stromnetz angeschlossen.
• Wenn Ihr Computer mit einem Modem ausgestattet ist, sollte das für das Modem
verwendete Kabel mindestens einen AWG-Wert (American Wire Gauge [Amerikanisches
Eichmaß für Kabel]) von 26 sowie einen FCC-konformen, modularen RJ-11-Stecker
www.dell.com | support.euro.dell.com
aufweisen.
• Bevor Sie die Speichermodul-/Mini-PCI-Karten-/Modemabdeckung auf der Unterseite des
Computers öffnen, trennen Sie alle Kabel vom Stromnetz, und ziehen Sie das Telefonkabel
vom Computer ab.
• Wenn der Computer sowohl mit einem RJ-11-Modemanschluss als auch mit einem RJ-45Netzwerkanschluss ausgestattet ist, schließen Sie das Telefonkabel an den RJ-11-Anschluss
und nicht an den RJ-45-Anschluss an.
• PC-Karten können während des Normalbetriebs sehr warm werden. Gehen Sie vorsichtig vor,
wenn Sie PC-Karten nach längerem Betrieb entfernen.
• Trennen Sie den Computer vor der Reinigung vom Stromnetz. Reinigen Sie den Computer
mit einem weichen Tuch, das mit Wasser befeuchtet wurde. Verwenden Sie keine flüssigen
Reinigungsmittel oder Sprühreiniger, die eventuell entflammbare Stoffe enthalten.
Stromversorgung
• Verwenden Sie nur den von Dell gelieferten Netzadapter, der für diesen Computer zugelassen
ist. Andernfalls besteht Brand- oder Explosionsgefahr.
• Stellen Sie vor dem Anschluss des Computers an eine Steckdose sicher, dass die
Betriebsspannung des Netzadapters mit der Nennspannung und Frequenz der verfügbaren
Stromquelle übereinstimmt.
• Um den Computer von der Stromversorgung zu trennen, schalten Sie den Computer aus,
entfernen den Akku und trennen den Netzadapter von der Steckdose.
90 Systeminformationshandbuch
Page 93

WARNUNG: Sicherheitshinweise (Fortsetzung)
• Um Stromschläge zu vermeiden, schließen Sie die Netzkabel von Netzadapter und Geräten
immer an ordnungsgemäß geerdete Stromquellen an. Die Kabel sollten mit Schukosteckern
ausgestattet sein, um eine einwandfreie Erdung zu gewährleisten. Verwenden Sie keine Adapterstecker. Entfernen Sie nicht den Massekontakt des Netzkabels. Verwenden Sie bei Bedarf
nur geeignete Verlängerungskabel mit Schukosteckern, die zum Netzadapterkabel passen.
• Stellen Sie sicher, dass nichts auf dem Netzkabel des Netzadapters abgelegt wird und man
weder auf das Kabel treten noch darüber stolpern kann.
• Gehen Sie beim Anschließen des Netzadapterkabels an eine Steckerleiste vorsichtig vor. In
einige Steckerleisten können Stecker auch falsch eingesteckt werden. Dadurch könnte der
Computer irreparabel beschädigt werden. Außerdem besteht Stromschlag- sowie Brandgefahr.
Stellen Sie sicher, dass der Erdungskontakt am Netzstecker in den entsprechenden Kontakt
der Steckerleiste eingesetzt ist.
Akku
• Verwenden Sie nur von Dell™ gelieferte Akkus, die für diesen Computer zugelassen sind. Bei
Verwendung anderer Akkus besteht Brand- oder Explosionsgefahr.
• Transportieren Sie den Akku nicht in Ihrer Tasche, Aktentasche oder einem anderen Behälter,
in dem dort befindliche Gegenstände aus Metall (beispielsweise Autoschlüssel oder Büroklammern) die Klemmen des Akkus kurzschließen könnten. Der starke Stromfluss kann
äußerst hohe Temperaturen und somit Beschädigungen am Akku sowie einen Brand
verursachen.
• Bei unsachgemäßer Handhabung des Akkus besteht Brandgefahr. Nehmen Sie den Akku
nicht auseinander. Behandeln Sie beschädigte oder auslaufende Akkus mit äußerster Vorsicht.
Ist der Akku beschädigt, kann Elektrolyt aus den Zellen austreten und zu Verletzungen
führen.
• Bewahren Sie den Akku außerhalb der Reichweite von Kindern auf.
• Bewahren Sie den Computer oder Akku nicht in der Nähe einer Wärmequelle auf,
z. B. einer Heizung, einem Kamin, einem Heizlüfter oder ähnlichen Geräten, oder setzen
Sie ihn nicht Temperaturen von über 60 °C aus. Bei übermäßiger Erhitzung besteht
Explosions- und Brandgefahr.
• Entsorgen Sie die Akkus des Computers nicht im Hausmüll, und verbrennen Sie sie nicht.
Akkus können explodieren. Entsorgen Sie verbrauchte Akkus gemäß den Anweisungen des
Herstellers, oder wenden Sie sich an Ihren örtlichen Abfallentsorgungsbetrieb, und fragen
Sie nach Informationen zur umweltgerechten Entsorgung. Entsorgen Sie verbrauchte oder
beschädigte Akkus umgehend.
Systeminformationshandbuch 91
Page 94

WARNUNG: Sicherheitshinweise (Fortsetzung)
Reisen mit dem Flugzeug
• Für den Betrieb von Dell-Computern an Bord eines Flugzeugs gelten bestimmte gesetzliche Bestimmungen und/oder von der Fluglinie festgelegte Richtlinien. Gemäß solchen
Richtlinien ist die Verwendung eines elektronischen Gerätes, das Funkwellen oder andere
elektromagnetische Signale aussenden kann, unter Umständen in einem Flugzeug verboten.
– Um solche Bestimmungen nach bestem Ermessen einzuhalten, drücken Sie ,
um Ihr TrueMobile™-Gerät von Dell oder ein anderes Gerät zur Übertragung von Daten
per Funk zu deaktivieren, wenn Ihr tragbarer Computer von Dell damit ausgestattet ist,
bevor Sie in das Flugzeug steigen. Befolgen Sie außerdem die Anweisungen des
www.dell.com | support.euro.dell.com
EMV-Richtlinien
Durch abgeschirmte Kabel wird sichergestellt, dass die entsprechende EMV-Klassifikation für die
vorgesehene Einsatzumgebung eingehalten wird. Ein Kabel für Drucker, die über die parallele
Schnittstelle angeschlossen werden, erhalten Sie bei Dell. Sie können ein solches Kabel auch über
die Website von Dell unter der Adresse www.dell.com bestellen.
Flugpersonals.
– Darüber hinaus ist die Verwendung von elektronischen Geräten, beispielsweise von
tragbaren Computern, in kritischen Flugphasen (wie Start und Landung) möglicherweise
nicht gestattet. Einige Fluglinien definieren den Begriff „kritische Flugphase“ noch
enger, und zwar als jeden Zeitpunkt, zu dem sich das Flugzeug in einer Höhe von unter
3050 Metern befindet. Befolgen Sie die Richtlinien der Fluglinien in Bezug auf die
Verwendung elektronischer Geräte.
Elektrostatische Entladungen können die elektronischen Bauteile des Computers beschädigen.
Um Beschädigungen durch elektrostatische Entladungen zu vermeiden, sollten Sie die statische
Elektrizität Ihres Körpers entladen, bevor Sie elektronische Bauteile (z. B. ein Speichermodul)
des Computers berühren. Berühren Sie dazu eine nicht lackierte Metallfläche an der E/A-Leiste
des Computers.
Benutzer in Kalifornien
ACHTUNG: Wenn Sie die Leitung dieses Produkts bzw. Leitungen, die zusammen mit Zubehör
für dieses Produkt verkauft werden, berühren, wird ein Kontakt mit Blei hergestellt, ein chemischer
Stoff, von dem im Staat Kalifornien bekannt ist, dass dadurch Geburtsfehler oder andere Erbgutschäden hervorgerufen werden können.
berührt haben.
92 Systeminformationshandbuch
Waschen Sie Ihre Hände, nachdem Sie die Leitung
Page 95

Arbeiten mit dem Computer
Beachten Sie die folgenden Sicherheitshinweise, um Schäden am Computer zu vermeiden.
• Wenn Sie den Computer zum Arbeiten aufstellen, platzieren Sie ihn auf einer ebenen
Fläche.
• Geben Sie den Computer auf Reisen nicht als Gepäckstück auf. Sie können den
Computer röntgen lassen, Sie dürfen ihn jedoch niemals durch einen Metalldetektor
laufen lassen. Wenn Sie den Computer manuell überprüfen lassen, halten Sie einen
geladenen Akku bereit, falls Sie aufgefordert werden, den Computer einzuschalten.
• Wenn Sie das Festplattenlaufwerk beim Reisen aus dem Computer ausbauen, wickeln Sie
es in ein nicht leitendes Material, z. B. Stoff oder Papier. Wenn Sie das Laufwerk manuell
überprüfen lassen, sollten Sie darauf vorbereitet sein, es in den Computer einbauen zu
müssen. Sie können das Festplattenlaufwerk röntgen lassen; Sie dürfen es jedoch niemals
durch einen Metalldetektor laufen lassen.
• Legen Sie den Computer während der Reise nicht in ein Gepäckfach über dem Sitz, wo er
umherrutschen könnte. Lassen Sie den Computer nicht fallen, und setzen Sie ihn keinen
anderen mechanischen Erschütterungen aus.
• Schützen Sie Computer, Akku und Festplattenlaufwerk vor Schmutz, Staub, Lebensmitteln, Flüssigkeiten, extremen Temperaturen und übermäßiger Sonneneinstrahlung.
• Wenn Sie Ihren Computer in eine Umgebung mit völlig unterschiedlicher Temperatur
und/oder Luftfeuchtigkeit bringen, kann sich auf oder im Computer Kondenswasser
bilden. Um eine Beschädigung des Computers zu vermeiden, sollten Sie genügend Zeit
verstreichen lassen, damit die Feuchtigkeit verdunsten kann, bevor Sie den Computer
benutzen.
VORSICHT: Wenn Sie den Computer aus einer kälteren in eine wärmere Umgebung bringen oder
umgekehrt, sollten Sie mit dem Einschalten warten, bis sich der Computer an die Raumtemperatur
angepasst hat.
• Ziehen Sie beim Trennen des Gerätes vom Stromnetz nur am Stecker oder an der Zugentlastung, aber nicht am Kabel selbst. Ziehen Sie den Stecker möglichst geradlinig
aus der Steckdose heraus, damit die Kontaktstifte nicht verbogen werden. Vor dem
Anschließen eines Kabels sollten Sie sicherstellen, dass der Stecker korrekt ausgerichtet
ist und nicht verkantet aufgesetzt wird.
• Behandeln Sie die Komponenten sorgsam. Halten Sie Bauteile wie Speichermodule an
den Kanten und nicht an den Kontaktstiften.
Systeminformationshandbuch 93
Page 96

Arbeiten mit dem Computer (Fortsetzung)
• Wenn Sie ein Speichermodul von der Systemplatine entfernen oder ein Gerät vom
Computer trennen möchten, warten Sie nach dem Ausschalten und Entfernen des
Netzadapterkabels des Computers mindestens fünf Sekunden, um Beschädigungen der
Systemplatine zu vermeiden.
• Reinigen Sie den Bildschirm mit einem weichen, sauberen Tuch und Wasser. Befeuchten
Sie das Tuch, und wischen Sie gleichmäßig in eine Richtung von oben nach unten über
den Bildschirm. Wischen Sie den Bildschirm sofort trocken. Vermeiden Sie, dass Flüssigkeit auf den Bildschirm gelangt. Durch längeren Kontakt mit Flüssigkeit kann der
Bildschirm beschädigt werden. Verwenden Sie keinen handelsüblichen Glasreiniger zum
Reinigen des Bildschirms.
www.dell.com | support.euro.dell.com
• Falls der Computer nass oder beschädigt wurde, führen Sie die im Online-Benutzerhandbuch unter „Problemlösung“ beschriebenen Schritte aus. Wenn Sie nach Durchführung
dieser Verfahren feststellen, dass der Computer nicht einwandfrei arbeitet, wenden Sie
sich an Dell. (Die entsprechenden Kontaktinformationen finden Sie im Benutzerhand-
buch unter „Weitere Hilfe“.)
Ergonomische Haltung beim Arbeiten mit dem Computer
WARNUNG: Falsches oder länger andauerndes Arbeiten mit der Tastatur kann
gesundheitsschädlich sein.
WARNUNG: Länger andauerndes Arbeiten am integrierten oder externen Bildschirm
kann die Augen belasten.
Um Arbeitskomfort und Produktivität zu optimieren, beachten Sie beim Aufstellen
und Verwenden des Computers die ergonomischen Richtlinien im Anhang des OnlineBenutzerhandbuchs.
Dieser tragbare Computer ist nicht für den länger andauernden Gebrauch im Büro bestimmt.
Für länger andauernden Gebrauch im Büro wird die Verwendung einer externen Tastatur
empfohlen.
94 Systeminformationshandbuch
Page 97

Arbeiten mit dem Computer (Fortsetzung)
Bei der Arbeit an Komponenten im Inneren des Computers
Führen Sie vor dem Entfernen oder Installieren von Speichermodulen, Mini-PC-Karten
bzw. eines Modems folgende Schritte in der angegebenen Reihenfolge aus.
VORSICHT: Nur bei der Installation von Speichermodulen, Mini-PC-Karten oder eines Modems
dürfte es erforderlich werden, im Inneren des Computers zu arbeiten.
VORSICHT: Um eine mögliche Beschädigung der Systemplatine zu vermeiden, warten Sie
nach dem Ausschalten des Computers fünf Sekunden, bevor Sie ein Peripheriegerät vom
Computer trennen oder ein Speichermodul., eine Mini-PC-Karte oder ein Modem entfernen.
Den Computer herunterfahren und und alle angeschlossenen Geräte ausschalten.
1
2 Den Computer und die daran angeschlossenen Geräte vom Stromnetz trennen. So
wird die Gefahr von Verletzungen oder elektrischen Schlägen verringert. Außerdem alle
Telefon- und Datenübertragungskabel vom System trennen.
3 Den Hauptakku aus dem Akkufach und gegebenenfalls den zweiten Akku aus dem
Modulschacht entfernen.
4 Sich durch Berühren einer nicht lackierten Metallfläche an der E/A-Leiste auf der
Rückseite des Computers erden.
Während der Arbeit von Zeit zu Zeit die E/A-Leiste berühren, um statische Elektrizität
abzuleiten, die Bauteile beschädigen kann.
Systeminformationshandbuch 95
Page 98

Arbeiten mit dem Computer (Fortsetzung)
Schutz vor elektrostatischen Entladungen
Elektrostatische Entladungen können die elektronischen Bauteile des Computers beschädigen.
Um Beschädigungen durch elektrostatische Entladungen zu vermeiden, sollten Sie die statische Elektrizität Ihres Körpers entladen, bevor Sie elektronische Bauteile (z. B. ein Speichermodul) des Computers berühren. Berühren Sie dazu eine nicht lackierte Metallfläche an der
E/A-Leiste des Computers.
Berühren Sie während Arbeiten im Inneren des Computers von Zeit zu Zeit einen E/AAnschluss, um die statische Elektrizität abzuleiten, die sich in Ihrem Körper aufgebaut hat.
Beachten Sie auch folgende Hinweise, um Beschädigungen durch elektrostatische Entladung
www.dell.com | support.euro.dell.com
(ESE) zu vermeiden:
• Entfernen Sie beim Auspacken einer elektrostatisch empfindlichen Komponente aus
dem Versandkarton erst dann ihre antistatische Verpackung, wenn Sie die Komponente
installieren möchten. Vergewissern Sie sich, dass die in Ihrem Körper aufgebaute statische
Elektrizität abgeleitet wurde, bevor Sie die antistatische Verpackung der Komponente
entfernen.
• Verwenden Sie für den Transport einer elektrostatisch empfindlichen Komponente einen
antistatischen Behälter oder eine antistatische Verpackung.
• Arbeiten Sie mit allen empfindlichen Komponenten in einer elektrostatisch unbedenklichen Umgebung. Verwenden Sie nach Möglichkeit antistatische Fußmatten und
Schreibtischauflagen.
Entsorgen von Akkus
In Ihrem Computer wird ein Lithium-Ionen-Akku verwendet. Anweisungen zum Austauschen
des Lithium-Ionen-Akkus finden Sie unter „Entfernen eines Akkus“ weiter hinten in diesem
Dokument bzw. im Abschnitt „Verwenden eines Akkus“ im Online-Benutzerhandbuch.
Entsorgen Sie den Akku nicht im Hausmüll. Die Adresse der nächstgelegenen Annahmestelle
für Altbatterien und Akkus erhalten Sie bei Ihrem örtlichen Abfallentsorgungsbetrieb.
96 Systeminformationshandbuch
Page 99

Suchen nach Informationen über den Computer
Wonach suchen Sie? Hier finden Sie das Gesuchte:
• Ein Diagnoseprogramm für den
Computer.
• Treiber für meinen Computer
• Die Dokumentation für meinen
Computer
• Die Dokumentation für das Gerät
• Expressdienst-Codenummer und
Service-Kennnummer
• Microsoft
®
Windows®-Lizenzetikett
Die CD Drivers and Utilities (diese wird auch als
ResourceCD bezeichnet).
Dokumentation und Treiber wurden von
Dell vor der Auslieferung bereits auf dem
Computer vorinstalliert. Mit Hilfe der
CD können Sie Treiber neu installieren,
das Dell-Diagnoseprogramm ausführen
oder auf die Dokumentation zugreifen.
Möglicherweise finden Sie auf der CD
Readme-Dateien. Diese Dateien enthalten Angaben zu den neuesten technischen Änderungen oder Detailinformationen zu technischen Fragen für
erfahrene Benutzer oder Techniker.
Expressdienst-Codenummer und Produktschlüssel
Diese Aufkleber sind am Computer
angebracht.
Systeminformationshandbuch 97
Page 100

Wonach suchen Sie? Hier finden Sie das Gesuchte:
• Aktuellste Treiber für den Computer
• Informationen zum technischen
Support und Kundendienst
• Onlinediskussionen mit anderen
Benutzern und dem technischen
Support
• Dokumentation zum Computer
Dell Support-Website
Die Dell Support-Website bietet verschiedene Online-Werkzeuge,
unter anderem:
• Lösungen – Hinweise und Tipps zur Problembehandlung, Artikel
von Technikern und Onlinekurse
• Kundenforum – Online-Diskussion mit anderen Dell-Kunden
• Aktualisierungen – Aktualisierungsinformationen für Komponenten,
z. B. für den Speicher, das Festplattenlaufwerk und das
Betriebssystem.
• Kundenbetreuung – Kontaktinformationen, Bestellstatus, Garantie
und Informationen in Notfällen.
• Downloads – Treiber, Patches und Software-Updates
www.dell.com | support.euro.dell.com
• Referenz – Computerdokumentation, Produktspezifikationen und
Whitepapers
• Anleitung zum Arbeiten mit
Windows XP
• Dokumentation für meinen
Computer
• Dokumentation für Geräte
(z.B.Modems)
• Wie das Betriebssystem neu
Hilfe- und Supportcenter unter Windows
1 Klicken Sie auf die Schaltfläche Start und anschließend auf Help
and Support (Hilfe und Support).
2 Ein Wort oder einen Ausdruck eingeben, das bzw. der Ihr Problem
beschreibt, und anschließend auf das Pfeilsymbol klicken.
3 Auf das Thema klicken, das Ihr Problem beschreibt.
4 Folgen Sie den Anweisungen auf dem Bildschirm.
Betriebssystem-CD
installiert wird
Verwenden Sie die Drivers and
Utilities-CD, um neuere Treiber für
die mit Ihrem Computer ausgelieferten
Geräte zu installieren, wenn Sie das
Betriebssystem Ihres Computers neu
installieren.
Der Produktschlüssel für Ihr Betriebssystem befindet sich auf Ihrem
Computer.
98 Systeminformationshandbuch
 Loading...