

Page 1

Dell Wireless Dock
D5000
User Manual
Ver. 1.0
February 2013
Page 2

Information in this publication is subject to change without notice.
© 2013 Dell Inc. All rights reserved.
Reproduction of these materials in any manner whatsoever without the written
permission of Dell Inc. is strictly forbidden.
Trademarks used in this text: Dell™ and the DELL logo are trademarks of
Dell Inc. Microsoft® and Windows® are either trademarks or registered
trademarks of Microsoft Corporation in the United States and/or other
countries.
Other trademarks and trade names may be used in this publication to refer to
either the entities claiming the marks and names or their products.
Dell Inc. disclaims any proprietary interest in trademarks and trade names
other than its own.
A
Page 3

Table of Contents
1. Introduction ................................................................ 1
1.1 Package Contents................................................................................... 1
1.2 Identifying Parts and Controls ............................................................ 2
1.3 Product Specifications .......................................................................... 3
2. Quick Setup of Hardware .......................................... 5
3. Working on the Dell Wireless Dock D5000 .............. 6
3.1 LED Status Indicators ............................................................................ 6
3.2 I/O Connectors on the Dell Wireless Dock D5000 .......................... 6
3.3 Resetting the Dell wireless dock D5000 ........................................... 9
4. Connecting to the Dell Wireless Dock D5000 ....... 10
4.1 Installing the Software......................................................................... 10
4.2 Scanning for the Dell Wireless Dock D5000 .................................. 11
4.3 Connecting to a Dell Wireless Dock D5000 ................................... 13
4.4 Managing the Dell wireless dock D5000 ......................................... 15
4.5 Using Devices Connected to the Dell wireless dock D5000 ..... 18
4.6 Exit or Shutdown the Wireless Docking Software ....................... 19
5. Appendix A Troubleshooting .................................. 21
6. Bluetooth Networking Overview ............................ 23
6.1 Setup Requirements ............................................................................ 23
6.2 Turn the Bluetooth Adapter On and Off .......................................... 24
6.3 Terminology ........................................................................................... 24
7. Getting Started ......................................................... 27
7.1 Installing the Bluetooth Windows Suite ......................................... 27
7.2 Launching the Bluetooth Windows Suite ....................................... 28
7.3 Uninstalling the Bluetooth Windows Suite .................................... 28
8. Adding Bluetooth Devices ...................................... 29
8.1 Discovering and Pairing with a Bluetooth Device ....................... 29
8.2 Adding a Bluetooth Device ................................................................ 30
B
Page 4

8.3 Removing a Bluetooth Device ........................................................... 30
9. Bluetooth Settings ................................................... 32
9.1 General Settings ................................................................................... 32
9.2 Add or Delete a Communications Port ........................................... 32
9.3 Manage My Local Bluetooth Adapters ............................................ 33
9.4 Set Rules for Sharing Files and Equipment .................................. 33
9.5 Set Rules for Sending and Receiving PIM Items .......................... 35
9.6 Display the Device Properties ........................................................... 36
10. Managing Bluetooth Devices .................................. 37
10.1 Bluetooth Operations ....................................................................... 37
11. Wireless Network Overview .................................... 44
11.1 To Setup a Wireless Network ......................................................... 44
11.2 Wireless Networking Basics .......................................................... 44
11.3 To Turn Radio ON and OFF ............................................................. 46
12. Operational Information .......................................... 47
12.1 Wireless Interoperability ................................................................. 47
C
Page 5
DP-VGA Dongle
Power Cord
1. Introduction
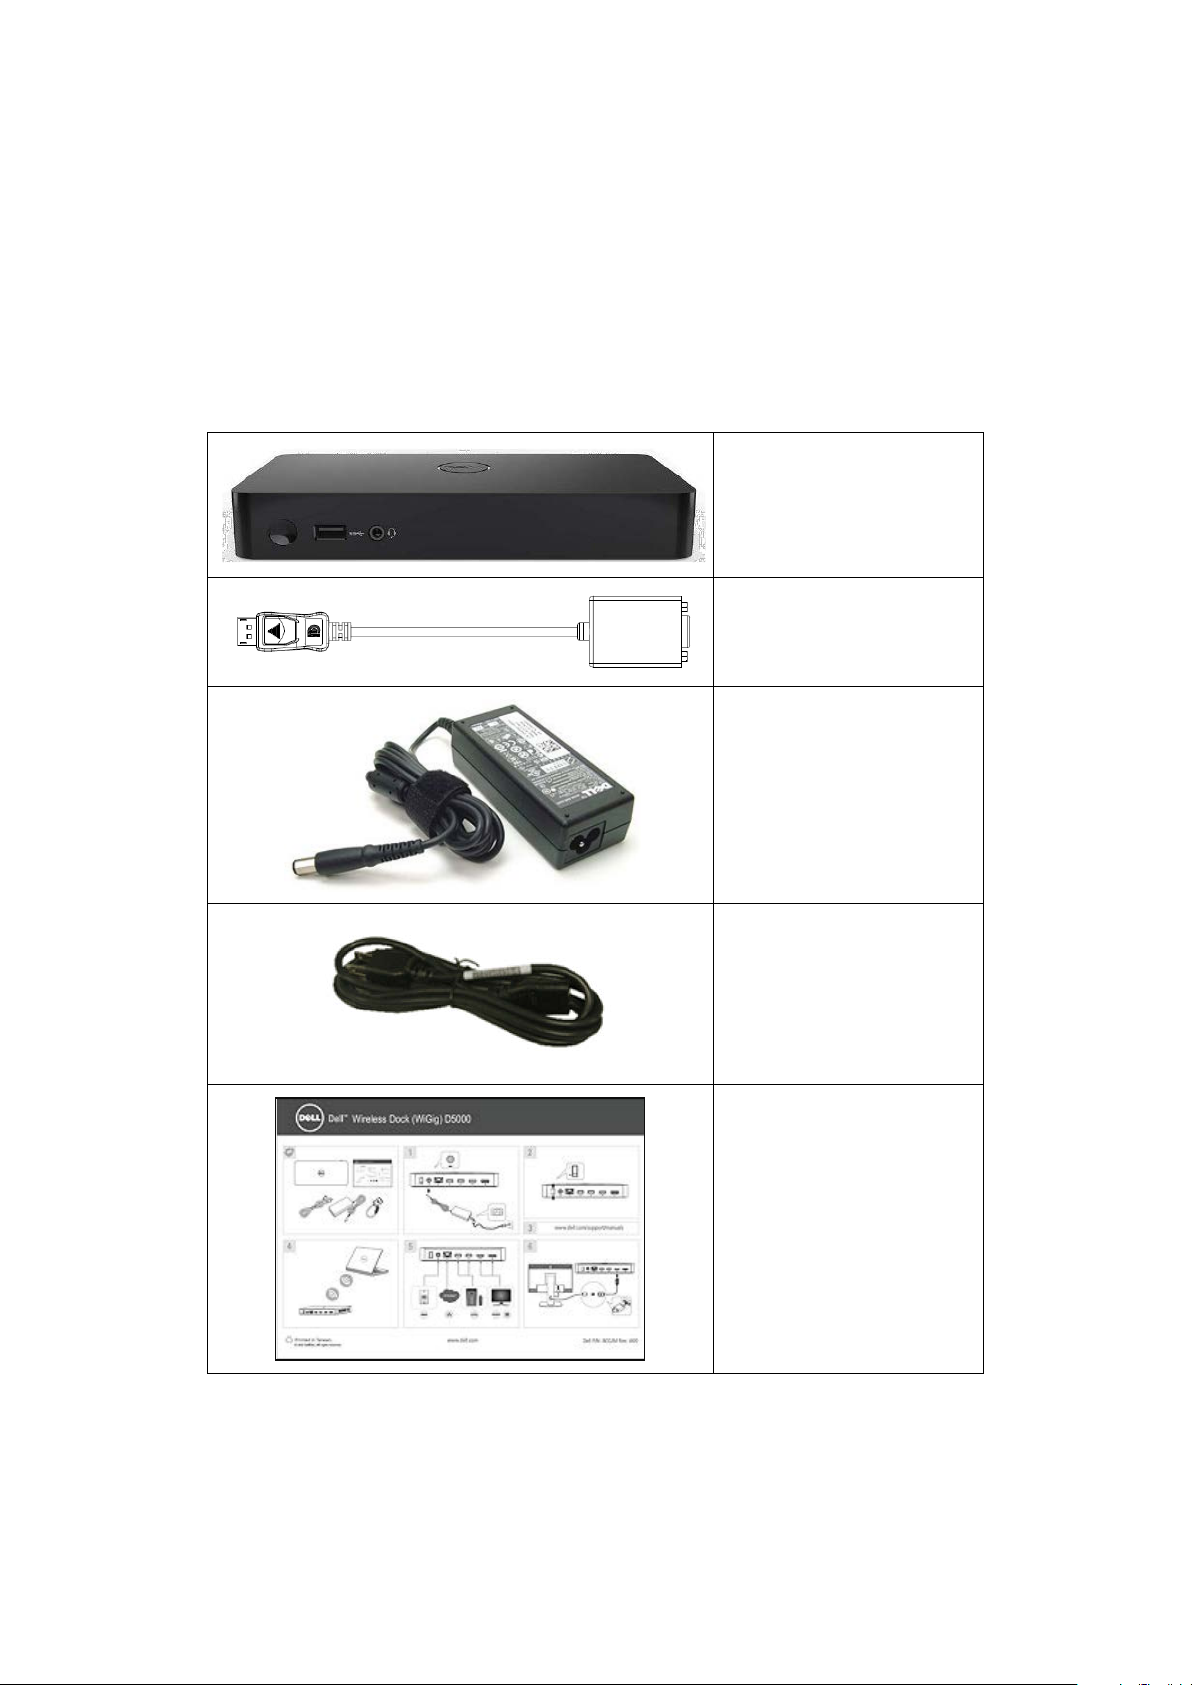
1.1 Package Contents
Your docking station ships with the components shown below. Ensure that you
have received all the components and contact Dell (see your invoice for
contact information) if something is missing.
Wireless Dock
Power Adapter
Quick Setup Guide
(QSG)
1
Page 6

1.2 Identifying Parts and Controls
Front View
Safety, Environmental,
and Regulatory
Information
1
2
3
4
1. Pairing button 2. USB 3.0 port
3. audio/microphone
combo connector
5. reset button
Figure 1. Front View
4. docking status indicator
5
2
Page 7
Video Ports
DisplayPort x 1 (supports DP 1.1)
out via
Buttons
Pairing button
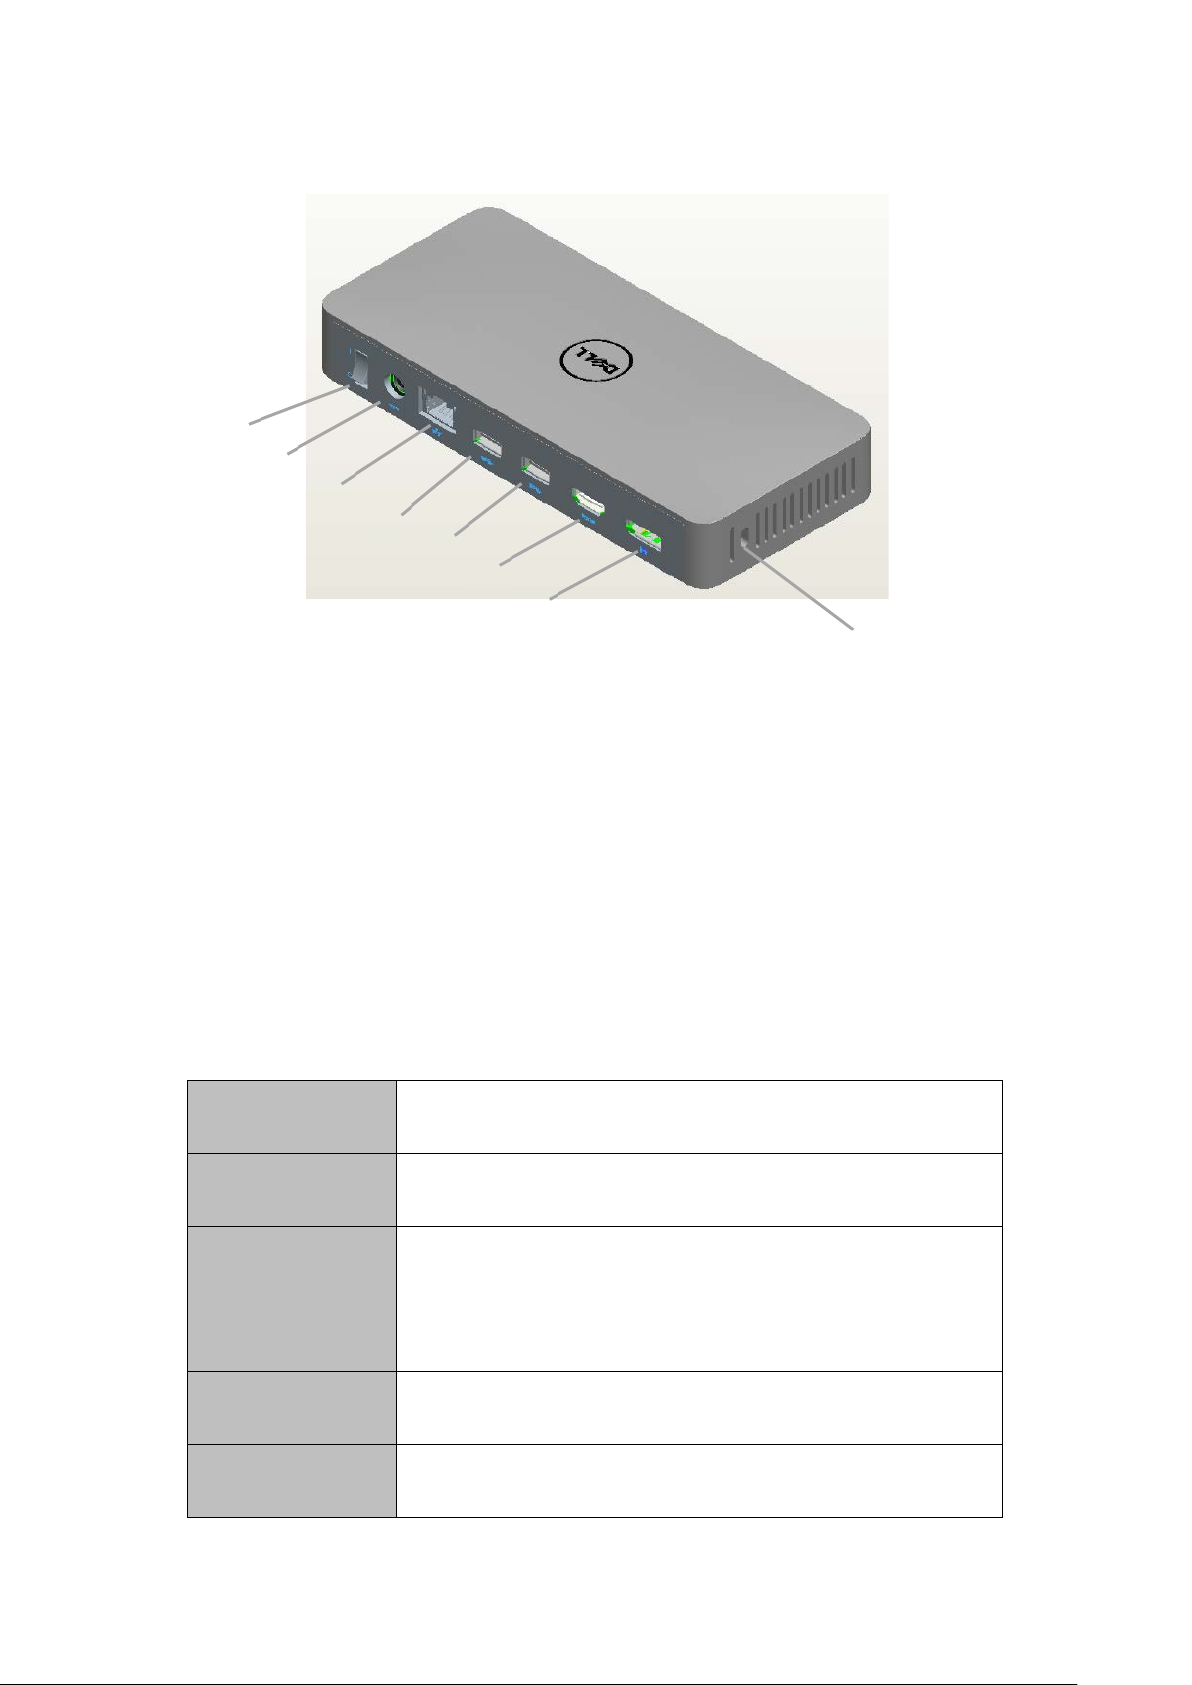
Back View
1
2
3
4
5
6
7
8
Figure 2. Back View
1. power switch 2. power connector
3. network port 4. USB 3.0 port
5. USB 3.0 port 6. HDMI
7. DisplayPort (DP) 8. security-cable slot
1.3 Product Specifications
Docking Specifications
Standard
IO Ports
WiGig 1.1
IEEE 802.11ad
HDMI x 1 (supports HDMI 1.3)
USB 3.0 x 3
Gigabit Ethernet
LEDs
Audio Jack x 1 (Microphone-in and line-
combo connector)
Reset
Wireless status indicator
Pairing status
3
Page 8

Non-operating:
Non-operating:
Power Supply
Dimension
190 mm x 86 mm x 30.7 mm
High Video Resolution
1920 x 1200 @ 60Hz, 1920 x 1080p @ 60Hz
Input Voltage
Output Voltage
5V ± 10% (Max 90 mA)
Power consumption
Standby current
50 mA
Environmental
Characteristics
Operating: 0 °C to 40 °C
Storage: -20 °C to 60 °C
Temperature
(-4 °F to 140 °F)
Shipping: -20 °C to 60 °C
(-4 °F to 140 °F)
Operating: 10% to 80%
(non-condensing)
Humidity
Storage: 5% to 90%
(non-condensing)
Shipping: 5% to 90%
(non-condensing)
19.5 V / 3.34 A (65 W)
DP-VGA Dongle Specifications
1600 x 1200 @ 60Hz
3.3V± 10%
Rated Current
175 mA
575 mW
Hardware Requirements
Before using the docking station, ensure that your notebook or PC has a WiGig
module and antenna to enable one-to-one wireless connection.
4
Page 9
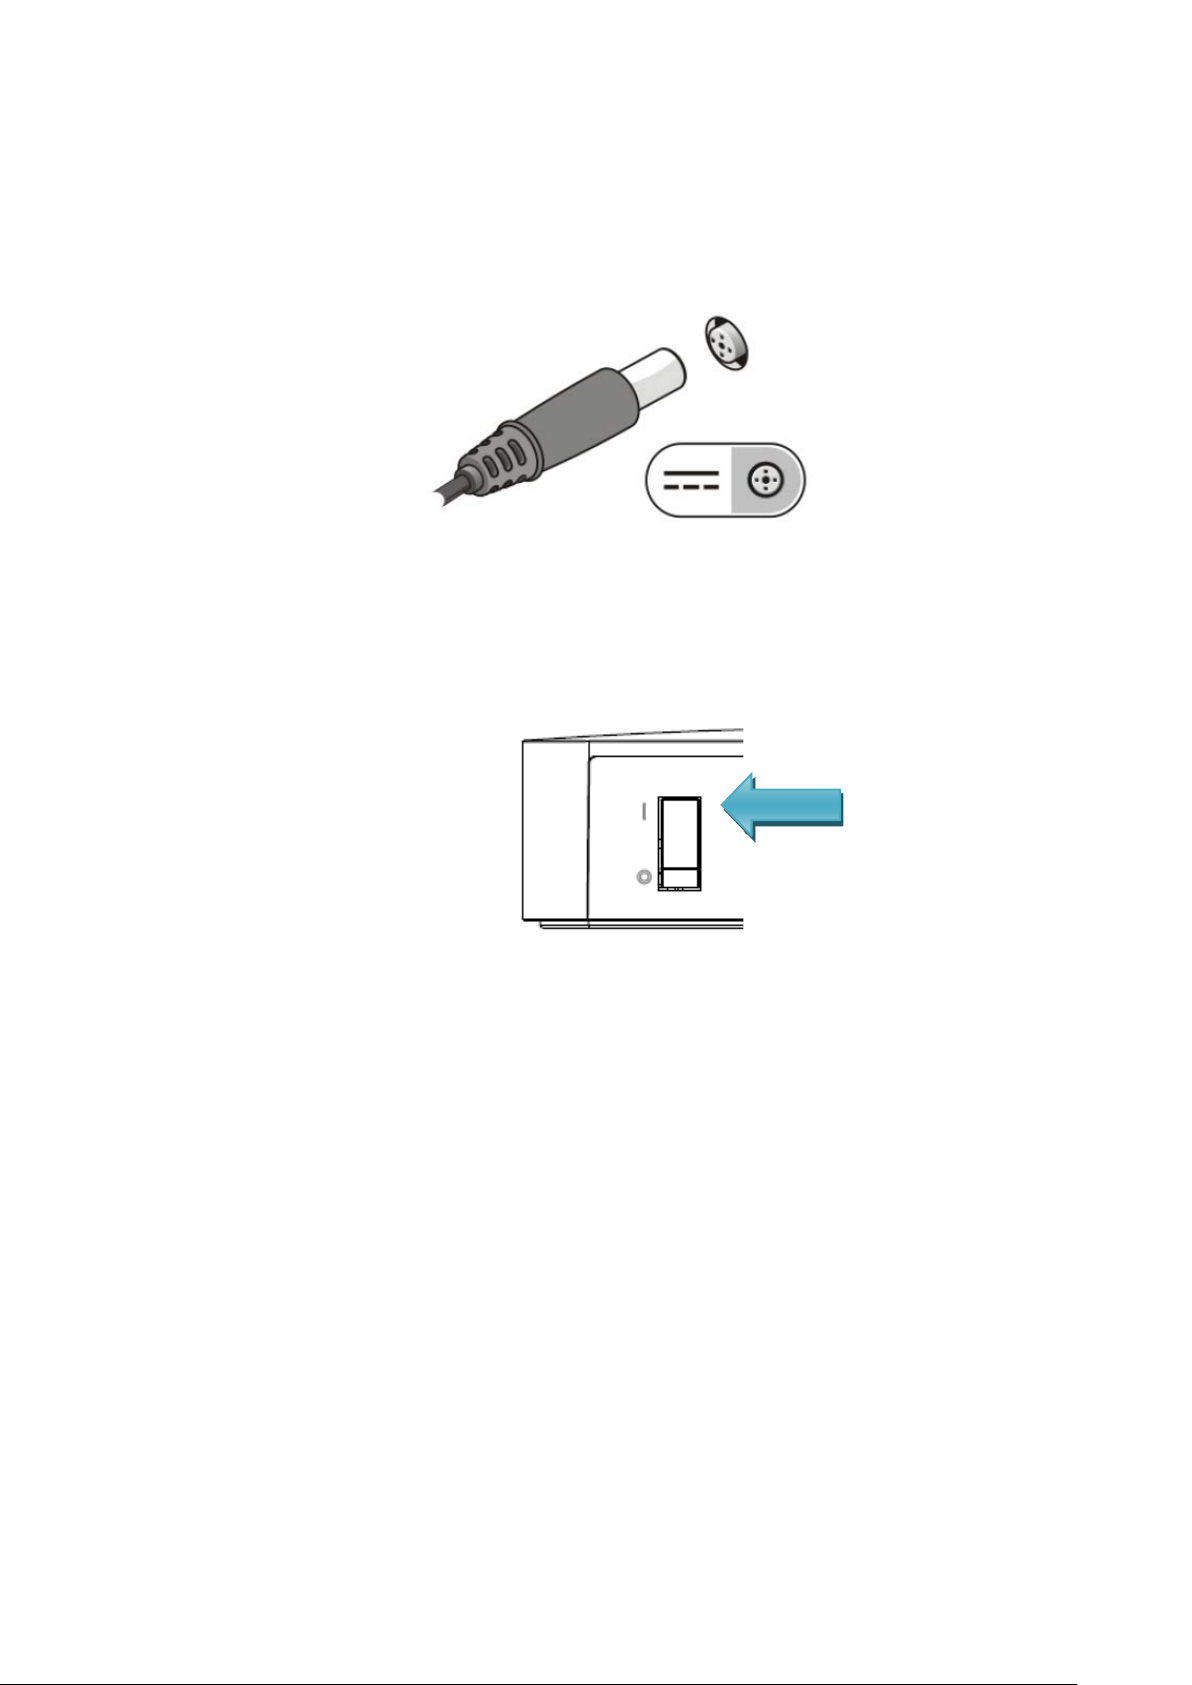
2. Quick Setup of Hardware
1. Connect the AC adapter to the AC adapter connector on the Dell Wireless
Dock D5000 and to the electrical outlet.
Figure 3. AC Adapter
2. Turn on the power switch to the “I” status.
Figure 4. Power switch
5
Page 10

In Progress
Success
again.
Error
120 seconds and then
revert back to solid state.
No link
3. Working on the Dell Wireless Dock D5000
3.1 LED Status Indicators
The Dell Wireless Dock shall include multiple LED status indicators on the unit.
3.1.1 Docking Status Indicator
The Docking Status Indicator is Amber when the device is powered on but not
connected to a host. When a WiGig connection is active, this indicator is ON
and turns from Amber to White. When there is a connection error, the indicator
will blink Amber for 5 seconds.
3.1.2 Pairing Button
The Pairing Button is an easy way for the user to connect to the docking
station. The user just pushes the pairing button on the docking station and the
host will automatically connect to this docking station. There is a backlit LED
on the button. The Pairing LED will be White for the success state and Amber
for the error state.
Blink Solid
White
LED should stay solid until pairing is In Progress
Amber
The LED should blink for
Dock station is powered on.
3.2 I/O Connectors on the Dell Wireless Dock D5000
Once a wireless connection is built, these I/O connectors are virtually built into
your computer. You can use them in the same way as you use on your
computer.
6
Page 11
out via combo
The Dell Wireless Dock D5000 has the below I/O connectors:
Video Ports
Input/Output
Ports
DisplayPort x 1
HDMI x 1
USB 3.0 x 3
Gigabit Ethernet
Audio Jack x 1 (Microphone-in and line-
connector)
If the wireless link between the computer and the Dell Wireless Dock
becomes weak, move the computer closer to the Dell Wireless Dock or rotate
the computer to find a position with a stronger wireless link. For example, if you
find that the wireless signal strength is reduced when the notebook lid is closed,
you can try to rotate the notebook to find the best reception.
Note: The wireless connection works best if your computer lid (logo side)
directly faces the front side of the docking station and there is a line-of-sight
between the computer and the docking station.
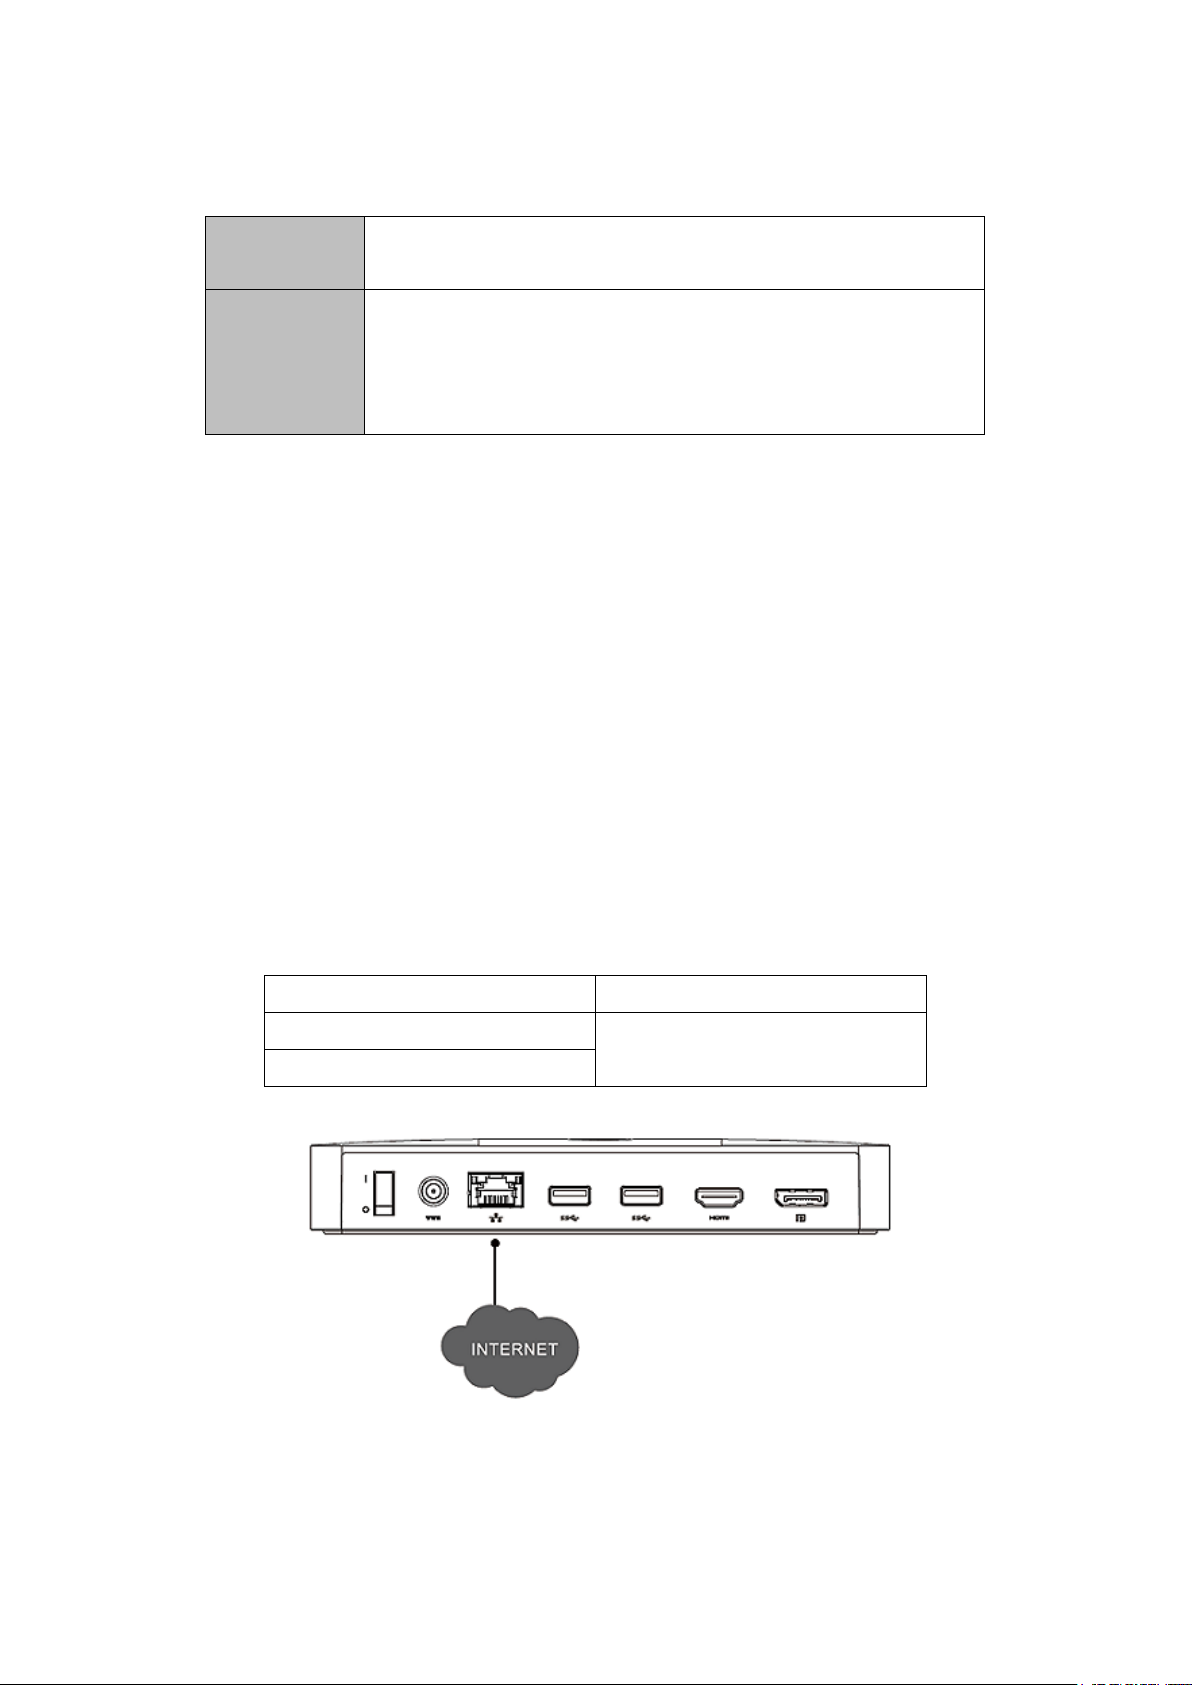
3.2.1 Using The Network Port
When you want to use Internet via the network port of the docking station, you
just plug the network cable into the network port of the docking station. The
meanings of the LED indicators on the network port are listed below:
Link Speed Indicator Ethernet Activity Indicator
Green = 10/100 Mb
Orange = 1 Gb
Yellow Flashing
Figure 5. Ethernet
7
Page 12
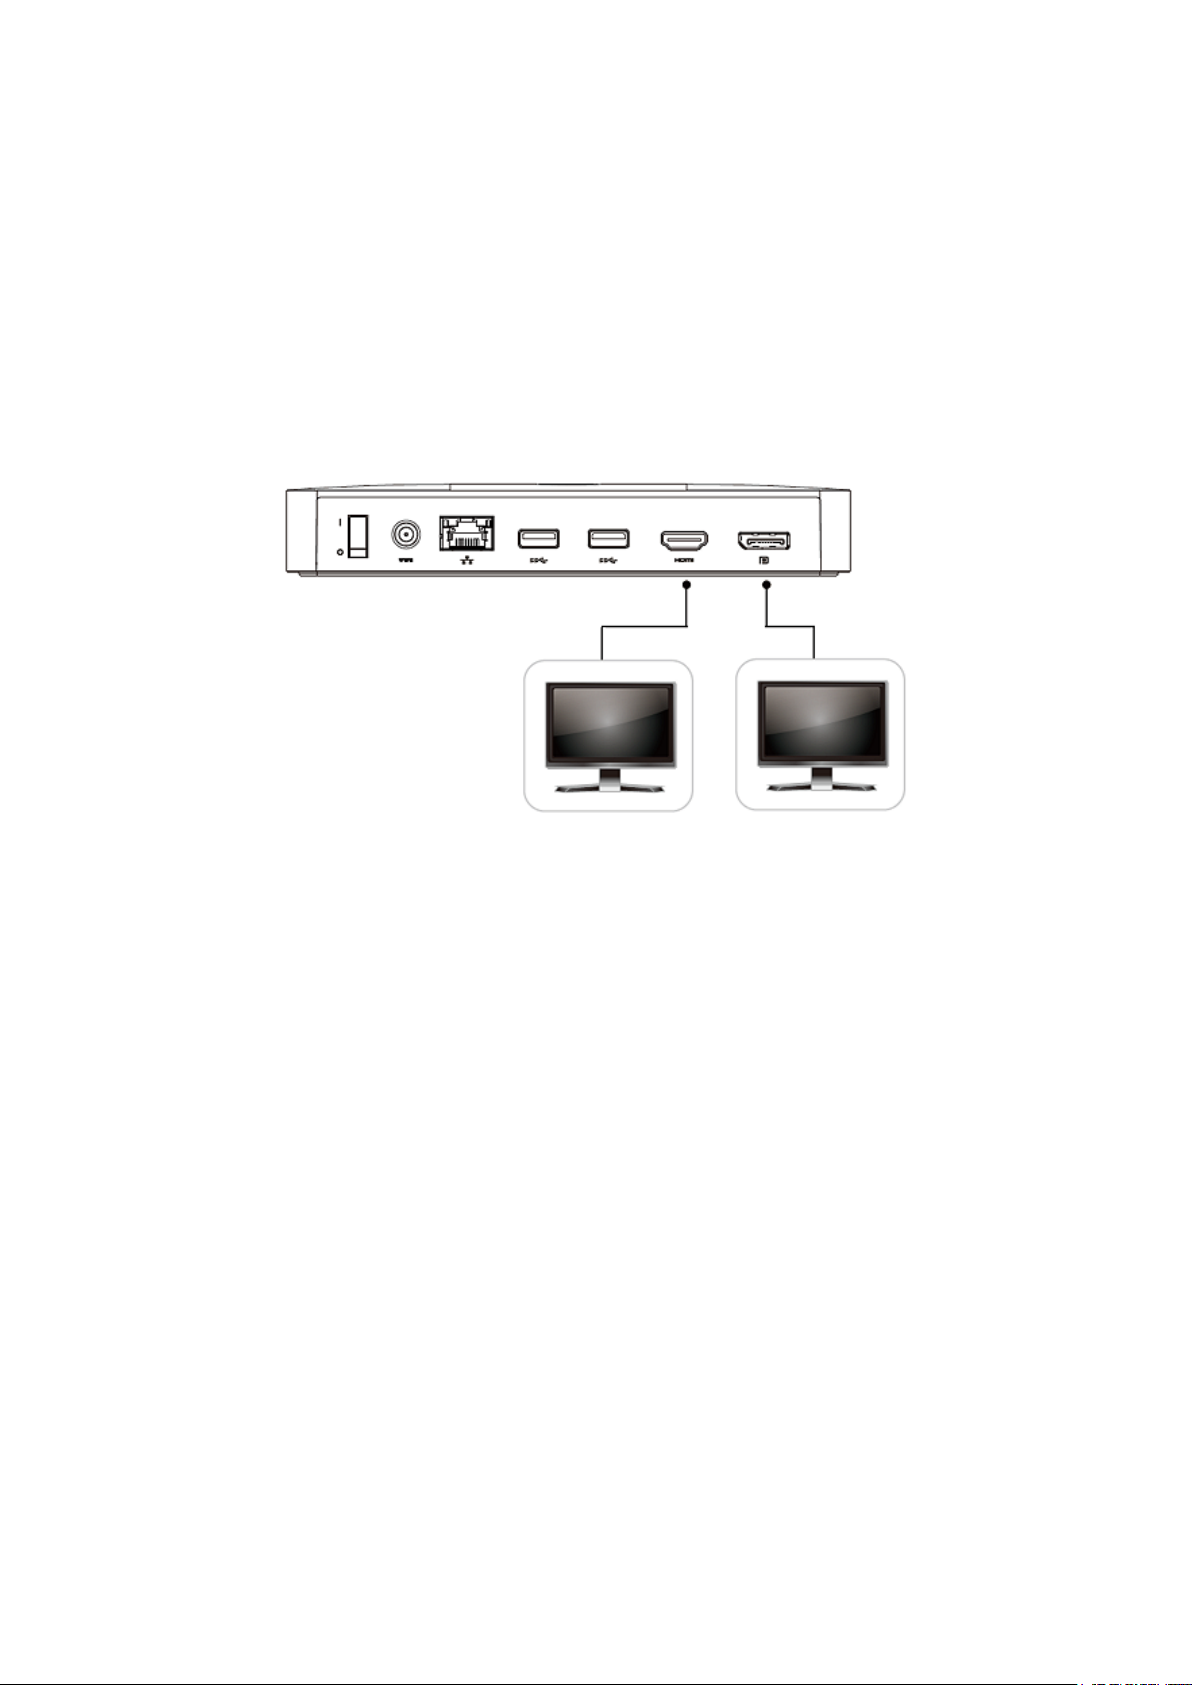
3.2.2 Using the Video/Audio Port
The video quality is similar to that of a notebook/PC connected to a TV/Monitor
via a real cable. When you want to use HDMI/DisplayPort on the docking
station to make a video output, just use the HDMI/DisplayPort cable to connect
the docking station to the monitor/TV. You can enjoy HD video on a big-sized
screen. The Dell Wireless Dock D5000 also has an audio jack to output audio
and MIC input. The Dell Wireless dock can support simultaneous HDMI and
DisplayPort output.
Figure 6. Video/Audio Port
Note: It is recommended that your wireless docking station be placed next to a
TV/Monitor. Do not place the wireless dock behind a TV/Monitor or any other
object.
Note: The wireless docking station does not support HDCP to play video from
a DVD/BD player on the TV/Monitor.
3.2.3 Using the USB 3.0 Port
When you want to access an external Hard Drive or Flash Drive, just plug them
into the USB 3.0 ports of the docking station for data transfer.
8
Page 13
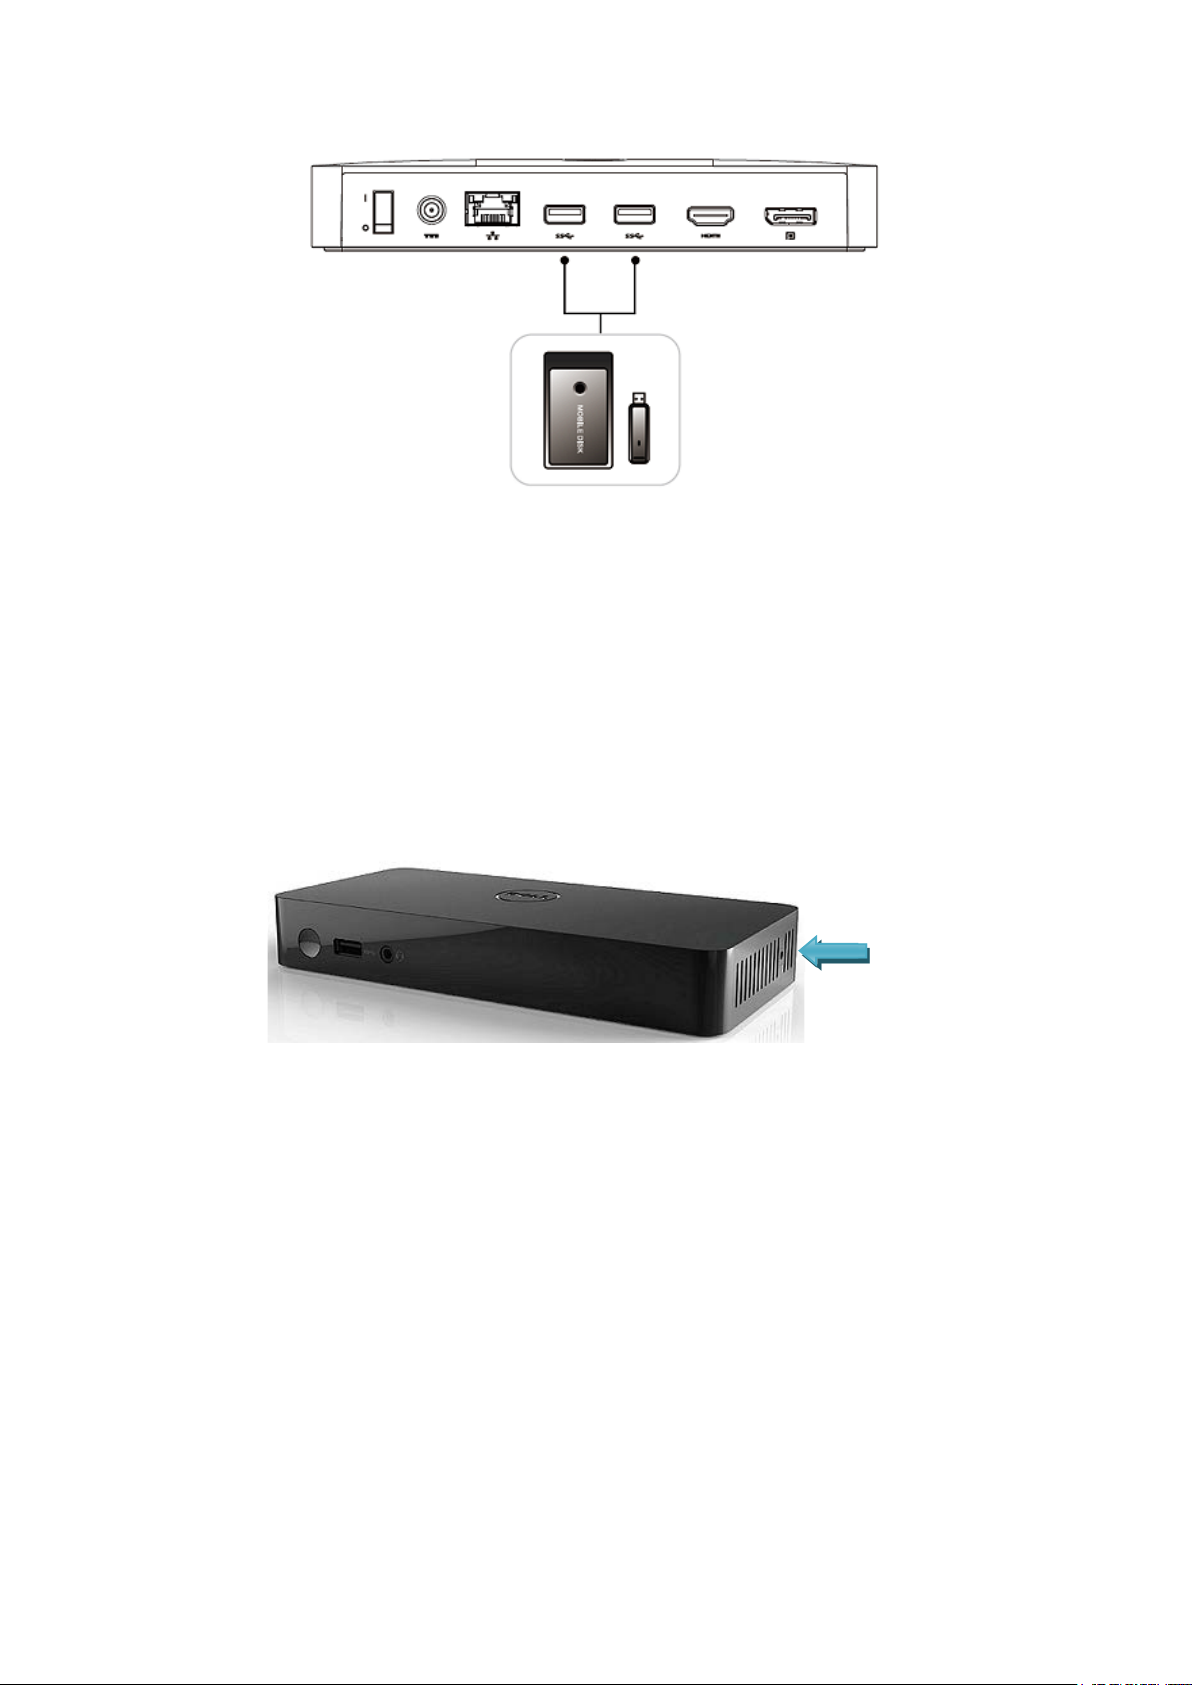
Reset button
Figure7. USB 3.0 Port
3.3 Resetting the Dell wireless dock D5000
To delete all associated settings stored on your Dell Wireless Dock, press and
hold down the reset button for 10 seconds. All dock settings will be deleted and
you will have to re-establish a connection. To re-establish a connection to a
wireless dock, you must repeat the connection process.
Figure 8. Reset Button
9
Page 14

4. Connecting to the Dell Wireless Dock D5000
The Dell Wireless Dock or Wireless Bus Extension (WBE) is an easy-to-use
software which allows you to connect to the Dell wireless dock D5000 using 60
GHz frequency band in parallel to other Wi-Fi access. The Wireless Docking
software uses WiGig’s WBE PAL leveraging the latest technology in
transmitting the data wirelessly. Using this software you can enjoy wireless
high-speed data, audio, and video transfer between your PC/laptop and Dell
wireless dock D5000 securely. The software supports WPA2 security.
Once you establish a connection between your PC/laptop and the Dell wireless
dock D5000, all the devices like printers, display devices, external hard drives,
etc. attached to the dock are available to you. You can access them wirelessly
using your PC/laptop. The Device Manager on your PC/laptop shows all the
devices attached to the Dell wireless dock D5000, as if they are attached to
your PC/laptop.
The following sections explain in detail how to install the software, connect to
Dell wireless dock D5000, and use the devices attached to the dock.
4.1 Installing the Software
The software comes pre-installed on your PC/laptop. In case if you need to
install the software, contact Dell support or download the software from the
following location:
http://www.dell.com/support/home/us/en/19?c=us&s=dhs&cs=19&l=en
In order to install the Wireless Docking software, navigate to the Wireless
Docking software folder on the downloaded software and run the setup file
(*.exe). The installation wizard starts installing the software. Follow the
instructions on the wizard to complete the installation.
You will be prompted to install the Qualcomm Atheros Ethernet driver, Display
Link, and Fresco Logic USB 3.0 Host controller driver. Select Yes to install
these drivers. These drivers are required by the devices attached to the Dell
wireless dock D5000 to work properly.
10
Page 15

Icon Color
Description
Green
Connected to a dock
Blue
Disconnected from the dock
Red
Error of any kind
Orange
Airplane Mode is ON or Hardware switch is
Grey
Your PC/laptop does not support wireless
Note: If you select No, you may need to install all the three drivers manually
from the location c:/program files/Wilocity/Dock_Drivers. Run *.exe from the
respective folders to install the drivers.
Once the Wireless Docking software is installed, an icon is created in the
taskbar notification area and the software runs automatically. You can also
access the Wireless Docking software through a desktop icon on your
PC/laptop.
4.1.1 Uninstalling the Software
You can uninstall the Wireless Docking software using the Windows Control
Panel and by selecting Uninstall or change a program window option.
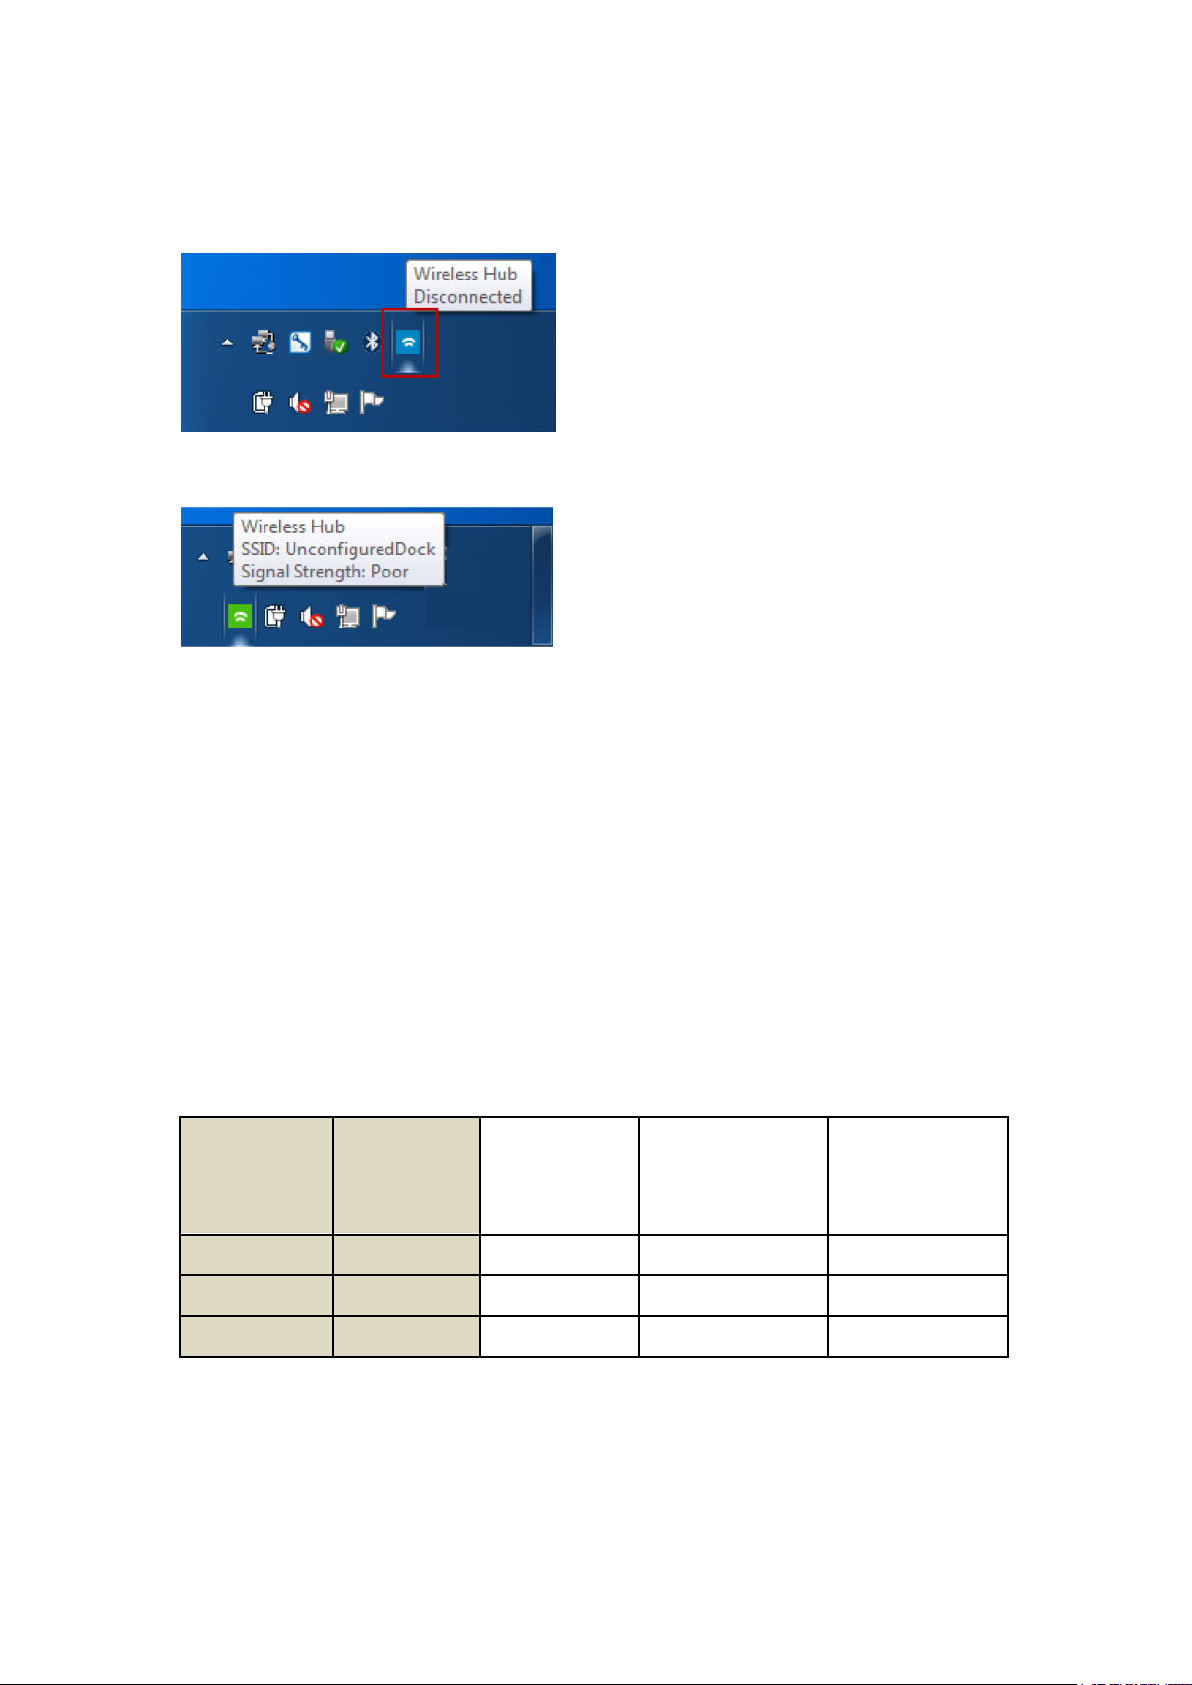
4.2 Scanning for the Dell Wireless Dock D5000
The Wireless Docking software runs automatically and scans for available
docks when your PC/laptop boots. An icon is displayed in the taskbar
notification area. For easy identification, the color of the icon changes when a
dock is connected.
Note: If the taskbar notification icon is hidden, expand the taskbar by selecting
You can also see the SSID and signal strength of the connected dock when
you move the mouse over the icon. The following table describes the color
status of the Wireless Docking software’s taskbar notification icon:
OFF on your PC/laptop
docking using 60 GHz frequency
Note: If the Wireless Docking software taskbar identification icon does not
change from red color to blue color or green color, first restart your PC/laptop.
If this still does not resolve the issue, you need to re-install the Wireless
Docking software again.
11
Page 16
Auto
Automatic
Connection
possible
Manual Connect
Required
Yes
Yes
No Yes
Yes
No No
No
Yes
Note: The symbol in the Wireless Docking software’s taskbar notification icon
shows that there are docks available for connection.
Figure 1 Connection Manager - Disconnected
Figure 2 WiGig Connection Manager - Connected
The Wireless Docking software automatically scans for available docks at a
pre-set interval of time. You can modify the time interval of this scan using the
Wireless Hub Connection Manager. All the available docks are displayed when
you click on the Wireless Docking software icon in the taskbar notification
area.
You can also manually scan for available docks at any time. First, click on the
Wireless Docking software icon in the taskbar notification area and then click
on the circular arrows as shown in Figure 3. The following table shows the auto
scan behavior:
Manual Scan
connect Auto scan
Required
Yes
No
No
No
Yes
Yes
Note: Manual scan is not available when a dock is connected to your
PC/laptop. You need to disconnect the dock to scan manually.
12
Page 17

Note: Only the docks that are available for connecting are displayed. If a dock
is already connected to your PC/laptop, the dock is not displayed in the
available list. You need to disconnect the dock to view it in the available list.
Figure 3 Scanning Manually
4.3 Connecting to a Dell Wireless Dock D5000
The Wireless Docking software allows you to connect to the Dell wireless dock
D5000. While connecting to the Dell wireless dock D5000, you can select the
checkbox Connect Automatically. This allows the Wireless Docking software
to remember the connection settings and connects to the Dell wireless dock
D5000 automatically if the dock is available. Once the dock is connected, all
the devices attached to the dock are available to you.
Note: You can connect to only one dock at a given time. Other users cannot
see the connected dock while scanning, until you disconnect the dock.
Depending on the security level and hardware capabilities of the Dell wireless
dock D5000, the following are the secured ways you can connect to a
Dell wireless dock D5000:
WPS Encryption: When trying to connect to Dell wireless dock D5000, you
will be prompted to enter an encryption password. Once the password is
entered and verified, the Dell wireless dock D5000 will be connected to your
PC/laptop and a profile with all the information will be created.
Note: The Dell wireless dock D5000 comes with the following pre-configured
SSID and password. The same is printed on a label behind the Dell wireless
dock D5000.
13
Page 18

SSID : D5000_xxxxxx (xxxxxx represents 6 alpha numeric)
Password : 12345678
WPS Push Button: This option allows you to connect to the Dell wireless dock
D5000 without a password. You need to manually push the WPS Push button
present on the Dell wireless dock D5000 to complete the connection between
your PC/laptop and the Dell wireless dock D5000. For more information see
3.1.2 Pairing Button
4.3.1 How to connect to the Dell wireless dock D5000
To connect to the Dell wireless dock D5000, follow these steps:
1. Click the Wireless Docking software icon in the taskbar notification area.
The Dock Station dialog appears and displays all the available docks.
2. Select the Dell wireless dock D5000. The available options for the Dell
wireless dock D5000 are displayed.
3. (Optional) Select the check box Connect Automatically if you want to
connect to the Dell wireless dock D5000 automatically from the next time.
4. Select Connect, you will be prompted to enter a password or push the
paring button on the Dell wireless dock D5000 and press return key on your
PC/laptop.
5. The Dell wireless dock D5000 is now connected to your PC/laptop.
Figure 4 Connecting to a Dock
14
Page 19

Once the dock is connected, the Wireless Docking software allows you to view
the status of the connected Dell wireless dock D5000 and also update the
firmware of the dock. You can also restore the Dell wireless dock D5000 to
factory settings.
Select to expand the Dell wireless dock D5000 Settings dialog. The
following options are available to you:
• Status: Displays the current status between your PC/laptop and the
Dell wireless dock D5000. Also, it displays the duration of the
connection, the speed at which the data is transferred between your
PC/laptop and dock, the SSID of the Dell wireless dock D5000, the
channel through which your PC/laptop and the Dell wireless dock
D5000 are communicating, the security mode of the connection, and
the firmware version of the Dell wireless dock D5000.
• Setup: Allows you to modify the SSID of the Dell wireless dock D5000,
channel, the security mode, the connection key, the Dell wireless dock
D5000 password, the Dell wireless dock D5000 firmware upgrade, and
restore to factory settings. To upgrade the firmware, select "....", browse
to the firmware image location on your PC/laptop, select the image file,
and select Start.
Note: The configuration is stored individually for respective docks and the dock
is managed via a wireless connection from your PC/laptop.
4.4 Managing the Dell wireless dock D5000
Using the Wireless Hub Connection Manager, the Wireless Docking software
allows you to manage the Dell wireless dock D5000. You can modify the profile
of the Dell wireless dock D5000, change the auto scan preferences, upgrade
the host firmware, change the look and feel of the Connection Manager dialog,
and view the version of the Wireless Docking software.
To access the Wireless Hub Connection Manager, click the Wireless Docking
software icon in the taskbar notification area and click the settings button
on the Wireless Hub Connection Manager.
15
Page 20

Figure 6 Dell wireless dock D5000 settings
4.4.1 Profile Management
You can access profile management through the Wireless Hub Connection
Manger. The profiles of all the connected Dell wireless dock D5000s are stored
on your PC/laptop. You can set the priority of the docks that can be connected,
if one or more docks are available. You can also add, delete, or edit a profile
for a particular dock.
To set Priority, follow these steps:
1. Click the Wireless Docking software icon in the taskbar notification area.
The Wireless Hub dialog appears.
2. Click on the Wireless Hub dialog. The Settings dialog appears.
3. Select Profiles. The profiles of all the connected docks are displayed.
4. Select the profile you want to prioritize and select Move UP until the
desired profile is displayed as the first profile.
To Delete a profile, follow these steps:
1. Follow the steps 1 to 3 from above.
2. Select the profile you want to delete and select Delete in the options on the
dialog. The profile is deleted.
Note: If you delete a profile for a dock, you will be prompted to enter the setup
key before connecting to the dock.
16
Page 21

To Edit a profile, follow these steps:
1. Follow the steps 1 to 3 from above.
2. Double click the Profile you want to edit. All the available options for that
profile are displayed.
3. Modify the desired options and select Save. The modifications are saved
for that profile.
4.4.2 Advanced Configuration
You can set scanning options as well as extended debug information using the
Advanced tab in the Settings dialog. You can also update the host module
firmware from here.
4.4.3 Properties
You can configure the look and feel of the application like color, language, and
other properties using this tab.
Figure 7 Properties tab
17
Page 22

4.4.4 About
You can view the version numbers of the components using this tab.
Figure 8 About tab
Note: The version information shown in Figure 9 may differ from the actual
version information displayed by the application on your PC/laptop.
4.5 Using Devices Connected to the Dell wireless
dock D5000
Once a connection is established between your laptop and the Dell wireless
dock D5000 using Wireless Docking software, all the devices attached to the
Dell wireless dock D5000 are available to you for use. The typical devices that
can be attached to a dock are printers, display devices, external hard driver,
and any USB device. These devices are shown in your PC/laptop device
manager.
4.5.1 Using Display Devices Attached to the Dell wireless dock
D5000
If any display device is attached to the connected Dell wireless dock D5000,
you can use the display device as an extended monitor. Once a connection is
established between your PC/laptop and the Dell wireless dock D5000, the
display device attached to the dock is automatically detected by Windows
operating system and will be shown as an extended monitor.
18
Page 23

Note: By default, the duplicate mode is selected by Windows.
You can use Windows native operations for using the extended monitor. The
Wireless Docking software remembers the last-used settings of the display
device and uses them from the next connection.
You can also transmit audio and video to the display device attached to the
Dell wireless dock D5000 from your PC/laptop. You can play audio and video
on your PC/laptop using the DVD tray, from the internal hard disk, from the
external memory plugged into an USB port, or from the Internet. Make sure
that you have the supported software to play your video and audio on your
PC/laptop. If you choose the display device attached to the Dell wireless dock
D5000 as Duplicate from the native Windows options, the audio and video is
transmitted to the display device attached to the Dell wireless dock D5000
wirelessly.
Note: After the connection is established between your PC/laptop and the
dock, your PC/laptop volume is muted.
4.6 Exit or Shutdown the Wireless Docking Software
There are two ways to exit Wireless Docking software: software shutdown and
hardware shutdown.
Software Shutdown: You can right-click on the Wireless Docking software
icon in the taskbar notification area and select Close to exit the wireless
Docking software. In this case, only the Wireless Docking software is
shutdown, i.e. the 60 GHz channel is closed and other Wi-Fi channels like
2.4/5 GHz are available for you to make Wi-Fi connections.
Note: Use the desktop icon to start the Wireless Docking software. Make sure
the airplane mode is turned OFF.
Hardware Shutdown: You can switch off the wireless switch on your
PC/laptop. In this case, all the Wi-Fi channels are closed, i.e. 2.4/5/60 GHz
channels are closed. The Wireless Docking software stops running and all
your Wi-Fi connections are disconnected. The Wireless Docking software
taskbar notification icon changes to Orange.
19
Page 24

Note: Turn ON the hardware switch on your PC/laptop to make Wi-Fi
connections.
Note: If airplane mode is turned ON, this automatically triggers the software
and hardware shutdown.
20
Page 25

Symptoms
Suggested solutions
No video on the monitor
No video on the monitor
disconnect and
Video on the attached
monitor is distorted or
Video on the attached
5. Appendix A Troubleshooting
1.
attached to the HDMI port
on dock.
2.
attached to the DisplayPort
port on dock.
Make sure the laptop is connected to the Dell wireless
dock D5000 station. Try to disconnect and re-connect
to the docking station.
Make sure the HDMI cable supplied with the panel is
tightly secured to the video port in the Dell wireless
dock D5000ing station.
Try a different HDMI cable.
Make sure the DisplayLink Display Adapter driver is
installed properly and appears in the device manager.
Make sure the laptop is connected with Dell wireless
dock D5000ing station. Try to
reconnect with docking station.
Make sure the DisplayPort cable supplied with the
panel is tightly secured to the video port in the Dell
wireless dock D5000ing station.
Try a different DisplayPort cable.
3.
flickering.
4.
monitor is not displayed as
an extended monitor.
5. Audio jack is not functioning
or is lagging.
Make sure the DisplayLink Display Adapter driver is
installed properly and appears in the device manager.
Make sure the HDMI or DisplayPort cable supplied
with the panel is tightly secured to the video port in the
Dell wireless dock D5000ing station.
Try a different HDMI or DisplayPort cable.
When the monitor is distorted or flickering, please
re-set your monitor to restore it to its original settings.
Make sure the DisplayLink Display Adapter driver is
installed properly and appears in the device manager.
Re-Install the DisplayLink driver from c:/program
files/Wilocity/Dockingdrivers/DisplayLink
First, try a re-set on the Dell wireless dock D5000
station to make sure it is not a software issue. If that
fails to work, try to re-plug in the audio cable to the
docking station from the external speaker.
6. USB ports are not functional Make sure the laptop is connected to the Dell wireless
Make sure the laptop is stationed to avoid audio lag.
21
Page 26

Symptoms
Suggested solutions
on the
WiGig connection is not
on the docking station dock D5000 station. Try to disconnect and re-connect
again with Dell wireless dock D5000 station.
Check the USB ports. Try plugging the USB device
into another port.
Make sure the Fresco Logic Xhci (USB3) Root Hub is
enabled in the device manager.
Re-install the Fresco USB driver from c:\program
files\Wilocity\Dockingdrivers\Fresco and check the
function again.
7. HDCP content is not able to
be displayed
attached monitor.
8. LAN port is not functional. Make sure the Ethernet cable connections are secure
9. Wireless Hub Connection
Manager is not loaded.
The Dell wireless dock D5000 station does not support
HDCP content.
at the firewall and the hub or workstation.
To resolve a temporary LAN port failure problem,
unplug the dock for 20 to 30 seconds and then plug it
back in.
Make sure the Qualcomm Atheros AR815x PCI-E
Gigabit Ethernet controllers are installed in the device
manager.
Please re-install the Qualcomm Atheros AR815x
Ethernet driver from c:\program
files\Wilocity\Dockingdrivers\QualcommAtheros
Make sure the Wireless Docking software is installed
in the laptop.
10.
established.
Please re-start the Wireless Hub connection Manager
from c:\program files\Wilocity\ D5000WirelessDock
for 32bit windows.
Please re-start the Wireless Hub connection Manager
from c:\program files(x86)\Wilocity\
D5000WirelessDock for 64bit windows
Make sure the SSID of the Dell wireless dock D5000
can be detected in the list of items of the Wireless Hub
Connection Manager.
Make sure the LED color is white when the WiGig
connection is established.
22
Page 27

6. Bluetooth Networking Overview
This chapter provides an overview of the Bluetooth Windows Suite. This
software tool helps you to discover and link with Bluetooth devices using your
PC/laptop. The Bluetooth Windows Suite also facilitates the communication
between your PC/laptop with other Bluetooth devices.
The Bluetooth Windows Suite is a Bluetooth communication application that
aids in easy management and interaction with wireless personal area networks
(WPAN) and remote Bluetooth devices. Among others, these devices include
mobile phones, headsets, pointing devices, modems, and access points.
The Bluetooth Windows Suite can do the following:
Find and connect to remote Bluetooth devices, as well as see the services
they can provide.
Browse folders and files on remote devices, and exchange files with them.
Use wireless dial-up networking and serial-based functions.
The Bluetooth Windows Suite's main screen provides easy-to-use controls for
the application and its user-friendly graphical user interface (GUI) works with
various Bluetooth devices such as:
Palm-sized PCs/PDAs
Laptops
Cellular phones
Human-interface devices such as a mouse and keyboard
Desktop workstations
Headsets
Printers
Fax machines
6.1 Setup Requirements
PC running Windows
Bluetooth mouse
Bluetooth cellular phone
Bluetooth headset
Bluetooth printer
Fax machine
Any other Bluetooth device
23
Page 28

6.2 Turn the Bluetooth Adapter On and Off
There may be times, such as when you are flying on a commercial aircraft,
when you want to leave your computer on but are required to turn the
Bluetooth adapter off. If your Bluetooth adapter is plugged into a USB port on
your computer, you can turn off the adapter just by physically removing it.
Similarly, it you want to turn it back on, just plug it in. If your Bluetooth adapter
is embedded in your computer, however, you must turn the adapter switch On
or Off.
To turn the Bluetooth adapter Off, click the Bluetooth icon in the taskbar
notification area, and then click Turn Adapter Off. By default, the Bluetooth
adapter is On unless you turn it off.
If the Bluetooth adapter is not detected, it is likely that the adapter has been
turned off with a hardware switch. Check the manual that came with your
computer for information about the location of the hardware switch and for
instructions on how to use it.
6.3 Terminology
Audio Headset
A wearable hands-free audio device that has a speaker and a microphone.
Some audio headsets can be used both for telephone calls and for listening to
high-quality stereo audio. Other types of audio headsets can be used only for
telephone calls and for voice playback and recording.
BDA
Bluetooth Device Address (assigned by the manufacturer).
Bluetooth device
Bluetooth-enabled hardware such as a computer, printer, fax machine, mouse,
keyboard, mobile phone, headset, headphones, camera, or PDA.
Bluetooth Exchange Folder
The highest-level folder on a Bluetooth-enabled computer to which another
Bluetooth device has access.
24
Page 29

Devices that have been granted access to the Bluetooth Exchange Folder also
have access to all subfolders contained within that folder and all files in those
subfolders.
Note: The default folder for Bluetooth file exchanges is named Bluetooth
Exchange Folder and is located in My Documents. You can choose a different
folder for exchanging Bluetooth files; however do not select the root directory
(for example, C:) or a system folder. Selecting the root directory or a system
folder creates the potential for remote devices to harm the operating system on
your computer.
The Bluetooth Exchange Folder is used to store received files. The location
and name of the folder can be specified on the Share tab of Bluetooth Settings.
If you change the location or name of the folder, the path is automatically
updated.
Bluetooth security code
A secret key that is exchanged between your Bluetooth-enabled computer and
other Bluetooth-enabled devices each time they connect to verify identity and
encrypt the data that is exchanged.
Bluetooth wireless technology
Bluetooth wireless technology is a standards-based technology that allows
short-range (typically within a distance of 10 meters) wireless communication
between Bluetooth-enabled devices.
Bluetooth Window Suite
Refers to Windows 7 and Windows 8 desktop versions.
Dynamic Host Control Protocol
A protocol used by a server to assign an Internet Protocol (IP) address to a
connecting device.
Encryption
Encryption translates data into an unreadable format using a secret key or
password. Decrypting the data requires the same key or password that was
used to encrypt it.
25
Page 30

HCI
Host Controller Interface
Human Interface Device (HID)
An input device such as a mouse, keyboard, or game controller that sends
user input to a computer.
Internet Telephony
A technology that uses the Internet to place and receive telephone calls.
Link key
An internally generated unique security key that is exchanged by paired
devices as proof of identity before a connection is established. Link keys are
generated automatically when two devices pair.
Remote Device
Any Bluetooth device which acts as a sink device. This means if you are
connecting to a Bluetooth device using your PC/laptop, your PC/laptop
becomes the source and the Bluetooth device becomes the sink device.
26
Page 31

7. Getting Started
This section describes the information related to both Windows 7 and Windows
8 desktop versions. Reference to the Windows 8 Metro Style is made where
ever it is applicable.
This chapter describes how to install, uninstall, and launch the Bluetooth
Windows Suite.
Note: It is assumed that Bluetooth Windows Suite is not present on your
PC/laptop.
The following major topics are covered in this chapter:
Installing Bluetooth Windows Suite
Launching Bluetooth Windows Suite
Uninstalling the Bluetooth Windows Suite
7.1 Installing the Bluetooth Windows Suite
You can get the Bluetooth Windows Suite either through a password-protected
download from the support site or through a product CD. If the Bluetooth
Windows Suite already exists on the hardware platform, uninstallation is not
necessary before installing the new version as the application supports
upgrade features.
If it is necessary to uninstall Bluetooth Windows Suite, refer to “Uninstalling the
Bluetooth Windows Suite”.
7.1.1 Installing from the CD/DVD
1. Insert the CD/DVD containing the Bluetooth Windows Suite into the
CD/DVD drive.
2. Double click on the Bluetooth Suite’s executable file and follow the
instructions on the InstallShield wizard. The InstallShield wizard starts to
prepare the package for installation.
3. Click Finish to complete the installation process and reboot your computer.
Note: A Bluetooth icon is created and displayed in the taskbar notification
area. For Windows 8 Metro Style, you can create the Bluetooth Suite tile and
pin it to Start.
27
Page 32

7.2 Launching the Bluetooth Windows Suite
From the Start menu , click All Programs > Bluetooth Suite > Bluetooth
Devices which will open a window. From this window, you can add a
Bluetooth-enabled device or configure a paired device by double-clicking the
paired device icon.
You can also launch the Bluetooth Windows Suite by double-clicking the
Bluetooth icon in the taskbar notification area.
For Windows 8, click Control Panel > Hardware and Sound > Devices and
Printers.
Note: For Windows 8 Metro style, you can create a tile for the Bluetooth
Windows Suite. Once a tile is created, you can tap the tile to launch the
application.
Refer to the following chapters for more information on:
how to add Bluetooth devices “Adding Bluetooth Devices“
sending and receiving files “Bluetooth Settings“
7.3 Uninstalling the Bluetooth Windows Suite
Use the following procedure to uninstall the Bluetooth Windows Suite.
For Windows 7, select Start menu > All Programs > Bluetooth Suite >
Uninstall Bluetooth Suite. The Preparing to Remove screen appears,
followed by a confirmation prompt. To confirm Windows Bluetooth Suite
uninstallation, click Yes. The application is automatically uninstalled.
For Windows 8, select Control Panel > Programs > Uninstall or change a
program. Then, select Bluetooth Suite and Uninstall.
28
Page 33

8. Adding Bluetooth Devices
This chapter describes how to add commonly used Bluetooth devices to a
PC/laptop using the Bluetooth Windows Suite. Before adding any new
Bluetooth device, a communication link known as pairing must be first
configured. After a successful pairing, the Bluetooth device is added and is
ready for exchanging messages or information between your PC/laptop and
the connected Bluetooth device. For pairing information of a particular device,
refer to the documentation that came with the device or refer to the
manufacturer’s web site.
Note: Paring is required when you are connecting to a Bluetooth device for the
first time. For subsequent connections, no paring is required.
In order to add a Bluetooth device, first you need to discover the device and
then pair with the device. Once pairing is done successfully, the Bluetooth
device is added automatically.
The following steps describe discovering and pairing with a Bluetooth device
which is in range.
8.1 Discovering and Pairing with a Bluetooth Device
Make sure that your wireless adaptor is turned ON in your PC/laptop.
1. Double click on the Bluetooth icon in the taskbar notification area. A
window appears, which displays already added Bluetooth devices. If there
are no devices displayed, it means there are no previously added devices.
For Windows 8 Metro style, use the Charm Bar and click Settings >
Change PC settings > Devices.
2. Select Add a device. This starts the process of discovering the Bluetooth
devices which are within the range. All the Bluetooth devices are displayed.
You can pair with any discovered Bluetooth device.
Note: If a Bluetooth device is already added, it is not shown in the list. You
need to remove the device in order for the device to appear in the list. See
Removing a Bluetooth Device to remove a Bluetooth device.
29
Page 34

8.2 Adding a Bluetooth Device
Follow these steps to add a Bluetooth Device.
1. Follow the step 1 and step 2 from above.
2. Select the desired Bluetooth device you want to add for the list. The pairing
process is automatically started.
A 6 to 8 digit pairing code is generated automatically for the remote device.
Ensure that this code matches on your PC/laptop and the Bluetooth device
you are trying to add. The Bluetooth device and your PC/laptop must agree
to this paring. Once both devices agree, the Bluetooth connection is then
established.
3. Select Yes on your PC/laptop and the Bluetooth device you are trying to
add.
Note: For Windows 7 PC/laptop, you may need to select Next to complete
the connection.
4. The Bluetooth device is added and displayed in the Devices list.
Note: For Windows 8 Metro Style, a tile is automatically created for the
Bluetooth device you just added on the Start. You can double click on the tile
to perform Bluetooth operations.
8.3 Removing a Bluetooth Device
You can remove an added Bluetooth Device using the Bluetooth Windows
Suite. Once the device is removed, you need to pair with, and add, the device
to perform Bluetooth Operations.
To remove an added Bluetooth Device follow these steps:
1. Click on the Bluetooth icon in the taskbar notification area and select
Show Bluetooth Devices. A window appears which displays all the added
Bluetooth devices.
2. Right-click on the desired Bluetooth device you want to remove. The
available options are displayed.
3. Select Remove Device from the options. A confirmation dialog box
appears.
4. Select Yes to remove the Bluetooth device.
30
Page 35

For Windows 8 Metro style, follow these steps to remove a Bluetooth device:
1. Use the Charm Bar and click Settings > Change PC settings >
Devices.
2. Select the desired Bluetooth device from the list and click . The
Bluetooth device is removed.
31
Page 36

9. Bluetooth Settings
The Bluetooth Windows Suite allows you to configure the general and
Bluetooth options to control the connected Bluetooth device. You can modify
the general settings, add or delete communication ports, modify the hardware
settings of the Bluetooth adaptor, set permissions for sharing files, and modify
the PIM interface. The following section explains in detail how to modify the
Bluetooth Settings.
9.1 General Settings
To change the general settings, follow the below steps:
1. Click the Bluetooth icon in the taskbar notification area, and then click
Open Settings. The Bluetooth Settings dialog box appears.
2. Select the Options tab in the dialog.
3. Using this tab, you can do any of the following actions:
• Allow or prevent Bluetooth devices to find this computer.
• Allow or prevent Bluetooth devices from connecting to this computer.
• If you later clear this check box, devices that have previously connected
to this computer can still do so.
• Select whether you receive an alert when a new Bluetooth device wants
to connect.
• Display or hide the Bluetooth icon in the notification area.
• Turn the Bluetooth Adapter off.
You can also turn off the Adapter by clicking the Bluetooth icon in the
taskbar notification area, and then click Turn Adapter Off.
4. When finished configuring Bluetooth options, click OK.
9.2 Add or Delete a Communications Port
On the COM Port tab, you can add or delete a serial port.
To view, add, or delete a communications port:
1. Click the Bluetooth icon in the taskbar notification area, and then select
Open Settings. The Bluetooth Settings dialog box appears.
2. Select the COM Ports tab in the dialog.
To add a communications port:
1. Click Add.
2. In Add COM Port, select Incoming or Outgoing.
32
Page 37

An incoming communications port is used by other Bluetooth-enabled
devices to create a communications link to your PC/laptop. An outgoing
communications port is used by your PC/laptop to create a
communications link with another Bluetooth-enabled device.
3. If you select Outgoing, click Browse, select the Bluetooth device you want
to create a link to, and click OK.
To delete a communications port:
In the list, click to select the communications port you want to delete, and then
click Delete.
9.3 Manage My Local Bluetooth Adapters
You can view the name, type, and status of each Bluetooth adapter that is
installed on your PC/laptop. You can also view the properties of each adapter.
To manage local Bluetooth adapters:
1. Click the Bluetooth icon in the taskbar notification area, and then select
Open Settings. The Bluetooth Settings dialog box appears.
2. Select the Hardware tab in the dialog.
3. To view properties of a specific adapter, select it and click Properties.
The tabs in the Properties window display the following information:
General tab—Displays basic properties of the adapter.
Advanced tab—Displays properties for the radio, including the Bluetooth
Host Controller Interface (HCI) version and the Bluetooth Link Manager
Protocol (LMP) version.
Driver tab—Displays information about the driver and, if these features are
available, enables updating, disabling, and uninstalling the driver.
Details tab—Displays device properties and values.
9.4 Set Rules for Sharing Files and Equipment
You can configure your PC/laptop to enable other Bluetooth devices to use
some of the peripheral devices that are physically connected to your PC/laptop.
Examples of such peripheral devices include a printer and modem.
Also, you can configure your PC/laptop to allow other Bluetooth devices to
access the files and folders in the Bluetooth Exchange Folder on your
PC/laptop and to send pictures, music, and other files to the folder.
33
Page 38

1. Click the Bluetooth icon in the taskbar notification area, and then select
Open Settings. The Bluetooth Settings dialog box appears.
2. Select the Share tab in the dialog.
3. Configure any of the following:
• Allow other Bluetooth devices to access the files and folders in
Bluetooth Exchange Folder and send files to Bluetooth Exchange
Folder.
Note: When another Bluetooth device attempts to send you a file, a
Bluetooth File Transfer Access Authorization message is displayed. If the
item is being sent from a trusted device, click OK to authorize access. If the
item is not being sent from a trusted device, or you are not sure, ignore the
request or click Cancel to deny access. You can specify whether to allow
access only for the current time, for a specific amount time, or to always
allow access for that particular device.
Note: Received files are saved in the Bluetooth Exchange Folder, which, by
default, is located in your Documents folder on your PC/laptop.
Note: To specify if or how you want to be notified when a remote device
attempts to connect to your PC/laptop, click the notification link in the You
will receive a notification when a remote Bluetooth device attempts to
connect to this computer statement.
• Open Bluetooth Exchange Folder
• To designate a different location for the Bluetooth Exchange Folder:
Click Browse, and then select the folder where the File Transfer service
will save files. Be sure to name the folder Bluetooth Exchange Folder.
Caution: The default folder for Bluetooth file exchanges is named
Bluetooth Exchange Folder and is located in My Documents. You can
choose a different folder for exchanging Bluetooth files; however do
not select the root directory (for example, C:) or a system folder.
Selecting the root directory or a system folder creates the potential for
remote devices to harm the operating system on your computer.
• Allow remote Bluetooth devices to use the printer connected to your
PC/laptop.
• Allow other Bluetooth devices to use the modem on your PC/laptop to
connect to the Internet or to send a fax.
4. When finished configuring sharing properties, click OK.
34
Page 39

9.5 Set Rules for Sending and Receiving PIM Items
You can specify whether you want to allow other Bluetooth-enabled devices to
send you PIM items such as business cards, calendar items, messages, and
notes. You can also specify where to store received items, whether to include
attachments with mail that you send and receive, and which business card to
send.
You can configure default rules for all Bluetooth devices paired with your
PC/laptop. You can also configure for each Bluetooth device that overrides the
default settings.
To configure default rules for all Bluetooth devices:
1. Click the Bluetooth icon in the taskbar notification area, and then select
Open Settings. The Bluetooth Settings dialog box appears.
2. Select the PIM Interface tab in the dialog.
3. Select Allow Bluetooth devices to send you PIM items such as
business cards, calendar items, mail, and notes check box. If you do
not want to allow this, clear the check box.
4. Select the application where you want to send and receive items of each
PIM type.
For example, if you have more than one e-mail application on your
PC/laptop, select the one you want to synchronize. If you do not want to
receive particular types of PIM items, click Do Not Accept for those types
of items.
5. If desired, select the Include attachments with mail sent or received by
this computer check box. If you do not want to include attachments, clear
the check box.
To configure rules for a particular device:
1. Double click the Bluetooth icon in the taskbar notification area. Double
click the icon for the device, or right-click the icon and select Control.
2. Under Tasks in the left pane, click Synchronization settings.
3. Select the checkboxes next to the PIM items that you want your PC/laptop
to accept from your Bluetooth-enabled device.
When you synchronize devices, these items are selected by default. You
may be able to select additional items before synchronizing.
35
Page 40

4. Select the application where you want to send and receive items of each
PIM type.
For example, if you have more than one e-mail application on your
PC/laptop, select the one you want to synchronize. If you do not want to
receive particular types of PIM items, click Do Not Accept for those types
of items.
5. Click Apply.
9.6 Display the Device Properties
To display hardware data and other information about a Bluetooth device:
Double-click the Bluetooth icon in the taskbar notification area.
In Bluetooth Devices, right-click the device and select Properties.
36
Page 41

10. Managing Bluetooth Devices
This chapter describes how to configure and manage Bluetooth devices using
the Bluetooth Windows Suite. The Bluetooth Windows Suite adds and
configures Bluetooth devices in order to perform various functions between
Bluetooth-enabled devices. These devices can be phones, modems, audio
devices, printers, imaging systems, Fax machines, and computers
(workstations, servers, PDAs, etc.).
To begin configuration of the Bluetooth devices, from the Start menu, click All
Programs > Bluetooth Suite > Bluetooth Devices which will display a
window. For Windows 8, click Control Panel > Hardware and Sound >
Devices and Printers.
Note: You can also double click the Bluetooth icon in the taskbar notification
area to open Bluetooth devices window.
This window displays the devices that have previously been paired and added
to your PC/laptop through the Bluetooth protocol. To manage any added
Bluetooth device, double-click the Bluetooth device icon from the displayed list.
The Bluetooth Operations window appears.
Note: If no Bluetooth devices appear in the list, add a Bluetooth device. For
information on how to add a Bluetooth device see Adding Bluetooth Devices.
The available features for that particular Bluetooth device are displayed in the
Bluetooth Operations window.
Note: For HID devices like Bluetooth keyboard or mouse, no Bluetooth
Operations window is displayed.
10.1 Bluetooth Operations
The Bluetooth Operations window can be considered as a central command
point. You can manage the connected Bluetooth device from here.
The left-hand blue pane allows you to perform the following actions:
37
Page 42

Add a Bluetooth device: Select this link to add a new Bluetooth device. The
Add a device dialog appears and allows you to pair and add a Bluetooth
device.
Show Bluetooth devices: Select this link to see paired Bluetooth Devices.
Open Bluetooth settings: Select this link to configure Bluetooth settings of
your PC/laptop. For more information on how to configure Bluetooth settings,
see Bluetooth Settings.
Open Bluetooth folder: Select this link to open the Bluetooth Folder on your
PC/laptop. All the files transferred from the connected Bluetooth device are
stored here.
Show File Transfer Dialog: The File Task Manager window appears. You can
add multiple files to this window that need to be transferred to a Bluetooth
device. For more information on file transfer, see File Task Manager window.
The right-hand pan displays the two devices that are connected by Bluetooth.
10.1.1 View Remote Device Information
This section displays details regarding the remote device, including its name
on the Bluetooth network, the type of device, the signal strength between
devices, and the properties of the remote device.
Properties Window of Remote Device
This dialog lists the general properties and the services of the connected
Bluetooth device.
General Tab: Displays the type of device, MAC address of the device, last
connected time, and connection type.
Services Tab: Displays the Bluetooth Services that the local computer can
use on the remote device. All of the available options are enabled by default.
To disable any of these services, simply uncheck its corresponding box and
click Apply.
Caution: Unchecking of any of these boxes may make certain functions
non-available. You should have a good knowledge of the remote device and its
services before performing these actions.
10.1.2 Audio Services
The next section of the Bluetooth Operations window is used to configure the
audio settings between your PC/laptop and the Bluetooth device. There are
three types of connections available for you.
38
Page 43

To use remote device’s speaker to listen to Audio from this PC status:
Click the Connect button to transmit audio from your PC/laptop to the
Bluetooth device.
To use this PC’s speakers to listen to Stereo Audio playing on remote
device: Click the Connect button to hear stereo audio on your PC/laptop,
originating from the Bluetooth device.
To use this PC as a hands-free device: Click Connect allows your PC/laptop
to receive an audio stream from the Bluetooth device. This connection is used
more for telephone connections than playing music files.
10.1.3 File Operations
The file operations section is used to transmit files between your PC/laptop to
the connected Bluetooth device. You can also use the connected Bluetooth
device as print server.
Browse and Transfer files with remote device: Click the Browse button to
open a shared Bluetooth folder that has been previously created on the
connected Bluetooth device. Files may be pasted to this folder, deleted, copied,
or cut from it. Any actions performed on this folder will be done in the shared
Bluetooth folder on the remote device.
Send files into remote device: Click the Send button to open a Windows
browser. This browser allows you to select files that need to be sent to the
remote device. Simply browse the local computer for the file to transfer and
then click the Open button, which will automatically send that file to the shared
Bluetooth folder of the remote device.
10.1.4 Advanced Phone Operations
The advanced phone operation allows you to connect to a remote phone and
use the phone features using Bluetooth protocol. You can sync the phone
contacts, make calls, answer calls, and send short messages using your
PC/laptop once the connection between your PC/laptop and the
Bluetooth-enabled phone is established. You can also view the history of
dialed numbers, received calls, and missed calls. To access these features
click Open under Advanced Phone Operations. A new dialog box is
displayed. You can also see the network operator name, signal strength, and
battery level of the connected remote phone.
39
Page 44

You can also use the remote phone modem and connect to the Internet using
DUN services.
The Advanced Phone Operations is displayed if the remote phone supports at
least one of the four profiles Hands Free (HF), Serial Port Profile (SPP),
Phonebook Access Profile (PBAP), and Sim Access Profile (SAP).
Contacts: Allows you to synchronize contacts from the phone and search the
contacts. The available options are sync, sync and save to local, sync contacts
to phone. You can also send the contacts to other remote devices connected
to your PC/laptop. You can call or send a message to the selected contact.
To synchronize the contacts from the phone to your PC/laptop click Get Phone
Book and the following three options are displayed. You can select any one
option:
• Sync: Allows you to synchronize the remote phone book contacts to the
local computer. If you close the dialog box and open again, the contacts
are not displayed.
• Sync and save to local: Allows you to synchronize the remote phone
book contacts to the local computer and store them in the local cache. If
you close the dialog box and open it, all the contacts are displayed from
the local cache.
• Sync contacts to phone: Allows you to synchronize the remote phone
book contacts from your PC/laptop to the remote device.
To delete the contacts from the local cache, click Delete cached phone book.
Once the contacts are synchronized, you can right click on a selected contact
and perform the following actions: You can call, send a message, or send the
contact to other devices that are connected to your PC/laptop.
Dial: Allows you to dial the desired phone numbers from your PC/laptop. To
dial the numbers click Dial: a dialing pad appears. Click the desired numbers
and click Call. A call is made to the dialed numbers and you can listen and
speak using your PC/laptop speakers and microphone.
Short Messages: Allows you to send short messages to the desired numbers.
To send a short message click Short Messages. Type the message in the
provided space and enter the desired phone number or retrieve the phone
40
Page 45

number from the book. Click Send, the message is sent to the desired phone
number. You can see the date, time, phone number, and the contents of the
sent message.
Note: To send message to multiple users, enter the phone numbers separated
by semicolon “;”.
Disconnect: Allows you to break the SPP connection to the remote phone,
this button is only available after the SPP connection is established.
You can send a short message of 70 characters in one SMS. However, if the
message is more than 70 characters it is automatically broken into short
messages of 70 characters and sent.
History Allows you to view the answered, called and missed phone calls.
10.1.5 DUN Services
You can connect to Dial-up Network (DUN) using the remote phone as a
modem. To use this feature click Connect under DUN Service on Phone. A
message appears on the remote phone to connect to your PC/laptop for
dial-up connection, accept the request.
10.1.6 Video Services
The video services allow you to stream the video. You need a web camera
attached to your PC/laptop to activate this feature. To access the video feature
click Connect under the option To use remote PC to display the video from
this PC camera. A dialog Bluetooth Video Source appears. Select the web
camera under the dropdown list and click Start Capture. You can see that the
web camera activates and starts streaming the video. Click Send to Remote
to send the streaming video to a remote computer.
10.1.7 Sync Operations
Sync operations allow you to exchange and update important files, like
calendars or address books, from your PC/laptop to a remote device, such as
a smartphone or PDA. To configure the settings for the Sync function, see
Bluetooth Settings.
Synchronize information with remote device: Click the Sync button to sync
pre-selected folders and files with the remote device. These files and folders
41
Page 46

can be configured in the Bluetooth Settings-Sync folder.
Backup PIM from remote device: Click the Backup button to import PIMs
from a remote device.
Restore PIM to remote device: Click the restore button to export PIMs to a
remote device.
10.1.8 Authorization Options
This section allows you to modify the authorization settings for the remote
device when connecting to your PC/laptop. The following are the available two
options:
Require confirmation for all operations from this remote device — Select
this option to configure your PC/laptop to prompt for authorization when a
remote device requests permission to perform actions on your PC/laptop, such
as sending and receiving files.
Always allow this remote device to connect for all operations — Select
this option to allow the remote device to perform operations on the shared
Bluetooth folder of your PC/laptop.
10.1.9 File Task Manager Window
This window shows the file transfers that are currently being transferred, along
with their pertinent information such as name and file size, as well as those
that are in the queue to be transferred. You can add files to the queue by
selecting the Add button, which opens a new list window. Within this new list
window, click the Add button, which opens a Windows browser where you can
find files to be transferred.
You can pause the file transfer and resume again from the same position
where the file transfer is paused. To use this feature, click Pause while the file
is in transfer. The file transfer is paused. To continue transfer, select the file
under Pending list and click Continue. The file transfer resumes from the
same position where it is paused. For example, if a file is paused after 20% of
file transfer, it will resume from the 20% again when continued.
42
Page 47

10.1.10 Right-Click Options
The following options are available when you right click on the Bluetooth
Windows Suite taskbar icon .
Add a device: Select this option to add a Bluetooth device to your PC/laptop.
For more information on how to add a Bluetooth device, see Adding Bluetooth
Devices.
Allow a device to connect: Select this option to allow other Bluetooth devices
to connect to your PC/laptop.
Show Bluetooth Devices: Select this option to see all the added Bluetooth
devices to your PC/laptop. The Bluetooth Devices window is opened.
Join a Personal Area Network: Select this option to join a PAN with other
Bluetooth devices.
Open Settings: Select this option to modify Bluetooth settings of your
PC/laptop. For more information on Bluetooth settings, see Bluetooth Settings.
Turn Adapter Off: Select this option to disable the Bluetooth adaptor of your
PC/laptop. Once turned off, the option to turn on again will appear in this place.
Remove Icon: Select this option to remove the Bluetooth Icon from the
taskbar notification area.
43
Page 48

11. Wireless Network Overview
A Wireless Local Area Network (WLAN) connects computers without network
cables. Instead, computers use radio communications to send data between
each other. In a WLAN, a radio communications device called an access point
or wireless router connects network computers and provides Internet or
network access. You can communicate directly with other wireless computers,
or connect to an existing network through a wireless access point. When you
set up your wireless adapter, you select the operating mode for the kind of
wireless network you want. You can use the Dell Wireless Network Connection
adapter to connect to other similar wireless devices that comply with the
802.11 standard for wireless networking.
11.1 To Setup a Wireless Network
The most common type of wireless network is an infrastructure network. To
setup an infrastructure network, you need the following:
• Broadband internet service such as cable or DSL (includes a broadband
modem)
• A wireless router
• A wireless network adapter for each computer that you want to connect
to the wireless network.
11.2 Wireless Networking Basics
11.2.1 To Connect to a Wireless Network
There are three basic components that must be configured for an 802.11
wireless network to operate properly:
• Network Name: Each wireless network uses a unique network name to
identify the network. This name is called the Service Set Identifier
(SSID). When you set up your wireless adapter, you specify the SSID. If
you want to connect to an existing network, you must use the name for
that network. If you are setting up your own network you can make up
your own name and use it on each computer. The name can be up to 32
characters long and can contain letters and numbers.
• Profiles: When you set up your computer to access a wireless network,
you will create a profile matching the wireless settings for that network.
After you create profiles, your computer will automatically connect when
you are in the vicinity of that wireless network.
44
Page 49

• Security: 802.11 wireless networks can use encryption to help protect
your data. To use encryption you will need a key or password. For more
information about security and security types, refer to Windows Help
and Support.
11.2.2 Identify a Wireless Network
Depending on the size and components of a wireless network, there are many
ways to identify a wireless network:
• Network Name or Service Set Identifier (SSID): Identifies a wireless
network. All wireless devices on the network must use the same SSID.
• Broadcast SSID: An access point that broadcasts its network name. If
this feature is enabled on an access point, any wireless user can
connect to it using a blank (null) SSID.
• Basic Service Set (BSS): Consists of at least two or more wireless
nodes or stations and includes at least one access point or wireless
router, which have recognized each other and have established
communications.
• Independent Basic Service Set (IBSS): A mode of operation in an
802.11 system that allows direct communication between 802.11
devices without the need to set up a communication session with an
access point.
11.2.3 Select a Wireless Network Mode
Wireless networks can operate with or without access points, depending on
the number of users in the network. Infrastructure mode uses access points to
allow wireless computers to send and receive information. Wireless computers
transmit to the access point, the access point receives the information and
rebroadcasts it to other computers. The access point can also connect to a
wired network or to the Internet. Multiple access points can work together to
provide coverage over a wide area.
Device-to-Device mode, also called ad hoc mode, works without access points
and allows wireless computers to send information directly to other wireless
computers. You can use Device-to-Device mode to network computers in a
home or small office or to set up a temporary wireless network for a meeting.
45
Page 50

11.3 To Turn Radio ON and OFF
You may want to turn your wireless adapter's radio on and off to:
• Conserve your computer’s battery when not connected.
• Meet the requirement to turn off radios on airplanes to prevent
interference.
Two methods to turn the radio on and off are:
• The hardware switch
• The Wireless Network button in Windows Mobility Center
A common cause for users not being able to connect to a wireless network is
due to the radio being turned off. If you are unable to connect to a wireless
network, verify that your radio is turned on by both the hardware switch and the
software Enable/Disable button. Verify that you have checked both methods.
46
Page 51

12. Operational Information
NOTE: EIRP = Effective Isotropic Radiated Power (including antenna gain)
NOTE: Your Dell Wireless 1601 WLAN and Bluetooth device transmits less
than 100 mW of power, but more than 10 mW.
12.1 Wireless Interoperability
Dell Wireless 1601 WLAN and Bluetooth products are designed to be
interoperable with any wireless LAN and Bluetooth product that is based on
Direct Sequence Spread Spectrum (DSSS) radio technology and Orthogonal
Frequency Division Multiplexing (OFDM) and to comply with the following
standards:
IEEE 802.11a Standard on 5 GHz Wireless LAN
IEEE 802.11b-1999 Standard on 2.4 GHz Wireless LAN
IEEE 802.11g Standard on 2.4 GHz Wireless LAN
IEEE 802.11n Standard on 2.4 GHz and 5 GHz Wireless LAN
IEEE 802.11ad D6.0 Standard
47
Page 52

48
 Loading...