

Page 1
M . I I \/ IV yi "
Q0"[t|Pn Up Your IVIOnitOr Paramétrer votre moniteur I Instalación del monitor I Configurar o monitor
4
. I I
Inbetriebnahme des Monitors | Configurazione del monitor | Instalacja monitore
=E-^—(D-\i''j Vyv'i
I a.u|E| I mîSwm'Siimn
Dell™ 2007FP Flat Panel Monitor
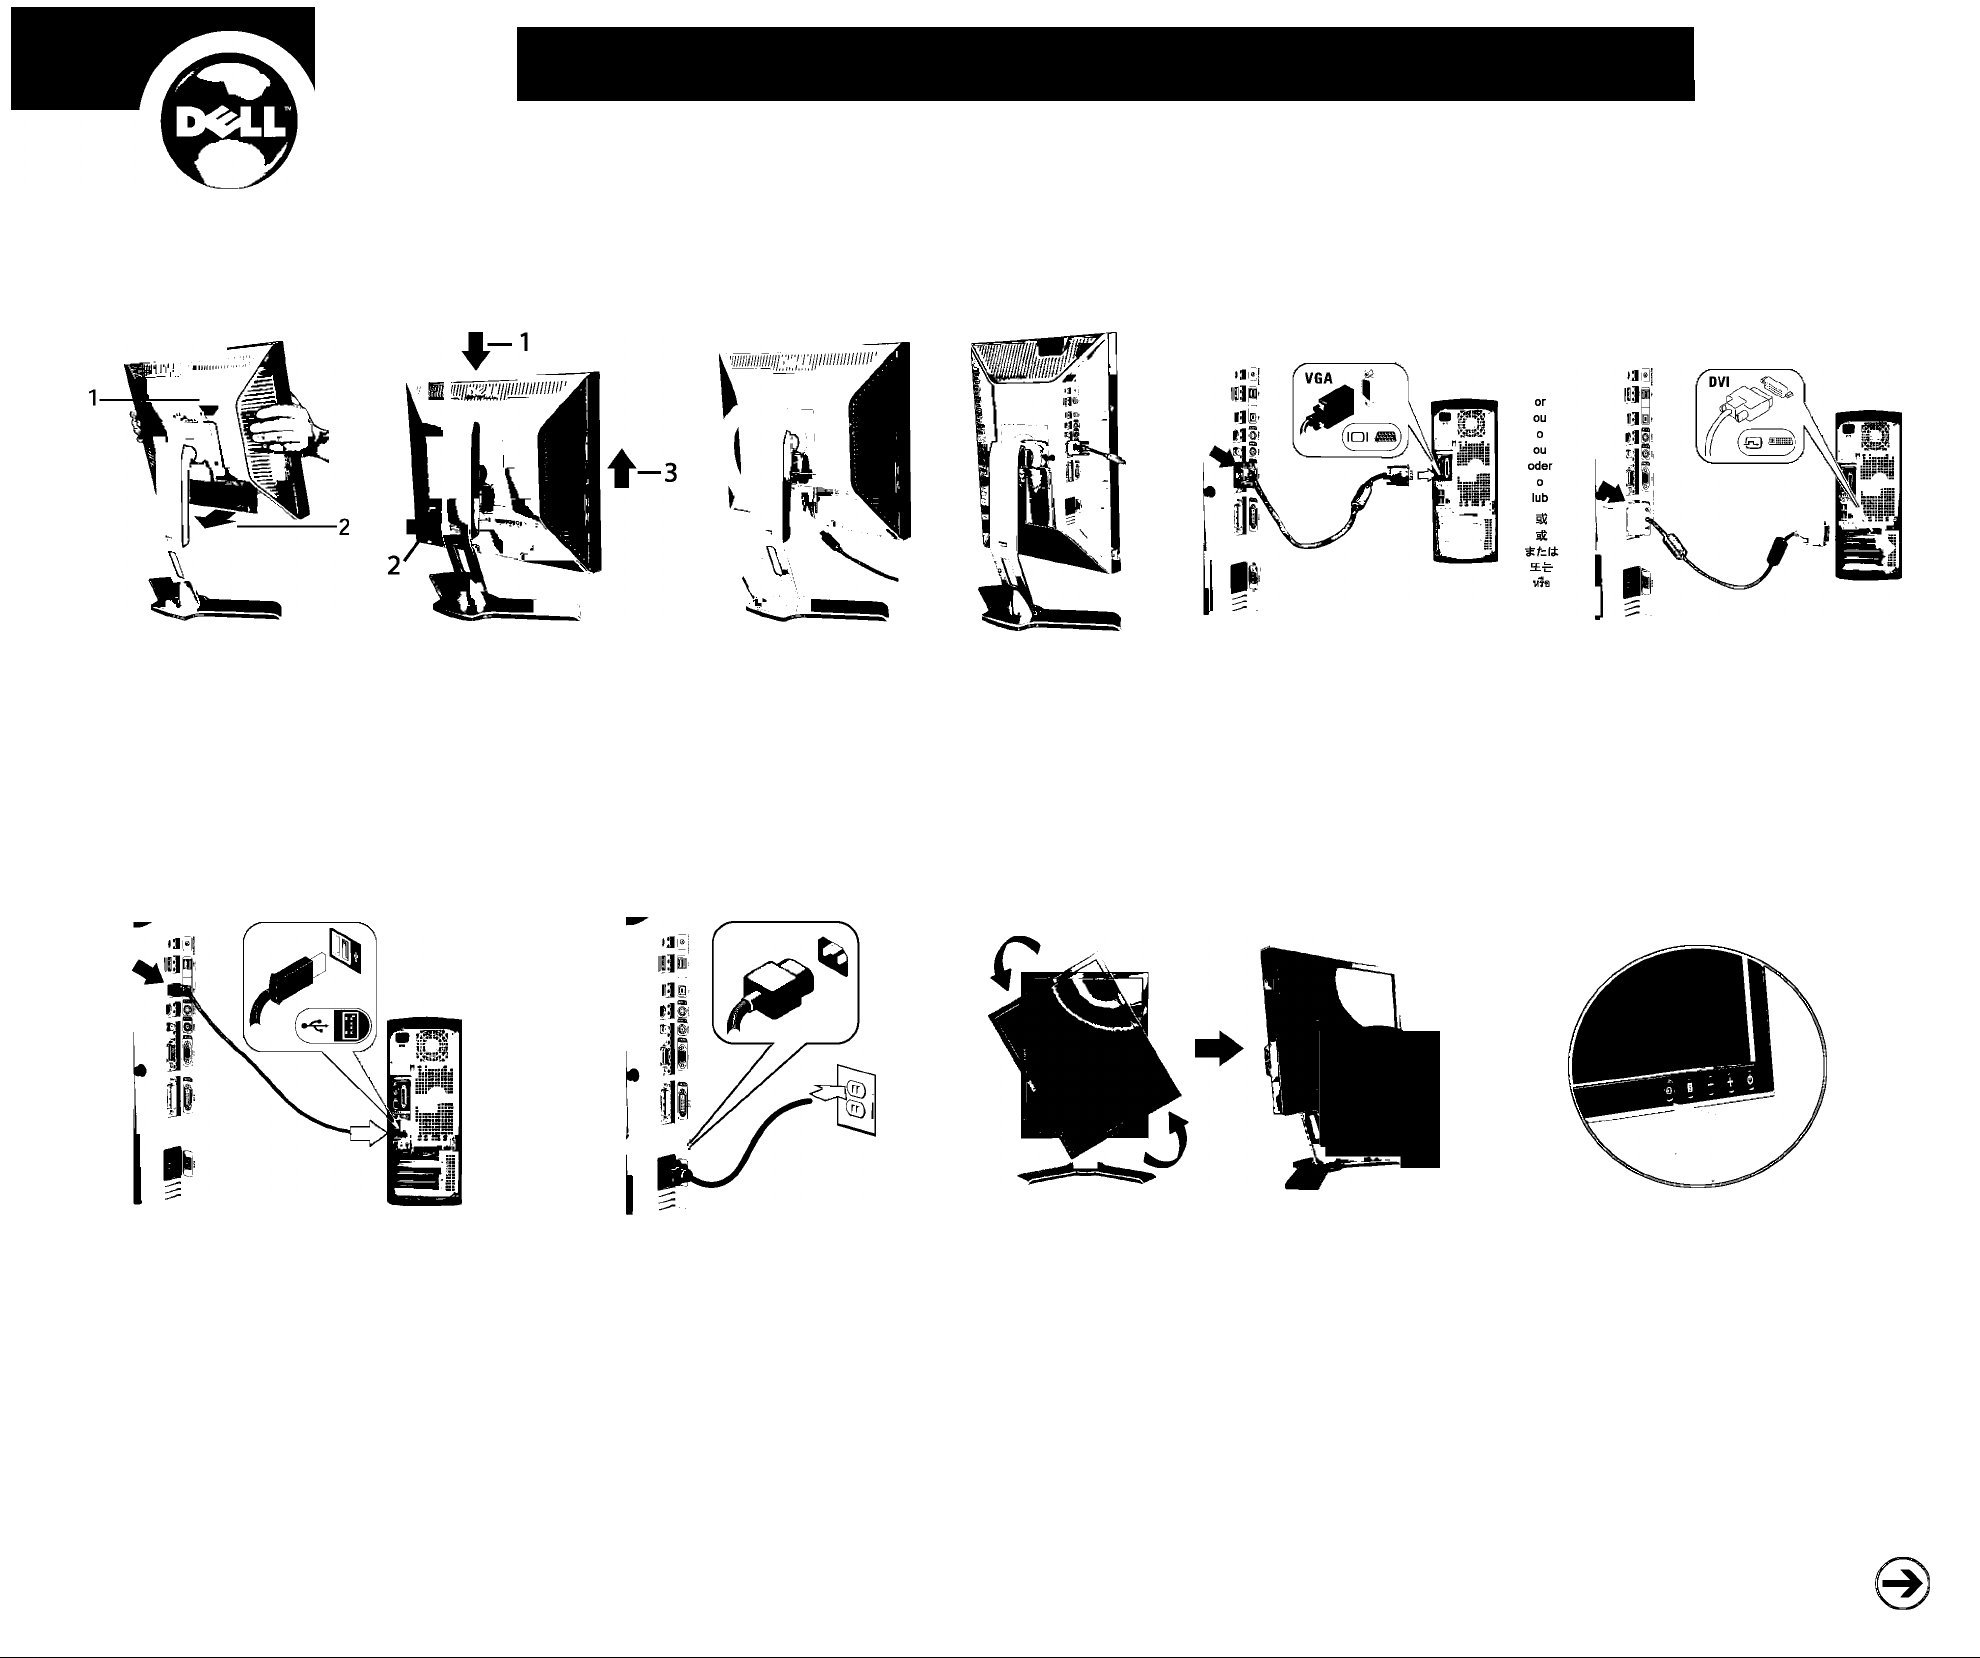
Attach the monitor to the stand.
Fixez le moniteur sur le sode.
Acople el monitor a la base.
1
Coloque o monitor no suporte.
Den Monitor auf den FuB befestigen.
Fissare il monitor alla base.
Podl^cz monitor do podstawy.
ll€P,3^SSiSSäffi± »
aua» ^@!Hoii ¥atma.
aeujafiieaTmAum^'a
K(c9iy#it*-r.
CAUTION:
Before setting up your Dell monitor,
see the safety instructions in
"Product Information Guide."
0STRZE2ENIE:
Ptzed skonfigurowaniem monitora Dell
zapoznaj si^ z instnikcjami dotycztjcymi
bezpieczeiistwa zamieszczonyml w
Informacji o produkcie.
Note: If the monitor gets locked down at the
lowest position, push the monitor straight
down with one hand until It goes no further.
To adjust the height of the stand, press the
stand lock/release button on the back of the
stand.
ATTENTION :
Avant de configurer votre moniteur
Dell, consultez les instructions de
sécurité du Guide d'information produit, en la Guía de información del producto. Guia de Informaçôes do Produto.
rsFnSsififfij °
Rotate the monitor to connect the cables.
Faites pivoter le moniteur pour connecter les câbles.
Gire el monitor para conectar los cables.
2
Gire o monitor para conectar os cabos.
Drehen Sie den Monitor, um die Kabel anzuschließen.
Ruotare il monitor per collegare i cavi.
Odwróé monitor w celu przytqczenla kabll.
3II0IMS saw 4» eua» waidAie. vii^uuaflieiaTi'^aciaEnmmfiei
PRECAUCION:
Antes de configurar el monitor Dell,
consulte las medidas de seguridad
d'iC»:
iáSDellfflTx^;¿Ü.l1#l^
ATENÇAO:
Antes de instalar o monitor Dell,
leia as instruçSes de segurança no
:
Dell
Î3SÎ*<Æ'SI.'.
Connect the blue VGA cable or the optional white DVI cable to the computer.
Connectez le câble VGA bleu ou le câble DVI blanc optionnel à l'ordinateur.
Conecte el cable VGA azul o el cable DVI blanco opcional al ordenador.
3
Conecte, no computador, o cabo VGA azul ou o DVI branco, opcional.
Schließen Sie das blaue VGA-Kabel oder das optionale weiße DVI-Kabel an den Computer an.
Collegare il cavo VGA blu o il cavo DVI optionale bianco al computer.
Przyt^cz do komputera niebieski kabel VGA lub opcjonalny bialy kabel DVI.
iiü€ÊÊ VGA dvi w^íssísíij^ís «
ifêæfe VGA DVI
VGA >T--f)\rtP. DVI •ir-7'JU^3VfzL-ÿ(CjgilSDT</£èl.'.
niiiiü! vGA3iioi«om aisg^ dvijiioi»* asaoii sastdAie.
eiasnmniDa VGA SlÍniSuvifaéhiSamiAuitnmni.Da DVI StntiiinAijnaijfl'nnas
ACHTUNG:
Bevor Sie Ihren Dell-Monitor aufstellen,
lesen Sie die Sicherheitsanweisungen
in der Produktinformationsanleitung.
^S|:
Deiieuaa äasf3i aoii sim
^SAioiiAi ofs! »as sfeisiäAie.
ATTENZIONE:
Prima di configurare il monitor Dell,
leggere le istruzioni di sicurezza
contenute nella Guida al prodotto.
riniaav: ,
nativfmitajmijaflieiaT Dell uajtjni
TiliRiii^usiaui.'^aFn'DJiJaaeiA'ut'ugfla
uatjaNaeiA'eu'ii
Connect the USB cable to the computer.
Connectez le câble USB â l'ordinateur.
Conecte el cable USB al ordenador.
4
Conecte o cabo USB ao computador.
Verbinden Sie das USB-Kabel mit dem Computer.
Collegare il cavo USB al computer.
Przyfaicz kable USB do Komputera.
ü€ USB lisfêsumflii °
m USB
USB írlcgaus-r.
USB9II0IMS asaoli samàiAis.
eiaanu USB lU'iAijaaij'fl’tiaaí
Connect the power cord firmly to the monitor and the
electrical outlet.
Connectez le cordon d'alimentation solidement au moniteur
5
et à la prise électrique.
Conecte el cable de alimentación al monitor y a la toma de
corriente.
Conecte corretamente o cabo elétrico no monitor e na tomada.
Schließen Sie das Netzkabel sicher an den Monitor und die
Netzsteckdose an.
Collegare saldamente il cavo di alimentazione al monitor e alla
presa elettrica.
Przytqcz pewnie kabel zasilaj^cy do monitora i do elektrycznego
gniazdka sieciowego.
)i€«ìiSiiisajgsiJS.3^N^Pi«s}iffi ”
as an* euEia a^i eMmoii sasidAie.
«aanavmnañvifViJtiaflinaTucinhfnTvnnutm^Hatjrt'nRa
T'iiii'ij'uvi'un
www.dell.com | support.dell.com
¿ □ V-fe V
y
Rotate the monitor back and turn on the monitor.
Fades pivoter l'affichage vers l'arrière et mettez le moniteur
sous tension.
6
Gire la pantalla hacia atrás y encienda el monitor.
Gire a tela para tras e ligue o monitor.
Drehen Sie die Anzeige zurück und schalten Sie den Monitor ein.
Ruotare all'indietro il display e accendere il monitor.
Obróc wyswietlacz do pierwotnej pozycjl wl^cz monitor.
¡lfgт^SÎÈISIâl)13|îfÈHÎf}TÎTSä^S.
Clí!^MSIIOI» CfAl SSXIS #£IH eUEl» SäAie.
viij'u^au.EieKiNaTiJa'niviá'q uasiDn^aaivi
If nothing appears on the screen, press the Input Source Select
button.
Si rien n'apparaît à l'écran, appuyez sur le bouton Sélection de
7
la source d'entrée.
Si no aparece nada, pulse el botón Selección de fuente de
entrada.
Se nada aparecer na tela, pressione o botáo Seleçâo de origem
de entrada.
Falls auf dem Bildschirm nichts zu sehen ist drücken Sie auf die
Taste Engangsquellenauswahl.
Se sulla schermata non viene visualizzato nulla, premere il tasto
Selezione sorgente di ingresso.
Jeéli na ekranie nie nie widaó, wciénij przycisk Wybór zródia
sygnalu wejsclowego.
înSB¥±S=SSSîfff^F»3§i. ilßt riiiAfs^».ä»J ffiíB.
Ai/ 'J->Äíe»гsnÄl^Jiêlí> A*
UT<¡e¿5i',
asoli 0i¥îüE SAiaXI St^S ¿¡ai bigi
¥ = tìAI2.
vnnTiiflacTîiJî'iniiij'uviiI'i^a litnniJiJilnvifi'iJLSanâiciiciincuiu'i
' m®T rusAsiMssj œœ -
Page 2
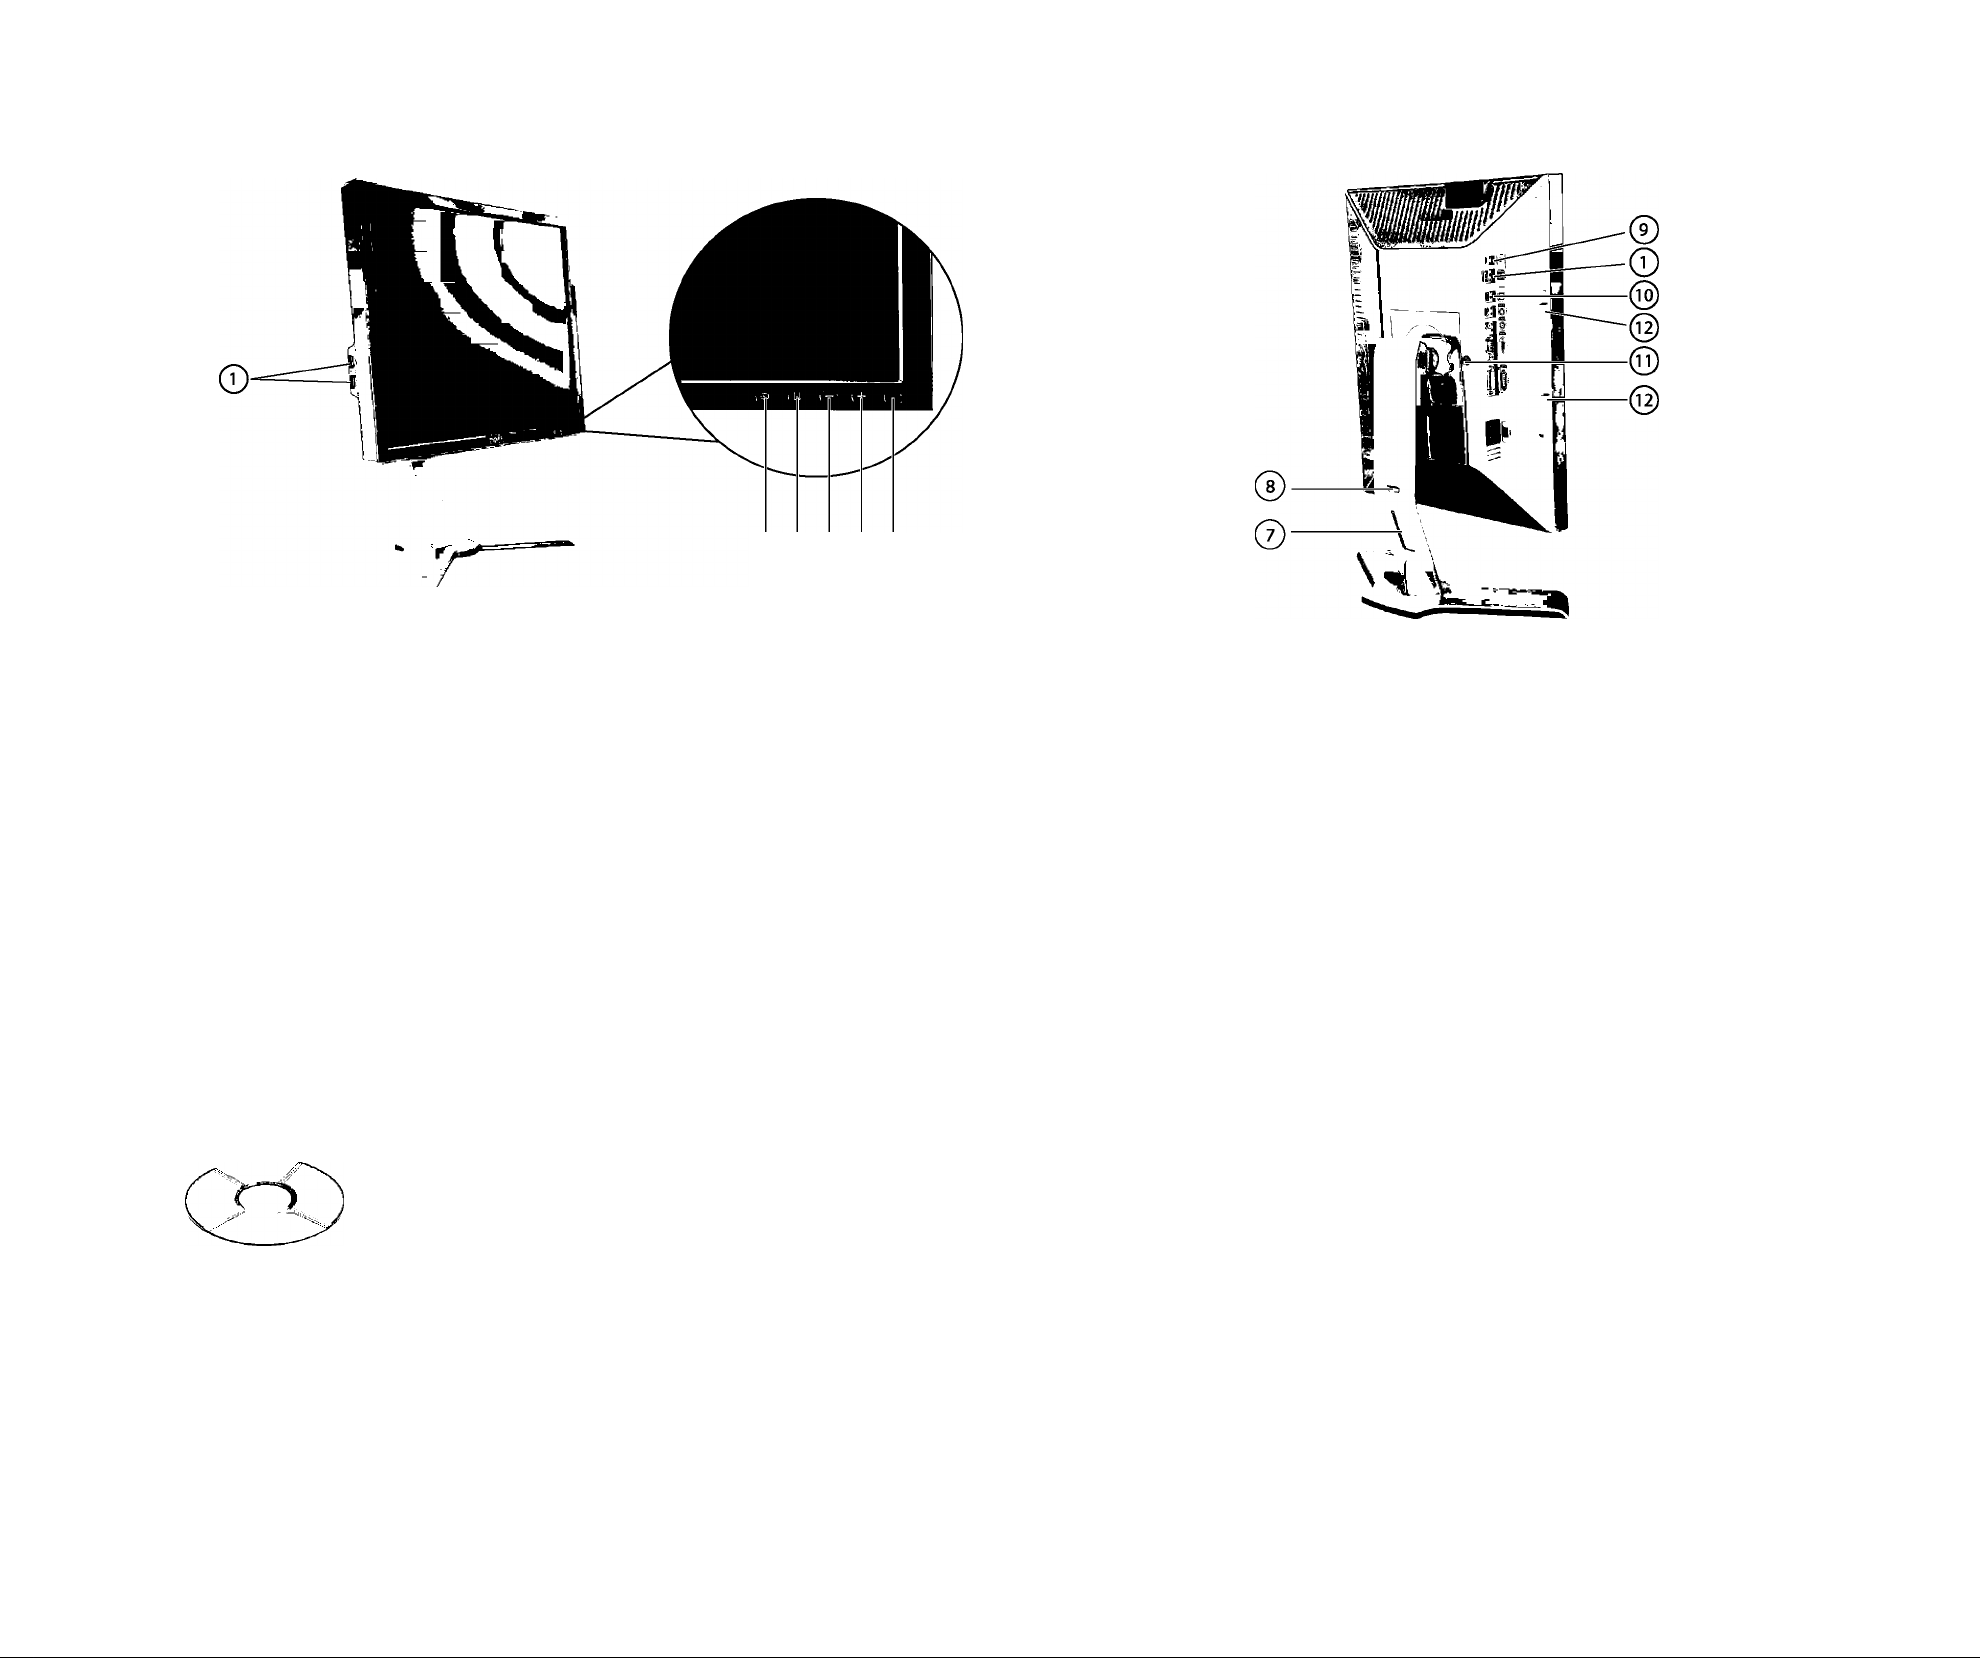
©©0©®
1. USB downstream ports
2. Input Source Select
3. OSD Menu/Select
4. Down (-)
5. Up(+)
6. Power Button (with power light indicator)
7. Cable management hole
8. Lock down / release button
9. DC power connector for Dell Soundbar
10. USB upstream port
11. Monitor Lock / Release Button
12. Dell Soundbar mounting brackets
1. Forty USB do odbioru danych
2. Wybór zródla sygn^u wejáciowego
3. Menu OSD/Wybierz
4. W dól (-)
5. W gôrç (+)
6. Przycisk zasilania (z lampk^wskaznika zasilania)
7. Otwor do uldadania kabli
8. Przycisk blokowania/zwalniania
9. Zii^ze zasilania prüdem зЫут dia zestawu
gioánikowego Dell™
10. Port USB do wysylania danych
11. Przycisk blokowania / zwalniania monitora
12. Wspomiki montazowe zestawu ^osnikowego Dell
1. Ports USB descendant
2. Sélection de la source d’entrée
3. Sélection/Menu OSD
4. Bas (-)
5. Haut (+)
6. Bouton d’alimentation {avec témoin lumineux
d’alimentation)
7. Trou de gestion des câbles
8. Bouton de verrouillage/libération
9. Connecteur d’alimentation CC pour la barre son Dell
10. Port USB ascendant
11. Bouton de verrouillage / libération du moniteur
12. Attaches de montage de la barre son Dell
¡.извтш
2. Ш
3. OSD^H/^lXîg^
4. тт(-)
5. Й±(+)
6.
7.
8. îiÆ/^ШШ
9. fflfi$Dell™Soundbar05DCi
10. USB±jS?if
12. Dell SoundbarS^fEsß
Finding information:
See your monitor User's Guide
in the CD for more information.
Wyszukiwanie infomnacji:
Zapoznaj sig z Przewodnikiem dia
uzytkownika znajduj^cym siç na dysku
CD, aby uzyskac wiçcej informacji.
1. Puertos de reeepción USB
2. Selección de fuente de entrada
3. Selección/Menú OSD
4. Bajar (-)
5. Subir (+)
6. Botón de encendido/apagado (con indicador de luz de
energía)
7. Alojamiento de cables
8. Botón de bloqueo/desbloqueo
9. Conector de alimentación de CC para la barra de
sonido Dell™
10. Puerto de envío USB
11. Botón de bloqueo/desbloqueo del monitor
12. Soporte de montaje de la barra de sonido Dell
1. USBT2Sií
2.
3. mEiVifmmn
4. TC-)
5. ±(+)
6.
7.
8.
9. ÍÍfflS$Dell™Soundbar(tPI^)flDDC%3Ij£SS
10. USB±2ܱÍ
12. Dell Soundbar(^0|5)ea^le
Recherche d'informations :
Consultez le Guide d'utiiisation
de votre moniteur sur ie CD pour
plus d'informations.
Encontrar información:
Consuite ia Guía del usuario que
encontrará en ei CD para obtener
más información.
SfSSiTl^
“mpmm".
1. Portas de downstream USB
2. Sele§ao de origem de entrada
3. Menu OSD/selecionar
4. Abaixo (-)
5. Aeima (+)
6. Botao liga/desliga (com luz indicadora de
funcionamento)
7. Alojamento de cabos
8. Botao de bloqueio/liberasao
9. Coneetor de alimentagáo CC para o Dell Soundbar
10. Porta de upstream USB
11. Botao de bloqueio/liberagáo do monitor
12. Suportes de fixaQáo do Dell Soundbar
1. USB VA h g-A/-K- h
2.
3.0SD>-i-/M#^
4. T(-)
5. ±(+)
6. ®ai7K^> (miiTd'
7.
8.
9. Dell™ Dcaas=i*í7 ^
10. USB T B 'j B
11. =E = í>P-yÍ7 /
12. Dell-9"5>BV<-ffiyií№:?7'y-y B
Locaiizando informagSes:
Para informagóes adicionáis,
consuite, no CD, o Guia do Usuàrio
do monitor.
SÍMIÍ. CD
1. USB-Downstream-Anschlüsse
2. Engangsquellenauswahl
3. OSD-Menü/Auswahl
4. Ab(-)
5. Auf (+)
6. Ein/Aus-Taste (mit Stromanzeige)
7. Auslassung für Kabelverlegung
8. Sperr-/Freigabe-Taste
9. Gleichstromanschluss für Dell Soundleiste
10. USB-Upstream-Anschluss
11. Sperre-/Freigabe-Taste für Monitor
12. Befestigungsklammem für Dell-Soundleiste
1. USBClêii^Ü SM
2. 2Ш
3.0SD
4. cm-)
5.S(+)
6. SS! ölg(SSl SÄieSü)
7. 9!I0IM &d|g
8. &^/8НЯ1 Ь\Ш
9. Dell™AlgEülDCaa 31 И]El
lo.usBSiSMa ÏM
11.2UEI ЭЗ/5НД1 Жё
12. Dell AlgEbl äXIS
Suche nach informationen:
Lesen Sie die Bedienungsanieitung
ihres Monitor auf der CD, um weitere
informationen zu erhalten.
äe 5Í3I:
XÎAIlËl LUgf
AÍS äSAIi
CD (Hl Ш01 alfe
SSüläAIS.
1. Porte USB downstream
2. Selezione sorgente di ingresso
3. Menu OSD/Seleziona
4. Giù (-)
5.Su(+)
6. Tasto di accensione (con indicatore luminoso di
accensione)
7. Foro passaggio cavi
8. Tasto Blocca / Rilascia
9. Connettore di alimentazione CC per la Barra audio Dell
10. Porta USB upstream
11. Tasto Blocco / Rilascio monitor
12. Staffe di fissaggio della Barra audio Dell
1. USB
2. iSanuvieioSìivivi
3. LUI! OSD/iuijiSian
4. a.] (-)
5. tìu (+)
6. ijuiflnilfl (wïauaiEj'lvIuaRjan'ius)
7. ïîauanij
8. ijijâan/i|ijilaa
9. na'ui'SninaflTfnTsuanfjEt'ivifu Eintvio DelP
10. wainiini.v'ivaya USB
11. i|jiàanijaflLaa;/i|>nlan
12. uviuflflEi'iln^ Dell
Reperimento informazioni:
Per maggiori informazioni, vedere
ia Guida utente dei monitor contenuta
neli'apposito CD.
nniffiuvnvaijÉ):
au El
QijflaqtiiiiaouafliRQfTitfA etinfiraa
tjetuRmSiu
16 Dell lnc.AOrightf n
of Dell Ine. is stridly fisbiddeo.
DeS and tbe D£U logo are Hades
Лев Dell 11К.Ю»вП=пГ,
Dea S. DELL «БВ Dell Inc
»^«ee^^BDelier«.
sane lyndorisaliin écrite de Dell In
DbB et le li^ D£U sont la profiriété de Dell lne..Tous
Man 2006
stceDell Inc.
Фвея.
DemoELL«eeDell Ine.
DellSiÜI«^
Dell&BHB«fRK««»№Sf««lc
Se prohíbe estrictanaite la rq
finma sin pemnn por eeoito
Dell y el logotqio DELL son I
Dell lanmcia el derecho (k pe
Marzo 2006
«всЕНЕёптигвяавшяе
ei.'(cKEán«C¿4(»U«-r.
OZOMtKTiDefHKttDell Ine.
Delf¿OELL0a^'7-^tt,Dell Ine
CDBemiTt.
±епвипв9кя«в«ь&«>в
вгпти««$о<»иФГ1(|(. С:
-ÜDDellInc.
200ВФЭЯ
O 2006 Dell Ine. O
Areisodugio de
Dell Ine. SI Л1Б
Ф&!И0| ISfSIfe ЩЯ solfe S^ei
?s8ua.
Déliai Oelie2ZfeDell Inc.
sissoiseiUQ.
Delie XIA> SISI èfS B èfBSOI
□»Alfe oiB ±ea£ eiasn
BtSUD.
20061H3S
lÆoii'niotqslermlmMir ensiii^cmflle
leaM'iiOufiMintlimrnjsntiiwi
e 2006 Dell Inc. enuSii9i4
tî^MSnle^ bul»A<ïiUnn'Kii|qp«r4'irai30(
nnannufliinin floooiJiiJanÄt
ОвЯ ывЪ1п DeU tOutfi^eemncnmiee
urmsjiriÑiyáhtnÍMSin^etbsnummrii
uJ^tmliJ
Пиши 2006
16 Dell In. IhtIl i diritti risaniti.
pennesBO scritto di Dell In
Detf e U logo DELL sono I
DeU non riconosce mtsess
denaninsàoni di sltri,
Q ® S
Printed in China
D0LL
Ddl i lov> DELL to
P/N: 4J.L2H01.003
(DELLP/N:PY471 REVA03)
P/N: 4J.L2H01.003
 Loading...