

Dell 1850 User Manual

Dell Projectors
User Guide

Notes, cautions, and warnings
NOTE: A NOTE indicates important information that helps you make better use of your computer.
CAUTION: A CAUTION indicates either potential damage to hardware or loss of data and tells you
how to avoid the problem.
WARNING: A WARNING indicates a potential for property damage, personal injury, or death.
Copyright © 2015 Dell Inc. All rights reserved. This product is protected by U.S. and international copyright and
intellectual property laws. Dell™ and the Dell logo are trademarks of Dell Inc. in the United States and/or other
jurisdictions. All other marks and names mentioned herein may be trademarks of their respective companies.
2015 - 11
Rev. A00

Contents
1 About Your Dell Projector................................................................................... 5
General Safety Information...................................................................................................................5
2 Cables and Documentation................................................................................ 6
3 Connecting with VGA and External Speakers..................................................7
4 Connecting a Computer or DVD Player Using an HDMI Cable....................8
5 Monitor Loop-Through Connection Using VGA Cables............................... 9
6 Turning Your Projector On............................................................................... 10
7 Turning Your Projector Off................................................................................11
8 Raising and Lowering the Projector Height.................................................. 12
9 Adjusting the Projector Focus..........................................................................13
10 Adjusting Projection Image Shape................................................................ 14
11 Input Source.......................................................................................................16
12 Auto Adjust.........................................................................................................17
13 Brightness/Contrast......................................................................................... 18
14 Video Mode........................................................................................................19
15 Audio Volume....................................................................................................20
16 Advanced Settings............................................................................................ 21
Image Settings (in PC Mode)...............................................................................................................21
Image Settings (in video mode)..........................................................................................................22
DISPLAY SETTINGS (IN PC MODE)..................................................................................................... 23
DISPLAY SETTINGS (IN VIDEO MODE)...............................................................................................25
PROJECTOR SETTINGS...................................................................................................................... 27
Menu Settings......................................................................................................................................28
POWER SETTINGS.............................................................................................................................. 30
Information.......................................................................................................................................... 31
3

17 Language............................................................................................................ 32
18 Help..................................................................................................................... 33
19 Changing the Lamp..........................................................................................34
20 Guiding Signals.................................................................................................35
21 Dell Web Management for Projectors.......................................................... 38
22 Getting help.......................................................................................................54
Contacting Dell................................................................................................................................... 54
23 Glossary..............................................................................................................55
4

About Your Dell Projector
General Safety Information
CAUTION: Safety Instructions
1. Do not install near heat sources such as radiators, heaters, stoves or any other apparatus, such
as amplifiers, that emit heat.
2. Do not use the projector in a dusty environment. Excess dust can cause system failures and
eventually will shut down your projector.
3. Ensure that the projector is mounted in a well-ventilated area.
4. Do not block the ventilation slots and openings on the projector.
5. Ensure that the projector operates between ambient temperatures of (5 °C to 40 °C).
6. Do not touch the ventilation outlet as it will become heated during operation or immediately
after the projector is turned off.
7. Do not look into the lens while the projector is on as it may cause injury to your eyes.
8. Do not place any objects near or in front of the projector or cover its lens while the projector is
on as the heat may cause the object to melt or burn.
9. Do not use alcohol to wipe the lens.
NOTE:
1
• Do not attempt to ceiling mount the projector yourself. It should be installed by a qualified
technician.
• Recommended Projector Ceiling Mount Kit (P/N: C3505). For more information, see the Dell
Support website at Dell.com/support
• For more information, see the Safety Information that shipped with your projector.
• With the exception of Dell mobile projectors, most Dell projectors can only be used indoors.
NOTE: Ceiling mount screw hole M3 x 6.5 mm depth.
Recommended torque <15 kgf-cm.
5

Cables and Documentation
Your Dell Projector ships with the necessary cables and documentation to get you started! Visit
www.dell.com/support to explore further support options.
2
6
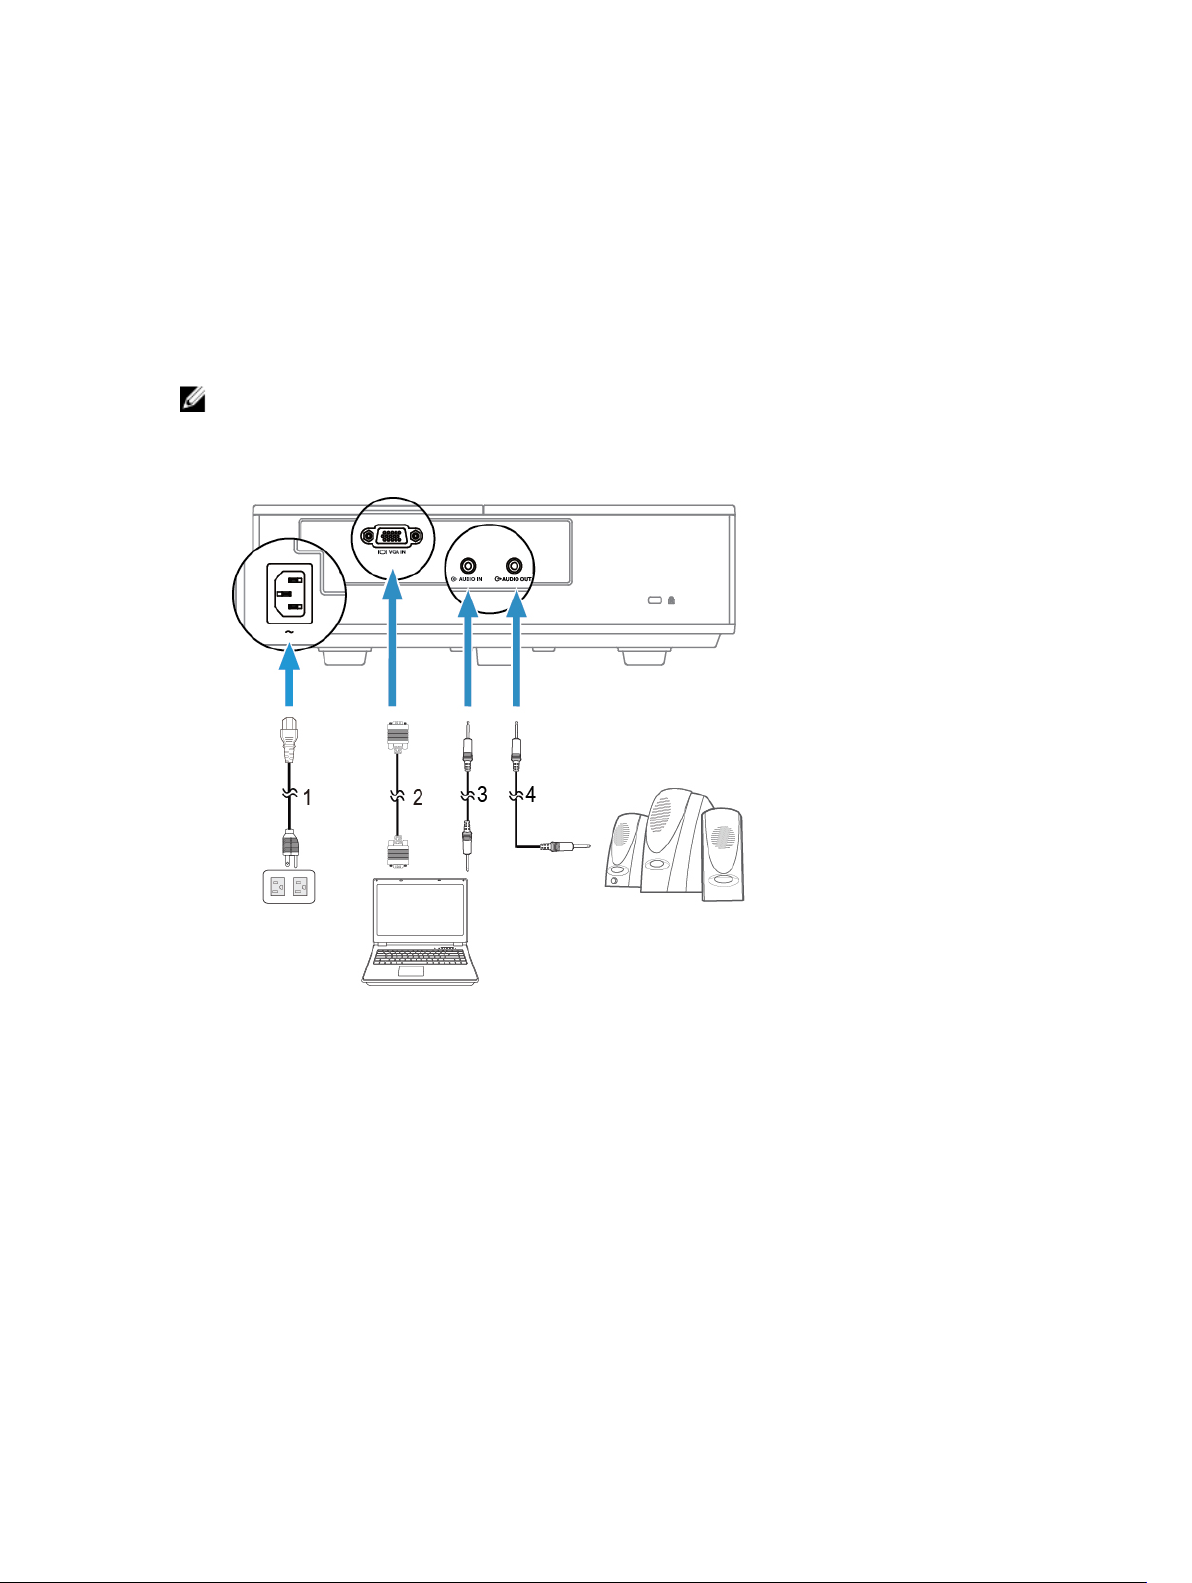
Connecting with VGA and External Speakers
NOTE: The projector shown is for representational purposes only.
3
1. Power cable 2. Video Graphics Adapater (VGA) cable
3. Audio-in cable to projector 4. Audio-out cable to external speakers
7
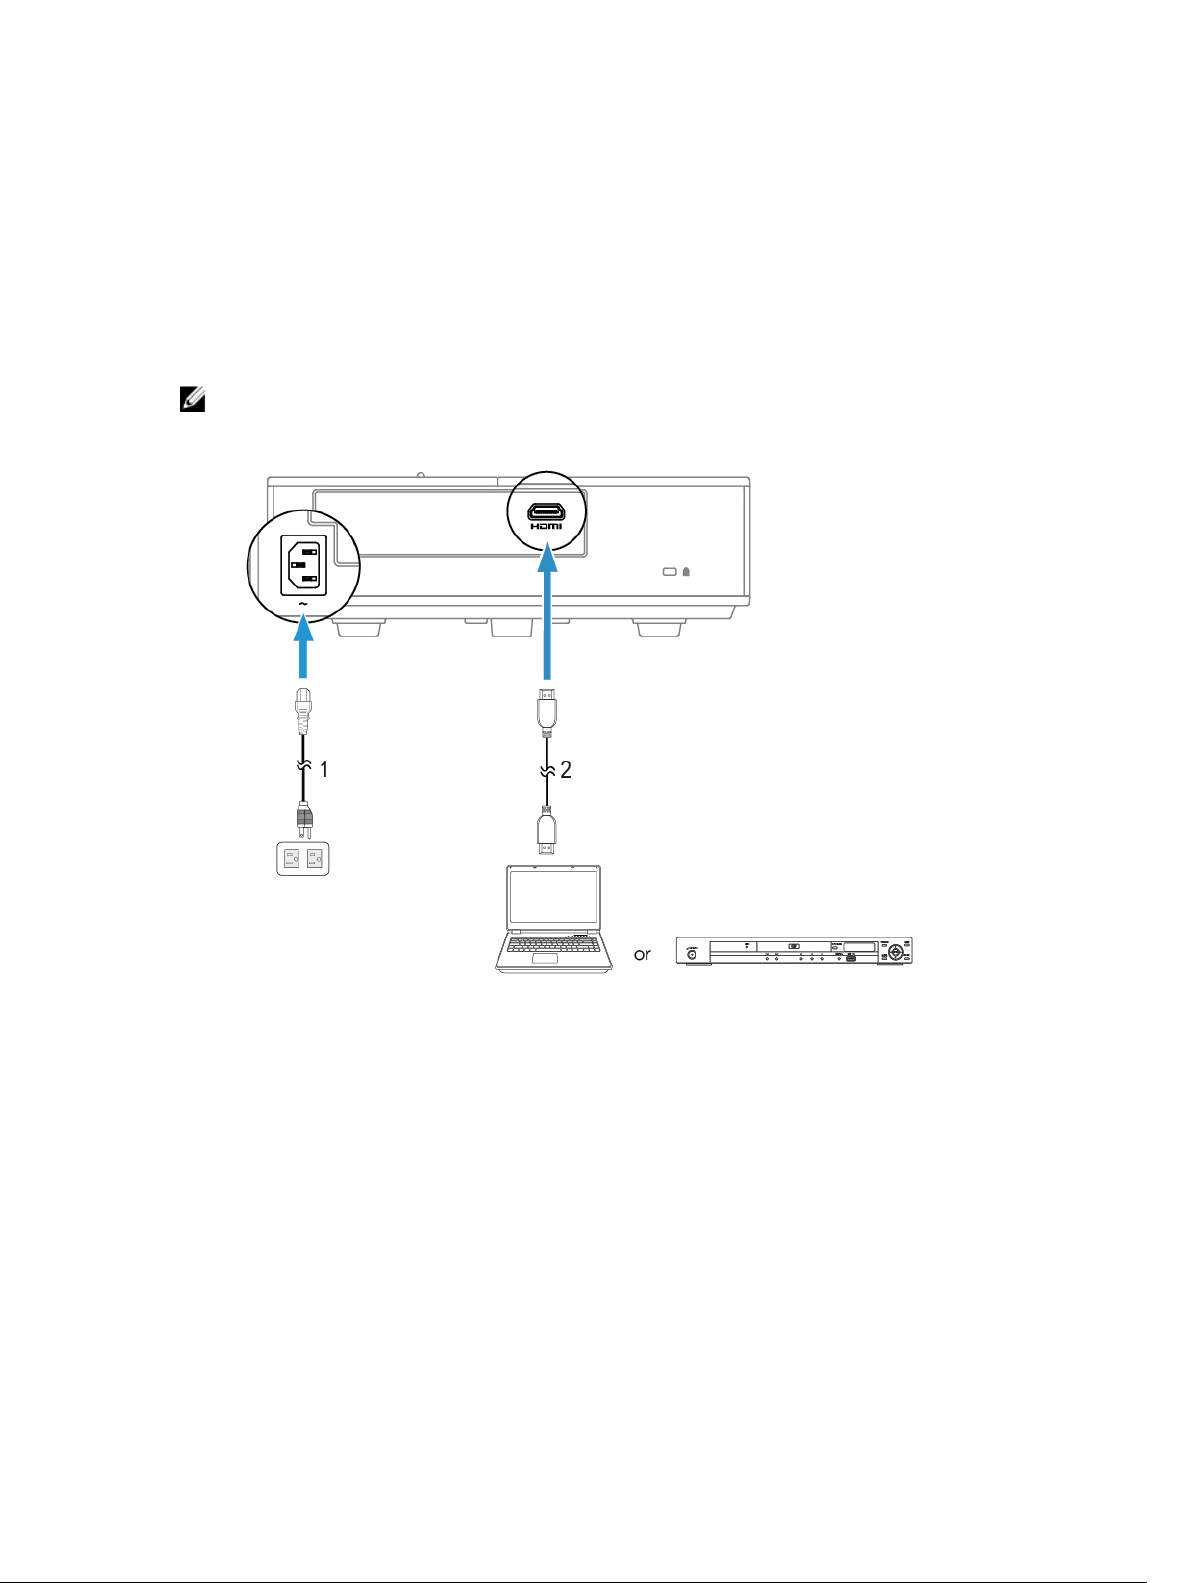
Connecting a Computer or DVD Player Using an HDMI Cable
NOTE: The HDMI cable is not shipped with your projector. You can purchase an HDMI cable on the
Dell website at www.dell.com
4
1. Power cable
2. HDMI cable
.
8

5
Monitor Loop-Through Connection Using VGA Cables
NOTE: Only one VGA cable is shipped with your projector. Any additional cables can be purchased
from www.dell.com
1. Power cable 2. VGA to VGA cable (laptop to projector)
3. VGA to VGA cable (projector to monitor)
9

Turning Your Projector On
NOTE: Turn on the projector before you turn on the source (computer, DVD player, etc.). The
Power button light glows white until pressed.
1. Connect the power cord and appropriate signal cables to the projector.
2. Press the Power button on the remote control.
3. Turn on your source (computer, DVD player, etc).
4. Connect your source to the projector using the appropriate cable.
5. By default, the input source of the projector is set to VGA-In. Change the input source of the
projector if necessary.
6. If you have multiple sources connected to the projector, press the Source button on the remote
control to select the desired source.
6
10

7
Turning Your Projector Off
CAUTION: Unplug the projector after properly shutting down as explained in the following
procedure.
1. Press the Power button. Follow the instruction displayed on screen to properly turn off the projector.
NOTE: The "Press Power Button to Turn off Projector" message will appear on the screen. The
message disappears after 5 seconds or you can press the Menu button to clear it.
2. Press the Power button again. The cooling fans continue to operate for 120 seconds.
3. To power off the projector quickly, press the Power button and hold for 1 second while the
projector’s cooling fans are still running.
NOTE:
Before you turn on the projector again, wait for 60 seconds to allow the internal temperature to
stabilize.
4. Disconnect the power cord from the electrical outlet and the projector.
11
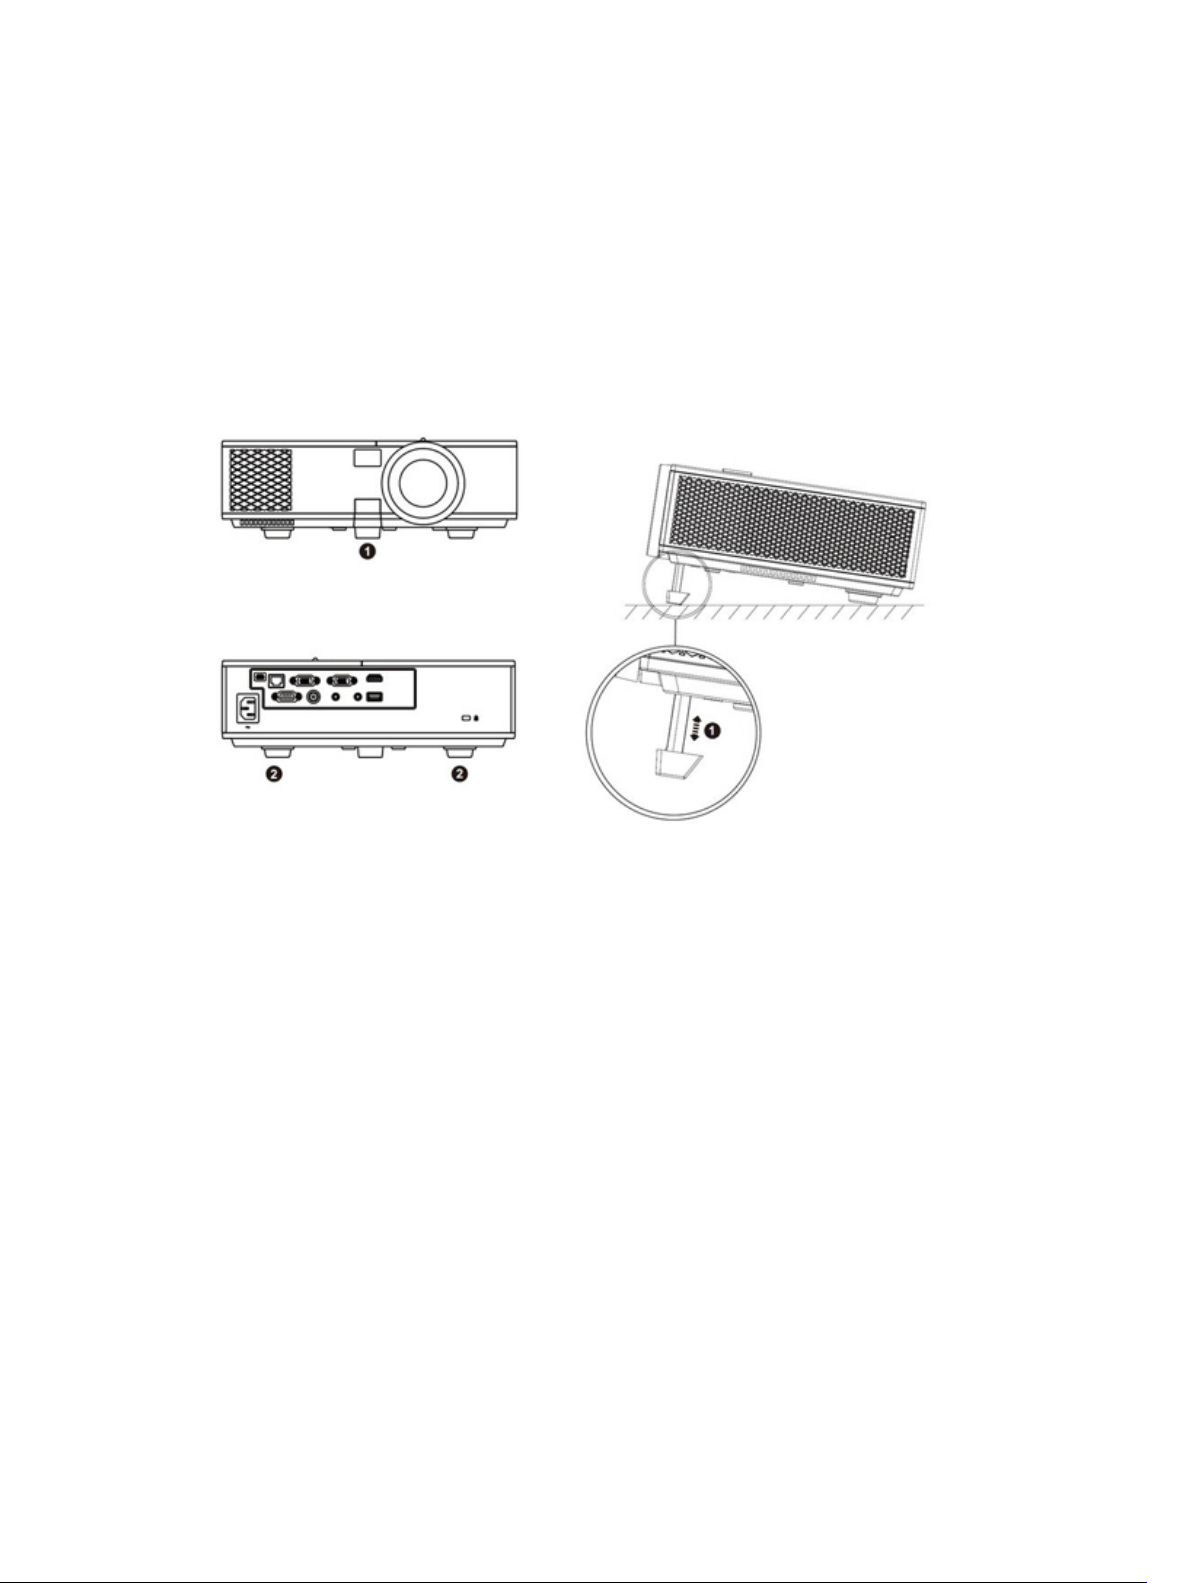
Raising and Lowering the Projector Height
Raise or lower the projector, and use the front tilt adjustment wheel/push button to fine-tune the
display angle.
8
12
1. Front tilt adjustment wheel/push button
(angle of tilt: –5 to 5 degrees)
2. Fixed rubber foot
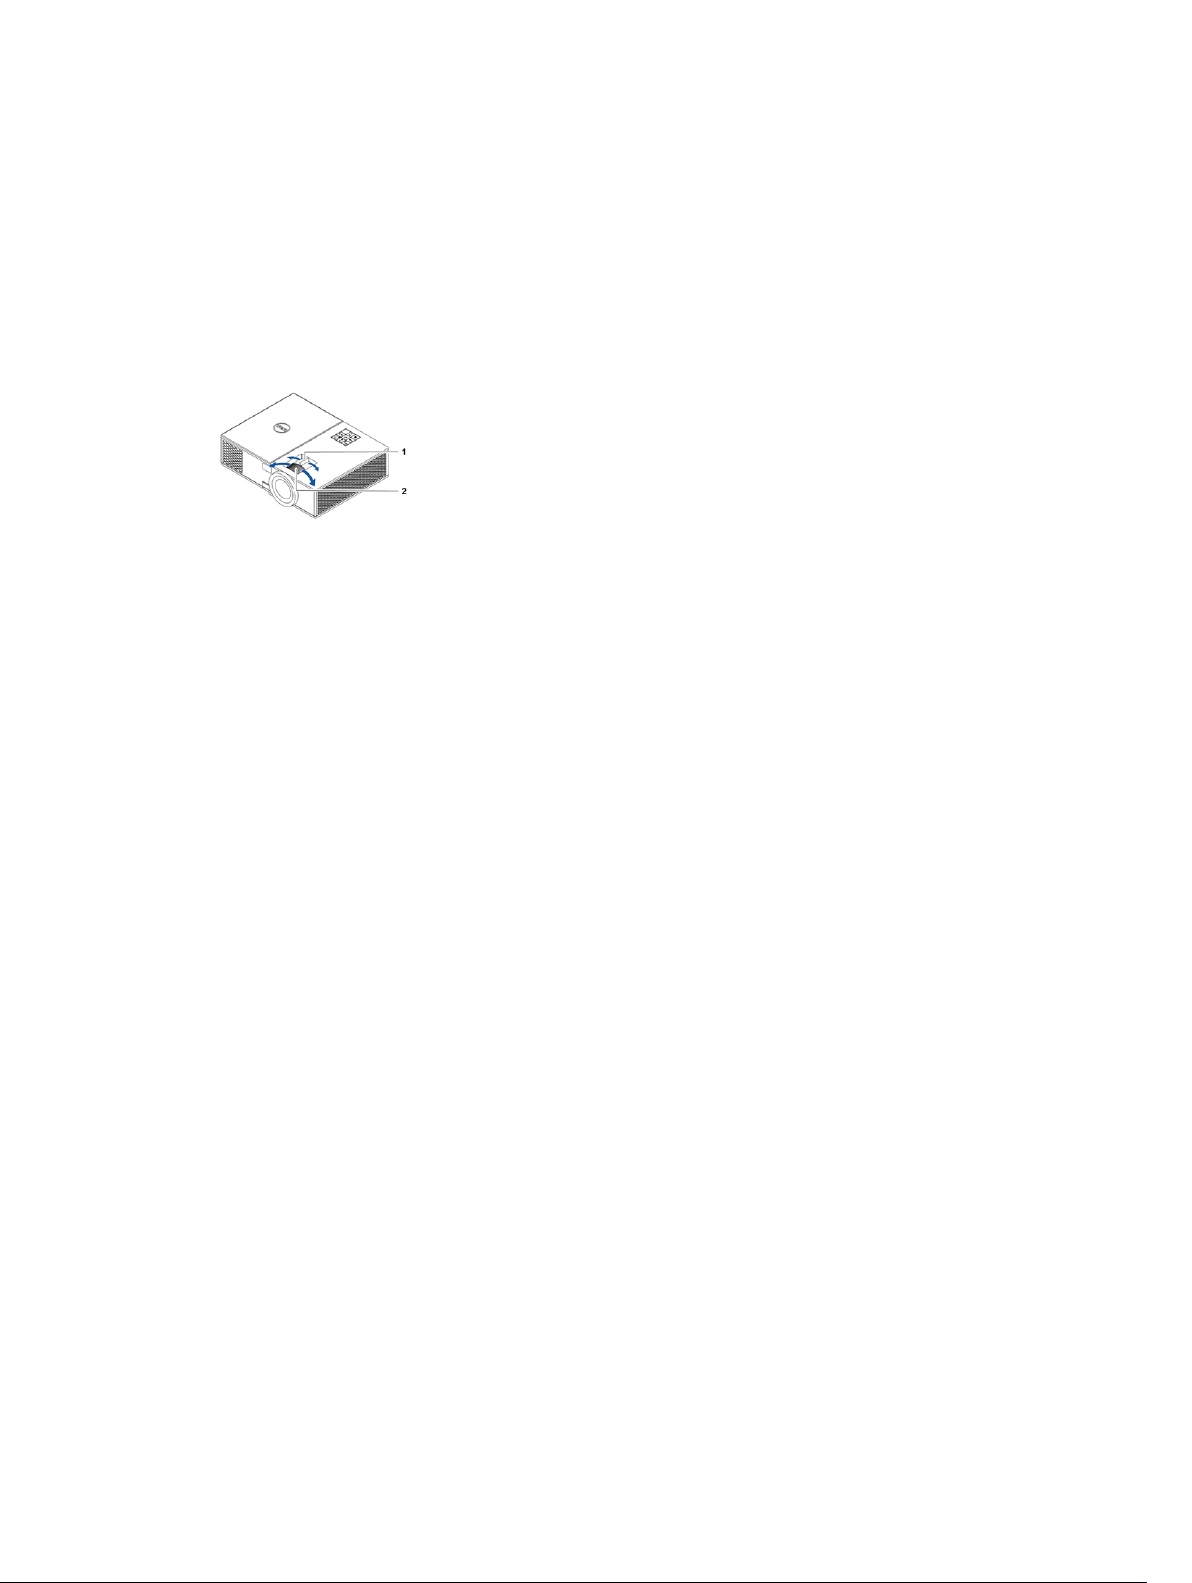
Adjusting the Projector Focus
Rotate the focus ring (2) until the image is clear. The projector focuses at distances ranging between
3.94 ft - 32.81 ft (1.2 m - 10 m).
1. Zoom tab 2. Focus ring
9
13

Adjusting Projection Image Shape
NOTE: The tables below are for representational purpose only. Please refer to your projector’s
User Guide for model-specific information.
Table 1.
Min Zoom
Image size
Projection
Distance (m)
[A]
1.2 27.4"/69.6 cm 56 42 48 6
3 69"/ 175.26 cm 140 105 120 15
5 114"/ 289.56 cm233 174 201 27
7 160"/ 406.4 cm 326 244 281 37
9 206"/ 523.24 cm419 314 361 47
Diagonal
(inch/cm)
[B]
Width (cm)
[W]
Height (cm)
[H]
Projector base
to top of image
(cm)
[C]
Projector base
to bottom of
image (cm)
[D]
10
10 229"/ 581.66 cm465 349 401 52
Table 2.
Max Zoom
Image size
Projection
Distance (m)
[A]
1.2 30"/ 76.2 cm 62 46 53 7
3 76"/ 193.04 cm 154 115 133 18
5 126"/ 320.04 cm256 192 221 29
7 177"/ 449.58 cm359 269 310 41
14
Diagonal
(inch/cm)
[B]
Width (cm)
[W]
Height (cm)
[H]
Projector base
to top of image
(cm)
[C]
Projector base
to bottom of
image (cm)
[D]
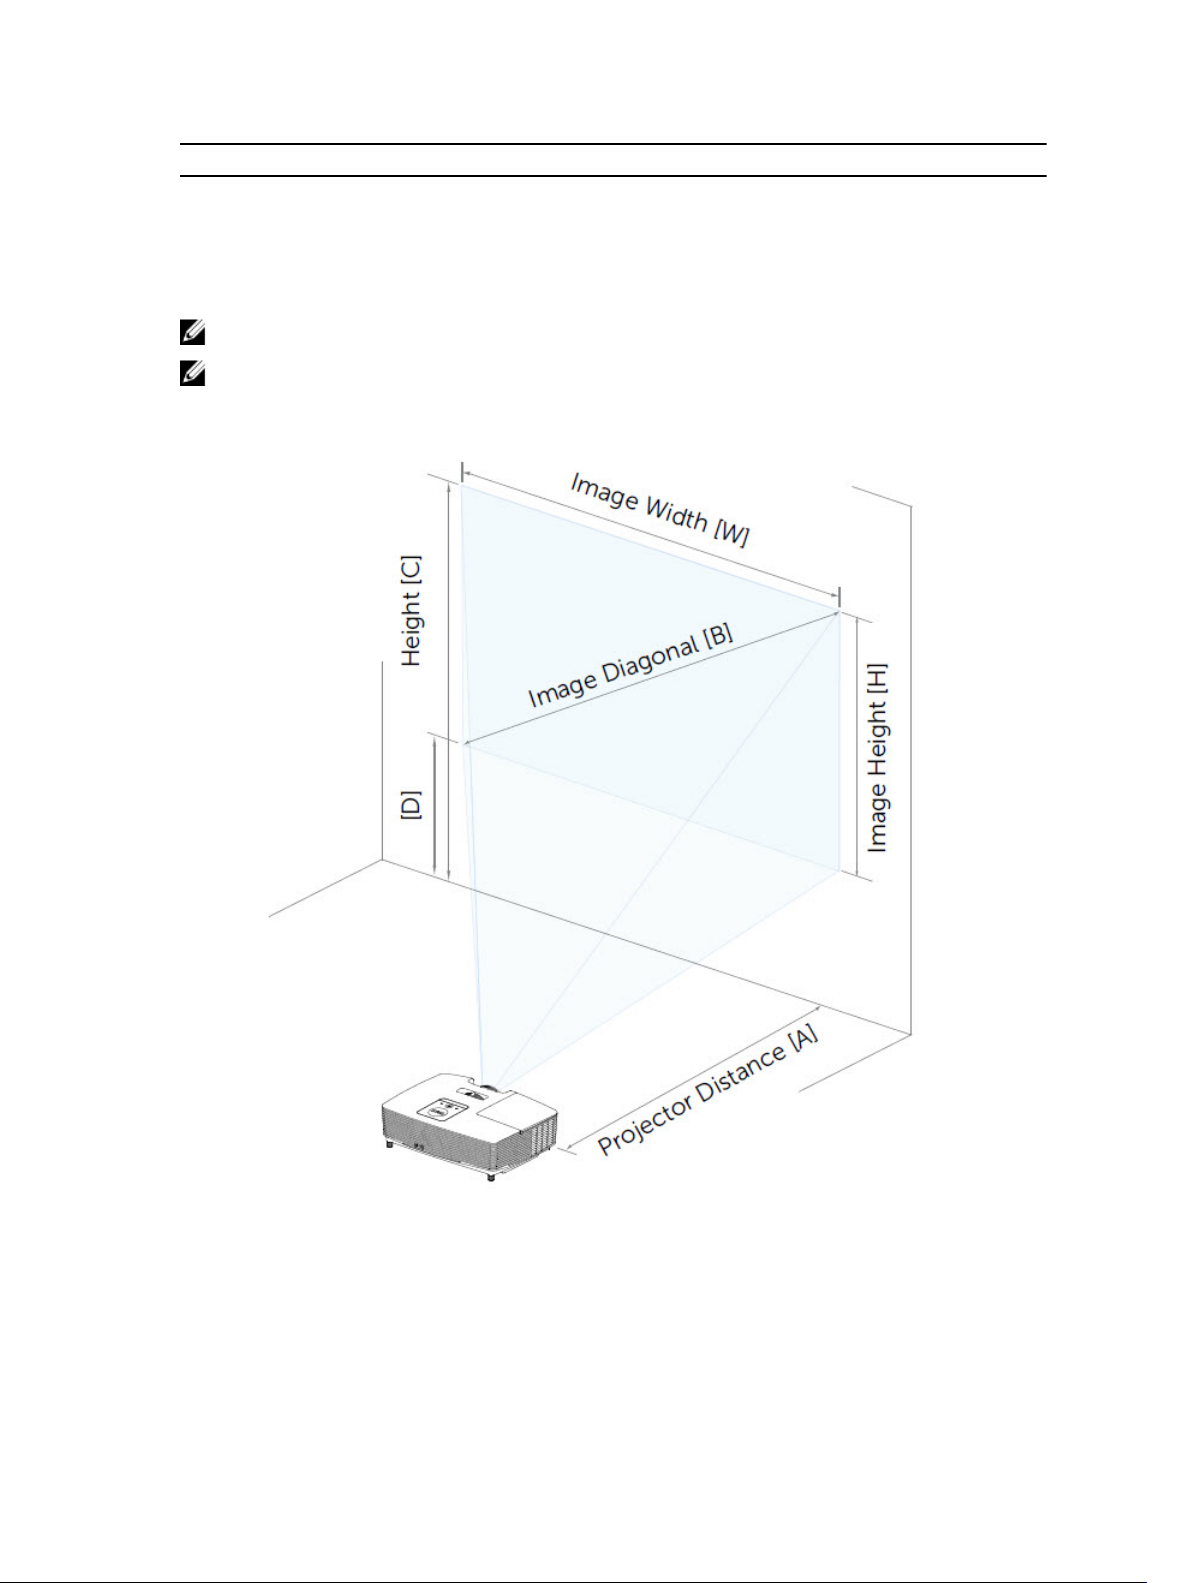
Max Zoom
9 227"/ 576.58 cm462 346 398 52
10 252.4"/ 641.1 cm513 385 442 57
NOTE: This graph is for user reference only.
NOTE: Offset Ratio: 115 +/- 5%
15
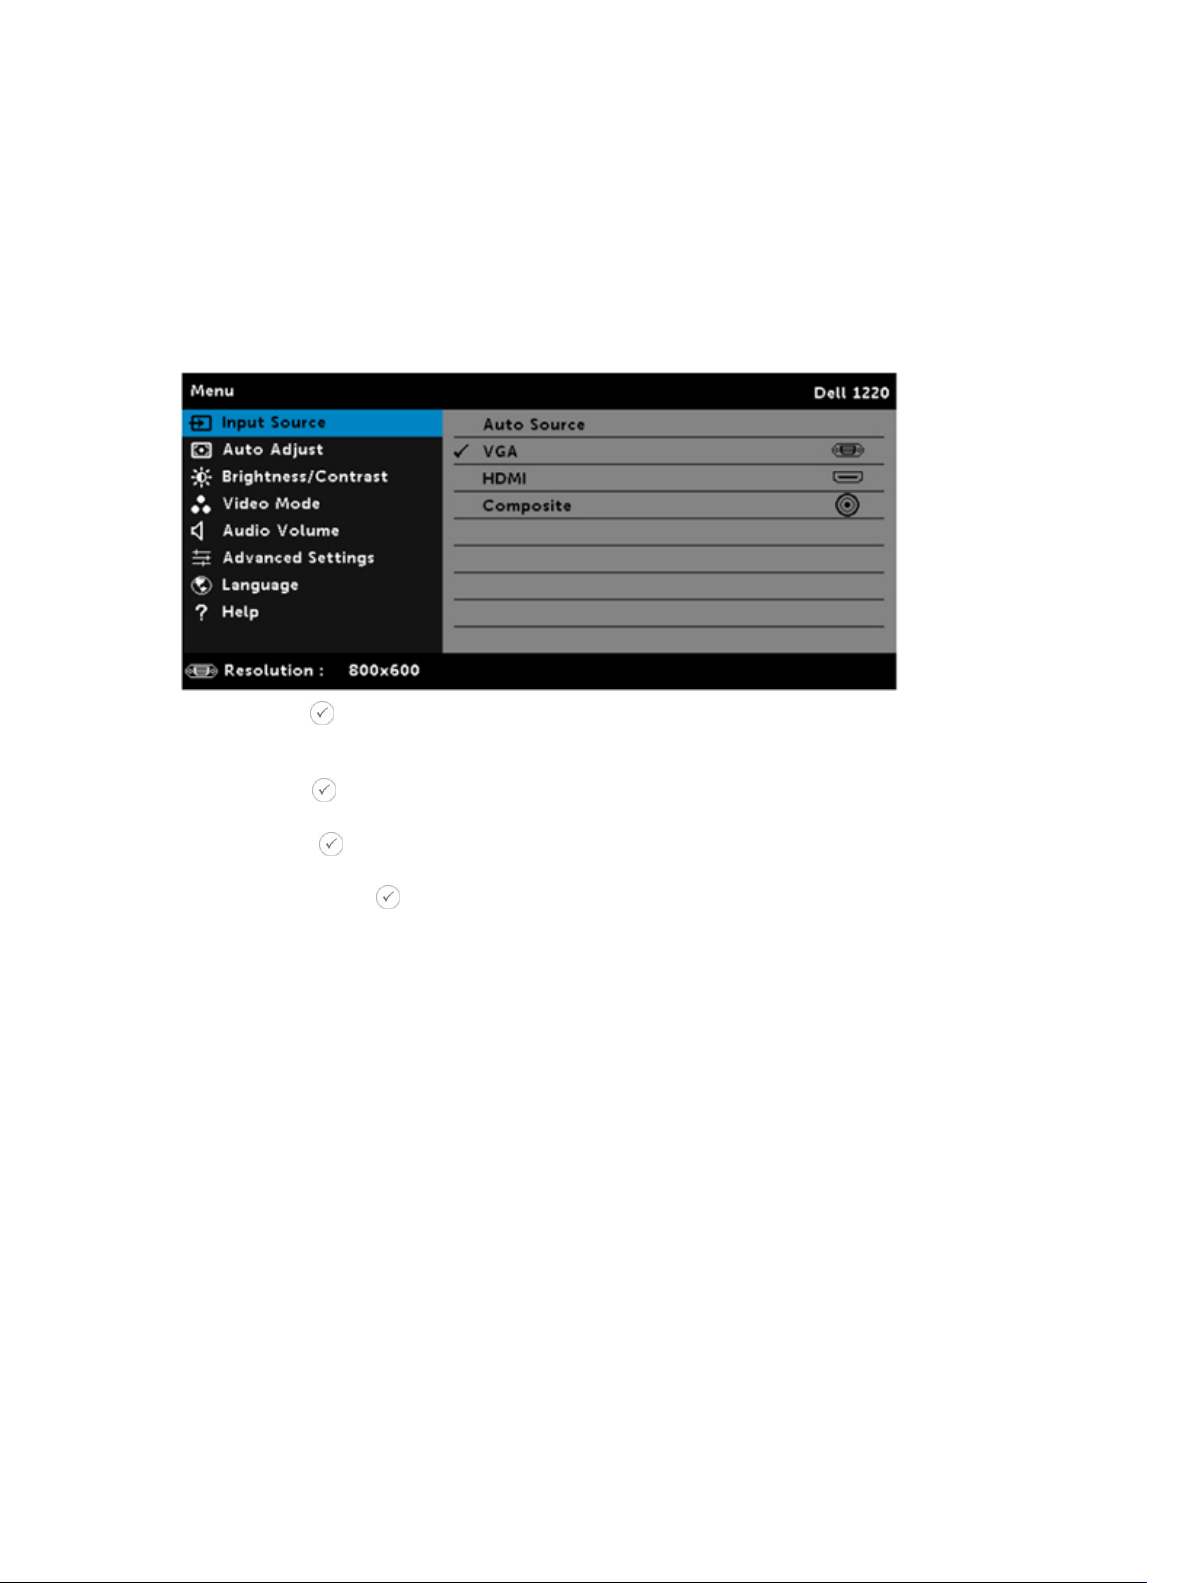
11
Input Source
The Input Source menu allows you to select your projector's input source.
AUTO SOURCE—
If you press the key on the remote control to select, the Auto Source option will automatically find the
next available input source.
VGA—Press the key on the remote control to detect a VGA signal.
HDMI—Press the key on the remote control to detect a HDMI signal.
COMPOSITE—Press the key on the remote control to detect a Composite Video signal.
16

12
Auto Adjust
Auto Adjust automatically adjusts the projector's Horizontal, Vertical, Frequency, and Tracking in PC
mode.
NOTE: Projector model shown is for representational purpose only.
17
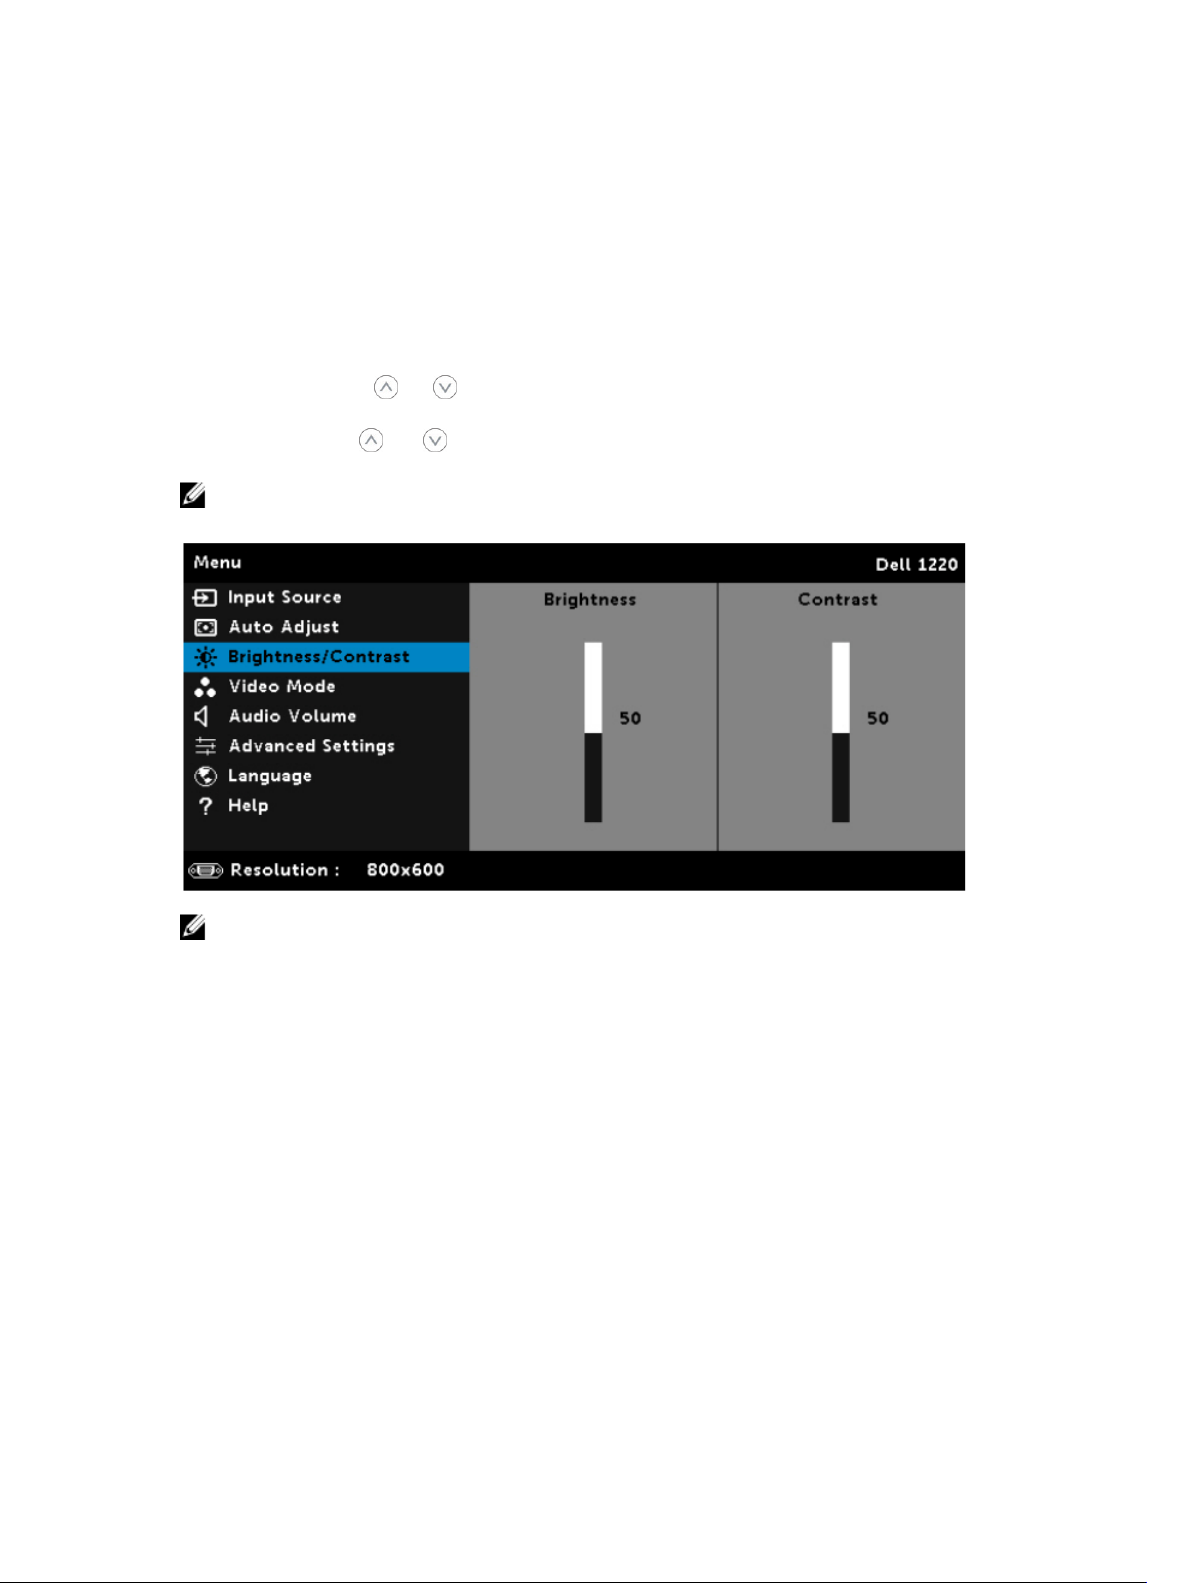
13
Brightness/Contrast
The Brightness/Contrast menu allows you adjust the brightness/contrast settings of your projector.
BRIGHTNESS—Use the and keys on your remote control to adjust the brightness of the image.
CONTRAST—Use the and keys on your remote control to adjust the display contrast.
NOTE: If you adjust the settings for Brightness and Contrast, the projector automatically switches to
Custom mode.
NOTE: Projector model shown is for representational purpose only.
18
 Loading...