

Page 1

Dell™ OptiPlex™ 170L
Quick Reference Guide
Models MTC2 and DHS
www.dell.com | support.dell.com
Page 2

Notes, Notices, and Cautions
NOTE: A NOTE indicates important information that helps you make better use of your computer.
NOTICE: A NOTICE indicates either potential damage to hardware or loss of data and tells you how to avoid
the problem.
CAUTION: A CAUTION indicates a potential for property damage, personal injury, or death.
If you purchased a Dell™ n Series computer, any references in this document to Microsoft® Windows®
operating systems are not applicable.
The
Drivers and Utilities
and may not ship with all computers.
CD (ResourceCD), operating system media, and
Quick Reference Guides
are optional
____________________
Information in this document is subject to change without notice.
© 2004 Dell Inc. All rights reserved.
Reproduction in any manner whatsoever without the written permission of Dell Inc. is strictly forbidden.
Trademarks used in this text: Dell, the DELL logo, and OptiPlex are trademarks of Dell Inc.; Microsoft and Windows are registered trademarks
of Microsoft Corporation.
Other trademarks and trade names may be used in this document to refer to either the entities claiming the marks and names or their products.
Dell Inc. disclaims any proprietary interest in trademarks and trade names other than its own.
Models MTC2 and DHS
September 2004 P/N D7235 Rev. A00
Page 3

Contents
Finding Information for Your Computer . . . . . . . . . . . . . . . . . . . 5
About Your Small Desktop Computer
Front and Back Views
Inside Your Computer
. . . . . . . . . . . . . . . . . . . . . . . . . 8
. . . . . . . . . . . . . . . . . . . . . . . . . 9
. . . . . . . . . . . . . . . . . . . . 8
Attaching and Removing the Computer Stand
About Your Mini-Tower Computer
Front and Back Views
Inside Your Computer
Setting Up Your Computer
Small Desktop Computer
Mini-tower Computer
Completed Setup
. . . . . . . . . . . . . . . . . . . . . . . . . . . . . 16
Small Desktop Computer
Mini-Tower Computer
Solving Problems
Dell Diagnostics
System Lights
Diagnostic Lights
Beep Codes
. . . . . . . . . . . . . . . . . . . . . . . . . . . . . 17
. . . . . . . . . . . . . . . . . . . . . . . . . . . . 17
. . . . . . . . . . . . . . . . . . . . . . . . . . . . . 19
. . . . . . . . . . . . . . . . . . . . . . . . . . . 20
. . . . . . . . . . . . . . . . . . . . . . . . . . . . . . 22
. . . . . . . . . . . . . . . . . . . . . 11
. . . . . . . . . . . . . . . . . . . . . . . . . 11
. . . . . . . . . . . . . . . . . . . . . . . . . 12
. . . . . . . . . . . . . . . . . . . . . . . . . 13
. . . . . . . . . . . . . . . . . . . . . . . 14
. . . . . . . . . . . . . . . . . . . . . . . . . 15
. . . . . . . . . . . . . . . . . . . . . . . 16
. . . . . . . . . . . . . . . . . . . . . . . . . 16
Running the Dell™ IDE Hard Drive Diagnostics
Resolving Software and Hardware Incompatibilities
®
Using Microsoft
Reinstalling Microsoft
Windows® XP System Restore . . . . . . . . . . . . 25
®
Windows® XP . . . . . . . . . . . . . . . . . 26
. . . . . . . . . . . . . . 10
. . . . . . . . . . . . . 23
. . . . . . . . . . 24
Using the Drivers and Utilities CD
Index
. . . . . . . . . . . . . . . . . . . . . . . . . . . . . . . . . . . 31
. . . . . . . . . . . . . . . . . . . . . 29
Contents 3
Page 4

4 Contents
Page 5
Finding Information for Your Computer
What Are You Looking For? Find It Here
• A diagnostic program for my computer
• Drivers for my computer
• My computer documentation
• My device documentation
• Desktop System Software (DSS)
• OS updates and patches
• Warranty information
• Safety instructions
• Regulatory information
• Ergonomics information
• End User License Agreement
Drivers and Utilities CD (also known as the ResourceCD)
Documentation and drivers are already installed on your
computer. You can use the CD to reinstall drivers, run the
Dell Diagnostics, or access your documentation.
NOTE: The latest drivers and documentation updates can
be found at support.dell.com.
NOTE: The Drivers and Utilities CD is optional and may not
ship with all computers.
Desktop System Software
Located on the Drivers and Utilities CD and the Dell
Support website at support.dell.com.
Product Information Guide
Readme files may be
included on your CD to
provide last-minute
updates about technical
changes to your
computer or advanced
technical-reference
material for technicians
or experienced users.
• How to remove and replace parts
• Technical specifications
• How to configure system settings
• How to troubleshoot and solve problems
Dell™ OptiPlex™ User’s Guide
®
Microsoft
1
Click the
2
Click
The User’s Guide is also available on the
Utilities
Windows® XP Help and Support Center
Start
button and click
User’s and system guides
CD
.
Quick Reference Guide 5
Help and Support.
and click
User’s guides
Drivers and
.
Page 6

What Are You Looking For? Find It Here
• Service Tag and Express Service Code
• Microsoft Windows License Label
www.dell.com | support.dell.com
• Latest drivers for my computer
• Answers to technical service and support questions
• Online discussions with other users and technical
support
• Documentation for my computer
• Service call status and support history
• Top technical issues for my computer
• Frequently asked questions
• File downloads
• Details on my computer configuration
• Service contract for my computer
Service Tag and Microsoft Windows License
These labels are located on your computer.
• Use the Service Tag to
• Enter the Express
Dell Support Website — support.dell.com
NOTE: Select your region to view the appropriate support
site.
The Dell Support website provides several online tools,
including:
• Solutions — Troubleshooting hints and tips, articles
• Community — Online discussion with other Dell
• Upgrades — Upgrade information for components, such
• Customer Care — Contact information, order status,
• Downloads — Drivers, patches, and software updates
• Reference — Computer documentation, product
Dell Premier Support Website — premiersupport.dell.com
The Dell Premier Support website is customized for
corporate, government, and education customers. This
website may not be available in all regions.
identify your
computer when you
support.dell.com
use
or contact technical
support.
Service Code to direct your call when contacting
technical support. The Express Service Code is not
available in all countries.
from technicians, and online courses
customers
as memory, the hard drive, and the operating system
warranty, and repair information
specifications, and white papers
6 Quick Reference Guide
Page 7

What Are You Looking For? Find It Here
• How to use Windows XP
• Documentation for my computer
• Documentation for devices (such as a modem)
Windows Help and Support Center
1
Click the
2
Type a word or phrase that describes your problem and
click the arrow icon.
3
Click the topic that describes your problem.
4
Follow the instructions on the screen.
• How to reinstall my operating system
Operating System CD
The operating system is already installed on your
computer. To reinstall your operating system, use the
Operating System CD. See your OptiPlex User’s Guide for
instructions.
NOTE: The color of your CD varies based on the operating
system you ordered.
NOTE: The operating system media are optional and may
not ship with all computers.
• Regulatory Model Information and Chassis Type
DHS—Small desktop chassis
MTC2
—
Start
button and click
Mini-tower chassis
Help and Support
.
After you reinstall your
operating system, use the
Drivers and Utilities CD
to reinstall drivers for the
devices that came with
your computer.
Your operating system
product key
label is
located on your
computer.
Quick Reference Guide 7
Page 8
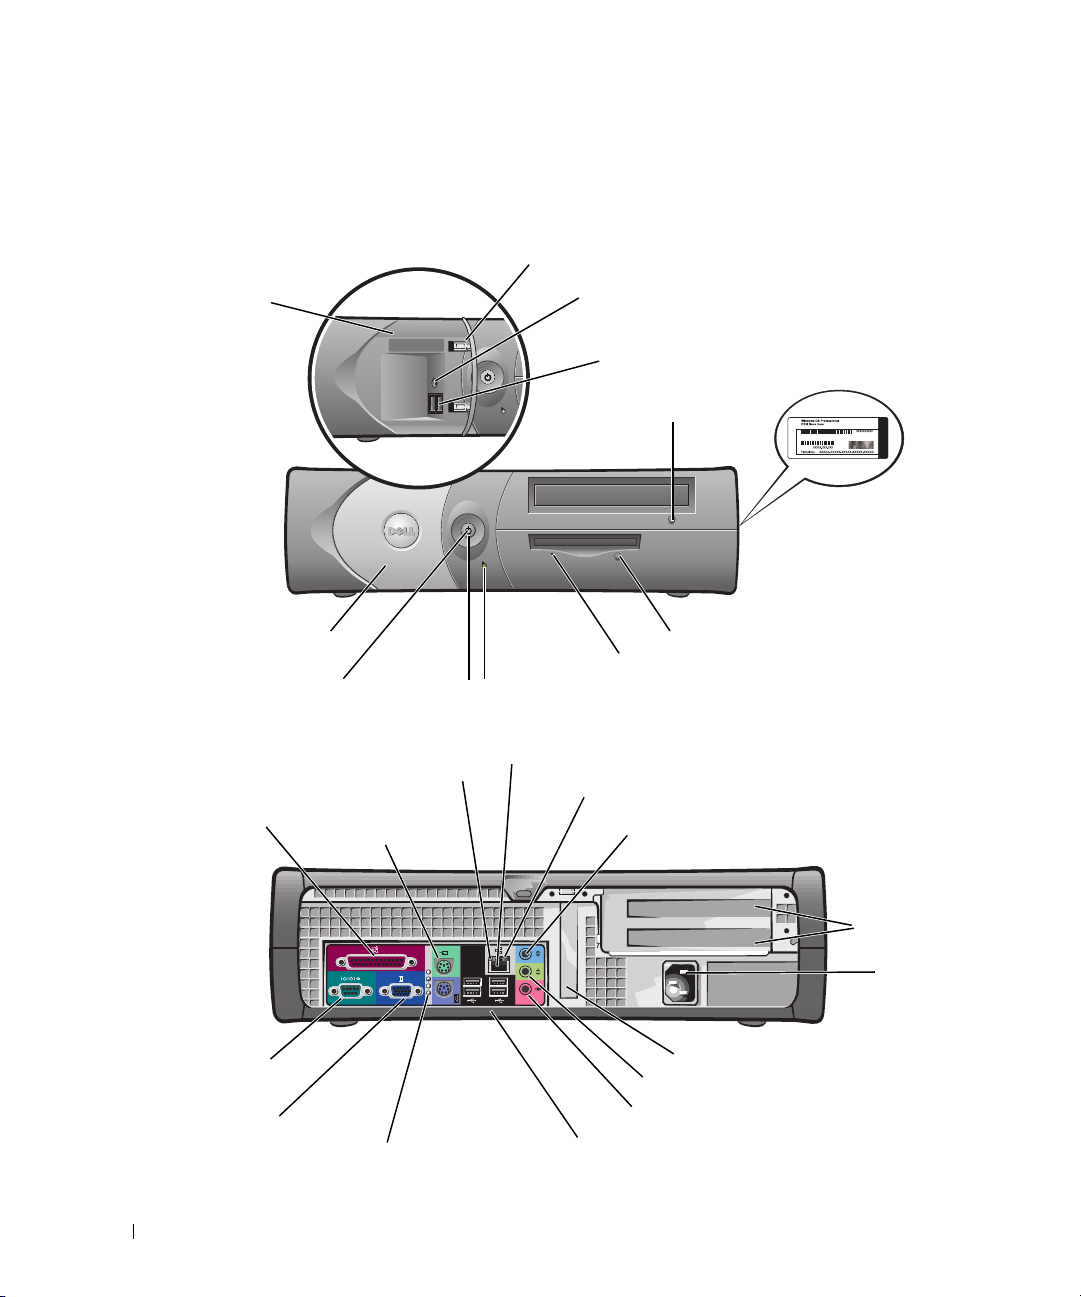
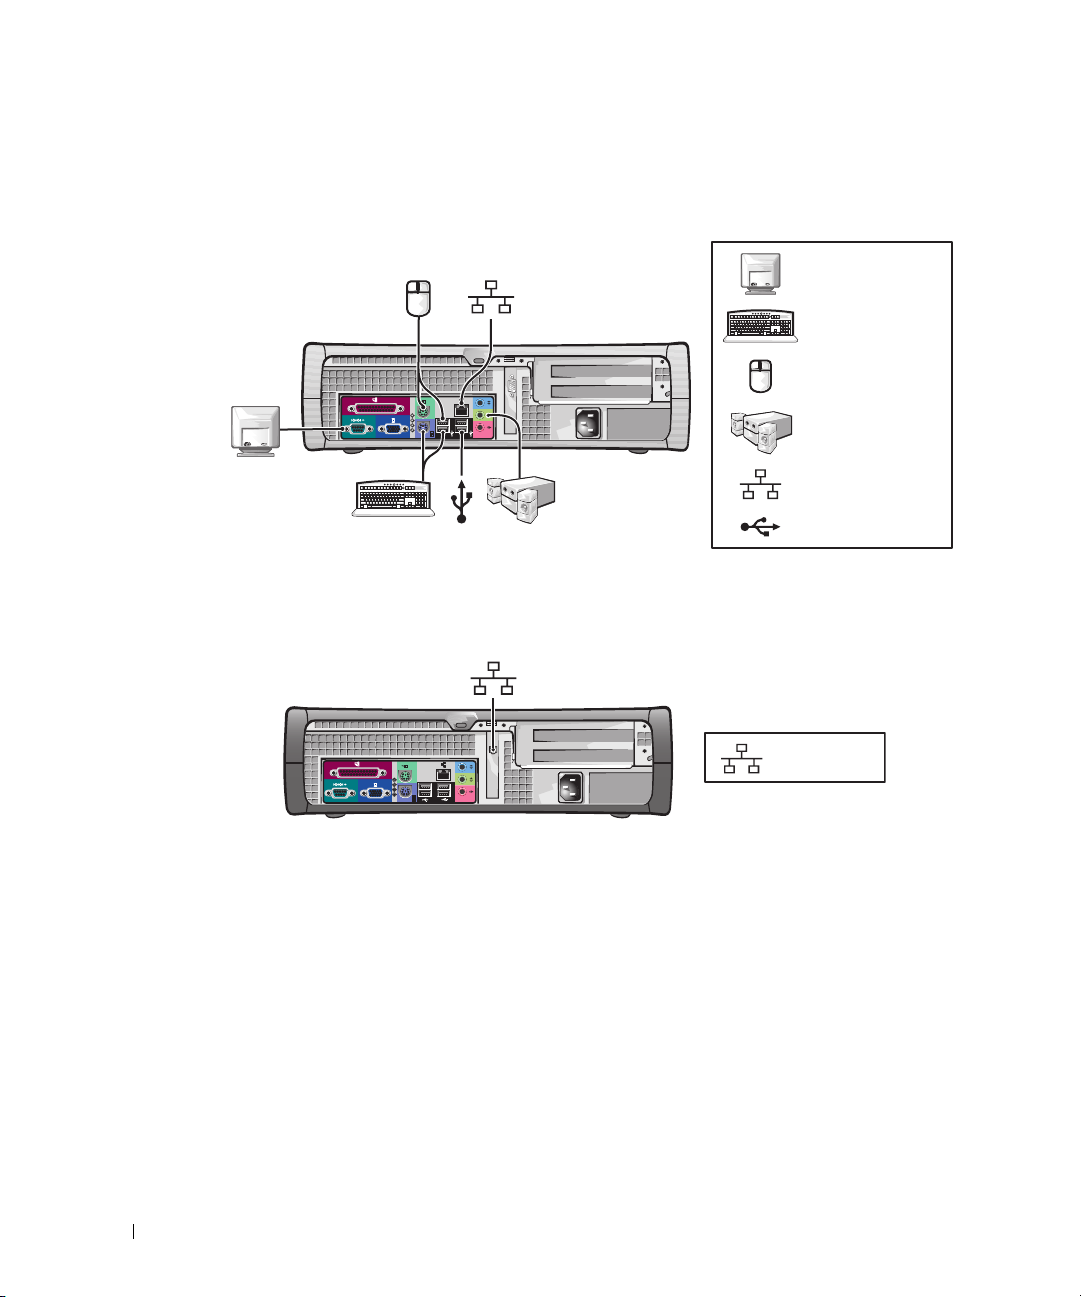
About Your Small Desktop Computer
Front and Back Views
service tag
www.dell.com | support.dell.com
front panel door
headphone connector
USB 2.0 connectors (2)
CD/DVD drive
eject button
Microsoft
Windows
Product Key
CD/DVD-drive
eject button
front panel door
power light
parallel
connector
serial
connector
video
connector
power button
link integrity light
mouse
connector
diagnostic lights
floppy-drive eject button
floppy-drive activity light
hard-drive activity light
network adapter connector
network activity light
line-in connector
optional card
slots (2)
A B C D
low-profile PCI card slot
line-out connector
microphone connector
USB 2.0 connectors (4)
power
connector
8 Quick Reference Guide
Page 9

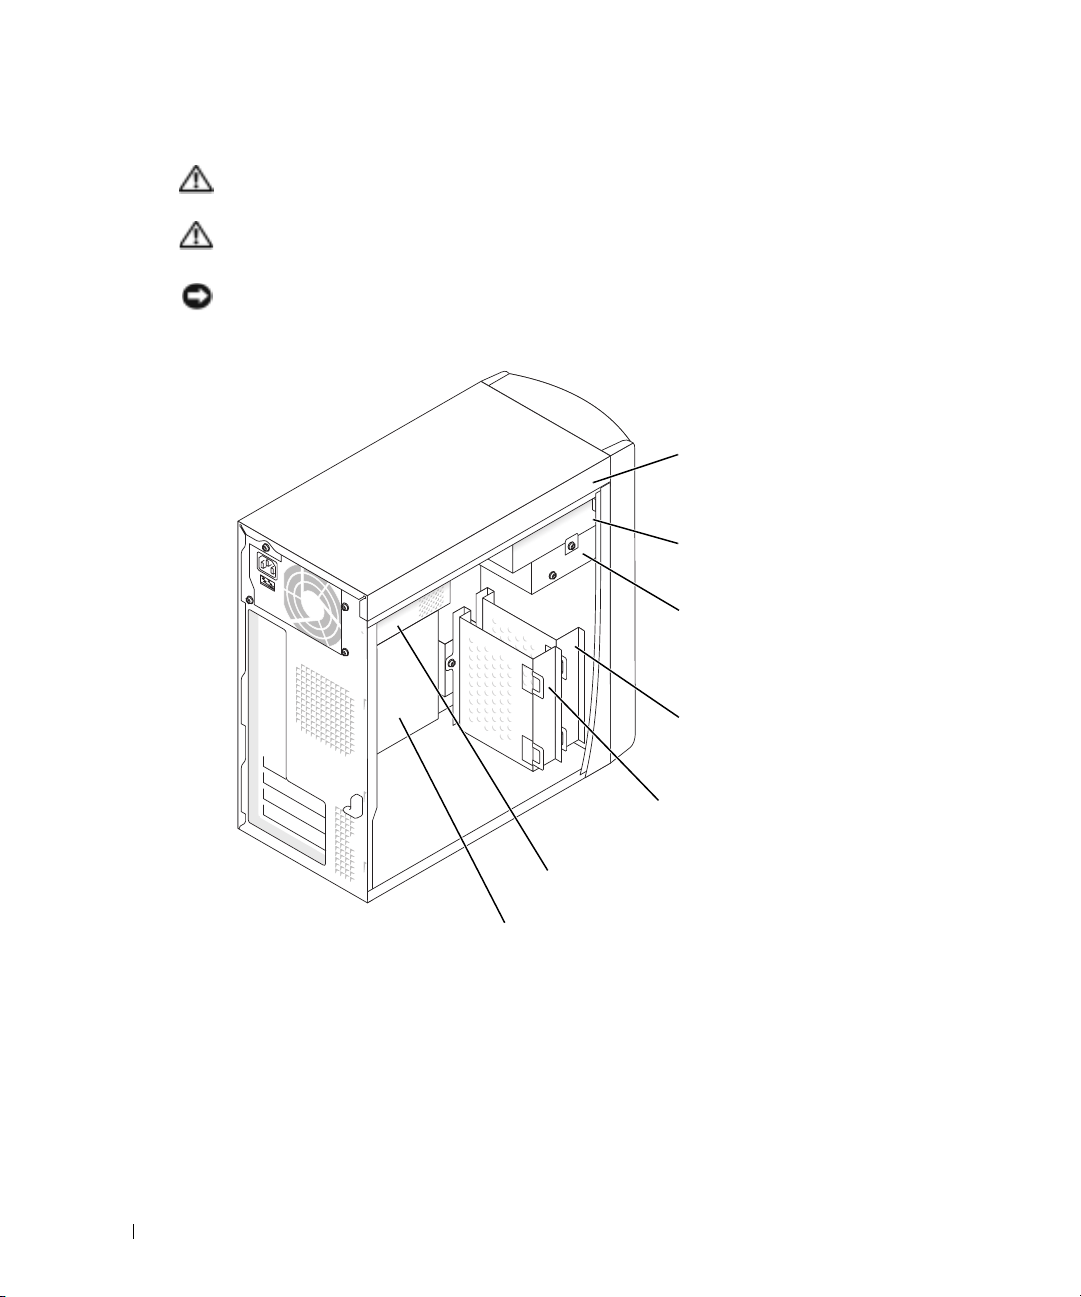
Inside Your Computer
CAUTION: Before you begin any of the procedures in this section, follow the safety instructions in the
Product Information Guide.
CAUTION: To avoid electrical shock, always unplug your computer from the electrical outlet before
opening the cover.
NOTICE: Be careful when opening the computer cover to ensure that you do not accidently disconnect
cables from the system board.
CD/DVD drive
floppy drive
hard drive
system board
heat sink and
blower assembly
optional internal
speaker
padlock ring
low-profile
PCI card slot
power supply
optional card cage
NOTE: Your computer may have a metal bracket
instead of a card cage
Quick Reference Guide 9
Page 10
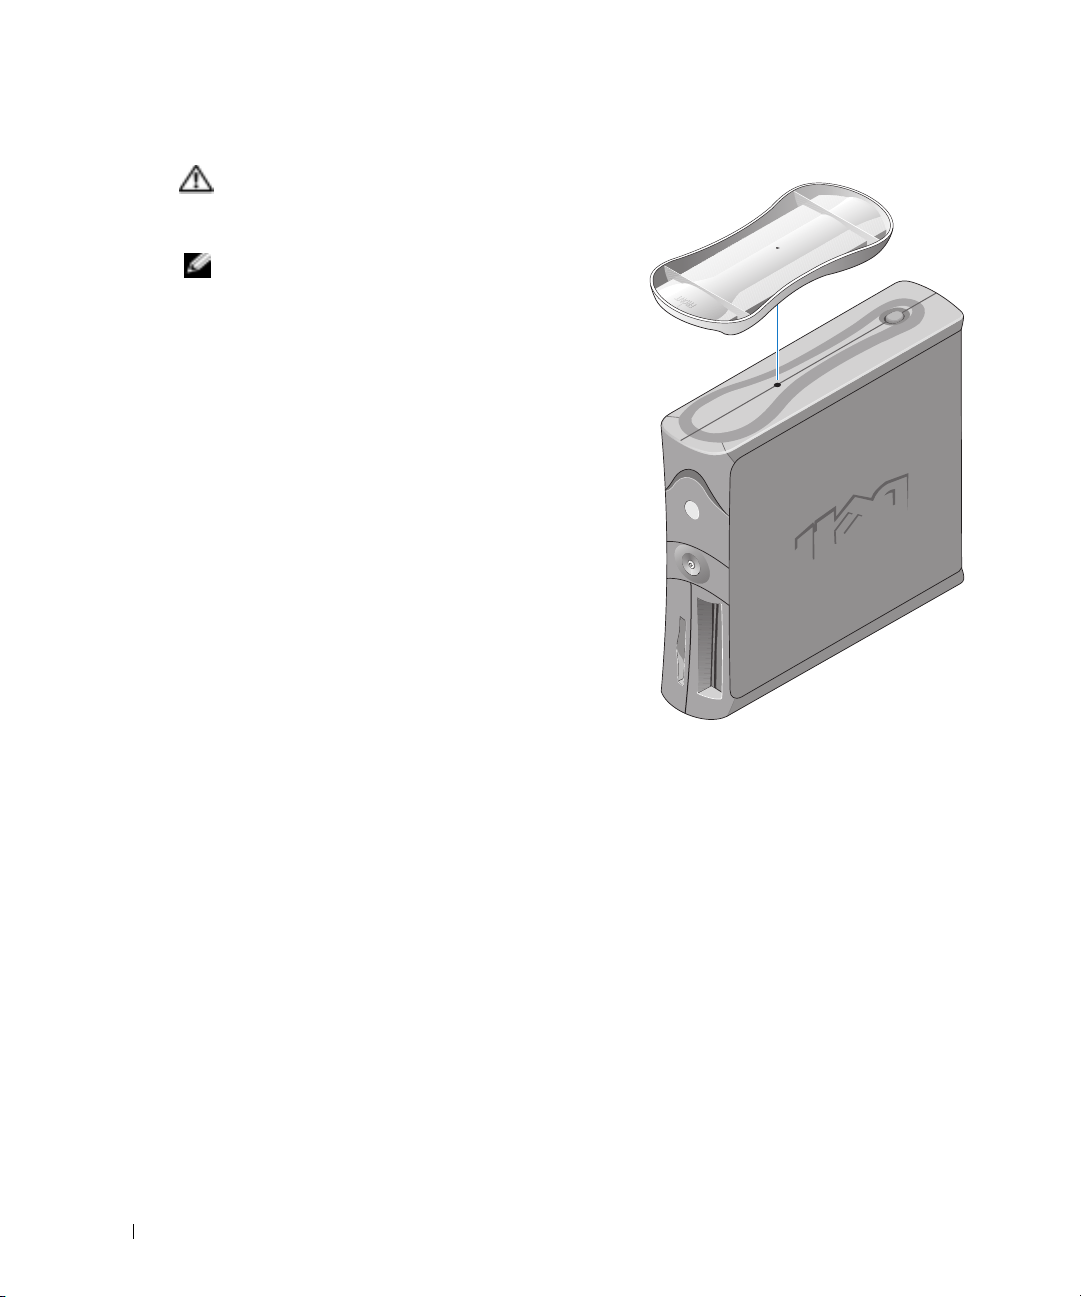
Attaching and Removing the Computer Stand
CAUTION: Before you begin any of the procedures in this
section, follow the safety instructions in the Product
Information Guide.
NOTE: Place your computer on a soft surface to prevent
scratching the top cover.
Your computer can be used in either a vertical or
horizontal position.
To use the computer in a vertical position, you must
attach the computer stand:
1
www.dell.com | support.dell.com
Place the computer on its right side so that the drive
bays are at the bottom and fit the stand onto what
was the left side of the computer:
a
Position the stand as shown in the following
figure by aligning the large round hole in the
stand with the securing button on the side of the
cover.
b
Align the captive screw in the stand with the
screw hole in the cover, and tighten the
thumbscrew.
2
Rotate the computer so that the stand is at the
bottom and the drives are at the top.
10 Quick Reference Guide
Page 11

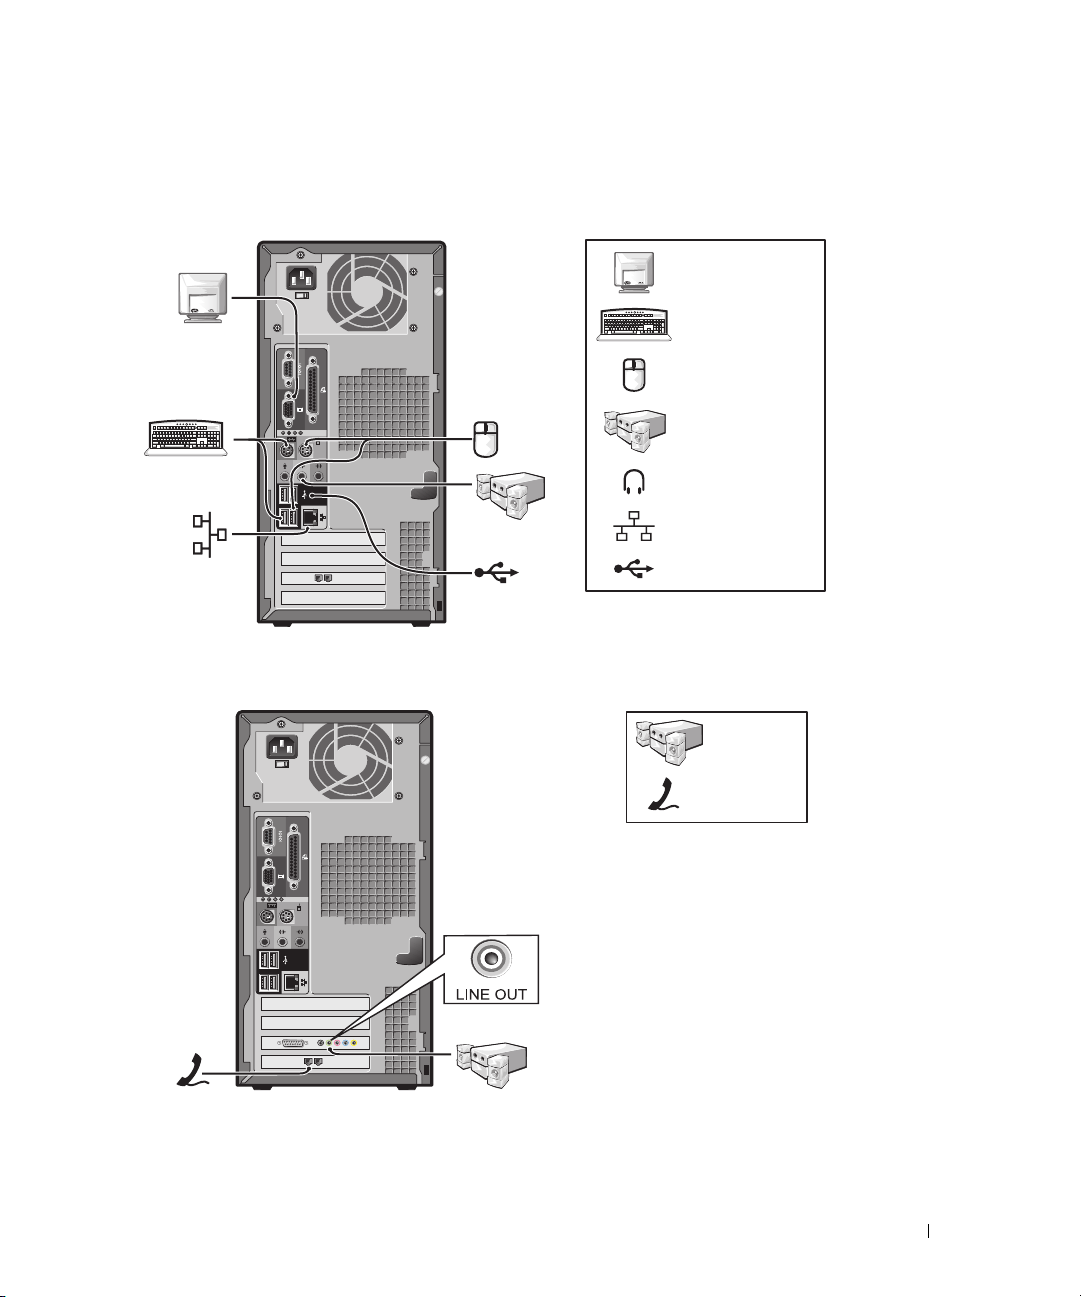
About Your Mini-Tower Computer
Front and Back Views
service tag
CD or DVD drive activity light
CD or DVD eject button
second drive bay
floppy drive light
power light
power button
USB 2.0 connectors (2)
power connector
voltage selection switch
serial connector
video connector
keyboard connector
line-out connector
microphone connector
floppy drive eject button
hard-drive activity light
headphone connector
parallel connector
diagnostic lights (4)
mouse connector
line-in connector
cover latch
USB 2.0 connectors (4)
PCI card slots (3)
network adapter connector
security cable slot
Quick Reference Guide 11
Page 12
Inside Your Computer
CAUTION: Before you begin any of the procedures in this section, follow the safety instructions in the
Product Information Guide.
CAUTION: To avoid electrical shock, always unplug your computer from the electrical outlet before
opening the cover.
NOTICE: Be careful when opening the computer cover to ensure that you do not accidently disconnect
cables from the system board.
www.dell.com | support.dell.com
CD or DVD drive bay
secondary CD or DVD drive bay
floppy drive bay
secondary hard drive bay
primary hard drive bay
power supply
system board
12 Quick Reference Guide
Page 13

Setting Up Your Computer
CAUTION: Before performing any of the procedures in this section, follow the safety instructions in the
Product Information Guide.
NOTICE: If your computer has an expansion card installed (such as a modem card), connect the
appropriate cable to the card, not to the connector on the back panel.
You must complete all steps to properly set up your computer. See the appropriate illustrations that
follow the instructions.
1
Connect the keyboard and mouse.
NOTICE: Do not attempt to operate a PS/2 mouse and a USB mouse simultaneously.
NOTE: If you have a USB-compliant mouse or keyboard, use the USB connectors on the back of your
computer.
2
Connect the modem or network cable.
Insert the network cable, not the phone line, into the network connector. If you have an
optional modem, connect the phone line to the modem.
NOTICE: Do not connect a modem cable to the network adapter. Voltage from telephone
communications can cause damage to the network adapter.
3
Connect the monitor.
Align and gently insert the monitor cable to avoid bending connector pins. Tighten the
thumbscrews on the cable connectors.
NOTE: Some monitors have the video connector underneath the back of the screen. See the
documentation that came with your monitor for its connector locations.
4
Connect the speakers.
5
Connect power cables to the computer, monitor, and devices and insert the other ends of the
power cables to electrical outlets.
6
Verify that the voltage selection switch is set correctly for your location. Your computer has a
manual voltage selection switch. Computers with a voltage selection switch on the back panel
must be manually set to operate at the correct operating voltage.
NOTICE: To help avoid damaging a computer with a manual voltage selection switch, set the switch for
the voltage that most closely matches the AC power available in your location.
NOTE: Before you install any devices or software that did not ship with your computer, read the
documentation that came with the software or device, or contact the vendor to verify that the software or
device is compatible with your computer and operating system.
Quick Reference Guide 13
Page 14
Small Desktop Computer
Setup Without Cards
www.dell.com | support.dell.com
Setup With Cards
monitor
keyboard
mouse
D
C
B
A
speakers
network
USB
14 Quick Reference Guide
network
Page 15
Mini-tower Computer
Setup Without Cards
Setup With Cards
monitor
keyboard
mouse
speakers
headphones
network
USB
speakers
telephony/
modem
Quick Reference Guide 15
Page 16
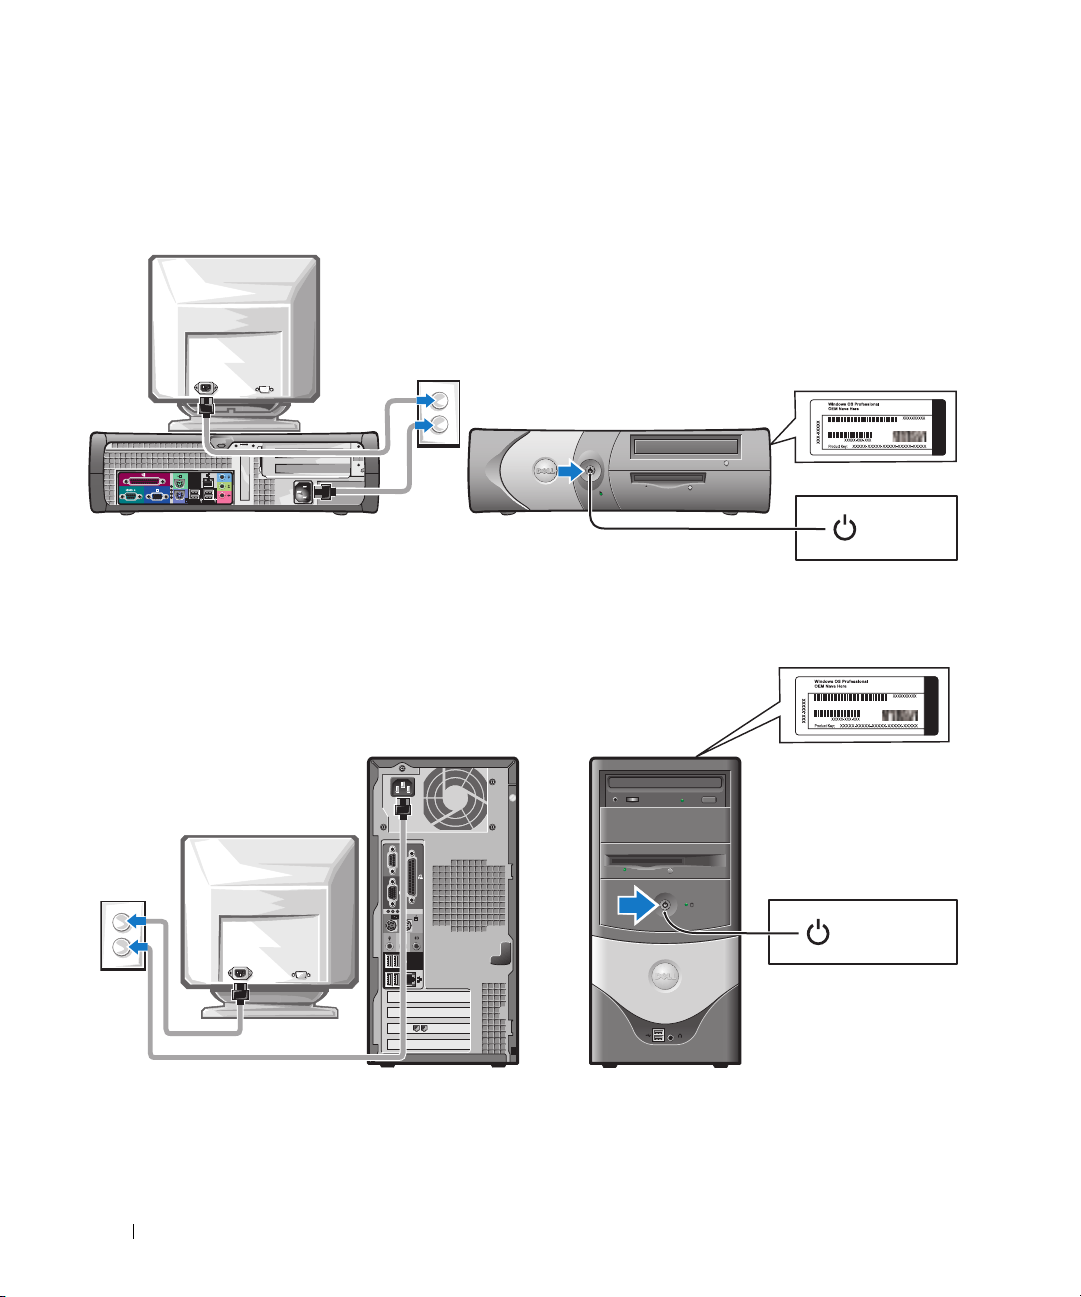
Completed Setup
Small Desktop Computer
www.dell.com | support.dell.com
Mini-Tower Computer
Microsoft Windows Product Key
power
Microsoft Windows Product Key
16 Quick Reference Guide
power
Page 17

Solving Problems
Dell provides a number of tools to help you if your computer does not perform as expected. For the
latest troubleshooting information available for your computer, see the Dell Support website at
support.dell.com
If computer problems occur that require help from Dell, write a detailed description of the error,
beep codes, or diagnostics light patterns; record your Express Service Code and Service Tag below;
and then contact Dell from the same location as your computer.
See "Finding Information for Your Computer" on page 5 for an example of the Express Service
Code and Service Tag.
Express Service Code:___________________________
Service Tag:___________________________
Dell Diagnostics
CAUTION: Before you begin any of the procedures in this section, follow the safety instructions
located in the Product Information Guide.
When to Use the Dell Diagnostics
If you experience a problem with your computer, perform the checks in "Solving Problems" of your
User’s Guide
online
It is recommended that you print these procedures before you begin.
NOTICE: The Dell Diagnostics works only on Dell™ computers.
Enter system setup, review your computer’s configuration information, and ensure that the device
you want to test displays in system setup and is active.
Start the Dell Diagnostics from either your hard drive or from the optional
(also known as the ResourceCD).
.
and run the Dell Diagnostics before you contact Dell for technical assistance.
Drivers and Utilities
CD
Starting the Dell Diagnostics From Your Hard Drive
1
Turn on (or restart) your computer.
2
When the DELL™ logo appears, press <F12> immediately.
NOTE: If you see a message stating that no diagnostics utility partition has been found, run the Dell
Diagnostics from your Drivers and Utilities CD.
If you wait too long and the operating system logo appears, continue to wait until you see the
Microsoft
3
When the boot device list appears, highlight
4
When the Dell Diagnostics
®
Windows® desktop. Then shut down your computer and try again.
Main Menu
Boot to Utility Partition
appears, select the test you want to run.
and press <Enter>.
Quick Reference Guide 17
Page 18

Starting the Dell Diagnostics From the Optional Drivers and Utilities CD
1
Insert the
2
Shut down and restart the computer.
When the DELL logo appears, press <F12> immediately.
If you wait too long and the Windows logo appears, continue to wait until you see the
Windows desktop. Then shut down your computer and try again.
NOTE: The next steps change the boot sequence for one time only. On the next start-up, the computer
boots according to the devices specified in system setup.
When the boot device list appears, highlight
3
4
www.dell.com | support.dell.com
Select the
5
Select the
6
Ty p e 1 to start the ResourceCD menu.
7
Ty p e 2 to start the Dell Diagnostics.
8
Select
Run the 32 Bit Dell Diagnostics
select the version appropriate for your computer.
9
When the Dell Diagnostics
Dell Diagnostics Main Menu
1
After the Dell Diagnostics loads and the
option you want.
Drivers and Utilities
CD.
IDE CD-ROM Device
Boot from CD-ROM
Main Menu
IDE CD-ROM Device
and press <Enter>.
option from the CD boot menu.
option from the menu that appears.
from the numbered list. If multiple versions are listed,
appears, select the test you want to run.
Main Menu
screen appears, click the button for the
Option Function
Express Test Performs a quick test of devices. This test typically takes 10 to 20 minutes and
Extended Test Performs a thorough check of devices. This test typically takes an hour or more
Custom Test Tests a specific device. You can customize the tests you want to run.
Symptom Tree Lists the most common symptoms encountered and allows you to select a test
2
If a problem is encountered during a test, a message appears with an error code and a
description of the problem. Write down the error code and problem description and follow
the instructions on the screen.
If you cannot resolve the error condition, contact Dell.
NOTE: The Service Tag for your computer is located at the top of each test screen. If you contact Dell,
technical support will ask for your Service Tag.
18 Quick Reference Guide
requires no interaction on your part. Run Express Test first to increase the
possibility of tracing the problem quickly.
and requires you to answer questions periodically.
based on the symptom of the problem you are having.
Page 19

3
If you run a test from the
Custom Test
or
Symptom Tree
option, click the applicable tab
described in the following table for more information.
Ta b Function
Results Displays the results of the test and any error conditions encountered.
Errors Displays error conditions encountered, error codes, and the problem
description.
Help Describes the test and may indicate requirements for running the test.
Configuration Displays your hardware configuration for the selected device.
The Dell Diagnostics obtains configuration information for all devices from
system setup, memory, and various internal tests, and it displays the
information in the device list in the left pane of the screen. The device list may
not display the names of all the components installed on your computer or all
devices attached to your computer.
Parameters Allows you to customize the test by changing the test settings.
4
When the tests are completed, if you are running the Dell Diagnostics from the
Utilities
5
Close the test screen to return to the
restart the computer, close the
CD, remove the CD.
Main Menu
Main Menu
screen. To exit the Dell Diagnostics and
screen.
Drivers and
System Lights
Your power light may indicate a computer problem.
Power Light Problem Description Suggested Resolution
Solid green Power is on, and the computer is
operating normally.
Blinking green The computer is in the suspended
state (Microsoft
and Windows XP).
Blinks green several
times and then
turns off
Solid yellow The Dell Diagnostics is running a
A configuration error exists. Check "Diagnostic Lights" on page 20 to see
test, or a device on the system board
may be faulty or incorrectly installed.
®
Windows® 2000
No corrective action is required.
Press the power button, move the mouse, or
press a key on the keyboard to wake the
computer.
if the specific problem is identified.
If the Dell Diagnostics is running, allow the
testing to complete.
Check "Diagnostic Lights" on page 20 to see
if the specific problem is identified.
If the computer does not boot, contact Dell
for technical assistance.
Quick Reference Guide 19
Page 20
Power Light Problem Description Suggested Resolution
Blinking yellow A power supply or system board
Solid green and a
beep code during
POST
Solid green power
light, no beep code
www.dell.com | support.dell.com
and no video during
POST
Solid green power
light and no beep
code but the
computer locks up
during POST
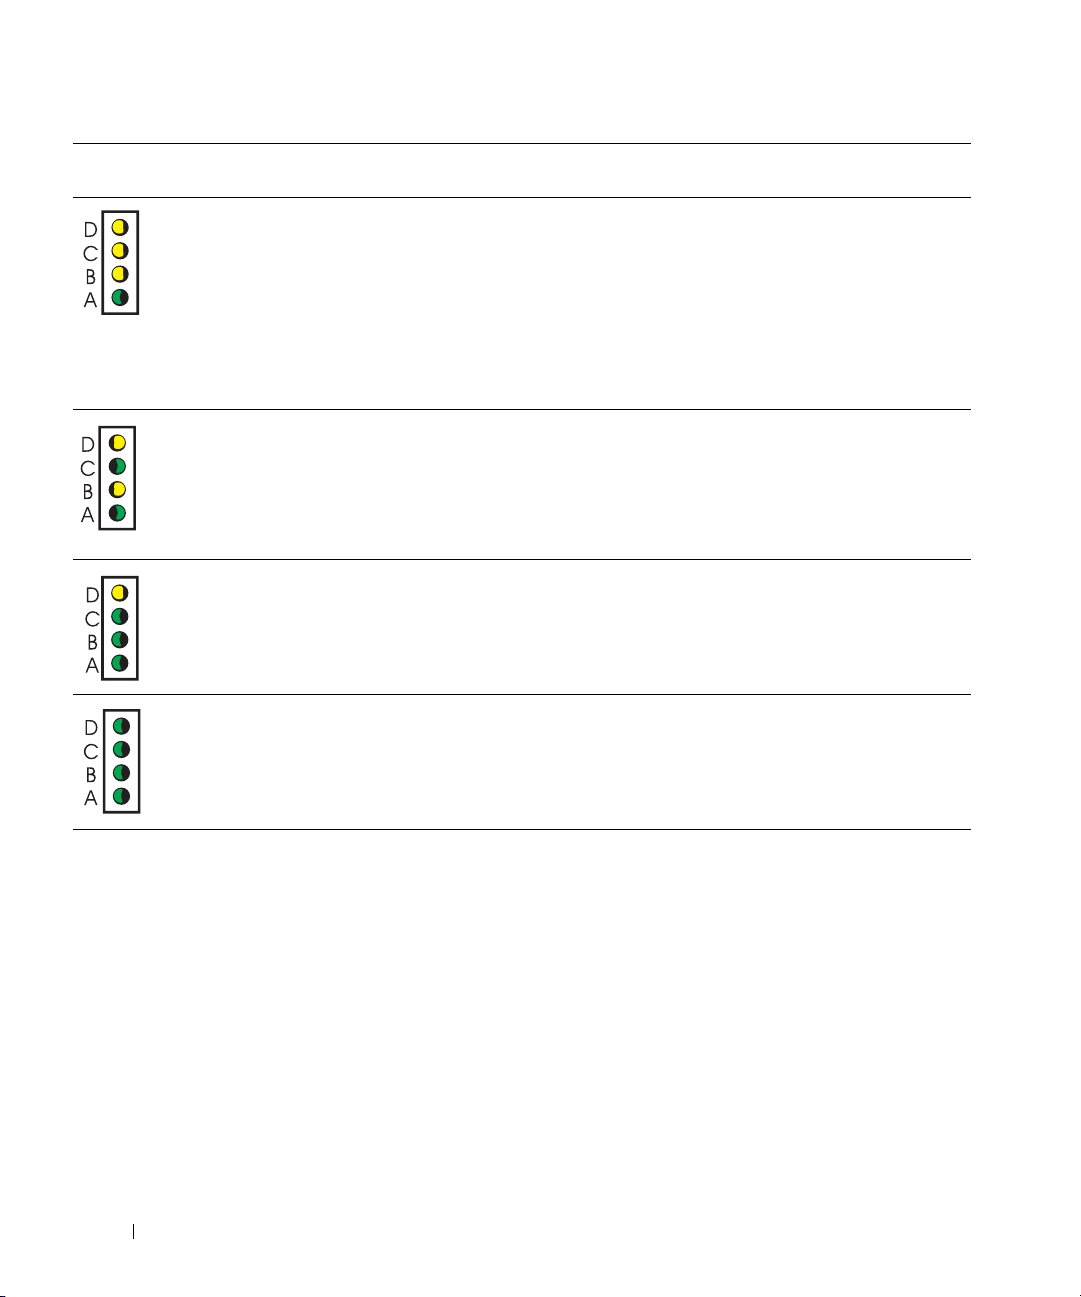
Diagnostic Lights
CAUTION: Before you begin any of the procedures in this section, follow the safety instructions
located in the Product Information Guide.
To help you troubleshoot a problem, your computer has four lights labeled "A," "B," "C," and "D" on
the back panel. The lights can be yellow or green. When the computer starts normally, the patterns
or codes on the lights change as the boot process completes. If the POST portion of system boot
completes successfully, all four lights display solid green. If the computer malfunctions during the
POST process, the pattern displayed on the lights may help identify where in the process the
computer halted.
failure has occurred.
A problem was detected while the
BIOS was executing.
The monitor or the graphics card may
be faulty or incorrectly installed.
An integrated system board device
may be faulty.
Check "Diagnostic Lights" on page 20 to see
if the specific problem is identified. See
"Power Problems" in your online User’s
Guide.
See "Beep Codes" on page 22 for instructions
on diagnosing the beep code. Also, check
"Diagnostic Lights" on page 20 to see if the
specific problem is identified.
Check "Diagnostic Lights" on page 20 to see
if the specific problem is identified.
Check "Diagnostic Lights" on page 20 to see
if the specific problem is identified. If the
problem is not identified, contact Dell for
technical assistance.
Light
Pattern
off
off
off
off
Problem Description Suggested Resolution
The computer is in a normal off
condition or a possible pre-BIOS
failure has occurred.
20 Quick Reference Guide
• Verify that the computer is plugged into a working
electrical outlet and that you have pressed the power
button.
Page 21

Light
Pattern
yellow
green
yellow
yellow
Problem Description Suggested Resolution
A possible processor failure has
occurred.
• Reinstall the processor and restart the computer.
green
green
yellow
yellow
yellow
yellow
green
yellow
yellow
green
green
yellow
Memory modules are detected, but a
memory failure has occurred.
A possible PCI expansion card failure
has occurred.
A possible IDE drive failure has
occurred.
• If you have one memory module installed, reinstall it and
restart the computer.
• If you have two memory modules installed, remove the
modules, reinstall one module, and then restart the
computer. If the computer starts normally, reinstall the
second module.
• If available, install properly working memory of the same
type into your computer.
• If the problem persists, contact Dell.
• Determine if a conflict exists by removing a card (not the
video card) and then restarting the computer.
• If the problem persists, reinstall the card that you
removed, remove a different card, and then restart the
computer.
• Repeat this process for each card. If the computer starts
normally, troubleshoot the last card removed from the
computer for resource conflicts (see ""Resolving Software
and Hardware Incompatibilities" on page 24").
• Move each card one at a time to a different PCI slot and
restart the computer after each move.
• If the problem persists, contact Dell.
• Reseat all IDE drive power and data cables and restart the
computer.
green
green
green
yellow
A possible USB failure has occurred.
• Reinstall all USB devices, check cable connections, and
then restart the computer.
Quick Reference Guide 21
Page 22
Light
Pattern
yellow
yellow
yellow
green
www.dell.com | support.dell.com
yellow
green
yellow
green
yellow
green
green
green
Problem Description Suggested Resolution
No memory modules are detected.
Memory modules are detected, but a
memory configuration or
compatibility error exists.
Another failure has occurred.
• Reinstall all memory modules and restart the computer.
• To eliminate the possibility of a faulty memory connector,
remove all memory modules, reinstall one memory
module (if the computer supports a single module), and
then restart the computer. If the computer starts
normally, move the memory module to a different
connector and restart the computer. Continue until you
have identified a faulty connector or reinstalled all
modules without error.
• Ensure that no special memory module/memory
connector placement requirements exist (see "Memory"
in the online
• Verify that the memory modules that you are installing
are compatible with your computer.
• If the problem persists, contact Dell.
• Ensure that the cables are properly connected to the
system board from all installed hard drives.
• Check the computer message that appears on your
monitor screen.
• If the problem persists, contact Dell.
User’s Guide
for more information).
green
green
green
green
The computer is in a normal
operating condition after POST.
Beep Codes
Your computer might emit a series of beeps during start-up if the monitor cannot display errors or
problems. This series of beeps, called a beep code, identifies a problem. One possible beep code
(code 1-3-1) consists of one beep, a burst of three beeps, and then one beep. This beep code tells
you that the computer encountered a memory problem.
If your computer beeps during start-up:
1
Write down the beep code.
2
See "Dell Diagnostics" on page 17 to identify a more serious cause.
3
Contact Dell for technical assistance.
22 Quick Reference Guide
•None.
Page 23

Code Cause Code Cause
1-1-2 Microprocessor register failure 3-1-4 Slave interrupt mask register failure
1-1-3 NVRAM read/write failure 3-2-2 Interrupt vector loading failure
1-1-4 ROM BIOS checksum failure 3-2-4 Keyboard Controller Test failure
1-2-1 Programmable interval timer failure 3-3-1 NVRAM power loss
1-2-2 DMA initialization failure 3-3-2 Invalid NVRAM configuration
1-2-3 DMA page register read/write
failure
1-3 Video Memory Test failure 3-4-1 Screen initialization failure
1-3-1 through 2-4-4 Memory not being properly
identified or used
3-1-1 Slave DMA register failure 3-4-3 Search for video ROM failure
3-1-2 Master DMA register failure 4-2-1 No timer tick
3-1-3 Master interrupt mask register
failure
4-2-3 Gate A20 failure 4-4-1 Serial or parallel port test failure
4-2-4 Unexpected interrupt in protected
mode
4-3-1 Memory failure above address
0FFFFh
4-3-3 Timer-chip counter 2 failure 4-4-4 Cache test failure
4-3-4 Time-of-day clock stopped
3-3-4 Video Memory Test failure
3-4-2 Screen retrace failure
4-2-2 Shutdown failure
4-4-2 Failure to decompress code to
shadowed memory
4-4-3 Math-coprocessor test failure
Running the Dell™ IDE Hard Drive Diagnostics
The Dell IDE Hard Drive Diagnostics is a utility that tests the hard drive to troubleshoot or
confirm a hard drive failure.
1
Turn on your computer (if your computer is already on, restart it).
2
When F2= Setup appears in the upper-right corner of the screen, press <Ctr><Alt><D>.
3
Follow the instructions on the screen.
If a failure is reported, see "Hard Drive Problems" in the "Solving Problems" section of the online
User’s Guide
.
Quick Reference Guide 23
Page 24

Resolving Software and Hardware Incompatibilities
If a device is either not detected during the operating system setup or is detected but incorrectly
configured, you can use the Hardware Troubleshooter to resolve the incompatibility. In the
Microsoft
incompatibilities.
Windows XP
To resolve incompatibilities using the Hardware Troubleshooter:
1
2
www.dell.com | support.dell.com
3
4
Windows 2000
To resolve incompatibilities using Device Manager:
1
2
3
4
5
6
®
Windows® 2000 operating system, you can also use Device Manager to resolve
Click the
Ty p e
hardware troubleshooter
Click
Hardware Troubleshooter
In the
Hardware Troubleshooter
computer
Click the
In the
Control Panel
Click the
Click
Device Manager
Click
View
Double-click
Incorrectly configured devices are indicated by a yellow exclamation point (
device has been disabled.
Start
button and click
, and click
Start
Next
.
button, point to
window, double-click
Hardware
tab.
.
and click
Resources by connection
Interrupt request (IRQ)
Help and Support
in the
Search
in the
Search Results
list, click
Settings
I need to resolve a hardware conflict on my
, and then click
System
.
.
.
field and click the arrow to start the search.
list.
Control Panel
.
.
!
) or a red X if the
7
Double-click any device marked with an exclamation point to display the
Device
The
reconfigured.
8
Reconfigure the devices or remove the devices from the Device Manager. See the
documentation that came with the device for information on configuring the device.
To resolve incompatibilities using the Hardware Troubleshooter:
1
Click the
2
Click
Start
Troubleshooting and Maintenance
troubleshooters
In the
Hardware Troubleshooter
Next
and click
.
24 Quick Reference Guide
status area in the
button and click
, and then click
list, click
Properties
Properties
Help
Hardware
window reports the cards or devices that need to be
.
on the
Contents
tab, click
Windows 2000
.
I need to resolve a hardware conflict on my computer
window.
Page 25

Using Microsoft® Windows® XP System Restore
The Microsoft® Windows® XP operating system provides System Restore to allow you to return
your computer to an earlier operating state (without affecting data files) if changes to the
hardware, software, or other system settings have left the computer in an undesirable operating
state. See the Windows Help and Support Center for information on using System Restore.
NOTICE: Make regular backups of your data files. System Restore does not monitor your data files or
recover them.
Creating a Restore Point
1
Click the
2
Click
3
Follow the instructions on the screen.
Restoring the Computer to an Earlier Operating State
NOTICE: Before you restore the computer to an earlier operating state, save and close any open files
and exit any open programs. Do not alter, open, or delete any files or programs until the system
restoration is complete.
Click the
1
System Restore
2
Ensure that
3
Click a calendar date to which you want to restore your computer.
The
points. All calendar dates with available restore points appear in boldface type.
Start
button and click
System Restore
Start
.
button, point to
.
Restore my computer to an earlier time
Select a Restore Point
Help and Support
All Programs→
.
Accessories→
System Tools
is selected and click
, and then click
Next
.
screen provides a calendar that allows you to see and select restore
4
Select a restore point and click
Next
.
If a calendar date has only one restore point, then that restore point is automatically selected.
If two or more restore points are available, click the restore point that you prefer.
5
Click
Next
.
Restoration Complete
The
screen appears after System Restore finishes collecting data and
then the computer restarts.
6
After the computer restarts, click OK.
To change the restore point, you can either repeat the steps using a different restore point, or you
can undo the restoration.
Quick Reference Guide 25
Page 26

Undoing the Last System Restore
NOTICE: Before you undo the last system restore, save and close all open files and exit any open
programs. Do not alter, open, or delete any files or programs until the system restoration is complete.
Click the
1
System Restore
2
Click
3
Click
The
4
After the computer restarts, click OK.
Start
button, point to
.
Undo my last restoration
Next
.
System Restore
screen appears and the computer restarts.
All Programs→ Accessories→ System Tools
and click
Next
.
, and then click
www.dell.com | support.dell.com
Enabling System Restore
If you reinstall Windows XP with less than 200 MB of free hard-disk space available, System
Restore is automatically disabled. To see if System Restore is enabled:
1
Click the
2
Click
Performance and Maintenance
3
Click
System
4
Click the
5
Ensure that
Reinstalling Microsoft® Windows® XP
Before You Begin
If you are considering reinstalling the Windows XP operating system to correct a problem with a
newly installed driver, first try using Windows XP Device Driver Rollback. If Device Driver
Rollback does not resolve the problem, then use System Restore to return your operating system to
the operating state it was in before you installed the new device driver.
NOTICE: Before performing the installation, back up all data files on your primary hard drive. For
conventional hard drive configurations, the primary hard drive is the first drive detected by the computer.
To reinstall Windows XP, you need the following items:
• Dell™
•Dell
Operating System
Drivers and Utilities
Start
button and click
.
System Restore
tab.
Turn off System Restore
CD
CD
Control Panel
.
is unchecked.
.
NOTE: The Drivers and Utilities CD contains drivers that were installed during assembly of the computer.
Use the Drivers and Utilities CD or go to the Dell support site to load any required drivers.
NOTE: The Operating System and Drivers and Utilities CDs are optional and may not ship with all
computers.
26 Quick Reference Guide
Page 27

Reinstalling Windows XP
NOTICE: You must use Windows XP Service Pack 1 or later when you reinstall Windows XP.
To reinstall Windows XP, perform all the steps in the following sections in the order in which they
are listed.
The reinstallation process can take 1 to 2 hours to complete. After you reinstall the operating
system, you must also reinstall the device drivers, virus protection program, and other software.
NOTICE: The Operating System CD provides options for reinstalling Windows XP. The options can
overwrite files and possibly affect programs installed on your hard drive. Therefore, do not reinstall
Windows XP unless a Dell technical support representative instructs you to do so.
NOTICE: To prevent conflicts with Windows XP, disable any virus protection software installed on your
computer before you reinstall Windows XP. See the documentation that came with the software for
instructions.
Booting From the Operating System CD
1
Save and close any open files and exit any open programs.
2
Insert the
3
Restart the computer.
4
Press <F12> immediately after the DELL™ logo appears.
Operating System
CD. Click
Exit
if
Install Windows XP
message appears.
If the operating system logo appears, wait until you see the Windows desktop, and then shut
down the computer and try again.
5
Press the arrow keys to select
6
When the
Press any key to boot from CD
CD-ROM
, and press <Enter>.
message appears, press any key.
Windows XP Setup
1
When the
Windows now
2
Read the information on the
Windows XP Setup
.
screen appears, press <Enter> to select
Microsoft Windows Licensing Agreement
To set up
screen, and press
<F8> to accept the license agreement.
3
If your computer already has Windows XP installed and you want to recover your current
Windows XP data, type
4
If you want to install a new copy of Windows XP, press <Esc> to select that option.
5
Press <Enter> to select the highlighted partition (recommended), and follow the
r
to select the repair option, and remove the CD.
instructions on the screen.
The
Windows XP Setup
screen appears, and the operating system begins to copy files and
install the devices. The computer automatically restarts multiple times.
NOTE: The time required to complete the setup depends on the size of the hard drive and the speed of
your computer.
Quick Reference Guide 27
Page 28

NOTICE: Do not press any key when the following message appears: Press any key to boot
from the CD.
6
When the
location and click
7
Enter your name and organization (optional) in the
click
Next
8
At the
Computer Name and Administrator Password
computer (or accept the one provided) and a password, and click
9
If the
Modem Dialing Information
Next
.
10
www.dell.com | support.dell.com
Enter the date, time, and time zone in the
11
If the
Networking Settings
12
If you are reinstalling Windows XP Professional and you are prompted to provide further
information regarding your network configuration, enter your selections. If you are unsure of
your settings, accept the default selections.
Windows XP installs the operating system components and configures the computer. The
computer automatically restarts.
NOTICE: Do not press any key when the following message appears: Press any key to boot
from the CD.
When the
13
14
When the
Skip
click
15
When the
click
Next
16
When the
17
Click
Next
18
Click
Finish
19
Reinstall the appropriate drivers with the
20
Reinstall your virus protection software.
21
Reinstall your programs.
Regional and Language Options
Next
.
screen appears, select the settings for your
Personalize Your Software
.
window, enter a name for your
Next
screen appears, enter the requested information and click
Date and Time Settings
screen appears, click
Welcome to Microsoft
How will this computer connect to the Internet?
screen appears, click
Typical
and click
Next
window, and click
Next
.
.
Ready to register with Microsoft?
screen appears, select
No, not at this time
.
Who will use this computer?
screen appears, you can enter up to five users.
.
to complete the setup, and remove the CD.
Drivers and Utilities
CD.
screen, and
.
.
message appears,
Next
and
.
NOTE: To reinstall and activate your Microsoft Office or Microsoft Works Suite programs, you need the
Product Key number located on the back of the Microsoft Office or Microsoft Works Suite CD sleeve.
28 Quick Reference Guide
Page 29

Using the Drivers and Utilities CD
To us e t h e
Drivers and Utilities
CD (also known as the ResourceCD) while you are running the
Windows operating system:
NOTE: To access device drivers and user documentation, you must use the Drivers and Utilities CD while
you are running Windows.
1
Turn on the computer and allow it to boot to the Windows desktop.
2
Insert the
If you are using the
ResourceCD Installation
Drivers and Utilities
Drivers and Utilities
window opens to inform you that the
CD into the CD drive.
CD for the first time on this computer, the
Drivers and Utilities
about to begin installation.
3
Click OK to continue.
To complete the installation, respond to the prompts offered by the installation program.
4
Click
Next
at the
5
Select the appropriate
Drivers for Your Computer
Welcome Dell System Owner
System Model, Operating System, Device Type,
screen.
and
To pi c
.
To display a list of device drivers for your computer:
1
Click
My Drivers
The
Drivers and Utilities
in the
To pi c
drop-down menu.
CD scans your computer’s hardware and operating system, and then
a list of device drivers for your system configuration is displayed on the screen.
2
Click the appropriate driver and follow the instructions to download the driver to your
computer.
To view all available drivers for your computer, click
Drivers
from the
To pi c
drop-down menu.
CD is
Quick Reference Guide 29
Page 30

www.dell.com | support.dell.com
30 Quick Reference Guide
Page 31

Index
B
beep codes, 22
C
CD
operating system, 7
computer
beep codes, 22
restore to previous state, 25
conflicts
software and hardware
incompatibilities, 24
D
Dell
premier support website, 6
support site, 6
Dell Diagnostics, 17
diagnostics
beep codes, 22
Dell, 17
Drivers and Utilities CD, 5
lights, 19-20
documentation
device, 5
online, 6
Quick Reference, 5
ResourceCD, 5
User’s Guide, 5
drivers
ResourceCD, 5
Drivers and Utilities CD, 5
E
error messages
beep codes, 22
diagnostic lights, 19-20
I
IRQ conflicts, 24
L
labels
Microsoft Windows, 6
Service Tag, 6
light, 19
lights
back of computer, 20
diagnostic, 19-20
front of computer, 19
power button, 19
system, 19
M
Microsoft Windows label, 6
Dell Premier Support
website, 6
Device Manager, 24
diagnostic lights, 19-20
H
hardware
beep codes, 22
conflicts, 24
Dell Diagnostics, 17
Hardware Troubleshooter, 24
Help and Support Center, 7
O
Operating System
CD, 7
Installation Guide, 7
operating system
reinstalling Windows XP, 26
Operating System CD, 7
Index 31
Page 32

P
S
U
power light, 19
problems
beep codes, 22
conflicts, 24
Dell Diagnostics, 17
diagnostic lights, 19-20
restore to previous state, 25
R
reinstalling
Drivers and Utilities CD, 5
ResourceCD, 5
Windows XP, 26
ResourceCD
Dell Diagnostics, 17
Service Tag, 6
software
conflicts, 24
stand
attach, 10
remove, 10
system lights, 19
System Restore, 25
T
troubleshooting
conflicts, 24
Dell Diagnostics, 17
diagnostic lights, 19-20
Hardware Troubleshooter, 24
Help and Support Center, 7
restore to previous state, 25
User’s Guide, 5
W
Windows 2000
Device Manager, 24
Hardware Troubleshooter, 24
Windows XP
Hardware Troubleshooter, 24
Help and Support Center, 7
reinstalling, 26
System Restore, 25
32 Index
Page 33

Dell™ OptiPlex™ 170L
Referencehåndbog
Model MTC2 og DHS
www.dell.com | support.euro.dell.com
Page 34

Bemærkninger, meddelelser og advarsler
BEMÆRK! En BEMÆRKNING angiver vigtige oplysninger, som du kan bruge for at udnytte computeren optimalt.
MEDDELELSE: En MEDDELELSE angiver enten en mulig beskadigelse af hardware eller tab af data og oplyser dig om,
hvordan du kan undgå dette problem.
ADVARSEL! En ADVARSEL angiver mulig tingskade, legemsbeskadigelse eller død.
Hvis du har købt en Dell™ n Series-computer, gælder referencer i dette dokument til
Microsoft
Cd'en
operativsystemet og
®
Windows®-operativsystemer ikke.
Drivers and Utilities
(Drivere og hjælpeværktøjer) (også kaldet ResourceCD), mediet med
Referencehåndbog
er tilbehør og følger ikke med alle computere.
____________________
Oplysningerne i dette dokument kan ændres uden varsel.
© 2004 Dell Inc. Alle rettigheder forbeholdes.
Enhver form for gengivelse uden skriftlig tilladelse fra Dell Inc. er strengt forbudt.
Anvendte varemærk er i denne tekst: Dell, DELL-logoet og OptiPlex er varemærker tilhørende Dell Inc. Microsoft og Windows er registrerede
varemærker tilhørende Microsoft Corporation.
Andre varemærker og firmanavne kan være brugt i dette dokument til at henvise til enten de fysiske eller juridiske personer, som gør krav på
mærkerne og navnene, eller til deres produkter . Dell Inc. fraskriver sig enhver interesse i ejendomsret over varemærker og handelsnavne, der
ikke tilhører dem.
Model MTC2 og DHS
September 2004 Artikelnr. D7235 Udgave A00
Page 35

Indhold
Søgning efter oplysninger om computeren . . . . . . . . . . . . . . . . . 37
Om den lille desktop-computer
Set forfra og bagfra
Inden i computeren
Montering og afmontering af computerens stativ
Om minitower-computeren
Set forfra og bagfra
Inden i computeren
Opstilling af computeren
Lille desktop-computer
Minitower-computer
Færdig installation
. . . . . . . . . . . . . . . . . . . . . . . . . . . . . 48
Lille desktop-computer
Minitower-computer
Problemløsning
. . . . . . . . . . . . . . . . . . . . . . . . . . . . . . 49
Dell Diagnostics (Dell Diagnosticering)
Systemlamper
. . . . . . . . . . . . . . . . . . . . . . . . . . . . . 51
Diagnosticeringslamper
Bipkoder
. . . . . . . . . . . . . . . . . . . . . . . . . . . . . . . 55
. . . . . . . . . . . . . . . . . . . . . . . 40
. . . . . . . . . . . . . . . . . . . . . . . . . . 40
. . . . . . . . . . . . . . . . . . . . . . . . . . 41
. . . . . . . . . . . . 42
. . . . . . . . . . . . . . . . . . . . . . . . . 43
. . . . . . . . . . . . . . . . . . . . . . . . . . 43
. . . . . . . . . . . . . . . . . . . . . . . . . . 44
. . . . . . . . . . . . . . . . . . . . . . . . . . 45
. . . . . . . . . . . . . . . . . . . . . . . . 46
. . . . . . . . . . . . . . . . . . . . . . . . . 47
. . . . . . . . . . . . . . . . . . . . . . . . 48
. . . . . . . . . . . . . . . . . . . . . . . . . 48
. . . . . . . . . . . . . . . . . 49
. . . . . . . . . . . . . . . . . . . . . . . . 52
Sådan køres Dell™ IDE Hard Drive Diagnostics
(Dell™ IDE-harddiskdiagnosticering)
. . . . . . . . . . . . . . . . . . 56
Afhjælpning af software- og hardwarekompatibilitetsproblemer
Brug af Microsoft
(Systemgendannelse)
Geninstallation af Microsoft
®
Windows® XP System Restore
. . . . . . . . . . . . . . . . . . . . . . . . . 57
®
Windows® XP . . . . . . . . . . . . . . 59
. . . . . 56
Brug af cd'en Drivers and Utilities (Drivere og hjælpeværktøjer)
. . . . . . . . . . . . . . . . . . . . . . . . . . . . . . . . . . 63
Indeks
. . . . . . . 61
Indhold 35
Page 36

36 Indhold
Page 37

Søgning efter oplysninger om computeren
Hvad søger du efter? Find det her
• Et diagnosticeringsprogram til computeren
• Drivere til computeren
• Dokumentation til computeren
• Dokumentation til enheden
• DSS (Desktop System Software)
• Opdateringer og rettelser til operativsystemer
• Garantioplysninger
• Sikkerhedsinstruktioner
• Oplysninger om lovgivningsmæssige regler
• Oplysninger om ergonomi
• Slutbrugerlicensaftale
Cd'en Drivers and Utilities (også kendt som ResourceCD
(ressource-cd'en)
Dokumentationen og driverne er allerede installeret på
computeren. Du kan bruge denne cd til at geninstallere
drivere, køre Dell Diagnostics (Dell Diagnosticering) eller
få adgang til dokumentationen
BEMÆRK! De seneste opdateringer af drivere og
dokumentation finder du på support.dell.com.
BEMÆRK! Cd'en Drivers and Utilities (Drivere og
hjælpeværktøjer) følger ikke med alle computere.
DSS (Desktop System Software)
Findes på cd'en Drivers and Utilities (Drivere og
hjælpeværktøjer) og på webstedet for Dell Support
på support.dell.com.
Produktvejledning
På cd'en kan der være
readme-filer (Vigtigt-filer),
som indeholder sidste
øjebliks-opdateringer
om tekniske ændringer
eller avanceret teknisk
referencemateriale til
erfarne brugere eller
teknikere.
Referencehåndbog 37
Page 38

Hvad søger du efter? Find det her
• Afmontering og udskiftning af dele
• Tekniske specifikationer
• Konfiguration af systemindstillinger
• Fejlfinding og løsning af problemer
Dell™ OptiPlex™ User’s Guide (Brugerhåndbog)
Microsoft
(Hjælp og support)
1
2
Brugerhåndbogen findes også på cd'en Drivers and Utilities
(Drivere og hjælpeværktøjer).
www.dell.com | support.dell.com
• Servicemærke og ekspresservicekode
• Microsoft Windows-licensmærkat
Servicenummer og Microsoft Windows-Licens
Disse mærkater findes på computeren.
• Når du går ind på
• Ved henvendelse til den
• De nyeste drivere til computeren
• Svar på spørgsmål om teknisk support.
• Onlinediskussioner med andre brugere og
teknisk support
• Dokumentation til computeren
Websted for Dell Support – support.dell.com
BEMÆRK! Vælg dit område for at få vist det korrekte
supportsted.
Webstedet for Dell Support indeholder flere onlineværktøjer,
herunder:
• Løsninger – fejlfindingsoplysninger og tip, tekniske artikler
• Forum – onlinediskussion med andre Dell-kunder
• Opgraderinger – oplysninger om opgradering af
• Kundeservice – kontaktoplysninger, ordrestatus, garanti og
• Download – drivere, programrettelser og
• Dokumentation – computerdokumentation,
®
Windows® XP Help and Support Center
Klik på knappen
Start
(Start), og klik på
Help and Support
(Hjælp og support).
Klik på
User's and system guides
systeminformation), og klik på
(Brugerhåndbog og
User's guides
(Brugerhåndbøger).
support.dell.com
eller
kontakter Dell’s tekniske
support, skal du bruge
servicenummeret.
tekniske support skal du
indtaste ekspresservicekoden for at retningsbestemme dit
opkald. Ekspresservicekoden er ikke tilgængelig i alle lande.
og onlinekurser
komponenter, f.eks. hukommelse, harddisk og
operativsystem
reparationsoplysninger
softwareopdateringer
produktspecifikationer og hvidbøger
38 Referencehåndbog
Page 39

Hvad søger du efter? Find det her
• Status for serviceopkald og oversigt over support
• De vigtigste tekniske problemer for computeren
• Ofte stillede spørgsmål
• Hentning af filer
• Oplysninger om computerens konfiguration
Webstedet for Dell Premier Support –
premiersupport.dell.com
Webstedet for Dell Premier Support er tilpasset kunder fra
erhvervslivet, den offentlige sektor og uddannelsessektoren.
Webstedet er muligvis ikke tilgængeligt i alle lande.
• Servicekontrakt for computeren
• Brug af Windows XP
• Dokumentation til computeren
• Dokumentation til enheder, f.eks. modem
Windows Help and Support Center (Windows Hjælp og
support)
1
Klik på knappen
(Hjælp og support).
2
Skriv et ord eller en sætning, der beskriver problemet, og
klik på pileikonet.
3
Klik på det emne, der beskriver problemet.
4
Følg instruktionerne på skærmen.
• Geninstallation af operativsystemet
Cd'en Operating System (Operativsystem)
Operativsystemet er allerede installeret på computeren. Hvis
du vil geninstallere operativsystemet, skal du bruge cd'en
Operating System (Operativsystem). Se OptiPlex User’s
Guide (Brugerhåndbogen) for at få en vejledning.
Start
(Start), og klik på
Help and Support
Når du har installeret
operativsystemet igen, skal
du bruge cd'en Drivers and
Utilities (Drivere og
hjælpeværktøjer) for
at geninstallere drivere til de
enheder, der blev leveret
sammen med computeren.
Operativsystemets
produktnøgleetiket sidder på
computeren.
• Lovpligtige oplysninger om model og chassistype
BEMÆRK! Cd'ens farve varierer afhængigt af, hvilket
operativsystem du bestilte.
BEMÆRK! Medierne med operativsystemet er tilbehør
og følger muligvis ikke med alle computere.
DHS—Lille desktop-chassis
—
MTC2
Minitower-chassis
Referencehåndbog 39
Page 40

Om den lille desktop-computer
Set forfra og bagfra
servicenummer
www.dell.com | support.dell.com
frontpanellåge
stik til hovedtelefoner
USB 2.0-stik (2)
Cd/dvd-drevets
udløserknap
Microsoft
Windowsproduktnøgle
Cd/dvd-drevets
udløserknap
frontpanellåge
strømlampe
parallel-stik
stik til mus
serielt stik
video-stik
diagnosticeringslamper
tænd/sluk-knap
forbindelseslampe
A B C D
diskettedrevets udløserknap
diskettedrevets aktivitetslampe
harddiskens aktivitetslampe
stik til netværksadapter
netværksaktivitetslampe
line-in-stik
valgfrit
kortstik (2)
strømstik
PCI-kortstik, lav profil
line-out-stik
mikrofonstik
USB 2.0-stik (4)
40 Referencehåndbog
Page 41

Inden i computeren
ADVARSEL! Før du begynder på nogen af procedurerne i dette afsnit, skal du følge
sikkerhedsinstruktionerne i Product Information Guide (Produktvejledning).
ADVARSEL! For at undgå elektrisk stød skal computerens stik altid tages ud af stikkontakten,
inden dækslet åbnes.
MEDDELELSE: Pas på, at du ikke ved en fejltagelse kommer til at frakoble kabler på systemkortet,
når du åbner computerens dæksel.
Cd/dvd-drev
diskettedrev
harddisk
systemkort
kølekappe og
blæser
valgfri intern
højttaler
ring til hængelås
PCI-kortstik, lav profil
strømforsyning
valgfri kortholder
BEMÆRK! Computeren har muligvis et
metalbeslag i stedet for en kortholder
Referencehåndbog 41
Page 42

Montering og afmontering af computerens stativ
ADVARSEL! Før du begynder på nogen af procedurerne
i dette afsnit, skal du følge sikkerhedsinstruktionerne i
Product Information Guide (Produktvejledning).
BEMÆRK! Anbring computeren på en blød flade, så
topdækslet ikke ridses.
Computeren kan placeres lodret eller vandret.
Du skal anbringe computeren i stativet, hvis den skal
bruges i lodret stilling:
1
Læg computeren på højre side, så drevbåsene vender
www.dell.com | support.dell.com
nedad, og sæt stativet på computerens venstre side:
a
Anbring stativet som vist i figuren i det følgende
ved at anbringe det store runde hul i stativet ud
for fastgøringsknappen på siden af dækslet.
b
Anbring stativets formonterede skrue ud for
skruehullet i dækslet, og tilspænd fingerskruen.
2
Drej computeren, så stativet vender nedad, og
drevene vender opad.
42 Referencehåndbog
Page 43

Om minitower-computeren
Set forfra og bagfra
servicenummer
Cd- eller dvd-drevets aktivitetslampe
Cd- eller dvd-drevets udløserknap
drevbås nr. 2
diskettedrevets lampe
strømlampe
tænd/sluk-knap
USB 2.0-stik (2)
strømstik
spændingsvælger
seriel port
skærmstik
stik til tastatur
line-out-stik
mikrofonstik
diskettedrevets udløserknap
harddiskens aktivitetslampe
stik til hovedtelefoner
parallel port
diagnosticeringslamper (4)
stik til mus
line-in-stik
dæksellås
USB 2.0-stik (4)
PCI-kortstik (3)
stik til netværksadapter
stik til sikkerhedskabel
Referencehåndbog 43
Page 44

Inden i computeren
ADVARSEL! Før du begynder på nogen af procedurerne i dette afsnit, skal du følge
sikkerhedsinstruktionerne i Product Information Guide (Produktvejledning).
ADVARSEL! For at undgå elektrisk stød skal computerens stik altid tages ud af stikkontakten,
inden dækslet åbnes.
MEDDELELSE: Pas på, at du ikke ved en fejltagelse kommer til at frakoble kabler på systemkortet,
når du åbner computerens dæksel.
www.dell.com | support.dell.com
Cd- eller dvd-drevbås
sekundær cd- eller dvd-drevbås
bås til diskettedrev
bås til sekundær harddisk
bås til primær harddisk
strømforsyning
systemkort
44 Referencehåndbog
Page 45

Opstilling af computeren
ADVARSEL! Før du foretager procedurerne i dette afsnit, skal du følge sikkerhedsinstruktionerne i
Product Information Guide (Produktvejledning).
MEDDELELSE: Hvis der er installeret et udvidelseskort i computeren (f.eks. et modemkort), skal det
tilhørende kabel sættes i kortet og ikke i stikket på bagpanelet.
Samtlige trin skal udføres for at computeren installeres korrekt. Se illustrationerne, der følger efter
instruktionerner.
1
Tilslut tastaturet og musen.
MEDDELELSE: Forsøg ikke at bruge en PS/2-mus og en USB-mus samtidigt.
BEMÆRK! Hvis du har en USB-kompatibel mus eller et USB-kompatibelt tastatur, skal du bruge
USB-stikkene bag på computeren.
2
Tilslut modemet eller netværkskablet.
Sæt netværkskablet, ikke telefonledningen, i netværksstikket. Hvis du har et modem
(tilbehør), skal du slutte telefonlinjen til modemet.
MEDDELELSE: Sæt ikke et modemkabel i netværksadapteren. Spændingen fra telefonledningen kan
beskadige netværksadapteren.
3
Tilslut skærmen.
Isæt forsigtigt skærmkablet, så stikbenene ikke bøjes. Tilspænd stikkets fingerskruer.
BEMÆRK! Visse skærme har videostikket placeret på undersiden bag på skærmen. Det fremgår af
dokumentationen, der fulgte med skærmen, hvor stikkene er placeret.
Tilslut højttalerne.
4
5
Sæt den ene ende strømkablerne i computeren, skærmen og de øvrige enheder, og sæt
derefter den anden ende af kablerne i elektriske stikkontakter.
6
Kontroller, at spændingsvælgeren er indstillet korrekt. Computeren har en manuel
spændingsvælger. Computere med en spændingsvælger på bagpanelet skal indstilles manuelt
til at fungere med spændingen på stedet.
MEDDELELSE: For at undgå beskadigelse af en computer med en kontakt til manuelt valg af spænding
skal du indstille kontakten til den spænding, der bedst muligt passer til netspændingen på stedet.
BEMÆRK! Inden du installerer enheder eller software, der ikke fulgte med computeren, skal du læse
dokumentationen, der fulgte med softwaren eller enheden, eller kontakte leverandøren for at få
bekræftet, at softwaren eller enheden er kompatibel med computeren og operativsystemet.
Referencehåndbog 45
Page 46

Lille desktop-computer
Installation uden kort
www.dell.com | support.dell.com
Installation med kort
skærm
tastatur
mus
D
C
B
A
højttalere
netværk
USB
46 Referencehåndbog
netværk
Page 47

Minitower-computer
Installation uden kort
Installation med kort
skærm
tastatur
mus
højttalere
hovedtelefoner
netværk
USB
højttalere
telefoni/
modem
Referencehåndbog 47
Page 48

Færdig installation
Lille desktop-computer
www.dell.com | support.dell.com
Minitower-computer
Produktnøgle til Microsoft Windows
strøm
Produktnøgle til Microsoft Windows
48 Referencehåndbog
strøm
Page 49

Problemløsning
Dell tilbyder en række værktøjer, der kan hjælpe dig, hvis din computer ikke fungerer som
forventet. De seneste oplysninger om fejlfinding til din computer finder du på webstedet for Dell
Support på
Skriv en detaljeret beskrivelse af fejlen, noter bipkoderne eller diagnosticeringslampernes mønstre
ned, registrer din ekspresservicekode og dit servicenummer nedenfor, og kontakt Dell fra det sted,
hvor computeren befinder sig, hvis der opstår computerproblemer, der kræver assistance fra Dell.
Se "Søgning efter oplysninger om computeren" på side 37 for at få vist et eksempel på en
ekspresservicekode og et servicenummer.
Ekspresservicekode:___________________________
Servicenummer:___________________________
Dell Diagnostics (Dell Diagnosticering)
ADVARSEL! Før du begynder på nogen af procedurerne i dette afsnit, skal du følge
Hvornår skal du bruge Dell Diagnostics (Dell Diagnosticering)
Hvis du får problemer med computeren, skal du følge de retningslinjer, der er beskrevet i afsnittet
"Solving Problems" (Problemløsning) i
køre Dell Diagnostics (Dell Diagnosticering), før du kontakter Dell for at få hjælp.
Det anbefales, at du udskriver disse procedurer, før du begynder.
support.dell.com
sikkerhedsinstruktionerne i Product Information Guide (Produktvejledning).
.
User's Guide
(Brugerhåndbog), som du finder online, og
MEDDELELSE: Dell Diagnosticering fungerer kun på Dell™-computere.
Aktiver systemopsætningen, gennemgå oplysningerne om computerens konfiguration, og
kontroller, at den enhed, du vil teste, vises i systemopsætningen og er aktiv.
Start Dell Diagnostics (Dell diagnosticering) fra harddisken eller fra den cd'en
Utilities
Sådan startes Dell Diagnostics (Dell diagnosticering) fra harddisken
(Drivere og hjælpeværktøjer) (kaldes også ResourceCD (ressource-cd'en)).
1
Tænd (eller genstart) computeren.
2
Tryk på <F12>, så snart DELL™-logoet vises.
BEMÆRK! Hvis du får vist en meddelelse om, at der ikke blev fundet en partition med
diagnosticeringsværktøjet, skal du køre Dell Diagnostics (Dell Diagnosticering) fra cd'en Drivers and
Utilities (Drivere og hjælpeværktøjer).
Drivers and
Hvis du venter for længe, og operativsystemets logo vises, skal du blive ved med at vente,
indtil Microsoft
3
Når startenhedslisten vises, skal du markere
®
Windows®-skrivebordet vises. Luk derefter computeren ned, og prøv igen.
Boot to Utility Partition
(Start med partitionen
med hjælpeværktøjer) og trykke på <Enter>.
Referencehåndbog 49
Page 50

4
Når
hovedmenuen
test, du vil køre.
Sådan startes Dell Diagnostics (Dell Diagnostics) fra den cd'en Drivers and Utilities (Drivere og
hjælpeværktøjer)
1
Isæt cd'en
2
Luk computeren ned, og genstart den.
Tryk på <F12>, så snart DELL-logoet vises.
Hvis du venter for længe, og Windows-logoet vises, skal du fortsætte med at vente, indtil
du ser skrivebordet i Windows. Luk derefter computeren ned, og prøv igen.
www.dell.com | support.dell.com
BEMÆRK! De næste trin ændrer startsekvensen én gang. Ved næste start, starter computeren
enhederne i den rækkefølge, der er angivet i systemopsætningen.
Når startenhedslisten vises, skal du markere
3
og trykke på <Enter>.
4
Vælg indstillingen
5
Vælg indstillingen
6
Skriv 1 for at starte menuen ResourceCD (Ressource-cd).
7
Skriv 2 for at starte menuen Dell Diagnostics (Dell Diagnosticering).
8
Vælg
Run the 32 Bit Dell Diagnostics
nummererede liste. Vælg den version, der passer til din computer, hvis der er flere versioner
på listen.
9
Når
hovedmenuen
du vil køre.
i Dell Diagnostics (Dell Diagnosticering) vises, skal du vælge hvilken
Drivers and Utilities
IDE CD-ROM Device
Boot from CD-ROM
i Dell Diagnostics (Dell Diagnosticering) vises, skal du vælge hvilken test,
(Drivere og hjælpeværktøjer).
IDE CD-ROM Device
(IDE cd-rom-enhed) i cd-startmenuen.
(Start fra cd-rom) i den menu, der vises.
(Kør 32-bit Dell Diagnosticering) på den
(IDE-cd-rom-enhed)
Hovedmenuen i Dell Diagnostics (Dell Diagnosticering)
1
Når Dell Diagnostics (Dell Diagnosticering) er indlæst, og skærmbilledet
(Hovedmenu) vises, skal du klikke på knappen for den ønskede indstilling.
Indstilling Funktion
Hurtig test Udfører en hurtig test af enhederne. Denne test varer typisk 10-20 minutter og
Udvidet test Udfører en grundig test af enhederne. Denne test varer typisk en time eller
Brugerdefineret test Tester en bestemt enhed. Du kan selv definere, hvilke test du vil køre.
Liste over symptomer Her vises en liste over de hyppigst forekomne symptomer, og du får mulighed
50 Referencehåndbog
Main Menu
kræver ingen handling fra dig. Kør den hurtige test først for at øge muligheden
for hurtigt at identificere problemet.
længere og kræver, at du indimellem besvarer nogle spørgsmål.
for at vælge en test, som er baseret på det problemsymptom, du er stødt på.
Page 51

2
Hvis der opdages et problem under en test, vises der en meddelelse med fejlkoden og en
beskrivelse af problemet. Skriv fejlkoden og beskrivelsen af problemet ned, og følg
vejledningen på skærmen.
Kontakt Dell, hvis du ikke kan løse problemet.
BEMÆRK! Computerens servicemærke er placeret øverst på testskærmbillederne. Hvis du kontakter
Dell, beder teknisk support dig om dit servicemærke.
Hvis du kører en test via indstillingen
3
Tr ee
(Liste over symptomer), skal du klikke på den relevante fane, som er beskrevet i
Custom Test
(Brugerdefineret test) eller via
Symptom
nedenstående tabel, for at få yderligere oplysninger.
Fane Funktion
Resultater Her vises testresultaterne og de fejl, som opstod.
Fejl Her vises, hvilke fejl der opstod, fejlkoder og beskrivelser af problemerne.
Hjælp Her får du en beskrivelse af testen og evt. hvilke krav der stilles til udførsel
af testen.
Konfiguration Her vises hardwarekonfigurationen for den valgte enhed.
Dell Diagnostics (Dell Diagnosticering) indeholder
konfigurationsoplysningerne for alle enhederne fra systemopsætning,
hukommelse og forskellige interne test. Oplysningerne vises på listen over
enheder i skærmens venstre side. Det er ikke sikkert, at alle komponenter,
som er installeret på computeren, eller alle enheder, som er tilsluttet til
computeren, vises på listen over enheder.
Parametre Giver dig mulighed for at tilpasse testen ved at ændre testindstillingerne.
4
Fjern cd'en, når testene er afsluttet, hvis du kører Dell Diagnostics (Dell Diagnosticering)
fra cd'en
5
Luk testskærmbilledet for at vende tilbage til skærmbilledet
Luk skærmbilledet
Drivers and Utilities
Main Menu
(Drivere og hjælpeværktøjer).
Main Menu
(Hovedmenu).
(Hovedmenu) for at forlade Dell Diagnostics (Dell
Diagnosticering) og genstarte computeren.
Systemlamper
Strømlampen kan vise, at der er et computerproblem.
Strømlampe Beskrivelse af problemet Forslag til løsning
Konstant grøn Der er tændt for strømmen, og
computeren fungerer normalt.
Blinker grønt Computeren er i dvale (Microsoft
Windows
®
2000 og Windows XP).
Det er ikke nødvendigt at gøre noget.
®
Tryk på strømlampen, bevæg musen, eller tryk
på en tast på tastaturet for at aktivere
computeren.
Referencehåndbog 51
Page 52

Strømlampe Beskrivelse af problemet Forslag til løsning
Blinker grønt flere
gange, og slukker
Konstant gul Dell Diagnostics (Dell
www.dell.com | support.dell.com
Blinker gult Der er opstået en fejl på
Konstant grøn og en
bipkode under
POST
Konstant grøn
strømlampe, ingen
bipkode og intet på
skærmen under
POST
Konstant grøn
strømlampe og
ingen bipkode, men
computeren låses
op under POST
Der er opstået en
konfigurationsfejl.
Diagnosticering) kører en test,
eller en enhed på systemkortet er
fejlbehæftet eller installeret forkert.
strømforsyningen eller
systemkortet.
Der opstod et problem under
eksekvering af BIOS.
Skærmen eller grafikkortet er
fejlbehæftet eller installeret forkert.
En enhed på systemkortet er
muligvis fejlbehæftet.
Kontroller "Diagnosticeringslamper" på side 52
for at se, om der er identificeret et specifikt
problem.
Lad testen køre færdig, hvis Dell Diagnostics
(Dell Diagnosticering) kører.
Kontroller "Diagnosticeringslamper" på side 52
for at se, om der er identificeret et specifikt
problem.
Kontakt Dell for at få teknisk assistance, hvis
computeren ikke starter.
Kontroller "Diagnosticeringslamper" på side 52
for at se, om der er identificeret et specifikt
problem. Se "Power Problems"
(Strømproblemer) i User’s Guide
(Brugerhåndbog), som du finder online.
Se "Bipkoder" på side 55 for at få en vejledning
i diagnosticering af bipkoden. Kontroller også
"Diagnosticeringslamper" på side 52 for at se,
om der er identificeret et specifikt problem.
Kontroller "Diagnosticeringslamper" på side 52
for at se, om der er identificeret et specifikt
problem.
Kontroller "Diagnosticeringslamper" på side 52
for at se, om der er identificeret et specifikt
problem. Kontakt Dell for at få teknisk
assistance, hvis problemet ikke identificeres.
Diagnosticeringslamper
ADVARSEL! Før du begynder på nogen af procedurerne i dette afsnit, skal du følge
sikkerhedsinstruktionerne i Product Information Guide (Produktvejledning).
Computeren har fire lamper på bagpanelet mærket "A", "B", "C" og "D". De kan hjælpe dig med
at finde årsagen til et problem. Lamperne kan være gule eller grønne. Når computeren starter
normalt, skifter lampernes mønstre eller koder, efterhånden som starten skrider frem. Hvis
POST-delen af systemstarten gennemføres uden fejl, lyser alle fire lamper konstant grønt.
Hvis computeren ikke fungerer korrekt under POST-processen, kan lampernes mønster medvirke
til at identificere, hvor i processen computeren stoppede.
52 Referencehåndbog
Page 53

Lampernes
mønster
slukket
slukket
slukket
slukket
Beskrivelse af problemet Forslag til løsning
Computeren er slukket eller der kan være
opstået en før-BIOS-fejl.
• Kontroller, at computeren er tilsluttet en fungerende
stikkontakt, og at du har trykket på afbryderen.
gul
grøn
gul
gul
grøn
grøn
gul
gul
gul
gul
grøn
gul
gul
grøn
grøn
gul
Der er muligvis opstået en processorfejl.
Der blev fundet hukommelsesmoduler,
men der er opstået en hukommelsesfejl.
Der er muligvis opstået en fejl på
PCI-udvidelseskortet.
Der er muligvis opstået fejl på IDE-drevet.
• Installer processoren igen, og genstart computeren.
• Hvis der er installeret et hukommelsesmodul, skal
det geninstalleres, og computeren skal genstartes.
• Hvis du har installeret to hukommelsesmoduler,
skal du fjerne dem, installere ét modul, og derefter
genstarte computeren. Geninstaller det andet modul,
hvis computeren starter normalt.
• Installer et hukommelsesmodul af samme type, der
fungerer korrekt, hvis du har et.
• Kontakt Dell, hvis det ikke løser problemet.
• Find ud af, om der er opstået en konflikt, ved at
fjerne et kort (ikke skærmkortet) og genstarte
computeren.
• Hvis det ikke løser problemet, skal du installere det
kort, du fjernede, fjerne et andet kort og derefter
genstarte computeren.
• Gentag processen for hvert kort. Find ud af, om
der er opstået ressourcekonflikter i forbindelse med
det sidste kort, du tog ud af computeren, hvis
computeren starter normalt (se ""Afhjælpning af
software- og hardwarekompatibilitetsproblemer" på
side 56").
• Flyt kortene ét ad gangen til et at andet PCI-stik,
og genstart computeren for hver flytning.
• Kontakt Dell, hvis det ikke løser problemet.
• Sæt alle IDE-drevets strøm- og datakabler i, og
genstart computeren.
Referencehåndbog 53
Page 54

Lampernes
mønster
grøn
grøn
grøn
gul
Beskrivelse af problemet Forslag til løsning
Der er muligvis opstået en USB-fejl.
• Geninstaller alle USB-enheder, kontroller
kabelforbindelserne, og genstart computeren.
gul
gul
gul
www.dell.com | support.dell.com
grøn
gul
grøn
gul
grøn
gul
grøn
grøn
grøn
Der blev ikke fundet
hukommelsesmoduler.
Der blev fundet hukommelsesmoduler,
men der er opstået en
hukommelseskonfigurationsfejl eller
kompatibilitetsfejl.
Der er opstået en anden fejl.
• Geninstaller alle hukommelsesmoduler, og
genstart computeren.
• Fjern alle hukommelsesmoduler, geninstaller
ét hukommelsesmodul (hvis computeren
understøtter ét modul), og genstart derefter
computeren for at eliminere muligheden for,
at der er fejl på hukommelsesstikket. Flyt
hukommelsesmodulet til et andet stik, og
genstart computeren, hvis computeren starter
normalt. Fortsæt, indtil du har identificeret et
fejlbehæftet stik eller geninstalleret modulerne
uden fejl.
• Kontroller, at der ikke stilles særlige krav
til placeringen af hukommelsesmodulet/
hukommelsesstikket (se "Hukommelse" i
User’s Guide
online, for at få flere oplysninger).
• Kontroller, at de hukommelsesmoduler, du
installerer, er kompatible med computeren.
• Kontakt Dell, hvis det ikke løser problemet.
• Kontroller, at kablerne fra alle installerede
harddiske er sluttet korrekt til systemkortet.
• Læs meddelelsen fra computeren, der vises
på skærmen.
• Kontakt Dell, hvis det ikke løser problemet.
(Brugerhåndbog), som findes
grøn
grøn
grøn
grøn
Computeren fungerer normalt efter
POST.
54 Referencehåndbog
•Ingen.
Page 55

Bipkoder
Computeren kan udsende en række bip under starten, hvis skærmen ikke kan vise fejl eller
problemer. Disse bipserier, der kaldes bipkoder, identificerer problemet. En bipkode (kode 1-3-1)
består af et bip, tre bip hurtigt efter hinanden og derefter et bip. Denne bipkode fortæller, at
computeren er stødt på et hukommelsesproblem.
Hvis computeren bipper under start:
1
Noter bipkoden ned.
2
Se "Dell Diagnostics (Dell Diagnosticering)" på side 49 for at identificere en mere alvorlig
årsag.
3
Kontakt Dell for at få teknisk assistance.
Kode Årsag Kode Årsag
1-1-2 Fejl i forbindelse med
mikroprocessorregistret
1-1-3 NVRAM-læse/skrivefejl 3-2-2 Interrupt vektorindlæsningsfejl
1-1-4 ROM BIOS checksum-fejl 3-2-4 Fejl under test af tastaturcontroller
1-2-1 Fejl i forbindelse med
programmerbar intervaltimer
1-2-2 DMA-initialiseringsfejl 3-3-2 Ugyldig NVRAM-konfiguration
1-2-3 DMA page register læse/skrivefejl 3-3-4 Fejl under test af
1-3 Fejl under test af
skærmhukommelsen
1-3-1 til 2-4-4 Hukommelsen identificeres eller
bruges ikke korrekt
3-1-1 Slave DMA register-fejl 3-4-3 Fejl under søgning efter skærm-
3-1-2 Master DMA register-fejl 4-2-1 Ingen timerskridt
3-1-3 Master interrupt mask-registerfejl 4-2-2 Nedlukningsfejl
4-2-3 Gate A20-fejl 4-4-1 Fejl under test af den serielle eller
4-2-4 Uventet interrupt i beskyttet
tilstand
4-3-1 Hukommelsesfejl på adressen
0FFFFh
4-3-3 Fejl på timer-chip-tæller 2 4-4-4 Fejl under cache-test
4-3-4 Uret er gået i stå
3-1-4 Slave interrupt mask-registerfejl
3-3-1 NVRAM-strømtab
skærmhukommelsen
3-4-1 Skærminitialiseringsfejl
3-4-2 Skærmoptegningsfejl
ROM
parallelle port
4-4-2 Kunne ikke dekomprimere koden
til skyggehukommelse
4-4-3 Fejl under test af math-coprocessor
Referencehåndbog 55
Page 56

Sådan køres Dell™ IDE Hard Drive Diagnostics (Dell™ IDE-harddiskdiagnosticering)
Dell IDE Hard Drive Diagnostics (Dell IDE harddiskdiagnosticering) er et værktøj, der tester
harddisken for at finde årsagen til fejl eller finde ud af, om der er opstået en fejl.
1
Tænd computeren (genstart den, hvis den allerede er tændt).
2
Tryk på <Ctr><Alt><D>, når F2= Setup (F2=Opsætning) vises i øverste højre hjørne
af skærmen.
3
Følg instruktionerne på skærmen.
Se "Hard Drive Problems" (Harddiskproblemer) i afsnittet "Solving Problems" (Problemløsning)
i
User’s Guide
(Brugervejledning), som findes online, hvis fejlen rapporteres.
www.dell.com | support.dell.com
Afhjælpning af software- og hardwarekompatibilitetsproblemer
Du kan bruge Hardware Troubleshooter (Hardwarefejlfinding) til at løse kompatibilitetsproblemer,
hvis en enhed enten ikke registreres under opsætningen af operativsystemet eller den registreres,
men konfigureres forkert. I operativsystemet Microsoft
Manager (Enhedshåndtering) til at løse kompatibilitetsproblemer.
Windows XP
Sådan løses kompatibilitetsproblemer vha. Hardware Troubleshooter (Hardwarefejlfinding):
1
Klik på knappen
2
Skriv
Hardware Troubleshooter
på pilen for at starte søgningen.
3
4
Klik på
Klik på
Hardware Troubleshooter
I need to resolve a hardware conflict on my computer
hardwarekonflikt på computeren), og klik på
Troubleshooter
Windows 2000
Sådan løses kompatibilitetsproblemer vha. Device Manager (Enhedshåndtering):
1
Klik på knappen
Kontrolpanel.
2
Dobbeltklik på
3
Klik på fanen
4
Klik på
5
Klik på
6
Dobbeltklik på
Device Manager (Enhedshåndtering)
View
Enheder, der ikke er korrekt konfigureret, vises med et gult udråbstegn (
enheden er deaktiveret.
Start
(Start), og klik på
(Hardwarefejlfinding) i feltet
(Hardwarefejlfinding) på listen med
(Hardwarefejlfinding).
Start
, peg på
System
Hardware
Settings
i vinduet
.
Control Panel
(Vis), og klik derefter på
Interrupt request (IRQ)
®
Windows® 2000 kan du bruge Device
Help and Support
(Hjælp og support).
Search
(Jeg skal løse en
Next
(Næste) på listen
Hardware
(Indstillinger), og klik derefter på
Kontrolpanel.
.
Resources by connection
(Ressourcer efter tilslutning).
.
(Søg), og klik
søgeresultater
Control Panel
!
) eller et rødt X, hvis
.
56 Referencehåndbog
Page 57

7
Dobbeltklik på en vilkårlig enhed markeret med et udråbstegn for at få vist vinduet
Properties
(Egenskaber).
Statusområdet
(Enhed) i vinduet
Properties
(Egenskaber) indeholder oplysninger om
Device
kort eller enheder, der skal konfigureres igen.
8
Genkonfigurer enheden, eller fjern den fra Device Manager (Enhedshåndtering). Se
dokumentationen, der fulgte med enheden, for at få oplysninger om at konfigurere enheden.
Sådan løses kompatibilitetsproblemer vha. Hardware Troubleshooter (Hardwarefejlfinding):
1
Klik på knappen
2
Klik på
Troubleshooting and Maintenance
Contents
klik derefter på
Klik på
I need to resolve a hardware conflict on my computer
computeren), og klik på
Start
, og klik på
(Indhold), klik på
Hardware
.
Next
(Næste) på listen
Help and Support
(Hjælp og support).
(Fejlfinding og vedligeholdelse) under fanen
Windows 2000 troubleshooters
(Jeg skal løse en hardwarekonflikt på
Hardware Troubleshooter
(Windows 2000-fejlfinding), og
(Hardwarefejlfinding).
Brug af Microsoft® Windows® XP System Restore (Systemgendannelse)
Operativsystemet Microsoft® Windows® XP indeholder System Restore (Systemgendannelse),
som gør det muligt at sætte computeren tilbage til en tidligere driftstilstand (uden at det påvirker
datafilerne), i tilfælde af at skift af hardware-, software- eller andre systemindstillinger har efterladt
computeren i en uønsket tilstand. Se Windows Help and Support Center (Hjælp og support) for
at få oplysninger om at bruge System Restore (Systemgendannelse).
MEDDELELSE: Tag en almindelig backup af dine datafiler. System Restore (Systemgendannelse)
overvåger ikke dine datafiler og gendanner dem ikke.
Oprettelse af et gendannelsespunkt
1
Klik på knappen
2
Klik på
3
Følg instruktionerne på skærmen.
Gendannelse af computeren til en tidligere driftstilstand
MEDDELELSE: Inden du gendanner computeren, som den var tidligere, skal du gemme og lukke alle
åbne filer og lukke alle åbne programmer. Du må ikke ændre, åbne eller slette filer eller programmer,
før gendannelsen er færdig.
Klik på
1
Tools
2
Kontroller, at der er valgt
System Restore
Start
(Systemværktøjer), og klik derefter på
som den var på et tidligere tidspunkt), og klik på
Start
, peg på
(Start), og klik på
Help and Support
(Systemgendannelse).
All Programs
(Alle programmer) →
System Restore
Restore my computer to an earlier time
Next
(Næste).
(Hjælp og support).
Accessories
(Tilbehør) →
(Systemgendannelse).
(Gendan computeren,
Referencehåndbog 57
System
Page 58

3
Klik på datoen, som computeren skal gendannes til.
Skærmbilledet
hvor du kan få vist og vælge gendannelsespunkter. Alle datoer med tilgængelige
gendannelsespunkter vises med fed.
4
Vælg et gendannelsespunkt, og klik på
Hvis der kun er ét gendannelsespunkt for en dato, markeres det automatisk. Klik på det
ønskede gendannelsespunkt, hvis der er to eller flere gendannelsespunkter.
5
Klik på
Next
Skærmbilledet
systemgendannelsen er færdig med at indsamle data, og computeren genstartes.
www.dell.com | support.dell.com
6
Klik på OK, når computeren er genstartet.
Du kan gentage proceduren med et andet gendannelsespunkt eller fortryde gendannelsen, hvis
du vil vælge et andet gendannelsespunkt.
Sådan fortryder du den seneste systemgendannelse
MEDDELELSE: Gem og luk alle åbne filer, og afslut alle åbne programmer, inden du fortryder den sidste
systemgendannelse. Du må ikke ændre, åbne eller slette filer eller programmer, før gendannelsen er
færdig.
1
2
3
Klik på
Tools
Klik på
Klik på
Start
(Systemværktøjer), og klik derefter på
Undo my last restoration
Next
Skærmbilledet
Select a Restore Point
(Næste).
Restoration Complete
, peg på
All Programs
(Næste).
System Restore
(Systemgendannelse) vises, og computeren genstartes.
(Vælg gendannelsespunkt) indeholder en kalender,
Next
(Næste).
(Gendannelsen fuldført) vises, når
(Alle programmer) → Accessories
System Restore
(Systemgendannelse).
(Fortryd min sidste gendannelse), og klik på
(Tilbehør) →
Next
System
(Næste).
4
Klik på OK, når computeren er genstartet.
Aktivering af systemgendannelse
Systemgendannelse deaktiveres automatisk, hvis du geninstallerer Windows XP med under 200
MB ledig plads på harddisken. Sådan får du vist, om Systemgendannelse er aktiveret:
1
Klik på knappen
2
Klik på
3
Klik på
4
Klik på fanen
5
Kontroller, at
58 Referencehåndbog
Start
, og klik på
Control Panel
Performance and Maintenance
System
.
System Restore
(Systemgendannelse).
Turn off System Restore
(Kontrolpanel).
(Ydelse og vedligeholdelse).
(Deaktiver Systemgendannelse) ikke er markeret.
Page 59

Geninstallation af Microsoft® Windows® XP
Før du begynder
Forsøg først at gendanne enhedsdriveren i Windows XP, før du geninstallerer operativsystemet
Windows XP for at løse et problem med en driver, du har installeret for nylig. Hvis gendannelsen
af enhedsdriveren ikke løser problemet, kan du bruge System Restore (Systemgendannelse) til at
gendanne operativsystemet til en tidligere tilstand.
MEDDELELSE: Tag backup af alle datafiler på din primære harddisk, inden du installerer. I en
konventionel harddiskkonfiguration er den primære harddisk det første drevbogstav, som computeren
registrerer.
Du skal bruge følgende for at geninstallere Windows XP:
• Dell™ cd'en
• Isæt cd'en
BEMÆRK! Cd'en Drivers and Utilities (Drivere og hjælpeværktøjer) indeholder drivere, der blev
installeret, da computeren blev samlet. Brug cd'en Drivers and Utilities (Drivere og hjælpeværktøjer),
eller besøg Dells supportsted for at hente de nødvendige drivere.
BEMÆRK! Cd'erne Operating System (Operativsystem) og Drivers and Utilities (Drivere og
hjælpeværktøjer) er tilbehør og følger ikke med alle computere.
Geninstallation af Windows XP
MEDDELELSE: Du skal bruge Windows XP Service Pack 1 eller nyere, når du geninstallerer
Windows XP.
Operating System
Drivers and Utilities
Gennemgå alle trinnene i det følgende i den anførte rækkefølge for at geninstallere Windows XP.
Geninstallationen kan tage en til to timer. Når du har geninstalleret operativsystemet, skal du også
geninstallere enhedsdriverne, virusbeskyttelsesprogrammet og anden software.
(Operativsystem)
(Drivere og hjælpeværktøjer).
MEDDELELSE: Cd'en Operating System (Operativsystem) indeholder punkter til geninstallation af
Windows XP. Med disse punkter vil der muligvis blive overskrevet filer, hvilket kan påvirke programmer
der er installeret på harddisken. Geninstaller derfor ikke Windows XP, med mindre en medarbejder fra
Dells afdeling for teknisk support råder dig til det.
MEDDELELSE: Deaktiver al virusbeskyttelsessoftware, der er installeret på computeren, inden du
geninstallerer Windows XP for at undgå eventuelle konflikter. Se dokumentationen til softwaren for at
få en vejledning.
Start fra cd'en Operating System (Operativsystem)
1
Gem og luk alle åbne filer, og luk alle åbne programmer.
2
Isæt cd'en
Install Windows XP
3
Genstart computeren.
Operating System
(Installer Windows XP) vises.
(Operativsystem). Klik på
Exit
(Afslut), hvis meddelelsen
Referencehåndbog 59
Page 60

4
Tryk på <F12> med det samme, DELL™-logoet vises.
Hvis operativsystemets logo vises, skal du vente, indtil skrivebordet i Windows vises, og
derefter lukke computeren ned og prøve igen.
5
Tryk på piletasterne for at vælge
6
Tryk på en tast, når meddelelsen
at starte fra cd) vises.
Installation af Windows XP
1
Tryk på <Enter>, når skærmbilledet
for at installere Windows med det samme.
2
www.dell.com | support.dell.com
Læs oplysningerne på skærmbilledet
XP Licensaftale), og tryk på <F8> for at acceptere licensaftalen.
3
Hvis Windows XP allerede er installeret på computeren, og du ønsker at gendanne tidligere
Windows XP-data, skal du skrive
4
Hvis du vil installere en ny kopi af Windows XP, skal du trykke på <Esc> for at gøre dette.
5
Tryk på <Enter> for at vælge den markerede partition (anbefales), og følg vejledningen på
skærmen.
Skærmbilledet
begynder at kopiere filer og installere enheder. Computeren genstartes automatisk flere gange.
BEMÆRK! Installationstiden afhænger af harddiskens størrelse og af computerens hastighed.
MEDDELELSE: Tryk ikke på nogen af tasterne, når følgende meddelelse vises: Press any key to
boot from the CD (Tryk på en tast for at starte fra cd).
Vælg indstillingerne for det sted, du befinder dig, når skærmbilledet
6
Options
7
Skriv dit navn og firmanavn (valgfrit) på skærmbilledet,
(Tilpasning af software), og klik på
8
Skriv et navn på computeren (eller accepter det viste navn) og en adgangskode i vinduet
Computer Name and Administrator Password
administratoradgangskode), og klik på
9
Angiv de ønskede oplysninger, hvis skærmbilledet
om modemopkald) vises, og klik på
10
Angiv datoen, klokkeslættet og tidszonen i vinduet
dato og klokkeslæt), og klik på
11
Klik på
klik på
Standard
Next
CD-ROM
Press any key to boot from CD
, og tryk på <Enter>.
Windows XP Setup
(Windows XP Installation) vises,
Microsoft Windows Licensing Agreement
r
for at vælge reparation og tage cd'en ud.
Windows XP Setup
(Windows XP Installation) vises, og operativsystemet
(Internationale og sproglige indstillinger) vises, og klik på
Personalize Your Software
Next
(Næste).
(Computernavn og
Next
(Næste).
Modem Dialing Information
Next
(Næste).
Date and Time Settings
Next
(Næste).
, hvis skærmbilledet
Networking Settings
(Netværksindstillinger) vises, og
(Næste).
(Tryk på en tast for
(Windows
Regional and Language
Next
(Næste).
(Oplysninger
(Indstillinger for
60 Referencehåndbog
Page 61

12
Angiv oplysningerne, hvis du geninstallerer Windows XP Professional og bliver bedt om
yderligere oplysninger om din netværkskonfiguration. Accepter standardindstillingerne, hvis
du ikke er sikker på dine indstillinger.
Windows XP installerer operativsystemets komponenter og konfigurerer computeren.
Computeren genstartes automatisk.
MEDDELELSE: Tryk ikke på nogen af tasterne, når følgende meddelelse vises: Press any key to
boot from the CD (Tryk på en tast for at starte fra cd).
Klik på When the
13
14
Klik på
Internet?
15
Væ lg
No, not at this time
skærmbilledet
Skip
Next
(Næste), når velkomstskærmbilledet vises.
(Spring over), når meddelelsen
How will this computer connect to the
(Hvordan skal denne computer oprette forbindelse til Internettet) vises.
(Nej, ikke på nuværende tidspunkt), og klik på
Ready to register with Microsoft?
(Er du klar til at registrere hos Microsoft?)
Next
(Næste), når
vises.
16
Du kan angive op til fem brugere, når skærmbilledet
Who will use this computer?
(Hvem skal
bruge denne computer) vises.
17
Klik på
18
Klik på
19
Geninstaller de nødvendige drivere fra cd'en
Next
(Næste).
Finish
(Udfør) for at gøre installationen færdig, og fjern cd'en.
Drivers and Utilities
(Drivere og
hjælpeværktøjer).
20
Geninstaller virusbeskyttelsessoftwaren.
21
Geninstaller dine programmer.
BEMÆRK! Du skal bruge nummeret på produktnøglen, der findes bag på hylstret med Microsoft
Office eller Microsoft Work Suite, for at geninstallere Microsoft Office eller Microsoft Work Suite.
Brug af cd'en Drivers and Utilities (Drivere og hjælpeværktøjer)
Brug af cd'en
(ressource-cd'en), mens du kører operativsystemet Windows.
BEMÆRK! Du skal bruge cd'en Drivers and Utilities (Drivere og hjælpeværktøjer), mens du kører
Windows, for at få adgang til enhedsdrivere og brugerdokumentation.
Tænd computeren og vent, indtil Windows-skrivebordet vises.
1
2
Sæt cd'en
Vinduet
cd'en
at fortælle, at installationen påbegyndes herfra).
Drivers and Utilities
Drivers and Utilities
ResourceCD Installation
Drivers and Utilities
(Drivere og hjælpeværktøjer) for første gang på computeren for
(Drivere og hjælpeprogrammer) (kaldes også ResourceCD
(Drivere og hjælpeværktøjer) i cd-drevet.
(Installation fra ressource-cd'en) åbnes, hvis du bruger
Referencehåndbog 61
Page 62

3
Klik på OK for at fortsætte.
Reager på installationsprogrammets prompter for at færdiggøre installationen.
4
Klik på
Next
Dell-systemejer).
5
Vælg
System Model
(Enhedstype)
Drivere til computeren
Sådan får du vist en oversigt over enhedsdrivere til computeren:
1
Klik på
www.dell.com | support.dell.com
Cd'en
My Drivers
Drivers and Utilities
og operativsystem, og viser derefter en oversigt over enhedsdrivere til konfiguration af
systemet på skærmen.
2
Klik på den ønskede driver, og følg vejledningen for at overføre driveren til computeren.
Klik på
Drivers
computeren.
(Næste) på skærmbilledet
(Systemmodel)
og
To pi c
(Emne).
(Mine drivere) i rullemenuen
(Drivere og hjælpeværktøjer) scanner computerens hardware
(Drivere) i rullemenuen
Welcome Dell System Owner
Operating System
To pi c
(Emne) for at få vist de tilgængelige drivere til
(Operativsystem)
To pi c
(Emne).
(Velkommen
Device Type
62 Referencehåndbog
Page 63

Indeks
B
bipkoder, 55
C
cd
operativsystem, 39
Cd'en Drivers and
Utilities, 37
Cd'en Operating System
(Operativsystem), 39
computer
bipkoder, 55
gendanne til en tidligere
tilstand, 57
D
Dell
Premier Support-websted, 39
supportsted, 38
Dell Diagnostics, 49
Device Manager
(Enhedshåndtering), 56
diagnostic.-lamper, 51
diagnosticering
bipkoder, 55
Cd'en Drivers and Utilities, 37
Dell, 49
lamper, 51-52
diagnosticeringslamper, 52
dokumentation
enhed, 37
online, 38-39
Referencehåndbog, 37
Ressource-cd, 37
User’s Guide
(Brugerhåndbog), 38
drivere
Ressource-cd, 37
F
Fejlfinding
Dell Diagnostics, 49
diagnostic.-lamper, 51
diagnosticeringslamper, 52
gendanne til en tidligere
tilstand, 57
Hardware Troubleshooter
(Hardwarefejlfinding), 56
konflikter, 56
Windows Hjælp og
support, 39
fejlmeddelelser
bipkoder, 55
diagnostic.-lamper, 51
diagnosticeringslamper, 52
G
geninstallere
Cd'en Drivers and Utilities, 37
Ressource-cd, 37
Windows XP, 59
H
hardware
bipkoder, 55
Dell Diagnostics, 49
konflikter, 56
Hardware Troubleshooter
(Hardwarefejlfinding), 56
I
IRQ-konflikter, 56
K
konflikter
software- og hardwareinkompa-
tibilitet, 56
L
lamper
computerens bagside, 52
computerens forside, 51
diagnosticering, 52
diagnostik, 51
system, 51
tænd/sluk-knap, 51
Indeks 63
Page 64

M
R
W
Mærkater
Microsoft Windows, 38
Servicemærke, 38
Microsoft Windows-
mærkat, 38
O
Operativsystem
cd, 39
Installationsvejledning, 39
operativsystem
geninstallere Windows XP, 59
P
problemer
bipkoder, 55
Dell Diagnostics, 49
diagnostic.-lamper, 51
diagnosticeringslamper, 52
gendanne til en tidligere
tilstand, 57
konflikter, 56
Ressource-cd
Dell Diagnostics, 49
S
Servicemærke, 38
software
konflikter, 56
stativ
afmontere, 42
montere, 42
strømlampe, 51
System Restore
(Systemgendannelse), 57
systemlamper, 51
U
User’s Guide
(Brugerhåndbog), 38
Webstedet for Dell Premier
Support, 39
Windows 2000
Device Manager
(Enhedshåndtering), 56
Hardware Troubleshooter
(Hardwarefejlfinding), 56
Windows Hjælp og
support, 39
Windows XP
geninstallere, 59
Hardware Troubleshooter
(Hardwarefejlfinding), 56
System Restore
(Systemgendannelse), 57
Windows Hjælp og
support, 39
64 Indeks
Page 65

Dell™ OptiPlex™ 170L
Pikaopas
Mallit MTC2 ja DHS
www.dell.com | support.dell.com
Page 66

Huomautukset, laitteistovaroitukset ja varoitukset
HUOMAUTUS: Huomautukset ovat tärkeitä tietoja, joiden avulla voit käyttää tietokonetta entistä paremmin.
LAITTEISTOVAROITUS: Laitteistovaroitukset ovat varoituksia tilanteista, joissa laitteisto voi vahingoittua tai joissa
tietoja voidaan menettää. Niissä kerrotaan myös, miten nämä tilanteet voidaan välttää.
VAROITUS: Varoituksissa kerrotaan tilanteista, joihin saattaa liittyä omaisuusvahinkojen, loukkaantumisen tai
kuoleman vaara.
Jos ostit Dell™ n Series -tietokoneen, mitkään tässä oppaassa olevat viittaukset Microsoft® Windows®
-käyttöjärjestelmiin eivät koske sitä.
Ohjaimet ja apuohjelmat
-CD-levy (resurssilevy), käyttöjärjestelmän tietoväline ja
pikaoppaat
ovat lisävarusteita,
eikä niitä välttämättä toimiteta kaikkien tietokoneiden mukana.
____________________
Tämän asiakirjan tiedot voivat muuttua ilman erillistä ilmoitusta.
© 2004 Dell Inc. Kaikki oikeudet pidätetään.
Tämän tekstin kaikenlainen kopioiminen ilman Dell Inc:n kirjallista lupaa on jyrkästi kielletty.
Tekstissä käytetyt ta varamerkit Dell, DELL-logo ja OptiPlex ovat Dell Inc:n tavaramerkkejä; Microsoft ja Windows ovat Microsoft Corporationin
rekisteröityjä tavaramerkkejä.
Muut tekstissä mahdollisesti käytetyt tavaramerkit ja tuotenimet viittaav at jok o merkkien ja nimien haltijoihin tai näiden tuotteisiin. Dell Inc.
kieltää omistusoikeutensa muihin kuin omiin tavaramerkkeihinsä ja tuotenimiinsä.
Mallit MTC2 ja DHS
Syyskuu 2004 P/N D7235 Rev. A00
Page 67

Sisällysluettelo
Tietokoneeseen liittyvien tietojen löytäminen. . . . . . . . . . . . . . . . 69
Tietoja pienikokoisesta pöytämallitietokoneesta
Tietokone edestä ja takaa
Tietokoneen sisus
. . . . . . . . . . . . . . . . . . . . . . . 72
. . . . . . . . . . . . . . . . . . . . . . . . . . . 73
Tietokoneen jalustan liittäminen ja irrottaminen
Tietoja minitornimallisesta tietokoneesta
Tietokone edestä ja takaa
Tietokoneen sisus
Tietokoneen käyttöönotto
Pienikokoinen pöytämallitietokone
Minitornimallinen tietokone
Valmis asennus
. . . . . . . . . . . . . . . . . . . . . . . . . . . . . . 80
Pienikokoinen pöytämallitietokone
Minitornimallinen tietokone
Ongelmien ratkaiseminen
Dell-diagnostiikkaohjelma
Järjestelmän merkkivalot
Diagnostiikkamerkkivalot
Äänimerkkikoodit
. . . . . . . . . . . . . . . . . . . . . . . 75
. . . . . . . . . . . . . . . . . . . . . . . . . . . 76
. . . . . . . . . . . . . . . . . . . . . . . . . 77
. . . . . . . . . . . . . . . . . . . 78
. . . . . . . . . . . . . . . . . . . . . . 79
. . . . . . . . . . . . . . . . . . . 80
. . . . . . . . . . . . . . . . . . . . . . 80
. . . . . . . . . . . . . . . . . . . . . . . . . 81
. . . . . . . . . . . . . . . . . . . . . . . 81
. . . . . . . . . . . . . . . . . . . . . . . 83
. . . . . . . . . . . . . . . . . . . . . . . 84
. . . . . . . . . . . . . . . . . . . . . . . . . . . 87
. . . . . . . . . . . . . . 72
. . . . . . . . . . . . . 74
. . . . . . . . . . . . . . . . . . 75
Dell™ IDE -kiintolevydiagnostiikkaohjelman suorittaminen
Ohjelmiston ja laitteiston yhteensopivuusongelmien ratkaiseminen
®
Microsoft
Windows® XP:n System Restore
(Järjestelmän palauttaminen) -toiminnon käyttäminen
Microsoft
®
Windows® XP:n asentaminen uudelleen . . . . . . . . . . 91
. . . . . . . 88
. . . 88
. . . . . . . . . 89
Ohjaimet ja apuohjelmat -levyn käyttäminen
Hakemisto
. . . . . . . . . . . . . . . . . . . . . . . . . . . . . . . . 95
. . . . . . . . . . . . . . . . 94
Sisällysluettelo 67
Page 68

68 Sisällysluettelo
Page 69

Tietokoneeseen liittyvien tietojen löytäminen
Etsittävä kohde: Tietolähde:
• tietokoneen diagnostiikkaohjelma
• tietokoneen ohjaimet
• tietokoneen ohjekirjat
• laitteen ohjekirjat
• Desktop System Software (DSS) -ohjelmisto
• käyttöjärjestelmäpäivitykset ja -korjaustiedostot
•takuutiedot
• turvallisuusohjeet
• säädökset
• ergonomiatiedot
• käyttöoikeussopimus
Ohjaimet ja apuohjelmat -CD-levy (resurssilevy)
Ohjeet ja ohjaimet on asennettu tietokoneeseen valmiiksi.
CD-levyn avulla voit asentaa ohjaimia uudelleen, suorittaa
Dell-diagnostiikkaohjelman tai lukea ohjeita.
HUOMAUTUS: Uusimmat ohjaimet ja ohjepäivitykset ovat
saatavina osoitteessa support.dell.com.
HUOMAUTUS: Ohjaimet ja apuohjelmat -CD-levy on
lisävaruste, eikä sitä välttämättä toimiteta kaikkien
tietokoneiden mukana.
Desktop System Software -ohjelmisto
Tämä ohjelmisto sijaitsee Ohjaimet ja apuohjelmat
-CD-levyllä ja Dell Support -sivustossa osoitteessa
support.dell.com.
Tuotetiedot
CD-levyllä saattaa olla
Readme (Lueminut)
-tiedostoja, joissa on
viime hetken päivityksiä
tietokoneen teknisistä
muutoksista tai teknisiä
lisätietoja kokeneille
käyttäjille tai teknikoille.
Pikaopas 69
Page 70

Etsittävä kohde: Tietolähde:
• osien irrottaminen ja vaihtaminen
• tekniset ominaisuudet
• järjestelmäasetusten määrittäminen
• vianmääritys ja ongelmanratkaisu
Dell™ OptiPlex™ -käyttöopas
Microsoft
(Ohje ja tukipalvelut)
1
2
Käyttöopas on saatavana myös Ohjaimet ja apuohjelmat
-CD-levyllä.
www.dell.com | support.dell.com
• pikapalvelukoodi ja huoltomerkki
• Microsoft Windows -käyttöoikeustarra
Huoltomerkki ja Microsoft Windows -käyttöoikeus
Tarrat ovat tietokoneessa.
• Huoltomerkin avulla voit
• Voit syöttää pikapalvelukoodin ottaessasi yhteyttä tekniseen
• tietokoneen uusimmat ohjaimet
• vastauksia teknisiin huolto- ja tukikysymyksiin
• online-keskustelupalstat, joilla voi keskustella muiden
käyttäjien ja teknisen tuen kanssa
• tietokoneen oppaat
Dell Support -sivusto: support.dell.com
HUOMAUTUS: Voit tarkastella maasi tukisivustoa
valitsemalla maasi.
Dell Support -sivustossa on useita online-työkaluja, mukaan
lukien seuraavat:
• Solutions (ratkaisut) – vianmääritysvihjeitä, teknikoiden
• Community (yhteisö) – online-keskustelua muiden Dellin
• Upgrades (päivitykset) – komponenttien päivitysohjeita,
• Customer Care (asiakaspalvelu) – yhteystiedot, tilauksen
• Downloads (ladattavat tiedostot) – ohjaimet,
• Reference (oppaat) – tietokoneen ohjekirjat, tuotteen
®
Windows® XP:n Help and Support Center
Napsauta
Help and Support
Va li t se
järjestelmäoppaat) ja valitse sitten
Start
(Käynnistä) -painiketta ja valitse
(Ohje ja tuki).
User’s and system guides
(Käyttö- ja
User’s guides
(Käyttöoppaat).
kertoa tietokoneesi
tunnistetiedot,
kun käytät
support.dell.com
sivustoa tai otat yhteyttä
tekniseen tukeen.
tukeen. Pikapalvelukoodi ei ole käytössä kaikissa maissa.
kirjoittamia artikkeleja ja online-kursseja
asiakkaiden kanssa
esimerkiksi muistin, kiintolevyaseman ja käyttöjärjestelmän
päivitysohjeet
tiedot sekä takuu- ja korjaustiedot
korjaustiedostot ja ohjelmistopäivitykset
ominaisuudet ja tekniset julkaisut.
70 Pikaopas
Page 71

Etsittävä kohde: Tietolähde:
• palvelupyynnön tila ja tukihistoria
• tärkeimmät tekniset kysymykset tietokoneesta
• useimmin kysytyt kysymykset
• tiedostojen lataaminen
• tietoja tietokoneen kokoonpanosta
Dell Premier Support -sivusto: premiersupport.dell.com
Dell Premier Support -sivusto on suunniteltu erityisesti
yrityksiä, valtionhallintoa ja opetusalan asiakkaita varten.
Tämä Web-sivusto ei välttämättä ole käytettävissä
kaikissa maissa.
• tietokoneen palvelusopimus
• Windows XP:n käyttäminen
• tietokoneen oppaat
• laitteiden oppaat (esimerkiksi modeemin opas)
Windowsin ohje- ja tukikeskus
1
Napsauta
Help and Support
2
Kirjoita ongelmaa kuvaava sana tai lause ja napsauta
nuolikuvaketta.
3
Napsauta ohjeaihetta, joka kuvaa ongelmaa.
4
Noudata näyttöön tulevia ohjeita.
• käyttöjärjestelmän uudelleenasentaminen
Käyttöjärjestelmän CD-levy
Käyttöjärjestelmä on jo asennettu tietokoneeseen.
Käyttöjärjestelmän voi asentaa uudelleen käyttöjärjestelmän
CD-levyltä. Tämän ohjeet ovat OptiPlex-käyttöoppaassa.
Start
(Käynnistä) -painiketta ja valitse
(Ohje ja tuki).
Kun olet asentanut
käyttöjärjestelmän
uudelleen, asenna
tietokoneesi mukana
toimitettujen laitteiden
laiteohjaimet uudelleen
tietokoneen mukana
toimitetulta Ohjaimet ja
apuohjelmat -CD-levyltä..
• säännösten mukaiset mallitiedot ja rungon tyyppi
Käyttöjärjestelmäsi tuotetunnus
on tietokoneessasi olevassa
tarrassa.
HUOMAUTUS: CD-levyn väri vaihtelee tilatun
käyttöjärjestelmän mukaan.
HUOMAUTUS: Käyttöjärjestelmätietoväline on lisävaruste,
eikä sitä välttämättä toimiteta kaikkien tietokoneiden mukana.
DHS—pienikokoinen pöytämallinen runko
—
MTC2
minitornimallinen runko
Pikaopas 71
Page 72

Tietoja pienikokoisesta pöytämallitietokoneesta
Tietokone edestä ja takaa
huoltomerkki
www.dell.com | support.dell.com
etupaneelin suojalevy
kuulokeliitin
USB 2.0 -liittimet (2)
CD/DVD-aseman
poistopainike
CD/DVD-
aseman
Microsoft
Windows
Product Key
-tunnus
etupaneelin suojalevy
virran merkkivalo
linkin eheyden merkkivalo
rinnakkaisliitin
hiiren liitin
sarja-liitin
näytön liitin
virtakytkin
diagnostiikkamerkkivalot
kiintolevyaseman toiminnan merkkivalo
verkkoliitin
A B C D
levykeaseman poistopainike
levykeaseman toiminnan merkkivalo
verkon toiminnan merkkivalo
linja sisään -liitin
lisäkorttipaikat
(2)
virtaliitin
litteä PCI-korttipaikka
linja ulos -liitin
mikrofoniliitin
USB 2.0 -liittimet (4)
72 Pikaopas
Page 73

Tietokoneen sisus
VAROITUS: Tutustu tuotetiedoissa oleviin turvallisuusohjeisiin ennen tässä osassa mainittujen
toimien tekemistä.
VAROITUS: Vältä sähköiskut irrottamalla tietokoneen virtajohto aina pistorasiasta ennen
kannen avaamista.
LAITTEISTOVAROITUS: Ole varovainen tietokoneen kantta avatessasi, että et vahingossa irrota
kaapeleita emolevystä.
CD/DVD-asema
levykeasema
kiintolevyasema
emolevy
jäähdytyslevy
ja tuuletin
valinnainen
sisäinen kaiutin
riippulukkorengas
litteä PCIkorttipaikka
virtalähde
valinnainen korttikehys
HUOMAUTUS: Tietokoneessasi saattaa olla
metallipidike korttikehyksen sijaan.
Pikaopas 73
Page 74

Tietokoneen jalustan liittäminen ja irrottaminen
VARO IT US: Tutustu tuotetiedoissa oleviin
turvallisuusohjeisiin ennen tässä osassa mainittujen
toimien tekemistä.
HUOMAUTUS: Aseta tietokone pehmeälle alustalle, jotta
yläkansi ei naarmuunnu.
Tietokonettasi voidaan käyttää pysty- tai vaaka-asennossa.
Jos haluat käyttää tietokonetta pystyasennossa, sinun on
liitettävä tietokoneen jalusta:
1
Aseta tietokone oikealle kyljelleen niin, että
www.dell.com | support.dell.com
levyasemapaikat ovat alhaalla, ja aseta jalusta
tietokoneen entiseen vasempaan kylkeen:
a
Aseta jalusta seuraavan kuvan mukaisesti niin,
että sen suuri pyöreä reikä tulee kannen kyljessä
olevaan kiinnityspainikkeeseen.
b
Aseta jalustan ankkuroitu ruuvi kannen ruuvin
reiän kohdalle ja kiristä peukaloruuvi.
2
Käännä tietokone niin, että jalusta on alhaalla ja
asemat ylhäällä.
74 Pikaopas
Page 75

Tietoja minitornimallisesta tietokoneesta
Tietokone edestä ja takaa
CD- tai DVD-aseman toiminnan merkkivalo
huoltomerkki
CD- tai DVD-aseman
poistopainike
toinen levyasemapaikka
levykeaseman merkkivalo
virran merkkivalo
virtakytkin
USB 2.0 -liittimet (2)
virtaliitin
jännitteenvalintakytkin
sarjaliitin
videoliitin
näppäimistöliitin
linja ulos -liitin
mikrofoniliitin
levykeaseman poistopainike
kiintolevyaseman toiminnan
merkkivalo
kuulokeliitin
rinnakkaisliitin
diagnostiikkamerkkivalot (4)
hiiriliitin
linja sisään -liitin
kannen salpa
USB 2.0 -liittimet (4)
PCI-korttipaikat (3)
verkkoliitin
suojakaapelin paikka
Pikaopas 75
Page 76

Tietokoneen sisus
VARO IT US: Tutustu tuotetiedoissa oleviin turvallisuusohjeisiin ennen tässä osassa mainittujen
toimien tekemistä.
VAROITUS: Vältä sähköiskut irrottamalla tietokoneen virtajohto aina pistorasiasta ennen
kannen avaamista.
LAITTEISTOVAROITUS: Ole varovainen tietokoneen kantta avatessasi, että et vahingossa irrota
kaapeleita emolevystä.
www.dell.com | support.dell.com
CD- tai DVD-asemapaikka
toinen CD- tai DVD-asemapaikka
levykeasemapaikka
toinen kiintolevyasemapaikka
ensimmäinen
kiintolevyasemapaikka
virtalähde
emolevy
76 Pikaopas
Page 77

Tietokoneen käyttöönotto
VAROITUS: Tutustu tuotetiedoissa oleviin turvallisuusohjeisiin ennen tässä osassa mainittujen
toimien tekemistä.
LAITTEISTOVAROITUS: Jos tietokoneeseen on asennettu laajennuskortti, esimerkiksi
modeemikortti, kytke sen kaapeli korttiin, ei tietokoneen takapaneelin liittimiin.
Kaikki toimet on suoritettava, jotta tietokone voidaan ottaa käyttöön. Ohjeiden jälkeen on kuvat
eri asennustilanteista.
1
Liitä näppäimistö ja hiiri.
LAITTEISTOVAROITUS: Älä yritä käyttää PS/2-hiirtä ja USB-hiirtä samanaikaisesti.
HUOMAUTUS: Jos käytössä on USB-hiiri tai -näppäimistö, kytke ne tietokoneen takana oleviin
USB-liittimiin.
2
Liitä modeemin tai verkon kaapeli.
Kytke verkkoliittimeen verkkokaapeli, ei puhelinkaapelia. Jos käytössäsi on valinnainen
modeemi, kytke puhelinkaapeli modeemiin.
LAITTEISTOVAROITUS: Älä kytke modeemikaapelia verkkosovittimeen. Puhelinliikenteen
aiheuttama jännite saattaa vahingoittaa verkkosovitinta.
3
Kytke näyttö.
Aseta näyttökaapeli paikalleen varovasti, jotteivät nastat vääntyisi. Kiristä kaapelin
liittimessä olevat kiinnitysruuvit.
HUOMAUTUS: Joidenkin näyttöjen videoliitin on ruudun taustan alla. Näytön videoliittimen sijainti
löytyy näytön mukana toimitettavista ohjeista.
4
Kytke kaiuttimet.
5
Yhdistä virtajohdot tietokoneeseen, näyttöön ja muihin laitteisiin sekä virtalähteisiin.
6
Varmista, että jännitteenvalintakytkin on oikeassa asennossa. Tietokoneessa on
manuaalinen jännitteenvalintakytkin. Tietokoneet, joiden takapaneelissa on manuaalinen
jännitteenvalintakytkin, on asetettava toimimaan oikealla jännitteellä manuaalisesti.
LAITTEISTOVAROITUS: Jotta välttyisit tietokoneen vaurioitumiselta, säädä manuaalinen
jännitteen valintakytkin asentoon, joka lähinnä vastaa käyttämääsi verkkovirran jännitettä.
HUOMAUTUS: Ennen kuin asennat laitteita tai ohjelmistoja, joita ei toimitettu tietokoneesi
mukana, tutustu laitteen tai ohjelmiston mukana toimitettuihin ohjeisiin. Voit myös ottaa yhteyttä
myyjään ja varmistaa, että laite tai ohjelmisto ovat yhteensopivia tietokoneen ja
käyttöjärjestelmän kanssa.
Pikaopas 77
Page 78

Pienikokoinen pöytämallitietokone
Asennus ilman kortteja
www.dell.com | support.dell.com
Asennus korttien kanssa
näyttö
näppäimistö
hiiri
D
C
B
A
kaiuttimet
verkko
USB-liittimet
78 Pikaopas
verkko
Page 79

Minitornimallinen tietokone
Asennus ilman kortteja
Asennus korttien kanssa
näyttö
näppäimistö
hiiri
kaiuttimet
kuulokkeet
verkko
USB-liittimet
kaiuttimet
puhelin tai
modeemi
Pikaopas 79
Page 80

Valmis asennus
Pienikokoinen pöytämallitietokone
www.dell.com | support.dell.com
Minitornimallinen tietokone
Microsoft Windowsin Product Key -tunnus
virtakyt
Microsoft Windowsin Product Key -tunnus
80 Pikaopas
virtakytkin
Page 81

Ongelmien ratkaiseminen
Dell on toimittanut tietokoneen mukana apuohjelmia, jotka auttavat vian selvittämisessä, jos
tietokone ei toimi oikein. Saat viimeisimmät vianmääritystiedot Dell Support -sivustosta
osoitteesta
Jos tarvitset ongelman ratkaisussa apua Delliltä, kirjoita muistiin virheen tarkka kuvaus,
äänimerkkikoodit tai diagnostiikkamerkkivaloyhdistelmät. Kirjoita tähän muistiin myös
pikapalvelukoodi ja huoltomerkin numero ja ota yhteyttä paikalliseen Dellin edustajaan.
Kohdassa "Tietokoneeseen liittyvien tietojen löytäminen" sivulla 69 on esimerkki
pikapalvelukoodista ja huoltomerkin numerosta.
Pikapalvelukoodi:___________________________
Huoltomerkki:___________________________
Dell-diagnostiikkaohjelma
Dell-diagnostiikkaohjelman käyttötilanteet
Jos tietokoneen käytössä ilmenee ongelma, tee onlinekäsittelevässä kohdassa olevat tarkistukset ja suorita Dell-diagnostiikkaohjelma, ennen kuin
otat yhteyttä Delliin teknistä tukea varten.
Toimintaohjeet kannattaa tulostaa ennen diagnostiikkaohjelman käytön aloittamista.
support.dell.com
VAROITUS: Tutustu tuotetiedoissa oleviin turvallisuusohjeisiin ennen tässä osassa mainittujen
toimien tekemistä.
.
käyttöoppaan
ratkaisujen löytämistä
LAITTEISTOVAROITUS: Dell-diagnostiikkaohjelma toimii vain Dell™-tietokoneissa
Siirry asetusohjelmaan, tarkista tietokoneen kokoonpanotiedot ja varmista, että testattava laite
näkyy asetusohjelmassa ja on määritetty aktiiviseksi.
Käynnistä Dell-diagnostiikkaohjelma joko kiintolevyltä tai lisävarusteena toimitetulta
Ohjaimet ja apuohjelmat
Dell-diagnostiikkaohjelman käynnistäminen kiintolevyltä
1
Käynnistä tietokone (tai käynnistä se uudelleen).
2
Kun DELL™-logo tulee näkyviin, paina heti <F12>-näppäintä.
HUOMAUTUS: Jos näyttöön tulee sanoma, jonka mukaan diagnostiikkaohjelman osiota ei löydy,
voit suorittaa Dell-diagnostiikkaohjelman Ohjaimet ja apuohjelmat -levyltä.
-CD-levyltä (resurssilevyltä).
Jos odotat liian kauan ja käyttöjärjestelmän logo tulee näyttöön, odota, kunnes näyttöön
tulee Microsoft
3
Kun käynnistysjärjestysluettelo tulee näyttöön, korosta vaihtoehto
®
Windows® -työpöytä. Sammuta sitten tietokone ja yritä uudelleen.
Boot to Utility Partition
(Käynnistä apuohjelmaosioon) ja paina <Enter>-näppäintä.
4
Kun Dell-diagnostiikkaohjelman
päävalikko
tulee näyttöön, valitse suoritettava testi.
Pikaopas 81
Page 82

Dell-diagnostiikkaohjelman suorittaminen lisävarusteena toimitettavalta Ohjaimet ja apuohjelmat
-CD-levyltä
1
Aseta
Ohjaimet ja apuohjelmat
2
Sammuta tietokone ja käynnistä se uudelleen.
Kun DELL-logo tulee näyttöön, paina heti <F12>-näppäintä.
Jos odotat liian kauan ja Windows-logo tulee näyttöön, odota, kunnes näyttöön tulee
Windows-työpöytä. Sammuta sitten tietokone ja yritä uudelleen.
HUOMAUTUS: Seuraavat vaiheet muuttavat käynnistysjärjestystä vain yhden käynnistyksen ajaksi.
Seuraavan käynnistyksen aikana tietokone käynnistyy järjestelmäasetuksissa määritetyn
laiteluettelon mukaisesti.
www.dell.com | support.dell.com
Kun käynnistysjärjestysluettelo tulee näyttöön, korosta vaihtoehto
3
(IDE-CD-laite)
4
Valitse CD-käynnistysvalikosta
5
Valitse näyttöön tulevasta valikosta
6
Avaa resurssilevyn valikko kirjoittamalla 1.
7
Käynnistä Dell-diagnostiikkaohjelma kirjoittamalla 2.
8
Valitse numeroidusta luettelosta
diagnostiikkaohjelma) -vaihtoehto. Jos luettelossa on useita versioita, valitse käyttämääsi
tietokonetta vastaava versio.
9
Kun Dell-diagnostiikkaohjelman
-CD-levy asemaan.
ja paina <Enter>-näppäintä.
IDE CD-ROM Device
Boot from CD-ROM
Run the 32 Bit Dell Diagnostics
päävalikko
tulee näyttöön, valitse suoritettava testi.
IDE CD-ROM Device
(IDE-CD-laite) -vaihtoehto.
(Käynnistä CD-levyltä)-vaihtoehto.
(Suorita 32-bittinen Dell-
Dell-diagnostiikkaohjelman päävalikko
1
Vaihtoehto: Toiminto:
Express Test (Pikatesti) Testaa laitteet nopeasti. Testaaminen vie yleensä 10 - 20 minuuttia. Käyttäjän
Extended Test
(Laaja testi)
Custom Test
(Mukautettu testi)
Symptom Tree
(Ongelmapuu)
82 Pikaopas
Kun Dell-diagnostiikkaohjelma on latautunut ja
vaihtoehtoa.
ei tarvitse tehdä mitään testauksen aikana. Pikatestillä voit selvittää ongelman
syyt nopeasti.
Testaa laitteet läpikotaisin. Testi kestää yleensä tunnin tai kauemmin,
ja käyttäjän on välillä vastattava kysymyksiin.
Testaa tietyn laitteen. Suoritettavia testejä voi mukauttaa.
Näyttää yleisimmin kohdatut ongelmien oireet, ja käyttäjä voi valita testin
oireiden perusteella.
päävalikko
avautuu, napsauta haluamaasi
Page 83

2
Jos ongelma löydetään testin aikana, näyttöön tulee sanoma, jossa ilmoitetaan virhekoodi ja
ongelman kuvaus. Kirjoita virhekoodi ja ongelman kuvaus muistiin. Noudata näyttöön
tulevia ohjeita.
Jos et voi selvittää virhetilaa, ota yhteyttä Delliin.
HUOMAUTUS: Tietokoneen huoltomerkki näkyy kunkin testinäytön yläosassa. Kun otat yhteyttä Delliin,
tekninen tuki kysyy sinulta huoltomerkin numeroa.
Jos suoritat testin käyttämällä
3
Custom Test
(Mukautettu testi)- tai
Symptom Tree
(Ongelmapuu) -vaihtoehtoa, saat lisätietoja napsauttamalla seuraavassa taulukossa
kuvattuja välilehtiä.
Välilehti: Toiminto:
Results (Tulokset) Näyttää testin tulokset ja havaitut virhetilanteet.
Errors (Virheet) Näyttää havaitut virhetilanteet, virhekoodit ja ongelmakuvauksen.
Help (Ohje) Sisältää kuvauksen testistä ja saattaa ilmoittaa testin suorittamiseen liittyviä
vaatimuksia.
Configuration
(Kokoonpano)
Parameters (Parametrit) Voit mukauttaa testiä muuttamalla testiasetuksia.
Näyttää valitun laitteen laitteistokokoonpanon.
Dell-diagnostiikkaohjelma saa kaikkien laitteiden kokoonpanotiedot
järjestelmän asennusohjelmasta, muistista ja sisäisistä testeistä. Kaikki tiedot
näytetään näytön vasemmassa reunassa olevassa laiteluettelossa.
Laiteluettelossa ei välttämättä ole kaikkien tietokoneeseen asennettujen
komponenttien tai tietokoneeseen liitettyjen laitteiden nimiä.
4
Jos suoritat Dell-diagnostiikkaohjelman
Ohjaimet ja apuohjelmat
-CD-levyltä, poista levy
CD-asemasta, kun testit on suoritettu.
5
Sulje testinäyttö, niin pääset takaisin
käytön ja käynnistää tietokoneen uudelleen sulkemalla
päävalikkoon
. Voit lopettaa Dell-diagnostiikkaohjelman
päävalikkonäytön
.
Järjestelmän merkkivalot
Virran merkkivalo saattaa ilmaista tietokoneen ongelmaa.
Virran merkkivalo Ongelman kuvaus Ehdotettu ongelman ratkaisu
Jatkuva vihreä Virta on kytkettynä, ja tietokone
toimii normaalisti.
Vilkkuva vihreä Tietokone on keskeytystilassa
(Microsoft
Windows XP).
®
Windows® 2000 ja
Korjaavia toimia ei tarvita.
Palauta tietokone normaaliin toimintaan
painamalla virtapainiketta, liikuttamalla
hiirtä tai painamalla jotakin näppäintä.
Pikaopas 83
Page 84

Virran merkkivalo Ongelman kuvaus Ehdotettu ongelman ratkaisu
Vilkkuu vihreänä
joitakin kertoja ja
sammuu
Jatkuva keltainen Dell-diagnostiikkaohjelma suorittaa
www.dell.com | support.dell.com
Vilkkuva keltainen On tapahtunut virtalähteen tai
Jatkuva vihreä ja
äänimerkkikoodi
POST-testin aikana
Jatkuva vihreä
virran merkkivalo, ei
äänimerkkikoodia
tai kuvaa POSTtestin aikana
Jatkuva vihreä
virran merkkivalo, ei
äänimerkkikoodia ja
tietokone jumittuu
POST-testin aikana
Järjestelmässä on kokoonpanovirhe. Tarkista kohdasta "Diagnostiikkamerkkivalot"
sivulla 84, liittyykö oire johonkin tiettyyn
ongelmaan.
Jos Dell-diagnostiikkaohjelma on käynnissä,
testiä, tai emolevyn laite on viallinen
tai asennettu virheellisesti.
emolevyn virhe.
Kohdattiin BIOS-ongelma. Lisätietoja äänimerkkikoodien
Näyttö tai näytönohjain saattaa olla
viallinen tai virheellisesti asennettu.
Integroitu emolevyn laite saattaa olla
viallinen.
odota, kunnes testit ovat päättyneet.
Tarkista kohdasta "Diagnostiikkamerkkivalot"
sivulla 84, liittyykö oire johonkin tiettyyn
ongelmaan.
Jos tietokone ei käynnisty, ota yhteyttä
Delliin ja pyydä teknistä tukea.
Tarkista kohdasta "Diagnostiikkamerkkivalot"
sivulla 84, liittyykö oire johonkin tiettyyn
ongelmaan. Katso online-käyttöoppaan
virtaongelmista kertovaa ohjetta.
diagnosoinnista on kohdassa
"Äänimerkkikoodit" sivulla 87. Tarkista myös
kohdasta "Diagnostiikkamerkkivalot"
sivulla 84, liittyykö oire johonkin tiettyyn
ongelmaan.
Tarkista kohdasta "Diagnostiikkamerkkivalot"
sivulla 84, liittyykö oire johonkin tiettyyn
ongelmaan.
Tarkista kohdasta "Diagnostiikkamerkkivalot"
sivulla 84, liittyykö oire johonkin tiettyyn
ongelmaan. Jos ongelmaa ei ole tunnistettu,
ota yhteyttä Delliin ja pyydä teknistä tukea.
Diagnostiikkamerkkivalot
Tietokoneen takapaneelissa on neljä vianmääritystä helpottavaa merkkivaloa (A, B, C ja D). Nämä
merkkivalot voivat olla keltaisia tai vihreitä. Kun tietokone käynnistyy normaalisti, merkkivalojen
yhdistelmät tai koodit muuttuvat käynnistysprosessin edetessä. Jos järjestelmän käynnistyksen
POST-testiosa suoritetaan onnistuneesti, kaikki neljä merkkivaloa palavat jatkuvasti vihreinä.
Jos tietokone ei toimi oikein POST-testin aikana, merkkivalojen yhdistelmä saattaa auttaa
tunnistamaan, missä prosessin vaiheessa tietokone kohtasi virheen.
84 Pikaopas
VAROITUS: Tutustu tuotetiedoissa oleviin turvallisuusohjeisiin ennen tässä osassa mainittujen
toimien tekemistä.
Page 85

Merkkivaloyhdistelmä
ei pala
ei pala
ei pala
ei pala
Ongelman kuvaus Ehdotettu ongelman ratkaisu
Tietokone ei ole käynnissä tai on
mahdollisesti ilmennyt ongelma
ennen BIOSin suorittamista.
• Tarkista, että tietokone on liitetty toimivaan
pistorasiaan ja että olet painanut virtapainiketta.
keltainen
vihreä
keltainen
keltainen
vihreä
vihreä
keltainen
keltainen
keltainen
keltainen
vihreä
keltainen
keltainen
vihreä
vihreä
keltainen
Mahdollinen suoritinvirhe.
Muistimoduulit on tunnistettu,
mutta on ilmennyt muistivirhe.
Mahdollinen PCI-korttivirhe.
Mahdollinen IDE-asemavirhe.
• Asenna suoritin uudelleen ja käynnistä
tietokone uudelleen.
• Jos asennettuna on vain yksi muistimoduuli, asenna
se uudelleen ja käynnistä tietokone uudelleen.
• Jos asennettuna on kaksi muistimoduulia, poista
moduulit, asenna toinen muistimoduuli uudelleen ja
käynnistä tietokone uudelleen. Jos tietokone käynnistyy
normaalisti, asenna toinen muistimoduuli uudelleen.
• Jos mahdollista, asenna samaa tyyppiä oleva toimiva
muistimoduuli tietokoneeseen.
• Jos ongelma toistuu, ota yhteyttä Delliin.
• Selvitä poistamalla kortti (ei näytönohjainkorttia)
ja käynnistämällä tietokone uudelleen, onko
tietokoneessa resurssiristiriita.
• Jos ongelma ei poistu, asenna poistamasi kortti
uudelleen, poista jokin toinen kortti ja käynnistä
sitten tietokone uudelleen.
• Toista tämä jokaisen kortin kohdalla. Jos tietokone
käynnistyy normaalisti, suorita viimeksi poistamasi
kortin resurssiristiriitojen vianmääritys (lisätietoja
on kohdassa "Ohjelmiston ja laitteiston
yhteensopivuusongelmien ratkaiseminen" sivulla 88).
• Siirrä yksi kortti kerrallaan eri PCI-korttipaikkaan ja
käynnistä tietokone uudelleen jokaisen siirron jälkeen.
• Jos ongelma toistuu, ota yhteyttä Delliin.
• Irrota kaikki IDE-asemien virta- ja datakaapelit, liitä
ne uudelleen ja käynnistä sitten tietokone uudelleen.
Pikaopas 85
Page 86

Merkkivaloyhdistelmä
vihreä
vihreä
vihreä
keltainen
Ongelman kuvaus Ehdotettu ongelman ratkaisu
Mahdollinen USB-virhe.
• Asenna kaikki USB-laitteet uudelleen, tarkista
laitteiden kaapelit ja käynnistä sitten tietokone
uudelleen.
keltainen
keltainen
keltainen
www.dell.com | support.dell.com
vihreä
keltainen
vihreä
keltainen
vihreä
keltainen
vihreä
vihreä
vihreä
Muistimoduuleja ei havaittu.
Muistimoduulit on tunnistettu,
mutta on ilmennyt muistin
kokoonpano- tai
yhteensopivuusvirhe.
Virhe on ilmennyt.
• Asenna kaikki muistimoduulit uudelleen ja käynnistä
tietokone uudelleen.
• Voit selvittää, aiheutuuko virhe vioittuneesta
muistivastakkeesta, poistamalla kaikki muistimoduulit,
asentamalla yhden muistimoduulin uudelleen
(jos tietokone tukee yksittäisen muistimoduulin
käyttämistä) ja käynnistämällä tietokoneen sitten
uudelleen. Jos tietokone käynnistyy normaalisti,
siirrä muistimoduuli eri vastakkeeseen ja käynnistä
tietokone uudelleen. Tee sama uudelleen, kunnes
olet paikantanut vioittuneen vastakkeen tai
asentanut kaikki muistimoduulit uudelleen niin,
että virhettä ei esiinny.
• Varmista, että tietokone ei edellytä mitään erityistä
muistimoduulin ja muistivastakkeiden sijoittamista
(lisätietoja on onlinekohdassa).
• Varmista, että asentamasi muistimoduulit ovat
yhteensopivia tietokoneen kanssa.
• Jos ongelma toistuu, ota yhteyttä Delliin.
• Varmista, että kaikkien asennettujen kiintolevyasemien
kaapelit on liitetty emolevyyn oikein.
• Tarkista näyttöön tuleva tietokoneen sanoma.
• Jos ongelma toistuu, ota yhteyttä Delliin.
käyttöoppaan
muistista kertovassa
vihreä
vihreä
vihreä
vihreä
86 Pikaopas
Tietokone on normaalissa
toimintatilassa POST-testin
suorittamisen jälkeen.
• Ei mitään.
Page 87

Äänimerkkikoodit
Tietokone saattaa antaa äänimerkkejä käynnistyksen aikana, jos näyttö ei pysty näyttämään virheitä
tai ongelmia. Nämä äänimerkit (eli äänimerkkikoodi) ilmaisevat, mikä ongelma on kyseessä. Yksi
mahdollinen äänimerkkikoodi (1-3-1) muodostuu yhdestä piippauksesta, kolmen piippauksen
sarjasta ja lopuksi yhdestä piippauksesta. Tämä äänimerkkikoodi ilmaisee, että tietokoneessa on
ilmennyt muistiongelma.
Jos tietokone antaa äänimerkin käynnistyksen aikana, toimi seuraavasti:
1
Kirjoita äänimerkkikoodi muistiin.
2
Tietoja vakavamman virheen selvittämisestä on kohdassa "Dell-diagnostiikkaohjelma"
sivulla 81.
3
Saat teknistä tukea ottamalla yhteyttä Delliin.
Koodi Syy Koodi Syy
1-1-2 Suoritinrekisterivirhe 3-1-4 Oheiskeskeytysmaskirekisterivirhe
1-1-3 NVRAM-luku- tai -kirjoitusvirhe 3-2-2 Keskeytysvektorin latausvirhe
1-1-4 ROM BIOS -tarkistussummavirhe 3-2-4 Näppäimistöohjaintestin virhe
1-2-1 Ohjelmoitavan väliajastimen virhe 3-3-1 NVRAM-virtakatkos
1-2-2 DMA-alustusvirhe 3-3-2 Virheellinen NVRAM-kokoonpano
1-2-3 DMA-sivurekisterin luku- tai
kirjoitusvirhe
1-3 Näyttömuistitestin virhe 3-4-1 Näytön alustusvirhe
1-3-1 - 2-4-4 Muistia ei tunnisteta tai
käytetä oikein
3-1-1 DMA-oheisrekisterivirhe 3-4-3 Näyttömuistin etsintävirhe
3-1-2 DMA-päärekisterivirhe 4-2-1 Ajastin ei käynnissä
3-1-3 Pääkeskeytysmaskirekisterivirhe 4-2-2 Sammutusvirhe
4-2-3 A20-porttivirhe 4-4-1 Sarja- tai rinnakkaisporttitestin
4-2-4 Odottamaton keskeytys
suojatussa tilassa
4-3-1 Muistivirhe osoitteen
0FFFFh jälkeen
4-3-3 Ajastinsirun laskurin 2 virhe 4-4-4 Välimuistitestin virhe
4-3-4 Kello pysäytetty
3-3-4 Näyttömuistitestin virhe
3-4-2 Näytön uudelleenpiirtovirhe
virhe
4-4-2 Koodin varjomuistiin purkamisen
virhe
4-4-3 Matematiikkasuoritintestin virhe
Pikaopas 87
Page 88

Dell™ IDE -kiintolevydiagnostiikkaohjelman suorittaminen
Dell IDE -kiintolevyasemadiagnostiikkaohjelma on apuohjelma, joka testaa kiintolevyaseman
virheiden vianmääritystä tai vahvistamista varten.
1
Kytke virta tietokoneeseen (jos tietokone on jo käynnissä, käynnistä se uudelleen).
2
Kun näytön oikeaan yläkulmaan tulee teksti F2= Setup (F2=Asetukset), paina
<Ctr><Alt><D>.
3
Noudata näyttöön tulevia ohjeita.
Jos virheestä ilmoitetaan, katso lisätietoja onlinekiintolevyongelmista kertovasta osasta.
käyttöoppaan
ongelmanratkaisuosan
www.dell.com | support.dell.com
Ohjelmiston ja laitteiston yhteensopivuusongelmien ratkaiseminen
Jos laitetta ei havaita käyttöjärjestelmän käynnistyksen aikana tai laite havaitaan, mutta se on
määritetty virheellisesti, voit ratkaista yhteensopivuusongelman Hardware Troubleshooter
(Laitteiden vianmääritys) -toiminnon avulla. Jos käyttöjärjestelmä on Microsoft
voit ratkaista yhteensopivuusongelmat myös Device Manager (Laitehallinta) -työkalun avulla.
Windows XP
Yhteensopivuusongelmien ratkaiseminen Hardware Troubleshooter (Laitteiden vianmääritys)
-toiminnon avulla:
1
Napsauta
2
Kirjoita
aloita haku napsauttamalla nuolta.
3
Valitse
Search Results
vianmääritys).
4
Valitse
Hardware Troubleshooter
hardware conflict on my computer
(Seuraava).
Windows 2000
Voit ratkaista yhteensopivuusongelmat Device Manager (Laitehallinta) -työkalun avulla
seuraavasti:
1
Napsauta
(Ohjauspaneeli).
Panel
2
Kaksoisnapsauta
3
Valitse
Hardware
4
Valitse
Device Manager
Start
(Käynnistä) -painiketta ja valitse
Search
(Etsi) -kenttään
hardware troubleshooter
(Etsinnän tulokset) -luettelossa
Start
(Käynnistä) -painiketta, valitse
Control Panel
(Ohjauspaneeli) -ikkunassa
(Laitteisto) -välilehti.
(Laitehallinta).
®
Windows® 2000,
Help and Support
(Ohje ja tuki).
(laitteiden vianmääritys) ja
Hardware Troubleshooter
(Laitteiden vianmääritys) -luettelossa
I need to resolve a
(Laitteiden
(Tietokoneessa on laitteistoristiriita) ja valitse sitten
Settings
(Asetukset) ja valitse sitten
System
(Järjestelmä) -kuvaketta.
Next
Control
88 Pikaopas
Page 89

5
Va li t se
View (Näytä)
6
Kaksoisnapsauta
Virheellisesti määritetyt laitteet ilmaistaan keltaisella huutomerkillä (
X
, jos laite on poistettu käytöstä.
7
Kaksoisnapsauta huutomerkillä merkittyä laitetta, jolloin laitteen
ja valitse sitten
Resources by connection
Interrupt request (IRQ)
(Resurssit yhteyden mukaan).
(Keskeytyspyyntö (IRQ).
!
) tai punaisella rastilla
Properties
(Ominaisuudet)
-ikkuna tulee näyttöön.
Properties
(Ominaisuudet) -ikkunan
Device
(Laite) -tila-alueella näkyvät kortit tai laitteet,
jotka on määritettävä uudelleen.
8
Määritä laitteet uudelleen tai poista ne Device Manager (Laitehallinta) -työkalussa.
Lisätietoja laitteen määrittämisestä on laitteen mukana toimitetuissa ohjeissa.
Voit ratkaista yhteensopivuusongelmat Hardware Troubleshooter (Laitteiden vianmääritys)
-toiminnon avulla seuraavasti:
1
Napsauta
2
Va li t se
ylläpito), valitse
sitten
Hardware Troubleshooter
Valitse
hardware conflict on my computer
Next
(Seuraava).
Start
Contents
Hardware
(Käynnistä) -painiketta ja valitse
(Sisällys) -välilehdessä
Troubleshooting and Maintenance
Windows 2000 troubleshooters
(Laitteisto).
(Laitteiden vianmääritys) -luettelossa
(Tietokoneessa on laitteistoristiriita) ja valitse sitten
Help
(Ohje).
(Vianmääritys ja
(Windows 2000 -vianmääritys) ja valitse
I need to resolve a
Microsoft® Windows® XP:n System Restore (Järjestelmän palauttaminen)
-toiminnon käyttäminen
Microsoft® Windows® XP -käyttöjärjestelmä sisältää System Restore (Järjestelmän palauttaminen)
-toiminnon, jonka avulla voit palauttaa tietokoneesi aiempaan toimivaan tilaan (ilman vaikutusta
datatiedostoihin), jos laitteistoon, ohjelmistoon tai järjestelmän asetuksiin tehdyt muutokset ovat
saattaneet tietokoneen tilaan, jossa se ei toimi halutulla tavalla. Lisätietoja System Restore
(Järjestelmän palauttaminen) -toiminnosta on Windowsin ohje- ja tukikeskuksessa.
LAITTEISTOVAROITUS: Ota datatiedostoistasi varmuuskopiot säännöllisesti. System Restore
(Järjestelmän palauttaminen) ei tarkkaile tai palauta datatiedostojasi.
Palautuspisteen luominen
1
Napsauta
2
Va li t se
3
Noudata näyttöön tulevia ohjeita.
Start
(Käynnistä) -painiketta ja valitse
System Restore
Help and Support
(Järjestelmän palauttaminen).
(Ohje ja tuki).
Pikaopas 89
Page 90

Tietokoneen palauttaminen aiempaan toimivaan tilaan
LAITTEISTOVAROITUS: Ennen kuin palautat tietokoneen aiempaan toimivaan tilaan, tallenna ja sulje
avoinna olevat tiedostot ja sulje avoimet ohjelmat. Älä muokkaa, avaa tai poista tiedostoja tai ohjelmia,
ennen kuin järjestelmän palauttaminen on valmis.
Napsauta
1
(Apuohjelmat)→
(Järjestelmän palauttaminen).
2
Varmista, että
ajankohdan mukaiseksi) on valittuna, ja valitse sitten
3
Valitse kalenterista päivämäärä, jonka mukaisen tilanteen haluat palauttaa tietokoneeseen.
www.dell.com | support.dell.com
Select a Restore Point
näkyvät ja josta niitä voidaan valita. Kaikki päivämäärät, joihin liittyy käytettävissä oleva
palautuspiste, näkyvät lihavoituina.
4
Valitse palautuspiste ja valitse sitten
Jos kalenterin päivämäärällä on vain yksi palautuspiste, se on valittuna automaattisesti. Jos
käytettävissä on kaksi tai useampia palautuspisteitä, valitse haluamasi palautuspiste.
5
Valitse
Next
Restoration Complete
palauttaminen on kerännyt tiedot. Tämän jälkeen tietokone käynnistetään uudelleen.
6
Kun tietokone on käynnistynyt uudelleen, valitse OK.
Jos haluat vaihtaa palautuspistettä, voit joko toistaa vaiheet ja valita toisen palautuspisteen tai voit
kumota palauttamisen.
Start
(Käynnistä) -painiketta, valitse
System Tools
(Järjestelmätyökalut) ja valitse sitten
Restore my computer to an earlier time
(Valitse palautuspiste) -näytössä on kalenteri, jossa palautuspisteet
Next
(Seuraava).
(Seuraava).
(Palauttaminen on valmis) -näyttö tulee näkyviin, kun Järjestelmän
All Programs
(Kaikki ohjelmat)→
(Palauta tietokone aiemman
Next
(Seuraava).
Accessories
System Restore
Viimeisimmän järjestelmän palauttamisen kumoaminen
1
2
3
4
90 Pikaopas
LAITTEISTOVAROITUS: Ennen kuin kumoat viimeisimmän järjestelmän palauttamisen, tallenna ja
sulje kaikki avoimet tiedostot ja sulje kaikki avoimet ohjelmat. Älä muokkaa, avaa tai poista tiedostoja
tai ohjelmia, ennen kuin järjestelmän palauttaminen on valmis.
Napsauta
Accessories
System Restore
Valitse
Next
Valitse
System Restore
Start
(Käynnistä) -painiketta, valitse
(Apuohjelmat)→
(Järjestelmän palauttaminen).
Undo my last restoration
(Seuraava).
Next
(Seuraava).
(Järjestelmän palauttaminen) -näyttö tulee näkyviin ja tietokone
System Tools
All Programs
(Järjestelmätyökalut) ja valitse sitten
(Kaikki ohjelmat)→
(Peruuta viimeisin palauttaminen) ja valitse sitten
käynnistyy uudelleen.
Kun tietokone on käynnistynyt uudelleen, valitse OK.
Page 91

Järjestelmän palauttamisen ottaminen käyttöön
Jos asennat Windows XP:n uudelleen niin, että vapaata kiintolevytilaa on alle 200 megatavua,
järjestelmän palauttaminen poistetaan käytöstä automaattisesti. Voit tarkistaa, onko järjestelmän
palauttaminen käytössä, toimimalla seuraavasti:
1
Napsauta
2
Va li t se
3
Va li t se
4
Va li t se
5
Varm is ta , e tt ä
Start
(Käynnistä) -painiketta ja valitse
Performance and Maintenance
System
(Järjestelmä).
System Restore
(Järjestelmän palauttaminen) -välilehti.
Turn off System Restore
Control Panel
(Ohjauspaneeli).
(Suorituskyky ja ylläpito).
(Poista järjestelmän palauttaminen käytöstä)
ei ole valittuna.
Microsoft® Windows® XP:n asentaminen uudelleen
Ennen aloittamista
Jos harkitset Windows XP -käyttöjärjestelmän asentamista uudelleen vastikään asennetun
ohjaimen ongelman korjaamiseksi, kokeile ensin Windows XP:n aiemman laiteohjaimen
käyttämistoimintoa. Jos aiemman laiteohjaimen käyttämistoiminnon käyttäminen ei korjaa
ongelmaa, palauta käyttöjärjestelmä Järjestelmän palauttamisen avulla toimintatilaan,
jossa se oli ennen uuden laiteohjaimen asentamista.
LAITTEISTOVAROITUS: Varmuuskopioi ennen asentamista kaikki ensisijaisen kiintolevyaseman
tiedot. Perinteisissä kiintolevyasemakokoonpanoissa ensisijainen kiintolevyasema on ensimmäinen
tietokoneen tunnistama asema.
Tarvitset seuraavat, jotta voit asentaa Windows XP:n uudelleen:
•Dell™
•Dell
Käyttöjärjestelmän
CD-levy
Ohjaimet ja apuohjelmat
-CD-levy
HUOMAUTUS: Ohjaimet ja apuohjelmat -CD-levy sisältää ohjaimet, jotka asennettiin tietokoneen
kokoamisvaiheessa. Voit ladata tarvittavat ohjaimet Ohjaimet ja apuohjelmat -CD-levyltä tai
Dellintukisivustosta.
HUOMAUTUS: Käyttöjärjestelmän CD-levy ja Ohjaimet ja apuohjelmat -CD-levyt ovat lisävarusteita,
eikä niitä välttämättä toimiteta kaikkien tietokoneiden mukana.
Windows XP:n asentaminen uudelleen
LAITTEISTOVAROITUS: Sinun on käytettävä Windows XP Service Pack 1 -pakettia tai uudempaa,
kun asennat Windows XP:n uudelleen.
Voit asentaa Windows XP:n uudelleen suorittamalla kaikki seuraavien osien vaiheet niiden
esittämisjärjestyksessä.
Pikaopas 91
Page 92

Uudelleenasennusprosessin viimeisteleminen voi kestää 1 - 2 tuntia. Kun olet asentanut
käyttöjärjestelmän uudelleen, sinun on asennettava myös laiteohjaimet,
virustentarkistusohjelmisto ja muut ohjelmat.
LAITTEISTOVAROITUS: Käyttöjärjestelmän CD-levyllä on asetukset Windows XP:n
uudelleenasentamista varten. Näiden asetusten käyttäminen voi korvata tiedostoja ja mahdollisesti
vaikuttaa kiintolevyasemaan asennettuihin ohjelmiin. Siksi sinun ei pidä asentaa Windows XP:tä
uudelleen, ellei Dellin tekninen tuki kehota sinua tekemään niin.
LAITTEISTOVAROITUS: Estä ristiriidat Windows XP:n kanssa poistamalla tietokoneeseen asennetut
virustentorjuntaohjelmistot käytöstä ennen Windows XP:n uudelleenasentamista. Lisätietoja saat
ohjelmiston mukana toimitetuista ohjeista.
www.dell.com | support.dell.com
Käynnistäminen käyttöjärjestelmän CD-levyltä
1
Tallenna ja sulje avoimet tiedostot ja sulje avoimet ohjelmat.
2
Aseta
Käyttöjärjestelmän
Windows XP
3
Käynnistä tietokone uudelleen.
4
Paina <F12>-näppäintä heti, kun DELL™-logo tulee näkyviin.
Jos käyttöjärjestelmän logo tulee näkyviin, odota, kunnes näet Windows-työpöydän.
Sammuta sitten tietokone ja yritä uudelleen.
5
Valitse
CD-ROM
6
Kun
Press any key to boot from CD (Käynnistä CD-levyltä painamalla
mitä tahansa näppäintä)
Windows XP -asennus
1
Kun
Windows XP Setup
Windows now
2
Lue
Microsoft Windows Licensing Agreement
-näytön tiedot ja hyväksy käyttöoikeussopimus painamalla <F8>-näppäintä.
3
Jos tietokoneessa on jo Windows XP asennettuna ja haluat palauttaa nykyiset Windows XP
-tiedot, valitse korjaaminen painamalla
4
Jos haluat asentaa uuden Windows XP -asennuksen, valitse sen vaihtoehto painamalla
<Esc>-näppäintä.
5
Valitse korostettu osio (suositeltu) painamalla <Enter>-näppäintä ja noudata näyttöön
tulevia ohjeita.
Näkyviin tulee
aloittaa tiedostojen kopioimisen ja laitteiden asentamisen. Tietokone käynnistyy
automaattisesti uudelleen useita kertoja.
CD-levy asemaan. Valitse
(Asenna Windows XP)
-sanoma tulee näyttöön.
Exit
(Lopeta), jos
Install
(CD-asema) nuolinäppäinten avulla ja paina <Enter>-näppäintä.
-sanoma tulee näyttöön, paina mitä tahansa näppäintä.
(Windows XP -asennus) -näyttö tulee näkyviin, valitse
(Asenna Windows nyt) painamalla <Enter>-näppäintä.
(Microsoft Windows -käyttöoikeussopimus)
r
-näppäintä ja poista CD-levy asemasta.
Windows XP Setup
(Windows XP -asennus) -näyttö, ja käyttöjärjestelmä
To s e t u p
92 Pikaopas
Page 93

HUOMAUTUS: Asennukseen kuluva aika määrittyy kiintolevyaseman koon ja tietokoneen nopeuden
mukaan.
LAITTEISTOVAROITUS: Älä paina mitään näppäintä, kun seuraava sanoma tulee näyttöön: Press
any key to boot from the CD (Käynnistä CD-levyltä painamalla mitä
tahansa näppäintä).
Kun
6
Regional and Language Options
näkyviin, valitse sijaintisi mukaiset asetukset ja valitse
7
Kirjoita nimesi ja yrityksesi nimi (valinnainen)
ohjelmistoasi) -näytössä ja valitse
8
Kirjoita
Computer Name and Administrator Password
(Aluekohtaiset- ja kieliasetukset) -näyttö tulee
Next
(Seuraava).
Next
(Seuraava).
Personalize Your Software
(Mukauta
(Tietokonenimi ja
järjestelmänvalvojan salasana) -ikkunassa tietokoneen nimi (tai hyväksy näytössä näkyvä
nimi) ja salasana. Valitse sitten
9
Jos
Modem Dialing Information
näkyviin, kirjoita pyydetyt tiedot ja valitse
10
Määritä päivämäärä, aika ja aikavyöhyke
asetukset) -ikkunassa ja valitse
11
Jos
Networking Settings
ja valitse
12
Jos asennat Windows XP Professionalia ja sinua pyydetään antamaan lisätietoja verkkosi
Next
(Seuraava).
Next
(Seuraava).
(Modeemin numeronvalinnan tiedot) -näyttö tulee
Next
(Seuraava).
Next
(Seuraava).
Date and Time Settings
(Päivämäärän ja ajan
(Verkkoasetukset) -näyttö tulee näkyviin, valitse
Typical
(Normaali)
kokoonpanosta, tee pyydetyt määritykset. Jos et ole varma siitä, mitkä määritykset sinun
tulee tehdä, hyväksy oletusarvoiset valinnat.
Windows XP asentaa käyttöjärjestelmän osat ja määrittää tietokoneen asetukset. Tietokone
käynnistyy automaattisesti uudelleen.
LAITTEISTOVAROITUS: Älä paina mitään näppäintä, kun seuraava sanoma tulee näyttöön: Press
any key to boot from the CD (Käynnistä CD-levyltä painamalla mitä
tahansa näppäintä).
Kun Microsoftin tervetulonäyttö tulee näkyviin, valitse
13
14
Kun
How will this computer connect to the Internet? (Kuinka tämä
tietokone muodostaa Internet-yhteyden?)
Skip
(Ohita).
15
Kun Microsoftin rekisteröitymisnäyttö tulee näkyviin, valitse
valitse
Next
(Seuraava).
16
Kun
Who will use this computer?
(Tietokoneen käyttäjät) -näyttö tulee näkyviin, voit lisätä
Next
(Seuraava).
-sanoma tulee näyttöön, valitse
No, not at this time
(Ei nyt) ja
enintään viisi käyttäjää.
17
Va li t se
Next
(Seuraava).
18
Viimeistele asennus valitsemalla
Finish
(Valmis) ja poista CD-levy asemasta.
Pikaopas 93
Page 94

19
Asenna tarvittavat ohjaimet uudelleen
20
Asenna virustentorjuntaohjelmisto uudelleen.
21
Asenna ohjelmat uudelleen.
HUOMAUTUS: Jotta voisit asentaa ja aktivoida Microsoft Office- tai Microsoft Works Suite -ohjelmat
uudelleen, tarvitset tuotteen CD-levyn kotelon takaosassa olevan Product Key -tunnuksen.
Ohjaimet ja apuohjelmat
-CD-levyltä.
Ohjaimet ja apuohjelmat -levyn käyttäminen
Ohjaimet ja apuohjelmat
HUOMAUTUS: Jos haluat käyttää laiteohjaimia ja käyttöoppaita, Ohjaimet ja apuohjelmat -CD-levyä
www.dell.com | support.dell.com
on käytettävä Windowsista.
Käynnistä tietokone ja anna sen ladata Windows-työpöytä.
1
2
Aseta
Ohjaimet ja apuohjelmat
Jos käytät
näyttöön tulee
CD-levyn asennuksen käynnistymisestä.
3
Jatka valitsemalla OK.
Viimeistele asennus vastaamalla asennusohjelman kehotteisiin.
4
Valitse
Next
omistaja) -näytössä.
5
Valitse haluamasi
(Käyttöjärjestelmä)-,
Tietokoneen ohjaimet
Jos haluat tarkastella tietokoneeseen saatavilla olevien laiteohjainten luetteloa, toimi seuraavasti:
1
Valitse avattavasta
Ohjaimet ja apuohjelmat
ja tuo sen jälkeen näyttöön järjestelmää koskevan laiteohjainluettelon.
-levyn (resurssilevyn) käyttäminen Windows-käyttöjärjestelmässä:
-CD-levy CD-asemaan.
Ohjaimet ja apuohjelmat
ResourceCD Installation
(Seuraava)
Welcome Dell System Owner
System Model
(Järjestelmän malli)-,
Device Type
To pi c
(Aihe) -luettelosta
-levy tutkii tietokoneen laitteistokokoonpanon ja käyttöjärjestelmän
-CD-levyä ensimmäistä kertaa tässä tietokoneessa,
(Resurssilevyn asennus) -ikkuna, joka ilmoittaa
(Tervetuloa, Dell-järjestelmän
Operating System
(Laitetyyppi)- ja
To pi c
My Drivers
(Aihe) -asetukset.
(Omat ohjaimet) -vaihtoehto.
2
Jos haluat tarkastella kaikkia tietokoneeseen saatavilla olevia ohjaimia, valitse avattavasta
(Aihe) -luettelosta
94 Pikaopas
Napsauta haluamaasi ohjainta ja lataa se tietokoneeseen noudattamalla näyttöön
tulevia ohjeita.
Drivers
(Ohjaimet) -vaihtoehto.
To pi c
Page 95

Hakemisto
C
CD
käyttöjärjestelmä, 71
D
Dell
Premier Support -sivusto, 71
tukisivusto, 70
Dell Premier Support
-sivusto, 71
Dell-
diagnostiikkaohjelma, 81
Device Manager
(Laitehallinta), 88
diagnostiikka
äänimerkkikoodit, 87
merkkivalot, 84
valot, 83
diagnostiikkamerkkivalot, 84
diagnostiikkaohjelma
Dell, 81
Ohjaimet ja apuohjelmat
-levy, 69
diagnostiikkavalot, 83
H
huoltomerkki, 70
I
IRQ-ristiriidat, 88
J
jalusta
irrota, 74
liitä, 74
järjestelmän valot, 83
järjestelmäongelmia
Dell-diagnostiikkaohjelma, 81
K
käyttöjärjestelmä
Asennusopas, 71
CD, 71
Windows XP:n asentaminen
uudelleen, 91
käyttöjärjestelmän CD-
levy, 71
Käyttöopas, 70
L
laiteohjaimet
resurssilevy, 69
Laitteiden vianmääritys, 88
laitteisto
äänimerkkikoodit, 87
Dell-diagnostiikkaohjelma, 81
ristiriidat, 88
M
merkkivalot
diagnostiikka, 83-84
etuosan, 83
järjestelmä, 83
tietokoneen takaosa, 84
virtakytkin, 83
Microsoft Windows
-käyttöoikeustarra, 70
O
Ohjaimet ja apuohjelmat
-levy, 69
Ohje- ja tukikeskus, 71
ohjelmisto
ristiriidat, 88
ongelmat
äänimerkkikoodit, 87
diagnostiikkamerkkivalot, 84
merkkivalot, 83
palauttaminen aiempaan
tilaan, 89
ristiriidat, 88
Hakemisto 95
Page 96

oppaat
Käyttöopas, 70
laite, 69
online, 70-71
Pikaopas, 69
resurssilevy, 69
U
uudelleenasentaminen
Ohjaimet ja apuohjelmat
-levy, 69
resurssilevy, 69
Windows XP, 91
W
Windows 2000
Device Manager
(Laitehallinta), 88
Hardware Troubleshooter
(Laitteiden
vianmääritys), 88
R
resurssilevy
Dell-diagnostiikkaohjelma, 81
ristiriidat
yhteensopivuusongelmat, 88
S
System Restore (Järjestelmän
palauttaminen), 89
T
tarrat
huoltomerkki, 70
Microsoft Windows, 70
tietokone
äänimerkkikoodit, 87
palauttaminen aiempaan
tilaan, 89
V
vianmääritys
Dell-diagnostiikkaohjelma, 81
diagnostiikkamerkkivalot, 84
Laitteiden vianmääritys, 88
merkkivalot, 83
Ohje- ja tukikeskus, 71
palauttaminen aiempaan
tilaan, 89
ristiriidat, 88
virhesanomat
äänimerkkikoodit, 87
diagnostiikkamerkkivalot, 84
merkkivalot, 83
virran merkkivalo, 83
Windows XP
Hardware Troubleshooter
(Laitteiden
vianmääritys), 88
Laitteiden vianmääritys, 88
Ohje- ja tukikeskus, 71
System Restore (Järjestelmän
palauttaminen), 89
uudelleenasentaminen, 91
Ä
äänimerkkikoodit, 87
96 Hakemisto
Page 97

Dell™ OptiPlex™ 170L
Hurtigreferanse
Modellene MTC2 og DHS
www.dell.com | support.dell.com
Page 98

OBS!, merknader og advarsler
OBS! Et OBS!-avsnitt inneholder viktig informasjon som gjør deg til en mer effektiv bruker av datamaskinen.
MERKNAD: En MERKNAD angir enten potensiell fare for maskinvaren eller tap av data, og forteller hvordan du
kan unngå problemet.
ADVARSEL: En ADVARSEL angir en potensiell fare for skade på eiendom, personskade eller dødsfall.
Hvis du kjøpte en datamaskin i serien Dell™ n, gjelder ikke eventuelle referanser i dette dokumentet til
operativsystemet Microsoft
Drivers and Utilities
CDen
®
Windows®.
(ressurs-CDen), operativsystemmediene og
Hurtigreferansene
er valgfrie og vil
kanskje ikke sendes med alle datamaskiner.
____________________
Informasjonen i dette dokumentet kan endres uten varsel.
© 2004 Dell Inc. Med enerett.
Reproduksjon i noen som helst form er strengt forbudt uten skriftlig tillatelse fra Dell Inc.
Varemerker som brukes i denne teksten: Dell, DELL-logoen ogOptiPlex er varemerker for Dell Inc.; Microsoft og Windows er registrerte
varemerker for Microsoft Corporation.
Andre varemerker og varena vn kan brukes i dette dokumentet for å referere til institusjonene som innehar rettighetene til merkene og navnene,
eller til produktene. Dell Inc. fraskriver seg enhver eierinteresse for varemerker og varenavn som ikke er sine egne.
Modellene MTC2 og DHS
September 2004 P/N D7235 Rev. A00
Page 99

Innhold
Finne informasjon for datamaskinen . . . . . . . . . . . . . . . . . . . 101
Om din lille skrivebordsmaskin
Visning forfra og bakfra
Inni datamaskinen
Feste og fjerne datamaskinens fot
Om din minitårn-datamaskin
Visning forfra og bakfra
Inni datamaskinen
Konfigurere datamaskinen
Liten skrivebordsmaskin
Minitårn-datamaskin
Fullført installasjon
. . . . . . . . . . . . . . . . . . . . . . . . . . . 112
Liten skrivebordsmaskin
Minitårn-datamaskin
Løse problemer
Dell Diagnostics
Systemlys
Diagnoselys
Signalkoder
. . . . . . . . . . . . . . . . . . . . . . . . . . . . . 113
. . . . . . . . . . . . . . . . . . . . . . . . . . . 113
. . . . . . . . . . . . . . . . . . . . . . . . . . . . . . 115
. . . . . . . . . . . . . . . . . . . . . . . . . . . . . 116
. . . . . . . . . . . . . . . . . . . . . . . . . . . . . 119
Kjører Dell™ IDE Hard Drive Diagnostics
. . . . . . . . . . . . . . . . . . . . . . 104
. . . . . . . . . . . . . . . . . . . . . . . 104
. . . . . . . . . . . . . . . . . . . . . . . . . . 105
. . . . . . . . . . . . . . . . . . 106
. . . . . . . . . . . . . . . . . . . . . . . 107
. . . . . . . . . . . . . . . . . . . . . . . 107
. . . . . . . . . . . . . . . . . . . . . . . . . . 108
. . . . . . . . . . . . . . . . . . . . . . . . 109
. . . . . . . . . . . . . . . . . . . . . . . 110
. . . . . . . . . . . . . . . . . . . . . . . . 111
. . . . . . . . . . . . . . . . . . . . . . . 112
. . . . . . . . . . . . . . . . . . . . . . . . 112
. . . . . . . . . . . . . . . 120
Løse kompatibilitetsproblemer for programvare og maskinvare
®
Bruke Microsoft
(Systemgjenoppretting)
Installere Microsoft
Windows® XP System Restore
. . . . . . . . . . . . . . . . . . . . . . . 121
®
Windows® XP på nytt . . . . . . . . . . . . . 123
. . . . 120
Bruke CDen Drivers and Utilities (Drivere og verktøy)
Stikkordregister
. . . . . . . . . . . . . . . . . . . . . . . . . . . . . 127
. . . . . . . . . . . 125
Innhold 99
Page 100

100 Innhold
 Loading...