


PLL FM STEREO/SW.MW.LW DUAL CONVERSION SYNTHESIZED WORLD RECEIVER
DE1103
PLL FM STEREO/SW.MW.LW DUAL CONVERSION SYNTHESIZED WORLD RECEIVER
DE1103
OPERATION MANUAL

INDEX |
|
POWER SUPPLY .......................................................... |
|
|
1 |
POWER INDICATION .................................................... |
|
|
3 |
BATTERY CHARGER .................................................... |
|
|
4 |
BEFORE OPERATION................................................... |
|
|
6 |
SET THE CLOCK .......................................................... |
|
|
7 |
TURN ON OFF THE UNIT ........................................... |
8 |
VOLUME CONTROL & LOCAL / DX SWITCH ................... |
|
|
9 |
BAND METER BAND CONVERSION............................ |
10 |
SET SLEEP TIME ......................................................... |
|
|
11 |
SET ALARM ON OFF ................................................. |
12 |
TUNING INTO A STATION............................................. |
14 |
PRESET STATIONS ..................................................... |
18 |
DELETE STATIONS. .................................................... |
19 |
HOLD & BACKLIGHT ................. .................................. |
20 |
TONE SELECTION & NARROW/WIDE BAND |
|
.................................. |
|
|
21 |
RESET & LINE OUT ..................................................... |
22 |
EARPHONES & FOLDING STAND ................................. |
23 |
RECEIVING SSB / CW ................................................. |
24 |
USING ANTENNA ........................................................ |
25 |
SPECIFICATIONS........................................................ |
27 |
POWER SUPPLY
OPERATING ON BATTERY
 BATTERY INSTALLATION
1. Slide the battery lid.
2. Insert four AA batteries with correct polarity as shown in the compartment.
3. Close the lid of compartment.
 Disconnect the AC adaptor plug with the unit while using batteries to supply power.
 Do not try to recharge no-rechargeable batteries.
 Do not mix old batteries with new ones.
 When the unit is not being used for a long period of time, remove batteries to avoid damage from battery leakage and corrosion.
 If battery leakage occurs, wipe the battery compartment with a soft cloth before inserting new batteries.
BATTERY REPLACEMENT
1.When the sound becomes weak and distorted, battery power indicates 
 , replace batteries or charge the batteries immediately, otherwise the unit will shut off automatically.
2.All memories are permanently stored. However, when the power supply is broken off, the clock reverts to the default setting 0:00, it needs to be reset.
3.The clock time will not lose if you replace new batteries in 3 minutes.
1
POWER SUPPLY
OPERATING ON AC
ANT |
Left side |
AM |
|
DX |
|
LO |
|
6V
1. Plug the adaptor into a 220V AC power outlet.
2. Insert the adaptor s small connector plug into the DC JACK 25 .
If use AC adaptor to supply power, adaptor surface may a little heat.
If the AC adaptor is connected, the unit automatically switches to the AC adaptor power, and installed batteries are no longer in use.
 Disconnect the AC adaptor with the outlet,if the AC adaptor is not being used.
The backlight will keep on illuminated when using AC adaptor.
Remove the batteries if you want to use AC adaptor for a long period of time.
 Only Supplied AC adaptor should be used for this unit.
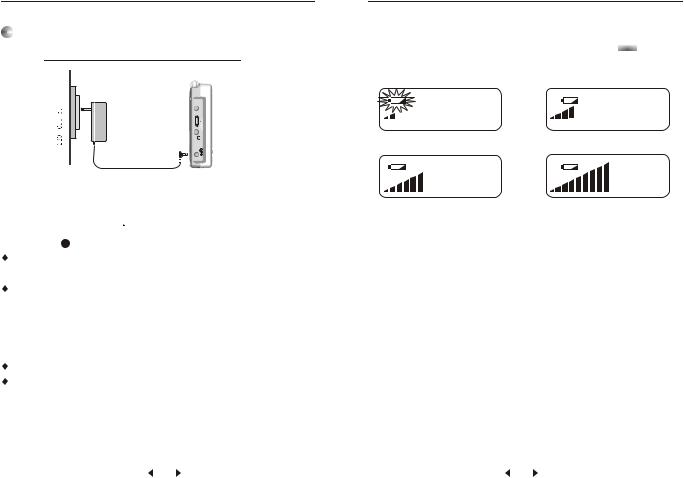
POWER INDICATION
Power indicator is a trapeze pattern, it is hidden when receiving programme. User can check power level by press  VOL
VOL  .
.
Lower |
Medium |
More |
Full |
 If the power is exhausted, the unit will turn off automatically.
 When using rechargeable batteries, if
  appears, batteries need to be recharged.
2 |
3 |

BATTERY CHARGE
Install four AA rechargeable batteries with correct polarity.
2.Plug the adaptor into an 220V AC power outlet, connect the other side securely to DC Jack 25 .
3.In power off mode, hold down button  VOL
VOL  , in the meantime
turn jog dial wheel TUNE |
to set charging time from 1~23 |
hours, then release button |
VOL , charging starts. Or press |
number button to input charging hours directly, then quickly press button  VOL
VOL  to confirm.
4.Indicator 

 flashes during battery charging.
5.When preset charging time reaches, the unit stops charging automatically.
Notes:
1.Charging time should be set in power off mode, but you can turn on the unit and listen programme during charging process.
2.There is no effect on battery charge if the unit is alarm on during charging.
3.Charging time can be calculated as: Charging hours = Battery Power (mAH) / 100mA ( charging current).
4.In power off mode, hold down  VOL
VOL  to check rest charging hours.
5.Battery charge will be terminated once the setting charging hours reaches.
6.Do not charge the batteries with fully power.
BATTERY CHARGE
CAUTIONS
 If
If constantly displays, the unit is in charging process. Please select high-quality rechargeable batteries.
When using new rechargeable batteries or those which have not been used for a long time, charge them fully, then use them until they have completely run down. Repeat this cycle two more times, then those batteries can be used normally.
Do not leave fully charged batteries unused for a long time.
Do not mix old batteries with new ones.
!Do not try to charge dry batteries, avoid batteries leakage or explosion
4 |
5 |

BEFORE OPERATING
Check Batteries/AC Adaptor
Check if batteries are inserted with correct polarity. Check if AC adaptor is connected in correct way. Please use supplied AC adaptor only.
Check Hold Button
If  appears in the display, the unit is locked. All buttons except HOLD button become inoperative. Unlock it to resume operation(Details refer page 20).
Check Local/DX Button
Normally, set Local / DX button to DX position 23 .
SET THE CLOCK
 Display Time
1.When the unit is off, current time indicates in the display.
2.When the unit is on, press  TIME
TIME  to display current time 5 seconds.
 Set The Clock
The default time of this unit is 0:00, time has to be set in power off mode.
1.Hold down button  TIME
TIME  for 2 seconds to set hour, hour number flashes for 30 seconds.
2. |
While hour number is flashing, |
turn the jog dial TUNE to |
|
3. |
set current hour. |
|
to set minute, minute number |
After hour setting, press |
TIME |
||
flashes.
4.Turn jog dial wheel to adjust minutes.
5.After setting, press  TIME
TIME  to confirm.
DEGEN
2. /4.
1 |
2 |
3 |
4 |
5 |
6 |
7 |
8 |
9 |
0 |
|
|
|
HOLD |
TIME |
|
SSB |
|
|
BAND+ |
SLEEP |
RESET |
|
|
DEL |
|
ST/MO |
FM |
SCAN |
AM |
1. /3./5.
 Please go to next step within 30 seconds, or the time setting will be invalid.
6 |
7 |
 Loading...