

Page 1

DE1103
Downloaded by
RadioAmateur.EU
PLL FM STEREO/SW.MW.LW DUAL CONVERSION SYNTHESIZED WORLD RECEIVER
PLL FM STEREO/SW.MW.LW DUAL CONVERSION SYNTHESIZED WORLD RECEIVER
DE1103
OPERATION MANUAL
Page 2
INDEX
POWER SUPPLY
POWER INDICATION ....................................................
BATTERY CHARGER ....................................................
BEFORE OPERATION..
SET THE CLOCK ..........................................................
TURN ON OFF THE UNIT ...........................................
VOLUME CONTROL & LOCAL / DX SWITCH ...................
BAND METER BAND CONVERSION............................
SET SLEEP TIME .........................................................
SET ALARM ON OFF .................................................
TUNING INTO A STATION.............................................
PRESET STATIONS .....................................................
DELETE STATIONS. ....................................................
HOLD & BACKLIGHT ................. ..................................
TONE SELECTION & NARROW/WIDE BAND
..................................
RESET & LINE OUT .....................................................
EARPHONES & FOLDING STAND .................................
RECEIVING SSB / CW .................................................
USING ANTENNA ........................................................
SPECIFICATIONS........................................................
..........................................................
.................................................
1
3
4
6
7
8
9
10
11
12
14
18
19
20
21
22
23
24
25
27
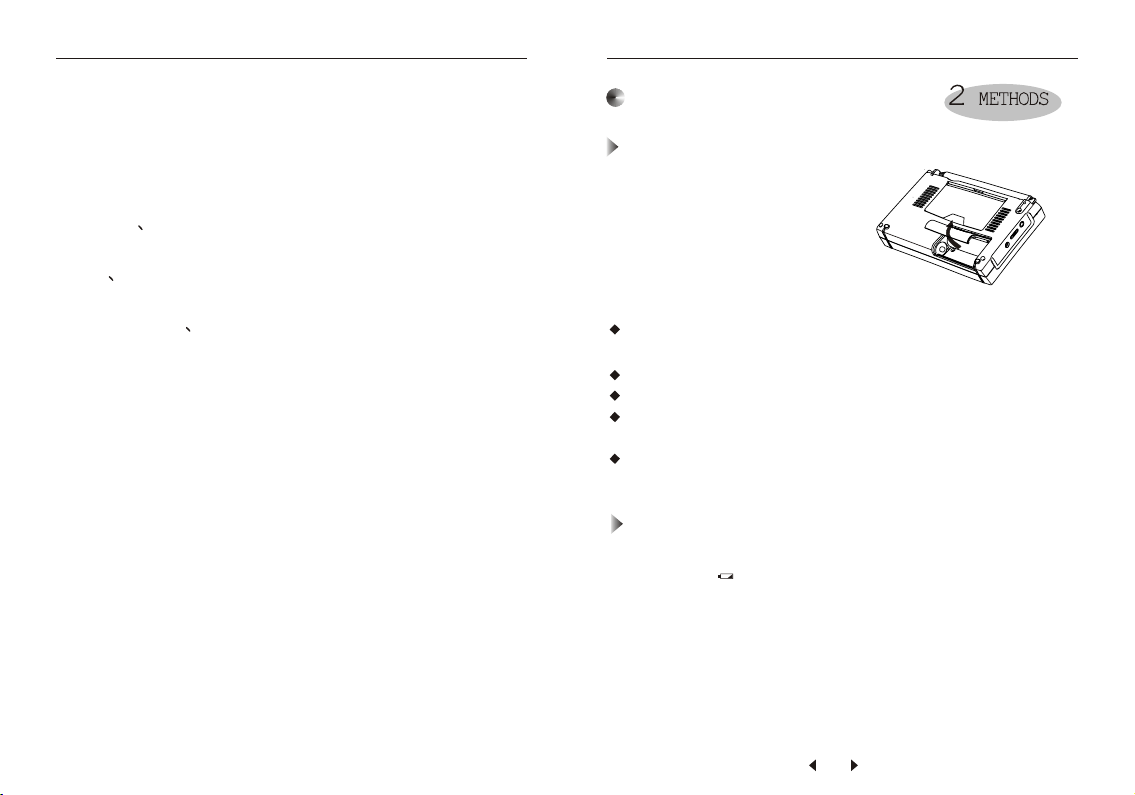
POWER SUPPLY
OPERATING ON BATTERY
BATTERY INSTALLATION
1. Slide the battery lid.
2. Insert four AA batteries with
correct polarity as shown in
the compartment.
3. Close the lid of compartment.
Disconnect the AC adaptor plug with the unit while using batteries
to supply power.
Do not try to recharge no-rechargeable batteries.
Do not mix old batteries with new ones.
When the unit is not being used for a long period of time, remove
batteries to avoid damage from battery leakage and corrosion.
If battery leakage occurs, wipe the battery compartment with a
soft cloth before inserting new batteries.
BATTERY REPLACEMENT
1. When the sound becomes weak and distorted, battery power
indicates , replace batteries or charge the batteries
immediately, otherwise the unit will shut off automatically.
2. All memories are permanently stored. However, when the
power supply is broken off, the clock reverts to the default
setting 0:00, it needs to be reset.
3. The clock time will not lose if you replace new batteries in 3
minutes.
1
Page 3
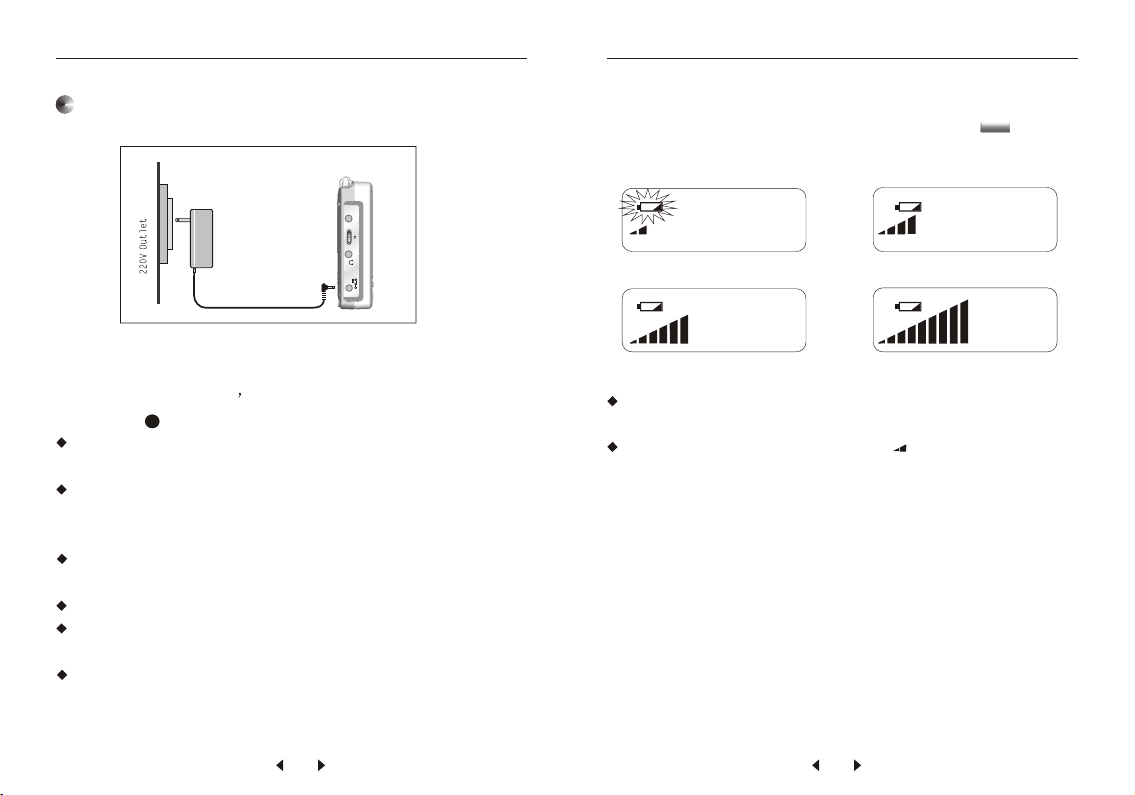
POWER SUPPLY
POWER INDICATION
OPERATING ON AC
Left side
AM ANT
LO DX
6V
1. Plug the adaptor into a 220V AC power outlet.
2. Insert the adaptor s small connector plug into the DC
JACK .
25
If use AC adaptor to supply power, adaptor surface may a little
heat.
If the AC adaptor is connected, the unit automatically switches
to the AC adaptor power, and installed batteries are no longer
in use.
Disconnect the AC adaptor with the outlet,if the AC adaptor
is not being used.
The backlight will keep on illuminated when using AC adaptor.
Remove the batteries if you want to use AC adaptor for a long
period of time.
Only Supplied AC adaptor should be used for this unit.
Power indicator is a trapeze pattern, it is hidden when receiving
programme. User can check power level by press .
VOL
Lower
More
Medium
Full
If the power is exhausted, the unit will turn off automatically.
When using rechargeable batteries, if appears, batteries need
to be recharged.
2
3
Page 4

BATTERY CHARGE
BATTERY CHARGE
Install four AA rechargeable batteries with correct polarity.
2. Plug the adaptor into an 220V AC power outlet, connect the
other side securely to DC Jack .
3. In power off mode, hold down button , in the meantime
25
VOL
turn jog dial wheel TUNE to set charging time from 1~23
hours, then release button , charging starts. Or press
VOL
number button to input charging hours directly, then quickly
press button to confirm.
VOL
4. Indicator flashes during battery charging.
5. When preset charging time reaches, the unit stops charging
automatically.
Notes:
1. Charging time should be set in power off mode, but you
can turn on the unit and listen programme during
charging process.
2. There is no effect on battery charge if the unit is alarm on
during charging.
3. Charging time can be calculated as: Charging hours =
Battery Power (mAH) / 100mA ( charging current).
4. In power off mode, hold down to check rest
charging hours.
5. Battery charge will be terminated once the setting
charging hours reaches.
6. Do not charge the batteries with fully power.
VOL
CAUTIONS
If constantly displays, the unit is in charging process.
Please select high-quality rechargeable batteries.
When using new rechargeable batteries or those which have
not been used for a long time, charge them fully, then use
them until they have completely run down. Repeat this cycle
two more times, then those batteries can be used normally.
Do not leave fully charged batteries unused for a long time.
Do not mix old batteries with new ones.
!
Do not try to charge dry batteries, avoid batteries leakage
or explosion
54
Page 5
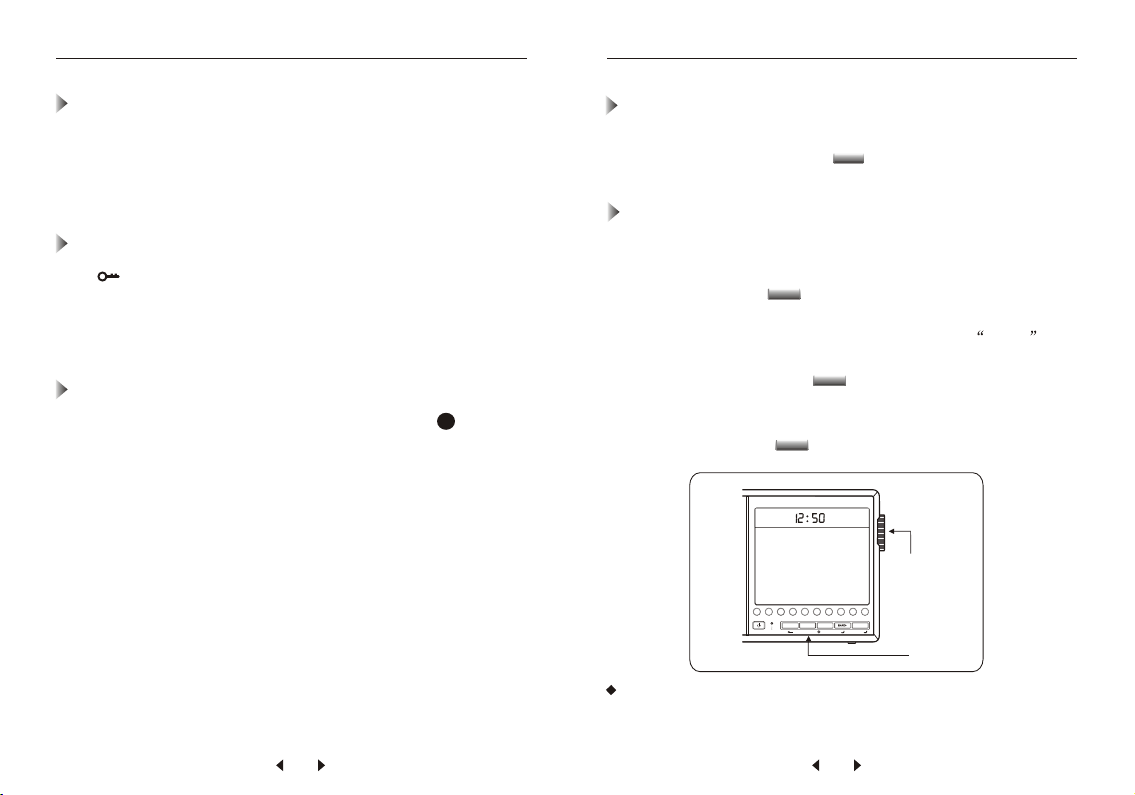
BEFORE OPERATING
DEGENDEGEN
DEGENDEGEN
1234567890
BAND+
TIME
SSB
HOLD
SLEEP
ST/MO
SCAN
DEL
RESET
FM AM
SET THE CLOCK
Check Batteries/AC Adaptor
Check if batteries are inserted with correct polarity. Check
if AC adaptor is connected in correct way. Please use
supplied AC adaptor only.
Check Hold Button
If appears in the display, the unit is locked. All buttons
except HOLD button become inoperative. Unlock it to resume
operation(Details refer page 20).
Check Local/DX Button
Normally, set Local / DX button to DX position .
23
Display Time
1. When the unit is off, current time indicates in the display.
2. When the unit is on, press to display current time 5
seconds.
TIME
Set The Clock
The default time of this unit is 0:00, time has to be set in power
off mode.
1. Hold down button for 2 seconds to set hour, hour number
flashes for 30 seconds.
2. While hour number is flashing, turn the jog dial TUNE to
set current hour.
3. After hour setting, press to set minute, minute number
flashes.
4. Turn jog dial wheel to adjust minutes.
5. After setting, press to confirm.
TIME
TIME
TIME
2. /4.
1. /3./5.
Please go to next step within 30 seconds, or the time setting will
be invalid.
76
Page 6

TURN ON OFF THE UNIT
DEGENDEGEN
DEGENDEGEN
1234567890
BAND+
TIME
SSB
HOLD
SLEEP
ST/MO
SCAN
DEL
RESET
FM AM
VOLUME CONTROL & LOCAL/DX SWITCH
Power On / Off the unit
to turn on the unit manually, press again to
SLEEP
SLEEP
turn it off. Each time turn on the unit, it will receive the last
station you ever heard.
Alarm On / Off
Two groups of alarm on /off time can be set in 24 hours.
Station, volume can be set as well. The unit will turn on at
preset time and will turn off after preset off time reaches.
After setting, indicator AlARM 1 AlARM 2 constantly
appears (Details refer to Page 12
Sleep Timer
Sleep time can be select from 1-99 minutes. After setting, indicator
SLEEP constantly appears, when preset sleep time reaches,
the unit will turn off automatically.(Details refer to Page 11).
SLEEP
ALARM1
SLEEP
ALARM1
ALARM2
ALARM2
Volume Control
The volume is divided to 64 levels 0~63 , default level after
reset the unit is level 40. When adjusting volume, corresponding
level number appears in the display.
Method 1 Turn on the unit, press , VOL flashes for 3
VOL
seconds, turn jog dial wheel to adjust volume.
VOL
+
+
-
Method 2 Press number button to input volume level directly, then
press to confirm.
VOL
For example: set volume to level 30
3
0
VOL
Please go to next step within 3 seconds.
Local /Dx Switch
In SW or MW band, set LOCAL/DX switch to
a proper position will increase reception.
LO DX
Generally, set the switch to DX position, unless there is a
strong interference or when you are listening to local stations.
NOTE
If LOCAL/DX switch is set to LOCAL position, some
strong signal stations may receive clearly, but most
weak signal stations can not be received.
23
98
Page 7

BAND METER BAND CONVERSION
DEGENDEGEN
DEGENDEGEN
1234567890
BAND+
TIME
SSB
HOLD
SLEEP
ST/MO
SCAN
DEL
RESET
FM AM
DEGENDEGEN
DEGENDEGEN
1234567890
BAND+
TIME
SSB
HOLD
SLEEP
ST/MO
SCAN
DEL
RESET
FM AM
SET SLEEP TIME
Band Conversion
MW
75
M
90
4.0
3.9
3.8
3.7
3.6
3.5
3.4
3.3
3.2
BAND+
75
M
90
60M
49M
41M
31M25M22M19M16M13M
18.0
21.9
12.4
14.4
15.9
5.4
6.4
9.9
7.4
17.9
21.8
12.3
14.3
15.8
5.3
6.3
9.8
7.3
17.8
21.7
12.2
14.2
15.7
5.2
6.2
9.7
7.2
17.7
21.6
12.1
14.1
15.6
5.1
6.1
9.6
7.1
17.6
21.5
12.0
14.0
15.5
5.0
6.0
9.5
7.0
17.5
21.4
11.9
13.9
15.4
4.9
5.9
9.4
6.9
17.4
21.3
11.8
13.8
15.3
4.8
5.8
9.3
6.8
17.3
21.2
11.7
13.7
15.2
4.7
5.7
9.2
6.7
17.2
21.1
11.6
13.6
15.1
4.6
5.6
9.1
6.6
17.1
21.0
11.5
13.5
15.0
2
After turn on the unit, press or repeatedly to select
your desired band, band indicator shows corresponding band in
the display.
FM
FM MW 60M 49M 41M 31M 25M 22M 19M 16M 13M
1710
108
106
1600
1510
104
1420
102
1330
100
1240
1150
98
1060
96
970
94
880
790
92
700
90
610
76
520
1
User can set sleep time from 1~99 minutes with the unit on or off
either.
Method 1
1. Press number button to input sleep time, the input number
appears for 3 seconds.
2. Press to confirm within 3 seconds.
SLEEP
3. Indicator SLEEP constantly appears in the display,
sleep function works, when the setting sleep time reaches,
the unit will shut off automatically.
3.
SLEEP
1.
2.
Method 2 1. Hold down , turn jog dial as well to select
SLEEP
sleep time.
Indicator SLEEP constantly appears in the
display.
Indicator will constantly display after sleep time is set.
SLEEP
You have to go to next step within 3 seconds, otherwise,
the unit will exit from sleep time setting.
1110
Page 8

SET ALARM ON OFF
SSB/268MEMORIES
DEGENDEGEN
DEGENDEGEN
STORE
M/F
VOL
AL1
AL2 CHG
DEGENDEGEN
DEGENDEGEN
1234567890
BAND+
TIME
SSB
HOLD
SLEEP
ST/MO
SCAN
DEL
RESET
FM AM
SET ALARM ON OFF
In power off mode, two groups of alarm on/off time can be set in 24
hours. Station volume can be set as well.
Set Alarm 1
1. In power off mode, hold down button for 3 seconds,
hour number flashes.
2. Turn jog dial TUNE to set hour, then press to set
minutes.
3. Turn TUNE to set minutes, then press to go into
station number setting.
4. Turn TUNE to select stored station number, then press
M/F
to go into volume setting.
5. Turn TUNE to adjust volume, then press to set auto
off time(from 5~99 minutes).
6. Turn TUNE to set auto off time.
7. Press to confirm setting. AlARM 1 constantly
M/F
appears, when preset on / off time reaches, the unit will on /
of automatically.
1./7.
Note
M/F
Press or to skip one step or confirm last setting.
STORE
M/F
M/F
M/F
M/F
ALARM 1
ALARM1
2./3./4.
/5./6.
Set Alarm 2
In power off mode, hold down button for 3 seconds,
hour number flashes.
Other operations are same as Alarm 1 setting.
2. Finally, press to confirm, ALARM2 constantly
STORE
appears, when preset on / off time reaches, the unit will
on / off automatically.
If alarm 2 time is followed alarm 1, the setting of station
and volume will supersede alarm 1.
Alarm on/ off is valid when you are listening radio programme.
If you do not change the alarm setting, it is still valid on next
day.
STORE
Cancel Alarm On Off
Cancel Alarm 1
In power off mode, press button , the unit defaults last
Alarm 1 setting. Press again to cancel, indicator AlARM
M/F
1 disappears from the display.
Cancel Alarm
In power off mode, press button , the unit defaults last
Alarm 2 setting. Press again to cancel, indicator AlARM
STORE
2 disappears from the display.
M/F
STORE
1312
Page 9

TUNING INTO A STATION
TUNE
TUNING INTO A STATION
You can use below 4 methods to find a desired station, when
tuning into a AM station, appears to indicate signal
strength. The more steps appear, the stronger signal it is.
JOG DIAL TUNING
1. Turn on the unit, select desired band.
2. Press and turn the centre of the jog dial TUNE with
one finger to quickly go to a desired station, watch the
change of the frequency.
3. When near a station, you can use two fingers to turn
the jog dial wheel slowly to find the exact frequency.
+
-
When use jog dial tuning, the frequency step for FM is 25K
for AM is 1K.
The highest turning speed is 80 step/circle.
DIRECT FREQUENCY ENTRY
Direct frequency entry makes it extremely easy to tune into
a station that you know its exact frequency. Frequency can
be input without selecting band first.
1. Turn on the unit, press button 0~9 to enter frequency.
2. Press corresponding button to confirm: Press
to confirm a FM band station, press to confirm
a AM band station.
Sample 1 FM 89.80MHz
8 9 8
(FM band decimal point and last digitals of 0 can be
ignored.)
Sample 2 AM 810KHz
8
1
BAND+
0
Sample 3 AM 120KHz
2
1
BAND+
0
Sample 4 AM 10000KHz
0 0 0 0
1
BAND+
Next number has to be entered within 3 seconds after
the fore number is entered.
If an invalid frequency is entered, Err will appear in the
display.
The frequency step for direct entry is 1KHz for AM and
100KHz for FM.
BAND+
1514
Page 10

TUNING INTO A STATION
SSB/268MEMORIES
DEGENDEGEN
DEGENDEGEN
STORE
M/F
VOL
AL1
AL2 CHG
DEGENDEGEN
DEGENDEGEN
1234567890
BAND+
TIME
SSB
HOLD
SLEEP
ST/MO
SCAN
DEL
RESET
FM AM
DEGENDEGEN
DEGENDEGEN
1234567890
BAND+
TIME
SSB
HOLD
SLEEP
ST/MO
SCAN
DEL
RESET
FM AM
Downloaded by
RadioAmateur.EU
TUNING INTO A STATION
AUTO SCAN TUNING
1. Turn on the unit, change to your desired band.
2. Hold down or for more than 2 seconds,
release when the frequency changes, the unit starts
tuning into stations from current frequency. When
a station is tuned in, scanning pauses for 3 seconds and
the tuned station is heard. The scanning will continue
if no further operation.
3. If a station is tuned in, you can use jog dial to fine tune.
4. Press any button to stop auto scan tuning.
1.
In auto scan tuning, the frequency step is 100K for FM
1K for MW and 5K for SW.
The unit will scan within the frequency range of chosen
band or meter band.
BAND+
ALARM1
3.
2.
MEMORY SCAN TUNING
Turn on the unit, press to go into memory scan tuning
mode, MEM appears in the display.
2.Turn the jog dial to tune into preset stations.
3. If you remember the preset number clearly, you can enter
number button directly, and press within 3 seconds
to une into the station.
1.
Empty station number will be skipped automatically.
If a empty station number is entered, indicator Err
will appear in the display.
M/F
M/F
ALARM1
2.
3.
1716
Page 11

PRESET STATIONS
SSB/268MEMORIES
DEGENDEGEN
DEGENDEGEN
STORE
M/F
VOL
AL1
AL2 CHG
DEGENDEGEN
DEGENDEGEN
1234567890
BAND+
TIME
SSB
HOLD
SLEEP
ST/MO
SCAN
DEL
RESET
FM AM
SSB/268MEMORIES
DEGENDEGEN
DEGENDEGEN
STORE
M/F
VOL
AL1
AL2 CHG
DEGENDEGEN
DEGENDEGEN
1234567890
BAND+
TIME
SSB
HOLD
SLEEP
ST/MO
SCAN
DEL
RESET
FM AM
DELETE STATIONS
There are total 255 stations can be preset in two area: convenience
area or hidden area. All memories are permanently stored.
1. Turn on the unit, tune into a desired station by jog dial tuning,
scan tuning or direct entry.
2. Hold down , indicator MEM flashes.
STORE
3. Turn jog dial wheel to find a desired number.
4. Press to store current frequency.
STORE
2./4.
1./3.
Up to 100 stations can be preset in convenience area,
from 0~99.
Total 156 stations can be preset in hidden area, from
0A~0F F0~FE.
For short wave (SW) broadcasts, the frequence may
different even for the same station at different time and
period. Presetting different frequencies for the same
station in the same area will let you tune into that station
easily.
If a preset number is already occupied, the new
frequency with sam e preset number replaces the old
one.
DELETE A SINGLE STATION
STORE
STORE
TIME
2.
3.
1. Turn on the unit hold down .
2. At the same time, turn jog dial wheel, MEM flashes and
frequency changes, find the station you want to delete.
3. Continue hold down , and press button , current
station is empty, indicator MEM changes to VOL .
1.
DELETE ALL PRESET STATIONS
Hold down and at the same time, then press
HOLD
SLEEP
RESET, all preset stations will be delete.
TIME
18
19
Page 12

HOLD & BACKLIGHT
DEGENDEGEN
DEGENDEGEN
1234567890
BAND+
TIME
SSB
HOLD
SLEEP
ST/MO
SCAN
DEL
RESET
FM AM
TONE SELECTION & NARROW / WIDE BAND
HOLD FUNCTION
The hold function can be used to avoid any accidental
operation when the unit is being carried or used.
1. Press button, indicator appears, hold
HOLD
function is activated, all buttons except HOLD button
become inoperative. If the unit is on, press can
turn off the unit.
2. Hold down button for 1 second to cancel hold
HOLD
function, disappears from the display.
HOLD
1./2.
BACK LIGHT FUNCTION
There are 3 kinds of back light mode to select: normal
always-on and back light off.
1. Normal press any button will start up the orange back
light of the display and buttons. The back light will be
off automatically if no further operation in 15 seconds.
2. Always-on If the power is supplied by AC adaptor, the
back light will always on.
3. Back light off Push the back light switch to OFF position,
the backlight will off, push the switch to ON to resume
back light function.
SLEEP
TONE SELECTION
STEREO /MONO
Stereo is suitable for strong signal music broadcast, mono is
suitable for weak signal and voice program.
SSB
Press button to convert between stereo and mono, the
LCD will on when choosing stereo.
NEWS/MUSIC
Push the switch to corresponding position when listen
14
news or music.
NAR./WIDE
When listening AM band program, push NAR./WIDE switch to
proper position will increase reception result. For this unit, the
ist IF is 55.845MHz, 2nd IF is 450KHz.
In AM band, push the NAR./WIDE switch up to select
14
WIDE , push the switch down to select Narrow
Wide band has a better tone reception than narrow band, but
it is noisier than narrow band reception.
21 20
Page 13

RESET & LINE OUT
EARPHONES & FOLDING STAND
RESET
If the unit operates erratically, press RESET to resume normal
operation. Reset function will not erase all of the memories except
the clock time.
LINE OUT
You can output the radio broadcasting by connecting the unit
to external appliance with a connecting cable inserted into
LINE OUT jack.
Volume adjustment and news/ music selection will not effect
output.
TUNE
MUSICNEWS
NAR. WIDE
FINE
LIGHT
OFF ON
LINE
OUT
Line out jack
Connect external appliance
LISTENING WITH EARPHONES
When listening to stereo reception, normally use earphones,
and the speaker will stop work automatically.
Speaker has MONO effect only.
FINE
P9
SSB
EARPOHNE JACK
MUSIC NEWS
LINE OUT
Notes On Earphones
Avoid using earphones at high volume, if you experience
a ringing in your ears, reduce volume or stop using it.
Set sleep time when listening radio before sleeping.
Do not use earphones while driving or cycling, it can
also be potentially dangerous to play your earphones
at high volume while walking ,especially at pedestrian
crossing.
USING FOLDING STAND
Pull out the folding stand in rear panel,
extending the telescopic antenna
straight upward.
23 22
Page 14

RECEIVING SSB/CW
DEGENDEGEN
DEGENDEGEN
1234567890
BAND+
TIME
SSB
HOLD
SLEEP
ST/MO
SCAN
DEL
RESET
FM AM
USING ANTENNA
1. Turn on the unit, SSB signal can be received att the frequency
range of 100~29999KHz.
2. Tune into a AM station with
medium strong signal.
3. Press SSB button, turn jog dial to tune into a SSB frequency.
4. When find a SSB signal, tune the SSB FINE Knob to have the
best reception.
2.
4.
3.
1.
FM Reception
Telescopic antenna functions as FM
antenna, keep it extended and change
its length and direction to find the
position which gives the best reception.
FM
MW Reception
Ferrite antenna inside the unit functions as MW antenna, it is
strongly effected by the reception direction. Therefore, when
listening to MW broadcast, rotate the unit to find the position
which gives the best reception.
MW
25 24
Page 15

USING ANTENNA
Downloaded by
RadioAmateur.EU
SPECIFICATIONS
SW Reception
Telescopic antenna functions as
SW antenna. Extending the antenna
straight upward to get the best
reception.
Normally, set the LOCAL/DX
23
switch to DX position when
listening SW programme.
1234567890
(SW)
External Antenna
If FM or SW reception is too weak, use supplied extra- long
external antenna to improve reception.
Outdoors
Keep the external antenna
straight, insert one side to
the ext. Jack of the unit,
another side outdoors.
If the signal is too strong when
using external antenna, set
!
Do not use external
antenna during a thunder
storm day.
the Local/DX switch to Local
position.
Frequency Range
FM 76.00 - 108.00 MHz
AM 100 - 29999 KHz
DEGENDEGEN
DEGENDEGEN
22
90m 3.160 - 3.455 MHz
75m 3.860 - 4.055 MHz
60m 4.710 - 5.105 MHz
49m 5.910 - 6.255 MHz
41m 7.010 - 7.405 MHz
31m 9.170 - 9.995 MHz
2. Noise Limit Sensitivity
FM 10 V
MW 1mv/m
SW 20 V
. AM 2nd IF
Wide band 6KHz Narrow band 4KHz
5. Power Supply:
Battery: 4 AA batteries
External power: DC in 8v 300mA
Recharging time: 1~23 hours
6. Speaker: D77mm
7. External Earphones: D3.5mm
8. Dimensions: Approx. 165*105*29mm
9. Weight: Approx. 300g (excl.batteries)
25m 11.510 - 12.155 MHz
22m 13.510 - 13.905 MHz
19m 15.010 - 15.705 MHz
16m 17.260 - 18.105 MHz
13m 21.410 - 21.955 MHz
11m 25.610 - 26.100 MHz
27 26
 Loading...