

Page 1
L
e guide d’utilisation de votre hotte verre
Guide to using your glass hood
Gebruiksaanwijzing van uw glazen afzuigkap
Brugsanvisning til Deres glasemhætte
La guía de utilización de su campana
extractora de vidrio
O
manual de utilização do seu extractor
de fumos de vidro
Bedienungsanleitung für Ihre Dunstabzugshaube aus Glas
Пдзгьт чсЮузт фпх гхЬлйнпх брпсспцзфЮсб
убт
FR
GB
NL
DK
ES
PT
GR
DE
99627772_ML_A.qxd 21/07/03 10:05 Page 1
Page 2

E
dito
Chère Cliente, Cher Client,
Vous venez d'acquérir une hotte DE DIETRICH et nous vous en remercions.
Nos équipes de recherche ont conçu pour vous une nouvelle génération d'appareils, qui par
leur qualité, leur design et leurs évolutions technologiques en font des produits d'exception
et révèle un savoir-faire unique.
Avec des lignes modernes et raffinées, votre nouvelle hotte DE DIETRICH s'intègre harmonieusement dans votre cuisine et allie parfaitement la maîtrise technologique, les performances d'aspiration, et le luxe esthétique.
Vous trouverez également dans la gamme des produits DE DIETRICH, un vaste choix de
fours encastrables, tables de cuisson, de lave-vaisselle, de fours micro-ondes et de réfrigérateurs intégrables, que vous pourrez coordonner à votre nouvelle hotte DE DIETRICH.
Bien entendu, dans un souci permanent de satisfaire au mieux vos exigences vis à vis de
nos produits, notre service consommateurs est à votre disposition et à votre écoute pour
répondre à toutes vos questions ou suggestions (coordonnées à la fin de ce livret).
Grâce à ces "nouveaux objets de valeurs" qui nous servent de repère dans nos vies de tous
les jours, DE DIETRICH, référence de l'excellence, est une véritable invitation à un nouvel
art de vivre.
La Marque DE DIETRICH.
C
onsignes de sécurité
- Il est interdit de flamber des mets ou de faire fonctionner des foyers gaz sans les recouvrir
de plats de cuisson au-dessous de la hotte (les flammes aspirées risqueraient de détériorer
l’appareil).
- Les fritures effectuées sous l’appareil doivent faire l’objet d’une surveillance constante.
- Les réparations doivent être exclusivement effectuées par un spécialiste agréé.
- Nettoyez régulièrement le filtre cassette.
- Le fonctionnement au-dessus d’un foyer à combustible (bois, charbon, etc...) n’est pas autorisé.
Ces hottes ont été conçues pour être utilisées par des particuliers dans un lieu d’habitation.
Dans le souci d’une amélioration constante de nos produits, nous nous réservons le droit d’apporter à leurs caractéristiques techniques, fonctionnelles ou esthétiques toutes modifications
de leurs caractéristiques liées à l’évolution technique.
Ces hottes sont destinées exclusivement à la cuisson des boissons et denrées alimentaires. Ces
produits ne contiennent aucun composant à base d’amiante.
Tout au long de la notice,
vous signale les consignes de sécurité,
vous signale les conseils et les astuces
99627772_ML_A.qxd 21/07/03 10:05 Page 2
Page 3
FR
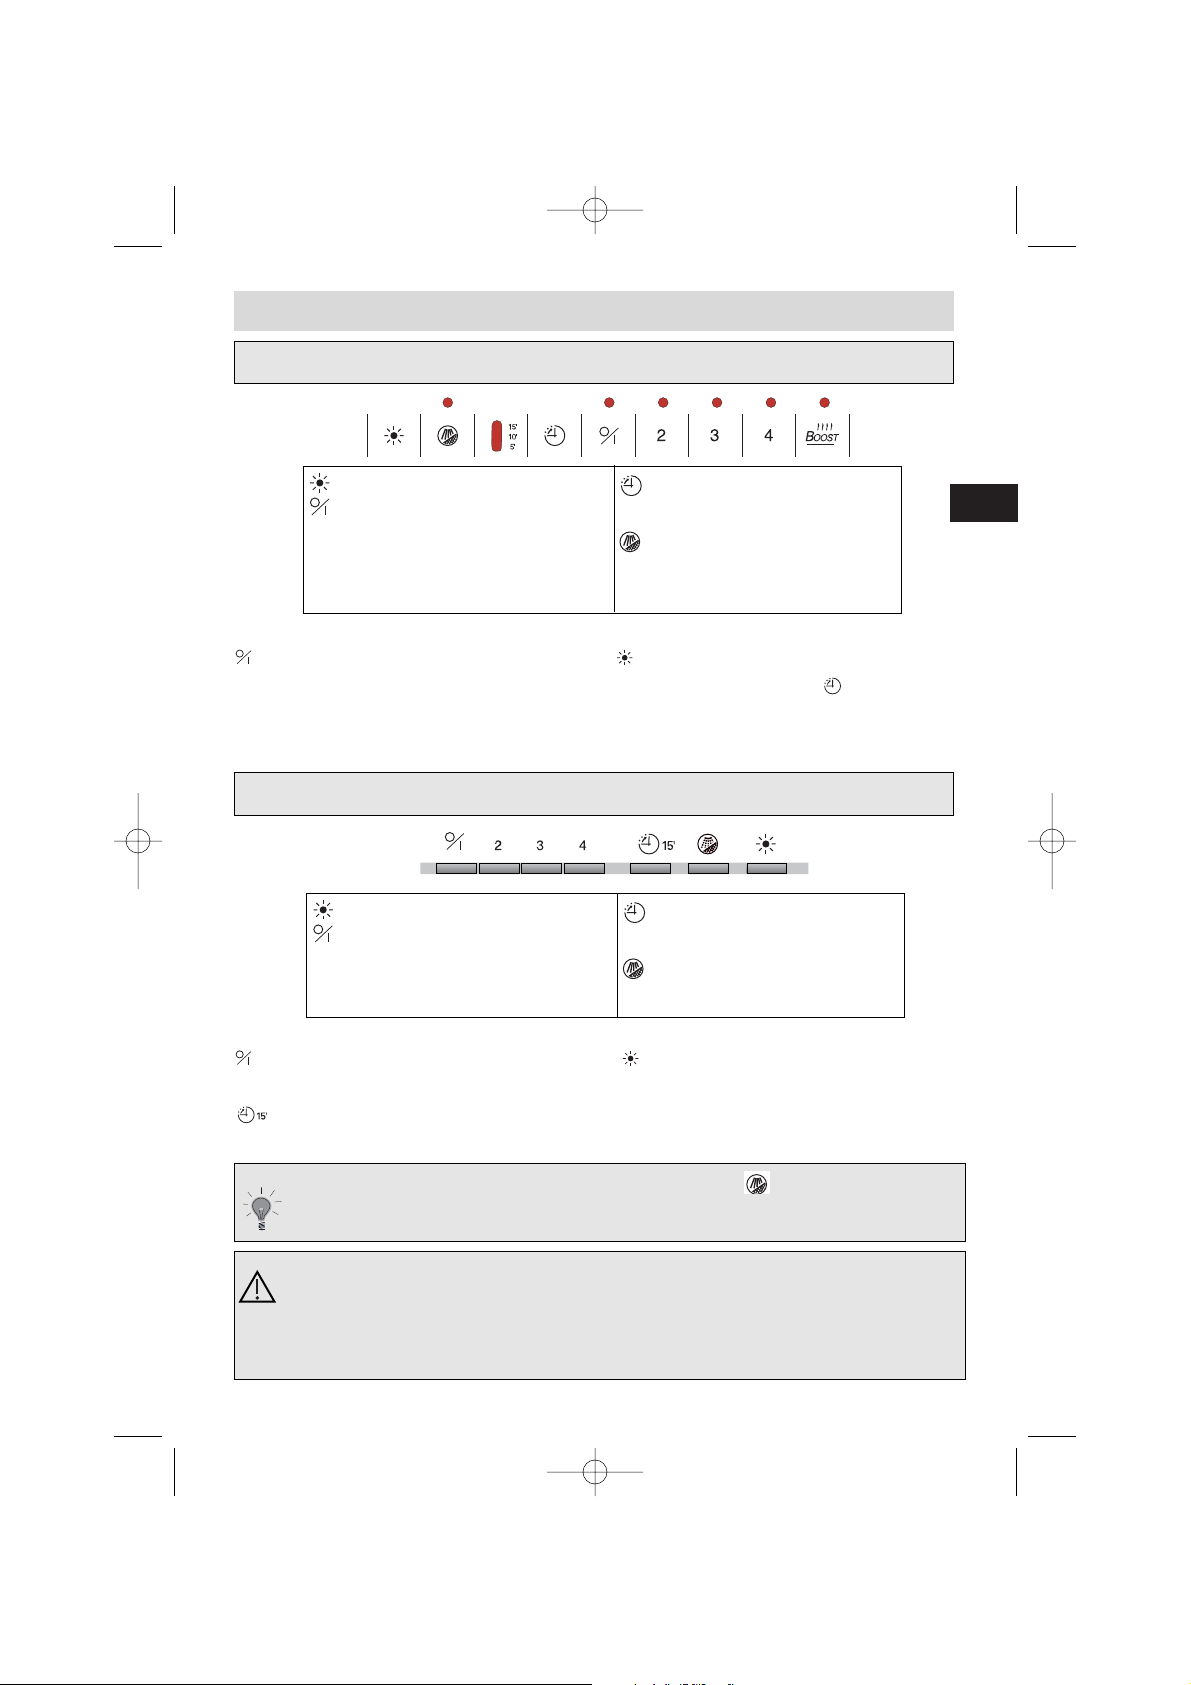
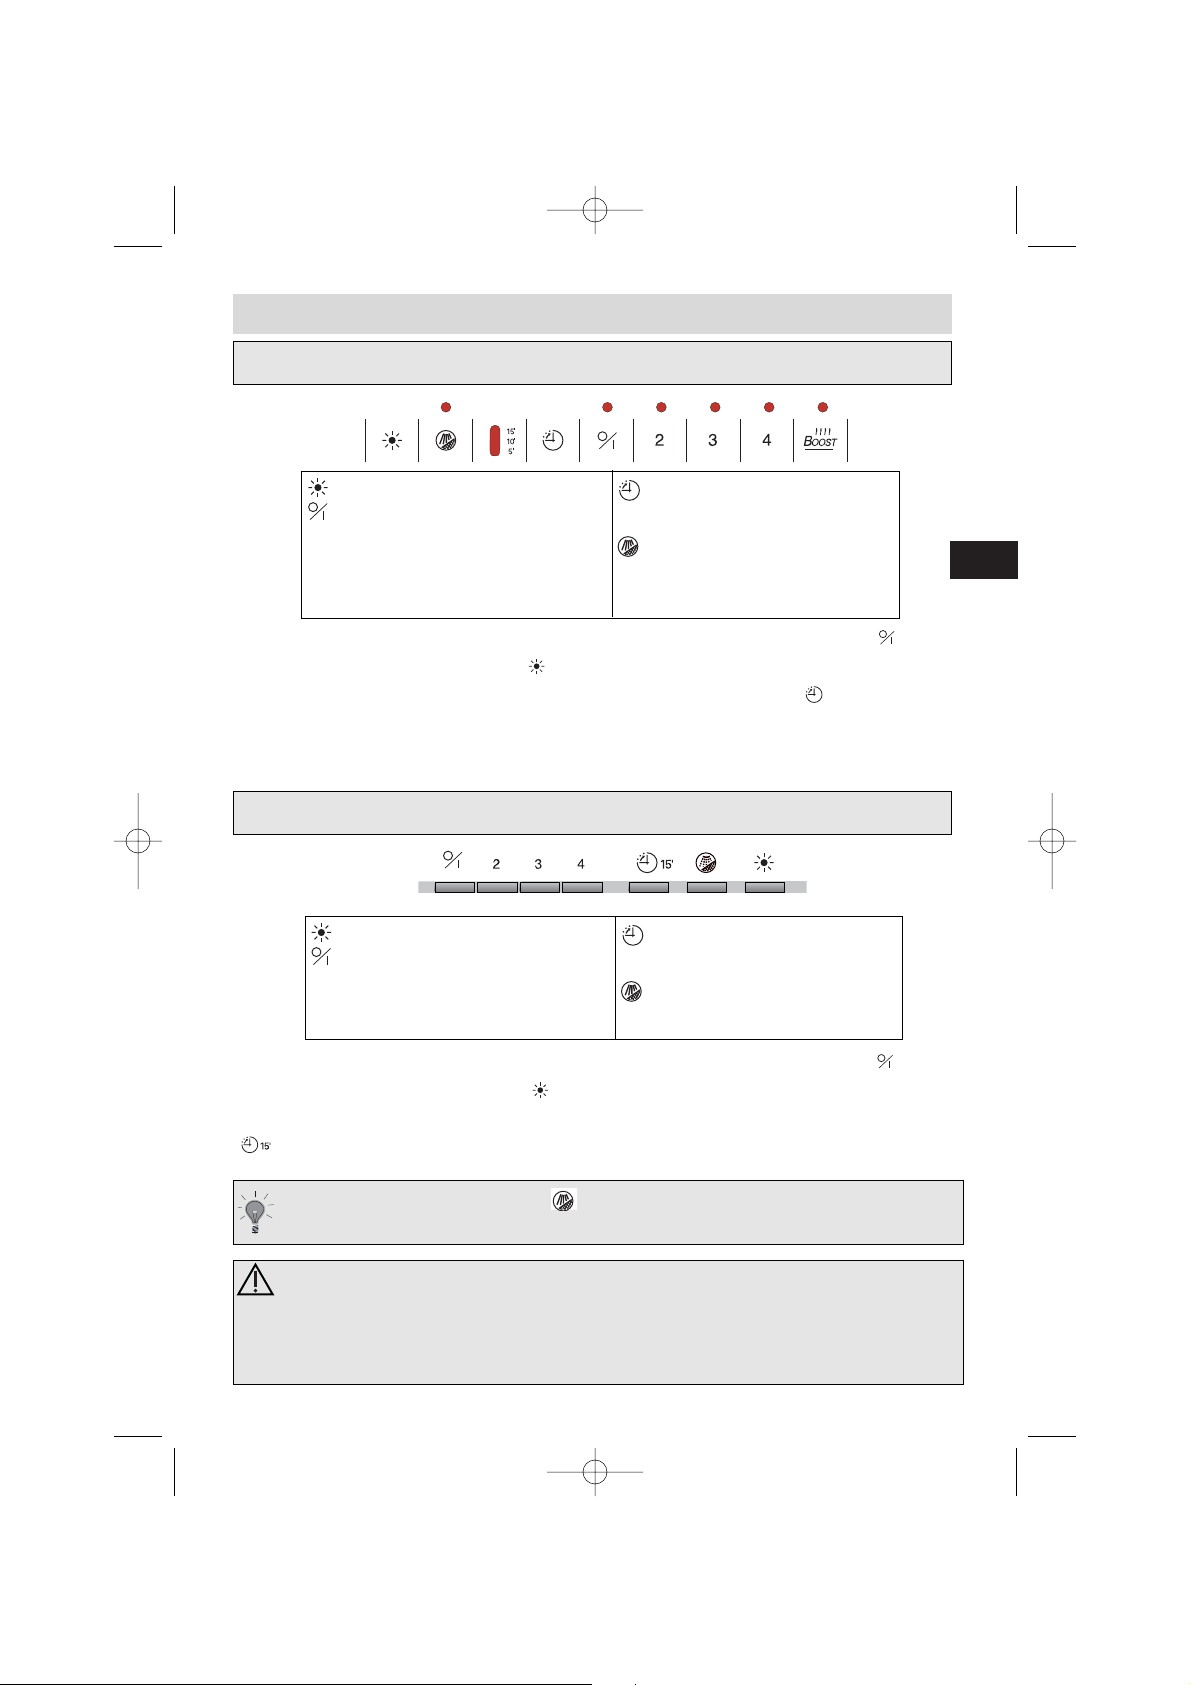
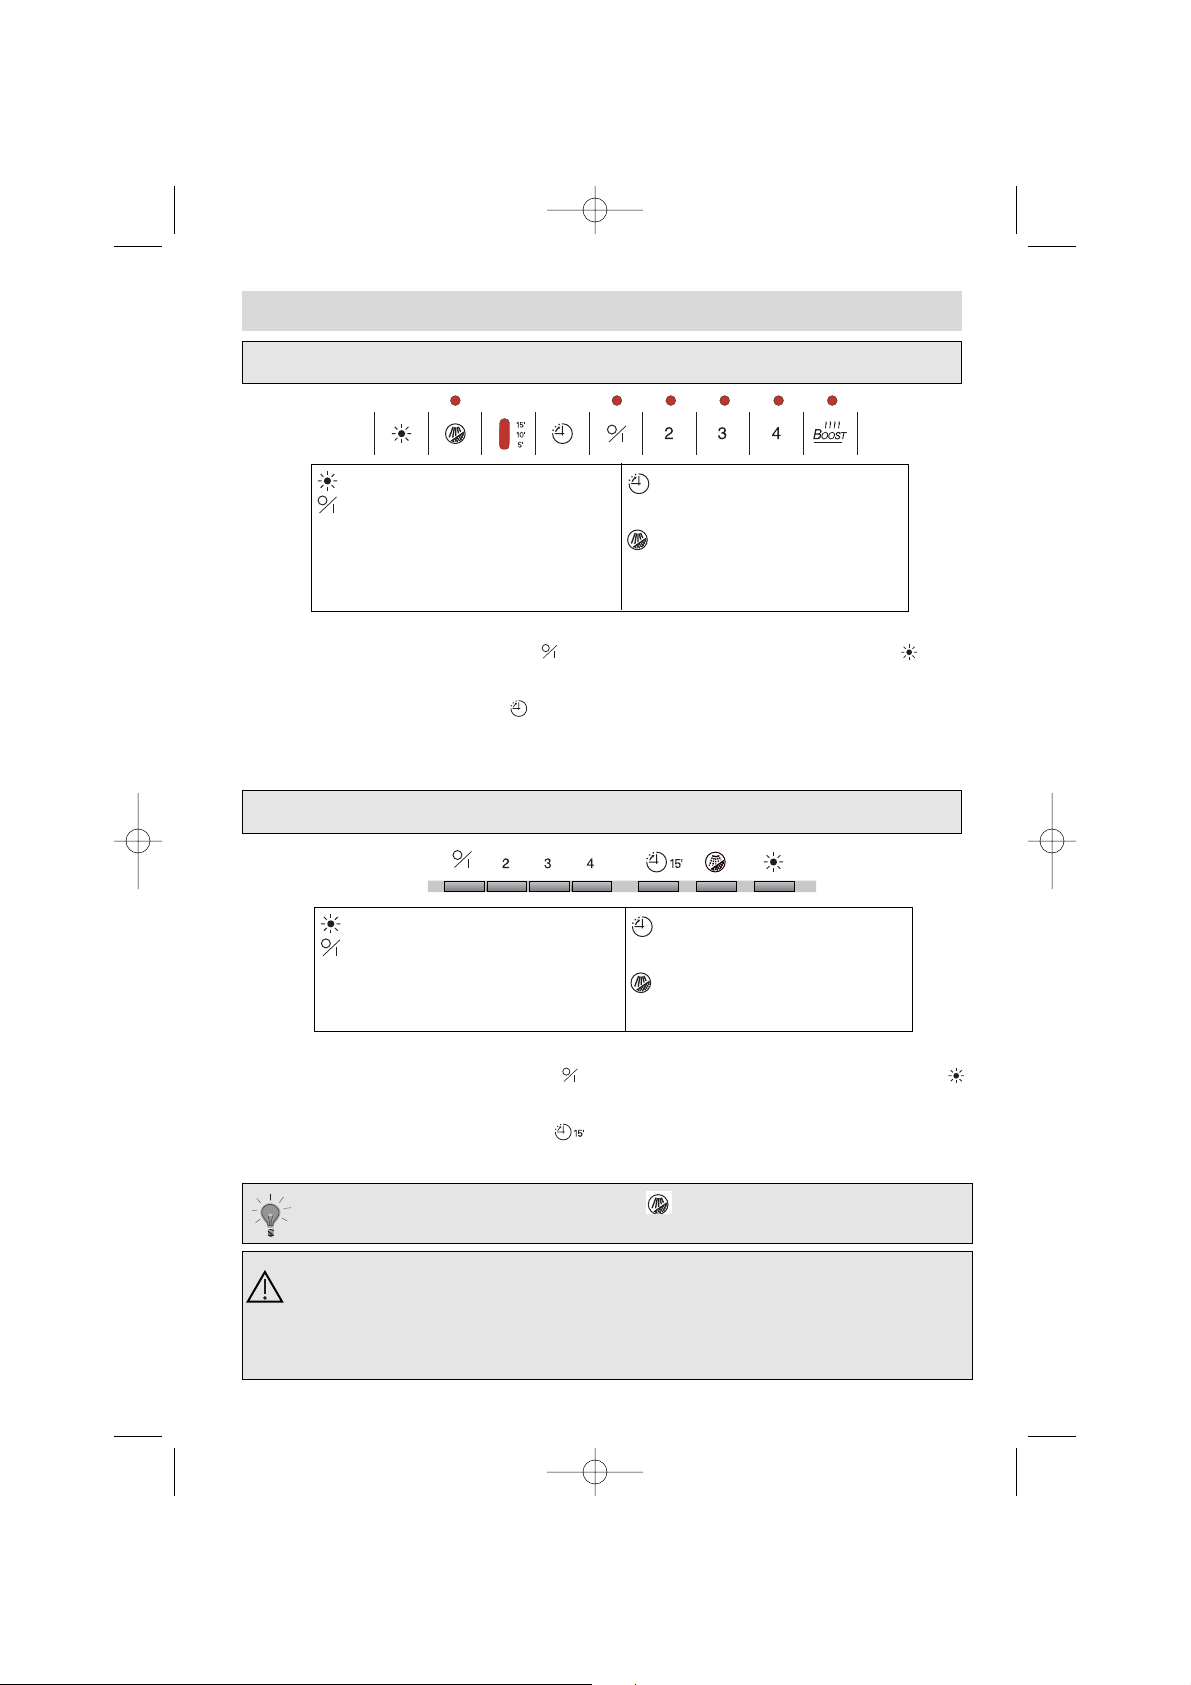
Comment se présente votre hotte ? Fig.1
Au bout de 30 heures de fonctionnement le symbole clignote. Cela signifie
que vous devez nettoyer vos filtres cassette. Une simple pression sur le bouton
le réinitialise.
Dans le cas d’une cuisine chauffée avec un appareil raccordé à une cheminée
(ex : poêle), il faut installer la hotte en version recyclage. Ne pas utilisez la hotte
sans les filtres métalliques.
Une ventilation convenable de la pièce doit être prévue lorsqu’une hotte de cuisine est
utilisée simultanément avec des appareils utilisants du gaz ou un autre combustible.
Éclairage
Marche/Arrêt - petite vitesse
Vitesse 2
Vitesse 3
Vitesse 4
Vitesse maxi
Modèle touches capacitives
Modèle électronique 4 vitesses
2
3
4
Boost
Temporisation :
arrêt différé de 5-10 ou 15 min.
Nettoyage filtre
Éclairage
Marche/Arrêt - petite vitesse
Vitesse 2
Vitesse 3
Vitesse 4
2
3
4
Temporisation :
arrêt différé de 15 min.
Nettoyage filtre
Un appui sur la vitesse choisie déclenche la mise en marche. Un appui prolongé sur le symbole
permet l’arrêt de la hotte. Un appui bref sur déclenche l’éclairage. Un appui prolongé
sur ce même symbole permet de régler l’intensité de l’éclairage. Un appui sur déclenche l’arrêt différé de la hotte. La sélection du temps (5,10 ou 15mn) s’effeectue par des appuis successifs sur ce même symbole.
Un appui sur la vitesse choisie déclenche la mise en marche. Un appui prolongé sur le symbole
permet l’arrêt de la hotte. Un appui bref sur déclenche l’éclairage ou l’extinction. Un
appui prolongé sur ce même symbole permet de régler l’intensité de l’éclairage. Une pression sur
déclenche l’arrêt différé (15mn) de la hotte.
99627772_ML_A.qxd 21/07/03 10:06 Page 3
Page 4

L’installation doit être conforme aux règlements en vigueur pour la ventilation des locaux. En France, ces règlements sont indiqués dans le DTU 61.1 du
CSTB. En particulier, l’air évacué ne doit pas être envoyé dans un conduit utilisé pour évacuer les fumées d’appareils utilisant du gaz ou autre combustible.
L’utilisation de conduits désaffectés ne peut se faire qu’après accord d’un spécialiste compétent.
La distance minimale entre le plan de cuisson et la partie la plus basse de la hotte
doit être de 70 cm. Si les instructions de la table de cuisson installée sous la hotte
spécifient une distance plus grande que 70 cm, celle-ci doit être prise en compte.
Comment installer votre hotte ?
Vous possédez une sortie vers l’extérieur : fig. 4
Votre hotte peut être raccordée sur celle-ci par l’intermédaire d’une gaine d’évacuation (minimum
Ø 125 mm, émaillée, en alu, flexible ou en matière ininflammable). Si votre gaine est inférieure
à 125 mm de diamètre, passez obligatoirement en mode recyclage.
Vous ne possédez pas de sortie vers l’extérieur : fig. 5
Tous nos appareils ont la possibilité de fonctionner en mode recyclage.
Dans ce cas, ajoutez un filtre à charbon actif qui retiendra les odeurs.
- Placez contre le mur le gabarit de montage : fig. 2
- Tracez un trait vertical sur le mur afin de positionner parfaitement l’axe de votre hotte avec
votre appareil de cuisson.
- Tracez un repère sur le trait vertical à 70 cm minimum de votre plan de cuisson.
Remarque : dans le cas d’un mur creux, utilisez des vis et des chevilles adaptées.
- Démontez les filtres cassette (fig. 3).
- Accrochez la hotte par ses découpes rectangulaires. La taille de ces découpes vous permet un réglage vers la gauche ou vers la droite (fig. 3).
Montage de votre hotte
Raccordement de votre hotte
Cet appareil est livré avec un câble d’alimentation H 05 VVF à 3 conducteurs
de 0,75 mm2(neutre, phase et terre). Il doit être branché sur réseau 220-240
V monophasé par l’intermédiaire d’une prise de courant normalisée CEI
60083 qui doit rester accessible après installation, ou d’un dispositif de coupure
omnipolaire ayant une distance d’ouverture des contacts d’au moins 3 mm.
Notre responsabilité ne saurait être engagée en cas d’accident consécutif à une mise
à la terre inexistante ou incorrecte. Le fusible de votre installation doit être de 10 ou
16 A. Si le câble d’alimentation est endommagé, faites appel au service après-vente
afin d’éviter un danger.
Régler la hauteur et le niveau en manoeuvrant les vis de réglage «A» des
supports puis bloquer la hotte contre le mur en serrant les vis «B» (Fig. 3).
99627772_ML_A.qxd 21/07/03 10:06 Page 4
Page 5
FR
Montage de la cheminée
Fonctionnement en évacuation extérieure: fig. 4 et 8
- Enlevez les 2 clips de fixation prévus pour le transport des cheminées.
- Enlevez les 2 vis de fixation du déflecteur plastique (en mode recyclage uniquement).
- Fixez contre le mur, en appui sur le plafond, le support de cheminée métallique (fig. 6).
Prendre soin d’aligner les 2 encoches triangulaires du support métallique avec le trait vertical sur
le mur.
- Dans le cas d’une gaine diamètre 125 mm, utilisez l’adaptateur fourni (fig. 8).
Si votre gaine extérieure est inférieure à 125 mm, il est obligatoire de raccorder votre
hotte en mode recyclage.
- Préparez votre cheminée télescopique en prenant soin de dissimuler les ouïes (fig. 8).
Emboîter les cheminées l’une dans l’autre au maximum.
- Fixez la partie supérieure sur le support métallique.
- Ajustez la longueur de la cheminée télescopique en descendant la partie inférieure et l’emboîter
dans le sommet de la hotte.
Fonctionnement en recyclage: fig. 5 et 9
- Il est possible de retirer les clapets anti-retours.
- Fixez contre le mur, en appui sur le plafond, le déflecteur plastique des fumées.
Prendre soin de centrer le déflecteur par rapport au trait vertical tracé sur le mur
(fig. 7).
- Préparez votre cheminée en prenant soin de placer les ouïes vers le haut de manière qu’elles soient visibles (fig. 9).
- Fixez la partie supérieure sur le déflecteur plastique.
- Ajustez la longueur de la cheminée télescopique en descendant la partie inférieure et l’emboîter
dans le sommet de la hotte.
Pour une utilisation optimale de votre appareil, nous vous conseillons le raccordement à une gaine diamètre 150 mm (non livrée). Limiter au maximum le
nombre de coude et la longueur de la gaine. Dans le cas où la hotte fonctionne
en évacuation extérieure, il convient d’assurer une arrivée d’air frais suffisante pour éviter de mettre la pièce en dépression.
1. Retirez le hublot (fig. 11).
2. Changez la lampe halogène G4-20W-12V.
3. Replacez l’ensemble en effectuant les opérations en sens inverse.
Comment changer la lampe ?
Avant toute intervention, la hotte doit être mise hors tension, soit en retirant la
prise, soit en actionnant le disjoncteur,
99627772_ML_A.qxd 21/07/03 10:06 Page 5
Page 6
BRANDT APPLIANCES SAS
7 rue Henri Becquerel
92500 RUEIL MALMAISON
Démontage du filtre cassette
(fig. 10)
Montage du filtre charbon
(fig. 12)
1. Retirez les cassettes.
2. Placez le filtre charbon neuf sur la cassette coté intérieur de la hotte.
3. Placez les 2 tringles de maintien.
4. Faîtes cette opération sur toutes les cassettes.
Qui contacter ?
Les défauts d’aspect provoqués par une utilisation anormale ou le nettoyage avec des produits abrasifs qui n’entraîne pas un non fonctionnement ou une inaptitude à l’usage ne sont pas pris en compte
par le fabriquant. Tout dépannage doit être effectué par un technicien qualifié.
Seuls les distributeurs de notre marque :
• • CConnaissent parfaitement votre appareil et son fonctionnement
onnaissent parfaitement votre appareil et son fonctionnement,,
• • AAppliquent intégralement nos méthodes de réglage, d’entretien et de
ppliquent intégralement nos méthodes de réglage, d’entretien et de
réparation,
réparation,
• • UUtilisent exclusivement les pièces d’origine.
tilisent exclusivement les pièces d’origine.
En cas de réclamation ou pour commander des pièces de rechange à votre distributeur, précisez-lui la
référence complète de votre appareil (type de l’appareil et numéro de série)
Ces renseignements figurent sur la plaque signalétique fixée à l’intérieur de l’appareil.
Les descriptions et les caractéristiques apportées dans ce livret sont données seulement à titre d’information et non d’engagement. En effet, soucieux de la qualité de nos produits, nous nous réservons le
droit d’effectuer, sans préavis, toutes modifications ou améliorations nécessaires.
Comment nettoyer votre hotte ?
La hotte doit être mise hors tension, soit en retirant la prise, soit en actionnant le disjoncteur, avant que les filtres métalliques soient enlevés. Après le nettoyage, les filtres
métalliques doivent être de nouveau fixés conformément aux instructions.
ENTRETIEN
POURQUOI ?
COMMENT ?
IMPERATIF TOUS LES MOIS
IMPERATIF TOUS LES ANS
Ce filtre retient les vapeurs grasses et les
poussières. Il est l’élément assurant une part
importante de l’efficacité de votre hotte.
Ce filtre retient les odeurs et doit
être changé au moins tous les ans
en fonction de votre utilisation.
Avec un nettoyant ménager du commerce, puis rincez abondamment et séchez. Ce nettoyage peut
être effectué dans votre lave-vaisselle en position
verticale (ne pas mettre en contact avec de la
vaisselle sale ou des couverts en argent).
Commandez ces filtres chez votre
revendeur (sous la référence indiquée sur la plaque signalétique
située à l’intérieur de la hotte) et
notez la date de changement.
FILTRE CASSETTE
FILTRE CHARBON ACTIF
N’utilisez jamais de tampons métalliques, de produits abrasifs ou de brosses trop dures.
Pour nettoyer la carrosserie et le hublot d’éclairage, utilisez exclusivement des nettoyants ménagers du
commerce dilués dans de l’eau, puis rincez à l’eau claire et essuyez avec un chiffon doux.
Avant la première utilisation du filtre cassette,
retirez le film de protection.
Pour les hottes installées en
recyclage
Pour éviter tout risque d’incendie.
MADE IN FRANCE
230V ~ 50 Hz
99627772_ML_A.qxd 21/07/03 10:06 Page 6
Page 7
FR
0 825
06 16 04
7, rue Henri Becquerel
92854 RUEIL MALMAISON CEDEX
Tel : 33 (0) 1 47 16 65 65
S.A.S au capital de 10.000.000 Euros RCS Nanterre B 440 303 196
N° SIREN : 440 303 196 - APE 297 A
99627772_ML_A.qxd 21/07/03 10:06 Page 7
TAPEZ 3615
CODE *
*0,197 € TTC/minute
Page 8
Introduction
Dear Customer,
Thank you for choosing the DE DIETRICH hood.
Our design staff have produced a new generation of kitchen equipment, to make everyday
cooking a pleasure.
The modern, attractive design of your new DE DIETRICH hood will blend smoothly into
your kitchen installation, providing an optimum combination of easy use and performance.
The DE DIETRICH range also includes a huge choice of fitted cooking hobs, ovens, dishwashers and refrigerators, that will match your new DE DIETRICH hood.
Of course, we make every effort to ensure that our products meet all your requirements,
and our Customer Relations department is at your disposal, to answer all your questions
and to listen to all your suggestions (see back cover of manual).
DE DIETRICH is certain that by setting new standards of excellence by which comparisons
can be made, customers will find that DE DIETRICH appliances offer a better and more
exciting way of living.
The DE DIETRICH name.
Safety instructions
- You should never "flambé" dishes under the hood or operate gas rings under the hood
without cooking utensils being placed on them (the flames sucked up into the hood can
damage the appliance).
- When frying food under the appliance, a careful watch must be kept on this at all times.
- Repairs must only be carried out by an approved specialist.
- You should regularly clean the filter cartridge.
- The hood should never be used over a combustible fuel burning stove (wood, coal, etc).
These hoods have been designed for non-commercial use in private homes.
With a view to constantly improving our products, we reserve the right to modify their
technical, functional or aesthetic characteristics, making any changes to their features considered necessary or desirable in view of technical progress.
These hoods are designed exclusively for cooking foodstuffs and drinks. These products do
not contain any asbestos based components.
indicates safety recommendations,
indicates advice to help you make the
best use of your oven
Throughout this manual,
99627772_ML_A.qxd 21/07/03 10:06 Page 8
Page 9
GB
The controls on your hood Fig.1
After 30 hours' use, the symbol will start flashing. This is to inform you that
you need to clean your filter cartridges. Pressing once on the button will reset it.
In the case of a kitchen heated by a device connected to a chimney (for exam-
ple a stove) the "recycling" version of the hood should be installed. Do not use
the hood without metal filters.
Suitable ventilation should be ensured for the room when the suction hood is used at
the same time as appliances using gas or another combustible fuel.
Lighting
Start/Stop - Low-speed
Speed 2
Speed 3
Speed 4
Maximum speed
Capacitive button model
Electronic 4-speed model
2
3
4
Boost
Timing:
Delayed stop (5-10 or 15 mins)
Filter cleaning
Lighting
Start/Stop - Low-speed
Speed 2
Speed 3
Speed 4
2
3
4
Timing:
Delayed stop (15 mins).
Filter cleaning
Pressing once on the chosen speed starts the appliance. A prolonged press on the symbol
turns off the hood. Pressing briefly on turns on the lighting. A prolonged press on this same
symbol makes it possible to adjust the intensity of the lighting. Pressing on triggers the stoppage of the hood. The time selection (5,10 ou 15 min) is carried out by successive presses on
this same symbol.
Pressing once on the chosen speed starts the appliance. A prolonged press on the symbol
turns off the hood. Pressing briefly on activates the lighting or the extinction. A prolonged
press on this same symbol makes it possible to adjust the intensity of the lighting. Pressing on
activatesthe delayed start (15 min) for the hood.
99627772_ML_A.qxd 21/07/03 10:06 Page 9
Page 10

The hood must be installed in conformity with the applicable regulations
concerning the ventilation of premises. In France, these regulations are
detailed in DTU 61.1 from the CSTB. In particular, the evacuated air must not
be channelled into a duct used to evacuate fumes from appliances using gas or
other combustible fuels. Disused ducts may only be used after approval from a
competent specialist.
The minimum distance between the cooking surface and the lowest part of the
hood must be 70 cm. If the instructions for the hob installed under the hood
specify a distance of more than 70 cm, this requirement must be respected.
Installing your hood ?
If you possess an outlet to the exterior
: fig. 4
Your hood can be connected to this using a flue (minimum Ø 125 mm, enamelled, made from
aluminium, flexible or made from a non-flammable material). If your flue is below 125 mm in
diameter, you must obligatorily use the "recycling" mode.
If y
ou do not possess an outlet to the exterior
: fig. 5
All of our appliances can be used in recycling mode.
In this case, you should add an active carbon filter which will keep in odours.
- Place the assembly template against the wall : fig. 2
- Draw a vertical line on the wall in order to perfectly line up your hood with your cooking
appliance.
- Draw a mark on the vertical line at 70 cm (minimum) from your cooktop.
Note
: in the case of a hollow wall, you should use suitable screws and wall plugs.
- Dismantle the filter cartridges (fig. 3).
- Attach the hood via its rectangular slots. The size of the slots enable you to position
the hood, moving it slightly to the left or right as needed (fig. 3).
Assembling your hood
Connecting up your hood
This appliance is delivered with a H 05 VVF power cable with three conductors of 0.75 mm2 (neutral, live and earth). This must be connected to the
220-240 V single phase mains network via a CEI 60083 standard plug which
must remain accessible following installation, or an all pole cut-off device with a
minimum contact opening distance of 3 mm. We will not be liable in the event of an
accident arising following incorrect or non-existent earthing. The fuse for your
installation must be 10 or 16A. If the power cable is damaged, call the after sales
service department in order to avoid danger.
Adjust the height and level by manoeuvring the bracket adjustment
screws ("A") and then attach the hood securely to the wall by tightening
the screws ("B"). (Fig. 3).
99627772_ML_A.qxd 21/07/03 10:06 Page 10
Page 11

GB
Assembling the chimney
Hood to be used with external evacuation : fig. 4 and 8
- Remove the two attachment clips provided for the transportation of the chimneys.
- Remove the two attachment screws from the plastic deflector (in recycle mode only).
- Attach the metal chimney bracket to the wall, also placing this against the ceiling (fig. 6).
Take care in aligning the 2 triangular slots on the metal bracket with the vertical line on the wall.
- In the case of a flue with a diameter of 125 mm, use the adapter supplied (fig. 8).
If your exterior duct is below 125 mm, you must obligatorily connect your hood in recycling mode
- Prepare your telescopic chimney taking care to block off the vents (fig. 8).
Fit the chimneys into one another as far as they will go..
- Fit the upper part to the metal bracket.
- Adjust the length of the telescopic chimney by bringing down the lower part and fitting it to the
top of the hood.
Hood to be used in "recycling" mode : f
ig. 5 and 9
- It is possible to remove the back flow valves.
- Fit the plastic smoke deflector to the wall also placing this against the ceiling.
Take care to centre the deflector vis-à-vis the vertical line drawn on the wall
(fig. 7).
- Prepare your chimney taking care to place the vents toward the top to ensure that
they are visible (fig. 9).
- Fit the upper part to the plastic deflector.
- Adjust the length of the telescopic chimney by bringing down the lower part and fitting it into
the top of the hood.
To ensure optimal use of your device, we advise that you connect a flue with a
diameter of 150 mm (not supplied). Limit the number of angles and bends as
far as possible, and keep the length of the flue to a minimum. In the event
that the hood will be functioning using exterior evacuation, you should ensure
a sufficient inlet of fresh air to avoid a pressure deficiency in the room.
1. Remove the viewing port (fig. 11).
2. Change the halogen lamp G4-20W-12V.
3. Replace the lamp assembly by carrying out the above operations in reverse order.
Changing the lamp ?
Before carrying out any work, the power supply to the hood must be turned off,
either by unplugging it or by using the circuit breaker switch,
99627772_ML_A.qxd 21/07/03 10:06 Page 11
Page 12

BRANDT APPLIANCES SAS
7 rue Henri Becquerel
92500 RUEIL MALMAISON
Dismantling the filter cartridge
(fig. 10)
Fitting the carbon filter
(fig. 12)
1. Remove the cartridges.
2. Place the new carbon filter on the cartridge inside the hood.
3. Fit the two retention rods.
4. Carry out this operation for all cartridges.
Who should I contact ?
Blemishes on the hood caused by abnormal use or cleaning with abrasive products which do not
cause the appliance to cease functioning or which do not cause it to become unsuitable for use will
not be dealt with by the manufacturer. Any repairs must be carried out by a qualified technician.
Only the distributors of our brand :
• Are fully familiar with your appliance and its operation
• Are fully familiar with your appliance and its operation,,
• Fully apply our adjustment, maintenance and repair methods,
• Fully apply our adjustment, maintenance and repair methods,
• Use only original parts.
• Use only original parts.
To submit a complaint or to order spare parts from your distributor, please be sure to give him the
complete reference for your appliance (type of appliance and serial number).
You can find this information on the identification plate fitted inside the appliance.
The descriptions and characteristics featuring in this booklet are provided for information purposes only,
and are not binding upon us. Indeed, as part of our ongoing commitment to improving the quality of our
products, we reserve the right to make any modifications or improvements necessary, without notice.
Cleaning your hood ?
The power supply to the hood must be turned off either by removing the plug or by
using the circuit breaker switch before you remove the metal filters. After cleaning, the
metal filters must be refitted in conformity with the instructions.
MAINTENANCE
WHY?
HOW ?
Vital every month
Vital every year
This filter traps fatty vapours and dust. This
component plays an important part in ensuring the effectiveness of your hood.
This filter traps odours and must be
changed at least once a year
depending on your level of use.
Use a commercial household cleaning product
then rinse abundantly and dry. This cleaning can
be carried out in your dishwasher in the vertical
position (ensure that the cartridge never comes
into contact with dirty crockery or silver tableware).
You should order these filters from
your dealer (quoting the reference
shown on the ID plate located inside the hood) and note the date the
filter was changed.
FILTER CARTRIDGE
ACTIVATED CARBON FILTER
Never use metal scouring pads, abrasive products or excessively stiff brushes.
To clean the body and the lighting port, you should use only commercial household cleaning products diluted in water and then rinse using clean water, drying with a soft cloth.
Remove the protective film before using the
filter cartridge for the first time.
For hoods installed in
"recycling" mode.
To avoid all risks of fire
MADE IN FRANCE
230V ~ 50 Hz
99627772_ML_A.qxd 21/07/03 10:06 Page 12
Page 13
NL
Inhoud
Geachte klant,
U heeft net een afzuigkap van DE DIETRICH aangekocht. We willen u hier graag voor
bedanken.
Onze onderzoeksteams hebben voor u een nieuwe generatie van apparaten ontwikkeld die
dank zij hun kwaliteit, design en technologische evolutie hoogwaardige toestellen met de
allernieuwste mogelijkheden zijn.
Dank zij het moderne en verfijnde ontwerp zal uw afzuigkap van DE DIETRICH perfect in
uw keuken kunnen worden ingepast. Uw afzuigkap is een combinatie van technologisch
vernuft, optimale kookprestaties en esthetische schoonheid.
In het gamma van DE DIETRICH-produkten vindt u een ruime keuze aan kookplaten, ovens
appen, vaatwasautomaten en koelkasten die allemaal kunnen worden ingebouwd en
harmonieus met uw afzuigkap van DE DIETRICH kunnen worden gecombineerd.
Uiteraard wensen wij onze klanten ook na de aankoop altijd tevreden te houden. Onze servicedienst zal u altijd met uw vragen of suggesties verderhelpen (zie achteraan deze
handleiding).
DE DIETRICH heeft haar apparaten dan ook zo ontworpen dat ze een waardevolle
bijdrage leveren om het leven van elke dag voor u een stuk comfortabeler te maken. Niet
voor niets is DE DIETRICH een kwaliteitsmerk dat een nieuwe levensstijl garandeert.
Veel succes met uw nieuw apparaat
DE DIETRICH.
Veiligheidsaanwijzingen
- Flambeer nooit gerechten onder de afzuigkap en laat nooit een gasvuur branden zonder dat
u er een kookpot op zet (de vlammen worden door de afzuigkap aangezogen en kunnen het
apparaat beschadigen).
- Frituren onder de afzuigkap mag, maar enkel indien u ononderbroken toezicht houdt
- Laat herstellingen uitsluitend door een erkend vakman uitvoeren.
- Nettoyez régulièrement le filtre cassette.
- Het gebruik van een afzuigkap boven een fornuis dat met brandstof zoals hout, houtskool enz.
werkt, is verboden.
Deze afzuigkappen zijn ontworpen voor gebruik door privé-personen in woningen.
Wij streven ononderbroken naar verbetering van onze produkten en behouden ons dan ook
het recht voor de technische, functionele en esthetische kenmerken van onze produkten te wijzigen om ze aan de nieuwste technische evolutie aan te passen.
Deze afzuigkappen zijn uitsluitend bestemd voor het koken en bakken van dranken en voedingsmiddelen. Deze produkten bevatten geen enkel bestanddeel op basis van asbest.
In deze gebruikshandlei-
ding geeft symbol
veiligheidsaanwijzingen en symbool,
tips en praktische richtlijnen aan
99627772_ML_A.qxd 21/07/03 10:06 Page 13
Page 14
Overzicht van uw afzuigkap ? Fig.1
Na 30 werkuren knippert de indicator . U dient nu de filtercassettes te
reinigen. Met een druk op de knop "filterreiniging" reinitialiseert u de afzuigkap.
Indien uw keuken wordt verwarmd met een toestel dat op een schouw is
aangesloten (kachel...), dient u de afzuigkap met luchtzuivering te installeren.
Gebruik de afzuigkap nooit zonder de metalen filters.
Gebruikt u in een bepaalde ruimte gelijktijdig een afzuigkap en apparaten die met gas
of een andere brandstof werken, zorg dan voor voldoende verluchting in de ruimte.
Verlichting
Aan/uit - lage snelheid
Snelheid 2
Snelheid 3
Snelheid 4
Maximale snelheid
Model met capacitieve toetsen
Elektronisch model met 4 snelheden
2
3
4
Boost
Tijdsregeling :
stoptijd met 5-10 of 15 minuten
uitgesteld.
Reiniging van de filter
Verlichting
Aan/uit - lage snelheid
Snelheid 2
Snelheid 3
Snelheid 4
2
3
4
Tijdsregeling :
stoptijd met 15 minuten
uitgesteld .
Reiniging van de filter
Druk op de toets met de gewenste afzuigsnelheid en de afzuigkap begint meteen te werken. Om
de afzuigkap te stoppen, houdt u toets even ingedrukt. Met een korte druk op toets schakelt u de verlichting in. Om de sterkte van de verlichting in te stellen, houdt u dezelfde toets even
ingedrukt. Met een druk op toets activeert u de functie "uitgestelde stoptijd" van de afzuigkap. Druk 1, 2 of 3 maal op dezelfde knop om de uitgestelde stoptijd (5, 10 of 15 minuten) te
selecteren.
Druk op de toets met de gewenste afzuigsnelheid en de afzuigkap begint meteen te werken. Om
de afzuigkap te stoppen, houdt u toets even ingedrukt. Met een korte druk op toets
schakelt u de verlichting in of uit. Om de sterkte van de verlichting in te stellen, houdt u
dezelfde toets even ingedrukt. Druk op om de stoptijd van de afzuigkap uit te stellen (met
15 minuten).
99627772_ML_A.qxd 21/07/03 10:06 Page 14
Page 15

NL
De installatie dient overeenkomstig de geldende bepalingen met betrekking
tot de ventilatie van de installatieplaats te worden uitgevoerd. In Frankrijk
gelden de bepalingen van DTU 61.1 van de CSTB. In het bijzonder mag de
afgevoerde lucht niet worden afgevoerd via een buis die ook wordt gebruikt voor
de afvoer van de rook van apparaten die met gas of een andere brandstof werken.
Het gebruik van tweedehands afvoerbuizen is enkel na raadpleging van een
erkend vakman toegelaten.
De minimale afstand tussen de kookplaat en de onderzijde van de afzuigkap dient 70
cm te bedragen. Indien in de gebruiksaanwijzing van de kookplaat een minimale
afstand van meer dan 70 cm staat vermeld, dient u deze aanwijzing toe te passen.
Installatie van de afzuigkap ?
U heeft een afvoer naar de buitenlucht
: fig. 4
Gebruik een afvoerbuis met een minimale diameter van 125 mm om de afzuigkap op de luchtafvoer aan te sluiten (gebruik een geëmailleerde afvoerbuis in aluminium, soepel materiaal of
onontvlambaar materiaal). Indien u een afvoerbuis met een diameter van minder dan 125 mm
gebruikt, dient u verplicht de luchtzuivering te installeren.
U heeft geen afv
oer naar de buitenlucht
: fig. 5
Al onze apparaten kunnen met luchtzuivering worden geïnstalleerd.
Gebruik in dit geval een actieve-koolfilter die de geuren filtert.
- Plaats het montageprofiel tegen de muur : fig. 2
- Tek een vertikale streep op de muur om de as van uw afzuigkap en de kookplaat perfect ten
opzichte van elkaar uit te lijnen.
- Markeer de plaats op de vertikale streep op minimaal 70 cm boven de kookplaat.
Opmerking : gebruik in het geval van een holle muur schroeven en aangepaste pluggen.
- Demonteer de kassettefilters (fig. 3).
- Haak de afzuigkap met de rechthoekige uitsnijdingen tegen de muur. De uitsnijdingen
zijn groot genoeg om de afzuigkap meer naar links of naar rechts te verplaatsen (fig. 3).
Montage van de afzuigkap
A
ansluiting van uw afzuigkap
Dit apparaat wordt geleverd met een voedingskabel van het type H 05 VVF
met 3 geleiders van 0,75 mm2 (nulleider, fase en aarding). Uw apparaat
dient te worden aangesloten op een elektriciteitsnet van 220-240 V ~
(monofasig) via een genormaliseerd stopcontact (1 fasedraad + 1 nulleider
+ 1 aarding) overeenkomstig de norm CEI 60083 (het stopcontact dient na de aansluiting
bereikbaar te blijven) of via een element met omnipolaire schakelaar met een minimale
afstand tussen de kontakten van 3 mm.
Onze aansprakelijkheid vervalt bij een ongeval ten gevolge van een afwezige,
defecte of foute aarding. De zekering van de installatie dient 10 of 16 A te bedragen.
Vervang een beschadigde voedingskabel altijd veiligheidshalve door een voedingskabel
die u bij de servicedienst kan aankopen.
Met de afstelschroeven "A" van de steunen kan u de hoogte en het niveau
aanpassen. Vervolgens schroeft u de afzuigkap met de schroeven "B" vast
tegen de muur (Fig. 3).
99627772_ML_A.qxd 21/07/03 10:06 Page 15
Page 16

Montage van de schouw
Bij afvoer naar de buitenlucht : fig. 4 en 8
- Verwijder de 2 bevestigingsklemmen die voor het transport van de schouwen worden gebruikt.
- Verwijder de 2 bevestigingsschroeven van de plastic rookdeflector (enkel bij installatie met
luchtzuivering).
- Plaats de metalen schouwsteun tegen de muur en tegen het plafond (fig. 6).
Let erop dat de twee driehoekige inkepingen van de metalen steun mooi in lijn liggen met de vertikale streep op de muur.
- Bij gebruik van een afvoerbuis met een diameter van 125 mm gebruikt u de bijgeleverde adapter (fig. 8).
Bij gebruik van een afvoerbuis met een buitendiameter van minder dan 125 mm dient
u de luchtzuivering op uw afzuigkap te installeren.
- Schuif uw teleskopische schouwelementen zoveel mogelijk ineen (fig. 8).
Zorg ervoor dat de luchtspleten niet zichtbaar blijven.
- Bevestig het bovenste deel op de metalen steun.
- Pas de lengte van de teleskopische schouw aan door het onderste element te verlagen en in de
bovenzijde van de afzuigkap te schuiven.
Bij een afzuigkap met luchtzuivering : f
ig. 5 en 9
- U kan de terugslapkleppen verwijderen.
- Plaats de plastic rookdeflector tegen de muur en tegen het plafond. Let erop dat de
deflector mooi in lijn ligt met de vertikale streep op de muur (fig. 7).
- Schuif uw teleskopische schouwelementen ineen. Zorg ervoor dat de luchtspleten
naar boven worden gericht zodat ze zichtbaar zijn (fig. 9).
- Bevestig het bovenste deel op de plastic deflector.
- Pas de lengte van de teleskopische schouw aan door het onderste element te verlagen en in de
bovenzijde van de afzuigkap te schuiven.
Om een optimaal gebruik van uw afzuigkap te garanderen, raden wij u aan een
afvoerbuis met een diameter van 150 mm te gebruiken (niet bijgeleverd). Beperkt
zoveel mogelijk het aantal gebogen buisselementen evenals de lengte van de
afvoerbuis. Bij gebruik van een afzuigkap met afvoer naar de buitenlucht, dient u
voor voldoende ventilatie met frisse lucht te zorgen om onderdruk in de kamer te
vermijden.
1. Verwijder de afdekkap (fig. 11).
2. Vervang de halogeenlamp G4-20W-12V
3. Plaats de afdekkap opnieuw op de lampbehuizing.
Vervanging van de lamp ?
Trek de stekker van de afzuigkap uit het stopcontact (of zet de beveiligingsschake-
laar uit) alvorens het lampje te vervangen,
99627772_ML_A.qxd 21/07/03 10:06 Page 16
Page 17

BRANDT APPLIANCES SAS
7 rue Henri Becquerel
92500 RUEIL MALMAISON
Demontage van de filterkassette
(fig. 10)
Montage van de actieve-koolfilter
(fig. 12)
1. Verwijder de kassettes.
2. Plaats de nieuwe koolfilter op de kassette aan de binnenzijde van de afzuigkap.
3. Plaats de 2 dwarsstangen die de filter op zijn plaats houden.
4. Ga op dezelfde manier tewerk voor alle andere kassettes.
Contactpersoon?
Esthetische fouten die zijn veroorzaakt door een verkeerd gebruik van de afzuigkap of het gebruik van
schurende produkten, maar die de werking van de afzuigkap niet storen of onmogelijk maken, vallen
niet onder de garantie van de fabrikant. Elke herstelling dient te gebeuren door een erkend vakman.
Enkel de verdelers van ons merk :
• Kennen perfect uw apparaat en de werking ervan
• Kennen perfect uw apparaat en de werking ervan,,
• Passen onze regel-, onderhouds- en herstellingsmethoden volledig toe,
• Passen onze regel-, onderhouds- en herstellingsmethoden volledig toe,
• • GGebruiken uitsluitend originele wisselstukken.
ebruiken uitsluitend originele wisselstukken.
Bij klachten of bestellingen van wisselstukken bij uw verdeler vermeldt u de precieze en volledige referentie van uw apparaat (type van apparaat en serienummer).
Deze gegevens vindt u op het identificatieplaatje aan de binnenzijde van uw afzuigkaps.
De beschrijvingen en kenmerken in deze handleiding worden enkel ter informatie gegeven en brengen geen
enkele verbintenis met zich mee. Wij streven naar een optimale kwaliteit en behouden ons bijgevolg het recht
voor zonder voorafgaandelijke kennisgeving alle noodzakelijke wijzigingen of verbeteringen aan te brengen.
Reiniging van de afzuigkap ?
Trek de stekker van de afzuigkap uit het stopcontact (of zet de beveiligingsschakelaar
uit) alvorens de metalen filters te verwijderen. Na de reiniging dienen de metalen filters
overeenkomstig de aanwijzingen opnieuw in de afzuigkap worden gemonteerd.
ONDERHOUD
WAAROM ?
HOE ?
VERPLICHT MAANDELIJKS
VERPLICHT JAARLIJKS
Deze filter houdt stof en vettige dampen
tegen en is een onmisbaar onderdeel om uw
afzuigkap proper te houden.
Deze filter houdt geuren tegen en
dient al naargelang van de intensiteit
van het gebruik van uw afzuigkap
jaarlijks te worden vervangen.
Met een huishoudelijk reinigingsprodukt. Spoel de
filterkassette vervolgens goed af en droog ze. U
kan de filterkassette vertikaal in uw vaatwasmachine reinigen (let erop dat de kassette geen
vuile vaatwas of zilveren bestek raakt).
Bestel deze filter bij uw verkoper.
Vermeld de referentie op het
infoplaatje (zie binnenzijde van
de afzuigkap) en noteer de vervangingsdatum.
FILTERKASSETTE
ACTIEVE-KOOLFILTER
Gebruik nooit metalen sponsen, schuurprodukten of te harde borstels.
Om de behuizing van de afzuigkap en de verlichtingskap te reinigen, gebruikt u uitsluitend huishoudelijke reinigingsmiddelen (verdund in water). Spoel ze vervolgens met zuiver water af en veeg ze met een zachte doek droog.
Vóór het eerste gebruik van de filterkassette
verwijdert u de beschermfolie.
Voor afzuigkappen met
luchtzuivering
om brandgevaar te vermijden
MADE IN FRANCE
230V ~ 50 Hz
NL
99627772_ML_A.qxd 21/07/03 10:06 Page 17
Page 18

Indledning
Kære kunde,
Tak fordi De har valgt en emhætte fra DE DIETRICH. Vores udviklingsafdeling har
udarbejdet en ny generation af apparater, så madlavning bliver en daglig glæde.
Designet af den nye emhætte fra DE DIETRICH er moderne med rene linjer, så emhætten
bliver en harmonisk del af Deres køkken. Emhætten er effektiv og let at betjene.
DE DIETRICH tilbyder desuden et stort udvalg af kogeplader, ovne, opvaskemaskiner og
køleskabe i indbygningsmodeller, som passer til Deres nye emhætte fra DE DIETRICH.
Serviceafdelingen er altid villig til at besvare spørgsmål og modtager gerne forslag (se
adressen bagest i vejledningen), da vi hele tiden prøver at opfylde kundernes behov og
krav til vores produkter
Med disse "nye værdigenstande", der er blevet en integreret del af vores
hverdag, indbyder DE DIETRICH med sin høje kvalitet til en ny livskunst.
Mærket DE DIETRICH.
Sikkerhedsforholdsregler
- Det er forbudt at flambere retter eller at tænde for gaskogeplader uden foregående
tildækning af blussene med en pande eller gryde under emhætten (de opsugede flammer ville
kunne beskadige apparatet).
- Stegning under apparatet bør overvåges uafbrudt.
- Reparationer bør udelukkende foretages af en godkendt specialist.
- Rengør filterkassen regelmæssigt.
- Igangsætning over en brændselsdreven kogeplade (træ, kul osv.) er ikke tilladt.
Emhætterne er skabt til brug for privatpersoner på deres bopæl.
Da vi lægger vægt på konstant at forbedre vores produkter, forbeholder vi os retten til i takt
med den tekniske udvikling at foretage alle nødvendige ændringer på disses tekniske,
funktionelle og æstetiske egenskaber.
Emhætterne skal udelukkende bruges ved kogning/stegning af drikke og fødevarer.
Produkterne indeholder ingen aspestholdige dele.
In deze gebruikshandlei-
ding geeft symbol
veiligheidsaanwijzingen en symbool,
tips en praktische richtlijnen aan
99627772_ML_A.qxd 21/07/03 10:06 Page 18
Page 19

Hvordan ser Deres emhætte ud? Fig.1
Efter 30 timers brug blinker -symbolet. Dette betyder, at filterkasserne skal
renses. Funktionen reaktiveres ved et enkelt tryk på knappen.
Hvis køkkenet opvarmes ved hjælp af et skorstenstilkoblet apparat (f.eks. en
brændeovn), skal emhætten indstilles på recirkulationsversionen. Anvend ikke
emhætten uden metalfiltrene.
Der skal påregnes en tilstrækkelig ventilation af lokalet, når en køkkenemhætte
anvendes samtidig med apparater, der bruger gas eller andre brændselstyper.
Lys
Start/Stop - svag hastighed
Hastighed 2
Hastighed 3
Hastighed 4
Maksimal hastighed
Model med kapacitive knapper
2
3
4
Boost
Automatisk eftersug:
Stop efter 5-10 eller 15 minutter.
Rengøring af filter
Elektronisk model med 4 hastigheder
Lys
Start/Stop - svag hastighed
Hastighed 2
Hastighed 3
Hastighed 4
2
3
4
Automatisk eftersug :
Stop efter 15 minutter.
Rengøring af filter
Et tryk på den valgte hastighed bevirker at emhætten går i gang. Ved et forlænget tryk på
symbolet stoppes emhætten. Ved et kort tryk på tændes lyset. Ved et forlænget tryk
på samme knap indstilles lysstyrken. Et tryk på udløser emhættens automatiske eftersugning. Dennes varighed (5, 10 eller 15 min.) vælges ved gentagne tryk på samme symbol.
Et tryk på den valgte hastighed bevirker at emhætten går i gang. Ved et forlænget tryk på
symbolet stoppes emhætten. Ved et kort tryk på tændes eller slukkes lyset. Ved et forlænget tryk på samme knap indstilles lysstyrken. Ved et tryk på udløses emhættens automatiske (15 min.'s) eftersugning.
DK
99627772_ML_A.qxd 21/07/03 10:07 Page 19
Page 20

Monteringen skal foretages i overensstemmelse med de gældende regler for
rumudluftning. I Frankrig opstilles disse regler i det tekniske harmoniserings-
dokument "DTU 61.1" fra det videnskabstekniske center for
byggeindustrien "CSTB". Særligt må den udpumpede luft ikke sendes ud i en slange,
der bruges til at bortlede røg fra apparater, der drives af gas eller andet brændstof.
Nedlagte slanger kan kun bruges efter en fagkyndig specialists godkendelse.
Minimumsafstanden mellem kogesektionen og emhættens underkant skal være på
70 cm. Hvis der opgives en større afstand end 70 cm i anvisningen til den
kogesektion, der forefindes under emhætten, skal en sådan overholdes.
Hvordan installeres Deres emhætte?
De råder over en åbning udadti
: fig. 4
Deres emhætte kan tilkobles denne åbning via en ventilationsslange (minimum Ø 125 mm,
emaljeret, i bøjeligt aluminium eller andet brandsikkert materiale). Hvis Deres slanges diameter
er på under 125 mm, er anvendelsen af recirkulationsindstillingen obligatorisk.
De råder ikk
e ov
er nogen åbning udadtil: fig. 5
Alle vores apparater kan virke i recirkulationsversionen.
I dette tilfælde tilføjes et aktivt kulfilter, der tilbageholder lugtene.
- Hold monteringsmålskitsen op mod væggen: fig. 2
- Tegn en lodret streg på væggen for at anbringe emhætten i en fuldkommen akse i forhold til
kogeapparatet.
- Sæt et mærke på den lodrette streg 70 cm over kogesektionen
Bemærk: I en hul væg skal der anvendes de hertil egnede skruer og rawlplugs.
- Afmonter filterkasserne (fig. 3).
- Ophæng emhætten på dens rektangulære udskæringer. Disse udskæringers størrelse
gør det muligt at foretage en justering mod højre eller venstre (fig. 3).
Montering af Deres emhætte
Tilslutning af Deres emhætte
Apparatet leveres med fødeledningen H 05 VVF med tre 0,75 mm² ledere
(nulleder, fase og jordleder). Den tillsluttes et enfaset 220-240 V net ved
hjælp af en standardiseret CEI 60083 stikdåse, der skal forblive tilgængelig
efter opsætningen, eller ved hjælp af en flerpolet afbrydelsesanordning, hvis
åbningsmellemrum mellem kontakterne er på mindst 3 mm.
Vi kan ikke gøres ansvarlige for ulykker som følge af en manglende eller ukorrekt
jordforbindelse. Deres installations sikring skal være på 10 eller 16 A. Hvis
fødeledningen beskadiges, skal serviceafdelingen tilkaldes for at undgå en farlig
situation.
Juster højde og niveau ved omdrejning af opsætningsbeslagenes stilleskruer "A"
og fastgør herefter emhætten på væggen ved at stramme skruerne "B" (Fig. 3).
99627772_ML_A.qxd 21/07/03 10:07 Page 20
Page 21

Montering af aftræksrør
Drift med udendørs udblæsning: fig. 4 og 8
- Fjern de 2 klemmer der blev brugt til at fastgøre aftræksrørene under transporten.
- Fjern de to monteringsskruer på plastventilationsruden (kun ved recirkulationsversionen).
- Fastgør beslaget til metalaftræksrøret på væggen med støtte mod loftsfladen (fig. 6).
Sørg for at metalbeslagets to trekantede indsnit flugter med den lodrette streg på væggen.
- Hvis der anvendes en Ø 125 mm slange, skal den vedlagte adapter anvendes (fig. 8).
Skulle den ydre slange være på under 125 mm, er det obligatorisk at slå emhætten over
på recirkulationsindstillingen.
- Forbered det teleskopiske aftræksrør og sørg for at dække jalousiventilerne (fig. 8).
Skub rørstykkerne mest muligt ind i hinanden.
- Fastsæt det øverste stykke på metalbeslaget.
- Tilpas længden på det teleskopiske aftræksrør ved at sænke den nedre del og derefter skubbe den fast på emhættens øverste del.
Drift med recirkulation: f
ig. 5 og 9
- Det er muligt at fjerne kontraventilerne.
- Fastgør røgventilationsruden i plast på væggen med støtte mod loftsfladen.
Sørg for at ventilationsruden centreres i forhold til den lodrette streg på væggen (fig. 7).
- Forbered aftræksrøret og sørg for at positionere jalousiventilerne i opadgående
retning så de er synlige (fig. 9).
- Fastsæt den øverste del på ventilationsruden.
- Tilpas længden på det teleskopiske aftræksrør ved at sænke den nedre del og
derefter skubbe den fast på emhættens øverste del.
For at opnå den bedst mulige udnyttelse af apparatet, tilrådes det at tilslutte
en Ø 150 mm slange (ikke leveret). Begræns så vidt muligt slangens antal af
knæk samt længde. Hvis emhætten fungerer med udendørs udblæsning, skal
man sikre sig, at der er en tilstrækkelig friskluftstilførsel for at at undgå at
skabe undertryk i lokalet.
1. Fjern koøjet (fig. 11).
2. Udskift halogenpæren G4-20W-12V.
3. Afslut ved at gentage ovenstående i modsat rækkefølge.
Hvordan udskiftes pæren?
Før enhvert indgreb skal strømmen til emhætten afbrydes, enten ved at
trække stikket ud eller ved at slukke for hovedafbryderen,
DK
99627772_ML_A.qxd 21/07/03 10:07 Page 21
Page 22

BRANDT APPLIANCES SAS
7 rue Henri Becquerel
92500 RUEIL MALMAISON
Afmontering af filterkassen
(fig. 10)
Montering af kulfilteret
(fig. 12)
1. Fjern kasserne.
2. Placer det ny kulfilter på den side af kassen der vender ind mod emhætten.
3. Anbring de 2 trådstøttepinde.
4. Udfør dette indgreb på alle kasserne.
Hvem kan kontaktes?
Fabrikanten tager ikke højde for skønhedsfejl, der skyldes en unormal brug eller rengøring
med skuremidler, og som ikke medfører, at emhætten er ude af drift eller er uegnet til
brug. Alle reparationer skal foretages af en kvalificeret tekniker.
Kun forhandlerne af vores mærke:
• har et perfekt kendskab til Deres apparat, og hvordan det virker
• har et perfekt kendskab til Deres apparat, og hvordan det virker,,
• anvender vores justerings-, vedligeholdelses- og reparationsmetoder fuldt ud,
• anvender vores justerings-, vedligeholdelses- og reparationsmetoder fuldt ud,
• bruger udelukkende originaldele.
• bruger udelukkende originaldele.
I tilfælde af reklamationer eller hvis der skal bestilles reservedele hos Deres forhandler, bedes De
opgive Deres apparats præcise reference (apparattype og serienummer). Disse oplysninger står på
mærkepladen inden i apparatet.
Beskrivelser og data i indeværende hæfte er udelukkende af oplysende karakter og er ikke
forpligtende. Da vi lægger vægt på vores produkters kvalitet, forbeholder vi os nemlig retten til uden
videre at foretage alle nødvendige ændringer eller forbedringer.
Hvordan rengøres emhætten?
Før metalfiltrene fjernes, skal strømmen til emhætten afbrydes, enten ved
at trække stikket ud eller ved at slukke for hovedafbryderen. Efter
rengøring skal filtrene genindsættes i henhold til vejledningen.
VEDLIGEHOLDELSE
HVORFOR?
HVORDAN ?
NØDVENDIG EN GANG OM MÅNEDEN
NØDVENDIG EN GANG OM ÅRET
Dette filter tilbageholder fedtdampe og støv.
Det er et vigtig element for emhættens
effektivitet.
Dette filter er lugttilbageholdende
og bør udskiftes mindst en gang om
året alt efter afbenyttelsesgraden.
Afvask med et husholdningsrengøringsmiddel i
handelen, derefter skylles der grundigt og aftørres.
Vasken kan foregå i opvaskemaskinen i lodret
stilling (undgå al kontakt med beskidt opvask
og sølvbestik).
Bestil disse filtre hos Deres forhandler (varereferencen aflæses på
mærkepladen inden i emhætten)
og noter udskiftningsdatoen.
FILTERKASSE
AKTIVT KULFILTER
Brug aldrig stålsvampe, skuremidler eller for hårde børster.
Til rengøringen af metalstellet og belysningskoøjet anvendes udelukkende almindelige husholdningsrengøringsmidler. Disse opblandes med vand, derefter skylles der med rent vand og aftørres med en blød klud.
Før filterkassen anvendes første gang, skal
beskyttelsesfilmen fjernes.
Til de emhætter der er indstillet
på recirkulation.
For at undgå al brandrisiko
MADE IN FRANCE
230V ~ 50 Hz
99627772_ML_A.qxd 21/07/03 10:07 Page 22
Page 23

ES
Introducción
Estimado cliente,
Acaba de comprar una campana DE DIETRICH y queremos darle las gracias por ello.
Nuestros equipos de investigación han diseñado para usted una nueva generación de a
paratos que por su calidad, su diseño y su desarrollo tecnológico los convierten en
productos excepcionales, poniendo de manifiesto toda su maestría.
Su nueva campana DE DIETRICH, de líneas modernas y refinadas, se integra con armonía
en su cocina y combina perfectamente el dominio tecnológico, los resultados de cocción y
el lujo estético.
También encontrará en la gama de productos DE DIETRICH una amplia gama de placas,
hornos, lavavajillas y frigoríficos integrables, que podrá coordinar con su nueva campana
DE DIETRICH.
Por supuesto, nuestro servicio al consumidor, siempre con el objetivo de satisfacer lo mejor
posible sus exigencias para con nuestros productos, está a su disposición y a su escucha
para responder a todas sus preguntas o sugerencias (ea la dirección al final del folleto).
Gracias a estos "nuevos objetos de valor" que nos sirven de punto de referencia en
nuestras vidas diarias, DE DIETRICH, referencia de la excelencia, constituye una invitación
a un nuevo arte de vivir.
La Marca DE DIETRICH.
Normas de seguridad
- No se puede flambear o tener encendidos los focos de gas bajo la campana sin cubrirlos con
las bandejas (las llamas aspiradas podrían deteriorar el aparato).
- Cuando esté friendo debajo del aparato, deberá vigilarlo constantemente.
- Las reparaciones deben ser realizadas exclusivamente por un especialista autorizado.
- Limpie periódicamente el filtro modular.
- No puede funcionar encima de un foco a base de combustible (madera, carbón, etc.).
Estas campanas extractoras han sido diseñadas para ser utilizadas por particulares en sus
hogares.
Con el objetivo de mejorar siempre nuestros productos, nos reservamos el derecho de aplicar
modificaciones a sus características técnicas, funcionales o estéticas, a causa de los avances
técnicos.
Estas campanas extractores están destinadas exclusivamente a cocinar bebidas y alimentos.
Estos productos no contienen ningún componente a base de amianto.
A lo largo del manual,
le señala las consignas de seguridad,
le señala los consejos y las astucias
99627772_ML_A.qxd 21/07/03 10:07 Page 23
Page 24

¿Cómo se presenta su campana extractora ? Fig.1
Al cabo de 30 horas de funcionamiento el piloto comenzará a parpadear, lo
cual significa que debe limpiar los filtros modulares. Bastará con pulsar el botón
para reinicializarlo.
Si la cocina calienta con un aparato conectado a una chimenea (por ejemplo estufa),
se debe instalar la campana en versión reciclaje. No utilice la campana sin filtros metálicos. Hay que prever una ventilación adecuada de la habitación cuando la campana se
utilice simultáneamente con aparatos que funcionan con gas u otro combustible.
Iluminación
Marcha/Parada - velocidad baja
Velocidad 2
Velocidad 3
Velocidad 4
Velocidad máxima
Modelo botones capacitativos
Modelo electrónico 4 velocidades
2
3
4
Boost
Temporización :
parada diferida de 5 - 10 ó 15 min.
Limpieza filtro
Iluminación
Marcha/Parada - velocidad baja
Velocidad 2
Velocidad 3
Velocidad 4
2
3
4
Temporización :
parada diferida de 15 min
Limpieza filtro
Pulsando una vez en la velocidad elegida, la campana se pone en marcha. Pulsando de manera prolongada en el símbolo se detiene la campana. Pulsando brevemente se enciende la iluminación. Pulsando de manera prolongada este mismo símbolo se puede regular la
intensidad de la iluminación. Pulsando se pone en marcha la parada diferida de la campana. Para
seleccionar el tiempo (5, 10 ó 15 min), hay que pulsar varias veces seguidas este mismo símbolo.
Pulsando una vez en la velocidad elegida, la campana se pone en marcha. Pulsando de manera
prolongada en el símbolo se detiene la campana. Pulsando brevemente se enciende
o se apaga la iluminación. Pulsando de manera prolongada este mismo símbolo se puede regular la intensidad de la iluminación. Pulsando se pone en marcha la parada diferida
(15 min) de la campana.
99627772_ML_A.qxd 21/07/03 10:07 Page 24
Page 25

La instalación debe ser conforme a las normativas vigentes para la ventilación
de los locales. En Francia, esta normativa viene indicada en el DTU 61.1 del
CSTB. En particular, el aire evacuado no debe ser enviado a un conducto
empleado para evacuar el humo de aparatos que funcionen con gas u otro
combustible. Los conductos en desuso sólo pueden ser utilizados con el acuerdo de un
especialista competente.
La distancia mínima entre la zona de cocción y la parte más baja de la campana debe
ser de 70 cm. Si las instrucciones de la placa instalada bajo la campana indicaran una
distancia mayor que 70 cm, es ésta la que se deberá tener en cuenta.
¿Cómo instalar la campana?
Si tiene salida al exterior : fig. 4
Su campana puede ir conectada a ésta por medio de una funda de evacuación (mínimo Ø 125
mm, esmaltada, de aluminio, flexible o de material no inflamable). Si su funda tiene un diámetro
inferior a 125 mm, pase obligatoriamente al modo reciclaje.
Si no tiene salida al exterior : fig. 5
Todos nuestros aparatos tienen la posibilidad de funcionar en modo reciclaje.
En ese caso, añada un filtro al carbono activo que retendrá los olores.
- Coloque contra la pared la plantilla de montaje : fig. 2
- Trace una marca vertical en la pared para colocar perfectamente el eje de su campana con su
aparato de cocción.
- Trace una señal en la marca vertical a una distancia mínima de 70 cm de la zona de cocción.
Observación: si su muro es hueco, utilice tornillos y pasadores apropiados.
- Desmonte los filtros modulares (fig. 3).
- Enganche la campana por los recortes rectangulares. La dimensión de los recortes le
permite ajustarla hacia la derecha o la izquierda (fig. 3).
Montaje de la campana extractora
Conexión de la campana extractora
Este aparato se suministra con un cable de alimentación H 05 VVF con 3 conductores
de 0,75 mm 2 (neutro, fase y tierra). Se debe conectar a la red eléctrica de 220-240
V monofásica por medio de un enchufe normalizado CEI 60083 que debe quedar
accesible una vez instalada la campana, o un dispositivo de corte omnipolar con una
distancia de apertura entre contactos de al menos 3 mm.
Nuestra responsabilidad no se verá comprometida en caso de accidente debido a que no
existe la puesta a tierra o que es incorrecta. El fusible de su instalación debe ser de 10 ó 16
A. Si el cable de alimentación estuviera dañado, llame al servicio posventa para evitar todo
peligro.
Para ajustar la altura y el nivel, manipule los tornillos de regulación "A" de los
soportes y bloque la campana contra el muro apretando los tornillos "B" (fig. 3)
ES
99627772_ML_A.qxd 21/07/03 10:07 Page 25
Page 26

Montaje de la chimenea
Funcionamiento en evacuación exterior: fig. 4 y 8
- Retire los 2 clips de fijación previstos para el transporte de la chimenea.
- Retire los 2 tornillos de fijación del deflector de plástico (únicamente en modo reciclaje).
- Fije contra la pared, apoyándolo en el techo, el soporte metálico de la chimenea (fig. 6).
Tenga cuidado de alinear las 2 muescas triangulares del soporte metálico con el trazo vertical de
la pared.
- Si tiene una funda de diámetro 125 mm, utilice el adaptador que se incluye (fig. 8).
Si su funda exterior tiene menos de 125 mm, es obligatorio que conecte su campana
en modo reciclaje.
- Prepare su chimenea telescópica teniendo cuidado de disimular las aberturas (fig. 8).
Encaje las chimeneas una en otra lo máximo posible.
- Fije la parte superior sobre el soporte metálico.
- Ajuste la longitud de la chimenea telescópica bajando la parte inferior y encajando la parte alta
de la campana.
Funcionamiento en reciclaje: fig. 5 y 9
- Se pueden retirar las válvulas antirretroceso.
- Fije contra pared, apoyándolo en el techo, el deflector de plástico para humos.
Tenga cuidado de centrar el deflector con respecto al trazo vertical hecho en la
pared (fig. 7).
- Prepare la chimenea teniendo cuidado de colocar las aberturas hacia arriba
para que sean visibles (fig. 9).
- Fije la parte superior del deflector de plástico.
- Ajuste la longitud de la chimenea telescópica bajando la parte inferior y encajando la parte alta de la campana.
Para lograr un funcionamiento óptimo del aparato, le aconsejamos que lo
conecte a una funda de 150 mm de diámetro (no suministrada). Limite al máxi-
mo el número de codos y la longitud de la funda. Si la campana funciona en
evacuación exterior, es conveniente asegurar que llegue aire suficiente para no
se cree depresión en la habitación.
1. Retire el ojo de buey (fig. 11).
2. Cambie la bombilla halógena G4-20W-12V.
3. Vuelva a colocarlo todo realizando las mismas operaciones en sentido inverso.
¿Cómo cambiar la bombilla?
Antes de realizar cualquier intervención, se deberá dejar la campana sin tensión,
bien desenchufándola o bien accionando el disyuntor.
99627772_ML_A.qxd 21/07/03 10:07 Page 26
Page 27

BRANDT APPLIANCES SAS
7 rue Henri Becquerel
92500 RUEIL MALMAISON
Desmontaje del filtro modular
(fig. 10)
Montaje del filtro de carbono
(fig. 12)
1. Retire los módulos.
2. Coloque el filtro de carbono nuevo en el módulo en el lado interior de la campana.
3. Coloque las 2 varillas de sujeción.
4. Haga la misma operación con todos los módulos.
¿A quién llamar?
Los defectos de aspecto provocados por una utilización anormal o una limpieza con productos abrasivos, ya provoque o no problemas de funcionamiento o inaptitud para el uso, no serán tenidos en
cuenta por el fabricante. Todas las reparaciones deben ser efectuadas por un técnico cualificado.
Sólo los distribuidores de nuestra marca :
o Conocen perfectamente su aparato y su funcionamiento,
o Conocen perfectamente su aparato y su funcionamiento,
o Aplican exactamente nuestros métodos de regulación, mantenimiento y reparación,
o Aplican exactamente nuestros métodos de regulación, mantenimiento y reparación,
o Utilizan exclusivamente las piezas de origen.
o Utilizan exclusivamente las piezas de origen.
En caso de reclamación o para pedir piezas de recambio a su distribuidor, indíquele la referencia completa
de su aparato (tipo de aparato y número de serie).
Esas informaciones figuran en la placa de características fijada en el interior del aparato.
Las descripciones y las características que se indican en este folleto se dan únicamente a título informativo y
no constituyen un compromiso ya que, con el objetivo constante de mejorar la calidad de nuestros productos, nos reservamos el derecho de efectuar, sin aviso previo, todas las modificaciones o mejoras necesarias.
¿Cómo limpiar la campana?
Hay que dejar la campana sin tensión, bien desenchufándola o bien accionando el
disyuntor, antes de sacar los filtros metálicos. Una vez limpia, se volverán a fijar los
filtros metálicos siguiendo las instrucciones.
MANTENIMIENTO
¿POR QUÉ?
¿CÓMO?
TODOS LOS MESES SIN FALTA
TODOS LOS AÑOS SIN FALTA
Este filtro retiene los vapores grasos y el polvo. Es
el elemento que garantiza una parte importante de
la eficacia de su campana.
Este filtro retiene los olores y tiene
que se cambiado al menos una vez
al año, en función de su uso.
Con un producto de limpieza del comercio, aclare
después abundantemente y seque. Esta limpieza
se puede efectuar en el lavavajillas en posición vertical (no poner en contacto con la vajilla sucia
o con cubiertos de plata).
Pida estos filtros a su revendedor
(con la referencia indicada en la
placa de características que se
encuentra en el interior de la campana) y anote la fecha de cambio.
FILTRO MODULAR
FILTRO CARBONO ACTIVO
No utilice estropajos metálicos, productos abrasivos o cepillos demasiado duros.
Para limpiar la carrocería y el ojo de buey de iluminación, utilice exclusivamente productos de limpieza
para el hogar diluidos en agua, aclare después con agua y seque con un trapo suave.
Antes de utilizar por primera vez el filtro
modular, retire la película protectora
En las campanas instaladas en
modo reciclaje
Para evitar cualquier riesgo de incendio
MADE IN FRANCE
230V ~ 50 Hz
ES
99627772_ML_A.qxd 21/07/03 10:07 Page 27
Page 28

Editorial
Estimado(a) Cliente
Acabou de adquirir um exaustor DE DIETRICH e agradecemos-lhe a sua confiança.
As nossas equipas de pesquisa conceberam, pensando em si, uma nova geração de
aparelhos para que o acto de cozinhar seja um prazer no dia a dia .
Dotado de linhas puras e de um design contemporâneo, o seu novo exaustor
DE DIETRICH, integra-se harmoniosamente na sua cozinha e alia perfeitamente facilidade
de utilização e altos desempenhos.
Encontrará também na gama dos produtos DE DIETRICH, uma vasta escolha de placas de
cozedura, de fornos, de máquinas de lavar loiça e de frigoríficos integráveis que poderá
coordenar ao seu novo exaustor DE DIETRICH.
Evidentemente, com a preocupação permanente de satisfazer da melhor maneira possível
as suas expectativas em relação aos nossos produtos, o nosso serviço de consumidores
encontra-se à sua disposição e à sua escuta para responder a todas as suas perguntas ou
sugestões (coordenadas no final do presente manual).
Graças a estes "novos objectos de valor" que nos servem de marcos na nossa vida do
dia-a-dia, DE DIETRICH, referência da excelência, é um verdadeiro convite para uma nova
arte de bem viver.
A Marca DE DIETRICH.
Instruções de Segurança
- É interdito realizar receitas "flambé" ou fazer funcionar os bicos de gás sem os cobrir com
pratos de cozedura por cima do extractor de fumos (as chamas aspiradas são susceptíveis de
deteriorar o aparelho).
- As frituras efectuadas sob o aparelho devem ser alvo de uma vigilância constante.
- As reparações devem ser efectuadas exclusivamente por um técnico homologado.
- Limpe regularmente o filtro da cassete.
- O funcionamento por cima de um foco de combustível (madeira, carvão, etc...) não é autorizado.
Estes extractores de fumos foram concebidos para serem utilizados por particulares num local
de habitação.
Com a preocupação de melhorar constantemente os nossos produtos, reservamo-nos o direito de
realizar modificações nas suas características técnicas, funcionais ou estéticas, modificações
estas inerentes à evolução técnica.
Estes extractores de fumos estão destinados exclusivamente à cozedura das bebidas e
alimentos. Estes produtos não contém qualquer componente à base de amianto.
Ao longo do folheto,
assina-lhe as instruções de segurança,
assinala-lhe os conselhos e as astúcias
99627772_ML_A.qxd 21/07/03 10:07 Page 28
Page 29

Como se apresenta o seu extractor de fumos ? Fig.1
Após 30 horas de funcionamento, o botão luminoso de aviso ccomeça a
piscar. Isto significa que tem de limpar os filtros das cassetes. Uma simples
pressão no botão provoca a reinicialização
Em caso de cozinha aquecida com um aparelho ligado a uma chaminé (ex.: ), é
necessário instalar o extractor de fumos na sua versão reciclagem. Não utilize o
extractor de fumos sem os filtros metálicos. Deverá ser prevista uma ventilação conveniente do espaço quando um extractor de fumos de cozinha for utilizado simultaneamente
com aparelhos que utilizam gás ou qualquer outro combustível.
Iluminação
Ligar/Desligar - pequena velocidade
Velocidade 2
Velocidade 3
Velocidade 4
Velocidade máxi
Modelo de teclas capacitivas
Modelo electrónico 4 velocidades
2
3
4
Boost
Temporização :
paragem diferida de 5-10 ou 15 min.
Limpeza do filtro
Iluminação
Ligar/Desligar - pequena velocidade
Velocidade
2
Velocidade
3
Velocidade
4
2
3
4
Temporização :
paragem diferida de 15 min .
Limpeza do filtro
PT
Uma pressão na velocidade seleccionada desencadeia a colocação em funcionamento. Uma pressão no
símbolo permite a paragem do extractor de fumos. Uma pressão curta em desencadeia a iluminação. Uma pressão prolongada neste mesmo símbolo permite regular a intensidade de iluminação.
Uma pressão em desencadeia a paragem diferida do exaustor. A definição do tempo (5, 10 ou 15
minutos) efectua-se através de pressões sucessivas neste mesmo símbolo.
Uma pressão na velocidade seleccionada desencadeia a colocação em funcionamento. Uma pressão prolongada no símbolo permite a paragem do extractor de fumos. Uma pressão curta em
desencadeia a iluminação ou a extinção. Uma pressão prolongada neste mesmo símbolo permite regular a intensidade de iluminação. Uma pressão em desencadeia a paragem diferida
(15 minutos) do exaustor.
99627772_ML_A.qxd 21/07/03 10:07 Page 29
Page 30

A instalação deverá estar conforme aos regulamentos em vigor para a ventilação dos locais. Em França, estes regulamentos estão indicados no DTU 61.1
do CSTB. Em particular, o ar evacuado não deve ser enviado numa conduta
utilizada para evacuar os fumos de aparelhos que utilizam gás ou qualquer outro
combustível. A utilização de tubos desafectados só pode ser feita após acordo de
um especialista competente.
A distância mínima entre a placa de cozedura e a parte mais baixa do extractor de
fumos deverá ser de 70 cm. Se as instruções da placa de cozedura instalada sob o
extractor de fumos especificarem uma distância superior a 70 cm, esta deverá ser
levada em consideração.
Como instalar o seu extractor de fumos ?
Você possui uma saída para o exterior? fig. 4
O seu extractor de fumos pode ser ligado a ela por intermédio de uma conduta de evacuação
(mínimo ø 125 mm, esmaltada, em alumínio ininflamável). Se o diâmetro da conduta for inferior a 125 mm, deve passar obrigatoriamente para o modo reciclagem.
Você não possui saída para o exterior
: fig. 5
Todos os nossos aparelhos têm a possibilidade de funcionar em modo reciclagem.
Neste caso, acrescente um filtro de carvão activo que captará os cheiros.
- Colocar contra a parede o modelo de montagem : fig. 2
- Traçar um traço vertical na parede a fim de posicionar perfeitamente o eixo do seu extractor
de fumos com o seu aparelho de cozedura.
- Tracez un repère sur le trait vertical à 70 cm minimum de votre plan de cuisson.
Observação : em caso de parede oca, utilize parafusos e cavilhas adequados.
- Desmonte os filtros da cassete (fig. 3).
- Fixe o extractor de fumos pelas aberturas rectangulares. O tamanho destes cortes permite-lhe um ajustamento para a esquerda ou para a direita (fig. 3).
Montagem do seu extrator de fumos
Ligação do seu extractor de fumos
Este aparelho é fornecido com um cabo eléctrico H 05 VVF de 3 condutores de
0,75 mm2 (neutro, fase e terra). Ele deve ser ligada à rede 220-240 V mono-
fásica por intermédio de uma tomada eléctrica normalizada CEI 60083 que
deve ficar acessível após instalação, ou de um dispositivo de corte omnipolar com
uma distância de abertura dos contactos de pelo menos 3 mm.
A nossa responsabilidade não poderia ser empenhada em caso de acidente consecutivo a uma colocação em terra inexistente ou incorrecta. O fusível da sua instalação
deve ser de 10 ou 16 A.. Se o cabo eléctrico estiver estragado, recorra ao serviço
pós-venda a fim de evitar qualquer perigo.
Ajustar a altura e o nível manobrando os parafusos de ajustamento "A" dos
suportes e em seguida bloquear o extractor de fumos contra a parede
apertando os parafusos "B" (Fig. 3).
99627772_ML_A.qxd 21/07/03 10:07 Page 30
Page 31

Montagem da chaminé
Funcionamento em evacuação exterior : fig. 4 e 8
- Retire os dois ganchos de fixação previstos para o transporte das chaminés.
- Retire os dois parafusos de fixação do deflector plástico (em modo reciclagem unicamente).
- Fixe contra a parede, apoiado ao tecto, o suporte da chaminé metálica (fig. 6).
Tome cuidado de maneira a alinhar as duas ranhuras triangulares do suporte metálico com o traço
vertical na parede.
- Em caso de um tubo com 125 mm de diâmetro, utilize o adaptador incluído (fig. 8).
Se o seu tubo exterior for inferior a 125 mm, é indispensável a ligação do seu extractor de fumos em modo reciclagem.
- Prepare a sua chaminé telescópica tomando cuidado para dissimular os orifícios (fig. 8).
Encaixar ao máximo as chaminés uma dentro da outra.
- Encaixar a parte superior no suporte metálico.
- Ajuste o comprimento da chaminé telescópica baixando a parte inferior e encaixá-la no topo
do extractor de fumos.
Funcionamento em modo reciclagem : fig. 5 e 9
- É possível retirar as válvulas de retenção.
- Fixe contra a parede, apoiado contra o tecto, o deflector plástico dos fumos.
Tome cuidado de maneira a centrar o deflector em relação ao traço vertical traçado na parede (fig. 7).
- Prepare a sua chaminé tomando cuidado para colocar os orifícios voltados para
cima de maneira a que fiquem visíveis (fig. 9).
- Fixe a parte superior ao deflector de plástico.
- Ajuste o comprimento da chaminé telescópica baixando a parte inferior e encaixando-a no topo
do extractor de fumos.
Para uma utilização optimizada do seu aparelho, aconselhamo-lo a ligar a uma
conduta com 150 mm de diâmetro (não incluída). Limitar ao máximo o número
de cotovelos e o comprimento do tubo. Se o extractor de fumos funcionar em
evacuação exterior, convém assegurar-se da existência de uma entrada de ar
fresco suficientemente grande para evitar colocar a peça em depressão.
1. Retire a vigia (fig. 11).
2. Substitua a lâmpada halogénea G4-20W-12V
3. Substitua o conjunto efectuando as operações em sentido contrário.
Como substituir a lâmpada ?
Antes de qualquer intervenção, o extractor de fumos deverá ser colocado fora de
tensão, quer retirando a tomada, quer accionando o disjuntor.
PT
99627772_ML_A.qxd 21/07/03 10:07 Page 31
Page 32

BRANDT APPLIANCES SAS
7 rue Henri Becquerel
92500 RUEIL MALMAISON
Desmontagem do filtro cassete
(fig. 10)
Montagem do filtro de carvão
(fig. 12)
1. Retire as cassetes.
2. Coloque o filtro de carvão novo sobre a cassete lado interior do extractor de fumos.
3. Coloque as 2 barras de manutenção.
4. Faça esta operação em todas as cassetes.
Quem contactar?
Qualquer defeito no aspecto que tenha sido provocado por uma utilização incorrecta ou pela limpeza com produtos abrasivos e que não provoquem o não funcionamento ou uma incapacidade de
tilização não serão levados em consideração pelo fabricante. Qualquer arranjo deverá ser efectuado por um
técnico competente.
.
Apenas os distribuidores da nossa marca :
• • C
C
ONHECEM
ONHECEM
PERFEITAMENTE
PERFEITAMENTEOO
SEU
SEU
APARELHO
APARELHOEEOO
SEU
SEU
FUNCIONAMENTO
FUNCIONAMENTO
,
,
• • A
A
PLICAM
PLICAM
INTEGRALMENTE
INTEGRALMENTEOSOS
NOSSOS
NOSSOS
MÉTODOS
MÉTODOSDEDE
REGULAÇÃO
REGULAÇÃO
,
,
DEDEMANUTENÇÃO
MANUTENÇÃOEEDEDE
REPARAÇÃO
REPARAÇÃO
,
,
• • Utilizam exclusivamente as peças de origem
Utilizam exclusivamente as peças de origem..
Em caso de reclamação ou para encomendar peças sobresselentes ao seu distribuidor, indique-lhe a
referência completa do seu aparelho (tipo de aparelho e número de série)
Estas informações estão inscritas na placa de características fixada no interior do aparelho.
As descrições e as características incluídas neste manual são dadas apenas a título de informação e não
de compromisso. De facto, preocupados com a qualidade dos nossos produtos, reservamo-nos o direito
de efectuar, sem pré-aviso, todas as modificações ou melhoramentos necessários.
Como limpar o seu extractor de fumos ?
O extractor de fumos deve ser colocado fora de tensão, quer retirando a tomada, quer
accionando o disjuntor, antes de retirar os filtros metálicos. Após a limpeza, os filtros
metálicos devem ser fixados de novo em conformidade com as instruções.
MNUTENÇÃO
PORQUÊ ?
COMO ?
INDISPENSÁVEL TODOS OS MESES
INDISPENSÁVEL TODOS OS ANOS
Este filtro absorve os vapores gordos e as poeiras. Ele é o elemento que assegura a parte
importante da eficácia do seu extractor de fumos
Este filtro absorve os cheiros e deve
ser substituído pelo menos todos os
anos em função da sua utilização.
Com um produto de limpeza doméstico vendido no
comércio, em seguida enxagúe e seque. Esta limpeza
pode ser efectuada no seu lava-loiça em posição
vertical (não colocar em contacto com a loiça
suja ou com talheres de prata).
Encomende filtros no seu revendedor (sob a referência indicada na
placa de característica situada dentro do extractor de fumos) e anote
a data de substituição.
FILTRO CASSETE
FILTRO CARVÃO ACTIVO
Nunca utilize esfregões metálicos, produtos abrasivos ou escovas demasiado duras.
Para limpar a parte exterior e o vigia de iluminação, utilize exclusivamente produtos de limpeza domésticos
vendidos no comércio diluídos em água, em seguida enxagúe com água límpida e seque com um pano.
Antes da primeira utilização do filtro cassete,
retire a película de protecção.
Para os extractor de fumos
instalados em modo reciclagem
Para evitar qualquer perigo de incêndio.
MADE IN FRANCE
230V ~ 50 Hz
99627772_ML_A.qxd 21/07/03 10:07 Page 32
Page 33

Vorwort
Liebe Kundin, lieber Kunde,
Sie haben soeben eine Dunstabzugshaube von DE DIETRICH erworben und wir bedanken
uns dafür. Unsere Forschungsteams haben für Sie eine neue Gerätegeneration entwickelt,
damit Ihnen das Kochen täglich Freude bereitet.
Mit klaren Linien und einer modernen Ästhetik, integriert sich Ihre neue Dunstabzugshaube
von DE DIETRICH harmonisch in Ihre Küche und verbindet auf perfekte Weise einfache
Benutzung und Leistung.
Die Produktreihe von DE DIETRICH enthält auch eine breite Auswahl an Kochplatten,
Backöfen, Geschirrspülern und Einbaukühlschränken, die zu Ihrer neuen
Dunstabzugshaube von DE DIETRICH gut passen.
Darum bemüht, Ihre Ansprüche, was unsere Produkte betrifft, ständig bestmöglich
zufrieden zu stellen, steht unser Verbraucherservice (Adresse am Ende dieser Broschüre)
gerne zu Ihrer Verfügung und ist bereit, Ihren Vorschlägen zuzuhören und all ihre Fragen
zu beantworten.
An der Spitze der Innovation, trägt DE DIETRICH zur Verbesserung des
täglichen Lebens bei, indem das Unternehmen immer leistungsstärkere Produkte auf den
Markt bringt, die einfach zu benutzen sind, die Umwelt respektieren und darüber hinaus
ästhetisch und zuverlässig sind.
Die Marke DE DIETRICH.
Sicherheitshinweise
- Keine Speisen unter der Abzugshaube flambieren, wenn diese in Betrieb ist. Auf
angezündeten Gasbrennern muss in diesem Fall immer ein Gefäß stehen (die angesaugten
Flammen könnten das Gerät beschädigen).
- Wenn die Abzugshaube in Betrieb ist und Sie darunter Nahrungsmittel frittieren, darf dies
nicht unbeaufsichtigt erfolgen.
- Reparaturen dürfen nur von einem zugelassenen Spezialisten durchgeführt werden.
- Den Kassettenfilter regelmäßig reinigen.
- Die Inbetriebnahme über einer Feuerstelle (Holz, Kohle usw. ...) ist untersagt.
Diese Abzugshauben wurden zur Benutzung von Privatpersonen in ihren Wohnungen
entworfen. Um die ständige Verbesserungen unserer Geräte bemüht, behalten wir uns das
Recht vor, ihre technischen, funktionellen oder ästhetischen, mit der technischen Entwicklung
verbundenen Eigenschaften jederzeit zu ändern.
Diese Abzugshauben sind ausschließlich für die Kochvorgänge von Getränken und
Speisen bestimmt. Diese Geräte enthalten keine Bestandteile auf Asbestbasis.
In der Gebrauchsanleitung
kennzeichnet,
die Sicherheitshinweise,
Kennzeichnet Hinweise und kleine Kniffe
DE
99627772_ML_A.qxd 21/07/03 10:07 Page 33
Page 34

Präsentierung Ihrer Dunstabzugshaube Abb.1
Nach 30 Stunden Betrieb blinkt die Anzeige Dies bedeutet, dass Sie Ihre
Kassettenfilter reinigen müssen. Ein einfacher Druck auf den Knopf ermöglicht
ihre erneute Initialisierung.
Wenn Ihre Küche anhand eines an einen Kamin angeschlossenen Gerätes (Bsp.:
Ofen) geheizt wird, muss die Abzugshaube in ihrer Recyclingversion installiert
werden. Die Abzugshaube nicht ohne ihre Metallfilter benutzen. Eine korrekte
Belüftung des Raums muss gewährleistet sein, wenn eine Küchenabzugshaube
gleichzeitig mit Geräten benutzt wird, die anhand von Verbrennungsstoffen wie Gas
funktionieren.
Beleuchtung
An/Aus - Geringe Geschwindigkeit
Geschwindigkeit 2
Geschwindigkeit 3
Geschwindigkeit 4
Maximale Geschwindigkeit
Modell mit Kapazitätstasten
Elektronisches Modell mit 4 Geschwindigkeiten
2
3
4
Boost
Verzögerung:
Abschaltverzögerung um 5-10 oder
15 Min.
Filterreinigung
Beleuchtung
An / Aus - Geringe Geschwindigkeit
Geschwindigkeit 2
Geschwindigkeit 3
Geschwindigkeit 4
2
3
4
Verzögerung:
Abschaltverzögerung um 15 Min.
Filterreinigung
Ein Druck auf die gewählte Geschwindigkeit löst die Inbetriebnahme aus. Ein verlängerter Druck
auf das Symbol ermöglicht das Abschalten der Dunstabzugshaube. Ein Druck auf löst
die Beleuchtung aus. Ein verlängerter Druck auf dasselbe Symbol ermöglicht die Einstellung der
Beleuchtungsstärke.
Ein Druck auf die gewählte Geschwindigkeit löst die Inbetriebnahme aus. Ein verlängerter Druck
auf das Symbol ermöglicht das Abschalten der Dunstabzugshaube. Ein Druck auf löst
die Beleuchtung aus. Ein verlängerter Druck auf dasselbe Symbol ermöglicht die Einstellung der
Beleuchtungsstärke.
99627772_ML_A.qxd 21/07/03 10:08 Page 34
Page 35

DE
Die Installation muss den für die Belüftung von Räumen geltenden
Vorschriften entsprechen. In Frankreich finden Sie diese Vorschriften im DTU
61.1 des CSTB. Die evakuierte Luft darf nicht in einen Abzug geleitet werden,
der zur Evakuierung des Rauchs von Geräten bestimmt ist, die Gas oder andere
Brennstoffe benutzen. Die Benutzung von nicht mehr verwendeten Abzügen kann
erst nach der Einwilligung eines Spezialisten erfolgen.
Der Mindestabstand zwischen der Kochfläche und dem untersten Teil der
Abzugshaube muss 70 cm betragen. Wenn die für die Kochplatte geltenden
Anweisungen einen größeren Abstand vorsehen, muss dieser respektiert werden.
Installation Ihrer Dunstabzugshaube
Sie verfügen über einen Abzug ins Freie: Abb. 4
Ihre Abzugshaube kann an diesen, anhand eines Evakuierungskanal ( mini 125 mm, emailliert,
aus Alu., Schlauch oder nicht entzündlichem Material) angeschlossen werden. Wenn der
Durchmesser des Kanals unter 125 mm liegt, müssen Sie den Recyclingmodus benutzen.
Sie verfügen über keinen Abzug ins Freie: Abb. 5
Alle unsere Geräte können im Recyclingmodus arbeiten.
In diesem Fall einen Kohlefilter hinzufügen, der die Gerüche aufnehmen wird.
- Die Montageschablone an die Wand setzen: Abb. 2
- Einen senkrechten Strich an die Wand ziehen, um die Position Ihrer Abzugshaube im Vergleich
zu Ihrem Kochherd genau zu bestimmen.
- Dann in mindestens 70 cm Abstand von Ihrem Herd einen waagerechten Strich ziehen.
Hin
weis: wenn die Abzugshaube an einer Hohlwand befestigt werden soll, die
entsprechenden Schrauben und Dübel benutzen.
- Die Kassettenfilter demontieren (Abb. 3).
- Die Abzugshaube an den rechteckigen Einschnitten aufhängen. Die Größe dieser
Einschnitte ermöglicht eine Einstellung nach rechts oder links (Abb. 3).
Montage Ihrer Dunstabzugshaube
Anschluss Ihrer Dunstabzugshaube
Dieses Gerät wird mit einem Netzkabel H 05 VVF mit 3 Leitern von 0,75 mm²
(Nulleiter, Phase und Erde) geliefert. Es muss anhand eines CEI 60083
normalisierten Steckers, der auch nach der Installation erreichbar sein muss, oder
anhand eines einpoligen Überlastschalters mit einem Kontaktöffnungsabstand von
mindestens 3 mm an ein einphasiges Stromnetz von 220-240 V angeschlossen werden.
Wir können für Unfälle, die infolge einer nicht vorhandenen oder unkorrekten Erdung
nicht haftbar gemacht werden. Für Ihre Installation ist eine Sicherung von 10 oder 16 A
erforderlich. Wenn das Netzkabel beschädigt ist, den Kundendienst rufen, um jede
Gefahr zu vermeiden.
Die Höhe und das Niveau anhand der Einstellungsschrauben "A" der
Träger einstellen. Die Abzugshaube dann durch Anziehen der Schrauben
"B" an der Wand blockieren (Abb. 3).
99627772_ML_A.qxd 21/07/03 10:08 Page 35
Page 36

Montage des Kamins
Betrieb mit einem Abzug ins Freie: Abb. 4 und 8
- Die 2 für den Transport der Kamine angebrachten Befestigungsclips entfernen.
- Die 2 Befestigungsschrauben vom Leitblech aus Kunststoff entfernen (nur im Recyclingmodus).
- Den Metallträger des Kamins an der Wand befestigen, indem Sie ihn an der Decke abstützen (Abb. 6).
Darauf achten, dass die 2 dreieckigen Einkerbungen des Metallträgers dem senkrechten Strich an
der Wand entsprechend ausgerichtet sind.
- Verwenden Sie bei einem Abzugsrohr Durchmesser 125 mm den mitgelieferten Adapter (Abb. 8).
Wenn Sie einen Kanal mit einem Durchmesser von 125 mm benutzen, den
mitgelieferten Adapter verwenden.
- Den teleskopischen Kamin vorbereiten, indem Sie darauf achten, die Ansaugöffnungen zu
verbergen (Abb. 8).
Die Kamine soweit wie möglich ineinander stecken.
- Den oberen Teil am Metallträger befestigen.
- Die Länge des teleskopischen Kamins justieren, indem Sie den unteren Teil nach unten
schieben und in den oberen Teil der Abzugshaube stecken.
Recyclingbetrieb:
Abb. 5 und 9
- Sie können die Rückschlagklappen entfernen.
-Das Leitblech aus Kunststoff an der Wand befestigen, indem Sie es an der Decke
abstützen. Darauf achten, dass es im Verhältnis zum waagerechten Strich an der
Wand korrekt zentriert ist (Abb. 7).
- Bereiten Sie die Abzugshaube vor. Die Ansaugöffnungen müssen sich oben
befinden und sichtbar sein (Abb. 9).
- Den oberen Teil am Leitblech aus Kunststoff befestigen.
- Die Länge des teleskopischen Kamins justieren, indem Sie den unteren Teil nach unten schieben
und in den oberen Teil der Abzugshaube stecken.
Für eine optimale Benutzung Ihres Gerätes raten wir Ihnen, für den Anschluss
einen Kanal von 150 mm (nicht mitgeliefert) zu verwenden. Benutzen Sie
möglichst wenig Kniestücke und begrenzen Sie die Länge des Kanals auf ein
Minimum. Wenn die Abzugshaube mit einem Abzug ins Freie versehen ist,
darauf achten, dass ausreichend frische Luft eintritt, um das Entstehen eines
Unterdrucks im Zimmer zu verhindern.
1. Die Abdeckung entfernen (Abb. 11).
2. Die Halogenbirne G4-20W-12V austauschen.
3. Danach die Vorgänge in entgegengesetzter Reihenfolge durchführen.
Auswechseln der Lampe
Vor jedem Eingriff muss die Abzugshaube vom Stromnetz getrennt werden,
indem Sie entweder den Stecker ziehen oder den Überlastschalter betätigen,
99627772_ML_A.qxd 21/07/03 10:08 Page 36
Page 37

DE
Demontage des Kassettenfilters
(Abb. 10)
Montage des Kohlefilters
(Abb. 12)
1. Die Kassetten herausnehmen.
2. Den neuen Kohlefilter auf die Kassette an der Innenseite der Abzugshaube legen.
3. Die 2 Halterungsstangen einsetzen.
4. Diesen Vorgang an allen Kassetten durchführen.
Kontaktaufnahme
Durch eine anormale Benutzung oder die Reinigung mit Scheuerprodukten hervorgerufene
Beeinträchtigungen des Aussehens Ihrer Abzugshaube, die dieselbe nicht außer Betrieb setzen oder
untauglich machen, werden vom Hersteller nicht berücksichtigt. Jede Pannenbehebung muss durch
einen qualifizierten Techniker erfolgen.
Nur die Händler unserer Marke:
• • K
K
ENNEN
ENNEN
I
I
HR
HR
G
G
ERÄT
ERÄT
UND
UND
SEINE
SEINE
F
F
UNKTIONSWEISE
UNKTIONSWEISE
GENAU
GENAU
,
,
• • W
W
ENDEN
ENDEN
UNSERE
UNSERE
E
E
INSTELLUNGS
INSTELLUNGS
-, W
-, W
ARTUNGS
ARTUNGS
-
-
UND
UND
R
R
EPARATURMETHODEN
EPARATURMETHODEN
GENAU
GENAUANAN
,
,
• • B
B
ENUTZEN
ENUTZEN
AUSSCHLIEßLICH
AUSSCHLIEßLICH
O
O
RIGINALERSATZTEILE
RIGINALERSATZTEILE
.
.
Im Falle von Reklamationen oder der Bestellung von Ersatzteilen bei Ihrem Händler, bitte immer die
komplette Referenz Ihres Gerätes angeben (Gerätetyp und Seriennummer).
Diese Auskünfte stehen auf dem im Gerät befestigten Typenschild.
Die in dieser Broschüre stehenden Beschreibungen dienen der Information und stellen in keinem Fall
ein Engagement dar. Um die Qualität unserer Produkte stets bemüht, behalten wir uns das Recht vor,
Änderungen oder erforderliche Verbesserungen ohne vorherige Benachrichtigung durchzuführen.
Reinigung Ihrer Dunstabzugshaube
Wenn Sie die Metallfilter entfernen, darf die Dunstabzugshaube nicht unter Strom stehen, Sie
müssen zuvor entweder den Stecker ziehen oder den Überlastschalter betätigen. Nach ihrer
Reinigung müssen die Metallfilter den Anweisungen entsprechend erneut eingesetzt werden.
REINIGUNG
WARUM?
WIE?
UNBEDINGT EINMAL PRO MONAT
UNBEDINGT EINMAL PRO JAHRAA
Dieser Filter nimmt den mit Fett und Staub
angereicherten Dampf auf. Er ist eines der
Elemente, die wesentlich zur Effizienz Ihrer
Abzugshaube beitragen.
Dieser Filter nimmt die Gerüche auf
und muss mindestens einmal pro
Jahr, je nach Häufigkeit der
Benutzung, gereinigt werden.
Mit einem Haushaltsmittel aus dem Handel reinigen,
danach gut spülen und abtrocknen. Diese Reinigung
kann, wenn Sei den Kassettenfilter senkrecht hinstellen, auch in Ihrem Geschirrspüler erfolgen (der Filter
darf jedoch nicht mit schmutzigem Geschirr
oder Besteck aus Silber in Berührung kommen).
Diesen Filter bei Ihrem Händler
bestellen (unter Angabe der auf
dem Typenschild im Innern der
Abzugshaube stehenden Referenz).
Das Austauschdatum notieren.
KASSETTENFILTER
AKTIVER KOHLEFILTER
Benutzen Sie auf keinen Fall Metallschwämme, Scheuermittel oder zu harte Bürsten.
Zur Reinigung des Gehäuses und der Beleuchtungsabdeckung ausschließlich mit Wasser verdünnte Haushaltsmittel aus
dem Handel verwenden, dann mit klarem Wasser spülen und mit einem weichen Tuch trocken reibentrocken reiben.
Vor der ersten Benutzung des Kassettenfilters
die Schutzfolie entfernen.
Für die im Recyclingmodus
installierten Abzugshauben.
Um Brandrisiken zu vermeiden
BRANDT APPLIANCES SAS
7 rue Henri Becquerel
92500 RUEIL MALMAISON
MADE IN FRANCE
230V ~ 50 Hz
99627772_ML_A.qxd 21/07/03 10:08 Page 37
Page 38

ЕйубгщгЮ
Бойьфймз релЬфйууб, Бойьфйме релЬфз,
Убт ехчбсйуфпэме рпх бгпсЬубфе Энбн брпсспцзфЮсб фзт DE DIETRICH .
Пй пмЬдет Эсехнбт дзмйпхсгпэн гйб еуЬт нЭет генйЭт рспъьнфщн кбй ухукехюн гйб нб еЯнбй фп
мбгеЯсемб кбизмесйнЮ брьлбхуз.
Ме брблЭт гсбммЭт кбй уэгчспнз бйуизфйкЮ, п нЭпт брпсспцзфЮсбт убт DE DIETRICH
енущмбфюнефбй бсмпнйкЬ уфзн кпхжЯнб убт кбй ухндхЬжей брпдюуейт кбй ехкплЯб чсЮузт.
З DE DIETRICH, рбсЬгей ерЯузт пльклзсет уейсЭт брь рспъьнфб, ьрщт кпхжЯнет, цпэснпхт,
рлхнфЮсйб рйЬфщн, шхгеЯб. ¼лб бхфЬ мрпспэн нб енфпйчйуфпэн Ю нб ухндхбуфпэн мбжЯ ме фпн
нЭп брпсспцзфЮсб убт брь фзн DE DIETRICH.
ВЭвбйб уе мйб ухнечЮ рспурЬиейб нб йкбнпрпйЮупхме ухнечют кблэфесб фйт брбйфЮуейт
брЭнбнфй уфб рспъьнфб мбт з хрзсеуЯб релбфюн еЯнбй уфз дйЬиеуЮ убт гйб нб убт бкпэуей, гйб
нб брбнфЮуей уфйт есщфЮуейт убт Ю гйб фйт прпйеудЮрпфе ухуфЬуейт убт (фб уфпйчеЯб иб фб
всеЯфе уфп фЭлпхт ефпэфпх фпх пдзгпэ).
Уфп брпкпсэцщмб фзт рсщфпрпсЯбт, з DE DIETRICH, ухмвЬллей уфз велфЯщуз фзт кбизмесйнЮт
рпйьфзфбт жщЮт рспуцЭспнфЬт убт рспъьнфб ьлп кбй рйп брпдпфйкЬ, брлЬ уфз чсЮуз, рпх
уЭвпнфбй фп ресйвЬллпн, кблбЯуизфб кбй бойьрйуфб.
З мЬскб DE DIETRICH.
ÌЭфсб буцблеЯбт
- Брбгпсеэефбй нб цлбмрЬсефе цбгзфЬ Ю нб иЭфефе уе лейфпхсгЯб фйт еуфЯет хгсбесЯпх чщсЯт нб
фйт кблэрфефе ме укеэз мбгейсЭмбфпт кЬфщ брь фпн брпсспцзфЮсб (бн з ухукехЮ брпсспцЮуей
цльгет кйндхнеэпхн нб фзт рспкблЭупхн влЬвз).
- Фп фзгЬнйумб кЬфщ брь фпн брпсспцзфЮсб рсЭрей нб еЯнбй бнфйкеЯменп мьнймзт ерЯвлешзт.
- Пй ерйукехЭт рсЭрей нб рсбгмбфпрпйпэнфбй брпклейуфйкЬ брь еоейдйкехмЭнп рспущрйкь.
- РсЭрей нб кбибсЯжефе фбкфйкЬ фзн кбуЭфб цЯлфспх.
- З лейфпхсгЯб фзт ухукехЮт рЬнщ брь еуфЯет кбэуймзт элзт (оэлп, кЬсвпхнп, клр...) ден ерйфсЭрефбй.
Пй брпсспцзфЮсет бхфпЯ Эчпхн учедйбуфеЯ гйб нб чсзуймпрпйпэнфбй брь йдйюфет уе пйкйбкь
ресйвЬллпн. Ме уфьчп фз ухнечЮ велфЯщуз фщн рспъьнфщн мбт, дйбфзспэме фп дйкбЯщмб нб
фспрпрпйЮупхме фб фечнйкЬ, лейфпхсгйкЬ Ю бйуизфйкЬ чбсбкфзсйуфйкЬ фщн ухукехюн уэмцщнб ме
фйт фечнйкЭт еоелЯоейт.
Пй брпсспцзфЮсет бхфпЯ рсппсЯжпнфбй брпклейуфйкЬ уфзн рбсбукехЮ фспцЯмщн кбй рпфюн. Фб
рспъьнфб мбт ден ресйЭчпхн кбнЭнб уфпйчеЯп ме вЬуз фпн бмЯбнфп.
Уе ьлп фп егчейсЯдйп, фп
убт ерйузмбЯней фйт пдзгЯет буцблеЯбт,
убт ерйузмбЯней фйт ухмвпхлЭт кбй фб фечнЬумбфб
99627772_ML_A.qxd 21/07/03 10:08 Page 38
Page 39

GR
Ð
бспхуЯбуз фпх брпсспцзфЮсб убт. учЮмб 1
МефЬ брь 30 юсет лейфпхсгЯбт бнбвпувЮней з цщфейнЮ Эндейоз . Бхфь узмбЯней рщт
рсЭрей нб кбибсЯуефе фйт кбуЭфет цЯлфсб. Мйб брлЮ рЯеуз фпх рлЮкфспх фп
ербнбсчйкпрпйеЯ.
Уе ресЯрфщуз рпх з кпхжЯнб иесмбЯнефбй брь ухукехЮ з прпЯб еЯнбй ухндедемЭнз ме
еобгщгЮ бЭсб (р.ч. уьмрб), п брпсспцзфЮсбт рсЭрей нб егкбфбуфбиеЯ ме уэуфзмб
бнбкэклщузт. Мз чсзуймпрпйеЯфе фпн брпсспцзфЮсб чщсЯт фб мефбллйкЬ цЯлфсб.
РсЭрей нб рспвлециеЯ йкбнпрпйзфйкьт еобесйумьт фпх чюспх ьфбн Энбт брпсспцзфЮсбт
кпхжЯнбт чсзуймпрпйеЯфбй фбхфьчспнб ме ухукехЭт пй прпЯет чсзуймпрпйпэн хгсбЭсйп Ю
кЬрпйб Ьллз кбэуймз элз.
Цщфйумьт
РлЮкфсп Энбсозт/ дйбкпрЮт
лейфпхсгЯбт - чбмзлЮ фбчэфзф
Фбчэфзфб 2
Фбчэфзфб 3
Фбчэфзфб 4
МЭгйуфз фбчэфзфб
МпнфЭлп ме рлЮкфсб бцЮт
Злекфспнйкь мпнфЭлп 4 фбчхфЮфщн
2
3
4
Boost
ЧспнпкбихуфЭсзуз :
Рбэуз мефЬ брь 5 - 10 Ю 15 лерфЬ
Кбибсйумьт цЯлфспх
Цщфйумьт
РлЮкфсп Энбсозт/ дйбкпрЮт
лейфпхсгЯбт - чбмзлЮ фбчэфзф
Фбчэфзфб 2
Фбчэфзфб 3
Фбчэфзфб 4
2
3
4
ЧспнпкбихуфЭсзуз:
Рбэуз мефЬ брь 15 лерфЬ.
Кбибсйумьт цЯлфспх
Рбфюнфбт кЬрпйп брь фб рлЮкфсб фбчэфзфбт енесгпрпйеЯфе фз ухукехЮ. ¸нб ухнечЭт рЬфзмб уфп рлЮкфсп
ерйфсЭрей фп уфбмЬфзмб фпх брпсспцзфЮсб. ¸нб уэнфпмп рЬфзмб уфп рлЮкфсп енесгпрпйеЯ фп
цщфйумь. ¸нб ухнечЭт рЬфзмб уе бхфь фп Ядйп рлЮкфсп убт ерйфсЭрей нб схимЯуефе фзн Энфбуз фпх
цщфйумпэ. ¸нб рЬфзмб уфп енесгпрпйеЯ фзн рспгсбммбфйумЭнз рбэуз фпх брпсспцзфЮсб. З ерйлпгЮ
фпх чсьнпх (5, 10 Ю 15 лерфЬ) рсбгмбфпрпйеЯфбй ме дйбдпчйкЭт рйЭуейт фпх Ядйпх бхфпэ ухмвьлпх.
Рбфюнфбт кЬрпйп брь фб рлЮкфсб фбчэфзфбт енесгпрпйеЯфе фз ухукехЮ. ¸нб ухнечЭт рЬфзмб уфп рлЮкфсп
змб фпх брпсспцзфЮсб. ¸нб уэнфпмп рЬфзмб уфп рлЮкфсп енесгпрпйеЯ фп цщфйумь Ю фп увЮуймь
фпх. ¸нб ухнечЭт рЬфзмб уе бхфь фп рлЮкфсп убт ерйфсЭрей нб схимЯуефе фзн Энфбуз фпх цщфйумпэ. ¸нб
рЬфзмб уфп енесгпрпйеЯ фзн рспгсбммбфйумЭнз рбэуз (15 лерфЬ) фпх брпсспцзфЮсб.
99627772_ML_A.qxd 21/07/03 10:08 Page 39
Page 40

З егкбфЬуфбуз рсЭрей нб ухммпсцюнефбй ме фйт йучэпхует нпмйкЭт дйбфЬоейт гйб фпн еобесйумь фщн еущфесйкюн чюсщн. Уфз ГбллЯб, бхфЭт пй дйбфЬоейт ресйлбмвЬнпнфбй уфп DTU
61.1 фпх CSTB (Пйкпдпмйкь Ерйуфзмпнйкь кбй Фечнйкь КЭнфсп). ЙдЯщт, п еккенщмЭнпт бЭсбт
ден рсЭрей нб кбфблЮгей уе кЬрпйп бгщгь п прпЯпт чсзуймпрпйеЯфбй гйб фзн еккЭнщуз бесЯщн
рспесчьменщн брь ухукехЭт рпх чсзуймпрпйпэн хгсбЭсйп Ю кЬрпйб Ьллз кбэуймз элз. З чсЮуз
бгщгюн уе егкбфЬлейшз хрькейфбй уфзн Эгксйуз еньт ейдйкпэ. З елЬчйуфз брьуфбуз мефбоэ фпх
ерйрЭдпх шзуЯмбфпт фщн фспцЯмщн кбй фпх чбмзльфеспх фмЮмбфпт фпх брпсспцзфЮсб рсЭрей нб
еЯнбй 70 ек. Уе ресЯрфщуз рпх пй пдзгЯет фзт вЬузт еуфйюн рпх Эчефе егкбфбуфЮуей кЬфщ брь
фпн брпсспцзфЮсб кбипсЯжпхн ьфй з брьуфбуз рсЭрей нб еЯнбй мегблэфесз фщн 70 cm., иб
рсЭрей нб фзн фзсЮуефе.
Ð
щт нб егкбфбуфЮуефе фпн брпсспцзфЮсб убт.
ДйбиЭфефе Эопдп рспт фб Эощ: учЮмб 4
П брпсспцзфЮсбт убт мрпсеЯ нб ухндеиеЯ ме фзн Эопдп дйб мЭущ еньт бгщгпэ еккЭнщузт (елЬчйуфз
дйЬмефспт 125 mm, п прпЯпт мрпсеЯ нб еЯнбй брь ембгйЭ, блпхмЯнйп, еэкбмрфпт Ю брь Ькбхуфп хлйкь)
Уе ресЯрфщуз рпх п бгщгьт убт Эчей дйЬмефсп мйксьфесз брь 125 mm, ресЬуфе хрпчсещфйкЬ уе
лейфпхсгЯб бнбкэклщузт.
Ден дйбиЭфефе Эопдп рспт фб Эощ:
учЮмб 5
¼лет мбт пй ухукехЭт мрпспэн нб лейфпхсгЮупхн уе лейфпхсгЯб бнбкэклщузт.
Уфзн ресЯрфщуз бхфЮ, рспуиЭуфе Энб цЯлфсп енесгпэ Ьнисбкб фп прпЯп иб ухгксбфеЯ фйт мхсщдйЭт.
- ФпрпиефЮуфе уфпн фпЯчп фп рлбЯуйп мпнфбсЯумбфпт: учЮмб 2
- КЬнфе мйб кЬиефз гсбммЮ уфпн фпЯчп юуфе нб ехихгсбммЯуефе брьлхфб фпн Ьопнб фпх
брпсспцзфЮсб убт ме фз ухукехЮ мбгейсЭмбфпт.
- КЬнфе Энб узмЬдй уфзн кЬиефз гсбммЮ уе эшпт 70 cm фпхлЬчйуфпн брь фп ерЯредп мбгейсЭмбфпт.
РбсбфЮсзуз: уе ресЯрфщуз рпх п фпЯчпт еЯнбй кпэцйпт, чсзуймпрпйЮуфе фйт кбфЬллзлет вЯдет
кбй пэрб.
- БцбйсЭуфе фйт кбуЭфет цЯлфспх (учЮмб 3)
- Уфесеюуфе фпн брпсспцзфЮсб брь фйт рбсбллзльгсбммет егкпрЭт, фп мЭгеипт фщн прпЯщн
убт ерйфсЭрей фзн рспубсмпгЮ рспт фб бсйуфесЬ Ю фб деойЬ (учЮмб 3).
ÔпрпиЭфзуз фпх брпсспцзфЮсб убт
Óэндеуз фпх брпсспцзфЮсб убт
З ухукехЮ ;бхфЮ дйбфЯиефбй ме кблюдйп фспцпдпуЯбт H 05 WF ме фсейт бгщгпэт
0,75 mm2 (пхдЭфесп, цЬуз кбй геЯщуз). РсЭрей нб ухндеиеЯ уе мпнпцбуйкь сеэмб
220-240 V мЭущ рсЯжбт сеэмбфпт ме вЬуз фб рсьфхрб CEI 60083, з прпЯб рсЭрей нб
еобкплпхиЮуей нб еЯнбй рспувЬуймз мефЬ фзн егкбфЬуфбуз, Ю мЭущ дйЬфбозт
кбиплйкЮт дйбкпрЮт фспцпдпуЯбт ме елЬчйуфп Ьнпйгмб ербцюн 3 mm.
ПхдемЯб ехиэнз цЭспхме уе ресЯрфщуз бфхчЮмбфпт льгщ брпхуЯбт геЯщузт Ю лбнибумЭнзт геЯщузт. З буцЬлейЬ убт рсЭрей нб еЯнбй 10 Ю 16 Б. Уе ресЯрфщуз рпх фп кблюдйп
фспцпдпуЯбт еЯнбй цибсмЭнп, кблЭуфе фзн хрзсеуЯб фечнйкЮт еохрзсЭфзузт юуфе нб
брпцэгефе кЬие кЯндхнп.
СхимЯуфе фп эшпт кбй фп ерЯредп ме фйт вЯдет сэимйузт "Б" фщн уфзсйгмЬфщн кбй ен
ухнечеЯб бкйнзфпрпйЮуфе фпн брпсспцзфЮсб уфпн фпЯчп уцЯггпнфбт фйт вЯдет "В" (учЮмб 3).
99627772_ML_A.qxd 21/07/03 10:08 Page 40
Page 41

Ô
прпиЭфзуз фпх кбрнбгщгпэ
ЛейфпхсгЯб еощфесйкЮт еккЭнщузт бесЯщн: учЮмбфб 4 кбй 8.
- БцбйсЭуфе фб дэп клйр уфесЭщузт рпх чсзуймеэпхн кбфЬ фз мефбцпсЬ фпх кбрнбгщгпэ.
- БцбйсЭуфе фйт дэп рлбуфйкЭт вЯдет фпх рлбуфйкпэ екфспрЭб (мьнп лейфпхсгЯб бнбкэклщузт).
- Уфесеюуфе уфпн фпЯчп, ме уфЮсйоз уфп фбвЬнй, фз мефбллйкЮ вЬуз фпх кбрнбгщгпэ (учЮмб 6).
ЦспнфЯуфе нб ехихгсбммЯуефе фйт дэп фсйгщнйкЭт егкпрЭт фзт мефбллйкЮт вЬузт ме фзн кЬиефз
гсбммЮ уфпн фпЯчп.
- Уе ресЯрфщуз рпх п бгщгьт убт Эчей дйЬмефсп 125 mm чсзуймпрпйЮуфе фп рбсечьменп
рспубсмпуфйкь еоЬсфзмб (учЮмб 8)
Уе ресЯрфщуз рпх п еощфесйкьт убт бгщгьт Эчей дйЬмефсп мйксьфесз брь 125 mm, рсЭрей брбсбЯфзфб нб ухндЭуефе фпн брпсспцзфЮсб уе лейфпхсгЯб бнбкэклщузт.
- РспефпймЬуфе фпн фзлеукпрйкь убт кбрнбгщгь цспнфЯжпнфбт нб кблэшефе фйт прЭт (учЮмб 8).
Ецбсмьуфе фпн Энб кбрнбгщгь мЭуб уфпн Ьллпн рйЭжпнфбт мЭчсй фЭсмб.
- Уфесеюуфе фп ерЬнщ мЭспт фзт мефбллйкЮт вЬузт.
- Рспубсмьуфе фп мЮкпт фпх фзлеукпрйкпэ кбрнбгщгпэ кбфевЬжпнфбт фп кЬфщ фмЮмб кбй
ецбсмьжпнфЬт фп уфзн кпсхцЮ фпх брпсспцзфЮсб.
ЛейфпхсгЯб бнбкэклщузт: учЮмб 5 кбй 9
- ЕЯнбй дхнбфьн нб бцбйсеипэн фб клбрЭфб бнферйуфспцЮт.
- Уфесеюуфе фпн рлбуфйкь екфспрЭб кбрнюн уфпн фпЯчп, ме уфЮсйоз уфп фбвЬнй.
ЦспнфЯуфе нб ехихгсбммЯуефе фпн екфспрЭб уе учЭуз ме фзн кЬиефз гсбммЮ рпх Эчефе
кЬней уфпн фпЯчп (учЮмб 7).
- РспефпймЬуфе фпн кбрнбгщгь убт цспнфЯжпнфбт нб фпрпиефЮуефе фйт прЭт рспт фб ерЬнщ
Эфуй юуфе нб еЯнбй псбфЭт (учЮмб 9).
- Уфесеюуфе фп ерЬнщ фмЮмб уфпн рлбуфйкь екфспрЭб.
- Рспубсмьуфе фп мЮкпт фпх фзлеукпрйкпэ кбрнбгщгпэ кбфевЬжпнфбт фп кЬфщ фмЮмб кбй
ецбсмьжпнфЬт фп уфзн кпсхцЮ фпх брпсспцзфЮсб.
Гйб фз вЭлфйуфз чсЮуз фзт ухукехЮт убт, убт ухнйуфпэме нб фз ухндЭуефе ме бгщгь
дйбмЭфспх 150 mm (ден рбсЭчефбй ме фз ухукехЮ). Мейюуфе ьуп фп дхнбфьн
ресйууьфесп фпн бсйимь фщн гщнйюн кбй фп мЮкпт фпх бгщгпэ. Уе ресЯрфщуз рпх п
брпсспцзфЮсбт лейфпхсгеЯ ме еощфесйкЮ еккЭнщуз фпх бЭсб, рсЭрей нб
еобуцблЯуефе ьфй иб хрЬсчей йкбнпрпйзфйкЮ рбспчЮ кбибспэ бЭсб Эфуй юуфе нб мзн
бнбрфхчиеЯ хрпрЯеуз уфз чюсп.
1. БцбйсЭуфе фп рспуфбфехфйкь кЬлхммб (учЮмб 11)
2. БнфйкбфбуфЮуфе фз лхчнЯб блпгьнпх G4- 20W- 12V.
3. ЕрбнбфпрпиефЮуфе фб еобсфЮмбфб бкплпхиюнфбт фзн бнфЯуфспцз дйбдйкбуЯб.
Ðщт нб бнфйкбфбуфЮуефе фз лЬмрб
Рсйн брь кЬие ерЭмвбуз, рсЭрей нб дйбкьшефе фзн злекфсйкЮ фспцпдпуЯб фпх
брпсспцзфЮсб, еЯфе вгЬжпнфбт фзн рсЯжб, еЯфе енесгпрпйюнфбт фп дйбкьрфз дйбкпрЮт.
GR
99627772_ML_A.qxd 21/07/03 10:08 Page 41
Page 42

BRANDT APPLIANCES SAS
7 rue Henri Becquerel
92500 RUEIL MALMAISON
БцбЯсеуз фзт кбуЭфбт цЯлфспх
(учЮмб 10)
ФпрпиЭфзуз фпх цЯлфспх Ьнисбкб
(учЮмб 12)
1. БцбйсЭуфе фйт кбуЭфет цЯлфспх.
2. ФпрпиефЮуфе фп кбйнпэсгйп цЯлфсп Ьнисбкб уфзн кбуЭфб цЯлфспх брь фзн еущфесйкЮ
рлехсЬ фпх брпсспцзфЮсб.
3. ФпрпиефЮуфе фб дэп сЬвдпхт ухгксЬфзузт.
4. КЬнфе фп Ядйп гйб ьлет фйт кбуЭфет.
ÅрйкпйнщнЯб
Пй бфЭлейет емцЬнйузт рпх ендЭчефбй нб рспклзипэн брь лбнибумЭнз чсЮуз Ю кбибсйумь ме лейбнфйкЬ
рспъьнфб кбй пй прпЯет ден Эчпхн убн брпфЭлеумб фз мз лейфпхсгЯб Ю фзн рспвлзмбфйкЮ лейфпхсгЯб фзт
ухукехЮт ден лбмвЬнпнфбй хрьшз брь фпн кбфбукехбуфЮ. З брпкбфЬуфбуз прпйбудЮрпфе влЬвзт рсЭрей
нб рсбгмбфпрпйеЯфбй брь еоейдйкехмЭнп фечнйкь.
Мьнпн пй еопхуйпдпфзмЭнпй дйбнпмеЯт фзт мЬскбт мбт:
ГнщсЯжпхн фЭлейб фз ухукехЮ убт кбй фз лейфпхсгЯб фзт
ГнщсЯжпхн фЭлейб фз ухукехЮ убт кбй фз лейфпхсгЯб фзт,,
Ецбсмьжпхн рлЮсщт фйт меиьдпхт мбт сэимйузт, ухнфЮсзузт кбй ерйукехЮт,
Ецбсмьжпхн рлЮсщт фйт меиьдпхт мбт сэимйузт, ухнфЮсзузт кбй ерйукехЮт,
Чсзуймпрпйпэн брпклейуфйкЬ гнЮуйб бнфбллбкфйкЬ.
Чсзуймпрпйпэн брпклейуфйкЬ гнЮуйб бнфбллбкфйкЬ.
Уе ресЯрфщуз рбсбрьнщн Ю гйб рбсбггелЯб бнфбллбкфйкюн, рсЭрей нб дюуефе фпн бксйвЮ кщдйкь фзт
ухукехЮт убт (фэрпт ухукехЮт кбй уейсйбкьт бсйимьт).
БхфЭт пй рлзспцпсЯет бнбгсЬцпнфбй уфзн ендейкфйкЮ рйнбкЯдб уфп еущфесйкь фзт ухукехЮт.
Пй ресйгсбцЭт кбй фб чбсбкфзсйуфйкЬ рпх рбспхуйЬжпнфбй уфп рбсьн егчейсЯдйп рбсЭчпнфбй мьнпн
ендейкфйкЬ кбй ден еЯнбй деумехфйкЭт. РсЬгмбфй, ме уфьчп фз ухнечЮ велфЯщуз фщн рспъьнфщн мбт,
дйбфзспэме фп дйкбЯщмб нб рсбгмбфпрпйЮупхме, чщсЯт рспзгпэменз ейдпрпЯзуз, ьлет фйт брбсбЯфзфет
фспрпрпйЮуейт Ю велфйюуейт .
Ê
бибсйумьт фпх брпсспцзфЮсб убт
РсЭрей нб дйбкьшефе фзн рбспчЮ злекфсйкЮт фспцпдпуЯбт фпх брпсспцзфЮсб, еЯфе вгЬжпнфбт фзн
рсЯжб, еЯфе енесгпрпйюнфбт фп дйбкьрфз дйбкпрЮт, рсйн бцбйсЭуефе фб мефбллйкЬ цЯлфсб. МефЬ
фпн кбибсйумь, фб мефбллйкЬ цЯлфсб рсЭрей нб ербнбфпрпиефзипэн уэмцщнб ме фйт пдзгЯет.
УХНФЗСЗУЗ
ГЙБФЙ;
ÐÙÓ;
БРБСБЙФЗФЗ КБИЕ МЗНБ
БРБСБЙФЗФЗ КБИЕ ЧСПНП
Бхфь фп цЯлфсп ухгксбфеЯ фпхт лйрбспэт бфмпэт кбй фйт
укьнет. БрпфелеЯ фп еоЬсфзмб рпх ерзсеЬжей уе
мегЬлп вбимь фзн брпфелеумбфйкьфзфб фпх
брпсспцзфЮсб убт.
Фп цЯлфсп бхфь ухгксбфеЯ фйт мхсщдйЭт кбй
рсЭрей нб бнфйкбиЯуфбфбй фпхлЬчйуфпн мйб
цпсЬ фп чсьнп бнЬлпгб кбй ме фз чсЮуз фзт
ухукехЮт убт.
Ме кЬрпйп хгсь кбибсйумпэ пйкйбкЮт чсЮузт фп прпЯп
иб оевгЬлефе ме Ьципнп несь рсйн уфегнюуефе. Бхфьт п
кбибсйумьт мрпсеЯ нб гЯней кбй уфп рлхнфЮсйп рйЬфщн
уе кЬиефз иЭуз (нб мзн Эсией уе ербцЮ ме всюмйкб
рйбфйкЬ Ю бузмЭнйб мбчбйспрЯспхнб)
РбсбггеЯлефе бхфЬ фб цЯлфсб брь фпн
бнфйрсьущрь убт (ме фпн кщдйкь
бнфбллбкфйкпэ п прпЯпт бнбгсЬцефбй
уфзн ендейкфйкЮ рйнбкЯдб уфп еущфесйкь
фпх брпсспцзфЮсб) кбй узмейюуфе фзн
змеспмзнЯб бнфйкбфЬуфбузт.
КБУЕФБ ЦЙЛФСПХ
ЦЙЛФСП ЕНЕСГПХ БНИСБКБ
Мзн чсзуймпрпйеЯфе мефбллйкь уэсмб, лейбнфйкЬ рспъьнфб Ю рплэ уклзсЭт впэсфует.
Гйб нб кбибсЯуефе фп рлбЯуйп кбй фп рспуфбфехфйкь кЬлхммб фпх цщфйумпэ, чсзуймпрпйЮуфе брпклейуфйкЬ хгсЬ кбибсйумпэ
пйкйбкЮт чсЮуещт дйблхмЭнб уе несь, кбй ен ухнечеЯб оевгЬлфе ме кбибсь несь кбй укпхрЯуфе ме Энб брбль рбнЬкй.
Рсйн фзн рсюфз чсЮуз фзт кбуЭфбт цЯлфспх,
бцбйсЭуфе фзн рспуфбфехфйкЮ фбйнЯб.
Гйб фпхт брпсспцзфЮсет уе лейфпхсгЯб бнбкэклщузт.
Гйб нб брпцэгефе прпйпдЮрпфе кЯндхнп рхскбгйЬт
MADE IN FRANCE
230V ~ 50 Hz
99627772_ML_A.qxd 21/07/03 10:08 Page 42
Page 43

Fig. 1
Abb.1
учЮмб.1
Fig. 2 /Abb.2 / учЮмб.2
Fig. 3 /Abb.3 / учЮмб.3
Fig. 4 /Abb.4 / учЮмб.4
Fig. 5 /Abb.5 / учЮмб.5
99627772_ML_A.qxd 21/07/03 10:08 Page 43
144 > 360 mm
> 70 cm
741 > 1093 mm
98 mm
Ø8mm
=
=
499 mm
500 mm
25 mm
8 mm
900 mm
A
B
Page 44

Fig. 6 /Abb.6 /учЮмб.6
Fig. 7 /Abb.7 / учЮмб.7
Fig. 8
Abb. 8
учЮмб.8
Fig. 12
Abb. 12
учЮмб.12
Fig. 10 /Abb.10 / учЮмб.10
Fig. 11
Abb. 11
учЮмб.11
Fig. 9
Abb.9
учЮмб.9
99627772 07/03
99627772_ML_A.qxd 21/07/03 10:08 Page 44
=
=
2 x Ø8mm
=
=
2 x Ø8mm
 Loading...