

Page 1
#3170
ASSEMBLY and MOUNTING
NSTRUCTIONS
WindeXL features a 23" Windex®wind vane for
boats over 40 feet (12 m). This large vane is easier to
see on a tall mast. WindeXL is 50% larger in linear
dimension than the popular Windex 15 (the choice of
most sailors worldwide).
WindeXL features a sapphire suspension bearing,
23" (58.4 cm) vane and adjustable tacking arms with
tabs. Vane and tabs feature reflectors for high visibility day and night. Uses same mounting thread pattern
as Windex 15 for easy upgrade or retrofit installation.
Stands 17.5" (44.5 cm) tall yet weighs just 8.3
ounces (233 g). May be fitted with optional Windex
Light #3200.
It is advisable to read through the entire set of
instructions before beginning assembly. Your
WindeXL is a precision instrument, and if not assembled properly might not hold together under the
strong vibration at the top of a mast. The mast top
environment is severe from a vibrational standpoint
and oscillates violently.
Note that you will find the diagram on the bottom of
the box helpful when adjusting the tab angle (step 6),
but these instructions should suffice if the box is no
longer in your possession.
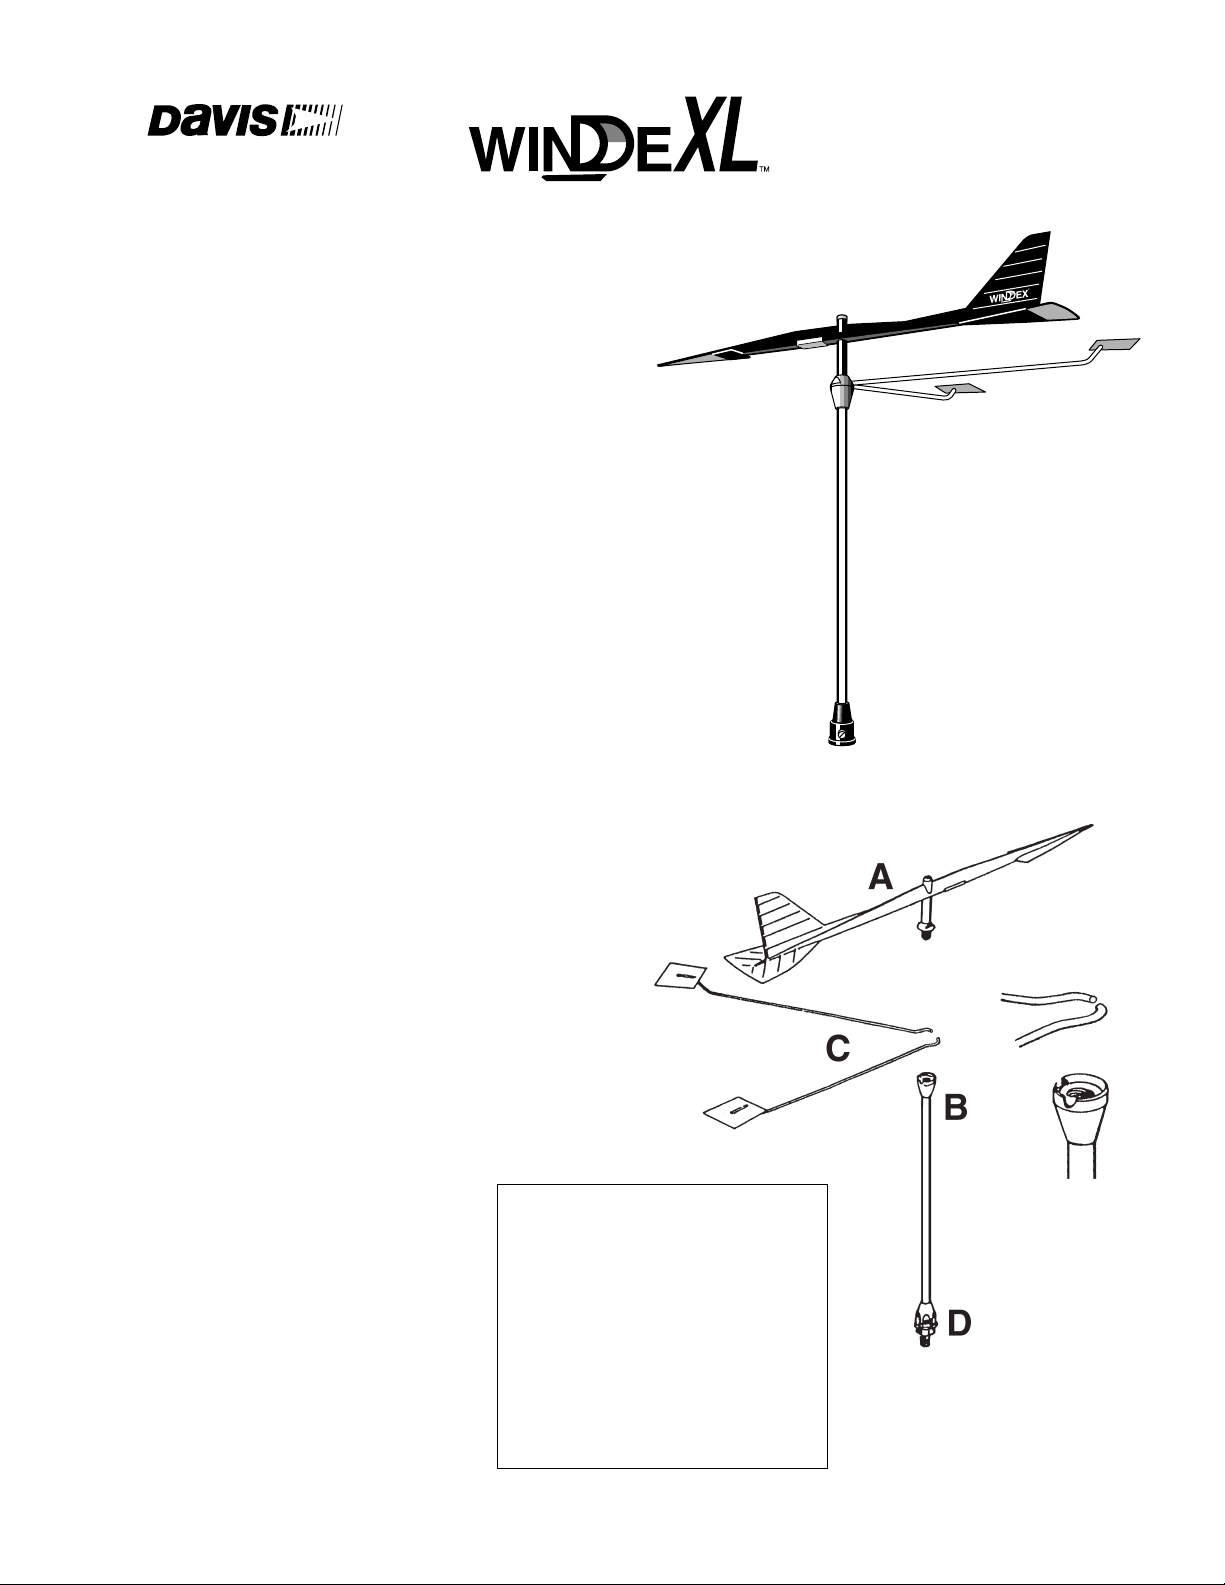
Box Contains:
(A) Vane assembly with jewel
bearing system and screw part.
(B) Supporting rod with tab arm
holder.
(C) Two reference tab arms, port
and starboard.
(D) Mast fitting with lock screw,
mounting screw, nut, and
washer
NOTE: WindeXL was
discontinued in 2006.
Page 2

Assembling your WindeXL:
1.Put some silicone or other sealant on the threads
of the screw part of the vane assembly (A).
2.Place the screw part against the tab arm holder
(B) and turn the screw by hand 2 full turns into the
thread, leaving a slot for insertion of the tab arms
(C).
3.Insert the curved ends of the tab arms (C) so that
the black surfaces of the tabs point upwards
(reflective side down). The tab arms should protrude through the cut-outs in the tab arm holder
(B.)
4.Now rotate the screw part of the vane assembly
(A) by hand, checking that the curved ends of the
tab arms lie flat in the recess of the tab arm holder. This procedure is easier with the tabs resting
on a flat surface. When you are satisfied with the
positioning of the tab arm ends in the recess and
how they lie in the cut-outs, check again that the
black surface of the tabs point upwards (reflecting
side down).
5.Take a well-fitting wrench or spanner and, holding
the assembly with your fingers around both tab
arms and the central rod, tighten the screw part
securely. With your hand, flex the tab arms a little
to finally seat them in position, then tighten again.
The tab arms should now be rigidly attached.
6.Use the angle indication on the underside of the
box to adjust the angle between the tab arms to
suit your yacht’s windward performance. The three
different angles could represent:
Heavy displacement cruising yachts
65°
Cruising yachts in general
60°
High-pointing racing yachts
55°
Adjust the tab arms carefully, a little bit at a time,
bending them close to the attachment point. The
angles suggested are based on experience, but
many individual variations exist, with rig types and
keels also having an influence. The recommended
tab angles are simply a convenience that allow
the index tabs to be approximately centered in
relation to the vane’s position when sailing closehauled.
Attaching WindeXL to the Mast Fitting:
1.Select a place for your WindeXL where the vane
and tab arms can be seen comfortably from deck
and there are no obstructions to the vane swinging freely.
2.The mounting of the mast fitting (D) is easiest
done with the mast on the ground.
3.There are two alternatives for mounting the mast
fitting. Whichever method is used, apply structural
adhesive (2-component epoxy or similar) under
the mast fitting to further secure it, itself, from
rotating.
Alternative I. On a horizontal part of the masthead with an 5/16" (8 mm) diameter throughhole. Insert mast fitting into hole. Slide on washer
and nut supplied. Use a strong screwdriver to
screw the bottom screw into the nut. The screw is
very strong and must be tightened with considerable force to prevent it and the mast fitting from
turning under sea conditions and vibration. Finally,
tighten the nut with a wrench, holding the screw
with the screwdriver. Again it must be emphasized
that the desired result depends on very forceful
tightening.
Alternative II. In a blind hole in an aluminum or
titanium masthead. Use a 5/16" UNC tap to cut
threads in a 1/4" diameter hole (FULL thread min.
3/4" deep). Then use structural adhesive on the
threads and under the mast fitting, and tighten
with considerable force as in Alternative I.
4. It is important that the two tab arms (C) are lined
up pointing symmetrically aft in relation to the
yacht’s centerline. For reference, use the spreaders (with the mast on the ground) or the aft stay
when the mast is stepped. When you are satisfied
with the symmetry of the tab arms, and with the
central shaft pressed all the way down (locking
screw unscrewed) into the mast socket (D), tighten the locking screw so that the sharp tip makes
an impression onto the aluminum shaft. This mark,
which should be deepened slightly using the
sharp point of a knife or similar tool, will help you
to accurately reposition your WindeXL. This
depression is also what keeps the WindeXL from
turning out of position.
Page 3

3465 Diablo Avenue, Hayward, CA 94545, U.S.A.
Phone (510) 732-9229 • Fax (510) 732-9188
info@davisnet.com • www.davisnet.com
3170_Ins.pdf June 2008
If you exercise reasonable care and take down your
WindeXL before you unstep your mast, it will give you
many years of excellent service without any form of
maintenance.
Replacement Parts
Spare parts for WindeXL are no longer available.
Manufactured and distributed by
The Complete Windex®Line…
Windex, the famous wind direction indicator for sailboats, is the standard on most mastheads
around the world. Models available for every sailor’s needs:
#3120 Windex 10.sport — 10" (25 cm) vane. . . for small boats and dinghies
#3150 Windex 15 — 15" (38 cm) vane . . . . . . the choice for most sailors
#3160 Windex AV — 15" (38 cm) vane . . . . . . for mounting on whip antennas,
combining two installations in one
 Loading...