

Page 1

WeatherLink® for APRS
Addendum
Introduction
This Streaming Data Logger is designed for use by Ham Radio Operators
with a TNC modem capable of accepting APRS data packets. The product
will allow the user to transmit weather data over Ham Radio without the
need for a PC.
This product also contains the functionality of the WeatherLink for Vantage
Pro Serial version. Please consult the WeatherLink for Vantage Pro™
Getting Started Guide and on-line Help files for information on the use of the
WeatherLink
installation), package contents, and optional accessories for this product.
Hardware Installation and Requirements
In addition to the requirements for WeatherLink, the streaming data
capability of this product has the following additional hardware
requirements.
• Ham Radio with attached TNC modem capable of accepting APRS
• Computer running any version of Windows™ with at least 3 MB free
Please refer to the WeatherLink Getting Started Guide, page 7, “serial Port
Installation” for detailed hardware installation instructions for connecting this
product to the console and a PC. To connect this product to a TNC modem,
connect the cable plug at the end of the 8’ cable to the supplied 25-pin TNC
Modem adapter. Plug the adapter into the 25-pin port labeled Computer on
the TNC modem. If your TNC modem requires a 9-pin or RJ connection,
these parts are not available from Davis Instruments.
Note 1: Davis highly recommends you use the same serial port on your
computer for both WeatherLink
communicate to both programs at the same time.
Note 2: While APRS
the Vantage Pro console may communicate at any baud rate including the
default 19,200 baud.
Note 3: Due to its normal operation, this product will draw more current
from the Vantage Pro™ Console and Weather Envoy™ than in typical use.
®
program (including its hardware requirements and typical
data packets.
of RAM and 512 KB of free hard disk space.
®
and APRS®, however, you cannot
®
can communicate up to 9600 baud, WeatherLink® and
1
Page 2

Davis recommends you use the power adapter provided with your product if
you are concerned about battery life.
For further and more detailed information on APRS, please visit the
following website: http://web.usna.navy.mil/~bruninga/aprs.html
.
Software Installation and Setup
Installing the Software
Follow the installation instructions for WeatherLink
configuration software. The install file contains this program as well as
WeatherLink
®
if you ever need to install the program manually.
Running the Configuration Software
To run the configuration software, double-click on the Streaming Data Utility
icon in the Streaming Data Utility directory of the WeatherLink
select the Streaming Data Utility from the Start Menu under the
WeatherLink
®
directory.
Finding the Correct Serial Port
The configuration software includes a procedure for locating the serial port
to which your streaming data logger is connected or determining whether
that serial port is working.
Note: Using the Auto Detect command in WeatherLink
the serial port. The Loopback command will help you determine whether
the serial port is functioning. Consult the WeatherLink
Getting Started Guide and on-line Help files for more information.
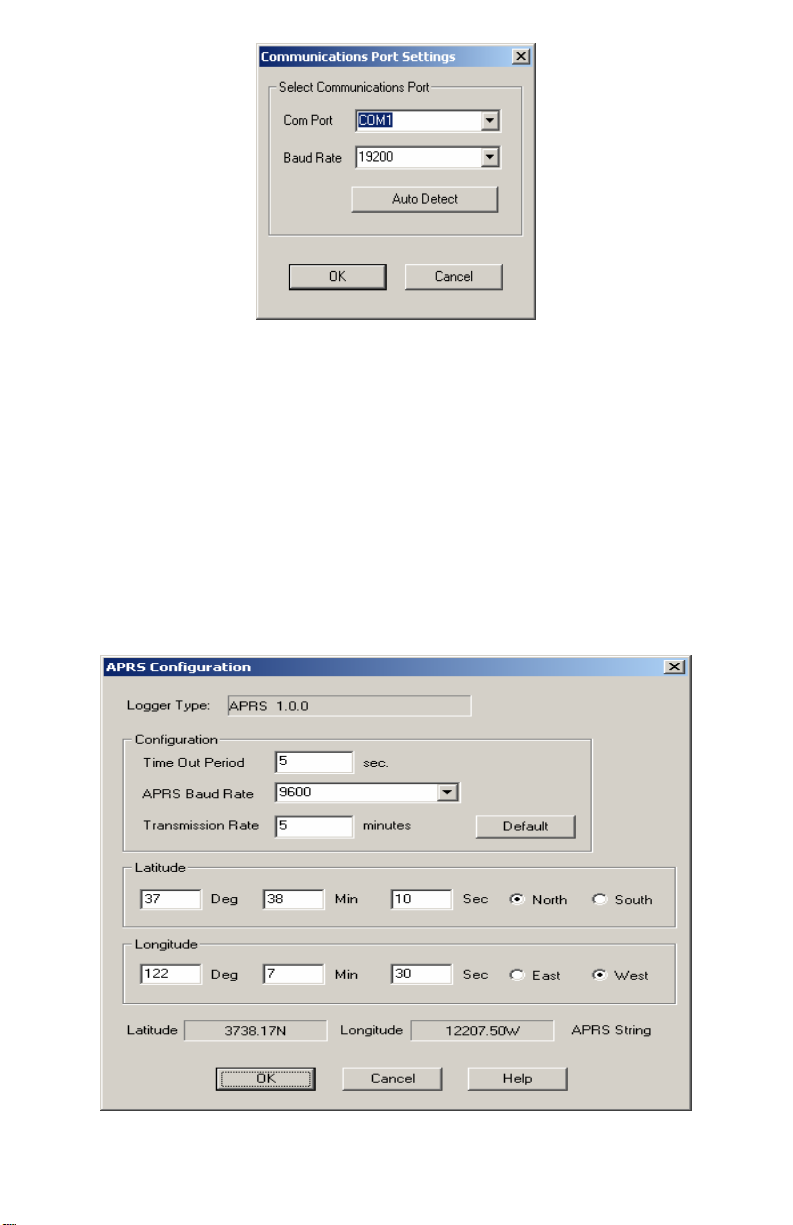
Use the Serial Port Settings dialog box to select the correct COM port and
baud rate to communicate to the streaming data logger. The correct baud
rate will be the one set in your Vantage Console, and in WeatherLink. The
default value is 19,200 baud. You may manually set the COM port setting
or use the Auto Detect button to automatically find where your streaming
data logger is connected.
®
. This will also install the
®
directory or
®
can help you locate
®
for Vantage Pro™
2
Page 3
Note: If you have more than one streaming data logger connected to your
system, it is highly recommended that you manually set the com port and
baud rate.
Consult your TNC modem and Ham Radio documentation to determine how
to configure your streaming data logger to communicate APRS data to your
Ham Radio.
Logger Type
The software indicates the logger type and firmware revision level of the
streaming data logger in the logger type box.
3
Page 4

Time Out Period
Normally, the streaming data logger will stream an ASCII character string
according to the Transmission Rate setting to the Ham Radio TNC modem.
However, the streaming data logger utilizes a time-out period for ceasing
streaming whenever software attempts to communicate to the logger. The
default setting is 5 seconds. You may adjust this value if you wish
streaming to resume sooner or later after communicating to the logger using
WeatherLink
Note: Once communications to WeatherLink are initiated and successful,
the streaming data logger will be unable to communicate with the Streaming
Data Utility until the Time Out Period expires. If you need to communicate
to the logger with both the Streaming Data Utility and WeatherLink
should communicate using the Streaming Data Utility first.
®
or the Streaming Data Utility.
®
, you
APRS Baud Rate
Use this setting to determine what baud rate to send APRS data to the TNC
modem on your Ham Radio. The default value is 9600. This is also the
recommended maximum value that you should set.
Transmission Rate
Use this setting to determine how often to send APRS data packets.
Initially, you will need to enter a valid value. The default setting is 5
minutes. Consult the APRS website for guidance on sending data more or
less often.
Note: Settings longer than 60 minutes will result in one erroneous time
stamp during “Fall Back” from Daylight Savings Time.
Latitude & Longitude
For APRS reporting, you must enter your latitude and longitude information.
Enter your latitude and longitude in degrees, minutes and seconds in the
appropriate boxes. The APRS String boxes below indicate what the APRS
position character string will look like based on the values entered. Before
any new data is entered, theses boxes indicate the latitude and longitude
string currently stored in the streaming data logger. If “invalid string” is
shown in these boxes, either one of the entries is outside the range of valid
parameters or, as in the case of the first time you receive the product, no
latitude or longitude values have been stored in the data logger.
4
Page 5

Default
Press this button to restore the data entries to their default values. You must
still hit OK to save the settings in the data logger.
5
Page 6

Streaming Data Logger Functionality &
Troubleshooting
The APRS streaming data logger compiles a character string consisting of
the following:
ASCII character “@”,
The date and time on a 24 hour clock in the following format: Day of
Month, Hour, Minute, where each value is a 2 digit number.
Lower case “z”,
Latitude/longitude “position” string: 4903.50N/07201.75W_.
Scalar average wind direction (in degrees) over one minute
(reported as 000 if the average wind speed is zero);
Forward slash “/”,
Sustained one-minute wind speed (in mph);
Lower case “g”,
Gust (peak wind speed in mph in the last 5 minutes);
Lower case “t”,
Temperature (in degrees Fahrenheit). Temperatures below zero are
expressed as -01 to -99;
Lower case “r”,
Rainfall (in hundredths of an inch) in the last hour,
Lower case “p”,
Rainfall (in hundredths of an inch) in the last 24 hours,
Upper case “P”,
Rainfall (in hundredths of an inch) since midnight,
Lower case “h”,
Humidity (in %. 00 = 100%), omitted if missing;
Lower case “b”,
Barometric pressure (in tenths of millibars/tenths of hPa), omitted if
missing;
The letter “L”, (upper case if solar radiation is below 1000, lower
case if solar radiation is between 1000 and 1999), omitted if
missing,
Solar Radiation (in watts per square meter) last 3 digits (see above),
omitted if missing,
The following character string inside the quotes (including the
leading period): “.DsVP“. This will indicate that a Davis Vantage
Pro is sending the APRS data packet with its own proprietary
device.
Carriage Return character
Line Feed character
Upon powering up the console, the data logger will report rain over the last
hour and the last 24 hour rain initially as zero and any cumulative rainfall
after power up for the first hour and first 24 hours, respectively. Also, if data
6
Page 7

is missing due to other problems such as disconnected sensors or poor
reception, data may not be reported.
Hourly and last 24 hour rain will resume reporting totals normally after the
data logger streaming function is interrupted for PC communication.
7
Page 8

Product Number: 06540
Davis Instruments Part Number: 07395.218
WeatherLink for APRS
Rev. A Addendum (1/26/05)
8
 Loading...