

Page 1

Index
Introduction ...........................................................................................................1
Technical Description ............................................................................................2
Photographs ......................................................................................................... 3
Schematic Diagrams ............................................................................................. 4
User’s Guide ......................................................................................................... 5
Page 2

Datamax-O’Neil Corporation Type Approval Application (E)
OC2 BT
Page 3

Introduction
Model: OC2 BT
Type:
Bluetooth Printer
Technology:
Bluetooth (Class I)
No other radios.
Fabricante:
Datamax‐O'Neil Corporation
4501 Parkway Commerce Blvd.
Orlando, FL 32808
USA
Factory:
KEYTRONIC EMS
MAGNETO 7824, KEY TRONIC JUAREZ
PARQUE INDUSTRIAL "GEMA", 32380 JUAREZ
CHIH MEXICO
Solicitante/Local Holder:
DAMKTECH Ltda.
Avenida Professor Benedicto Montenegro nº
382 – Betel – CEP: 13.148‐189
Paulínia, São Paulo, Brazil
CNPJ: 18.806.187/0001‐80
Page 4

Section 2
Technical Description
OC2 BT 4 pages
Technical Description
Page 5

Datamax-O’Neil Corporation Type Approval Application (E)
OC2 BT
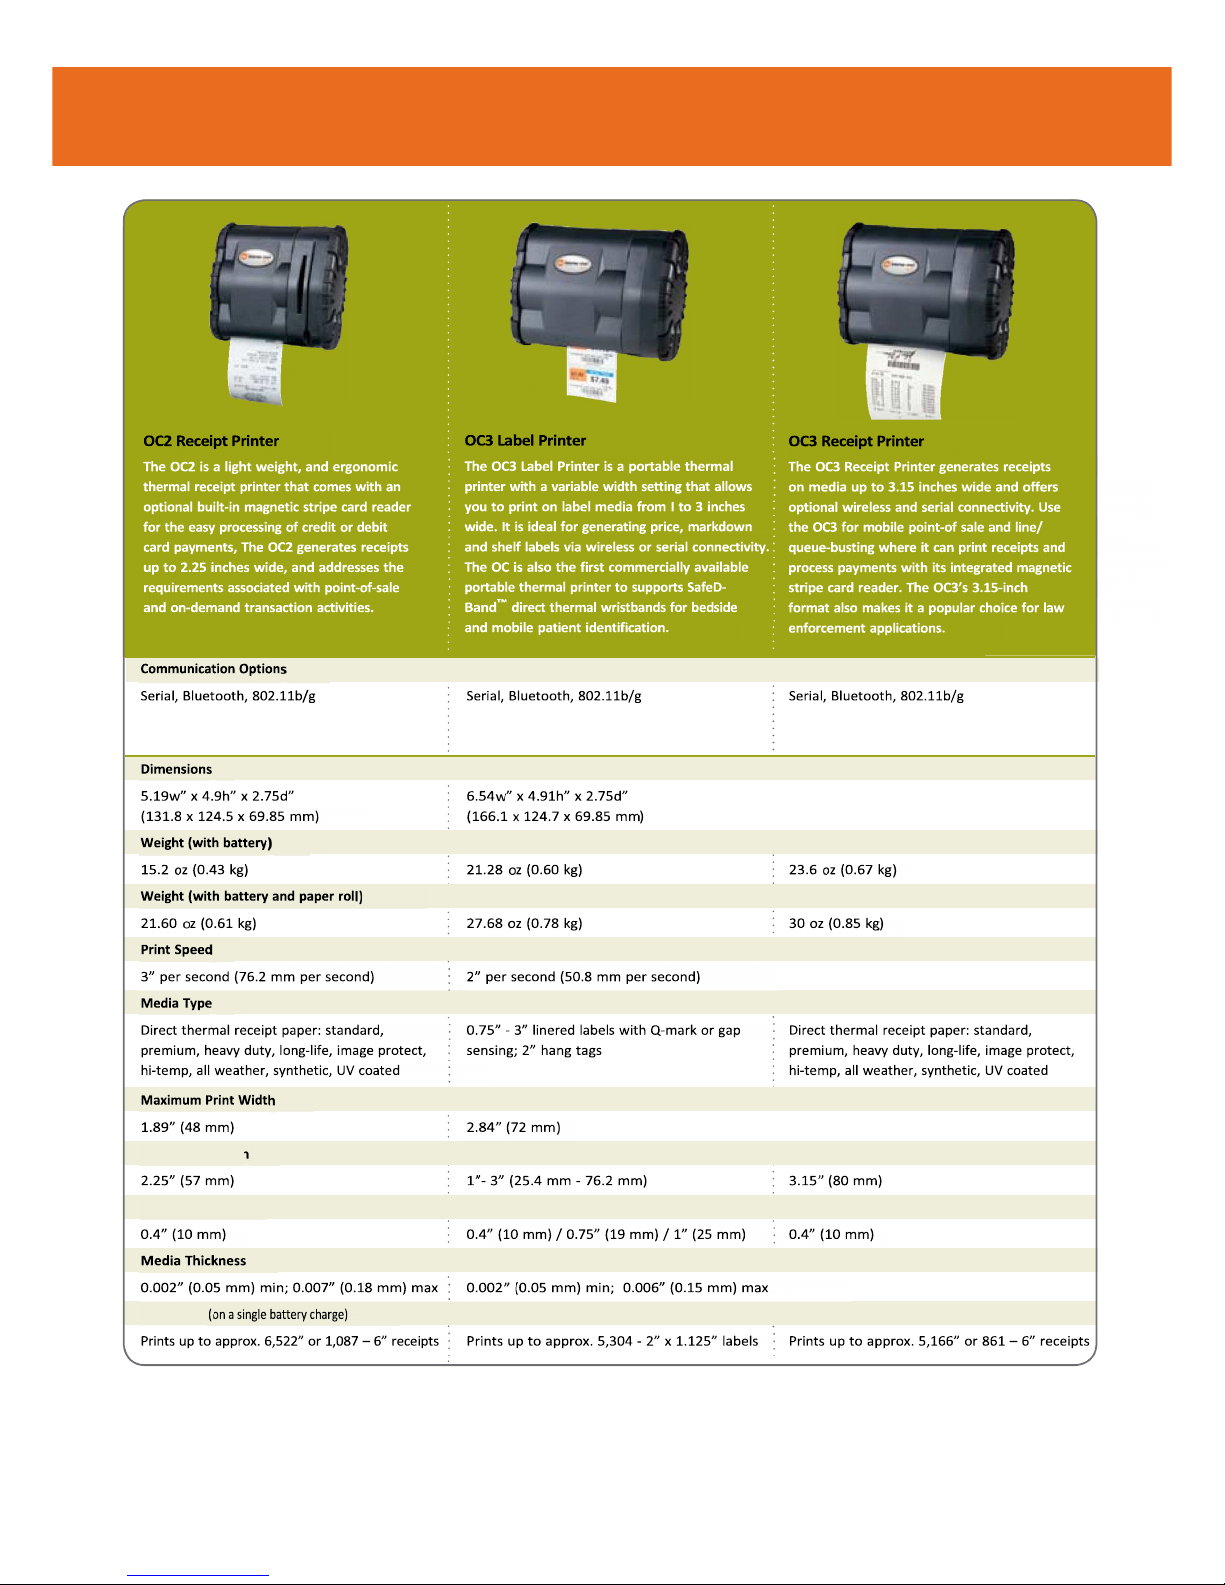
OC3
OC2
features at a
glance
•
Compact design: Streamlined design
makes the OC3 35% smaller than the
closest competition
•
Fast printing: Advanced 32-bit
architecture RISC processor for
lightspeed processing
•
Easy to use: LED lights indicate
Bluetooth, charging and power status,
and an external DC jack allows for easy
charging
•
Options: Receipt or label printing
capability and Bluetooth or 802.11b/g
connectivity
•
Compatibility: Supports a wide variety
of hand-held computers from leading
manufacturers
•
Swipe-style card reader: print receipts
and process payments in the field
•
Graphics: Supports the printing of
graphics, 1D bar codes, 2D symbologies,
and signature capture
•
Endurance: Intelligent power
management and programmable sleep
mode for extended battery life
•
Battery: Unlike competitors’ printers,
the battery is included in the purchase
price. And when it’s time to replace the
battery, the OC printers use economical
replacement batteries
•
Charging options: External charge contacts, AC adapter, or 12V vehicle cigarette lighter
adapter
OC2 / OC3
Compact and Ergonomic
The OC is the world’s most streamlined, light weight, and ergonomic family of portable
label and receipt printers. Designed especially for those labeling and transaction
applications where ergonomic considerations, ultimate portability, and smart looks are
paramount, the OC is ideal to meet the continually expanding requirements associated
with retail, healthcare, hospitality, transportation, and field mobile service applications.
The advanced features, standard with any OC printer, offer extreme adaptability to
meet the unique and industry specific portable printing requirements demanded in
today’s evolving business environment. Simple charging solutions and drop‐in media
loading allow entry level associates to use the printer with no downtime. The OC is
compatible with a wide selection of media including labels, hang tags, shelf tags, and
receipt paper. The OC is available in 2‐inch and 3‐inch widths and offers an optional
magnetic stripe card reader. For wireless communication, the OC can be purchased
with 802.11b/g or Bluetooth connectivity and offers a broad range of security and
encryption protocols that are compatible with today’s high‐tech security requirements.
popular applications your benefits
Retail
Safe and secure – Inthestorefront,atthe
•
Item Labels office,inthewarehouse,andontheroad,
•
Shelf Tags wirelesstechnologyisacriticaltoolfor
•
Specials and Talkers conductingbusiness.Tohelpensurethat
•
Returns Labeling & yourwirelesstransactionsaresecure,the
Tagging OCoffersabroadrangeofsecurityand
encryptionprotocolsthatarecompatible
withtoday’shigh‐techsecurityrequirements.
Reliable performance saves you money –
Field Service
Intoday’stougheconomictimesyoucan’t
•
Service Receipts affordtobuyprintersthatfail.TheOCcomes
•
Pickups/Deliveries withDatamax‐O’Neil’slegendaryreliability.
•
Maintenance
•
Settlement Reports
Did you know?
Using quality labels and paper can
significantly prolong the life of your
printhead. Datamax‐O’Neil offers a wide
variety of high quality media for
Mobile POS
its printers including custom and stock
Page 6

•
Transaction
Receipts
labels
and receipts, ticketing
media, and cleaning
products. When you
choose
•
Rain Checks
Datamax‐O’Neil,
you receive a proven
•
Coupons
commitment to
superior quality. Quality
•
Que Busting
that results in performance and
compatibility...
Guaranteed.
Healthcare
•
Patient ID Wristbands
•
Asset Identification
•
Specimen Tracking • Records Labeling
productspecifications
Page 7
Media Roll Width
Media I.D. Core
Endurance
Page 8
productspecifications
physical characteristic
•
Drop specification:
– 4 ft. (1.22 m)
user environment
• Operating temperature:
‐4° F to 122° F (‐20° C to 50° C) •
Storage temperature:
‐40° F to 158° F (‐40° C to 70° C) •
Charging temperature:
41° F to 104° F (5° C to 40° C) •
Relative humidity:
10% to 90% non‐condensing •
ESD protection:
15 kV Air, 8 kV contact
• Printhead:
– Direct thermal – 203
dots per inch (8 dots per mm)
• Maximum media roll
capacity:
– 2.25” (57 mm)
max roll
diameter (O.D.)
• For optimum print quality and
printer performance, use
Certified Datamax‐O’Neil
supplies
Safe-D Band™ Wristbands
SafeD‐Band direct thermal wristbands are the
perfect solution for your patient
identification and patron management
applications. With its durable latex‐free
polypropylene face stock and polyethylene
liner, Datamax‐O’Neil SafeD‐Bands provide
unmatched image quality and durability.
Trust your patient safety and patron
management initiatives to a leader in thermal
printing technology. More info:
www.datamax‐oneil.com/supplies
communication
• Serial: – RS‐232;
up to 460.8
kbps • USB:
– 2.0 (full speed) • 802.11 b/g:
– Frequency band: 2.4 to 2.4897 GHz
– Data rates: Standard 802.11b/g rates
– Network standard: IEEE 802.11b/g
– Wireless access modes: Infrastructure and ad
hoc
– Security protocols:
WPA WPA2
Modes PSK/Enterprise
Security/
Encryption
TKIP/RC4 CCMP/AES
Authentication
EAP‐FAST,
EAP‐PEAP,
EAP‐TTLS
– Network support: DHCP, TCP, UDP,
BOOTP
– Remote management support:
Compatible
with the Remote Management
Software and other
remote management systems
• Bluetooth:
– Network environment: Ad hoc
– Supported versions: v1.2 (compatible with v1.1
devices)
• Battery:
– (1) 7.2V Lithium‐ion (Li‐
ion), 2200 mAh • DC
Inputs:
– External DC jack, 12‐15V, built‐
in spike and surge protection
– External charge contacts, 12‐15V, built‐
in spike and surge protection
• Recharging:
– 3.5‐4.5 hours from AC adapter or
cigarette adapter
warranty
• Printer*: 1 year (including platen roller and
installed options)
• Printhead*: 1 year or 1,000,000 inches
whichever comes first
• Contact sales representative for
extended warranty options
* when used with approved supplies
barcodes/fonts/graphics
• Memory: – 2MB
RAM / 4MB
Flash •
Standard fonts:
– 5.5CPI, 7.2CPI, 10.2 CPI, 10.7CPI,
18.5CPI 20.4CPI, 22.6CPI & 34.0CPI
(additional fonts available)
• Optional characters:
– Arabic, Greek, Hebrew, OCRA,
OCRB, Unicode subset
including Latin & Thai
– Asian (including Big 5, Simplified Chinese,
Korean and Shift JIS) ‐ additional international
characters available
• Barcodes:
– Linear: Codabar, Code 39, Code
93, Code
128, EAN‐8, EAN13, Interleaved
2 of
5, MSI/Plessey, UCC/EAN‐128,
UPC‐A, UPC‐E
– 2D Symbologies: PDF417,
AZTEC, QR, GS1, Datamatrix
(available on wireless only)
• Graphics:
– Supports storage of graphics/logos in
Flash memory and transient “print once”
graphics
Page 9

• Protocol:
– Line Printer Mode, Easy Print
®
• Device management (for
802.11 models only):
– Remote Management Software
(RMS), Wavelink Avalanche MC,
Motorola MSP
• Drivers:
– Windows CE and
Desktop
• Compatible label
design software: –
NiceLabel, BarTender®, DP Designer •
Software development
kit:
– C++, Visual Basic, Microsoft Dynamics,
Blackberry
• Wireless communication
• Magnetic stripe card
reader
Contact sales representative for the most current
approval list
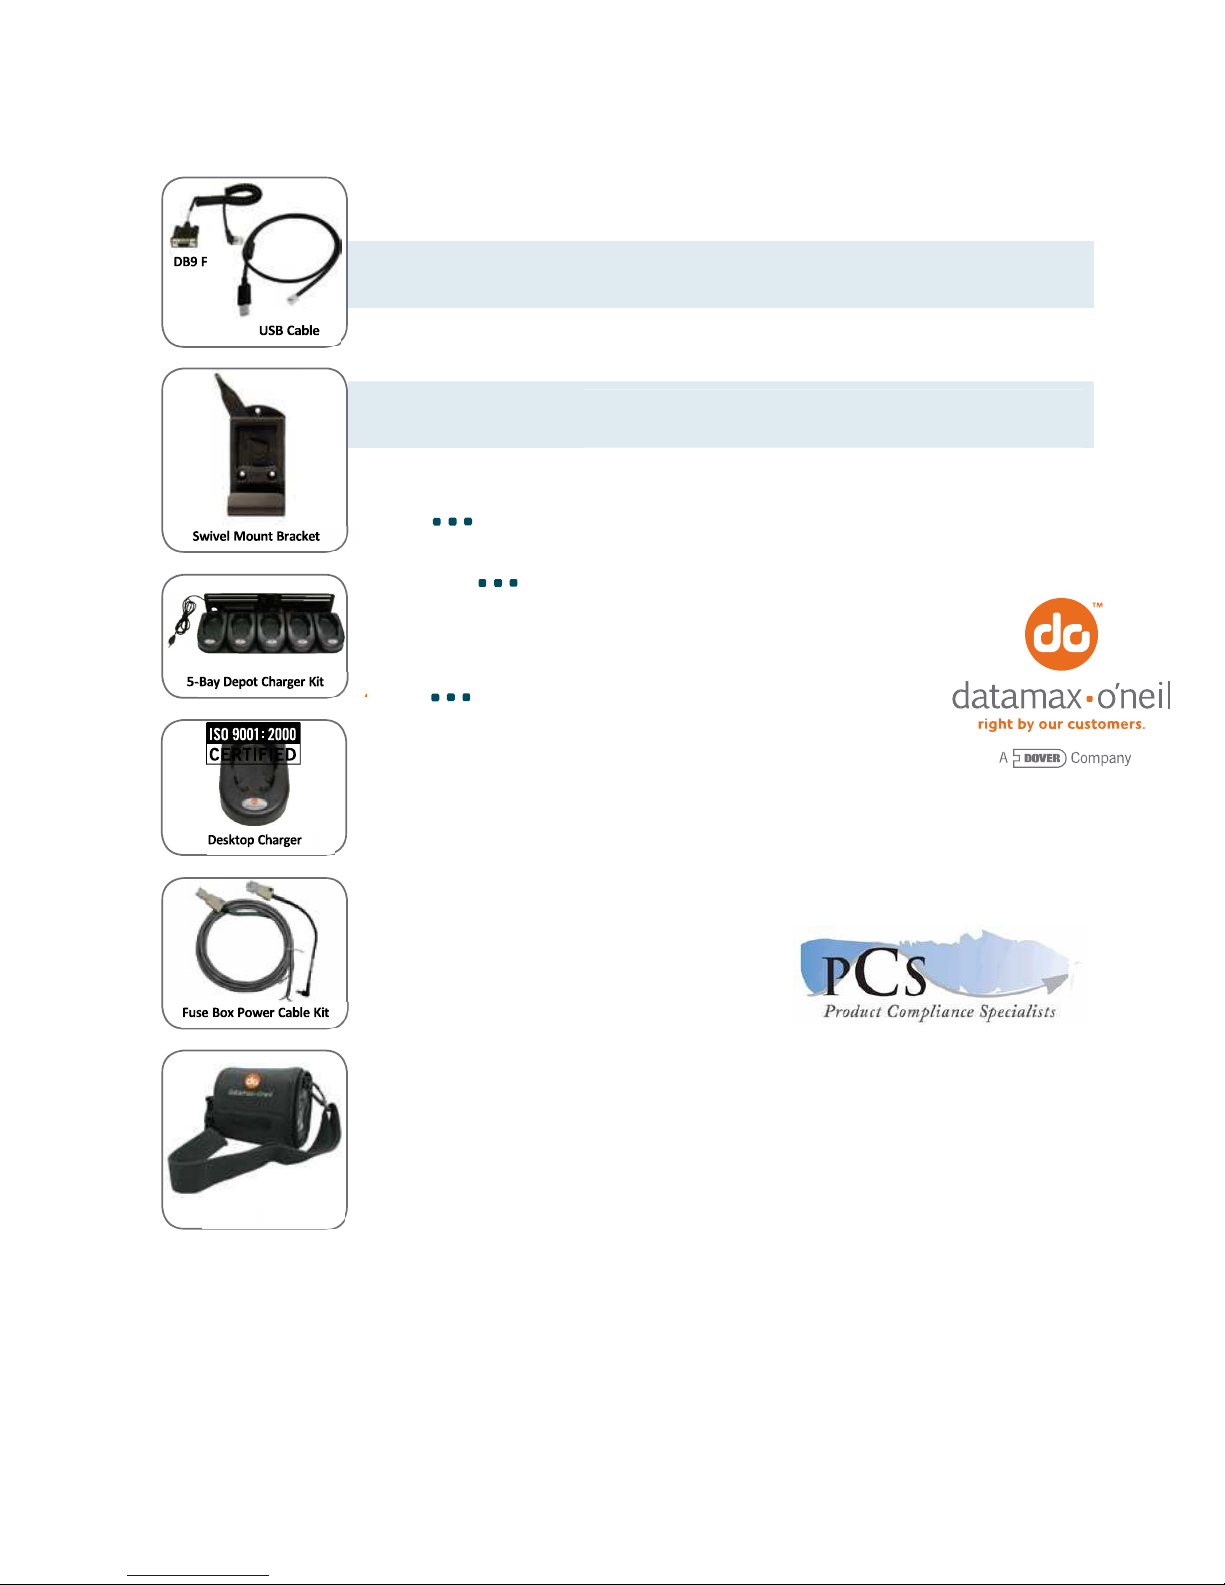
accessories
AC Adapter
AC Adapter available with US, UK, Australia, or
Euro plugs
Cigarette Lighter Adapter
Allows you to charge the printer from the vehicle cigarette lighter
DB9 F Serial/Configuration Cable DB9 F coiled right angle cable for connecting to a laptop or desktop computer
USB Cable
DB9 right angle USB download cable
Desktop Charger
Allows you to charge (1) OC printer; AC
adapter must be ordered separately
Swivel Mount Bracket
Can be wall mounted or mounted in the vehicle to securely hold the printer in
place; available in standard, e‐charge and card reader configurations; additional
charging cables must be used to charge printer ‐ compatible with AC, cigarette
lighter cables and fuse box cables (not included)
Serial Cables for
Mobile Computers
DB9 F coiled right angle download cables are compatible with a variety of popular
mobile computers; see price list for a specific model compatibility and part number
5-Bay Depot Charger Kit
Allows you to charge (5) OC printers;
includes an AC adapter
4-Bay Depot Charger Kit
Allows you to charge (4) OC printers and
2 batteries; includes an AC adapter
Spare Battery
Lithium‐Ion, 7.2V, 2200mAh
Double Bay Battery Charger
2‐bay battery charger keeps additional batteries charged and ready for use
Page 10
Included with each OC printer:
(1) battery, (1) roll of media, and (1) swivel belt clip
required
recommended
Cleaning Cards & Kits Use of cleaning cards is recommended to extend the life of the
printhead (visit www.datamax‐oneil.com/supplies for more information)
optional
to learn more, visit www.datamax-oneil.com
Specifications subject to change witho ut notice. Copyright 2010, Datamax‐O’Neil
(rev. 20100505)
Section 3
Photographs
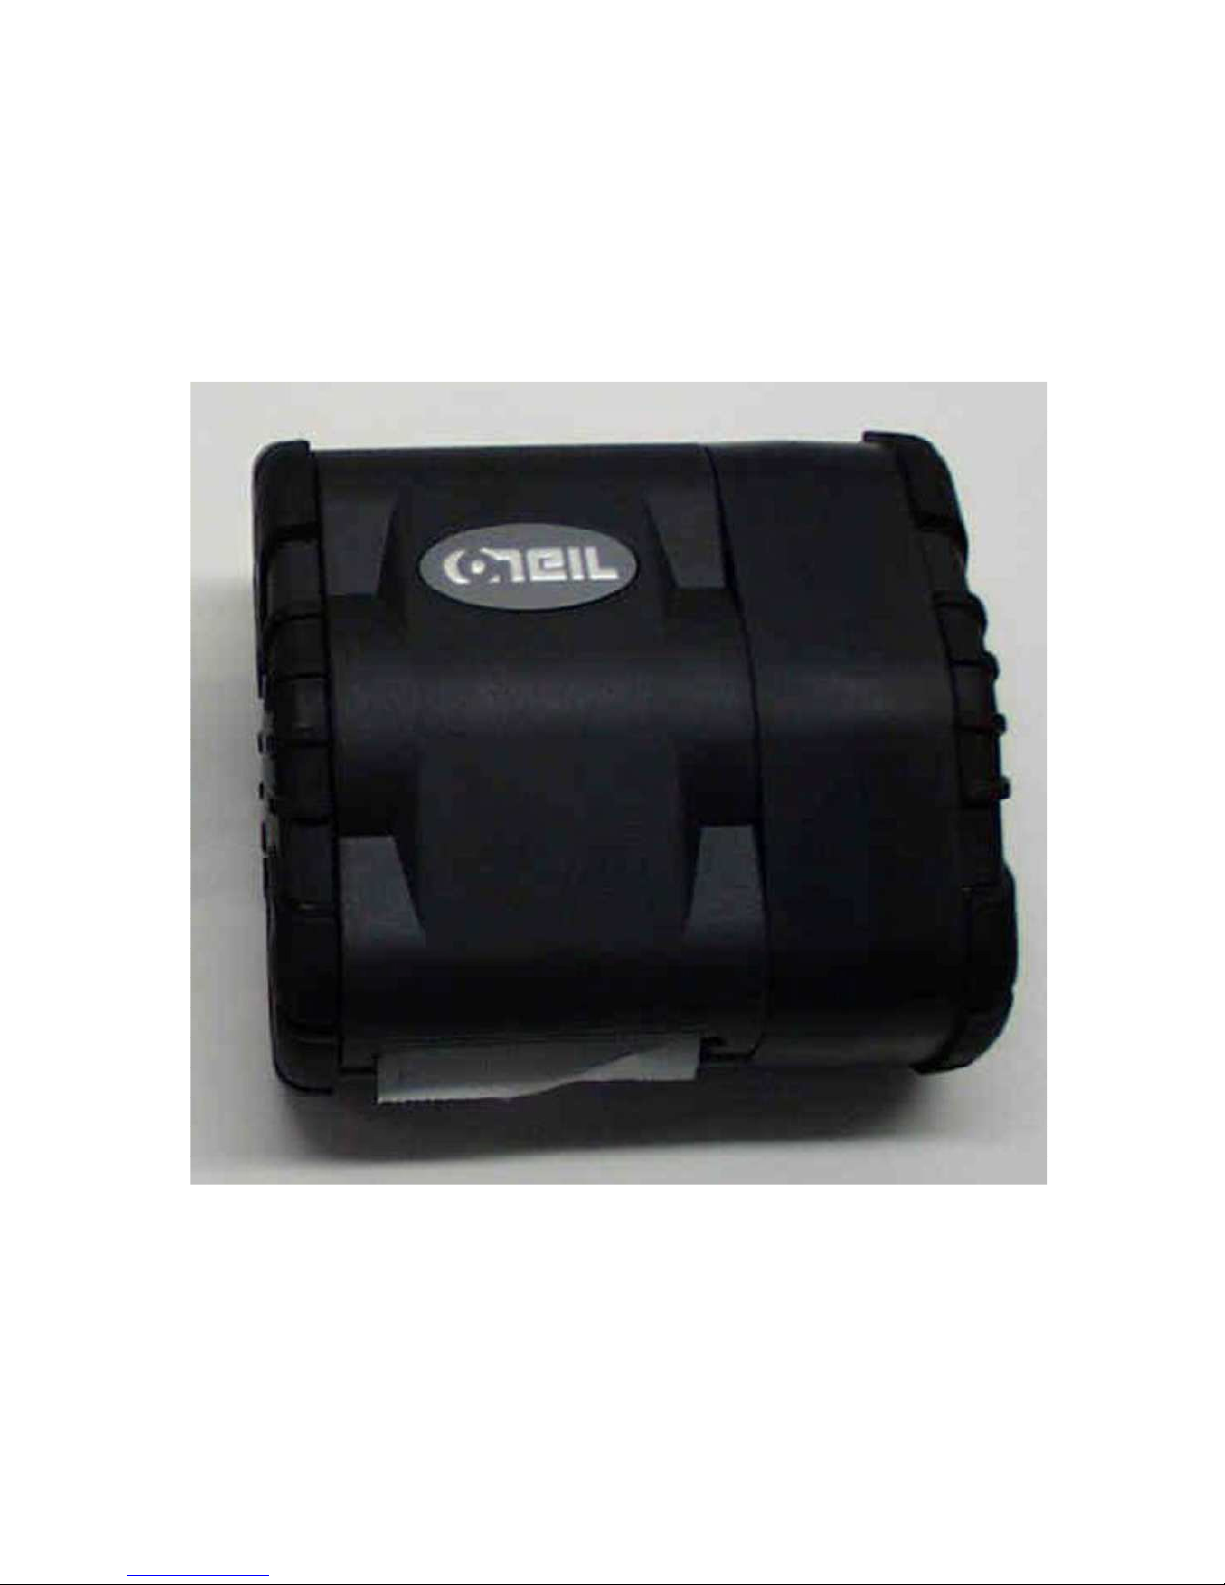
1. Datamax-O’Neil Corporation 1 page
OC2 BT
External Top View – Closed
Fuse Box Power Cable Kit, 10’
Charge your printer from a vehicle’s fuse box
Extension cables available in 3’, 6’, and
10’ lengths for existing installations
IP54 Soft Cases
Protects your printer from environmental elements such as dust and moisture;
meets IP54 compliance standards
Swivel Mount Belt Clip
Clip slips into the waistband and holds the printer in place; keeps the printer secure
yet swivels for comfort while bending over or getting in and out of trucks (comes
standard on all OC models)
Swivel Mount Shoulder Strap
Adjustable strap allows the user to comfortably
carry the printer on the shoulder; keeps
the printer secure yet swivels for ease of motion
IP54 Case for OC3
Cable
Page 11

2. Datamax-O’Neil Corporation 1 page
OC2 BT
External Top View – Open
3. Datamax-O’Neil Corporation 1 page
OC2 BT
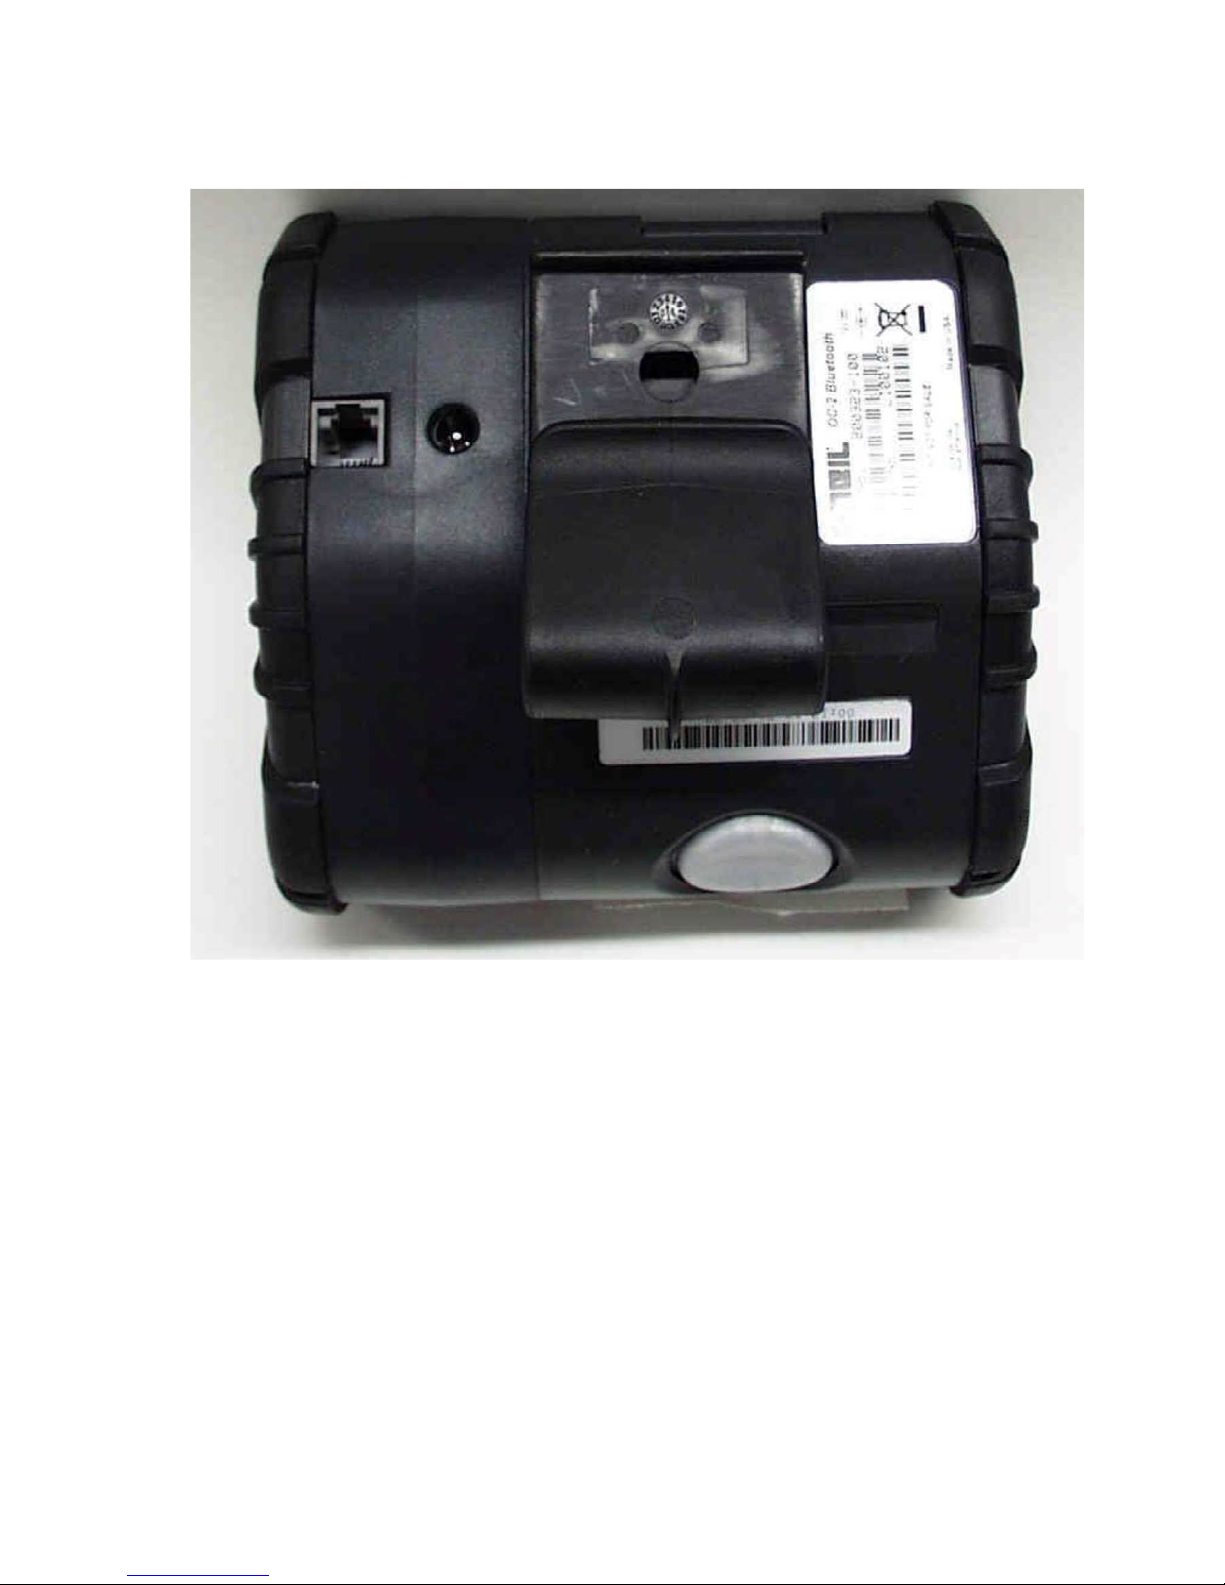
External Rear View
4. Datamax-O’Neil Corporation 1 page
OC2 BT
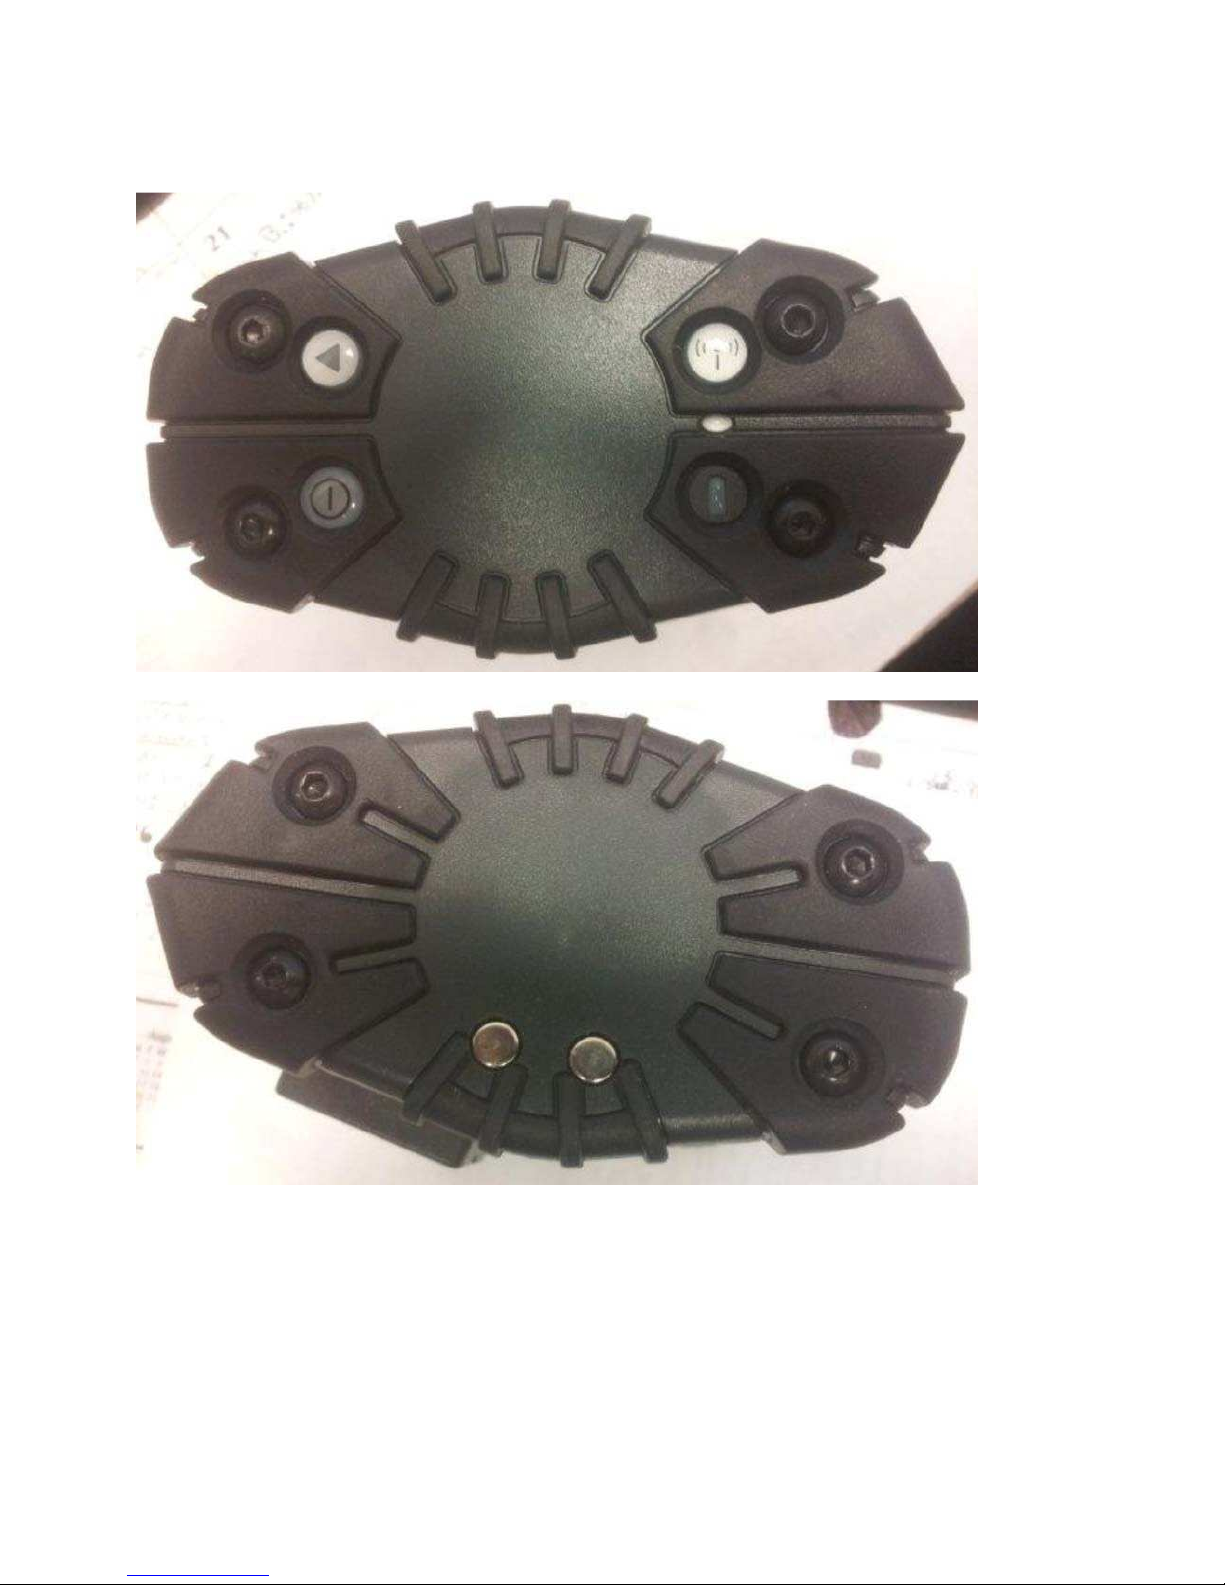
Side Views
5. Datamax-O’Neil Corporation 1 page
OC2 BT
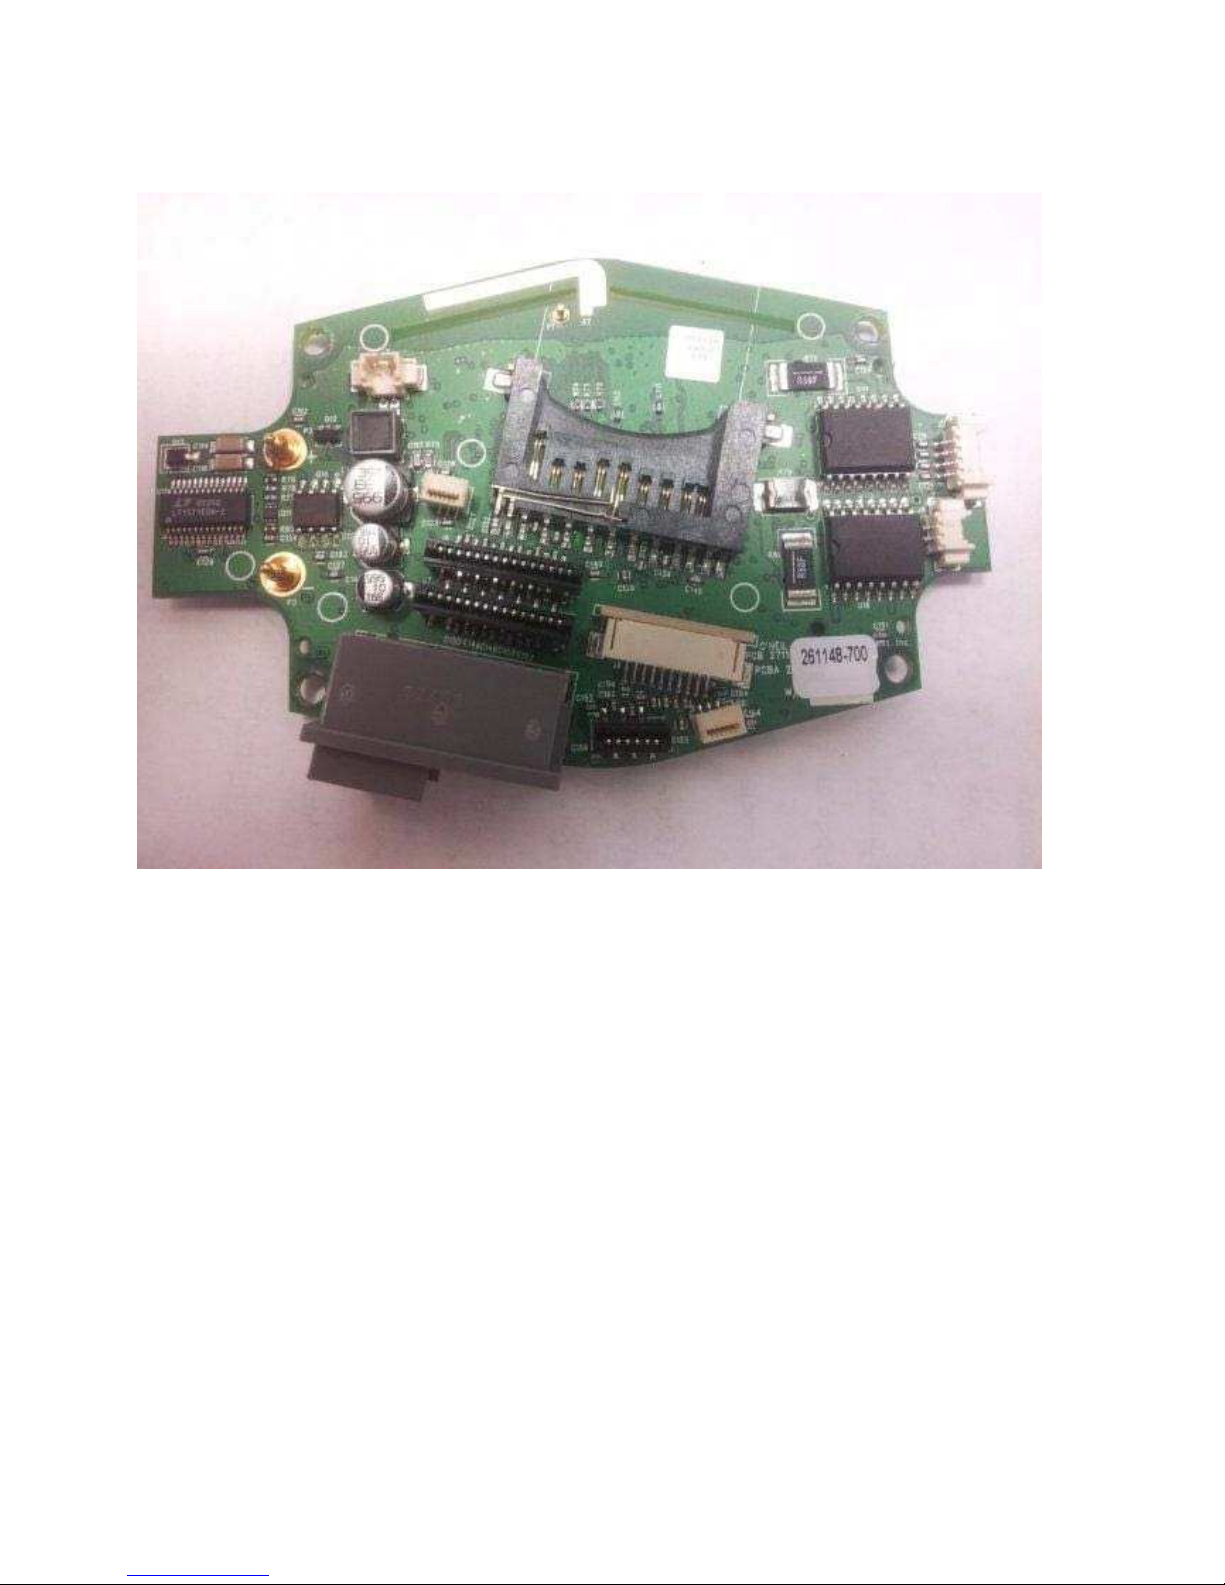
Motherboard Top View
6. Datamax-O’Neil Corporation 1 page
OC2 BT
Motherboard Bottom View
Datamax-O’Neil Corporation Type Approval Application (E)
OC2 BT
Page 12

7. Datamax-O’Neil Corporation 1 page
OC2 BT
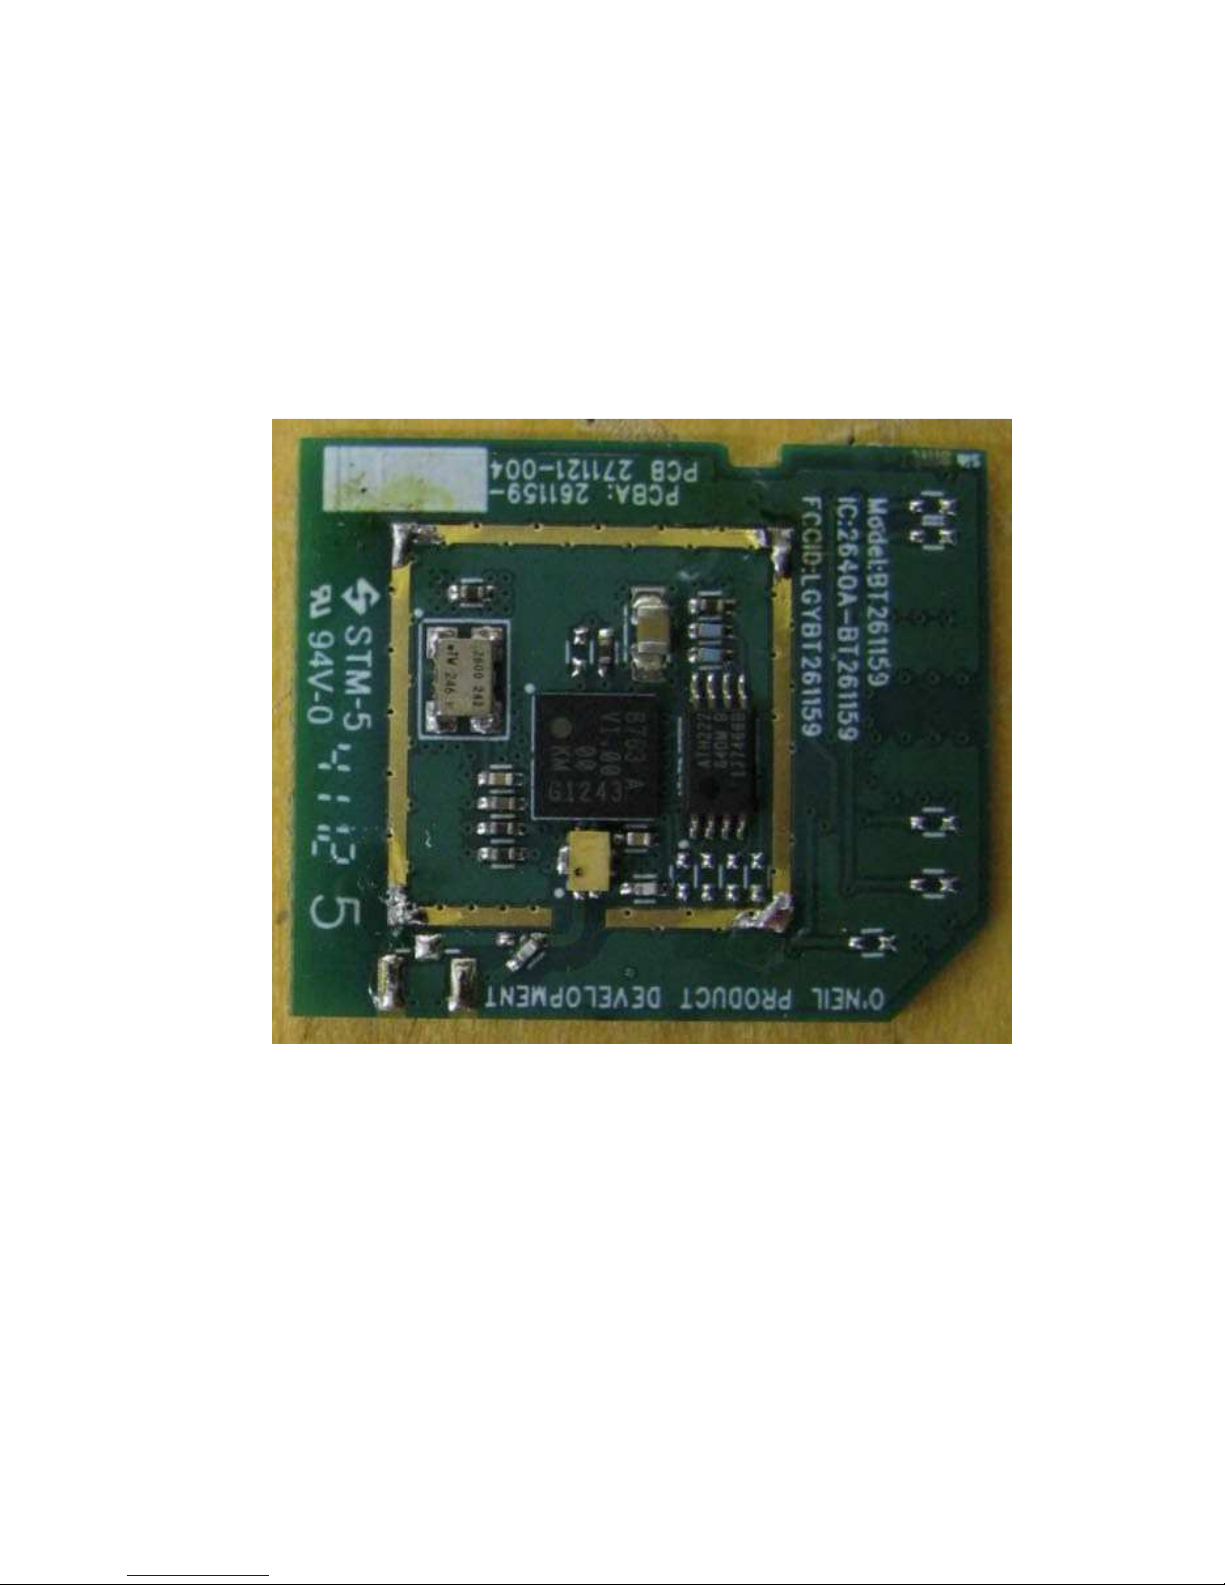
Bluetooth Module Top View – with RF Shield in place
8. Datamax-O’Neil Corporation 1 page
OC2 BT
Bluetooth Module Top View – with RF Shield removed
9. Datamax-O’Neil Corporation 1 page
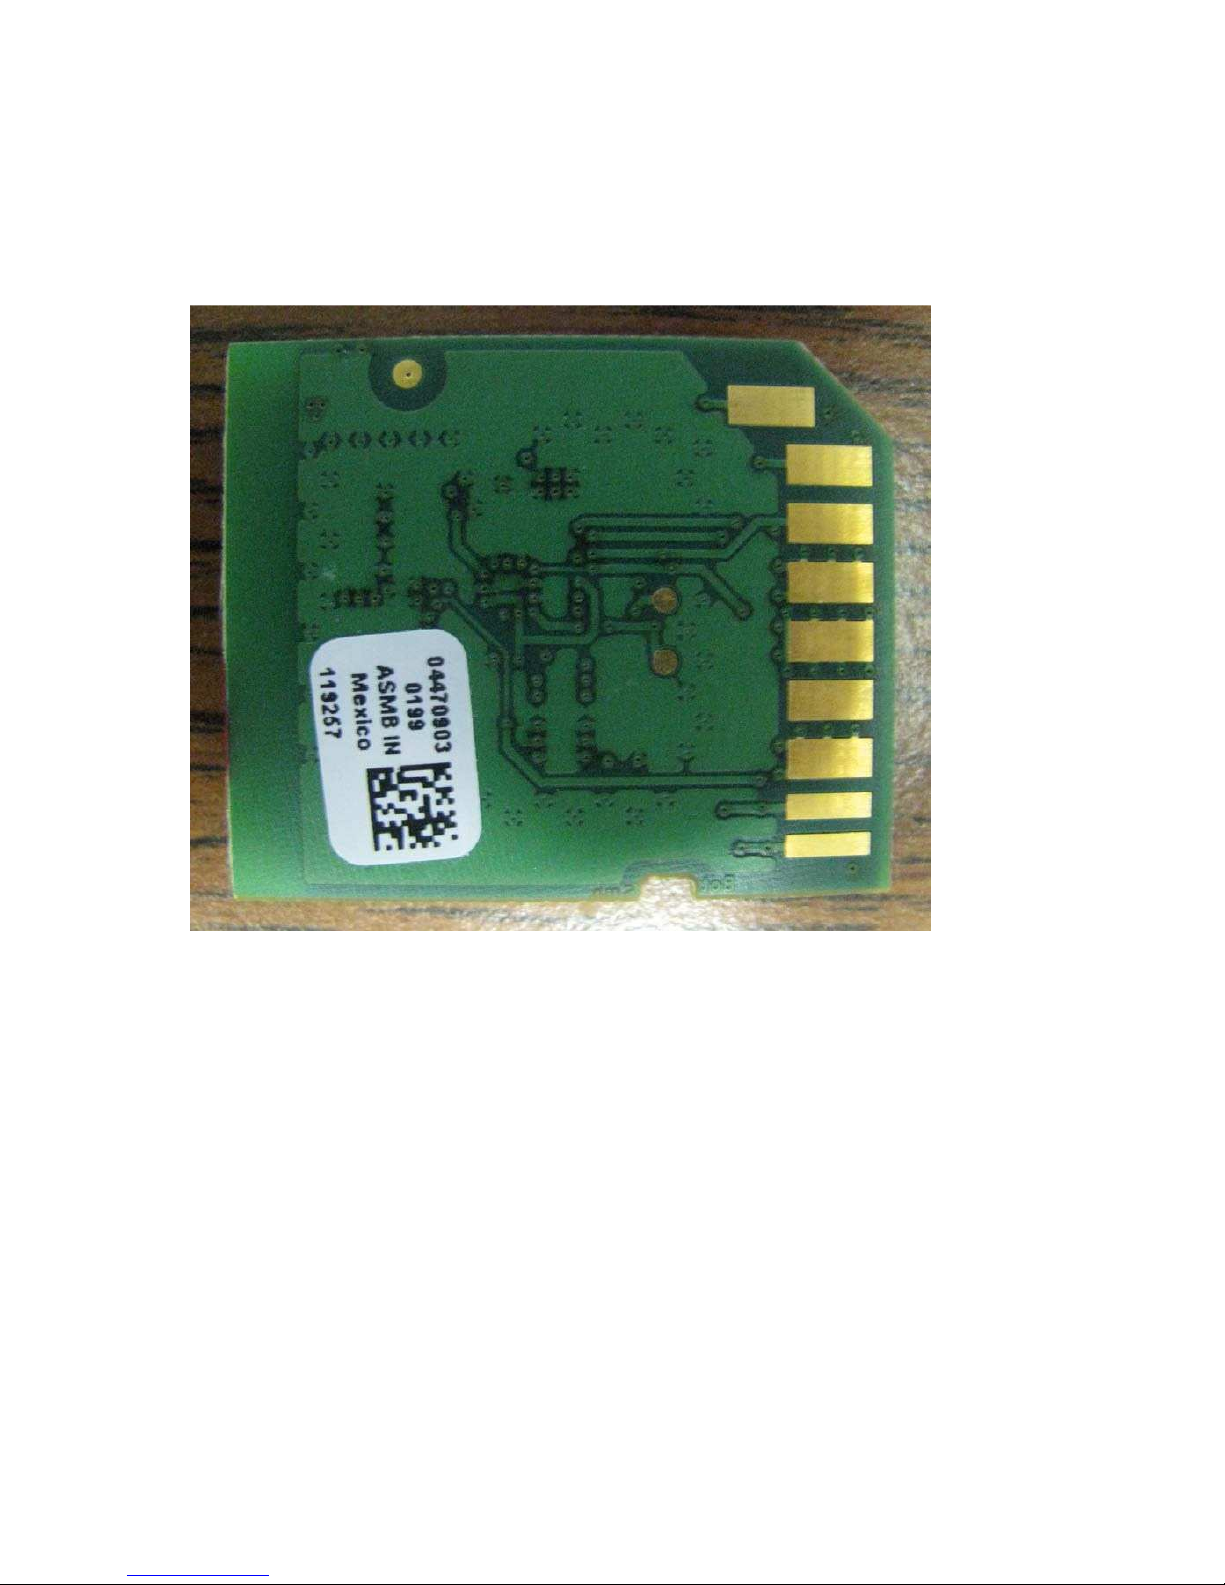
OC2 BT
Bluetooth Module Rear View
Page 13
1.
Datamax-O’Neil Corporation Type Approval Application (E)
OC2 BT
Datamax-O'Neil Corporation OC2
BT
External Top View - Closed
External Top View - Open
Page 14

2. Datamax-O’Neil Corporation
OC2 BT
Datamax-O’Neil Corporation OC2
BT
External Rear View
Page 15
3.
Side Views
Page 16
4. Datamax-O’Neil Corporation
OC2 BT
Datamax-O’Neil Corporation OC2
BT
Motherboard Top View
Page 17

5.
Motherboard Bottom View
Page 18
6. Datamax-O’Neil Corporation
OC2 BT
Page 19

Datamax-O’Neil Corporation
OC2 BT
7
Bluetooth Module Top View – with RF Shield in place
Page 20
8. Datamax-O’Neil Corporation
OC2 BT
Bluetooth Module Top View – with RF Shield removed
9.
Bluetooth Module Rear View
Page 21
Datamax-O’Neil Corporation
OC2 BT
Page 22

Section 4
Schematic Diagrams
• OC2 BT 8 pages
Schematic Diagrams – System
• OC2 BT 1 page
Schematic Diagrams – BT Module
Page 23

Datamax-O’Neil Corporation Type Approval Application (E)
OC2 BT
Page 24

Page 25

6 5 4 3 2
Page 26

6 5 4 3 2
CS1 [2]
OE[2]
[2
]
[2
]
[2
]
[2
]
[2
]
Page 27

6 5 4 3 2
Page 28

6 5 4 3 2
TP99
3.3V
[1,2]
[1,2]
[1,2]
[1,2]
[1,2]
[1,2]
[1,2]
[1,2]
[1,2]
[1,2]
[1,2]
[1,2]
[1,2]
[1,2]
[1,2]
[1,2]
[1,2]
[1,2] [1,2]
[1,2] [1,2] [1,2][1,2]
[1,2]
[1,2]
[1,2]
[1,2]
[1,2]
[1,2]
[1,2]
[1,2]
[1,2]
[1,2]
[1,2]
[1,2]
[1,2]
[1,2]
[1,2]
[1]
[1]
FLASH 32M(2Mx16)
3.3V
C16
.1uF
Page 29

6 5 4 3 2
10 Layer 0.062" THICK
Layer 1 Signal Horizontal GND FILL
Layer2 Signal Vertical
Layer 3 Plane 3.3V
Layer 4 Plane GND
Layer 5 Signal Horizontal
Layer 6 Signal Vertical
Layer 7 Plane GND
Layer 8 Plane 1.5V 2.5V GND Hole/Split?
Layer 9 Signal Horizontal
Layer 10 Signal Vertical GND FILL
Page 30

6 5 4 3 2
Page 31

6 5 4 3 2
SW1
SLEEP/RESUME
SW1
C91
uF .1
K 100
TP15
SW1
3.3 V
INT0_SWITCH1
[1]
Page 32

6 5 4 3 2
PAPER ADV
INT1_SWITCH2
[1]
TP16
3.3V
SW2
PAPER FEED
SW
1
K 100
C20
uF .1
SW2
V 3.3
RADIO ON/OFF
SW3
RADIO ON OFF
SW1
K 100
C17
.1 uF
TP17
SW3
INT2_SWITCH3
[1]
3.3 V
Page 33

6 5 4 3 2
Page 34

6 5 4 3 2
Page 35

6 5 4 3 2
3.3V
Page 36

6 5 4 3 2
Page 37

6 5 4 3 2
Page 38

6 5 4 3 2
COMPANY:
D
C
B
Page 39

6 5 4 3 2
CHGND
3.3V
MS_CLK3
MS_DATA3
MS_CLK1
MS_MD
MS_DATA1
MS_CLK2
MS_DATA2
GND
Page 40

Page 41

Section 5
User’s Guide
OC2 BT 26 pages
User Manual
Page 42

Datamax-O’Neil Corporation Type Approval Application (E)
OC2 BT
Page 43

110203‐003
OC‐2 SERIES OF PRINTERS
User Guide
Page 44

Page 45

TABLE OF CONTENTS
OC-2 printer views ............................................. 1
Front and back view ..................................... 1
Side views ................................................... 1
Setting up your printer ....................................... 1
Unpacking your printer ................................. 2
Removing the battery isolator ....................... 2
Installing/removing the battery ..................... 3
Installing the battery .................................... 3
Removing the battery ................................... 4
Charging the battery .................................... 4
Determining the battery condition.................. 5
Loading media ............................................. 7
Printing a self-test ........................................ 8
Connecting the printer via a cable or radio ..... 9
Installing a data cable .................................. 9
Bluetooth and/or 802.11b parameters ............ 9
Configuring the printer ............................... 10
Using the belt clip ............................................ 11
Using the control panel .................................... 11
Audio Indicators ......................................... 12
Page 46

Battery Status LED ................................12
Power Button ..............................................14
Media Function LED .....................................14
Radio Button/LED .......................14
Radio Button ...............................................14
CardReader Audio Indicators ........................15
Using a CardReader ..........................................15
General guidelines .......................................16
Maintenance and troubleshooting ......................16
TABLE OF CONTENTS
Maintenance guidelines ............................. 17
Preventative maintenance .......................... 17
Troubleshooting ........................................ 18
Help desk ................................................. 18
Supplies ....................................................... 19
For more information ................................. 19
Page 47

1
OC-2
PRINTER VIEWS
OC-2 printer views
Front and back view
Side views
Setting up your printer
Use the following information to set up your printer:
Figure1: Front view
Figure2: Back view
Magnetic card reader slot
Printhead cover
Swivel mount
Data port
Power port
Figure3:Side view
Charge contacts
Figure4:Side view
Media advance
Radio enable
Battery status
Reset
Power
Page 48

OC-2 SERIES OF PRINTERS USER'S GUIDE
2
• "Unpacking your printer" on page 2
• "Installing/removing the battery" on page 3, or "Removing
the battery isolator" on page 2 (new printers only)
• "Loading media" on page 7
• "Printing a self-test" on page 8
• "Connecting the printer via a cable or radio" on page 9
• "Configuring the printer" on page 10
In addition to the steps outlined in each section, additional
information may be included if it applies to, or expands upon,
the step being discussed.
Unpacking your printer
Before using your new printer, remove all packaging material
and inspect the printer for possible shipping damage.
If the printer has been damaged:
• Contact the shipping company and file a damage report.
• Contact Datamax-O’Neil.
• Keep all shipping materials.
Removing the battery isolator
The battery is already installed in new printers. An insulating
strip (battery isolator) prevents accidental discharge during
shipping. You must remove the battery isolator before using
the printer or attempting to charge its battery.
1. Press the printhead cover release and open the printer.
Locate the battery isolator (see Figure 5).
2. Lift out the battery and battery isolator (Figure 6). Remove
and discard the battery isolator.
3. Insert the battery in the printer in its original orientation,
as shown in Figure 7.
4. Close the printer.
Page 49

S
ETTING UP YOUR PRINTER
3
Installing/removing the battery
Note:
The battery is already installed in new printers. See
"Removing the battery isolator" on page 2 for information on
enabling the battery in a new printer.
Installing the battery
1. Press the printhead cover release and open the printer, as
shown in Figure 8.
2. Remove any packaging material (if applicable).
3. Position the battery with its contacts facing toward the
battery cavity, as shown in Figure 9.
4. Lower the battery into the battery cavity, fitting the
contact end of the battery into the cavity first, as shown in
Figure 10.
5. Slide the battery all the way to the right in the battery
cavity so that the edge of the battery hits the battery stop,
as shown in Figure 11. The printer beeps one time when
you install the battery. Figure 12 shows the fully seated
battery.
Figure5
Figure6
F
igure7
Figure10
Figure8
Figure9
Page 50

OC-2 SERIES OF PRINTERS USER'S GUIDE
4
Note: Do not force the battery into the battery cavity.
When inserted properly, the battery easily slides and locks
into place. If the battery does not easily slide into place,
re-insert the battery.
6. Close the printer cover (Figure 13).
7. Charge the battery (batteries are shipped uncharged). For
more information, see "Charging the battery" on page 4.
Removing the battery
1. Lift the battery up and out of the battery cavity while
sliding it to the left (Figure 14).
2. Remove the battery from the battery cavity (Figure 15).
Charging the battery
The battery status LED will glow red if the battery charge is
low and the printer is powered on. (For more information, see
"Using the control panel" on page 12.) Charge the battery as
follows:
1. Verify the battery is installed correctly.
Figure13
Figure11
Figure12
Figure14
Figure15
Page 51

S
ETTING UP YOUR PRINTER
5
2. Plug the AC adapter power cord into an appropriate power
source.
3. Plug the AC adapter into the printer power port (Figure
16).
4. Charge the battery. The battery status LED flashes red
while the battery is charging and turns solid green when
the battery is fully charged. One complete charge takes 4
to 5 hours.
Determining the battery condition
The battery voltage varies between 6.2 and 8.4 volts. While the
battery is powering the printer (AC adapter not connected), the
battery status LED displays the battery condition as follows:
•
Solid Green
: The battery is fully charged.
•
Solid Orange
: The battery is partially discharged, but will
power the printer. Plan on recharging the battery soon.
•
Solid Red
: The battery does not have sufficient charge to
operate the printer. Recharge it immediately.
For information on battery error conditions, see "Using the
control panel" on page 12.
Caution: There is a risk of explosion if the battery is
replaced by an incorrect type. Dispose of used
batteries according to the instructions.
Caution: The operating temperature of this portable printer is
50° C. However, the operating temperature when used with
Datamax-O’Neil power supply for charging the portable printer is
Power port
Figure16
Figure17
Battery status
Page 52

OC-2 SERIES OF PRINTERS USER'S GUIDE
6
limited to 40° C. Please charge the printer in a suitable location
that meets this temperature requirement.
Caution: (For US/Canada) Please only use the Datamax-O’Neil
part number 220240-100 power supply with this product.
Page 53

S
ETTING UP YOUR PRINTER
7
Loading media
The OC-2 series of printers are designed to print receipt paper
and label media, as follows:
Media Guidelines
Media width
Receipt Paper: 2.25”
Label Media: 2.25”
Roll capacity diameter
Receipt Paper: 2.25”
Label Media: 2.25”
Media types
Receipt paper media, thermal paper.
* Depending on the type of media
used, you may need to configure your
printer. For more information, see
"Configuring the printer" on page 10.
Load media as follows:
1. Position the printer so that the Datamax-O’Neil logo is
facing you (Figure 18).
2. Press the printhead release and open the printer (Figure
19).
3. Place the paper roll between the paper roll holders, as
shown in Figure 20. Make sure the paper exits over the roll
and is firmly in place.
4. Unroll enough paper so that paper exits the printer (Figure
21).
5. Verify the media exits straight and is against the right-
hand edge.
Figure18
Figure19
Page 54

OC-2 SERIES OF PRINTERS USER'S GUIDE
8
6. Close the printer (Figure 22). The printhead cover snaps
into place when completely closed.
7. Push the Media Function button 1-2 times to align the
media.
8. At either edge of the printer cover are serrated corners.
Tear the media by pulling up and away from the printer
(Figure 24).
Warning: The tear bar and printhead cover surface may be
hot and/or sharp. Use caution when handling the printhead
and tear bar.
Printing a self-test
1. Press and hold the power button for approximately three
(3) seconds until printing begins. For information on button
functions, see "Using the control panel" on page 12.
2. After printing begins, release the power button. A self-test
label will print showing parameters, as described on page
10.
Figure20
Figure21
Figure 22
Figure 23
Figure 24
Page 55

S
ETTING UP YOUR PRINTER
9
Connecting the printer via a cable or radio
The OC-2 printer is designed to transmit and receive data from
a host terminal. The host terminal may be your computer,
handheld, or laptop. Communication can occur using one of the
following methods:
• Using a data cable to connect the printer and the host
terminal (this page), or
• Enabling wireless communication (see "Bluetooth and/or
802.11b parameters" on page 10).
Installing a data cable
1. Verify the printer settings before connecting the printer to
a host terminal. For more information, see "Printing a
selftest" on page 8.
2. Insert the data cable plug into the printer's data port
(Figure 26).
Figure 25 Figure 26
3. Connect the data cable to the host or device you are using.
Removing a data cable
1. Rotate the printer so that the printer's data port is visible.
2. Lift the cable connector's lever and remove the cable.
Bluetooth and/or 802.11b parameters
Your printer is configured with default factory settings. To
determine your printer's radio configuration, print a self-test
(For more information, see "Printing a self-test" on page 8). If
you have multiple printers, configure them specifically for use
in your environment.
Data port
Page 56

OC-2 SERIES OF PRINTERS USER'S GUIDE
10
For proper system operation, set the following parameters on
your printer and host computer:
802.11b Parameters
• ESS ID
• IP Address (if not DHCP)
• DHCP
• Subnet Mask
• WEP Encryption
• Port
• Network Type
Bluetooth Parameters
• Device Name
• Authentication
• Bondable
• Discoverable
• Connectable
• Encryption
For information on setting parameters, see "Configuring the
printer" on page 10. Contact your network administrator to
verify the proper radio settings for your environment.
Configuring the printer
The printer has many configurable settings. To configure or
upgrade firmware, download the latest Windows configuration
program from our Internet Web site at
www.datamaxoneil.com.
Page 57

11
U
SING THE BELT CLIP
Using the belt clip
Install the belt clip as follows:
1. Turn the printer so that its back faces you and the belt clip
socket is up, as shown in Figure 27.
2. Place the belt clip over the belt clip socket such that the
flat side of the belt clip swivel matches the flat side of the
belt clip socket (Figure 28).
3. Press the belt clip onto the printer until the swivel is fully
seated into the socket.
4. Rotate the belt clip 180 degrees to lock it into place
(Figure 29 and Figure 30).
Reverse the above steps to remove the belt clip.
Using the control panel
The tables on the following pages document the following:
• Audio Indicators on page 12
• Battery Status LED on page 13
Figure27
Figure28
Belt clip socket
Belt clip swivel
Figure29
Figure30
Page 58

OC-2 SERIES OF PRINTERS USER'S GUIDE
12
• Power Button/LED on page 14
• Media Function Button/LED on page 14
• Radio Button/LED on page 15
• Reset Button on page 15
• CardReader Audio Indicators on page 15
Battery Status Power Button/ Media Function Radio Reset
LED LED Button/LED Button/LED Button
Audio Indicators
Beep(s) Description
Action
1 short
Printer wakes up.
None.
2 short
Out of paper.
Install paper.
3 short Low battery. Charge battery.
1 very short RF power is on.
Note:
This beep occurs when
you press the RF power button
and the RF power was off.
None.
2 very short RF power is off. None.
Note:
This beep occurs when you
press the RF power button and the
RF power was on.
1 long
Boot code is starting or
restarting.
Redownload firmware.
8 short
CRC error in firmware.
Redownload firmware.
U
SING THE CONTROL PANEL
Battery Status LED
Battery
Status LED
Description
Action
Page 59

13
Red (solid):
The battery
has less than
• If A/C power is not plugged • Charge the battery.
in, the printer will soon turn
off.
5% power. • If A/C power is plugged in, • None. Wait for the
the LED flashes and charge LED to turn
charging is in progress. green.
Orange
(solid): The
battery has
less than 25%
power.
• If A/C power is not plugged • Charge the battery.
in, indicates the battery
charge is low.
• If A/C power is plugged in, • None. Wait for the
the LED flashes and charge LED to turn
charging is in progress. green
Green (solid): • If A/C power is not plugged None.
The battery is in, the battery is well near, or at, full
charged.
capacity.
• If A/C power is plugged in,
the LED is solid and
charging is complete.
None.
Red to orange
flash - fast
Battery voltage is too high. Replace battery.
Orange flash slow
Charge has timed out.
Restart battery charge
(battery may be bad).
Orange flash fast
Internal code error.
Remove the battery,
then re-connect A/C
power.
Orange, red, or When the AC adapter is None.
green flash - plugged into the printer's
fast power port, the battery
status LED flashes orange, red,
or green (depending on the
battery status LED color that is
initially displayed) to indicate
the AC adapter is plugged in.
Page 60

OC-2 SERIES OF PRINTERS USER'S GUIDE
14
Off
Power Button
Short press If printer is asleep, wakes up printer; if printer is awake,
enters sleep mode.
Long press (press and Prints a self-test.
hold for three to five seconds)
Power LED
Green Printer is awake.
Off Printer is asleep.
Short press If printer is asleep, wakes up printer. If
printer is awake, advances media.
Media Function LED
Red flash Media is out; reload media.
Media is present.
U
SING THE CONTROL PANEL
Radio Button/LED
Radio Button
Short press Toggles radio power off and on.
Power Button/LED
Media Function Button/LED
Media Function Button
Page 61

15
Radio LED*
Blue flash - slow* RF power is on and printer is asleep.
Blue flash - fast* RF power is on and printer is awake.
Blue flash to solid red The printer is out of range of the access point
and/or infrastructure and it is not correctly
configured for the radio it recognizes.
* If the signal quality option is on (default is off) and the
printer is awake, the amount of time the blue radio LED is on
indicates the signal strength. For example, if the blue LED is
on 90% of the time, the printer has a very strong signal;
however, if the blue LED is on only 10% of the time, the
printer has a very weak signal. When the signal quality option
is turned on, the blue radio LED indicates signal strength only.
When the printer is asleep, the radio strength is not indicated.
Reset Button
Reset Button
Short press Re-boots printer and cycles power.
CardReader Audio Indicators
Beep(s)
Description
Action
1 long Bad read. None. 2 short Good read.
None.
Using a CardReader
Note: The following information applies to printers installed
with the CardReader option.
Off
RF power is off.
Page 62

OC-2 SERIES OF PRINTERS USER'S GUIDE
16
General guidelines
• If you are using a magnetic CardReader, insert a card with
the stripe facing toward the printer, then slowly slide the
card through the CardReader slot.
• To wake up the CardReader, insert a card into the
CardReader slot. One short beep indicates the
CardReader/printer is awake.
• For information on CardReader LED indicators and audio
indicators, see "Using the control panel" on page 12.
M
AINTENANCE AND TROUBLESHOOTING
Maintenance and troubleshooting
Maintenance guidelines
• Keep the printer in a cool, dry place, away from direct
sunlight, high temperature, and moisture.
• Do not insert foreign objects into the printer.
• Do not operate the printer if it appears damaged.
• Do not operate the printer when your hands or body are
wet.
• Do not operate the printer near water.
• To reduce risk of electric shock, unplug the printer and
remove the battery before cleaning.
Preventative maintenance
Figure31
Figure32
CardReader slot
Page 63

17
Area
Method
Interval
Printhead/
roller
Use only a DatamaxO’Neilapproved cleaning card.
After every ten (10)
rolls of media.
Tear bar
Clean thoroughly with 70%
isopropyl alcohol on a cotton
swab.
After every five (5)
rolls of media.
Exterior
Use a soft cloth and mild cleanser As needed.
if necessary. Do not use abrasive
cleanser, chemicals or scrubbing
pads, which can damage the
printer's finish.
Troubleshooting
Symptom(s)
Action
Printer does not print • Verify the printer is turned on.
•
Recharge or replace the battery.
•
Verify the battery is properly installed.
•
Check cable connections (if applicable).
•
Check radio card connections. If the radio card is not properly
connected, data will not be transmitted from the host terminal to
the printer.
Media/paper jam
• Open the printhead cover and
reinstall media.
• Verify the media is properly installed.
For more information, see "Loading
media" on page 7.
• Clean the printhead and the media
cavity.
Reduced battery capacity • Recharge or replace battery.
Media does not feed
• Verify the printhead cover is closed
and latched.
• Verify the label sensors are not
blocked.
Page 64

OC-2 SERIES OF PRINTERS USER'S GUIDE
18
Printer does not stop at Q • Check the printer configuration.
Verify Mark and/or printer prints the configuration matches the type
of continuously media it is printing on.
Help desk
If you need additional assistance, please contact
DatamaxO’Neil at (949) 458-0500. Please have the following
information ready:
• Model number
• Serial number
S
UPPLIES
Supplies
Media supplies
Datamax-O’Neil offers seven certified grades of paper for use
in the printer. Our certified supplies are guaranteed compatible
— this important qualification means that rigorous
performance and image life testing have been performed.
Quality supplies are key to obtaining optimal image quality and
print performance. Quality supplies are also the key to
extending the life of the printer. Datamax-O’Neil strongly
recommends using Datamax-O’Neil Supplies only.
For more information, contact Datamax-O’Neil at (949)
4586400.
Maintenance supplies
We recommend that you follow a regular maintenance
schedule using our cleaning card. Datamax-O’Neil cleaning
cards are designed to effectively remove dirt and other
contaminants from the thermal printhead, rollers, and paper
path...resulting in a clean, crisp image output — every time.
Page 65

19
Our cleaning kits remove any adhesive residue (when using
linerless labels) in addition to dirt and other contaminants.
For more information, contact Datamax-O’Neil at (949)
4586400.
General supplies
• Use only supplies certified by the Original Equipment
Manufacturer (OEM). For OEM supplies, please contact
Datamax-O’Neil at (949) 458-0500.
For more information
• For more information about using the printer, contact
Datamax-O’Neil at (949) 458-0500, or visit our Web site at
www.datamax-oneil.com.
Page 66

20
OC-2 SERIES OF PRINTERS USER'S GUIDE
Agency Approvals
FCC Notice
This equipment has been tested and found to comply with the limits
for a Class B digital device, pursuant to Part 15 of the FCC Rules.
These limits are designed to provide reasonable protection against
harmful interference in a residential installation. This equipment
generates, uses and can radiate radio frequency energy and, if not
installed and used in accordance with the instructions, it may cause
harmful interference to radio communications. However there is no
guarantee that interference will not occur in a particular installation.
If this equipment does cause harmful interference to radio or
television reception, which can be determined by turning the
equipment off and on, the user is encouraged to try to correct the
interference by one or more of the following measures:
• Reorient or relocate the receiving antenna.
• Increase the separation between the equipment and receiver.
• Connect the equipment to an outlet on a circuit different from
that to which the receiver is connected.
• Consult the dealer or an experienced radio/TV technician for
help.
Applicable Directive
• 89/336/EEC, 73/23/EEC Applicable Standards
• EN55022 (1998) • EN55024 (1998)
• EN60950 (1992)
Page 67

OC-2 SERIES OF PRINTERS USER'S GUIDE
Copyright
This manual and any examples contained herein are provided
“as is” and are subject to change without notice. Datamax-O’Neil
makes no warranty of any kind with regard to this manual,
including, but not limited to, the implied warranties of
merchantability and fitness for a particular purpose.
DatamaxO’Neil shall not be liable for any errors or for incidental
or consequential damages in connection with the furnishing,
performance, or use of this manual or the examples herein. This
guide is copyrighted. All rights are reserved. This guide may not,
in whole or in part, be reproduced, translated, stored in a
retrieval system or transmitted in any form or by any means,
electronic, mechanical, photographic, or otherwise, without the
prior written consent of Datamax-O’Neil.
Page 68

22
Anatel Label:
Page 69

COPYRIGHT © 2010, DATAMAX-O’NEIL
 Loading...