

Page 1
TWIN-TURBINE CENTRIFUGAL
COMPRESSOR
MODEL TT-300
SERVICE MONITOR USER MANUAL
Danfoss Turbocor Compressors Inc. ECD-00007M Rev. 1
Page 2

Contents
Introduction 1
System Requirements 2
Getting Started 3
Cable Connection 3
RS232 Connection 3
RS485 Connection 3
Monitor Program Installation 5
Starting the Monitor Program 5
User Interface 5
Monitor Program Toolbar 5
Entering User Input 6
Serial Port Connection 6
Compressor Configuration 7
Using the Setup Wizard 7
Start-up Settings 8
Electronics Valve Control 9
Analog Output Setup 11
Modbus Communications 12
Downloading and Saving Configuration Data 12
Using a Saved Configuration File 13
Controlling User Access 14
Starting and Stopping the Compressor 15
Analog Input 15
How to Start the Compressor 15
How to Stop the Compressor 15
Modbus Network 15
How to Start the Compressor 15
How to Stop the Compressor 16
Chiller Control 16
How to Start the Compressor 16
How to Stop the Compressor 16
Monitor Program Data and Controls 18
Main System 18
Bearing Calibration 20
Bearing Calibration Procedure 22
Calibration Data Interpretation 23
“Gain” Interpretation 23
“Offset” Interpretation 23
Compressor Control 23
Compressor Control Modes 26
Calibration 26
Manual Control 26
Analog Input 27
Modbus Network 27
Chiller Control 27
Compressor Faults/Alarms 27
Danfoss Turbocor Compressors Inc. i
ECD-00007M Rev. 1
Page 3

Contents
Motor Monitoring 28
Motor Monitoring Overview 28
Motor Faults / Alarms 30
Magnetic Bearing Monitoring 31
Bearing Monitoring Overview 31
Bearing Faults 33
Electronic Valve Data / Tuning 33
Chiller Control 36
System Information 38
Compressor Info 39
EEPROM Log Resets 39
EEPROM Settings 39
Compressor Controller Settings 40
Compressor Controller Alarms 41
Compressor Controller Fault Limits 43
Compressor Stepper Motor Settings 44
Stepper Motor Valve Controls 45
Analog Output Controls 47
Compressor Controller Impeller Specific Settings 49
Compressor Controller (CC) Critical Fault Lock Outs 50
Refrigerant 51
Compressor Event Log 51
History Data 52
Trending 53
Graphs 53
Trending & Data Acquisition 56
Compressor Map 57
Fault Captures 59
Data Capture 60
Appendix A: Determination of Actual Power Setting A-1
ii Danfoss Turbocor Compressors Inc.
ECD-00007M Rev. 1
Page 4
1 Introduction
The Turbocor Service Monitor program is a rich, userfriendly, graphical user interface designed to control the
Turbocor compressor and to provide status information
about the compressor. Furthermore, it can be used as a tool
for troubleshooting purposes.
This manual describes the functions provided by the
Turbocor Service Monitor program.
Service Monitor User Manual
Danfoss Turbocor Compressors Inc. 1
ECD-00007M Rev. 1
Page 5

System Requirements
2 System Requirements
The monitor program must be installed on a PC that meets
the minimum requirements specified in Table 1. For
optimum performance, a 533 MHz Pentium or higher CPU
with 128 MB RAM running Windows 2000 (SP4) or XP is
recommended.
The monitor program was developed for the .NET
Framework and requires the .NET Framework to be
installed on the PC where the program runs. Microsoft
provides a re-distributable installer, Dotnetfx.exe, that
contains the common language runtime and .NET
Framework components that are necessary to run the
monitor program. Before installing the monitor program,
the .NET framework 1.1 re-distributable must be installed.
This can be downloaded from the Microsoft website.
The latest Windows service packs and security updates
should also be installed on the PC.
Table 1: Minimum Requirements
Processor 533-MHz Intel Pentium-class processor
Operating System
The .NET Framework 1.1 Re-distributable is supported on the following
platforms:
• Microsoft Windows® Server 2003 (.NET Framework 1.1 is installed as part
of the operating system)
• Windows XP Professional
• Windows XP Home Edition
• Windows 2000
• Windows Millennium Edition (Windows Me)
• Windows 98
Memory
Hard Disk
Display
Input Device
Other
• Microsoft Windows NT® 4.0 Service Pack 6a
The .NET Framework 1.1 Re-distributable cannot be installed on 64-bit
computers; Windows NT 4.0 Terminal Server is not supported
128 MB of RAM, 256 MB recommended
110 MB of hard disk space required, 40 MB additional hard disk space
required for installation (150 MB total)
800 x 600 or higher-resolution display with 256 colors
Microsoft mouse or compatible pointing device
Install the latest Windows service packs and critical updates from the
Windows Update site.
Installation of the .NET Framework 1.1 is split into two parts: the core
and language packs. The core cont ains everything yo u need to run .NET
Framework applications; all dialog boxes and error messages will be in
English. If you want dialog boxes and error messages in another
language, you must also install the corresponding language pack. For
more information, see the .NET Frame wo rk Dow nlo a ds page.
2 Danfoss Turbocor Compressors Inc.
ECD-00007M Rev. 1
Page 6
3 Getting Started
3.1 Cable Connection
The monitoring program communicates with the
compressor via the Modbus* protocol using either the
RS232 or RS485 connection at the Chiller Interface
module. RS485 communication requires an RS485/RS232
adapter (user-supplied). RS232 communication is
recommended for cable lengths not exceeding 15 meters
(50 feet) between the PC and compressor. For cables that
run up to 100 meters (328 feet), use the RS485
communication line. Always use shielded, twisted-pair
cable for data communications
*The Modbus protocol was originally developed to exchange information
between products on the factory floor. This protocol has become a de f acto
standard for exchanging data and control between PLC systems. Modbus is
a registered trademark of Modicon Corp.
Service Monitor User Manual
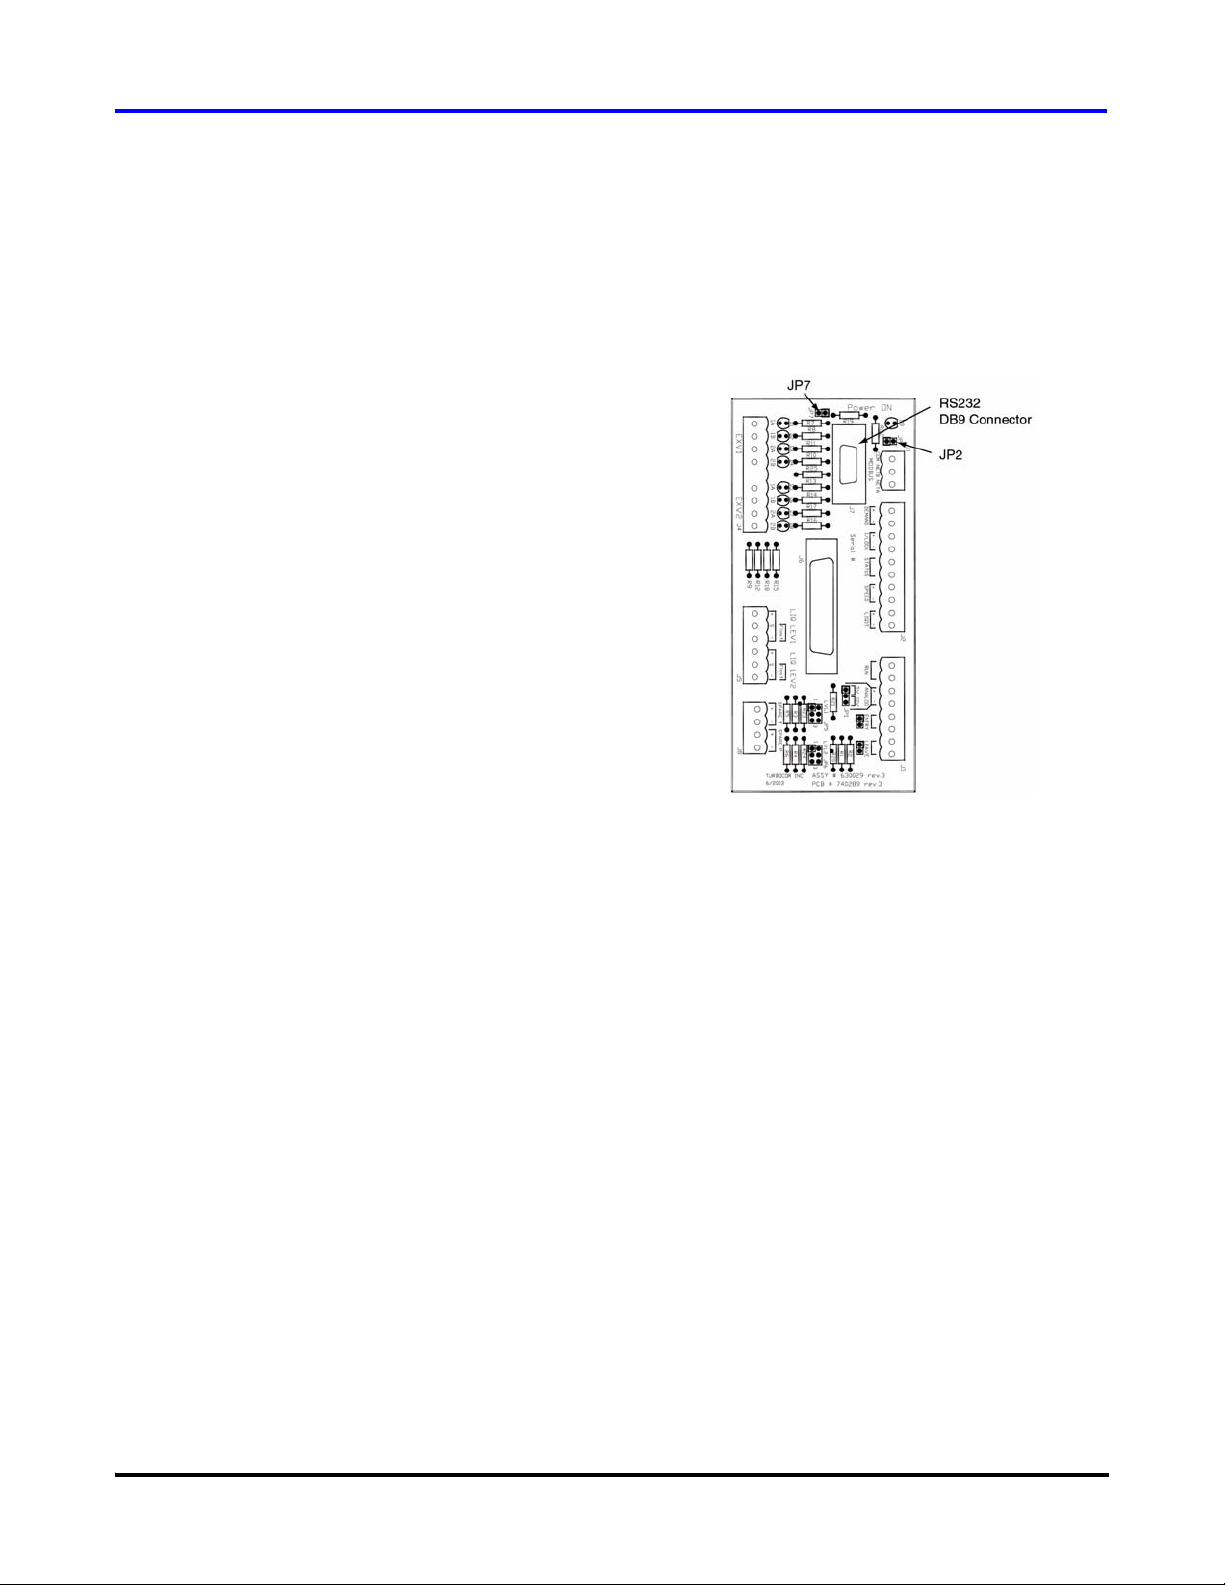
3.1.1 RS232 Connection
1. Connect one end of the RS232 cable (user-supplied) to
the DB9 connector on the Chiller Interface module; see
Figure 1.
2. Connect the other end of the cable to an available COM
port on the PC.
3. Confirm that jumpers JP2 and JP7 are in proper
positions before starting.
JP2 is the Modbus termination jumper. Install the
jumper if the Modbus connection is at the end of a
cable run.
Remove JP7 to enable RS-232 communication with the
PC.
Figure 1 RS232 Connector - Chiller Interface
Module
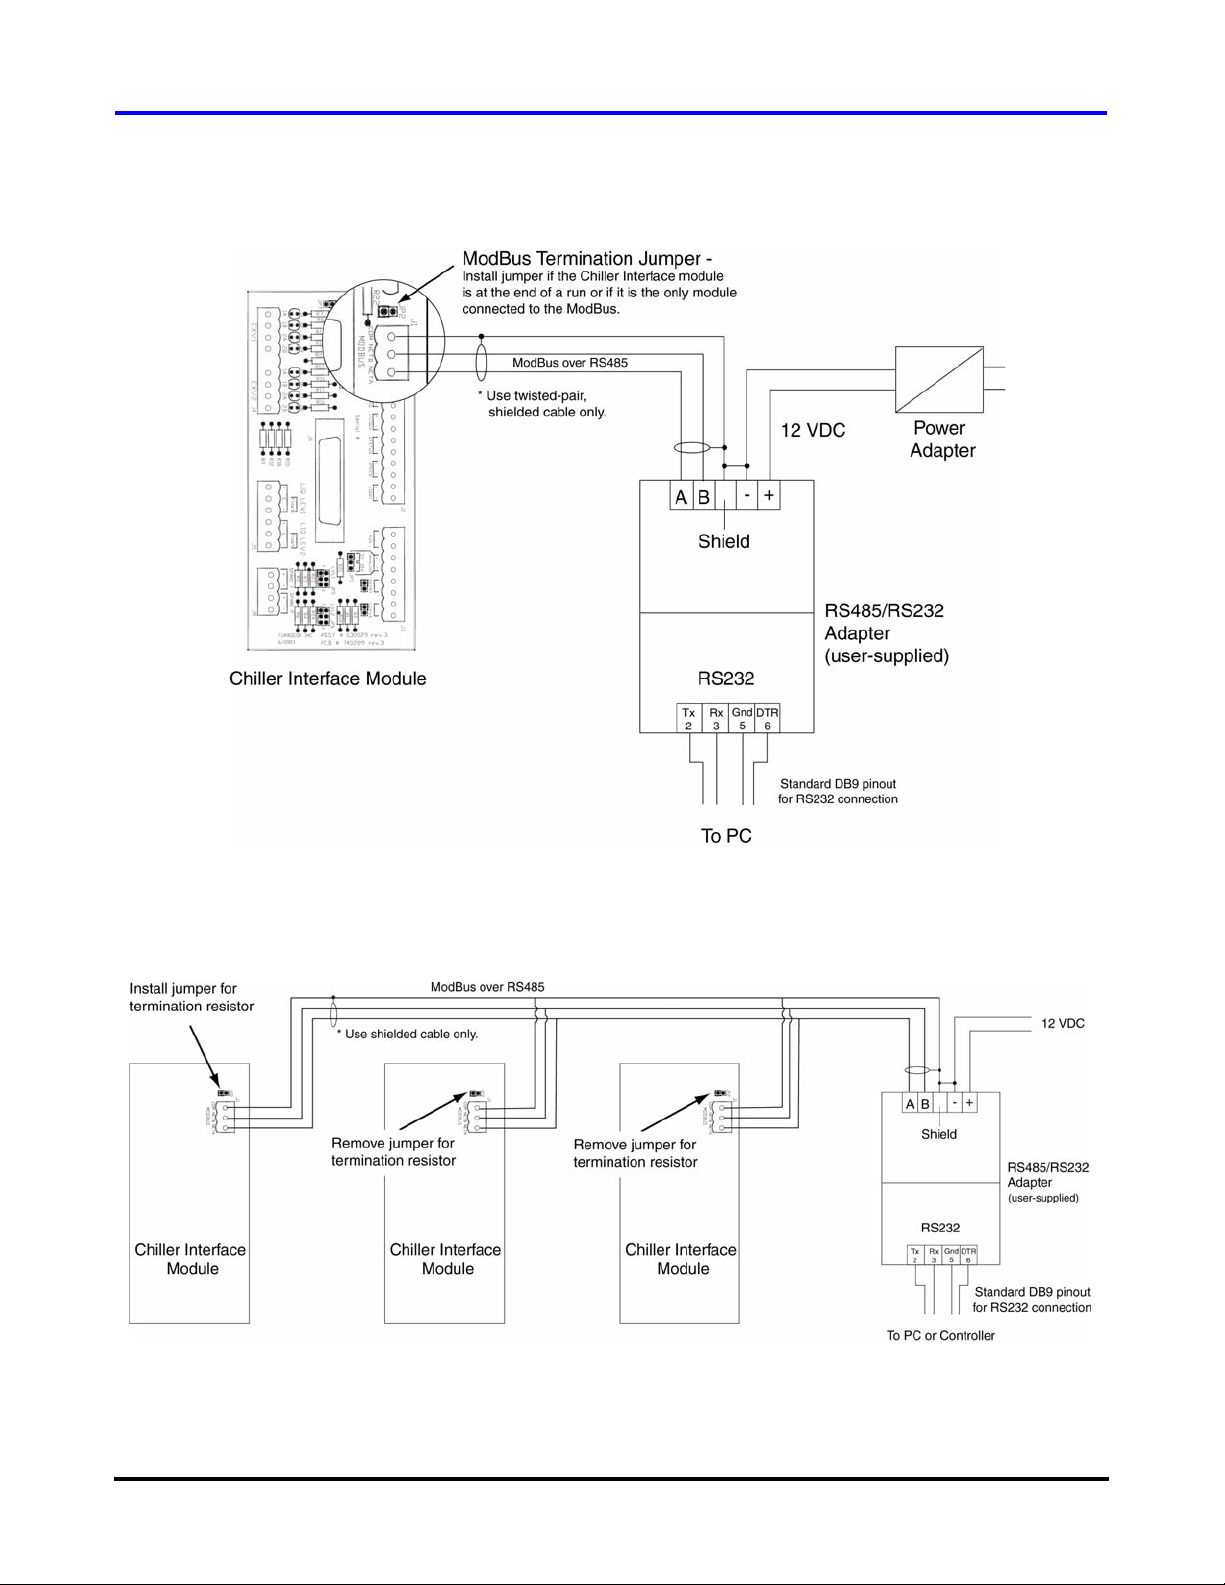
3.1.2 RS485 Connection
1. Connect the RS485/RS232 adapter directly onto the PC
COM port.
Connect the other side of the adapter to the Modbus. Figure
2 shows the PC and adapter connections to the Modbus for
a single compressor application. Ensure that the termination
jumper (JP2) on the Chiller Interface module is installed.
Figure 3 shows the PC and adapter connections to the
Modbus for a multiple compressor application. In this case,
set the termination jumper only on the Chiller Interface
module that is connected at the end of the Modbus cable
run.
Danfoss Turbocor Compressors Inc. 3
ECD-00007M Rev. 1
Page 7
Getting Started
Figure 2 PC to Modbus Connection (single compressor with > 10 m cable length)
Figure 3 PC to Modbus Connection (multiple compressors with > 10 m cable length)
4 Danfoss Turbocor Compressors Inc.
ECD-00007M Rev. 1
Page 8
3.2 Monitor Program Installation
Service Monitor User Manual
The monitor program is installed on the PC and
communicates with the compressor using the ModBus
protocol over a RS-232 or RS-485 serial link. Administrator
privileges may be required to install and remove software
on the PC.
NOTE:
If a previous version of the monitor program is already
installed on the PC, it must be uninstalled before proceeding
with the current installation. To uninstall the monitor
program: from the “Start” menu, select “Settings” →
“Control Panel”. Double-click “Add/Remove Programs”.
From the list, select “Danfoss Turbocor Service Monitoring
Tool” and then click the “Remove” button.
3.3 Starting the Monitor Program
To start the monitor program: from the “Start” menu, select
“Programs” → “Danfoss Turbocor Monitoring Tool”.
3.4 User Interface
Installation Procedure:
1. Insert the monitor program CD into th e drive.
2. In Windows Explorer, navigate to the
Turbocor_Service_Tool_Setup.msi file. Double-click
the file to launch the setup wizard.
3. Follow the instructions provided by the wizard to
complete the installation.
4. Click the Close button to exit the setup wizard.
3.4.1 Monitor Program Toolbar
NOTE:
The toolbar (located under the menu bar) provides the user
with easy access to the monitoring windows. Table 2
provides details for each icon on the toolbar.
Table 2 Monitor Program Toolbar Icons
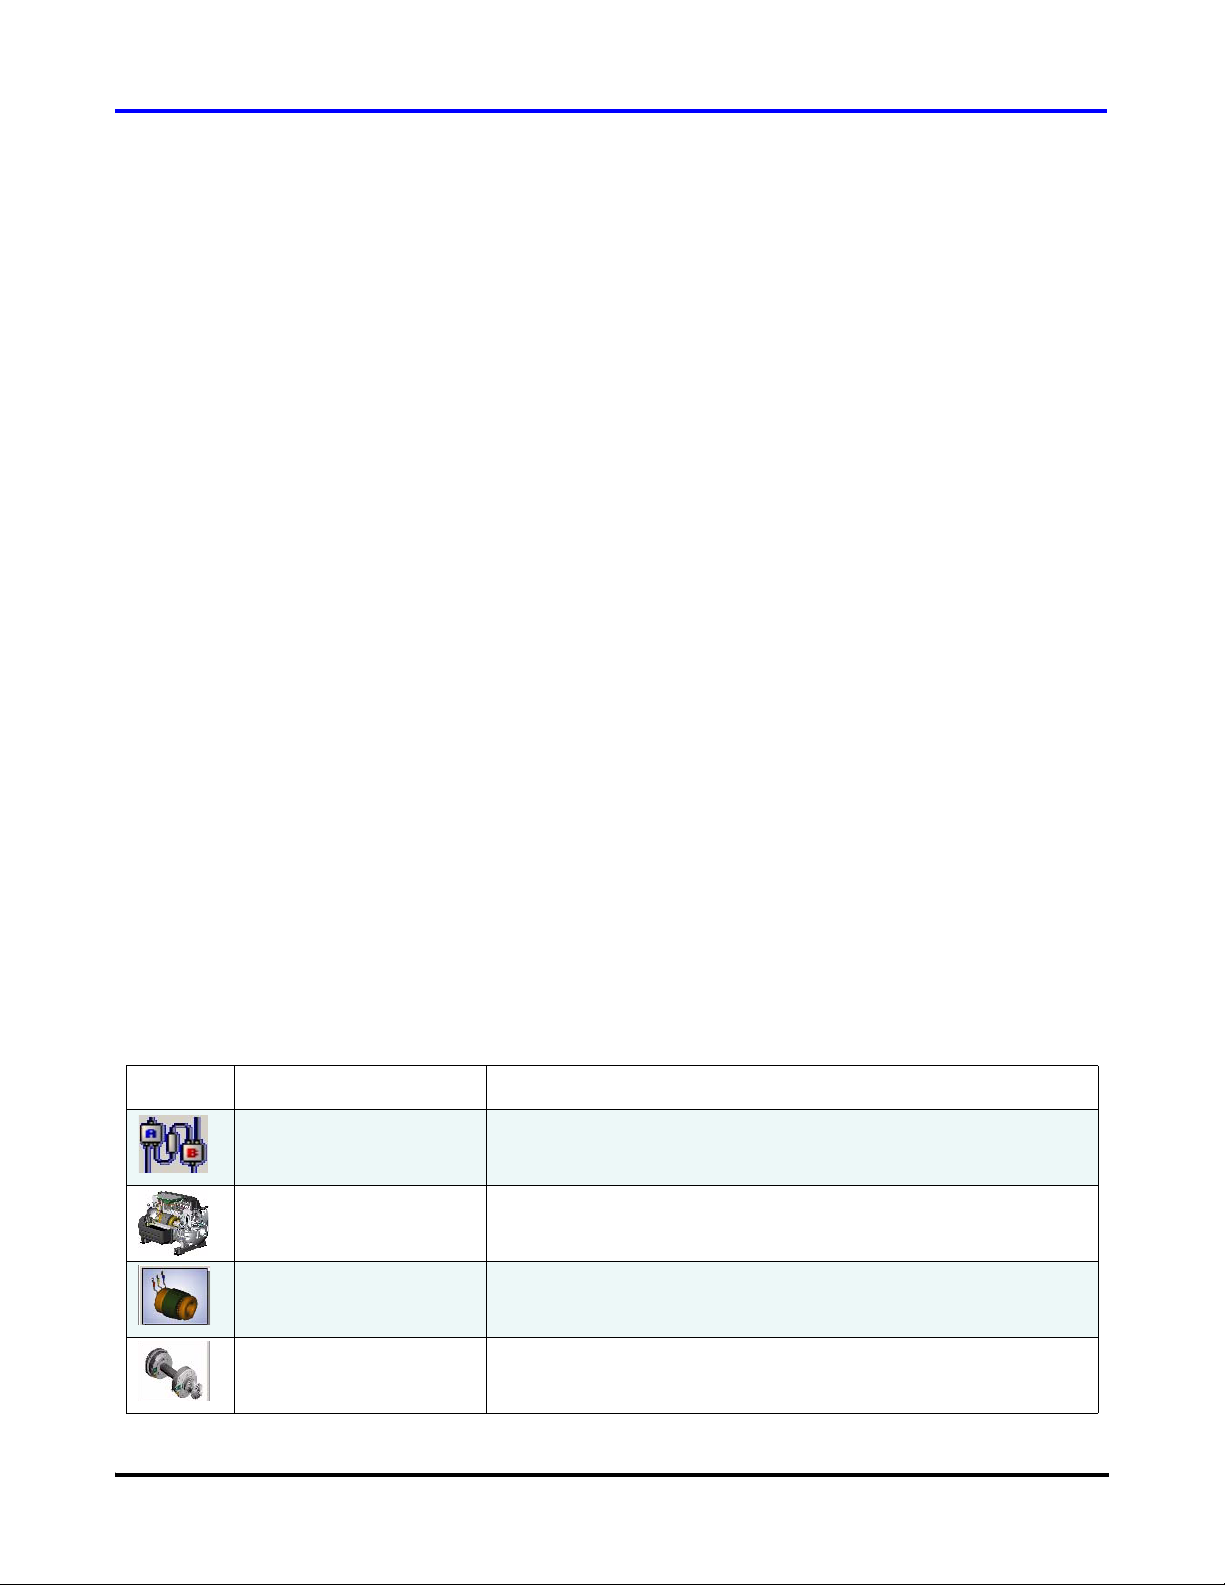
Icon Name Description
Serial Port Connection Clicking on the “Serial Port Connection” icon opens the “Serial Port
Connection” window. Refer to section 3.5 "Serial Port Connection"
on page 6.
Compressor Controller
Parameters
Motor Monitor Clicking on the “Motor Monitor” icon opens the “Variable Speed
Magnetic Bearings Clicking on the “Magnetic Bearings” icon opens the “Magnetic
Clicking on the “Compressor Controller Parameters” icon opens
the “Compressor Controller” window. Refer to section 6.3
"Compressor Control" on page 23.
Permanent Magnet Motor Monitoring” window. Refer to section
6.4 "Motor Monitoring" on page 28.
Bearing Monitoring” window. Refer to section 6.5 "Magnetic
Bearing Monitoring" on page 31.
Up to three windows can be displayed at one time. If three
windows are already open, one must be closed before
another window can be opened.
Danfoss Turbocor Compressors Inc. 5
ECD-00007M Rev. 1
Page 9
Getting Started
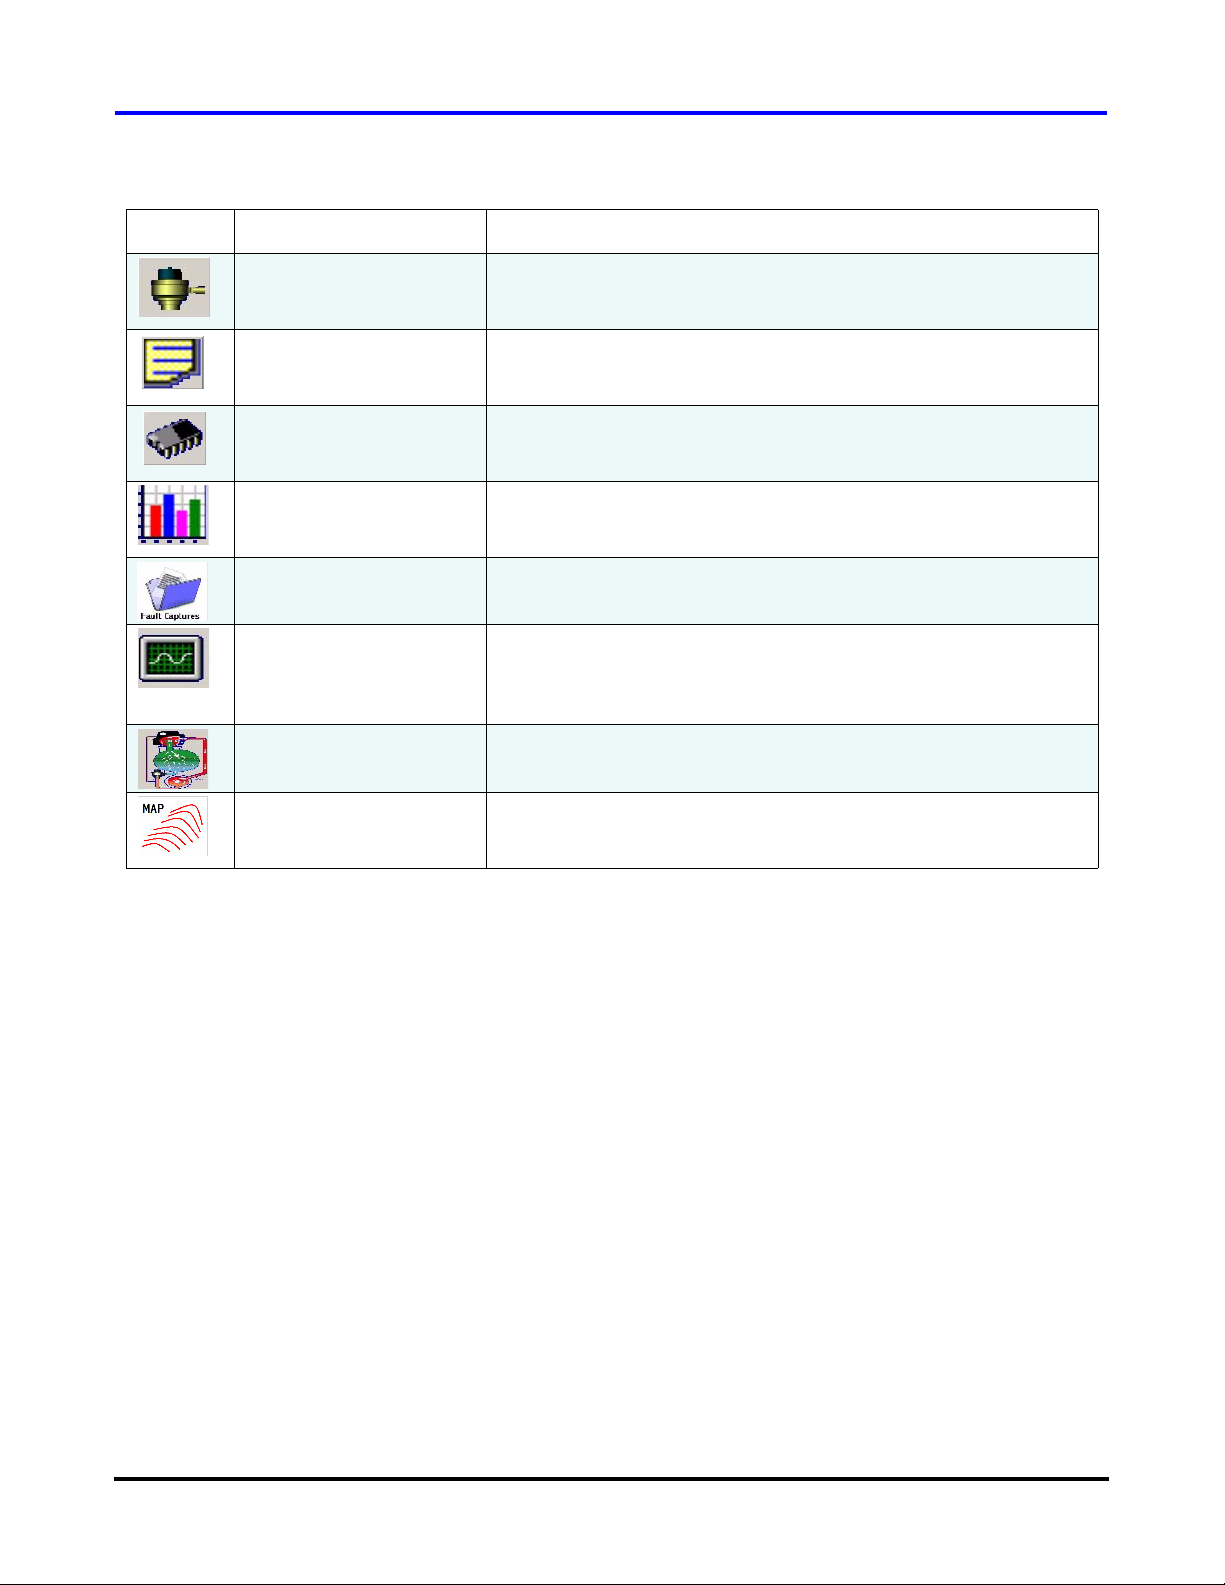
Table 2 Monitor Program Toolbar Icons (Continued)
Icon Name Description
Expansion Valves Clicking on the “Expansion Valves” icon opens the “Electronic
Valve / Data Tuning” window. Refer to section 6.6 "Electronic
Valve Data / Tuning" on page 33.
Event Log Clicking on the “Event Log” icon opens the “Compressor Event
Log” window. Refer to section 6.10 "Compressor Event Log" on
page 51.
EEPROM Settings Clicking on the “EEPROM Settings” icon opens the “EEPROM
Settings” window. Refer to section 6.9 "EEPROM Settings" on
page 39.
Load Profile Graphs Clicking on the “Load Profile Graphs” icon opens the “Compressor
History Data” window. Refer to section 6.1 1 "History Data" on p age
52.
Fault Captures Clicking on the “Fault Captures” icon opens the “Fault Captures”
window. Refer to section 6.14 "Fault Captures" on page 59.
Trending Clicking on down arrow next to the “Trending” icon, and selecting
“Charts 1” opens the trending “Graphs” window; selecting on
“Charts 2” opens the “Trending and Data Acquisition” window.
Refer to section 6.12 "Trending" on page 53.
Chiller Control Clicking on the “Chiller Control” icon opens the “Chiller Control”
window. Refer to section 6.7 "Chiller Control" on page 36.
Compressor Envelope Clicking on the “Compressor Envelope” icon opens the
“Compressor Map” window. Refer to section 6.13 "Compressor
Map" on page 57.
3.4.2 Entering User Input
When user input is required for the monitor program fields,
perform the following sequence:
1. Double-click the variable field. (This activates the field
for user input.)
3.5 Serial Port Connection
The Serial Port Connection window contains fields that
must be filled in order to enable communication between
the monitor program and the compressor; refer to Figure 4.
The comm settings of the compressor must be known in
order for the monitor program to communicate with the
compressor.
To access the “Serial Port Connection” window, select
“Window”→ “Connection” from the menu bar, or click on
the “Serial Port Connection” icon located below the menu
bar.
2. Scroll or type in the new setting.
3. Press Enter. It is important to press Enter as this causes
the user input to be validated.
The following paragraphs describe the dialog box fields.
Comm Port - Serial communication port that the computer
will use to connect to the compressor. Enter the COM port
number such as COM1 or COM2, etc.
Baud Rate -19,200 or 38,400 baud (38,400: default)
Stop Bits - 1 or 2. (1: default)
Slave Address - 1-63. (1: default)
6 Danfoss Turbocor Compressors Inc.
ECD-00007M Rev. 1
Page 10

Service Monitor User Manual
Access Code - The access code controls access to all
adjustable parameters. The default user access level on
power up is read only. Enter the code that corresponds to
the access level you require. Contact Turbocor Product
Support to obtain the required access code.
1. Once the serial port connection data has been set, click
the Connect button. At this point, connection status,
compressor details, and user access level appear in the
right-hand pane of the dialog box.
2. If necessary, change the access level. Enter the access
code in the “Access Code” parameter box, then click
“Change Access Level”. Confirm that the correct
access level has been set on the right-hand pane of the
dialog box.
NOTE:
The access level connection cannot be changed prior to a
establishing connection.
Entering the wrong access code more than 3 times will lock
out all communications until a cycle of the power is
performed.
3. Click the “OK to start monitoring” button.
Figure 4 Serial Port Connection Dialog Box
4 Compressor Configuration
4.1 Using the Setup Wizard
The monitor program features a commissioning setup
wizard to guide the user through the complete compressor
configuration process.
1. To launch the commissioning setup wizard, select
“System Commissioning” from the “Advanced” menu
item. The introduction screen for the commissioning
setup wizard appears; refer to Figure 5. Click Next.
(To bypass the setup wizard and use a saved
configuration file to setup the compressor, check the
checkbox and click Next. Continue with 4.2 "Using a
Saved Configuration File" on page 13.)
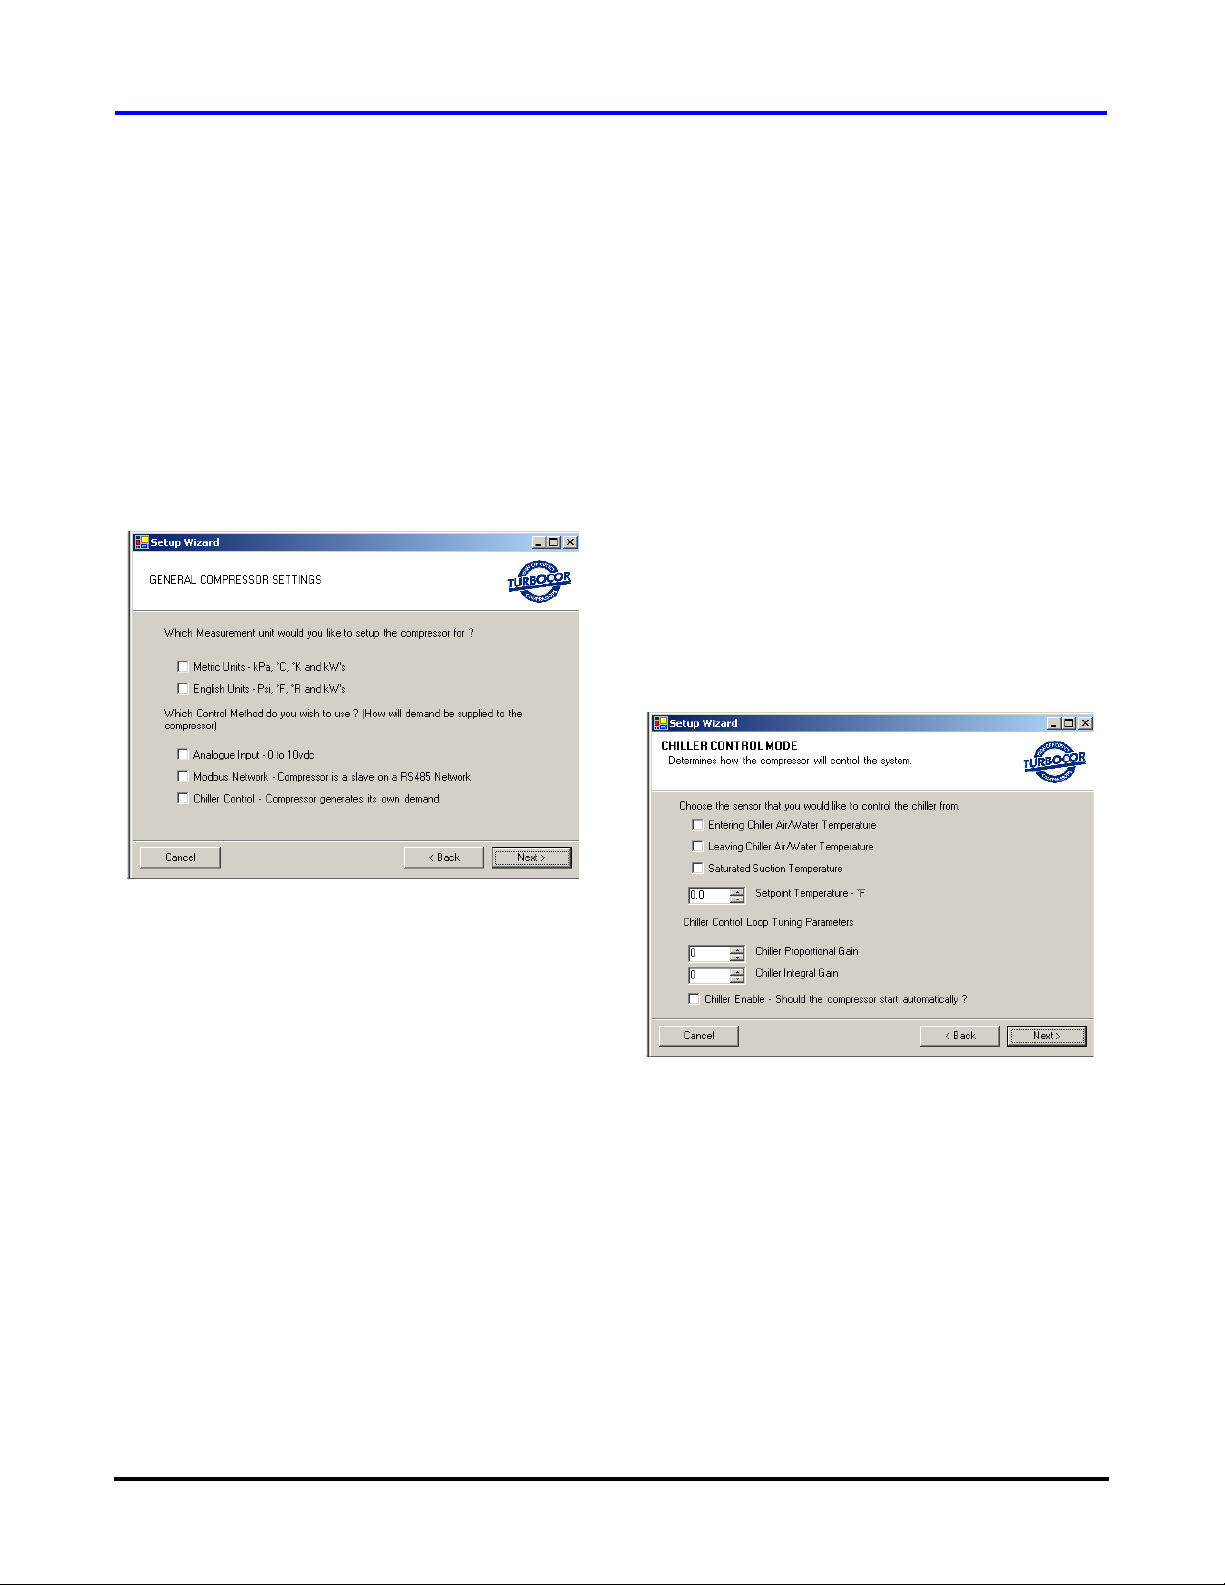
2. Select the appropriate units of measurement (metric or
imperial). Refer to Figure 6.
3. Select the appropriate compressor control method.
There are three modes available:
external controller. The variable demand signal
corresponds to the range of 0-100% maximum
power available.
• Analog Input: compressor loading controlled using
an analog demand signal of 0-10 VDC from an
Danfoss Turbocor Compressors Inc. 7
ECD-00007M Rev. 1
Figure 5 Commissioning Set-up Wizard
Page 11
Compressor Configuration
• Modbus Network: the compressor receives a
demand from an external computer, PLC, or
building management system using the Modbus
protocol on a RS-232 or RS-485 communication
link.
• Chiller Control: fully automatic; controls the chilled
water temperature using a temperature sensor
connected directly to the Chiller Interface module.
This mode can also be used to control evaporating
temperature which is derived from the suction
pressure measurement
6. Set the Chiller Control Set Point to the desired value.
7. Set the Proportional and Integral Gain values to obtain
stable control (the Proportional and Integral Gain
values will vary depending on the application).
NOTE:
The Integral part of the internal chiller controller is
switched off until the compressor reaches a speed of 18,500
RPM. Stopping the compressor and restarting also resets the
Integral part to 0.
8. Click in the Chiller Enable checkbox if you would like
to have the compressor start automatically. It is
advised, however, to open the interlock contact (located
on the Chiller Interface module) to prevent the
compressor from starting before the commissioning
sequence is complete.
Figure 6 General Compressor Settings
NOTE:
If the compressor is linked to an external controller, changes
made to the compressor demand via the monitor program
can conflict with controller-issued commands. This
situation can lead to unexpected results. Before testing the
demand input, isolate the compressor from the controller.
4. Click the Next button.
Steps 5 through 8 apply to the Chil ler Control mode
only.
5. Select the type of sensor that will control the chiller. If
selecting Entering or Leaving Chiller Air/Water
Temperature, connect an NTC temperature sensor (as
specified in the compressor Application manual) to
either the Entering- or Leaving Chilled Water
temperature input on the Chiller Interface module.
8 Danfoss Turbocor Compressors Inc.
Figure 7 Chiller Control Commissioning
4.1.1 Start-up Settings
(Refer to Figure 8)
1. Enter the Temporary Suction Pressure Alarm %. The
limit is set up as a % of the current suction pressure
limit, e.g., if a suction pressure trip of 270 kPa was set
and the temporary suction pressure alarm was set to
50%, the temporary suction pressure trip limit would
be 135 kPa. This temporary alarm is only active while
the Suction Pressure Delay timer is counting down.
ECD-00007M Rev. 1
Page 12
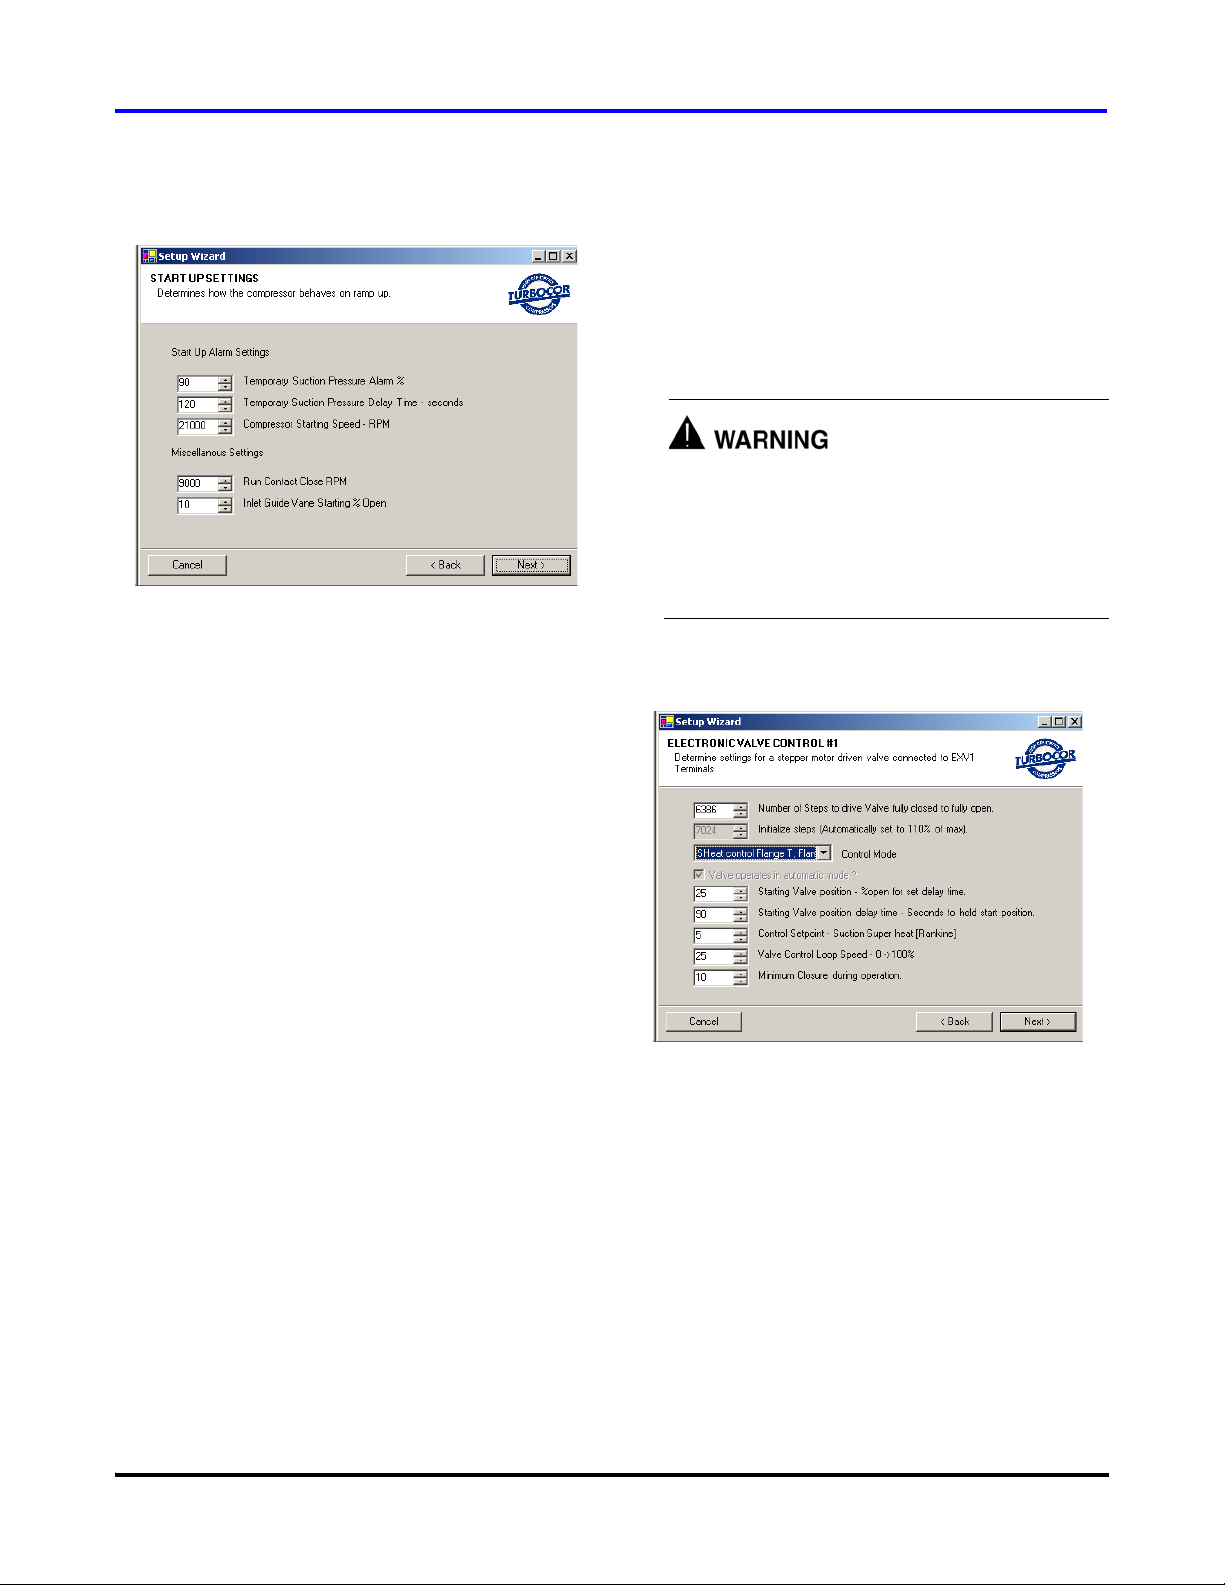
Figure 8 Start-up Settings
Service Monitor User Manual
This section explains how to set up the expansion valves for
various applications. Both valves can be operated
independently or in parallel.
For Expansion Valve #1:
1. Enter the number of steps to drive the valve from fully
closed to fully open. Expansion valves with different
numbers of steps can be used.
If the incorrect number of steps is selected, the valves
may not have enough travel to allow the required
amount of mass flow or the valve may not be able to
throttle down to the required amount of mass flow.
This situation could cause liquid flood back and
damage to the compressor.
2. Enter the Temporary Suction Pressure Delay Time.
This parameter represents time in seconds that the
temporary suction pressure alarm / fault limit should be
enabled. The timer starts to count down once the shaft
starts to rotate.
3. Enter the Compressor Starting Speed. If the estimated
surge speed is greater than the starting speed setting,
the compressor will ramp up to the surge speed. If the
starting speed setting is greater than the estimated surge
speed, the compressor will ramp up to the starting
speed. In both cases, the compressor speed will
increase at the full ramp rate.
4. Enter the Run Contact Close RPM. The compressor
contains a NO relay contact that closes while the
compressor is running. The speed at which the contact
closes is determined by the Run Contact Close RPM.
5. Enter the Inlet Guide Vane Starting % Open. Typically,
the vanes will be set to the closed or almost closed
position at start-up.This is to minimize the possibility
of liquid flood back and to reduce the compressor’s
start-up current draw.
6. Click Next to continue.
4.1.2 Electronics Valve Control
(Refer to Figure 9)
Figure 9 Electronics Valve Control Setup
2. Select the control mode for the expansion valve.
Available options are: superheat, liquid level, or load
balance. See Table 3 for a description of the modes.
3. Enter the Starting Valve Position. If desired, at
compressor start-up, the valves can be set to open to a
pre-start value for a given time. This value represents
the percentage of maximum steps sent to the motor
upon start-up of the compressor. The stepper motor will
hold at this position until the stepper start delay timer
has expired.
4. Enter the Valve Starting Position Delay Time. The
delay is the amount of time (from compressor start-up)
Danfoss Turbocor Compressors Inc. 9
ECD-00007M Rev. 1
Page 13

Compressor Configuration
to hold the number of steps sent to the motor as
determined by the Starting Valve Position %. Value is
in seconds and starts to count down when the drive is
enabled.
5. Enter the Control Setpoint, i.e., suction superheat or
liquid level. (Not applicable to load balance control
mode.)
6. Enter the Valve Control Loop Speed. This value
represents the reaction time of the control loop to a
7. Enter the Minimum Closure During Operation. This is
8. Click Next to continue. Repeat steps 1 through 7 for
Table 3 Control Modes
Control Mode Description
Superheat
The calculation of superheat can be based on the temperature and pressure
measurements from one of the following sources:
• Superheat control using the compressor flange temperature and pressure (this
mode is not recommended as the temperature at the compressor flange is
influenced by external factors).
• Superheat control using the compressor flange pressure and a 10K thermistor
that is connected to the terminals labeled “ENTRY” on the Chiller Interface
module.
• Superheat control using the compressor flange pressure and a 10K thermistor
that is connected to the terminals labeled “LIQT” on the Chiller Interface
module.
process error and replaces the PID controller gains
(proportional, integral, and derivative).
the minimum close position for the valve while the
compressor is spinning.
electronic expansion valve # 2.
Liquid Level
Load Balance
• Superheat control using an external temperature and pressure sensor
connected to the terminals on the IO pcb labeled “SPARE T” & “SPARE P”.
Liquid level can be measured from one of the following sources:
• Liquid Level 1 contro l usin g a lev el sen so r co nn ec te d to the te rm ina ls on the
Chiller Interface module labeled “LIQ LEV1”.
• Liquid Level 2 contro l usin g a lev el sen so r co nn ec te d to the te rm ina ls on the
Chiller Interface module labeled “LIQ LEV2”.
For liquid level sensing, two types of level sensors can be used: a level sensor
with a supply of 15VDC and an output of 0-5VDC or a resistive-type level sensor,
0-90 Ohm. Refer to vendor documentation for wiri ng these types of se nsors to the
Chiller Interface module.
The Load Balance control mode uses the compressor’s own internal control
algorithm to determine the best mix of speed control, inlet guide vane opening and
load balance valve opening. Use this mode only if a load balancing valve is
installed in the system. Since the load balancing valve is connected to the
compressor’s capacity control algorithm, selecting this mode without a valve
installed will add a delay to the loading/unloading process, i.e., the compressor will
try to open and close the valve for 2 minutes r ather th an clo se the va ne or change
the speed.
10 Danfoss Turbocor Compressors Inc.
ECD-00007M Rev. 1
Page 14
Service Monitor User Manual
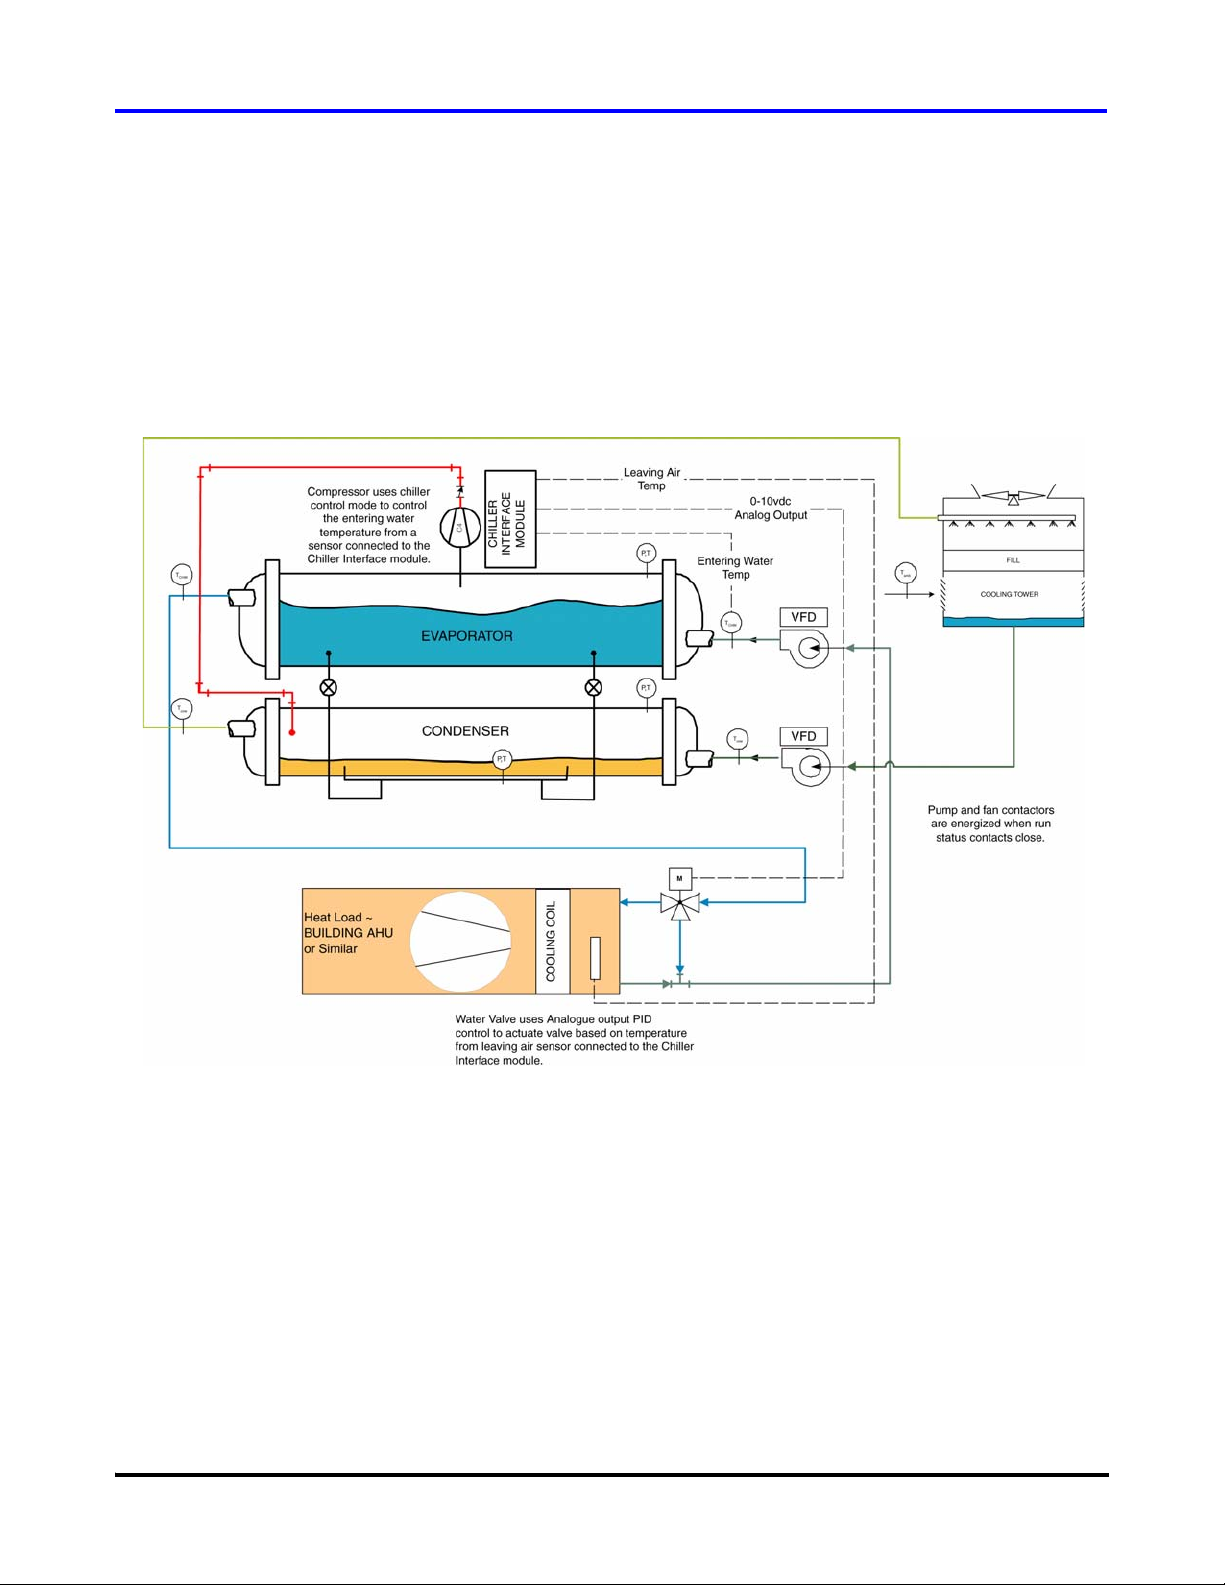
4.1.3 Analog Output Setup
The compressor features a universal analog output for load
balancing valve, IGV position, discharge pressure, etc. The
operating range can be set to 0-5V or 0-10V via jumpers on
the Chiller Interface module.
Figure 10 shows a typical application for the analog output.
In this example, the analog output from the Chiller Interface
module is connected to a 3-way valve that channels chilled
water to a cooling coil. A temperature sensor at the cooling
coil is connected to the Leave terminals of the Chiller
Interface module. The analog output controls the amount of
chilled water entering the cooling coil based on the air
temperature setpoint.
Figure 10 Analog Output Application Example
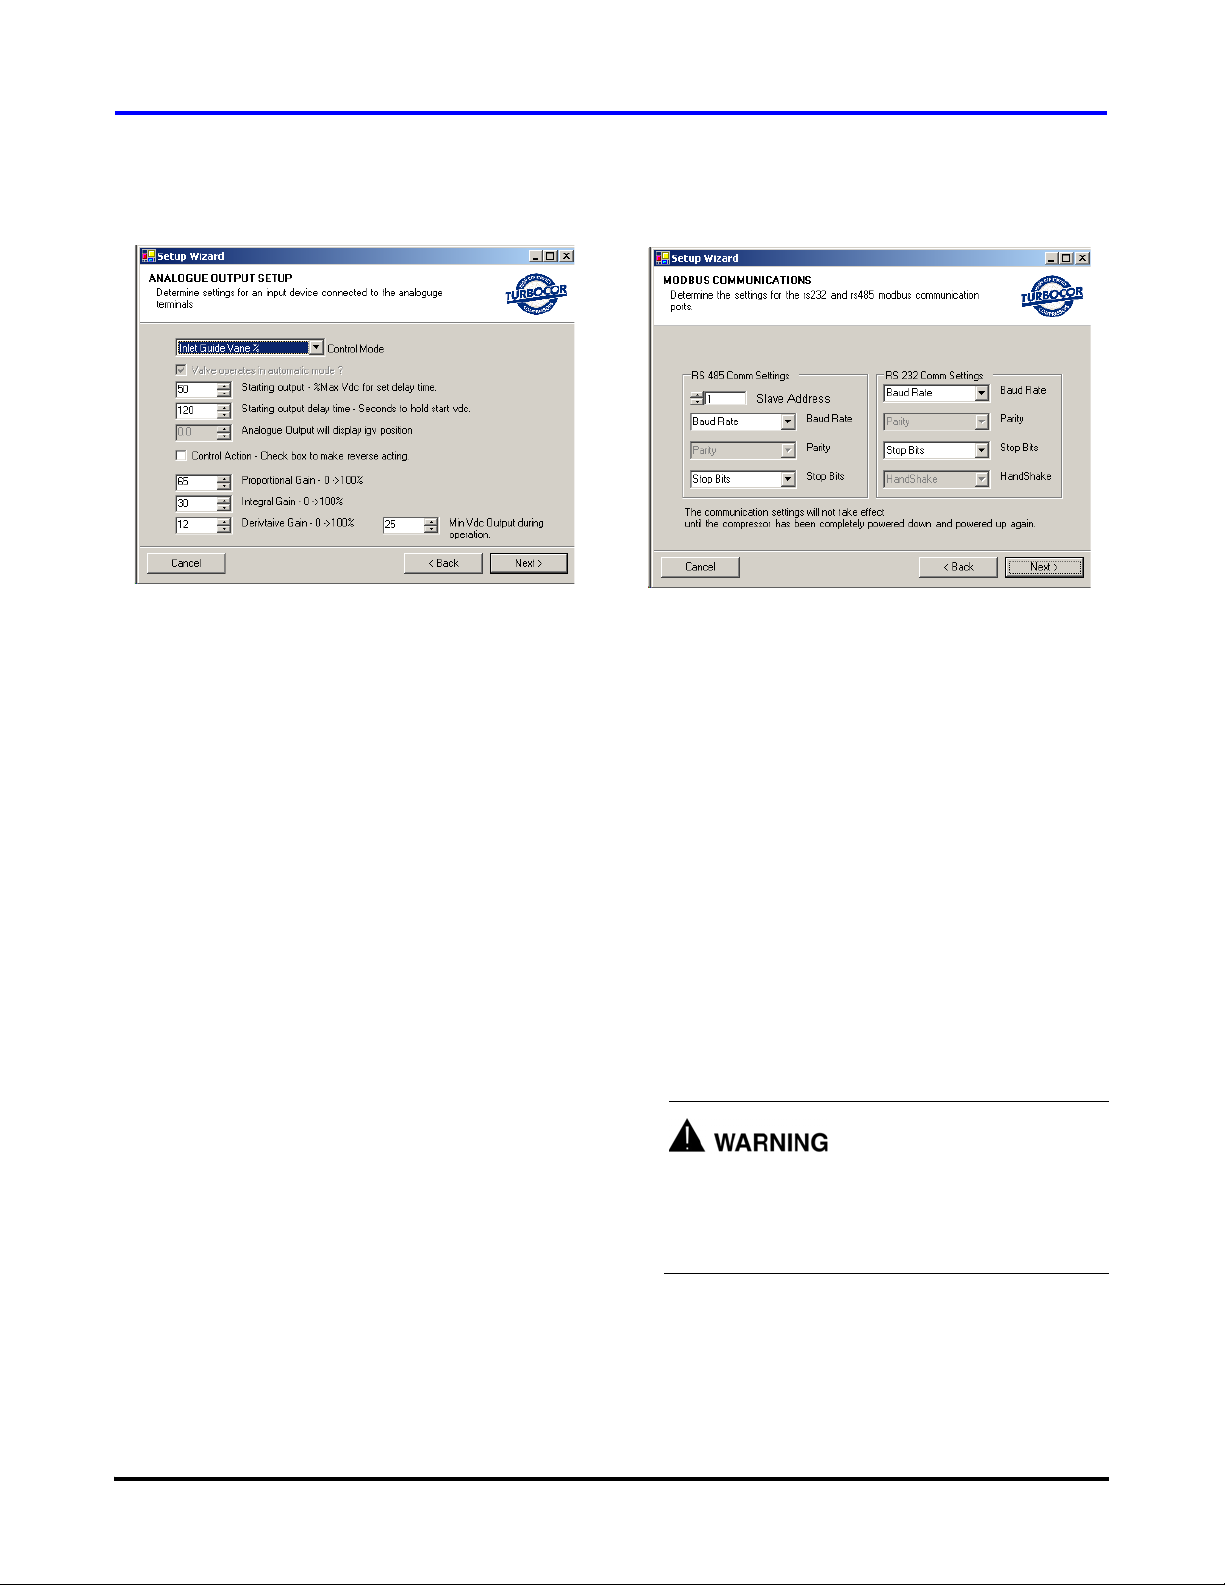
Configure the analog output as follows (Refer to Figure 11):
1. Select the control mode for the analog output. The
selection determines which control variable will be the
source for the 0-10vdc output (at the ANALOG output
terminals on the Chiller Interface module). The options
are:
• Load Balance
•HP
•IGV
Danfoss Turbocor Compressors Inc. 11
ECD-00007M Rev. 1
•Auto
• Superheat - Flange TP
• Superheat - FlangeP, EWT
• Superheat - FlangeP, LIQT
• Suction Pressure.
• Leaving Temp
•Entering Temp
•Liquid Temp
Page 15
Compressor Configuration
Figure 11 Analog Output Setup
2. Enter the Starting Output. This value equals the
percentage of maximum voltage sent to the terminals of
the Chiller Interface module on compressor start-up.
The analog output will hold at this position until the
start delay timer has expired.
3. Enter Starting Output Delay Time. This value is the
amount of time from compressor start-up to hold the
voltage at the start-up %. Value is in seconds and starts
to count down when the drive is enabled.
4. Check the Control Action checkbox for reverse acting.
Leaving the checkbox unchecked will enable direct
acting.
5. Enter the Proportional, Integral, and Derivative gains to
provide stable control.
6. Enter the minimum analog output (in DC volts) during
operation, if required. This parameter can be used, for
example, to maintain a minimum valve open position
during operation.
4.1.4 Modbus Communications
(Refer to Figure 12)
Figure 12 Modbus Communications Setup
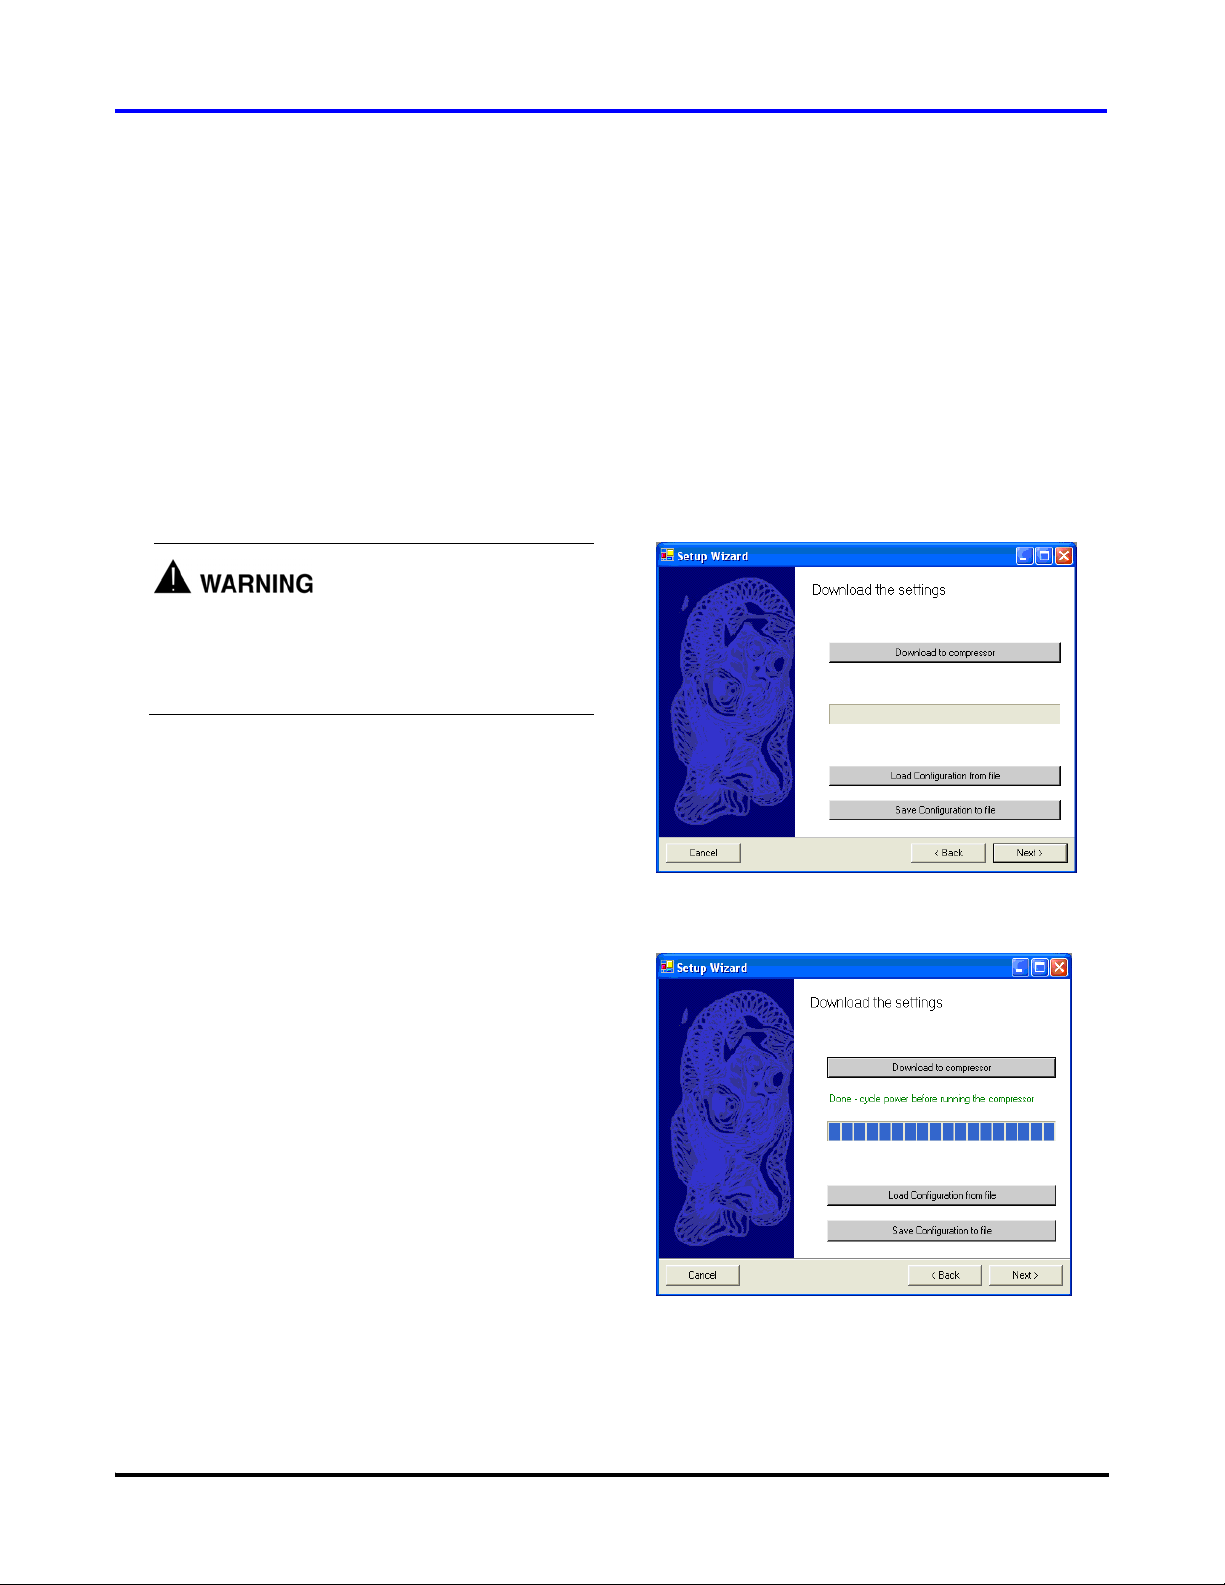
4.1.5 Downloading and Saving
Configuration Data
At the end of the commissioning sequence, you have the
choice of either downloading the configuration data to the
compressor or saving it to a file for later use.
To save the data to a configuration file, click the Save to
Configuration File button. In the Save As dialog box, name
the file and save it in a designated location.
NOTE:
If modifications are made to the configuration data after the
commissioning is complete, the new values must be
recorded in a new commissioning session if the data is to be
saved to a file.
Never attempt a download while the compressor is
running as it can lead to a loss of compressor control.
Open interlock contacts on the Chiller Interface
module before downloading configuration data.
Set up the RS-485 and RS-232 ports, as required, on the
Chiller Interface module to enable communication with an
external PLC, computer or building management system.
12 Danfoss Turbocor Compressors Inc.
For immediate downloading of the configuration data to the
compressor, click the Download to Compressor button. To
enable the new configuration data, perform the following
steps:
ECD-00007M Rev. 1
Page 16
1. Turn OFF power to the compressor. Wait at least 5
minutes, then check that the LEDs on the Backplane
are OFF.
2. Turn ON power to the compressor.
4.2 Using a Saved Configuration File
Service Monitor User Manual
IMPORTANT:
Record the comm settings before you close the monitor
program since they will be necessary to communicate with
the compressor when you restart the monitor program.
3. Close and then restart the Monitor program.
Follow the steps outlined here if you have bypassed the
commissioning wizard in order to download a configuration
file to the compressor.
Never attempt a download while the compressor is
running as it can lead to a loss of compressor control.
Open interlock contacts on the Chiller Interface
module before downloading configuration data.
1. Click the “Load configuration from file” button; refer
to Figure 13.
2. In the Open File dialog box, browse to the location of
the .ttc file.
3. Click Open.
4. On the Download Settings form, click “Download to
compressor” button.
5. When the message “Done. Cycle power before running
the compressor” appears, turn OFF power to the
compressor; refer to Figure 14. Wait at least 5 minutes,
then check that the LEDs on the Backplane are OFF.
configuration file has been successfully downloaded to
the compressor.
Figure 13 Download Settings Screen
6. Close the Monitor program.
7. Turn ON power to the compressor.
8. Restart the Monitor program.
9. Once reconnected, the text in the right-hand pane of the
Serial Port Connection dialog box appears in red.
When the text turns black, it indicates that the new
Figure 14 Download Settings Screen (After
Download)
Danfoss Turbocor Compressors Inc. 13
ECD-00007M Rev. 1
Page 17
Compressor Configuration
4.3 Controlling User Access
The access code system allows OEM customers to set their
own unique pass codes thereby restricting access to
company authorized personnel.
These access codes control access to all adjustable
parameters via the Modbus communications layer. The
access levels are:
• Read only ~ User may only view values across the
Modbus layer.
• Low Level ~ User may only alter basic settings such as
leaving chilled water temp, display units, chiller enable/
disable, etc.
• Mid Level ~ User may alter all settings that are required
for commissioning a compressor in the field. Values
alterable, for example, are control mode, valve control
settings, run status contact energize RPM, reset load
profile data, and retrieve and save fault data.
• High level ~ User may alter all settings. This level of
access is reserved for users that configure motor/
compressor and bearing control only.
Upon power-up of the compressor, the access codes are
calculated and stored in RAM memory. The default user
access level on power up is read only.
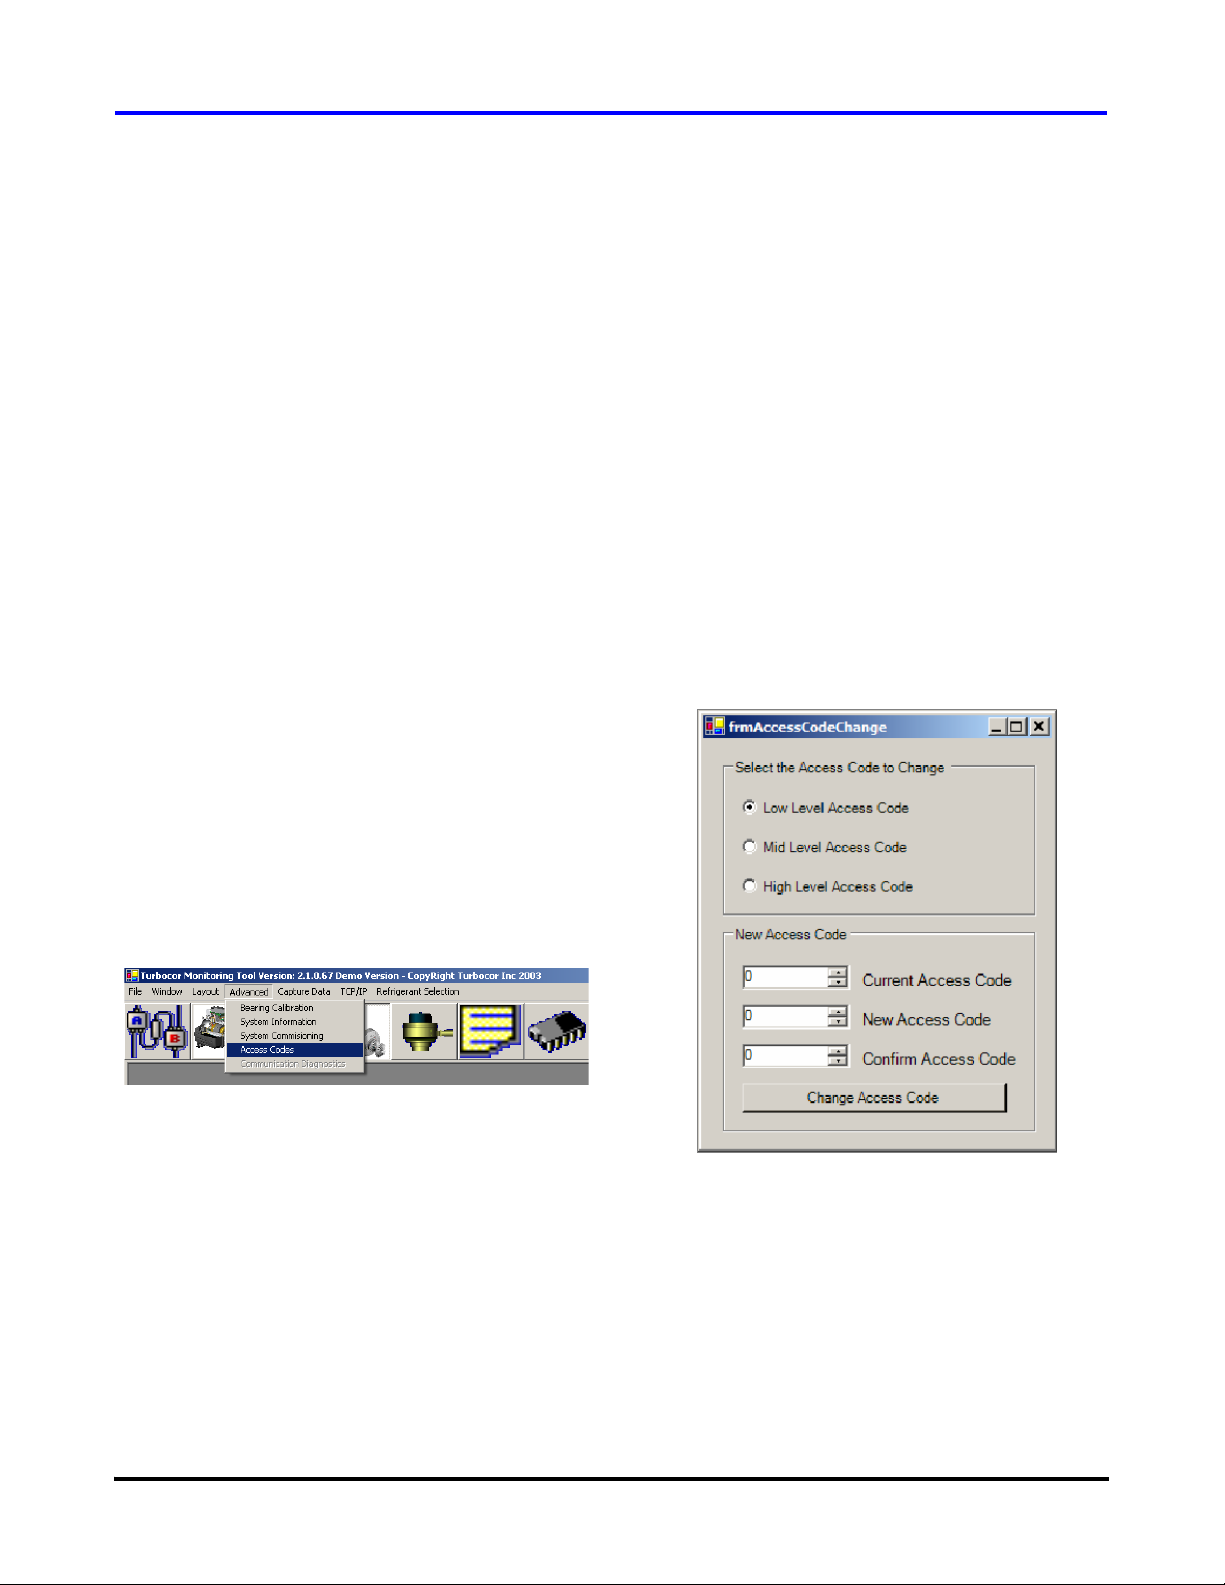
The Access Code Change form appears. To change the
access code for a specific user level:
1. Select the appropriate radio button.
2. Enter the current access code followed by the new
access code for the selected user level (if you enter the
incorrect access code nothing will be changed).
3. Re-enter the new access code in the Confirm Access
Code field.
4. Click the Change Access Code button.
NOTE:
The new access code does not take effect until the
compressor has been restarted.
To change the access code, select “Access Codes” from the
“Advanced” menu item; refer to Figure 15.
Figure 15 Navigating to the Access Code
Change Form
Figure 16 Access Code Change Form
14 Danfoss Turbocor Compressors Inc.
ECD-00007M Rev. 1
Page 18

Service Monitor User Manual
5 Starting and Stopping the Compressor
The following sections describes how to start and stop the
compressor. Refer to the section corresponding to the
5.1 Analog Input
The Analog Input mode controls the compressor loading
using an analog demand signal of 0-10 VDC from an
external controller. The variable demand signal corresponds
to the range of 0-100% maximum power available.
NOTE:
The Chiller Interface interlock switch must be closed and
no errors present for the compressor to start up and run.
5.1.1 How to Start the Compressor
1. Make sure the contact to the ‘Interlock’ input on the
Chiller Interface is closed.
Ensure that power to the compressor is OFF before
connecting wiring to the Chiller Interface module.
control method selected during configuration of the
compressor.
2. Connect a 0-10VDC demand signal to the Chiller
Interface module.
3. Apply a signal between 2 and 10VDC to the ‘Demand’
input. (2VDC = min kW/min speed, 10VDC = max kW
according to model capacity.)
5.1.2 How to Stop the Compressor
Decrease the demand signal to 0VDC or open the contact
connected to the ‘Interlock’ input on the Chiller Interface
module. The compressor will ramp down to 0 RPM and delevitate.
5.2 Modbus Network
In Modbus Network mode, the compressor receives a
demand from an external computer, PLC, or building
management system using the Modbus protocol on a RS232
or RS485 communication link.
NOTE:
The Chiller Interface interlock switch must be closed and
no errors present for the compressor to start up and run.
Danfoss Turbocor Compressors Inc. 15
ECD-00007M Rev. 1
5.2.1 How to Start the Compressor
Open the “Compressor Controller” window. Click on the
“Compressor Controller Parameters” icon located below the
menu bar.
On the Compressor Control Data form, click in the Loading
Demand field and enter a value representing a percentage of
maximum power available. (The maximum power available
is dependent on the compressor model.) The compressor
will levitate and spin up. Refer to Figure 17
Page 19
Starting and Stopping the Compressor
5.2.2 How to Stop the Compressor
To stop the compressor, enter ‘0’ in the Loading Demand
field.
Figure 17 Compressor Control Form
5.3 Chiller Control
The Chiller Control mode is fully automatic and controls
the chilled water temperature using a temperature sensor
connected directly to the Chiller Interface module. This
mode can also be used to control evaporating temperature
which is derived from the suction pressure measurement
NOTE:
The Chiller Interface interlock switch must be closed and
no errors present for the compressor to start up and run.
5.3.1 How to Start the Compressor
Open the “Chiller Control” window. Select “Window”→
“Chiller Control” from the menu bar, or click on the
“Chiller Control” icon located below the menu bar.
On the Chiller Control form, check the Chiller Enable
Status box. The compressor will ramp up and adjust its
speed to reach and maintain the setpoint. Refer to Figure 18.
5.3.2 How to Stop the Compressor
On the Chiller Control form, uncheck the Chiller Enable
Status box. The compressor will ramp down to 0 RPM and
de-levitate.
16 Danfoss Turbocor Compressors Inc.
ECD-00007M Rev. 1
Page 20
Service Monitor User Manual
Figure 18 Chiller Control Form
Danfoss Turbocor Compressors Inc. 17
ECD-00007M Rev. 1
Page 21

Monitor Program Data and Controls
6 Monitor Program Data and Controls
This section provides a detailed description of the forms
and related data and controls that are accessible via the
monitor program’s user interface. The forms are organized
as follows:
• main system
• bearing calibration
• compressor control
• motor monitoring
• magnetic bearing monitor
• electronic valve tuning
6.1 Main System
The “General Data Page” allows the user to quickly view
the following major compressor parameters:
• AC input power
• compressor demand
• shaft speed
• suction temperature/pressure
• discharge temperature/pressure
• IGV % open
To view the “General Data Page”, select “Window” →
“Main System” from the menu bar. Table 4 provides a
description of the “General Data Page” parameters.
The “General Data Page” also plots the following
parameters with respect to time:
• chiller control
• system information
• EEPROM settings
• compressor event log
• history data
• trending
• compressor map
• fault captures
• data captures
• evaporating temperature
• condensing temperature
• power input
• shaft speed
•IGV % Open
• demand
The units used to display the temperature readings depend
on the measurement unit set (Metric: ºC; Imperial: ºF). To
verify or change the measurement unit, refer to section 6.3
"Compressor Control" on page 23. The time displayed
corresponds to the PC system time, and is displayed in
HH:MM format. To clear the graphs, click on the “Reset
Graphs” button.
18 Danfoss Turbocor Compressors Inc.
ECD-00007M Rev. 1
Page 22

Service Monitor User Manual
Figure 19 General Data Page
Table 4 General Data Page Parameters
Parameter Description
Ts [sat] Saturated suction temperature
Tc [sat] Saturated discharge temperature
3 Phase Power In 3-phase AC input power (mains input)
Shaft Speed Actual shaft speed in RPM
Compressor Demand Requested motor power demand as a percentage of maximum motor
power [kW].
Discharge Pressure The actual discharge gauge pressure at the compressor flange as
measured by the suction pressure transducer.
Discharge Temperature The actual discharge temperature at the compressor flange as
measured by the suction temperature/pressure transducer.
Suction Temperature The actual suction temperatur e at the compresso r flange as measured
by the suction temperature/pressure transducer.
Suction Pressure The actual suction pressure at the compressor flange as measured by
the suction pressure transducer.
IGV % Open % of Inlet guide vane opening, 0.0% means the vanes are at 90º to the
pipe line (Fully closed). 110% means 10º over turned from fully open.
Fault Text Box Displays the compressor’s most recent active critical fault. Refer to
6.3.2 "Compressor Faults/Alarms" for fault details.
Alarm Text Box Displays the compressor’s most recent active alarm. Refer to 6.3.2
"Compressor Faults/Alarms" for alarm details.
Interlock Statu s Displays the status of the interlock: either open or closed.
Danfoss Turbocor Compressors Inc. 19
ECD-00007M Rev. 1
Page 23

Monitor Program Data and Controls
6.2 Bearing Calibration
The “Calibration Data” window allows the user to view and
compare the data of the latest calibration performed with
the latest stored calibration data, thus allowing the user to
verify that the bearing calibration was performed
successfully. It also allows the user to perform a manual
bearing calibration.
To view the “Calibration Data” window: from the menu
bar, select “Advanced”→ “Bearing Calibration” .
NOTE:
Bearing calibration is always automatically performed
during compressor startup.
Figure 20 Bearing Calibration Window
The “Description” column lists the calibration data
parameters. A more detailed description of the calibration
data parameters is provided in Table 5.
The “Latest Check” column shows the calibration data of
the latest calibration performed.
The “Stored Calibration” column shows the calibration data
of the latest saved calibration data.
The “Diff” column shows the difference between the
“Latest Check” value and the “Stored Calibration” value.
Clicking on the “Save Calibration” button stores the data
from the “Latest Check” as the “Stored Calibration” data.
Clicking on the “Save Data To File” button saves the
calibration data displayed on the “Calibration Data” screen
to a .csv file, which may be viewed using a spreadsheet
editor such as Microsoft® Excel.
Clicking on the “Perform Calibration” button, performs a
manual bearing calibration.
Table 5 Calibration Data Details
Data Parameter Description
FRX Min Minimum DC voltage indicating minimum front radial x displacement.
FRX Max Maximum DC voltage indicating maximum front radial x displacement.
FRY Min Minimum DC voltage indicating minimum front radial y displacement.
20 Danfoss Turbocor Compressors Inc.
ECD-00007M Rev. 1
Page 24

Service Monitor User Manual
Table 5 Calibration Data Details
Data Parameter Description
FRY Max Maximum DC voltage indicating maximum front radial y displacement.
BRX Min Minimum DC voltage indicating minimum rear radial x displacement.
BRX Max Maximum DC voltage indicating maximum rear radial x displacement.
BRY Min Minimum DC voltage indicating minimum rear radial y displacement.
BRY Max Maximum DC voltage indicating maximum rear radial y displacement.
Ax Min Minimum DC voltage indicating minimum axial displacement.
Ax Max Maximum DC voltage indicating maximum axial displacement.
FRX Gain Gain Formula: Fixed Voltage / (FRX Min Voltage - FRX Max Voltage)
FRX Offset Difference between the x-component of the front radial sensor center and the
x-component of the front touchdown bearing center. Refer to Figure 22.
FRX HW Offset Hardware offset.
FRY Gain Gain Formula: Fixed Voltage / (FRY Min Voltage - FRY Max Voltage)
FRY Offset Difference between the y-component of the front radial sensor center and the
y-component of the front touchdown bearing center. Refer to Figure 22.
FRY HW Offset Hardware offset.
BRX Gain Gain Formula: Fixed Voltage / (BRX Min Voltage - BRX Max Voltage)
BRX Offset Difference b etween the x-com ponent of the re ar r adia l sen sor ce nter a nd th e x-
component of the rear touchdown bearing center. Refer to Figure 22.
BRX HW Offset Hardware offset.
BRY Gain Gain Formula: Fixed Voltage / (BRY Min Voltage - BRY Max Voltage)
BRY Offset Dif fe re nce between the y-compon ent of the re ar r adia l sen sor ce nter and th e y-
component of the rear touchdown bearing center. Refer to Figure 22.
BRY HW Offset Hardware offset.
Ax Gain Gain Formula: Fixed V oltage / (Ax Min Voltage - Ax Max Voltage)
Ax Offset Difference between the axial sensor zero and the touchdown axial center.
Refer to Figure 23.
Ax HW Offset Hardware offset.
Time Stamp Date and time of calibration.
Danfoss Turbocor Compressors Inc. 21
ECD-00007M Rev. 1
Page 25

Monitor Program Data and Controls
Figure 21 Magnetic Bearing Configuration
6.2.1 Bearing Calibration Procedure
For the bearing calibration to be performed:
• The shaft must be de-levitated
• The interlock connection on the Chiller Interface
module must be open
1. Turn OFF the AC input power to the compressor and
wait 3-5 minutes for the capacitors to discharge.
2. Turn ON the AC input power to the compressor.
3. Launch the monitor program. If the monitor program is
already running, close it and open it again.
4. Change the compressor control mode to “Calibration
Mode”. Refer to 6.3 "Compressor Control" on page 23.
NOTE:
In Calibration mode, the compressor prepares itself for
calibration. Any external demand will be blocked from the
system, i.e., any external computer, PLC, building
management system, or automatic control will not be able
to write to the compressor.
Figure 22 Front and Rear Bearing Offset
Figure 23 Axial Bearing Offset
5. From the menu bar, select “Advanced”→ “Bearing
Calibration”. The “Startup Check Calibration Data”
window appears, as shown in Figure 20.
6. Click on “Perform Calibration”. The message “Bearing
Calibration in Progress” appears. Observe if the
compressor makes a distinctive knocking noise; this
confirms the calibration is in progress. Do not click on
“Save Calibration”.
7. Open the “Compressor Event Log” window. From the
menu bar, select “W indow”→ “Event Log”, or click on
the “Event Log” icon located below the menu bar.
Verify that the following message is displayed:
- “Bearing Calibration Performed”
Verify that the following error is not displayed:
- “Bearing Error: Calibration Failed”
If the bearing calibration is reported to have failed, try
to perform the bearing calibration one more time. If the
bearing calibration is still not successful, contact
Turbocor technical support.
8. For the following parameters in the “Startup Check
Calibration Data” window , compare the values between
22 Danfoss Turbocor Compressors Inc.
ECD-00007M Rev. 1
Page 26

Service Monitor User Manual
the “Latest Check” and the “Stored Calibration”; see
6.2.2 "Calibration Data Interpretation":
- FRX Gain
- FRY Gain
- BRX Gain
- BRY Gain
- AX Gain
6.2.2 Calibration Data Interpretation
“Gain” Interpretation
• One or more of the gains are zero
Interpretation: There is an electrical fault.
Refer to the Troubleshooting Manual for the appropriate
troubleshooting procedure.
6.3 Compressor Control
• The difference between the “Latest Check” and
“Stored Calibration” is less than 20% of the “Stored
Calibration” value
Interpretation: Bearing calibration was successful.
• The difference between the “Latest Check” and
“Stored Calibration” is greater than 20% of the
“Stored Calibration” value
Interpretation: Excess carbon obstructing the shaft.
Refer to the Troubleshooting Manual for the appropriate
troubleshooting procedure.
“Offset” Interpretation
Only the difference between the “Latest Check” offset and
the “Stored Calibration” offset is important. The “Latest
Check” offset value or the “Stored Calibration” offset value
by itself has no significance. The change between the offset
values signifies a change in the area of shaft orbit.
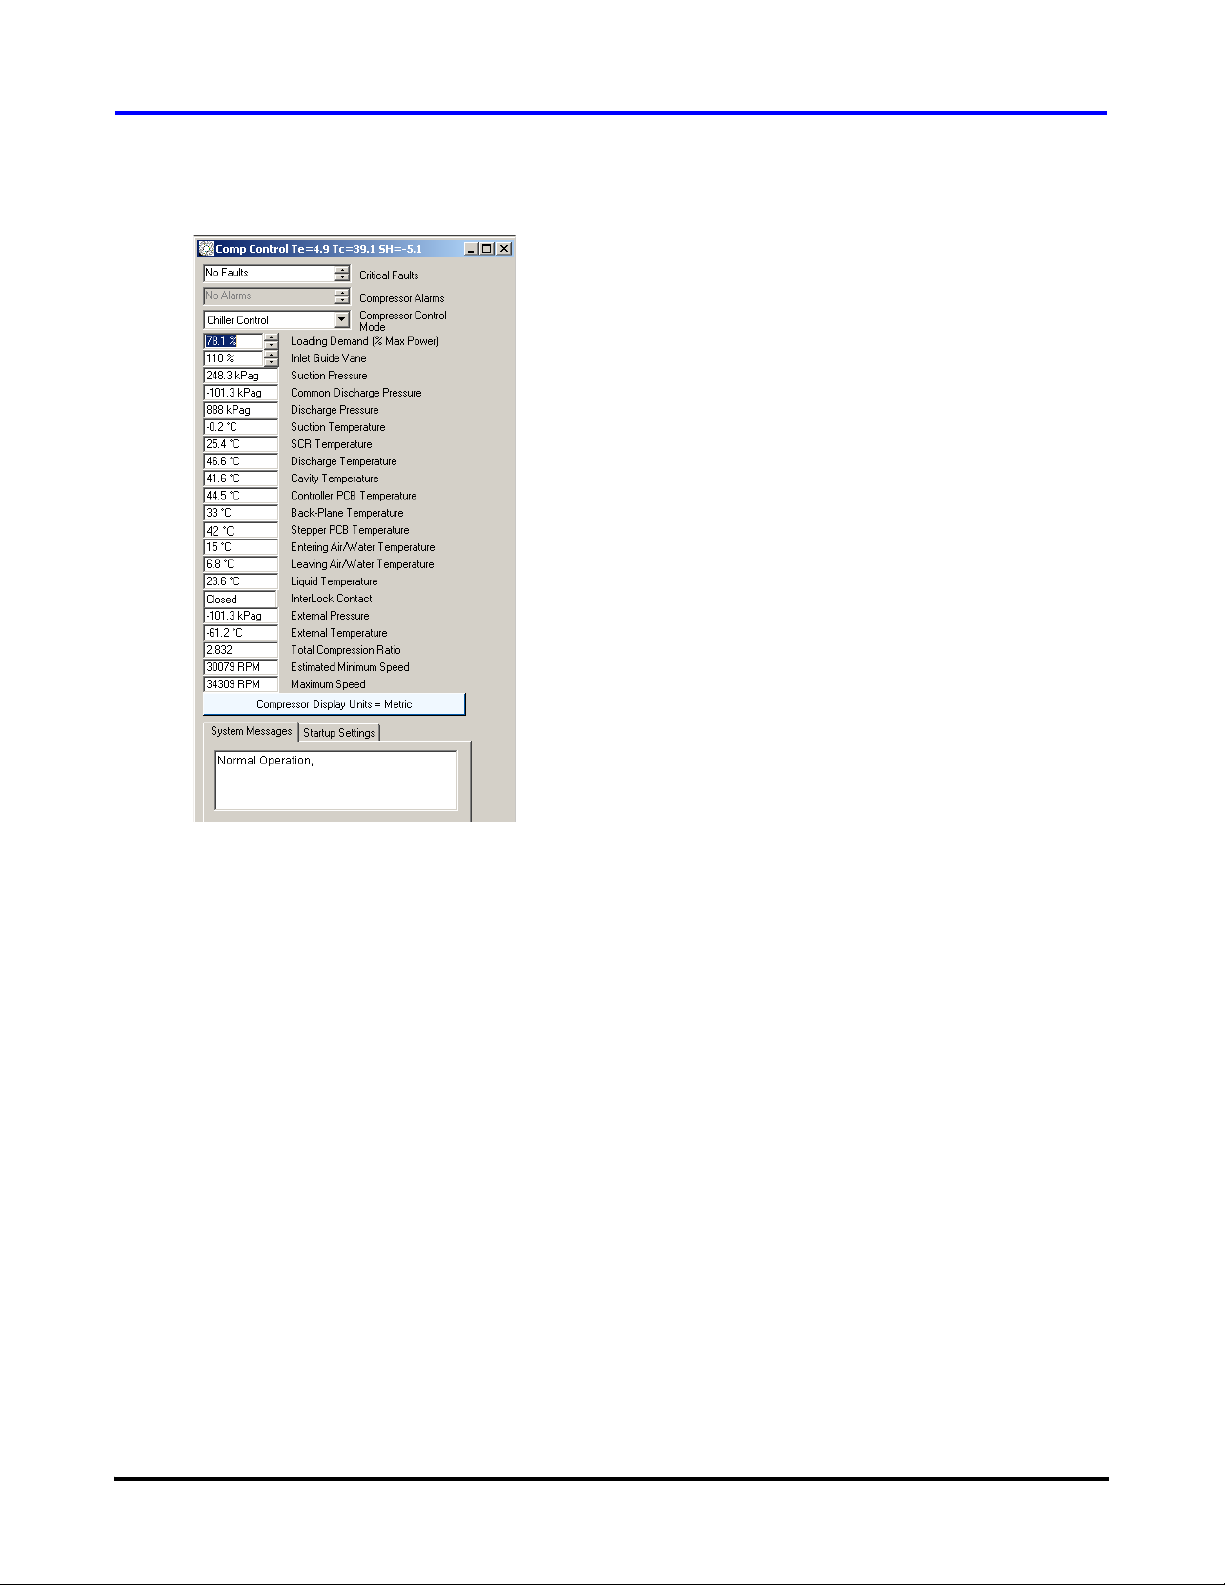
The “Compressor Controller” window allows the user to:
• Control the suction pressure at compressor start-up
• Set the compressor control mode
• Set the compressor loading demand
• Set the inlet guide vane opening
• View the current temperature and pressure sensor
readings
• View the compressor control faults and alarms
• View the sys tem messages
To view the “Compressor Controller” window, click on the
“Compressor Controller Parameters” icon located below the
menu bar. Table 6 provides a description of the compressor
controller parameters.
IMPORTANT:
To change a parameter setting, double-click the variable
field, scroll or type in the new setting, and press Enter. It is
important to press Enter as this causes the user input to be
validated.
Danfoss Turbocor Compressors Inc. 23
ECD-00007M Rev. 1
Page 27

Monitor Program Data and Controls
Figure 24 Compressor Controller Form
24 Danfoss Turbocor Compressors Inc.
ECD-00007M Rev. 1
Page 28

Service Monitor User Manual
Table 6 Compressor Controller Parameters
Parameter Description
Te (on title bar) Evaporation Temperature
Tc (on title bar) Condensation Temperature
SH (on title bar) Superheat Calculation [Metric: ºK; Imperial: ºR]
If the absolute superheat value is < 5, then the gas is wet and will
cause the motor to overwork (as wet gas is heavier than dry gas).
Critical Faults Displays the compressor’s most recent active critical fault.
Refer to 6.3.2 "Compressor Faults/Alarms" for furt he r de tails.
Compressor Alarms Displays the compressor’s most recent active critical alarm.
Refer to 6.3.2 "Compressor Faults/Alarms" for furt he r de tails.
Compressor Control Mode Selects the source of demand for the compressor: Calibration, Manual
Control, Analog Input, Modbus Network, or Chiller Control. Refer to
6.3.1 "Compressor Control Modes" for further details.
Loading Demand (% max power) Compressor Demand: requested motor power demand as a
percentage of the maximum motor power [kW].
Inlet Guide Vane % of Inlet guide vane opening, 0.0% means the vanes are at 90º to the
pipe line (Fully closed). 110% means 10º over turned from fully open.
Suction Pressure The actual suction gauge pressure at the compressor flange as
measured by the suction pressure transducer.
Common Discharge Pressure Used when an extra discharge pressure transducer is mounted to a
common discharge line in the case of multiple compressors.
Discharge Pressure The actual discharge gauge pressure at the compressor flange as
measured by the discharge pressure transducer.
Suction Temperature The actual suction temperature at the compressor flange as measured
by the suction temperature/pressure transducer.
SCR Temperature Temperature of the SCR heat sink plate.
Discharge Temperature The actual discharge temperature at the compressor flange as
measured by the discharge temperature/pressure transducer.
Cavity Temperature Temperature of the superheated gas moving past the shaft.
Controller PCB Temperature Temperature of the BMCC circuit board.
Backplane Temperature Temperature of the backplane.
Stepper PCB Temperature Temperature of the serial driver circuit board.
Entering Air/water Temperature Temperature as measured by the 10K thermistor connected to the
terminals marked “ENTRY” on the Chiller Interface module.
Leaving Air/water Temperature Temperature as measured by the 10K thermistor connected to the
terminals marked “LEAVE” on the Chiller Interface module.
Interlock Contact Status of the digital input marked “I/LOCK” on the Chiller Interface
module. Possible values are “OPEN” and “CLOSED”. If condition is
open the compressor will not run.
External Pressure Gauge pressure as measured from a pressure transducer connected
to the terminals marked “SPARE P” on the Chiller Interface module.
External Temperature Temperature as measured from a thermistor connected to the
terminals marked “SPARE T” on the Chiller Interface module.
Danfoss Turbocor Compressors Inc. 25
ECD-00007M Rev. 1
Page 29

Monitor Program Data and Controls
Table 6 Compressor Controller Parameters (Continued)
Parameter Description
Total Compression Ratio Ratio of the absolute discharge pressure and the absolute suction
pressure.
Estimated Minimum Speed Estimated minimum RPM the compressor can run at with a fully open
inlet guide vane.
Maximum Speed Maximum RPM the compressor can run at for a given set of inlet and
outlet conditions.
Compressor Display Units Button Changes the measurement unit used when button is pressed.
The options are:
• Metric Units - kPa, ºC, ºK
• Imperial Units - Psi, ºF, ºR
System Messages Describes the state of the system.
Start-up Settings
- Suction Press Start Limit (% Trip)
Start-up Settings
- Suction Start Press Fault delay
Start-up Settings
- Suction Pressure Delay
(Count down)
Temporary alarm and trip limit for the suction pressure. The limit is set
up as a % of the current suction pressure limit, e.g. if a suction
pressure trip of 270 kPa was set and the suction pressure start limit
was set to 50%, the temporary suction pressure trip limit would be 135
kPa. This temporary limit is only active while the Suction press start
fault delay is timing down.
Time in seconds that the temporary suction pressure alarm / fault limit
should be enabled.
Current count down in seconds. The timer starts to count down once
the shaft starts to rotate.
6.3.1 Compressor Control Modes
Calibration
In Calibration mode, the compressor prepares itself for
calibration. Any external demand will be blocked from the
system, i.e., any external computer, PLC, building
management system, or automatic control will not be able
to control the compressor.
In Calibration mode, the user may only calibrate the
bearings. Refer to section 6.2 "Bearing Calibration" on page
20.
NOTE:
The compressor must be de-levitated, and the Chiller
Interface interlock circuit must be open for the compressor
to be calibrated.
Manual Control
In Manual Control mode, the user:
• Must set the “Loading Demand (% max power)”
parameter from the “Compressor Control” window.
Refer to 6.3 "Compressor Control".
• Must set the “Inlet Guide Vane” (% opening) from
the “Compressor Control” window. Refer to 6.3
"Compressor Control".
• Must set the “Desired Shaft Speed (RPM)”
parameter from the “Magnet Motor Monitoring”
window. Refer to section 6.4 "Motor Monitoring" on
page 28.
• May calibrate the bearings. Refer to section 6.2
"Bearing Calibration" on page 20.
Use Manual Control mode when servicing or
troubleshooting the compressor.
26 Danfoss Turbocor Compressors Inc.
ECD-00007M Rev. 1
Page 30

NOTE:
In Manual Control mode, the Chiller Interface interlock
switch has no effect on the compressor state.
Analog Input
The Analog Input mode controls the compressor loading
using an analog demand signal of 0-10 VDC from an
external controller. The variable demand signal corresponds
to the range of 0-100% maximum power available.
NOTE:
The Chiller Interface interlock switch must be closed and
no errors present for the compressor to start up and run.
Modbus Network
In Modbus Network mode, the compressor receives a
demand from an external computer, PLC, or building
management system using the Modbus protocol on a RS232 or RS4-85 communication link.
In Modbus Network mode, the user may only set the
“Loading Demand (% max power)” parameter from the
“Compressor Controller” window. Refer to 6.3
"Compressor Control". All other parameters in the monitor
program may only be viewed.
NOTE:
The Chiller Interface interlock switch must be closed and
no errors present for the compressor to start up and run.
Chiller Control
The Chiller Control mode is fully automatic and controls
the chilled water or air temperature using a temperature
sensor connected directly to the Chiller Interface module.
This mode can also be used to control evaporating
Service Monitor User Manual
temperature which is derived from the suction pressure
measurement.
NOTE:
The Chiller Interface interlock switch must be closed and
no errors present for the compressor to start up and run.
6.3.2 Compressor Faults/Alarms
This section describes the possible “Critical Faults” and
“Compressor Alarms” displayed in the “Compressor
Controller” window. Table 7 provides a description of the
possible cause of the fault/alarm.
If a compressor controller fault/alarm occurs, it is an
indication that the EEPROM fault/alarm limit setting has
been exceeded. Check that the EEPROM fault/alarm limit
settings are adequate for the current compressor load. From
the menu bar, select “Window”→ “Eeprom Settings”, or
click on the “Eeprom Settings” icon located below the
menu bar. Then select the “CC Trip Limits” tab to view the
“Compressor General Fault Limits”, or select the “CC
Alarm Limits” tab to view the “Compressor General Alarm
Limits”. Refer to section 6.9 "EEPROM Settings" on page
39. If the current user access level does not permit viewing
of the EEPROM settings, contact a service technician with a
higher access level
If a fault or alarm occurs, refer to the Troubleshooting
Manual for the appropriate procedure(s) to follow.
NOTE:
A “Compressor Alarm” will slow down the motor, whereas
a “Critical Fault” will trip the motor. A “Compressor
Alarm” occurs when a compressor parameter (e.g.
temperature/pressure) has exceeded its alarm limit setting.
A “Critical Fault” occurs when a compressor parameter has
exceeded its fault limit setting.
Table 7 Compressor Faults and Alarms
Fault / Alarm Possible Cause
Inverter Temperature Fault / Alarm Insufficient motor cooling
Discharge Temperature Fault / Alarm Insufficient charge (not enough gas)
Suction Pressure Fault / Alarm Insufficient charge or insufficient system load
Discharge Pressure Fault / Alarm Faulty condenser
Note: A “Discharge Pressure” fault will lock out the compressor.
The compressor will have to be powered down and restarted.
Danfoss Turbocor Compressors Inc. 27
ECD-00007M Rev. 1
Page 31

Monitor Program Data and Controls
Table 7 Compressor Faults and Alarms (Continued)
Fault / Alarm Possible Cause
3-Phase Over-Current Fault / Alarm Excessive system load (usually due to compressor pumping liquid).
Note: A “3 Phase Over Current” fault will lock out the compressor.
The compressor will have to be powered down and restarted.
Cavity Temperature Fault / Alarm Insufficient motor cooling
Leaving Water Temp Fault / Alarm Insufficient water flow.
Compression Ratio Fault / Alarm Faulty condenser or insufficient load on the evaporator.
BMC Fault Faulty BMCC
Sensor Fault Faulty sensor or faulty BMCC
SCR Temperature Fault / Alarm Insufficient cooling to the SCR plate
Lock Out Fault If any (or a combination of) the alarms listed below occurs more
than 3 times within 30 minutes, a “Lock Out Fault” occurs:
• Inverter temperature alarm
• Cavity temperature alarm
• SCR temperature alarm
Winding Temperature Fault Motor winding temperature has exceeded 155ºC
6.4 Motor Monitoring
6.4.1 Motor Monitoring Overview
The “Variable Speed Permanent Magnet Motor
Monitoring” window allows the user to:
• View the actua l shaft speed, and set the de sired shaft
speed
• View motor parameters such as current, voltage, and
power
• View motor faults and alarms
• View the number of energized motor cooling
solenoids
• View the Soft-Start Controller data
To view the “Variable Speed Permanent Magnet Motor
Monitoring” window, select “Window”→ “Motor” from the
menu bar, or click on the “Motor Monitor” icon located
below the menu bar. Table 8 provides a description of the
motor monitoring parameters.
NOTE:
The measurement unit (metric/imperial) displayed depends
on the measurement unit previously set. To verify or change
the measurement unit, refer to section 6.3 "Compressor
Control" on page 23.
IMPORTANT:
To change a parameter setting, double-click the variable
field, scroll or type in the new setting, and press Enter. It is
important to press Enter as this causes the user input to be
validated.
28 Danfoss Turbocor Compressors Inc.
ECD-00007M Rev. 1
Page 32

Service Monitor User Manual
Figure 25 Motor Monitoring Form
Table 8 Motor Monitoring Parameters
Parameter Description
General Motor Data:
Actual Shaft Speed (RPM) Actual shaft speed in RPM.
Desired Shaft Speed (RPM) Commanding shaft speed in RPM (always higher than the actual shaft
speed).
Inverter Side Motor Amps = Id Current output from the IGBT Inverter to the motor.
Torque-generating current component.
Inverter Side Motor Amps = Iq Current output from the IGBT Inverter to the motor.
Flux-generating current component.
Earth Leakage Current Motor current that leaks to ground due to an insulation fault.
Calculated Total Power Calculated 3-phase input power in kW.
Requested Motor Power Requested motor power in kW. Value is a function of the compressor
model designation and demand percentage. The demand percentage
is set through the “Loading Demand (% max power)” in the
“Compressor Controller” window. Refer to section 6.3 "Compressor
Control" on page 23.
Inverter Temperature Inverter temperature as measured by thermistor mounted under the
IGBT Inverter.
Back EMF Value Internal motor voltage
Fault Code Hexadecimal motor fault code from the bearing motor control.
Alarm Code Hexadecimal motor alarm code from the bearing motor control.
Danfoss Turbocor Compressors Inc. 29
ECD-00007M Rev. 1
Page 33

Monitor Program Data and Controls
Table 8 Motor Monitoring Parameters (Continued)
Parameter Description
Fault Text Box Displays the motor’s most recent active fault.
Refer to 6.4.2 "Motor Faults / Alarms" for alarm details.
Alarm Text Box Displays the motor’s most recent active alarm.
Refer to 6.4.2 "Motor Faults / Alarms" for fault details.
Motor Cooling:
Number of solenoids energized Indicates the number of motor-cooling solen oids that are open.
Soft Start Data:
Three-Phase Mains Voltage Calculated three phase mains voltage.
Three-Phase Current Calculated three phase mains current.
DC Bus Regulation Percentage of maximum DC Bus output voltage.
DC Bus Volt age DC Bus Voltage as measured at the inverter
Graph: Amps Id & Iq Graphical representation of the torque-generating current (Id) and the
flux-generating current (Iq) versus time.
Under normal conditions, when the motor is driving, Iq should
decrease to at least -1 during compressor start-up, an d the “Amps - Id
& Iq” graph should look like:
The turquoise line represents Id, and the red line represents Iq.
Notice that the red line (Iq) dips to negative values. If Iq does not
decrease to negative values during compressor start-up, then there is
no motor drive.
Id should stabilize towards the torque value;
Iq should stabilize towards zero at medium motor speeds, and
increase with positive values at high motor speeds.
6.4.2 Motor Faults / Alarms
This section describes the possible faults displayed in the
“Variable Speed Permanent Magnet Motor Monitoring”
30 Danfoss Turbocor Compressors Inc.
window. Table 9 provides a description of the possible
cause of the fault/alarm. If a fault or alarm occurs, refer to
the Troubleshooting Manual for the appropriate
procedure(s) to follow.
ECD-00007M Rev. 1
Page 34

NOTE:
A motor alarm will slow down the motor, whereas a motor
fault will trip the motor.
Table 9 Motor Faults and Alarms
Fault / Alarm Possible Cause
Service Monitor User Manual
Motor Single Phase Over-Current
Detected
DC Bus Over-Voltage Detected DC bus voltage exceeds acceptable voltage range.
Motor High Current Warning The AC input voltage is too low, or the compressor is overloaded
Motor High Current Fault The AC input voltage is too low, or the compressor is overloaded
Inverter Error Signal Faulty IGBT Inverter
Over-Current During S tartup - Rotor
May Be Locked
Bearing Warning Active The shaft is out of orbit, the compressor communication is affected
Bearing Error Active Shaft is blocked or the bearings are faulty.
Output voltage on the motor Faulty IGBT Inverter.
Soft Start Error Detected Faulty Soft Start Controller.
24Vdc Fault Faulty 24VDC supply.
Motor back EMF is low. Motor magnet strength is weak, possibly caused by insufficient
EEPROM checksum error. Faulty BMCC.
Generator mode active Compressor is coasting down due to loss of power supply.
SCR phase loss Excessive imbalance may exist between the phases.
Excess liquid at the suction valve, thus causing the motor to
overwork and generate too much current.
(due to wet gas or exceeded compressor capacity).
(due to wet gas or exceeded compressor capacity).
Too m uch cur rent output to the shaft (rotor) during compressor
start-up.
by noise, or there is excessive compressor load.
motor cooling.
6.5 Magnetic Bearing Monitoring
6.5.1 Bearing Monitoring Overview
The “Magnetic Bearing Monitoring” window allows the
user to:
• Change the shaft levitation state
• View the shaft unbalance percentage
• View the current required to counteract the shaft
unbalance
• View bearing faults and alarms
Danfoss Turbocor Compressors Inc. 31
ECD-00007M Rev. 1
T o view the “Magnetic Bearing Monitoring” window , select
“Window”→ “Bearing” from the menu bar, or click on the
“Magnetic Bearings” icon located below the menu bar.
Table 10 provides a description of the bearing monitorin g
parameters.
IMPORTANT:
To change a parameter setting, double-click the variable
field, scroll or type in the new setting, and press Enter. It is
important to press Enter as this causes the user input to be
validated.
Page 35

Monitor Program Data and Controls
Figure 26 Magnetic Bearing Monitoring Form
Table 10 Bearing Monitoring Parameters
Parameter Description
Shaft Levitation State Shaft state control.
When in the “Shaft Levitated” st ate, click the up ar row to change to the
“Shaft De-Levitated” state
When in the “Shaft De-Levitated” st ate, click the down ar row to change
to the “Shaft Levitated” state
Note: Shaft state may only be changed while in Manual Control Mode.
Refer to section 6.3 "Compressor Control" on page 23.
Axial Unbalance % Percentage unbalance of total allowable axial displacement.
Front Radial Unbalance % Percentage unbalance of total allowable front radial displaceme n t.
Rear Radial Unbalance % Percentage unbalance of total allowable rear radial displacement.
Axial Bearing Force (Amps) Current required to counteract axial unbalance force.
Front X Bearing Force (Amps) Current required to counteract front x unbalance force.
Front Y Bearing Force (Amps) Cur rent required to counteract front y unbalance force.
Rear X Bearing Force (Amps) Current required to counteract rear x unbalance force.
Rear Y Bearing Force (Amps) Current required to counteract rear y unbalance force.
Fault Code Hexadecimal bearing fault code from the bearing motor control.
32 Danfoss Turbocor Compressors Inc.
ECD-00007M Rev. 1
Page 36

Service Monitor User Manual
Table 10 Bearing Monitoring Parameters (Continued)
Parameter Description
Alarm Code Hexadecimal bearing alarm code from the bearing motor control.
Fault Text Box Displays the most recent active bearing fault.
Refer to 6.5.2 "Bearing Faults" for fault details.
Graph Graphical representation of the front radial orbit of the shaft.
Percentile shown at the bottom right-hand corner in dicates the average
front orbit displacement.
Note: The domain of the graph shows half of the allowable area of
shaft displacement. However, if the shaft orbit is shown to exceed 500
units in any direction, then there is excessive shaft vibration, possibly
caused by a surge of gas flow.
6.5.2 Bearing Faults
This section describes the possible faults displayed in the
“Magnetic Bearing Monitoring” window. Table 11 provides
a description of the possible cause of the fault. If a fault
occurs, refer to the Troubleshooting Manual for the
appropriate procedure(s) to follow.
Table 11 Bearing Faults
Fault Possible Cause
Calibration Failed Manual calibration performed on compressor failed.
Startup Check Failed Automatic calibration during compressor startup failed.
Axial Displacement Fault Current force exerted on the axial bearing exceeds 60% of the
calibration value.
Front Radial Displacement Fault Current force exerted on the front radial bearing exceeds 60% of
the calibration value.
Rear Radial Displacement Fault Current force exerted on the rear radial bearing exceeds 60% of the
calibration value.
Axial Static Load Current force exerted on the axial bearing exceeds 2.5 amps.
Front Radial Static Load Current force exerted on the front radial bearing exceeds 2.5 amps.
Back Radial Static Load Current force exerted on the back ra dial bearing exceed s 2.5 amp s.
6.6 Electronic Valve Data / Tuning
The “Electronic Valve Data / Tuning” window allows the
user to:
• Control the electronic expansion valve stepper
motors
• Control the analog output
To view the “Electronic Valve Data / Tuning” window,
select “Window”→ “Expansion V alves” from the menu bar ,
or click on the “Expansion Valves” icon located below the
menu bar.
To access the stepper motor control settings, select the
“Stepper Motor” tab. The “EXV#1 Control Settings”
controls the stepper motor connected to “EXV1” on the
Danfoss Turbocor Compressors Inc. 33
ECD-00007M Rev. 1
Page 37

Monitor Program Data and Controls
Chiller Interface module. Similarly, the “EXV#2 Control
Settings” controls the stepper motor connected to “EXV2”
on the Chiller Interface module. Table 12 describes the
stepper motor control parameters.
To access the analog output controls, select the “Analogue
Output” tab. The “Analog Output Controls” controls the
output labeled “Analog” on the Chiller Interface module.
Table 13 describes the analog output control parameters.
NOTE:
The measurement unit (metric/imperial) displayed depends
on the measurement unit previously set. To verify or change
the measurement unit, refer to section 6.3 "Compressor
Control" on page 23.
IMPORTANT:
To change a parameter setting, double-click the variable
field, scroll or type in the new setting, and press Enter. It is
important to press Enter as this causes the user input to be
validated.
Figure 27 Electronic Valve Data / Tuning Form
34 Danfoss Turbocor Compressors Inc.
ECD-00007M Rev. 1
Page 38

Service Monitor User Manual
Table 12 Electronic Valve Data / Tuning Parameters (Stepper Motors)
Parameter Description
Control Mode Selects which control variable will be maintained by the stepper motor
output. The options are:
1. Superheat control using the compressor flange temperature and
pressure (this mode is not recommended as the temperatur e at the
compressor flange is influenced by external factors).
2. Superheat control using the compressor flange pressure and a
10K thermistor that is connected to the terminals labeled “ENTR Y”
on the Chiller Interface module.
3. Superheat control using the compressor flange pressure and a
10K thermistor that is connected to the terminals labeled “LIQT” on
the Chiller Interface module.
4. Superheat control using an external temperature and pressure
sensor connected to the terminals labeled “SPARE T” & “SPARE
P” on the Chiller Interface module.
5. Liquid Level 1 control usin g a lev el sen so r co nn ec te d to the
terminals on the Chiller Interface module labeled “LIQ LEV1”.
6. Liquid Level 2 control usin g a lev el sen so r co nn ec te d to the
terminals on the Chiller Interface module labeled “LIQ LEV2”.
7. Load Balance control uses the compressor’s own internal control
algorithm to determine the best mix of speed control, inlet guide
vane opening and load balance valve opening.
Auto/Manual In automatic mode the compressor has complete control over the
stepper motor output. In Manual mode the user is able to enter the
valve position.
Process Value Value of the controlled variable selected from the Control Mode.
Valve % Open Ratio of the actual number of steps sent to the stepper motor over the
maximum number of steps the motor is allowed to drive.
Stepper Startup % Percentage of maximum steps sent to the motor on start of the
compressor. The stepper motor will hold at this position until the
stepper start delay timer has expired.
Stepper Start Position Delay Amount of time from compressor start to hold the number of step s sent
to the motor at the stepper startup %. Value is in seconds and starts to
count down when the drive enables.
Stepper Control Setpoint Desired value of the controlled variable.
Stepper Control Loop Speed Reaction time of the control loop to a process error.
Stepper Minimum Close % The minimum close position for the valve while the compressor is
spinning.
Maximum Step Count Number of steps from fully closed to fully open for the installed stepper
motor driven device.
Graph Displays the “Process Value” parameter with respect to time. The time
corresponds to the PC system time, and is displayed in HH:MM format.
Danfoss Turbocor Compressors Inc. 35
ECD-00007M Rev. 1
Page 39

Monitor Program Data and Controls
Table 13 Electronic Valve Data / Tuning Parameters (Analog Output)
Parameter Description
Control Mode Selects which control variable will be maintained by the 0 -10 VDC
output labeled “ANALOG” on the Chiller Interface module.
The options are:
• Load Balance Valve
• Discharge Pressure
• Inlet Guide Vane %
• Superheat – Flange TP
• Superheat – FlangeP, EWT
• Superheat – FlangeP, LIQT
• Suction Pressure
•Leaving Temp
• Entering Temp
•Liquid Temp
Auto/Manual Selects the compressor control mode. In automatic mode the
compressor has complete control over the stepper motor output. In
Manual mode the user is able to enter the valve position.
Analog Output % Actual percentage of the maximum voltage sent to the output.
Analog Output Starting % Percentage of maximum voltage sent to the terminals on start of the
compressor. The analog output will hold at this position until st art delay
timer has expired.
Analog Output Start Delay Amount of time from compressor start to hold the volta ge at the star tup
percentage. Value is in seconds and starts to count down when the
drive enables.
Analog Setpoint Desired value of the controlled variable.
Analog Proportional Gain Controller Proportional Gain
Analog Integral Gain Controller Integral Gain
Analog Derivative Gain Controller Derivative Gain
Direct Acting/ Reverse Acting Control action.
Direct Acting: output increases as process variable increases.
Reverse Acting: output decreases as process variable increases.
Minimum Analog Output The minimum voltage output while the compressor is spinning.
Process Variable Value of the controlled variable.
Process Error Difference between the analog setpoint and the process variable.
Process Graph Plots the process variable (selected from the Control Mode) versus
time. Time is the PC system time, and is displayed in HH:MM format.
Output Graph Plots the percentage of the maximum o utput voltage versu s time. T ime
is the PC system time, and is displayed in HH:MM format.
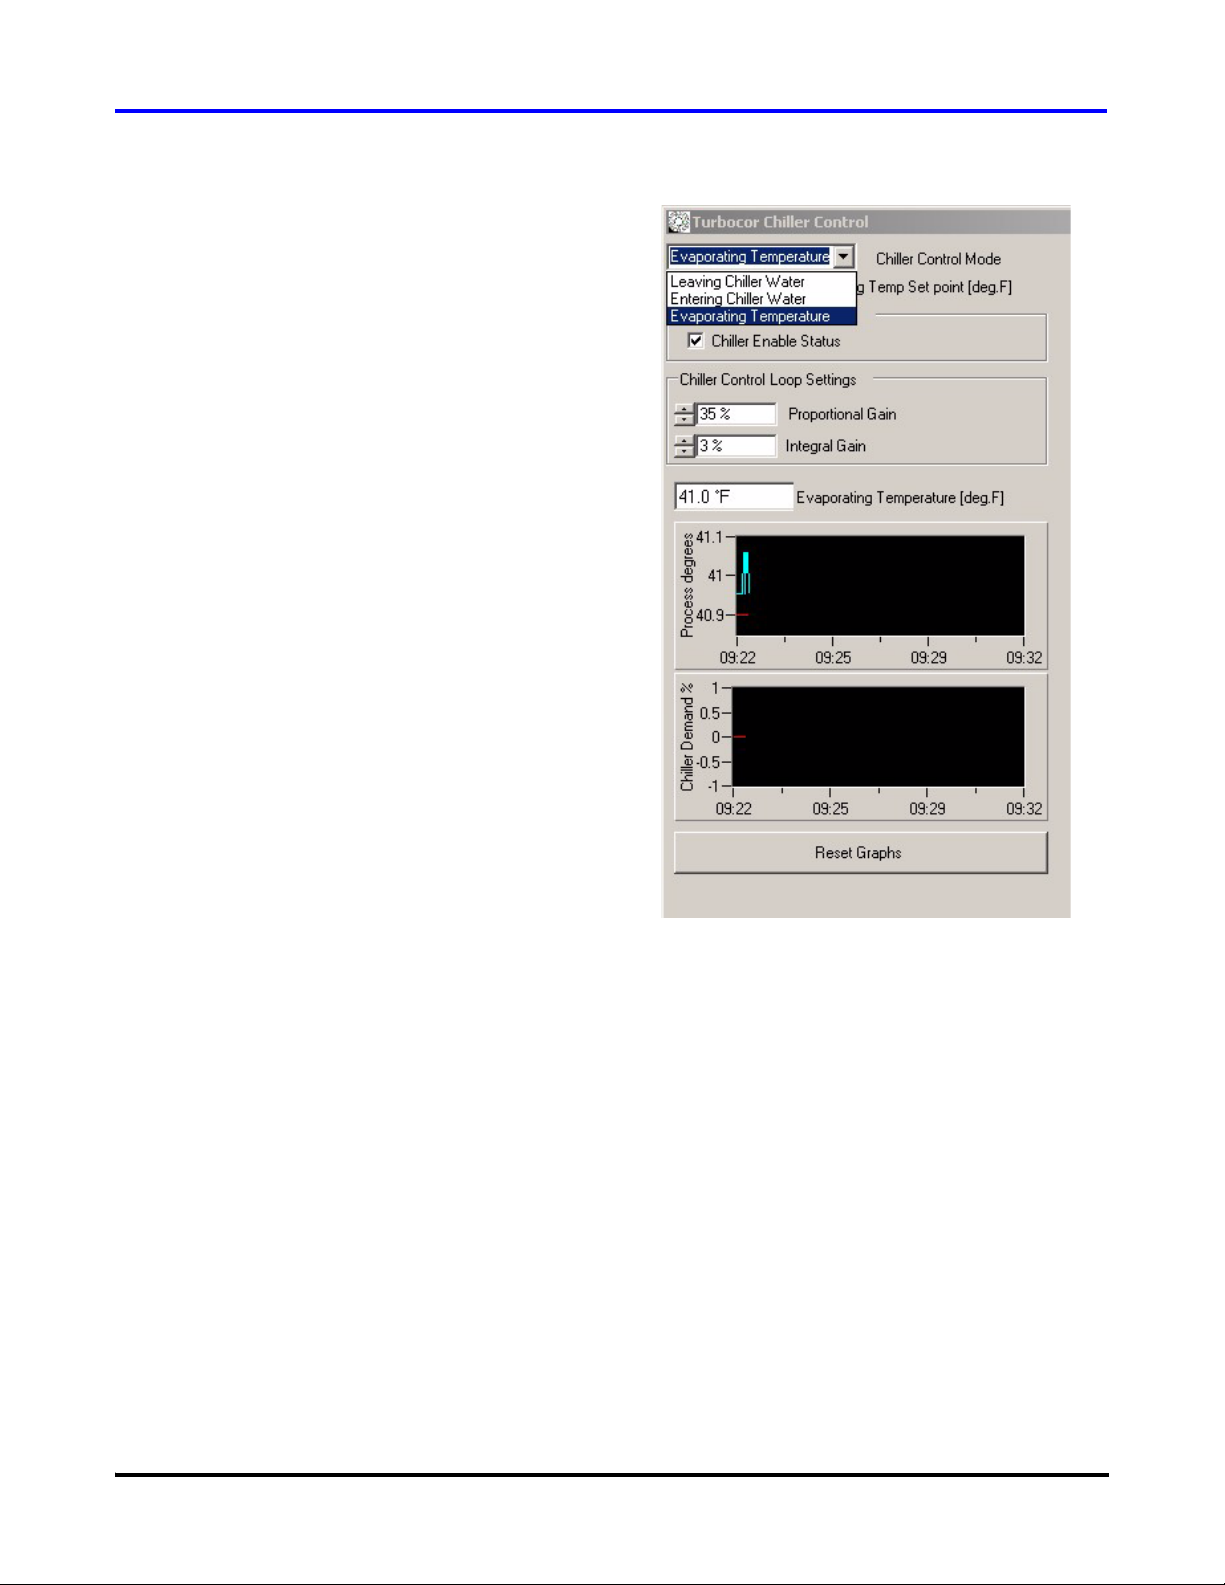
6.7 Chiller Control
The “Chiller Control” window allows the user to control
one of the following:
• Leaving chiller water or air temperature
36 Danfoss Turbocor Compressors Inc.
• Entering chiller water or air temperature
• Evaporating (saturated suction) temperature
ECD-00007M Rev. 1
Page 40

To view the “Chiller Control” window, select “Window”→
“Chiller Control” from the menu bar, or click on the
“Chiller Control” icon located below the menu bar. T able 14
provides details about the chiller controller parameters.
NOTE:
The measurement unit (metric/imperial) displayed depends
on the measurement unit previously set. To verify or change
the measurement unit, refer to section 6.3 "Compressor
Control" on page 23.
Service Monitor User Manual
IMPORTANT:
To change a parameter setting, double-click the variable
field, scroll or type in the new setting, and press Enter. It is
important to press Enter as this causes the user input to be
validated.
Figure 28 Chiller Control Form
Danfoss Turbocor Compressors Inc. 37
ECD-00007M Rev. 1
Page 41

Monitor Program Data and Controls
Table 14 Chiller Controller Parameters
Parameter Description
Chiller Control Mode Selection of the sensor that the chiller control will try to maintain the
value of. The options are:
• Leaving Chiller Water:
Controls the water or air temperature leaving the chiller.
• Entering Chiller Water:
Controls water or air temperature entering the chiller.
• Evaporating Temperature:
Controls the evaporating (saturated suction) temperature.
Chiller Control Set Point The control set point is the value at which the controlled variable shall
be maintained. The controlled variable depends on the Chiller Control
Mode selected:
• Leaving Chiller Set Point [deg.C / deg.F]: the controlled variable
is either the leaving chiller water or air temperature.
• Entering Chiller Set Point [deg.C / deg.F]: the controlled variable
is either the entering chiller water or air temperature.
• Evaporating Temperature Set Point [deg.C / deg.F]: the
controlled variable is the evaporating (saturated suction)
temperature.
Chiller Control Enable Status
Chiller Enable Status Checked: chiller able to run
Unchecked: chiller will not run.
Chiller Control Loop Settings:
Proportional Gain Control loop - Proportional gain, 0 to 100%.
Integral Gain Control loop - Integral gain or reset, 0 to 100%.
Control Variable Temperature Indication of the current value of the controlled variable.
Controlled variable depends on the Chiller Control Mode selected:
• Leaving Chiller Water [deg.C / deg.F]
• Entering Chiller Water [deg.C / deg.F]
• Evaporating Temperature [deg.C / deg.F]
Graph: Process Graphical representation of the current value of the controlled variable
(turquoise line) and the control set point (red line).
Graph: Chiller Demand % Graphical representation of the current demand output from the chiller
control algorithm.
Reset Graphs Button Clears all data in the charts.
6.8 System Information
To access the “System Information” window, select
“Advanced”→ “System Information” from the menu bar.
The “System Information” window displays the current
DSP time (i.e. real time) and the current system time (i.e.
PC system time). Clicking on the “Reset Real Time Clock
to System Time” synchronizes the DSP time with the
system time.
38 Danfoss Turbocor Compressors Inc.
ECD-00007M Rev. 1
Page 42

Service Monitor User Manual
Figure 29 System Information
6.8.1 Compressor Info
Selecting the “Compressor Info” tab allows the user to view
the system information. Specifically, it allows the user to
view the:
• Compressor model and serial #
• BMC PCB hardware serial #
• Software revision installed
• Configuration version
Click on the “Request System Information” button to obtain
the system information.
6.9 EEPROM Settings
To access the “EEPROM Settings”, select “Window”→
“Eeprom Settings” from the menu bar, or click on the
“Eeprom Settings” icon located below the menu bar.
6.8.2 EEPROM Log Resets
Selecting the “Eeprom Log Resets” tab allows the user to:
• Reset the fault frequency counters
• Reset the fault captures
• Reset the load profile counters
(i.e. the power demand counters)
• Reset the event log
The “Eeprom Log Resets” is only accessible by authorized
service personnel.
NOTE:
Viewing and/or modifying the EEPROM settings is
restricted to users with mid level or high level access codes.
Danfoss Turbocor Compressors Inc. 39
ECD-00007M Rev. 1
Page 43

Monitor Program Data and Controls
6.9.1 Compressor Controller Settings
Select the “CC_Control” tab to view the following:
• Monitor program measurement unit selected
• Compressor Control Mode
• Chiller Control Parameters
• Compressor Startup Parameters
The compressor controller parameters are described in
Table 15.
Figure 30 EEPROM Settings - Compressor Controller Settings
Table 15 EEPROM Settings - Compressor Controller Parameters
Parameter Description
Control Mode Displays the source of demand for the compressor: Calibration,
Manual Control, Analog Input, Modbus Network, or Chiller Control.
Refer to 6.3.1 "Compressor Control Mode s" on page 26 for furt he r
details.
Display Units Displays the measurement unit used. The options are:
• Metric Units - kPa, ºC, ºK
• Imperial Units - Psi, ºF, ºR
Refer to 6.3.1 "Compressor Control Modes" for details on how to
change the measurement unit.
Chiller Control Parameters: Refer to 6.7 "Chiller Control" on page 36 for further details.
40 Danfoss Turbocor Compressors Inc.
ECD-00007M Rev. 1
Page 44

Service Monitor User Manual
Table 15 EEPROM Settings - Compressor Controller Parameters (Continued)
Parameter Description
Control Mode Displays the sensor that the chiller control will try to maintain the value
of. The options are:
• Leaving Chiller Water:
Controls the water or air temperature leaving the chiller.
• Entering Chiller Water:
Controls water or air temperature entering the chiller.
• Evaporating Temperature:
Controls the evaporating (saturated suction) temperature.
Chiller Control Set Point Value at which the controlled variable (selected through “Control
Mode”) shall be maintained.
Chiller Enable Status Checked: chiller able to run
Unchecked: chiller will not run
Proportional Gain Control loop - Proportional gain, 0 to 100%.
Integral Gain Control loop - Integral gain or reset, 0 to 100%.
Startup Parameters: Refer to 6.3 "Compressor Control" on page 23 for further details.
Suction Press Start Limit (% Trip) Temporary alarm and trip limit for th e suc tio n pr es sur e . The limit is set
up as a percentage of the current suction pressure limit, e.g. if a
suction pressure trip of 270 kPa was set and the suction pressure start
limit was set to 50% the temporary suction pressure, trip limit would be
135 kPa. This temporary alarm is only active while the Suction press
start fault delay is timing down.
Suction Press Start Fault Delay Time in seconds that the temporary suction pressure alarm / fault limit
should be enabled.
Run Status Contact Close RPM Speed at which the “Run” contact on Chiller Interface module closes.
Inlet Guide Vane Start Steps Number of Inlet Guide Vane steps at compressor startup.
Power Control Loop Speed PID loop gain for control of motor power.
6.9.2 Compressor Controller Alarms
Select the “CC Alarm Limits” tab to view the compressor
general alarm limits. Table 16 describes the general alarm
limits.
The limits represent the maximum temperature and/or
pressure values the compressor will tolerate before
activating an alarm.
Danfoss Turbocor Compressors Inc. 41
ECD-00007M Rev. 1
Once an alarm is activated, the compressor motor will slow
down, and the alarm will be reported in the “Compressor
Controller” window as well as in the “Event Log” window.
An authorized user may change the temperature and/or
pressure limits to adapt to the application needs. Note
however, that the “Inverter Temperature” and the “SCR
Temperature” alarm limits cannot be altered, as changing
these limits may cause the compressor to malfunction.
Page 45

Monitor Program Data and Controls
Figure 31 EEPROM Settings - Compressor Controller Alarm Limits
Table 16 EEPROM Settings - Compressor Controller Alarm Limit Parameters
Parameter Description
Discharge Pressure The actual discharge gauge pressure at the compressor flange as
measured by the discharge pressure transducer.
Inverter Temperature Inverter temperature as measured by thermistor mounted under the
IGBT Inverter.
Discharge Temperature The actual discharge temperature at the compressor flange as
measured by the discharge temperature/pressure transducer.
Suction Pressure The actual suction gauge pressure at the compressor flange as
measured by the suction pressure transducer.
Cavity Temperature Temperature of the superheated gas moving past the shaft.
Leaving Temperature Leavin g wat er tem p er at ur e as m ea su re d fro m the 10K ther mistor
connected to the terminals marked “LEAVE” on the Chiller Interface
module.
Total Compression Ratio Ratio of the absolute discharge pressure and the absolute suction
pressure.
Current Draw - Amps 3-phase mains input current.
SCR Temperature Temperature of the SCR heat sink plate.
Anti Start Temperature IGBT Inverter temperature limit at compressor startup.
42 Danfoss Turbocor Compressors Inc.
ECD-00007M Rev. 1
Page 46

Service Monitor User Manual
6.9.3 Compressor Controller Fault Limits
Select the “CC Trip Limits” tab to view the compressor
general fault limits. Table 17 describes the general trip
limits.
The limits represent the maximum temperature and/or
pressure values the compressor will tolerate before
activating a fault.
Once a fault occurs, the compressor motor will trip and the
fault will be reported in the “Compressor Controller”
window as well as in the “Event Log” window.
An authorized user may change the following fault limits to
adapt to the application needs:
• Suction Pressure
• Leaving Temperature
• Total Compression Ratio
All other fault limits cannot be altered, as changing these
limits may cause the compressor to malfunction.
Figure 32 EEPROM Settings - Compressor Controller Fault Limits
Danfoss Turbocor Compressors Inc. 43
ECD-00007M Rev. 1
Page 47

Monitor Program Data and Controls
Table 17 EEPROM Settings - Compressor Controller Fault Limit Parameters
Parameter Description
Discharge Pressure The actual discharge gauge pressure at the compressor flange as
measured by the discharge pressure transducer.
Inverter Temperature Inverter temperature as measured by thermistor mounted under the
IGBT Inverter.
Discharge Temperature The actual discharge temperature at the compressor flange as
measured by the discharge temperature/pressure transducer.
Suction Pressure The actual suction gauge pressure at the compressor flange as
measured by the suction pressure transducer.
Cavity Temperature Temperature of the superheated gas moving past the shaft.
Leaving Temperature Leavin g wat er tem p er at ur e as m ea su re d fro m the 10K ther mistor
connected to the terminals marked “LEAVE” on the Chiller Interface
module.
Total Compression Ratio Ratio of the absolute discharge pressure and the absolute suction
pressure.
Current Draw - Amps 3-phase mains input current.
SCR Temperature Temperature of the SCR heat sink plate.
Anti Start Temperature Temperature limit at which the compressor will start up. If the inverter
temperature, cavity temperature, or SCR temperature exceeds the
anti-start temperature, then the compressor will not start up until the
temperature has been reduced.
6.9.4 Compressor Stepper Motor
Settings
Select the “Stepper Motor Controls” tab to view and change
the compressor’s stepper motor settings. Specifically, it
allows the user to view the maximum motor steps and the
initial motor steps at compressor startup. For the electronic
expansion valves, the user may adjust the settings to meet
the application needs.
44 Danfoss Turbocor Compressors Inc.
ECD-00007M Rev. 1
Page 48

Service Monitor User Manual
Figure 33 EEPROM Settings - Stepper Motor Settings
6.9.5 Stepper Motor Valve Controls
Select the “EXV#1 Settings” tab to view the control settings
for the electronic expansion valve #1 (EXV#1). EXV#1
refers to the electronic expansion valve connected to
“EXV1” at the Chiller Interface module.
Similarly, select the “EXV#2 Settings” tab to view the
control settings for the electronic expansion valve #2
(EXV#2). EXV#2 refers to the electronic expansion valve
connected to “EXV2” at the Chiller Interface module.
Table 18 describes the EXV settings. To update the EXV
settings, refer to section 6.6 "Electronic Valve Data /
Tuning" on page 33.
Danfoss Turbocor Compressors Inc. 45
ECD-00007M Rev. 1
Page 49

Monitor Program Data and Controls
Figure 34 EEPROM Settings - Stepper Motor Valve #1 Controls
46 Danfoss Turbocor Compressors Inc.
ECD-00007M Rev. 1
Page 50

Service Monitor User Manual
Table 18 EEPROM Settings - EXV Parameters
Parameter Description
Control Mode Displays which control variable will be maintained by the stepper motor
output. The options are:
1. Superheat control using the compressor flange temperature and
pressure (this mode is not recommended as the temperatur e at the
compressor flange is influenced by external factors).
2. Superheat control using the compressor flange pressure and a
10K thermistor that is connected to the terminals labeled “ENTR Y”
on the Chiller Interface module.
3. Superheat control using the compressor flange pressure and a
10K thermistor that is connected to the terminals labeled “LIQT” on
the Chiller Interface module.
4. Superheat control using an external temperature and pressure
sensor connected to the terminals on the IO pcb labeled “SPARE
T” & “SPARE P”.
5. Liquid Level 1 control usin g a lev el sen so r co nn ec te d to the
terminals on the Chiller Interface module labeled “LIQ LEV1”.
6. Liquid Level 2 control usin g a lev el sen so r co nn ec te d to the
terminals on the Chiller Interface module labeled “LIQ LEV2”.
7. Load Balance control uses the compressors own internal control
algorithm to determine the best mix of speed control, inlet guide
vane opening and load balance valve opening.
Auto/Manual Displays the compressor control mode. In automatic mode the
compressor has complete control over the stepper motor output. In
Manual mode the user is able to enter the valve position.
Stepper Startup % Percentage of maximum steps sent to the motor on start of the
compressor. The stepper motor will hold at this position until stepper
start delay timer has expired.
Stepper Start Position Delay Amount of time from compressor start to hold the number of step s sent
to the motor at the stepper startup %. Value is in seconds and starts to
count down when the drive enables.
Stepper Control Setpoint Desired value of the controlled variable.
Stepper Control Loop Speed Reaction time of the control loop to a process error.
Stepper Minimum Close % The minimum close position for the valve while the compressor is
spinning.
Maximum Step Count Number of steps from fully closed to fully open for the installed stepper
motor driven device.
6.9.6 Analog Output Controls
Select the “Analog Output” tab to view the analog output
control settings. The Analog Output Control Settings
control the output labeled “Analog” on the Chiller Interface
module.
Danfoss Turbocor Compressors Inc. 47
ECD-00007M Rev. 1
Table 19 provides details about the analog output control
settings. To update the settings, refer to section 6.6
"Electronic Valve Data / Tuning" on page 33.
Page 51

Monitor Program Data and Controls
.
Figure 35 EEPROM Settings - Analog Output Controls
48 Danfoss Turbocor Compressors Inc.
ECD-00007M Rev. 1
Page 52

Service Monitor User Manual
Table 19 Electronic Valve Data / Tuning Parameters (Analog Output)
Parameter Description
Analog Control Mode Selects which control variable will be maintained by the 0-10VDC
output labeled “ANALOG” on the Chiller Interface module.
The options are:
• Load Balance Valve
• Discharge Pressure
• Inlet Guide Vane %
• Superheat – Flange TP
• Superheat – FlangeP, EWT
• Superheat – FlangeP, LIQT
• Suction Pressure
•Leaving Temp
• Entering Temp
•Liquid Temp
Auto/Manual Selects the compressor control mode. In automatic mode the
compressor has complete control over the stepper motor output. In
Manual mode the user is able to enter the valve position.
Analog Output Starting % Percentage of maximum voltage sent to the terminals on start of the
compressor. The analog output will hold at this position until st art delay
timer has expired.
Analog Output Start Delay Amount of time from compressor start to h old the volt age a t the st artup
percentage. Value is in seconds and starts to count down when the
drive enables.
6.9.7 Compressor Controller Impeller
Specific Settings
Select the “Impeller Settings” tab to view the compressor
controller impeller specific settings. The parameters shown
are those that define the operational envelope of the specific
compressor model.
Danfoss Turbocor Compressors Inc. 49
ECD-00007M Rev. 1
Page 53

Monitor Program Data and Controls
Figure 36 EEPROM Settings - Compressor Controller Impeller Specific Settings
6.9.8 Compressor Controller (CC) Critical
Fault Lock Outs
Select the “CC LockOuts” tab to view the setup for the CC
critical fault lock outs.
The “Number of Drive Cooling System Alarms In Buffer”
represents the number of times the following alarms have
occurred within the “Moving Window Hold Time” of 30
minutes:
• Anti-start temperature alarm
• Inverter temperature alarm
• Cavity temperature alarm
• SCR temperature alarm
The compressor will continue to operate even if the
aforementioned alarms occur.
However, if any (or a combination of) the aforementioned
alarms occurs more than the allowable “Limit of Alarms in
Buffer”, within the “Moving Window Hold Time” of 30
minutes, then a “Lock Out Fault” occurs and the motor will
trip.
50 Danfoss Turbocor Compressors Inc.
ECD-00007M Rev. 1
Page 54

Service Monitor User Manual
Figure 37 EEPROM Settings - CC Critical Fault Lock Outs
6.9.9 Refrigerant
TBD
6.10 Compressor Event Log
The compressor event log provides the user with details
about the compressor events and faults.
To view the “Compressor Event Log” window, select
“Window”→ “Event Log” from the menu bar, or click on
the “Event Log” icon located below the menu bar.
The “Type” column describes the type of event or fault
logged:
• The icon indicates that the compressor
controller has started
• The icon denotes information about the
compressor events.
• The icon denotes a compressor fault.
The “Time” column indicates the date and time at which the
event or fault occurred, and the “Description” column
provides details about the event or fault.
In the case of a compressor fault, check the timestamp of
the fault. To help in troubleshooting the compressor fault,
look at all the events and faults that occurred before the
fault (i.e. events and faults logged with an earlier
timestamp). Particularly, pay attention to the information
logged immediately before the fault occurred, as it provides
hints to the possible events that caused the fault.
To start downloading the compressor events, click on the
“Start Download” button. The events with an index between
the “Start Index” and the “Stop Index” will be downloaded.
Click on the “Stop Download” button anytime to stop the
download. The downloaded events may be saved to a file by
clicking on the “Save Data to File” button. The “Current
Danfoss Turbocor Compressors Inc. 51
ECD-00007M Rev. 1
Page 55

Monitor Program Data and Controls
Fault” parameter box indicates the current event being
displayed.
Figure 38 Event Log Window
6.11 History Data
The “Compressor History Data” window provides the user
with information about the compressor energy usage.
To view the “Compressor History Data” window, select
“Window”→ “Load Profile” from the menu bar, or click on
the “Load Profile Graphs” icon located below the menu bar.
52 Danfoss Turbocor Compressors Inc.
ECD-00007M Rev. 1
Page 56

Service Monitor User Manual
Figure 39 Compressor History Data
Table 20 Compressor History Data Parameters
Parameter Description
Graph:
%Power Demand vs. Hours
Total Time Online Total time the comp re ss or has bee n ru nn ing .
Total Energy Usage Estimation
kWh
Reset Load Profile Data button Reset the operating hours.
Reset Energy Usage Data button Reset the energy usage counter.
User Authentication Access code to use resets. The access code is the same as that used
The graph shows the number of hours the compressor has been in
operation for a given power demand . The statistical valu es of operating
hours for each 10% of power demand is displayed in the “Load Profile
Data” section.
The estimated total energy used in an hour.
for the serial port connection, and must be a mid-level access code or
higher.
6.12 Trending
6.12.1 Graphs
The trending graphs allow the user to view the individual
“trends” of the parameters listed in Table 21 with respect to
time. The time displayed is the PC system time, and is
shown in HH:MM format.
To view the trending “Graphs”, as shown in Figure 40, click
on the down arrow next to the “Trending” icon, and select
“Charts 1”.
For each graph, the parameter plotted may be changed at
any time by selecting a different parameter from the drop-
Danfoss Turbocor Compressors Inc. 53
ECD-00007M Rev. 1
Page 57

Monitor Program Data and Controls
down menu. All graphs may be cleared simultaneously by
clicking on “Reset Graphs” located on the menu bar.
When the “Graphs” window is closed, all parameters
selected for graphing are automatically saved to a .csv data
file, and may be viewed using a spreadsheet editor such as
Microsoft® Excel. Each data file is limited by a maximum
file size of 32,768 (2
“Turbocor Service Monitoring Software#.csv”, where # is a
unique file number automatically assigned. The data file is
stored in the “$Turbocor_Install_Dir\Turbocor Inc”
directory (typically “C:\Program Files\Turbocor Inc”). Data
files left in the “$Turbocor_Install_Dir\Turbocor Inc” for
more than 15 days are automatically deleted.
15
) lines of data. The data file is named
The parameters plotted may be played back by loading the
stored data file. From the “File” menu, select “Open”. Go to
the “$Turbocor_Install_Dir\Turbocor Inc” directory, select
the desired .csv data file to be loaded, and click on “Open”.
The stored data begins to playback on the graphs. The
playback speed may be adjusted from the “PlayBackSpeed”
menu.
NOTE:
The measurement unit (metric/imperial) displayed depends
on the measurement unit previously set. To verify or change
the measurement unit, refer to section 6.3 "Compressor
Control" on page 23.
Figure 40 Trending (Chart 1)
Table 21 Trending Parameters
Parameter Description
3 Phase Voltage 3-phase AC input voltage (mains input)
3 Phase Amps 3-phase AC input current (mains input)
DC Bus Voltage DC Bus Voltage as measured at the inverter
Compressor Demand Requested motor power demand as a percentage of the
maximum motor power [kW].
IGV Position % of Inlet guide vane opening, 0.0% means the vanes are at
90º to the pipe line (Fully closed). 1 10% means 10º over turned
from fully open.
Suction Pressure The actual suction gauge pressure at the compressor flange
as measured by the suction pressure transducer.
54 Danfoss Turbocor Compressors Inc.
ECD-00007M Rev. 1
Page 58

Service Monitor User Manual
Table 21 Trending Parameters (Continued)
Parameter Description
Discharge Pressure The actual discharge gauge pressure at the compressor flange
as measured by the discharge pressure transducer.
Suction Temperature The actual suction temperature at the compressor flange as
measured by the suction temperature/pressure transducer.
Discharge Temperature The actual disch arge temperature a t the compressor flang e as
measured by the discharge temperature/pressure transducer.
Cavity Temperature Temperature of the superheated gas moving past the shaft.
Entering Air/Water Temp Temperature as measured from the 10K thermistor connected
to the terminals marked “ENTRY” on the Chiller Interface
module.
Leaving Air/Water Temp Temperature as measured from the 10K thermistor connected
to the terminals marked “LEAVE” on the Chiller Interface
module.
24VDC Supply Regulated 24V DC voltage as measured from the Backplane.
InterLock Status Interlock status:
either opened (denoted by 1.0) or closed (denoted by 0.0).
Surge Speed Minimum compressor speed [RPM].
Choke Speed Maximum compressor speed [RPM].
Stepper #1 PV Controlled variable maintained by the stepper motor #1 output.
Stepper #1 Position Ratio of the actual number of steps sent to the stepper motor
over the maximum number of steps the motor is allowed to
drive. Range: 0%-100%.
Stepper #2 PV Controlled variable maintained by the stepper motor #2 output.
Stepper #2 Position Ratio of the actual number of steps sent to the stepper motor
over the maximum number of steps the motor is allowed to
drive. Range: 0%-100%.
Cooling Solenoid Status Cooling solenoid status:
either open (denoted by 1.0) or closed (denoted by 0.0).
Axial Force Current required to counteract axial unbalance force [Amps].
FX Force Current required to counteract front x unbalance force [Amps].
FY Force Current required to counteract front y unbalance force [Amps].
BX Force Current required to counteract rear x unbalance force [Amps].
BY Force Current required to counteract rear y unbalance force [Amps].
Actual Speed Actual shaft speed in RPM.
Desired Speed Commanding shaft speed in RPM (always higher than the
actual shaft speed).
Motor Amps (Inverter Side) Current output from the IGBT Inverter to the motor (torque-
generating current component).
3 Phase Power (kW) 3-phase AC input power (mains input)
Inverter Temperature Inverter temperature as measured by thermi stor mounted
under the IGBT Inverter.
Front Orbit Average Percentile indicating the average front orbit displacement.
Danfoss Turbocor Compressors Inc. 55
ECD-00007M Rev. 1
Page 59

Monitor Program Data and Controls
6.12.2 Trending & Data Acquisition
The “Trending & Data Acquisition” window allows the
user to view and compare the trends of:
• Multiple temperature readings on one graph;
• Multiple energy demand and usage parameters on
one graph
• Multiple compressor speed parameters on one graph
To view the “Trending & Data Acquisition” window, as
shown in Figure 41, click on the down arrow next to the
“Trending” icon, and select “Charts 2”.
For the “Temperatures” graph, the trends of the following
parameters may be viewed simultaneously:
• Suction Temperature
• Discharge Temperature
• Liquid Temperature
• Entering Air/Water Temperature
• Leaving Air/Water Temperature
• Evaporating Temperature
• Condensing Temperature
For the “Energy Demand & Usage” graph, the trends of the
following parameters may be viewed simultaneo usly:
• Actual (Mains) Power Input [kW]
• Requested (Motor) Power Input [kW]
• Compressor Demand %
• Inlet Guide Vane Opening %
For the “Compressor Speeds” graph, the trends of the
following parameters may be viewed simultaneo usly:
• Actual Compressor Speed [RPM]
• Minimum Compressor Speed [RPM]
(estimated surge)
• Maximum Compressor Speed [RPM]
(choke)
56 Danfoss Turbocor Compressors Inc.
ECD-00007M Rev. 1
Page 60

Service Monitor User Manual
For each parameter, check the checkbox next to the
parameter to plot the parameter. Uncheck the checkbox to
stop plotting the parameter. To clear the graphs, click on the
“Clear Graphs” button.
To the right of the graphs, the compressor event log is
displayed. However, the only events shown are those that
occur after the “Trending & Data Acquisition” window is
opened. To clear the event log, click on the “Clear Event
Log” button.
Samples of the trends may also be saved to a log file. Select
the time interval (from 10-1800 seconds) at which to
capture the values. Click on the “Save” button to create the
log file. The log file is saved in .csv format and may be
viewed using a spreadsheet editor such as Microsoft®
Excel. After creating the log file, the “Save” button
becomes a “Stop” button. Click on the “Stop” button
anytime to stop recording the trends to the log file. The
trending log file records the date and time when the
parameters are logged, and it records all parameters
regardless if they are selected to be plotted or not. See
Figure 42 for a sample trending log file.
Figure 41 Trending (Chart 2)
Figure 42 Trending Log
6.13 Compressor Map
The “Compressor Map” allows the user to view the
operating envelope of the compressor, and to estimate its
capacity and performance.
Danfoss Turbocor Compressors Inc. 57
ECD-00007M Rev. 1
To view the “Compressor Map” window, select
“Window”→ “Performance Map” from the menu bar, or
click on the “Compressor Envelope” icon located below the
menu bar.
Page 61

Monitor Program Data and Controls
The graph, as shown in Figure 43, displays the saturated
discharge temperature (SDT) versus the evaporator
capacity . For a given evaporator capacity, the red lines
mapped on the graph represents the constant compressor
speed (in RPM) required to bring the saturated discharge
temperature to the desired level. The mapping outline
represents the compressor operational envelope, limited to
the left by the minimum operational capacity, and to the
right by the maximum operational capacity. The compressor
cannot operate for load capacities outside the operational
envelope. The blue dot on the compressor map represents
the current operating point.
inputs are generated automatically when the serial port
connection has been established (refer to 3.5 "Serial Port
Connection" on page 6).
However, if the compressor is offline (i.e. the serial port
connection has not been established), then it is possible to
calculate the estimated compressor capacity and
performance. To do so, input the following parameters in
the input section:
• Suction pressure [kPa/Psi]
• Suction temperature [ºC/ºF]
• Discharge pressure [kPa/Psi]
• Mains (3-phase AC) power input [kW]
• Shaft speed [RPM]
• Subcooling temperature [ºK/ºR]
If the metric values (kPa, ºC, ºK) were inputted, set the
“Check for Metric” checkbox. If imperial values (Psi, ºF,
ºR) were inputted, ensure the checkbox is clear.
Click on the “Calculate” button. The graph and “outputs”
section shows the estimated compressor capacity and
performance.
Figure 43 Compressor Map
The outputs section shows the estimated capacity and
performance of the compressor, given the set of inputs. The
NOTE:
The measurement unit (metric/imperial) displayed depends
on the measurement unit previously set. To verify or change
the measurement unit, refer to section 6.3 "Compressor
Control" on page 23.
58 Danfoss Turbocor Compressors Inc.
ECD-00007M Rev. 1
Page 62

Service Monitor User Manual
Figure 44 Compressor Map Window
6.14 Fault Captures
The “Fault Captures” window allows the user to view all
the compressor faults, and the state of the compressor at the
time the fault occurred.
To view the “Fault Captures” window, select “Window”→
“Fault Captures” from the menu bar, or click on the “Fault
Captures” icon located below the menu bar.
Click on the “Download All Faults” button. A list of the
most recent faults will be shown below the button.
The “Descriptive Fault Information” box shows the state of
the compressor, under which the fault occurred, 10ms
before the compressor shut down. The information can be
used to determine the cause of the fault.
The “Current Index”, located above the “Descriptive Fault
Information” box, is the index of the fault that occurred, for
which the compressor state is being described.
The timestamp when the “Current Index” fault occurred is
also shown above the “Descriptive Fault Information” box.
For a description of the fault that occurred, look under the
descriptive fault information ID 47 to 51, where the motor,
bearing, and compressor alarms and faults are described.
See Figure 45.
To view the “Descriptive Fault Information” for another
fault, change the current index. Select a number from 0 to
the maximum index indicated - 1. Another option is to
select one of the faults listed in the right-hand pane.
The “Descriptive Fault Information” may be saved by
clicking on the “Save Fault Information” button. The data is
saved to a .csv file, which may be viewed using a
spreadsheet editor such as MS Excel.
Danfoss Turbocor Compressors Inc. 59
ECD-00007M Rev. 1
Page 63

Monitor Program Data and Controls
Figure 45 Stored Faults Window
6.15 Data Capture
The “Compressor Data Capture Screen” allows the user to
view the compressor data, listed in Table 22, at a particular
instant in time.
To capture the data, click on “Capture Data” from the menu
bar. An “Acquiring Data” message box appears. After the
“Acquiring Data” message box disappears, click on the
“Data Preview” button to view the compressor data. The
acquired data may be saved to file by clicking on the “Save
Data to File” button.
NOTE:
The measurement unit (metric/imperial) displayed depends
on the measurement unit previously set. To verify or change
the measurement unit, refer to section 6.3 "Compressor
Control" on page 23.
60 Danfoss Turbocor Compressors Inc.
ECD-00007M Rev. 1
Page 64

Service Monitor User Manual
Figure 46 Compressor Data Capture Screen
Danfoss Turbocor Compressors Inc. 61
ECD-00007M Rev. 1
Page 65

Monitor Program Data and Controls
Table 22 List of Compressor Data Captured
Data Parameter Description
0 Compressor Control Faults Displays the compressor’s most recent active critical fault.
Refer to 6.3.2 "Compressor Faults/Alarms" for furt he r de tails.
1 Compressor Control Alarms Displays the compressor’s most recent active critical alarm.
Refer to 6.3.2 "Compressor Faults/Alarms" for furt he r de tails.
2 Compressor Control Mode Selects the source of demand for the compressor: either Calibration,
Manual Control, Analog Input, Modbus Network, or Chiller Control.
Refer to 6.3.1 "Compressor Control Modes" for further details.
3 Compressor Demand % Requested motor power demand as a percentage of the maximum
motor power [kW].
4 Inlet Guide Vane % Open % of Inlet guide vane opening, 0.0% means the vanes are at 90º to the
pipe line (Fully closed). 110% means 10º over turned from fully open.
5 Suction Pressure The actual suction gauge pressure at the compressor flange as
measured by the suction pressure transducer.
6 Discharge Pressure The actual discharge gauge pressure at the compressor flange as
measured by the discharge pressure transducer.
7 Suction Temperature The actual suction temperature at the co mpressor flange as measured
by the suction temperature/pressure transducer.
8 Discharge Temperature The actual discharge temperature at the compressor flange as
measured by the discharge temperature/pressure transducer.
9 Cavity Temperature Temperature of the superheated gas moving past the shaft.
10 Controller PCB Temperature Temperature of the BMCC board.
11 Backplane Temperature Temperature of the Backplane.
12 Stepper PCB Temperature Temperature of the Serial Driver.
13 Entering Wa ter Temperature Temperature as measured from the 10K thermistor connected to the
terminals marked “ENTRY” on the Chiller Interface module.
14 Leaving Water Temperature Temperature as measured from the 10K thermistor connected to the
terminals marked “LEAVE” on the Chiller Interface module.
15 Estimated Minimum Speed
(compressor speed in RPM)
16 Maximum S peed
(compressor speed in RPM)
17 Display Units Metric / Imperial units displayed.
18 24VDC supply voltage Voltage outputted by 24VDC voltage supply.
19 EEV#1 Process Variable Controlled variable maintained by the stepper motor #1 output.
20 Stepper Motor #1 % Open Ratio of the actual number of steps sent to the stepper motor over the
21 EEV#2 Process Variable Controlled variable maintained by the stepper motor #2 output.
22 Stepper Motor #2 % Open Ratio of the actual number of steps sent to the stepper motor over the
23 Motor-Cooling Solenoids
Open
Estimated minimum RPM the compressor can run at with a fully open
inlet guide vane.
Maximum RPM the compressor can run at for a given set of inlet and
outlet conditions.
maximum number of steps the motor is allowed to drive.
Range: 0%-100%.
maximum number of steps the motor is allowed to drive.
Range: 0%-100%.
Number of motor-cooling solenoids open.
62 Danfoss Turbocor Compressors Inc.
ECD-00007M Rev. 1
Page 66

Service Monitor User Manual
Table 22 List of Compressor Data Captured (Continued)
Data Parameter Description
24 Actual Shaft Speed (RPM) Actual rotational shaft speed.
25 Desired Shaft Speed (RPM) Desired rotational shaft speed.
26 Inverter Side Motor Amps Current outputted from the IGBT Inverter to the motor (torque-
generating current component).
27 Earth Leakage Current Motor current that leaks to ground due to an insulation fault.
28 3-Phase Power Input Mains (AC) input power [kW] .
29 Inverter Temperature Inverter temperature as measured by thermistor mounted under the
IGBT Inverter.
30 Back EMF Internal motor voltage
31 Shaft Status Shaft state. Either levitated or de-levitated.
32 Ax Un-balance % Percentage unbalance of total allowable axial displac em e nt .
33 Fr Un-balance % Percentage unbalance of total allowable front radial displacement.
34 Br Un-balance % Percentage unbalance of total allowable rear radial displacement.
35 Ax Force [Amps] Current required to counteract axial unbalance force.
36 Fx Force [Amps] Current required to counteract front x unbalance force.
37 Fy Force [Amps] Current required to counteract front y unbalance force.
38 Bx Force [Amps] Current required to counteract rear x unbalance force.
39 By Force [Amps] Current required to counteract rear y unbalance force.
40 3 Phase Amps Mains (AC) input current.
41 3 Phase Voltage Mains (AC) input voltage.
42 Compressor Real Time Clock Time of data capture.
Danfoss Turbocor Compressors Inc. 63
ECD-00007M Rev. 1
Page 67

Service Monitor User Manual
Appendix A: Determination of Actual Power Setting
The BMC\CC holds four variables in the EPROM that
determine the input power capability of the compressor
based on the model number of the compressor. These four
variables define the straight-line equation for the maximum
referred power (y=mx+c) as a function of total flange to
flange pressure ratio, see graph below. The referred power
is the power absorbed at the reference pressure and
temperature.
Next the power-reset factor may be calculated from the
absolute suction pressure (referred power).
To obtain the actual maximum power input, the referred
power input is multiplied by the power reset factor
The next step is to calculate the percentage of the maximum
power that is required based on the analogue input voltage
level, modbus set demand or chiller control supplied
demand.
Analog Input Mode Example:
Calculate the actual 3ph power set point for a 75ton
(TT300W-75TR-460-480V) compressor running with a
suction pressure of 340 kPa, a compression ratio of 2.80 and
an input voltage level of 6.50 VDC.
Recall that for analogue input mode, the input voltage range
is 0-10VDC, with a deadband of 2VDC.
Thus, the demand % for a 6.50 VDC input is:
%demand = (6.5-2)/(10-2) = 0.562 or 56.2%
For a reference pressure of 356kPa at 283ºK:
The referred power is determined to be:
PWR
The actual maximum power is:
PWRmax= 55.32 * (340 / 356) = 52.83 kW
= 24.783*2.80-14.06 = 55.32 kW
ref
The desired 3 phase power input is then :
Desired power = 52.83 * .562 = 29.69 kW
ModBus Network Input Mode Example:
Calculate the actual 3ph power set point for a 75ton
(TT300W-75TR-460-480V) compressor running with a
suction pressure of 340 kPa, a compression ratio of 2.80 and
a input voltage level of 6.50 VDC.
The demand % for a 6.50 VDC input is:
Recall that in Modbus network input mode, the demand is
manually set through the Monitor program.
In this case, the demand is set to 56.2%.
Danfoss Turbocor Compressors Inc. A-1
ECD-00007M Rev. 1
Page 68

For a reference pressure of 356kPa at 283ºK:
The referred power is determined to be:
PWR
= 24.783*2.80-14.06 = 55.32 kW
ref
The actual maximum power is:
PWRmax= 55.32 * (340 / 356) = 52.83 kW
The desired 3 phase power input is then :
Desired power = 52.83 * .562 = 29.69 kW
A-2 Danfoss Turbocor Compressors Inc.
ECD-00007M Rev. 1
 Loading...