

Page 1

Contents MCO 305 Operating Instructions
Contents
1 Introduction
1.1 Available Literature for VLT AutomationDrive, MCO 305 and MCT 10 Motion
Control Tool
1.2 Symbols and Conventions
1.3 Abbreviations
2.1 High Voltage Warning
2.2 Safety Instructions
2.3 Before Commencing Repair Work
2.4 Avoid Unintended Start
2.5 Safe Stop of FC 302
2.6 General Warning
3 How to Install
3.1 How to Get Started
3.1.1 Initialisation to Default Settings 7
3.2 System Overview
3.2.1 Electrical Installation 10
3.2.2 MCO 305 Control Terminals 10
3
3
3
4
5
5
5
5
6
6
7
7
8
3.2.3 Terminal overview 11
3.2.4 Encoder Connections Examples 12
3.2.5 Virtual Master Connection 13
3.3 Commissioning Guide
3.4 Basic MCO Parameter Settings
3.4.1 Setting of Encoder Parameters 14
3.4.2 Setting of parameters for CANopen feedback encoder 14
3.4.3 Setting of parameters for CANopen Master encoder 15
3.4.4 Setting of Velocity Parameters 15
3.4.5 Setting of Home Parameters 15
3.4.6 Setting of Synchronization Parameters 15
3.5 Connecting and Testing the Encoder(s)
3.5.1 Execute the Encoder Test Program 16
3.5.2 Checking Master Encoder for Synchronizing Applications 16
3.5.3 Ending the Encoder Check 16
3.6 PID Controller Settings
3.6.1 Sample Program: Feed-forward Calculation 17
14
14
16
16
3.6.2 Influence to the Control Loop when Changing Parameters 17
3.7 Executing a Test Program
4 Optimizing the PID controller
4.1 How to Control Process Works
MG.33.K3.02 - VLT® is a registered Danfoss trademark 1
18
19
19
Page 2

Contents MCO 305 Operating Instructions
4.2 Significance and Influence of the Controller Parameters
4.3 PID Factors
4.3.1 Derivative Value for PID Control 21
4.3.2 Integral Factor: KINT 21
4.3.3 Limit Value for Integral Sum: KILIM 21
4.3.4 Velocity Feed-forward: FFVEL 21
4.3.5 Acceleration Feed-forward: FFACC 21
4.3.6 Sampling Time for PID Control: TIMER 21
4.3.7 PID Bandwidth 22
4.4 Optimizing your Controller Settings Step-by-Step
4.4.1 Ten Steps for Optimum Control 22
5 How to Install the Application
5.1 Download Application Program and Configuration
5.2 Backup and Restore
5.3 How to Connect and Run Multiple Frequency Converters
6 General Specifications
19
20
22
24
24
24
25
26
6.1 Protection and Features
6.2 Technical Data
6.3 Supply Voltage Overview
7 Troubleshooting
7.1 Warnings and Error Messages
7.2 APOSS Software Messages
8 Appendix
8.1 Parameter Lists
8.1.1 Application Parameters, Parameter Group 19-** 35
8.1.2 MCO Basics Settings, Parameter Group 32-** 36
8.1.3 MCO Advanced Settings, Parameter Group 33-** 38
8.1.4 MCO Data Readouts, Parameter Group 34-** 41
Index
26
26
27
28
28
33
35
35
42
2 MG.33.K3.02 - VLT® is a registered Danfoss trademark
Page 3

Introduction MCO 305 Operating Instructions
1 Introduction
1.1 Available Literature for VLT
AutomationDrive, MCO 305 and MCT 10
Motion Control Tool
-
The MCO 305 Design Guide entails all technical
information about the option board and customer
design and applications.
-
The MCO 305 Command Reference completes the
MCO 305 Design Guide with detailed description of
all commands available for programming MCO 305.
-
The VLT AutomationDrive Operating Instructions
provide the necessary information for getting the
frequency converter up and running.
-
The VLT AutomationDrive Programming Guide
provides complete descriptions of all parameters in
the frequency converter.
-
The VLT AutomationDrive Design Guide entails all
technical information about the frequency
converter and customer design and applications.
-
The VLT AutomationDrive Profibus Operating
Instructions provide the information required for
controlling, monitoring and programming the
drive via a Profibus fieldbus.
-
The VLT AutomationDrive DeviceNet Operating
Instructions provide the information required for
controlling, monitoring and programming the
drive via a DeviceNet fieldbus.
-
The VLT AutomationDrive MCT- 10 Operating
Instructions provide information for installation and
use of the software on a PC.
Danfoss Drives technical literature is also available online at
www.danfoss.com/drives.
CAUTION
Indicates a situation that may result in equipment or
property-damage-only accidents.
NOTE
Indicates highlighted information that should be regarded
with attention to avoid mistakes or operate equipment at
less than optimal performance.
Approvals
Conventions
The information in this manual follows the system and uses
the typographical features described below to the greatest
extent possible:
Menus and Functions
Menus and functions are printed italics, for
→
example:Controller
Commands and Parameters
Commands and parameter names are written in capitals, for
example: AXEND and KPROP; Parameters are printed in
italics, for example: Proportional factor.
Parameter Options
Values for use to select the parameter options are written in
brackets, e.g. [3].
Parameters.
1 1
1.2
Symbols and Conventions
Symbols
The following symbols are used in this manual.
WARNING
Indicates a potentially hazardous situation which, if not
avoided, could result in death or serious injury.
CAUTION
Indicates a potentially hazardous situation which, if not
avoided, may result in minor or moderate injury. It may also
be used to alert against unsafe practices.
MG.33.K3.02 - VLT® is a registered Danfoss trademark 3
Keys
The names of keys and function keys are printed in brackets,
for example the control key [Cntl] key, or just [Cntl], the [Esc]
key or the [F1] key.
Page 4

Introduction MCO 305 Operating Instructions
11
1.3 Abbreviations
Automatic Motor Adaptation AMA
Direct Current DC
Frequency Converter FC
Local Control Panel LCP
Master Unit MU
Millisecond ms
Minute min
Motion Control Option MCO
Motion Control Tool MCT
Parameter par.
Protective Extra Low Voltage PELV
Position Control Loop PID
Pulses per Revolution PPR
Quad-counts qc
Revolutions per Minute RPM
Second sec.
Switch normally closed nc
Switch normally open no
User Unit UU
Volts V
4 MG.33.K3.02 - VLT® is a registered Danfoss trademark
Page 5

Safety Instructions and Gen... MCO 305 Operating Instructions
2.1 High Voltage Warning
MCO 305
Operating Instructions
Software version: 5.xx
These Operating Instructions can be used for the MCO 305 option board
with all FC 300 frequency converters with software version later than 5.xx.
The software version number can be seen from 15-43 Software Version for the frequency converter and in 15-61 Option SW Version for the MCO
305
2.1.1 High Voltage Warning
2 2
The voltage of the VLT AutomationDrive is dangerous
whenever the converter is connected to mains. Incorrect
fitting of the motor or VLT AutomationDrive may cause
damage to the equipment, serious injury or death.
Consequently, it is essential to comply with the instructions
in this manual as well as local and national rules and safety
regulations. At altitudes above 2km, please contact Danfoss
Drives regarding PELV.
2.2 Safety Instructions
- Make sure the VLT AutomationDrive is properly
connected to earth.
- Do not remove mains plugs or motor plugs while
the VLT AutomationDrive is connected to mains.
- Protect users against supply voltage.
- Protect the motor against overloading according to
national and local regulations.
- Motor overload protection is not included in the
default settings. To add this function, set par. 1-90
Motor thermal protection to value ETR trip or ETR
warning. For the North American market:
- ETR functions provide class 20 motor overload
protection, in accordance with NEC.
- The earth leakage current exceeds 3.5 mA.
- The [OFF] key is not a safety switch. It does not
disconnect the VLT AutomationDrive from mains.
2.3
Before Commencing Repair Work
1. Disconnect VLT AutomationDrive from mains.
2. Disconnect DC bus terminals 88 and 89.
3. Wait at least 4 minutes.
4. Remove motor plugs.
2.4 Avoid Unintended Start
While VLT AutomationDrive is connected to mains, the
motor can be started/stopped using digital commands, bus
commands, references or via the LCP.
- Disconnect the VLT AutomationDrive from mains
whenever personal safety considerations make it
necessary to avoid unintended start.
- To avoid unintended start, always activate the
[OFF] key before changing parameters.
- Unless terminal 37 (safe stop) is turned off, an
electronic fault, temporary overload, a fault in the
mains supply, or lost motor connection may cause
a stopped motor to start.
MG.33.K3.02 - VLT® is a registered Danfoss trademark 5
Page 6

Safety Instructions and Gen... MCO 305 Operating Instructions
2.5 Safe Stop of FC 302
22
The FC 302 can perform the Designated Safety Function
Uncontrolled Stopping by removal of power (as defined by
IEC 61800-5-2) or Stop Category 0 (as defined in EN 60204-1).
It is designed and approved suitable for the requirements of
Safety Category 3 according to EN 954/PLd according to ISO
13849-1. This functionality is called Safe Stop.
In order to install and use the Safe Stop function in
accordance with the requirements of Safety Category 3
according to EN 954-1/PLd according to ISO 13849-1, the
related information and instructions of the VLT
AutomationDrive Design Guide MG.33.BX.YY must be
followed! The information and instructions of Operating
Instructions are not sufficient for a correct and safe use of the
Safe Stop functionality.
2.6 General Warning
WARNING
Touching the electrical parts may be fatal – even after the
equipment has been disconnected from mains. Also make
sure that all voltage inputs have been disconnected, such as
load-sharing (linkage of DC intermediate circuit), as well as
the motor connection for kinetic back-up. Using VLT
AutomationDrive (at and below 7.5kW):
wait at least xx minutes.
xx = The waiting time using the VLT AutomationDrive is
different for different sizes: Please see period of waiting time
xx in the VLT AutomationDrive Operating Instructions, MG.
33.AX.YY.
6 MG.33.K3.02 - VLT® is a registered Danfoss trademark
Page 7

How to Install MCO 305 Operating Instructions
3 How to Install
Manual initialisation
3.1 How to Get Started
Please consult the VLT AutomationDrive Operating
Instructions for correct installation of VLT AutomationDrive,
these instructions cover installation of MCO 305.
3.1.1 Initialisation to Default Settings
Initialize the frequency converter to default setting in two
ways:
Recommended initialisation (via 14-22 Operation Mode)
1.
Select 14-22 Operation Mode
2. Press [OK]
3. Select “Initialization”
4. Press [OK]
5. Cut off the mains supply and wait until the displays
turns off.
6. Reconnect the mains supply – the frequency
converter is now reset.
1. Disconnect from mains and wait until the display
2. Press [Status] – [Main Menu] – [OK] at the same
3. Reconnect mains supply while pressing the keys.
4. Release the keys after 5 sec.
5. The frequency converter is now programmed
NOTE
When carrying out manual initialization, serial communication and fault log settings are reset. All MCO 305 programs
and arrays are deleted!
This method initializes all except:
15-00 Operating Hours
15-03 Power Up's
15-04 Over Temp's
15-05 Over Volt's
turns off.
time:
according to default settings.
3
3
NOTE
MCO 305 programs and arrays are not affected.
14-22 Operation Mode initialises all except:
14-50 RFI Filter
8-30 Protocol
8-31 Address
8-32 FC Port Baud Rate
8-35 Minimum Response Delay
8-36 Max Response Delay
8-37 Max Inter-Char Delay
15-00 - 15-05 Operating Data
15-20 - 15-22 Historic log
15-30 - 15-32 Fault log
33-90 X62 MCO CAN node ID
33-91 X62 MCO CAN baud rate
MG.33.K3.02 - VLT® is a registered Danfoss trademark 7
Page 8
How to Install MCO 305 Operating Instructions
3.2 System Overview
3
This is only relevant if the MCO 305 is delivered as an option
for upgrading an existing VLT AutomationDrive. When
ordered with the frequency converter, MCO 305 is
preinstalled from factory. For retrofit, a mounting kit must be
purchased.
There is a different mounting kit for different frames. MCO
305 is to be used in slot C0 but can be combined with
another option in slot C1.
Mounting kit depending on frame Order no.
Bookstyle
A2 and A3 (40 mm for one C option) 130B7530
A2 and A3 (60 mm for C0 + C1 option) 130B7531
B3 (40 mm for one C option) 130B1413
B3 (60 mm for C0 + C1 option) 130B1414
Compact
A5 130B7532
B, C, D, E and F (except B3) 130B7533
Do not mount the small fan for B4, C3, C4, D, E and F
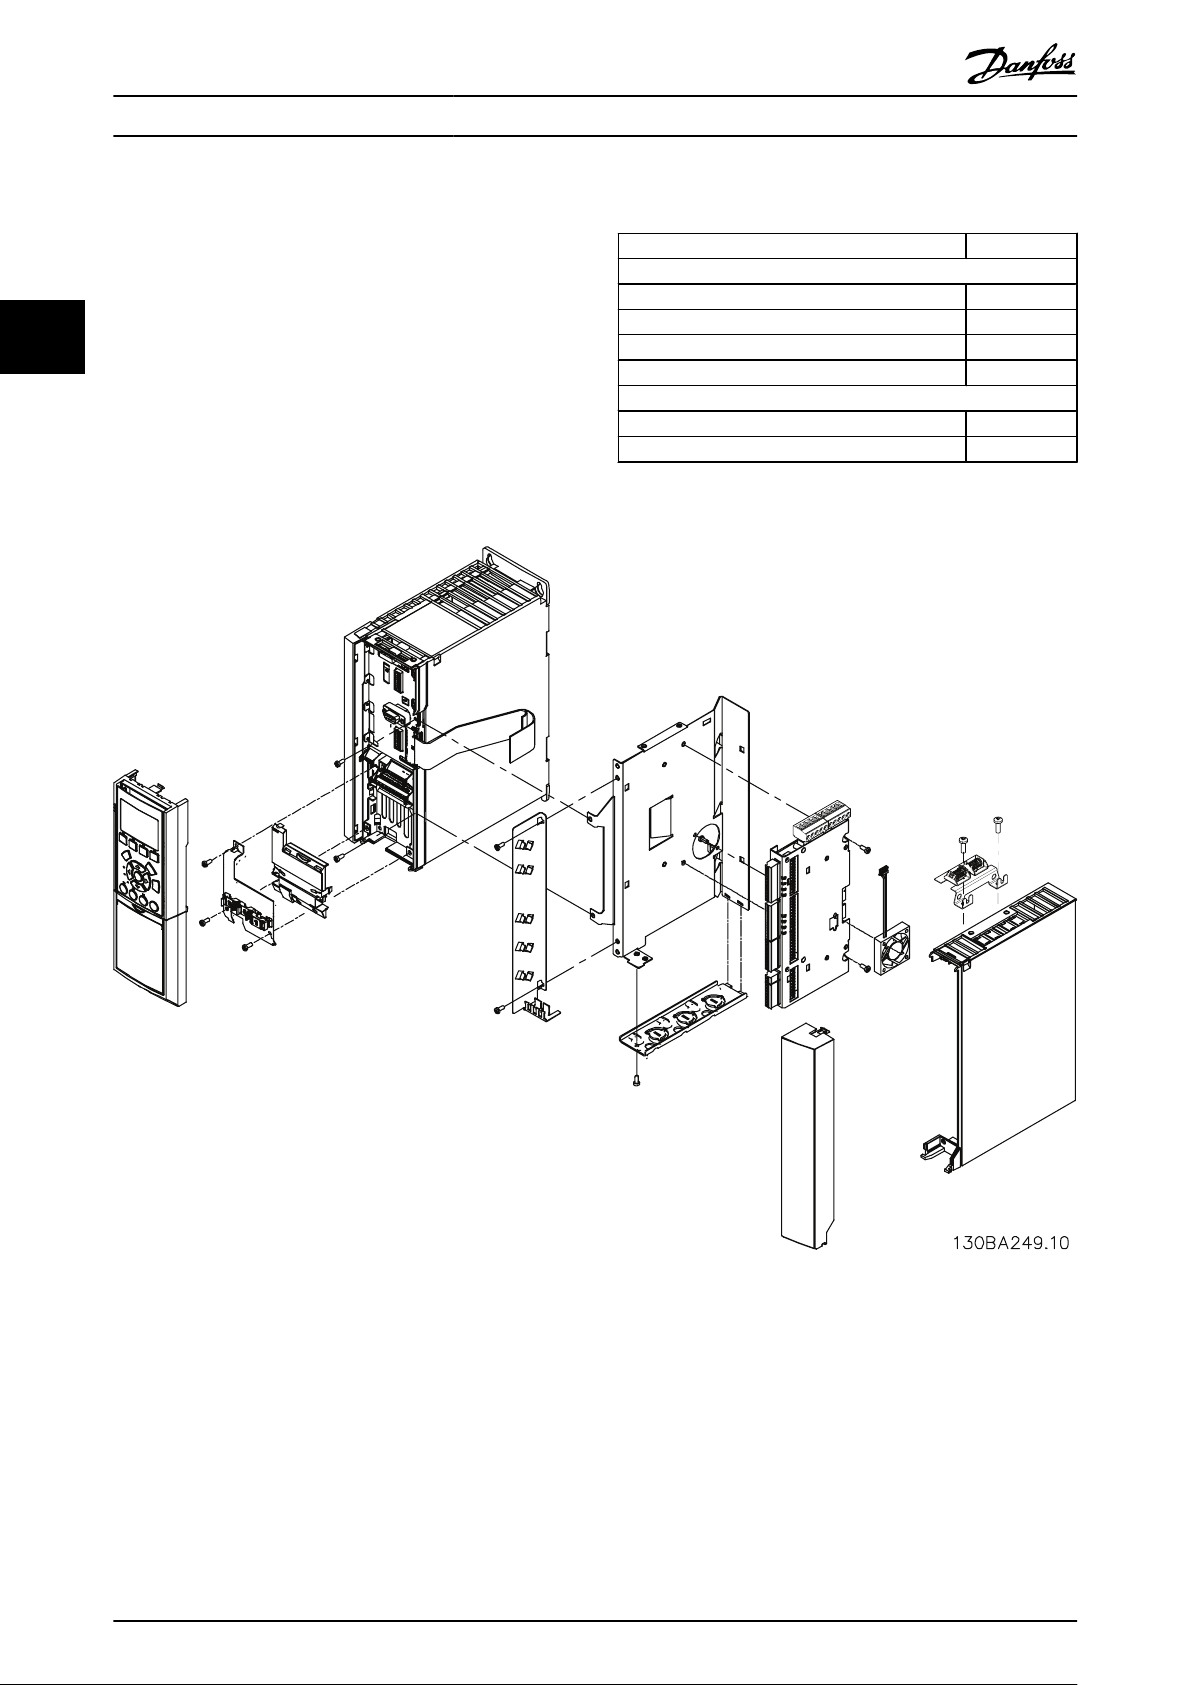
Illustration 3.1 Bookstyle - A2, A3, B3
8 MG.33.K3.02 - VLT® is a registered Danfoss trademark
Page 9
How to Install MCO 305 Operating Instructions
3
3
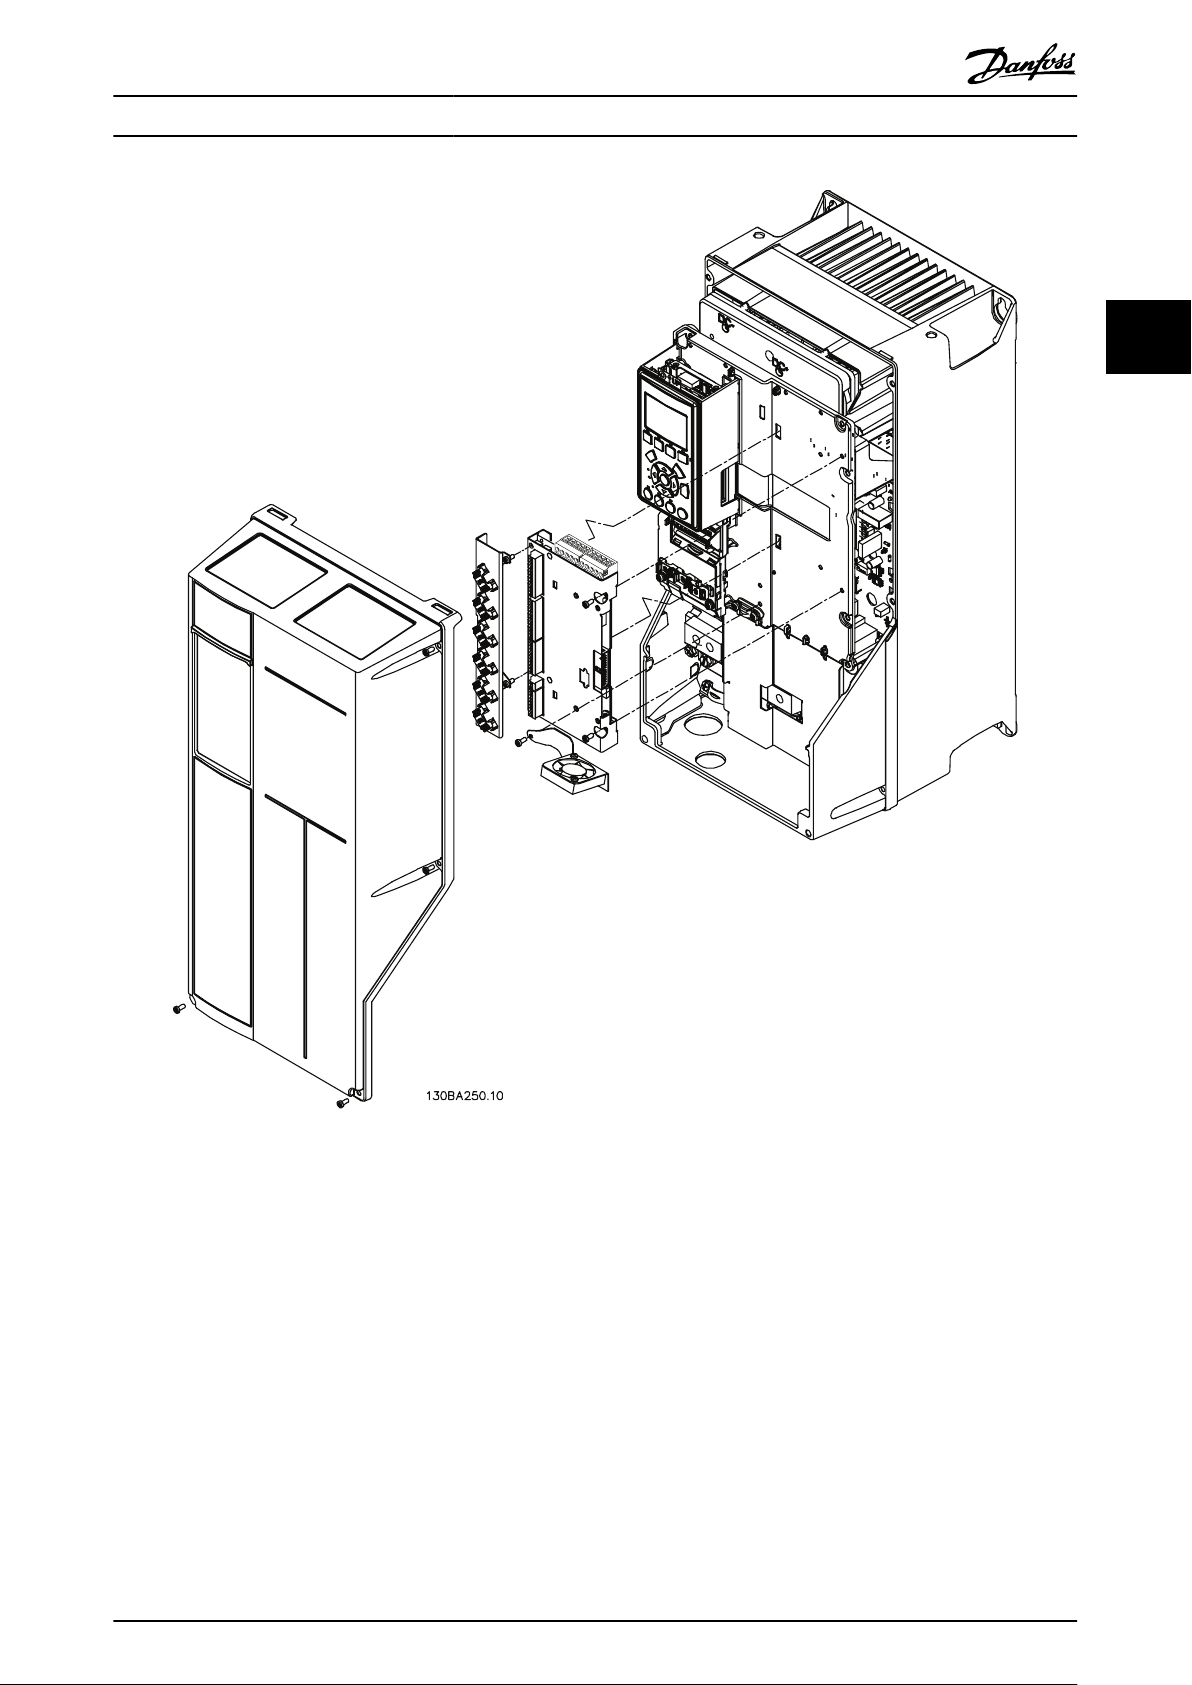
Illustration 3.2 Compact - A5, B (except B3), C, D, E, F
MG.33.K3.02 - VLT® is a registered Danfoss trademark 9
Page 10

130BA248.11
130BT334.10
How to Install MCO 305 Operating Instructions
3
3.2.1 Electrical Installation
All control cables must be screened and the cable screen
must be connected to earth at both ends. It is very important
to use the correct cable for encoders to avoid noise
problems, always follow the prescriptions of the encoder
supplier. See also VLT AutomationDrive Design Guide (MG.
33.AX.YY) for more information regarding EMC correct cable
installation.
3.2.2 MCO 305 Control Terminals
Frame size A2 and A3:
Encoder and I/O terminal are located behind the C option
terminal cover, see Illustration 3.3.
MCO CAN bus terminals and debug terminals (RS485) are
located on the top of the c-option cover. If these connections
are used cut out the plastic parts above the connectors and
mount the cable relief
Frame size A5, B1 and B2:
All MCO 305 terminals are located next to the VLT
AutomationDrive control card. Remove the front cover to get
access, see illustration.
MCO 305 control terminals are plug connectors with screw
terminals; the terminal blocks are duplicated to enable use of
the same MCO 305 in all frame sizes. See Illustration 3.5 to
locate the terminal blocks:
Illustration 3.3 Location of Encoder and I/O Terminals
Illustration 3.4 Removing Front Cover
10 MG.33.K3.02 - VLT® is a registered Danfoss trademark
Page 11

X62
X55
X56
X57
X58
X59
2
X60
130BB794.10
1
How to Install MCO 305 Operating Instructions
MCO control terminals are plug connectors with screw
3.2.3
Terminal overview
terminals. Terminals X55, X56, X57, X58 and X59 are
duplicated to be used for both bookstyle and compact frame
size.
X55 = Encoder 2
X56 = Encoder 1
X57 = Digital inputs
X58 = 24V DC supply
X59 = Digital outputs
X62 = MCO CAN Bus
X60 = Debug connections (RS-485)
Illustration 3.5 Location of Terminal Blocks
Terminal block 1 is to be used with bookstyle and terminal
Terminal
block
X55
Terminal
block
X56
Terminal
block
X57
Terminal number Descriptive Name Encoder 2
(Feedback)
1 +24V Supply
2 +8V Supply
3 +5V Supply
4 GND
5 A
6 A not
7 B
8 B not
9 Z / Clock
10 Z not / Clock not
11 DATA
12 DATA not
Terminal number Descriptive Name Encoder 1
(Master)
1 +24V Supply
2 N/A
3 +5V Supply
4 GND
5 A
6 A not
7 B
8 B not
9 Z / Clock
10 Z not / Clock not
11 DATA
12 DATA not
Terminal number Descriptive Name Digital inputs
1 Digital Input
2 Digital Input
3 Digital Input
4 Digital Input
5 Digital Input
6 Digital Input
7 Digital Input
8 Digital Input
9 Digital Input
10 Digital Input
3
3
block 2 with compact.
Terminal
block
X58
Terminal number Descriptive Name Supply
1 +24V Supply
2 GND
MG.33.K3.02 - VLT® is a registered Danfoss trademark 11
Page 12

5V incremental encoder
1
2 3 12
130BA163.10
754 6 8 9 10 11
24V
8V 5V GND A A B B Z Z D D
How to Install MCO 305 Operating Instructions
3
Terminal
block
X59
Terminal
block
X60
Terminal
block
X62
Terminal number Descriptive Name Digital
outputs
1 Digital Output/Input
2 Digital Output/Input
3 Digital Output
4 Digital Output
5 Digital Output
6 Digital Output
7 Digital Output
8 Digital Output
Terminal number MCO Debug (RS485)
1
CS
Control Select
62 RxD/TxD - P
63 RxD/TxD - N
66 OV
67 +5V
1
CS is high when transmissions is active
Terminal number MCO CAN Bus
1 N/A
2 CAN - L
3 DRAIN
4 CAN - H
5 N/A
Illustration 3.7 5V Incremental Encoder (RS-422) Supplied by an
External Power Source
Illustration 3.8 24V Absolute Encoder (SSI) Supplied by MCO 305
3.2.4 Encoder Connections Examples
Illustration 3.6 5V Incremental Encoder (RS-422) Supplied by MCO
305
Illustration 3.9 24V Absolute Encoder (SSI) Supplied by an External
Power Source
NOTE
When external power supply is used, ensure the same
potential between GND on external supply and encoder
connections (4). This is to avoid common mode disturbances.
12 MG.33.K3.02 - VLT® is a registered Danfoss trademark
Page 13

How to Install MCO 305 Operating Instructions
3.2.5 Virtual Master Connection
When more than 2 MCO 305 master encoder interfaces are
interconnected termination must be on (32-40 Encoder
Termination = ON) at both ends of the bus. Termination must
be off (32-40 Encoder Termination = OFF) in all other MCOs.
3
3
MG.33.K3.02 - VLT® is a registered Danfoss trademark 13
Page 14

How to Install MCO 305 Operating Instructions
3
3.3 Commissioning Guide
This guideline is only describing basic configuration and
optimizing of MCO 305, before starting the following steps
must be completed.
1. Basic commissioning of VLT AutomationDrive.
NOTE
VLT AutomationDrive must be optimized and have good
control over the motor and application before commissioning MCO 305. Guidelines can be found in VLT
AutomationDrive Operating Instructions (MG.33.AX.XX).
2. Install the PC software tools (MCT 10 Set-up
Software)
3. Establish communication between PC and VLT
AutomationDrive using USB, RS-485 or PROFIBUS
DPV1.
Then follow these steps to set-up and optimize MCO 305.
1. Setting of basic MCO 305 parameters (groups 32-**
and 33-**).
2. Connect and test encoder(s).
3. Optimize PID controller.
The MCT 10 Set-up Software will support you to set the
parameters in LCP. For a detailed description of all
parameters, please refer to 8 Appendix.
3.4.1 Setting of Encoder Parameters
Define the used type of feedback encoder in parameter
group 32-0*.
These defaults are set:
32-0* Encoder 2 - Feedback Default
32-00 Incremental Signal Type
32-01 Incremental Resolution
32-02 Absolute Protocol
32-03 Absolute Resolution
32-05 Absolute Encoder Data Length
32-06 Absolute Encoder Clock Frequency
32-07 Absolute Encoder Clock Generation
32-08 Absolute Encoder Cable Length
32-09 Encoder Monitoring
For CAN Encoders
32-14 Enc.2 node ID
32-15 Enc.2 CAN guard
33-91 X62 MCO CAN baud rate
[1] RS422
1024
[0] None
8192
25
262000
[1] On
0
[0] Off
127
[0] Off
[20] 125 kbps
NOTE
Error 113 will show up right after power up if the VLT
AutomationDrive is not ready. The VLT AutomationDrive is in
the “Not ready” state when
- it has an alarm (trip),
- it is in hand mode, [Hand on] key,
- local LCP stop is activated, [OFF] key,
- there is no signal on input 37 safe stop (only FC
302).
Error 113 can only be reset using the ERRCLR command or
with BREAK [Esc] in the PC software and only when the VLT
AutomationDrive is in the “ready” state, which means none
of the above may be true. The VLT AutomationDrive
monitoring function can be switched off by selecting [0] in
33-82 Drive Status Monitoring.
Read the Safety Instructions before installing the frequency
converter.
3.4 Basic MCO Parameter Settings
3.4.2 Setting of parameters for CANopen
feedback encoder
-
In 32-00 Incremental Signal Type select the setting
[3] “CAN encoder”.
-
In 32-01 Incremental Resolution set the resolution of
the encoder.
-
In 32-14 Enc.2 node ID set the CAN ID of the
encoder.
-
In 32-15 Enc.2 CAN guard activate or deactivate the
guarding.
-
In 33-91 X62 MCO CAN baud rate set in the CAN bus
baud rate.
The following parameters are only relevant for synchronizing
applications when a master encoder signal is used. These
defaults are set:
The following parameters must always be checked and if
necessary adjusted. Depending on the requirements of the
application it might be necessary to adjust other parameters
as well.
For the other parameters, use the default settings at first and
then optimize the controller as needed at a later point in
time with a Testrun.
14 MG.33.K3.02 - VLT® is a registered Danfoss trademark
Page 15

How to Install MCO 305 Operating Instructions
32-3* Encoder 1 - Master
32-30 Incremental Signal Type
32-31 Incremental Resolution
32-32 Absolute Protocol
32-33 Absolute Resolution
32-35 Absolute Encoder Data Length
32-36 Absolute Encoder Clock Frequency
32-37 Absolute Encoder Clock Generation
32-38 Absolute Encoder Cable Length
32-39 Encoder Monitoring
32-40 Encoder Termination
For CAN Encoders
32-44 Enc.1 node ID
32-45 Enc.1 CAN guard
33-91 X62 MCO CAN baud rate
[1] RS422
1024
[0] None
8192
25
262000
[1] On
0
[0] Off
[1] On
127
[0] Off
[20] 125 kbps
3.4.3 Setting of parameters for CANopen
Master encoder
-
In 32-30 Incremental Signal Type select the setting
[3] “CAN encoder”.
-
In 32-31 Incremental Resolution set the resolution of
the encoder.
-
In 32-44 Enc.1 node ID set the CAN ID of the
encoder.
-
In 32-45 Enc.1 CAN guard activate or deactivate the
guarding.
-
In 33-91 X62 MCO CAN baud rate set in the CAN bus
baud rate.
Setting of Velocity Parameters
3.4.4
Define 32-80 Maximum Velocity (Encoder), the Maximum
Velocity of the shaft where the encoder is mounted in RPM.
32-8* Velocity & Acceleration
32-80 Maximum Velocity (Encoder)
32-81 Shortest Ramp
Default
1500
1.000
NOTE
For synchronizing application the setting of the follower
drive must be at least the same as the maximum velocity of
the master in order to be able to synchronize. For position
synchronizing it must even be higher so that the follower
drive can catch up lost position related to the master. All
velocity commands (VEL, CVEL) are related to this value.
Define 32-81 Shortest Ramp. That is the time from 0 to
maximum velocity and from maximum velocity to 0. All
acceleration and deceleration commands (ACC, DEC) are
related to this value.
3.4.5 Setting of Home Parameters
Homing is not necessary in standard synchronization
applications and applications using an absolute encoder.
When using an incremental encoder the controller must be
run to home after being switched on. During this process the
reference switch defines the position at which 0 is located
and how the VLT AutomationDrive functions during a home
run: input depends on the application. Define 33-03 Velocity
of Home Motion: Home speed is entered in % relative to the
maximum speed of the frequency converter.
33-0* Home Motion Default
33-00 Force HOME
33-01 Zero Point Offset from Home Pos.
33-02 Ramp for Home Motion
33-03 Velocity of Home Motion
33-04 Behaviour during HomeMotion
[0] not forced
0
10
10
[0] Reverse +
Index
3.4.6 Setting of Synchronization Parameters
The following parameters are only relevant for synchronizing
applications:
33-10 Sync Factor Master
•
33-11 Sync Factor Slave
•
The Synchronizing Factors Master and Slave must be set
according to the gear ratio between master and slave
encoder.
Example:
Both encoders have 1024 PPR, master is running
305 RPM and slave must run 1220 RPM.
33-10 Sync Factor Master
33-11 Sync Factor Slave
Alternative:
33-10 Sync Factor Master
33-11 Sync Factor Slave
The following parameters are only relevant when using
synchronizing with marker correction (SYNCM):
33-15 Marker Number for Master
•
33-16 Marker Number for Slave
•
Marker Number for Master and Slave must be set according to
the ratio between the number of marker signals from master
and slave. A ratio of 1:1 means that each slave marker will be
aligned with each master marker. A ratio of 2:1 means that
each slave marker will be aligned with each second master
marker.
= 305 and
= 1220
= 1
= 4
3
3
MG.33.K3.02 - VLT® is a registered Danfoss trademark 15
Page 16

How to Install MCO 305 Operating Instructions
3
33-1* Synchronization Default
33-10 Sync Factor Master
33-11 Sync Factor Slave
33-15 Marker Number for Master
33-16 Marker Number for Slave
33-17 Master Marker Distance
33-18 Slave Marker Distance
33-19 Master Marker Type
33-20 Slave Marker Type
33-17 Master Marker Distance
•
33-18 Slave Marker Distance
•
When using the encoder zero pulse as marker signal the
distance between 2 markers is the resolution (qc) of the
encoder.
When external marker signals are used, the marker distance
can be measured by means of the program sample “Marker
count”.
33-19 Master Marker Type
•
33-20 Slave Marker Type
•
Master marker signal: Input 5
Slave marker signal: Input 6
Marker signal type must be selected for master and slave:
Default setting is [0] Encoder Z positive flank for both.
3.5
Connecting and Testing the Encoder(s)
1
1
1
1
4096
4096
[0] Enc. Z pos.
[0] Enc. Z pos.
monitoring is activated in
32-39 Encoder Monitoring.
Check the encoder connections by means of the test
program: Select the file “Enc-S.m” via the MCT 10. APOSS and
with that the file is opened automatically .
32-09 Encoder Monitoring and
3.5.1 Execute the Encoder Test Program
In the Development menu click on→ Execute to start the test
program. Run the frequency converter forward for example
in hand mode – [Hand on] key – then the position must
count positive. If the position is counting negative, swap A
and B channels from the encoder or two motor phases. If the
motor is turned on by hand (the motor should not be
connected!), test whether the encoder functions: the
position is continuously registered in the communications
window. For a full rotation you should receive 4 times the
value of the resolution of the encoder, that means 2000 if the
Encoder Counts per Revolution is 500.
Checking Master Encoder for
3.5.2
Synchronizing Applications
To check the master encoder change the test program:
replace the command APOS by MAPOS in “Enc-S.m” and run
the master forward then the master position must count
positive as well. If the position is counting negative, swap A
and B channels from the master encoder.
Ending the Encoder Check
3.5.3
NOTE
The controller and the motor must be able to be switched off
at any time with an EMERGENCY STOP button.
The motor must be able to turn completely freely so that a
sudden jolt can not cause damage.
NOTE
If not yet connected, now is the time to connect and test the
encoder. When using an absolute encoder, enter [0] in
32-00 Incremental Signal Type and in 32-02 Absolute Protocol
the used type of encoder. Then enter the resolution in
32-03 Absolute Resolution.
WARNING
Turn off the power before connecting the encoder.
Each encoder channel (A, B, Z, and D) is monitored, open
circuit as well as short circuit is detected. A green LED shows
the status of each active channel, LED on means that the
channel is ok. Monitoring if the channels are automatically
enabled/disabled depending on the selected encoder type,
e.g. A, B, and Z is monitored when an incremental encoder is
selected. Additionally an alarm will be triggered if encoder
End the test of the encoder with the [Esc]-key and close the
test program with File Close. A successful test of the encoder
is a requirement for further starting up of operations. Repeat
the test when using other encoders.
What to do, if … ?
....the encoder does not work?
This could be a result of incorrect cable installation. Measure
the signals coming from the encoder and compare them to
the values listed in the specifications. Check whether the
connection was made according to the specification.
....the count is descending?
If the Count is Descending with an incremental encoder,
exchange the feedback encoder track A by B and A/ by B/. If
there is no counting in the display then check the wiring of
the encoder.
3.6
PID Controller Settings
This is a quick guide to set-up the PID controller, further
details can be found in the chapter “Optimizing the PID
controller”.
16 MG.33.K3.02 - VLT® is a registered Danfoss trademark
Page 17

How to Install MCO 305 Operating Instructions
The following basic settings can be used in most applications
with a 1024 PPR encoder connected directly to the motor
shaft and maximum reference (3-03 Maximum Reference) is
1500 RPM:
32-60 Proportional factor
32-61 Derivative factor
32-62 Integral factor
32-65 Velocity Feed-Forward
Velocity Feed-forward (32-65 Velocity Feed-Forward) can also
be calculated using the following formula:
Velocity Feed forward
Where:
- “envel” is encoder velocity in RPM at maximum
reference (3-03 Maximum Reference).
- eres” is the encoder resolution
(Incremental encoder: eres = 32-01 Incremental
Resolution * 4.
Absolute encoder: eres = 32-03 Absolute
Resolution).
- “tsample” is PID sample time
(tsample = 32-69 Sampling Time for PID Control
except with SYNCV where tsample = 32-70 Scan
Time for Profile Generator).
The sample program “Feed-forward calculation” is making
the above calculation and sets the parameters:
=
envel
62914560000
×
eres
×
tsample
= 200
= 1000
= 5
= 10200
Sample Program: Feed-forward
3.6.1
Calculation
This program calculates basic settings for Velocity Feedforward and PID settings based on the following inputs:
Encoder type (32-00 Incremental Signal Type and
32-02 Absolute Protocol), Encoder resolution
(32-01 Incremental Resolution or 32-03 Absolute Resolution),
Encoder velocity (par. 19-00), and Motion type (par. 19-00).
These parameters must thus be set before starting the
calculation.
The program performs the following steps when setting
input 1:
1. Check encoder type and resolution
2. Calculate PID sample time in order to get sufficient
resolution
3. Check motion type and select sample time
4. Calculate Feed-Forward.
Parameters are updated when setting input 2.
The updated parameters can be saved by setting input 3.
New calculation is enabled by setting input 4.
Influence to the Control Loop when
3.6.2
Changing Parameters
The gain of the control loop changes when one or more of
the following parameters is changed: Maximum reference,
encoder resolution, and gearing between motor and
encoder.
When changing these parameters the following rules apply:
Increased maximum reference = P and D factors as well as
Feed-forward must be reduced.
Higher encoder resolution = P and D factors as well as Feedforward must be reduced.
Increase gear-ratio between motor and encoder (encoder
turning slower) = P and D factors as well as Feedforward
must be increased.
3
3
MG.33.K3.02 - VLT® is a registered Danfoss trademark 17
Page 18

How to Install MCO 305 Operating Instructions
3
Examples 32-60 32-61 32-62 32-65
1024 PPR encoder
connected directly to the
motor shaft and maximum
reference 1500 RPM
4096 PPR encoder
connected directly to the
motor shaft and maximum
reference 1500 RPM
1024 PPR encoder
connected behind a 10:1
gearbox and maximum
reference 1500 RPM
1024 PPR encoder
connected directly to the
motor shaft and maximum
reference 3000 RPM
Further optimizing can easily be done by means of the
graphical Test-run tool which is included in the APOSS editor
this however implies that the motor/application can move.
200 1000 5 10200
50 250 5 2550
2000 10000 5 102000
100 500 5 5100
3.7 Executing a Test Program
Check the VLT AutomationDrive enable (terminal 37 = 24V)
and check that the VLT AutomationDrive was not stopped
via the LCP. Then increase 32-60 Proportional factor. (See
4 Optimizing the PID controller).
....the motor vibrates heavily?
If the motor vibrates, optimize the PID controller and adjust
the other parameters of the controller: Reduce either
32-60 Proportional factor or increase 32-61 Derivative factor
.
....a "Tolerated Position Error is exceeded" is reported?
If the frequency converter stops due to a "Tolerated Position
Error is exceeded" message it is possible to determine
whether the frequency converter was rotating in the wrong
direction by comparing the curves of the set and actual
values. Check the connections of the motor or encoder. If the
connections are correct, then it is necessary to increase the
par. 32-67 Maximum Tolerated Position Error. (See Optimizing
the PID controller.)
Now connect the motor to the VLT AutomationDrive, make
sure that the motor can turn completely freely.
NOTE
The motor must be provided with an EMERGENCY STOP
button.
Select the file “Move-S.m” via the VLT AutomationDrive.
APOSS and with that the file is opened automatically.
Click on Development and start the test program with →
Execute or [F5].
The test is successful if the motor runs slowly back and forth
and position 500 is registered.
End the test with [Esc] and Close the File.
What to do, if … ?
....the motor sets off uncontrolled or vibrates heavily?
NOTE
Turn off the motor immediately with the EMERGENCY STOP
button if it vibrates heavily or sets off uncontrolled.
....the motor sets off uncontrolled, but the encoder test
previously was successful, then decrease 32-60 Proportional
factor. (See Optimizing the PID controller).
....the motor doesn't move?
If the motor doesn’t move at all, then the Proportional Factor
of the PID filter is probably too low or the VLT
AutomationDrive has not been enabled.
18 MG.33.K3.02 - VLT® is a registered Danfoss trademark
Page 19

Optimizing the PID controll... MCO 305 Operating Instructions
4 Optimizing the PID controller
4.1 How to Control Process Works
How the Control Process Works
The Testrun explained in the chapter PC Software interface in
the APOSS Online help can be used as a tool to optimize the
MCO 305 controller settings, thereby optimizing system
performance. To do that you only need to know a few things
about the control scheme of MCO 305:
The APOSS position controller has two parts:
1.
The Setpoint Generator interprets the various
positioning commands in APOSS and generates a
series of setpoint positions that eventually ends
with the desired position. Normally, all positioning
processes have a trapeze-shaped velocity curve.
That means that after a phase of constant
acceleration there is a phase with constant velocity
and finally a phase with constant deceleration,
which ends at the desired target position.
2.
The PID controller receives the setpoint positions
from the Setpoint Generator and in turn calculates
the speed reference needed for the motor to follow
the current setpoint position. By setting the PID
control parameters you can directly influence to
what degree and how quickly a deviation from a
theoretical set path (as specified by the setpoint
series) should be counteracted.
The following behavior indicate that the control parameters
are not optimally adjusted:
4.2
Significance and Influence of the
Controller Parameters
The PID control unit of the MCO 305 motion controller
transfers the necessary output frequency via an internal
speed reference to the VLT AutomationDrive. This set value
is periodically recalculated with an interval of one
millisecond (interval is programmable by the TIMER
parameter). The MCO 305 is by default set with soft “fit for
all” controller parameters.
4 4
- Frequency converter vibrates
- Frequency converter is loud
- Frequent occurrence of position errors
- Poor control accuracy
NOTE
The control parameters are load-dependent. Thus the
frequency converter must be optimized under the actual
conditions of use.
In exceptional cases it may be necessary to determine
various sets of control parameters while working with
heavily changing load conditions and to re-program them in
subsequent application programs depending on the motion
process.
MG.33.K3.02 - VLT® is a registered Danfoss trademark 19
Page 20

Motor and
FC300
FFVEL
FFACC
KDER
Setpoint
generator
Position
Reference
CA
CV
CP
AP
KPROP
KINT
KILIM
BANDWIDTH
+
+
+
+
+
+
–
–
130BB809.10
Optimizing the PID controll... MCO 305 Operating Instructions
44
AP is the actual position (calculated from encoder feedback) in
qc (Quad Counts)
CP is the current position set point in qc
CV is the velocity set point in qc/ms (position deviation) is
calculated by CP-AP
CA is the acceleration set point
The PID filter works according to the following formula:
1 = FFVEL * (Setpoint Velocity)
2 = FFACC * (Setpoint Acceleration)
3 = KPROP * (Position Deviation)
4 = KINT * (Sum of all previous Position Deviations) (limited
by KILIM)
5 = KDER * (Difference of Position Deviation)
6 = 3 + 4 + 5 (Limited by BANDWIDTH)
NOTE
In SYNCV mode the PID controller is working with speed
deviation instead of position deviation. Speed deviation is
calculated by CV–AV. (AV is the Actual Velocity)
The controller in the MCO 305 utilizes two control strategies
at the same time:
1. An open-loop feed-forward control. Since the
asynchronous motor inherently has a good open
loop performance the feed-forward control is a
very important part of the controller in most
applications. Benefits from using feed-forwards
control is a very fast and accurate response to
changes in the setpoint reference.
2. A closed-loop PID control. The PID controller
monitors the difference between the actual
position and the setpoint position. Based on this
information it calculates a control signal to
minimize the position deviance. Thus the MCO is
able to compensate for changes in load or friction.
The PID controller is also necessary to compensate
for any position deviance caused by inaccurate
setting of the open-loop feedforward controller.
In short: The feed-forward control is used to handle changes
in the setpoint reference (especially important in synchronization applications), while the PID control is used to handle
changes in load conditions or inaccuracies of the feedforward control.
4.3 PID Factors
The32-60 Proportional factor is multiplied with the position
deviance and the result is added to the control signal (the
internal speed-reference to the VLT AutomationDrive). Since
the calculated control signal is proportional to the position
deviance (or error) this kind of control is called proportional
control. The behavior of the proportional control is similar to
that of a spring – the further the spring is extended the
stronger the counter-force it produces.
20 MG.33.K3.02 - VLT® is a registered Danfoss trademark
Page 21

Optimizing the PID controll... MCO 305 Operating Instructions
Influence of the Proportional Factor:
KPROP too small large position deviation due to non-
compensatable load and frictional
moment
KPROP larger quicker reaction, smaller steady-state
deviation, larger overshoot, lesser
damping
KPROP too great heavy vibrations, instability
4.3.1 Derivative Value for PID Control
The 32-61 Derivative factor is multiplied with the derivative of
the position deviance (the 'velocity' of the position deviance)
and the result is added to the control signal. The behavior of
the derivative control is similar to that of an absorber – the
faster the absorber is extended the stronger the counterforce it produces. Thus using the Derivative Value increases
damping in your system.
Influence of the Derivative Value:
KDER small no effect
KDER larger better dampening, lesser overshoot; if
KPROP is increased simultaneously: faster
reaction to control deviation at the same
level of vibration;
KDER too large heavy vibrations, instability
overall control signal (the internal speed-reference) is maxed
out for long periods of time.
This feature is also very helpful in applications where the
power to the motor is turned off and on while the option
card is controlling the VLT AutomationDrive. Cutting of
power to the motor (by setting terminal 27 low) while little
positioning deviance is present in the controller, could result
in an enormous control signal being generated once the
power is turned back on.
4 4
4.3.4 Velocity Feed-forward: FFVEL
The 32-65 Velocity Feed-Forward is a scaling factor that is
multiplied with the derivative of the setpoint position (the
velocity of the setpoint). The result of this operation is added
to the overall control signal. This feature is especially useful
in applications where there is a good correlation between
the control signal (the VLT AutomationDrive speed
reference), and the speed of the motor. This is indeed the
case with most applications.
NOTE
The scaling of the FFVEL parameter is dependent on the
correct setting of the Maximum Reference (3-03 Maximum
Reference) as well as the32-80 Maximum Velocity (Encoder)
and 32-01 Incremental Resolution.
4.3.2 Integral Factor: KINT
The sum of all error is calculated every time the control
signal is updated. The 32-62 Integral factor is then multiplied
with the sum of all positioning errors and added to the
overall control signal.
Thus in case that steady-state position errors occurs in your
application, make sure to use the integral part of the
controller. Steady-state errors will be leveled out as the
summed error increases over time until the control signal
eventually matches the load.
It is possible to set a limit for the control signal generated by
the integral part of the controller (anti-windup).
Influence of the Integral factor:
KINT very small steady-state position deviance is very
slowly regulated to zero
KINT larger faster regulation towards zero steady-state
position deviance, larger overshoot
KINT too large heavy vibrations, instability
4.3.3 Limit Value for Integral Sum: KILIM
The32-63 Limit Value for Integral Sum sets a limit for the
control signal generated by the integral part of the
controller. This helps to prevent the so called "wind-up"
problem which typically occurs in applications where the
4.3.5 Acceleration Feed-forward: FFACC
The 32-66 Acceleration Feed-Forward is multiplied with the
2nd derivative of the setpoint position (the acceleration of
the setpoint) and the result is added to the control signal.
This feature should be used to compensate for the torque
used to accelerate/decelerate the system inertia.
NOTE
Scaling of the Acceleration Feed-forward factor is depending
on the setting of the Shortest Ramp. Increase
32-66 Acceleration Feed-Forward accordingly when
decreasing 32-81 Shortest Ramp and vice versa.
4.3.6 Sampling Time for PID Control: TIMER
For particularly slow systems, slow down the entire control
system by entering multiples of 1 ms as the sampling time.
However, it is important to remember that such a change
influences all the control parameters!
Therefore, normally you should not deviate from the value of
1 ms in 32-69 Sampling Time for PID Control.
MG.33.K3.02 - VLT® is a registered Danfoss trademark 21
Page 22

Optimizing the PID controll... MCO 305 Operating Instructions
4.3.7 PID Bandwidth
A Bandwidth of 1000 means that the set value is being
executed 100%, thus Derivative, Proportional and Integral
Factors are effective as defined. But if operating a system
which could be jeopardized by vibrations, for example, a
crane with a heavy load then you can limit the bandwidth in
which the PID controller should function.32-64 PID
Bandwidth of 300 makes a limitation of 30% possible. The
44
build-up of a vibration is thus prevented since the control is
only moved to with 30% of the calculated set value.
However, then it is necessary also to use the feed-forward
part of the controller in order to achieve the corresponding
control.
Par. # Typical Settings
3-03
32-80
32-00
32-01
32-81
4.4 Optimizing your Controller Settings
as well as
encoder type and resolution in 32-00 Incremental
Signal Type and 32-01 Incremental Resolution, and
32-81 Shortest Ramp. If these settings change again
at a later point, the controller may need optimizing
again.
Maximum Reference
Max. Velocity (Encoder)
Incremental Signal Type
Incremental Resolution
Incremental Resolution
2.
Set 32-67 Max. Tolerated Position Error to a very high
value e.g. 1000000 to avoid getting the error 108
during the following tests.
32-80 Maximum Velocity (Encoder), the
1500,000
1500
[1] RS422
1024
1.000
Step-by-Step
NOTE
Before adjusting the controller parameters it is important to
determine which controller behavior is to be achieved.
NOTE
The drive elements must never be operated outside of the
technical specifications. Thus the maximum acceleration is
determined by the “weakest” drive element.
- “Stiff” axis: the fastest reaction possible is mainly
influenced by the Proportional Factor. You can
judge the results on the basis of the velocity graph.
- Damping of vibrations is mainly influenced by the
Derivative Value. The results can best be assessed in
the velocity graph.
- Temporary (static) deviations in position are mainly
reduced by the Integral Factor and can best be
judged on the basis of the positioning graph.
For best results use the functions in the Tune Oscilloscope for
this purpose; these help you to evaluate and optimize the
PID controller on the basis of graphs of the set and actual
curves.
However, it is recommended only to change one value at a
time and subsequently determining the improvement with a
Testrun.
Click on Controller → Parameter → Axis and select the
frequency converter, of which you are currently adjusting
the settings.
4.4.1
Ten Steps for Optimum Control
The following procedure will optimize your controller
settings in most applications:
1. Make sure that you have specified correct values
for VLT AutomationDrive 3-03 Maximum Reference,
To avoid damaging the system, make sure to set 32-67 Max.
Tolerated Position Error within the limits of the system,
because the position error monitoring is not active with
extremely high values.
3. Optimize the Velocity Feed-forward control: Click
on Execute Testrun and Start a testrun with
following parameter settings:
32-6* PID-Controller
32-60 Proportional factor
32-61 Derivative factor
32-65 Velocity Feed-Forward
32-66 Acceleration Feed-Forward
View the velocity profiles: If the Actual Velocity profile is
lower than the Commanded Velocity profile, increase
Velocity Feed-forward and → Start the testrun again. Of course
if the Actual Velocity profile is
Commanded Velocity you should decrease Velocity Feed-
forward.
Run successive test runs until the two velocity profiles shown
in the Testrun graph have the same maximum value.
Velocity Feed-forward is now optimized, save the current
value.
4. In systems with large inertia and/or rapid changes
in the reference velocity it is a good idea to use and
optimize the Acceleration Feed-forward control
(make sure the inertial load is connected when
optimizing this parameter):
Execute a Testrun with KPROP=0, KDER=0, KINT=0,
FFACC=0, and FFVEL at the optimized value found
above. Use the highest possible acceleration
setting. If 32-81 Shortest Ramp is adjusted properly
an acceleration value of 100 and a deceleration
value of 100 should be sufficient. Start out with a
low setting of Acceleration Feed-forward approx. 10.
higher than the specified
0
0
100
0
22 MG.33.K3.02 - VLT® is a registered Danfoss trademark
Page 23

Optimizing the PID controll... MCO 305 Operating Instructions
View the velocity profiles: If during acceleration the
actual velocity is constantly lower than the
reference velocity profile, then set a higher value of
Acceleration Feed-forward and → Start the Testrun
again.
Run successive test runs until the two velocity
profiles shown in the Testrun graph have similar
rampup and ramp-down curves.
Acceleration Feed-forward is now optimized, save
the current value.
32-6* PID-Controller
32-60 Proportional factor
32-61 Derivative factor
32-62 Integral factor
32-65 Velocity Feed-Forward
32-66 Acceleration Feed-Forward
0
0
0
result of step 3
10
5. Next step is finding the maximum stable value of
the Proportional Factor in the PID controller.
Execute a Testrun with KPROP=0, KDER=0, KINT=0.
Set FFVEL and FFACC at the optimized values
found above.
View the velocity profile. If the velocity profile is
not oscillating then increase the Proportional
Factor. Run successive testruns until the actual
velocity profile is oscillating mildly.
Decrease this "mildly" unstable Proportional Factor
value to about 70 %. Save this new value.
32-6* PID-Controller
32-60 Proportional factor
32-61 Derivative factor
32-62 Integral factor
32-65 Velocity Feed-Forward
32-66 Acceleration Feed-Forward
KPROP 0
KDER 0
KINT 0
FFVEL result of step 3
FFACC result of step 4
6. In order to dampen the oscillations created by the
Proportional part of the controller, the Derivative
Value should now be optimized. Start a Testrun
with KINT=0 and KDER=200. Set FFVEL, FFACC and
KPROP at the optimized values found above.
Run successive test runs with increasing values of
the Derivative Value. At first the oscillations will
gradually reduce. Stop increasing Derivative Value
when the oscillations begin to increase.
Save the last value of Derivative.
32-6* PID-Controller
32-60 Proportional factor
32-61 Derivative factor
32-62 Integral factor
32-65 Velocity Feed-Forward
32-66 Acceleration Feed-Forward
KPROP result of step 5
KDER 200
KINT 0
FFVEL result of step 3
FFACC result of step 4
7. In any system that requires a zero steady-state
error, the Integral part of the controller must be
used. Setting this parameter though is a trade-off
between achieving zero steady-state error fast
(which is good) and increasing overshoot and
oscillations in the system (which is bad).
If you are using the Integral part of the PID
controller, remember to reduce the 32-63 Limit
Value for Integral Sum as much as possible (without
losing the Integral Factor effect of course) in order
to reduce oscillations and overshoot as much as
possible.
8.
Reduce the 32-64 PID Bandwidth as much as
possible. With a properly optimized open-loop
control Bandwidth could be reduced to as little as 6
or 12 % (60 – 120).
9.
Set the 32-67 Max. Tolerated Position Error back to
normal e.g. 20,000.
10.
Once the Testrun is concluded, then → Save the
new parameters as the user parameters. Thus,
these parameters are saved in the controller and in
the future will be used for all programs.
What to do if....
....there is a tendency towards instability?
In the event of a strong tendency towards instability reduce
32-60 Proportional factor and 32-61 Derivative factor again, or
reset 32-62 Integral factor.
....stationary precision is required?
If stationary precision is required, increase 32-62 Integral
factor.
....the tolerated position error is exceeded?
If the test run is constantly interrupted with the message
“position error” set 32-67 Max. Tolerated Position Error –
within the tolerable limits – as large as possible.
If the position error occurs during the acceleration phase
that suggests that the set acceleration cannot be achieved
under the existing load conditions. Increase 32-67 Max.
Tolerated Position Error or determine a Maximum Acceleration
suitable for the entire system.
If position errors do not occur until after the acceleration
phase and they can be delayed but not eliminated by
increasing 32-67 Max. Tolerated Position Error, this suggests
that the Maximum Velocity (RPM) chosen is too high.
Determine a maximum velocity suitable for the entire
system.
....the maximum acceleration is not achieved?
In general, the technical data for a frequency converter are
only valid for a freely rotating axle end. If the frequency
converter is carrying a load the maximum acceleration is
reduced.
The theoretical maximum acceleration will also not be
achieved if, for example, the PID controller output is too
small, or the FC 300/motor is not sized correctly and
therefore does not provide enough energy for peak
consumption during acceleration.
4 4
MG.33.K3.02 - VLT® is a registered Danfoss trademark 23
Page 24

How to Install the Applicat... MCO 305 Operating Instructions
5 How to Install the Application
3. When copy is completed, paste the drive in-to a
5.1 Download Application Program and
Configuration
Follow these steps to create and download MCO 305
program and configuration using MCT 10 and APOSS
55
1. Open MCT 10.
2. Open the folder “Project – Drive – MCO 305 –
programs”.
3. Right click in the right hand view and select:
a. “Import program file” if using an existing program
“outside” the project file or,
b. “New MCO 305 program” when writing a new
program. Right click the program file and double
click or right click and select “Edit”. Program editor
will open.
4. Repeat step 3 if more programs are required.
5. One program must be set as Autostart program:
Right click the program file and select “Set as
Autostart”.
6. Open the folder “Project – Drive – MCO 305 –
Arrays”.
7. Right click on the file and select “Import” or “Edit”.
8. Right click on the MCO 305 folder in the tree
structure in the left-hand view of MCT 10 and select
“Write to drive”.
9. “Write MCO 305 Program Source Files to the Drive”
must be ticked if it should be possible to read the
program from the frequency converter.
Now parameters and MCO 305 data is stored in the project
file, restore by the following steps:
Now both parameters and MCO 305 data is restored in the
drive.
Backup and Restore via LCP
Both parameters and MCO 305 data can be stored in the LCP
and thus restored from the LCP to another frequency
converter.
Use the following steps to back-up parameters data in the
LCP:
Now parameters and MCO 305 data is stored in the LCP,
restore by the following steps:
Now both parameters and MCO 305 data are restored in the
frequency converter.
project folder.
4. Save the project.
1. Open the project file with MCT 10 Set-up
Software.
2. Go on-line with the drive via the Network folder.
3. Open the project folder, Right click on the drive
folder and select “Write to drive”.
1.
Select “All to LCP” [1] in 0-50 LCP Copy.
2.
Select “File from MCO to LCP” [4] in 0-50 LCP Copy.
1.
Select “All from LCP” [2] in 0-50 LCP Copy.
2.
Select “File from LCP to MCO” [5] in 0-50 LCP Copy.
5.2
Backup and Restore
All parameters and MCO 305 data can be read out and stored
in an MCT 10 project and thus restored to the frequency
converter.
NOTE
MCO 305 programs can only be read-out when they have be
downloaded including source code!
Use the following steps to back-up parameters and data by
PC:
1. Go on-line with the drive via the Network folder.
2. Right click on the drive folder and select copy.
“Include programs” must be ticked.
24 MG.33.K3.02 - VLT® is a registered Danfoss trademark
Page 25

How to Install the Applicat... MCO 305 Operating Instructions
5.3 How to Connect and Run Multiple
Frequency Converters
Use MCT 10 Networking or start APOSS directly by clicking on
the application's icon. This stand-alone operation mode
allows APOSS to switch frequency converters or connect to
multiple frequency converters. In stand-alone mode, all file
and parameter handling is done via APOSS. Thus the File
menu also provides the functions for File → New, → Open, and
→ Save As. The Settings menu allows selecting the interface.
Run programs in several frequency converters
If you want to load the program into several controllers, link
the program with the corresponding VLT AutomationDrive
and click on → Execute.
If you want to load a different program in each controller,
open a different edit window for each VLT AutomationDrive,
then open the desired program file and connect it to the VLT
AutomationDrive with → Select Controller. Then start each
program, one after the other, with → Execute.
5 5
MG.33.K3.02 - VLT® is a registered Danfoss trademark 25
Page 26

General Specifications MCO 305 Operating Instructions
6 General Specifications
1) Selected in parameter 5-00 Digital I/O mode. The digital
6.1 Protection and Features
inputs are galvanic isolated from the internal electronics and
can be sourced by an external 24V power supply.
6
- All inputs, outputs and supply voltages are
protected against short circuit.
- All inputs, outputs and supply voltages are galvanic
isolated from high voltages such as mains supply
and motor voltage (PELV).
- Encoder signals are monitored during operation
and standstill.
- Customer specific application programs can be
copy protected.
- All MCO 305 parameters including user defined
application parameters are accessible via the VLT
AutomationDrive LCP.
- MCO 305 can be combined with other VLT
AutomationDrive options e.g. PROFIBUS and
DeviceNet interface.
- All digital inputs and outputs are galvanic isolated
from the internal electronics and can be sourced
from an external 24V power supply.
6.2
Technical Data
Type Plug connectors with screw
terminals.
Maximum cross section, rigid wire
Maximum cross section, flexible
wire
Maximum cross section, wire with
enclosed core
Minimum cross section
Table 6.1 Connection Terminals
of programmable digital inputs 10
Number
Terminal block X57
Terminal number 1, 2, 3, 4, 5, 6, 7, 8, 9, 10
Logic
Voltage level 0 - 24V DC
Voltage level, logic.0. PNP < 5V DC
Voltage level, logic.1. PNP > 10V DC
Voltage level, logic.0. NPN > 19V DC
Voltage level, logic.1. NPN < 14V DC
Maximum voltage on input 28V DC
1.5mm2 / AWG 16
1.5mm2 / AWG 16
1.5mm2 / AWG 16
0.08mm2 / AWG 28
PNP or NPN ¹
Number of programmable digital outputs
Terminal block X59
Terminal number
Driver type Push/Pull
Logic
Voltage level 0 - 24V DC
Max. output current (sink or source) with
internal power supply (total )
Max. output current (sink or source) with
external power supply (per output)
Table 6.3 Digital Outputs
1
8 (6)
11, 21, 3, 4, 5, 6, 7, 8
PNP or NPN
40mA
100mA
2
1) Terminals X59-1 and X59-2 can be programmed as input,
33-60 Terminal X59/1 and X59/2 Mode.
2) Selected in 5-00 Digital I/O Mode.
Number of digital outputs which can be used as
digital inputs
Terminal block X59
Terminal number 1, 2
Logic
Voltage level 0 - 24V DC
Voltage level, logic.0. PNP < 10V DC
Voltage level, logic.1. PNP > 17V DC
Voltage level, logic.0. NPN > 13V DC
Voltage level, logic.1. NPN < 6V DC
Maximum voltage on input 28V DC
Table 6.4 Combined Digital Inputs/Outputs
1
2
PNP or NPN
1) Terminals X59-1 and X59-2 can be programmed as input,
33-60 Terminal X59/1 and X59/2 Mode.
2) Selected in 5-00 Digital I/O Mode.
Terminal block
Terminal number 1, 2
Maximum load 65mA
Table 6.5 24V DC Supply Output
X58
The internal 24V power supply can be disconnected via
parameter 33-85, an external 24V power supply must then
be connected to X58-1 and X58-2.
2
Table 6.2 Digital Inputs
26 MG.33.K3.02 - VLT® is a registered Danfoss trademark
Page 27

General Specifications MCO 305 Operating Instructions
General specifications:
Number of encoder inputs 2
Terminal block X55 and X56
Terminal number 5, 6, 7, 8, 9, 10, 11, 12
Input impedance
Maximum voltage on inputs 5V DC
Cable type Screened cable with a twisted pair of
Table 6.6 Encoder Inputs
Incremental encoder type RS422/TTL
Maximum frequency 410kHz
Phase displacement between A and B 90°± 30°
Maximum cable length
Table 6.7 Incremental Encoder Specifications
Absolute encoder type SSI
Data coding Gray
Data length 12 – 32 bit
Clock frequency
Maximum cable length
120Ω
wires for each encoder channel
2
300m
78kHz – 2MHz
2
150m
1
1
Sample time of position PID loop
Positioning accuracy
Synchronizing accuracy
Table 6.11 Control Characteristics
1ms
± 1 increment ¹
± 1 increment ¹
1) This is the static accuracy; dynamic accuracy depends on
many “external” factors such as encoder resolution, moment
of inertia, mechanical backlash and elasticity.
Program memory size 100 Kbytes
Maximum number of application programs 90
Average command execution time 0.3ms
Maximum reaction time on interrupt input ms
Table 6.12 Application Program
6.3 Supply Voltage Overview
6
6
Table 6.8 Absolute Encoder Specifications
1) Always observe specifications/limitations prescribed by
the encoder supplier.
2) 150m cable is possible up to 500kHz clock frequency,
above 500kHz cable length must be limited further.
Number of encoder outputs
Terminal block X56
Terminal number 5, 6, 7, 8, 9, 10, 11, 12
Signal type RS422
Maximum frequency 410kHz
Maximum number of slaves 31 (more with repeater)
Maximum cable length 400m
Table 6.9 Encoder Output
Number of supply voltages
Terminal block X55 and X56
Terminal number 1, 2, 3, 4
24V, max. load
8V, max. load
5V, max. load
1
3
1
250mA
12
250mA
1
400mA
Table 6.10 Encoder Voltage Supply
1) This is maximum load when only one supply voltage is
used; when 2 or 3 supply voltages are used simultaneously
the load must be reduced accordingly. The following must
be observed: load24V + load8V + load5V 6W and load8V +
load5V 2W.
2) 8V is only available at terminal block X55.
MG.33.K3.02 - VLT® is a registered Danfoss trademark 27
Page 28

Troubleshooting MCO 305 Operating Instructions
7 Troubleshooting
You can find brief information on the error messages in the
7.1 Warnings and Error Messages
All messages are shown in the LCP display of the VLT
AutomationDrive in short and in the APOSS software in plain
text.
Error no. LCP display Error text
102 Too many CAN objects There are no more CAN objects available (CANINI).
103 Illegal axis num. Axis not in system.
105 Error not reset Error not cleared.
106 Home not done Failed to move to HOME position.
107 Home vel. zero Home velocity 0
77
108 Position error Position error.
109 Index not found Index pulse (encoder) not found.
110 Unknown com. Unknown command.
111 SW end limit Software end limit activated.
112 Unknown param. Illegal parameter number.
113 FC not enabled VLT Error Status
114 Too many loops. Too many nested loops.
115 Par. save failed INLONG command got an illegal string
116 Param. memory Parameters in memory are corrupted.
117 Progr. Memory Programs in memory are corrupted.
118 Reset by CPU Reset by CPU.
119 User abort User abort.
121 No more SDO chn Number of SDO channels exceeded.
125 HW end limit Limit switch activated.
149 Too many inter. Too many interrupt functions.
150 No ext. 24V External supply is missing.
151 Too many gosub Too many nested GOSUB commands
152 Too many return Too many RETURN commands.
154 D. out overload Digital output overloaded.
155 LINK failed LINKGPAR failed.
156 Illegal double arg. A floating point function was called with an invalid argument.
160 Internal Intr. error Interrupt happened, but interrupt address is no longer valid.
162 Memory error Error in verifying
170 Too many DIM arrays Too many DIM arrays defined.
171 Array too small Array too small
175 Out of array mem. No more memory space for the new array defined by DIM.
176 Array size wrong Array size does not correspond to the size of the existing array.
179 Waitndx timeout Timeout while waiting for index.
184 Too many ontime Too many ONTIME or ONPERIODS interrupts.
187 Out of memory Not enough memory for variables
188 CAN guarding error A guarding error happened.
189 CAN send-receive error CAN send or receive error.
190 Memory locked Memory locked
191 Illegal cam array Illegal curve array in SETCURVE.
192 Encoder error Encoder error
193 Stack overflow Stack overflow: Too many local variables or nested function calls.
194 Out of dyn. mem Out of dynamic memory.
table or detailed information in the following section.
The tables contain the messages in numerical order. Letters
following a % sign represent variables which can be used in
plain text at the corresponding locations.
28 MG.33.K3.02 - VLT® is a registered Danfoss trademark
Page 29

Troubleshooting MCO 305 Operating Instructions
Error no. LCP display Error text
195 Too many testindices Too many test indices in data logging command.
196 Code too old Code is too old for the current firmware.
198 Limit sw. violation rong direction after limit switch tripped and error reset.
199 Internal MCO fault Internal MCO fault
Error 102
Too many CAN objects have been used and there are no more CAN objects available. The optional error information (see Error
History) is used as follows:
CN_TIMEOUT -2 // timeout of CAN commands when sending or reading telegrams
NO_HARDWARE -6 // no CAN hardware present
NO_MEMORY -7 // no more entries available (mailboxes or lists)
NO_CANMEMORY -10 // no more mailboxes available for define command
NO_MOBJ -11 // the demanded mailbox is not available
CN_CANERROR -12 // a CAN bus error is detected (low level bus error)
CN_MOBJ_DIRERR -13 // direction of mailbox is wrong (try to read a write box or vice versa)
NO_USER -33 // return value for sdo state (SDOSTATE).
SDO_ABORT -50 // has to be higher than the CN_ error messages
SDO_ID_NOT_IN_USE -33 // return value for sdo state (SDOSTATE )
SDO_SEG_ARRAY_TOO_SMALL -51
SDO_SEG_TOGGLE_ERROR -52
SDO_SEG_TOO_MUCH_DATA -53
SDO_SEG_NOT_ENOUGH_DATA -54
SDO_SEG_ARRAY_WRITE_ERROR -55
7 7
GUARD_ERROR_NOT_OPERATIONAL -101
GUARD_ERROR_TOGGLE -102
GUARD_ERROR_MODULE_NOT_RESPONSE -103
GUARD_ERROR_NO_MODULE -104
Error 103
Illegal axis number
An attempt has been made to find an axis which does not
exist in the controller.
Check to see if the program axis command has an invalid
number or a general axis command (...X(*)).
Error 105
Error 108
Position error
HOME was executed with HOME_VEL set to zero.
The distance between the set and the real position was
greater than the Maximum Tolerated Position Error defined in
32-67 Max. Tolerated Position Error.
Causes:
Error not reset
An attempt has been made to execute a motion command,
although an actual error message has not been cleared.
Error 106
Home not done
Failed to move to HOME position. According to the axis
33-00 Force HOME, a forced move to the machine zero-point
is demanded, before other motion commands can be
executed. This move to the machine zero-point has not been
executed.
Error 107
Home velocity zero
An attempt was made to execute the HOME command but
the motor is set to 0 in 33-03 Velocity of Home Motion.
- Mechanically blocked or overloaded frequency
converter,
-
32-67 Max. Tolerated Position Error too small,
- commanded speed greater than VLT
AutomationDrive 4-13 Motor Speed High Limit [RPM]
and 3-03 Maximum Reference,
- commanded acceleration too great,
-
32-60 Proportional factor too small, or
- VLT AutomationDrive not enabled.
MG.33.K3.02 - VLT® is a registered Danfoss trademark 29
Page 30

Troubleshooting MCO 305 Operating Instructions
Error 109
Index not found
At reference or index search, the encoder index pulse could
not be found within a motor rotation.
Causes:
- An encoder without an index pulse has been used,
- index pulse not connected,
- index pulse incorrect (all three channels must have
a simultaneous low), or
-
32-01 Incremental Resolution (ENCODER) is set too
low.
Error 110
Unknown command
Cause is a Communication or program error. The program
must be re-compiled and re-loaded.
Error 111
77
Software end limit
A motion command will cause or has caused the software
end limit to be activated.
Identification of attainment of software limit at a motion in
the speed mode will only be made after the current position
is identical to the software limit switch.
Starting with MCO 5.00 it is possible to clear a software limit
error and then drive in the opposite direction. If you try again
to move in the wrong direction, then a new error is
generated.
Handling of hardware limit switches is the same as software
limit switches. That means that the error you can clear and
drive in the opposite direction. But if you try to move in the
wrong direction, then the error 198 occurs.
In positioning mode, it is known before motion start that the
target position lies outside the path. In this case, the
movement will not be executed and the error message can
be cleared.
The control unit will be switched off and the frequency
converter must be manually moved back to within the
admissible area, or the monitoring of the software limit
switch must be temporarily de-activated via 33-43 Negative
Software End Limit Active and 33-44 Positive Software End Limit
Active. Only then is it possible to clear the error.
Limit switches and reference switches allow the usage of any
input. That means not only 1..8 are supported but also larger
numbers as well as virtual inputs or outputs.
NOTE
Using virtual inputs as limit switches is dangerous because it
eliminates the direct connection between the limit switch
and the controller. That may introduce a time delay (or other
failure scenarios) which will limit the controller’s ability to
respond quickly to the switch. Software-limit error handling
a up MCO 5.00:
A Software-Limit error can not be cleared: The control unit
will be switched off and the frequency converter must be
manually moved back to within the admissible area, or the
monitoring of the software limit switch must be temporarily
de-activated in 33-43 Negative Software End Limit Active and
33-44 Positive Software End Limit Active. Only then is it
possible to clear the error.
Error 112
Unknown parameter
An attempt has been made to change a parameter (SET or
SETVLT command), which does not exist.
Error 113
FC not enabled
VLT Error Status: VLT AutomationDrive is not ready but the
PID controller is active. The FC status word (Bit 09 and Bit 11)
is monitored every 20ms when the PID controller is active.
The VLT AutomationDrive is in the “Not ready” state when:
- it has an alarm,
- it is in local mode,
- local LCP stop is activated.
Error 114
Too many loops
Too many nested LOOP commands exist in the executed
program.
Error 115
Parameter save failed
The INLONG command got an illegal string. It has been used
to read a long value from serial line. If the string which
arrives does not represent a valid number then this error will
be released.
Error 116
Parameters memory are corrupted
The parameters in EPROM are no longer correct because of
- EEPROM defective or
- power outage while saving.
NOTE
Re-initialize the parameter with 14-22 Operation Mode and
then overwrite these parameters again with your own
application parameters. Otherwise motion programs which
require application parameters will no longer function
correctly.
In Stand-alone-Mode you could also use Controller →
Parameters →Reset.
30 MG.33.K3.02 - VLT® is a registered Danfoss trademark
Page 31

Troubleshooting MCO 305 Operating Instructions
Error 117
Programs in memory are corrupted
The program data stored in EPROM cannot be found or are
no longer correct because of
- EEPROM defective or
- power outage while saving.
have to do a 3-finger reset to reset all para¬me¬ters to their
defaults (ex factory) and to delete all user programs, arrays,
and application parameters. Afterwards re-load the
programs and parameters. This corresponds to a Reset →
Complete in the APOSS menu.
In Stand-alone-Mode delete the EPROM with Controller →
Memory → Delete EPROM and then re-load the programs
and parameters.
Error 118
Reset by CPU
The processor has been stopped and a re-set has automatically been executed (watchdog).
Causes could be
- Short term voltage drop,
- voltage peak, or
- short circuit.
Error 119
User abort
The Autostart program has been aborted by the user.
Or the [CANCEL] key was pressed during switching on and a
Master Reset triggered.
Error 121
No more SDO channels
If a SDOREAD or SDOWRITE is used with a negative index,
then the command returns immediately and stores the
running SDO in a channel. It is freed when the result is read.
There is a maximum of 5 channels.
Error 125
Limit switch activated
A motion command has caused an axis limit switch to be
activated.
Through activation of an end limit switch, the controller
(depending on 33-40 Behaviour at End Limit Switch) is
automatically switched off and the frequency converter must
be manually moved out of this position, before the error
message can be cleared.
The behavior in case of hard and software limit switches has
been improved starting with MCO 5.00: It is possible to clear
a Software-Limit error and then drive in the opposite
direction. If you try again to move in the wrong direction,
then a new error is generated.
Handling of hardware limit switches is now the same as
software limit switches. That means that you can clear the
error and drive in the opposite direction. But if you try to
move in the wrong direction, then the error 198 occurs.
Limit switches and reference switches allow the usage of any
input. That means not only 1..8 are supported but also larger
numbers as well as virtual inputs or outputs.
NOTE
Using virtual inputs as limit switches is dangerous because it
eliminates the direct connection between the limit switch
and the controller. That may introduce a time delay (or other
failure scenarios) which will limit the controller’s ability to
respond quickly to the switch.
Error 149
Too many interrupt functions
More interrupt functions than the maximum possible
number were used. Permitted are:
32 ON INT
32 ON STATBIT
32 ON COMBIT
10 ON PARAM
20 ON posint GOSUB: ON APOS, ON IPOS, ON MAPOS, ON
MCPOS, ON MIPOS
Error 150
No external 24V
External supply is missing.
Error 151
Too many nested GOSUB commands
In the program exists too many calls from one subroutine to
another subroutine.
The error usually occurs when there is a recurrent reference
to one of the sub-programs in a subprogram.
Avoid too many (10 is maximum) opposing subroutine calls,
and avoid subroutines which call themselves (re-cursive
subroutine procedures).
Error 152
Too many RETURN commands
There are either more RETURN than corresponding GOSUB
commands in the program, or there is a direct jump from a
subroutine with a GOTO command.
Only one RETURN is allowed per sub-program. It is always
better to jump to the beginning of a sub-program and then
to jump with IF… to a previously defined label.
Error 154
D. out overload
Digital output overloaded.
Error 155
LINK failed
LINKGPAR command failed.
Error 156
Illegal double argument
Mathematical error: Illegal arguments for one of the “double”
function, that means, a floating point function was called
with an invalid argument. For example sqrt got a negative
number or asin or acos were called with an argument bigger
than 1. Double functions are available starting with MCO
5.00.
7 7
MG.33.K3.02 - VLT® is a registered Danfoss trademark 31
Page 32

Troubleshooting MCO 305 Operating Instructions
Error 160
Internal interrupt error
Interrupt happened, but interrupt address is no longer valid.
(Internal error which should not ever happen.)
Error 162
Memory error
Error in verifying: After saving something in the EPROM (a
program or parameters) an error was detected during verification.
Delete the EPROM with a 3-finger reset and try to save the
program or parameters again.
In Stand-alone Mode you can use → Controller → Memory →
Delete EPROM instead of the 3-finger reset.
If this is not successful please call the technical service
department.
Error 170
Too many DIM arrays
77
The definition of an array in a DIM command does not
correspond to an already existing array in the MCO 305.
Cause might be that the fields are from older SYNCPOS/
APOSS programs. The current program has other definitions.
Either adapt the APOSS program to the correct array size or
delete the old arrays, e.g. in Stand-alone Mode with
Controller → Memory → Delete EPROM or use the command
Controller → Reset → Arrays.
NOTE
Remember to follow the recommendations concerning
saving programs and parameters before deleting the
EPROM.
Error 183
Invalid argument
This command error signals that an TESTSTOP command
contained an invalid argument.
Or a compiler error in other commands like invalid
parameter value, format, or range. (Internal error, which
should not occurred.)
Error 184
Too many ONTIME
Too many interrupts (ON TIME or ON PERIOD commands)
were used within the program.
A maximum of 12 of these ON TIME and/or ON PERIOD
commands are allowed within one program.
Error 187
Out of memory
Not enough memory for variables: When the APOSS program
is started the space for the necessary variables is reserved
dynamically. This space is now no longer available.
You may have selected a maximum number of variables
which is too high. Reduce the maximum number in Settings
→ Compiler (Standard = 92).
Or the memory available is occupied with programs or
arrays. Delete the programs with Controller → Programs →
Delete all
or delete both the programs and arrays, i.e. by deleting the
entire memory with Controller → Memory → Delete EPROM..
Remember to follow the recommendations concerning
saving programs and parameters before deleting the
EEPROM.
Error 171
Array too small
An attempt was made to describe an array element that is
located outside of the defined array limits. Cause might be
an error in the APOSS program. Array sizing does not agree
with the space required (e.g. due to an incorrectly
programmed loop).
Or the array is too small for the number of test drives
triggered by TESTSTART.
Check loop variables.
Error 175
Out of array memory
There is no more memory space for the new array defined by
a DIM command.
Error 176
Array size wrong
The size in a DIM command does not correspond to the size
of the existing array. Either delete existing arrays or correct
the DIM command.
Error 179
Waitndx timeout
Timeout while waiting for index: The command WAITNDX
was executed and the timeout listed was exceeded.
The timeout is probably too short or the index impulse could
not found (see also Error 109).
Error 188
CAN guarding error
A guarding error happened. This happens either when
requesting guarding messages from slaves or if guarding is
done by a master. In both cases it is caused by a time out. In
the additional error information it could be seen if it was an
error caused by a master guarding (-34).
The additional error information (see Error History) is used as
it is shown in error 102.
Error 189
CAN send or receive error.
This error is a send or receive error caused by a SDOREAD or
SDOWRITE, by a CANIN or CANOUT or by an IN or OUT
command using CAN I/O.
The optional error information either contains the CAN ID
which produced the error (IN, OUT, SDO, …) or the object
number (handle) which was used (CANIN, CANOUT).
Error 190
Memory locked
The program memory is write-protected and cannot be
altered.
This means that auto recognition can neither be set nor
deleted and programs can neither be saved nor deleted.
Equally, → RAM save and → Delete EPROM will not be
executed.
32 MG.33.K3.02 - VLT® is a registered Danfoss trademark
Page 33

Troubleshooting MCO 305 Operating Instructions
Error 191
Illegal cam array
An incorrect or old array is defined in the DIM instruction for
SETCURVE.
An old array may exist if the zbc (or cnf) file with all
parameters and arrays has not been loaded into the CAM-
Editor.
An incorrect array could be caused by the following:
- It was not created by the curve editor.
- Previous version of a curve editor. Such an array
must first be converted by the current CAMEditor
(→ load and save).
- Or the order of the arrays in the DIM instruction
does not match the order in the zbc (or cnf) file.
Refer to the number of the array in the title bar of
the CAM-Editor in this respect.
Error 192
Encoder error
Error from encoder monitoring: open or short circuit in
accordance with the displayed LED.
An error will be indicated even if no encoder is connected.
Error 193
Stack overflow
Internal error. Dynamic stack overflow caused by too many
local variables or to many nested function calls.
Increase the stack size in Settings → Compiler.
Error 194
Out of dynamic memory
There is not enough dynamic memory for the requested data
log (TESTSETP). Either TESTSTART demands too much
dynamic memory or is called repeatedly.
Error 195
Too many testindices
The data logging command (TESTSETP) contained too many
indices. There is an actual limit of 20.
Error 196
Code too old
The compiler which produced the program code was too old
for this firmware. Please use a newer APOSS.
Error 198
Limit sw. violation
After reaching the limit switch and clearing the error there
was the attempt to move again into wrong direction.
Error 199
Internal MCO fault
If such an error should occur, please contact your dealer and
report the error number displayed to the technical service
department.
7.2
APOSS Software Messages
The APOSS software messages are arranged in alphabetical
order. Letters following a % sign represent variables which
can be used in plain text at the corresponding locations.
Compilation error(s): program not saved!
A file is always compiled first and then saved. If you want to
save the program, for example in the menu Controller → Save
program and a syntax error is found during compilation this
message will be displayed.
Start the → Syntax Check in the menu Development, correct
the syntax error and then save the program.
Connection to ... already exists . . .
Connection to %d already exists [%s] - change to Window?
When opening a new window, or when trying to connect a
window with a controller that is already linked to a window.
Yes: The controller is disconnected from the old window
No: The controller stays connected to the old window. The
Connector pin is not valid
Connector %d pin %d is not valid in line %d column %d
An illegal combination or a pin number which cannot be set
is used with the OUT command.
Controller is executing a program or command!
When the controller is executing a command or program it is
not available for additional commands. You have to Break
the new command and re-start it once the previous
command has been completely.
Error in array part of file
When re-saving a configuration (e.g. Controller → Parameters
→ Restore from file) the computer recognizes that the data in
the array area is formatted incorrectly.
In order to be able to save a file, the following conditions
must be fulfilled:
- Identical software versions,
- same configuration (e.g. same number of axes),
- in the case that arrays have already been inputted,
7 7
and linked to the new window.
new window is not linked to a controller.
these must match the ones that are to be saved in
terms of type and size.
MG.33.K3.02 - VLT® is a registered Danfoss trademark 33
Page 34

Troubleshooting MCO 305 Operating Instructions
Error in axis parameter part of file
When re-saving a configuration (e.g. Controller → Parameters
→ Restore from file) the computer recognizes that the data in
the area of the axis parameters is formatted incorrectly. The
parameter number and the sequence must be correct and
numbering must be continuous.
In order to be able to save a file, the following conditions
must be fulfilled:
- Identical software versions, that provides same
number and order of the parameters,
- same configuration (e.g. same number of axes).
Error in global parameter part of file
When re-saving a configuration (e.g. Controller →
Parameters→ Restore from file) the computer recognizes that
77
the data in the area of the global parameters is formatted
incorrectly.
In order to be able to save a file, the following conditions
must be fulfilled:
- Identical software versions, that provides same
number and order of the parameters,
- same configuration (e.g. same number of axes).
Lost connection to ...
If the VLT AutomationDrive is turned off or the plug is pulled,
etc. the window is disconnected from the VLT
AutomationDrive and the lost connection is registered.
Timeout: no reply from FC
The VLT AutomationDrive does not answer; check the
connection.
34 MG.33.K3.02 - VLT® is a registered Danfoss trademark
Page 35

Appendix MCO 305 Operating Instructions
8 Appendix
Conversion index
8.1 Parameter Lists
The parameters are determined by parameter numbers. We
recommend using the alphabetical overview as a guide; then
you will be able to find detailed information very quickly
This number refers to a conversion figure used when writing
or reading by means of a frequency converter.
Please see for all conversion indices the VLT AutomationDrive
Design Guide, MG.33.BX.YY.
using the number or the link.
Conversion index 0
Changes during operation
“TRUE” means that the parameter can be changed, while the
Conversion factor 1
Data type
frequency converter is in operation.
“FALSE” means that the frequency converter must be
stopped before a change can be made.
4-Set-up
“1-Set-up”: Data value will be the same in all set-ups.
Please see for all data types the VLT AutomationDrive Design
Guide, MG.33.BX.YY.
Data type Description Type
2 Integer 8 Int8
3 Integer 16 Int16
4 Integer 32 Int32
5 Unsigned 8 Uint8
6 Unsigned 16 Uint16
7 Unsigned 32 Uint32
8.1.1 Application Parameters, Parameter Group 19-**
8 8
Par. No. # Parameter name Parameter description Default setting Changes
during
operation
19-0* Application Parameters
19-00 Application parameters 0 'TRUE'
… TRUE
19-89 Application parameters 0 TRUE
19-9* Read-only Application Parameters
19-90 Application parameter 90 0 read only 1 set-up 0 Int32
19-91 Application parameter 91 0 read only 1 set-up 0 Int32
19-92 Application parameter 92 0 read only 1 set-up 0 Int32
19-93 Application parameter 93 0 read only 1 set-up 0 Int32
19-94 Application parameter 94 0 read only 1 set-up 0 Int32
19-95 Application parameter 95 0 read only 1 set-up 0 Int32
19-96 Application parameter 96 0 read only 1 set-up 0 Int32
19-97 Application parameter 97 0 read only 1 set-up 0 Int32
19-98 Application parameter 98 0 read only 1 set-up 0 Int32
19-99 Application parameter 99 0 read only 1 set-up 0 Int32
4-set-up Conversion
index
Type
MG.33.K3.02 - VLT® is a registered Danfoss trademark 35
Page 36

Appendix MCO 305 Operating Instructions
8.1.2 MCO Basics Settings, Parameter Group 32-**
Par. No. # Parameter name Parameter
description
Default setting Changes
during
4-set-up Conver-
sion index
Type
operation
32-0* Encoder 2 - Slave
32-00 ENCODERTYPE Incremental Signal
Type
32-01 ENCODER Incremental
Resolution
32-02 ENCODER ABSTYPE Absolute Protocol [0] None TRUE 1 set-up Uint8
32-03 ENCODER ABSRES Absolute
Resolution
32-04 ENCODERBAUD Absolute Encoder
Baudrate X55
32-05 ENCODERDATLEN Absolute Encoder
Data Length
32-06 ENCODERFREQ Absolute Encoder
Clock Frequency
32-07 ENCODER CLOCK Absolute Encoder
88
32-08 ENCODER DELAY Absolute Encoder
32-09 ENCODER
MONITORING
32-10 POSDRCT Rotational
32-11 POSFACT_N User Unit
32-12 POSFACT_Z User Unit
32-13 ENCCONTROL Enc.2 Control 0 TRUE 2 set-ups Uint8
32-14 Enc.2 node ID 127 TRUE 2 set-ups Uint8
32-15 Enc.2 CAN guard [0] Off TRUE 2 set-ups Uint8
32-3* Encoder 1 - Master
32-30 MENCODER TYPE Incremental Signal
32-31 MENCODER Incremental
32-32 MENCODER ABSTYPE Absolute Protocol [0] None TRUE 1 set-up Uint8
32-33 MENCODER ABSRES Absolute
32-34 MENCODERBAUD Absolute Encoder
32-35 MENCODER DATLEN Absolute Encoder
32-36 MENCODER FREQ Absolute Encoder
32-37 MENCODER CLOCK Absolute Encoder
32-38 MENCODER DELAY Absolute Encoder
32-39 MENCODER
MONITORING
Clock Generation
Cable Length
Encoder
Monitoring
Direction
Denominator
Numerator
Type
Resolution
Resolution
Baudrate X56
Data Length
Clock Frequency
Clock Generation
Cable Length
Encoder
Monitoring
[1] RS422 'TRUE' 1 set-up Uint8
1024 PPR TRUE 1 set-up Uint32
8192 PPR TRUE 1 set-up Uint32
[4] 9600 TRUE 1 set-up
25 Bit TRUE 1 set-up Uint8
262.000 kHz TRUE 1 set-up Uint32
[1] On TRUE 1 set-up Uint8
0 TRUE 1 set-up Uint16
[0] Off TRUE 1 set-up Uint8
[1] No action TRUE 1 set-up Uint8
1 TRUE 1 set-up Uint32
1 TRUE 1 set-up Uint32
[1] RS422 TRUE 1 set-up Uint8
1024 PPR TRUE 1 set-up Uint32
8192 PPR TRUE 1 set-up Uint32
[4] 9600 TRUE 1 set-up
25 Bit TRUE 1 set-up Uint8
262.000 kHz TRUE 1 set-up Uint32
[1] On TRUE 1 set-up Uint8
0 TRUE 1 set-up Uint16
[0] Off TRUE 1 set-up Uint8
36 MG.33.K3.02 - VLT® is a registered Danfoss trademark
Page 37

Appendix MCO 305 Operating Instructions
Par. No. # Parameter name Parameter
description
Default setting Changes
during
4-set-up Conver-
sion index
Type
operation
32-40 MENCODER TERM Encoder
Termination
32-43 MENCCONTROL Enc.1 Control 0 TRUE 2 set-ups Uint8
32-44 Enc.1 node ID 127 TRUE 2 set-ups Uint8
32-45 Enc.1 CAN guard [0] Off TRUE 2 set-ups Uint8
32-5* Feedback Source
32-50 Source Slave [2] Enc2 TRUE 1 set-up
32-52 Source Master [1] Enc1 TRUE 1 set-up
32-6* PID-Controller
32-60 KPROP Proportional Factor 30 TRUE 1 set-up 0 Uint32
32-61 KDER Derivative Value for
PID Control
32-62 KINT Integral Factor 0 TRUE 1 set-up 0 Uint32
32-63 KILIM Limit Value for
Integral Sum
32-64 BANDWIDTH PID Bandwidth 1000 TRUE 1 set-up 0 Uint16
32-65 FFVEL Velocity Feed-
forward
32-66 FFACC Acceleration Feed-
forward
32-67 POSERR Maximum
Tolerated Position
Error
32-68 REVERS Reverse Behavior
for Slave
32-69 TIMER Sampling Time for
PID control
32-70 PROFTIME Scan Time for
Profile Generator
32-71 REGWINMAX Size of the Control
Window
(Activation)
32-72 REGWINMIN Size of the Control
Window (Deacti-
vation)
32-73 KILIMTIME Integral limit filter
time
32-74 POSERRTIME Position error filter
time
32-8* Velocity & Acceleration
32-80 VELMAX Maximum Velocity
(Encoder)
32-81 RAMPMIN Shortest Ramp 1 s TRUE 1 set-up Uint32
32-82 RAMPTYPE Ramp Type 0 TRUE 1 set-up Uint8
32-83 VELRES Velocity Resolution 100 TRUE 1 set-up Uint16
32-84 DFLTVEL Default Velocity 50 TRUE 1 set-up Uint16
32-85 DFLTACC Default
Acceleration
32-86 JERKMIN Acc. up for limited
jerk
32-87 JERKMIN2 Acc. down for
limited jerk
[1] On TRUE 1 set-up Uint8
0 TRUE 1 set-up 0 Uint32
1000 TRUE 1 set-up 0 Uint16
0 TRUE 1 set-up 0 Uint32
0% TRUE 1 set-up 0 Uint32
20000 qc TRUE 1 set-up Uint32
[0] Reversing TRUE 1 set-up Uint8
1 ms TRUE 1 set-up Uint16
[1] 1 ms TRUE 1 set-up Uint8
0 qc TRUE 1 set-up Uint32
0 qc TRUE 1 set-up Uint32
0 ms TRUE 2 set-ups int16
0 ms TRUE 2 set-ups int16
1500 RPM TRUE 1 set-up Uint32
50 TRUE 1 set-up Uint16
100 ms TRUE 2 set-ups Uint32
0 ms TRUE 2 set-ups Uint32
8 8
MG.33.K3.02 - VLT® is a registered Danfoss trademark 37
Page 38

Appendix MCO 305 Operating Instructions
Par. No. # Parameter name Parameter
description
Default setting Changes
during
4-set-up Conver-
sion index
Type
operation
32-88 JERKMIN3 Dec. up for limited
jerk
32-89 JERKMIN4 Dec. down for
limited jerk
0 ms TRUE 2 set-ups Uint32
0 ms TRUE 2 set-ups Uint32
8.1.3 MCO Advanced Settings, Parameter Group 33-**
Par. No. # Parameter
name
33-0* Home Motion
33-00 HOME_FORCE Force HOME [0] not forced 'TRUE' 1 set-up Uint8
33-01 HOME_OFFSET Zero Point Offset
33-02 HOME_RAMP Ramp for Home
33-03 HOME_VEL Velocity of Home
88
33-04 HOME_TYPE Behavior during
33-1* Synchronization
33-10 SYNCFACTM Synchronization
33-11 SYNCFACTS Synchronization
33-12 SYNCPOSOFFS Position Offset for
33-13 SYNC ACCURACY Accuracy Window for
33-14 SYNCVELREL Relative Slave
33-15 SYNCMARKM Marker Number for
33-16 SYNCMARKS Marker Number for
33-17 SYNCMPULSM Master Marker
33-18 SYNCMPULSS Slave Marker
33-19 SYNCMTYPM Master Marker Type [0] Enc. Z pos. TRUE 1 set-up Uint8
33-20 SYNCMTYPS Slave Marker Type [0] Enc. Z pos. TRUE 1 set-up Uint8
33-21 SYNCMWINM Master Marker
33-22 SYNCMWINS Slave Marker
33-23 SYNCMSTART Start Behavior for
33-24 SYNCFAULT Marker Number for
33-25 SYNCREADY Marker Number for
Parameter
description
from Home Position
Motion
Motion
Home Motion
Factor Master (M:S)
Factor Slave (M:S)
Synchronization
Position Synchronization
Velocity Limit
Master
Slave
Distance
Distance
Tolerance Window
Tolerance Window
Synchronization
Fault
Ready
Default setting Changes
during
4-set-up Conver-
sion index
Type
operation
0 qc TRUE 1 set-up Int32
10 TRUE 1 set-up Uint16
10 TRUE 1 set-up Int16
[0] Reverse + Index TRUE 1 set-up Uint8
1 TRUE 1 set-up Int32
1 TRUE 1 set-up Int32
0 qc TRUE 1 set-up Int32
1000 qc TRUE 1 set-up Int32
0% TRUE 1 set-up Uint8
1 TRUE 1 set-up Uint16
1 TRUE 1 set-up Uint16
4096 TRUE 1 set-up Uint32
4096 TRUE 1 set-up Uint32
0 TRUE 1 set-up Uint32
0 TRUE 1 set-up Uint32
[0] Start Funct. 1 TRUE 1 set-up Uint16
10 TRUE 1 set-up Uint16
1 TRUE 1 set-up Uint16
38 MG.33.K3.02 - VLT® is a registered Danfoss trademark
Page 39

Appendix MCO 305 Operating Instructions
Par. No. # Parameter
name
Parameter
description
Default setting Changes
during
4-set-up Conver-
sion index
Type
operation
33-26 SYNCVFTIME Velocity Filter 0 ms TRUE 1 set-up 0 Int32
33-27 SYNCOFFTIME Offset Filter Time 0 ms TRUE 1 set-up Uint32
33-28 SYNCMFPAR Marker Filter Config-
uration
33-29 SYNCMFTIME Filter Time for Marker
Correction
33-30 SYNCM
MAXCORR
33-31 SYNCTYPE Synchronization Type [0] Standard TRUE 1 set-up Uint8
33-32 SYNCFFVEL Feed Forward Speed
33-33 SYNCVFLIMIT Velocity Filter
33-34 SYNCSFTIME Slave Marker Filter
33-4* Limit Handling
33-40 ENDSWMOD Behavior at End Limit
33-41 NEGLIMIT Negative Software
33-42 POSLIMIT Positive Software End
33-43 SWNEGLIMACT Negative Software
33-44 SWPOSLIMACT Positive Software End
33-45 TESTTIM Time in Target
33-46 TESTVAL Target Window Limit
33-47 TESTWIN Size of Target
33-5* I/O Configuration
33-50 I_FUNCTION_1 Terminal X57/1
33-51 I_FUNCTION_2 Terminal X57/2
33-52 I_FUNCTION_3 Terminal X57/3
33-53 I_FUNCTION_4 Terminal X57/4
33-54 I_FUNCTION_5 Terminal X57/5
33-55 I_FUNCTION_6 Terminal X57/6
33-56 I_FUNCTION_7 Terminal X57/7
33-57 I_FUNCTION_8 Terminal X57/8
33-58 I_FUNCTION_9 Terminal X57/9
Maximum Marker
Correction
Adaptation
Window
time
Switch
End Limit
Limit
End Limit Active
Limit Active
Window
Value
Window
Digital Input
Digital Input
Digital Input
Digital Input
Digital Input
Digital Input
Digital Input
Digital Input
Digital Input
[0] Marker Filter 1 TRUE 1 set-up Uint8
0 ms TRUE 1 set-up Int32
[0] Off TRUE 1 set-up Uint32
0 TRUE
0 qc TRUE
0 TRUE
[0] Call error handler TRUE 1 set-up Uint8
-500000 qc TRUE 1 set-up Int32
500000 qc TRUE 1 set-up Int32
[0] Inactive TRUE 1 set-up Uint8
[0] Inactive TRUE 1 set-up Uint8
0 ms TRUE 1 set-up Uint8
1 qc TRUE 1 set-up Uint16
0 qc TRUE 1 set-up Uint16
[0] no function TRUE 1 set-up Uint8
[0] no function TRUE 1 set-up Uint8
[0] no function TRUE 1 set-up Uint8
[0] no function TRUE 1 set-up Uint8
[0] no function TRUE 1 set-up Uint8
[0] no function TRUE 1 set-up Uint8
[0] no function TRUE 1 set-up Uint8
[0] no function TRUE 1 set-up Uint8
[0] no function TRUE 1 set-up Uint8
8 8
MG.33.K3.02 - VLT® is a registered Danfoss trademark 39
Page 40

Appendix MCO 305 Operating Instructions
Par. No. # Parameter
name
Parameter
description
Default setting Changes
during
4-set-up Conver-
sion index
Type
operation
33-59 I_FUNCTION_10 Terminal X57/10
Digital Input
33-60 IOMODE Terminal X59/1 and
X59/2 Mode
33-61 I_FUNCTION_11 Terminal X57/11
Digital Input
33-62 I_FUNCTION_12 Terminal X57/12
Digital Input
33-63 O_FUNCTION_1 Terminal X59/1
Digital Output
33-64 O_FUNCTION_2 Terminal X59/2
Digital Output
33-65 O_FUNCTION_3 Terminal X59/3
Digital Output
33-66 O_FUNCTION_4 Terminal X59/4
Digital Output
33-67 O_FUNCTION_5 Terminal X59/5
Digital Output
88
33-68 O_FUNCTION_6 Terminal X59/6
Digital Output
33-69 O_FUNCTION_7 Terminal X59/7
Digital Output
33-70 O_FUNCTION_8 Terminal X59/8
Digital Output
33-8* Global Parameters
33-80 PRGPAR Activated Program
Number
33-81 Power-up State Power-up State [1] Motor on TRUE 1 set-up Uint8
33-82 STATUS
MONITORING
33-83 ERRCOND Behavior after Error [0] Coast TRUE 1 set-up Uint8
33-84 ESCCOND Behavior after Escape [0] Contr. Stop TRUE 1 set-up Uint8
33-85 EXTERNAL24V MCO Supplied by
33-9* MCO Port Settings
33-90 X62 MCO CAN node
33-91 X62 MCO CAN baud
33-94 X62 MCO RS485
33-95 X62 MCO RS485
Drive Status
Monitoring
External 24VDC
ID
rate
serial termination
serial baud rate
[0] no function TRUE 1 set-up Uint8
[0] Output 'FALSE' 1 set-up Uint8
[0] no function TRUE 1 set-up Uint8
[0] no function TRUE 1 set-up Uint8
[0] no function TRUE 1 set-up Uint8
[0] no function TRUE 1 set-up Uint8
[0] no function TRUE 1 set-up Uint8
[0] no function TRUE 1 set-up Uint8
[0] no function TRUE 1 set-up Uint8
[0] no function TRUE 1 set-up Uint8
[0] no function TRUE 1 set-up Uint8
[0] no function TRUE 1 set-up Uint8
-1 TRUE 1 set-up 0 Uint8
[1] On TRUE 1 set-up 0 Uint8
[0] No TRUE 1 set-up Uint8
127 N/A TRUE 2 set-ups Uint8
[20] 125 Kbps TRUE 2 set-ups Uint8
[0] Off TRUE 2 set-ups Uint8
[2] 9600 Baud TRUE 2 set-ups Uint8
40 MG.33.K3.02 - VLT® is a registered Danfoss trademark
Page 41

Appendix MCO 305 Operating Instructions
8.1.4 MCO Data Readouts, Parameter Group 34-**
Par. No. # Parameter
Name
Parameter description Default
setting
Changes
during
4-Setup Conver-
sion Index
Type
operation
34-0* PCD Write Parameters
34-01 PCD 1 Write to MCO 1 set-up Uint16
34-02 PCD 2 Write to MCO 1 set-up Uint16
34-03 PCD 3 Write to MCO 1 set-up Uint16
34-04 PCD 4 Write to MCO 1 set-up Uint16
34-05 PCD 5 Write to MCO 1 set-up Uint16
34-06 PCD 6 Write to MCO 1 set-up Uint16
34-07 PCD 7 Write to MCO 1 set-up Uint16
34-08 PCD 8 Write to MCO 1 set-up Uint16
34-09 PCD 9 Write to MCO 1 set-up Uint16
34-10 PCD 10 Write to MCO 1 set-up Uint16
34-2* PCD Read Parameters
34-21 PCD 1 Read from MCO 1 set-up Uint16
34-22 PCD 2 Read from MCO 1 set-up Uint16
34-23 PCD 3 Read from MCO 1 set-up Uint16
34-24 PCD 4 Read from MCO 1 set-up Uint16
34-26 PCD 6 Read from MCO 1 set-up Uint16
34-27 PCD 7 Read from MCO 1 set-up Uint16
34-28 PCD 8 Read from MCO 1 set-up Uint16
34-29 PCD 9 Read from MCO 1 set-up Uint16
34-30 PCD 10 Read from MCO 1 set-up Uint16
34-4* Inputs & Outputs
34-40 Digital Inputs 1 set-up Uint16
34-41 Digital Outputs 1 set-up Uint16
34-5* Process Data Unit
34-50 Actual Position UU 1 set-up Int32
34-51 Commanded Position UU 1 set-up Int32
34-52 Actual Master Position qc 1 set-up Int32
34-53 Slave Index Position UU 1 set-up Int32
34-54 Master Index Position qc 1 set-up Int32
34-55 Curve Position 1 set-up Int32
34-56 Track Error UU 1 set-up Int32
34-57 Synchronizing Error UU 1 set-up Int32
34-58 Actual Velocity UU/s 1 set-up Int32
34-59 Actual Master Velocity qc/s 1 set-up Int32
34-60 Synchronizing Status 1 set-up Int32
34-61 Axis Status 1 set-up Int32
34-62 Program Status 1 set-up Int32
34-7* Diagnosis Readouts
34-70 MCO Alarm Word 1 'FALSE' 1 set-up Uint32
34-71 MCO Alarm Word 2 FALSE 1 set-up Uint32
8 8
MG.33.K3.02 - VLT® is a registered Danfoss trademark 41
Page 42

Index MCO 305 Operating Instructions
Index
G
A
Abbreviations........................................................................................... 4
Absolute Encoder Specifications.................................................... 27
Acceleration Feed-forward:.............................................................. 21
Application
Parameters, Parameter Group 19-**......................................... 35
Program............................................................................................... 27
Approvals................................................................................................... 3
Available Literature For VLT AutomationDrive, MCO 305 And
MCT 10 Motion Control Tool...... 3
General
Specifications.................................................................................... 26
Warning................................................................................................. 6
H
High Voltage Warning........................................................................... 5
How
To Connect And Run Multiple Frequency Converters........ 25
To Control Process Works............................................................. 19
To Get Started...................................................................................... 7
To Install The Application............................................................. 24
B
Backup And Restore Via LCP............................................................. 24
Basic MCO Parameter Settings........................................................ 14
Before Commencing Repair Work.................................................... 5
C
Checking Master Encoder For Synchronizing Applications........
16
Combined Digital Inputs/Outputs................................................. 26
Commissioning Guide........................................................................ 14
Connecting And Testing The Encoder (s).................................... 16
Connection Terminals......................................................................... 26
Control Characteristics....................................................................... 27
Conventions.............................................................................................. 3
D
Derivative Value For PID Control.................................................... 21
Digital
Inputs................................................................................................... 26
Outputs................................................................................................ 26
Download Application Program And Configuration............... 24
I
Incremental Encoder Specifications.............................................. 27
Influence To The Control Loop When Changing Parameters.....
17
Integral Factor:...................................................................................... 21
K
KILIM.......................................................................................................... 21
KINT........................................................................................................... 21
KPROP....................................................................................................... 20
L
Limit Value For Integral Sum:........................................................... 21
M
Manual Initialisation............................................................................... 7
MCO
305 Control Terminals.................................................................... 10
Advanced Settings, Parameter Group 33-**.......................... 38
Basics Settings, Parameter Group 32-**................................... 36
Data Readouts, Parameter Group 34-**................................... 41
Mechanical Installation Of The Option In The VLT Automation-
Drive...... 8
E
Electrical Installation........................................................................... 10
Encoder
Connections Examples................................................................... 12
Inputs................................................................................................... 27
Output.................................................................................................. 27
Voltage Supply.................................................................................. 27
Ending The Encoder Check............................................................... 16
Execute The Encoder Test Program............................................... 16
F
FFACC....................................................................................................... 21
FFVEL......................................................................................................... 21
42 MG.33.K3.02 - VLT® is a registered Danfoss trademark
O
Optimizing
The PID Controller........................................................................... 19
Your Controller Settings Step-by-Step..................................... 22
P
PID
Bandwidth.......................................................................................... 22
Controller Settings........................................................................... 16
Filter...................................................................................................... 20
Proportional Factor.............................................................................. 20
Protection And Features.................................................................... 26
Page 43

Index MCO 305 Operating Instructions
R
Restore...................................................................................................... 24
S
Safe Stop Of FC 302................................................................................ 6
Safety Instructions.................................................................................. 5
Sample Program: Feed-forward Calculation.............................. 17
Sampling Time For PID Control:...................................................... 21
Setting
Of Encoder Parameters.................................................................. 14
Of Home Parameters...................................................................... 15
Of Synchronization Parameters.................................................. 15
Of Velocity Parameters................................................................... 15
Significance And Influence Of The Controller Parameters..........
19
Software Version..................................................................................... 5
Stationary Precision Is Required?.................................................... 23
Supply Voltage Overview.................................................................. 27
Symbols...................................................................................................... 3
T
Technical Data....................................................................................... 26
Terminal Overview............................................................................... 11
Test Program.......................................................................................... 18
The
Maximum Acceleration Is Not Achieved?............................... 23
Motor Doesn't Move?..................................................................... 18
Motor Sets Off Uncontrolled........................................................ 18
Tolerated Position Error Is Exceeded?...................................... 23
There Is A Tendency Towards Instability?.................................... 23
TIMER........................................................................................................ 21
Tolerated Position Error Is Exceeded............................................. 18
U
Unintended Start..................................................................................... 5
V
Velocity Feed-forward:....................................................................... 21
MG.33.K3.02 - VLT® is a registered Danfoss trademark 43
 Loading...