


DANBY PRODUCTS LIMITED, ONTARIO, CANADA N1H 6Z9
DANBY PRODUCTS INC., FINDLAY, OHIO, USA 45840
2017.04.11

CONTENTS * TABLE DES MATIÈRES * ÍNDICE
Wine Display
Use and Care Guide ........................................................1 - 10
• Welcome
• Important Safety Information
• Installation Instructions
• Features
• Operation Instructions
• Care and Maintenance
• Troubleshooting
• Warranty
Affi cheur de vin
Guide d’utilisation et d’entretien.....................................11 - 20
• Bienvenue
• Consignes de sécurité importantes
• Caractéristiques
• Consignes d’installation
• Consignes d’utilisation
• Soins et entretien
• Dépannage
• Garantie
Visualización del vino
Guía de utilización y cuidado.........................................21 - 30
• Bienvenido
• Información importante sobre seguridad
• Características
• Instrucciones de instalación
• Instrucciones de funcionamiento
• Cuidado y mantenimiento
• Solución sugerida
• Garantía
Model • Modèle • Modelo
SR001

Thank you for choosing Silhouette
We know you’re excited. We are too! However, the more familiar you are with your new appliance, the better experience you will
have. We therefore strongly suggest that you read this Owner’s Manual before plugging in your new appliance. It contains
important operational information that will help you make full use of the technical features available in your appliance. The
manual also contains information designed to enhance operating reliability and safety, as well as tips to maintaining your new
appliance so that it brings you happiness for years to come.
This appliance comes with a comprehensive 3 year warranty, one of the best in the industry. Please take a moment to review the
full warranty statement. In addition, we encourage our consumers to register their product with us. This can be accomplished in
one of three ways:
- Mail in the provided registration card.
- Register online at https://www.silhouetteappliances.com/warranty-registration/product-registration/
- Call the Silhouette consumer care department at 1-844-455-6097.
Please visit www.silhouetteappliances.com to access self-service tools, FAQs and more. Should you need additional assistance,
please call 1-844-455-6097.
Note: You will need the below information to obtain service under warranty.
To receive service, you must provide the original receipt.
Model Number:
Serial Number:
Date of Purchase:
NEED HELP?
Before you call for service, here are a few things you can do to help us serve you better:
Read this Owner’s Manual:
It contains instructions to help you use and maintain your appliance properly.
If you received a damaged appliance:
Our product is rigorously tested and inspected prior to leaving the factory. Please inspect the
product prior to installation and inform the installer of any damage to the appliance.
Troubleshooting:
The installer will demonstrat how to use the features of this appliance. If, however, you have
further questions, please consult the troubleshooting section of this manual to find answers to
common questions or concerns you may have.
If you do need service, you can relax, knowing help is only a phone call away.
Tel: 1-844-455-6097
1

Important Safety Information
READ AND FOLLOW ALL SAFETY INSTRUCTIONS
WARNING
To reduce the risk of fi re, burns, electric shock, or injury to persons when using your appliance, follow
basic precautions, including the following sections.
GENERAL PRECAUTIONS
• CAUTION: Read all instructions and safety
information before using the appliance.
• Use this appliance only for its intended use as
described by this manual.
• Store wine in sealed bottles only.
• This unit is not designed for outside installation,
including anywhere that is not temperature
controlled (garages, porches, carports, etc.).
• This appliance must be grounded. In the event
of an electrical short circuit, grounding reduces
the risk of electric shock by providing an escape
wire for the electric current.
• This appliance is equipped with a power cord
that has a grounding wire with a grounding plug.
The plug must be plugged into an outlet that is
properly installed and grounded.
• Do not use an extension cord with this appliance.
If the power cord is too short, have a qualifi ed
electrician or service technician install an outlet
near the appliance.
• Do not splice the power cord.
• Do not operate this appliance if it has a
damaged power cord or plug, if it is not working
properly, or if the appliance has been damaged
or dropped.
• Do not immerse cord, plug or the appliance itself
in water.
• Do not use accessories that were not included for
use with this appliance.
• WARNING: Keep ventilation openings clear of
obstruction.
• WARNING: Do not damage the refrigerant
circuit.
• Consult a qualifi ed electrician or service
technician if the grounding instructions are not
completely understood, or if doubt exists as to
whether the appliance is properly grounded.
• If the outlet is a standard 2-prong wall outlet,
it is your personal responsibility and obligation
to have it replaced with a properly grounded
3-prong wall outlet.
• Use an exclusive wall outlet. Do not connect your
appliance together with any other appliance in
the same wall outlet.
• Unplug from electrical outlet when the appliance
is not in use.
• Do not under any circumstances cut or remove
the third (ground) prong from the power cord.
• Do not use an ungrounded (two prong) adapter
plug with this appliance.
• WARNING: Do not use electrical appliances
inside the food storage compartments of
the appliance, unless they are of the type
recommended by the manufacturer.
SAVE THESE INSTRUCTIONS!
2
INSTALLATION INSTRUCTIONS
CAUTION
We strongly recommend having a professional complete the installation of this unit.
To avoid personal injury to yourself and/or property, have someone assist you during the installation
process. Gloves and safety goggles should be worn.
Tools you will need:
• Philips screwdriver
• Drill and drill bit
• Level
• Measuring tape
• Pencil
• Tape or push pin
• Stud fi nder
INSTALLATION INSTRUCTIONS
1. Open packaging.
• Cut carton straps.
• Lift off top of carton box.
• Remove paper template.
2. Choose a location.
• Use the paper template to visualize and mark
where the unit will be installed.
• The purpose of the paper template is to
help choose a location for the unit, to create
guidelines to show where to mount the
securing bracket and to help determine if it will
be necessary to to have a certifi ed electrician
install a power outlet for the unit.
• Do not install the unit into a corner or directly
beside a wall as this will impede the door
opening.
• The unit can accommodate baseboard
moldings with a maximum height of 22 cm
(8.5 in) and a maximum depth of 4 cm (1.5
in).
Electrical Requirements:
The appliance must be connected to an
individual, properly grounded electrical
outlet, protected by a 15 or 20 ampere
circuit breaker or time delay fuse.
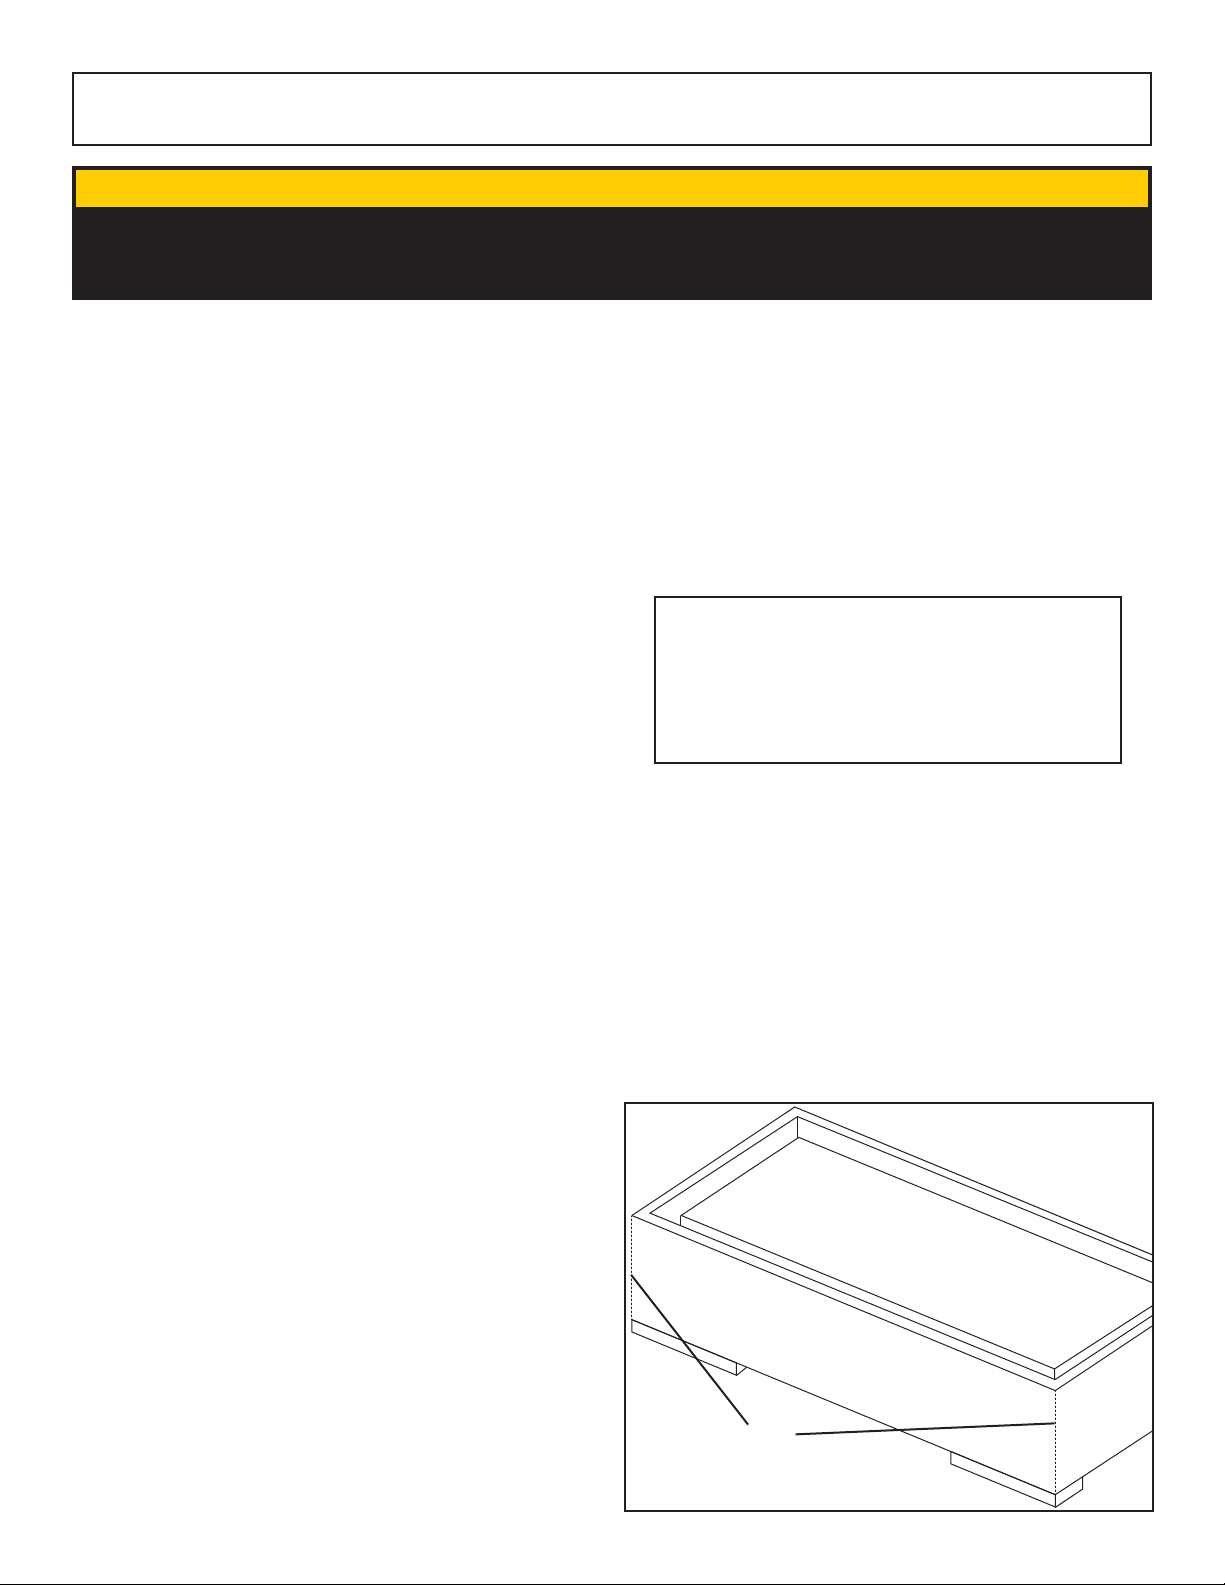
3. Unpack the unit.
• With the help of an extra person, take the
foam pieces that are on top of the unit and lay
them on the fl oor.
• Cut two corners out of the side of the carton
and fold the long side down.
• Slide the unit out of the folded side and onto
the foam pieces on the fl oor to protect the
back of the unit from damage.
Cut
3
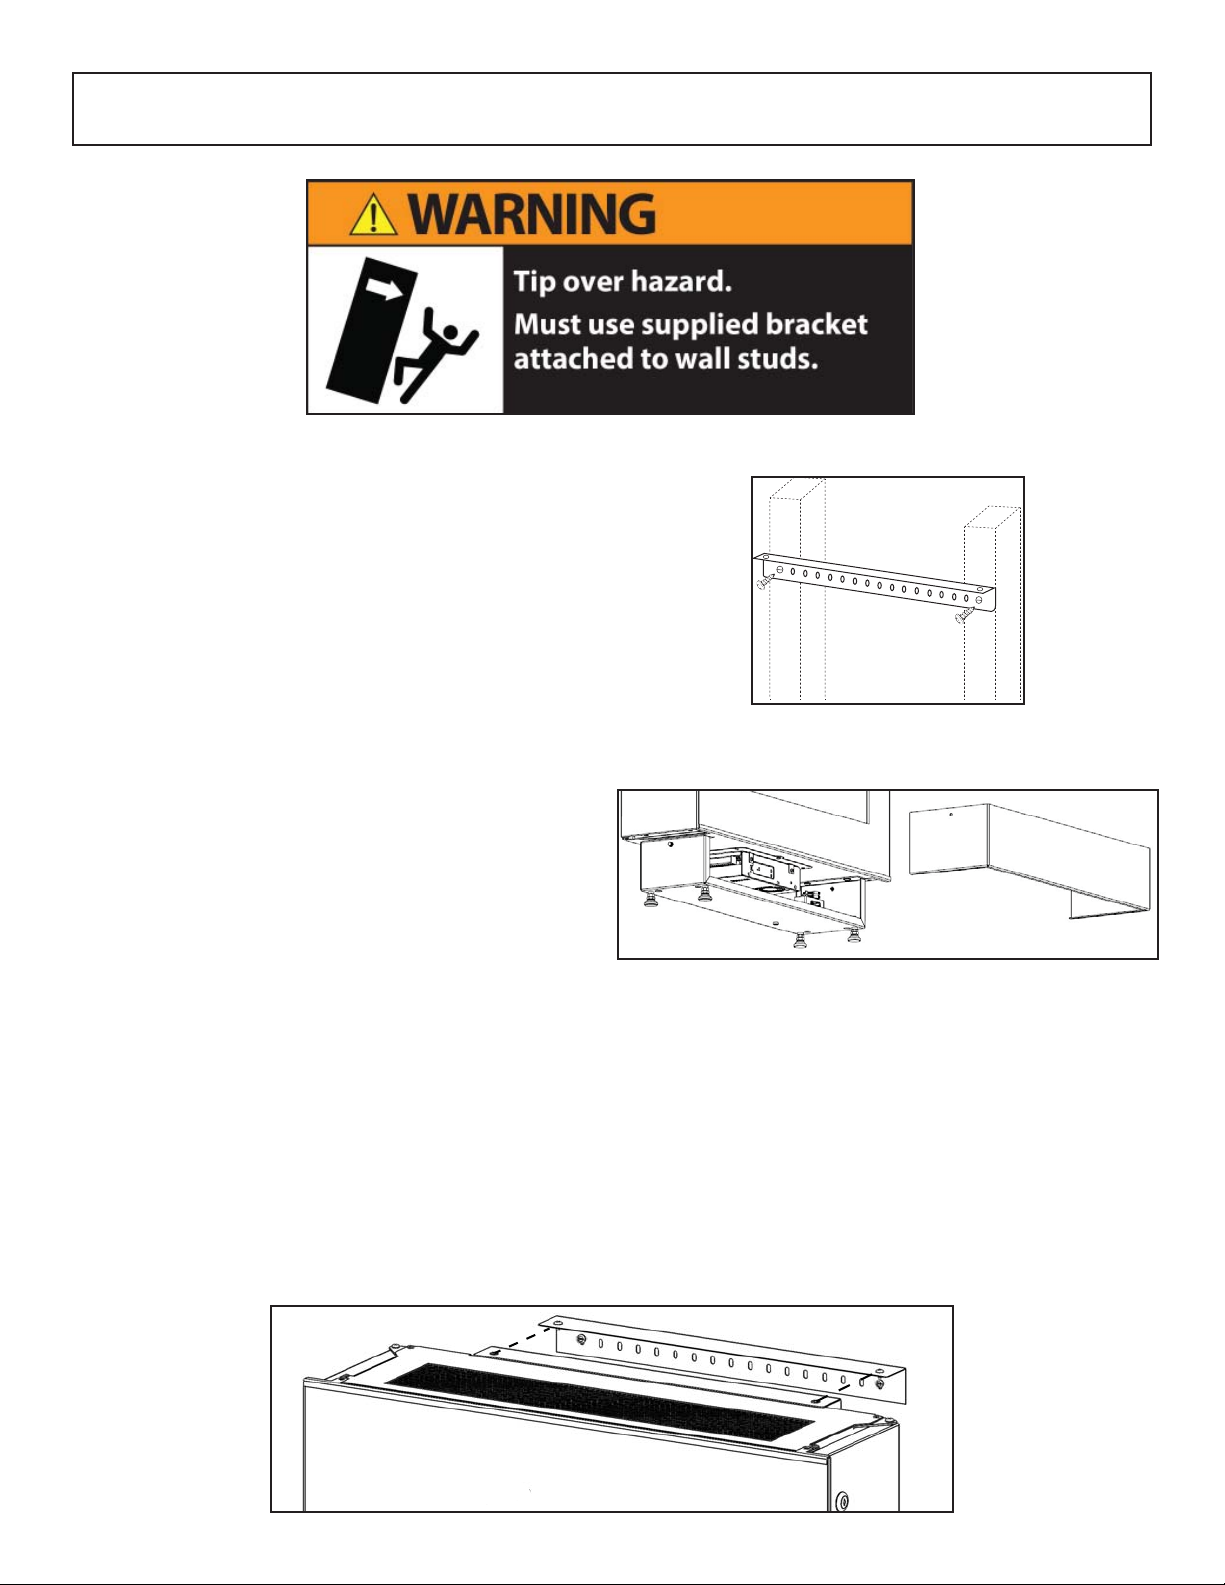
INSTALLATION INSTRUCTIONS
4. Install the mounting bracket.
• Using the guidelines on the paper template
and three screws, install the mounting bracket.
• The mounting bracket should be secured with
two separate screws each entering a stud.
• It is recommended to secure the bracket into
two separate wall studs.
• Use the included drywall anchors for added
stability.
5. Level the unit.
• Remove the pedestal cover from the front of the
unit by removing the two screws on either side.
• With the help of another person, place the unit
against the wall and plug it in.
6. Attach the unit to the mounting bracket.
• Firmly secure the unit to the mounting bracket
using two screws.
• If necessary, adjust the levelling legs to the
approrpiate height.
• Replace the pedestal cover.
• Ensure the main power switch, located on the
lower right side beneath the door, is turned to
the “ON” position.
4
INSTALLATION INSTRUCTIONS
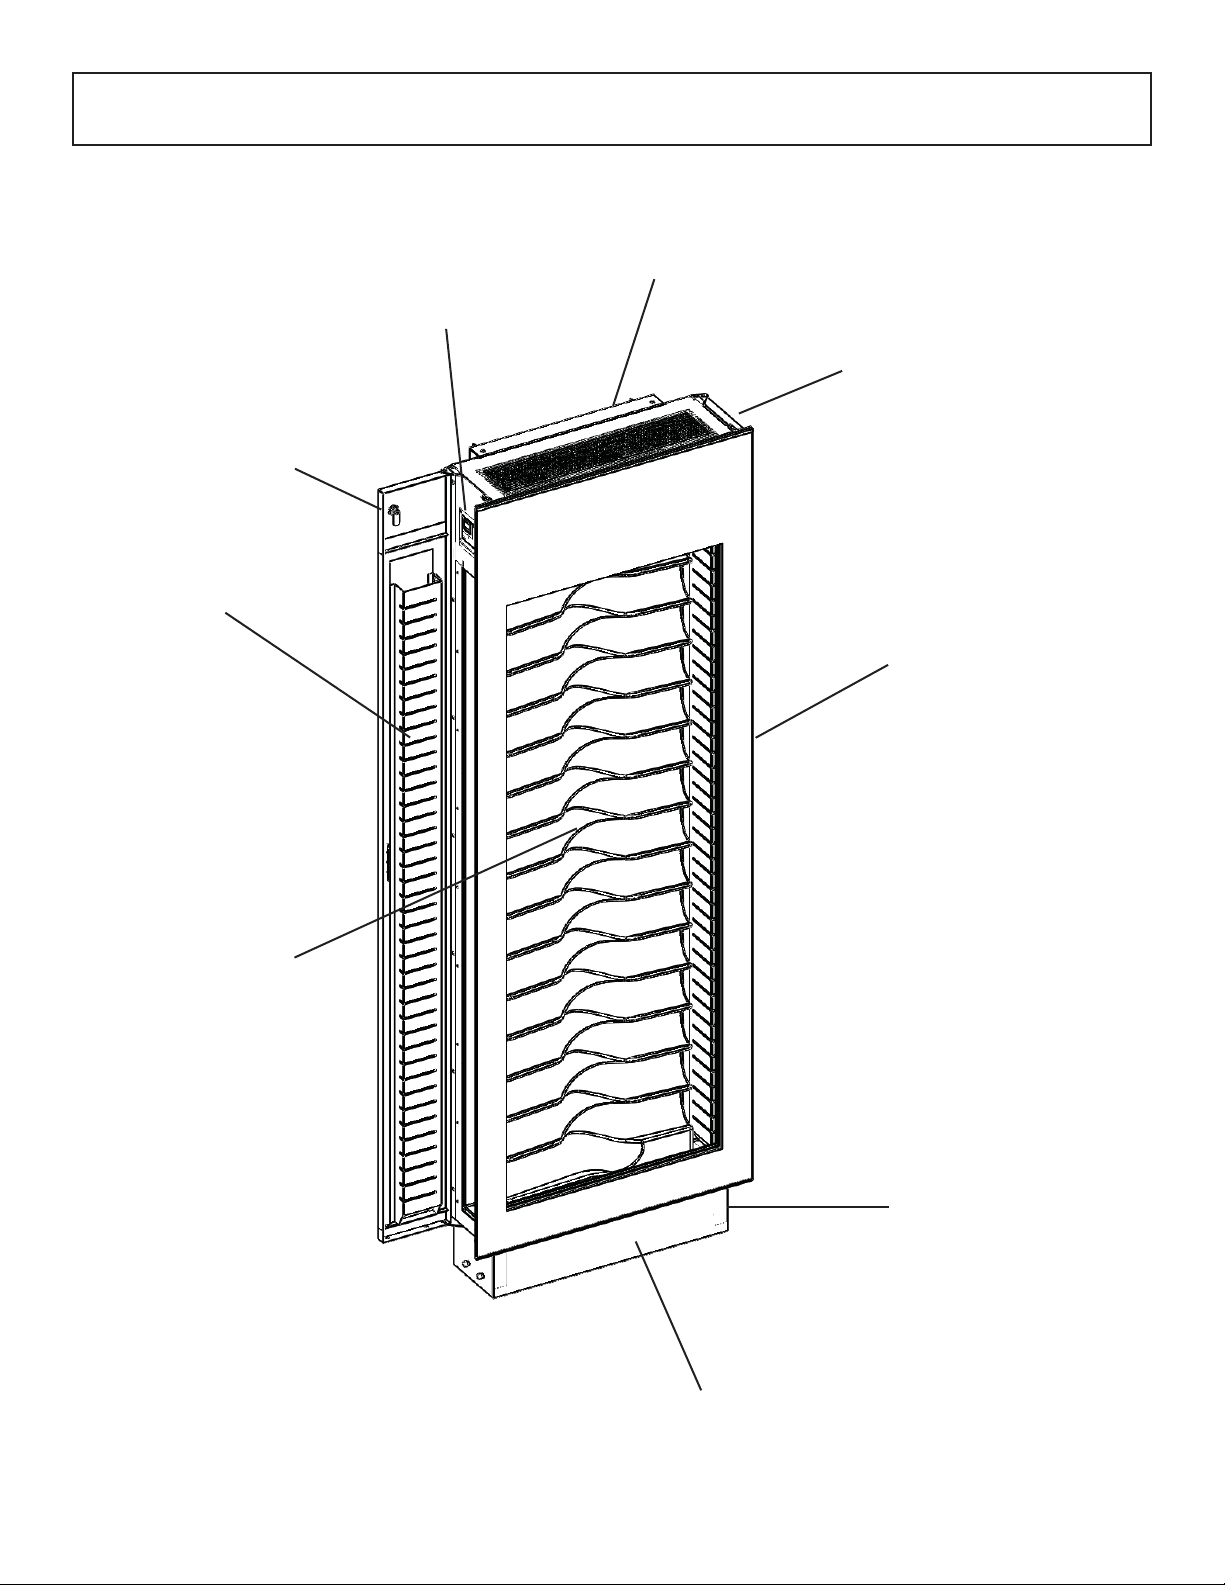
FEATURES
Control Panel
Lock
Left Hand Door
Mounting Bracket
Door Lock (not pictured)
Right Hand Door
(Not Pictured)
Wine Storage Slots (up
to 30 wine bottles can
be stored in this unit)
Power ON/OFF Switch
(not pictured)
Pedestal Cover
5
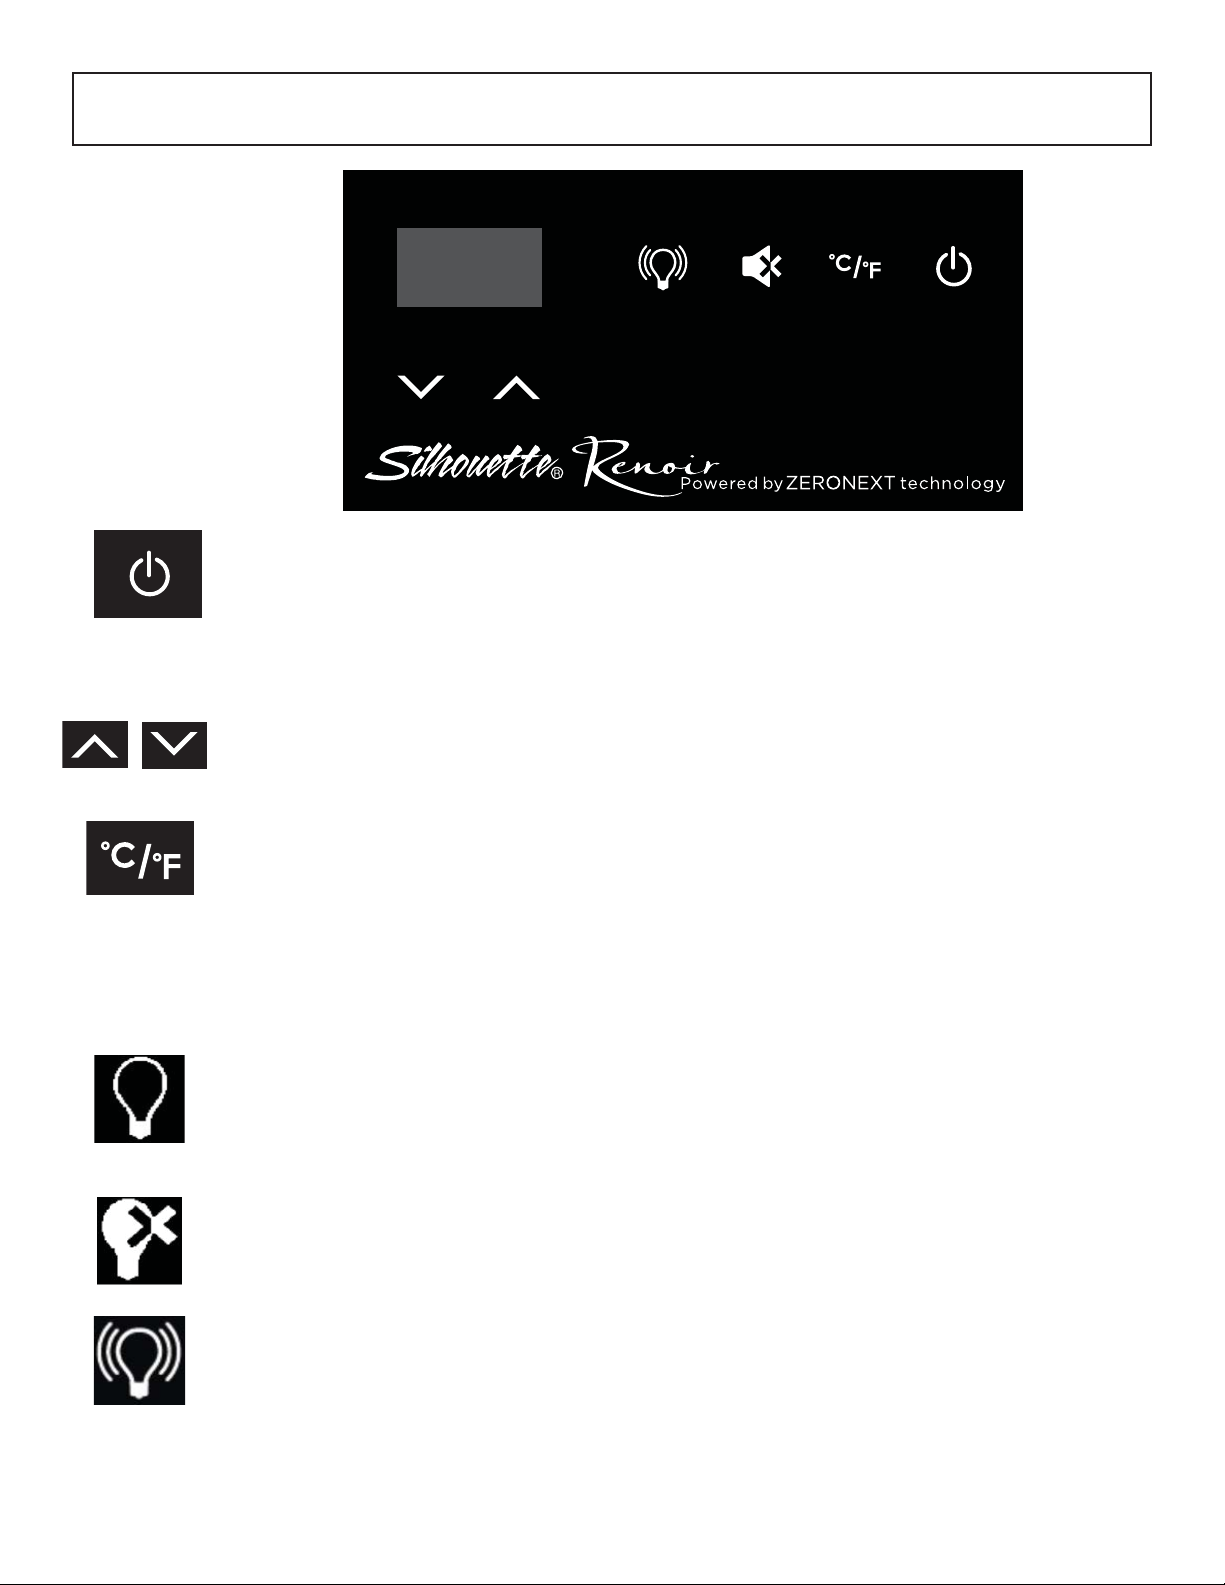
OPERATING INSTRUCTIONS
CONTROL PANEL
Power Button: Press once to start the cooling function. Cooling temperature will default to
12°C (54°F). While the unit is cooling, press this button to stop the cooling function.
Note: In order for the power button to function properly the unit must be plugged into a
grounded outlet and the power switch must be turned on.
12°C
Up and Down Arrows: The temperature range of the unit is 12°C (54°F) to 17°C (63°F).
Use the up and down arrows to increase or decrease the set temperature in 1° increments.
°C/°F Button: The default setting is °C. Press this button to switch between °C and °F.
LED Interior Light: The interior light can be set to ‘on’, ‘off’ or ‘motion activated’. The default
setting is ‘motion activated’. The light will illuminate if there is motion within 1.5 m (5 feet) of
the appliance and will remain on for 3 minutes.
• Press the LED button once for continuous illumination. Continuous illumination mode will
display a lightbulb on the display panel. The light will be on continuously at 50% power
and 100% power when there is motion detected.
• Press the LED button a second time to turn the light off. Light off mode will display a
lightbulb with an X on the display panel.
• Press the LED button a third time to return to motion activated illumination. Motion activated
mode will display a lightbulb with lines around it on the display panel.
6

OPERATING INSTRUCTIONS
CONTROL PANEL
Volume Button: The appliance will provide audible alerts during certain actions. The unit will
default to sound being on.
Door Ajar Alarm: If one of the doors remains open for more than 3 minutes, an alarm will
sound.
• Press the volume button once to mute the door ajar alarm for 3 minutes. The display icon of
a speaker with an X will fl ash while sound is muted. After three minutes, sound will resume.
• Press the volume button twice in quick succession to completely silence the unit. When the
unit is silenced, there will be no noise is the door is left ajar or a button is pressed. The
display icon of a speaker with an X will remain solid while sound is turned off.
• When silenced, press the volume button once to resume sound function. The display icon of
a speaker will remain solid while sound is turned on.
Temperature Alarm: An audible alarm will sound if the interior temperature of the unit is more
than 4 degrees above or below the set temperature.
• If the interior temperature is 4 degrees higher than the set temperature, the display panel will
show the error code “INTERIOR TOO WARM”.
INTERIOR TOO WARM
• If the interior temperature is 4 degrees lower than the set temperature, the display panel will
show the error code “INTERIOR TOO COLD”.
INTERIOR TOO COLD
7

CARE & MAINTENANCE
CLEANING YOUR WINE DISPLAY
Cleaning the Inside:
• Water deposits and dust can be removed with
a dry paper towel, others may require a damp
cloth.
Cleaning the Outside:
• It is important to keep the area clean where the
door seals against the cabinet. Clean with a
damp cloth and let dry.
• Control Panel and Door - Wipe with a damp
cloth and dry thoroughly. Do not use cleaning
sprays, large amounts of soap and water,
abrasive or sharp objects on the panel, they can
damage it. Some paper towels may also scratch
the control panel and glass on the door.
• Door Surface - Use only mild, non-abrasive
detergents applied with a clean sponge or soft
cloth. Rinse well with damp cloth.
POWER FAILURE
Most power failures are corrected within a few
hours and should not affect the temperature of your
appliance if you minimize the number of times the
door is opened. If the power is going to be off for a
longer period of time, you need to take the proper
steps to protect your contents. When power resumes,
the unit will default to the last setting.
ENERGY SAVING TIP
The unit should be located in the coolest area of the
room, away from heat producing appliances, and
out of direct sunlight.
INTERIOR LIGHT
Your wine display is equipped with a long life LED
light. If your light burns out, please call Silhouette
Consumer Care at 1-844-455-6097 for the number
of an authorized technician to replace the light.
Note: Do not use cleaners containing ammonia or
alcohol on the wine display. Ammonia or alcohol
can damage the appearance of the appliance.
Note: Never use any commercial / abrasive
cleaners or sharp objects on any part of the wine
display.
8

TROUBLESHOOTING
Silhouette Consumer Care: 1-844-455-6097
Hours of operation:
Monday to Thursday 8:30 am - 6:00 pm Eastern Standard Time
Friday 8:30 am - 4:00 pm Eastern Standard Time
Information in this manual is subject to change without notice.
PROBLEM POSSIBLE CAUSE SOLUTIONS
No power • A fuse in your home may be
blown or the circuit breaker
tripped
• Power surge
• Plug not fully inserted into wall
outlet
• Power is not turned on
Cabinet temperature
is too warm
• Temperature is set too high
(warm)
• Door is not shut properly or
opened excessively
• Exhaust vent is obstructed
• Recently added a large
quantity of warm beverages to
the cabinet
• Replace fuse or reset circuit breaker
• Unplug the wine cooler, wait a few
seconds and then plug it back in
• Make sure the 3-prong plug is fully
inserted into the outlet
• Ensure the ON/OFF switch is turned to
ON
• Verify the temperature control setting,
adjust if necessary
• Ensure that the door is fully closed and
that the gasket is sealing against the
cabinet. Open the doors only as needed
and for short periods of time
• Verify there is nothing blocking the front
mounted exhausting vent
• Limit the quantity of warm beverages
being introduced to the cabinet at the
same time. Attempt to stagger the load
introduction if possible
9

LIMITED IN-HOME APPLIANCE WARRANTY
LIMITED IN-HOME APPLIANCE WARRANTY
This quality product is warranted to be free from manufacturer’s defects in material and workmanship, provided that the unit is used under the normal operating
This quality product is warranted to be free from manufacturer’s defects in material and workmanship, provided that the unit is
conditions intended by the manufacturer.
used under the normal operating conditions intended by the manufacturer.
This warranty is available only to the person to whom the unit was originally sold by Danby Products Limited (Canada) or Danby Products Inc. (U.S.A.) (hereafter
This warranty is available only to the person to whom the unit was originally sold by Danby Products Limited (Canada) or
“Danby”) or by an authorized distributor of Danby, and is non-transferable.
Danby Products Inc. (U.S.A.) (hereafter “Danby”) or by an authorized distributor of Danby, and is non-transferable.
TERMS OF WARRANTY
Plastic parts, are warranted for thirty (30) days only from purchase date, with no extensions provided.
Plastic parts, are warranted for thirty (30) days only from purchase date, with no extensions provided.
First 36 months
First Year
To obtain
service
To obtain
Service
Boundaries of
Boundaries of
in-home service
In Home Service
During the first thirty six (36) months, any functional parts of this product found to be defective, will be
repaired or replaced, at warrantor’s option, at no charge to the ORIGINAL purchaser.
During the rst twelve (12) months, any functional parts of this product found to be defective, will be repaired or replaced, at warrantor’s
option, at no charge to the ORIGINAL purchaser.
Danby reserves the right to limit the boundaries of “In Home Service” to the proximity of an Authorized
Service Depot. Any appliance requiring service outside the limited boundaries of “In Home Service” ,it
Danby reserves the right to limit the boundaries of “In Home Service” to the proximity of an Authorized Service Depot. Any app liance
will be the consumer’s responsibility to transport the appliance (at their own expense) to the original
requiring service outside the limited boundaries of “In Home Service” , it will be the consumer’s responsibility to transport the appliance (at
retailer (point of purchase) or a service depot for repair. See “Boundaries of In Home Service” below.
their own expense) to the original retailer (point of purchase) or a service depot for repair. See “Boundaries of In Home Serv ice” below.
Contact your dealer from whom your unit was purchased, or contact your nearest authorized Danby
Contact your dealer from whom your unit was purchased, or contact your nearest authorized Danby service depot, where service
service depot, where service must be performed by a qualified service technician. If service is performed
must be performed by a qualied service technician.
on the units by anyone other than an authorized service depot, or the unit is used for commercial
If service is performed on the units by anyone other than an authorized service depot, or the unit is used for commercial appli cation, all
application, all obligations of Danby under this warranty shall be void.
obligations of Danby under this warranty shall be void.
If the appliance is installed in a location that is 100 kilometers (62 miles) or more from the nearest
If the appliance is installed in a location that is 100 kilometers (62 miles) or more from the nearest service center your unit must be
service center your unit must be delivered to the nearest authorized Danby Service Depot, as service
delivered to the nearest authorized Danby Service Depot, as service must only be performed by a technician qualied and certif ied for
must only be performed by a technician qualified and certified for warranty service by Danby. Transpor-
warranty service by Danby. Transportation charges to and from the service location are not protected by this warranty and are t he
tation charges to and from the service location are not protected by this warranty and are the responsi-
responsibility of the purchaser.
bility of the purchaser.
TERMS OF WARRANTY
Nothing within this warranty shall imply that Danby will be responsible or liable for any spoilage or damage to food or other c ontents of this appliance, whether due
Nothing within this warranty shall imply that Danby will be responsible or liable for any spoilage or damage to food or other
to any defect of the appliance, or its use, whether proper or improper.
contents of this appliance, whether due to any defect of the appliance, or its use, whether proper or improper.
EXCLUSIONS
EXCLUSIONS
Save as herein provided, by Danby, there are no other warranties, conditions, representations or guarantees, express or
Save as herein provided, Danby, there are no other warranties, conditions, representations or guarantees, express or implied, m ade or intended by Danby or its
implied, made or intended by Danby or its authorized distributors and all other warranties, conditions, representations or
authorized distributors and all other warranties, conditions, representations or guarantees, including any warranties, conditio ns, representations or guarantees
guarantees, including any warranties, conditions, representations or guarantees under any Sale of Goods Act or like legislation
under any Sale of Goods Act or like legislation or statue is hereby expressly excluded. Save as herein provided, Danby shall no t be responsible for any damages
or statute is hereby expressly excluded. Save as herein provided, Danby shall not be responsible for any damages to persons
to persons or property, including the unit itself, howsoever caused or any consequential damages arising from the malfunction o f the unit and by the purchase of
or property, including the unit itself, howsoever caused or any consequential damages arising from the malfunction of the unit
the unit, the purchaser does hereby agree to indemnify and hold harmless Danby from any claim for damages to persons or propert y caused by the unit.
and by the purchase of the unit, the purchaser does hereby agree to indemnify and hold harmless Danby from any claim for
damages to persons or property caused by the unit.
No warranty or insurance herein contained or set out shall apply when damage or repair is caused by any of the following:
1) Power failure.
No warranty or insurance herein contained or set out shall apply when damage or repair is caused by any of the following:
1) Power failure.
2) Damage in transit or when moving the appliance.
2) Damage in transit or when moving the appliance.
3) Improper power supply such as low voltage, defective house wiring or inadequate fuses.
3) Improper power supply such as low voltage, defective house wiring or inadequate fuses.
4) Accident, alteration, abuse or misuse of the appliance such as inadequate air circulation in the room or abnormal operating con ditions
4) Accident, alteration, abuse or misuse of the appliance such as inadequate air circulation in the room or abnormal operating
conditions (extremely high or low room temperature).
5) Use for commercial or industrial purposes (ie. If the appliance is not installed in a domestic residence).
6) Fire, water damage, theft, war, riot, hostility, acts of God such as hurricanes, floods etc.
7) Service calls resulting in customer education.
8) Improper Installation (ie. Building-in of a free standing appliance or using an appliance outdoors that is not approved for
outdoor application). Proof of purchase date will be required for warranty claims; so, please retain bills of sale. In the event
Proof of purchase date will be required for warranty claims; so, please retain bills of sale. In the event warranty service is required, present this document to our
warranty service is required, present this document to our AUTHORIZED SERVICE DEPOT.
AUTHORIZED SERVICE DEPOT.
(extremely high or low room temperature).
5) Use for commercial or industrial purposes (ie. If the appliance is not installed in a domestic residence).
6) Fire, water damage, theft, war, riot, hostility, acts of God such as hurricanes, oods etc.
7) Service calls resulting in customer education.
8) Improper Installation (ie. Building-in of a free standing appliance or using an appliance outdoors that is not approved for out door application).
GENERAL PROVISIONS
GENERAL PROVISIONS
Danby Products Limited
Danby Products Limited
PO Box 1778, Guelph, Ontario, Canada N1H 6Z9
PO Box 1778, Guelph, Ontario, Canada N1H 6Z9
Telephone: (519) 837-0920 FAX: (519) 837-0449
Telephone: (519) 837-0920 FAX: (519) 837-0449
Warranty Service
Warranty Service
In-home
In-home
1-844-455-6097
1-800-263-2629
01/17
04/09
Danby Products Inc.
PO Box 669, Findlay, Ohio, U.S.A. 45840
Telephone: (419) 425-8627 FAX: (419) 425-8629
PO Box 669, Findlay, Ohio, U.S.A. 45840
Telephone: (419) 425-8627 FAX: (419) 425-8629
Danby Products Inc.

Merci d’avoir choisi Silhouette
Nous savons que vous êtes excité. Nous sommes aussi! Cependant, le plus que vous vous familiarisez avec votre
nouvel appareil, le mieux va être votre expérience. Nous suggérons donc de lire ces instructions avant connecter votre
nouvel appareil. Ce manuel contient des informations opérationnel important qui vous aidera à faire un usage pleine de les
caractéristiques techniques disponibles dans votre appareil. Le manuel contient également des informations conçu
pour améliorer la fiabilité et la sécurité de votre appareil ainsi que des conseils pour le maintien, pour vous assurez des annees
de bonheur.
Cet appareil est livré avec une garantie complète de 3 ans, l'un des meilleurs de l'industrie. Veuillez prendre un moment pour
examiner la déclaration de garantie complète. En outre, nous encourageons nos consommateurs à enregistrer leur produit
avec nous. Cela peut se faire de trois façons:
- Courrier dans la carte d'enregistrement fournie
- Inscrivez-vous en ligne à l'adresse https://www.silhouetteappliances.com/warranty-registration/product-registration/
- Appelez le service de soins aux consommateurs de Silhouette au 1-844-455-6097
Se il vous plaît visitez www.silhouetteappliance.com pour accéder les outils libre-service, FAQ et plus encore. Si jamais vous
avez besoin d'aide supplémentaire, s’il vous plaît appelez 1-844-455-6097. S’il vous plaît ayez votre facture d’achat, le
numéro de modèle, et le numéro de série près durant l'appel.
Remarque : Ces renseignements seront nécessaires si votre appareil a besoin d’entretien ou pour les demandes de
renseignements généraux. Pour bénéficier d’une opération de maintenance ou de dépannage, le reçu original sera exigé.
Numéro de modèle :
Numéro de serie :
Date d’achat :
BESOIN D’ASSISTANCE ?
Veuillez trouver quelques conseils avant de faire appel à nos services, cela
nous aidera à mieux vous servir :
Lisez ce guide :
Il comprend des instructions pour l’utilisation et l’entretien adapté de votre
appareil.
Si votre nouvel appareil est endommagé :
Notre produit est rigoureusement testé et inspecté avant de quitter l'usine. Veuillez
inspecter le produit avant l'installation et informer l'installateur de tout dommage
à l'appareil.
Gagnez du temps et de l’argent :
Avant de faire appel à nos services, consultez à nouveau la section
« Dépannage ». Cette section vous aidera à résoudre des problèmes courants.
Si une réparation est nécessaire, ne vous inquiétez pas, la solution est au bout du fil.
Tel: 1-844-455-6097
11

Consignes de sécurité importantes
LIRE ET SUIVRE TOUTES LES INSTRUCTIONS DE SÉCURITÉ
ATTENTION
Pour réduire le risque d’incendies, de brûlures, de choc électrique ou de blessures lors de l’utilisation
de l’appareil, suivez les consignes de sécurité fondamentales, dont les suivantes.
PRÉCAUTIONS GÉNÉRALES
• PRÉCAUTION: Lisez toutes les instructions et les
consignes de sécurité avant d‘utiliser l’appareil.
• N’utilisez cet appareil que pour l ‘usage prévu tel
que décrit dans ce manuel.
• Entreposez les vin dans des bouteilles scellées
seullement.
• Cet appareil n’a pas été conçu pour une
installation extérieur, inclant l’installation dans un
endroit qui n’a pas une température contrôlée (y
compris les garages, les vérandas, les abris de
voitures, etc.).
• Cet appareil doit être mis à la terre. Dans
l’éventualité d’un court-circuit, la mise à la terre
procure un chemin direct de contournement
du courant pour prévenir l’électrocution des
manipulateurs de l’appareil.
• Sous aucun prétexte il est permis de couper ou
d’enlever la troisième branche (mise à la terre) de
la fi che du cordon électrique.
• N’utilisez pas d’adaptateur de fi che avec cet
appareil.
• N’utilisez pas de cordon de rallonge avec cet
appareil. Si le cordon électrique de l’appareil
ne rejoint pas la prise murale, faites installer une
prise plus rapprochée par un électricien ou un
technicien qualifi é.
• N’épissez pas le cordon d’alimentation.
• N’utilisez pas cet appareil si son cordon
d’alimentation ou sa prise est endommagé, s’il
ne fonctionne pas bien ou s’il a été endommagé
ou échappé.
• N’immergez ni le cordon d’alimentation, ni la
fi che, ni l’appareil même dans l’eau.
• Cet appareil est muni d’un cordon comprenant
une fi che et fi l de mise à la terre. La fi che doit
être branchée dans une prise correctement
installée et mise à la terre.
• Si les directives de mise à la terre ne sont
pas tout à fait comprises ou en cas de tout
doute relatif à la mise à la terre appropriée de
l’appareil, faites appel à un électricien ou à un
technicien qualifi é.
• Si la prise murale est une prise à deux branches,
c’est votre obligation, et la responsabilité vous en
incombe, de la faire remplacer par une prise à
trois branches adéquatement mise à la terre.
• Utilisez une prise murale exclusive. Ne branchez
pas l’appareil dans une rallonge ou dans la
même prise murale qu’un autre appareil.
• Débranchez l’appareil de la prise électrique
lorsque vous ne l’utilisez pas.
• N’utilisez aucun autre accessoire que ceux qui
sont inclus pour l’utilisation avec cet appareil.
• AVERTISSEMENT: Ne pas obstruer les ouvertures
de ventilation.
• AVERTISSEMENT: Ne pas endommager le circuit
frigorigène.
• AVERTISSEMENT: N’utilisez pas d’appareils
électriques à l’intérieur des compartiments de
l’appareil, sauf s’ils sont du type recommandé
par le fabricant.
GARDER CES INSTRUCTIONS!
12

INSTRUCTIONS D’INSTALLATION
PRÉCAUTION
Nous recommandons fortement à un professionnel de terminer l’installation de cet appareil.
Pour éviter tout dommage corporel à vous-même et / ou à la propriété, demandez à quelqu’un de
vous aider pendant le processus d’installation. Des gants et des lunettes de sécurité doivent être
portés.
Outils nécessaires:
• Tournevis philippes
• Perceuse et jeu de scie cylindrique
• Niveau
• Ruban à mesurer
• Crayon
• Ruban adhésif ou punaise
• Détecteur de montants
CONSIGNES D’INSTALLATION
1. Emballage ouvert.
L’appareil doit être branché dans une prise de
courant individuelle, correctement mise à la terre,
protégée par un disjoncteur de 15 ou 20 ampères,
Exigences électriques:
ou par un dispositif de surcharge.
• Couper les sangles de carton.
• Soulever le haut du carton.
• Retirez le gabarit en papier.
2. Choisissez un emplacement.
• Utilisez le modèle papier pour visualiser et
marquer l’endroit où l’unité sera installée.
• Le but du modèle papier est de vous aider à
choisir un emplacement pour l’unité, de créer
des directives pour montrer où installer le
support de fi xation et pour aider à déterminer
s’il sera nécessaire d’avoir un électricien
certifi é installer une prise de courant pour
l’unité.
• N’installez pas l’appareil dans un coin
ou directement à côté d’un mur car cela
empêchera l’ouverture de la porte.
• L’appareil peut accueillir des moulures de
plinthe avec une hauteur maximale de 22 cm
(8,5 in) et une profondeur maximale de 4 cm
(1,5 po).
3. Déballez l’appareil.
• Avec l’aide d’une personne supplémentaire,
prendre les morceaux de mousse qui sont sur
le dessus de l’unité et les poser sur le sol.
• Couper deux coins sur le côté du carton et
plier le long côté vers le bas.
• Faites glisser l’unité hors du côté plié et sur les
morceaux de mousse sur le sol pour protéger
l’arrière de l’unité contre les dommages.
Couper
13

INSTRUCTIONS D’INSTALLATION
4. Installez le support de montage.
• En utilisant les directives sur le gabarit de
papier et les trois vis, installez le support de
montage au mur.
• Nous vous recommandons de fi xer le support
de montage avec deux vis séparées entrant
chacune dans un goujon.
• Il est recommandé de fi xer le support en deux
montants de mur séparés.
• Utilisez les ancres de cloisons sèches fournies
pour plus de stabilité.
5. Nivelez l’unité.
• Retirez le couvercle du socle de l ‘avant de
l’ appareil en retirant les deux vis de chaque
côté.
• Avec l’assitance d’une autre personne, amenez
l’appareil au mur at branchez l’appareil et
pressez-le au mur.
6. Fixez l ‘appareil au support de montage.
• Securez l’appareil au support de montage
avec les deux (2) vis inclus.
• Si nécessaire, ajustez les pieds de nivellement
en les tournant.
• Remplacez le couvercle du piedestal.
• Assurez-vous que l’interrupteur d’alimentation,
situé en bas à droite sous la porte, est tourné
vers la position “ON”.
14

INSTRUCTIONS D’INSTALLATION
CARACTÉRISTIQUES
Panneau de commande
Verrou
Porte de gauche
Un support de fi xation
Verrou (non illustré)
Porte de droite
(non illustré)
Stockage du vin
(jusqu’à 30 bouteilles
de vin peuvent être
stockés dans l’appareil)
Interrupteur Marche /
Arrêt (non illustré)
Couverture de
piédestal
15

CONSIGNES D’UTILISATION
PANNEAU DE
COMMANDE
L’interrupteur marche/arrêt: appuyez sur ce bouton une fois pour mettre la fonction
de refroidissement de l’unité en marche. Appuyez une deuxième fois pour arrêter le
refroidissement.
Remarque: Pour que le bouton d’alimentation fonctionne correctement, l’appareil doit être
branché sur une prise mise à la terre et l’interrupteur doit être allumé.
12°C
Flèches haut et bas: La plage de température de l’appareil est de 12 °C (54 °F) à 17 °C
(63 °F). Utilisez les fl èches haut et bas pour augmenter ou diminuer la température réglée par
incréments de 1°.
°C / °F Bouton: Le réglage par défaut est °C. Appuyez sur cette touche pour basculer entre
°C et °F.
Éclairage intérieur à LED: L’éclairage intérieur peut être réglé sur «on», «off» ou «motion
activated». Le réglage par défaut est ‘motion activated’. Le voyant s’allumera s’il y a un
mouvement à moins de 1,5 m (5 pieds) de l’appareil et reste allumé pendant 3 minutes.
• Appuyer une fois sur la touche LED pour un éclairage continu. Le mode d’éclairage continu
affi che une ampoule sur le panneau d’affi chage. La lumière sera allumée continuellement à
une puissance de 50% et à une puissance de 100% lorsqu’un mouvement est détecté.
• Appuyez une deuxième fois sur la touche LED pour éteindre l’éclairage. Le voyant éteint
affi che une ampoule avec un X sur le panneau d’affi chage.
• Appuyez une troisième fois sur la touche LED pour revenir à l ‘éclairage activé par
mouvement. Le mode Motion activé affi che une ampoule avec des lignes autour de lui sur
le panneau d’affi chage.
16

CONSIGNES D’UTILISATION
PANNEAU DE COMMANDE
Bouton Volume: L’appareil fournit des alertes sonores pendant certaines actions. Par défaut,
l’appareil est activé.
Alarme de porte: Si l’une des portes reste ouverte pendant plus de 3 minutes, une alarme
retentit.
• Appuyez une fois sur le bouton de volume pour couper l’alarme pendant 3 minutes. L’icône
d’affi chage d’un haut-parleur avec un X clignotera pendant que le son est coupé. Après
trois minutes, le son reprendra.
• Appuyez deux fois de suite sur le bouton de volume pour arrêter complètement l’appareil.
Lorsque l’appareil est éteint, il n’y a pas de bruit si la porte est laissée entrebâillée ou une
touche est enfoncée. L’icône d’affi chage d’un haut-parleur avec un X restera solide pendant
que le son est éteint.
• Quand vous le faites taire, appuyez une fois sur le bouton de volume pour reprendre la
fonction sonore. L’icône d’affi chage d’un haut-parleur reste solide pendant que le son est
activé.
Alarme de température: Une alarme sonore retentira si la température intérieure de l’appareil
est supérieure à 4 degrés au-dessus ou au-dessous de la température réglée.
• Si la température intérieure est 4 degrés supérieure à la température réglée, le panneau
d’affi chage affi chera le code d’erreur “INTERIOR TOO WARM”.
INTERIOR TOO WARM
• Si la température intérieure est inférieure de 4 degrés à la température réglée, le panneau
d’affi chage affi chera le code d’erreur “INTERIOR TOO COLD”.
INTERIOR TOO COLD
17

SOINS ET ENTRETIEN
NETTOYAGE DE VOTRE AFFICHEUR DE VIN
Nettoyer l’intérieur:
• Les dépôts d’eau et la poussière peuvent être
enlevés avec une serviette en papier sèche,
d’autres peuvent nécessiter un chiffon humide.
Nettoyage de l’extérieur:
• Il est important de garder la zone propre où la
porte scelle contre le cabinet. Nettoyer avec un
chiffon humide et laisser sécher.
• Tableau de commande et porte - Essuyez avec
un chiffon humide et séchez complètement.
Ne pas utiliser des nettoyants en aérosol, des
grandes quantités d’eau et de savon, ou des
objets abrasifs ou coupants sur le panneau,
puisqu’ils peuvent l’endommager. Certains types
d’essuie-tout peuvent également égratigner le
tableau de commande et le verre de la porte.
• Surface de la porte - Utilisez seulement des
détergents doux non abrasifs à l’aide d’une
éponge ou d’un chiffon doux propres. Rincez
bien avec un chiffon humide.
Remarque: Ne pas utiliser des nettoyants contenant
d’ammoniac ou d’alcool sur l’affi cheur de vin.
L’ammoniac et l’alcool peuvent endommager
l’apparence de l’appareil.
PANNE DE COURANT
La plupart des pannes de courant sont corrigées
en quelques heures et ne devraient pas affecter
la température de votre appareil si vous réduisez
le nombre de fois que la porte est ouverte. Si la
puissance va être hors service pendant une longue
période de temps, vous devez prendre les mesures
appropriées pour protéger vos contenus. Lorsque
l’alimentation est rétablie, l’unité par défaut le dernier
réglage.
CONSEIL RELATIF AUX ÉCONOMIES
D’ÉNERGIE
Cette unité doit être située dans la partie la plus
froide de la pièce, éloignée des appareils qui
produisent de la chaleur et à l’abri de la lumière
directe du soleil.
LUMIÈRE INTÉRIEURE
Votre affi cheur de vin est équipé d’une lumière à DEL
de longue durée. Si votre lampe est grillée, veuillez
téléphoner au service à la clientèle Silhouette a
1-844-455-6097 pour se renseigner sur le numéro
d’un technicien de maintenance agréé, qui pourrait
remplacer la lampe.
Remarque: Ne jamais utiliser aucun nettoyant
commercial/abrasif, ni des objets coupants sur
aucune partie de l’affi cheur de vin.
18

DÉPANNAGE
Silhouette Soins du Consommateur: 1-844-455-6097
Heures d’ouverture:
Lundi à Jeudi 8 h 30 à 18 h, heure normale de l’Est
Vendredi de 8 h 30 à 16 h, heure normale de l’Est
Les informations contenues dans ce manuel sont sujettes à modifi cation sans préavis.
PROBLÈME CAUSE POSSIBLE SOLUTION
L’appareil n’est pas
alimenté
La température dans le
cabinet est trop haute
• Un fusible de votre panneau
de distribution peut être grillé
ou le disjoncteur déclenché
• Surtension
• La fi che n’est pas
complètement insérée dans
prise murale
• L’alimentation n’est pas activée
• Réglage du température
• Le porte n’est pas fermées
correctement ou ouverte trop
souvent
• L’échappement est obstrué
• Stocké une grande quantité
de bouteilles ou canettes dans
le cabinet
• Remplacez le fusible ou réarmez le
disjoncteur
• Débranchez la refroidisseur de vin et
attendez quelques secondes, et puis
rebranchez
• Assurez-vous que la fi ches à 3
branch es de refroidisseur de vin est
complètement insérée dans la prise
• Assurez-vous que l’interrupteur ON /
OFF est sur ON
• Vérifi ez que la commande est réglée à
la bonne arrangement
• Assurez-vous que la porte est fermées
et que le joint étanche est contre le
coffret. Ouvrez la porte seulement
quand nécessaire
• Vérifi ez qu’il n’y a rien qui bloque
l’échappement sur le devant
• Limitez la quantité de bouteilles ou
canettes qui son stockées dans le
cabinet en même temps
19

LIMITED IN-HOME APPLIANCE WARRANTY
This quality product is warranted to be free from manufacturer’s defects in material and workmanship, provided that the unit is used under the normal operating
conditions intended by the manufacturer.
Cet appareil de qualité est garantie exempt de tout vice de matière première et de fabrication, s’il est utilisé dans les conditions
This warranty is available only to the person to whom the unit was originally sold by Danby Products Limited (Canada) or Danby Products Inc. (U.S.A.) (hereafter
normales recommandées par le fabricant.
“Danby”) or by an authorized distributor of Danby, and is non-transferable.
Cette garantie n’est offerte qu’à l’acheteur initial de l’appareil vendu par Danby Products Limited (Canada) ou Danby Products
Inc. (E.- U. d’A) (ci-après “Danby”) ou par l’un des ses distributeurs agréés et elle ne peut être transférée.
Plastic parts, are warranted for thirty (30) days only from purchase date, with no extensions provided.
Les pièces en plastique sont garanties pour trente (30) jours seulement à partir de la date de l’achat, sans aucune prolongation
prévue.
First Year
Première 36 mois
To obtain
Pour bénéficier
Service
du Service
Limites de l’entre-
Boundaries of
tien à domicile
In Home Service
APPAREIL ÉLECTROMÉNAGER À DOMICILE
Pendant les trente-six (36) mois, toutes pièces fonctionnelles de ce produit s’avèrent défectueuses,
option, at no charge to the ORIGINAL purchaser.
seront réparées ou remplacées, selon le choix du garant, sans frais à l’acheteur INITIAL.
Danby reserves the right to limit the boundaries of “In Home Service” to the proximity of an Authorized Service Depot. Any app liance
Le client sera responsable pour le transport et tous les frais d’expédition de tout appareil exigeant le
requiring service outside the limited boundaries of “In Home Service” , it will be the consumer’s responsibility to transport the appliance (at
service au dépot de service autorisé le plus proche. S’adresser au détaillant qui a vendu l’appareil, ou à
their own expense) to the original retailer (point of purchase) or a service depot for repair. See “Boundaries of In Home Serv ice” below.
la station technique agréée de service la plus proche, où les réparations doivent être effectuées par un
Contact your dealer from whom your unit was purchased, or contact your nearest authorized Danby service depot, where service
technicien qualifié. Si les réparations sont effectuées par quiconque autre que la station de service
agréée où à des fins commerciales, toutes les obligations de Danby en vertu de cette garantie seront
If service is performed on the units by anyone other than an authorized service depot, or the unit is used for commercial appli cation, all
annulées.
obligations of Danby under this warranty shall be void.
Si l'appareil est installé à plus de 100 kilomètres (62 milles) du centre de service le plus proche, il doit
If the appliance is installed in a location that is 100 kilometers (62 miles) or more from the nearest service center your unit must be
être livré à l'atelier de réparation autorisé par Danby le plus proche, car l'entretien doit uniquement être
réalisé par un technicien qualifié et certifié pour effectuer un entretien couvert par la garantie de Danby.
warranty service by Danby. Transportation charges to and from the service location are not protected by this warranty and are t he
Les frais de transport entre votre domicile et le lieu de l'entretien ne sont pas couverts par la présente
responsibility of the purchaser.
garantie et doivent être acquittés par l'acheteur.
GARANTIE LIMITÉE SUR
TERMS OF WARRANTY
CONDITIONS
t warrantor’s
ed for
Cette garantie indique en aucun temps la responsabilité de Danby de l’avarie ou dommage de la vin ou autre contenu, soit par
Nothing within this warranty shall imply that Danby will be responsible or liable for any spoilage or damage to food or other c ontents of this appliance, whether due
les vices de l’appareil, ou soit parl’utilisation convenable ou inexacte.
to any defect of the appliance, or its use, whether proper or improper.
EXCLUSIONS
En vertu de la présente, il n’existe aucune autre garantie, condition ou représentation, qu’elle soit exprimée ou tacite, de façon
Save as herein provided, Danby, there are no other warranties, conditions, representations or guarantees, express or implied, m ade or intended by Danby or its
manifeste ou intentionnelle, par Danby ou ses distributeurs agréés. De même, sont exclues toutes les autres garanties,
authorized distributors and all other warranties, conditions, representations or guarantees, including any warranties, conditio ns, representations or guarantees
conditions ou représentations, y compris les garanties, conditions ou représentations en vertu de toute loi régissant la vente
under any Sale of Goods Act or like legislation or statue is hereby expressly excluded. Save as herein provided, Danby shall no t be responsible for any damages
de produits ou de toute autre législation ou règlement semblables.En vertu de la présente, Danby ne peut être tenue respons-
to persons or property, including the unit itself, howsoever caused or any consequential damages arising from the malfunction o f the unit and by the purchase of
able en cas de blessures corporelles ou des dégâts matériels, y compris à l’appareil, quelle qu’en soit les causes. Danby ne
the unit, the purchaser does hereby agree to indemnify and hold harmless Danby from any claim for damages to persons or propert y caused by the unit.
peut pas être tenue responsable des dommages indirects dus au fonctionnement défectueux de l’appareil. En achetant
l’appareil, l’acheteur accepte de mettre à couvert et de dégager Danby de toute responsabilité en cas de réclamation pour
toute blessure corporelle ou tout dégât matériel causé par cet appareil.
EXCLUSIONS
GENERAL PROVISIONS
No warranty or insurance herein contained or set out shall apply when damage or repair is caused by any of the following:
CONDITIONS GÉNÉRALES
1) Power failure.
La garantie ou assurance ci-dessus ne s’applique pas si les dégâts ou réparations sont dus aux cas suivants:
2) Damage in transit or when moving the appliance.
1) Panne de courant.
3) Improper power supply such as low voltage, defective house wiring or inadequate fuses.
2) Dommage subis pendant le transport ou le déplacement de l’appareil.
4) Accident, alteration, abuse or misuse of the appliance such as inadequate air circulation in the room or abnormal operating con ditions
3) Alimentation électrique incorrecte (tension faible, câblage défectueux, fusibles incorrects).
4) Accident, modification, emploi abusif ou incorrect de l’appareil tel qu'une circulation d'air inadéquate dans la pièce ou des
conditions de fonctionnement anormales (température extrêmement élevée ou basse).
5) Utilisation dans un but commercial ou industriel (à savoir, si l'appareil n'est pas installé dans un domicile résidentiel).
6) Incendie, dommage causés par l’eau, vol, guerre, émeute, hostilités, cas de force majeure (ouragan, inondation, etc.).
7) Visites d’un technicien pour expliquer le fonctionnement de l’appareil au propriétaire.
8) Installation inappropriée (par exemple, encastrement d'un appareil autoportant, ou utilisation extérieure d'un appareil non
Proof of purchase date will be required for warranty claims; so, please retain bills of sale. In the event warranty service is required, present this document to our
conçu à cet effet). Une preuve d’achat doit être présentée pour toute demande de réparation sous garantie. Prière de garder
AUTHORIZED SERVICE DEPOT.
le reçu. Pour faire honorer la garantie, présenter ce document à la station technique agréée ou s’adresser à:
(extremely high or low room temperature).
5) Use for commercial or industrial purposes (ie. If the appliance is not installed in a domestic residence).
6)
7) Service calls resulting in customer education.
8) Improper Installation (ie. Building-in of a free standing appliance or using an appliance outdoors that is not approved for out door application).
Danby Products Limited
Danby Products Limited
PO Box 1778, Guelph, Ontario, Canada N1H 6Z9
PO Box 1778, Guelph, Ontario, Canada N1H 6Z9
Telephone: (519) 837-0920 FAX: (519) 837-0449
Telephone: (519) 837-0920 FAX: (519) 837-0449
Warranty Service
Service sous-garantie
In-home
Service au domicile
1-800-263-2629
1-800-263-2629
07/13
04/09
Danby Products Inc.
PO Box 669, Findlay, Ohio, U.S.A. 45840
Telephone: (419) 425-8627 FAX: (419) 425-8629
PO Box 669, Findlay, Ohio, U.S.A. 45840
Telephone: (419) 425-8627 FAX: (419) 425-8629
Danby Products Inc.

Gracias por elegir Silhouette
Sabemos que está emocionado. Nosotros lo estamos también! Sin embargo, cuanto más se familiarice con su nuevo aparto,
mejor será su experiencia. Por lo tanto le sugerimos de manera especial que lea este manual de instrucciones antes de
conectar su nuevo aparato. Este manual contiene importante información operacional que le ayudará a hacer un uso completo
de las características técnicas disponibles en su aparato. El manual también contiene información diseñada para
mejorar la fiabilidad y seguridad operacional de su aparato, así como consejos para el mantenimiento del mismo, lo que le
traerá felicidad en los años venideros.
Este aparato viene con una garantía completa de 3 años, uno de los mejores de la industria. Por favor, tómese un momento
para revisar la declaración de garantía completa. Además, animamos a nuestros consumidores a registrar su producto con
nosotros. Esto se puede lograr en una de tres maneras:
- Envíe por correo la tarjeta de registro proporcionada.
- Regístrese en línea en https://www.silhouetteappliances.com/warranty-registration/product-registration/
- Llame al departamento de atención al consumidor de Silhouette al 1-844-455-6097.
Por favor, visite www.silhouetteappliances.com para acceder a herramientas de autoservicio, preguntas frecuentes y más. En
caso de necesitar asistencia adicional, por favor llame al 1-844-455-6097. Por favor tenga disponible su recibo de compra y
número de modelo cuando llame.
Nota: Esta información será necesaria si su unidad requiere servicio o para hacer consultas generales.
Para recibir servicio técnico debe sonstrar el recibo original.
Número de modelo:
Número de serie:
Fecha de la compra:
NECESIT A AYUDA
Antes de solicitar servicio, hay algunas cosas que puede hacer para ayudarnos a
servirle mejor:
Lea este manual:
Contiene instrucciones que lo ayudarán a mantener correctamente su unidad.
Si usted recibe un artefacto dañado:
Nuestro producto es rigurosamente probado e inspeccionado antes de salir de la fábrica.
Por favor inspeccione el producto antes de la instalación e informe al instalador de cualquier
daño al aparato.
Ahorre tiempo y dinero:
Lea la sección de Diagnóstico de problemas antes de llamar. Esta sección le
ayudará a resolver problemas comunes que pudieran ocurrir.
Si necesita asistencia, no se preocupe y llámenos.
Tel: 1-844-455-6097
21

Importantes Instrucciones de Seguridad
LEA Y SIGA TODAS LAS INSTRUCCIONES DE SEGURIDAD
ADVERTENCIA
Para reducir el riesgo de incendio, quemaduras, descargas eléctricas o lesiones a las personas
cuando utilizan este aparato/electrodoméstico, siga las precauciones básicas, incluyendo las
siguientes secciones.
PRECAUCIONES GENERALES
• PRECAUCIÓN: Lea todas las instrucciones y
advertencias de seguridad antes de usar.
• Use este aparato únicamente de acuerdo al uso
previsto y según lo prescrito por este manual.
• Almacenar vino, solamente en botellas selladas.
• Esta unidad no está diseñada para su instalación
en el exterior, incluyendo cualquier parte que no
está a temperatura controlada (ejemplo: garajes,
porches, cocheras, etc.).
• Este aparato/electrodoméstico debe estar
conectado a tierra. En el caso de un cortocircuito
eléctrico, la conexión a tierra reduce el riesgo
de descarga eléctrica proporcionando un cable
de escape para la corriente eléctrica.
• Este aparato está equipado con un cable de
alimentación eléctrica que tiene una línea/
clavija de conexión a tierra. El enchufe debe
estar conectado a un tomacorriente que esté
debidamente instalado y conectado a tierra.
• Desenchufe del tomacorriente cuando el aparato
no este en uso.
• Bajo ninguna circunstancia corte o retire la
tercera línea/clavija (tierra) del cable de
alimentación.
• No use un enchufe adaptador con este aparato/
electrodoméstico.
• No use un cable de extensión con este
aparato/electrodoméstico. Si el cable de
alimentación es demasiado corto, solicite que
un electricista o técnico de servicio califi cado
instale un tomacorriente cerca del aparato/
electrodoméstico.
• No empalme el cable de alimentación.
• No utilice el aparato; si tiene el cable de
alimentación eléctrico dañado; si no funciona
correctamente, o si el aparato ha sido dañado o
se ha caído.
• No sumerja el cable, el enchufe o el mismo
aparato en agua.
• Consulte a un técnico electricista o técnico
de servicio califi cado, si las instrucciones
de conexión a tierra no se entienden
completamente, o si existen dudas referente a la
correcta conexión a tierra del aparato.
• Si la salida eléctrica (enchufe) es una
tomacorriente estándar de 2 puntas/terminales,
es su responsabilidad y obligación reemplazarlo
por un tomacorriente de pared de 3 terminales
debidamente conectado a tierra.
• Utilice una tomacorriente exclusivo. No conecte
el aparato con un cable de extensión o junto
con cualquier otro aparato en la misma
tomacorriente.
¡GUARDE ESTAS INSTRUCCIONES!
• No utilice accesorios que no hayan sido
incluidos para su uso con este aparato.
• ADVERTENCIA - No cubra ni bloquee ninguna
de las aperturas de este aparato.
• ADVERTENCIA - No dañe el circuito refrigerante.
• ADVERTENCIA - No utilice aparatos
eléctricos dentro de los compartimentos de
almacenamiento de alimentos del aparato, a
menos que sean del tipo recomendado por el
fabricante.
22

INSTRUCCIONES DE INSTALACIÓN
PRECAUCIÓN
Recomendamos encarecidamente que un profesional complete la instalación de esta unidad.
Para evitar lesiones personales a usted y / oa la propiedad, solicite a alguien que le ayude durante
el proceso de instalación. Se deben usar guantes y gafas de seguridad.
Herramientas que necesitará:
• Destornillador Phillips (punta de cruz)
• Taladro (broca)
• Nivel
• Cinta métrica
• Lápiz
• Cinta o alfi ler
• Localizador de montantes – en paredes
revestidas.
El aparato debe estar conectado a un
tomacorriente individual, con adecuada conexión
a tierra, protegido por un fusible de retardo o
disyuntor (pastilla) de 15 ó 20 amperios.
Requisitos eléctricos:
INSTRUCCIONES DE INSTALACIÓN
1. Embalaje abierto.
• Corta las correas del cartón.
• Levante la parte superior de la caja del cartón.
• Retire la plantilla de papel.
2. Elija una ubicación.
• Utilice la plantilla de papel para visualizar y
marcar dónde se instalará la unidad.
• El propósito de la plantilla de papel es ayudar
a elegir una ubicación para la unidad, crear
directrices para mostrar dónde montar el
soporte de seguridad y ayudar a determinar si
será necesario que un electricista certifi cado
instale una toma de corriente para la unidad.
• No instale la unidad en una esquina o
directamente al lado de una pared ya que
esto impedirá la apertura de la puerta.
• El aparato puede acomodar molduras de
base con una altura máxima de 22 cm (8,5
pulgadas) y una profundidad máxima de 4 cm
(1,5 pulgadas).
3. Desembale la unidad.
• Con la ayuda de una persona extra, tomar
las piezas de espuma que están en la parte
superior de la unidad y ponerlos en el suelo.
• Corte dos esquinas por el lado del cartón y
doble el lado largo hacia abajo.
• Deslice la unidad hacia fuera del lado
plegado y sobre las piezas de espuma en el
piso para proteger la parte posterior de la
unidad de daños.
Cortar
23

INSTRUCCIONES DE INSTALACIÓN
4. Instale el soporte de montaje.
• Utilizando las directrices de la plantilla de
papel y los tres tornillos, instale el soporte de
montaje en la pared.
• Recomendamos sujetar el soporte de montaje
con dos tornillos diferentes cada uno entrando
en un perno.
• Se recomienda para asegurar el soporte en
dos montantes de la pared separadas.
• Utilice los anclajes de pared de yeso incluidos
para mayor estabilidad.
5. Nivele la unidad.
• Retire la cubierta del pedestal de la parte
frontal de la unidad quitando los dos tornillos
de cada lado.
• Con la ayuda de otra persona, coloque la
unidad contra la pared y enchúfela.
6. Fije la unidad al soporte de montaje.
• Asegure fi rmemente la unidad al soporte de
montaje usando dos tornillos.
• Si es necesario, ajuste las patas niveladoras a
la altura adecuada.
• Vuelva a colocar la cubierta del pedestal.
• Asegúrese de que el interruptor de encendido,
situado en la parte inferior derecha debajo de
la puerta, se encuentre en la posición “ON”.
24

INSTRUCCIONES DE INSTALACIÓN
CARACTERÍSTICAS
Panel de control
Cerradura
Puerta izquierda
Soporte de montaje
Cerradura
(no se muestra)
Puerta derecha
(no se muestra)
Ranuras de
almacenamiento
de vinos (hasta 30
botellas de vino se
pueden almacenar en
esta unidad)
Interruptor de encendido
/ apagado
(no se muestra)
Cubierta del pedestal
25

INSTRUCCIONES OPERADORAS
PANEL DE CONTROL
12°C
Botón de encendido: Pulse una vez para iniciar la función de enfriamiento. La temperatura de
enfriamiento será por defecto a 12 ° C (54 ° F). Mientras la unidad está enfriando, presione
este botón para detener la función de enfriamiento.
Nota: Para que el botón de encendido funcione correctamente, la unidad debe estar
enchufada a una toma de tierra y el interruptor de alimentación debe estar encendido.
Flechas Arriba y Abajo: El rango de temperatura de la unidad es de 12 °C (54 °F) a 17 °C
(63 °F). Utilice las fl echas arriba y abajo para aumentar o disminuir la temperatura ajustada
en incrementos de 1 °.
Botón °C / °F: El ajuste predeterminado es ° C. Pulse este botón para cambiar entre °C y °F.
Luz interior LED: La luz interior puede ajustarse a ‘encendido’, ‘apagado’ o ‘activado
por movimiento’. El ajuste predeterminado es ‘motion activated’. La luz se iluminará si hay
movimiento a 1,5 m (5 pies) del aparato y permanecerá encendida durante 3 minutos.
• Presione el botón LED una vez para iluminación continua. El modo de iluminación
continua mostrará una bombilla en el panel de visualización. La luz estará encendida
continuamente al 50% de potencia y al 100% de potencia cuando se detecte
movimiento.
• Presione el botón LED una segunda vez para apagar la luz. El modo apagado mostrará
una bombilla con una X en el panel de visualización.
• Pulse el botón LED una tercera vez para volver a la iluminación activada por movimiento.
El modo activado por movimiento mostrará una bombilla con líneas a su alrededor en el
panel de visualización.
26

INSTRUCCIONES OPERADORAS
PANEL DE CONTROL
Botón Volumen: El aparato proporcionará alertas audibles durante ciertas acciones. Por
defecto, la unidad seguirá sonando.
Alarma de puerta ajustable: Si una de las puertas permanece abierta durante más de 3
minutos, sonará una alarma.
• Presione el botón de volumen una vez para silenciar la alarma entreabierta de la puerta
durante 3 minutos. El icono de la pantalla de un altavoz con una X parpadeará mientras
el sonido esté silenciado. Después de tres minutos, el sonido se reanudará.
• Presione el botón de volumen dos veces en una sucesión rápida para silenciar
completamente la unidad. Cuando la unidad se silencia, no habrá ruido si la puerta se
deja entreabierta o se presiona un botón. El icono de visualización de un altavoz con una
X permanecerá sólido mientras el sonido esté apagado.
• Cuando se silencie, presione el botón de volumen una vez para reanudar la función de
sonido. El icono de visualización de un altavoz permanecerá sólido mientras el sonido
esté activado.
Alarma de temperatura: Una alarma sonora sonará si la temperatura interior de la unidad es
más de 4 grados por encima o por debajo de la temperatura establecida.
• Si la temperatura interior es 4 grados más alta que la temperatura ajustada, el panel de la
exhibición mostrará el código de error “INTERIOR TOO WARM”.
INTERIOR TOO WARM
• Si la temperatura interior es 4 grados inferior a la temperatura ajustada, el panel de
visualización mostrará el código de error “INTERIOR TOO COLD”.
INTERIOR TOO COLD
27

CUIDADO Y MANTENIMIENTO
LIMPIANDO LA PANTALLA DEL VINO
Limpieza Interior:
• Algunos residuos de agua y polvo pueden
eliminarse con una toalla de papel seca, otros
pueden requerir un paño húmedo.
Limpieza del exterior:
• Es importante mantener limpia el área donde la
puerta se sella y hace contacto con el gabinete.
Limpiar con un paño húmedo y dejar secar.
• Panel de control y puerta - Limpiar con un paño
húmedo y secar completamente. No utilice
aerosoles de limpieza, grandes cantidades de
agua y jabón, objetos abrasivos o cortantes
sobre el panel, ya que lo pueden dañar. Algunas
toallas de papel también pueden rayar el panel
de control y el cristal de la puerta.
• Superfi cie de la puerta – Use únicamente
detergentes suaves, no abrasivos aplicados con
una esponja o paño limpio y suave. Enjuague
bien con un paño húmedo.
Nota: No use limpiadores que contengan amoníaco
o alcohol en la pantalla. El amoníaco o alcohol
pueden dañar el aspecto del aparato.
FALLAS POR FALTA DE ENERGÍA
La mayoría de las fallas por falta de energía
eléctrica se corrigen dentro de unas pocas
horas y no deben afectar a la temperatura de su
aparato/electrodoméstico si se minimiza el número
de veces que se abre la puerta. Si la falla de
energía eléctrica se prolonga durante un período
de tiempo más largo, es necesario tomar las
medidas adecuadas para proteger sus contenidos.
Cuando se reanude la energía eléctrica, la unidad
mantendrá los valores por defecto en el ultimo
ajuste/programación.
TIP DE AHORRO DE ENERGÍA
La unidad debería de estar ubicada en la área más
fría de la habitación, lejos de aparatos productores
de calor y de la luz directa del sol.
LUZ INTERIOR
La pantalla está equipado con luz LED de larga
duración. Si su luz se funde, por favor llame al
numero de servicios al consumidor Silhouette al
1-844-455-6097 donde se le proporcionara
información de contacto de un técnico autorizado
(local) para sustituir la luz.
Nota: Nunca utilice limpiadores comerciales /
abrasivos u objetos afi lados en cualquier parte de la
pantalla.
28

SOLUCIÓN SUGERIDA
Silhouette Cuidado del Consumidor: 1-844-455-6097
Horas de operación:
Lunes a Jueves 8:30 am - 6:00 pm Hora estándar del este
Viernes 8:30 am - 4:00 pm Hora estándar del este
La información de este manual está sujeta a cambios sin previo aviso.
PROBLEMA CAUSA POSIBLE SOLUCIONES
Falta de energía eléctrica • Un fusible en su el tablero de
su casa puede estar fundido o
el disyuntor activado.
• Sobrecarga de energía
• El enchufe no está
completamente insertado en el
tomacorriente
• La alimentación no está
encendida
La temperatura del
gabinete esta demasiado
• La temperatura esta ajustada
a muy alto (caliente)
• La puerta no está bien
cerrada o abierta en exceso.
• Recientemente añadió una
gran cantidad de bebidas
calientes en el gabinete.
• Verifi car el ajuste de control
de temperatura, ajustar en
caso de ser necesario.
• Cambie el fusible o reinicie el disyuntor
• Desconecte el enfriador de vino,
espere unos segundos y luego vuelva a
conectar.
• Asegúrese de que el enchufe de 3
clavijas está completamente insertado
en el tomacorriente.
• Asegúrese de que el interruptor ON /
OFF esté en ON
• Verifi car el ajuste de control de
temperatura, ajustar en caso de ser
necesario.
• Asegúrese de que la puerta esté
completamente cerrada y que la junta
está bien sellada y tiene buen contacto
con el gabinete. Abrir las puertas
solamente cuando sea necesario y por
cortos períodos de tiempo.
• Verifi car que no hay nada bloqueando
las ranuras ventilación.
29
• Limitar la cantidad de bebidas
calientes que se introducen en el
gabinete al mismo tiempo. Tratar
de escalonar la introducción de las
mismas, si es posible.

GARANTÍA LIMITADA PARA
LIMITED IN-HOME APPLIANCE WARRANTY
ELECTRODOMÉSTICO
This quality product is warranted to be free from manufacturer’s defects in material and workmanship, provided that the unit is used under the normal operating
conditions intended by the manufacturer.
Este producto de calidad está garantizado contra defectos de fabricación, incluyendo partes y mano de obra, siempre y cuando
la unidad se utilice bajo las condiciones normales de funcionamiento para las que fue diseñado.
This warranty is available only to the person to whom the unit was originally sold by Danby Products Limited (Canada) or Danby Products Inc. (U.S.A.) (hereafter
Esta garantía está solamente disponible para la persona que haya comprado originalmente esta unidad directamente de
“Danby”) or by an authorized distributor of Danby, and is non-transferable.
Danby Products Limited (Canada) o Danby Products Inc. (U.S.A.) (en adelante “Danby”) o uno de sus distribuidores autorizados, y no es transferible.
Plastic parts, are warranted for thirty (30) days only from purchase date, with no extensions provided.
Las piezas plásticas, se autorizan por treinta (30) días solamente a partir de la fecha de la compra, sin las extensiones
proporcionadas.
First Year
option, at no charge to the ORIGINAL purchaser.
Primeros 36 Meses
To obtain
Service
Para obtener
Servicio
Boundaries of
In Home Service
Límites del servicio
técnico a domicilio
Nothing within this warranty shall imply that Danby will be responsible or liable for any spoilage or damage to food or other c ontents of this appliance, whether due
to any defect of the appliance, or its use, whether proper or improper.
Nada dentro de esta garantía implica que Danby será responsable por cualquier daño que hayan sufrido los alimentos u otros
contenidos de este aparato, ya sea debido a un defecto del aparato, o su uso, adecuado o inadecuado.
Durante los primer treinta y seis (36) meses, cualquier parte en buen estado de este producto que
resulte defectuosa, incluyendo cualquier sistema sellado, será reparado o reemplazado, a opción del
fabricante, sin cargo para el comprador ORIGINAL.
Danby reserves the right to limit the boundaries of “In Home Service” to the proximity of an Authorized Service Depot. Any app liance
requiring service outside the limited boundaries of “In Home Service” , it will be the consumer’s responsibility to transport the appliance (at
Danby se reserva el derecho de limitar la cobertura de "Servicio en Domicilio" sujeto a la proximidad de
their own expense) to the original retailer (point of purchase) or a service depot for repair. See “Boundaries of In Home Serv ice” below.
un Taller de Servicio Autorizado. Para todo artefacto que requiera servicio fuera del área limitada de
Contact your dealer from whom your unit was purchased, or contact your nearest authorized Danby service depot, where service
"Servicio en Domicilio", el cliente será responsable por transportar dicho artefacto hasta el Taller de
Servicio Autorizado mas cercano. Consulte "Límites del servicio técnico a domicilio", a continuación.
If service is performed on the units by anyone other than an authorized service depot, or the unit is used for commercial appli cation, all
Comuníquese con el distribuidor donde haya comprado la unidad, o llame al Taller de Servicio Autoriza-
obligations of Danby under this warranty shall be void.
do más cercano, donde debe ser reparada por un técnico calificado. Si esta unidad es reparada en otro
lugar que no sea un Taller de Servicio Autorizado, o si la unidad se utiliza para aplicaciones comercia-
If the appliance is installed in a location that is 100 kilometers (62 miles) or more from the nearest service center your unit must be
les, Danby no se hará responsable de ninguna forma y la garantía será anulada.
Si el electrodoméstico está instalado en un lugar que se encuentra a 100 kilómetros (62 millas) o más
warranty service by Danby. Transportation charges to and from the service location are not protected by this warranty and are t he
del centro de servicios más cercano, se debe llevar la unidad al Centro de servicios Danby autorizado
responsibility of the purchaser.
más cercano, ya que dicho servicio sólo puede realizarlo un técnico calificado y certificado por Danby
para prestar servicios de garantía. Los cargos por transporte desde y hacia el lugar en que se
efectúe el servicio técnico no están cubiertos por esta garantía y son de responsabilidad del comprador.
CONDICIONES DE LA GARANTÍA
Save as herein provided, Danby, there are no other warranties, conditions, representations or guarantees, express or implied, m ade or intended by Danby or its
authorized distributors and all other warranties, conditions, representations or guarantees, including any warranties, conditio ns, representations or guarantees
Salvo lo aquí indicado por Danby, no existen otras garantías, condiciones o representaciones, explícitas o implícitas, concre-
under any Sale of Goods Act or like legislation or statue is hereby expressly excluded. Save as herein provided, Danby shall no t be responsible for any damages
tas o intencionales por parte de Danby o sus distribuidores autorizados y todas las demás garantías, condiciones o repre-
to persons or property, including the unit itself, howsoever caused or any consequential damages arising from the malfunction o f the unit and by the purchase of
sentaciones, incluyendo cualquier garantía, condiciones o representaciones bajo cualquier Acta de Venta de Productos o
the unit, the purchaser does hereby agree to indemnify and hold harmless Danby from any claim for damages to persons or propert y caused by the unit.
legislación o estatuto similar, quedan de esta forma expresamente excluidas. Salvo lo aquí indicado, Danby no serán responsables por ningún daño a personas o bienes, incluyendo la propia unidad, sin importar su causa, o de ningún daño indirecto
causado por el desperfecto de la unidad, y al comprar esta unidad, el comprador acepta por la presente, indemnizar y
proteger a Danby contra cualquier reclamo por daños a personas o bienes causados por la unidad.
No warranty or insurance herein contained or set out shall apply when damage or repair is caused by any of the following:
1) Power failure.
2) Damage in transit or when moving the appliance.
No se considerará ninguna de estas garantías o seguros cuando el daño o la necesidad de reparación sea el producto de los
3) Improper power supply such as low voltage, defective house wiring or inadequate fuses.
siguientes casos:
1) Falla del suministro eléctrico.
4) Accident, alteration, abuse or misuse of the appliance such as inadequate air circulation in the room or abnormal operating con ditions
2) Daños en tránsito o durante el transporte de la unidad.
3) Alimentación incorrecta, como bajo voltaje, instalación eléctrica defectuosa o fusibles inadecuados.
4) Accidente, modificación, abuso o uso incorrecto del artefacto, tal como insuficiente ventilación del ambiente o condiciones
de operación anormales (temperatura ambiente extremadamente alta o baja).
5) Utilización comercial o industrial (v.g., si el electrodoméstico no está instalado en una vivienda particular).
6) Incendio, daños por agua, robo, guerra, disturbios, hostilidades, actos de fuerza mayor como huracanes, inundaciones, etc.
7) Pedidos de servicio debido a desinformación del usuario.
Proof of purchase date will be required for warranty claims; so, please retain bills of sale. In the event warranty service is required, present this document to our
8) Instalación inadecuada (v.g., instalación empotrada de un electrodoméstico diseñado como unidad independiente o uso de
AUTHORIZED SERVICE DEPOT.
un electrodoméstico al aire libre que no esté aprobado para dicho fin).
(extremely high or low room temperature).
5) Use for commercial or industrial purposes (ie. If the appliance is not installed in a domestic residence).
6)
7) Service calls resulting in customer education.
8) Improper Installation (ie. Building-in of a free standing appliance or using an appliance outdoors that is not approved for out door application).
TERMS OF WARRANTY
t warrantor’s
ed for
EXCLUSIONS
EXCLUSIONES
GENERAL PROVISIONS
CONDICIONES GENERALES
Para acceder a la garantía se solicitará un comprobante de compra; por lo tanto, guarde su recibo. En caso de necesitar
servicio de garantía, presente ese documento al TALLER DE SERVICIO AUTORIZADO.
Warranty Service
In-home
Servicio de Garantía
Danby Products Limited
Danby Products Limited
PO Box 1778, Guelph, Ontario, Canada N1H 6Z9
PO Box 1778, Guelph, Ontario, Canada N1H 6Z9
Telephone: (519) 837-0920 FAX: (519) 837-0449
Telephone: (519) 837-0920 FAX: (519) 837-0449
Servicio en Domicilio
1-800-263-2629
1-800-263-2629
04/09
07/13
Danby Products Inc.
PO Box 669, Findlay, Ohio, U.S.A. 45840
Telephone: (419) 425-8627 FAX: (419) 425-8629
Telephone: (419) 425-8627 FAX: (419) 425-8629
PO Box 669, Findlay, Ohio, U.S.A. 45840
Danby Products Inc.

NOTES / REMARQUES / NOTAS :
__________________________________________________________________________________________
__________________________________________________________________________________________
__________________________________________________________________________________________
__________________________________________________________________________________________
__________________________________________________________________________________________
__________________________________________________________________________________________
__________________________________________________________________________________________
__________________________________________________________________________________________
__________________________________________________________________________________________
__________________________________________________________________________________________
__________________________________________________________________________________________
__________________________________________________________________________________________
__________________________________________________________________________________________
__________________________________________________________________________________________
__________________________________________________________________________________________
__________________________________________________________________________________________
__________________________________________________________________________________________
__________________________________________________________________________________________
__________________________________________________________________________________________
__________________________________________________________________________________________
__________________________________________________________________________________________
__________________________________________________________________________________________

DANBY PRODUCTS LIMITED, ONTARIO, CANADA N1H 6Z9
DANBY PRODUCTS INC., FINDLAY, OHIO, USA 45840
Printed in Canada
Imprimé au Canada
Impreso en Canadá
 Loading...