

Page 1

HOME HERB GROWER
Owner’s Manual...............................1 - 8
CULTIVATEUR À HERBE À LA MAISON
Manuel du propriétaire...................9 - 16
CULTIVADOR DE HIERBAS PARA EL HOGAR
Manual del propietario.................17 - 24
MODEL • MODÈLE • MODELO
DFG26A1B
2017.10.16
Page 2

Welcome
Welcome to the Danby family. We are proud of our quality products and we believe in
dependable service. We suggest that you read this owner’s manual before plugging in your new
appliance as it contains important operation information, safety information, troubleshooting and
maintenance tips to ensure the reliability and longevity of your appliance.
Visit www.Danby.com to access self service tools, FAQs and much more. For additional assistance
call 1-800-263-2629.
Note the information below; you will need this information to obtain service under warranty.
You must provide the original purchase receipt to validate your warranty and receive service.
Any returned appliances must include the original grow light system.
Model Number: _________________________________________________
Serial Number: _________________________________________________
Date of Purchase: _______________________________________________
Need Help?
Before you call for service, here are a few things you can do to help us serve you better.
Read this owner’s manual:
It contains instructions to help you use and maintain your appliance properly.
If you receive a damaged appliance:
Immediately contact the retailer or builder that sold you the appliance.
Save time and money:
Check the troubleshooting section at the end of this manual before calling. This section
will help you solve common problems that may occur.
1-800-26- Danby
(1-800-263-2629)
1
Page 3

Important Safety Information
READ AND FOLLOW ALL SAFETY INSTRUCTIONS
SAFETY REQUIREMENTS
This appliance is not intended for use by persons
(including children) whose physical, sensory or
mental capabilities may be different or reduced,
or who lack experience or knowledge, unless such
persons receive supervision or training to operate
the appliance by a person responsible for their
safety.
Children should be supervised to ensure that they
do not play with the appliance.
To avoid risk of electric shock, do not operate this
appliance in an area that is likely to accumulate
standing water. If this condition develops, disconnect
the power supply before stepping into the water.
Do not store or use combustible materials such as
gasoline or other flammable vapors or liquids in the
vicinity of this or any other appliance.
Do not cover or block the intake and exhaust
openings.
GROUNDING INSTRUCTIONS
This appliance must be grounded. Grounding
reduces the risk of electrical shock by providing an
escape wire for the electrical current.
This appliance has a cord that has a grounding
wire with a 3-prong plug. The power cord must be
plugged into an outlet that is properly grounded.
If the outlet is a 2-prong wall outlet, it must be
replaced with a properly grounded 3-prong wall
outlet. The serial rating plate indicates the voltage
and frequency the appliance is designed for.
WARNING - Improper use of the grounding
plug can result in a risk of electric shock.
Consult a qualified electrician or service agent
if the grounding instructions are not completely
understood, or if doubt exists as to whether the
appliance is properly grounded.
Do not connect the appliance to extension cords,
adapters or together with another appliance in the
same wall outlet.
This appliance is intended for indoor, residential
applications only. Do not use this appliance
outdoors. Do not use this appliance for commercial
or industrial applications.
DANGER: Risk of child entrapment. Before throwing
away an old appliance:
• Remove the door or lid.
• Leave shelves in place so that children may not
easily climb inside.
Do not splice the power cord. Do not under any
circumstances cut or remove the third ground prong
from the power cord.
If the power supply cord is damaged, it must be
replaced by the manufacturer, its service agent or
similar qualified person in order to avoid hazard.
For lighting equipment with cords please ensure that
the cords:
1)Are not concealed or extended through a wall,
floor, ceiling, or other parts of the building structure,
2)Are not located above a suspended ceiling or
dropped celing,
3)Are not permanently affixed to the building
structure,
4)Are routed so that they are not subject to strain
and are protected from physical damage,
5)Are visible over their entire length, and
6)Are used within their rated ampacity as
determined for the maximum temperature of the
installed environment specified in the instructions.
SAVE THESE INSTRUCTIONS!
2
Page 4
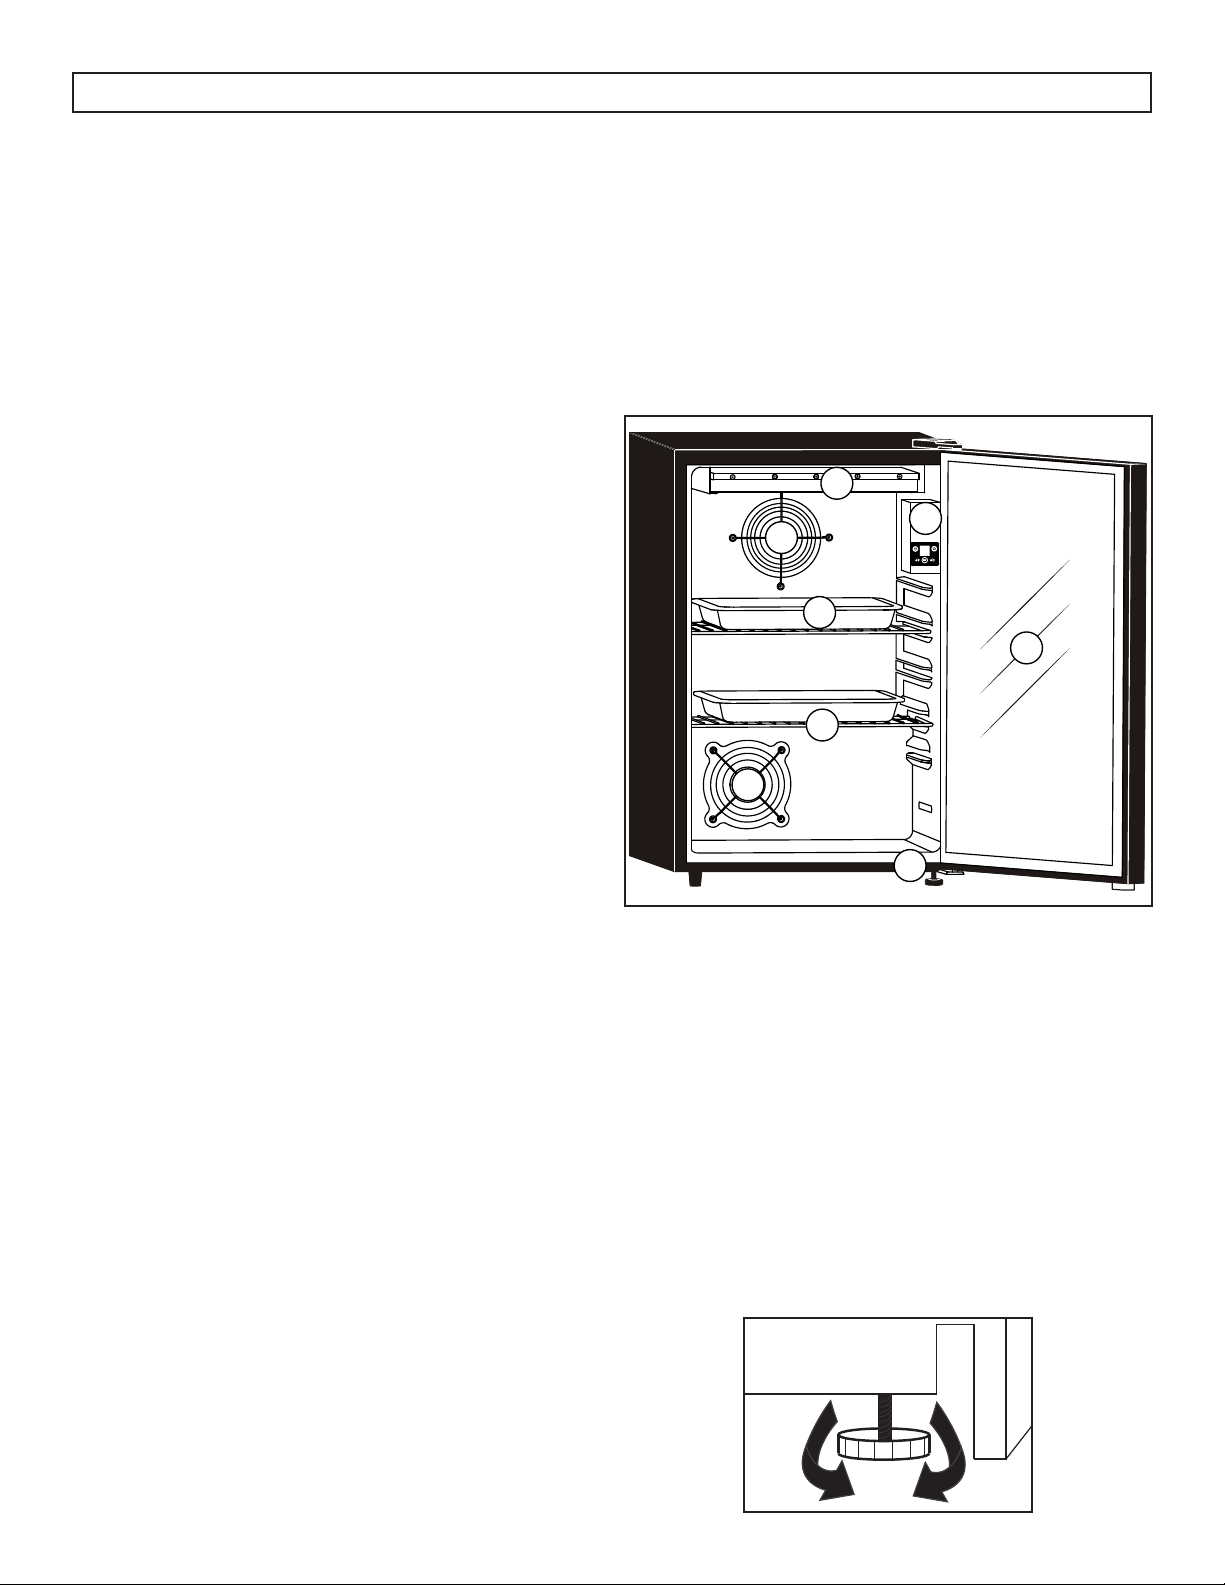
OPERATING INSTRUCTIONS
LOCATION
Select a location with a strong level floor that can
support the weight of the appliance and the plants
grown inside.
Allow 5 inches (12.7 cm) between the back of the
appliance and the wall. Allow 1 inch (2.5 cm) of
space between the sides of the appliance and any
adjacent walls.
Avoid direct sunlight and heat. Direct sunlight may
affect the acrylic coating of the appliance or the
growing cycle of your plants. Nearby heat sources
can overheat the unit and cause high internal
temperatures that may harm your plants.
Ensure that the appliance is turned off and
unplugged before any changes are made to the
light system.
Keep the door closed during operation.
Only use genuine spare parts from Danby or those
that have been CSA, UL or CE approved.
FEATURES
1. LED grow light system
2. Air outlet
3. Control box
4. Drip tray (x2)
5. Wire shelf (x2)
6. Air inlet
7. Adjustable foot
8. Glass door
1
3
2
4
8
5
The LED light panel is not water proof. Do not spray
water on the surface, sides or back of the light
panel.
Do not look directly at the LED light with the naked
eye as this can cause retinal damage.
Recommended ambient operating temperature is
between 13°C - 32°C (55°F - 90°F).
Recommended operating humidity is below 80%.
The LED panel cannot be exposed to corrosive
materials.
The LED panel is for indoor growing only and
should not be used outdoors.
Do not touch the surface of the light system while the
power is connected as it can get hot.
Do not use the LED panel during a thunderstorm to
avoid a surge that could damage the light system.
6
7
LEVELING INSTRUCTIONS
There is an adjustable foot on the bottom of the
appliance that can be turned up or down to ensure
that the appliance is level.
1. Turn the leveling foot counter-clockwise until
the top of the foot is touching the bottom of the
cabinet.
2. Slowly turn the leveling foot clockwise until the
appliance is level.
3
Page 5
OPERATING INSTRUCTIONS
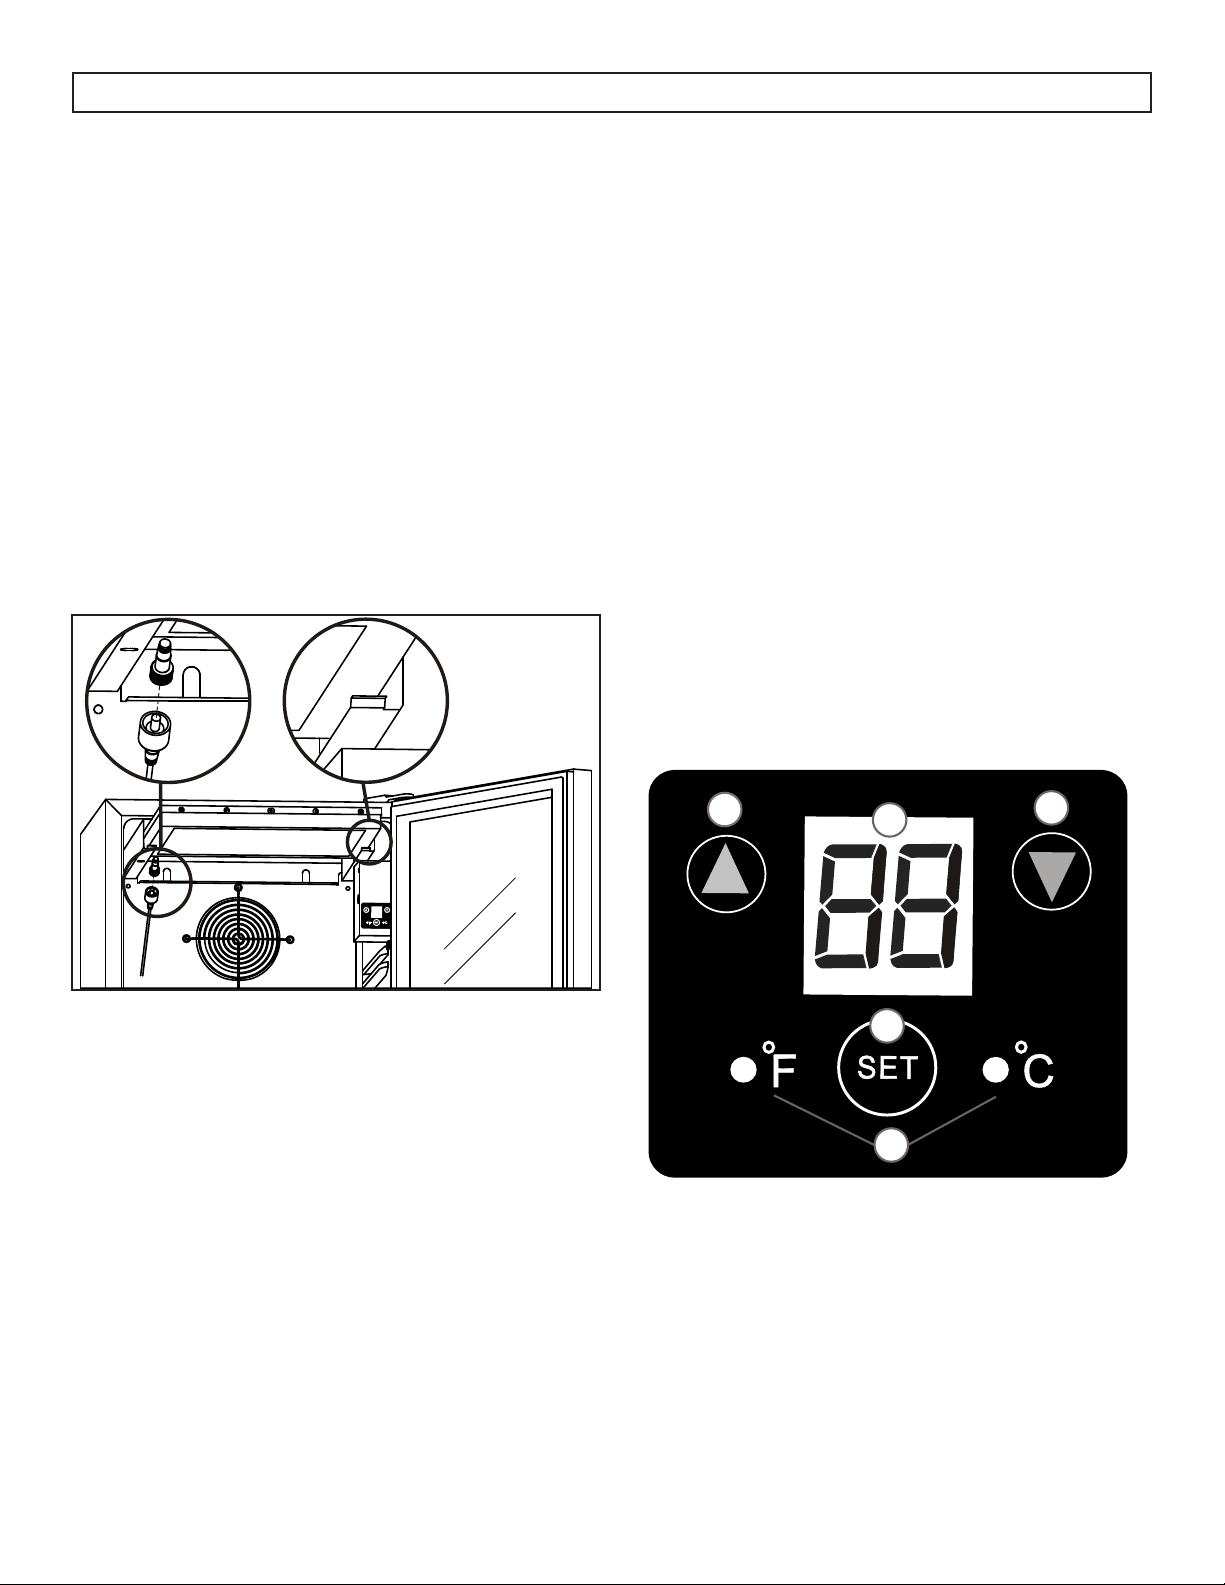
LIGHT INSTALLATION INSTRUCTIONS
The grow light system will ship inside the appliance
and must be installed by the end user.
1. Remove the light system from the box and
remove any packaging.
2. Connect the wire coming from the back of the
light system to the receptacle on the back wall of
the appliance.
3. Slide the light system into the two “L” shaped
brackets installed on the ceiling of the cabinet.
To remove the light system, first disconnect the light
from the receptacle and then push the end of the “L”
shaped bracket down and slide the light out.
CONTROL PANEL
The control panel is located on the control box on
the upper right side of the cabinet.
1. Up arrow: Press and hold the up arrow for 5
seconds to manually turn the light system on or
off. Press again to resume normal functioning.
2. Down arrow: Press and hold the down arrow
for 5 seconds to manually turn the fan on or off.
Press again to resume normal functioning.
3. Display screen: The display screen will show
the current internal temperature and the timer
settings.
4. Set button: The set button is used to set the timer
function.
5. °C/°F indicator lights: The light will illuminate
to indicate which temperature scale is being
displayed. To change the temperature scale,
press the set button. The default setting is
Fahrenheit.
1
4
3
2
5
4
Page 6

OPERATING INSTRUCTIONS
TIMER OPERATION
The timer will turn the light system on and off based
on the chosen settings, creating a regular light and
dark cycle for plants just as they would experience
when growing outdoors.
Different plants will grow best under different light
cycle conditions; some need more light and some
need less. Check the back of the seed packet for
information on the best light cycle to set for the
plants being grown.
To program the timer:
1. Press and hold the set button for 5 seconds until
“TS” appears on the display.
2. Press the up and down arrows to set the current
time to the nearest hour. The default time is
12:00 am, indicated by a ‘0’.
3. Once the current time is set, there are two preset
operating modes to choose from.
• Press the up arrow to choose preset P1.
• P1: 12 hour light cycle, meaning the lights
will be on for 12 hours and off for 12 hours.
• Press the down arrow to choose preset P2.
TIMER OPERATION
The preset modes can be altered by following the
steps below.
1. Press and hold the set button for 5 seconds until
“TS” appears on the display.
2. Press the set button repeatedly to choose from
the settings outlined in the below charts.
3. Use the up and down arrows to modify the
chosen setting.
Mode P1
H1
• The time when the light will turn on
• The default is 7:00 am
L1
• The number of hours that the light will remain on
• The default is 12 hours
Mode P2
H2
• The time when the light will turn on
• The default is 6:00 am
L2
• The number of hours that the light will remain on
• The default is 18 hours
• P2: 18 hour light cycle, meaning the lights
will be on for 18 hours and off for 6 hours.
Note: The timer is a 24 hour clock and can only be
set to the closest hour.
For example, if the current time is 3:45 pm, set
the clock to 16 indicating 4:00 pm. Always set the
current time to the nearest hour.
The timer will not display the current time. It uses the
set time as a guideline for the day and night cycle
and to count the hours before turning the light on or
off.
Light Temperature Setting
T1
• The temperature at which the light will turn off
• Default: 32°C (90°F)
• Temperature range: 30°C - 35°C (86°F - 95°F)
T2
• The temperature at which the light will turn on
• Default: 30°C (86°F)
• Temperature range: 26°C - 34°C (79°F - 93°F)
Note: T1 must be higher than T2
Fan Temperature Setting
F1
• The temperature at which the fan will turn off
• Default: 17°C (63°F)
• Temperature range: 16°C - 20°C (61°F - 68°F)
F2
• The temperature at which the fan will turn on
• Default: 19°C (66°F)
• Temperature range: 18°C - 22°C (64°F - 72°F)
Note: F1 must be higher than F2
5
Page 7

OPERATING INSTRUCTIONS
DOOR REVERSAL INSTRUCTIONS
1. Remove the hinge cover and the upper hinge
from the upper right side of the cabinet. Remove
the hinge hole covers from the upper left side of
the cabinet. Remove the door from the cabinet.
2. Remove the hinge hole cover from the top left
side of the door and place it in the hinge hole on
the top right side of the door.
3. Remove the solid foot from the lower left side
of the cabinet and remove the adjustable foot
and lower hinge from the lower right side of the
cabinet. Install the hinge and adjustable foot on
the lower left side of the cabinet. Install the solid
foot on the lower right side of the cabinet.
4. Install the door on the cabinet and install the
upper hinge on the upper left side of the cabinet.
Before tightening the screws on the upper hinge,
ensure that the top of the door is level with the
top of the cabinet and that the rubber gasket is
making a good seal with the cabinet all the way
around. Install the hinge hole covers in the hinge
holes on the top right side of the cabinet.
1
2
3
4
6
Page 8

OPERATING INSTRUCTIONS
LIMITED IN-HOME APPLIANCE WARRANTY
This quality product is warranted to be free from manufacturer’s defects in material and workmanship, provided that the unit is used under the normal operating
conditions intended by the manufacturer.
This warranty is available only to the person to whom the unit was originally sold by Danby Products Limited (Canada) or Danby Products Inc. (U.S.A.) (hereafter
“Danby”) or by an authorized distributor of Danby, and is non-transferable.
TERMS OF WARRANTY
Plastic parts, are warranted for thirty (30) days only from purchase date, with no extensions provided.
First Year
During the rst twelve (12) months, any functional parts of this product found to be defective, will be repaired or replaced, at warrantor’s
option, at no charge to the ORIGINAL purchaser.
To obtain
Danby reserves the right to limit the boundaries of “In Home Service” to the proximity of an Authorized Service Depot. Any app liance
Service
requiring service outside the limited boundaries of “In Home Service” , it will be the consumer’s responsibility to transport the appliance (at
their own expense) to the original retailer (point of purchase) or a service depot for repair. See “Boundaries of In Home Serv ice”below.
Contact your dealer from whom your unit was purchased, or contact your nearest authorized Danby service depot, where service
must be performed by a qualied service technician.
If service is performed on the units by anyone other than an authorized service depot, or the unit is used for commercial appli cation, all
obligations of Danby under this warranty shall be void.
Boundaries of
If the appliance is installed in a location that is 100 kilometers (62 miles) or more from the nearest service center your unit must be
In Home Service
delivered to the nearest authorized Danby Service Depot, as service must only be performed by a technician qualied and certif ied for
warranty service by Danby. Transportation charges to and from the service location are not protected by this warranty and are t he
responsibility of the purchaser.
Nothing within this warranty shall imply that Danby will be responsible or liable for any spoilage or damage to food or other c ontents of this appliance, whether due
to any defect of the appliance, or its use, whether proper or improper.
EXCLUSIONS
Save as herein provided, Danby, there are no other warranties, conditions, representations or guarantees, express or implied, m ade or intended by Danby or its
authorized distributors and all other warranties, conditions, representations or guarantees, including any warranties, conditio ns, representations or guarantees
under any Sale of Goods Act or like legislation or statue is hereby expressly excluded. Save as herein provided, Danby shall no t be responsible for any damages
to persons or property, including the unit itself, howsoever caused or any consequential damages arising from the malfunction o f the unit and by the purchase of
the unit, the purchaser does hereby agree to indemnify and hold harmless Danby from any claim for damages to persons or propert y caused by the unit.
GENERAL PROVISIONS
No warranty or insurance herein contained or set out shall apply when damage or repair is caused by any of the following:
1) Power failure.
2) Damage in transit or when moving the appliance.
3) Improper power supply such as low voltage, defective house wiring or inadequate fuses.
4) Accident, alteration, abuse or misuse of the appliance such as inadequate air circulation in the room or abnormal operating con ditions
(extremely high or low room temperature).
5) Use for commercial or industrial purposes (ie. If the appliance is not installed in a domestic residence).
6) Fire, water damage, theft, war, riot, hostility, acts of God such as hurricanes, oods etc.
7) Service calls resulting in customer education.
8) Improper Installation (ie. Building-in of a free standing appliance or using an appliance outdoors that is not approved for out door application).
Proof of purchase date will be required for warranty claims; so, please retain bills of sale. In the event warranty service is required, present this document to our
AUTHORIZED SERVICE DEPOT.
Danby Products Limited
PO Box 1778, Guelph, Ontario, Canada N1H 6Z9
Telephone: (519) 837-0920 FAX: (519) 837-0449
Danby Products Inc.
PO Box 669, Findlay, Ohio, U.S.A. 45840
Telephone: (419) 425-8627 FAX: (419) 425-8629
04/09
1-800-263-2629
Warranty Service
In-home
Transportation charges to and from the service location are not protected by this warranty and are the responsibility of the purchaser.
During the first twenty four (24) months, any functional parts of this product found to be defective, will be repaired
or replaced, at warrantor’s option, at no charge to the original purchaser.
Contact the dealer where the unit was purchased, or contact the nearest authorized Danby service depot, where
service must be performed by a qualified service technician. If service is performed on the unit by anyone other
than an authorized service depot, all obligations of Danby under this warranty shall be void.
It is the responsibility of the purchaser to transport the appliance to the nearest authorized service depot.
First 24 months
To obtain service
LIMITED “CARRY IN” WARRANTY
This quality product is warranted to be free from manufacturer’s defects in material and workmanship, provided that the unit is used
under the normal operating conditions intended by the manufacturer.
This warranty is available only to the person to whom the unit was originally sold by Danby Products Limited (Canada) or Danby
Products Inc. (U.S.A.) (hereafter “Danby”) or by an authorized distributor of Danby, and is non-transferable.
TERMS OF WARRANTY
Plastic parts are warranted for thirty (30) days from the date of purchase, with no extensions provided.
Nothing within this warranty shall imply that Danby will be responsible or liable for any spoilage or damage to food or other
contents of this appliance, whether due to any defect of the appliance, or its use, whether proper or improper.
EXCLUSIONS
Save as herein provided, by Danby, there are no other warranties, conditions, representations or guarantees, express or implied, made
or intended by Danby or its authorized distributors and all other warranties, conditions, representations or guarantees, including any
warranties, conditions, representations or guarantees under any Sale of Goods Act or like legislation or statute is hereby expressly
excluded. Save as herein provided, Danby shall not be responsible for any damages to persons or property, including the unit itself,
howsoever caused or any consequential damages arising from the malfunction of the unit and by the purchase of the unit, the
purchaser does hereby agree to indemnify and hold harmless Danby from any claim for damages to persons or property caused by
the unit.
GENERAL PROVISIONS
No warranty or insurance herein contained or set out shall apply when damage or repair is caused by any of the following:
1) Power failure.
2) Damage in transit or when moving the appliance.
3) Improper power supply such as low voltage, defective house wiring or inadequate fuses.
4) Accident, alteration, abuse or misuse of the appliance such as inadequate air circulation in the room or abnormal operating
conditions (ie. extremely high or low room temperature).
5) Use for commercial or industrial purposes (ie. If the appliance is not installed in a domestic residence).
6) Fire, water damage, theft, war, riot, hostility, acts of God such as hurricanes, floods etc.
7) Service calls resulting in customer education.
8) Improper Installation (ie. Building-in of a free standing appliance or using an appliance outdoors that is not approved for outdoor
application, including but not limited to: garages, patios, porches or anywhere that is not properly insulated or climate controlled).
Proof of purchase date will be required for warranty claims; retain bills of sale. In the event that warranty service is required, present
the proof of purchase to our authorized service depot.
Warranty Service
Carry In
Danby Products Limited
PO Box 1778, Guelph, Ontario, Canada N1H 6Z9
Telephone: (519) 837-0920 FAX: (519) 837-0449
Danby Products Inc.
PO Box 669, Findlay, Ohio, U.S.A. 45840
Telephone: (419) 425-8627 FAX: (419) 425-8629
1-800-263-2629
04/17
GROWING TIPS
• Keep pots or planters in the provided drip tray
to avoid water spillage.
• Plants grow best when the ambient room
temperature is between 13°C - 32°C (55°F 90°F)
• Keep the growing environment clean. Clean the
drip try and the inside of the cabinet at least
once a month to avoid the growth of mold and
mildew.
• If powdery, white mildew forms on plants they
can be sprayed with a solution of hydrogen
peroxide and water. Use 1 teaspoon of 17% 35% food-grade hydrogen peroxide to 1 liter of
water and only spray the soil as this can cause
rot if sprayed on leaves or flowers.
• Do not overwater plants, especially seedlings
as they can drown. There is space between the
particles of soil that is filled with oxygen. Soil
that is constantly wet will not carry enough
oxygen and the plants will not be able to
breathe.
• As a general rule, soil should be damp but
not wet. Check the seed packet for specific
information on watering instructions.
• In general, for most herbs and vegetables, the
following light cycles are recommended:
• Growth Cycle: 18 hours on / 6 hours off for
approximately 20 - 30 days.
• Bloom Cycle: 12 hours on / 12 hours off for
approximately 20 - 30 days.
• Most herbs and vegetables have a maturity date
between 45 - 90 days. How long the plants
take to mature will depend on the type of plants
being grown. Check the seed packet for specific
information on growth cycles, germination and
flowering times.
GROWING TIPS
Seeds must be germinated before they will grow
and bloom. For best results in germination, consult
the tips below.
• Spread potting soil evenly in a pot or tray.
• Spread seeds evenly over the surface of the soil.
• Add enough water so that the soil is damp but
not sodden. Using a spray bottle to add water is
recommended to avoid over-watering seeds.
• The use of a humidity dome or plastic bag over
the seeds is recommended to trap heat and
humidity around the seeds.
• Place the pot or tray in a dark place. The bottom
of the Danby Fresh Grower is ideal for this
purpose.
• Leave the humidity dome or plastic bag in place
for 2 - 3 days or until sprouts are visible.
• Remove the humidity dome or plastic bag and
place the pot or tray on the wire shelf in the
Danby Fresh Grower.
• Set the desired light cycle based on the
information on the seed packet using the timer
instructions on page 5.
• Water your plants as required based on the
information on the seed packet.
• Most microgreens reach maturity within 1 - 2
weeks.
Note: Seedling chambers, humidity domes and
germination bags are not included with this
appliance and must be purchased separately.
Note: Danby Products Ltd. will accept no liability for
lost plants or weak harvests based on inappropriate
use of the timer and light cycle system.
7
Page 9

LIMITED IN-HOME APPLIANCE WARRANTY
LIMITED “CARRY IN” WARRANTY
This quality product is warranted to be free from manufacturer’s defects in material and workmanship, provided that the unit is used under the normal operating
conditions intended by the manufacturer.
This quality product is warranted to be free from manufacturer’s defects in material and workmanship, provided that the unit is used
under the normal operating conditions intended by the manufacturer.
This warranty is available only to the person to whom the unit was originally sold by Danby Products Limited (Canada) or Danby Products Inc. (U.S.A.) (hereafter
This warranty is available only to the person to whom the unit was originally sold by Danby Products Limited (Canada) or Danby
“Danby”) or by an authorized distributor of Danby, and is non-transferable.
Products Inc. (U.S.A.) (hereafter “Danby”) or by an authorized distributor of Danby, and is non-transferable.
TERMS OF WARRANTY
TERMS OF WARRANTY
Plastic parts are warranted for thirty (30) days from the date of purchase, with no extensions provided.
Plastic parts, are warranted for thirty (30) days only from purchase date, with no extensions provided.
First 24 months
First Year
During the first twenty four (24) months, any functional parts of this product found to be defective, will be repaired
During the rst twelve (12) months, any functional parts of this product found to be defective, will be repaired or replaced, at warrantor’s
or replaced, at warrantor’s option, at no charge to the original purchaser.
option, at no charge to the ORIGINAL purchaser.
To obtain service
To obtain
Service
Contact the dealer where the unit was purchased, or contact the nearest authorized Danby service depot, where
service must be performed by a qualified service technician. If service is performed on the unit by anyone other
Danby reserves the right to limit the boundaries of “In Home Service” to the proximity of an Authorized Service Depot. Any app liance
than an authorized service depot, all obligations of Danby under this warranty shall be void.
requiring service outside the limited boundaries of “In Home Service” , it will be the consumer’s responsibility to transport the appliance (at
their own expense) to the original retailer (point of purchase) or a service depot for repair. See “Boundaries of In Home Serv ice”below.
It is the responsibility of the purchaser to transport the appliance to the nearest authorized service depot.
Contact your dealer from whom your unit was purchased, or contact your nearest authorized Danby service depot, where service
must be performed by a qualied service technician.
Transportation charges to and from the service location are not protected by this warranty and are the responsibility of the purchaser.
If service is performed on the units by anyone other than an authorized service depot, or the unit is used for commercial appli cation, all
obligations of Danby under this warranty shall be void.
Nothing within this warranty shall imply that Danby will be responsible or liable for any spoilage or damage to food or other
Boundaries of
contents of this appliance, whether due to any defect of the appliance, or its use, whether proper or improper.
In Home Service
Save as herein provided, by Danby, there are no other warranties, conditions, representations or guarantees, express or implied, made
or intended by Danby or its authorized distributors and all other warranties, conditions, representations or guarantees, including any
warranties, conditions, representations or guarantees under any Sale of Goods Act or like legislation or statute is hereby expressly
Nothing within this warranty shall imply that Danby will be responsible or liable for any spoilage or damage to food or other c ontents of this appliance, whether due
excluded. Save as herein provided, Danby shall not be responsible for any damages to persons or property, including the unit itself,
to any defect of the appliance, or its use, whether proper or improper.
howsoever caused or any consequential damages arising from the malfunction of the unit and by the purchase of the unit, the
purchaser does hereby agree to indemnify and hold harmless Danby from any claim for damages to persons or property caused by
the unit.
Save as herein provided, Danby, there are no other warranties, conditions, representations or guarantees, express or implied, m ade or intended by Danby or its
authorized distributors and all other warranties, conditions, representations or guarantees, including any warranties, conditio ns, representations or guarantees
under any Sale of Goods Act or like legislation or statue is hereby expressly excluded. Save as herein provided, Danby shall no t be responsible for any damages
No warranty or insurance herein contained or set out shall apply when damage or repair is caused by any of the following:
to persons or property, including the unit itself, howsoever caused or any consequential damages arising from the malfunction o f the unit and by the purchase of
1) Power failure.
the unit, the purchaser does hereby agree to indemnify and hold harmless Danby from any claim for damages to persons or propert y caused by the unit.
2) Damage in transit or when moving the appliance.
3) Improper power supply such as low voltage, defective house wiring or inadequate fuses.
4) Accident, alteration, abuse or misuse of the appliance such as inadequate air circulation in the room or abnormal operating
conditions (ie. extremely high or low room temperature).
No warranty or insurance herein contained or set out shall apply when damage or repair is caused by any of the following:
5) Use for commercial or industrial purposes (ie. If the appliance is not installed in a domestic residence).
1) Power failure.
6) Fire, water damage, theft, war, riot, hostility, acts of God such as hurricanes, floods etc.
2) Damage in transit or when moving the appliance.
7) Service calls resulting in customer education.
3) Improper power supply such as low voltage, defective house wiring or inadequate fuses.
8) Improper Installation (ie. Building-in of a free standing appliance or using an appliance outdoors that is not approved for outdoor
4) Accident, alteration, abuse or misuse of the appliance such as inadequate air circulation in the room or abnormal operating con ditions
application, including but not limited to: garages, patios, porches or anywhere that is not properly insulated or climate controlled).
If the appliance is installed in a location that is 100 kilometers (62 miles) or more from the nearest service center your unit must be
delivered to the nearest authorized Danby Service Depot, as service must only be performed by a technician qualied and certif ied for
warranty service by Danby. Transportation charges to and from the service location are not protected by this warranty and are t he
EXCLUSIONS
responsibility of the purchaser.
EXCLUSIONS
GENERAL PROVISIONS
GENERAL PROVISIONS
(extremely high or low room temperature).
Proof of purchase date will be required for warranty claims; retain bills of sale. In the event that warranty service is required, present
5) Use for commercial or industrial purposes (ie. If the appliance is not installed in a domestic residence).
the proof of purchase to our authorized service depot.
6) Fire, water damage, theft, war, riot, hostility, acts of God such as hurricanes, oods etc.
7) Service calls resulting in customer education.
8) Improper Installation (ie. Building-in of a free standing appliance or using an appliance outdoors that is not approved for out door application).
Proof of purchase date will be required for warranty claims; so, please retain bills of sale. In the event warranty service is required, present this document to our
AUTHORIZED SERVICE DEPOT.
Danby Products Limited
Danby Products Limited
PO Box 1778, Guelph, Ontario, Canada N1H 6Z9
PO Box 1778, Guelph, Ontario, Canada N1H 6Z9
Telephone: (519) 837-0920 FAX: (519) 837-0449
Telephone: (519) 837-0920 FAX: (519) 837-0449
Warranty Service
Warranty Service
In-home
Carry In
1-800-263-2629
1-800-263-2629
04/17
04/09
Danby Products Inc.
PO Box 669, Findlay, Ohio, U.S.A. 45840
Telephone: (419) 425-8627 FAX: (419) 425-8629
PO Box 669, Findlay, Ohio, U.S.A. 45840
Telephone: (419) 425-8627 FAX: (419) 425-8629
Danby Products Inc.
Page 10

Bienvenue
Bienvenue dans la famille Danby. Nous sommes fiers de nos produits de qualité et nous croyons
en un service fiable. Nous vous suggérons de lire ce mode d’emploi avant de brancher votre
nouvel appareil car il contient des informations importantes sur l’exploitation, des informations de
sécurité, des conseils de dépannage et de maintenance afin d’assurer la fiabilité et la longévité de
votre appareil.
Visitez www.Danby.com pour accéder aux outils d’autoservice, aux questions fréquentes et bien
plus encore. Pour obtenir de l’aide supplémentaire, composez le 1-800-263-2629.
Notez les informations ci-dessous; vous aurez besoin de cette information pour obtenir un
service sous garantie.
Vous devez fournir le reçu d’achat original pour valider votre garantie et recevoir le service.
Tous les appareils retournés doivent inclure le système d’éclairage d’origine.
Numéro de modèle:_____________________________________________
Numéro de série:_______________________________________________
Date d’achat: __________________________________________________
Besoin d’assistance?
Avant d’appeler pour service, voici quelques choses que vous pouvez faire pour nous
aider à mieux vous servir.
Lire ce manuel du propriétaire:
Il contient des instructions pour vous aider à utiliser et à maintenir votre appareil
correctement.
Si vous recevez un appareil endommagé:
Contactez immédiatement le revendeur ou l’entrepreneur qui vous a vendu l’appareil.
Gagnez du temps et de l’argent:
Avant d’appeler pour service, consultez la section de dépannage à la fin de ce manuel.
Cette section vous aidera à résoudre les problèmes courants pouvant survenir.
1-800-26- Danby
(1-800-263-2629)
9
Page 11

Informations importantes de sécurité
LIRE ET SUIVRE TOUTES LES INSTRUCTIONS DE SÉCURITÉ
EXIGENCES DE SÉCURITÉ
Cet appareil n’est pas destiné à être utilisé par
des personnes (y compris des enfants) dont les
capacités physiques, sensorielles ou mentales
peuvent être différentes ou réduites, ou qui n’ont
pas d’expérience ou de connaissances, à moins
que ces personnes ne soient surveillées ou formées
pour faire fonctionner l’appareil par une personne
responsable de leur sécurité.
Les enfants devraient être surveillés pour s’assurer
qu’ils ne jouent pas avec l’appareil.
Pour éviter tout risque de choc électrique, ne pas
utiliser cet appareil dans une zone susceptible
d’accumuler de l’eau stagnante. Si cette condition
se développe, débranchez l’alimentation avant de
pénétrer dans l’eau.
Ne pas stocker ou utiliser des matériaux
combustibles tels que de l’essence ou d’autres
vapeurs ou liquides inflammables à proximité de ce
ou d’un autre appareil.
INSTRUCTIONS DE MISE À LA TERRE
Cet appareil doit être mis à la terre. La mise à
la terre réduit le risque de choc électrique en
fournissant un câble d’échappement pour le courant
électrique.
Cet appareil possède un cordon doté d’un fil de
mise à la terre avec une fiche à 3 broches. Le
cordon d’alimentation doit être branché sur une
prise correctement mise à la terre. Si la sortie
est une prise murale à 2 broches, elle doit être
remplacée par une prise murale à 3 broches
correctement mise à la terre. La plaque signalétique
en série indique la tension et la fréquence
auxquelles l’appareil est conçu.
ATTENTION - L’utilisation incorrecte de la fiche
de mise à la terre peut entraîner un risque
d’électrocution. Consultez un électricien qualifié
ou un agent de service si les instructions de mise
à la terre ne sont pas complètement comprises, ou
s’il existe un doute quant à savoir si l’appareil est
correctement mis à la terre.
Ne pas couvrir ou bloquer les ouvertures
d’admission et d’échappement.
Cet appareil est destiné uniquement à des
applications résidentielles et intérieures. N’utilisez
pas cet appareil à l’extérieur. N’utilisez pas cet
appareil pour des applications commerciales ou
industrielles.
DANGER: Risque de piégeage des enfants. Avant
de jeter un ancien appareil:
• Retirez la porte ou le couvercle.
• Laissez les étagères en place afin que les enfants
ne puissent pas facilement monter à l’intérieur.
Pour l’équipement d’éclairage avec des cordons,
veuillez-vous assurer que les cordons:
1) Ne sont pas cachés ou étendus à travers un mur,
un plancher, un plafond ou d’autres parts de la
structure du bâtiment,
2) Ne sont pas situés au-dessus d’un plafond
suspendu
Ne branchez pas l’appareil à des rallonges, des
adaptateurs ou à un autre appareil dans la même
prise murale.
Ne pas épisser le cordon d’alimentation. Ne coupez
ou retirez en aucun cas la troisième broche du
cordon d’alimentation.
Si le cordon d’alimentation est endommagé, il
doit être remplacé par le fabricant, son agent de
maintenance ou une personne qualifiée similaire
afin d’éviter tout risque.
3) Ne sont pas fixés en permanence à la structure
du bâtiment,
4) Sont acheminés de sorte qu’ils ne sont pas
soumis à des contraintes et sont protégés contre les
dommages physiques,
5) Sont visibles sur toute leur longueur, et
6) Sont utilisés dans les limites de leur intensité
nominale déterminée pour la température maximale
de l’environnement installé spécifiée dans les
instructions.
GARDEZ CES INSTRUCTIONS!
Page 12

INSTRUCTIONS D’UTILISATION
EMPLACEMENT
Sélectionnez un endroit avec un plancher de niveau
fort qui peut supporter le poids de l’appareil et les
plantes cultivées à l’intérieur.
Laissez 5 pouces (12,7 cm) entre l’arrière de
l’appareil et le mur. Laissez 1 pouce (2,5 cm)
d’espace entre les côtés de l’appareil et les parois
adjacentes.
Évitez la lumière directe du soleil et la chaleur. La
lumière directe du soleil peut affecter le revêtement
acrylique de l’appareil ou le cycle de croissance
de vos plantes. Les sources de chaleur à proximité
peuvent surchauffer l’appareil et provoquer des
températures internes élevées pouvant nuire à vos
plantes.
Assurez-vous que l’appareil est éteint et débranché
avant toute modification du système d’éclairage.
Garder la porte fermée pendant l’opération.
N’utilisez que des pièces de rechange originales de
Danby ou celles qui ont été homologuées CSA, UL
ou CE.
Le panneau lumineux LED n’est pas étanche à l’eau.
Ne pas pulvériser d’eau sur la surface, les côtés ou
l’arrière du panneau lumineux.
CARACTÉRISTIQUES
1. La lumière LED pour la culture de plantes
2. Sortie d’air
3. Boîtier de commande
4. Bac d’égouttage (x2)
5. Étagère métallique (x2)
6. Entrée d’air
7. Pied réglable
8. Porte en verre
1
3
2
4
8
5
6
7
Ne regardez pas directement la lumière LED à l’œil
nu car cela peut causer des dommages à la rétine.
La température de fonctionnement ambiante
recommandée est comprise entre 13°C et 32 °C
(55°F - 90°F).
L’humidité de fonctionnement recommandée est
inférieure à 80%.
Le panneau LED ne peut pas être exposé à des
matériaux corrosifs.
Le panneau LED est pour la culture intérieure
uniquement et ne doit pas être utilisé à l’extérieur.
Ne touchez pas la surface du système de lumière
lorsque l’alimentation est connectée car elle peut
devenir chaude.
N’utilisez pas le panneau LED pendant un orage
pour éviter une surtension qui pourrait endommager
le système d’éclairage.
INSTRUCTIONS DE NIVEAU
Il y a un pied réglable au bas de l’appareil qui peut
être monté ou bas pour s’assurer que l’appareil est
au niveau.
1. Tournez le pied de nivellement dans le sens
inverse des aiguilles d’une montre jusqu’à ce
que le haut du pied touche le bas de l’armoire.
2. Tournez lentement le pied de nivellement dans le
sens des aiguilles d’une montre jusqu’à ce que
l’appareil soit à niveau.
11
Page 13

INSTRUCTIONS D’UTILISATION
INSTRUCTIONS D’INSTALLATION DE LUMIÈRE
Le système d’éclairage de culture se transportera
à l’intérieur de l’appareil et doit être installé par
l’utilisateur final.
1. Retirez le système d’éclairage de la boîte et
enlevez tout emballage.
2. Connectez le fil venant de l’arrière du système
d’éclairage à la prise sur la paroi arrière de
l’appareil.
3. Faites glisser le système de lumière dans les
deux supports en “L” installés sur le plafond de
l’armoire.
Pour retirer le système d’éclairage, débranchez
d’abord la lumière de la prise, puis enfoncez
l’extrémité du support en “L” et faites glisser la
lumière.
PANNEAU DE CONTRÔLE
Le panneau de commande est situé sur la boîte de
commande en haut à droite de l’armoire.
1. Flèche vers le haut: Maintenez la touche
enfoncée pendant 5 secondes pour allumer
ou éteindre le système lumineux. Appuyez à
nouveau pour reprendre le fonctionnement
normal.
2. Flèche vers le bas: Appuyez et maintenez la
touche enfoncée pendant 5 secondes pour
allumer ou éteindre le ventilateur. Appuyez
à nouveau pour reprendre le fonctionnement
normal.
3. Écran d’affichage: L’écran affiche la
température interne actuelle et les réglages de la
minuterie.
4. Bouton set: Le bouton set est utilisé pour régler
la fonction de minuterie.
5. °C/°F voyants: La lumière s’allume pour
indiquer quelle échelle de température est
affichée. Pour changer l’échelle de température,
appuyez sur le bouton de réglage. Le paramètre
par défaut est Fahrenheit.
1
4
3
2
5
12
Page 14

INSTRUCTIONS D’UTILISATION
FONCTIONNEMENT DE LA MINUTERIE
La minuterie allume et éteint le système d’éclairage
en fonction des paramètres choisis, créant un cycle
régulier de lumière et d’obscurité pour les plantes,
tout comme elles le ressentiraient lors de leur
croissance extérieure.
Différentes plantes se développeront mieux dans
différentes conditions de cycle de lumière; certains
ont besoin de plus de lumière et certains ont besoin
de moins. Vérifiez l’arrière du paquet de graines
pour obtenir des informations sur le meilleur cycle
de lumière à configurer pour les plantes cultivées.
Pour programmer la minuterie:
1. Appuyez et maintenez la touche set enfoncée
pendant 5 secondes jusqu’à ce que “TS”
apparaisse sur l’affichage.
2. Appuyez sur les flèches haut et bas pour régler
l’heure actuelle à l’heure la plus proche. L’heure
par défaut est 12h00, indiquée par un ‘0’.
FONCTIONNEMENT DE LA MINUTERIE
Les modes préréglés peuvent être modifiés en
suivant les étapes ci-dessous.
1. Appuyez et maintenez le bouton de réglage
pendant 5 secondes jusqu’à ce que “TS”
apparaisse sur l’affichage.
2. Appuyez plusieurs fois sur le bouton de réglage
pour choisir parmi les réglages décrits dans les
tableaux ci-dessous.
3. Utilisez les flèches haut et bas pour modifier le
réglage choisi.
Mode P1
H1
• Le moment où la lumière s’allume
• La valeur par défaut est 7h00
L1
• Le nombre d’heures pendant lesquelles la lumière
restera allumée
• La valeur par défaut est 12 heures
Mode P2
3. Une fois que l’heure actuelle est réglée, il existe
deux modes de fonctionnement prédéfinis à
choisir.
• Appuyez sur la flèche vers le haut pour choisir le
préréglage P1.
• P1: cycle de lumière de 12 heures, ce qui
signifie que les lumières seront allumées
pendant 12 heures et s’éteintes pendant 12
heures.
• Appuyez sur la flèche vers le bas pour choisir le
P2 prédéfini.
• P2: cycle de lumière de 18 heures, ce qui
signifie que les lumières seront allumées
pendant 18 heures et s’éteintes pendant 6
heures.
Remarque: La minuterie est une horloge de 24
heures et ne peut être réglée qu’à l’heure la plus
proche.
Par exemple, si l’heure actuelle est 15h45, réglez
l’horloge à 16, ce qui indique 4:00 pm. Réglez
toujours l’heure actuelle à l’heure la plus proche.
La minuterie n’indique pas l’heure actuelle. Il utilise
le temps défini comme guide pour le cycle jour et
nuit et pour compter les heures avant d’allumer ou
éteindre la lumière.
H2
• Le moment où la lumière s’allume
• La valeur par défaut est 6h00
L2
• Le nombre d’heures pendant lesquelles la lumière
restera allumée
• La valeur par défaut est 18 heures
Réglage de la température de lumière
T1
• La température à laquelle la lumière s’éteindra
• Par défaut: 32°C (90°F)
• Plage de température: 30°C - 35°C (86°F - 95°F)
T2
• La température à laquelle la lumière s’allume
• Par défaut: 30°C (86°F)
• Plage de température: 26°C - 34°C (79°F - 93°F)
Remarque: T1 doit être supérieur à T2
Réglage de la température du ventilateur
F1
• La température à laquelle le ventilateur s’éteindra
• Par défaut: 17°C (63°F)
• Plage de température: 16°C - 20°C (61°F - 68°F)
F2
• La température à laquelle le ventilateur s’allume
• Par défaut: 19°C (66°F)
• Plage de température: 18°C - 22°C (64°F - 72°F)
Remarque: F1 doit être supérieur à F2
13
Page 15

INSTRUCTIONS D’UTILISATION
INSTRUCTIONS DE REVERSION DE PORTE
1. Retirez le couvercle de charnière et la charnière
supérieure du haut droit de l’armoire. Retirez
les couvercles des trous de charnière du côté
supérieur gauche de l’armoire. Retirez la porte
de l’armoire.
2. Retirez le couvercle du trou de charnière du côté
supérieur gauche de la porte et placez-le dans
le trou de charnière situé en haut à droite de la
porte.
1
3. Retirez le pied solide du côté inférieur gauche
de l’armoire et retirez le pied réglable et
abaissez la charnière du côté inférieur droit
de l’armoire. Installez la charnière et le pied
réglable sur le côté inférieur gauche de
l’armoire. Installez le pied plein sur le côté
inférieur droit de l’armoire.
4. Installez la porte sur l’armoire et installez la
charnière supérieure en haut à gauche de
l’armoire. Avant de serrer les vis sur la charnière
supérieure, assurez-vous que le haut de la porte
est au niveau du haut de l’armoire et que le joint
en caoutchouc fait un bon joint avec l’armoire
tout autour. Installez les couvercles des trous de
charnière dans les trous de charnière sur le côté
supérieur droit de l’armoire.
2
3
14
4
Page 16

INSTRUCTIONS D’UTILISATION
CONSEILS CROISSANTS
• Gardez les pots ou les planteurs dans le bac
d’égouttage fourni pour éviter le déversement
d’eau.
• Les plantes poussent mieux lorsque la
température ambiante est comprise entre 13 ° C
et 32 ° C (55 ° F - 90 ° F)
• Gardez l’environnement en pleine croissance.
Nettoyez l’essai de goutte à goutte et l’intérieur
de l’armoire au moins une fois par mois pour
éviter la croissance de la moisissure.
• En cas de poudreuse, le mildiou blanc se forme
sur les plantes, on peut les pulvériser avec une
solution de peroxyde d’hydrogène et d’eau.
Utiliser 1 cuillère à café de 17% - 35% de
peroxyde d’hydrogène de qualité alimentaire
à 1 litre d’eau et pulvériser uniquement le sol,
car cela peut provoquer une pourriture si on
pulvérise sur des feuilles ou des fleurs.
• Ne pas surélever les plantes, en particulier les
semis, car ils peuvent se noyer. Il y a un espace
entre les particules de sol remplies d’oxygène.
Les sols constamment humides ne contiennent
pas assez d’oxygène et les plantes ne pourront
pas respirer.
CONSEILS CROISSANTS
Les graines doivent être germées avant qu’ils ne
pousseront et fleuriront. Pour obtenir de meilleurs
résultats en germination, consultez les conseils cidessous.
• Étaler uniformément le terreau dans un pot ou
un plateau.
• Étaler les graines uniformément sur la surface du
sol.
• Ajoutez suffisamment d’eau pour que le sol
soit humide mais pas trempé. L’utilisation d’une
bouteille pour ajouter de l’eau est recommandée
pour éviter d’arroser les graines.
• L’utilisation d’un dôme d’humidité ou d’un sac
en plastique sur les graines est recommandée
pour piéger la chaleur et l’humidité autour des
graines.
• Placez le pot ou le plateau dans un endroit
sombre. Le fond du Danby Fresh Grower est
idéal à cette fin.
• Laissez le dôme d’humidité ou le sac en
plastique en place pendant 2 à 3 jours ou
jusqu’à ce que les pousses soient visibles.
• En règle générale, le sol doit être humide mais
pas humide. Vérifiez le paquet de graines pour
des informations spécifiques sur les instructions
d’arrosage.
• En général, pour la plupart des herbes et des
légumes, les cycles lumineux suivants sont
recommandés:
• Cycle de croissance: 18 heures sur / 6
heures de congé pendant environ 20 à 30
jours.
• Cycle de floraison: 12 heures sur / 12
heures de congé pendant environ 20 à 30
jours.
• La plupart des herbes et légumes ont une date
d’échéance comprise entre 45 et 90 jours. La
durée de vie des plantes dépendra du type de
plantes cultivées. Vérifiez le paquet de graines
pour des informations spécifiques sur les cycles
de croissance, la germination et les temps de
floraison.
• Retirez le dôme d’humidité ou le sac en
plastique et placez le pot ou le plateau sur
l’étagère de fil dans le Fresh Grower de Danby.
• Réglez le cycle de lumière souhaité en fonction
des informations sur le paquet de graines en
utilisant les instructions de la minuterie à la page
13.
• Eauz vos plantes selon les besoins en fonction de
l’information sur le paquet de graines.
• La plupart des microgreens atteignent la
maturité dans les 1 à 2 semaines.
Remarque: Les chambres d’épandage, les dômes
d’humidité et les sacs de germination ne sont pas
inclus dans cet appareil et doivent être achetés
séparément.
Remarque: Danby Products Ltd. n’acceptera
aucune responsabilité pour les plantes perdues
ou les mauvaises récoltes en raison de l’utilisation
inappropriée du système de la minuterie et du cycle
de la lumière.
15
Page 17

LIMITED IN-HOME APPLIANCE WARRANTY
GARANTIE LIMITÉE “EN ATELIER”
This quality product is warranted to be free from manufacturer’s defects in material and workmanship, provided that the unit is used under the normal operating
Cet appareil de qualité est garanti exempt de tout vice de matière première et de fabrication, s’il est utilisé dans les conditions normales
conditions intended by the manufacturer.
recommandées par le fabricant.
This warranty is available only to the person to whom the unit was originally sold by Danby Products Limited (Canada) or Danby Products Inc. (U.S.A.) (hereafter
Cette garantie n’est offerte qu’à l’acheteur initial de l’appareil vendu par Danby Products Limited (Canada) ou Danby Products Inc.
“Danby”) or by an authorized distributor of Danby, and is non-transferable.
(E.- U.A.) (ci-après « Danby ») ou par l’un des ses distributeurs agréés et elle ne peut être transférée.
CONDITIONS
Les pièces en plastique sont garanties pendant trente (30) jours seulement à partir de la date de l’achat, sans aucune prolongation
Plastic parts, are warranted for thirty (30) days only from purchase date, with no extensions provided.
prévue.
TERMS OF WARRANTY
Premiers 24 mois
First Year
Pour obtenir un
To obtain
service
Service
Pendant les premiers vingt quatre (24) mois, toutes les pièces fonctionnelles de ce produit qui s’avèrent
During the rst twelve (12) months, any functional parts of this product found to be defective, will be repaired or replaced, at warrantor’s
défectueuses seront réparées ou remplacées, selon le choix du garant, sans frais à l’acheteur initial.
option, at no charge to the ORIGINAL purchaser.
Contactez le revendeur où l'appareil a été acheté ou contactez le dépôt de service Danby autorisé le plus
Danby reserves the right to limit the boundaries of “In Home Service” to the proximity of an Authorized Service Depot. Any app liance
proche, où le service doit être effectué par un technicien de service qualifié. Si le service est effectué sur
requiring service outside the limited boundaries of “In Home Service” , it will be the consumer’s responsibility to transport the appliance (at
l'appareil par une personne autre qu'un dépôt de service autorisé, toutes les obligations de Danby en vertu de
their own expense) to the original retailer (point of purchase) or a service depot for repair. See “Boundaries of In Home Serv ice”below.
cette garantie seront annulées.
Contact your dealer from whom your unit was purchased, or contact your nearest authorized Danby service depot, where service
must be performed by a qualied service technician.
Il est de la responsabilité de l'acheteur de transporter l'appareil vers le dépôt de service agréé le plus proche.
If service is performed on the units by anyone other than an authorized service depot, or the unit is used for commercial appli cation, all
Les frais de transport entre votre domicile et le lieu de l'entretien ne sont pas couverts par la présente garantie et doivent être
acquittés par l'acheteur.
Boundaries of
In Home Service
Aucune partie de la garantie ne prévoit implicitement que le fabricant sera tenu responsable des dommages subis par les aliments ou
d’autres types de contenu, qu’ils soient causés par la défectuosité de l’appareil ou par son usage adéquat ou inadéquat.
En vertu de la présente, il n’existe aucune autre garantie, condition ou représentation, qu’elle soit exprimée ou tacite, de façon
Nothing within this warranty shall imply that Danby will be responsible or liable for any spoilage or damage to food or other c ontents of this appliance, whether due
to any defect of the appliance, or its use, whether proper or improper.
manifeste ou intentionnelle, par Danby ou ses distributeurs agréés. De même, sont exclues toutes les autres garanties, conditions ou
représentations, y compris les garanties, conditions ou représentations en vertu de toute loi régissant la vente de produits ou de toute
autre législation ou règlement semblables. En vertu de la présente, Danby ne peut être tenue responsable en cas de blessures
corporelles ou des dégâts matériels, y compris à l’appareil, quelle qu’en soit les causes. Danby ne peut pas être tenue responsable
Save as herein provided, Danby, there are no other warranties, conditions, representations or guarantees, express or implied, m ade or intended by Danby or its
des dommages indirects dus au fonctionnement défectueux de l’appareil. En achetant l’appareil, l’acheteur accepte de mettre à
authorized distributors and all other warranties, conditions, representations or guarantees, including any warranties, conditio ns, representations or guarantees
couvert et de dégager Danby de toute responsabilité en cas de réclamation pour toute blessure corporelle ou tout dégât matériel
under any Sale of Goods Act or like legislation or statue is hereby expressly excluded. Save as herein provided, Danby shall no t be responsible for any damages
causé par cet appareil.
to persons or property, including the unit itself, howsoever caused or any consequential damages arising from the malfunction o f the unit and by the purchase of
obligations of Danby under this warranty shall be void.
If the appliance is installed in a location that is 100 kilometers (62 miles) or more from the nearest service center your unit must be
delivered to the nearest authorized Danby Service Depot, as service must only be performed by a technician qualied and certif ied for
warranty service by Danby. Transportation charges to and from the service location are not protected by this warranty and are t he
responsibility of the purchaser.
EXCLUSIONS
EXCLUSIONS
the unit, the purchaser does hereby agree to indemnify and hold harmless Danby from any claim for damages to persons or propert y caused by the unit.
CONDITIONS GÉNÉRALES
La garantie ou assurance ci-dessus ne s’applique pas si les dégâts ou réparations sont dus aux cas suivants:
1) Panne de courant.
No warranty or insurance herein contained or set out shall apply when damage or repair is caused by any of the following:
2) Dommage subis pendant le transport ou le déplacement de l’appareil.
1) Power failure.
3) Alimentation électrique incorrecte (tension faible, câblage défectueux, fusibles incorrects).
4) Accident, modification, emploi abusif ou incorrect de l’appareil tel qu'une circulation d'air inadéquate dans la pièce ou des
2) Damage in transit or when moving the appliance.
conditions de fonctionnement anormales (température extrêmement élevée ou basse).
3) Improper power supply such as low voltage, defective house wiring or inadequate fuses.
5) Utilisation dans un but commercial ou industriel (à savoir, si l'appareil n'est pas installé dans un domicile résidentiel).
4) Accident, alteration, abuse or misuse of the appliance such as inadequate air circulation in the room or abnormal operating con ditions
6) Incendie, dommages causés par l’eau, vol, guerre, émeute, hostilités, cas de force majeure (ouragan, inondation, etc.).
7) Visites d’un technicien pour expliquer le fonctionnement de l’appareil au propriétaire.
8) Installation inappropriée (par exemple, encastrement d'un appareil autoportant, ou utilisation extérieure d'un appareil non conçu à
cet effet, y compris, mais sans s'y limiter: les garages, les patios, les porches ou ailleurs qui ne sont pas correctement isolés ou
climatisés).
(extremely high or low room temperature).
5) Use for commercial or industrial purposes (ie. If the appliance is not installed in a domestic residence).
6) Fire, water damage, theft, war, riot, hostility, acts of God such as hurricanes, oods etc.
7) Service calls resulting in customer education.
GENERAL PROVISIONS
8) Improper Installation (ie. Building-in of a free standing appliance or using an appliance outdoors that is not approved for out door application).
La preuve de la date d'achat sera requise pour les réclamations de garantie; Conserver les factures de vente. Dans le cas où un
Proof of purchase date will be required for warranty claims; so, please retain bills of sale. In the event warranty service is required, present this document to our
service de garantie est requis, présentez la preuve d'achat à notre dépôt de service agréé.
AUTHORIZED SERVICE DEPOT.
Danby Products Limited
Danby Products Limited
PO Box 1778, Guelph, Ontario, Canada N1H 6Z9
PO Box 1778, Guelph, Ontario, Canada N1H 6Z9
Téléphone : (519) 837-0920 Télécopieur: (519) 837-0449
Telephone: (519) 837-0920 FAX: (519) 837-0449
Warranty Service
Service sous garantie
In-home
En Atelier
1-800-263-2629
1-800-263-2629
04/17
04/09
Danby Products Inc.
PO Box 669, Findlay, Ohio, U.S.A. 45840
Téléphone: (419) 425-8627 Télécopieur: (419) 425-8629
PO Box 669, Findlay, Ohio, U.S.A. 45840
Telephone: (419) 425-8627 FAX: (419) 425-8629
Danby Products Inc.
Page 18

Bienvenido
Bienvenido a la familia Danby. Estamos orgullosos de nuestros productos de calidad y creemos en
un servicio confiable. Sugerimos que lea este manual del propietario antes de conectar el nuevo
aparato ya que contiene información importante sobre la operación, información de seguridad,
solución de problemas y consejos de mantenimiento para garantizar la fiabilidad y longevidad de
su electrodoméstico.
Visite www.Danby.com para acceder a herramientas de autoservicio, preguntas frecuentes y
mucho más. Para asistencia adicional, llame al 1-800-263-2629.
Tenga en cuenta la información siguiente; Necesitará esta información para obtener un servicio
bajo garantía.
Debe proporcionar el recibo de compra original para validar su garantía y recibir servicio.
Cualquier aparato devuelto debe incluir el sistema de luz de crecimiento original.
Número de modelo: _____________________________________________
Número de serie: _______________________________________________
Fecha de compra: _______________________________________________
Necesitas ayuda?
Antes de llamar al servicio, aquí hay algunas cosas que puede hacer para ayudarnos a
servirle mejor.
Lea este manual del propietario:
Contiene instrucciones para ayudarle a usar y mantener su aparato correctamente.
Si recibe un aparato dañado:
Inmediatamente póngase en contacto con el minorista o el constructor que le vendió el
aparato.
Ahorre tiempo y dinero:
Consulte la sección de solución de problemas al final de este manual antes de llamar. Esta
sección le ayudará a resolver problemas comunes que pueden ocurrir.
1-800-26- Danby
(1-800-263-2629)
17
Page 19

Informacion de Seguridad Importante
LEA Y SIGA TODAS LAS INSTRUCCIONES DE SEGURIDAD
REQUERIMIENTOS DE SEGURIDAD
Este aparato no está diseñado para ser utilizado
por personas (incluyendo niños) cuyas capacidades
físicas, sensoriales o mentales sean diferentes
o reducidas, o que carezcan de experiencia o
conocimiento, a menos que dichas personas
reciban supervisión o entrenamiento para operar el
aparato por una persona responsable de su uso. la
seguridad.
Los niños deben ser supervisados para asegurarse
de que no juegan con el aparato.
Para evitar el riesgo de descarga eléctrica, no
utilice este aparato en un área que pueda acumular
agua estancada. Si se desarrolla esta condición,
desconecte la fuente de alimentación antes de
entrar en el agua.
No almacene ni utilice materiales combustibles
tales como gasolina u otros vapores o líquidos
inflamables cerca de este o de cualquier otro
aparato.
No cubra ni bloquee las aberturas de admisión y
de escape.
Este aparato está destinado únicamente a
aplicaciones interiores y residenciales. No utilice
este aparato al aire libre. No utilice este aparato
para aplicaciones comerciales o industriales.
PELIGRO: Riesgo de atrapamiento de niños. Antes
de tirar un electrodoméstico viejo:
• Retire la puerta o la tapa.
• Deje los estantes en su lugar para que los niños
no puedan subir fácilmente dentro.
Para equipos de iluminación con cables, las
instrucciones deben incluir información para guiar
la instalación de manera que los cables:
1) No se ocultan ni se extienden a través de una
pared, piso, techo u otras partes de la estructura del
edificio,
2) No se encuentran encima de un techo o
suspendido de un techo caído,
INSTRUCCIONES DE CONEXION A TIERRA
Este aparato debe estar conectado a tierra. La
puesta a tierra reduce el riesgo de descarga
eléctrica proporcionando un cable de escape para
la corriente eléctrica.
Este aparato tiene un cable que tiene un cable de
conexión a tierra con un enchufe de 3 clavijas. El
cable de alimentación debe estar enchufado en
un tomacorriente que esté debidamente conectado
a tierra. Si el tomacorriente es un tomacorriente
de dos clavijas, debe ser reemplazado por un
tomacorriente de 3 clavijas con conexión a tierra
adecuada. La placa de características en serie
indica el voltaje y la frecuencia para los que está
diseñado el artefacto.
ADVERTENCIA - El uso incorrecto del enchufe
de conexión a tierra puede resultar en un riesgo
de descarga eléctrica. Consulte a un electricista
calificado o agente de servicio si las instrucciones
de conexión a tierra no se entienden completamente
o si existe duda sobre si el aparato está
debidamente conectado a tierra.
No conecte el aparato a cables de extensión,
adaptadores o junto con otro aparato en la misma
toma de corriente.
No empalme el cable de alimentación. No corte ni
extraiga en ningún caso la tercera clavija de tierra
del cable de alimentación.
Si el cable de alimentación está dañado, debe
ser reemplazado por el fabricante, su agente de
servicio o persona calificada similar para evitar
riesgos.
3) No están fijados de forma permanente a la
estructura del edificio,
4) Se enrutan para que no estén sujetos a esfuerzos
y estén protegidos contra daños físicos,
5) Son visibles en toda su longitud, y
6) Se utilizan dentro de su ampacidad nominal
según se determina para la temperatura máxima
del entorno instalado especificado en las
instrucciones.
¡GUARDA ESTAS INSTRUCCIONES!
Page 20

INSTRUCCIONES DE OPERACIÓN
LOCATION
Seleccione una ubicación con un nivel de piso
fuerte que pueda soportar el peso del aparato y las
plantas cultivadas en su interior.
Deje 5 pulgadas (12.7 cm) entre la parte posterior
del aparato y la pared. Deje 1 pulgada (2.5 cm) de
espacio entre los lados del aparato y las paredes
adyacentes.
Evite la luz directa del sol y el calor. La luz directa
del sol puede afectar el recubrimiento acrílico del
aparato o el ciclo de crecimiento de sus plantas.
Las fuentes de calor cercanas pueden sobrecalentar
la unidad y causar altas temperaturas internas que
pueden dañar sus plantas.
Asegúrese de que el aparato esté apagado y
desconectado antes de realizar cualquier cambio en
el sistema de iluminación.
Mantenga la puerta cerrada durante el
funcionamiento.
Utilice solamente repuestos originales de Danby o
aquellos que han sido aprobados por CSA, UL o
CE.
CARACTERISTICAS
1. Luz LED para plantas en crecimiento
2. Salida de aire
3. Caja de control
4. Bandeja de goteo (x2)
5. Estante de alambre (x2)
6. Entrada de aire
7. Pie ajustable
8. Puerta de cristal
1
3
2
4
8
5
6
El panel de luz LED no es a prueba de agua. No
rocíe agua sobre la superficie, los lados o la parte
posterior del panel de luces.
No mire directamente a la luz LED a simple vista ya
que esto puede causar daños en la retina.
La temperatura de funcionamiento ambiente
recomendada es de entre 13°C - 32°C (55°F 90°F).
La humedad de funcionamiento recomendada es
inferior al 80%.
El panel LED no puede estar expuesto a materiales
corrosivos.
El panel de LED es solo para cultivo en interiores y
no debe usarse al aire libre.
No toque la superficie del sistema de iluminación
mientras la alimentación esté conectada ya que
puede calentarse.
No utilice el panel LED durante una tormenta
eléctrica para evitar una oleada que podría dañar
el sistema de iluminación.
7
INSTRUCCIONES DE NIVELACIÓN
Hay un pie ajustable en la parte inferior del
aparato que se puede subir o bajar para
asegurarse de que el aparato esté nivelado.
1. Gire el pie de nivelación en sentido contrario a
las agujas del reloj hasta que la parte superior
del pie toque la parte inferior del armario.
2. Gire lentamente el pie de nivelación en sentido
horario hasta que el aparato esté nivelado.
19
Page 21

INSTRUCCIONES DE OPERACIÓN
INSTRUCCIONES DE INSTALACION DE LUZ
El sistema de luz de crecimiento se enviará dentro
del aparato y deberá ser instalado por el usuario
final.
1. Retire el sistema de luz de la caja y retire
cualquier embalaje.
2. Conecte el cable procedente de la parte
posterior del sistema de iluminación al
receptáculo en la pared posterior del aparato.
3. Deslice el sistema de luz en los dos soportes en
forma de “L” instalados en el techo del gabinete.
Para quitar el sistema de iluminación, primero
desconecte la luz del receptáculo y luego empuje el
extremo del soporte en forma de “L” hacia abajo y
deslice la luz hacia fuera.
PANEL DE CONTROL
El panel de control se encuentra en la caja de
control en el lado superior derecho del gabinete.
1. Flecha arriba: Mantenga pulsada la flecha
hacia arriba durante 5 segundos para
encender o apagar manualmente el sistema
de iluminación. Presione nuevamente para
reanudar el funcionamiento normal.
2. Flecha abajo: Mantenga pulsada la flecha
hacia abajo durante 5 segundos para activar o
desactivar manualmente el ventilador. Presione
nuevamente para reanudar el funcionamiento
normal.
3. Pantalla de visualización: La pantalla mostrará
la temperatura interna actual y los ajustes del
temporizador.
4. Botón set: El botón de ajuste se utiliza para
ajustar la función del temporizador.
5. °C/°F luces indicadoras: La luz se iluminará
para indicar qué escala de temperatura se
está visualizando. Para cambiar la escala de
temperatura, presione el botón de ajuste. El
valor predeterminado es Fahrenheit.
1
4
3
2
5
20
Page 22

INSTRUCCIONES DE OPERACIÓN
FUNCIONAMIENTO DEL TEMPORIZADOR
El temporizador encenderá y apagará el sistema de
luces basándose en los ajustes elegidos, creando un
ciclo regular de luz y oscuridad para las plantas, tal
como lo harían al crecer al aire libre.
Diferentes plantas crecerán mejor bajo diferentes
condiciones de ciclo de luz; algunos necesitan más
luz y otros necesitan menos. Compruebe la parte
posterior del paquete de semillas para obtener
información sobre el mejor ciclo de luz para
establecer para las plantas que se cultiva.
Para programar el temporizador:
1. Mantenga pulsado el botón de ajuste durante
5 segundos hasta que aparezca “TS” en la
pantalla.
2. Presione las flechas arriba y abajo para ajustar
la hora actual a la hora más cercana. El tiempo
predeterminado es 12:00 am, indicado por un
‘0’.
3. Una vez ajustada la hora actual, hay dos modos
de funcionamiento preestablecidos para elegir.
FUNCIONAMIENTO DEL TEMPORIZADOR
Los modos preestablecidos pueden modificarse
siguiendo los pasos a continuación.
1. Mantenga pulsado el botón de ajuste durante
5 segundos hasta que aparezca “TS” en la
pantalla.
2. Presione el botón de ajuste repetidamente para
elegir entre los ajustes detallados en los gráficos
siguientes.
3. Utilice las flechas arriba y abajo para modificar
la configuración elegida.
Modo P1
H1
• El momento en que la luz se enciende
• El valor predeterminado es 7:00 am
L1
• El número de horas que la luz permanecerá en
• El valor predeterminado es 12 horas
Modo P2
H2
• El momento en que la luz se enciende
• El valor predeterminado es 6:00 am
• Presione la flecha hacia arriba para elegir el
preset P1.
• P1: ciclo de luz de 12 horas, lo que significa
que las luces estarán encendidas durante 12
horas y apagadas durante 12 horas.
• Presione la flecha hacia abajo para elegir el
preset P2.
• P2: ciclo de luz de 18 horas, lo que significa
que las luces estarán encendidas durante 18
horas y apagadas durante 6 horas.
Nota: El temporizador es un reloj de 24 horas y
sólo puede ajustarse a la hora más cercana.
Por ejemplo, si la hora actual es 3:45 pm,
establezca el reloj a 16 que indica 4:00 pm. Ajuste
siempre la hora actual a la hora más cercana.
El temporizador no mostrará la hora actual. Utiliza
el tiempo establecido como guía para el ciclo de
día y de noche y para contar las horas antes de
encender o apagar la luz.
L2
• El número de horas que la luz permanecerá en
• El valor predeterminado es 18 horas
Ajuste de la temperatura de la luz
T1
• La temperatura a la que se apagará la luz
• Defecto: 32°C (90°F)
• Rango de temperatura: 30°C-35°C (86°F-95°F)
T2
• La temperatura a la que se encenderá la luz
• Defecto: 30°C (86°F)
• Rango de temperatura: 26°C-34°C (79°F-93°F)
Nota: T1 debe ser mayor que T2
Ajuste de temperatura del ventilador
F1
• La temperatura a la que se apaga el ventilador
• Defecto: 17°C (63°F)
• Rango de temperatura: 16°C-20°C (61°F-68°F)
F2
• La temperatura a la que se encenderá el
ventilador
• Defecto: 19°C (66°F)
• Rango de temperatura: 18°C-22°C (64°F-72°F)
Nota: F1 debe ser mayor que F2
21
Page 23

INSTRUCCIONES DE OPERACIÓN
INSTRUCCIONES DE REVERSIÓN DE LA
PUERTA
1. Retire la cubierta de la bisagra y la bisagra
superior del lado superior derecho del gabinete.
Retire las cubiertas del orificio de bisagra del
lado izquierdo superior del gabinete. Retire la
puerta del armario.
2. Retire la cubierta del orificio de la bisagra del
lado izquierdo superior de la puerta y colóquela
en el orificio de la bisagra en el lado superior
derecho de la puerta.
1
3. Retire el pie sólido del lado inferior izquierdo
del gabinete y retire el pie ajustable y la bisagra
inferior del lado inferior derecho del gabinete.
Instale la bisagra y el pie ajustable en el lado
inferior izquierdo del gabinete. Instale el pie
sólido en el lado inferior derecho del gabinete.
4. Instale la puerta en el gabinete e instale la
bisagra superior en el lado izquierdo superior
del gabinete. Antes de apretar los tornillos de
la bisagra superior, asegúrese de que la parte
superior de la puerta está nivelada con la parte
superior del gabinete y que la junta de goma
está haciendo un buen sellado con el gabinete
todo el camino alrededor. Instale las cubiertas
del orificio de la bisagra en los orificios de
la bisagra en el lado superior derecho del
gabinete.
2
3
22
4
Page 24

INSTRUCCIONES DE OPERACIÓN
CONSEJOS PARA CULTIVAR
• Mantenga las macetas o macetas en la bandeja
de goteo proporcionada para evitar derrames
de agua.
• Las plantas crecen mejor cuando la temperatura
ambiental ambiente está entre 13°C - 32°C
(55°F - 90°F)
• Mantenga el ambiente en crecimiento limpio.
Limpie el intento de goteo y el interior del
gabinete al menos una vez al mes para evitar el
crecimiento de moho y moho.
• Si se forma moho blanco en polvo en las
plantas, se pueden rociar con una solución
de peróxido de hidrógeno y agua. Use 1
cucharadita de peróxido de hidrógeno al 17%
- 35% de grado alimenticio a 1 litro de agua
y rocíe solamente el suelo ya que esto puede
causar putrefacción si se rocía sobre hojas o
flores.
• No sobrecargue las plantas, especialmente
las plantas de semillero, ya que pueden
ahogarse. Hay espacio entre las partículas de
tierra que se llena de oxígeno. El suelo que
está constantemente húmedo no transportará
suficiente oxígeno y las plantas no podrán
respirar.
• Como regla general, el suelo debe estar húmedo
pero no húmedo. Revise el paquete de semillas
para obtener información específica sobre las
instrucciones de riego.
• En general, para la mayoría de hierbas y
verduras, se recomiendan los siguientes ciclos
de luz:
• Ciclo de crecimiento: 18 horas en / 6 horas
de descanso durante aproximadamente 20 30 días.
CONSEJOS PARA CULTIVAR
Las semillas deben germinarse antes de que crezcan
y florecen. Para obtener mejores resultados en la
germinación, consulte los consejos a continuación.
• Extienda el suelo de macetas uniformemente en
una olla o bandeja.
• Distribuya semillas uniformemente sobre la
superficie del suelo.
• Agregue suficiente agua para que el suelo esté
húmedo pero no empapado. Se recomienda
usar una botella de spray para agregar agua
para evitar que se regen las semillas.
• Se recomienda el uso de una cúpula de
humedad o una bolsa de plástico sobre las
semillas para atrapar el calor y la humedad
alrededor de las semillas.
• Coloque la olla o bandeja en un lugar oscuro.
El fondo del Danby Fresh Grower es ideal para
este propósito.
• Deje la cúpula de humedad o la bolsa de
plástico en su lugar durante 2 - 3 días o hasta
que los brotes sean visibles.
• Retire la cúpula de humedad o la bolsa de
plástico y coloque la olla o bandeja en el
estante de alambre en el Danby Fresh Grower.
• Ajuste el ciclo de luz deseado basándose en la
información del paquete de semillas utilizando
las instrucciones del temporizador en la página
21.
• Riegue sus plantas según sea necesario sobre la
base de la información del paquete de semillas.
• La mayoría de microgreens alcanzan la
madurez dentro de 1 - 2 semanas.
• Ciclo de floración: 12 horas en / 12 horas
de descanso durante aproximadamente 20 30 días.
• La mayoría de las hierbas y las verduras tienen
una fecha de vencimiento entre 45 - 90 días.
El tiempo que tardan las plantas en madurar
dependerá del tipo de plantas que se cultiven.
Compruebe el paquete de semillas para obtener
información específica sobre los ciclos de
crecimiento, la germinación y los tiempos de
floración.
Nota: Las cámaras de semillero, las cúpulas de
humedad y las bolsas de germinación no se
incluyen con este aparato y se deben adquirir por
separado.
Nota: Danby Products Ltd. no aceptará ninguna
responsabilidad por las plantas perdidas o las
cosechas débiles basadas en el uso inadecuado del
sistema de temporizador y ciclo de luz.
23
Page 25

GARANTÍA LIMITADA “ACARREADO SOLAMENTE”
Este producto de calidad está garantizado contra defectos de fabricación, incluyendo partes y mano de obra, siempre y cuando la
This quality product is warranted to be free from manufacturer’s defects in material and workmanship, provided that the unit is used under the normal operating
unidad se utilice bajo las condiciones normales de funcionamiento para las que fue diseñado.
conditions intended by the manufacturer.
Esta garantía está solamente disponible para la persona que haya comprado originalmente esta unidad directamente de Danby
This warranty is available only to the person to whom the unit was originally sold by Danby Products Limited (Canada) or Danby Products Inc. (U.S.A.) (hereafter
Products Limited (Canada) o Danby Products Inc. (U.S.A.) (en adelante “Danby”) o uno de sus distribuidores autorizados, y no es
“Danby”) or by an authorized distributor of Danby, and is non-transferable.
transferible.
Las piezas plásticas, se autorizan por treinta (30) días solamente a partir de la fecha de la compra, sin las extensiones
Plastic parts, are warranted for thirty (30) days only from purchase date, with no extensions provided.
proporcionadas.
LIMITED IN-HOME APPLIANCE WARRANTY
CONDICIONES DE LA GARANTÍA
TERMS OF WARRANTY
Primeros 24 meses
First Year
To obtain
Para obtener servicio
Service
Durante los primeros veinticuatro (24) meses, cualquier parte en buen estado de este producto que resulte
During the rst twelve (12) months, any functional parts of this product found to be defective, will be repaired or replaced, at warrantor’s
defectuosa, incluyendo cualquier sistema sellado, será reparado o reemplazado, a opción del fabricante, sin
option, at no charge to the ORIGINAL purchaser.
cargo para el comprador original.
Danby reserves the right to limit the boundaries of “In Home Service” to the proximity of an Authorized Service Depot. Any app liance
Póngase en contacto con el distribuidor donde adquirió el electrodoméstico o póngase en contacto con el
requiring service outside the limited boundaries of “In Home Service” , it will be the consumer’s responsibility to transport the appliance (at
centro de servicio autorizado más cercano de Danby, donde el servicio debe ser realizado por un técnico
their own expense) to the original retailer (point of purchase) or a service depot for repair. See “Boundaries of In Home Serv ice”below.
cualificado. Si el servicio es realizado por cualquier persona que no sea un depósito de servicio autorizado,
Contact your dealer from whom your unit was purchased, or contact your nearest authorized Danby service depot, where service
todas las obligaciones de Danby bajo esta garantía serán nulas.
must be performed by a qualied service technician.
Es responsabilidad del comprador transportar el aparato al centro de servicio autorizado más cercano.
If service is performed on the units by anyone other than an authorized service depot, or the unit is used for commercial appli cation, all
obligations of Danby under this warranty shall be void.
Los cargos de transporte desde y hacia el lugar de servicio no están protegidos por esta garantía y son responsabilidad del
comprador.
Boundaries of
In Home Service
Nada dentro de esta garantía implica que Danby será responsable por cualquier daño que hayan sufrido los alimentos u otros
contenidos de este aparato, ya sea debido a un defecto del aparato, o su uso, adecuado o inadecuado.
Nothing within this warranty shall imply that Danby will be responsible or liable for any spoilage or damage to food or other c ontents of this appliance, whether due
Salvo lo aquí indicado por Danby, no existen otras garantías, condiciones o representaciones, explícitas o implícitas, concretas o
to any defect of the appliance, or its use, whether proper or improper.
intencionales por parte de Danby o sus distribuidores autorizados y todas las demás garantías, condiciones o representaciones,
incluyendo cualquier garantía, condiciones o representaciones bajo cualquier Acta de Venta de Productos o legislación o estatuto
similar, quedan de esta forma expresamente excluidas. Salvo lo aquí indicado, Danby no serán responsables por ningún daño a
Save as herein provided, Danby, there are no other warranties, conditions, representations or guarantees, express or implied, m ade or intended by Danby or its
personas o bienes, incluyendo la propia unidad, sin importar su causa, o de ningún daño indirecto causado por el desperfecto de la
authorized distributors and all other warranties, conditions, representations or guarantees, including any warranties, conditio ns, representations or guarantees
unidad, y al comprar esta unidad, el comprador acepta por la presente, indemnizar y proteger a Danby contra cualquier reclamo
under any Sale of Goods Act or like legislation or statue is hereby expressly excluded. Save as herein provided, Danby shall no t be responsible for any damages
por daños a personas o bienes causados por la unidad.
to persons or property, including the unit itself, howsoever caused or any consequential damages arising from the malfunction o f the unit and by the purchase of
the unit, the purchaser does hereby agree to indemnify and hold harmless Danby from any claim for damages to persons or propert y caused by the unit.
No se considerará ninguna de estas garantías o seguros cuando el daño o la necesidad de reparación sea el producto de los
siguientes casos:
1) Falla del suministro eléctrico.
No warranty or insurance herein contained or set out shall apply when damage or repair is caused by any of the following:
2) Daños en tránsito o durante el transporte de la unidad.
1) Power failure.
3) Alimentación incorrecta, como bajo voltaje, instalación eléctrica defectuosa o fusibles inadecuados.
4) Accidente, modificación, abuso o uso incorrecto del artefacto, tal como insuficiente ventilación del ambiente o condiciones de
2) Damage in transit or when moving the appliance.
operación anormales (temperatura ambiente extremadamente alta o baja).
3) Improper power supply such as low voltage, defective house wiring or inadequate fuses.
5) Utilización comercial o industrial (v.g., si el electrodoméstico no está instalado en una vivienda particular).
4) Accident, alteration, abuse or misuse of the appliance such as inadequate air circulation in the room or abnormal operating con ditions
6) Incendio, daños por agua, robo, guerra, disturbios, hostilidades, actos de fuerza mayor como huracanes, inundaciones, etc.
7) Pedidos de servicio debido a desinformación del usuario.
8) Instalación inadecuada (v.g., instalación de un electrodoméstico independiente o uso de un aparato al aire libre que no esté
aprobado para aplicaciones en exteriores, incluyendo pero no limitado a: garajes, patios, porches o cualquier lugar que no esté bien
aislado o controlado por el clima).
Se requerirá una prueba de la fecha de compra para reclamaciones de garantía; conservar las facturas de venta. En el caso de que
se requiera servicio de garantía, presente el comprobante de compra a nuestro depósito de servicio autorizado.
Proof of purchase date will be required for warranty claims; so, please retain bills of sale. In the event warranty service is required, present this document to our
(extremely high or low room temperature).
5) Use for commercial or industrial purposes (ie. If the appliance is not installed in a domestic residence).
6) Fire, water damage, theft, war, riot, hostility, acts of God such as hurricanes, oods etc.
7) Service calls resulting in customer education.
8) Improper Installation (ie. Building-in of a free standing appliance or using an appliance outdoors that is not approved for out door application).
If the appliance is installed in a location that is 100 kilometers (62 miles) or more from the nearest service center your unit must be
delivered to the nearest authorized Danby Service Depot, as service must only be performed by a technician qualied and certif ied for
warranty service by Danby. Transportation charges to and from the service location are not protected by this warranty and are t he
responsibility of the purchaser.
EXCLUSIONES
EXCLUSIONS
CONDICIONES GENERALES
GENERAL PROVISIONS
AUTHORIZED SERVICE DEPOT.
Danby Products Limited
PO Box 1778, Guelph, Ontario, Canada N1H 6Z9
Danby Products Limited
Telephone: (519) 837-0920 FAX: (519) 837-0449
PO Box 1778, Guelph, Ontario, Canada N1H 6Z9
Telephone: (519) 837-0920 FAX: (519) 837-0449
Warranty Service
In-home
Servicio de Garantía
Acarreado Solamente
1-800-263-2629
1-800-263-2629
04/17
04/09
PO Box 669, Findlay, Ohio, U.S.A. 45840
Telephone: (419) 425-8627 FAX: (419) 425-8629
Telephone: (419) 425-8627 FAX: (419) 425-8629
PO Box 669, Findlay, Ohio, U.S.A. 45840
Danby Products Inc.
Danby Products Inc.
Page 26

MODEL • MODÈLE • MODELO
DFG26A1B
Printed in China
Imprimé en Chine
Impresso en China
Danby Products Limited, Guelph, ON, Canada N1H 6Z9
Danby Products Inc., Findlay, Ohio, USA 45840
 Loading...