Daisy PowerLine TargetPro 953 User Manual

O P E R A T I O N M A N U A L
MODEL 953 By 


.177 Cal. (4.5mm) Lead Airgun Pellet 
MULTIPLE PUMPS WILL
DAMAGE THIS GUN!
 NOT A TOY. ADULT SUPERVISION REQUIRED. MISUSE OR CARELESS USE MAY CAUSE SERIOUS INJURY OR DEATH. MAY BE DANGEROUS UP TO 257 YARDS (235 METERS).
THIS IS A HIGH POWER AIR GUN RECOMMENDED FOR USE BY THOSE 16 YEARS OF AGE OR OLDER. READ ALL INSTRUCTIONS BEFORE USING. THE PURCHASER AND USER SHOULD CONFORM TO ALL LAWS GOVERNING USE AND OWNERSHIP OF AIR GUNS.

WARNING: THIS GUN CAN CAUSE DEATH. READ AND FOLLOW THE INSTRUCTIONS CAREFULLY. DO NOT LOAD A PELLET INTO THE CHAMBER UNTIL YOU ARE READY TO SHOOT. IF YOU DO LOAD A PELLET AND DECIDE NOT TO SHOOT, REMOVE EITHER MANUALLY OR BY SHOOTING IT IN A SAFE DIRECTION. AN UNCOCKED, UNLOADED GUN IS SAFEST. ACCIDENTS HAPPEN FAST, AND ACCIDENTALLY INJURING OR KILLING SOMEONE IS A TERRIBLE THING. SHOOT SAFELY.
 This safety alert symbol indicates important safety messages in this manual. When you see this symbol, be alert to the possibility of personal injury and carefully read the message that follows.
The “Introducing PowerLine® Shooting” section of this book, which starts on page 10, tells about the rules of shooting safety. READ THIS SECTION. Follow the safety rules and make certain anyone using your gun has been instructed in proper gun handling and safety. More power means greater chance of serious injury or death.
This air gun shoots with up to ten times as much muzzle energy as the traditional spring air BB gun. More power means greater chance of serious injury or death. BE SURE TO READ THE
RULES FOR PROPER GUN HANDLING ON PAGE 11.
Although your new PowerLine® Air Rifle is not a firearm, it has lethal potential and should be treated with the caution and respect due any conventional firearm. Like a firearm, your PowerLine® Air Rifle, when misused or carelessly used, can kill or seriously injure the shooter or other persons.
Always remember, the first and most important safety aspect of any gun is the shooter. All safeties are mechanical devices and the shooter is the only part of the system that can make a gun safe –or unsafe. DON’T DEPEND ON MECHANICAL SAFETIES; think ahead and avoid situations that might lead to accidents.
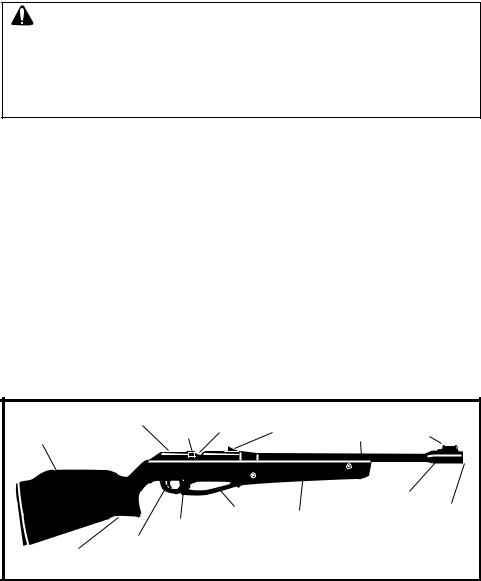
Guns differ in their operations and you are never ready to fire any gun until you are thoroughly familiar with it. Read the following operating instructions and WITHOUT LOADING A PROJECTILE, proceed several times through the operating steps with your gun (dry fire the gun at a safe target) so that you will be able to operate the PowerLine® 953 properly and safely.
|
DOVETAIL |
BOLT |
FEED |
REAR |
|
FRONT |
|
STOCK |
GROOVE |
HANDLE |
TRACK |
SIGHT |
BARREL |
|
|
|
|
|
|
|
SIGHT |
|
|
|
|
|
|
|
|
|
|
|
|
|
|
|
BARREL |
|
|
|
|
|
|
|
WEIGHT |
MUZZLE |
|
|
|
|
PUMPING |
FOREARM |
|
|
|
|
|
TRIGGER |
HANDLE |
|
|
|
|
|
|
|
|
|
|
||
|
TRIGGER |
SAFETY |
|
|
|
|
|
|
|
|
|
|
|
|
|
PISTOL |
|
953 PowerLine® TargetPro |
|
||||
GRIP |
|
NO. 1 |
|||||
|
|
|
2 |
|
|
|
|

HOW TO OPERATE:

 WARNING: Be sure gun is always pointed in a safe direction. Never point the gun at anyone. Always assume and handle the gun as if it were loaded and ready to fire.
Step 1. |
OPEN BOLT |
Step 5. |
CLOSE BOLT |
Step 2. |
PUT “ON” TRIGGER SAFETY |
Step 6. |
AIM AT SAFE TARGET |
Step 3. |
PUMP ONCE |
Step 7. |
TAKE “OFF” TRIGGER SAFETY |
Step 4. |
LOAD |
Step 8. |
FIRE |
NO. 2 |
FEED |
|
|
|
NO. 3 |
|
||
|
|
|
|
|||||
DOVETAIL GROOVES |
|
|
|
|
||||
TRACK |
|
|
|
|
|
|||
|
|
|
|
|
||||
|
|
|
|
|
|
|
|
|
|
|
|
|
|
TRIGGER |
|
||
BOLT HANDLE |
|
|
|
|
|
TRIGGER |
|
|
|
|
|
|
SAFETY ON |
|
SAFETY OFF |
|
|
|
|
|
|
|
|
|
||
|
|
|
|
|
|
|
red showing on |
|
|
|
TRIGGER |
|
|
|
|
||
|
|
|
|
|
|
opposite side |
|
|
|
|
SAFETY |
|
|
|
|
|
|
|
|
|
|
|
|
|
|
|
|
|
|
|
|
|
|
|
|
|
|
|
|
|
|
|
|
|
Step 1. OPEN BOLT
Pull the bolt handle fully to the rear. Then, release your hold on the bolt handle, leaving the bolt open. The gun cannot fire with the bolt open. (See Drawing 2)
Step 2. PUT “ON” TRIGGER SAFETY
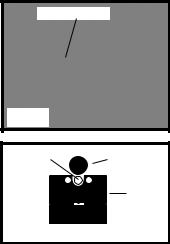
The bolt must FIRST be opened, then the trigger safety is pushed from the left to right so that NO red is showing (See Drawing No. 3). It is a good practice to get into the habit of always keeping the trigger safety “ON” until actually ready to fire the gun.
Step 3. PUMP (ONCE)
IMPORTANT: Do not pump over one time. This gun is designed to produce a maximum velocity using a single pump stroke. Additional pump strokes may result in serious damage to the gun. The bolt must be opened to pump gun. For greater safety, we recommend that the bolt remain open while pumping and that you close the bolt only when the barrel can be pointed in a safe direction.
Grasp the pump handle. Pull out and forward as far as possible. You should hear a fresh charge of air being drawn into the pump cylinder. Then, return the pump lever to the original, closed position. (See Drawing No. 4)
|
PINCH |
|
POINTS |
PULL LEVER |
|
OUTWARD FOR |
|
FULL STROKE |
NO. 4 |
THEN RETURN |
 CAUTION: Be sure to grasp pump handle firmly as you close the lever to prevent it from snapping back and causing possible injury. Also be careful to keep fingers out of cocking mechanism when closing lever. (See “PINCH POINTS,” Drawing No. 4).
3

CAUTION: The TargetPro 953 is a single pump pneumatic. DO NOT pump more than once! If gun is left pumped for an extended period of time it could result in damage to this gun.
Step 4. LOAD
TO LOAD A PELLET AS A SINGLE SHOT:
If the single-shot adapter is not already in place in the receiver, insert it into the clip track from the right-hand side until it is flush with both sides of the receiver. Hold the gun with the barrel in a horizontal position and place a pellet (head or solid end forward) in the loading track that is formed by the single-shot adapter. (See Drawing No. 5).
NOTE: The single-shot adapter can only be removed from the receiver by pulling it from the right-hand side of the gun.
TO LOAD 5-SHOT CLIP: With solid end forward, insert pellet into clip as shown. (See Drawing No. 6). Be certain that rear edge of pellet skirt is seated deeply enough to be beyond the ramp at the lower edge of the pellet opening. Repeat until clip is completely filled.
TO LOAD 5-SHOT CLIP INTO THE CLIP TRACK: From the right-hand side of the gun, insert a previously loaded clip into the clip track until the left end of the clip is flush with the left side of the receiver (See Drawing No. 7).
NOTE: The clip may be removed from either side of the gun.
BOLT TIP |
|
PELLET (SOLID |
|
|
END FORWARD) |
|
|
|
|
|
|
SINGLE SHOT ADAPTER |
NO. 5 |
NO. 6
5-SHOT CLIP
CLIP TRACK
NO. 7
4

Step 5. CLOSE BOLT
Push the bolt handle fully forward. This will chamber a pellet. (See Drawing No. 8) The gun will not fire if the bolt is open.
 CAUTION: The gun is now loaded and ready to fire.
Step 6. AIM AT SAFE TARGET
Aim the gun at a safe target. To be a consistent marksman, use the correct sight picture each time you fire your gun (See Drawing No. 9). Never point a gun, loaded or unloaded, at anyone.
 CAUTION: Use extra caution in selecting a safe target and backstop. This gun should not be used with BB gun targets or backstops. Whether you use a commercial target and backstop or make your own, it is important to remember that they will wear out with continued use. Because of this you should always place your target and backstop where it will be safe should it fail, and check it carefully before and after each use. Do not shoot at the surface of water.
Step 7. TAKE “OFF” TRIGGER SAFETY
BOLT HANDLE
NO. 8
FRONT
BULLSEYE
SIGHT
REAR
SIGHT
NO. 9
When you are certain the target, backstop and surrounding area is safe, push the trigger safety from the right, fully to the left (RED SHOWING ON LEFT). Your gun is now cocked and ready to shoot. In this condition, it should be handled with extreme care.
Step 8. FIRE
After making sure the gun is pointed in a safe direction, gently (but firmly) squeeze the trigger. Repeat Steps 1 through 8 to continue shooting, using the appropriate loading procedure. NOTE: To fire, bolt must be completely closed as indicated in Step 5.
 WARNING: If a pellet does not fire after completing the operation steps, the gun is jammed. This can be a dangerous condition until corrected.
Open the bolt and put “ON” trigger safety immediately. If the bolt is not completely closed, do not try to close it until after opening it by pulling the bolt handle all the way back. The gun will not fire a projectile when the bolt is completely open.
Keep the gun pointed in a safe direction and perform the following steps.
1.Open bolt.
2.Put trigger safety “ON”.
3.Pump the gun, close bolt and with gun pointed in a safe direction, take the trigger safety “OFF” and fire the gun.
If the pellet still does not fire, follow these steps carefully:
1.Open bolt
2.Put the trigger safety “ON” (no red showing)
3.Clear barrel by running a cleaning rod through from the muzzle end. Be careful not to damage the bolt tip by pushing the rod through too hard. Do not re-use the pellet.
4.Repeat operation steps 1 through 8. If after following the firing procedure the projectile is not fired, return your gun to Daisy (See “REPAIR OF DAISY GUNS” section).
5
 Loading...