


25 Pump Gun
D
aisy Outdoor Products
Rogers, AR 72757-0220 U.S.A.
800-643-3458 • www.daisy.com
R
ev. 11/09 Part No. 138062-001
BB Cal. (4.5mm) Steel Airgun Shot
Operation Manual
Model 25 BB Gun
36
NE RAPPORTEZ
PAS
Ce pistolet à air chez le détaillant ou vous l’avez acheté. Si la
qualité ou la performance de ce pistolet à air ne vous satisfait
pas, veuillez appeler le service client ou le retourner à:
Daisy Outdoor Products
308 West Stribling Drive
Rogers, AR 72756
Attn: Service Department
Veuillez remplir le formulaire situé à la 3è de couverture, et le
retourner avec une copie de votre reçu (pour une utilisation en
preuve d'achat uniquement) ainsi que votre fusil à air
comprimé. To us les pistolets à air Daisy, Powerline, Winchester
Air Rifles et Avanti ont une garantie d’un an à partir de la date
d’achat. Les vues ont 90 jours de garantie. Lire le manuel
d’utilisation pour vous informer au sujet des garanties. Daisy
ne fait des remboursements que sur les produits achetés
directement à partir du service client de Daisy ou sur notre
site internet. Si vous avez acheté ce pistolet à air chez un
revendeur, nous réparerons ou remplacerons volontiers votre
article d’après notre politique de garantie.
Si vous avez des questions,
veuillez appeler le service client de
Daisy au 1-800-713-2479.
LISEZ VOTRE MANUEL D’UTILISATION ET TOUS
LES AVERTISSEMENTS AVANT TOUTE UTILISATION.
YARDS (198 METRES)
2
10 SHOOTING SAFETY RULES
1
A
lways keep the muzzle pointed in a safe direction.
T
here are several safe “carries” depending on the situation. NEVER
A
LLOW THE MUZZLE TO POINT IN THE
D
IRECTION OF A PERSON.
2
Treat every gun as if it were loaded.
You can never be positive that you were the last person to handle
the gun. Never take anyone’s word about whether or not a gun is
loaded. Always check a gun to see if it is loaded when removed
from storage or received from another person. Even if you have fired
an airgun one or more times and no pellet or BB was expelled from
the barrel, it does not mean that the magazine of the gun is empty of
ammunition. Any airgun can fail to feed for any number of reasons.
Continue to treat the airgun as loaded and ready to fire. ALWAYS
TREAT A GUN AS IF IT IS LOADED EVEN IF YOU KNOW IT ISN’T.
3
Only load or cock a gun when you are shooting.
A loaded gun has no place in your home or
other public place.
4
Check your target and beyond your target.
Be sure all persons are well clear
of the target area before you shoot. Check behind and beyond your
target to be certain you have a safe backstop and that no person or
property could be endangered.
5
Anyone shooting or near a shooter should
wear shooting glasses.
Also, all other persons should remain behind the shooter.
6
Never climb or jump with a gun.
You can’t control the direction of the muzzle if you stumble or fall.
You should safely lay the gun down or hand it to a companion while
you climb or jump over anything.
7
Avoid ricochet.
Never shoot at a flat hard surface or at the surface of water.
Ammunition can ricochet off of water just like a skipped rock.
8
Keep the muzzle clear.
Never let anything obstruct the muzzle of a gun. Don’t allow the
muzzle to come in contact with the ground.
9
Guns not in use should always be unloaded.
Keeping guns unloaded when not in use is critical to the safety of
you and others. When you are finished shooting, put the trigger
safety in the “on” position and unload the gun. Store guns so that
they are inaccessible to untrained shooters and store ammunition
separately from the gun.
10
Respect other people’s property.
Whether you’re target shooting or hunting, if you’re a guest on oth-
ers’ land, you should leave it exactly as you found it.
Visit www
.daisy.com and read the shooting
safety rules. Take a quiz and get your
“Take Aim at Safety” Certificate.
WARNING:
FAILURE TO FOLLOW
THESE RULES CAN RESULT
IN SERIOUS INJURY, PARTICULARLY TO THE EYE.
3
4 5
NOT A TOY. ADULT
SUPERVISION REQUIRED.
MISUSE OR CARELESS USE MAY CAUSE SERIOUS
INJURY, PARTICULARLY TO THE EYE. MAY BE DAN-
GEROUS UP TO 217 YARDS (198 METERS).
READ ALL INSTRUCTIONS BEFORE USING. THE
PURCHASER AND USER SHOULD CONFORM TO ALL
LAWS GOVERNING USE AND OWNERSHIP OF AIR
GUNS. AIR GUNS ARE RECOMMENDED FOR USE BY
THOSE TEN YEARS OF AGE OR OLDER UNDER
ADULT SUPERVISION.
ACCORDING TO CALIFORNIA LAW
DO NOT BRANDISH OR
DISPLAY THIS AIRGUN IN
PUBLIC - IT MAY CONFUSE PEOPLE AND MAY BE A
CRIME. POLICE AND OTHERS MAY THINK THIS AIR-
GUN IS A FIREARM. DO NOT CHANGE THE COL-
ORATION AND MARKINGS TO MAKE IT LOOK MORE
LIKE A FIREARM. THAT IS DANGEROUS AND MAY BE
A CRIME.
WARNING:
WARNING:
WARNING: THIS GUN CAN CAUSE THE
LOSS OF AN EYE. READ AND FOLLOW THE
INSTRUCTIONS. DO NOT COCK THE GUN UNTIL
Y
OU ARE READY TO SHOOT. IF YOU DO COCK IT
A
ND DECIDE NOT TO SHOOT, POINT IT IN A SAFE
D
IRECTION AND FIRE IT. AN UNCOCKED,
UNLOADED GUN IS THE SAFEST. ACCIDENTS HAP-
PEN FAST, AND THE LOSS OF AN EYE IS A TERRIBLE
THING. SHOOT SAFELY.
BB Cal. (4.5mm) Steel Airgun Shot
Operation
Manual
for the
Model 25 BB Gun
This safety alert symbol indicates important safety mes-
sages in this manual. When you see this symbol, be alert to
the possibility of personal injury and carefully read the mes-
sage that follows.
The 10 Shooting Safety Rules are found in “An
Introduction to Daisy Airgun Shooting” section of this manual
which is an important guide to the care and safe handling of
any gun. READ THIS SECTION. It is your responsibility as
the owner of this gun to make certain that anyone using the
gun is instructed in its safe and proper operation.
As the proud owner of a Daisy air gun, you have become
part of an American tradition which dates back to the time
when your great-grandfather was a small boy. Your new Daisy
gun is the result of more than 100 years experience by Daisy
in the manufacture of quality products.
Although your new Daisy is not a firearm, it is a gun and
should be treated with care and respect. Always remember,
the first and most important safety aspect of any gun is the
shooter. All safeties are mechanical devices and the shooter
is the only part of the system that can make a gun safe – or
unsafe.
DON'T DEPEND ON MECHANICAL SAFETIES –
think ahead and avoid situations that might lead to accidents.
FOR YOUR SAFETY AND THE SAFETY OF OTHERS,
READ COMPLETE OPERATING INSTRUCTIONS BEFORE
ATTEMPTING TO SHOOT GUN. Guns differ in their opera-
tions and you are never ready to fire any gun until you are
thoroughly familiar with it. Read the operating instructions
and WITHOUT LOADING ANY AMMUNITION, proceed sever-
al times through the operating steps with your gun (dry fire
the gun at a safe target) so that you will be able to operate
your Daisy properly and safely.
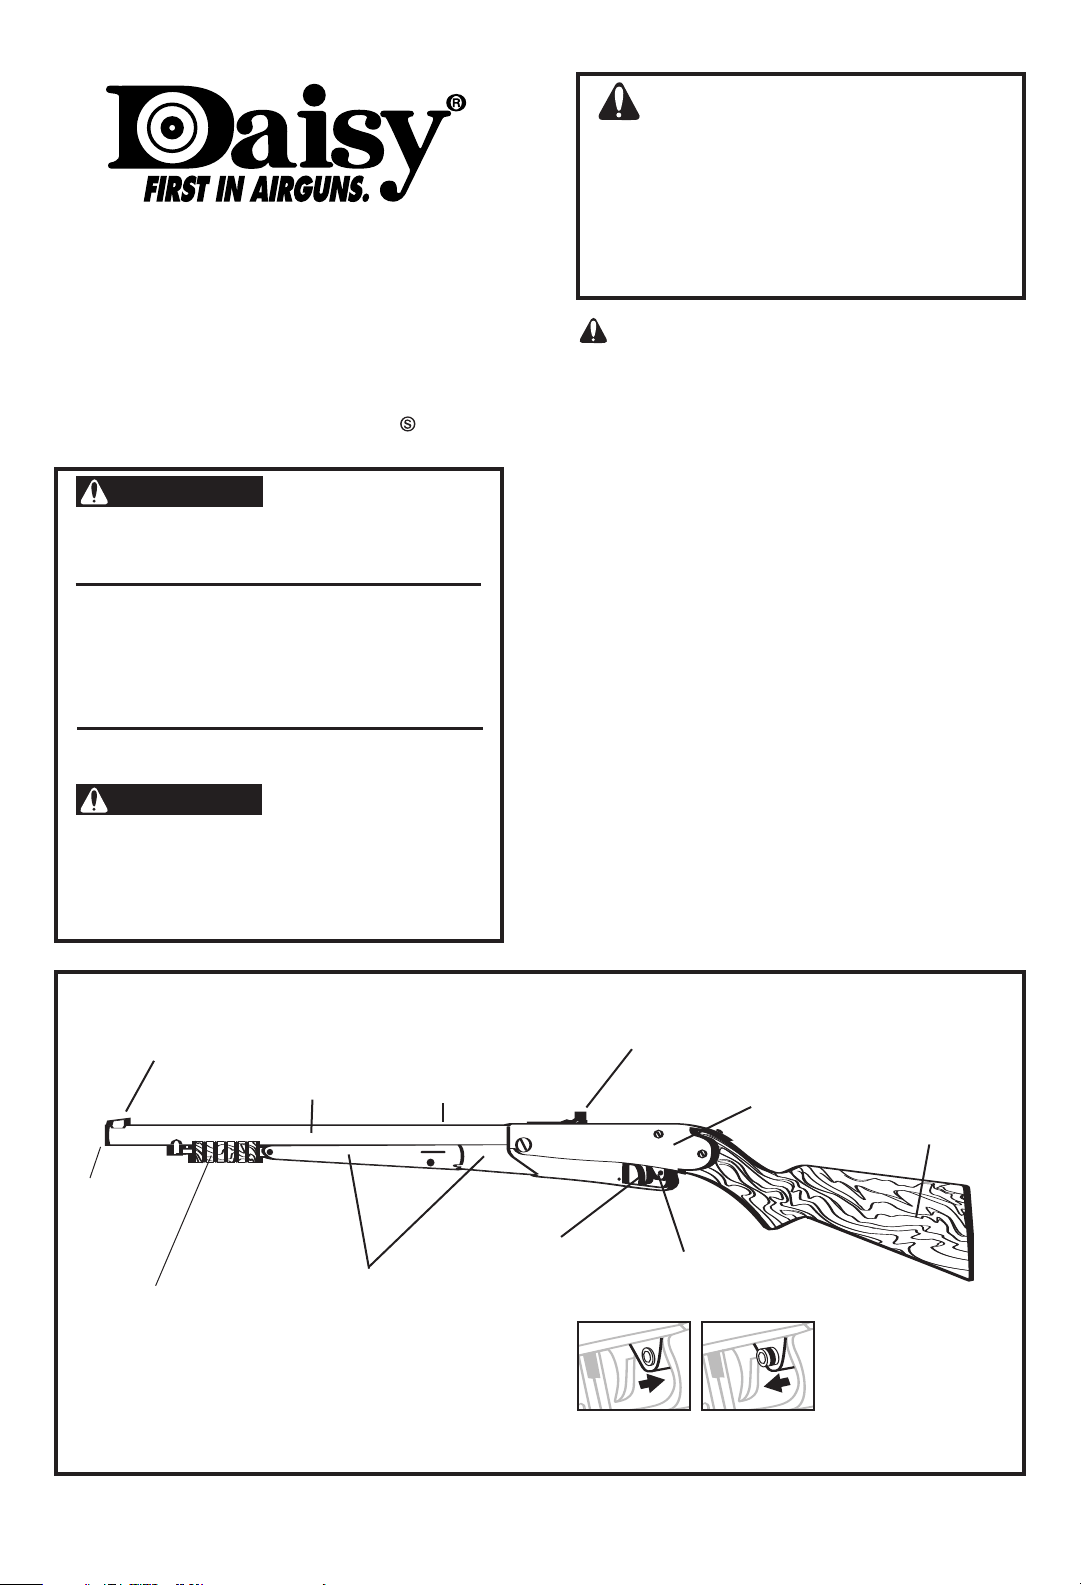
MUZZLE
BOCA
GUEULE
COCKING LEVERS
PALANCA DE AMARTILLADO
LEVIERS D’ARMEMENT
FRONT SIGHT
MIRA DELANTERA
VISEUR AVANT
OIL HOLE
ORIFICIO PARA ACEITE
ORIFICE POUR HUILE
No. 1
ADJUSTABLE REAR SIGHT
MIRA TRASERA AJUST
ABLE
VISEUR ARRIERE REGLABLE
BARREL
CAÑÓN
CANON
RECEIVER
RECEPTOR
CARCASSE
TRIGGER
GA
TILLO
DETENTE
STOCK
CAJA
CROSSE
PUMP GRIP
CORREDERA
POMPE
Safety ON No Red Showing
Seguro activo en "ON" No se ve indicador rojo
Sûreté Enclenchée Pas de Rouge Visible
TRIGGER SAFETY
SEGURO DEL GATILLO
CRAN DE SURETE
Safety OFF Red Showing
Seguro desactivado en "OFF" Se ve indicador rojo
Sûr
eté Retirée Rouge Visible
A
B

HOW TO OPERATE
CAUTION: B
e sure gun is always pointed in a
safe direction.
Step 1. PUT "ON SAFE" No Red Showing
Step 2. LOAD BBs
Step 3. COCK
Step 4. AIM AT SAFE TARGET
Step 5. TAKE “OFF SAFE” Red Showing
Step 6. FIRE
Step 1. PUT "ON" TRIGGER SAFETY
Push trigger safety from left to right so no red is showing.
It is a good practice to get in the habit of keeping the trigger
safety "ON" until ready to fire the gun (See Drawing No. 1A).
Step 2. LOAD BBs (See Drawing No. 2)
1. Unscrew the shot tub counterclockwise and remove it
from the barrel. (2A)
2. Slide the magazine feed tab toward muzzle to notch,
and hold it securely with your finger. (2B)
3. While holding tab, load BBs into the loading hole. (2C)
RELEASE THE MAGAZINE FEED TAB SLOWLY to prevent
damage. Replace shot tube in barrel, engage threads carefully
and screw clockwise until tight.
WARNING: It is possible to accidentally fire a cocked
gun while loading. Never remove the shot tub from a cocked
gun. First make certain the gun is not cocked by pointing it in
a safe direction and pulling the trigger.
CAUTION: Hold magazine feed tab securely while
loading BBs If tab is released, it could fly rearward, possibly
causing injury.
NOTE: When you replace the shot tube, a BB is automatically
fed into firing position.
WARNING:
Do not replace the shot tube while the gun is
cocked. You could be injured if the gun discharges accidentally.
NO. 2
LO
ADING HOLE
ORIFICIO DE CARGA
ORIFICE DE CHARGEMENT
MAGAZINE FEED TAB
PEST
AÑA DE ALIMENT
ACIÓN DEL C
ARGADOR
LANGUETTE CHARGEUR MAGASIN
NOTCH
RANURA
ENCOCHE
SHOT TUBE
ÁNIMA DEL C
AÑÓN
BARIL
2C
2B
2A
Step 4. AIM AT SAFE TARGET
Your Daisy Model 25 rear sight gives you the option of
using an open sight or a peep sight. The windage and elevation
adjustment is the same for both options. Using a small flat
blade screwdriver loosen the indicated screw (See drawing No.
4) to move the rear sight in the same direction you want the
point of impact to move on the target.
To be a consistent marksman, use the correct sight picture
each time you fire your gun. (See drawing No. 5)
CAUTION:
Sight or point the gun only in a safe direc-
tion. BBs will bounce or ricochet if they hit a hard surface. Do
not shoot at water.
NO. 3
T
O COCK / PARA MARTILLAR / POUR ARMER
P
inch Points
P
untos de compresión
Points de Pincement
NO. 4
BULLSEYE
BLANCO
MILLE
WARNING: Always keep gun pointed in a safe direc-
tion. While cocking, be careful to keep your hands and fin-
gers from between the cocking levers. Possible injury could
result from careless handling of the gun during cocking. (See
Drawing No. 3, “Pinch Points”).
NO. 5
WINDAGE ADJUSTMENT
AJUSTE RESISTENCIA AERODIN ÁMICA
REGLAGE DE LA DERIVE
ELEVATION ADJUSTMENT
AJUSTE ELEV
ACIÓN
REGLAGE DE L’ELEVATION
BLADE FRONT SIGHT
MIRA FRONTAL
VISEUR AVANT
BLADE FRONT SIGHT
MIRA FRONTAL
VISEUR AVANT
REAR SIGHT
MIRA POSTERIOR
VISEUR ARRIERE
Step 3. COCK
Tilt the gun upward at a 45˚ angle. Firmly grasp the pump
grip and pull it back until a click is hear
d (See Drawing No. 3).
At this point, a BB is loaded and your gun must be handled
with care. Push the pump grip completely forward and your
gun is cocked.
6 7
P
ull the Pump Grip back until a click is heard
Tire de la corredera hasta que escuche
Tirer la pompe vers l’arrière jusqu’au clic
T
ilt the gun
u
pward 45˚
I
ncline el rifle a 45°
Incliner le fusil
à 45° vers le haut
LOAD BBs / CARGUE LOS BALINES / CHARGER LES BB
Step 5. TAKE "OFF" TRIGGER SAFETY
When you are certain that the target, backstop and sur-
rounding area are safe, push the trigger safety from right to
left. “Safety OFF”- Red Showing. (See Drawing No. 1B)
CAUTION: Keep gun pointed in a safe direction.
Step 6. FIRE
After completing the operation steps, your gun may be
fired by gently, but firmly, squeezing the trigger.
NOTE: A good rifleman gently but firmly, squeezes his
trigger when on target. He does not jerk or pull the trigger.
CAUTION:
Never carry a cocked gun. Cock it only
when ready to fire. Even with the manual safety "ON" SAFE, your
gun is in a fully loaded condition and must be handled with care.
Never assume the gun is empty. Make sure the gun is always
pointed in a safe direction.
WHAT IS A JAM, AND WHY DOES IT
HAPPEN?
A jammed gun is one that does not fire a BB when it is
loaded, cocked and the trigger is pulled. It is a dangerous
condition which must have immediate and careful attention.
Jamming can result from:
1. Improper feeding–turning the gun on its side as the muzzle
is raised to feed a BB into firing position.
2. Reusing shot which has been damaged by hitting a hard
surface.
3. Using ammunition not intended for BB gun use.
4. Using dirty shot.
If you follow the instructions for proper loading and feed-
ing, and if you only use recommended shot, your Daisy will
provide many hours of trouble free, recreational air gun
shooting.
If the gun does not fire after loading, cocking, and
squeezing the trigger, the gun is jammed.
CAUTION: A jam is a dangerous condition which must
have immediate and careful attention.To correct it, keep the
gun pointed in a safe direction, cocking and firing the gun
three or four times.
If your gun has not cleared,
with the gun uncocked,
and
the "Safety ON"- No RED Showing (Drawing No. 1A),
care-
fully unscrew and remove the shot tube. (See drawing No. 2)
After safely r
emoving the shot tube, you can then cIear the
shot tube. (If the gun is empty
, simply fill with clean, new BBs
and replace the shot tube.) If you are unable to clear the gun,
return it to the
Daisy Service Department. (See Repair of Daisy
Guns section.)
UNLOADING
WARNING: EVEN IF YOU HAVE FIRED THE AIRGUN
ONE OR MORE TIMES AND NO BB WAS EXPELLED, IT
DOES NOT MEAN THAT THE GUN IS EMPTY OF BBs.
CONTINUE TO TREAT THE AIRGUN AS IF IT IS LOADED.
Make certain your gun is not cocked by firing in a safe
direction. Put "Safety ON"- No RED Showing (Drawing No. 1A),
remove the shot tube (See drawing No. 2), slide the magazine
feed tab forward and dump BBs from the loading hole. Then
slowly return the tab to the bottom position.
PROPER CARE
To operate properly, your Daisy BB gun requires mainte-
nance. Simple oiling and cleaning are sufficient. Lack of
maintenance can cause poor performance and could make
the gun unsafe.
OILING: To maintain top shooting performance, you
should add two drops of oil in the "oil" hole (See Drawing
No. 1) every 500 to 1000 shots. Also oil trigger, cocking
mechanism and other moving parts regularly. Use a "20"
weight motor oil. Do not use light weight household-type oils.
CLEANING: The exterior can be cleaned by wiping with
a soft clean cloth.
STORAGE
Unload BBs and store them in a separate place to keep
them from untrained shooters. Before putting gun away in a
cabinet or gun rack, make sure it is clean, dry, oiled,
unloaded, and uncocked.
MODIFICATION
CAUTION: The components of this gun were engi-
neered to deliver optimum performance. Any modification or
tampering with a gun may cause a malfunction and may
make it unsafe to use. Any change in performance, such as a
lowered trigger force and shortened trigger travel, indicates
possible wear, and such gun should be inspected, replaced,
or properly repaired by qualified personnel. Any gun that has
been dropped should be checked by qualified personnel to
insure that its function has not been affected.
REPAIR OF DAISY GUNS
WARNING: A GUN THAT IS NOT OPERATING PROP-
ERLY MAY BE DANGEROUS. IT SHOULD BE KEPT SAFELY
FROM USE BY ANYONE UNTIL REPAIRED OR DESTROYED.
DO NOT TRY TO TAKE THE GUN APART. IT IS DIFFICULT TO
REASSEMBLE, AND IMPROPER REASSEMBLY CAN CAUSE
A HAZARDOUS CONDITION.
GUNS IN WARRANTY
LIMITED ONE YEAR WARRANTY
For one year from date of purchase, Daisy will repair or
replace this gun, free of charge, if defective in material or work-
manship. Service is available by returning the gun to Daisy
Outdoor Products. Attach to the gun your name and address
and telephone number, description of problem and proof of date
of retail purchase (sales slip). Package and send to Daisy
Outdoor Products, transportation prepaid. This Warranty gives
you specific legal rights, and you may also have other rights
which may vary from state to state.
GUNS OUT OF WARRANTY
If your Daisy needs repair, call Customer Service at 1-800-
713-2479 for repair or replacement charge. We accept Visa
and Mastercard. When paying by check or money order,
please send with gun. Attach to the gun your name, street
address (Not Post Office Boxes) and description of the prob-
lem. Package and send, transportation prepaid, to Daisy
Outdoor Products, Service Department. Daisy will repair the
gun or replace it with a reconditioned gun of the same model,
if available, otherwise with a model of equivalent quality
.
Exploded gun part drawings and price lists ar
e available
fr
om Daisy Service Department. Please make sur
e you state
model number stamped on barr
el. Service and parts char
ges
ar
e subject to change without notice.
Daisy Outdoor Pr
oducts
Service Department
308 W
est Stribling Drive
Rogers, AR 72756
NOTE: W
e r
ecommend r
etur
ning guns via UPS.
MODEL 25 SPECIFICATIONS
ACTION Spring Air
CALIBER .177 cal. BB (4.5 mm)
BB CAPACITY 50
TARGET DISTANCE 16.4 ft. (5 m)
MAXIMUM SHOOTING DISTANCE 217 yds. (198 m)
MAXIMUM MUZZLE VELOCITY 350 fps. (106 mps)
8 9
10
An Introduction to
Daisy
®
Airgun Shooting
A MESSAGE TO PARENTS
Although not a firearm, a Daisy airgun is a gun and not a
toy. Properly used and maintained, it will provide many hours
of safe, trouble free recreational shooting. Misused, it can be
dangerous. Therefore, we recommend it be used only under
adult supervision and never by a young person less than ten
years of age. Included in this operation manual are 10
Shooting Safety Rules. We urge you to read them with your
child, practice them and review them often.
As the proud owner of a new Daisy gun, your child has
become part of an American tradition dating back more than
100 years. Mechanically, a new Daisy is backed by nearly a
century of engineering know-how and experience in the man-
ufacture of quality products.
Safe gun handling depends upon proper safety training,
and instilling in your son or daughter the right attitude toward
gun ownership. To help you, we have designed this booklet to
cover the basic facts every young person should understand
before shooting a gun. Take time to study it thoroughly with
your child. A proper understanding of these basics will greatly
increase your youngster's enjoyment of the lifetime sport of
recreational air gun shooting and, at the same time, give you
the satisfaction of knowing your child is properly prepared to
handle an air gun.
We strongly urge a formal course of instruction in
Shooting Education for your child. There are a number of
youth and civic organizations which offer a complete 10-les-
son course based on guidelines developed by the training
experts at Daisy, and they are listed in the section “Learn to
shoot safely” on page 15 of this book. A quick check with
them will let you know when the next course will be starting
in your area. If you would like more detailed information,
write: Special Market Programs, Daisy, P.O. Box 220, Rogers,
Arkansas 72757.
GETTING STARTED
First, you should know that your Daisy is not a toy. It's a
gun. If you use it carefully, it will provide many years of enjoy-
ment. But, if you aren't careful, it can be dangerous.
Second, read this book. In conjunction with the
Operation Manual, it tells you how to handle your new BB
gun properly and how to have the most fun with it. Read it
carefully with a parent and make sure you all understand it.
Then, put what you've learned into practice. And remember,
it's your responsibility as a gun owner to make certain that
anyone using it is instructed in the rules of proper gun han-
dling.
SAFE GUN HANDLING IS THE KEY
TO SHOOTING FUN
If you understand that "HANDLING" your gun means
every time you touch it, and if you remember always to han-
dle a gun as if it were loaded, then you are well on your way
to proper gun handling. A majority of air gun accidents in this
country are caused by 1) careless and improper handling of
the gun, 2) believing the gun to be empty when it isn't, or 3)
shooting at improper targets. All three causes can be avoided
if the shooter handles the gun properly.
For years we have been teaching the 10 Shooting Safety
Rules. Read, remember, practice and review these few simple
rules. They will help you enjoy many hours of safe, fun, recre-
ational shooting.
10 SHOOTING SAFETY RULES
1. Always keep the muzzle pointed in a safe direction.
2. Treat every gun as if it were loaded.
3. Only load or cock a gun when you are shooting.
4. Check your target and beyond your target.
5. Anyone shooting or near a shooter should wear
shooting glasses.
6. Never climb or jump with a gun.
7. Avoid ricochet.
8. Keep the muzzle clear.
9. Guns not in use should always be unloaded.
10. Respect other people’s property.
It is also very important for you to remember that any
time you receive a gun from anyone, or take a gun from it's
storage place, you should make sure it's unloaded and
uncocked by pointing it in a safe direction and pulling the
trigger.
WARNING: EVEN IF YOU HAVE FIRED THE AIR-
GUN ONE OR MORE TIMES AND NO BB WAS EXPELLED, IT
DOES NOT MEAN THAT THE GUN IS EMPTY OF BBs. CON-
TINUE TO TREAT THE AIRGUN AS IF IT IS LOADED.
Never look into the muzzle of your gun. You can't tell by
looking if your gun is loaded, so always treat it as if it were.
Habits which you form now in handling your new Daisy will be
helpful in the handling of any gun.
THE
OUTDOOR
DAISY
Your Daisy
airgun isn't
designed for hunt-
ing, but you can
still have outdoor
fun with it. It's
easy to set up an
outdoor range. In
fact, outdoor shooting is a great way for a young person and
his or her parents to have some real family fun and competi-
tion.
When you are carrying a Daisy airgun outdoors, keep the
following things in mind:
• Don't shoot at targets with a hard surface, like rocks or
trees. Your BB could ricochet. Never shoot at the surface of
water for the same reason.
• Always be sure you know where other people are before
you shoot. Make sure they're clear of the target.
• Keep the muzzle always pointed in a safe direction so if you
stumble and fall you can control the direction of the muzzle.
• Keep your Daisy airgun unloaded when you are not using it.
• Indoors or out, anyone shooting or near a shooter should
wear shooting glasses. (They can be purchased at most
stores selling sporting goods.)
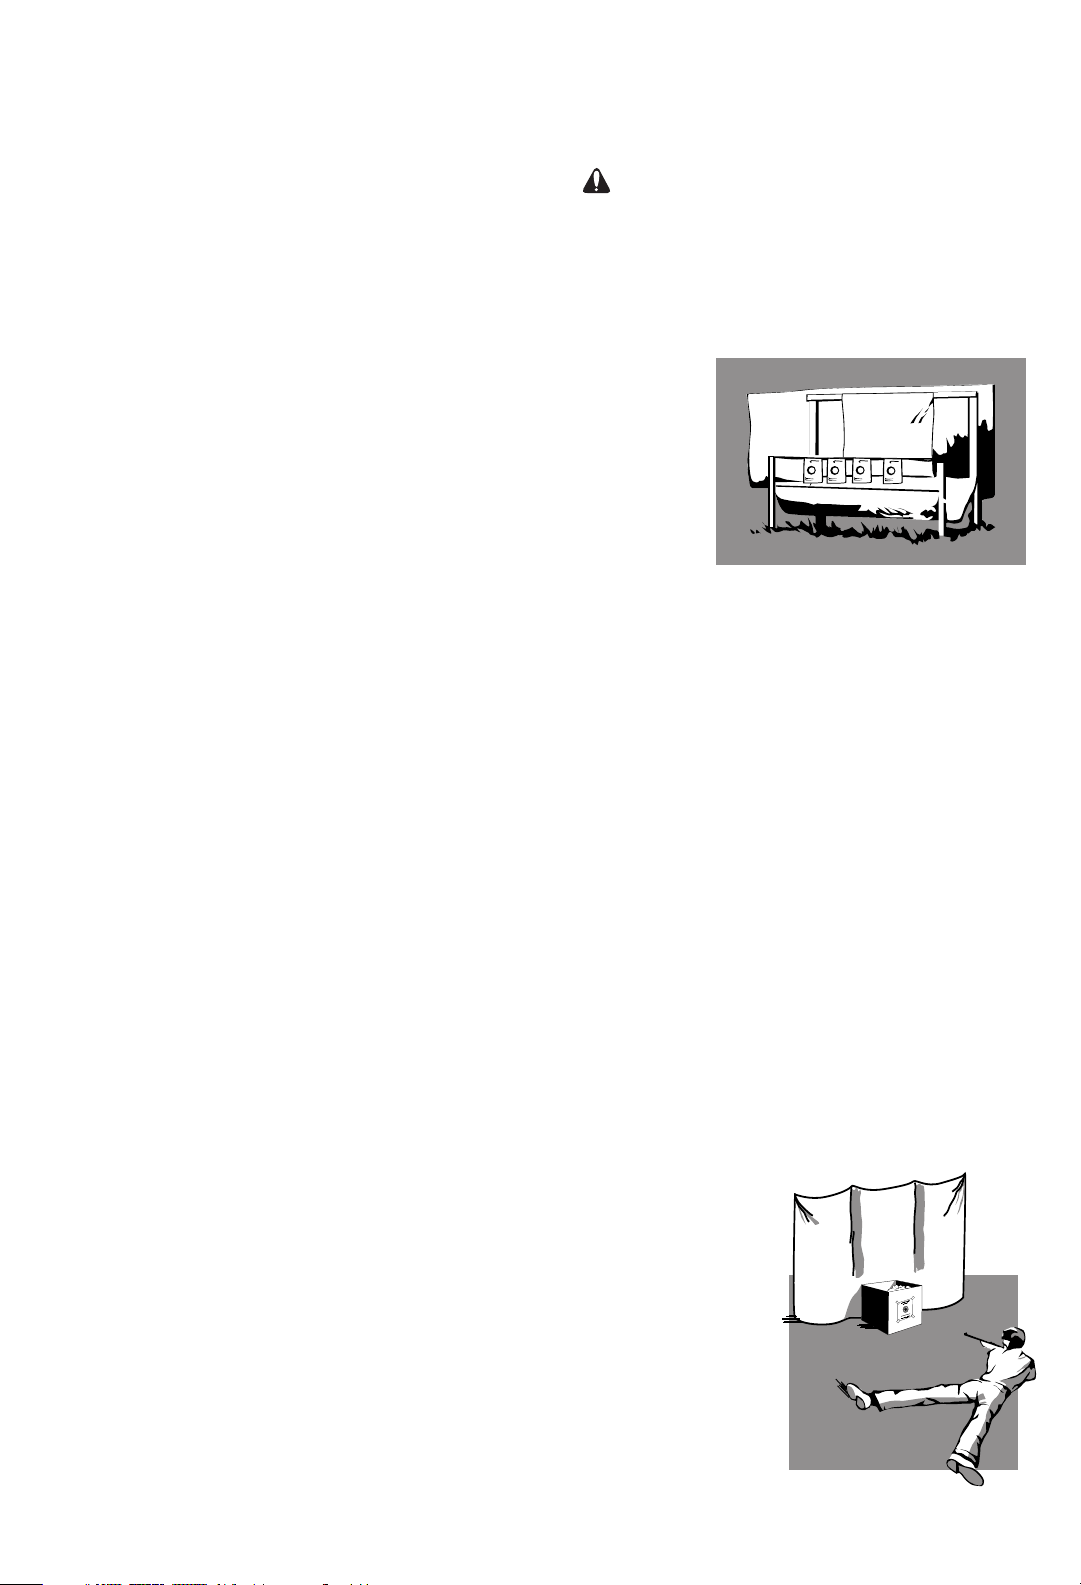
THE INDOOR DAISY
A Daisy airgun
is safe
for indoor shooting as long as you
observe the proper safety rules. There aren't many, but they
are important. First, you must have at least 5 meters (16.4 ft.)
of space from the firing line to the target. All Daisy Youth Line
air rifles are designed with controlled velocity of less than 350
feet per second and ar
e most ef
fective for tar
get shooting at
5 meters. (It takes as much skill to shoot a Daisy on a 5 meter
range as it takes to shoot a .22 on a 50 foot range!) Second,
you must have a safe tar
get (See "SAFE T
ARGET" section)
placed so ther
e ar
e no entry ways in front of the firing line or
behind the tar
gets. If this is not possible, then doorways in
the ar
eas should be blocked. Thir
d, you should have a canvas
or blanket behind the tar
get which hangs fr
ee from the wall
and clears the floor
. This will pr
event ricochet should you
miss the tar
get. Finally
, your target should be well lighted.
Remember to keep
your Daisy unloaded
until the tar
get is up and
you ar
e ready to shoot.
Never point it in any
dir
ection except toward
the tar
get.
If you follow these
rules and combine them
with the other tips on
pr
oper gun handling in
this book, you can enjoy
safe, indoor Daisy air
gun
shooting.
11
 Loading...