


10 SHOOTING SAFETY RULES
WARNING: FAILURE TO FOLLOW
THESE RULES CAN RESULT
IN SERIOUS INJURY, PARTICULARLY TO THE EYE.
1
Always keep the muzzle pointed in a safe direction.
There are several safe “carries” depending on the situation. NEVER ALLOW THE MUZZLE TO POINT IN THE DIRECTION OF A PERSON.
2
Treat every gun as if it were loaded.
You can never be positive that you were the last person to handle the gun. Never take anyone’s word about whether or not a gun is loaded. Always check a gun to see if it is loaded when removed from storage or received from another person. Even if you have fired an airgun one or more times and no pellet or BB was expelled from the barrel, it does not mean that the magazine of the gun is empty of ammunition. Any airgun can fail to feed for any number of reasons. Continue to treat the airgun as loaded and ready to fire. ALWAYS TREAT A GUN AS IF IT IS LOADED EVEN IF YOU KNOW IT ISN’T.
3
Only load or cock a gun when you are shooting.
A loaded gun has no place in your home or other public place.
4
Check your target and beyond your target.
Be sure all persons are well clear
of the target area before you shoot. Check behind and beyond your target to be certain you have a safe backstop and that no person or property could be endangered.
5
Anyone shooting or near a shooter should wear shooting glasses.
Also, all other persons should remain behind the shooter.
6
Never climb or jump with a gun.
You can’t control the direction of the muzzle if you stumble or fall. You should safely lay the gun down or hand it to a companion while you climb or jump over anything.
7
Avoid ricochet.
Never shoot at a flat hard surface or at the surface of water. Ammunition can ricochet off of water just like a skipped rock.
8
Keep the muzzle clear.
Never let anything obstruct the muzzle of a gun. Don’t allow the muzzle to come in contact with the ground.
9
Guns not in use should always be unloaded.
Keeping guns unloaded when not in use is critical to the safety of you and others. When you are finished shooting, put the trigger safety in the “on” position and unload the gun. Store guns so that they are inaccessible to untrained shooters and store ammunition separately from the gun.
10
Respect other people’s property.
Whether you’re target shooting or hunting, if you’re a guest on others’ land, you should leave it exactly as you found it.
Visit www.daisy.com and read the shooting safety rules. Take a quiz and get your “Take Aim at Safety” Certificate.
Daisy Outdoor Products
Rogers, AR 72757-0220 U.S.A. 800-643-3458 • www.daisy.com
01/09
0 p e r a t i o n M a n u a l
840 Series Air Rifles
Single-pump Pneumatic
BB Cal. (4.5mm) Steel Airgun Shot 
.177 (4.5mm) Lead Airgun Pellet 
Daisy Grizzly 840
Daisy Grizzly 840C
Daisy 841
Avanti Mentor 845
 WARNING: DAISY RECOMMENDS LEAD-FREE PELLETS FOR SHOOTERS 12 YEARS OF AGE OR UNDER.
NOT A TOY. ADULT SUPERVISION REQUIRED. MISUSE OR CARE-
LESS USE MAY CAUSE SERIOUS INJURY, PARTICULARLY TO THE EYE. MAY BE DANGEROUS UP TO 216 YARDS (197METERS).
READ ALL INSTRUCTIONS BEFORE USING. THE PURCHASER AND USER SHOULD CONFORM TO ALL LAWS GOVERNING USE AND OWNERSHIP OF AIR GUNS. AIR GUNS ARE RECOMMENDED FOR USE BY THOSE TEN YEARS OF AGE OR OLDER UNDER ADULT SUPERVISION.
ACCORDING TO CALIFORNIA LAW
WARNING: |
DO NOT BRANDISH OR DISPLAY |
THIS AIRGUN IN PUBLIC - IT MAY |
CONFUSE PEOPLE AND MAY BE A CRIME. POLICE AND OTHERS MAY THINK THIS AIRGUN IS A FIREARM. DO NOT CHANGE THE COLORATION AND MARKINGS TO MAKE IT LOOK MORE LIKE A FIREARM. THAT IS DANGEROUS AND MAY BE A CRIME.
 WARNING: THIS GUN CAN CAUSE THE LOSS OF AN EYE IF MISUSED OR CARELESSLY USED. READ AND FOLLOW THE INSTRUCTIONS. DO NOT COCK THE GUN UNTIL YOU ARE READY TO SHOOT. IF YOU DO COCK IT AND DECIDE NOT TO SHOOT, POINT IT IN A SAFE DIRECTION AND FIRE IT. AN UNCOCKED, UNLOADED GUN IS THE SAFEST. ACCIDENTS HAPPEN FAST, AND THE LOSS OF AN EYE IS A TERRIBLE THING. SHOOT SAFELY.
 This safety alert symbol indicates important safety messages in this manual. When you see this symbol, be alert to the possibility of personal injury and carefully read the message that follows.
It is your responsibility as the owner of this gun to make certain that anyone using the gun is instructed in its safe and proper operation.
As the proud owner of a Daisy air gun, you have become part of an American tradition which dates back to the time when your great-grandfather was a small boy. Your new Daisy gun is the result of more than 100 years experience by Daisy in the manufacture of quality products.
Although your new Daisy is not a firearm, it is a gun and should be treated with care and respect. Always remember, the first and most important safety aspect of any gun is the shooter. All safeties are mechanical devices and the shooter is the only part of the system that can make a gun safe--or unsafe. DON’T DEPEND ON MECHANICAL SAFETIES.
Think ahead and avoid situations that might lead to accidents.
FOR YOUR SAFETY AND THE SAFETY OF OTHERS, READ COMPLETE OPERATING INSTRUCTIONS BEFORE ATTEMPTING TO SHOOT GUN. Guns differ in their operations and you are never ready to fire any gun until you are thoroughly familiar with it. Read the operating instructions and WITHOUT LOADING ANY AMMUNITION, proceed several times through the operating steps with your gun (dry fire the gun at a safe target) so that you will be able to operate the Model 840/841/845 properly and safely.
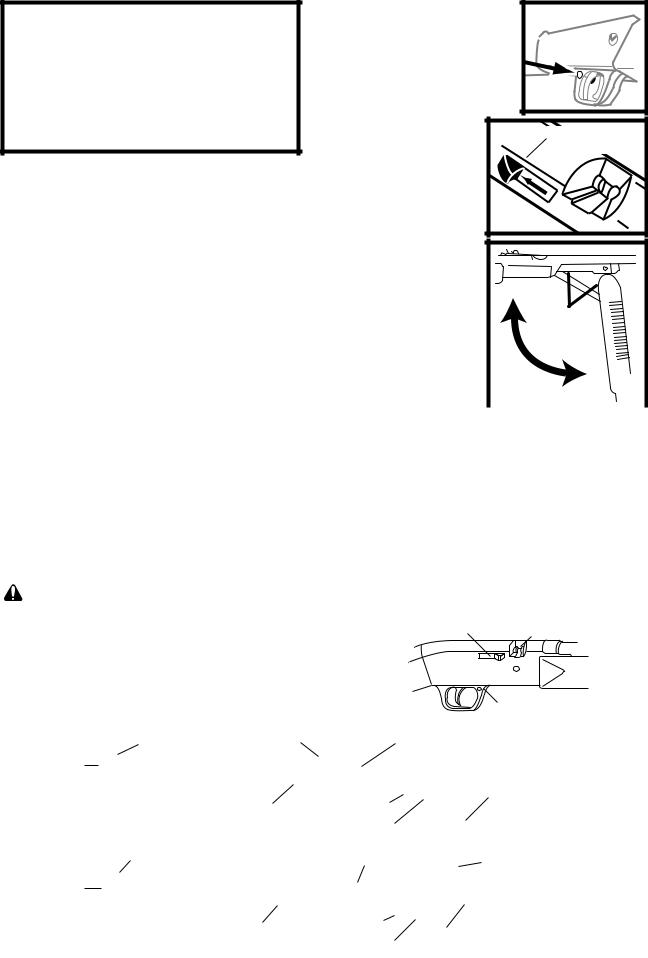
STEP 1. PUT “ON” |
SAFETY “ON” |
|
TRIGGER SAFETY |
||
|
||
Push trigger safety from left to |
||
right so no red is showing. It is a |
||
good practice to get in the habit of |
||
keeping the trigger safety “ON” |
||
until ready to fire the gun. (Fig. 2) |
||
|
FIG. 2 |
|
STEP 2. OPEN BOLT |
BOLT |
|
Tilt muzzle down about |
||
REARWARD |
||
30° and pull bolt handle |
||
|
||
rearward. The gun cannot |
|
|
fire with the bolt open. |
|
|
(Fig.3) |
|
|
STEP 3. PUMP |
FIG. 3 |
|
ONE TIME |
|
|
IMPORTANT: Do not |
|
pump more than one time. |
|
May cause |
|
serious damage to your |
|
gun. This gun was |
|
designed and intended as |
PINCH |
a single pump. For greater |
POINTS |
safety, we recommend that |
|
the bolt remain open while |
|
pumping, and that you |
|
close the bolt only when |
|
the barrel can be pointed in |
FIG. 4 |
a safe direction. Grasp the |
|
|
forearm at rear and pull down and forward as far as possible, then return forearm to original closed position. (Fig. 4)
 CAUTION: Be sure to grasp forearm firmly as you close the lever to prevent it from snapping back and causing possible injury. Also, be careful to keep fingers out of cocking mechanism when closing lever (See “PINCH POINTS”, Fig. 4). Never put your finger on the trigger until you are ready to fire.
FILL BB MAGAZINE
The loading door is located on the left side of the receiver. (Fig. 1) Push door rearward and fill magazine with a maximum of 350 BBs. Then close door.
HOW TO OPERATE
|
CAUTION: Be sure gun is always pointed in a safe |
|
|
|
|
|
|
|
|
|
|
|
|
||
direction. |
|
|
|
|
|
|
|
|
|
|
|
|
|
||
Step 1: PUT “ON” TRIGGER SAFETY |
|
|
BOLT HANDLE |
|
|
FEED TRACK |
|||||||||
Step 2: OPEN BOLT |
|
|
|
|
|||||||||||
Step 3: PUMP (ONCE) |
|
|
|
|
|
|
|
|
|
|
|
|
|
||
Step 4: LOAD |
|
|
|
|
|
|
|
|
|
|
|
|
|
||
Step 5: CLOSE BOLT |
|
|
|
|
|
|
|
|
|
|
|
|
|
||
Step 6: AIM AT SAFE TARGET |
|
|
|
|
|
|
|
|
|
|
|
|
|
||
|
|
|
|
|
|
|
|
|
|
|
|
|
|||
Step 7: TAKE “OFF” TRIGGER SAFETY |
|
|
FIG. 1A |
|
|
TRIGGER SAFETY |
|||||||||
Step 8: FIRE |
|
|
RIGHT SIDE |
|
|
||||||||||
|
|
|
|
|
|
|
|
|
|
|
|
||||
|
|
|
|
|
|
|
|
|
|
|
|
|
|
|
|
|
|
|
|
|
|
|
|
|
|
|
|
|
|
|
|
|
|
|
|
|
|
|
|
|
|
|
|
|
|
|
|
|
|
FRONT SIGHT |
REAR SIGHT |
|
LOADING DOOR |
|
|
|
STOCK |
||||||
|
MUZZLE |
|
|
|
|
|
|
|
|
||||||
|
FOREARM |
TRIGGER |
|
|
|
|
|
|
|
|
|
|
|||
|
|
|
|
|
|
|
|
|
|
|
|
|
|||
|
|
|
|
|
|
|
|
|
|
|
|
|
|||
|
FIG. 1 |
SAFETY |
PISTOL |
|
|
|
|
|
|
|
|
||||
|
|
|
TRIGGER |
|
|
|
|
|
|
|
|
||||
|
MODEL |
|
|
|
GRIP |
|
|
|
|
|
|
|
|
||
|
|
|
|
|
|
|
|
|
|
|
|
|
|
|
|
|
|
FRONT |
|
LOADING DOOR |
|
|
REAR |
|
|
||||||
|
|
SIGHT |
|
|
|
|
|
SIGHT |
|
|
|||||
|
MUZZLE |
|
|
|
|
|
|
|
|
|
|
STOCK |
|
|
|
|
|
FOREARM |
TRIGGER |
|
|
|
|
|
|
|
|
|
|
||
|
|
|
|
|
|
|
|
|
|
|
|||||
|
FIG. 1 |
|
|
|
|
|
|
|
|
|
|
|
|||
|
|
|
|
|
|
|
|
|
|
|
|
||||
|
|
SAFETY |
PISTOL |
|
|
|
|
|
|
|
|
||||
|
MODEL 845 |
|
|
|
|
|
|
|
|
|
|
|
|
||
|
|
|
|
TRIGGER |
GRIP |
|
|
|
|
|
|
|
|
||
|
|
|
|
|
|
|
|
|
|
|
|
|
|
|
|
|
|
|
|
|
|
|
|
|
|
|
|
|
|
|
|
2 |
3 |

STEP 4. LOAD
LOADING BBs: To load a BB from the magazine, raise the muzzle 45 degrees to 60 degrees and pull the bolt handle
fully to the rear. (Fig. 5) |
A BB is gravity fed onto the magnetic |
|||||||||||||||||||||||
tip of the bolt (Fig. 5) When raising the muzzle, be sure the |
||||||||||||||||||||||||
|
|
|
|
|
|
|
|
|
|
|
|
|
|
|
|
|
|
|
|
|
|
|
|
front sight is |
|
|
|
|
|
|
|
|
|
|
|
|
|
|
|
|
|
|
|
|
|
|
|
|
|
|
|
|
|
|
|
BB |
|
|
|
|
|
|
|
|
|
pointed |
||||||||
|
|
|
|
|
|
|
|
|
|
|
|
|
|
|
upward, |
|||||||||
|
|
|
|
|
|
|
|
|
|
|
|
|
|
|
|
|
|
|
|
|
|
|
|
|
|
|
|
|
|
|
|
|
|
|
|
|
|
|
|
|
|
|
|
|
|
|
|
|
because the |
|
|
|
|
|
|
|
|
|
|
|
|
|
|
|
|
|
|
|
|
|
|
|
|
gun will not |
|
|
|
|
|
|
|
|
|
|
|
|
|
|
|
|
|
|
|
|
|
|
|
|
feed properly |
|
|
|
|
|
|
|
|
|
|
|
|
|
|
|
|
|
|
|
|
|
|
|
|
if it is on its |
|
|
|
|
|
|
|
|
|
|
|
|
|
|
|
|
|
|
|
|
FEED |
|
|||
|
|
|
MAGNETIC |
|
|
|
|
|
|
|
|
|
|
|
|
|
||||||||
|
|
|
|
|
|
|
|
|
|
|
|
|
|
|
|
side. |
||||||||
|
|
|
|
|
TIP |
|
|
|
|
|
|
|
|
|
|
|
|
TRACK |
|
|||||
|
|
|
|
|
|
|
|
|
|
|
|
|
|
|
|
|
|
(Fig. 6) The |
||||||
|
|
|
|
|
|
|
|
|
|
|
|
|
|
|
|
|
||||||||
|
|
|
|
|
|
|
|
|
||||||||||||||||
|
|
|
|
|
|
|
|
|
|
|
|
|
|
|
|
|
|
|
|
|
|
|
|
BB can be |
|
|
|
|
|
|
|
|
|
|
|
|
|
|
|
|
BOLT HANDLE |
seen on the |
|||||||
|
|
|
|
|
|
|
|
|
|
|
|
|
|
|
|
magnetic tip |
||||||||
|
FIG. 5 |
|
||||||||||||||||||||||
|
|
TOWARD REAR |
(after the bolt |
|||||||||||||||||||||
|
|
|
|
|
|
|
|
|
|
|
|
|
|
|
|
|
|
|
|
|
|
|
|
handle is |
|
|
|
|
|
|
|
|
|
|
|
|
|
|
|
|
|
|
|
|
|
|
|
|
|
|
|
|
|
|
|
|
|
|
|
|
|
|
|
|
|
|
|
|
|
|
|
|
|
released) by |
|
|
|
|
|
|
|
|
|
|
|
|
|
|
|
|
|
|
|
|
|
|
|
|
|
|
|
|
|
BARREL |
|
|
|
|
|
|
|
|
|
looking into |
||||||||||
|
|
|
|
|
|
|
|
|
|
|
|
|
||||||||||||
|
|
|
|
|
|
|
|
|
|
|
|
|
the feed track. |
|||||||||||
|
|
|
|
|
|
|
|
|
|
|
|
|
|
|
|
|
|
|
|
|
|
|
|
|
|
|
|
|
|
|
|
|
|
|
|
|
|
|
|
|
|
|
|
|
|
|
|
|
If a BB did not |
|
|
|
|
|
|
|
|
|
|
|
|
|
|
|
|
|
|
|
RIGHT |
feed onto the |
||||
|
|
|
|
|
|
|
|
|
|
MUZZLE |
magnetic tip, |
|||||||||||||
|
|
|
|
|
|
|
|
|
|
|
|
|
|
|
|
|
|
|
|
|
|
|
|
shake the gun |
|
|
|
|
|
|
|
|
|
|
|
|
|
|
|
|
|
|
|
|
|
|
|
|
slightly and |
|
|
|
|
|
|
|
|
|
|
|
|
|
|
|
|
|
|
|
|
|
|
|
|
repeat the |
|
|
|
|
|
|
|
|
|
|
|
|
|
|
|
|
|
|
|
WRONG |
“LOADING |
||||
|
FIG. 6 |
|
|
|
|
BBs” instruc- |
||||||||||||||||||
|
|
|
|
|
|
|
|
|
|
|||||||||||||||
|
|
|
|
|
|
|
|
|
|
|
|
|
|
|
|
|
|
|
|
|
|
|
|
tions. |
|
|
|
|
|
|
|
|
|
|
|
|
|
|
|
|
|
|
|
|
|
|
|
|
|
|
|
|
|
|
|
|
|
|
|
|
|
|
|
|
|
|
|
|
|
|
|
|
|
|
|
|
|
|
|
|
|
|
|
|
|
|
|
|
|
|
|
|
|
|
|
|
|
|
|
|
|
|
|
|
|
|
|
|
|
|
|
|
|
|
|
|
|
|
|
|
|
|
|
|
|
|
|
|
|
|
|
|
|
|
|
|
|
|
|
|
|
|
|
|
|
|
|
|
|
|
|
|
|
|
|
|
|
|
|
|
|
|
|
|
|
|
|
|
|
|
|
|
|
|
|
|
|
|
|
|
|
|
|
|
|
|
|
|
|
|
|
|
|
|
|
|
|
|
|
|
|
|
|
|
|
|
|
|
|
|
|
|
|
|
|
|
|
|
|
|
|
|
|
|
|
|
|
|
|
|
|
|
|
|
|
|
|
|
|
|
|
|
|
|
|
|
|
|
|
|
|
|
|
|
|
|
|
|
|
|
|
|
|
|
|
|
|
|
|
|
|
|
|
|
|
|
|
|
|
|
|
|
|
|
|
|
|
|
|
|
|
|
|
|
|
|
|
|
|
PROPER SIGHT PICTURE FOR 840 Series Air Rifles:
BLADE |
BULLSEYE |
FIBER OPTIC |
|
FRONT |
FRONT |
||
|
|||
SIGHT |
|
SIGHT |
|
REAR |
|
|
FIG. 8 |
SIGHT |
|
|
SIGHT |
BULLSEYE |
|
|
ADJUSTMENT |
FRONT |
||
|
|||
Your 845 Target BB |
|
SIGHT |
|
gun is equipped with a |
REAR |
||
|
|||
hooded front sight with |
SIGHT |
|
|
four interchangeable |
FIG. 9 |
|
|
inserts, and a precision |
|
||
rear peep sight. (See |
RAISE |
LOWER |
|
instructions packed |
|||
|
|
||
with the sight.) |
|
|
|
You will have to |
|
|
|
experiment with the |
|
|
|
interchangeable front |
|
|
|
inserts to determine |
FIG. 10 |
|
|
which is best for you. |
|
|
The Model 840/841 is equipped with a rear sight that is adjustable for elevation. Raise the rear sight to make the gun shoot higher. Lower the rear sight to make the gun shoot lower. (Fig. 9 & 10)
STEP 7. TAKE “OFF” |
SAFETY “OFF” |
|
TRIGGER SAFETY |
||
|
||
When you are certain the target, |
|
|
backstop and surrounding area is |
|
|
safe, push the trigger safety from |
|
|
right to left until red band is |
|
|
exposed. (Fig. 11) |
|
|
STEP 8. FIRE |
FIG. 2 |
After completing the operation
steps, your gun may be fired by gently, but firmly, squeezing the trigger. NOTE: The bolt must be completely closed, as indicated in Step 5. IMPORTANT: Do not leave the gun pumped up for more than one hour or damage to the gun could result.
 WARNING: If a BB or pellet does not fire after completing the operation steps, the gun is jammed. This is a dangerous condition. Keep gun pointed in a safe direction and repeat all operation steps except Step 4. If a projectile still does not fire, do the following:
1.Put the trigger safety “ON SAFE” (no red showing).
2.Open bolt.
3.Clear barrel by running a cleaning rod through from the muzzle end. Be careful not to damage the bolt tip by pushing the rod through too hard. Do not reuse this BB or pellet.
4.Repeat operation steps.
If after following the firing procedure the BB or pellet still does not fire, your gun should be returned to the factory (See “Repair of Daisy Guns” section).
EMPTY BB MAGAZINE
Put “ON” trigger safety. Open BB loading door, cup your hand under it and turn gun fully to its left side. Shake gun until all BBs are removed. To make sure no BBs remain in the feed system, raise the muzzle, shake gun, and work the bolt forward and all the way back several times, removing any BBs that appear.
 CAUTION: Never assume the gun is empty of projectiles. Always point the gun in a safe direction.
5
 Loading...