

Page 1
10 SHOOTING SAFETY RULES
WARNING:
IN SERIOUS INJURY OR DEATH.
FAILURE TO FOLLOW
THESE RULES CAN RESULT
Multi-Lingual
Operation Manual
Always keep the muzzle pointed in a safe direction.
There are several safe “carries” depending on the situation.
NEVER ALLOW THE MUZZLE TO POINT IN THE
DIRECTION OF A PERSON.
2
1
reat every gun as if it were loaded.
ou can never be positive that you were the last person to handle
Y
he gun. Never take anyone’s word about whether or not a gun is
t
oaded. Always check a gun to see if it is loaded when removed
l
rom storage or received from another person. Even if you have
f
ired an airgun one or more times and no pellet or BB was
f
xpelled from the barrel, it does not mean that the magazine of
e
the gun is empty of ammunition. Any airgun can fail to feed for
any number of reasons. Continue to treat the airgun as loaded
and ready to fire. ALWAYS TREAT A GUN AS IF IT IS LOADED
T
EVEN IF YOU KNOW IT ISN’T.
3
Only load or cock a gun when you are shooting.
A loaded gun has no place in your home or
other public place.
4
Check your target and beyond your target.
of the target area before you shoot. Check behind and beyond
your target to be certain you have a safe backstop and that no
Be sure all persons are well clear
person or property could be endangered.
5
Anyone shooting or near a shooter should
Also, all other persons should remain behind the shooter.
wear shooting glasses.
6
You can’t control the direction of the muzzle if you stumble or fall.
You should safely lay the gun down or hand it to a companion
Never climb or jump with a gun.
while you climb or jump over anything.
7
Never shoot at a flat hard surface or at the surface of water.
Ammunition can ricochet off of water just like a skipped rock.
Avoid ricochet.
8
Never let anything obstruct the muzzle of a gun. Don’t allow the
muzzle to come in contact with the ground.
Keep the muzzle clear.
9
Keeping guns unloaded when not in use is critical to the safety of
safety in the “on” position and unload the gun. Stor
they ar
Guns not in use should always be unloaded.
you and others. When you ar
e inaccessible to untrained shooters and store ammunition
separately fr
e finished shooting, put the trigger
e guns so that
om the gun.
10
Whether you’re target shooting or hunting, if you’re a guest on
others’ land, you should leave it exactly as you found it.
Respect other people’s property.
Visit www.daisy.com and read the shooting
safety rules. Take a quiz and get your
“Take Aim at Safety” Certificate.
Multi-Pump
Pneumatic
Air Rifle
B•B Cal. (4.5 mm) Steel Air Gun Shot
.177 Cal. (4.5mm) Lead Airgun Pellet
WARNING:
USE MAY CAUSE SERIOUS INJURY OR DEATH. MAY BE DANGEROUS UP TO 291 Y
THIS IS A HIGH POWER AIR GUN RECOMMENDED FOR USE BY
THOSE 16 YEARS OF AGE OR OLDER. READ ALL INSTRUCTIONS
BEFORE USING. THE PURCHASER AND USER SHOULD CONFORM
TO ALL LA
ARDS (266 METERS).
WS GOVERNING USE AND OWNERSHIP OF AIR GUNS.
PowerLine®901
NOT A TOY. ADULT SUPERVISION
REQUIRED. MISUSE OR CARELESS
06/07
Daisy Outdoor Pr
Rogers, AR 72757-0220 U.S.A.
800-643-3458 • www
oducts
.daisy
.com
ACCORDING TO CALIFORNIA LA
WARNING:
CONFUSE PEOPLE AND MA
Y THINK THIS AIRGUN IS A FIREARM. DO NOT CHANGE THE
MA
TION AND MARKINGS TO MAKE IT LOOK MORE LIKE A
COLORA
FIREARM. THA
T IS DANGEROUS AND MAY BE A CRIME.
DO NOT BRANDISH OR DISPLA
THIS AIRGUN IN PUBLIC - IT MA
Y BE A CRIME. POLICE AND OTHERS
W
Y
Y
Page 2
WARNING:
HIS GUN CAN CAUSE
T
DEATH. READ AND FOLLOW THE INSTRUCTIONS
CAREFULLY. DO NOT LOAD A BB OR PELLET INTO THE
CHAMBER UNTIL YOU ARE READY TO SHOOT. IF YOU
O LOAD A BB OR PELLET AND DECIDE NOT TO
D
HOOT, REMOVE EITHER MANUALLY OR BY SHOOT-
S
ING IT IN A SAFE DIRECTION. AN UNCOCKED,
UNLOADED GUN IS SAFEST. ACCIDENTS HAPPEN
AST, AND ACCIDENTALLY INJURING OR KILLING
F
OMEONE IS A TERRIBLE THING. SHOOT SAFELY.
S
This safety alert symbol indicates important safety mes-
ages in this manual. When you see this symbol, be alert to
s
the possibility of personal injury and carefully read the message that follows.
This air gun shoots with much more power than the tradi-
tional spring air BB gun. More power means greater chance
of serious injury or death.
lthough your new PowerLine®A
A
has lethal potential and should be treated with the caution
and respect due any conventional firearm. Like a firearm, your
PowerLine
kill or seriously injure the shooter or other persons.
Always remember, the first and most important safety
aspect of any gun is the shooter. All safeties are mechanical
devices and the shooter is the only part of the system that
can make a gun safe –or unsafe.
MECHANICAL SAFETIES;
that might lead to accidents.
Guns differ in their operations and you are never ready to
fire any gun until you are thoroughly familiar with it. Read the
following operating instructions and
PROJECTILE, proceed several times through the operating
steps with your gun (dry fire the gun at a safe target) so that
you will be able to operate the PowerLine
and safely.
®
Air Rifle, when misused or carelessly used, can
ir Rifle is not a firearm, it
DON’T DEPEND ON
think ahead and avoid situations
WITHOUT LOADING A
®
Air Rifle properly
HOW TO OPERATE:
CAUTION:
direction.
Step 1. OPEN BOLT
Step 2. PUT “ON” TRIGGER SAFETY (“PUSH SAFE”)
Step 3. PUMP
Step 4. LOAD
Step 5. CLOSE
Step 6. AIM
Step 7. TAKE “OFF” TRIGGER SAFETY (“PUSH FIRE”)
Step 8. FIRE
Be sure gun is always pointed in a safe
T
BOL
T SAFE TARGET
A
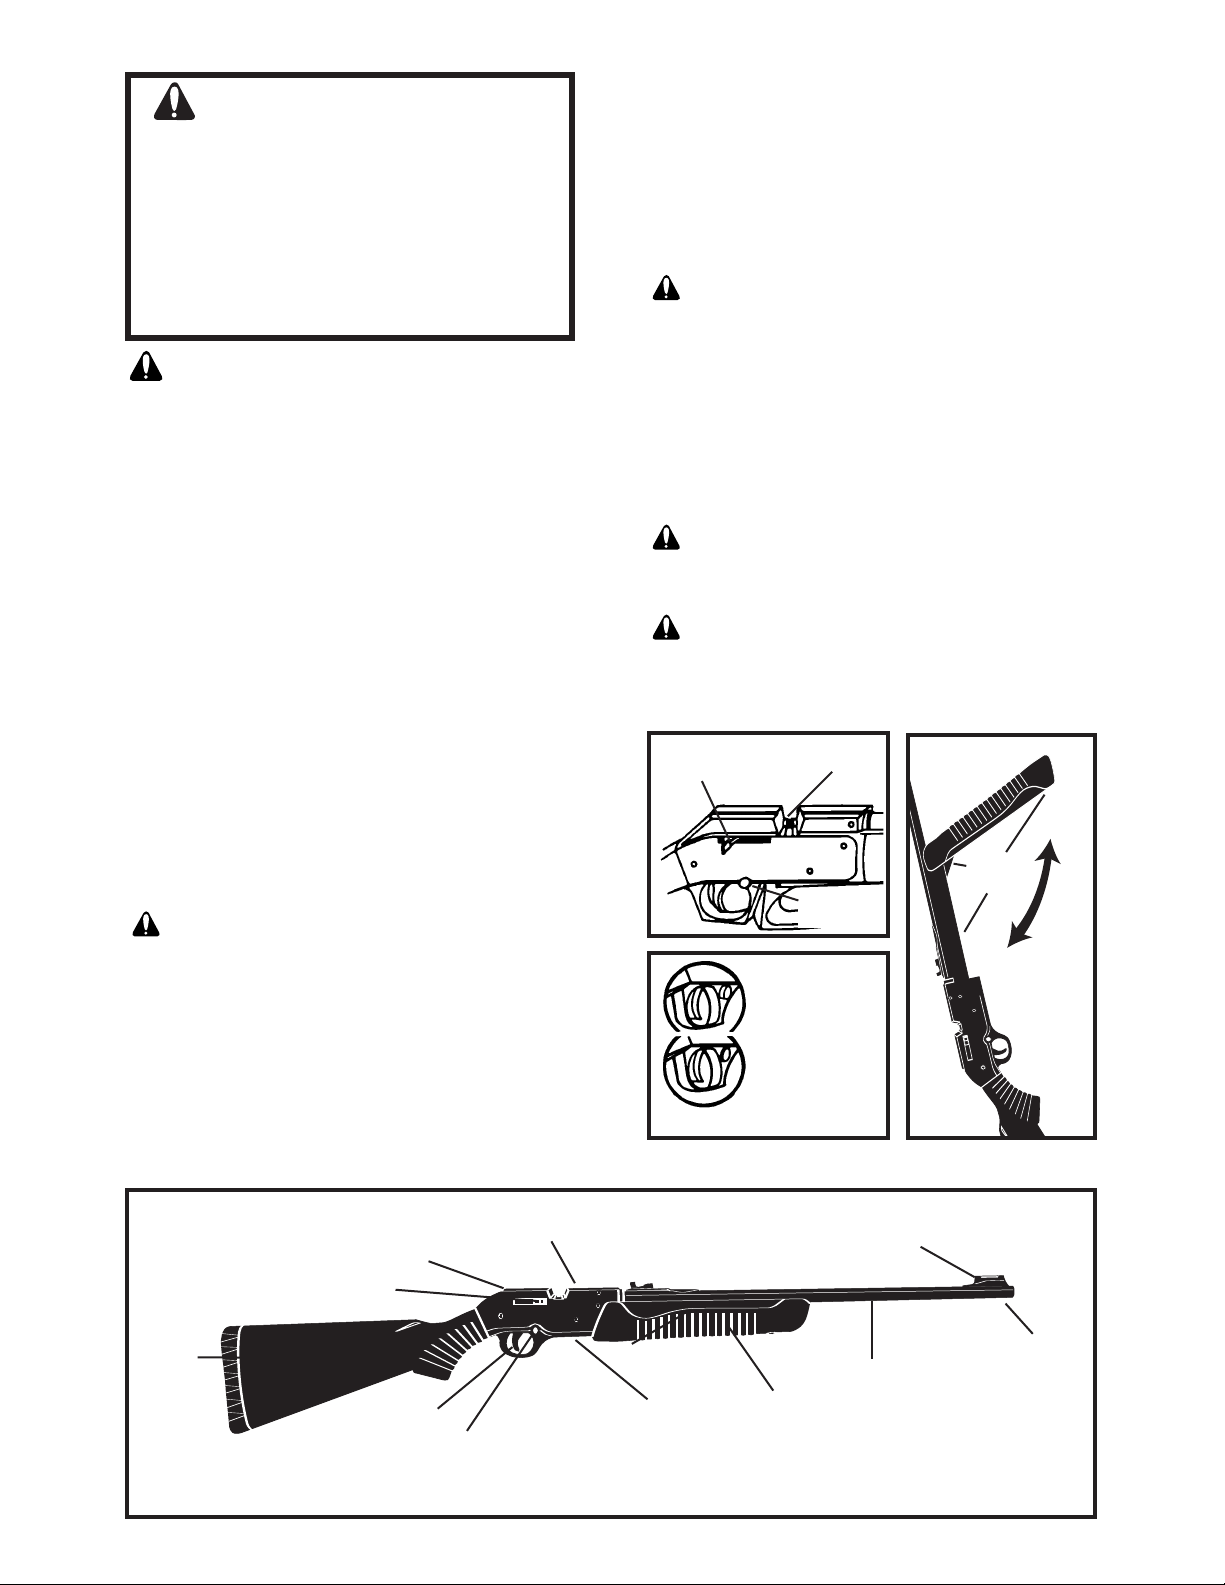
Step 1. OPEN BOLT
Pull straight back on bolt handle, pulling it fully to the rear (Figure
). The gun cannot fire with bolt open.
2
Step 2. PUT “ON” TRIGGER SAFETY
(“PUSH SAFE”)
The bolt must FIRST be opened, then the trigger safety is pushed
from the left to right so that
(“PUSH SAFE”).
CAUTION:
direction.
NO red is showing (See Figure 3)
Gun must always be pointed in a safe
Step 3. PUMP
The bolt should be opened when pumping the gun. For greater
safety, we recommend that the bolt remain open while pumping and
that you close the bolt only when the barrel can be pointed in a safe
direction. With the muzzle pointed in a safe direction, pump the gun
the desired number of times up to 10. More power means greater
chance of serious injury. Never put finger on trigger until ready to fire
the gun. NOTE: Do not pump your gun more than 10 times. Muzzle
energy increases produced by more than 10 pumps are minor, and
increased pumping may damage your gun.
CAUTION: Be sure to grasp forearm firmly as you close
it to prevent it from snapping back and causing possible injury. Also
be careful to keep fingers out of cocking mechanism when closing
forearm. (See “PINCH POINTS,” Figure 4)
WARNING: Do not open the bolt, close the bolt and
then pull the trigger before pumping. This procedure can result in a
loaded gun and a projectile being expelled from the gun during
pumping. Recock the gun by opening the bolt and put “ON” trigger
safety before pumping as in Steps 1 and 2.
Fig 2
BOLT HANDLE
Fig 3
LOADING
PORT
TRIGGER
SAFETY
TRIGGER
SAFETY ON
TRIGGER
SAFETY OFF
red showing on
opposite side
Fig. 4
PINCH
POINTS
Pull Forearm
outward for
full stroke,
then return.
Model 901
STOCK
Fig 1
BOL
DOVETAIL
GROOVE
T HANDLE
TRIGGER
TRIGGER SAFETY
2
BB LOADING DOOR
(on left side)
REAR SIGHT
RECEIVER
FRONT SIGHT
MUZZLE
BARREL
FOREARM
PUMPING
HANDLE
3
Page 3
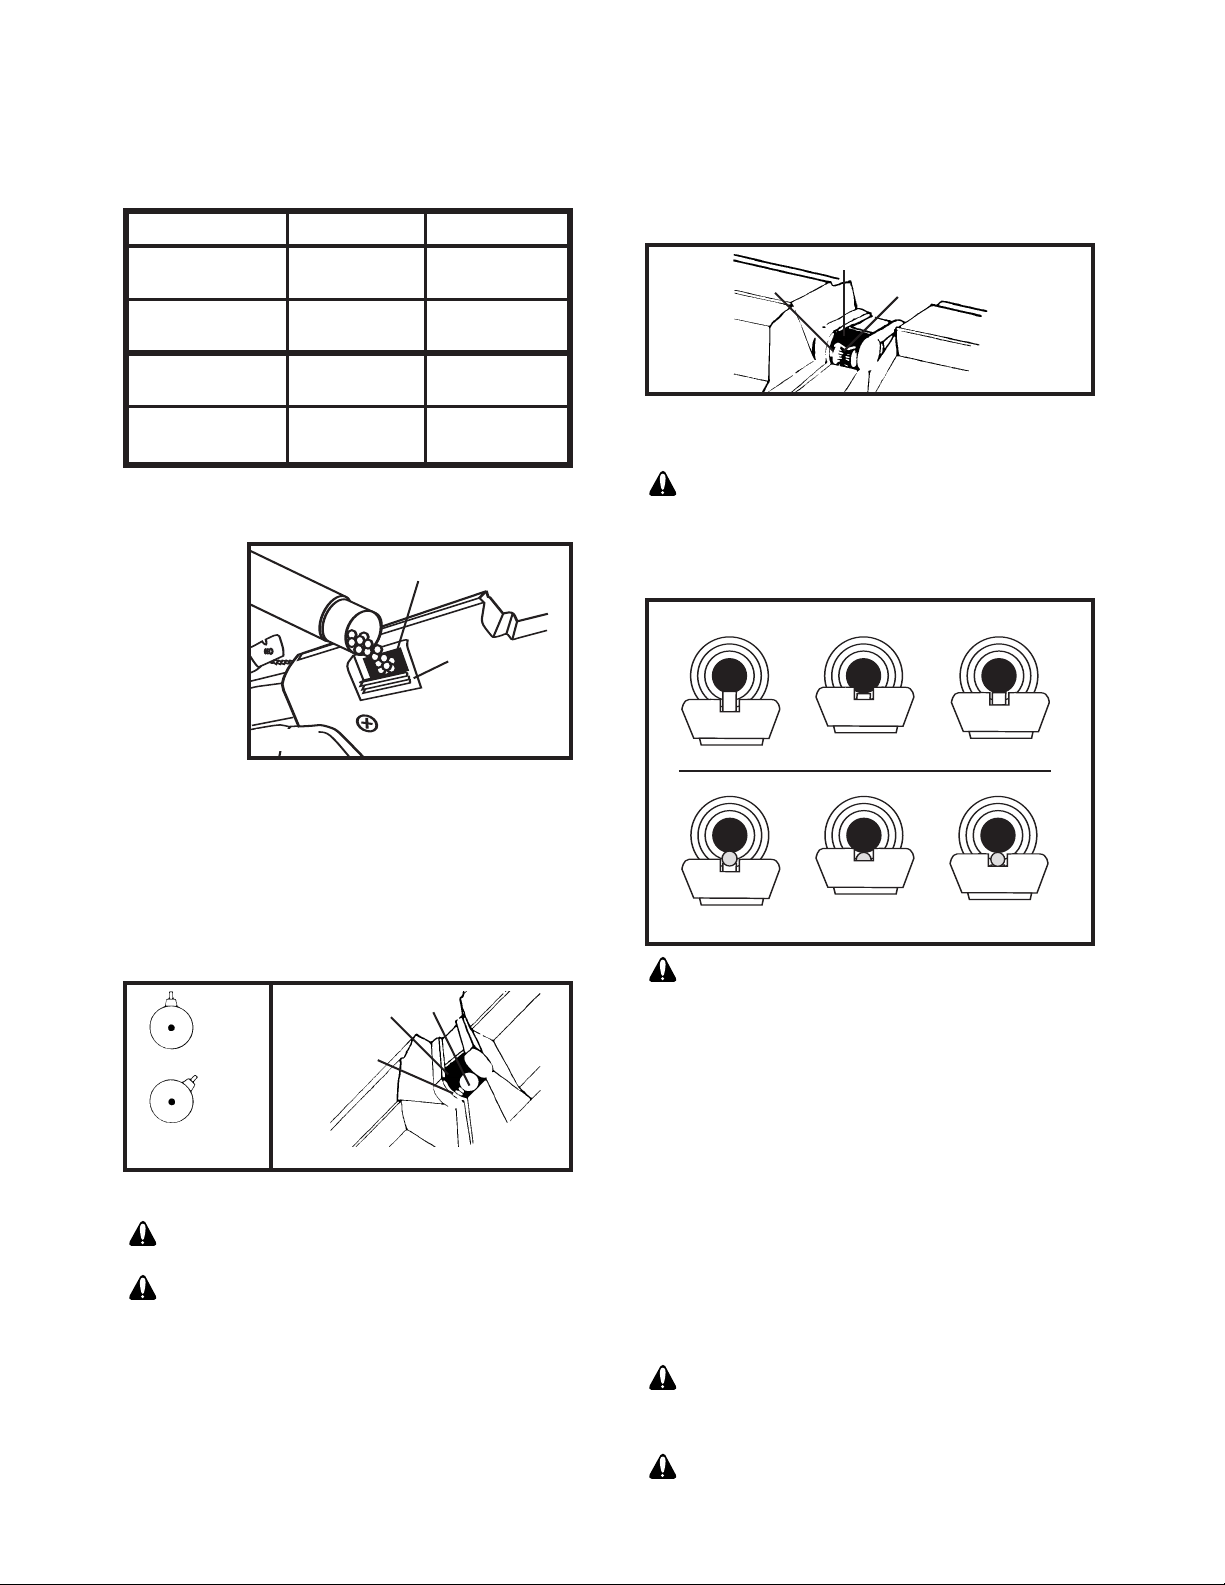
We recommend the following number of pumps for differ-
Blade Front Sight
TOO HIGH TOO LOW
J
UST RIGHT
TOO HIGH TOO LOW
JUST RIGHT
Fiber Optic Front Sight
ent shooting conditions.
• For indoor shooting, 2 pumps
• For 10-meter (33-ft.) distance, 4 to 6 pumps.
• For longer distances, 7 to 10 pumps.
NOTE: Do not pump more than 10 times. Over pumping may
cause serious damage to the gun.
Bs PELLETS
B
MUZZLE VELOCITY
(10 PUMPS)
SHOOTING DISTANCE
(10 PUMPS)
750 fps - 229 mps 715 fps - 218 mps
291 yds. - 266 m 286 yds. - 261 m
IMPORTANT:
Do not allow a pellet to fall into the rear of the loading port
and become jammed in the BB feed hole. If this occurs, have
a qualified gunsmith remove the left receiver and clear the
loading port or return gun to Daisy.
IMPORTANT:
Care must be exercised when shooting pellets while the
magazine contains BBs. Loading a BB and pellet at the same
time may result in a jammed or obstructed barrel.
OADING PORT
MAGNETIC
IP
T
L
PELLET
(SOLID
END FORWARD)
MUZZLE VELOCITY
CANADA
(10 PUMPS)
SHOOTING DISTANCE
CANADA
(10 PUMPS)
Step 4. LOAD
FILLING THE BB MAGAZINE:
The loading
door is located
on the left side
of the receiver
(Figure 5).
Push the door
down and tilt
gun with muzzle end down.
Fill magazine
with approximately 50 BBs.
Do not overfill
or the feed system may not operate properly.
LOADING BBs:
With the bolt handle back and BBs in the magazine (See
“FILLING THE BB MAGAZINE” above), RAISE the muzzle of
the gun 45 degrees to 90 degrees. When raising the muzzle,
be sure the front sight is pointed upward since the gun may
not feed properly if it is on its side (Figure 6). A BB can be
seen on the magnetic tip by looking into the loading port
(Figure 7). If a BB does not feed onto the magnetic tip when
the muzzle is raised, shake the gun slightly until you see a BB
RIGHT
WRONG
Fig 6
in the loading port. Push bolt handle fully forwar
is in firing position.
CAUTION: Always view the BB or Pellet when
closing the bolt and loading port.
WARNING: BBs feed fr
ty which r
THE MAGAZINE OR CHAMBER IS EMPTY even if the gun
does not fir
LOADING PELLETS:
(See “TO EMPTY MAGAZINE,” Page 6), advance the bolt forward until the magnetic tip is visibly even with the rear edge
of the pellet loading port; lower the muzzle and load a pellet,
solid end forward (Figure 8). Push the bolt handle fully forward and the pellet is chambered in the firing position.
equires that the muzzle be raised.
With the bolt back and BBs removed from the magazine
490 fps - 149 mps 490 fps - 149 mps
247 yds. - 226 m 223 yds. - 204 m
BB MAGAZINE
Fig. 5
LOADING
PORT
MAGNETIC
TIP
BB
Fig. 7
om the magazine by gravi-
e a projectile one or more times.
4
PUSH LOADING
DOOR DOWN
TO OPEN
d and the BB
NEVER ASSUME
Fig. 8
Step 5. CLOSE BOLT
Close bolt by pushing fully forward on bolt handle to cham-
ber either a BB or pellet and lock the bolt.
CAUTION:
The gun is now loaded and ready to fire.
Step 6. AIM AT SAFE TARGET
Aim the gun at a safe target. To be a consistent marksman, use
the correct sight picture each time you fire your gun (Figure 9).
Never point a gun, loaded or unloaded, at anyone.
Fig. 9
CAUTION:
caution in selecting a safe target backstop. This gun should not
be used with BB gun target backstops. Pick targets that cannot
be penetrated or that will not cause ricochet because of their
hard surface. Use only targets and traps that are designed for
use with high power air guns. Do not shoot at water.
Due to the power of this air gun, use extra
Step 7. TAKE “OFF” TRIGGER SAFETY
(“PUSH FIRE”)
When you ar
ea is safe, take trigger safety “OFF” by pushing fr
ar
left so that r
gun is now cocked and r
should be handled with extr
e certain the tar
ed is exposed (See Figur
get, backstop and surr
eady to shoot. In this condition, it
eme car
e 3) (“PUSH FIRE”). Y
e.
ounding
om right to
our
Step 8. FIRE
After making sur
gently (but firmly) squeeze the trigger
8 to continue shooting, using the appr
e.
dur
NOTE: T
cated in Step 5.
e the gun is pointed in a safe dir
e, bolt must be completely closed as indi
o fir
. Repeat Steps 1 thr
opriate loading pr
ection,
ough
oce
-
-
CAUTION: Do not leave your gun pumped for an
extended period of time. Leaving your gun pumped for mor
than one hour could r
elease valve.
r
WARNING: If a BB or pellet does not fir
completing the operation steps, the gun is jammed. This is a
ous condition.
danger
esult in permanent damage to the air
e after
5
e
Page 4

Open the bolt and put “ON” trigger safety immediately. If
the bolt is not completely closed, do not try to close it until
after opening it by pulling the bolt handle all the way back.
The gun will not fire a projectile when the bolt is completely
open.
Repeat all operations except Step 4 (do not load BB or pellet), pumping gun 10 times. If a projectile still does not fire,
follow these steps carefully:
1. Open bolt.
2. Put trigger safety “ON”.
3. Clear barrel by running a cleaning rod through from the
muzzle end. Be careful not to damage the bolt tip by pushing
the rod through too hard. Do not reuse this BB or pellet.
4. Repeat operation steps. Make sure a BB or pellet is fed
into firing position. If after following the firing procedure the
projectile is not fired, return your gun to Daisy (See “REPAIR
OF DAISY GUNS” section).
UNLOAD PELLETS
The magnetic tip does not extract a pellet. You must shoot
the pellet out if a safe target is available. If a safe target is not
available, open bolt, put trigger safety “ON”, insert a cleaning
rod in the muzzle end and push the pellet out of the barrel.
Do not allow a pellet to fall into the rear of the loading port
and become jammed in the BB feed hole.
TO EMPTY MAGAZINE
Open bolt and put trigger safety “ON”. Open the BB magazine door, cup your hand over it and tilt the gun fully to the
left side. Shake gun until all BBs are removed. Then remove
BB from loading port (Figure 7). To make certain no BBs
remain, raise muzzle, shake well and work bolt forward and
all the way back several times, removing any BBs that
appear.
WARNING: Never assume gun is empty of pro-
jectiles. Always point the gun in a safe direction.
WARNING: EVEN IF YOU HAVE FIRED THE AIR-
GUN ONE OR MORE TIMES AND NO BB WAS EXPELLED, IT
DOES NOT MEAN THAT THE GUN IS EMPTY OF BBs.
CONTINUE TO TREAT THE AIRGUN AS IF IT IS LOADED.
REAR SIGHT ADJUSTMENT
Your air gun is equipped with an adjustable rear sight.
HOW TO ADJUST SIGHT RIGHT OR LEFT (WINDAGE):
Loosen screw “A” by turning counterclockwise (Figure 10).
Move rear sight to the right side of the gun to make it shoot
to the right, or to the left side of the gun to make the gun
shoot to the left. Make certain screw “A” is retightened after
adjustment.
HOW TO ADJUST SIGHT UP OR DOWN (ELEVATION):
Raise the rear sight by moving sight elevator back to make
the gun shoot higher. Lower the rear sight by moving the sight
elevator forward to make the gun shoot lower (Figure 11).
HOW TO
ADJUST SIGHT
LEFT OR RIGHT
(WINDAGE)
SCREW “A”
WINDAGE
PROPER CARE
To maintain top shooting performance, lightly oil the three
pumping lever hinges and the foam wiper on the piston every
1,000 shots (Figure 12). Use a 10-, 20- or 30-weight nondetergent, automotive motor oil. DO NOT use light, household
type oils or aerosol type spray lubricants since they may contain substances or additives harmful to the rubber seals or
other components. Clean the exterior by wiping with a soft,
clean, lightly oiled cloth. The screws are a gun blue finish.
Wipe with oil to prevent rust.
HINGES
PUMPING
OREARM
F
PUMP ROD
ig. 12
F
FOAM WIPER
CAUTION: Improper lubricants, such as aerosol
type spray lubricants, can ignite (diesel) during pumping. Use
only automotive motor oils.
STORAGE
Before putting the gun away in a cabinet or gun rack, shoot
the gun at a safe target to make sure the pump system and
barrel are empty. Then, open the bolt and place the trigger
safety “ON” (“PUSH SAFE”), then close the bolt. Always make
sure the gun is empty and the trigger safety is “ON” (“PUSH
SAFE”) before storage. The gun should also be clean, dry and
oiled.
Store projectiles in a separate location from the gun to keep
them away from untrained shooters.
WARNING: EVEN IF YOU HAVE FIRED THE AIR-
GUN ONE OR MORE TIMES AND NO BB WAS EXPELLED, IT
DOES NOT MEAN THAT THE GUN IS EMPTY OF BBs.
CONTINUE TO TREAT THE AIRGUN AS IF IT IS LOADED.
MODIFICATION
WARNING: The components of this gun were
engineered to deliver optimum performance. Any modification
or tampering with a gun may cause a malfunction and may
make it unsafe to use. Any change in performance, such as a
lowered trigger force and shortened trigger travel, indicates
possible wear and such gun should be inspected, replaced or
properly repaired by qualified personnel. Any gun that has
been dropped should be checked by qualified personnel to
insure that its function has not been effected.
WARNING: A GUN THAT IS NOT OPERATING
PROPERLY MAY BE DANGEROUS. IT SHOULD BE KEPT
SAFELY FROM USE BY ANYONE UNTIL REPAIRED OR
DESTROYED. DO NOT TRY TO TAKE THE GUN APART. IT IS
DIFFICULT TO REASSEMBLE, AND IMPROPER REASSEMBLY CAN CAUSE A HAZARDOUS CONDITION.
Fig. 10
HOW TO
ADJUST SIGHT
UP OR DOWN
(ELEVATION)
Fig. 11
CORRECT SIGHT ELEV
RAISE
6
TOR POSITION
A
SIGHT
ELEVATOR
LOWER
7
Page 5
GUNS IN WARRANTY
LIMITED ONE — YEAR WARRANTY
For one year from date of purchase, Daisy will repair or replace this
gun, free of charge, if defective in material or workmanship. Service is
available by returning the gun to Daisy Outdoor Products. Attach to
the gun your name and address and telephone number, description of
problem and proof of date of retail purchase (sales slip). Package and
send to Daisy Outdoor Products, transportation prepaid. This Warranty
gives you specific legal rights, and you may also have other rights
which may vary from state to state.
GUNS OUT OF WARRANTY
If your Daisy needs repair, call Customer Service at 1-800-713-2479
for repair or replacement charge. We accept Visa and Mastercard.
When paying by check or money order, please send with gun. Attach
to the gun your name, street address (Not Post Office Boxes) and
description of the problem. Package and send, transportation prepaid,
to Daisy Outdoor Products, Service Department. Daisy will repair the
gun or replace it with a reconditioned gun of the same model, if available, otherwise with a model of equivalent quality.
Exploded gun part drawings and price lists are available from Daisy
Service Department. Please make sure you state model number
stamped on barrel. Service and parts charges are subject to change
without notice.
Daisy®Outdoor Products
Service Department
308 West Stribling Drive
Rogers, AR 72756 U.S.A.
NOTE: We recommend returning guns via UPS.
SPECIFICATIONS: Model 901
ACTION Multi-pump pneumatic pump-up
BB repeater; single shot pellet
CALIBER .177 cal. (4.5mm)
AMMO CAPACITY 50-shot BB; single-shot pellet
OVERALL LENGTH 37.75 in. (95.8cm)
WEIGHT 3.2 lbs. (1.45 kg)
MAXIMUM SHOOTING BB: 291 yds. (266m)*
DISTANCE** Pellet: 286yds. (262m)*
MAXIMUM SHOOTING BB: 247 yds. (226m)*
DISTANCE**(CANADA) Pellet: 223yds. (204m)*
BARREL 20.8in. (53cm) rifled steel barrel
SAFETY Manual cr
block with red indicator
*Indicates 10 pumps
**With muzzle pointed upwar
oss bolt trigger
d at optimum angle
INTRODUCING
SHOOTING
89
Page 6

A MESSAGE TO PARENTS
Included in the material accompanying each new
PowerLine®is a check list covering the most important aspects
of proper gun handling. We urge you to use the check list in
assuring that anyone operating a PowerLine®has a thorough
understanding of these rules and is diligent in their practice.
Although not a firearm, a PowerLine®is a gun and not a toy.
Properly used and maintained, it will provide many hours of safe,
trouble free recreational shooting. Misused, it can be danger-
ous. Therefore, we recommend it be used only by someone
sixteen years of age or older and with adult supervision.
As the proud owner of a new PowerLine®gun, you have
become part of an American tradition dating back more than 100
years. Mechanically, a new PowerLine®is backed by nearly a
century of engineering know-how and experience in the manufacture of quality products.
Safe gun handling depends upon proper safety training and
the right attitude toward gun ownership. To help you, we have
designed this booklet to cover the basic facts everyone should
understand before shooting a gun. Take time to study it thoroughly. A proper understanding of these basics will greatly
increase your enjoyment of the lifetime sport of recreational air
gun shooting and, at the same time, give you the satisfaction of
knowing you are properly prepared to handle an air gun.
If your child becomes the owner of a
strongly urge a formal course of instruction in Shooting Education
for your child. Daisy products are age graded to help you pick the
right product for your child. There are a number of youth and
civic organizations which offer a complete 10 lesson course
based on guidelines developed by the training experts at Daisy
and they are listed in the section of CLUBS AND COMPETITION
near the back of this book. A quick check with them will let you
know when the next course will be starting in your area. If you
would like more detailed information, write: Special Market
Programs, Daisy, Box 220, Rogers, Arkansas 72757 or call 1-800643-3458.
WHAT IS A POWERLINE®?
Backed by 100 years of engineering know-how, the design
and craftsmanship of the PowerLine®rifles and pistols has
advanced to true gun levels. With much more power than traditional air guns, their sophistication in performance and operation
have brought them to the attention of even the most serious
sport shooters.
In recent years, sport shooters have begun to feel the
squeeze of limited space and money for firearm shooting. The
PowerLine®guns remove these limits for both the enthusiast
who wants low cost shooting for year-round training, indoors or
out, and dedicated shooters interested in shoulder-to-shoulder
competition. With a PowerLine®gun, looks, heft and performance add up to adult size shooting right at your doorstep, and at
a fraction of the cost of firearm shooting.
PROPER GUN HANDLING
You may be familiar with the responsibilities of proper gun
handling, but the fact that your new PowerLine®gun has much
more power than a traditional air gun means extra care is needed. In reviewing the basic rules of proper gun handling, keep in
mind that "Handling" means every time you touch your gun.
• Always keep the muzzle pointed in a safe direction.
• Treat every gun as if it were loaded
• Only load or cock a gun when you are shooting
• Anyone shooting or near a shooter should wear shooting
glasses and should be standing behind the shooter
• Never climb or jump with a gun.
• A
void ricochet.
• Keep the muzzle clear.
• Guns not in use should always be unloaded.
• Respect other people’s property.
• Check your target and beyond your target.
Almost all of the air gun related accidents occurring in this
country are caused by careless use or misuse of the gun and
shooting at improper targets. These incidents can be eliminated
if the shooter handles the gun properly.
PowerLine®gun, we
.
YOUR POWERLINE®IS A TARGET GUN
Your PowerLine®gun has been designed for target shooting
and is suited for use both indoors and out to help you develop
your marksmanship skills. However, your PowerLine®gun means
greatly increased velocity and energy, so take care to prepare
your target. Target traps designed for use with low-velocity (less
than 350 feet-per-second) spring-piston BB and pellet guns
should not be used with a PowerLine®gun. Always use a target trap designed to prevent ricochet and put extra reinforcement behind your target to compensate for the added power.
(See "How to Make an Indoor-Outdoor Target," page 14).
TIPS ON MARKSMANSHIP
Many people become proficient at gun handling without
learning the basics of proper marksmanship. Yet, these basics
are intended for one purpose–to increase your skills. If you
haven't learned them, now is the time to start. If you have, this
may serve as a timely review.
Although there are four basic positions for shooting - prone,
sitting, kneeling, and standing, the one most challenging and the
one you will undoubtedly use most often is standing. To assume
the proper position, follow these simple rules: (All directions have
been given for right hand shooters - left hand shooters should, of
course, reverse the procedure.)
PRONE
KNEELING
(LOW)
SITTING
(LOW)
N.R.A.
STANDING
STANDING
• From a position directly facing the target, face to the right
of the line of fire. The knees should be straight but not
locked.
• Grasp the forearm of the gun in the left hand and place
the butt of your gun in the shoulder pocket with the muzzle pointed upward.
• With the right hand, grasp the stock at the pistol grip, then
press your cheek gently against the stock as far forward
as possible without straining.
• Thrust the left hip forward, lower the gun to shoulder
height, and with the left elbow directly under the gun, let
the left upper arm rest against your body.
• The forearm of the gun should be supported in the palm of
the left hand. (Thumb and fingertips, if using the NRA
standing position.)
• Shift your weight to the left foot and lean your upper body
away from the target.
To assume the other positions: (It should be noted again that
left hand shooters reverse these directions when assuming
the following positions).
PRONE
• Half face to the right, then lie at an angle of about 45
degrees to the line of fire. The left leg should be completely
relaxed. The right leg should angle away from the spine
and may be bent or straight. The feet should be as flat on
the ground as possible.
1110
Page 7

SITTING
• Half face to the right, then in the low position, cross your
legs in front of you with the outside of each foot resting on
the ground and supporting the knees. Elbows should be
placed near the knees, forming triangles to support the rifle.
• In the high position, legs are not crossed; the feet are well
spread, with the heels braced, and the body leaning forward
so the elbows may be braced by the knees.
KNEELING
• Half face to the right and drop to the right knee. In the low
position, the left foot should be extended as far forward as
is comfortable while the right leg is flat on the ground with
the shooter sitting on the side of his foot. In the high position, the shooter sits on his right heel.
SIGHTING-IN YOUR GUN
The first step in proper sight
alignment is to determine the
shot grouping of your new airgun. To do this, position a rest,
such as a table or bench, 33 feet
from your target. Place your rifle
on the rest and aiming at the
same point on the target each
time, fire three shots. Do not
attempt to make any adjustments during the three shots. At
this point you are only interested in how well your shots
group. Once you have determined the grouping ability of you
and your rifle, you can then adjust your sights to bring the
group on target. NOTE: It may be necessary for each person
shooting your airgun to realign the sights to fit his sight pattern.
HOW TO MAKE AN INDOOR-OUTDOOR TARGET
Because of the velocity
and energy of PowerLine®airguns, care must be exercised in
assuring that you have an adequate backstop for your target.
A cardboard box 16 inches or
more deep, and with at least
two-foot square front surface,
will serve as the basis for the
target. Center 3 inches of tightly
bound magazines (do not substitute newspapers) on the inside back wall of the box opposite the target, and fill the box with tightly packed, crumpled
newspaper to prevent ricochet. Once the backstop is complete, tape the target to the front of the box. Do not use
metal fasteners–ammunition can ricochet. As the target is
used, the backing must be watched closely and should be
replaced when the ammunition has penetrated half the thickness of the magazines.
doorways in the area
should be blocked. A
canvas or heavy blanket should be hung
behind the target backstop which is free from
the wall and clears the
floor. This will prevent
ricochet should you
miss the backstop.
Finally, your target
should be well lighted.
Remember to
keep your PowerLine
®
unloaded until the target is up and you are
ready to shoot. Never
point in any direction
except down range.
OUTDOOR SHOOTING
While your air gun is excellent for outdoor shooting, its
exceptional power means extra care is needed. The target
backstop described on the preceding page will work equally
well for outdoor shooting where space is limited. Be sure the
target area is clear and safe before shooting.
USE THE RIGHT AMMUNITION
PowerLine®guns are designed to use various types of
ammunition. Some models shoot BBs only, while others
shoot pellets only, and some shoot either BBs or pellets.
Make certain you check the instructions stamped on your
PowerLine
®
gun to assure that you use only the correct
ammunition. The PowerLine®901 shoots .177 caliber BBs
and pellets. If improper ammunition is used, your gun will not
feed correctly and may jam, possibly resulting in serious
injury. Because dirty and misshapen ammunition can jam your
gun, DO NOT reuse BBs or pellets.
LEARN TO SHOOT SAFELY
Daisy Outdoor Products has a rich heritage of teaching
young and first time shooters to shoot safely. In order to
effectively implement shooting education programs nationwide, Daisy has partnered with the following organizations
which teach shooting safety and provide additional shooting
safety materials and information. We encourage you to contact Daisy at 1-800-643-3458 or one of these organizations to
sign up for a shooting safety class in your area.
PROGRAM MATERIALS & EQUIPMENT
Daisy Outdoor Products
800-713-2479
www.daisy.com
CAUTION: Whether you purchase a target trap or make
your own, it is important to remember that they will wear out
with continued use. Because of this, you should always
place your backstop where it will be safe should it fail and
check it carefully before and after each use. A rebound or ricochet is an indication that the backstop is faulty and that you
should stop using it immediately.
INDOOR SHOOTING
Inside as well as out, the rules of proper gun handling
remain the same. If these rules are observed, your
PowerLine®is safe for indoor shooting. Just remember to
take the gun's power into account and carefully follow the
instructions for constructing the target backstop.
If you are using a multi-pump PowerLine®pneumatic air
gun, two pumps are recommended for indoor shooting.
This will give you a velocity only slightly higher than the conventional spring-piston gun. However, the PowerLine®CO2
guns, the high performance spring-piston guns and the single
pump pneumatic airguns deliver consistent maximum power,
so make certain that the target backstop has been properly
built.
For safety reasons, you must have the target placed so
that there are not entry ways in front of or to the side of the
firing line or behind the targets. If this is not possible, then
12
PROGRAM INFORMATION
American Legion Junior Shooting Sports Program
317-630-1249
www.legion.org
NRA Youth Programs
800-672-3888 ext. 1505
www.nrahq.org/youth
Daisy / Jaycees Shooting Education Program
The United States Junior Chamber of Commerce
800-529-2337
www.usjaycees.org
4-H Shooting Sports
Contact your County Extension Agent
www.4-h.org
Junior Olympic Shooting Program
719-866-4670
www.usashooting.com
13
 Loading...