

Page 1
OPERATION MANUAL
MODEL 717 By
SINGLE PUMP PNEUMATIC
.177cal. (4.5mm) LEAD AIRGUN PELLET
WARNING:
NOT A TOY. ADULT SUPERVISION REQUIRED.
MISUSE OR CARELESS USE MAY CAUSE SERIOUS INJURY OR DEATH.
MAY BE DANGEROUS UP TO 209 YARDS (191 METERS).
THIS IS A HIGH POWER AIR GUN RECOMMENDED FOR USE BY THOSE
16 YEARS OF AGE OR OLDER. READ ALL INSTRUCTIONS BEFORE
USING. THE PURCHASER AND USER SHOULD CONFORM TO ALL LAWS
GOVERNING USE AND OWNERSHIP OF AIR GUNS.
Page 2
WARNING:
THIS GUN CAN CAUSE SERIOUS INJURY OR DEATH. READ AND
FOLLOW THE INSTRUCTIONS CAREFULLY. DO NOT LOAD A PELLET INTO
THE GUN UNTIL YOU ARE READY TO SHOOT. IF YOU DO LOAD A PELLET AND
THEN DECIDE NOT TO SHOOT, REMOVE IT EITHER MANUALLY OR BY SHOOTING
THE GUN AT A SAFE TARGET. AN UNLOADED, UNCOCKED GUN IS SAFEST.
ACCIDENTS HAPPEN FAST, AND ACCIDENTALLY INJURING OR KILLING SOMEONE
IS A TERRIBLE THING. PLEASE SHOOT SAFELY.
This safety alert symbol indicates important safety messages in this manual. When
you see this symbol, be alert to the possibility of personal injury and carefully read
the message that follows.
The PowerLine® Model 717 shoots with much more muzzle energy than the traditional
spring powered airgun. More power means greater chance of serious injury. Use extreme
caution when operating this gun.
Although your new Daisy® is not a firearm, it has lethal potential and should be treated
with caution and respect due any conventional firearm. Always remember, the first and
most important safety feature of any gun is the shooter. All safeties are mechanical devices and the shooter is the only part of the system that can make a gun safe–or unsafe.
DON’T DEPEND ON MECHANICAL SAFETIES–think ahead and avoid situations that
might lead to accidents.
Guns differ in their operations and you are never ready to fire any gun until you are
thoroughly familiar with it. Read the following operating instructions and WITHOUT
LOADING A PROJECTILE, proceed through the operating steps (dry firing your gun several times at a safe target). This will enable you to learn to operate the PowerLine®
Model 717 properly and safely.
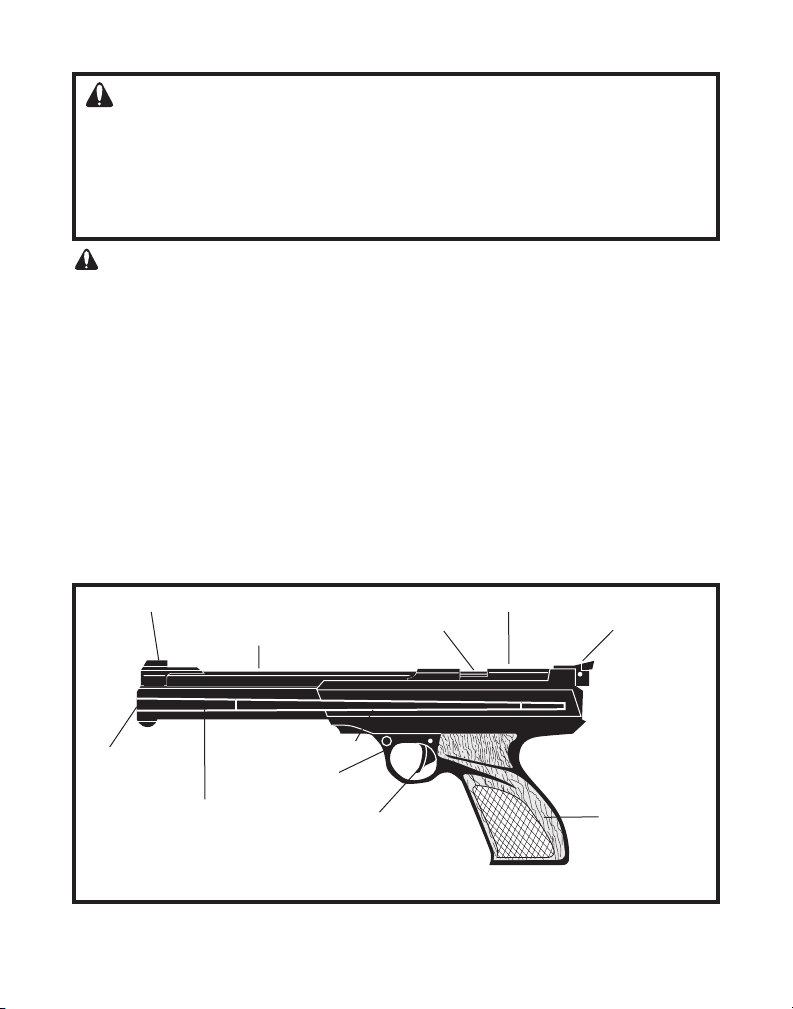
FRONT SIGHT
MUZZLE
FIGURE 1
PUMP LEVER
BARREL
TRIGGER
SAFETY
TRIGGER
BOLT HANDLE
BOLT
ADJUSTABLE
REAR SIGHT
GRIP
POWERLINE 717
2
Page 3
OPERATION STEPS
Step 1. Put “ON SAFE” Step 5. CLOSE BOLT
Step 2. OPEN BOLT Step 6. AIM
Step 3. PUMP Step 7. Take “OFF SAFE”
Step 4. LOAD Step 8. FIRE
Step 1. Put “ON SAFE”
Push trigger safety from left to right until no red is showing. In this position, the pistol (in
proper working condition) cannot be fired by pulling the trigger.
CAUTION: Even when the safety is
“ON SAFE” you should continue to
FIG. 2
handle the pistol safely. Don’t point the gun
at anything that you don’t intend to shoot.
NOTE: The safety is not automatic. It will
only do its job when you do yours. With the
index finger out of the trigger area, move
the safety lever to the “ON SAFE” position.
REMEMBER, THE BEST SAFETY IS
GOOD GUN HANDLING.
Step 2. OPEN BOLT
Lift up and pull straight back on the bolt
handle. The gun cannot fire with the bolt
open. NOTE: BOLT MUST BE OPEN TO
PUMP-UP GUN.
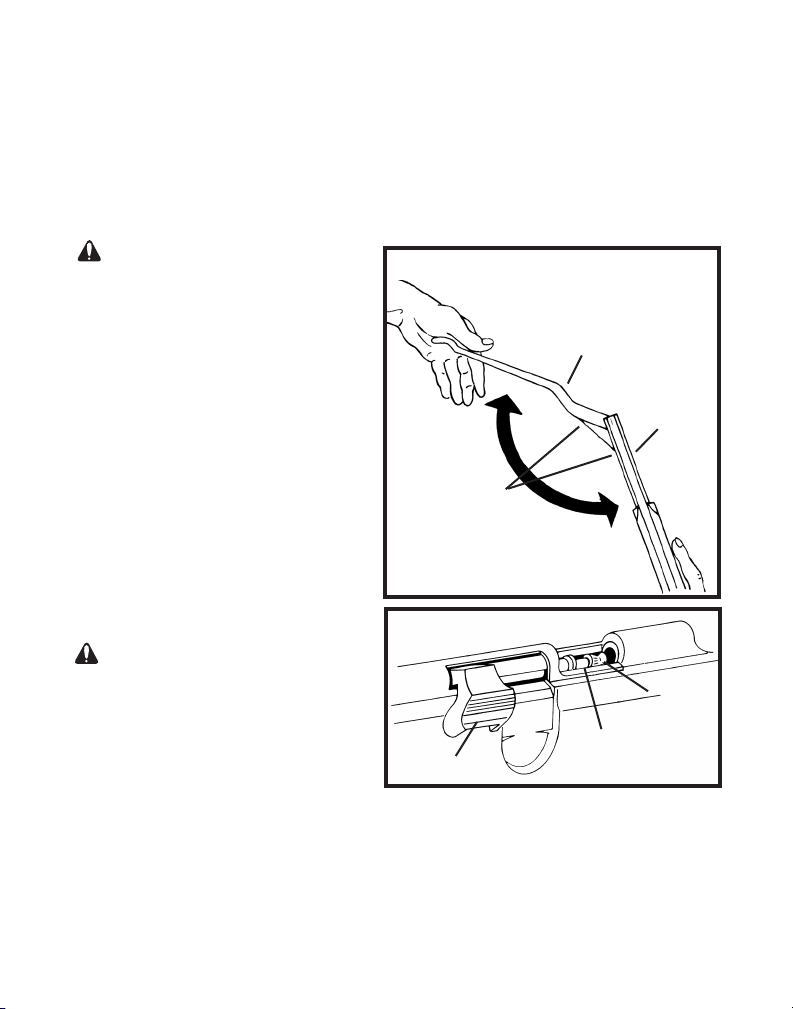
Step 3. PUMP
With the bolt open, pump gun only once.
Any additional pumping will not increase
velocity. Be careful to keep fingers out of
pumping mechanism when closing the
pump lever. (See PINCH POINTS in Fig. 2)
Trigger finger should be extended
against the right side of the gun to
react against lever closing force.
FIG. 3
WARNING: After gun has been
pumped up one, do not attempt to pump
again or open pump lever as the lever
is under pressure and could fly open,
possible causing injury.
Step 4. LOAD
With the bolt open, load one pellet (solid
BOLT HANDLE
end forward) into the feed track. (Fig 3)
Step 5. CLOSE BOLT
Push the bolt fully forward, then push bolt handle down. The gun is now ready to fire.
CAUTION: It is very important that the bolt be completely closed. Never close the bolt
while the trigger is being pulled.
If the gun does not fire when the trigger is pulled, open the bolt by pulling the bolt handle
all the way back and put “ON SAFE” immediately, then close the bolt completely and
continue to Step 6.
3
When pumping, pull lever as far forward as possible, then with curved
end of lever in open palm, close
lever in fast continuous motion.
PUMP LEVER
BARREL
PINCH
POINTS
BOLT TIP
Page 4

Step 6. AIM
Point gun toward target. Pick a target backstop
that cannot be penetrated. (Take final sighting
after Step 7, - See Fig. 3 for correct sight picture).
FIG. 4
FRONT
SIGHT
Step 7. TAKE “OFF SAFE”
Take trigger safety “OFF SAFE” by pushing from
right to left so that red is showing. (Take final
sighting at this point) (Fig. 4)
Step 8. FIRE
The gun can be safely fired after properly
completing the operating steps.
IMPORTANT: Do not leave the gun in a pumped
up condition for more than one hour or the air
REAR
SIGHT
Use the correct sight picture
each time you fire the gun
release valve may be damaged and cause a
permanent leak.
WARNING: If a pellet does not fire after completing the operating steps, the gun is
jammed. This is a dangerous condition.
OPEN THE BOLT AT ONCE, THEN REPEAT ALL OPERATIONS EXCEPT STEP 4 (DO
NOT LOAD A PELLET). IF A PELLET STILL DOES NOT FIRE, FOLLOW THESE STEPS
CAREFULLY:
Step 1. Open bolt.
Step 2. Put trigger safety “ON SAFE”
Step 3. Clear the barrel by running a size .177 cleaning rod through the barrel from
the muzzle end. Be careful not to damage the bolt tip by pushing the rod
through too hard.
Step 4. Repeat the operating steps. Make sure a pellet is fed into the firing
position. If after following the firing procedure the pellet is not fired, return
your gun to the Daisy Service Department. (See “REPAIR OF GUN” section).
UNLOAD PELLETS
The bolt does not extract a pellet. Point the gun in a safe direction and fire, or open the
bolt and insert a .177 cleaning rod in the muzzle
end of the barrel and push the pellet out.
REAR SIGHT ADJUSTMENT
ELEVATION: (Fig. 5) (Up or down) To move the
point of impact up, raise the sight by turning the elevation screw “A” counterclockwise. To lower the
point of impact, lower the sight by turning the elevation screw “A” clockwise. At a range of 10 meters,
one click will move the point of impact .077 inch.
WINDAGE: (Fig. 5) (Right or left) To move the
point of impact left, move the sight left by turning
screw “B” counterclockwise. To move the sight to
the right, turn screw “B” clockwise. At a range of 10
meters, one click will move the point of impact .054
FIG. 5
REAR
SIGHT
SCREW
RAISE LOWER
LEFT RIGHT
“A”
4
Page 5

PUMP LEVER ADJUSTMENT
IMPORTANT: After 500 shots, and every 1,000 shots thereafter, the length of the pump
lever stroke may need adjustment in order to maintain maximum performance. To check
and make the needed adjustments, follow these steps:
Step 1. After firing the gun, open the pump lever and close to the point where a slight
resistance can be felt and stop.
Step 2. Measure the distance between the receiver and end of the pump lever as shown
in Figure 6. This dimension should be between 1 1/8 and 1 1/2 inches. If the
clearance dimension on your gun is within this range, no adjustment is required.
If the clearance dimension is not within this range, proceed to Step 3.
Step 3. With the pump lever in the fully open position, place a screwdriver with a large
blade between slots in the threaded portion of the pump. (Fig. 7) To increase the
pump lever clearance, rotate the screwdriver clockwise. To decrease the pump
lever clearance, rotate the screwdriver counterclockwise.
NOTE: Adjusting the pump lever to a clearance dimension larger than 1 1/2 inches
will overstress the gun and will result in permanent damage to the gun. Maximum
performance will be achieved by adjusting the clearance as specified in Step 2.
FIG. 7
PUMP LEVER
PUMP LEVER
Rotate screwdriver
clockwise to increase
clearance
RECEIVER
1 1/8” – 1 1/2”
SLOTS
Rotate screwdriver
counterclockwise to
decrease clearance
PROPER CARE AND MAINTENANCE
To maintain top shooting performance, lightly oil the three pump lever hinges and pump
oil wiper on the pump rod every 1,000 shots (Fig. 8). Excessive oil on the wiper will affect
accuracy. When a finger is pressed against the wiper, only a light trace of oil should be
deposited on the finger. Excess oil on the wiper will migrate into the pump system and
can affect accuracy from heavy oil deposits in the barrel. Use only a 20-weight nondetergent automotive motor oil. Other type oils may ruin the seals. The exterior is cleaned
by wiping with a soft, clean cloth. The screws and rear sight should be wiped with oil to
prevent rust.
5
Page 6

BARREL:
The barrel must be clean and dry to attain maximum accuracy. Run clean, dry patches
through the barrel until all foreign material is removed. It may be necessary to clean the
barrel approximately every 50 shots to achieve maximum accuracy. Frequent cleaning
may be necessary when the gun is new until all excess oil is removed from the pump
system. If the gun is to be stored for a period of time, a light coat of oil in the barrel will
help prevent corrosion.
FIG. 8
HINGES
OIL WIPER
AMMUNITION
Precision MaxTM Pellets are recommended for use in the PowerLine® Model 717. These
pellets are uniform in size with minimal weight variations. The flat wad-cutting designed
head will punch a clean hole to provide for easier and more accurate scoring. The design
of the Precision MaxTM Pellet is engineered to produce maximum accuracy in all
air rifles and pistols.
GRIPS
Left hand grips are available for your PowerLine® 717 by contacting customer service at
1-800-713-2479. Ask for Item number 5822.
STORAGE
NEVER STORE A LOADED OR COCKED GUN. Shoot the gun at a safe target to make
sure the pump system and barrel are empty. Place the trigger safety in the “ON SAFE”
position. Keep the gun away from children and untrained shooters. Store pellets
separately from the gun to keep them from untrained shooters. Protect your PowerLine®
Model 717 from moisture and dirt; clean and lightly oil the gun to prevent corrosion and
MODIFICATION
WARNING: The components of this gun were engineered and manufactured to
deliver optimum performance. Any modification or tampering with a gun may cause a
malfunction and may make it unsafe to use. Such a gun should be inspected, replaced
or properly repaired by qualified personnel. Any gun that has been dropped should be
checked by qualified personnel to ensure that its function has not been affected.
wrap it in a smooth, dry cloth, or store the gun in the package it came in when new.
6
Page 7

WARNING:
IT SHOULD BE KEPT SAFELY FROM USE BY ANYONE UNTIL REPAIRED OR
DESTROYED. DO NOT TRY TO TAKE THE GUN APART. IT IS DIFFICULT TO
REASSEM
CONDITION.
A GUN THAT IS NOT OPERATING PROPERLY MAY BE DANGEROUS.
BLE, AND IMPROPER REASSEMBLY CAN CAUSE A HAZARDOUS
REPAIR OF DAISY AIR PISTOLS
GUNS IN WARRANTY: LIMITED ONE-YEAR WARRANTY
For one year from date of purchase, Daisy® will repair or replace and return this gun,
free of charge, if defective in material or workmanship. Service is available by returning
the gun to Daisy® Outdoor Products (refer to important note below). Attach to the gun,
your name, address and telephone number, description of problem and proof of date of
retail purchase (sales slip). Package and send transportation prepaid to Daisy®. This
warranty gives you specific legal rights; you may also have other rights which may vary
from state to state. IMPORTANT: You can return your inoperative pistol to Daisy® for repair
via United Parcel Service. Shoot gun in a safe direction to discharge any pressure, empty all
ammo and put safety “ON SAFE” before returning the gun to Daisy®. You must include your
street address for Daisy® to send your pistol directly back to you through UPS delivery.
GUNS OUT OF WARRANTY
If your Daisy® Air Pistol needs repair, please call 1-800-713-2479 for repair charges.
Daisy® will repair the gun or replace it with a reconditioned gun of the same model, if
available; otherwise, with a model of equivalent quality.
SPECIFICATIONS – POWERLINE
ACTION Bolt action/
CALIBER .177 cal. (4.5 mm) lead airgun pellets
AMMUNITION CAPACITY Single shot .177 cal. (4.5 mm) pellet
SAFETY Crossbolt trigger block
MAXIMUM PUMP FORCE 17 Lbs. (75.6 N)
TRIGGER PULL FORCE 4.0 lbf (17.8 N)
OVERALL LENGTH 13.5 in. (34.30 cm)
WEIGHT 2.25 lbs (1.0 kg)
MAXIMUM VELOCITY 400 fps, (122 mps)
BARREL .177 cal., 9.61 in. long (24.41 cm)
SIGHTS Rear sight adjustable for windage and elevation
Front sight blade and ramp
TARGET DISTANCE 33 ft, (10 m)
MAXIMUM SHOOTING DISTANCE 209 yds. (191 m)
®
717
single pump pneumatic
7
Page 8

CLUBS AND COMPETITION
Throughout its history, Daisy Outdoor Products has supported safety education and
competitive target shooting programs. These programs have extended opportunities for
hundreds of thousands of young shooters and adults to learn the responsibilities and
skills that the shooting sports demand. Today, the company continues to provide teaching aids, special airguns, and turn-key kits so that camps, schools, and civic groups have
the right materials to properly teach safe shooting skills.
PROGRAM MATERIALS
& EQUIPMENT
Daisy Outdoor Products
Special Market Programs
400 West Stribling Drive
Rogers, AR 72756
PROGRAM INFORMATION
National Guard Junior
Marksmanship Program
Details available from:
NGMTC
Camp Robinson
North Little Rock, AR 72118
AMERICAN LEGION JUNIOR
SHOOTING SPORTS PROGRAM
Details available from:
The American Legion
P.O. Box 1055
Indianapolis, IN 46206
DAISY/JAYCEES SHOOTING
EDUCATION PROGRAM
Details available from:
The United States Junior
Chamber of Commerce
P.O. Box 7
Tulsa, OK 74121-0007
4-H SHOOTING SPORTS
Contact your County
Extension Agent
JUNIOR OLYMPIC
SHOOTING PROGRAM
AND NRA JUNIOR CLUBS
Details available from:
National Rifle Assoc.
Competitions Div.
1600 Rhode Island Ave., N.W.
Washington, D.C. 20036
Rogers, AR 72757-0220 U.S.A.
(479) 636-1200 • 800-643-3458
www.daisy.com
PRINTED IN U.S.A.
PART NO. 135258-000
REV. 10/04
 Loading...