

Page 1
Model 74
Semi-Automatic
CO
this airgun to the retail store where you purchased it. If
you are dissatisfied with the quality or performance of
this airgun, please call Customer Service or return it to:
Please fill out the form on the inside back cover and
(for proof of purchase use only) along with your airgun.
All Daisy, PowerLine, Winchester Air Rifles and Avanti
airguns have a one year warranty from the date of
purchase. Sights have a 90 day warranty. Read the
Operation Manual for specific warranty information.
Daisy can only offer refunds on items purchased directly
from Daisy’s Customer Service Department or our
Website. If you bought this item from a retail store, we will
gladly repair or replace your item per our warranty policy.
Please call Daisy Customer Service at 1-800-713-2479
Powered BB Rie
2
DO NOT
RETURN
Daisy Outdoor Products
308 West Stribling Drive
Rogers, AR 72756
Attn: Service Department
return it with a copy of your dated sales receipt
if you have any questions.
READ YOUR OPERATION MANUAL AND ALL
WARNINGS BEFORE USING.
NOT A TOY. ADULT SUPERVISION
REQUIRED. MISUSE OR CARELESS USE
MAY CAUSE SERIOUS INJURY, PARTICULARLY TO THE EYE. MAY BE
DANGEROUS UP TO 211 YARDS (193METERS).
READ ALL INSTRUCTIONS BEFORE USING. THE PURCHASER AND USER
SHOULD CONFORM TO ALL LAWS GOVERNING USE AND OWNERSHIP OF
AIR GUNS. AIR GUNS ARE RECOMMENDED FOR USE BY THOSE TEN
YEARS OF AGE OR OLDER UNDER ADULT SUPERVISION.
ACCORDING TO CALIFORNIA LAW
DO NOT BRANDISH OR DISPL AY THIS
AIRGUN IN PUBLIC - IT MAY CONFUSE
PEOPLE AND MAY BE A CRIME. POLICE AND OTHER S MAY THINK
THIS AIRGUN IS A FIREARM. DO NOT CHANGE THE COLORATION AND
MARKINGS TO MAKE IT LOOK MORE LIKE A FIREARM. THAT IS
DANGEROUS AND MAY BE A CRIME.
EVEN IF YOU FIRED THE AIRGUN ONE
OR MORE TIMES AND NO BB IS
EXPELLED, IT DOES NOT ME AN THAT THE GUN IS EMPTY OF BBS.
CONTINUE TO TREAT THE AIRGUN AS IF IT IS LOADED
Page 2

La version española
comienza en la página 18
La version française
commence à la page 34
2
Page 3
3
Page 4
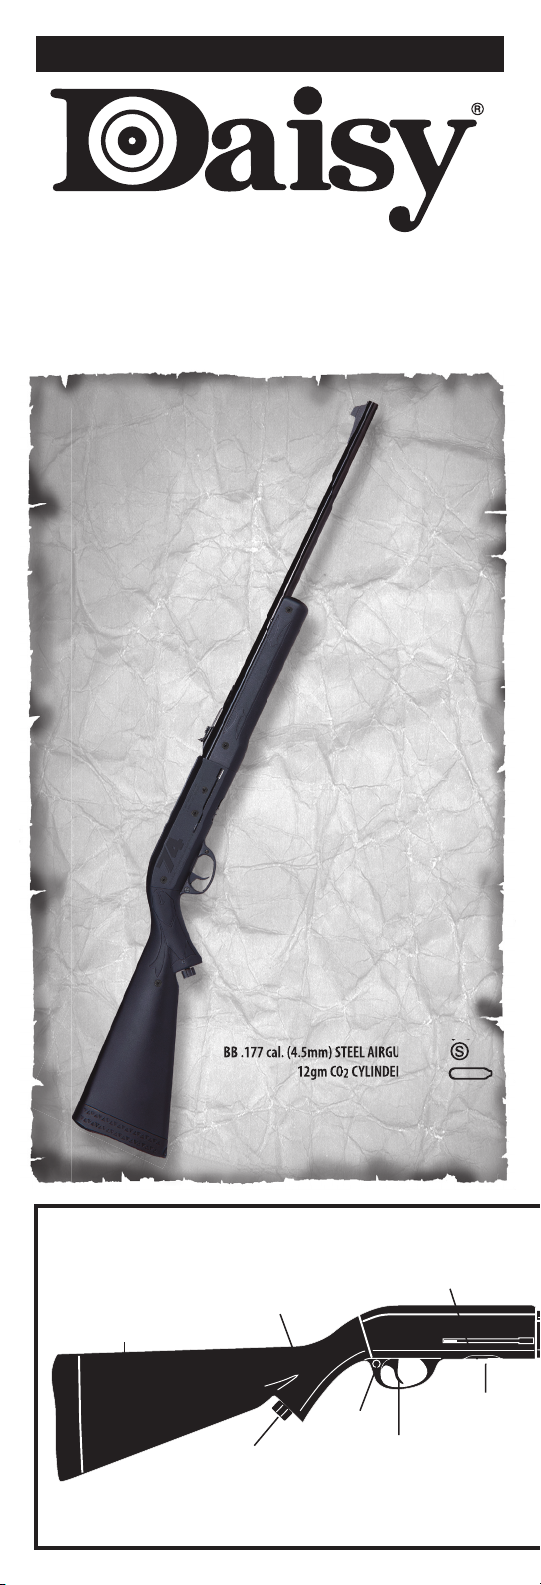
OPERATION MANUAL
BB .177 cal. (4.5mm) STEEL AIRGUN SHOT
12gm CO
2
CYLINDERS ONLY
Model 74
Semi-Automatic
CO2 Powered BB Ri e
STOCK
CO2 CYLINDER
PUNCTURE
FIG. 1
BB .177 cal. (4.5mm) STEEL AIRGUN SHOT
12gm CO2 CYLINDERS ONLY
CO2 CYLINDER
RETAINER
(INSIDE GRIP)
SAFETY
TRIGGER
SCREW
4
AMMUNITION
MAGAZINE
200 ROUND
AMMUNITION
RESERVOIR
Page 5
NOT A TOY. ADULT SUPERVISION
WARNING:
REQUIRED. MISUSE OR CARELESS
USE MAY CAUSE SERIOUS INJURY, PARTICULARLY TO THE EYE. MAY BE
DANGEROUS UP TO 211 YARDS (193METERS).
READ ALL INSTRUCTIONS BEFORE USING. THE PURCHASER AND USER
SHOULD CONFORM TO ALL LAWS GOVERNING USE AND OWNERSHIP OF
AIR GUNS. AIR GUNS ARE RECOMMENDED FOR USE BY THOSE TEN YEARS
OF AGE OR OLDER UNDER ADULT SUPERVISION.
ACCORDING TO CALIFORNIA LAW
DO NOT BRANDISH OR DISPLAY
WARNING:
THIS AIRGUN IN PUBLIC - IT MAY
CONFUSE PEOPLE AND MAY BE A CRIME. POLICE AND OTHERS MAY THINK
THIS AIRGUN IS A FIREARM. DO NOT CHANGE THE COLORATION AND
MARKINGS TO MAKE IT LOOK MORE LIKE A FIREARM. THAT IS DANGEROUS
AND MAY BE A CRIME.
This safety alert symbol indicates important safety
messages in this manual. When you see this symbol, be alert to
the possibility of personal injury and carefully read the
message that follows.
The Rules of safe gun handling found in the Introduction to
Air Rie Shooting section of this manual (begins on Page 12)
is an important guide to the care and safe handling of any
gun. READ THIS SECTION. It is your responsibility as the
owner of this gun to make certain that anyone using the gun
is instructed in its safe and proper operation.
As the proud owner of a Daisy air gun, you have become
part of an American tradition which dates back to the time
when your great-grandfather was a small boy. Your new Daisy
gun is the result of more than 100 years experience by Daisy
in the manufacture of quality products.
Although your new Daisy is not a rearm, it is a gun and
should be treated with care and respect. Always remember,
the rst and most important safety aspect of any gun is the
shooter. All safeties are mechanical devices and the shooter
is the only part of the system that can make a gun safe--or
unsafe. DON’T DEPEND ON MECHANICAL SAFETIES.
Think ahead and avoid situations that might lead to accidents.
FOR YOUR SAFETY AND THE SAFETY OF OTHERS,
READ COMPLETE OPERATING INSTRUCTIONS BEFORE
ATTEMPTING TO SHOOT THE GUN. Guns dier in their
operations and you are never ready to re any gun until you
are thoroughly familiar with it. Read the operating instructions
and WITHOUT LOADING ANY AMMUNITION, proceed
several times through the operating steps with your gun (dry
re the gun at a safe target) so that you will be able to operate
the Model 74 properly and safely.
ADJUSTABLE
REAR SIGHT
FRONT
SIGHT
BARREL
MUZZLE
5
Page 6

PRIOR TO OPERATION
Put “ON” SAFE – NO RED SHOWING (refer to Operation Step 1).
OPERATION STEPS:
WARNING: Be sure the gun is always pointed in a safe
direction. Never point the gun at anyone. Always assume and treat the
gun as if it were loaded and ready to re. The gun may continue to be
red until the built-in BB magazine is empty or the CO2 cylinder needs
to be replaced. Once the built-in BB magazine is empty, Steps 1,3,4,5,6,
and 7 should be followed. If the CO2 cylinder is empty, then all 7 Steps
should be followed. (Approximately 100 shots can be expected per
CO2 cylinder).
Step 1. Put “ON” safety - No red showing.
Step 2. Insert CO2 Cylinder
Step 3. Fill BB reservoir with a maximum of 200 BBs
Step 4. Fill built-in magazine with a maximum of 15 BBs.
Step 5. Aim at a safe target.
Step 6. Take “OFF” safety - Red showing.
Step 7. Fire.
Step 8. Put “ON” safety - No red showing.
NEVER STORE A LOADED GUN
At the end of a shooting session, as a safety precaution, always put
“ON” safety – NO RED SHOWING, remove CO2 cylinder and remove BBs
from the BB reservoir and the built-in Magazine. Store in a safe place
to prevent unauthorized use.
HOW TO OPERATE
WARNING: Be sure gun is always pointed in a safe direction.
Never point the gun at anyone. Always assume and treat the gun as if
it were loaded and ready to re.
STEP 1. PUT “ON” SAFETY – POSITION SAFETY SO NO
RED IS SHOWING.
Push the safety button to the right toward the “SAFE” position – NO
RED SHOWING (Fig. 2A). In this position, the trigger cannot be pulled
to re the gun.
FIG.2A
FIG.2B
CAUTION: Even when the safety is “ON” you should continue
to handle the gun safely. Don’t point the gun at anything that you
don’t intend to shoot.
NOTE: The safety is manual and not automatic. It will only do its job
when you do yours. With the index nger out of the trigger area, move
the safety to the “SAFE” position-NO RED SHOWING (Fig. 2A).
REMEMBER, THE BEST SAFETY IS GOOD GUN HANDLING.
STEP 2. INSERT CO2 CYLINDER
A. Put “ON” safety - NO
RED SHOWING (Fig. 2A).
B. Remove the left grip
cover by lifting the grip
cover tab (Fig. 3).
C. Turn the puncture
screw counterclockwise
until there is enough
room to insert a CO2
cylinder.
D. Insert the large end
of the CO2 cylinder into
the lower portion of the
grip. Hold the gun in an
inverted position with
the grip pointing up
and the muzzle pointing
away from you as shown
(Fig. 4).
FIG. 3
FIG. 4
6
Page 7
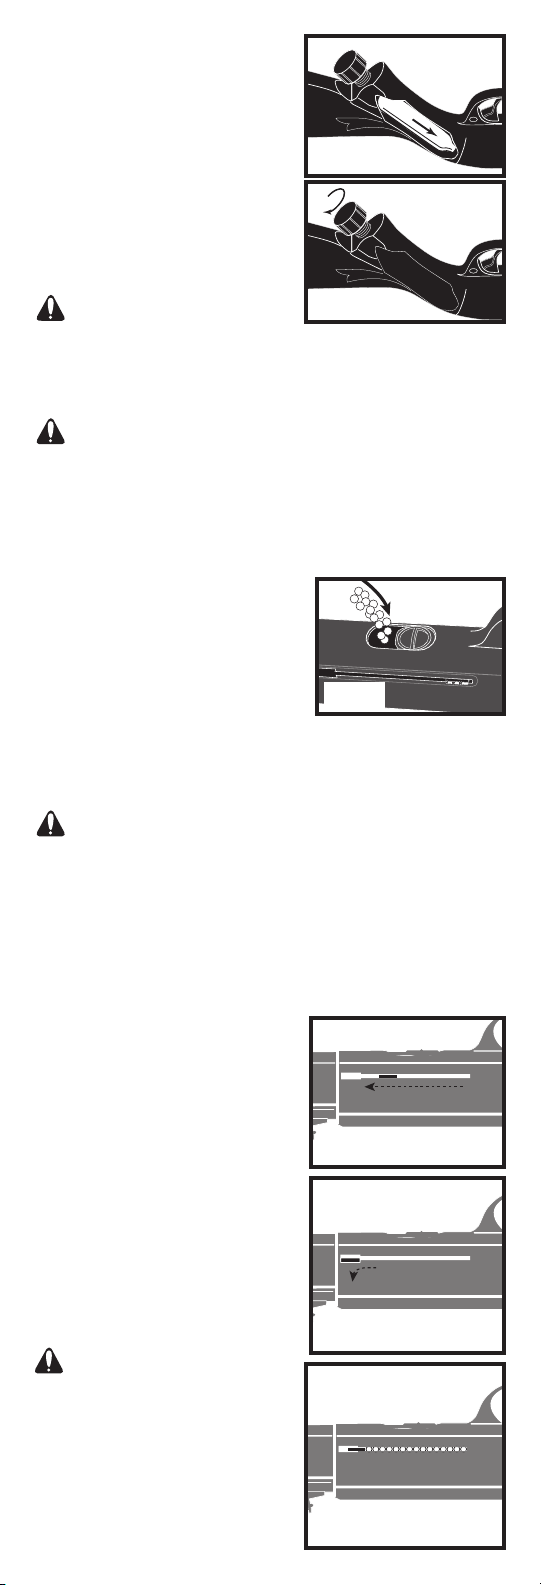
E. Position the small end of the CO2
cylinder inside the retainer so that the
CO2 cylinder touches the puncture pin
(Fig. 5).
F. While continuing to hold gun in
an inverted position, replace the left
grip cover, point the muzzle in a safe
direction and turn the puncture screw
clockwise to puncture the CO2 cylinder.
(Fig. 6) Continue turning the puncture
screw RAPIDLY until nger tight. NOTE:
A slight seepage of CO2 gas may occur
until puncture screw is tight.
WARNING: Be sure the muzzle
is pointed in a safe direction when
puncturing a CO2 cylinder. In the event that a seal temporarily leaks
while a CO2 cylinder is being punctured, the CO2 gas may escape
through the barrel. If ammunition is jammed in the barrel from prior
shooting, this could result in a projectile being shot.
FIG. 5
FIG. 6
WARNING: Use only 12 gram CO2 cylinders. Any attempt to
use other types of gas cylinders could be extremely dangerous and
could result in serious injury. Gasses other than CO2 could result in an
explosion or rupture of the gun.
STEP 3. FILL THE BB RESERVOIR WITH A MAXIMUM
OF 200 BBs
A. Always point the gun in a safe
direction. Ensure that the gun is “ON”
safe – NO RED SHOWING (see Operation
Step 1.)
B. Invert the gun so that you have
access to the BB loading port door
located on the underside of the gun, just
in front of the trigger guard. (See Fig. 7)
C. Open the loading port door by sliding it back, toward the trigger
guard.
D. Fill the magazine with a maximum of 200 new BBs then slide the
door closed.
FIG.7
CAUTION: Use only Precision Max™ BBs by Daisy® or similar
quality BBs that are labeled as such. Do no use lead pellets, buck shot,
darts, ball bearings or other foreign objects because they can cause
injury to someone or may damage and/or jam the gun.
STEP 4. FILL THE BUILT-IN MAGAZINE WITH A
MAXIMUM OF 15 BBs
A. Always point the gun in a safe direction. Ensure that the gun is
“ON” safe – NO RED SHOWING. (See Operation Step 1.)
B. With the gun still inverted, use your thumb and forenger to grasp
the BB follower tabs of the built-in BB
magazine and pull it toward the muzzle
end of the gun. (Fig. 8)
C. Hold the BB follower tabs in this
forward position and push the tabs
down into the slots which will hold
them in position. (Fig. 9)
D. Observe that the built-in magazine
has lled with up to 15 BBs.
E. After the built-in magazine has been
loaded with a maximum of 15 BBs,
slowly release the built-in magazine BB
follower and allow it to rest up against
the BBs. This will allow the BBs to be
under spring tension and feed properly.
(Fig.10)
FIG. 8
FIG. 9
CAUTION: Use extra precaution
in selecting a safe target and backstop.
Improper targets may cause ricochet.
Never shoot BBs into a steel trap
designed for pellets. Select targets
and backstops that will not cause a
ricochet or allow the BB to penetrate
the backstop. Never shoot at a at hard
surface or the surface of water.
FIG . 10
7
Page 8
WARNING: Once the built-in magazine is loaded with BBs,
the gun is considered to be loaded so use extreme caution in handling
the gun. Keep the gun pointed in a safe direction. Never point the
gun at anyone. Always treat the gun as if it were loaded and ready to
re.
STEP 5. AIM AT A SAFE TARGET
To be a consistent marksman, use the correct sight picture each
time you re the gun (Fig11).
CAUTION: Use extra precaution in selecting a safe target.
Improper targets may cause ricochet.
FI G. 11
STEP 6. TAKE “OFF” SAFETY – RED SHOWING.
When you are certain that the target, back-stop and surrounding
area is safe, position the safety “OFF” – RED SHOWING (Fig. 2B). Pulling
the trigger now will re the gun.
STEP 7. FIRE
Make sure the gun is pointed at a safe target. Once the last BB has
been shot from the gun, it is still possible for the trigger to be pulled,
but only CO2 will be discharged.
STEP 8. PUT “ON” SAFETY - NO RED SHOWING.
After ring, return the safety to the “ON” position – NO RED
SHOWING (Fig 2A).
BB DOES NOT FIRE
WARNING: If a BB does not re after completing the operation
steps, do not assume that the gun is unloaded. Keep the gun pointed
in a safe direction.
MAKE THE FOLLOWING CHECKS IF A BB DOES NOT
FIRE
A. Did the built-in magazine contain .177 cal. Daisy® Precision Max™
or similar quality BBs? If not, ll the built-in magazine with BBs and
repeat the operation steps.
B. Was the safety “OFF” – RED SHOWING, when the trigger was pulled?
If not, repeat the operation steps.
C. Was a CO2 cylinder installed? If not, put “ON” safe – NO RED
SHOWING, and insert a new CO2 cylinder. Repeat the operation steps
after the new cylinder is installed.
D. Refer to the section on CO2 characteristics.
E. If the gun still does not re, refer to warning below.
WARNING: If the gun still fails to shoot a BB after checking
the ve items above, there is a malfunction in the gun. This could
represent a dangerous condition. There could be BBs in the gun even
though a BB did not shoot out. Always treat the gun as if it were
loaded. At no time should you look down the barrel of the gun. Put
“ON” safe – NO RED SHOWING, remove the CO2 cylinder, and send the
gun directly to DAISY MANUFACTURING SERVICE DEPARTMENT.
Refer to section on REPAIRS OF DAISY GUNS.
HOW TO UNLOAD
After a shooting session is complete, the gun should be unloaded
before storing it. Always point the gun in a safe direction. Ensure
that the gun is “ON” safe – NO RED SHOWING (see Operation Step 1.)
Complete your shooting session by shooting until all BBs have been
expelled from the built-in BB magazine.
CAUTION: Even after the last BB has been shot, the gun may
continue to be red although only CO2 will be expelled. Remove BBs
from the BB reservoir and remove BBs from the built-in BB magazine.
REMOVE BBs FROM THE BB RESERVOIR
A. Always point the gun in a safe direction. Ensure that the gun is
“ON” safe – NO RED SHOWING (see Operation Step 1.)
B. Invert the gun so that you have access to the BB loading port door
located on the underside of the gun, just in front of the trigger guard.
(See Fig. 7)
C. Open the loading port door by sliding it back, toward the trigger
guard.
D. With the gun in an upright horizontal position (Fig. 12) shake the
gun to remove all BBs from the reservoir through the sliding loading
port door.
8
Page 9
CAUTION: Even though you have gone through an unloading
procedure, continue to treat the gun as though it were loaded. Don’t
point the gun at anything you don’t want to shoot. Always put “ON”
safe – NO RED SHOWING.
REMOVE BBs FROM THE BUILT-IN MAGAZINE
A. Always point the gun
in a safe direction. Ensure
that the gun is “ON” safe
– NO RED SHOWING (see
Operation Step 1 and Fig. 2)
B. With the gun in an
upright, horizintal position
(Fig. 12) lock the BB follower
in the forward position by
locking the tabs (Fig. 8) into the slots to allow the BBs to roll out of the
magazine into the BB reservoir.
C. Release the BB follower and observe that the follower is at the end
of the magazine slot.
D. Then repeat the preceding step to empty the BBs from the BB
reservoir.
FIG. 12
CAUTION: Even though you have gone through an unloading
procedure, continue to treat the gun as though it were loaded. Don’t
point the gun at anything you don’t want to shoot. Always put “ON”
safe – NO RED SHOWING.
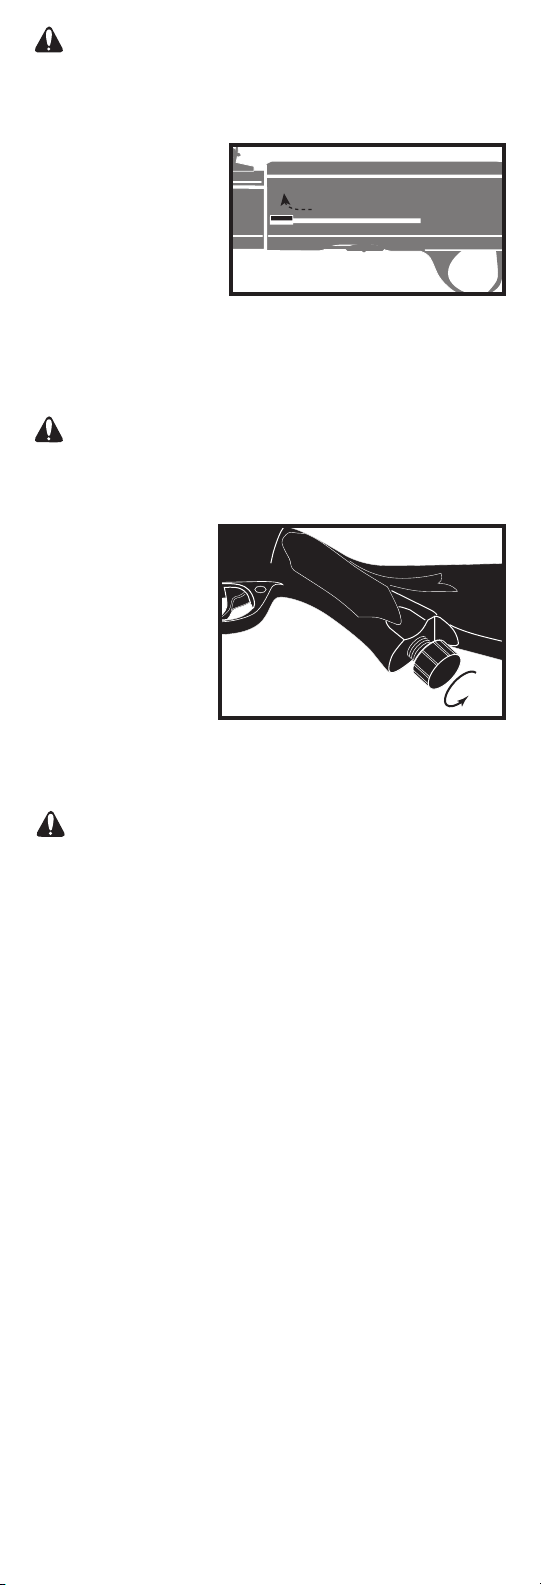
REMOVE CO2 CYLINDER
A. Put gun “ON” safe
– NO RED SHOWING.
(Operation Step 1.)
B. With the muzzle
pointed in a safe direction
and the left-hand grip
cover still in place, slowly
turn the puncture screw
counter clockwise,
allowing any remaining
gas to be discharged.
Continue turning the screw until the end stop is reached (Fig. 13).
C. Remove the left-hand grip cover by lifting at the bottom of the
grip.
D. Remove and properly dispose of the CO2 cylinder.
FI G.13
CAUTION: Never attempt to reuse a CO2 cylinder for any
purpose.
CO
CHARACTERISTICS
2
There are occasions when a CO2 gun may be subjected to
abnormal conditions that can produce eects on the gun’s
performance. These conditions include operation and/or storage of
the gun at temperatures that are considerably higher or lower than
normal outdoor temperatures 60o to 70oF (15.5o to 21oC) , as well as
conditions of rapid re.
A. High temperatures can produce pressure in the CO2 cylinder
that is considerably higher than normal operating pressure. Such
increased pressure may prevent the gun from ring and may result in
permanent damage to the gun. The maximum operating or storage
temperature should not exceed 105o F (40oC). This temperature can
easily be reached if the gun is left directly in the sun on a bright,
sunny day. Therefore, the shooter should not expose the gun to high
temperature conditions or direct sunlight for any extended period
of time.
B. Rapid ring of the gun will cause temperature reduction in the
gun and CO2 gas. This will result in lower ammunition velocities
and may even lower gas pressure enough so that the gun will not
re. This condition can be especially apparent when shooting in
cold weather. This condition can be avoided by allowing more time
between shots. This permits the gas to increase in temperature and
pressure and produce normal velocities.
C. During rapid re, the muzzle velocity of each shot can be expected
to decrease. This can be detrimental to shooting accuracy. Also, the
faster the gun is shot, the fewer shots you will get per CO2 cylinder.
D. Exercise care to insure that the gun is not shot with a CO2 cylinder
that is low in pressure.
STORAGE
Store your rie unloaded. Put “ON” safety – NO RED SHOWING.
Remove CO
away from children and untrained shooters. Store ammunition and
CO2 cylinders separately from the gun to keep them from untrained
shooters.
cylinders and remove all ammunition. Keep the gun
2
9
Page 10
WARNING: A CO2 cylinder contains gas under pressure,
whether or not it has been inserted into a gun. If exposed to high
temperatures (such as inside of a closed car in direct sunlight), it
could explode. Be sure to store all cylinders in a cool place.
PROPER CARE
With care and periodic cleaning, your Daisy Air Rie will provide
many years of shooting enjoyment. As in the case with conventional
rearms, abuse, neglect, and continued exposure to the elements
will impair the performance of any airgun. Learn to take care of your
Daisy Air Rie and it will serve you well.
CAUTION: Never attempt to clean any Daisy Air Rie until
the gun is “ON” safe – NO RED SHOWING and the CO
ammunition have been removed.
cylinders and
2
EXTERIOR PARTS
All of the plastic parts may be cleaned with a damp rag and mild
soap or detergent. Avoid using strong detergent, abrasive cleaning
compounds or solvents that may scratch or otherwise damage
surfaces.
LUBRICATION
Your Daisy Air Rie was lubricated when built and should not
require any additional lubrication.
MODIFICATION
CAUTION: The components of this gun were engineered and
manufactured to deliver optimum performance. Any modication
or tampering with a gun may cause a malfunction and may make
it unsafe to use. Any change in performance (such as a lowered
trigger pull force and shortened trigger travel), indicates possible
modication, tampering and/or wear. Such gun should be inspected,
replaced or properly repaired by qualied personnel. Any gun that
has been dropped should be checked by qualied personnel to
ensure that its function has not been aected.
WARNING: A GUN THAT IS NOT OPERATING PROPERLY
MAY BE DANGEROUS. IT SHOULD BE KEPT SAFELY FROM USE BY
ANYONE UNTIL REPAIRED OR DESTROYED. DO NOT TRY TO TAKE
THE GUN APART. IT IS DIFFICULT TO REASSEMBLE, AND IMPROPER
REASSEMBLY CAN CAUSE A HAZARDOUS CONDITION.
REPAIR OF DAISY® AIR RIFLES
GUNS IN WARRANTY
LIMITED ONE-YEAR WARRANTY
For one year from date of purchase, Daisy will repair or replace
and return this gun, free of charge, if defective in material or
workmanship. Service is available by returning the gun to Daisy
Outdoor Products (refer to important note below). Attach to the gun,
your name, street address, and telephone number, description of
problem and proof of date of retail purchase (sales slip). Package and
send transportation prepaid to Daisy. This warranty give you specic
legal rights, and you may also have other rights which may vary from
state to state.
IMPORTANT: You can return your inoperative rie to Daisy for repair
via United Parcel Service (UPS). Be sure to unload ammunition and
CO2 before returning the gun to Daisy. You must include your street
address for Daisy to send your rie directly back to you through UPS
delivery.
GUNS OUT OF WARRANTY
If your Daisy Air Rie needs repair, please call 1-800-713-2479
for repair charges. Daisy will repair the gun or replace it with a
reconditioned gun of the same model, if available; otherwise, with a
model of equivalent value.
Daisy Outdoor Products
Service Department
308 Stribling Drive
Rogers, AR 72756 U.S.A.
10
Page 11

MODEL 74 SPECIFICATIONS
ACTION Semi-Automatic CO2 BB repeater
CALIBER .177 cal. (4.5mm) BB
AMMO CAPACITY 15-shot built-in magazine
200 shot BB reservoir
MAXIMUM SHOOTING
DISTANCE* 211 yds. (193m)
MUZZLE VELOCITY 350 fps. (107mps)
BARREL Smooth bore steel
SAFETY Manual crossbolt trigger block
SIGHTS Blade and ramp front; adjustable rear
WEIGHT 1.98 lbs. (0.90 kg)
OVERALL LENGTH 35.5 in. (95.8cm)
*With muzzle pointed upward at optimum angle
11
Page 12

An Introduction to
Daisy® Air Rie Shooting
A MESSAGE TO PARENTS
Although not a rearm, a Daisy airgun is a gun and not a toy.
Properly used and maintained, it will provide many hours of safe,
trouble free recreational shooting. Misused, it can be dangerous.
Therefore, we recommend it be used only under adult supervision
and never by a young person less than ten years of age. Included in
this operation manual are 10 Shooting Safety Rules. We urge you to
read them with your child, practice them and review them often.
As the proud owner of a new Daisy gun, your child has become
part of an American tradition dating back more than 100 years.
Mechanically, a new Daisy is backed by nearly a century of
engineering know-how and experience in the manufactureof quality
products.
Safe gun handling depends upon proper safety training, and
instilling in your son or daughter the right attitude toward gun
ownership. To help you, we have designed this booklet to cover the
basic facts every young person should understand before shooting
a gun. Take time to study it thoroughly with your child. A proper
understanding of these basics will greatly increase your youngster’s
enjoyment of the lifetime sport of recreational air gun shooting and,
at the same time, give you the satisfaction of knowing your child is
properly prepared to handle an air gun.
We strongly urge a formal course of instruction in Shooting
Education for your child. There are a number of youth and civic
organizations which oer a complete 10-lesson course based on
guidelines developed by the training experts at Daisy, and they are
listed in the section “Learn to shoot safely” on page 16 of this book. A
quick check with them will let you know when the next course will be
starting in your area. If you would like more detailed information,
write: Special Market Programs, Daisy, P.O. Box 220, Rogers,
Arkansas 72757.
GETTING STARTED
First, you should know that your Daisy is not a toy. It’s a gun. If
you use it carefully, it will provide many years of enjoyment. But, if
you aren’t careful, it can be dangerous. Second, read this book. In
conjunction with the Operation Manual, it tells you how to handle
your new BB gun properly and how to have the most fun with it.
Read it carefully with a parent and make sure you all understand it.
Then, put what you’ve learned into practice. And remember, it’s your
responsibility as a gun owner to make certain that anyone using it is
instructed in the rules of proper gun handling. SAFE GUN HANDLING
IS THE KEY TO SHOOTING FUN. If you understand that “HANDLING”
your gun means every time you touch it, and if you remember always
to handle a gun as if it were loaded, then you are well on your way to
proper gun handling. A majority of air gun accidents in this country
are caused by 1) careless and improper handling of the gun, 2)
believing the gun to be empty when it isn’t, or 3) shooting at improper
targets. All three causes can be avoided if the shooter handles the gun
properly.
For years we have been teaching the 10 Shooting Safety Rules.
Read, remember, practice and review these few simple rules. They will
help you enjoy many hours of safe, fun, recreational shooting.
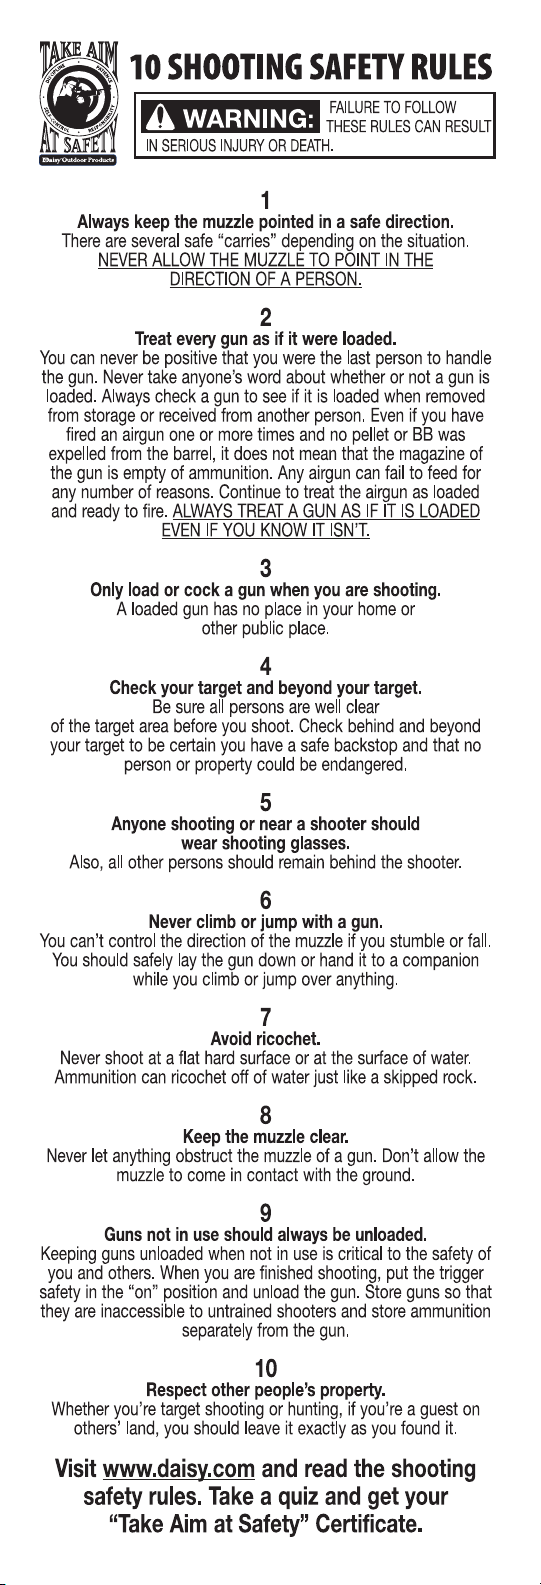
10 SHOOTING SAFETY RULES
1. Always keep the muzzle pointed in a safe direction.
2. Treat every gun as if it were loaded.
3. Only load or cock a gun when you are shooting.
4. Check your target and beyond your target.
5. Anyone shooting or near a shooter should wear shooting glasses.
6. Never climb or jump with a gun.
7. Avoid ricochet.
8. Keep the muzzle clear.
9. Guns not in use should always be unloaded.
10. Respect other people’s property.
It is also very important for you to remember that any time you
receive a gun from anyone, or take a gun from its storage place, you
should make sure it’s unloaded and uncocked by pointing it in a safe
direction and pulling the trigger.
WARNING: EVEN IF YOU HAVE FIRED THE AIRGUN ONE OR
MORE TIMES AND NO BB WAS EXPELLED, IT DOES NOT MEAN THAT
THE GUN IS EMPTY OF BBs. CONTINUETO TREAT THE AIRGUN AS IF IT
IS LOADED.
12
Page 13
Never look into the muzzle of your gun. You can’t tell by
looking if your gun is loaded, so always treat it as if it were.
Habits which you form now in handling your new Daisy will be
helpful in the handling of any gun.
THE OUTDOOR DAISY
Your Daisy airgun isn’t
designed for hunting,
but you can still have
outdoor fun with it.
It’s easy to set up an
outdoor range.
In fact, outdoor
shooting is a great way
for a young person and
his or her parents to
have some realfamily
fun and competition.
When you are carrying a Daisy airgun outdoors, keep the
following things in mind:
• Don’t shoot at targets with a hard surface, like rocks or trees. Your
BB could ricochet. Never shoot at the surface of water for the same
reason.
• Always be sure you know where other people are before you shoot.
Make sure they’re clear of the target.
• Keep the muzzle always pointed in a safe direction so if you stumble
and fall you can control the direction of the muzzle.
• Keep your Daisy airgun unloaded when you are not using it.
• Indoors or out, anyone shooting or near a shooter should wear
shooting glasses. (They can be purchased at most stores selling
sporting goods.)
THE INDOOR DAISY
A Daisy airgun is safe for indoor shooting as long as you observe
the proper safety rules. There aren’t many, but they are important.
First, you must have at least 5 meters (16.4 ft.) of space from the ring
line to the target. All Daisy Youth Line air ries are designed with
controlled velocity of less than 350 feet per second and are most
eective for target shooting at 5 meters. (It takes as much skill to
shoot a Daisy
on a 5 meter
range as it
takes to shoot
a .22 on a 50
foot range!)
Second, you
must have a
safe target
(See “SAFE
TARGET”
section)
placed so
there are no
entry ways in
front of the
ring line or
behind the
targets. If
this is not
possible, then
doorways
in the areas
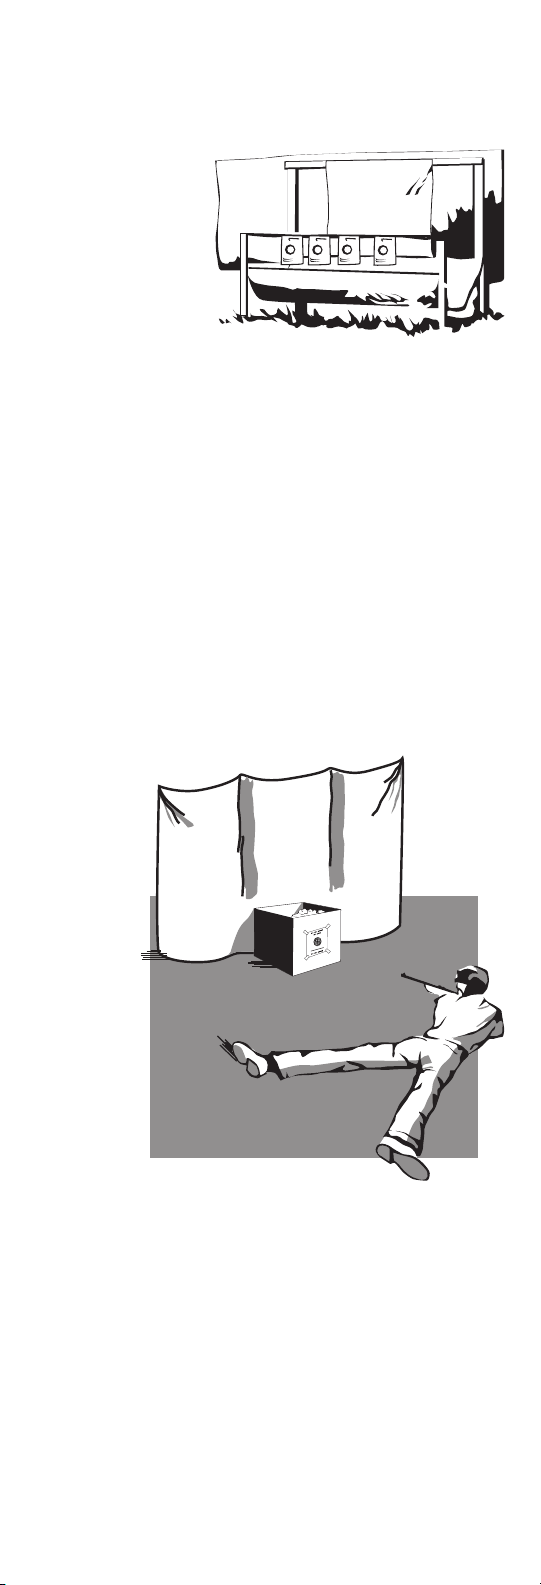
should be blocked. Third, you should have a canvas or blanket behind
the target which hangs free from the wall and clears the oor. This will
prevent ricochet should you miss the target. Finally, your target should
be well lighted.
Remember to keep your Daisy unloaded until the target is up and
you are ready to shoot. Never point it in any direction except toward
the target. If you follow these rules and combine them with the other
tips on proper gun handling in this book, you can enjoy safe, indoor
Daisy airgun shooting.
A DAISY BB GUN IS NOT FOR HUNTING
It’s a target-shooting gun. But it teaches you the skill and safety
habits you’ll need for hunting. Or, you might prefer preparing yourself
for match target shooting. Many adult gun owners do.
13
Page 14
ASSIS (POSITION BASSE)
CO2 CYLINDER
RETAINER
(INSIDE GRIP)
STOCK
AMMUNITION
MAGAZINE
ADJUSTABLE
REAR SIGHT
FRONT
SIGHT
CO2 CYLINDER
PUNCTURE
SCREW
SAFETY
TRIGGER
FOREARM
200 ROUND
AMMUNITION
RESERVOIR
BARREL
MUZZLE
GET TO KNOW YOUR DAISY FROM BUTT PLATE TO
MUZZLE
Do you know what the trigger is? The forearm? Check your knowledge
with the picture.
HOW TO BECOME AN EXPERT MARKSMAN
If you learn the techniques, and practice regularly, you can become
a real marksman. Marksmanship will provide you with a lot of
enjoyment all your life. The tips you’ll pick up in this book will get you
started. But you’ll learn faster by getting some help from an adult
who is an experienced shooter.
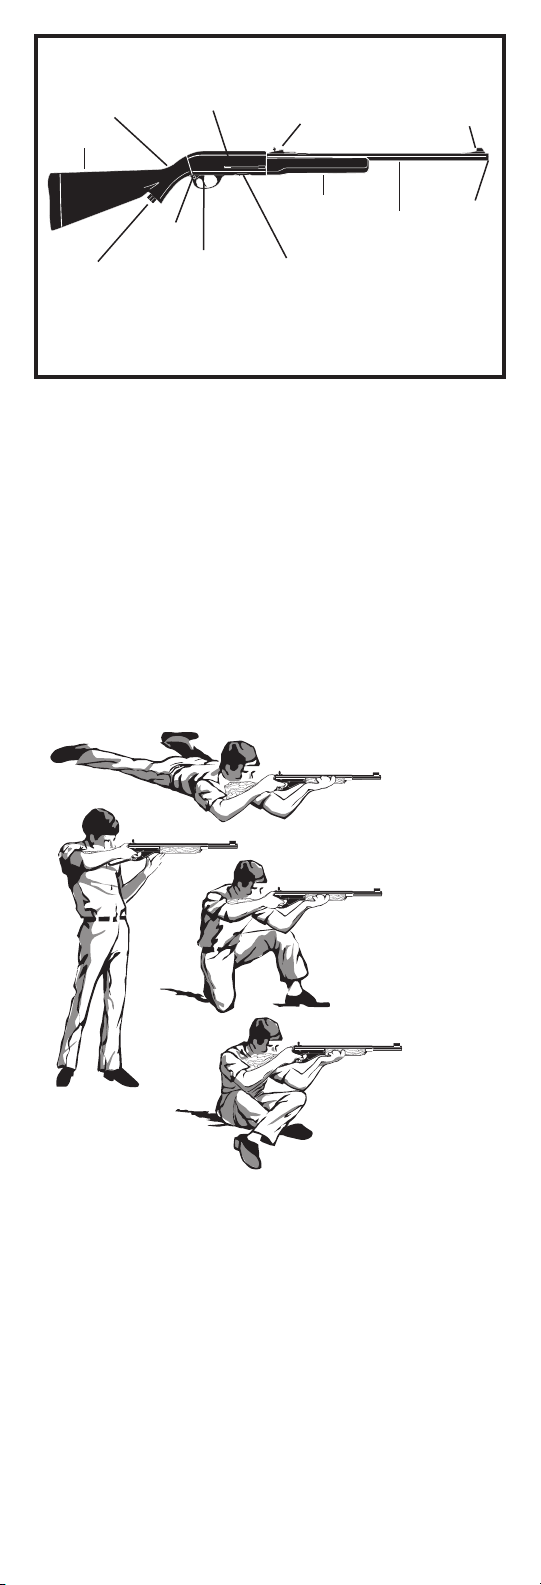
POSITIONS
There are four basic rie shooting positions and two variations
of each. Learn them all so you will be prepared for any shooting
conditions. The positions are prone, sitting, kneeling, and standing.
Half face to the right before getting into any position. Then:
PRONE
ACOSTADO
COUCHE
KNEELING (LOW)
ARRODILLADO (ABAJO)
UN GENOU EN TERRE
(POSITION BASSE)
SITTING (LOW)
N.R.A. STANDING
N.R.A. PARADO
POSITION PRECONISEE
PAR LA N.R.A.
SENTADO (ABAJO)
PRONE - Lie at an angle of about 5 to 15 degrees to the line of re. The
left leg should be completely relaxed. The right leg should angle away
from the spine and may be bent or straight.
KNEELING - Half face to the right, then drop to the right knee. In the
low position, the left foot should be extended as far forward as is
comfortable, while the right leg is at on the ground with foot at and
rotated inward, with shooter sitting on side of right foot. In the high
position, the shooter sits on his right heel.
SITTING - In the low position, cross your legs in front of you with the
outside of each foot resting on the ground and supporting the knees.
Elbows should be placed near the knees forming triangles to support
the rie. legs are not crossed in the high position. The feet are well
spread, with the heels braced, and the body leaning forward so the
elbows may be braced over the knees.
STANDING - In the Army standing position, half face to the right
with feet spread about a foot apart. Stand relaxed, not rigid. The right
elbow should be at about the same height as the shoulder. Your left
14
Page 15
arm does not touch your body. In the N.R.A. standing position, you
may rest your left upper arm against your body on your hip.
NOW GET YOUR BB GUN IN PROPER POSITION
These simple rules will help you hold your rie correctly.
(Instructions are for a right handed person–reverse for left handed
person.)
1. Grasp the small of the stock with your right hand.
2. Let the forearm rest on the palm of your left hand (or on the thumb
and ngertips if using the N.R.A. standing position).
3. Place your left elbow as close to directly under your gun as possible.
4. Place your cheek as far forward on the stock as possible without
straining and press gently against the stock.
5. Now make sure your Daisy still points eortlessly at the center of
the target. To make sure, close your eyes and point it where you think
the target is. If, when you open your eyes, the gun is pointing away
from the center of the target, shift your body to correct. Repeat until
naturally centered.
6. Prepare to squeeze the trigger with the rst joint of your rst (index)
nger. But don’t re yet!
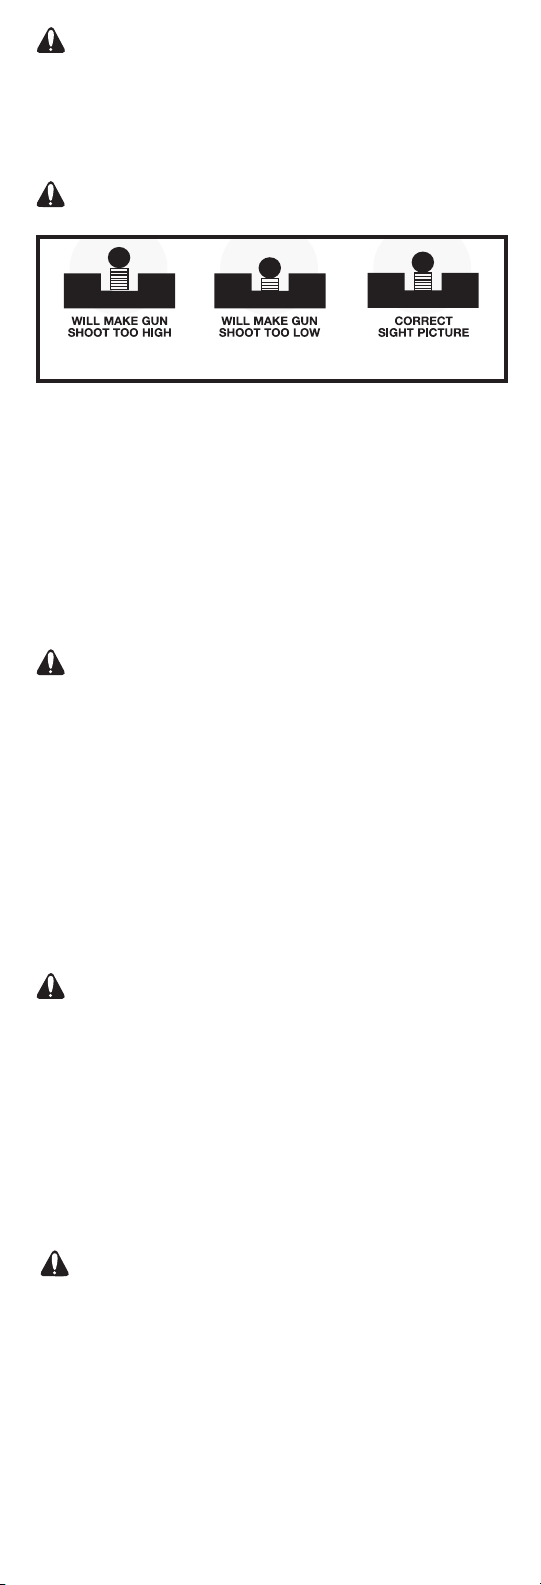
AIMING (OR SIGHTING)
A Daisy will shoot where you aim it. The trick is holding the proper
sight picture. To do this, think about a lollipop. Then make the front
sight the lollipop stick, and the bullseye the candy! Keep the top of the
lollipop stick even with the top of the rear sight and centered in the V
notch.
Blade Front Sight / La hoja la Vista Anterior / La Vue de Devant de lame
Too High
También Alto
Aussi Haut
Too Low
También Bajo
Trop Bas
Just Right
Apenas Correcto
A la perfection
Fiber Optic Front Sight
La fibra la Vista Anterior Optica / Fibre la Vue de Devant Optique
Too High
También Alto
Aussi Haut
Too Low
También Bajo
Trop Bas
Just Right
Apenas Correcto
A la perfection
Try sighting. Then check what you see against the sight pictures
above. To be a consistent marksman, use the correct sight picture each
time you re the gun, and remember - sight or point the gun only in a
safe direction.
BREATHING
Breathing at the wrong moment can cause your body to move, and
your aim to go astray. So breathe properly. Here’s how:
(a) Take a long breath.
(b) Let out half. Aim.
(c) Hold the rest until after you’ve red.
But don’t re yet!
FIRING
This consists of two steps: Aiming and Squeezing. Get your sights in
line and watch carefully. As the tip of the sight arrives at the bottom of
the bullseye, gradually squeeze the trigger. Never jerk the trigger. The
sudden movement will ruin your aim. Trigger squeezing takes practice.
But keep trying. You’ll get it down to an art. Now you are ready to re.
But wait a moment!
What are you ring at? Where are you ring? Remember the 10
Shooting Safety Rules - Be sure of your target before you shoot. Never
carry a cocked gun. Cock it only when ready to re. Even with the
trigger safety in the ON position, your gun is in fully loaded condition
and must be handled with care.
SIGHTING-IN YOUR GUN
The rst step in proper sight alignment
is to determine the shot grouping of
your new Daisy. To do this, position a
rest, such as a table or bench, 5 meters
from your target. Place your rie on the
rest, and, aiming at the same point on
the target each time, re three shots. Do
15
Page 16

not attempt to make any adjustments during the three shots. At this
point you are only interested in how well your shots group. Once you
have determined the grouping ability of you and your rie, you can
then adjust your sights to bring the group on target. NOTE: It may be
necessary for each person shooting your Daisy air gun to realign the
sights to t his sight pattern.
HOW TO MAKE AN INDOOR-OUTDOOR TARGET
A cardboard box 16 inches or
more deep, and with at least
two-foot square front surface,
will serve as the basis for the
target. Center 3 inches of
tightly bound magazines (do
not substitute newspapers)
on the inside back wall of
the box opposite the target,
and ll the box with tightly
packed, crumpled newspaper
to prevent ricochet. Once the
backstop is complete, tape
the target to the front of the
box. Do not use metal fasteners–ammunition can ricochet. As the
target is used, the backing must be watched closely and should be
replaced when the ammunition has penetrated half the thickness of
the magazines.
CAUTION: Whether you purchase a target trap or make your
own, it is important to remember that they will wear out with
continued use. Because of this, you should always place your backstop
where it will be safe should it fail and check it carefully before
and after each use. A rebound or ricochet is an indication that the
backstop is faulty and that you should stop using it immediately.
SHOOTING GAMES
Once you’ve mastered the basics, you can try a few shooting games
like these:
1. TIC-TAC-TOE - Two shooters take one-shot-turns, and mark each
hit. Play like regular tic-tac-toe.
2. MISS-N-OUT - Set up ten targets. Shoot until you miss. Shooter
with most shoots wins.
3. HIT-AND-MOVE-BACK - Each shooter takes one step back every
time he hits the target. Farthest back wins.
IMPORTANT: Be sure you are using a safe backstop behind all targets!
LEARN TO SHOOT SAFELY
Daisy Outdoor Products has a rich heritage of teaching young and
rst time shooters to shoot safely. In order to eectively implement
shooting education programs nationwide, Daisy has partnered with
the following organizations, which teach shooting safety and provide
additional shooting safety materials and information. We encourage
you to contact Daisy at 1-800-713-2479 or one of these organizations
to sign up for a shooting safety class in your area.
PROGRAM MATERIALS & EQUIPMENT
(U.S. Customers Only)
Daisy Outdoor Products
800-713-2479
www.daisy.com
PROGRAM INFORMATION
American Legion Junior Shooting Sports Program
317-630-1249
www.legion.org
NRA Youth Programs
800-672-3888 ext. 1505
www.nrahq.org/youth
4-H Shooting Sports
Contact your County Extension Agent
www.4-h.org
Junior Olympic Shooting Program
719-866-4670
www.usashooting.com
161718
Page 17

Page 18

Page 19

Manual de Operación
Modelo 74
El Rie Semi-Automático
de BB Impulsado por CO
2
NO DEVUELVA
Esta arma a la tienda en donde la compro. Si no está
satisfecho con la calidad o rendimiento de este rifle de aire
por favor llame al Servicio al Cliente o regrese el arma a:
Por favor llene la forma en la parte de adentro de la
contracubierta y regrésela con una copia de su recibo de
compra fechado (para comprobante de compra
únicamente) junto con su rifle de aire. Todos los Rifles de
Aire Daisy, Powerline, Winchester y las armas de aire
Avanti tienen un año de garantía de la fecha de compra. Las
miras tienen una garantía de 90 días. Lea el Manual de
Operación para información especifica de garantía. Daisy
únicamente puede ofrecer reembolsos en productos
comprados directamente de nuestro Depar tamento de
Servicio al Cliente o de nuestra página Web. Si usted
compro esta arma de una tienda, felizmente repararemos o
remplazaremos su producto de acuerdo a nuestra póliza de
garantía. Por favor llame al Centro de Servicio al Cliente al
1-80 0-1-713-2479 si tiene alguna pregunta.
Lea se Manual de Operaciones y todas las Precauciones
Daisy Outdoor Products
308 West Stribling Dr
Rogers, Ar, 72756
Attn: Service Department
antes de usar el arma.
NO ES UN JUGUE TE. SE REQUIERE
PRECAUCIÓN:
SUPERVISIÓN DE UN ADULTO. USO
INDEBIDO O SIN CUIDADO PUEDE CAUSAR LESIONES SERIAS O LA MUER TE.
PUEDE SER PELIGROSA HASTA UNA DISTANCIA DE 193 METROS (211 YARDAS).
LEA TODAS LAS INSTRUCCIONES ANTES DE UTILIZAR . EL COMPRADOR Y EL
USUARIO NECESITAN SEGUIR TODAS LAS LE YES GOBERNANDO EL USO Y
PROPIEDAD DE ARMAS DE AIRE. ESTA ES UN ARMA DE AIRE DE ALTO PODER ES
RECOMENDADA PARA USO POR PERSONAS DE 10 AÑOS DE EDAD Y MAYORES
BAJO SUPERVISIÓN DE UN ADULTO.
DE ACUERDO A LA LEY DE CALIFORNIA
NO BLANDEE O MUESTRE SU ARMA DE
PRECAUCIÓN:
FUEGO EN PÚBLICO – PUEDE CONFUNDIR A
LA GENTE Y PUED E SER UN DELITO. LA POLICÍA U OTROS PUEDEN PENSAR QUE
ESTA ARMA DE AIRE E S UN ARMA DE FUEGO. NO CAMBIE LA COLORACIÓN O
LAS MARC AS PARA HACERLA PARECER MÁS COMO UN ARMA DE FUEGO. E SO
ES PELIGROSO Y PUEDE SER UN CRIMEN.
AUN SI HA DISPARADO SU ARM A DE AIRE
PRECAUCIÓN:
UNA O MÁS VECE S Y NO HA EXPULSADO UN
PERDIGÓN, ESTO NO QUIERE DECIR QUE EL ARMA E STÁ VACÍA DE PERDIGONE S.
CONTINÚE TRATANDO EL ARMA COMO SI ESTUV IERA CARGADA.
19
Page 20

No es un juguete. Se requiere supervisión
de un adulto. Uso indebido o sin cuidado
puede causar lesiones serias o la muerte. Puede ser peligrosa hasta una
distancia de 211 yardas (193 metros).
Lea todas las instrucciones antes de utilizar. El comprador y el usuario
necesitan seguir todas las leyes gobernando el uso y propiedad de armas
de aire. Esta es un arma de aire de alto poder es recomendada para uso por
personas de 10 años de edad y mayores bajo supervisión de un adulto.
DE ACUERDO A LA LEY DE CALIFORNIA
No blandee o muestre su arma de fuego en
público – puede confundir a la gente y puede
ser un delito. La policía u otros pueden pensar que esta arma de aire es un
arma de fuego. No cambie la coloración o las marcas para hacerla parecer
más como un arma de fuego. Eso es peligroso y puede ser un crimen.
Este símbolo de alerta indica un mensaje importante de
seguridad en este manual. Cuando vea este símbolo, esté alerta
a la posibilidad de lesiones personales y cuidadosamente lea el
mensaje que le sigue.
Las reglas para el manejo seguro que se encuentran en la
sección “Introducción a Disparar el Rie de Aire en este manual
(comenzando en la página 28) es una guía importante para el
cuidado y manejo seguro de cualquier arma. LEA ESTA SECCIÓN.
Es su responsabilidad como el dueño de esta arma de asegurarse
de que cualquier persona utilizando el arma reciba instrucciones
en el cuidado y el buen manejo del arma.
Como el dueño orgulloso de una arma de aire Daisy, usted es
parte de una tradición Americana que data hasta los tiempos
de cuando tátara-abuelo era un niño. Su nueva arma Daisy es
el producto de más de 100 años de experiencia por Daisy en la
fabricación de productos de calidad.
Aunque su nuevo rie de aire Daisy no sea un arma de
fuego, es un arma y necesita ser tratada con precaución y
respeto. Siempre recuerde que la característica de seguridad
primera y principal es el tirador. Todas las seguridades son
dispositivos mecánicos y el tirador es la única parte del sistema
que puede hacer el arma segura – o no segura. NO DEPENDA
EN LOS SEGUROS MECÁNICOS – piense por adelantado y evite
situaciones que puedan llevar a accidentes.
PARA SU SEGURIDAD Y LA SEGURIDAD DE LOS DEMÁS,
LEA Y SIGA TODAS LAS INSTRUCCIONES CUIDADOSAMENTE
ANTES DE TRATAR DE DISPARAR EL ARMA. Las armas dieren
en su operación y usted nunca está listo para dispara cualquier
arma hasta que esté completamente familiarizado con él. Lea
el manual de instrucciones de operación y SIN CARGAR UN
PROYECTIL, proceda por los pasos de operación (disparando su
arma en seco a un blanco seguro) para permitirle poder operar su
rie Modelo 74 apropiada y seguramente.
FIG. 1
CU LATA
PORTADOR DEL
CILINDRO DE C0
(DENTRO DE LA
EMPUÑADURA)
TORNILLO
PERFORADOR
DEL CILINDRO
DE C0
2
20
2
SEGURIDAD
CARGADOR DE
GAT ILLO
MUNICIONES
RESERVOR IO DE
200 RONDAS DE
MUNICIONES
Page 21

ANTES DE OPERAR
Ponga el seguro en “PUESTO” – NO SE VE ROJO (vea los Paso de
Op erac ión 1).
PASOS DE OPERACIÓN
PRECAUCIÓN: Asegúrese de que el arma siempre este
apuntada en una dirección segura. Nunca apunte el arma hacia nadie.
Siempre suponga y maneje el arma como si estuviera cargada y lista para
disparar. El arma puede seguir siendo disparada hasta que el cargador
de perdigones integrado esté vacío o cuando el cilindro de CO2 necesite
ser reemplazado. Una vez que el cargador de perdigones integrado esté
vacío, se necesitan seguir los pasos 1,3,4,5,6 y 7. Si el cilindro de CO2 está
vacío entonces se necesitan seguir los 7 pasos. (Se pueden esperar hasta
100 disparos por cilindro de CO2).
Paso 1. Poner el seguro en “PUESTO” – No se ve rojo.
Paso 2. Insertar los cilindros de CO
Paso 3. Llenar el reservorio de perdigones con un máximo de 200
perdigones.
Paso 4. Llenar el cargador integrado con un máximo de 15 perdigones.
Paso 5. Apuntar a un blanco seguro.
Paso 6. Poner el seguro en “NO PUESTO” – Se ve el rojo
Paso 7. Disparar
Paso 8. Poner el seguro en “PUESTO” – No se ve rojo
NUNCA ALMACENE UN ARMA CARGADA
Después de la sesión de disparo, como una precaución de seguridad,
siempre ponga el seguro en “PUESTO” – NO SE VE ROJO, quite el cilindro
de CO2 y descargue las municiones del reservorio de perdigones y el
Cargador integrado. Almacene en un lugar seguro para prevenir el uso
no autorizado.
2
COMO OPERAR
PRECAUCIÓN: Asegúrese de que el arma siempre esté
apuntada a una dirección segura. Nunca apunte el arma hacia nadie.
Siempre piense y trate el arma como si estuviera cargada y lista para
disparar.
PASO 1. PONER EL SEGURO EN “PUESTO” – POSICIÓN
DE SEGURIDAD DONDE NO SE VE ROJO.
Jale la palanquilla de seguridad hacia la derecha hacia la posición segura
“PUESTO” - NO SE VE ROJO. (FIG 2A). En esta posición, el gatillo no puede
ser jalado para disparar el arma.
FIG.2A
FIG.2B
PRECAUCIÓN: Aun cuando el seguro esté en la posición
segura “PUESTO”, usted necesita continuar manejando manejar el arma
ALZA
AJUSTABLE
MIRA
DELANTERA
21
CAÑÓN
BOCA
Page 22

con seguridad. No apunte el arma a nada que no quiera disparar.
NOTA: La seguridad es manual y no es automática. Solamente hará su
trabajo cuando usted haga el suyo. Con el dedo índice fuera del área del
gatillo, mueva la seguridad a la posición “PUESTO” – NO SE VE ROJO (Fig
2A). RECUERDE, LA MEJOR SEGURIDAD ES EL BUEN MANEJO.
PASO 2. INSERTAR LOS CILINDROS DE
CO
2
A. Ponga el seguro en “PUESTO” –
NO SE VE ROJO. (Fig. 2A)
B. Quite la cubierta izquierda
de la empuñadora levantando
la lengüeta de la cubierta de
empuñadora (Fig. 3)
C. De vuelta al tornillo de
perforación hacia la izquierda
hasta que haya suciente espacio
para insertar el cilindro de CO2.
D. Inserte el extremo grande del
cilindro de CO2 en la parte inferior
de la empuñadora. Agarre el
arma en posición invertida con la
empuñadora hacia arriba y la boca
apuntando hacia abajo como se
muestra (Fig. 4).
E. Posicione el extremo pequeño
del cilindro de CO2 adentro del área
para que el cilindro de CO2 toque el
tornillo de perforación. (Fig. 5).
F. Continuando agarrando el
arma en una posición invertida,
vuelva a colocar la cubierta de
la empuñadora, apunte la boca a
una dirección segura y de vuelta
al tornillo de perforación hacia la
derecha para perforar el cilindro de
CO2. (Fig. 6) Continúe apretando
los tornillos RAPIDAMENTE hasta
que estén apretados a fuerza de
dedo. NOTA: Un poco de escape de gas CO2 puede ocurrir hasta que los
tornillos estén apretados.
FIG. 3
FIG. 4
FIG. 5
FIG. 6
PRECAUCIÓN: Asegúrese de apuntar la boca en una dirección
segura cuando perfore el cilindro de CO2. En evento de que el sello tenga
una fuga temporal mientras los cilindros de CO2 estén siendo perforados,
el gas CO2 puede escapar por el cañón. Si hay municiones atoradas en
el cañón antes de disparar, esto puede resultar en que la munición se
dispare.
PRECAUCIÓN: Utilice solamente cilindros de CO
Cualquier intento de usar cualquier otro tipo de cilindro de gas puede ser
extremamente peligroso y puede resultar en lesiones severas. Gases que
no sean CO2 pueden resultar en una explosión o en una ruptura del arma.
de 12 gramos.
2
PASO 3. LLENAR EL RESERVORIO CON UN MÁXIMO DE
200 PERDIGONES
A. Siempre apunte el arma en una
dirección segura. Asegúrese que
el arma esté en la posición segura
“PUESTO” - NO SE VE ROJO. (Ver
Pasos de Operación Paso 1)
B. De vuelta al arma para que
tenga acceso a la puertecilla del
cargador de perdigones que se
encuentra en la parte debajo del
arma, justamente enfrente del guardamonte. (Ver Fig. 7).
D. Abra la puertecilla del cargador de perdigones deslizándolo hacia
atrás, hacia el guardamonte.
E. Llene el cargador con un máximo de 200 perdigones nuevos y luego
deslice la puertecilla para cerrarla.
FIG.7
22
Page 23

PRECAUCIÓN: Utilice solamente perdigones Precision Max ™
de Daisy® o de calidad similar que han sido marcados como tal. No utilice
balines de acero, municiones para venado, dardos, balines o algún otro
objeto extraño porque pueden causar lesiones a alguien o pueden dañar
y/o atorar la pistola.
PASO 4. LLENAR EL CARGADOR INTEGRADO CON UN
MÁXIMO DE 15 PERDIGONES
A. Siempre apunte el arma en una
dirección segura. Asegúrese que el arma
esté en la posición segura “PUESTO” - NO
SE VE ROJO. (Ver Pasos de Operación
Paso 1)
B. Con el arma todavía invertid, utilice su
pulgar y su dedo índice para agarrar las
lengüetas del seguidor de perdigones
del cargador integrado y jálelo hacia la
boca del arma. (Fig. 8)
C. Agarre las lengüetas del seguidor de
perdigones en esta posición delantera y
presione las lengüetas hacia abajo en las
ranuras que las mantendrán en posición.
(Fig. 9)
D. Observe que el cargador integrado
este lleno con hasta 15 perdigones.
E. Después de que el cargador integrado
ha sido cargado con un máximo de
15 perdigones, lentamente suelte el
seguidor del cargador de municiones
integrado y permita que descanse
contra los perdigones. Esto permite que
los perdigones estén bajo tensión del
resorte y se carguen apropiadamente.
(Fig. 10)
FIG. 8
FIG. 9
FIG . 10
PRECAUCIÓN: Utilice precaución extrema en la selección
de un blanco y un cazabalines de blanco seguro. Blancos incorrectos
pueden causar rebotes. Nunca dispare perdigones a una trampa de acero
diseñada para balines. Escoja blancos y cazabalines que no permitirán
rebotes o que permita que los perdigones penetren al cazabalines.
Nunca dispare a una supercie plana dura o a la supercie del agua.
PRECAUCIÓN: Una vez que el cargador integrado esté cargado
con municiones, el arma se considera cargada, así que utilice precaución
extrema en el manejo del arma. Mantenga el arma apuntada en una
dirección segura. Nunca apunte el arma hacia nadie. Siempre trate el
arma como si estuviera cargada y lista para disparar.
PASO 5. APUNTAR A UN BLANCO SEGURO.
Para ser un disparador consistente, utilice el dibujo de miras correcto
cada vez que dispare su arma (Fig.11)
PRECAUCIÓN: Utilice precaución adicional en la selección de
un blanco seguro. Los blancos incorrectos pueden causar rebote.
FI G. 11
PASO 6. PONER EL SEGURO EN “NO PUESTO” – SE VE EL
ROJO.
Cuando esté seguro que el blanco, el cazabalines y el área alrededor
estén seguros, ponga el seguro en la posición “NO PUESTO” – SE VE EL
ROJO (Fig. 2B). El jalar el gatillo ahora disparará el arma.
PASO 7. DISPARAR
Asegúrese de que el arma esté apuntando a un blanco seguro. Una vez
que el último perdigón haya sido disparado del arma, todavía es posible
apretar el gatillo, pero solamente saldrá CO2.
23
Page 24

PASO 8. PONER EL SEGURO EN “PUESTO” – NO SE VE
ROJO.
Después de disparar regrese la seguridad a la posición “PUESTO” – NO SE
VE ROJO (FIG. 2A).
MUNICIÓN NO DISPARA
PRECAUCIÓN: Si los perdigones o los balines no disparan
después de completar los pasos de operación, no suponga que el arma
está descargada. Continúe apuntando el arma en una dirección segura y
vuelva a repetir los pasos de operación con excepción de los Pasos 2 y 3.
HAGA LAS SIGUIENTES REVISIONES SI LA MUNICIÓN TODAVÍA NO
DISPARA .
A. ¿El cargador de municiones tiene municiones Daisy® PrecisionMax
de calibre .177 (4.5mm) o municiones de calidad similar? Si no, llene el
cargador integrado con perdigones de .177 (4.55mm) y repita los pasos
de operación.
B. ¿La seguridad está en la posición “NO PUESTO” – SE VE EL ROJOcuando se jaló el gatillo? Si no, repita los pasos de operación.
C. ¿Se instalo un cilindro de CO2? Si no, ponga la seguridad en “PUESTO”
– NO SE VE EL ROJO e instale un cilindro nuevo de CO2. Repita los pasos
de operación después de instalar el nuevo cilindro.
D. Vea la sección en características del CO2.
E. Si el rie todavía no dispara, vea la precaución a continuación.
PRECAUCIÓN: Si el rie todavía no dispara un perdigón
después de revisar todos los pasos anteriores, hay un fallo en el rie. Esto
puede presentar una situación peligrosa. Puede haber un perdigón en el
arma aunque un perdigón no se haya disparado. Siempre trate el arma
como si estuviera cargada. En ninguna ocasión debe ver por la boca
del arma. Ponga la seguridad en “PUESTO”- NO SE VE EL ROJO, quite el
cilindro de CO2 y envíe directamente a DAISY MANUFACTURING SERVICE
DEPARTMENT. Vea la sección en REPARACIÓN DE ARMAS DAISY.
TM
COMO DESCARGAR
Después de terminar de disparar, el arma necesita ser descargada
antes de almacenarla. Siempre apunte el arma en una dirección segura.
Asegúrese que el arma esta con la seguridad en “PUESTO”- NO SE VE
EL ROJO (Ver los Pasos de Operación Paso 1.) Termine su sesión de tiro
disparando hasta que todos los perdigones hayan sido expulsados del
cargador integrado.
PRECAUCIÓN: Aun cuando se haya disparado el último
perdigón, el arma puede seguir siendo disparada aunque solo saldrá
CO2. Quite los perdigones del reservorio de perdigones y quite los
perdigones del cargador integrado.
QUITE TODOS LOS PERDIGONES DEL RESERVORIO DE
PERDIGONES
A. Siempre apunte el arma en una dirección segura. Asegúrese que el
arma esté en la posición segura “PUESTO” - NO SE VE ROJO. (Ver Pasos de
Operación Paso 1)
B. De vuelta al arma para que tenga acceso a la puertecilla del cargador
de perdigones que se encuentra en la parte debajo del arma, justamente
enfrente del guardamonte. (Ver Fig. 7).
C. Abra la puertecilla del cargador de perdigones deslizándolo hacia
atrás, hacia el guardamonte.
D. Con el arma en una posición derecha y horizontal (Fig. 12) sacuda el
arma para quitar todos los perdigones del reservorio por medio de la
puertecilla del cargador de perdigones.
PRECAUCIÓN: Aunque haya seguido los pasos de descarga,
continúe tratando el arma como si estuviera cargada. No la apunte a
nada que no quiera disparar. Siempre ponga la seguridad en “PUESTO”NO SE VE ELROJO.
QUITE TODOS LOS PERDIGONES DEL CARGADOR
INTEGRADO
A. Siempre apunte el arma en una dirección segura. Asegúrese que el
arma esté en la posición segura “PUESTO” - NO SE VE ROJO. (Ver Pasos de
Operación Paso 1 y Fig. 2)
24
Page 25

B. Con el arma en una
posición derecha y
horizontal (Fig. 12) cierre
el seguidor de perdigones
en la posición delantera
jando las lengüetas en las
ranuras para permitir que
los perdigones salgan del
cargador al reservorio.
C. Suelte el seguidor de perdigones y observe que el seguidor esté hasta
el nal del cargador.
D. Luego repita los pasos anteriores para vaciar los perdigones del
reservorio de perdigones.
FIG. 12
PRECAUCIÓN: Aunque haya seguido los pasos de descarga,
continúe tratando el arma como si estuviera cargada. No la apunte a
nada que no quiera disparar. Siempre ponga la seguridad en “PUESTO”NO SE VE EL ROJO.
QUITE EL CILINDRO DE
A. Ponga el seguro en
“PUESTO” – NO SE VE EL
ROJO (Paso de Operación 1.)
B. Con la boca apuntada en
una dirección segur y con la
cubierta de la empuñadora
izquierda todavía está en su
lugar, lentamente de vuelta
al tornillo perforador hacia
la izquierda dejando que se
descargue el gas CO2 restante. Continúe dando vuelta al tornillo hasta
que llegue al tope nal (Fig. 13).
C. Quite la cubierta de la empuñadora izquierda levantando por la parte
inferior de la cubierta de la empuñadora.
D. Quite y tire apropiadamente el cilindro de CO2
PRECAUCIÓN: Nunca trate de volver a usar un cilindro de CO
para cualquier propósito.
CARACTERÍSTICAS DEL
Hay ocasiones en las cuales la pistola de CO2 puede ser sujeta a
condiciones anormales que pueden producir efectos en el rendimiento
de la pistola. Estas condiciones incluyen operación y/o almacenamiento
de la pistola en temperaturas que se consideran más altas o bajas que la
temperatura exterior normal de 60 a 70 grados Fahrenheit (15.5° a 21° C),
al igual que condiciones de disparo rápido.
A. Temperaturas altas pueden producir presión en el cilindro de CO2 y
el arma que es considerablemente más alta que la presión de operación
normal. Tal aumento de presión puede prevenir que la pistola dispare
y puede causar daño permanente al arma. Las temperaturas máximas
de operación y almacenamiento no deben exceder 105° F (40°C). Esta
temperatura fácilmente puede ser atenidas si el arma se deja bajo el sol
directo en un día soleado. Por lo tanto el tirador no debe exponer al arma
a condiciones altas de temperatura o la luz solar directa por un tiempo
extendido de tiempo.
B. El disparo rápido del arma puede causar que la temperatura baje en la
pistola y el gas CO2. Esto resultará en que la velocidad de los perdigones
sea más baja y hasta puede bajar la presión del gas lo suciente para
que ya no dispare. Esta condición es especialmente aparente en climas
fríos. Esta condición puede ser evitada permitiendo más tiempo entre
los disparos. Esto permite que el gas suba en temperatura y presión y
produzca velocidades normales.
C. Durante el disparo rápido, se espera que la velocidad de boca de cada
tiro sea más baja. Esto puede ser perjudicial a la puntería del tirador.
También, entre más rápido se dispare el arma, usted obtendrá menos
tiros por cilindro de CO2.
D. Se debe usar cuidado para asegurar que el arma no sea disparada con
un cilindro de CO2 que tiene presión baja.
CO
2
FI G.13
CO
2
2
25
Page 26

ALMACENAMIENTO:
Almacene su pistola no cargada. Ponga el seguro en “PUESTO”- NO SE
VE ROJO. Quite el cilindro de CO2 y quite toda la munición. Mantenga el
arma fuera del alcance de los niños y tiradores no entrenados. Almacene
la munición y el cilindro de CO2 en un lugar separado de la pistola para
mantenerla lejos de tiradores no entrenados.
PRECAUCIÓN: Un cilindro de CO
ya esté insertado en el arma o no. Si está expuesta a temperaturas altas
(tales como adentro de un automóvil cerrado bajo luz solar directa)
puede estallar. Asegúrese de almacenar todos los cilindros en un lugar
fresco.
contiene gas bajo presión,
2
CUIDADO APROPIADO
Con cuidados y limpieza periódica, su Rie de Aire Daisy le proveerá
muchos años de deleite disparando su pistola. Como es en el caso de
armas de fuego convencionales, el abuso, negligencia y exposición a los
elementos dañará el rendimiento de cualquier arma de aire. Aprenda a
cuidar su Rie de Aire Daisy y le rendirá bien.
PRECAUCIÓN: Nunca trate de limpiar su Rie de Aire Daisy
hasta que el seguro esté en “PUESTO”- NO SE VE EL ROJO y los cilindros
de CO2 hayan sido quitados y el cargador de municiones haya sido
quitado.
PARTES EXTERIORES
Todas las partes de plástico pueden ser limpiadas con un trapo húmedo
y jabón o detergente suave. Evite el uso de detergentes fuertes,
materiales de limpieza o solventes abrasivos que puedan raspar o de
alguna otra manera dañar las supercies.
LUBRICACIÓN:
Su Rie de Aire Daisy fue lubricado al ser fabricado y no debe necesitar
lubricación adicional.
MODIFICACIÓN:
PRECAUCIÓN: Los componentes de esta arma fueron
fabricados para ofrecer un rendimiento óptimo. Cualquier modicación
o alteración con el arma pueden causar un funcionamiento defectuoso
y puede rendir al arma no segura de usar. Cualquier cambio en el
rendimiento (tal como una fuerza de jale del gatillo disminuida o una
trayectoria disminuida del gatillo), indican una posible modicación,
alteración y/o gasto. Tal arma necesita ser inspeccionada, reemplazada
o apropiadamente reparada por un personal cualicado. Cualquier arma
que se ha caído necesita ser revisada por un personal cualicado para
asegurar que el funcionamiento no ha sido afectado.
PRECAUCIÓN: UNA PISTOLA QUE NO ESTÉ FUNCIONANDO
APROPIADAMENTE PUEDE SER PELIGROSA. DEBE SER ALMACENADA
SEGURAMENTE FUERA DEL ALCANCE DE CUALQUIER PERSONA HASTA
QUE SEA REPARADA O DESTRUIDA. NO TRATE DE DESARMAR SU ARMA.
ES DIFÍCIL DE VOLVER A ENSAMBLARLA Y UN ENSAMBLAJE INCORRECTO
PUEDE CAUSAR CONDICIONES PELIGROSAS.
REPARACIÓN DE RIFLES DE AIRE DAISY®
ARMAS BAJO GARANTÍA
GARANTÍA LIMITADA DE UN AÑO
Por un año de la fecha de compra, Daisy reparará o reemplazará y
regresará el arma, sin costo alguno, si hay defectos en el material o la
fabricación. Servicio es disponible regresando el arma a Daisy Outdoor
Products (vea la nota importante siguiente). Fije a su arma su nombre,
dirección de calle y número telefónico, descripción del problema y
comprobante de fecha de compra (recibo de compra). Empaquete y
envíe con transporte pre pagado a Daisy Outdoor Products. Esta garantía
le da derechos legales especícos y también puede tener otros derechos
que pueden variar de estado a estado.
IMPORTANTE: Usted puede regresar su pistola fuera de servicio a Daisy
para reparación por United Parcel Service (UPS). Asegúrese de quitar
toda la munición y el cilindro de CO2 antes de regresar la pistola a Daisy.
Necesita incluir su dirección de calle para que Daisy le pueda enviar su
arma directamente a usted por entrega de UPS.
26
Page 27

ARMAS FUERA DE GARANTÍA
Si su Rie de Aire Daisy necesita ser reparado, por favor llame al 1-800713-2479 para los cargos de reparación. Daisy reparará su arma o la
reemplazará con un arma reacondicionada del mismo modelo, si hay
disponibles; de otra manera, con un modelo de calidad equivalente.
Daisy Outdoor Products
Service Department
308 West Stribling Drive
Rogers, AR 72756 U.S.A.
Modelo 74 – ESPECIFICACIONES
ACCIÓN Semiautomática CO2 repetidor de Perdigones
CALIBRE .177 Calibre (4.5 mm) Perdigones
CAPACIDAD Cargador integrado de municiones de 15 tiros
Reservorio de tiro 200 de perdigones
DISTANCIA MÁXIMA 211 yardas (193 metros)
DE DISPARO*:
VELOCIDAD 350 pps (170 mps)
DE LA BOCA
CAÑÓN Interior de acero liso
SEGURIDAD Seguro pasador del gatillo (tipo perno
transversal)
MIRAS Punto de Mira Hoja y Rampa; alza ajustable
PESO 1.98 libras (0.90 kg)
LONGITUD TOTAL 35.5 pulgadas (95.8 cm)
*Con la boca apuntando hacia arriba a un ángulo máximo
27
Page 28

Introducción para Tiro
con Armas de Aire Daisy®
UN MENSAJE A LOS PADRES
Aunque no es un arma de fuego, un rie de aire Daisy es un arma y
no un juguete. Usada y cuidada apropiadamente, su arma le brindara
muchas horas de tiro recreacional seguro y sin problemas. Si es usado
incorrectamente, puede ser peligrosa. Por lo tanto, le recomendamos
que solo sea utilizada bajo supervisión de un adulto y nunca por un
joven menor de los diez años de edad. Incluido en este manual están
las 10 Reglas para el Tiro Seguro. Lo alentamos a leerlas, practicarlas y
repasarlas frecuentemente con su hijo.
Como el dueño orgulloso de una nueva arma de Daisy, su hijo se ha
convertido en una parte de la tradición Americana de más de 100 años.
Mecánicamente, una nueva Daisy está respaldada por más de cien
años de conocimientos de ingeniería y experiencia en la fabricación de
productos de calidad.
El manejo seguro depende de una capacitación apropiada de
seguridad y de engendrarle a su hijo o hija la actitud correcta hacia
ser propietario de un arma. Para ayudarlo, hemos diseñado este libreto
para cubrir los puntos básicos que todos necesitan entender antes de
disparar un arma. Tómese el tiempo de estudiarlo completamente con
su hijo. Una comprensión apropiada de estos puntos básicos realmente
aumentará la diversión de su joven del deporte recreacional de tiroteo
con rie de aire que puede disfrutar toda su vida, y al mismo tiempo le da
la satisfacción de saber que si hijo/a está completamente preparado para
manejar su rie de aire.
Le recomendamos fuertemente que se inscriba usted y a ellos
en un curso formal de Instrucción de Tiroteo. Hay un número de
organizaciones de jóvenes y cívicas las cuales ofrecen un curso completo
de 10 lecciones basado en las normas desarrolladas por entrenadores
expertos de Daisy, y están listados en la sección de”Aprenda a Disparar
Seguramente” en la página 33 de este libreto. Un llamado rápido a ellos
les dirá cuando empezará el siguiente curso en su área. Si desea más
información detallada, escriba a: Special Market Programs, Daisy, P.O. Box
220, Rogers, Arkansas 72757.
COMENZANDO
Primero, usted debe saber que su arma Daisy no es juguete. Es un
arma. Si la usa cuidadosamente, le brindara muchos años de diversión.
Pero, si no tiene cuidado, puede ser peligros. Segundo, lea este libreto.
Junto con el Manual de Operaciones, le dice cómo manejar su nueva
arma de perdigones apropiadamente y cómo sacarle mucha diversión.
Léalo cuidadosamente con su padre y asegúrese de que lo entienda.
Luego, ponga lo que ha aprendido en práctica. Y recuerde, es su
responsabilidad como el dueño del arma de asegurarse de que cualquier
persona usando el arma sepa las reglas para el manejo apropiado del
arma. EL MANEJO APROPIADO DEL ARMA ES LA CLAVE PARA EL TIRO
DIVERTIDO. Si entiende que “MANEJO” de su arma quiere decir cada vez
que la toca y si siempre se acuerda de manejar el arma como si estuviera
cargada está en camino al buen manejo del arma. La mayoría de los
accidentes con armas de aire en este país ocurren por 1) el manejo sin
cuidado y erróneo del arma, 2) creer que el arma esta descargada y no lo
esta, o 3) tirar a blancos incorrectos. Todas estas tres causas pueden ser
evitadas si el tirador maneja el arma apropiadamente.
Por años hemos utilizado las 10 Reglas para el Tiro Seguro. Lea,
recuerde, practique y repase estas reglas sencillas. Estas reglas le darán
muchas horas de tiro recreacional divertido y seguro.
10 REGLAS PARA EL TIRO SEGURO
1. Siempre mantenga la boca apuntada en una dirección segura.
2. Trate cualquier arma como si estuviera cargada.
3. Solamente cargue o amartille un arma cuando esté listo para disparar
4. Revise su blanco y mas allá de su blanco.
5. Cualquiera que esté disparando o alguien observando al tirador
necesita usar lentes de disparo.
6. Nunca trepe o brinque con un arma cargada.
7. Evite el tiro de rebote.
8. Mantenga la boca libre de impedimentos.
9. Las armas que no estén en uso necesitan ser descargadas.
10. Respete la propiedad de otras personas.
También es muy importante que recuerde que cada vez que reciba un
arma de otra persona o saque un arma de su lugar de almacenamiento,
necesita asegurarse de que esté descargada y no amartillada
apuntándola en una dirección segura y jalando el gatillo.
28
Page 29

PRECAUCIÓN: Aun si ha disparado un rie de aire una o más
veces y no salió un perdigón, esto no quiere decir que está libre de
perdigones. Continúe tratando el arma como si estuviera cargada.
Nunca vea dentro de la boca de su arma. No puede saber viendo si su
arma está cargada o no, así que siempre trátela como si lo estuviese. Los
hábitos que forma ahora en el manejo de su nueva Daisy les serán de
ayuda en el maneja de cualquier arma.
LA DAISY AFUERA
Su arma Daisy no fue diseñada para ir a cazar, pero todavía puede
divertirse con ella afuera. Es fácil hacer un blanco afuera.
De hecho, el tiro
afuera es una buena
manera para que una
persona joven y sus
padres se diviertan y
tengan competencias
familiares juntos.
Cuando lleve su arma
Daisy afuera, recuerde
las siguientes cosas:
• No tire a blancos con
supercies duras, como piedras o arboles. Sus perdigones pueden
rebotar. Nunca tire a la supercie del agua por la misma razón.
• Siempre sepa en donde están las otras personas antes de disparar.
Asegúrese que no estén cerca del blanco.
• Siempre mantenga la boca apuntada en una dirección segura por si se
tropieza o se cae entonces puede controlar la dirección de la boca.
• Mantenga su rie de aire Daisy descargado cuando no lo utilice.
• Adentro o afuera, cualquiera que esté disparando necesita usar lentes
de tiro. (Pueden ser comprados en la mayoría de tiendas que venden
productos deportivos.)
LA DAISY ADENTRO
El rie de aire Daisy es seguro para tiro adentro siempre y cuando
siga las reglas de seguridad apropiadas. No hay muchas, pero son
importantes. Primero, tiene que tener por lo menos 5 metros (16.4 pies)
de espacio
de la línea
de tiro al
blanco. Todas
las Líneas
de Armas
Daisy para
Jóvenes están
diseñadas
con velocidad
controlada
de menos
de 350 pies
por segundo
y son más
efectivas para
tiro al blanco
a 5 metros.
(¡Necesitan el
mismo nivel
de destreza
para disparar
su Daisy a
distancia de 5
metros como para disparar una .22 en un campo de 50 pies!). Segundo,
necesitan un blanco seguro (Ver la sección “BLANCO SEGURO”) colocado
para que no haya puertas de entrada en frente o a los lados de la línea de
fuego o atrás de los blancos. Si esto no es posible, entonces las puertas
en el área necesitan ser bloqueadas. Tercero, necesita tener una lona o
una manta detrás del blanco separada de la pared y que llegue hasta
el suelo. Esto puede prevenir un tiro de rebote si es que falla tirarle al
cazabalines. Finalmente, su blanco necesita estar bien iluminado.
Recuerde mantener su arma Daisy descargada hasta que el blanco
esté en su lugar y esté listo para disparar. Nunca apunte en cualquier
dirección que no sea hacia el blanco. Si sigue estas reglas y los combina
con los otros consejos en el manejo apropiado del arma en este libreto,
usted puede disfrutar de tiro adentro seguro.
29
Page 30

ARMA DAISY DE PERDIGONES NO ES PARA CACERÍA
ASSIS (POSITION BASSE)
Es un arma para tiro al blanco. Pero le enseña las destrezas y los
hábitos de manejo que necesita para la cacería. O, tal vez quiere
preparase para competencias de tiro al blanco. Muchos adultos dueños
de armas hacen esto.
PORTADOR DEL
CILINDRO DE C0
(DENTRO DE LA
EMPUÑADURA)
CU LATA
2
CARGADOR DE
MUNICIONES
ALZA
AJUSTABLE
MIRA
DELANTERA
TORNILLO
PERFORADOR
DEL CILINDRO
DE C0
2
SEGURIDAD
ANTEBRAZO
CAÑÓN
GAT ILLO
RESERVOR IO DE
200 RONDAS DE
MUNICIONES
BOCA
CONOZCA SU ARMA DE LA CANTONERA A LA BOCA
¿Sabes lo que es un gatillo? ¿El antebrazo? Checa tu conocimiento con
este dibujo.
COMO SER UN TIRADOR EXPERTO.
Si se aprende las técnicas y las practica frecuentemente, usted puede
ser un tirador experto. La puntería de puede brindar mucha alegría por el
resto de su vida. Los consejos que aprenda en este libreto serán un buen
comienzo. Pero aprenderá más rápidamente si recibe ayuda de un adulto
con experiencia en el tiro.
PRONE
ACOSTADO
COUCHE
KNEELING (LOW)
ARRODILLADO (ABAJO)
UN GENOU EN TERRE
(POSITION BASSE)
SITTING (LOW)
N.R.A. STANDING
N.R.A. PARADO
POSITION PRECONISEE
PAR LA N.R.A.
SENTADO (ABAJO)
POSICIONES
Hay cuatro posiciones básicas para disparar el rie y dos variaciones
de cada una. Apréndalas todas para que pueda estar preparado para
cualquier condición de tiro. Las posiciones son acostado, sentado,
arrodillado y parado. Vea medio a la derecha antes de entra en cualquier
posición. Luego:
ACOSTADO- Acuéstese a un ángulo de aproximadamente de 5 a 15
grados de la línea de fuego. La pierna izquierda necesita estar totalmente
relajada. La pierna derecha debe estar a un ángulo de la columna y
puede estar doblada o derecha.
ARRODILLADO- Voltee medio a la derecha y baje sobre su rodilla
derecha. En la posición baja, el pie izquierdo necesita estar extendido
lo más adelante cómodamente posible, mientras que la pierna derecha
esta plana sobre el suelo con el tirador sentado en el lado de su pie. En la
posición alta, el tirador se sienta sobre su tobillo derecho.
SENTA DO- En la posición baja, cruce sus piernas en frente de usted con
la parte exterior de cada pie descansando en el suelo y apoyando las
rodillas. Los codos deben estar puestos cerca de las rodillas, formando un
triangulo para apoyar el rie, las piernas no están cruzadas en la posición
30
Page 31

alta. Los pies están bien separados, con los tobillos apoyados y el cuerpo
Blade Front Sight / La hoja la Vista Anterior / La Vue de Devant de lame
inclinado hacia delante para que los codos puedan ser apoyados por las
rodillas.
PARADO- En la posición parada de la Armada, de media vuelta hacia la
derecha con los pies separados como un pie. Párese relajadamente, no
rígido. El codo derecho necesita estar más o menos a la misma altura del
hombro. Su brazo izquierdo no toca su cuerpo. En la posición parada de
la N.R.A. usted puede descansar la parte superior de su brazo contra su
brazo en su cadera.
AHORA PONGA SU RIFLE DE PERDIGONES EN LA
POSICIÓN CORRECTA.
Estas reglas sencillas le ayudaran a agarrar su arma correctamente.
(Estas instrucciones son para personas derechas – para los zurdos
invierta las posiciones.)
1. Agarre la parte pequeña de la culata con su mano derecha.
2. Permite que el antebrazo descanse en la palma de su mano izquierda
(o con el pulgar y el índice si está utilizando la posición parada de la
N.R.A.)
3. Coloque su codo izquierdo lo mas cercanamente directamente debajo
de arma como pueda.
4. Coloque su cachete lo más delante posible en la culata sin forzarse y
presione levemente contra la culata.
5. Asegúrese de que su Daisy todavía apunte fácilmente al centro del
blanco. Para asegurarse, cierre sus ojos y señale a donde piense que
esta el blanco. Si, cuando abre sus ojos, el arma está apuntando en otra
dirección del blanco, mueva su cuerpo para corregir. Repita hasta que
esté centrado naturalmente.
6. Prepárese para apretar el gatillo con la parte superior de su dedo
índice. ¡Pero todavía no dispare!
PUNTERÍA (ALINEACIÓN)
Una Daisy disparara a donde la apunte. El truco es de mantener la
alineación correcta. Para hacer esto, piense en una paleta. ¡Luego haga
la punta de mira el palillo de la paleta y el blanco el dulce! Mantenga la
parte de arriba del palillo de la paleta a nivel con la parte superior del
alza y centrado en la muesca en forma de V.
Intente alinear. Luego revise lo que ve contra los dibujos anteriores.
Para ser un buen tirador consistente, use el dibujo correcto cada vez que
dispare el arma, y recuerde - alinee o apunte el arma solamente en una
dirección segura.
Too High
También Alto
Aussi Haut
Too Low
También Bajo
Trop Bas
Fiber Optic Front Sight
La fibra la Vista Anterior Optica / Fibre la Vue de Devant Optique
Too High
También Alto
Aussi Haut
Too Low
También Bajo
Trop Bas
Just Right
Apenas Correcto
A la perfection
Just Right
Apenas Correcto
A la perfection
RESPIRACIÓN
El respirar en el momento inadecuado puede causar que su cuerpo se
mueva y su puntería se pierda. Así que respire apropiadamente. Aquí
está como:
(a) Tome una respiración profunda.
(b) Deje salir la mitad. Apunte.
(c) Aguante el resto hasta que haya disparado.
¡Pero todavía no dispare!
31
Page 32

DISPARO
Esto consiste de dos pasos: Puntería y Jalar. Ponga sus miras alineadas
y mire cuidadosamente. Cuando la punta de la mira llega a la parte
inferior del blanco, gradualmente jale el gatillo. Nunca jale rápidamente
del gatillo. El movimiento repentino arruinará su puntería. Jalar el gatillo
necesita práctica. Pero continúe intentando. Lo aprenderá muy bien.
Ahora está listo para disparar.
¡Pero espérese un momento!
¿A que le está disparando? ¿A donde está disparando? Recuerde las 10
reglas de Tiro Seguro - Esté seguro de su blanco antes de disparar. Nunca
cargue un arma amartillada. Amartíllela solamente cuando esté listo
para disparar. Aun con la seguridad del gatillo en “PUESTO”, su arma está
totalmente cargada y necesita ser manejada con cuidado.
APUNTANDO SU ARMA
El primer paso en la alineación apropiada de la puntería es el
determinar el agrupamiento de disparo de su nueva Daisy. Para hacer
esto, posicione un descanso, tal como una tabla o un banco, 5 metros de
su blanco. Coloque su rie en el descanso y apunte al mismo punto en el
blanco cada vez, dispare tres tiros. No intente hacer ajustes durante sus
tres tiros. Ahora solamente está interesado
en que tan bien se agrupan sus tiros. Una
vez que haya determinado la habilidad de
agrupamiento de usted y su rie, ahora
puede ajustar sus miras para poner su
agrupamiento sobre el blanco. NOTA: Puede
ser necesario que cada persona que dispare
su rie de aire Daisy necesite ajustar sus
miras para su propio patrón de mira.
COMO HACER UN BLANCO INTERIOR-EXTERIOR
Una caja de cartón de 16 pulgadas o mas de profundidad, y con
por lo menos un cuadro de dos pies de supercie de frente, puede
ser utilizada para la base de su blanco. Centre 3 pulgadas de revistas
fuertemente sujetadas (no sustituya periódicos) en la parte adentro
de la pared posterior del lado
opuesto del blanco y luego
llene completamente la caja con
bolas de periódico fuertemente
apretadas para prevenir tiro
de rebote. Una vez que el
cazabalines esté listo, pegue el
blanco a la parte de enfrente de
la caja. No utilice sujetadores de
metal - los perdigones pueden
rebotar. Al usar el cazabalines,
este necesita ser revisado
cercanamente y necesita ser
cambiado cuando los perdigones o los balines han penetrado a la mitad
del grosor de las revistas.
PRECAUCIÓN: Ya sea que compre un cazabalines o haga el
suyo, es importante recordar que se desgastan con uso continuo. Dado
a esto, siempre debe colocar su cazabalines en donde estará seguro si
es que falla, y revíselo cuidadosamente antes y después de cada uso.
Un rebote o tiro de rebote es una indicación de que el cazabalines tiene
faltas y necesita dejar de utilizarlo inmediatamente.
JUEGOS DE TIRO
Una vez que haya dominado los puntos básicos, puede tratar de jugar
algunos de estos juegos:
1. GATO – Dos tiradores toman turno de un disparo y marcan cada tiro.
Se juega como el ga-to normal.
2. FALLA Y PIERDES – Coloque diez blancos. Dispare hasta que falle. El
tirador con más tiros gana.
3. MARCA Y HACIA ATRÁS – Cada tirador toma un paso hacia atrás cada
vez que le pega al blanco. El que llegue más atrás gana.
IMPORTANTE: ¡Asegúrese de usar un cazabalines seguro detrás de toso
sus blancos!
32
Page 33

APRENDA A DISPARAR CON SEGURIDAD
Daisy Outdoor Products tiene grandes antecedentes de enseñar a
jóvenes y usuarios primerizos a disparar con seguridad. Para poder
implementar ecazmente nuestros programas de educación de tiro a
nivel nacional, Daisy está asociada con las siguientes organizaciones
que enseñan seguridad de tiro y ofrecen materiales de seguridad e
información adicional. Le alentamos ponerse en contacto con Daisy al
1-800-713-2479.
33
Page 34

10 RÈGLES
DE SÉCURITÉ DE TIR
le non-respect de ces
règles peut entraîner des
blessures graves ou la mort.
1
Toujours pointer la bouche du canon dans une direction qui ne
présente aucun danger.
Selon la situation, il existe plusieurs « manières de porter » sûres.
NE JAMAIS LAISSER LA BOUCHE DU CANON POINTÉE VERS UNE PERSONNE.
2
Traiter chaque fusil/pistolet comme s'il était chargé.
Vous ne pouvez jamais être totalement sûr d'être la dernière personne à avoir manipulé
l'arme. Ne jamais croire si qui que ce soit vous dit qu'une arme est chargée ou
déchargée. Toujours vérifier si une arme est chargée lorsqu'elle vient du rangement ou
que vous la recevez des mains d'une autre personne. Même si vous avez appuyé
plusieurs fois sur la gâchette du fusil à air comprimé et qu'aucune bille ou balle n'a été
expulsée, cela ne signifie pas que l'arme ne contient pas de munitions. Les munitions
d'une arme à air comprimé peuvent ne pas sortir pour une raison ou une autre. Traiter
toujours l'arme comme si elle est chargée et prête à tirer. TRAITER TOUJOURS
L'ARME COMME SI ELLE EST CHARGÉE ET PRÊTE À TIRER MÊME SI VOUS SAVEZ
QUE CE N’EST PAS LE CAS.
3
Ne charger ou armer un fusil/pistolet que lorsque vous voulez tirer.
Une arme chargée n’a pas sa place dans votre maison ou dans tout autre lieu public.
4
Vérifier votre cible et au-delà de votre cible.
Avant de tirer, assurez-vous qu’il n’y a personne aux environs de la cible. Regardez
derrière et au-delà de votre cible pour être certain que vous avez un pare-balles sûr et
qu’aucune personne ou aucun bien n’est menacé.
5
Toute personne qui effectue un tir ou qui est près
du tireur doit mettre des lunettes de protection de tir.
En outre, toute personne présente sur le lieu doit rester derrière le tireur.
6
Ne jamais grimper ou sauter avec un fusil.
Si vous trébuchez ou tombez, vous ne pourrez pas contrôler la direction de la bouche
du canon. Vous devriez poser l’arme en toute sécurité ou la remettre à un compagnon
pendant que vous grimpez ou sautez par-dessus quelque chose.
7
Éviter les ricochets.
Ne jamais tirer sur une surface plane dure ou sur une surface d’eau.
Les munitions peuvent ricocher sur l’eau comme une pierre.
8
Maintenir la bouche du canon éloignée de tout autre objet.
Ne jamais laisser quoi que ce soit obstruer la bouche du canon de l’arme. Ne pas
laisser la bouche du canon de l’arme toucher le sol.
9
Les armes non utilisées doivent toujours être déchargées.
Garder les armes déchargées lorsqu’elles ne sont pas utilisées est important pour
votre sécurité et celle des autres. Lorsque vous avez fini de tirer, mettez la sûreté de la
gâchette en position « on » et déchargez le pistolet. Ranger les fusils/pistolets de sorte
qu’ils soient inaccessibles aux tireurs non qualifiés et rangez les munitions séparément
du fusil/pistolet.
10
Respecter les propriétés d’autrui.
Que vous pratiquiez le tir sur cible ou que soyez à la chasse comme invité sur des
terres qui ne vous appartiennent pas, veillez à laisser les lieux dans l’état exact où vous
les avez trouvés.
Visitez www.daisy.com et lisez les règles de sécurité de tir.
Répondez aux questions et obtenez votre certificat
« prendre la sécurité pour cible».
34
Page 35

Manuel d’utilisation
Modèle 74
Fusil à Air Comprimé
Semi-Automatique au C0
ARRET
cette arme à air comprimé chez le détaillant qui vous l’a vendue. Si
vous n’êtes pas satisfait par la qualité ou la performance de ce fusil
à air comprimé, veuillez appeler le Service Client ou le renvoyer à :
Veuillez remplir le formulaire se trouvant sur la face interne de la
couverture arrière et le retourner avec une copie de votre facture
Avanti sont couverts par une garantie d’un an à compter de la date
notre site Web. Si vous avez acheté cet article dans un magasin de
NE RENVOYEZ PAS
Daisy Outdoor Products
308 Stribling Drive
Rogers, AR 72756
À l’attention de : Service Departement
d’achat datée (utilisée uniquement comme preuve d’achat) avec
votre arme à air comprimé.
Tous les fusils à air comprimé Daisy, PowerLine, Winchester et
d’achat. Les viseurs sont couverts par une garantie de 90 jours.
Lire le manuel d’utilisation pour obtenir les informations
spécifiques sur la garantie.
Daisy ne peut offrir des remboursements que sur les articles
achetés directement auprès du Service Client de Daisy ou sur
détail, nous nous ferons le plaisir de le réparer ou le remplacer
conformément à notre politique de garantie.
Veuillez appeler le Service Client de Daisy au 1-800-713-2479 si
vous avez des questions.
à BB
2
ARRET
LIRE VOTRE MANUEL D’UTILISATION ET TOUS LES
AVERTISSEMENTS AVANT D’UTILISER.
CECI N’EST PAS UN JOUET. NÉCESSITE
AVERTISSEMENT:
LA SURVEILLANCE PAR UN ADULTE.
L’UTILISATION INAPPROPRIÉE OU IMPRUDENTE PEUT ENTRAINER DES
BLESSURES GRAVES, EN PARTICULIER AUX YEUX. PEUT ÊTRE DANGEREUX
JUSQU’À 211 YARDS (193 MÈTRES).
LIRE TOUTES LES INSTRUCTIONS AVANT D’UTILISER. LACHETEUR ET
L’UTILISATEUR DOIVENT RESPECTER TOUTES LES LOIS RÉGISSANT L’UTILISATION
ET LA POSSESSION DES ARMES À AIR COMPRIMÉ. L’UTILISATION DES ARMES À
AIR COMPRIMÉ EST RECOMMANDÉE POUR DES PERSONNES ÂGÉES DE 10 ANS OU
PLUS, UNIQUEMENT SOUS LA SUPERVISION DUN ADULTE.
CONFORMÉMENT AUX LOIS DE LA CALIFORNIE
NE PAS BRANDIR OU MONTRERCETTE
AVERTISSEMENT:
ARME À AIR COMPRIMÉ EN PUBLIC CELA PEUT CRÉER LA CONFUSION DANS LA POPULATION ET CONSTITUER UN
CRIME. LA POLICE OU D’AUTRES PERSONNES PEUVENT PENSER QU’IL SAGIT
DUNE ARME À FEU. NE PAS EN CHANGER LA COLORATION ET LES MARQUES
POUR LA FAIRE RESSEMBLER DAVANTAGE À UNE ARME À FEU. CET ACTE EST
DANGEREUX ET PEUT CONSTITUER UN CRIME.
MÊME SI VOUS AVEZ APPUYÉ
AVERTISSEMENT:
PLUSIEURS FOIS SUR LA GÂCHETTE DU
FUSIL À AIR COMPRIMÉ ET QUAUCUNE BILLE NA ÉTÉ EXPULSÉE, CELA NE
SIGNIFIE PAS QUE LARME NE CONTIENT PAS DE BILLES. NARRÊTEZ PAS DE
TRAITER LARME COMME SI ELLE EST CHARGÉE.
35
Page 36

CECI N’EST PAS UN JOUET. NÉCESSITE LA
AVERTISSEMENT:
SURVEILLANCE PAR UN ADULTE. L’UTILISATION
INAPPROPRIÉE OU IMPRUDENTE PEUT ENTRAINER DES BLESSURES GRAVES, EN
PARTICULIER AUX YEUX. PEUT ÊTRE DANGEREUX JUSQU’À 211 YARDS (193 MÈTRES).
LIRE TOUTES LES INSTRUCTIONS AVANT D’UTILISER. L’ACHETEUR ET L’UTILISATEUR
DOIVENT RESPECTER TOUTES LES LOIS RÉGISSANT L’UTILISATION ET LA POSSESSION DES
ARMES À AIR COMPRIMÉ. L’UTILISATION DES ARMES À AIR COMPRIMÉ EST RECOMMANDÉE
POUR DES PERSONNES ÂGÉES DE 10 ANS OU PLUS, UNIQUEMENT SOUS LA SUPERVISION
D’UN ADULTE.
SELON LES LOIS DES LA CALIFORNIE
NE PAS BRANDIR OU MONTRER CETTE ARME À
AVERTISSEMENT:
AIR COMPRIMÉ EN PUBLIC - CELA PEUT CRÉER
LA CONFUSION DANS LA POPULATION ET CONSTITUER UN CRIME. LA POLICE OU D’AUTRES
PERSONNES PEUVENT PENSER
QU’IL S’AGIT D’UNE ARME À FEU. NE PAS EN CHANGER LA COLORATION ET
ET LES MARQUES POUR LA FAIRE RESSEMBLER DAVANTAGE À UNE ARME À FEU. CET ACTE
EST DANGEREUX ET PEUT CONSTITUER UN CRIME.
Ce symbole d’alerte de sécurité indique les messages
de sécurité importants dans ce manuel. Quand vous voyez
ce symbole, soyez attentif à la possibilité de blessures et lisez
attentivement le message qui suit.
Les règles de maniement en toute sécurité des armes repris
dans la section « Introduction au tir avec une carabine à air
comprimé » de ce manuel (qui commence à la page 43) est
un guide important pour le soin et le maniement en toute
sécurité de tout type de fusil/pistolet. LISEZ CETTE SECTION.
Il est de votre responsabilité, en tant que propriétaire de cette
arme, de vous assurer que toute personne qui l’utilise soit
instruite aux pratiques de maniement en toute sécurité.
En tant que l’heureux propriétaire d’une arme à air comprimé
Daisy, vous êtes entré dans une tradition américaine qui
remonte à l’époque où votre grand-père était un petit garçon.
Votre nouvelle arme Daisy est le résultat d’une expérience de
plus de 100 ans que Daisy a dans la fabrication de produits de
qualité.
Quoique votre nouvelle Daisy ne soit pas une arme à feu,
elle est quand même une arme et doit être traitée avec
soin et respect. Rappelez-vous toujours de ceci: le tireur
est le tout premier et le plus important aspect de sécurité
de tout pistolet/fusil. Toutes les sûretés sont des dispositifs
mécaniques et le tireur est la seule partie du système qui peut
rendre un pistolet/fusil sûr - ou dangereux. NEVOUS FIEZ PAS
QU’AUX DISPOSITIFS DE SÛRETÉ MÉCANIQUES.
Anticipez, pensez à l’avance et évitez les situations qui
pourraient provoquer des accidents.
POUR VOTRE SÉCURITÉ ET CELLE DES AUTRES, LISEZ LE
MODE D’EMPLOI DANS SON ENTIÈRETÉ AVANT D’ESSAYER
LE TIR AVEC CETTE ARME. Les armes dièrent dans leurs
fonctionnements et vous ne serez prêt à tirer avec une d’entre
elles qu’après vous en être familiarisé au préalable. Lire le
mode d’emploi et SANS CHARGER DE MUNITION, pratiquer
à plusieurs reprises les étapes de maniement avec votre arme
(simulation de tir à vide avec l’arme sur une cible sécurisée)
pour que vous soyez en mesure de manier le modèle 74, par la
suite, correctement et en toute sécurité.
FIG. 1
CROSSE
DISPOSITIF DE
RETENUE DE
CARTOUCHE DE CO2
(DANS LA POIGNÉE)
VIS DE
PERFORATION
DE CARTOUCHE
DE CO2
36
SÛRETÉ
DÉTENTE
MAGASIN DE
MUNITIONS
RÉSERVOIR POUR
200 PIÈCES DE
MUNITIONS
RONDES
Page 37

AVANT LE MANIEMENT
Enclencher LA SÛRETÉ (« ON ») - COULEUR ROUGE NON VISIBLE (voir
étape 1 du maniement).
ÉTAPES DE MANIEMENT:
AVERTISSEMENT : Assurez-vous toujours que l’arme est
pointée dans une direction qui ne présente aucun danger. Ne jamais
pointer l’arme vers une personne. Il faut toujours présumer que et
traiter l’arme comme si elle est chargée et prête à tirer. Le tir avec
l’arme sera possible jusqu’à ce que le magasin de billes incorporé soit
vide ou que la cartouche de CO2 nécessite d’être remplacée. Une fois
que le magasin de billes incorporé est vide, les étapes 1,3,4,5,6, et 7
doivent être suivies. Si la cartouche de CO2 se vide, alors toutes les 7
étapes doivent être suivies. (Environs 100 coups sont possibles par
cartouche de CO2).
Étape 1. Enclencher la sûreté (« ON ») ‘couleur rouge non visible.
Étape 2. Insérer une cartouche de CO
Étape 3. Remplir le réservoir de billes avec 200 billes au maximum
Étape 4. Remplir le magasin incorporé avec 15 billes au maximum.
Étape 5. Viser une cible sécurisée.
Étape 6. Retirer la sûreté (« OFF ») - couleur rouge apparaît.
Étape 7. Tirer.
Étape 8. Enclencher la sûreté (« ON ») - couleur rouge non visible.
NE JAMAIS RANGER UNE ARME CHARGÉE
À la n d’une séance de tir, par mesure de précaution, toujours
enclencher la sûreté «ON» - de la sécurité - ROUGE NON VISIBLE,
retirer la cartouche de CO2 et retirer les billes du réservoir de billes
et le magasin intégré. Ranger dans un lieu sûr pour empêcher toute
utilisation non autorisée.
MANIEMENT
AVERTISSEMENT : Assurez-vous toujours que l’arme est
pointée dans une direction qui ne présente aucun danger. Ne jamais
pointer l’arme vers une personne. Il faut toujours présumer que et
traiter l’arme comme si elle est chargée et prête à tirer.
ÉTAPE 1. ENCLENCHER LA SÛRETÉ « ON » POSITIONNER LA SÛRETÉ DE SORTE QUE LA
COULEUR ROUGE NE SOIT PAS VISIBLE.
Appuyer sur le bouton de sûreté pour le pousser à droite vers la
position « sûreté » (“SAFE”) - COULEUR ROUGE NON VISIBLE (Fig. 2A).
Dans cette position, il est impossible d’appuyer sur la gâchette pour
tirer avec l’arme.
2
FIG.2A
FIG.2B
ATTENTION: Même quand la sûreté est enclenchée (“ON”),
vous devez continuer à manipuler l’arme avec prudence. Ne pas
pointer l’arme vers une chose sur laquelle vous n’avez pas l’intention
de tirer.
REMARQUE : La sûreté est manuelle, elle n’est pas automatique. Elle
accomplira son rôle après que vous ayez accompli le vôtre. Tout en
gardant le doigt (index) loin de la zone de la gâchette, déplacer la
sûreté vers la position « SÛRETÉ » (“SAFE”) - COULEUR ROUGE NON
VISIBLE (Fig. 2A).
SOUVENEZ-VOUS, LE BON MANIEMENT D’UNE ARME EST LA
MEILLEURE SÉCURITÉ.
VISEUR
ARRIÈRE
RÉGLABLE
CANON
VISEUR
AVANT
BOUCHE
DE CANON
37
Page 38

ÉTAPE 2. INSÉRER UNE CARTOUCHE DE CO
A. Enclencher la sûreté (« ON ») -
couleur rouge COULEUR ROUGE NON
VISIBLE. 2A).
B. Retirer le couvercle gauche de la
poignée en soulevant sa languette
(Fig. 3).
C. Tourner la vis de perforation dans
le sens antihorlogique jusqu’à ce qu’il
y ait assez de place pour insérer une
cartouche de CO
D. Insérer la grosse extrémité de
la cartouche de CO2 dans la partie
inférieure de la poignée. Tenir l’arme
en position inversée avec la poignée
vers le haut et le canon pointée loin
de vous tel que indiqué (Fig. 4).
E. Positionner la petite extrémité de
la cartouche de CO2 à l’intérieur du
dispositif de retenue de sorte que la
cartouche de CO2 touche la tige de
perforation (Fig. 5).
F. Tout en maintenant le fusil dans
une position inversée, remettre
en place le couvercle gauche de la
poignée, pointer la bouche du canon
dans qui ne présente pas de danger et
tourner la vis dans le sens horlogique
pour perforer la cartouche de CO2.
(Fig. 6) Continuer à tourner la vis
RAPIDEMENT jusqu’à ce que les doigts
sentent une résistance. REMARQUE :
Une petite fuite de gaz (CO2) peut se
produire avant que la vis de ponction soit serrée.
.
2
FIG. 3
FIG. 4
FIG. 5
FIG. 6
2
AVERTISSEMENT : Assurez-vous que la bouche du canon
est pointée dans une direction qui ne présente pas de danger lors
de la perforation de la cartouche de CO2. Au cas où des fuites se
produiraient temporairement sur un joint pendant la perforation
d’une cartouche de CO2, le CO2 peut s’échapper par le canon. Si des
munitions sont coincées dans le canon à cause d’un tir précédant, cela
peut entraîner le tir d’un projectile.
AVERTISSEMENT : Utiliser uniquement des cartouches de
CO2 de 12 grammes. Essayer d’utiliser d’autres types de cartouche de
gaz peut être extrêmement dangereux et peut entraîner des blessures
graves. Des gaz autres gaz que le CO2 peuvent entraîner l’explosion ou
la rupture de l’arme.
ÉTAPE 3. REMPLIR LE RÉSERVOIR DE BILLES AVEC
200 BILLES AU MAXIMUM
A. Pointez toujours l’arme vers une direction qui ne présente aucun
danger. Assurez-vous que la
sûreté de l’arme est enclenchée
(“ON”) - COULEUR ROUGE
NON VISIBLE (voir Étape 1 du
maniement.)
B. Retourner l’arme pour avoir
accès à la porte de chargement
des billes située sur la partie
inférieure de l’arme, juste devant
le pontet. (Voir g. 7)
C. Ouvrir la porte de chargement en la faisant glisser vers l’arrière, vers
le pontet.
D. Remplir le magasin avec une nouvelle charge de 200 billes au
maximum ensuite faire glisser la porte pour la fermer.
FIG.7
ATTENTION: Utiliser uniquement les billes Daisy® Precision
MaxTM ou d’autres billes de qualité similaire portant une étiquette
les décrivant comme telles. Ne pas utiliser la grenaille de plomb, des
grains de plomb, des échettes, des billes de roulements ou autres
objets étrangers, car ils peuvent causer des blessures aux personnes
ou endommager et/ou boucher l’arme.
ÉTAPE 4. REMPLIR LE MAGASIN INCORPORÉ AVEC 15
BILLES AU MAXIMUM.
A. Pointez l’arme toujours vers une direction qui ne présente aucun
danger. Assurez-vous que la sûreté de l’arme est enclenchée (“ON”) COULEUR ROUGE NON VISIBLE. (Voir étape 1 de maniement.)
38
Page 39

B. Avec le fusil toujours retourné,
utiliser votre pouce et votre index pour
saisir les onglets suiveurs des billes du
magasin de billes incorporé et tirez-le
vers l’extrémité de la bouche du canon.
(Fig. 8)
C. Maintenir les onglets suiveurs de
billes dans cette position avant et les
pousser vers le bas dans les fentes qui
les maintiendront en position. (Fig. 9)
D. Vériez que le magasin incorporé est
rempli avec un maximum de 15 billes.
E. Après que le magasin incorporé ait
été chargé avec un maximum de 15
billes, relâcher lentement le suiveur
de billes du magasin et lui permettre
de s’appuyer contre les billes. Cela
permettra aux billes d’être sous tension
du ressort et d’avancer correctement.
(Fig.10)
FIG. 8
FIG. 9
ATTENTION: Utilisez des
précautions supplémentaires dans le
choix d’une cible et d’un pare-balles
sûres. Des objectifs inappropriés
peuvent causer des ricochets. Ne
tirez jamais sur une cible magnétique
en acier conçu pour la grenaille.
Sélectionnez des cibles et pare-balles qui ne causeront pas de ricochet
ni ne permettront aux billes de percer le pare-balle. Ne jamais tirer sur
une surface plane dure ou sur une surface d’eau.
FIG . 10
AVERTISSEMENT : Une fois que le magasin incorporé est
chargé de billes, l’arme est considéré comme chargée, alors usez d’une
extrême prudence dans le maniement. Toujours pointer la bouche
de canon du fusil dans une direction qui ne présente aucun danger.
Ne jamais pointer l’arme vers une personne. Traiter toujours l’arme
comme si elle est chargée et prête à tirer.
ÉTAPE 5. VISER UNE CIBLE SÉCURISÉE
Pour être un tireur d’élite cohérent, utilisez l’image de visée appropriée
chaque fois que vous tirez avec l’arme (Fig11).
ATTENTION: Utilisez des précautions supplémentaires dans
le choix d’une cible sûre. Des objectifs inappropriés peuvent causer
des ricochets.
FI G. 11
ÉTAPE 6. RETIRER LA SÛRETÉ (« OFF ») - COULEUR
ROUGE VISIBLE.
Après vous être assuré que la cible, le pare-balle et les zones
avoisinantes sont sans danger, retirez la sûreté (“OFF”) - ROUGE VISIBLE
(Fig. 2B). Appuyer sur la gâchette maintenant fera partir le coup.
ÉTAPE 7. TIRER
Assurez-vous que le fusil est pointé vers une cible sûre. Une fois que la
dernière bille a été tirée du fusil, il est encore possible d’appuyer sur la
gâchette, mais seul le CO2 sera libéré.
ÉTAPE 8 ENCLENCHER LA SÛRETÉ (« ON ») - COULEUR
ROUGE NON VISIBLE.
Après avoir tiré, remettre la sûreté en position « ON » - rouge non
visible (Fig. 2A).
LES BILLES NE SONT PAS TIRÉES
AVERTISSEMENT : Si une bille n’est pas tirée après
exécution des étapes de l’opération, ne supposez pas que l’arme
est déchargée. Maintenir le fusil pointé dans une direction qui ne
présente aucun danger.
EFFECTUER LES VÉRIFICATIONS CI-APRÈS SI UNE
BILLE N’EST PAS TIRÉE
A. Le magasin incorporé contenait-il des billes de calibre 0,177 Daisy ®
39
Page 40

Precision Max™ ou d’autres de qualité similaires? Sinon, remplissez le
magasin de billes et répéter les étapes de l’opération.
B. La sûreté était-elle en position « OFF » - ROUGE VISIBLE, lorsque la
gâchette a été appuyée? Sinon, répéter les étapes de l’opération.
C. La cartouche de CO
en position « ON » - ROUGE NON VISIBLE et insérer une nouvelle
cartouche de CO
nouvelle cartouche ait été installée.
était-elle installée? Sinon, mettre la sûreté
2
. Répéter les étapes de l’opération après que la
2
D. Consulter la section sur les caractéristiques du CO
E. Si le fusil ne tire toujours pas, se référer à l’avertissement ci-dessous.
2
AVERTISSEMENT : Si une bille ne peut toujours pas être
tirée après que vous ayez vérié les 5 éléments ci-dessus, le fusil a
un dysfonctionnement. Cette situation peut être dangereuse. Il se
peut qu’il y ait une bille dans l’arme malgré qu’aucune n’en est sortie.
Traiter toujours l’arme comme si elle est chargée. N’essayez jamais de
regarder dans le canon du fusil. Enclencher la sûreté - ROUGE NON
VISIBLE, retirer la cartouche de CO
DAISY MANUFACTURING SERVICE DEPARTEMENT. Consultez la
section sur LES RÉPARATIONS DES FUSILS DAISY
et envoyer le fusil directement à
2
COMMENT DÉCHARGER
À la n d’une séance de tir, le fusil doit être déchargé avant d’être
rangé. Pointez toujours vers une direction qui ne présente aucun
danger. Assurez-vous que la sûreté de l’arme est enclenchée (“ON”) COULEUR ROUGE NON VISIBLE (voir Étape 1 du maniement.) Clôturez
votre séance en tirant jusqu’à ce que toutes les billes aient été éjectées
du magasin incorporé.
ATTENTION: Même après que la dernière bille ait été tirée, le
fusil peut continuer à tirer, même si seul le CO
billes du réservoir à billes et du magasin incorporé.
RETIRER LES BILLES DU RÉSERVOIR DE BILLES
A. Pointez toujours l’arme vers une direction qui ne présente aucun
danger. Assurez-vous que la sûreté de l’arme est enclenchée (“ON”) COULEUR ROUGE NON VISIBLE (voir Étape 1 du maniement.)
B. Retourner l’arme pour avoir accès à la porte de chargement des
billes située sur la partie inférieure de l’arme, juste devant le pontet.
(Voir g. 7)
C. Ouvrir la porte de chargement en la faisant glisser vers l’arrière, vers
le pontet.
D. Avec le pistolet à l’endroit dans une position verticale (Fig. 12)
agiter le fusil pour retirer toutes les billes du réservoir par la porte de
chargement coulissante.
sera éjecté. Retirer les
2
ATTENTION: Même si vous venez d’exécuter la procédure de
déchargement, continuez à traiter l’arme comme si elle était chargée.
Ne pointez pas l’arme vers une chose sur laquelle vous n’avez pas
l’intention de tirer. Enclencher la sûreté (« ON ») - COULEUR ROUGE
NON VISIBLE.
RETIRER LES BILLES DU MAGASIN INCORPORÉ
A. Pointez toujours l’arme
vers une direction qui ne
présente aucun danger.
Assurez-vous que la sûreté
de l’arme est enclenchée
(“ON”) - COULEUR ROUGE
NON VISIBLE (voir Étape 1
du maniement et la Fig.) 2)
B. Avec le pistolet à
l’endroit dans une position verticale (Fig. 12) verrouiller le suiveur de
billes en position avant en bloquant les onglets (Fig. 8) dans les fentes
pour permettre aux billes de sortir en roulant du magasin et entrer
dans le réservoir de billes.
C. Relâcher le suiveur de billes et observer que le suiveur soit au bout
de la fente du magasin.
D. Ensuite, répétez l’étape précédente pour vider les billes du réservoir
de billes.
FIG. 12
ATTENTION: Même si vous venez d’exécuter la procédure de
déchargement, continuez à traiter l’arme comme si elle était chargée.
Ne pas pointer l’arme vers une chose sur laquelle vous n’avez pas
l’intention de tirer. Enclencher la sûreté (« ON ») - COULEUR ROUGE
NON VISIBLE.
40
Page 41

RETRAIT DES CARTOUCHES DE CO
2
A. Enclencher la sûreté de
l’arme (« ON ») - COULEUR
ROUGE NON VISIBLE.
(Étape 1 du maniement.)
B. Avec le canon pointé
dans une direction sans
danger et le couvercle
gauche de la poignée
toujours en place, tourner
lentement la vis de
FI G.13
perforation dans le sens
antihorlogique, permettant à tout gaz restant de s’échapper.
Continuer de tourner la vis jusqu’à atteindre la butée de n de course
(g. 13).
C. Retirer le couvercle gauche de la poignée en soulevant le bas de la
poignée.
D. Retirer et mettre la cartouche de CO
au rebut.
2
ATTENTION: Ne jamais essayer de réutiliser les cartouches
de CO
pour quelque raison que ce soit.
2
CARACTÉRISTIQUES DU CO2
Il y a des occasions où une arme au CO2 peut être soumise à des
conditions anormales qui peuvent avoir des conséquences sur les
performances de l’arme. Ces situations incluent le maniement et/ou
rangement de l’arme à des températures qui sont considérablement
plus élevées ou plus basses que la température ambiante normale
extérieure de 60° à 70° F (15,5° à 21°C), ainsi que les conditions de tir
rapide.
A. Des températures élevées peuvent produire des pressions dans la
cartouche de CO
d’utilisation. Une telle augmentation de pression peut empêcher le
fusil de tirer et peut entraîner des dommages permanents sur l’arme.
La température maximale de fonctionnement ou de rangement
ne doit pas dépasser 105° F (40° C). Cette température peut être
facilement atteinte si l’arme est laissée exposée directement au soleil,
par temps ensoleillé. Par conséquent, le tireur ne doit pas exposer le
fusil à des conditions de haute température ou à la lumière du soleil
directe pendant une longue durée de temps.
B. Le tir rapide avec le fusil entraîne la réduction de température
dans l’arme et dans le CO
projectiles plus faibles et peut même diminuer la pression du gaz au
point de rendre l’arme incapable de tirer. Cette situation peut être
particulièrement apparente lors de séances de tir par temps froid.
Cette condition peut être évitée en laissant plus de temps entre les
tirs. Cela permet à la température du gaz et à sa pression d’augmenter
et de produire des vitesses normales.
C. En cas de tir rapide, il est possible que la vitesse initiale de chaque
tir diminue. Cela peut compromettre la précision du tir. En outre,
plus vite vous tirez avec le fusil, moins vous obtiendrez de coups par
cartouche de CO
D. Assurez-vous qu’une arme avec une cartouche de CO2 dont la
pression est faible ne soit pas utilisée pour tirer.
qui sont de loin supérieures à la pression normale
2
. Cela se traduira par des vitesses de
2
.
2
RANGEMENT
Ranger votre fusil non chargé. Enclencher la sûreté (« ON ») COULEUR ROUGE NON VISIBLE. Retirer les cartouches de CO
retirer toutes les munitions. Gardez le fusil loin des enfants et des
et
2
tireurs inexpérimentés. Ranger l’arme dans un endroit séparé des
munitions et des cartouches de CO
inexpérimentés.
AVERTISSEMENT : Une cartouche de CO
gaz sous pression, qu’elle ait été insérée dans un fusil ou pas. En cas
an de les protéger des tireurs
2
contient du
2
d’exposition à des températures élevées (tel que dans une voiture
fermée en plein soleil), elle peut exploser. Assurez-vous de stocker
toutes les cartouches dans un endroit frais.
ENTRETIEN APPROPRIÉ
Avec des soins et un nettoyage périodiques, votre carabine à
air comprimé Daisy orira de nombreuses années de plaisir de tir.
Comme dans le cas des armes à feu conventionnelles, les mauvais
traitements, la négligence et l’exposition continue aux éléments
peuvent nuire à la performance d’un fusil/pistolet à air comprimé.
Apprenez à prendre soin de votre fusil à air comprimé Daisy et il vous
sera bien utile.
ATTENTION: Ne jamais essayer de nettoyer une carabine
à air comprimé Daisy avant d’enclencher la sûreté (“ON”) - COULEUR
41
Page 42

ROUGE NON VISIBLE et avant que les cartouches de CO2 et les
munitions aient été retirés.
PIÈCES EXTERNES
Toutes les pièces en plastique peuvent être nettoyées avec un
chion humide et du savon ou un détergent doux. Évitez d’utiliser
des détergents puissants, des composés de nettoyants abrasifs ou des
solvants qui peuvent rayer ou encore endommager les surfaces.
LUBRIFICATION
Votre carabine à air comprimé Daisy a été lubriée lors
de la fabrication et ne devrait pas nécessiter de lubrication
supplémentaire.
MODIFICATION
ATTENTION: Les composants de cette arme ont été
conçus et fabriqués pour orir des performances optimales.
Toute modication ou altération d’un fusil peut provoquer un
dysfonctionnement et rendre dangereux son utilisation. Tout
changement dans la performance (tels qu’une réduction de la force
de traction ou de la course de la détente), indique la possibilité
d’une modication, falsication et/ou usure. Une telle arme doit être
inspectée, remplacée ou réparée par le personnel qualié. Toute
arme qui est tombée doit être vériée par le personnel qualié an
d’assurer que son fonctionnement n’a pas été aecté.
AVERTISSEMENT : UNE ARME QUI NE FONCTIONNE PAS
CORRECTEMENT PEUT ÊTRE DANGEREUSE. EN EMPÊCHER L’USAGE
PAR QUI QUE CE SOIT JUSQU’À CE QU’ELLE SOIT RÉPARÉE OU
DÉTRUITE. NE PAS ESSAYER DE DÉMONTER L’ARME. ELLE EST DIFFICILE
À REMONTER ET UN REMONTAGE INADÉQUAT PEUT CAUSER UNE
SITUATION DANGEREUSE.
RÉPARATION DE FUSILS À AIR COMPRIMÉ
DAISY ®
ARMES SOUS GARANTIE
GARANTIE LIMITÉE D’UNE ANNÉE
Pendant une période d’un an après la date d’achat, Daisy réparera
ou remplacera et retournera cette arme, sans frais, si elle présente
des défauts de matériaux ou de fabrication. Le service d’entretien est
disponible si l’arme est retournée à Daisy Outdoor Products (se référer
à la remarque « important » ci-dessous). Attacher à l’arme votre nom,
adresse et numéro de téléphone, la description du problème et la
preuve de la date d’achat (ticket de caisse). Emballer et envoyer en
port payé à Daisy. Cette garantie vous donne des droits spéciques
reconnus par la loi, vous pouvez également bénécier d’autres droits
qui peuvent varier d’un État à l’autre.
IMPORTANT: Vous pouvez retourner à Daisy, pour réparation, votre
fusil qui ne fonctionne pas par United Parcel Service (UPS). S’assurer
de retirer les munitions et le CO
Vous devez inclure votre adresse postale pour permettre à Daisy
d’envoyer votre fusil directement à vous par le biais de livraison d’UPS.
ARMES HORS GARANTIE
Si votre carabine à air comprimé Daisy a besoin d’une réparation,
veuillez appeler le 1-800-713-2479 pour connaître les frais de
réparation. Daisy réparera l’arme ou la remplacera par une autre arme
remise à neuf du même modèle, en cas de disponibilité; sinon elle sera
remplacée par un modèle de valeur équivalente.
Daisy Outdoor Products
Service Département
308 Stribling Drive
Rogers, AR 72756 U.S.A.
avant de retourner l’arme à Daisy.
2
CARACTÉRISTIQUES DU MODÈLE 74
ACTION À répétition semi-automatique au CO2 et à billes
CALIBRE Billes de calibre 0,177 (4.5m
CAPACITÉ Magasin incorporé de 15-tirs
EN MUNITIONS Réservoir à billes pour 200 tirs
DISTANCE 211 yards. (193m)
MAXIMALE DE TIR*
VITESSE INITIALE 350 pieds par seconde. (107m/s)
CANON Acier à paroi interne lisse
SÛRETÉ Poussoir manuel de blocage de gâchette
VISEURS: Avant lame et incliné, arrière réglable
POIDS 1,98 livres (0,90 kg)
LONGUEUR TOTALE 33,5 pouces (95,8cm)
*Avec la bouche du canon pointée vers le haut à un angle optimal
42
Page 43

Introduction au tir avec
le fusil à air comprimé Daisy®
MESSAGE AUX PARENTS
Quoique n’étant pas une arme à feu, une Daisy n’est pas un jouet,
c’est un fusil. Utilisée et entretenue de manière appropriée, elle
fournira de nombreuses heures de tir de loisir en toute sécurité et sans
problème. Mal utilisée, elle peut être dangereuse. Par conséquent,
nous recommandons qu’elle soit utilisée uniquement sous la
supervision d’un adulte et jamais par un enfant de moins de dix ans.
10 Règles de sécurité de tir sont inclues dans ce manuel. Nous vous
invitons à les lire avec votre enfant, à vous y entraîner et à les passer
en revue régulièrement.
En tant que l’heureux propriétaire d’un nouveau fusil Daisy, votre
enfant est entré dans une tradition américaine veille de plus de 100
ans. Du point de vue mécanique, une nouvelle Daisy bénécie de
près d’un siècle de savoir-faire technique et d’expérience dans la
fabrication de produits de qualité
Le maniement en toute sécurité d’un fusil dépend de la formation
à la sécurité adéquate et de l’inculcation à votre lle ou ls de
l’attitude appropriée à la possession d’un fusil. Pour vous aider,
nous avons conçu cette brochure an de couvrir les informations de
base que chaque jeune devrait comprendre avant de tirer avec une
arme. Prenez le temps de l’étudier à fond avec votre enfant. Une
bonne compréhension de ces notions de base permettra d’accroître
considérablement le plaisir que vos enfants tireront de ce sport
praticable à vie qu’est le tir de loisir au fusil à air comprimé et, en
même temps, vous donnera la satisfaction de savoir que votre enfant
est correctement préparé à gérer une arme à air comprimé.
Nous recommandons vivement un cours formel de formation
au tir pour votre enfant. Il existe plusieurs organisations des jeunes
et civiques qui orent un cours complet en 10 leçons basé sur les
directives élaborées par les experts de la formation de Daisy, et
elles sont énumérées dans la section « Apprendre à tirer en toute
sécurité » à la page 47 de ce manuel. Une vérication rapide auprès
de ces organisations vous permettra de savoir quand le prochain
cours sera organisé dans votre région. Si vous souhaitez avoir plus
d’informations, écrivez à : Special Market Programs, Daisy, P.O. Box 220,
Rogers, Arkansas 72757.
PREMIÈRE UTILISATION
Premièrement, vous devez savoir que votre Daisy n’est pas un jouet.
C’est une arme. Si vous l’utilisez avec précaution, elle vous fournira
plusieurs années de plaisir. Mais, elle peut être dangereuse si vous ne
faites pas attention. Ensuite, lisez ce manuel. Ensemble avec le manuel
d’utilisation, il vous instruit sur la manière de gérer correctement
votre nouveau fusil à billes et sur comment avoir le plus de plaisir
avec lui. Lisez le manuel attentivement avec un parent et soyez sûr
que tous vous le comprenez. Ensuite, mettez en pratique ce que vous
avez appris. Et souvenez-vous, c’est votre responsabilité, en tant que
propriétaire d’une arme, de vous assurer que toute personne qui
l’utilise soit instruite aux pratiques de maniement en toute sécurité.
LE MANIEMENT PRUDENT DES ARMES EST LA CLÉ POUR JOUIR DES
SÉANCES DE TIR. Si vous comprenez que « MANIER » votre arme
signie chaque fois que vous la touchez, et si vous vous souvenez
de manier toujours un fusil/pistolet comme s’il est chargé, alors vous
êtes bien sur la bonne voie pour le maniement approprié des fusils/
pistolets. La majorité des accidents impliquant les fusils/pistolets à air
comprimé dans ce pays sont causées par 1) un maniement imprudent
et inapproprié de l’arme, 2) croire que l’arme est vide pendant qu’il ne
l’est pas, ou 3) tirer sur des cibles inappropriées. Toutes les trois causes
peuvent être évitées si le tireur manie l’arme de manière appropriée.
Il y a plusieurs années nous enseignons les 10 règles de sécurité
de tir. Lisez, rappelez-vous et exercez-vous à pratiquer et passez en
revue ces quelques règles simples. Elles vous aideront à tirer plaisir de
nombreuses heures de tir de loisir sans danger et divertissants.
10 RÈGLES DE SÉCURITÉ DE TIR
1. Toujours pointer la bouche du canon dans une direction qui ne
présente aucun danger.
2. Traiter chaque fusil/pistolet comme s’il était chargé.
3. Ne charger ou armer un fusil/pistolet que lorsque vous voulez tirer.
4. Vérier votre cible et au-delà de votre cible.
5. Toute personne qui eectue un tir ou qui est près du tireur doit mettre
des lunettes de protection de tir.
6. Ne jamais grimper ou sauter avec un fusil.
7. Éviter les ricochets.
8. Maintenir la bouche du canon éloignée de tout autre objet.
9. Les armes non utilisées doivent toujours être déchargées.
10. Respecter les propriétés d’autrui.
43
Page 44

Il est également très important de vous rappeler que chaque fois
que vous recevez un fusil/pistolet de qui que ce soit, ou que vous
prenez un fusil/pistolet du lieu où il est rangé, vous devez vous assurer
qu’il est déchargé et désarmé en le pointant dans direction qui ne
présente aucun danger et en tirant sur la gâchette.
AVERTISSEMENT : MÊME SI VOUS AVEZ APPUYÉ PLUSIEURS
FOIS SUR LA GÂCHETTE DU FUSIL À AIR COMPRIMÉ ET QU’AUCUNE
BILLE N’A ÉTÉ EXPULSÉE, CELA NE SIGNIFIE PAS QUE L’ARME NE
CONTIENT PAS DE BILLES. ARRÊTEZ DE TRAITER L’ARME COMME SI ELLE
EST DÉCHARGÉE.
Ne regardez jamais dans la bouche de canon de votre fusil. Traiteztoujours votre arme comme si elle est chargée, vous ne serez pas en
mesure de voir si elle l’est juste en regardant.
Les habitudes que vous créez maintenant en maniant votre Daisy
vous seront utiles dans le maniement de n’importe quelle fusil/
pistolet.
LE TIR AVEC DAISY À L’EXTÉRIEUR
Votre fusil à air
comprimé Daisy n’est
pas conçu pour la
chasse, mais vous
pouvez toujours vous
divertir avec en plein.
Il est facile de xer une
distance à l’extérieur.
En fait, le tir à
l’extérieur est un
excellent moyen pour
les enfants et son/ses
parents d’avoir du bon temps et de concourir en famille.
Lorsque vous portez un fusil à air comprimé Daisy à l’extérieur, gardez
ce qui suit à l’esprit:
• Ne tirez pas sur des cibles à surface dure, telles que les rochers ou
les arbres. Vos billes peuvent ricocher. Ne jamais tirer sur une surface
d’eau pour la même raison.
• Assurez-vous toujours de savoir où se trouvent les autres personnes
avant de tirer. Assurez-vous qu’ils n’y a personne près de la cible.
• Gardez toujours la bouche du canon pointée dans une direction
sans danger de sorte que si vous trébuchez et tombez, vous pouvez
contrôler la direction de la bouche.
• Gardez votre fusil à air comprimé Daisy déchargé lorsque vous ne
l’utilisez pas.
• Que ce soit à l’intérieur ou à l’extérieur, toute personne qui eectue
un tir ou qui est près du tireur doit mettre des lunettes de protection
de tir. (Elles peuvent être achetées dans la plupart des magasins
vendant des articles de sport.)
L’UTILISATION DE DAISY À L’INTÉRIEUR
Un fusil à air comprimé Daisy ne présente aucun danger
d’utilisation à l’intérieur aussi longtemps que vous respectez les
règles de sécurité appropriées.
Il n’y en a pas beaucoup,
mais elles sont importantes.
Premièrement, vous devez
avoir au moins 5 m (16,4 pieds)
de distance de la ligne de tir
à la cible. Tous les fusils à air
comprimé de la série Daisy
Youth Line sont conçus avec
une vitesse contrôlée de moins
de 350 pieds par seconde et
sont plus ecaces pour le tir à
5 mètres. (Tirer avec une Daisy
à une distance de 5 mètres
demande autant d’habileté
qu’il en faut pour tirer avec
un .22 sur une distance de 50
pieds!) Deuxièmement, vous
devez avoir une cible sûre (Voir
la section « CIBLE SÛRE ») placée de sorte qu’il n’y ait pas une entrée
en face de la ligne de tir ou derrière les cibles. Si cela n’est pas possible,
alors les entrées des zones doivent être bloquées. Troisièmement,
vous devriez avoir une toile ou une couverture lourde derrière la
cible qui pend librement du mur et ne touche pas sol. Cela permettra
d’éviter les ricochets si vous ratez la cible. Enn, votre cible doit être
bien éclairée.
Souvenez-vous de garder votre Daisy non chargé jusqu’à ce que
la cible soit placée et que vous soyez prêt à tirer. Ne jamais le pointer
dans une quelconque direction, excepté la cible. Si vous respectez
ces règles et les combinez avec les autres conseils sur le maniement
44
Page 45

approprié des fusils/pistolets repris dans ce manuel, vous pouvez
ASSIS (POSITION BASSE)
proter du tir à l’intérieur en toute sécurité avec le fusil à air comprimé
Daisy.
LE DAISY À BILLES N’EST PAS UN FUSIL DE CHASSE
C’est un fusil de tir sur cible. Mais il vous enseigne les aptitudes et
habitudes de sécurité dont vous aurez besoin pour la chasse. Ou, si
vous préférez vous pouvez vous préparer pour des concours de tir sur
cible. Beaucoup de propriétaires d’armes adultes le font.
DISPOSITIF DE
RETENUE DE
CARTOUCHE DE CO2
(DANS LA POIGNÉE)
CROSSE
MAGASIN DE
MUNITIONS
VISEUR
ARRIÈRE
RÉGLABLE
VISEUR
AVANT
VIS DE
PERFORATION
DE CARTOUCHE
DE CO2
SÛRETÉ
L’AV AN T-B RA S
CANON
DÉTENTE
RÉSERVOIR POUR
200 PIÈCES DE
MUNITIONS RONDES
BOUCHE DE
CANON
APPRENEZ À CONNAÎTRE VOTRE DAISY DE LA
PLAQUE DE COUCHE À LA BOUCHE DU CANON
Savez-vous ce qu’est la gâchette? L’avant-bras? Vérier vos
connaissances avec l’image.
COMMENT DEVENIR UN TIREUR D’ÉLITE
Si vous apprenez les techniques et vous exercez régulièrement,
vous pouvez devenir un vrai tireur d’élite. La pratique du tir vous
donnera beaucoup de plaisir toute votre vie. Les conseils que vous
récolterez dans ce livre vous aideront à débuter. Mais vous apprendrez
plus vite en obtenant de l’aide d’un tireur adulte expérimenté.
POSITIONS
Il y a quatre positions de tir au fusil de base et deux variantes de
chacune. Apprenez-les toutes pour que vous soyez préparé pour
toutes les situations de tir. Les positions sont couché, assis, à genoux
et debout. Tournez-vous partiellement vers la droite avant de vous
mettre dans une de ces positions. Puis :
PRONE
ACOSTADO
COUCHE
KNEELING (LOW)
ARRODILLADO (ABAJO)
UN GENOU EN TERRE
(POSITION BASSE)
SITTING (LOW)
N.R.A. STANDING
N.R.A. PARADO
POSITION PRECONISEE
PAR LA N.R.A.
SENTADO (ABAJO)
COUCHÉ – Allongez-vous sur le ventre à un angle d’environ 5 à
15 degrés par rapport à la ligne de tir. La jambe gauche doit être
complètement détendue. La jambe droite ne doit pas être dans l’axe
de la colonne vertébrale et peut être pliée ou droite.
À GENOU - Tournez-vous partiellement vers la droite puis posez votre
genou droit à terre. Dans la position basse, le pied gauche devra être
étendu aussi loin qu’il conviendra au tireur, tandis que la jambe droite
est à plat sur le sol avec le pied à plat et tourné vers l’intérieur, avec
tireur assis sur le côté du pied droit. Dans la position haute, le tireur est
assis sur son talon droit.
45
Page 46

ASSIS – En position basse, croisez vos jambes en face de vous avec
Blade Front Sight / La hoja la Vista Anterior / La Vue de Devant de lame
l’extérieur de chaque pied reposant sur le sol et soutenant un genou.
Les coudes doivent être placés près des genoux formant des triangles
pour soutenir le fusil. Les jambes ne sont pas croisées en position
haute. Les pieds sont bien écartés, avec les talons bien calés et le corps
penché en avant de sorte que les coudes puissent être bien calés.
DEBOUT – Dans la position debout de l’armée, se tourner à moitié
vers la droite avec les pieds écartés d’environ un pied. Tenez-vous
debout relâché, ne soyez pas tendu. Le coude droit doit être presque
à la même hauteur que l’épaule. Votre bras droit ne touche pas votre
corps. Dans la position debout N.R.A. vous pouvez poser votre bras
gauche contre votre corps sur la hanche.
MAINTENANT TENEZ VOTRE FUSIL À BILLE DANS LA
POSITION APPROPRIÉE
Ces règles simples vous aideront à tenir votre fusil correctement.
(Ces instructions sont pour les droitiers - inverser pour les gauchers.)
1. Saisissez la partie amincie de la crosse avec votre bras droit.
2. Laisser l’avant-bras reposer sur la paume de votre main gauche (ou
sur le pouce et le bout des doigts si vous utilisez la position debout
N.R.A).
3. Placez votre coude gauche le plus près possible directement en
dessous de votre arme.
4. Placez votre joue le plus en avant possible sur la crosse sans forcer
et appuyez doucement contre la crosse.
5. Maintenant, assurez-vous que votre Daisy est toujours pointée sans
eort vers le centre de la cible. Pour vous en assurer, fermez les yeux et
pointez-le là où vous pensez que la cible est. Lorsque vous rouvrez les
yeux, si l’arme n’est plus pointée sur cible, déplacez votre corps pour
corriger. Répétez jusqu’à centrer naturellement.
6. Préparez-vous à appuyer sur la gâchette avec la première phalange
de votre premier doigt (index). Ne tirez pas encore!
VISÉE (LIGNE DE MIRE)
Un Daisy tirera où vous visez. L’astuce est de maintenir la bonne
image de visée. Pour ce faire, pensez à une sucette. Ensuite,
représentez-vous le viseur avant comme le bâton de la sucette et le
centre de la cible comme la sucette! Maintenir le haut du bâton de la
sucette au même niveau que le sommet du viseur arrière et centré
dans la rainure en V.
Essayez la visée. Ensuite, comparez ce que vous voyez aux images
de visée ci-dessus. Pour être un tireur d’élite cohérent, utiliser l’image
de visée correcte chaque fois que vous tirez avec l’arme, et souvenezvous : ne visez ou ne pointez votre arme que vers une direction qui ne
présente aucun danger.
RESPIRATION
Respirer au mauvais moment peut faire que votre corps bouge,
et vous faire perdre l’objectif. Alors respirez correctement. Voici
comment le faire :
Too High
También Alto
Aussi Haut
Too Low
También Bajo
Trop Bas
Fiber Optic Front Sight
La fibra la Vista Anterior Optica / Fibre la Vue de Devant Optique
Just Right
Apenas Correcto
A la perfection
Too High
También Alto
Aussi Haut
Too Low
También Bajo
Trop Bas
Apenas Correcto
A la perfection
(a) Inspirez profondément.
(b) Expirez à moitié. Visez.
(c) Retenez le reste de l’air jusqu’à ce que vous ayez tiré.
46
Just Right
Page 47

TIR
Constitué de deux étapes : Viser et appuyer. Aligner vos viseurs et
soyez attentif. Lorsque le bout du viseur arrive au bas du centre de
la cible, appuyez progressivement sur la gâchette. N’appuyez jamais
brusquement sur la gâchette. Le mouvement brusque peut ruiner
votre visée. Il faut de l’exercice pour maîtriser comment appuyer sur la
gâchette.
Mais continuez à essayer. Vous nirez par devenir un artiste.
Maintenant vous êtes prêt à tirer.
Sur quoi tirez-vous? Où eectuez-vous votre tir? Rappelez-vous les
10 règles de sécurité du tir - soyez sûr de votre cible avant de tirer. Ne
jamais transporter un fusil/pistolet armé. Ne l’armez que lorsque vous
êtes prêt à tirer. Même lorsque la sûreté de la gâchette est enclenchée
(en position ON), votre arme est dans un état de charge complète et
doit être manipulé avec prudence.
RÉGLAGE DES VISEURS
La première étape dans l’alignement correct des viseurs est de
déterminer le groupement d’impacts de votre nouvelle Daisy. Pour
ce faire, placez un appui comme une table ou un banc, à 5 mètres de
votre cible. Placez votre fusil sur l’appui et, eectuez trois tirs en visant
le même point à chaque fois. Ne tentez pas d’eectuer des réglages
pendant ces trois coups de feu. À ce stade, vous êtes uniquement
intéressé par le groupement de vos impacts. Une fois que vous avez
déterminé votre capacité de groupement et celle de votre fusil, vous
pouvez alors ajuster vos viseurs pour centrer le groupement sur la
cible. REMARQUE : Il peut être nécessaire pour chaque personne qui
tire avec votre fusil à air comprimé Daisy de réaligner les viseurs pour
les adapter à son modèle de visée.
COMMENT RÉALISER UNE CIBLE D’INTÉRIEUR/EXTÉRIEUR
Une boîte en carton de 16 pouces ou plus de profondeur, et ayant
une surface avant d’au moins deux pieds carrés, servira de base pour
la cible. Centrer 3 pouces d’épaisseur de magazines étroitement serrés
(ne pas les substituer par des journaux) sur la paroi interne arrière de
la boîte en face de la cible, et remplir la boîte avec du papier journal
plié serré, pour éviter les ricochets. Une fois le pare-balles exécuté,
coller la cible avec du ruban adhésif sur le devant de la boîte. Ne pas
utiliser des attaches métalliques, les projectiles pourraient ricocher
dessus. Avec le temps, le renfort de la cible doit être surveillé de près
et doit être remplacé lorsque les munitions ont pénétré la moitié de
l’épaisseur des magazines.
ATTENTION: Que vous achetez un pare-balles ou que vous
en fabriquiez un vous-même, il est important de vous rappeler qu’ils
s’usent avec l’utilisation continue. Pour cette raison, vous devriez
toujours placer votre pare-balles à un endroit sans danger et le
vérier attentivement avant et après chaque utilisation. Un rebond ou
ricochet est une indication que le pare-balles est défectueux et que
vous devriez cesser de l’utiliser immédiatement.
JEUX DE TIR :
Une fois que vous avez maîtrisé les notions de base, vous pouvez
essayer des jeux de tir, tels que ceux-ci:
1. TIC-TAC-TOE - Deux tireurs eectuent tour à tour un tir à la fois
et marquent chaque coup au but. Jouer comme pour un tic-tac-toe
ordinaire.
2. QUI RATE PERD - Placer dix cibles. Tirez jusqu’à ce que vous ratiez.
Le tireur qui a le plus de tirs gagne.
3. ATTEINDRE LA CIBLE PUIS RECULER - Chaque tireur recule d’un
pas chaque fois qu’il touche la cible. Celui qui recule le plus loin gagne.
IMPORTANT: Assurez-vous d’utiliser un pare-balles sûr derrière vos
cibles!
APPRENEZ À TIRER EN TOUTE SÉCURITÉ
Grâce à sa longue expérience Daisy Outdoor Products enseigne
aux jeunes qui découvrent le monde du tir à pratiquer en toute
sécurité. An de mettre en ‘uvre de manière ecace des programmes
de formation dans tout le pays, Daisy s’est associée avec les
organisations suivantes, qui enseignent la sécurité de tir et fournissent
divers matériels et informations sur la sécurité de tir. Nous vous
encourageons à contacter Daisy au 1-800-713-2479.
47
Page 48

PLEASE INCLUDE A COPY OF YOUR SALES RECEIPT (FOR PROOF OF PURCHASE USE ONLY) WITH THIS CARD.
POR FAVOR INCLUYA CON UNA COPIA DE SU COMPROBANTE DE COMPRA (SOLAMENTE PARE USO DE COMPROBANTE DE COMPRA) CON ESTA TARHJETA.
S'IL VOUS PLAIT INCLURE UNE COPIE DE VOS VENTES RFECEIPT (POUR PREUVE D'USAGE D'ACHAT SEULEMENT) AVEC CETTE CARTE.
DAISY RETURNED PRODUCT / DEVOLUCIÓN DE UN PRODUCTIO DAISY / DAISY EST RETOURNEE PRODUCT
NAME
NOMBRE
NOM
COUNTRY
PAÍS
PAYS
ZIP
CÓDIGO POSTAL
CODE PO STAL
REASON FOR RETURN
RAZÓN DE DEVOLUCIÓN
RAISONNER POUR LE RETOUR
DAYTIME PHONE
TELEFONO DURANTE EL DÍA
TELEPHONE DE JOUR
STAT E
ESTADO
ETAT
CITY
CIUDAD
VILLE
ADDRESS
DIRECCIÓN
ADRESSE
Daisy Outdoor Products®
Rogers, AR 72757 U.S.A.
1-800-643-3458 • www.daisy.com
Rev. 04/12 Part No. 300525-000
 Loading...