

Daisy 5 Star MKII, 5 Star LP, 5 Star FM, 5 Star ST, 5 Star 125 Installation Instructions Manual
Installation
Instructions
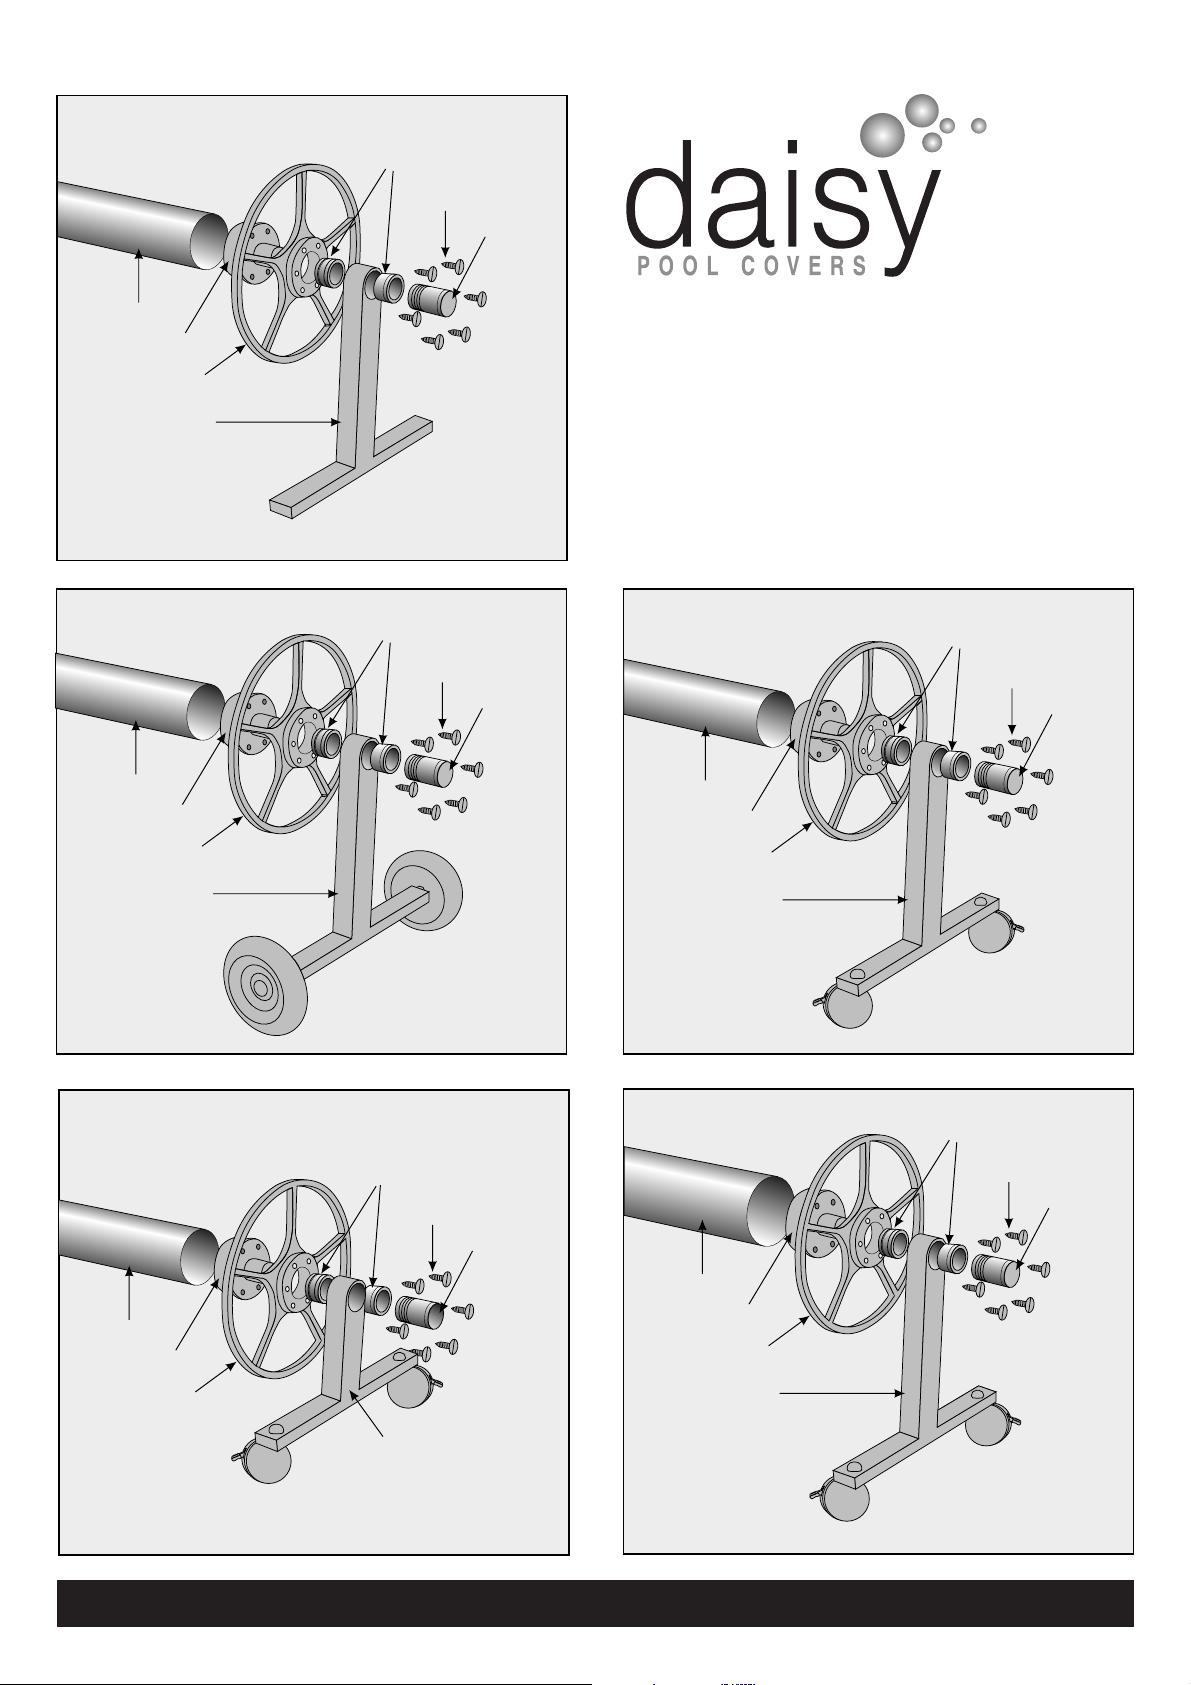
For: 5 Star ST, 5 Star MKII,
5 Star LP, 5 Star FM and 5 Star 125 Rollers
T-frame
Roller Tube
End Slug
Handwheel
Bush
Screws
End Plug
Roller Tube
End Slug
Handwheel
Bush
Screws
End Plug
T-frame
T-frame
Roller Tube
End Slug
Handwheel
Bush
Screws
End Plug
T-frame
Roller Tube
End Slug
Handwheel
Bush
Screws
End Plug
T-frame
Roller Tube
End Slug
Handwheel
Bush
Screws
End Plug
5 Star ST
5 Star 125 FM
5 Star FM
5 Star LP
5 Star MKII
Having trouble? call the Daisy Help Line: 1300 551 811
www.daisypoolcovers.com.au
Overcover Installation Instructions
(if made up overcover is not supplied)
1) Cut the overcover to size (ie: over the roller between the handwheels)
2) Wrap one end of the black shock cord around the male section of the
white overcover clip (between the centre section and the peg on each
side).
3) Push the male section
through the corner of the
overcover sheet, in
approximately 25mm from
each edge. Place the white
female section on the male
section and tap home.
4) Repeat steps 2 and 3 for the other end of the
shock cord on the opposing corner of the
overcover – see diagram
5) Repeat steps 2 to 4 for other end of overcover
6) Make a loop with one end of the cord and place
over centre section of male piece
7) Push male section through the overcover on the
centre line in 25mm from one edge
8) Place the white female section on the male
section and tap home.
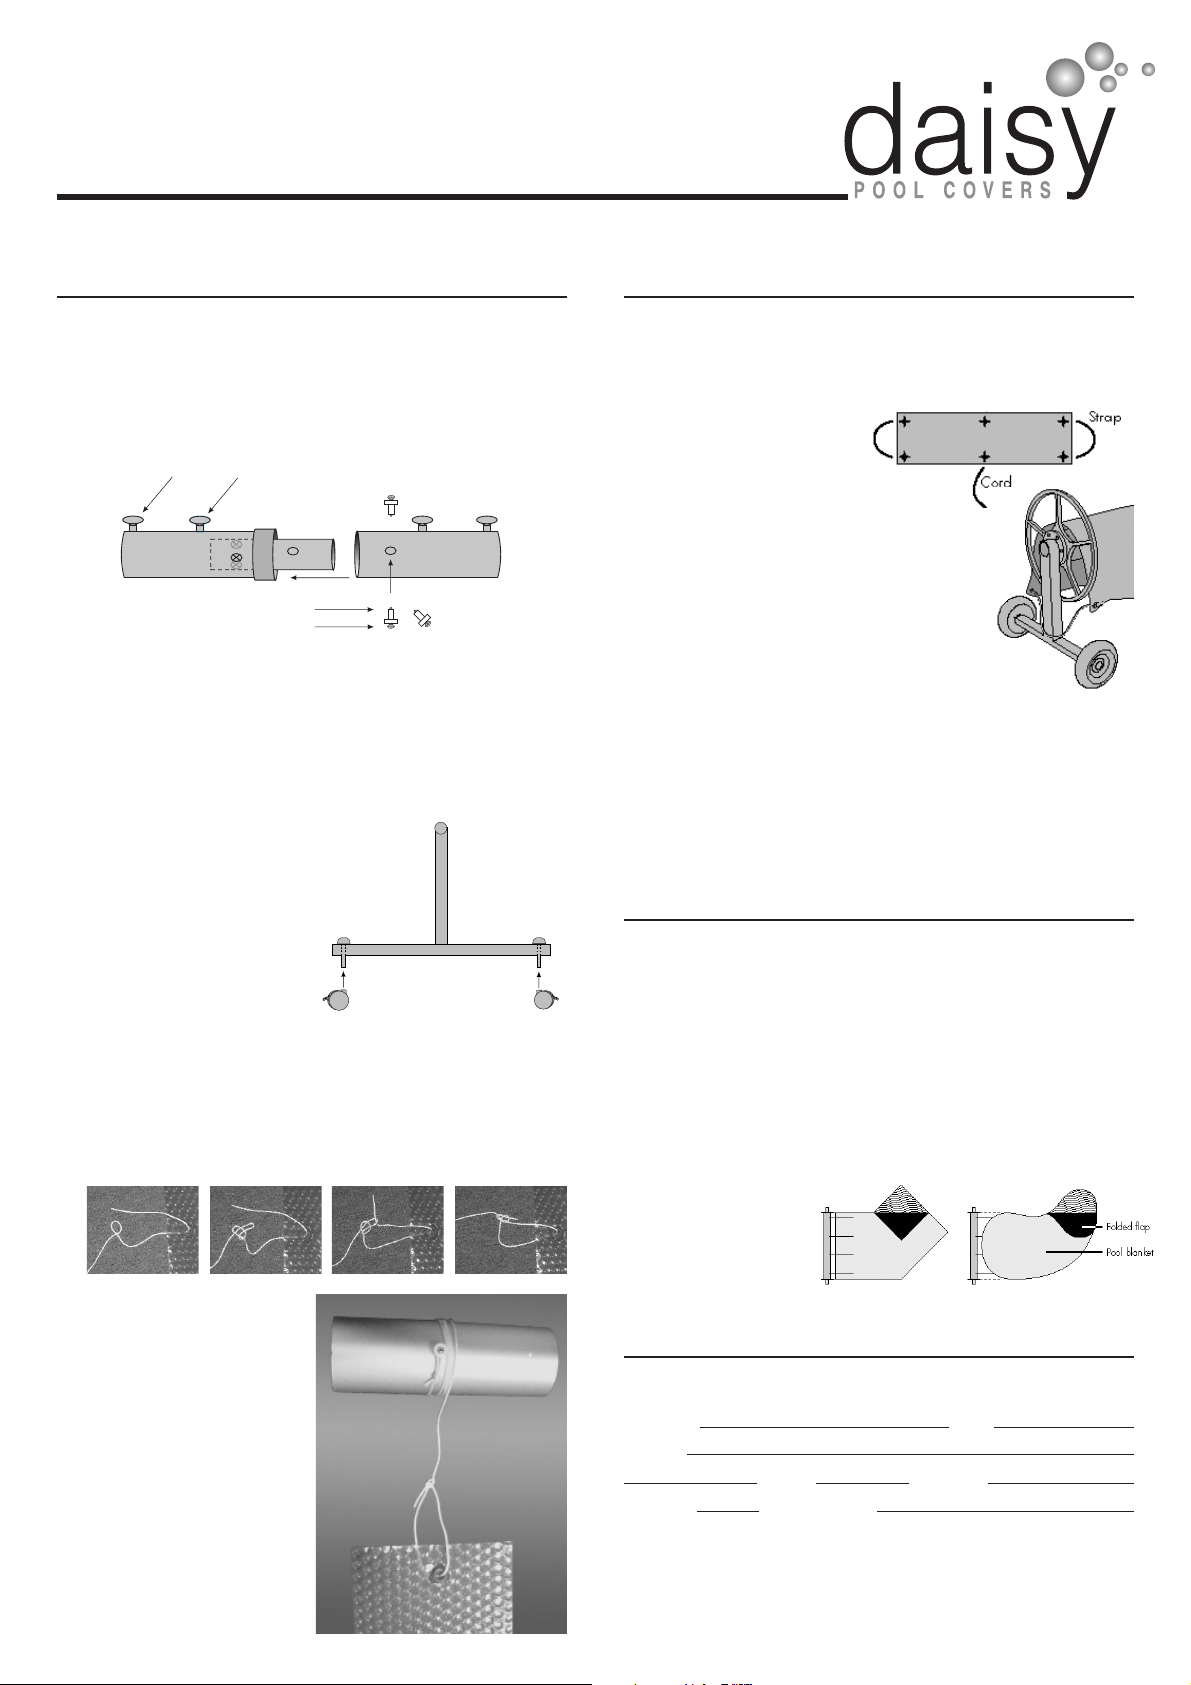
9) Repeat steps 6 to 8 for the other side – see diagram
10) Place overcover on top of roller and wrap one strap
around one handwheel
11) Place the other strap over the other handwheel
12) Tie the middle cord
13) Your overcover is now installed
14) Always use your overcover when you blanket is rolled up on your roller.
NOTE: Never overextend elastic straps as injury may result.
Tips for use
1) To prevent damage to your blanket, do not drag the blanket over
abrasive pool decking or any sharp surfaces.
2) When rolling up the blanket onto the roller, ensure that it rolls up evenly.
3) Roll your blanket over the top of your roller when using.
4) Fold in any flaps or step areas on the blanket before rolling it up. This
will ensure that you don't put excessive force on the blanket and allow
it to move easily across the water and through the narrowest part of
the pool towards the roller.
5) When putting the blanket back onto the pool, roll the blanket out
slightly, fold one corner over onto itself (to create a bow effect), pick up
the other corner and walk slowly down the side of your pool.
6) Do not sit or step on your roller. If the tube gets bent, it cannot be
repaired.
7) On irregular shaped
pools, the fold in odd
shaped extrusions as
shown:
8) Always cover your
blanket when on the
roller with the
protective overcover supplied.
Warranty
To ensure receipt of the benefit of this warranty, complete this section upon
the purchase and retain with purchase receipt and warranty form.
Purchaser: Date:
Address:
Phone: City/State:
Postcode: Purchased from:
This warranty covers the purchaser for defective material or workmanship
on a pro-rata basis as set out below. The manufacturer will repair or replace
the product upon inspection at their premises. The warranty will be void if
the purchaser fails to comply with the manufacturers installation
instructions.
5 Star Roller 10 Year, Year by Year Pro-rata Warranty.
Roller Installation Instructions
NOTE-There are two tube styles. Fixed Length Tube and Segmented Tube
1) Segmented Roller only - slide the tube sections together so the rope
clips on top of the tube are in line and the pre punched joiner holes are
lined up.
2) Segmented Roller only - Install the joiner bolts by inserting the fitting in
the hole and tightening the screw.
3) Place the roller tube evenly across one end of the pool.
4) Slide the handwheel over the end of the end slug and insert the 6
stainless steel screws, repeat for other end.
5) FM & LP Models only - Insert the castor on the exposed shaft on the
underside of the “T” frame, with the castors on the ground tap the nut
with a soft hammer (or stamp on with shoe) until castor clips home.
6) Slide the “T” frame onto the axle shaft on each end.
7) Tap the end plugs into each end
of the end slug axle shafts. Do not
hit hard.
8) In line with the cord attachment on
the roller tube, approximately
100mm in from the cut end of the
blanket, punch a hole in the blanket
with the wad punch supplied.
9) Install the eyelets by placing the
male section on the ground, place the blanket hole over the male eyelet
section place the female section on top and tap together
10) Tie a loop on one end of the cord and place over the cord attachment
on the roller.
11) Take the other end of the cord and thread through the eyelet in the blanket.
Simply follow the the illustrations below to tie knot.
12) Repeat step 8 to 11 for all cord
attachments required on the
blanket. If your pool has a
curved end, then you only need
to use 3-4 anchoring points.
13) Adjust the cords with the cord
adjuster so the blanket comes
on to the roller tube evenly. Start
from the centre and work one
way outwards, then go back to
the centre and work the other
way ensuring all cords retrieve
the blanket evenly. Minor
adjustments may be required to
get correct blanket recovery.
Installation Instructions
For: 5 Star ST, 5 Star MKII, 5 Star LP, 5 Star FM and 5 Star 125 Rollers
Keep cord clips in line
Slide tube over joiner
Tap in inserts
Fasten screws
Castor
Castor
 Loading...