


DAIKIN ROOM AIR CONDITIONER
OPERATION MANUAL
MODELS
FVXS25KV1A
FVXS35KV1A
FVXS50KV1A
FVXS35LV1A

CONTENTS
READ BEFORE OPERATION
Safety Precautions......................................... 2
Names of Parts .............................................. 4
Preparation before Operation......................... 7
OPERATION
AUTO · DRY · COOL · HEAT · FAN
Operation ..................................................... 10
Adjusting the Airflow Direction ..................... 12
POWERFUL Operation................................ 14
OUTDOOR UNIT QUIET Operation............. 15
ECONO Operation ....................................... 16
TIMER Operation.......... ...... .... ... ... ... .... ... ... .. 17
WEEKLY TIMER Operation ......................... 19
Note for Multi System................................... 24
CARE
Care and Cleaning ........ ... ... .... ... ... ... .... ... ... .. 26
TROUBLESHOOTING
Troubleshooting ........................................... 29
1

READ BEFORE OPERATION
Safety Precautions
• Keep this manual where the operator can easily find it.
• Read the precautions in this manual carefully before operating the unit.
• The precautions described herein are classified as WARNING and CAUTION. They both contain
important information regarding safety. Be sure to observe all precautions without fail.
WARNING
Failure to follow these instructions properly may
result in personal injury or loss of life.
Never attempt. Be sure to follow the instructions.
Be sure to establish an earth connection.
Never touch the air conditioner nor the
remote controller with wet hands.
• After reading, keep this manual in a convenient place so that you can refer to it whenever necessary. If the equipment is transferred to a new user, be sure also to hand over the manual.
Failure to observe these instructions properly may
result in property damage or personal injury , wh ich may
be serious depending on the circumstances.
Never wet the air conditioner nor the remote
controller with water.
CAUTION
WARNING
• In order to avoid fire, explosion or injury, do not operate the unit when harmful, among
which flammable or corrosive gases, are detected near the unit.
• Be aware that prolonged, direct exposure to cool or warm air from the air conditioner, or to
air that is too cool or too warm can be harmful to your physical condition and health.
Do not place objects, including rods, your fingers, etc., in the air inlet or outlet. Product malfunctioning,
•
product or injury damage may result due to contact with the air conditioner's high-speed fan blades.
• Do not attempt to repair, dismantle, reinstall or modify the air conditioner yourself as this may result
in water leakage, electric shocks or fire hazards.
• Do not use flammable spray near the air conditioner, or otherwise fire may result.
•
Beware of fire in case of refrigerant leakage. If the air conditioner is not operating correctly, i.e.
not generating cool or warm air, refrigerant leakage could be the cause. Consult your dealer for
assistance. The refrigerant within the air conditioner is safe and normally does not leak.
However, in the event of a leakage, contact with a naked burner, heater or cooker may result in generation of noxious gas. Do not longer use the air conditioner until a qualified service person confirms that the leakage has been repaired.
•
Do not attempt to install or repair the air conditioner yourself. Improper workmanship may result in water leakage, electric
shocks or fire hazards. Please contact your local dealer or qualified personnel for installation and maintenance work.
•
When the air conditioner is malfunctioning (giving off a bu rning odour , et c.) turn off po wer to the unit and con tact your
local dealer. Continued operation under such circumstances may result in a failure, electric shoc ks or fire hazards.
•
Be sure to install an earth leakage breaker. Failure to install the earth leak age breaker may result in electric shocks or fire.
• Be sure to earth the unit. Do not earth the unit to a utility pipe, lightning conductor or telephone earth lead. Imperfect earthing may result in electric shocks.
CAUTION
•
Do not use the air conditioner for purposes other than those for which it is intended. Do not use
the air conditioner for cooling precision instruments, food, plants, animals or works of art as this
may adversely affect the performance, quality and/or longevity of the object concerned.
Do not expose plants or animals directly to airflow from the unit as this may cause adverse effects.
•
2

•
Do not place appliances that produce naked flames in places exposed to the airflow from the unit as this may impair comb ustion of the burner.
• Do not block air inlets nor outlets. Impaired airflow may result in insufficient performance or trouble.
• Do not sit or place objects on the outdoor unit. Falling yourself or falling objects could cause injury.
• Do not place objects that are susceptible to moisture directly beneath the indoor or outdoor units.
Under certain conditions, condensation on the main unit or refrigerant pipes, air filter dirt or drain
blockage may cause dripping, resulting in fouling or failure of the object concerned.
• After prolonged use, check the unit stand and its mounts for damage. If they are left in a damaged
condition, the unit may fall and cause injury.
• To avoid injury, do not touch the air inlet or aluminum fins of the unit.
• The appliance is not intended for use by unattended young children or infirm persons. Impairment of
bodily functions and harm to health may result.
• T o avoid oxygen depletion, ensure that the room is adequately ventilated if equipment such
as a burner is used together with the air conditioner.
Before cleaning, be sure to stop unit operation, turn the breaker off or remove the power
•
cord. Otherwise, an electric shock and injury may result.
• Only connect the air conditioner to the specified power supply circuit. Power supplies other than the
one specified may result in electric shocks, overheating and fires.
Arrange the drain hose to ensure smooth drainage. Imperfect drainage may cause wetting of the building, furniture etc.
•
• Do not place objects in direct proximity of the outdoor unit and do not let leaves and other debris accumulate around the unit. Leaves are a hotbed for small animals which can enter the unit. Once in the unit,
such animals can cause malfunctions, smoke or fire when making contact with electrical parts.
• Do not place objects around the indoor unit.
Doing so may have an adverse influence on the performance, product quality, and life of the air conditioner.
• This appliance is not intended to be used by persons with reduced physical, sensory or mental
capabilities, or with lack of operation knowledge, unless they have been given supervision or
instruction concerning the appliance use by person responsible for their safety.
Keep out of children's reach to ensure that they do not play with the appliance.
• To avoid electric shocks, do not operate with wet hands.
• Do not wash the air conditioner with water, as this may result in electric shocks or fire.
Do not place water containers (vases etc.) above the unit, as this may result in electric shocks
•
or fire hazards.
Installation site.
■ To install the air conditioner in the following types of environments, consult the dealer.
• Places with an oily ambient or where steam or soot occurs.
• Salty environment such as coastal areas.
• Places where sulfide gas occurs such as hot springs.
• Places where snow may block the outdoor unit.
• The drain from the outdoor unit must be discharged to a place of good drainage.
Consider nuisance to your neighbours from nois es.
■ For installation, choose a place as described below.
A place solid enough to bear the weight of the unit which does not amplify the operation noise or vibration.
•
•
A place from where the air discharged from the outdoor unit or the operation noise will not annoy your neighbours.
Electrical work.
• For power supply, be sure to use a separate power circuit dedicated to the air conditioner.
System relocation.
• Relocating the air conditioner requires specialized knowledge and skills. Please consult the
dealer if relocation is necessary for moving or remodeling.
3
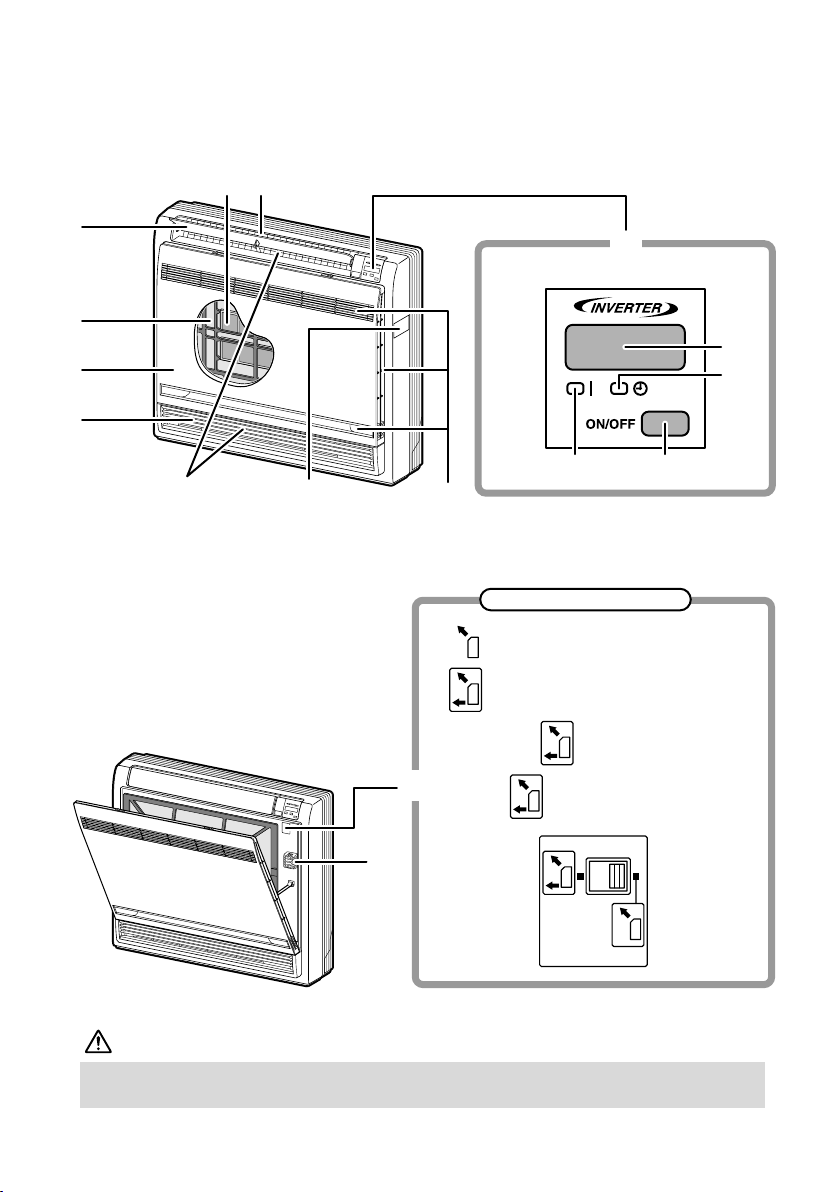
Names of Parts
■ Indoor Unit
12
8
7
4
2
512
■ Opening the Front Panel
How to open the front panel: (page 26.)
6
•
• This setting is
14
3
9
Air outlet selection switch
This setting blows air from upper outlet only.•
This setting automatically decides a blow
pattern depending on mode and conditions.
recommended.
• The unit is shipped from the
factory with this setting.
13
10
11
15
CAUTION
Before opening the front panel, be sure to stop the operation and turn the breaker off.
Do not touch the aluminum fins on the inside of the indoor unit, as it may result in injury.
4

■ Outdoor Unit
16
20
Indoor Unit
■
1. Titanium apatite photocatalytic
air-purifying filter:
• These filters are attached to the inside of
the air filters.
2. Air outlet
3. Display
4. Front panel
5. Louvers (vertical blades):
• The louvers are inside of the air outlet.
6. Air inlet
7. Air filter
8. Flap (horizontal blade):
9. OPERATION lamp (green)
10. TIMER lamp (yellow): (page 17.)
11. Indoor Unit ON/OFF switch:
• Push this switch once to start operation.
Push once again to stop it.
(page 12.)
(page 12.)
21
17
18
22
19
• The operation mode refers to the following
table.
Temperature
Mode
COOL
AUTO
• This switch is useful when the remote
controller is missing.
12. Model name plate
13. Signal receiver:
• It receives signals from the remote
controller.
• When the unit receives a signal, you will
hear a short beep.
• Operation start ........beep-beep
• Settings changed .....beep
• Operation stop.......... long beep
14. Air outlet selection switch:
15. Room temperature sensor:
•
It senses the air temperature around the unit.
setting
22°C
25°C
Airflow rate
AUTO
AUTO
(page 13.)
Outdoor Unit
■
16. Air inlet: (Back and side)
17. Refrigerant piping and inter-unit wiring
18. Drain hose
19. Earth terminal:
• It is inside of this cover.
Appearance of the outdoor unit may differ from some models.
20. Air outlet
21. Outdoor temperature sensor (back)
22. Model name plate
5

Names of Parts
■ Remote Controller
2
3
4
1
5
6
<Open the lid>
9
7
10
8
11
<ARC452A2>
1. Signal transmitter:
• It sends signals to the indoor unit.
2. Display:
• It displays the current settings.
(In this illustration, each section is shown
with all its displays on for the purpose of
explanation.)
3. FAN setting button:
• It selects the airflow rate setting.
4. POWERFUL button:
POWERFUL operation (page 14.)
5. ON/OFF button:
• Press this button once to start operation.
Press once again to stop it.
6. TEMPERATURE adjustment buttons:
• It changes the temperature setting.
7. MODE selector button:
• It selects the operation mode.
(AUTO/DRY/COOL/HEA T/FAN) (page 10.)
6
12
13
14
16
15
8. QUIET button:
OUTDOOR UNIT QUIET operation (page 1 5.)
9. ECONO button:
ECONO operation (page 16.)
10. SWING button:
• Adjusting the airflow direction (page 12.)
11. WEEKLY/PROGRAM/COPY/BACK/NEXT
button:
• WEEKLY TIMER operation (page 19.)
12. SELECT button:
• It changes the ON/OFF TIMER and
WEEKLY TIMER settings. (page 17, 19.)
13. OFF TIMER button: (page 17.)
14. ON TIMER button: (page 18.)
15. TIMER CANCEL button:
• It cancels the timer setting. (page 17, 18.)
• It cannot be used for the WEEKLY TIMER
operation.
16. CLOCK button: (page 8.)

Preparation before Operation
■ To set the batteries
1. Slide the front cover to take it off.
2. Set two dry batteries AAA.LR03 (alkaline).
3. Set the front cover as before.
■ To operate the remote controller
• T o use the remote controller, aim the transmitter at the indoor
unit. If there is anything to block signals between the unit and
the remote controller, such as a curtain, the unit will not
operate.
• Do not drop the remote controller. Do not get it wet.
• The maximum distance for communication is about 7m.
■ T o fix the remote controller holder
on the wall
1. Choose a place from where the signals
reach the unit.
2. Fix the holder to a wall, a pillar, etc. with the
screws supplied with the holder.
3. Place the remote controller in the remote
controller holder.
2
Position + and
– correctly!
3
1
Receiver
Remote
controller
holder
Set.
• To remove, pull it
upwards.
NOTE
■
Notes on batteries
• When replacing the batteries, use batteries of the same type, and replace both old batteries together.
• When the system is not used for a long time, take the batteries out.
• The batteries will last for approximately 1 year. If the remote controller display begins to
fade and the degradation of reception performance occurs within a year, however, replace
both batteries with new, size AAA.LR03 (alkaline).
• The attached batteries are provided for the initial use of the system.
The usable period of the batteries may be short depending on the manufactured date of the air conditioner.
■
Notes on remote controller
• Never expose the remote controller to direct sunlight.
• Dust on the signal transmitter or receiv e r will reduce the sensitivity. Wipe o ff dust with soft cloth.
• Signal communication may be disabled if an electronic-starter-type fluorescent lamp (such
as inverter-type lamps) is in the room. Consult the shop if that is the case.
• If the remote controller signals happen to operate another appliance, move that appliance
to somewhere else, or consult the shop.
7

Preparation before Operation
■ To set the clock
1. Press “CLOCK button”.
“ ” is displayed.
“ ” and “ ” blink.
2. Press “SELECT button” to set
the current day of the week.
3. Press “CLOCK button”.
“ ” blinks.
4. Press “SELECT button” to set
the clock to the present time.
Holding down “ ” or “ ” button
rapidly increases or decreases the time
display.
5. Press “CLOCK button”.
Point the remote controller at the indoor
unit when pushing the buttons when
setting the indoor unit’s internal clock.
“ ” blinks.
2, 4
1, 3, 5
NOTE
• If the indoor unit’s internal clock is not set to the correct time, ON/OFF TIMER and
WEEKLY TIMER will not operate punctually.
8
■ Turn the breaker on
• After the power is turned on, the flap of the indoor unit opens and closes once to set the
reference position.
NOTE
■
Tips for saving energy
• Be careful not to cool (heat) the room too much.
Keeping the temperature setting at a moderate level helps save energy.
• Cover windows with a blind or a curtain.
Blocking sunlight and ai r from outdoors increases the cooling (heating) effect.
• Clogged air filters cause inefficient operation and waste energy.
Clean them once in about every two weeks.
■
Please note
• The air conditioner always consumes a small amount of electricity even while it is not operating.
•
If you are not going to use the air conditioner for a long period, for example in spring or autumn, turn the breaker off.
• Use the air conditioner in the following conditions.
Mode Op erating conditions If operation is continued out of this range
COOL
Outdoor temperature:
Indoor temperature: 18-32°C
Indoor humidity: 80% max.
HEAT
Outdoor temperature:
Indoor temperature: 10-30°C
DRY
Outdoor temperature:
Indoor temperature: 18-32°C
Indoor humidity: 80% max.
〈3MXS〉 –5-46°C
〈RMXS〉 –5-46°C
〈4MXS〉 –10-46°C
〈RXS〉 10-46°C
〈3/4MXS〉 –15-24°C
〈RMXS〉 –15-24°C
〈RXS〉 –15-24°C
〈3MXS〉 –5-46°C
〈RMXS〉 –5-46°C
〈4MXS〉 –10-46°C
〈RXS〉 10-46°C
• A safety device may work to stop the operation.
(In multi system, it may work to stop the operation of
the outdoor unit only.)
• Condensation may occur on the indoor unit and drip.
• A safety device may work to stop the operation.
• A safety device may work to stop the operation.
• Condensation may occur on the indoor unit and drip.
• Operation outside this humidity or temperature range may cause a safety device to disable the system.
Recommended temperature setting
For cooling:26-28°C
For heating:20-24°C
9
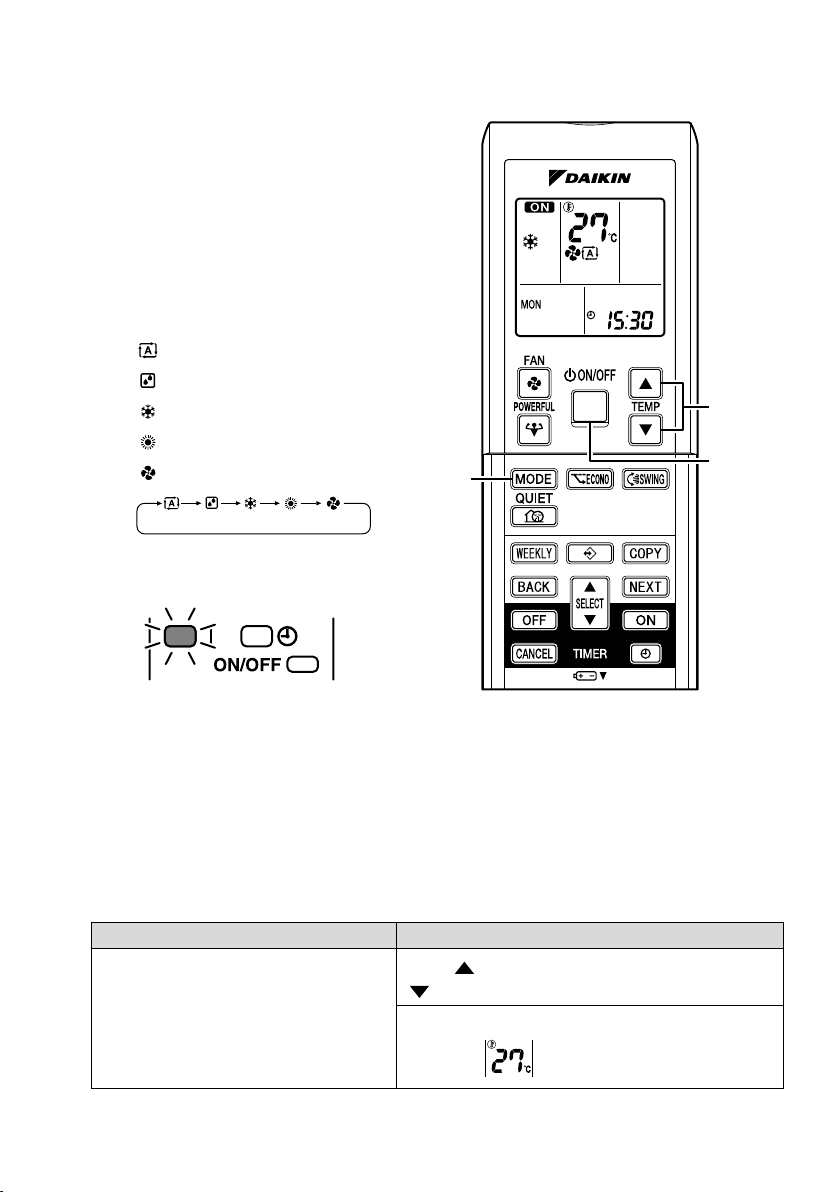
OPERATION
AUTO · DRY · COOL · HEAT · F AN Operation
The air conditioner operates with the operation
mode of your choice.
From the next time on, the air conditioner will
operate with the same operation mode.
■ To start operation
1. Press “MODE selector button”
and select an operation mode.
• Each pressing of the button advances
the mode setting in sequence.
:AUTO
:DRY
: COOL
:HEAT
:FAN
2. Press “ON/OFF button”.
• The OPERATION lamp lights green.
1
4
2, 3
■ To stop operation
3. Press “ON/OFF button” again.
• The OPERATION lamp goes off.
■ To change the temperature setting
4. Press “TEMPERATURE adjustment button”.
DRY or FAN operation AUTO or COOL or HEAT operation
Press “ ” to raise the temperature and press
“ ” to lower the temperature.
The temperature setting is not variable.
10
Set to the temperature you like.
 Loading...